

Page 1
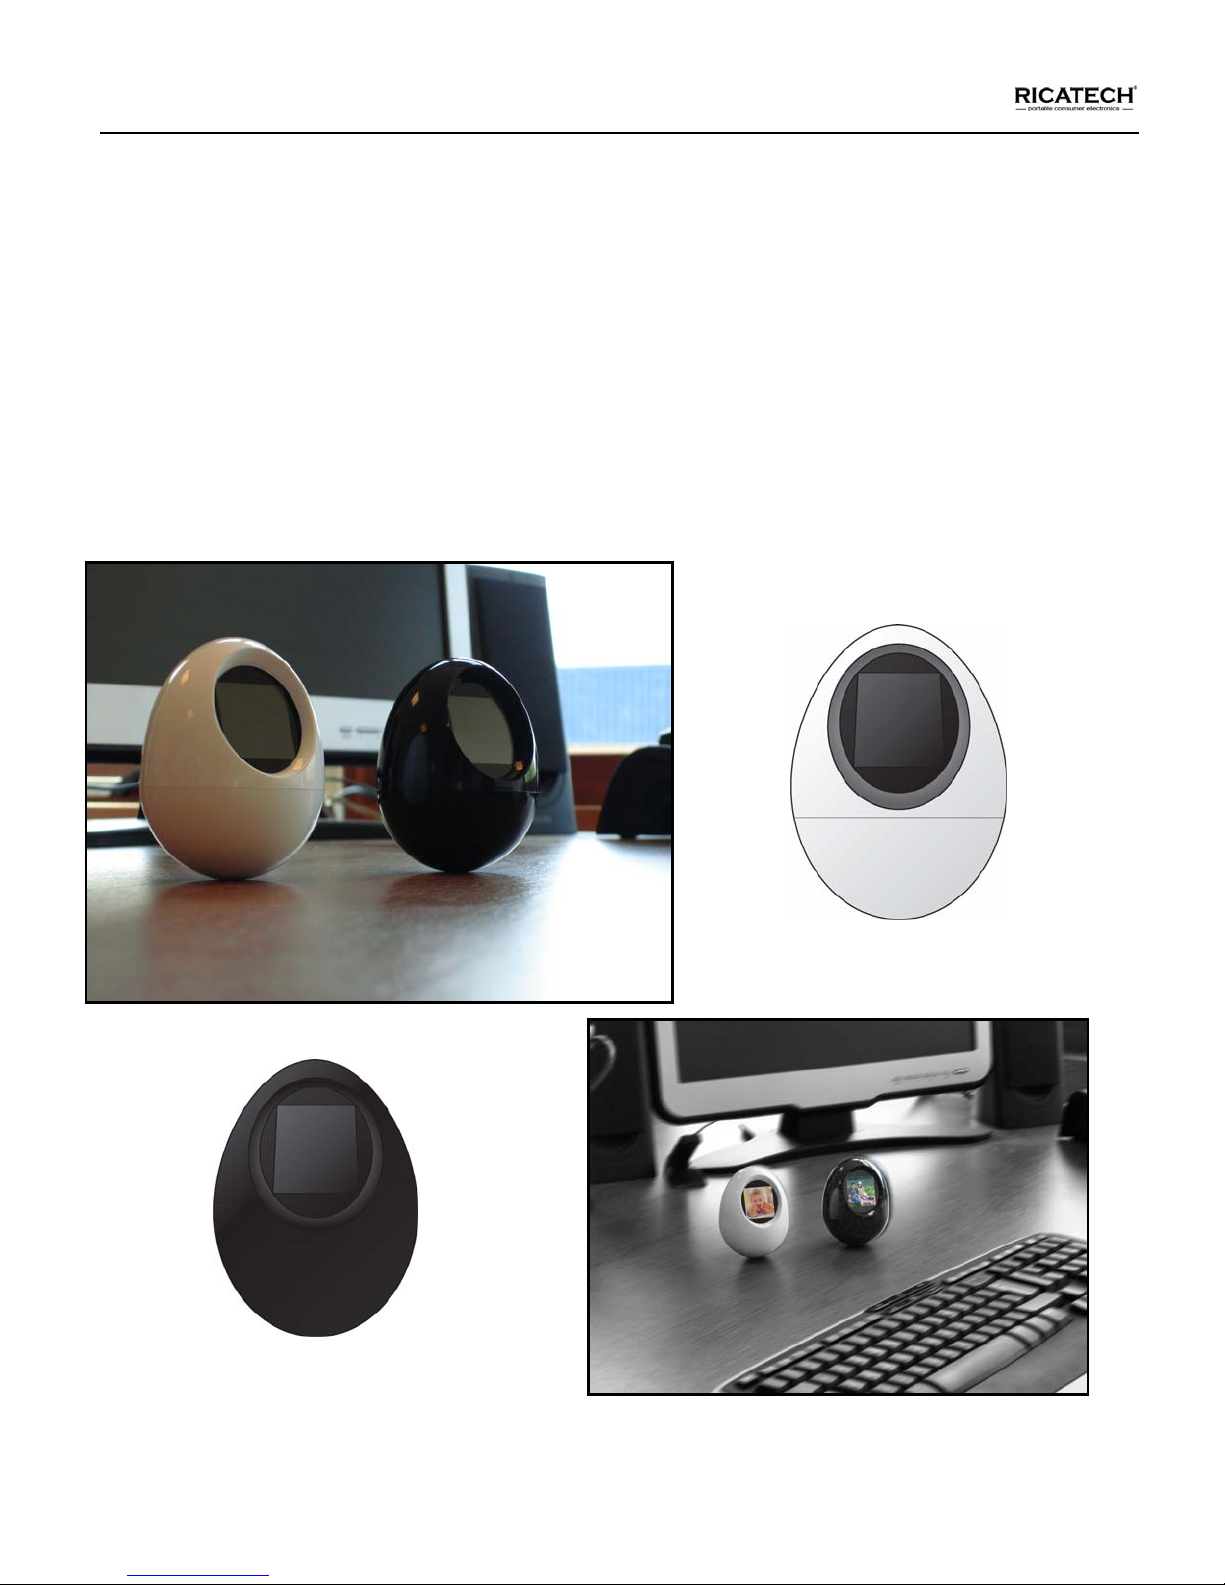
Ricatech RPF15
FULL COLOR DIGITAL PHOTOFRAME
User Manual (English)
User manual v1.0
Page 1 of 11
Page 2

Important Notice:
Attention: Please don't operate the digital photo frame when driving a car.
A few light spots or dark spots may appear on the LCD display. these colored pixels are a general phenomenon in the
fabrication process of LCD and TFT displays. Please don't attempt to repair it by yourself, The photoframe is made up
of a lot of accurate electronic elements. When more than 13 pixels seem to be defective please contact us directly at
the phone number or email address provided on the last page of this manual.
Foreword
Congratulations with the purchase of the ne w Ricatech RPF-15 digital photoframe. Pleas e while reading this manual
connect the photoframe to a free USB port on your computer to start the charging process (8hours).
Safety and maintenance
1. In order to use the photoframe correctly and safely please read this manual carefully.
2. When using for the first time, please read this manual in all detail.
3. Please do not use the photoframe near water, Avoiding water or other liquids being
splashed and spread on the ph otoframe.
4. Do not drop shake or put the photoframe near a heat source like open fire.
5. The LCD Display is easely scratched, only clean the LCD display with a dry cloth.
6. Clean your photoframe with a dry cloth and turn the unit off before cleaning.
Page 2 of 11
Page 3

Catalogue
SAFETY AND MAINTENANCE Page 2
BUTTONS Page 4
FUNCTIONS Page 4
MENU INTRODUCTION Page 5
PICTURE CONVERSION Page 7
TECHNICAL SPECIFICATIONS Page 9
ACCESSORIES Page 9
WARRANTY INFORMATION Page 9
CONTACT DETAILS Page 9
Page 3 of 11
Page 4

1. Buttons.
-Menu: Press and hold to power on and off. / Confirm selections
-Up: Go back to the previous item/picture.
-Down: Go to the next item/picture.
-USB: Used to charge the unit and to transfer data.
-Reset button: To restart the unit when it has been stopped.
*Internal Battery
The Ricatech RPF15 is equipped with a bu ilt-in Lithium Ion b attery. Please fully charge and de-charge (use) 8 hou rs before u sing it for t he first time.
This drastically increases battery life.
Previous
Next
Menu
Reset
USB Connection
-When the battery is empty, the screen will display “Low Power,” please charge the battery.
-Battery is not needed if connected to the USB port.
2. Functions.
-Digital photo album Function: Supports both BMP and JPG files.
-Multi-Function: Clock, LCD brightness adjustments, Auto turn on /off, Time display.
-Store up to 80 Photos (A ssuming 100KB per picture)
-Picture Slide Show: 14 different presentation styles.
*Please use the software in the unit to convert the picture files to the supported format.
Page 4 of 11
Page 5

3. Menu Introduction
A. Press “Menu” button to access the Menu:
-Use “Up/Down” buttons to navigate then press “Menu” to access the selected item.
-The menu including:USB connect, Slid e Show、Auto off, LCD Contrast LCD Backlight Display Clock, Set Clock
Delete, Delete All and Exit.
- If there are no pictures in the unit, the screen will display:
-Power off: Hold the “Menu” button for 2 seconds. The unit will power off.
B. Connecting to your computer:
-Connect the unit with your computer. Select “USB connect” and press “Menu” button to enter the sub-menu.
-Select “Yes” to connect it with computer.
-Select “No” to exit the connection menu.
(Without connecting the unit, it can be used while powered trough the USB port
of your computer. The battery will be charged)
C. Slide Show
-Select “Slide Show” and press “ Menu ” to enter.
- Adjust the setting by using the “Up/Down” buttons (the range is 00-15,0 is for manual slide).
-Press “Menu“ to confirm and exit the slide show menu.
D. Auto Power On/Off:
-Select “Auto off” and press “Menu” to enter.
- Adjust the setting by using “Up/Down” buttons (range is 00-30,0 is for don’t auto power off).
E. Contrast Adjustment:
-Select “Contrast adjusting” and press “Menu” to enter.
-Adjust the setting by using “Up/Down” buttons.
F. Backlight Adjustment:
-Select “Backlight” and press “Menu” to enter .
-Adjust the setting by using “Up/Down” buttons.
Page 5 of 11
Page 6

G. Clock Display:
-Select “Time Display” and press “Menu” to enter.
-Press any button to exit
-Press “Up/Down” buttons for 2 seconds to display the time on screen when watching a slideshow.
-Press “Up/Down” buttons for 2 seconds again to cancel the time display.
F. Setting the clock time:
-Select “Clock Set” and press “Menu” to enter.
-Press “Menu” button and use “Up/Down” buttons to adjust the date and time.
G. Delete a picture:
-Select “Delete One” and press “Menu” to enter.
-Select a picture by using “Up/Down” buttons.
-Select “Yes” and press “Menu” to delete the picture.
-Select “No” and press “Menu” to exit.
H. Delete all pictures:
-Select “Delete All” and press “Menu” to enter.
-Select “Yes” and press “Menu” to delete all pictures.
-Select “No” and press “Menu” to exit.
Note: Allways keep a backup of your pictures on your PC or Mobile harddrive!!!
I. Exit:
-Select “Exit” and press “Menu” to exit the menu.
Page 6 of 11
Page 7

4. Picture File Conversion:
Note : When connecting the photoframe, a virtual CD-ROM application will be temporarily installed and the software will be loaded from the photoframe
automatically. Because of the fully automated installation, some virus scanners may detect a system intrusion. Click “Allow” or manually allow this
installation in your anti-virus software.
-Connect the unit to the computer with the USB cable.
- Select “Connect” then press “Menu” and select “Yes” and press “Menu” to enter to “connect” mode.
-The utility will open showing the main screen below.
Page 7 of 11
Page 8

-On the left screen you can select the pictures you want to resize for correct display on the photoframe.
Note: Allways make a copy of the original pictures, and don’t over-write your pictures with the resized ones!
-Green indicates your photoframe is currently connected with computer.
-Red indicates the unit was disconnected from your computer. (Reconnect)
, : -Zoom in/out the picture for select the picture.
, :-Rotates the picture counter/clockwise. (Left-Right)
: -Cut the picture to correct size.
: -Whole picture convert.
: -Select all pictures in the unit.
: -Delete the selected picture.
: -Save the selected pictures in the unit to computer.
: -Save all pictures in the unit to computer.
: Exit.
-Click the setting button to change the font color and the background color of the main menu.
-Click the “
-After all the pictures are converted,. click “
” button to start the conversion process.
” (Download) button to transfer the pictures to the unit.
Page 8 of 11
Page 9
5. Technical Specifications:
Screen 1.5 Inch CSTN color LCD
Power Built-in 3.7V Li-ion battery
Supported Picture Formats JPEG, BMP
6 Accessories:
-USB Cable
-Manual
-Key chain
Ricatech BV covers all products (Excl. Acessories) with a 2 year warranty applying to all faults caused by a factory-error. External physical
damage will not
Warranty: All hardware errors occurring within 2 years after purchase
No Warranty : Faults caused by:
Out of warrranty repairs Please be so kind to contact us for out-of-warranty repairs.
Warranty:
be covered by our warranty
unless caused by points mentioned below.
*Dismountal by any other service center then ours.
*Firmware upgrade
*Water and moisture damage
*Drop and bump damage
*Usage with non Ricatech approved accessories.
*Short-circuit or over-voltage by host computer (PC)
*Physical damage, loss or damage to accessories
We will provide you with a quotation with the expected costs.
Goods out of warranty cannot be return ed to your reseller.
Ricatech BV
Tinstraat 103
2984AN Ridderkerk
The Netherlands
Tel : 0031 (0) 180 446020
Fax : 0031 (0) 180446029
Email : info@ricatech.com
Page 9 of 11
Technical Support
For technial support and price quotations please
contact our helpdesk directly at :
Telephone : 0031 (0) 180 446023
Email : Support@ricatech.com
 Loading...