

Page 1
USER MANUAL
GEBRUIKERSHANDLEIDING
MODE D’EMPLOI
BEDIENUNGSANLEITUN
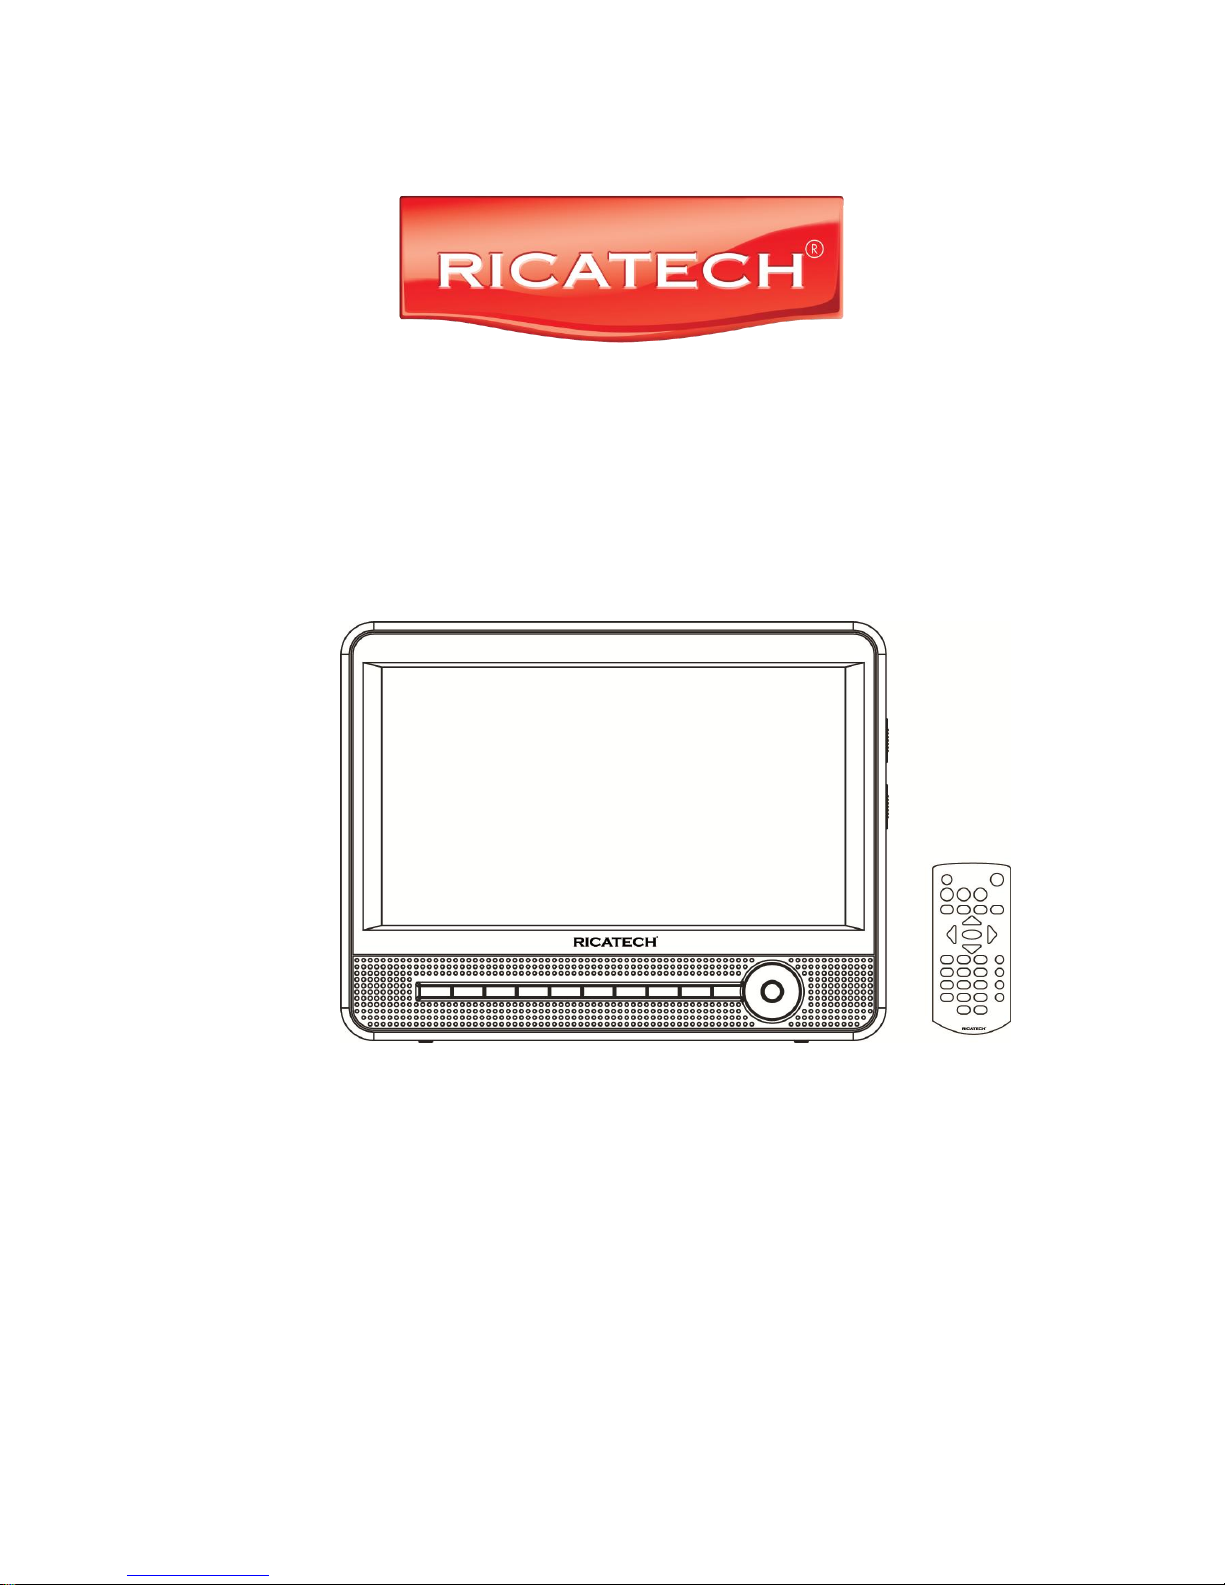
Ricatech RDPDVD900
Page 2
1
USER MANUAL
READ THESE INSTRUCTIONS INCLUDED IN THIS IM THOROUGHLY PRIOR TO CONNECTING AND OPERATING.
PLEASE RETAIN THIS MANUAL IN CASE YOU MAY NEED IT FOR FUTURE REFERENCE.
THE ILLUSTRATIONS & GRAPHICS HEREIN ARE FOR REFERENCE ONLY AND SUBJECT TO CHANGE WITHOUT NOTICE.
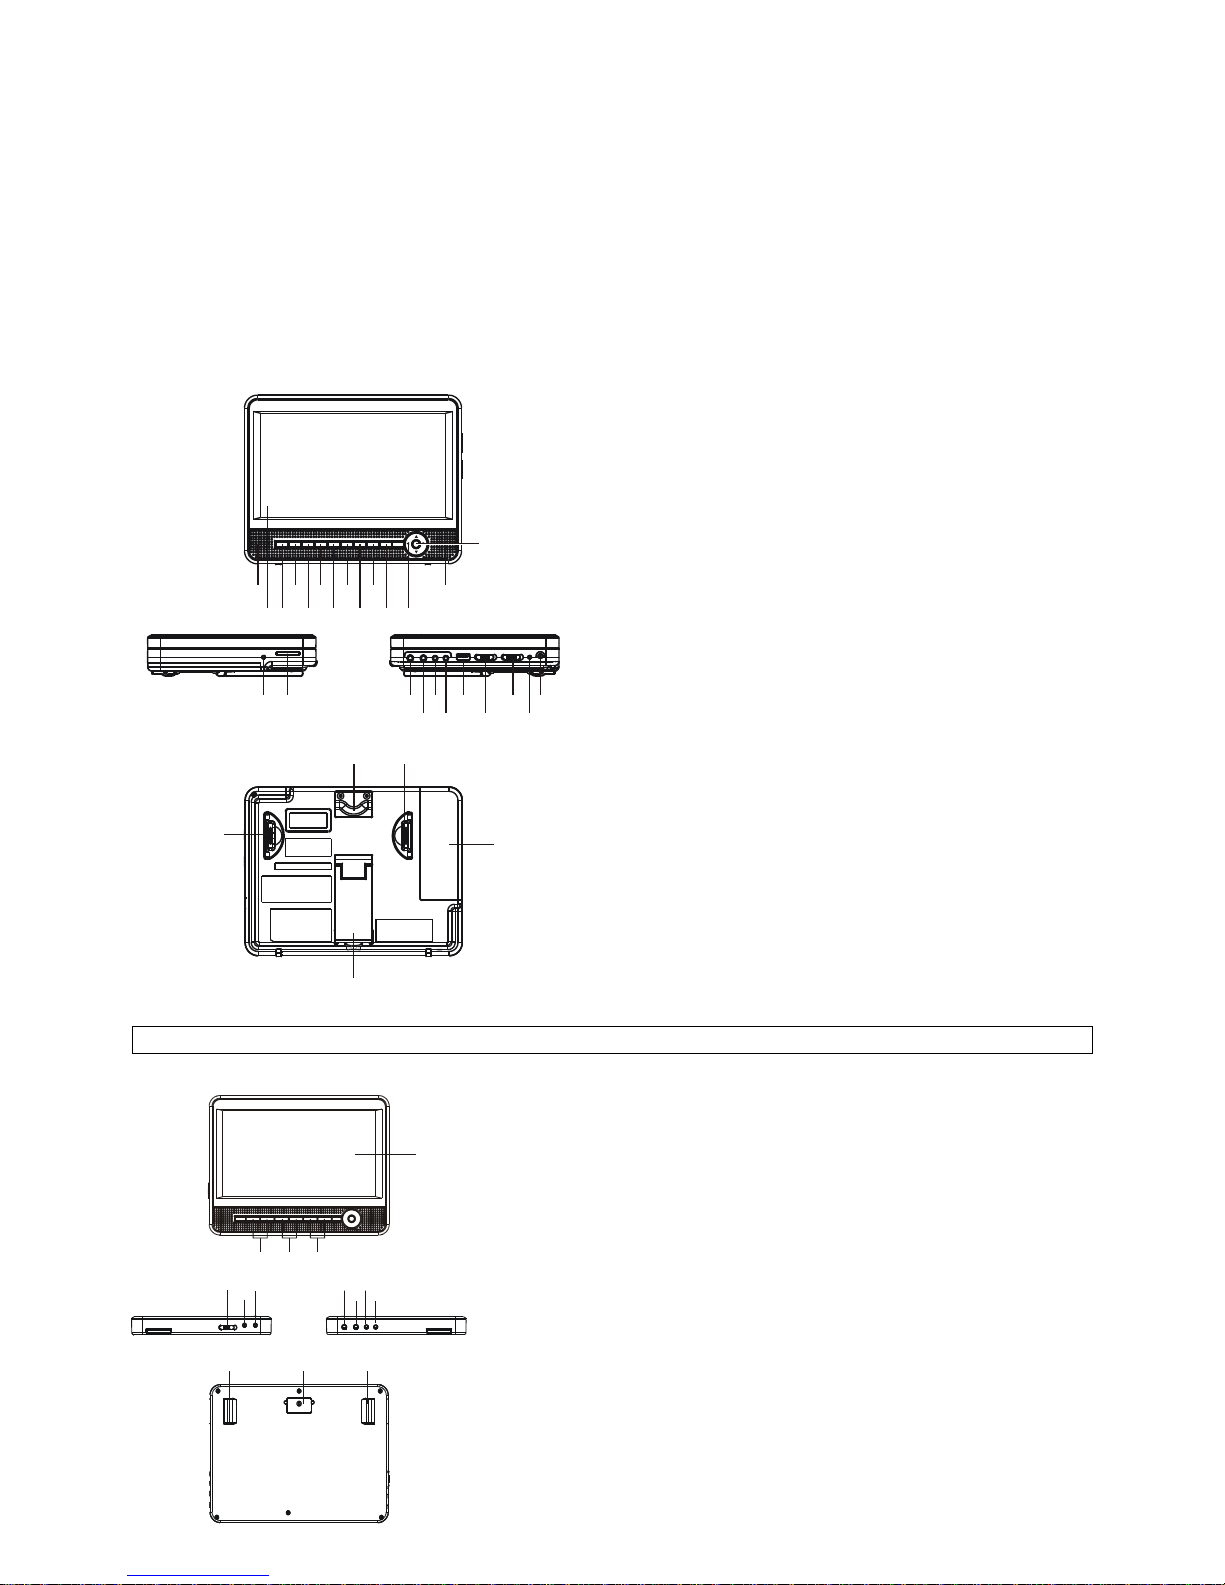
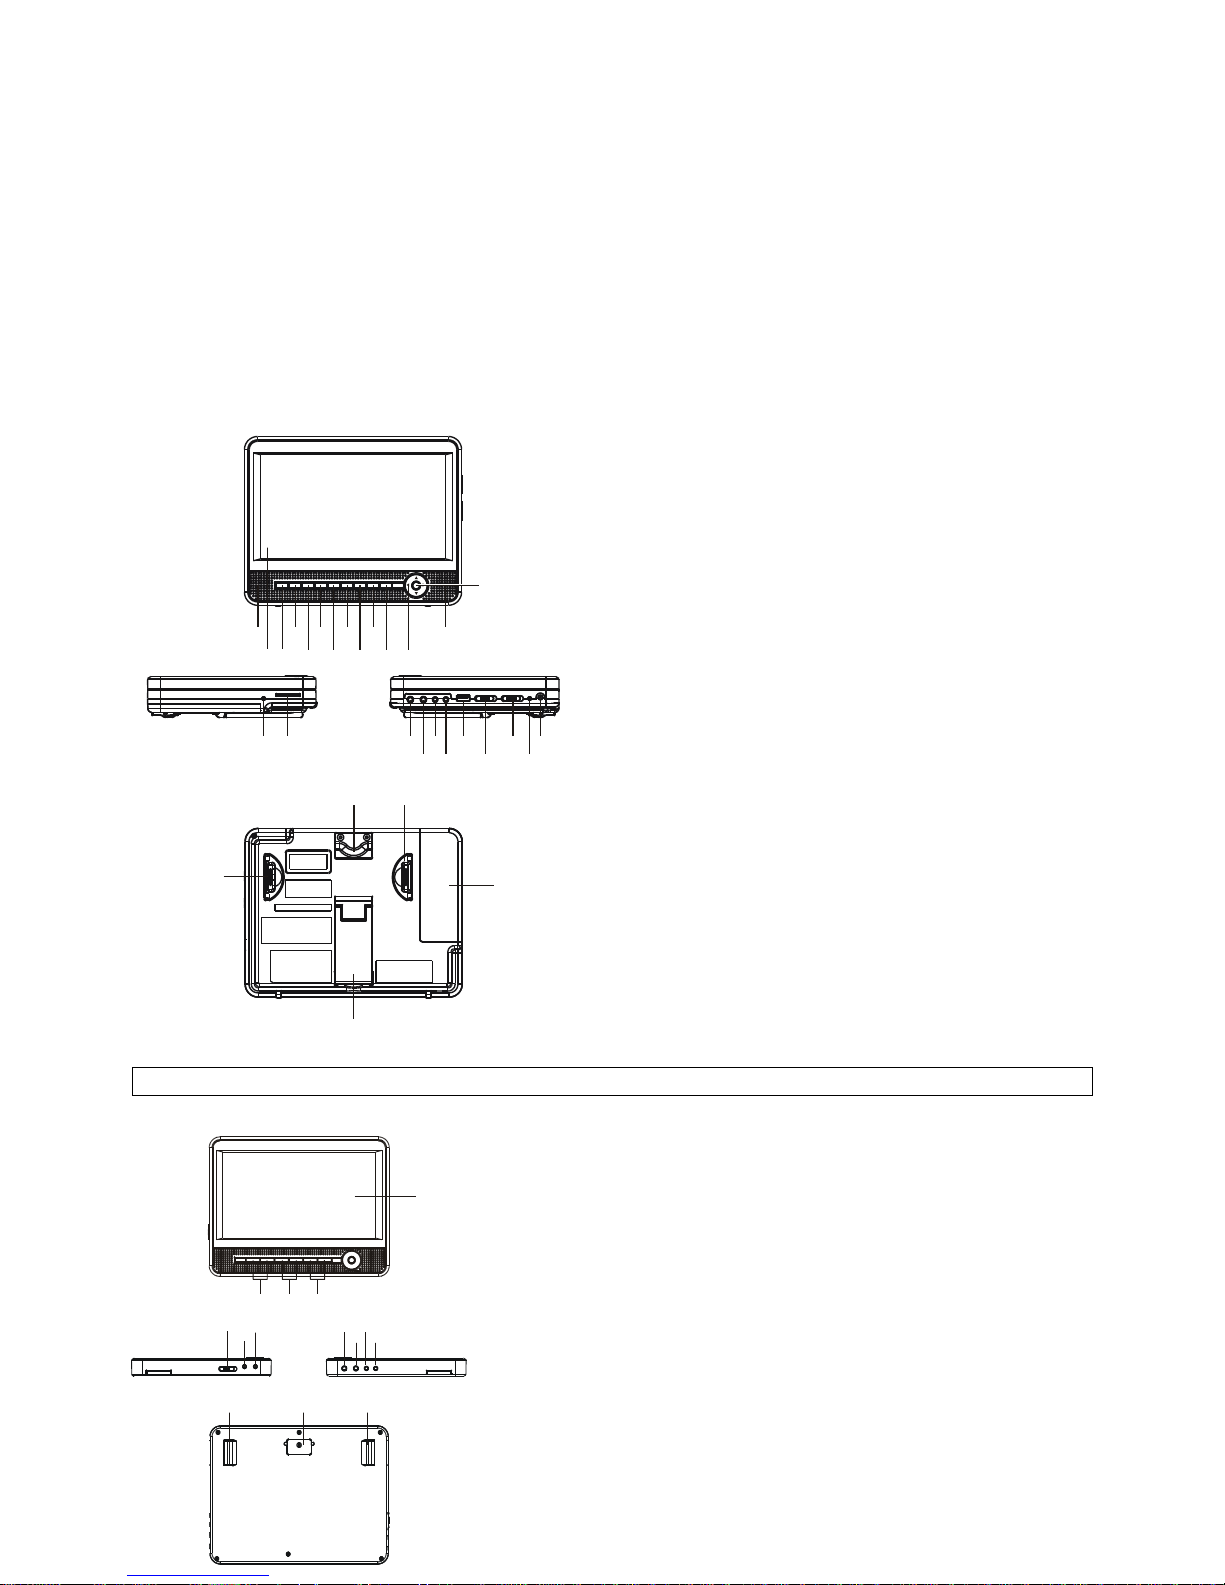
OVERVIEW OF THE DVD PLAYER:
1. TFT SCREEN
2. REMOTE SENSOR
3. PLAY/PAUSE BUTTON
4. STOP&USB/SD/MMC CARD BUTTON
5. PREVIOUS & FAST BACKWARD BUTTON
6. NEXT & FAST FORWARD BUTTON
7. SETUP BUTTON
8. SUBTITLE BUTTON
9. VOLUME - BUTTON
10. VOLUME + BUTTON
11. SPEAKER
12. NAVIGATION BUTTON
13. OK BUTTON
14. CHARGE INDICATOR
15. SD/MMC CARD SLOT
16. PHONES JACK
17. PHONES JACK
18. VIDEO OUT JACK
19. AUDIO OUT JACK
20. USB PORT
21. DISPLAY ON/OFF SWITCH
22. POWER ON/OFF SWITCH
23. POWER INDICATOR
24. DC IN & CAR PLUG IN SOCKET
25. HANGING STRING
26. BUCKLE
27. BATTERY COMPARTMENT
28. BRACKET
SLAVE SCREEN
1. BRIGHTNESS BUTTONS
2. COLOR BUTTONS
3. VOL BUTTONS
4. TFT SCREEN
5. POWER ON/OFF SWITCH
6. DC IN SOCKET
7. DC OUT SOCKET
8. PHONES JACK
9. PHONES JACK
10. AUDIO IN SOCKET
11. VIDEO IN SOCKET
12. BUCKLE
13. HANGING STRING
1
234
5
6789101112
14 15 16 18 20 22 24
17 19 21 23
252626
27
28
11
13
4
12 1213
1 2
3
8910
11
5
6
7
Page 3
2
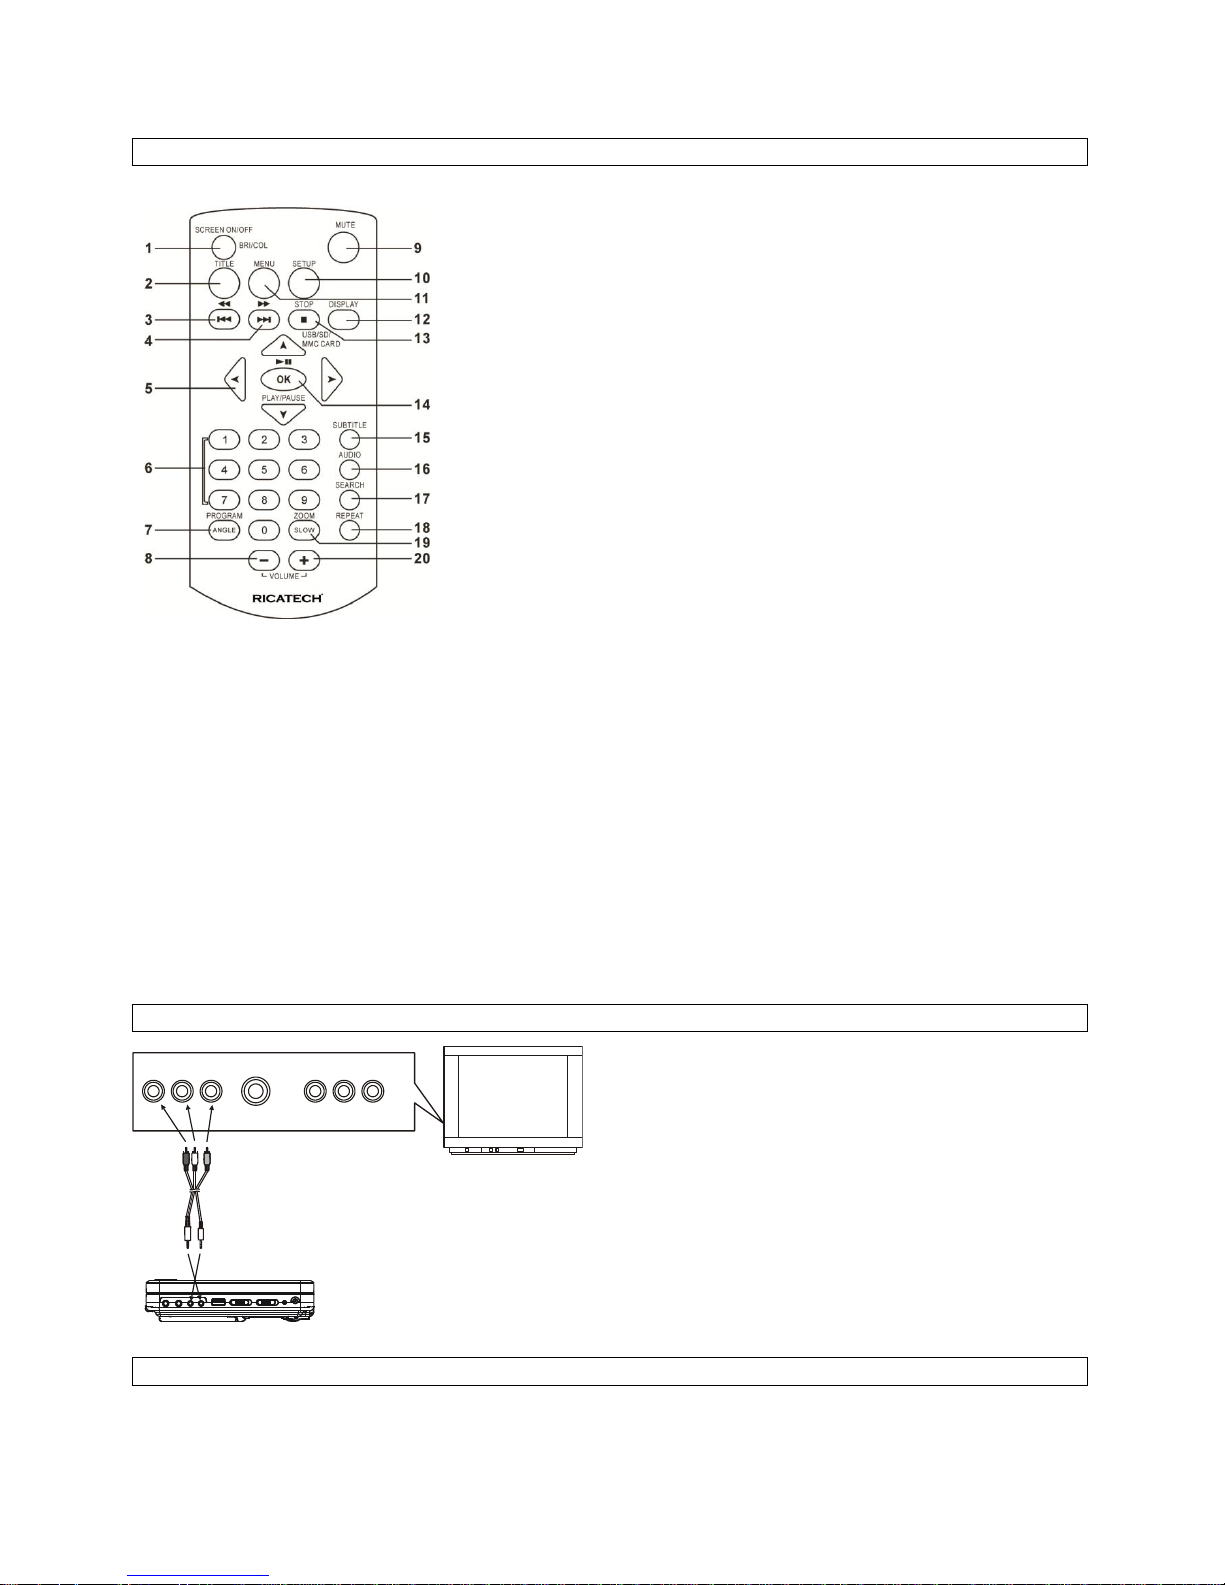
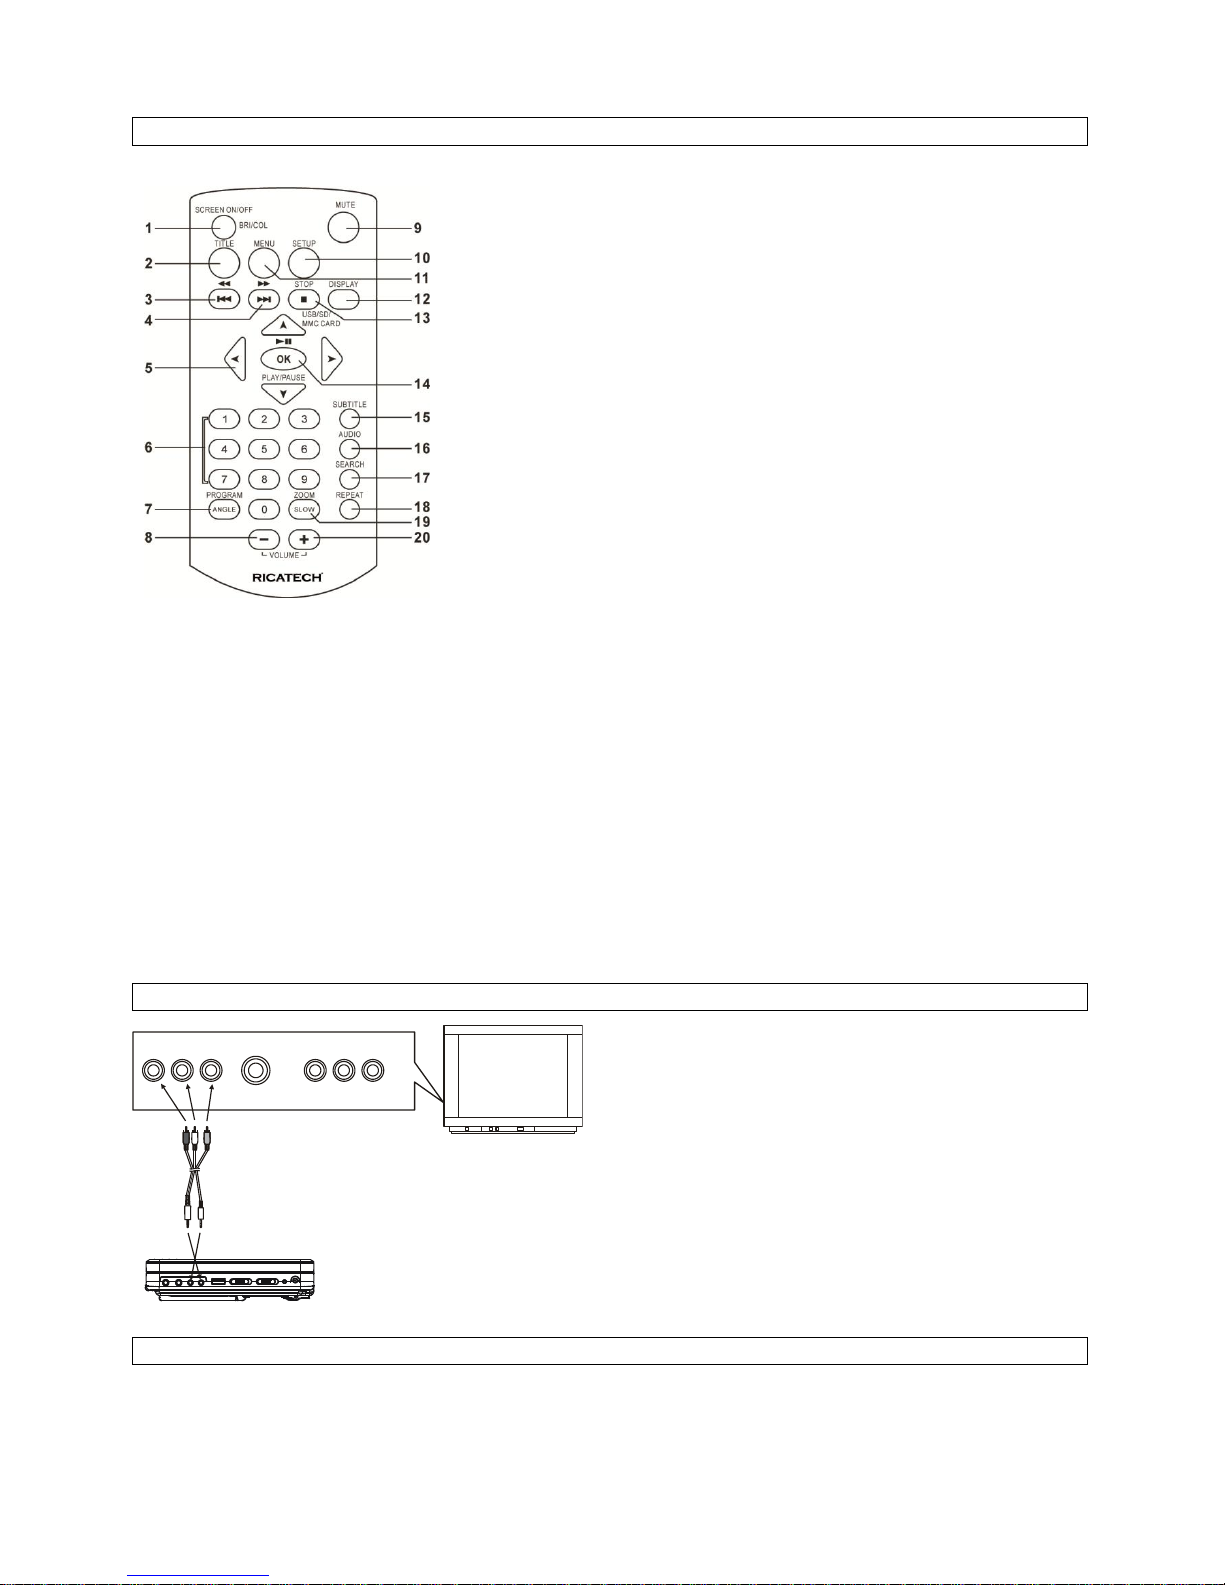
REMOTE CONTROL UNIT
1. SCREEN ON/OFF & BRI/COL ADJUST BUTTON
2. TITLE BUTTON
3. PREV & FAST BACKWARD BUTTON
4. NEXT & FAST FORWARD BUTTON
5. NAVIGATION BUTTONS
6. NUMERIC BUTTONS
7. PROGRAM/ANGLE BUTTON
8. VOLUME - BUTTON
9. MUTE BUTTON
10. SETUP BUTTON
11. MENU BUTTON
12. DISPLAY BUTTON
13. STOP &USB/SD/MMC CARD BUTTON
14. OK/ENTER(PLAY/PAUSE) BUTTON
15. SUBTITLE BUTTON
16. AUDIO BUTTON
17. SEARCH BUTTON
18. REPEAT BUTTON
19. ZOOM/SLOW BUTTON
20. VOLUME + BUTTON
BASIC CONNECTION
It is recommended to connect a multi-system TV.
Ensure that this player and other equipment to be connected are set to the standby mode or off and disconnect the AC power
cords before commencing connection.
Do not block ventilation holes of any of the equipment and arrange them so that air can circulate freely.
Read through the instructions before connecting other equipment.
Observe the color coding when connecting audio and video cables, for instance connect yellow plug to the yellow jack, the red
plug to the red jack and so on. If the A/V connected cable is only supplied, please link one end of the A/V connected cable with
A/V cable according to the color coding, and connect the other end of the A/V connected cable to the unit, finally connect the
AV cable with TV set.
Note:
During DVD play, the TV volume may be at a lower level than during TV broadcasts, etc. If this is the case, adjust the volume
to the desired level.
If the DVD/CD player is connected to the TV through a video cassette recorder, the picture may not be played back normally
with some DVDs. If this is the case, do not connect the player via the VCR.
Connecting to a stereo TV set
AU DI O R
AU DI O L
VI DE O I N
S- VI DE O
YU V I NP UT
AV A UD IO /V ID EO IN P UT
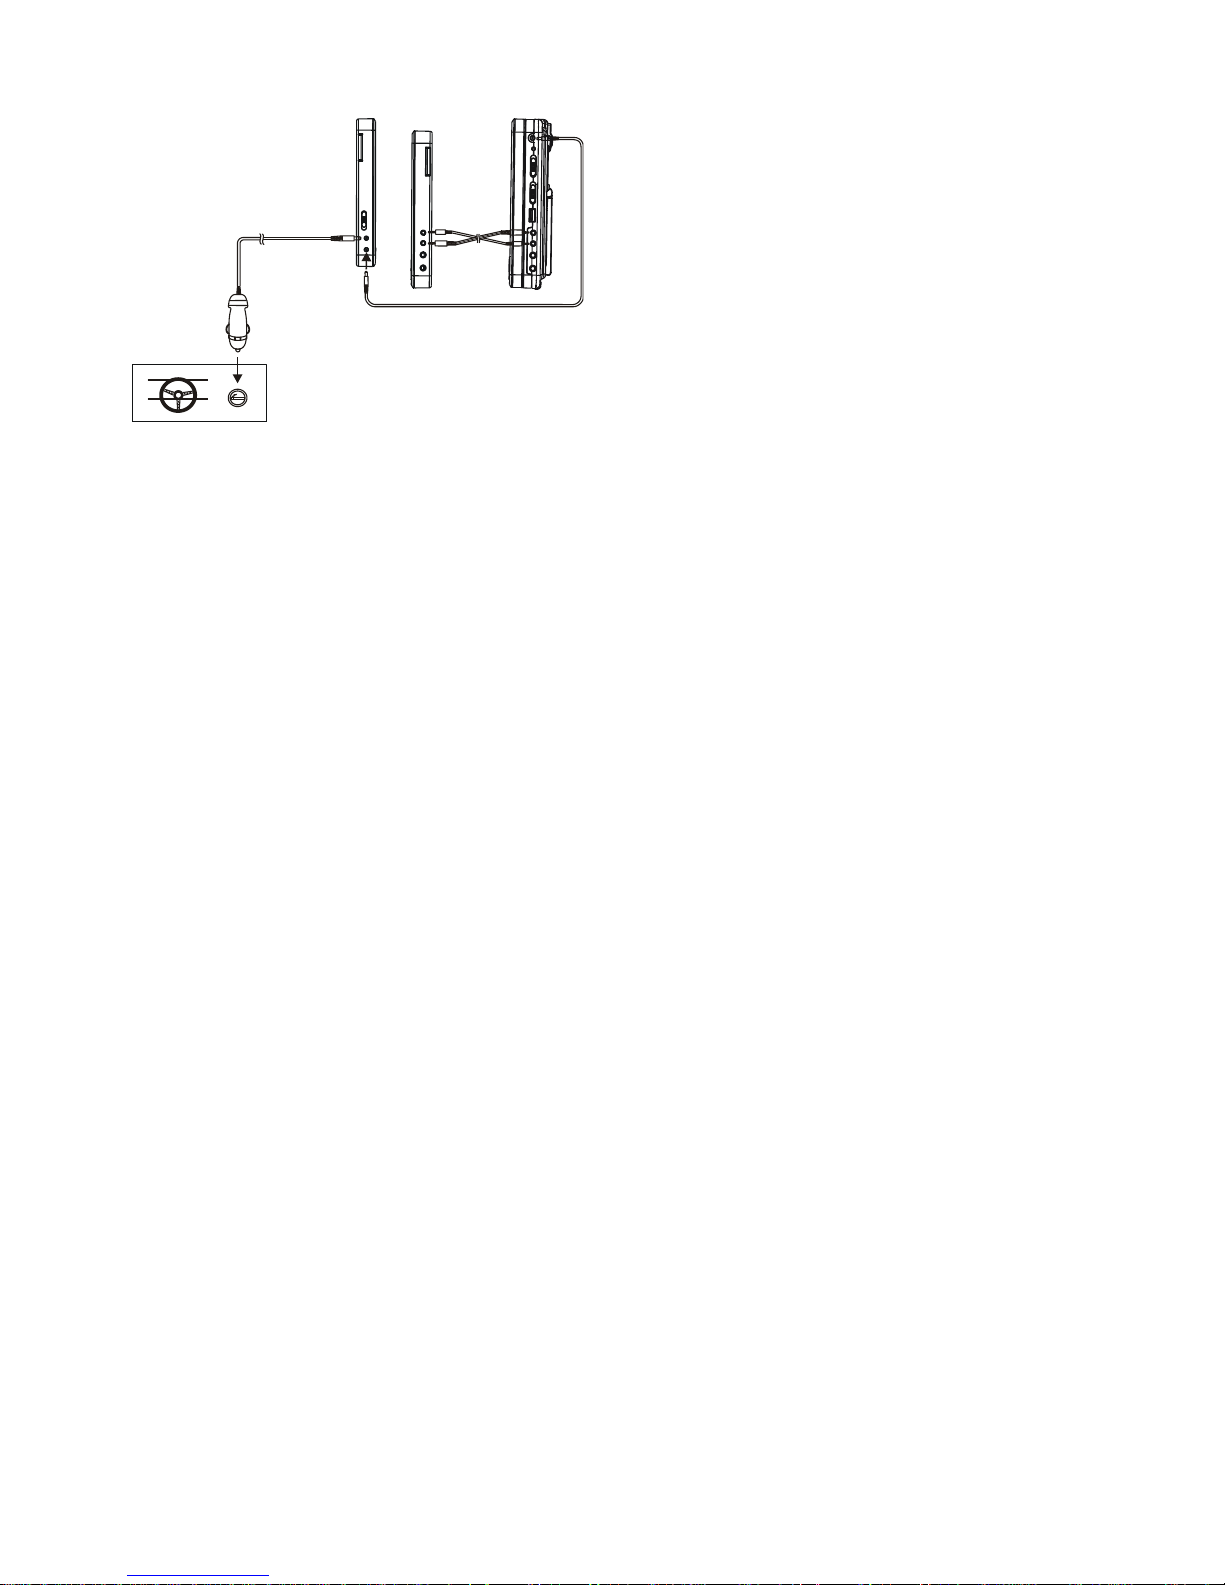
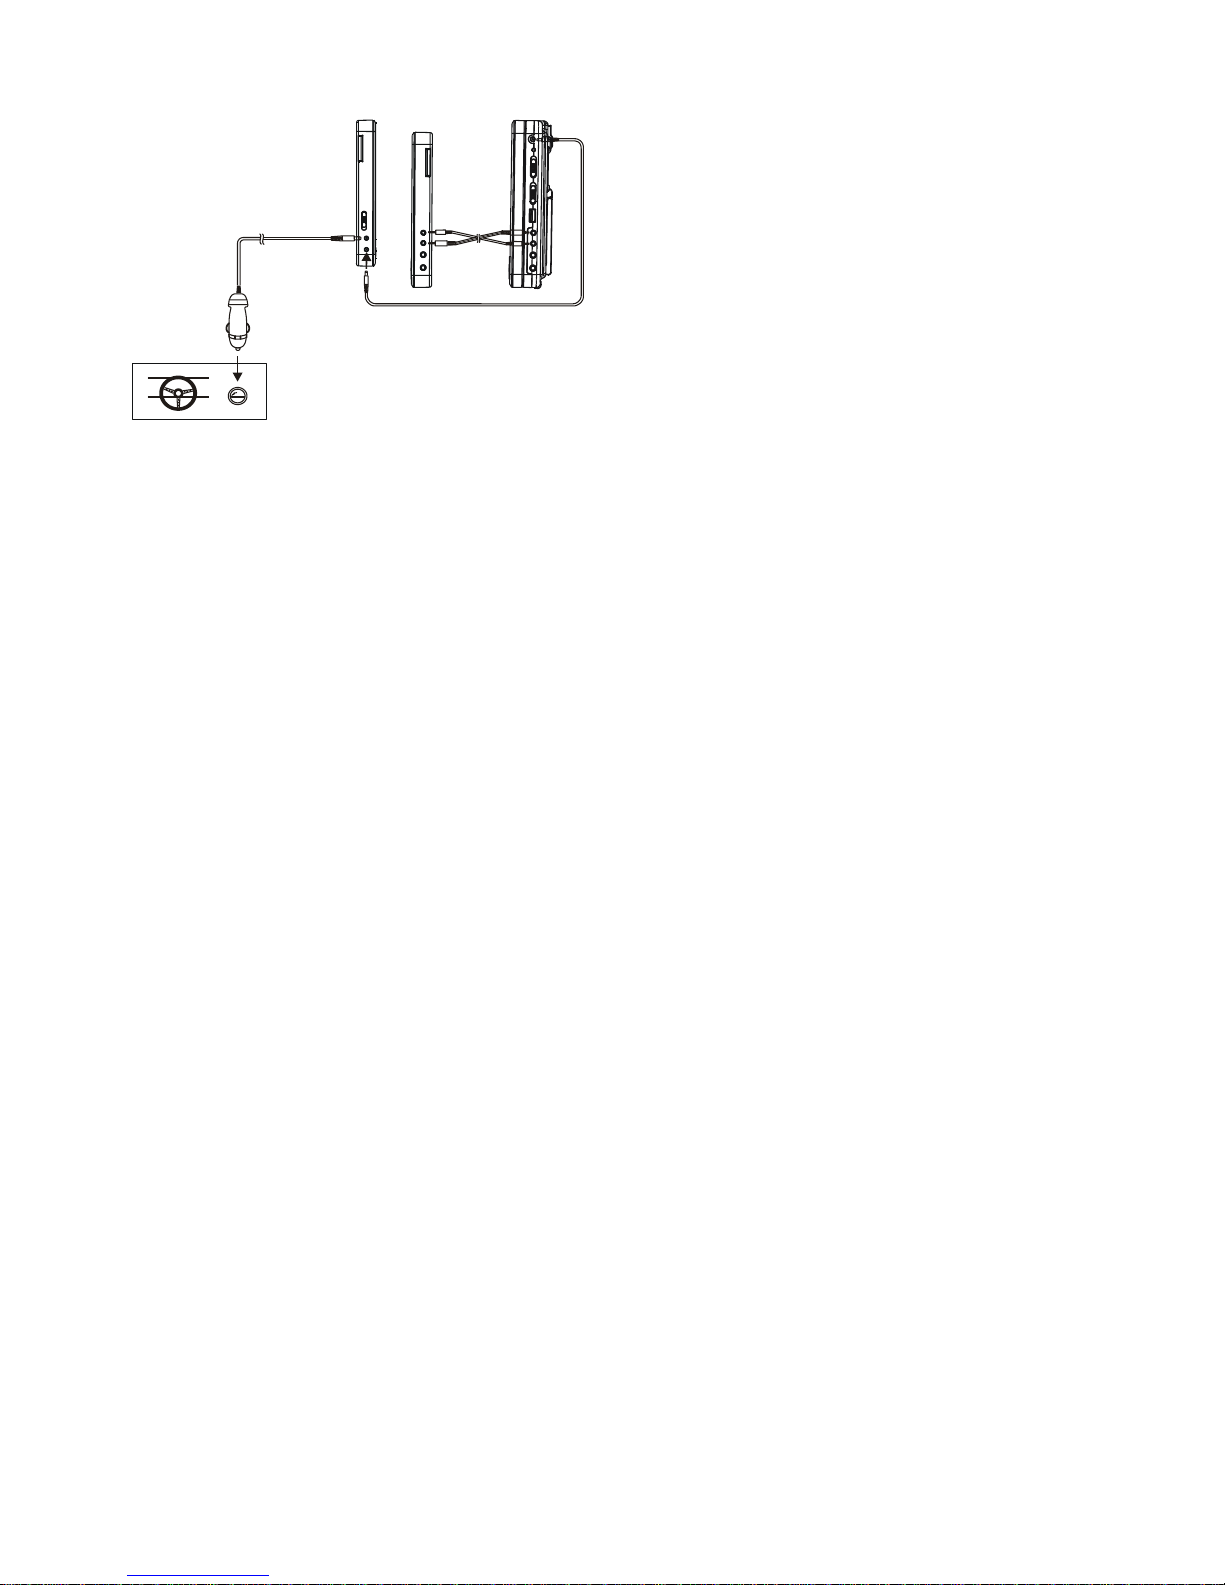
Connecting to an affiliated screen
This unit is equipped with another affiliated screen, you can use the affiliated screen and player to appreciate the programme at
the same time, the connecting method is illustrated as below using the in car adaptor.
A/V cable
TV SET
Page 4
3
OPERATIONS
PREPARATION
Power on the TV set and select video input mode.
Power on the audio system which is connected to the player.
GET STARTED
1. Switch POWER ON/OFF button to turn on the player.
2. Lift the CD compartment to place a disc onto the disc tray.
3. Close the disc tray and the playback starts automatically.
4. When a menu screen appears on the TV, move the navigation buttons to select a preferred track number, then press
PLAY/PAUSE button to start playback.
ADJUST THE VOLUME
Press VOLUME+/-button to increase or reduce the volume level.
MUTE
Press MUTE button, the audio output of the main unit will be shut off; pressing this button again or VOLUME button will resume
the audio output.
SKIP AHEAD OR BACK
Press PREVIOUS or NEXT button once during play to skip a chapter (DVD) or a track (CD) ahead or backwards.
RAPID ADVANCE/REVERSE
During playback, press and hold F.BWD&PREVIOUS or F.FWD&NEXT button several times to scan the disc forward or backward
at X2, X4, X8, X16,X32 normal speed.
Press PLAY/PAUSE button to resume normal play.
STOP PLAYBACK
Press STOP button during playback to stop playback; the player activates its resume function when STOP is pressed in STOP
mode; press PLAY button again, playback resumes at the point it stopped previously; open the disc tray or press the STOP
button one more time to clear the resume function. Press and hold this button on the remote to make change between
DVD/CARD and USB.
SLOW-MOTION PLAY (DVD)
Press and hold ZOOM/SLOW button on the remote control during playback, the Disc will be played at 1/2 normal speed at first,
each time this button is pressed, the play speed becomes slower at 1/4, 1/8 and 1/16 speed.
REPEAT
Press REPEAT button during playback, it will repeat play one chapter/title or repeat all (for DVD disc), or repeat play a track or all
tracks (CD), or repeat the sections between two specific points (A-B).
SEARCH FOR PREFERRED SCENE
1. Press SEARCH button several times during play for you to input the item to be played.
2. Input the desired number or time via the numeric buttons.
3. Press OK/ENTER button to confirm and the playback from the located scene starts.
4. Search menu will exit automatically no input.
ON SCREEN DISPLAY INFORMATION
When the player is in operation, press DISPLAY button continuously on the remote control, the screen will display parts of
information (current disc type, title number, chapter number, playtime, audio language, audio type, subtitle language and multi
Slave screen connector
To the cigarette lighter socket
Page 5

4
angle, etc) in a sequence.
CHANGING AUDIO SOUNDTRACK LANGUAGE (DVD DISC)
It is possible to change the audio soundtrack language to a different language from the one selected at the initial settings (This
operation works only with discs on which multiple audio soundtrack languages are recorded).
Press AUDIO button during DVD disc play, the sound track language changes with the current sound track number shown on the
TV screen.
NOTE: When no soundtrack languages are recorded, pressing this button will not work.
CHANGING SUBTITLE LANGUAGE (DVD ONLY)
Press SUBTITLE button during playback, the subtitle language shown on the screen will change as a response to each press;
When the desired language appears, release the button to view the subtitle in that language.
Note: this function only works on the DVDs recorded with multi-language subtitles.
RETURNING TO MAIN MENU AND PLAYING THE TITLE (DVD)
During playback, press MENU button to return to main menu. Press TITLE button to play the title.
PROGRAM PLAY (UP TO 20 MEMORIES)
1. Press PROGRAM during playback to display the program menu.
2. Select location(s) to be memorized via navigation buttons and then enter desired Titles/Chapters/tracks numbers via numeric
buttons.
Note: Inputting leading zero is not necessary. If the chapter/title/track number is behind the cardinal 10, press the unit digit key
first and then another unit digit. Some figure inputs may be useless, because it's greater figure than total title/chapter/track
number on the disc. To programme another ten tracks by pressing NEXT button. Up to 20 tracks can be programmed.
Example: Track 3, press "3"
Track 12, press "1" and then "2"
Track 21, press "2" and then "1"
3. To start programmed playback, scroll START on the menu and then press OK(PLAY/PAUSE) button .
4. To clear all programmed item, first of all, press PROGRAM button to enter the program menu, by now it will highlight STOP on
the menu, press OK(PLAY/PAUSE) button once to confirm, then EXIT on the menu will be highlighted, press OK(PLAY/PAUSE)
again to clear all the programmed item.
ZOOM PLAY
Press the ZOOM key continuously to zoom in the picture by 2, 3, and 4 times.
Scroll to view the enlarged picture using Navigation buttons.
MULTI-ANGLE VIEWING (DVD ONLY)
Press and hold ANGLE button during playback to display the number of angles being played and then select a desired angle to
view the scene.
Note: only the DVDs shot with multi-angle scenes have this function.
MP3/WMA/MPEG 4 PLAYBACK
1. Load the MP3/WMA/MPEG 4 disc onto the disc tray and the TV screen will show all its folders after a few seconds.
2. Select the folder you want by the navigation buttons and then OK/ENTER button to confirm.
3. The files in this folder are displayed and select your favourable song via navigation buttons and press OK/ENTER button to
start playback.
4. Press NEXT and PREV button to select track directly.
5. Press REPEAT button to change play mode.
KODAK PICTURE CD / JPEG CD PLAYBACK
Slide show of Kodak Picture CD after being loaded begins automatically; Folders of JPEG picture CD after being loaded are
displayed on the TV screen; use the navigation buttons to select the desired folder and then press OK/ENTER button to confirm.
The files in this folder are displayed and you can select your favourable pictures using the up/down navigation buttons and press
OK/ENTER button to start playback. Preview of the picture will be displayed while you scroll across the filenames.
KODAK PICTURE CD/JPEG CD OPERATIONS
1. PLAY MODES
Press REPEAT button to change play mode.
2. SKIP TO NEXT/PREVIOUS PICTURE
Press NEXT button to skip to the next picture or PREV button to the previous picture.
If no key is pressed for a few seconds, it will skip to next picture automatically.
3. PICTURE ROTATIONS
Press RIGHT and LEFT navigation buttons to rotate the picture Clockwise and anti-clockwise respectively.
4. PICTURE FLIPS
Press UP NAVIGATION button to flip the picture vertically.
Press DOWN NAVIGATION button to flip the picture horizontally.
5. PICTURE ZOOM IN/OUT
Page 6

5
Press ZOOM button continuously, the picture zooms in by 125%,150%,200% or zooms out by 75%, 50% the original size. Press
this button once more when the picture getting 50% size to return to the normal play. If the picture is enlarged, you may use the
navigation buttons to view blocked parts of the picture.
COLOR AND BRIGHTNESS ADJUSTMENT (FOR THE LCD SCREEN)
Press SCREEN ON/OFF button on the remote control to adjust the color intensity and brightness respectively.
Press and hold this button for a moment to open or close the TFT display.
EXTERNAL MEMORY MEDIA OPERATION (USB&SD/MMC CARD)
Prepare the player for External Memory media operation
1. Slide the POWER switch to ON position, plug a USB data traveller filled with Audio/video files into the USB port or Insert the
SD/MMC card into the card slot, the USB or the SD/MMC card is successfully detected and read after a few seconds, at the
same time, the TV screen will show all its folders.
2. You may play the files stored in the storage media much in the same way as you do the Mp3 disc.
Note: Press and hold STOP button to make change between USB/SD/MMC card and disc.
CAUTION: To avoid electronic static discharge, don't touch the USB port and card slot during playback.
INITIAL SETTINGS
Initial settings page is for you to make your preferred settings up for your player. Once the initial settings are done they are
retained in the CPU of the player until otherwise modified.
COMMON PROCEDURES FOR INITIAL SETTINGS
1. Press SETUP button.
2. Use the navigation buttons to select the item you want to modify, press PLAY/PAUSE button to confirm, setting page with
further setting items displayed shows on the TV screen. Again use navigation buttons to make changes. Press again
PLAY/PAUSE button to confirm modifications.
3. Use navigation buttons to switch to another setting on the main setting page.
4. Press SETUP button to exit main setting page.
1. GENERAL SETUP
G E N ER A L S E TU P PA G E
TV D ISP LAY P S
SC R EEN SAVE R ON
EX IT S E TUP
LC D M O D E W IDE
OSD L A NG E NG
1.1 TV DISPLAY - it is used to select the TV scan mode, please set as per your TV set.
Options: Normal/PS
Normal LB
Wide
1.2 LCD MODE - it is used to select the LCD mode.
Options: 4:3 16:9
1.3 OSD LANG - it is used to select different On Screen Display language for different user.
1.4 SCREEN SAVER - when the player is not in used for several minutes, a running DVD logo will move across the TV screen to
protect the TV screen.
Options: On: Screen saver is enabled
Off: Screen saver is disabled
2. AUDIO SETUP
A U D IO SE T U P P A GE
DO W N M IX S TR
EX IT S E TUP
2.1 DOWNMIX
Options: LT/RT- Left/Right mix mode
STEREO- Select this option if you don't have a 5.1 channels amplifier.
3. VIDEO QUALITY SETUP
Page 7
6
VID E O Q UA L IT Y S ETU P
SH A RPNE S S
BR IGH T NESS
CO N T RAS T
HUE
SATU R AT IO N
EX IT S E TUP
3.1 SHARPNESS - to set the sharpness for display.
Options: HIGH MEDIUM LOW
3.2 BRIGHTNESS - to set the brightness for display.
3.3 CONTRAST - to set the contrast effect for display.
3.4 HUE - to set the hue for display.
3.5 SATURATION - to set the saturation for display.
4. SYSTEM SETUP
SY S TE M PA GE
TV T YPE
AU D IO
SU B TITLE
DISC MEN U
PAREN TA L
PASS W O R D
DE FAU LT
EX IT S E TUP
4.1 TV TYPE - it is used to select the TV mode.
Please select this option as per your TV set.
4.2 AUDIO - select preferred audio language.
(DVD only - need disc software support)
4.3 SUBTITLE - select preferred subtitle language.
(DVD only - need disc software support)
4.4 DISC MENU - select preferred disc menu language.
(DVD only - need disc software support)
4.5 PARENTAL - select rating levels. You must set PASSWORD MODE ON and then enter password to enable this selection.
(DVD only - need disc software support)
4.6 PASSWORD
Option: Change
Select to change password
Procedure to change password:
1) Enter old password in the OLD PASSWORD row
2) Enter new password in the NEW PASSWORD row
3) Enter the new password again in the CONFIRM PWD row
You may reset the password if you forget the old password by using the supervisor password: 1389
4.7 DEFAULT - Reset to factory settings.
DISC HANDLING PRECAUTIONS
Hold the disc by the edge so the surface will not be soiled with finger prints. Finger prints, dirt and scratches can
cause skipping and distortion.
Do not write on the label side with a ball-point pen or other writing utensils.
Do not apply benzine, thinner, and liquid that prevents against static electricity.
Be careful not to drop or bend the disc.
Install only one disc on the disc tray.
Do not try to close the disc tray when the disc is not installed properly.
Be sure to store the disc in its case when not in use.
TROUBLESHOOTING
If your DVD player does not seem to be functioning properly, check the items below before you contact an authorized service
center.
Symptom
Check
Power does not turn on or
suddenly turns off.
Make sure the AC adapter is securely plugged into an AC outlet.
Turn the power off and then back on.
No picture or sound
Check that the A/V cables are securely connected.
Check that the disc is a DVD, DVD-RW or AUDIO CD.
Do not use a disc that has scratches or dirt.
Page 8

7
Check that the label-side of the disc is facing up.
The pick-up lens of the DVD player may be dirty. Contact the service center for lens
cleaning.
Check that the TV channel is set to VIDEO or AV if viewing with a TV.
No picture
Check that the LCD display is turned on.
No sound
Check that the display panel is open. If it is closed, audio will not be output to the
speakers.
Check the volume setting. If set to zero, turn up volume level.
Check that the headphones are plugged into the PHONES socket. Speakers cannot be
used with the headphones.
No picture and sound
Check that the battery is properly installed and AC Adapter is properly connected.
Distorted video or sound
Use a disc without scratches or dents.
IMPORTANT SAFETY INSTRUCTIONS
The apparatus shall not be exposed to dripping or splashing and that no objects filled with liquids, such as vases, shall be
placed on the apparatus.
When the mains plug or an appliance coupler is used as the disconnect device, the disconnect device shall remain readily
operable. To be completely disconnected the power input, the mains plug of the apparatus or the appliance coupler shall be
disconnected from the mains completely.
No naked flame sources, such as lighted candles, should be placed on the apparatus.
Minimum distances 2.0cm around the apparatus for sufficient ventilation. The ventilation should not be impeded by covering
the ventilation openings with items, such as newspapers, table-cloths, curtains, etc.
The use of apparatus is in tropical and/or moderate climates.
Attention should be drawn to the environmental aspects of battery disposal.
CAUTION: Danger of explosion if battery is incorrectly replaced. Replace only with the same or equivalent type.
Battery shall not be exposed to excessive heat such as sunshine, fire or the like.
Excessive sound pressure from earphones and headphones can cause hearing loss.
The marking plate is located at the back of the apparatus.
CUSTOMER SUPPORT
You can contact the Ricatech customer service when you have a question or a problem with your Ricatech product. You can
contact us by telephone and email.
Email
For customer support by email, please sent a email to support@ricatech.com Please make sure that you mention the model
number and serial number of the product, mention your name & address and describe your question or problem clearly.
Telephone
For customer support by telephone, please dial +32 3 3265694. One of our service staff will be ready to serve you.
For full procedure please visit the website of Ricatech at: www.ricatech.com
Page 9
8
GEBRUIKERSHANDLEIDING
VOORDAT HET APPARAAT WORDT AANGESLOTEN OF BEDIEND DIENT U DE INSTRUCTIES IN DEZE
GEBRUIKERSHANDLEIDING AANDACHTIG DOOR TE LEZEN.
BEWAAR DEZE HANDLEIDING VOOR HET GEVAL U DE HANDLEIDING IN DE TOEKOMST ALS NASLAGWERK WILT GEBRUIKEN.
DE ILLUSTRATIES EN GRAPHICS IN DEZE HANDLEIDING DIENEN ALLEEN ALS REFERENTIE EN ZIJN ONDERHEVIG AAN
WIJZIGEN ZONDER VOORAFGAANDE KENNISGEVING.
OVERZICHT VAN DE DVD-SPELER:
1. TFT-SCHERM
2. AFSTANDSBEDIENINGSENSOR
3. AFSPELEN/PAUZE-KNOP
4. STOP&USB/SD/MMC KAART-KNOP
5. VORIGE & SNEL ACHTERWAARTS-KNOP
6. VOLGENDE & SNEL VOORWAARTS-KNOP
7. SETUP-KNOP
8. ONDERTITELINGKNOP
9. VOLUME - KNOP
10. VOLUME + KNOP
11. LUIDSPREKER
12. NAVIGATIEKNOP
13. OK-KNOP
14. LAADINDICATOR
15. SD/MMC KAARTSLEUF
16. HOOFD/OORTELEFOONAANSLUITING
17. HOOFD/OORTELEFOONAANSLUITING
18. VIDEO-OUT-AANSLUITING
19. AUDIO-OUT-AANSLUITING
20. USB-POORT
21. DISPLAY AAN/UIT-SCHAKELAAR
22. AAN/UIT-SCHAKELAAR
23. AAN/UIT-INDICATOR
24. DC-IN & INGANG AUTOSTEKKER
25. OPHANGKOORD
26. GESP
27. BATTERIJVAK
28. BEUGEL
SLAVE SCHERM
1. HELDERHEIDKNOPPEN
2. KLEURKNOPPEN
3. VOLUMEKNOPPEN
4. TFT-SCHERM
5. AAN/UIT-SCHAKELAAR
6. DC-IN-INGANG
7. DC-OUT-INGANG
8. HOOFD/OORTELEFOONAANSLUITING
9. HOOFD/OORTELEFOONAANSLUITING
10. AUDIO-IN-INGANG
11. VIDEO-IN-INGANG
12. GESP
13. OPHANGKOORD
1
234
5
6789101112
14 15 16 18 20 22 24
17 19 21 23
252626
27
28
11
13
4
12 1213
1 2
3
8910
11
5
6
7
Page 10
9
AFSTANDSBEDIENING
1. SCHERM AAN/UIT & HELD/KLR-INSTELKNOP
2. TITELKNOP
3. VOR & SNEL ACHTERWAARTS KNOP
4. VOLG & SNEL VOORWAARTS KNOP
5. NAVIGATIEKNOPPEN
6. NUMERIEKE KNOPPEN
7. PROGRAMMA-/KIJKHOEKKNOP
8. VOLUME - KNOP
9. DEMPEN-KNOP
10. SETUP-KNOP
11. MENUKNOP
12. DISPLAY-KNOP
13. STOP &USB/SD/MMC KAART-KNOP
14. OK/ENTER(AFSPELEN/PAUZE)-KNOP
15. ONDERTITELINGSKNOP
16. AUDIOKNOP
17. ZOEKEN-KNOP
18. HERHALEN-KNOP
19. ZOOM/SLOW-KNOP
20. VOLUME + KNOP
BASISAANSLUITING
Het is raadzaam een tv met multisysteem aan te sluiten.
Zorg dat deze speler en ander aan te sluiten apparatuur op stand-by staan of uitgeschakeld zijn en haal voor aanvang van het
aansluiten de netsnoeren uit het stopcontact.
Houd de ventilatiegaten van de apparatuur vrij en stel deze zo op dat de lucht vrij kan circuleren.
Lees eerst de instructies door, voordat er andere apparatuur wordt aangesloten.
Houd de kleurcodering in acht bij het aansluiten van audio- en videokabels. Sluit bijvoorbeeld de gele stekker op het gele
contact aan, de rode stekker op het rode contact, enz. Als alleen de A/V verbonden kabel is meegeleverd, dient u één uiteinde
van de A/V verbonden kabel overeenkomstig de kleurcodering aan te sluiten en sluit het andere uiteinde van de A/V
aangesloten kabel op het toestel aan. Sluit ten slotte de AV-kabel op het tv-toestel aan.
Opmerking:
Tijdens het afspelen van een dvd kan het volumeniveau lager zijn dan tijdens tv-uitzendingen, enz. Mocht dit het geval zijn,
pas het volume dan aan het gewenste niveau aan.
Als de dvd/cd-speler via een videocassetterecorder op de tv is aangesloten, wordt het beeld mogelijk niet normaal afgespeeld
met bepaalde dvd's. Mocht dit het geval zijn, sluit de speler dan niet via de VCR aan.
Aansluiten op een stereo tv-toestel
AU DI O R
AU DI O L
VI DE O I N
S- VI DE O
YU V I NP UT
AV A UD IO /V ID EO IN P UT
Aansluiten op een extra aangesloten scherm
Dit toestel is voorzien van een extra aangesloten scherm. U kunt het aangesloten scherm en de speler gebruiken om op
hetzelfde moment nog meer van het programma te genieten. De aansluitmethode wordt met onderstaande illustratie toegelicht.
Voor het aansluiten wordt van de autoadapter gebruik gemaakt.
A/V-kabel
TV-TOESTEL
Page 11

10
BEDIENINGEN
VOORBEREIDING
Schakel het tv-toestel in en selecteer de video-invoermodus.
Schakel het audiosysteem in dat op de speler aangesloten is.
VAN START GAAN
3. Sluit de disklade en het afspelen start automatisch.
4. Gebruik de navigatieknoppen wanneer er een menuscherm op de tv verschijnt om een gewenst muzieknummer te selecteren
en druk vervolgens op de PLAY/PAUSE-knop om het afspelen te starten. 1. Zet de POWER ON/OFF-knop aan om de speler in
te schakelen.
2. Til het cd-compartiment op om een disk in de disklade te plaatsen.
HET VOLUME AANPASSEN
Druk op de VOLUME+/- knop om het volumeniveau te verhogen of te verhogen.
DEMPEN
Druk op de MUTE-knop en de audio-uitvoer van het hoofdtoestel wordt uitgeschakeld. Door nogmaals op deze knop of op de
VOLUME-knop te drukken, wordt de audio-uitvoer hervat.
OVERSLAAN VOORUIT OF ACHTERUIT
Druk tijdens het afspelen eenmaal op de PREVIOUS of NEXT-knop om een hoofdstuk (dvd) of een muzieknummer vooruit of
achteruit over te slaan.
SNEL VOORWAARTS/ACHTERWAARTS
Houd tijdens het afspelen de F.BWD&PREVIOUS of F.FWD&NEXT-knop meerdere malen ingedrukt om de disk voorwaarts of
achterwaarts bij X2, X4, X8, X16, X32 normale snelheid te scannen.
Druk op de PLAY/PAUSE-knop om normaal afspelen te hervatten.
AFSPELEN STOPPEN
Druk tijdens het afspelen op de STOP-knop om het afspelen te stoppen. De speler activeert de functie hervatten wanneer STOP
in de STOP-modus wordt gestopt. Druk nogmaals op de PLAY-knop en het afspelen wordt hervat op het punt waar het hiervoor
werd gestopt. Open de disklade of druk nog een keer op de STOP-knop om de functie hervatten te wissen. Houd deze knop
ingedrukt op de afstandsbediening om van DVD/CARD naar USB over te schakelen.
VERTRAAGD AFSPELEN (DVD)
Houd tijdens het afspelen de ZOOM/SLOW-knop op de afstandsbediening ingedrukt. Telkens bij het indrukken van de knop wordt
de disk eerst op 1/2 normale snelheid afgespeeld en wordt de afspeelsnelheid vervolgens vertraagd naar 1/4, 1/8 en 1/16
snelheid.
HERHALEN
Druk tijdens het afspelen op de REPEAT-knop. Deze herhaalt het afspelen van één hoofdstuk/titel of herhaalt alles (voor
dvd-disk), of herhaalt het afspelen van één muzieknummer of alle muzieknummers (cd), of herhaalt de secties tussen de
specifieke punten (A-B).
ZOEKEN NAAR EEN VOORKEURSCÈNE
1. Druk tijdens het afspelen meerdere malen op de SEARCH-knop om het af te spelen item in te voeren. Voer via de numerieke
knoppen het gewenste aantal of de tijd in.
3. Druk op de OK/ENTER-knop om te bevestigen en het afspelen van de opgespoorde scène start.
4. Het menu zoeken sluit automatisch wanneer er geen items worden ingevoerd.
Slave schermaansluiting
Naar de ingang van de sigarettenaansteker
Page 12

11
ON-SCREEN DISPLAY INFORMATIE
Druk ononderbroken op de DISPLAY-knop op de afstandsbediening wanneer de speler in werking is. Het scherm toont
opeenvolgende informatie over verschillende onderdelen (huidig disktype, titelnummer, hoofdstuknummer, afspeeltijd, audiotaal,
ondertitelingstaal en verschillende invalshoeken, enz.).
AUDIO SOUNDTRACKTAAL WIJZIGEN (DVD DISK)
U kunt de audio soundtracktaal geselecteerd bij de startinstellingen in een andere taal wijzigen (Deze bewerking werkt alleen met
disks waarop meerdere audio soundtracktalen zijn opgenomen).
Druk tijdens het afspelen van een dvd-disk op de AUDIO-knop en de soundtracktaal wijzigt het huidige soundtracknummer op het
tv-scherm.
OPMERKING: Als er geen soundtracktalen worden opgenomen, werkt het indrukken van deze knop niet.
ONDERTITELINGSTAAL WIJZIGEN (ALLEEN DVD)
Druk tijdens het afspelen op de SUBTITLE-knop en de ondertitelingstaal weergegeven op het scherm wijzigt bij elke druk op de
knop.
Laat de knop los zodra de gewenste taal verschijnt om de ondertiteling in die taal te bekijken.
Opmerking: Deze functie werkt alleen op dvd’s die zijn opgenomen met meertalige ondertitelingen.
NAAR HET HOOFDMENU TERUGKEREN EN DE TITEL AFSPELEN (DVD)
Druk tijdens het afspelen op de MENU-knop om naar het hoofdmenu terug te keren. Druk op de TITLE-knop om de titel af te
spelen.
PROGRAMMA AFSPELEN (TOT 20 GEHEUGENS)
1. Druk tijdens het afspelen op PROGRAM om het programmamenu weer te geven.
2. Selecteer via de navigatieknoppen een locatie of locaties om in het geheugen op te slaan en voer vervolgens via de numerieke
knoppen de gewenste titels/hoofdstukken/muzieknummers in.
Opmerking: Het invoeren van een voorafgaande nul is niet noodzakelijk. Druk eerst op de rekeneenheidtoets en vervolgens op
een andere cijfereenheid wanneer het nummer van hoofdstuk/titel/muzieknummer zich achter de kardinale 10 bevindt.
Bepaalde cijferinvoeren kunnen onbruikbaar zijn, omdat dit cijfer hoger is dan het totale titel/hoofdstuk/muzieknummer op de
disk. Door op de NEXT-knop te drukken kunt u nog eens 10 nummers programmeren. Tot 20 nummers kunnen worden
geprogrammeerd.
Voorbeeld: nummer 2, druk op "3"
nummer 12, druk op "1" en vervolgens op "2"
nummer 21, druk op "2" en vervolgens op "1"
3. Scroll naar START in het menu om geprogrammeerd afspelen te starten en druk vervolgens op de OK (PLAY/PAUSE)-knop.
4. Om alle programma-items te wissen dient u eerst op de PROGRAM-knop te drukken om naar het programmamenu te gaan.
Nu wordt STOP op het menu gemarkeerd. Druk eenmaal op de OK (PLAY/PAUSE) knop om te bevestigen. Vervolgens wordt
EXIT op het menu gemarkeerd en druk nogmaals op OK (PLAY/PAUSE) om alle programma-items te wissen.
ZOOM AFSPELEN
Druk ononderbroken op de ZOOM-toets om 2, 3 of 4 keer op het beeld in te zoomen.
Scroll met behulp van de navigatieknoppen om de vergrote foto te bekijken.
VANUIT VERSCHILLENDE INVALSHOEKEN KIJKEN (ALLEEN VOOR DVD)
Houd tijdens het afspelen de ANGLE-knop ingedrukt om het aantal af te spelen invalshoeken weer te geven en selecteer
vervolgens een gewenste invalshoek om de scène te bekijken.
Opmerking: Alleen dvd-opnames met scènes vanuit verschillende invalshoeken hebben deze functie.
MP3/WMA/MPEG-4 AFSPELEN
1. Laad de MP3/WMA/MPEG-4 disk in de disklade en na enkele seconden toont het tv-scherm alle mappen.
2. Selecteer met behulp van de navigatieknoppen de door u gewenste map en druk vervolgens op de OK/ENTER-knop om te
bevestigen.
3. De bestanden in deze map worden weergegeven en selecteer via de navigatieknoppen uw favoriete liedje en druk vervolgens
op de OK/ENTER-knop om het afspelen te starten.
4. Druk op de NEXT en PREV-knop om het nummer rechtstreeks te selecteren.
5. Druk op de REPEAT-knop om de afspeelmodus te wijzigen.
KODAK PICTURE CD / JPEG CD AFSPELEN
Een diavoorstelling van Kodak Picture CD wordt automatisch na het laden gestart. Vervolgens worden de mappen van JPEG
picture CD op het tv-scherm weergegeven. Gebruik de navigatieknoppen om de gewenste map te selecteren en druk vervolgens
op de OK/ENTER-knop om te bevestigen. De bestanden in deze map worden weergegeven en kunt u met behulp van de
omhoog/omlaag-knoppen uw favoriete foto's selecteren en druk op de OK/ENTER-knop om het afspelen te starten. Terwijl u door
de bestandsnamen scrollt wordt er een voorvertoning van de foto getoond.
KODAK PICTURE CD/JPEG CD BEDIENINGEN
1. AFSPEELMODI
Page 13

12
Druk op de REPEAT-knop om de afspeelmodus te wijzigen.
2. OVERSPRINGEN NAAR VOLGENDE/VORIGE FOTO
Druk op de NEXT-knop om naar het volgende beeld over te springen of op de PREV-knop om naar het vorige beeld over te
springen.
Als gedurende een aantal seconden geen toets wordt ingedrukt, springt deze automatisch over naar het volgende beeld.
3. BEELDROTATIES
Druk op de RIGHT en LEFT navigatieknoppen om het beeld respectievelijk naar rechts of links te draaien.
4. BEELD OMDRAAIEN
Druk op de UP NAVIGATION-knop om het beeld verticaal te draaien.
Druk op de DOWN NAVIGATION-knop om het beeld horizontaal te draaien.
5. BEELD IN-/UITZOOMEN
Druk ononderbroken op de ZOOM-knop. Het beeld zoomt vanuit de oorspronkelijke grootte 125%,150% en 200% in of zoomt
75%, 50% uit. Druk nogmaals op deze knop wanneer het beeld 50% groot wordt om terug te keren naar normaal afspelen. Als
het beeld is vergroot, kunt u met behulp van de navigatieknoppen geblokkeerde delen van het beeld bekijken.
AANPASSEN VAN KLEUR EN HELDERHEID (VOOR HET LCD-SCHERM)
Druk op de SCREEN ON/OFF-knop op de afstandsbediening om respectievelijk de kleurintensiteit en helderheid aan te passen.
Houd deze knop even ingedrukt om het TFT-scherm te openen of te sluiten.
BEDIENING EXTERNE GEHEUGENMEDIA (USB&SD/MMC KAART)
Bereid de speler voor op bediening van externe geheugenmedia
1. Schuif de POWER-schakelaar naar de ON positie, steek een USB gegevensopslagmedium gevuld met audio-/videobestanden
in de USB-poort of steek de SD/MMC-kaart in de kaartsleuf. De USB of de SD/MMC-kaart is na enkele seconden succesvol
gedetecteerd en gelezen en tegelijkertijd geeft het tv-scherm alle mappen weer.
2. U kunt de bestanden opgeslagen op het opslagmedium bijna op dezelfde wijze afspelen als het afspelen van een MP3-disk.
Opmerking: Houd de STOP-knop ingedrukt om van de USB/SD/MMC-kaart naar de disk over te schakelen.
ATTENTIE: Raak de USB-poort en kaartsleuf niet aan tijdens het afspelen om elektrische statische ontlading te voorkomen.
STARTINSTELLINGEN
Met de pagina startinstellingen kunt u voorkeursinstellingen voor uw speler tot stand brengen. Zodra de startinstellingen tot stand
zijn gebracht, worden deze in het CPU van de speler bewaard totdat deze anderszins worden gewijzigd.
ALGEMENE PROCEDURES VOOR STARTINSTELLINGEN
1. Druk op de SETUP-knop.
2. Gebruik de navigatieknoppen om het door u gewenste item aan te passen en druk op de PLAY/PAUSE-knop om te bevestigen.
De instelpagina met nadere instellingen wordt op het tv-scherm weergegeven. Gebruik nogmaals de navigatieknoppen om
wijzigingen aan te brengen. Druk nogmaals op de PLAY/PAUSE-knop om de aanpassingen te bevestigen.
3. Gebruik de navigatieknoppen om naar een andere instelling op de hoofdinstelpagina over te schakelen.
4. Druk op de SETUP-knop om de hoofdinstelpagina af te sluiten.
1. ALGEMENE SETUP
G E N ER A L S E TU P PA G E
TV D ISP LAY P S
SC R EEN SAVE R ON
EX IT S E TUP
LC D M O D E W IDE
OSD L A NG E NG
1.1 TV DISPLAY – wordt gebruikt om de modus tv scannen te selecteren. Stel in op uw tv-toestel.
Opties: Normaal/PS
Normaal LB
Breed
1.2 LCD-MODUS – wordt gebruikt om de LCD-modus te selecteren.
Opties: 4:3 16:9
1.3 OSD-TAAL – wordt gebruikt om een andere on-screen displaytaal voor een andere gebruiker te selecteren.
1.4 SCREENSAVER – wanneer de speler enkele minuten niet wordt gebruikt, loopt er ter bescherming van het tv-scherm een
dvd-logo over het tv-scherm.
Opties: Aan: Screensaver is ingeschakeld
Uit: Screensaver is uitgeschakeld
2. AUDIO SETUP
Page 14

13
A U D IO SE T U P P A GE
DO W N M IX S TR
EX IT S E TUP
2.1 DOWNMIX
Opties: L/R- Links/Rechts mixstand
STEREO- Selecteer deze optie als u geen 5.1 kanaals versterker heeft.
3. SETUP VIDEOKWALITEIT
VID E O Q UA L IT Y S ETU P
SH A RPNE S S
BR IGH T NESS
CO N T RAS T
HUE
SATU R AT IO N
EX IT S E TUP
3.1 SCHERPTE – om de scherpte van de display in te stellen.
Opties: HIGH MEDIUM LOW
3.2 HELDERHEID – om de helderheid van de display in te stellen.
3.3 CONTRAST – om het contrasteffect van de display in te stellen.
3.4 TINT – om de tint van de display in te stellen.
3.5 VERZADIGING – om de verzadiging van de display in te stellen.
4. SYSTEEM SETUP
SY S TE M PA GE
TV T YPE
AU D IO
SU B TITLE
DISC MEN U
PAREN TA L
PASS W O R D
DE FAU LT
EX IT S E TUP
4.1 TV-TYPE – wordt gebruikt om de tv-modus te selecteren.
Selecteer deze optie voor uw tv-toestel.
4.2 AUDIO – selecteer de audiotaal van uw voorkeur.
(alleen voor dvd – u hebt softwareondersteuning voor de disk nodig)
4.3 ONDERTITELING – selecteer de ondertitelingstaal van uw voorkeur.
(alleen voor dvd – u hebt softwareondersteuning voor de disk nodig)
4.4 DISKMENU – selecteer de menutaal van uw voorkeur.
(alleen voor dvd – u hebt softwareondersteuning voor de disk nodig)
4.5 OUDERLIJK TOEZICHT – selecteer waarderingsniveaus. U moet PASSWORD MODE ON instellen en vervolgens het
wachtwoord invoeren om deze selectie in te schakelen. (alleen voor dvd – u hebt softwareondersteuning voor de disk nodig)
4.6 WACHTWOORD
Optie: wijzigen
Selecteer om het wachtwoord te wijzigen
Procedure voor het wijzigen van het wachtwoord:
1) Voer het oude wachtwoord in de rij OLD PASSWORD in
2) Voer het nieuwe wachtwoord in de rij NEW PASSWORD in
3) Voer het nieuwe wachtwoord opnieuw in de rij CONFIRM PWD in
U moet het wachtwoord mogelijk resetten met het supervisor wachtwoord: 1389 als u het oude wachtwoord bent vergeten.
4.7 STANDAARD – Terugzetten naar de fabrieksinstellingen.
VOORZORGSMAATREGELEN HANTEREN DISK
Houd de disk bij de rand vast, zodat het oppervlak niet wordt bevuild met vingerafdrukken. Vingerafdrukken, vuil en
krassen kunnen overslaan en vervorming veroorzaken.
Schrijf niet met een balpen of andere schrijfwaren op de labelzijde van de disk.
Breng geen benzeen, thinner of vloeistof dat statische elektriciteit voorkomt op de disk aan.
Laat de disk niet vallen of buig de disk niet.
Plaats slechts één disk in de disklade.
Probeer de disklade niet te sluiten wanneer de disk niet juist geplaatst is.
Bewaar de disk in het hoesje wanneer deze niet in gebruik is.
Page 15

14
PROBLEEMOPLOSSING
Controleer de onderstaande items als uw dvd-speler niet goed lijkt te functioneren, voordat u contact opneemt met een erkend
servicecentrum.
Symptoom
Controle
Toestel schakelt niet in of
schakelt onverwachts uit.
Zorg dat de lichtnetadapter goed in het stopcontact is geplaatst.
Schakel het toestel uit en vervolgens weer in.
Geen beeld of geluid
Controleer of de A/V-kabels goed aangesloten zijn.
Controleer of de disk een DVD, DVD-RW of AUDIO CD is.
Gebruik geen disk met krassen of vuil.
Controleer of de labelzijde van de disk naar boven is gericht.
De pick-up lens van de dvd-speler kan vuil zijn. Neem voor reiniging van de lens contact
op met het servicecentrum.
Controleer, indien u middels een tv kijkt, of het tv-kanaal is ingesteld op VIDEO of AV.
Geen beeld
Controleer of het LCD-scherm ingeschakeld is.
Geen geluid
Controleer of het displaypaneel open is. Als deze gesloten is, wordt er geen audio via de
luidsprekers uitgevoerd.
Controleer de volume-instelling. Verhoog het volumeniveau als deze is ingesteld op nul.
Controleer of de stekker van de hoofdtelefoon in de PHONES-ingang is gestoken.
Luidsprekers kunnen niet in combinatie met de hoofdtelefoon worden gebruikt.
Geen beeld en geluid
Controleer of de batterij juist geïnstalleerd is en of de lichtnetadapter juist is aangesloten.
Vervormd videobeeld of geluid
Gebruik een disk zonder krassen of deuken.
BELANGRIJKE VEILIGHEIDSINSTRUCTIES
Het apparaat mag niet worden blootgesteld aan druppelend of spattend water en er mogen geen voorwerpen gevuld met
vloeistof, zoals vazen op het apparaat worden geplaatst.
Wanneer de stroomstekker of een stekkerdoos als ontkoppelapparaat wordt gebruikt, moet het ontkoppelapparaat eenvoudig
bedienbaar zijn. Om de stroom volledig af te sluiten, dient u de stroomstekker van het apparaat of de stekkerdoos volledig van
de stroom te ontkoppelen.
Er mogen geen open vuurbronnen, zoals brandende kaarsen, op het apparaat worden geplaatst.
Voor voldoende ventilatie moet de minimale afstand rond het apparaat 2,0 centimeter zijn. De ventilatieopeningen mogen niet
worden belemmerd door deze te bedekken met items, zoals kranten, tafelkleden, gordijnen, enz.
Als het apparaat in tropische en/of gematigde klimaten wordt gebruikt.
Let op de milieuaspecten bij het afvoeren van batterijen.
ATTENTIE: Er is gevaar voor ontploffing als de batterij onjuist wordt geplaatst. Vervang de batterijen alleen voor dezelfde of
een soortgelijke batterij.
Batterijen mogen niet worden blootgesteld aan overmatige warmte, zoals zonneschijn, vuur of vergelijkbaar.
Overmatige geluidsdruk uit oortelefoons en hoofdtelefoons kan gehoorverlies veroorzaken.
De markeringplaat bevindt zich aan de achterkant van het apparaat.
KLANTENONDERSTEUNING
Voor vragen over of problemen met uw Ricatech product, kunt u contact opnemen met de Ricatech klantenservice. We zijn
bereikbaar per telefoon of e-mail.
E-mail
Voor klantenondersteuning per e-mail dient u een e-mail te sturen naar support@richatech.com. Zorg dat u het modelnummer en
serienummer van het product en uw naam en adres vermeld en beschrijf duidelijk uw vraag of probleem.
Telefoon
Voor klantenondersteuning per telefoon dient u te bellen naar +32 3 3265694. Eén van onze klantenservicemedewerkers staat u
te woord.
Bezoek voor de volledige procedure de website van Ricatech op: www.ricatech.com
Page 16

15
MODE D’EMPLOI
LISEZ ATTENTIVEMENT CES INSTRUCTIONS AVANT D'EFFECTUER LES BRANCHEMENTS ET D'UTILISER L'APPAREIL.
CONSERVEZ CE MANUEL, VOUS POURRIEZ AVOIR BESOIN DE VOUS Y RÉFÉRER ULTÉRIEUREMENT.
LES ILLUSTRATIONS ET IMAGES CI-DESSOUS SONT LÀ POUR RÉFÉRENCE ET SONT SUSCEPTIBLES D’ÊTRE MODIFIÉES
SANS PRÉAVIS.
VUE D’ENSEMBLE DU LECTEUR DVD :
1. ÉCRAN TFT
2. CAPTEUR DE LA TÉLÉCOMMANDE
3. BOUTON LECTURE/PAUSE
4. BOUTON STOP, USB ET CARTE SD/MMC
5. BOUTON PRÉCÉDENT ET RETOUR RAPIDE
6. BOUTON SUIVANT ET AVANCE RAPIDE
7. BOUTON CONFIGURATION
8. BOUTON DE SOUS-TITRES
9. BOUTON DE VOLUME -
10. BOUTON DE VOLUME +
11. HAUT-PARLEURS
12. BOUTON DE NAVIGATION
13. BOUTON OK
14. VOYANT DE CHARGE
15. FENTE DE CARTE SD/MMC
16. PRISE CASQUE AUDIO
17. PRISE CASQUE AUDIO
18. PRISE DE SORTIE VIDÉO
19. PRISE DE SORTIE AUDIO
20. PORT USB
21. COMMUTATEUR D’AFFICHAGE
ACTIVÉ/DÉSACTIVÉ
22. COMMUTATEUR D’ALIMENTATION
ACTIVÉ/DÉSACTIVÉ
23. VOYANT DALIMENTATION
24. PRISE D’ALIMENTATION SECTEUR ET DE
VOITURE
25. CORDE DE SUSPENSION
26. BOUCLE
27. LOGEMENT DE LA BATTERIE
28. SUPPORT
ÉCRAN ESCLAVE
1. BOUTONS DE LUMINOSITÉ
2. BOUTONS DE COULEUR
3. BOUTONS DU VOLUME
4. ÉCRAN TFT
5. COMMUTATEUR D’ALIMENTATION
ACTIVÉ/DÉSACTIVÉ
6. ENTRÉE D’ALIMENTATION SECTEUR (courant
continu)
7. SORTIE D’ALIMENTATION SECTEUR (courant
continu)
8. PRISE CASQUE AUDIO
9. PRISE CASQUE AUDIO
10. PRISE D’ENTRÉE AUDIO
11. PRISE D’ENTRÉE VIDÉO
12. BOUCLE
13. CORDE DE SUSPENSION
1
234
5
6789101112
14 15 16 18 20 22 24
17 19 21 23
252626
27
28
11
13
4
12 1213
1 2
3
8910
11
5
6
7
Page 17

16
TÉLÉCOMMANDE
1. COMMUTATEUR ÉCRAN ACTIVER/DÉSACTIVER
ET RÉGLAGE BRI/COL
2. BOUTON DE TITRE
3. BOUTON PRÉCÉDENT ET RETOUR RAPIDE
4. BOUTON SUIVANT ET AVANCE RAPIDE
5. BOUTONS DE NAVIGATION
6. BOUTONS NUMÉRIQUES
7. BOUTON DE PROGRAMME/D’ANGLE
8. BOUTON DE VOLUME -
9. BOUTON DE SOURDINE (« mute »)
10. BOUTON CONFIGURATION
11. BOUTON MENU
12. BOUTON AFFICHAGE
13. BOUTON STOP, USB ET CARTE SD/MMC
14. BOUTON OK/ENTRÉE (LECTURE/PAUSE)
15. BOUTON DE SOUS-TITRES
16. BOUTON AUDIO
17. BOUTON DE RECHERCHE
18. BOUTON RÉPÉTITION
19. BOUTON DE ZOOM/RALENTI
20. BOUTON DE VOLUME +
BRANCHEMENT DE BASE
Il est recommandé de brancher cet appareil à une télévision multi-système.
Assurez-vous que ce lecteur et l’autre appareil à connecter sont en mode veille (standby) ou à l’arrêt, puis débranchez leurs
cordons d’alimentation avant de débuter l’opération.
Ne bloquez pas les orifices de ventilation des appareils et placez ceux-ci de façon à ce que l’air puisse circuler librement.
Lisez attentivement les instructions avant d’effectuer les branchements à d’autres appareils.
Respectez le code de couleurs lors du branchement des câbles audio et vidéo, par exemple, branchez la fiche jaune à la prise
jaune, la fiche rouge à la prise rouge, etc. Si seul le câble de connexion A/V (Audio/Vidéo) est fourni, reliez une de ses
extrémités à un câble A/V en fonction du code de couleur, et reliez son autre extrémité à l’appareil, puis enfin, branchez le
câble A/V à la télévision.
Remarque :
Lors de la lecture d’un DVD, le volume sonore de la télévision peut être d’un niveau inférieur à une retransmission télévisée,
etc. Dans ce cas, réglez le volume au niveau souhaité.
Si le lecteur DVD/CD est branché à la télévision via un magnétoscope, l’image affichée pourrait ne pas être normale avec
certains DVDs. Dans ce cas, ne branchez pas le lecteur via le magnétoscope.
Branchement à un à téléviseur stéréo
AU DI O R
AU DI O L
VI DE O I N
S- VI DE O
YU V I NP UT
AV A UD IO /V ID EO IN P UT
Câble audio/vidéo
Télévision
Page 18

17
Branchement à un écran affilié
Cet appareil est équipé d’un autre écran affilié, vous pouvez utiliser cet écran et le lecteur pour profiter d’un programme en même
temps ; la méthode de connexion est illustrée ci-dessous, et utilise un adaptateur de voiture.
UTILISATION
PRÉPARATION
Allumez la télévision et sélectionnez le mode d’entrée vidéo.
Allumez le système audio qui est branché au lecteur.
COMMENCER
1. Appuyez sur le bouton de mise sous tension (ACTIVER/DÉSACTIVER) pour allumez le lecteur.
2. Levez le compartiment CD, et placez un disque sur le plateau de disque.
3. Fermer le plateau de disque et la lecture démarre automatiquement.
4. Lorsque l’écran du menu apparaît à la télévision, utilisez les boutons de navigation pour choisir le numéro de piste désiré, puis
appuyez sur le bouton LECTURE/PAUSE pour démarrer la lecture.
RÉGLAGE DU VOLUME
Appuyez sur le bouton VOLUME +/- pour augmenter ou réduire le niveau du volume sonore.
SOURDINE
Appuyez sur le bouton SOURDINE (« mute ») et le signal de sortie audio de l’appareil se coupe. Faites une deuxième pression
sur ce bouton ou sur le bouton VOLUME pour réactiver le signal de sortie audio.
PASSER AU SUIVANT OU AU PRÉCÉDENT
Appuyez sur les boutons PRÉCÉDENT ou SUIVANT durant la lecture pour sauter un chapitre (DVD) ou une piste (CD), vers
l’avant ou l’arrière.
AVANCE/RETOUR RAPIDE
Pendant la lecture, appuyez sur les boutons RETOUR RAPIDE/PRÉCÉDENT ou AVANCE RAPIDE/SUIVANT, pour avancer ou
reculer dans la lecture du disque, aux vitesses de X2, X4, X8, X16, X32, et vitesse normale.
Appuyez sur le bouton LECTURE/PAUSE pour revenir à la lecture normale.
ARRÊTER LA LECTURE
Appuyez sur le bouton STOP pendant la lecture pour arrêter celle-ci. Le lecteur active la fonction de reprise lorsque le bouton
STOP est enfoncé en mode STOP ; appuyez sur le bouton LECTURE pour reprendre la lecture au point où elle avait été arrêtée ;
Ouvrez le plateau de disque ou appuyez sur le bouton STOP une seconde fois pour annuler la fonction de reprise. Maintenez
enfoncé ce bouton sur la télécommande pour effectuer la permutation entre les mode DVD/CARTE et USB.
LECTURE RALENTIE (DVD)
Maintenez enfoncé le bouton ZOOM/RALENTI de la télécommande pendant la lecture, et le disque sera lu à la moitié de la
vitesse normale tout d'abord, puis à chaque pression sur le bouton, la vitesse de lecture ralentira de 1/4, 1/8, 1/16.
RÉPÉTITION
Appuyez sur le bouton RÉPÉTITION pendant la lecture pour activer la répétition de la lecture d’un chapitre/titre ou de tout le DVD,
ou la répétition de la lecture d'une piste ou de toutes les pistes d'un CD, ou la répétition de sections entre deux points spécifiques
(A-B).
RECHERCHE D’UNE SCÈNE PRÉFÉRÉE
1. Appuyez sur le bouton RECHERCHE plusieurs fois pendant la lecture pour entrer l'élément à lire.
Connecteur de l’écran esclave
Vers la prise allume-cigare
Page 19

18
2. Entrez le numéro ou le temps souhaité avec les boutons numériques.
3. Appuyez sur OK/ENTRÉE pour confirmer et mettre en route la lecture à partir de la scène choisie.
4. Le menu de recherche sera quitté automatiquement.
INFORMATIONS AFFICHÉES À L’ÉCRAN
Pendant le fonctionnement du lecteur, appuyez en continu sur le bouton AFFICHAGE de la télécommande, l’écran affichera les
différentes informations de la séquence (type de disque inséré, numéro de titre, numéro de chapitre, temps de lecture, langue de
la piste audio, type de sortie audio, langue des sous-titres et angles multiples, etc.).
CHANGER LA LANGUE DE LA PISTE AUDIO (DVD)
Il est possible de changer la langue de la piste audio pour une autre langue, parmi les autres langues sélectionnées dans les
paramètres initiaux (Cette fonction n’est disponible que pour la lecture de disques sur lesquels plusieurs langues sont
enregistrées).
Appuyez sur le bouton AUDIO pendant la lecture d’un DVD, la langue de la piste audio change avec le numéro de la piste audio
actuelle affiché sur l’écran de la télévision.
REMARQUE : S'il n’y a aucune langue de piste audio, l’utilisation de ce bouton sera vaine.
CHANGER LA LANGUE DES SOUS-TITRES (DVD SEULEMENT)
Appuyez sur le bouton SOUS-TITRES pendant la lecture et la langue des sous-titres affichés à l'écran va changer en réponse à
chaque pression sur le bouton ;
Lorsque la langue désirée apparaît, relâchez le bouton pour lire les sous-titres dans la langue ainsi sélectionnée.
Remarque : Cette fonction n’est disponible que pour les DVDs sur lesquels des sous-titres multi-langues sont enregistrés.
REVENIR AU MENU PRINCIPAL ET LIRE LE TITRE (DVD)
Pendant la lecture, appuyez sur le bouton MENU pour revenir au menu principal. Appuyez sur le bouton TITRE pour lire le titre.
LECTURE D’UN PROGRAMME (JUSQU’À 20 EN MÉMOIRE)
1. Appuyez sur PROGRAMME pendant la lecture pour afficher le menu programme.
2. Choisissez un ou plusieurs emplacements pour la mémorisation avec les boutons de navigation, puis, entrez les numéros des
titres/chapitres/pistes désirés avec les boutons numériques.
Remarque : Il n’est pas nécessaire d’ajouter un zéro au début. Si le numéro de titre/chapitre/piste se situe après la dizaine,
taper chacun des chiffres composant ce numéro l’un après l’autre. Certain chiffres seront peut-être inutiles, car ils seront plus
grand que le nombre total de titre/chapitre/piste du disque. Pour programmer une autre série de 10 pistes, appuyez sur le
bouton SUIVANT. Vous pouvez programmer jusqu’à 20 pistes.
Exemple : Piste 3, appuyez sur « 3 »
Piste 12, appuyez sur « 1 » puis « 2 »
Piste 21, appuyez sur « 2 » puis « 1 »
3. Pour démarrer la lecture d’un programme, faites défiler le menu jusqu’à DÉMARRER puis appuyez sur le bouton OK
(LECTURE/PAUSE).
4. Pour supprimer toutes les programmations, tout d’abord, appuyez sur le bouton PROGRAMME pour accéder au menu
programme, ensuite, mettez en surbrillance STOP dans le menu et appuyez sur OK (LECTURE/PAUSE) pour confirmer ; enfin,
SORTIE sera en surbrillance dans le menu, appuyez encore une fois sur OK (LECTURE/PAUSE) pour supprimer toutes les
programmations.
LECTURE ZOOM
Appuyez sur le bouton ZOOM en continu pour zoomer sur l’image à raison de 2, 3 ou 4 fois.
Vous pouvez vous déplacer sur l’image élargie à l’aide des boutons de navigations.
VISIONNAGE MULTI-ANGLE (DVD SEULEMENT)
Maintenez enfoncé le bouton ANGLE pendant la lecture pour afficher le nombre d’angles disponibles, puis choisissez celui que
vous voulez pour le visionnage de la scène.
Remarque : Cette fonction n’est disponible que pour les DVDs sur lesquels des scènes multi-angles ont été enregistrées.
LECTURE DE MP3/WMA/MPEG4
1. Chargez un disque Mp3/WMA/Mpeg4 sur le plateau de disque, et le contenu de tous les fichiers du disque va s’afficher sur
l’écran de la télévision après quelques secondes.
2. Choisissez le dossier que vous voulez avec les boutons de navigation, puis appuyez sur OK/ENTRÉE pour confirmer.
3. Les fichiers du dossier sont affichés ; sélectionnez votre chanson favorite à l’aide des boutons de navigation et appuyez sur le
bouton OK/ENTRÉE pour démarrer la lecture.
4. Appuyez sur les boutons SUIVANT et PRÉCÉDENT pour choisir directement une piste.
5. Appuyez sur le bouton RÉPÉTITION pour changer le mode de lecture.
LECTURE D’UN CD KODAK PICTURE OU D’UN CD DE FICHIERS JPEG
Après avoir chargé un CD Kodak Picture, un diaporama de celui-ci démarre automatiquement. Après avoir chargé un cd
contenant des dossiers d’images JPEG, ceux-ci sont affichés à l’écran de la télévision. Choisissez le dossier que vous voulez
avec les boutons de navigation, puis appuyez sur OK/ENTRÉE pour confirmer. Les fichiers du dossier sont affichés et vous
pouvez sélectionner vos images favorites à l’aide des boutons de navigation haut/bas et appuyer sur le bouton OK/ENTRÉE
Page 20

19
pour démarrer la lecture. Une prévisualisation des images sera affichée à côté des noms de fichiers pendant que vous les ferez
défiler.
UTILISATION D’UN CD KODAK PICTURE OU D’UN CD DE FICHIERS JPEG
1. MODES DE LECTURE
Appuyez sur le bouton RÉPÉTITION pour changer le mode de lecture.
2. ALLER À L’IMAGE SUIVANTE/PRÉCÉDENTE
Appuyez sur le bouton SUIVANT pour aller à l’image suivante ou sur le bouton PRÉCÉDENT pour aller à l’image précédente.
Si aucun bouton n’est utilisé pendant quelques secondes, l’image suivante va s’afficher automatiquement.
3. ROTATIONS D’IMAGES
Appuyez sur les boutons DROITE et GAUCHE pour faire pivoter respectivement l’image dans le sens des aiguilles d’une montre
ou dans le sens inverse des aiguilles d’une montre.
4. VISIONNAGE DES IMAGES
Appuyez sur le bouton de navigation HAUT pour passer à l’image suivante verticalement.
Appuyez sur le bouton de navigation BAS pour passer à l’image suivante horizontalement.
5. ZOOM AVANT/ARRIÈRE SUR UNE IMAGE
Appuyez sur le bouton ZOOM en continu, le zoom avant passe à 125%, 150%, 200%, ou le zoom arrière passe à 75% ou 50%
de la taille réelle de l’image. Appuyez sur ce bouton une fois de plus lorsque l’image est affichée à 50% de sa taille pour revenir à
l’affichage normal. Lorsque l’image est élargie, utilisez les boutons de navigation pour visionner les zones cachées de l’image.
RÉGLAGE DE LA LUMINOSITÉ ET DES COULEURS (POUR L’ÉCRAN LCD)
Appuyez sur le bouton ÉCRAN ACTIVER/DÉSACTIVER de la télécommande pour régler respectivement l’intensité de la couleur
et la luminosité.
Maintenez enfoncé ce bouton pendant un moment pour ouvrir ou fermer l’affichage TFT.
UTILISATION D’UN MÉDIA SUR MÉMOIRE EXTERNE (USB et CARTE SD/MMC)
Préparer le lecteur pour l’utilisation de média sur mémoire externe
1. Positionnez le commutateur d’alimentation sur ACTIVÉ, branchez une clé USB contenant des fichiers audio/vidéo dans le port
USB ou insérez une carte SD/MMC dans la fente du lecteur de carte ; la clé USB ou la carte SD/MMC est détectée et lue
après quelques secondes ; ainsi, l’écran de la télévision affichera tous les dossiers présents.
2. Vous pouvez lire les fichiers stockés sur le périphérique de stockage de la même manière que pour un disque Mp3.
Remarque : Maintenez enfoncé le bouton STOP pour effectuer la permutation entre les modes USB, carte SD/MMC ou disque.
ATTENTION : Pour éviter toute décharge d’électricité statique, ne touchez pas le port USB et la fente du lecteur de carte pendant
la lecture.
RÉGLAGES DE BASE
La page des réglages de base est faite pour vous aider à faire les réglages de vos préférences pour votre lecteur. Une fois que
ces réglages de bases sont effectués, ils sont enregistrés par le processeur du lecteur jusqu’à la prochaine modification.
PROCÉDURE À SUIVRE POUR LES RÉGLAGES DE BASE
1. Appuyez sur le bouton CONFIGURATION.
2. À l’aide des boutons de navigation, sélectionnez le paramètre que vous désirez modifier et appuyez sur le bouton
LECTURE/PAUSE pour confirmer ; une page de réglage comprenant plus de paramètres est affichée sur l’écran de la
télévision. Là encore, utilisez les boutons de navigation pour effectuer les modifications. Appuyez une nouvelle fois sur le
bouton LECTURE/PAUSE pour confirmer les changements effectués.
3. Servez-vous des boutons de navigation pour passer d’un paramètre à un autre sur la page principale des réglages.
4. Appuyez sur le bouton CONFIGURATION pour quitter la page principale des réglages.
1. CONFIGURATION GÉNÉRALE
G E N ER A L S E TU P PA G E
TV D ISP LAY P S
SC R EEN SAVE R ON
EX IT S E TUP
LC D M O D E W IDE
OSD L A NG E NG
1.1 AFFICHAGE TV – utilisé pour sélectionner le mode de balayage de la télévision ; réglez ce paramètre en fonction de votre
télévision.
Options : Normal/PS
Normal LB
Large
1.2 MODE LCD – utilisé pour choisir le mode LCD.
Options : 4:3 16:9
1.3 LANGUE DU MENU À L’ÉCRAN – utilisé pour choisir une langue différente pour l’affichage des menus à l’écran selon
l’utilisateur.
Page 21

20
1.4 ÉCONOMISEUR D'ÉCRAN – si le lecteur n’est pas utilisé pendant plusieurs minutes, un logo DVD animé défilera sur l’écran
de la télévision pour l’économiser.
Options : Activé : L’économiseur d’écran est activé.
Désactivé : L’économiseur d’écran est désactivé.
2. CONFIGURATION AUDIO
A U D IO SE T U P P A GE
DO W N M IX S TR
EX IT S E TUP
2.1 MIXAGE AUDIO
Options : G/D – mode de mixage Gauche/Droite
STÉRÉO – Choisissez cette option si vous ne possédez pas d’amplificateur à 5.1 canaux.
3. CONFIGURATION DE LA QUALITÉ VIDÉO
VID E O Q UA L IT Y S ETU P
SH A RPNE S S
BR IGH T NESS
CO N T RAS T
HUE
SATU R AT IO N
EX IT S E TUP
3.1 FINESSE – pour ajuster la finesse de l’affichage.
Options : ÉLEVÉ MOYEN BAS
3.2 LUMINOSITÉ – pour ajuster la luminosité de l’affichage.
3.3 CONTRASTE – pour ajuster le contraste de l’affichage.
3.4 TEINTE – pour ajuster la teinte des couleurs de l’affichage.
3.5 SATURATION – pour ajuster la saturation de l’affichage.
4. CONFIGURATION DU SYSTÈME
SY S TE M PA GE
TV T YPE
AU D IO
SU B TITLE
DISC MEN U
PAREN TA L
PASS W O R D
DE FAU LT
EX IT S E TUP
4.1 TYPE TV – utilisé pour choisir le mode de télévision.
Réglez cette option en fonction de votre télévision.
4.2 AUDIO – sélectionnez votre langue audio préférée.
(DVD seulement – requière le support de logiciel de disque)
4.3 SOUS-TITRES - sélectionnez votre langue préférée pour les sous-titres.
(DVD seulement – requière le support de logiciel de disque)
4.4 MENU DISQUE – sélectionnez votre langue préférée pour l’affichage des menus de disque.
(DVD seulement – requière le support de logiciel de disque)
4.5 PARENTAL – choisissez les niveaux de classement. Vous devez régler le mode MOT DE PASSE sur ACTIVÉ, puis entrez le
mot de passe pour accéder à cette sélection. (DVD seulement – requière le support de logiciel de disque)
4.6 MOT DE PASSE
Option : Modifier
Sélectionner pour modifier le mot de passe
Procédure de modification de mot de passe :
1) Entrez l’ancien mot de passe dans le champ ANCIEN MOT DE PASSE
2) Entrez le nouveau mot de passe dans le champ NOUVEAU MOT DE PASSE
3) Entrez le nouveau mot de passe une deuxième fois dans le champ CONFIRMER MOT DE PASSE
Vous pouvez réinitialiser le mot de passe si vous avez oublié l’ancien, en utilisant le mot de passe superviseur : 1389
4.7 DÉFAUT – réinitialiser les paramètres d’usine.
PRÉCAUTIONS DE MANIEMENT DES DISQUES
Tenez le disque par sa bordure afin que sa surface ne soit pas souillée par des traces de doigts. Les traces de
doigts, saletés et rayures peuvent causer des sauts et distorsions pendant la lecture.
Page 22

21
Ne pas écrire avec un stylobille ou autre stylo sur la surface imprimée.
N’appliquez pas de benzine, de diluant ou autre liquide conçus pour empêcher l’électricité statique.
Attention à ne pas faire tomber ou plier le disque.
Placez seulement un disque sur le plateau de disque.
Ne tentez pas de refermer le plateau de disque si le disque n'est pas inséré correctement.
Assurez-vous de stocker le disque dans son boîtier lorsqu’il n’est pas utilisé.
RÉSOLUTION DES PROBLÈMES
Si votre lecteur DVD ne semble pas fonctionner correctement, vérifiez les éléments suivants avant de contacter un centre de
service agréé.
Problèmes
Vérification
La mise sous tension ne
fonctionne pas, ou l’appareil
s’éteint brusquement.
Assurez-vous que l’adaptateur secteur est correctement branché à une prise secteur.
Éteignez l’appareil puis rallumez-le.
Pas d’image ou pas de son
Vérifiez que les câbles audio/vidéo sont correctement branchés.
Assurez-vous que le disque est bien un DVD, DVD-RW ou un CD AUDIO.
N’utilisez pas un disque rayé ou sale.
Assurez-vous que la face imprimée du disque est bien sur le dessus.
La lentille du lecteur DVD est peut-être sale. Contacter le centre de servie pour un
nettoyage de la lentille.
Assurez-vous que la chaîne de télévision est bien réglée sur VIDÉO ou AV si vous
utilisez la télévision.
Pas d’image
Assurez-vous que l’affichage LCD est allumé.
Pas de son
Assurez-vous que le panneau d’affichage LCD est ouvert. S’il est fermé, aucun son ne
sera émis par les haut-parleurs.
Vérifiez le réglage du volume sonore. S’il est sur zéro, augmentez-le.
Vérifiez si le casque est branché dans la prise CASQUE. Les haut-parleurs ne peuvent
pas être utilisés en même temps que le casque.
Pas d’image et pas de son
Vérifiez que la batterie est correctement installée et que l’adaptateur secteur est
correctement branché.
Distorsions de son ou d'image
Utilisez un disque sans rayures ou entailles.
INSTRUCTIONS IMPORTANTES DE SÉCURITÉ
L’appareil ne doit pas être exposé à de l'eau et tout risque d’éclaboussures, et aucun objet rempli d’eau, comme un vase, ne
doit être posé dessus.
Quand la prise secteur ou un coupleur sont utilisés comme appareil de déconnexion, l’appareil de déconnexion devrait rester
opérationnel. Pour débrancher complètement l’entrée d’alimentation, la fiche d’alimentation de l’appareil ou du coupleur
devrait être débranchée complètement de la prise secteur.
Ne placez aucune flamme nue, telle qu’une bougie allumée à proximité de l’appareil.
Laissez un minimum de 2,0 cm de libre autour de l’appareil pour une aération suffisante. La ventilation ne doit pas être
entravée ; ne placez aucun élément sur les orifices de ventilation, comme des journaux, du linge de maison, des rideaux, etc.
L'appareil doit être utilisé dans une zone de climat tropical et/ou modéré.
La mise au rebut de la batterie doit être effectuée en respectant l'environnement.
ATTENTION : Il y a un danger d’explosion si la batterie n’est pas correctement remplacée. Remplacez uniquement avec le
même type de batterie ou un type équivalent.
La batterie ne devrait pas être exposée à des chaleurs excessives, comme les rayons de soleil, le feu, etc.
L’écoute à un niveau sonore excessif avec des écouteurs ou un casque peut causer une perte d’acuité auditive.
La plaque d’identification est située à l’arrière de l’appareil.
Page 23

22
SERVICE CONSOMMATEUR
Vous pouvez contacter le service consommateur de Ricatech si vous avez une question ou un problème avec votre produit
Ricatech. Contactez-nous par téléphone ou par courrier électronique.
Courriel
Pour une assistance par courriel, envoyez-nous un courriel à l’adresse support@ricatech.com. Assurez-vous de bien nous
communiquer le numéro de modèle et le numéro de série de l’appareil, vos nom et adresse ainsi qu'une claire description de
votre problème ou votre question.
Téléphone
Pour contacter le service consommateur par téléphone, composez le +32 3 3265694. Un membre de notre personnel se tiendra
à votre service.
Pour toute les procédures, rendez vous sur le site web de Ricatech : www.ricatech.com
Page 24

23
BEDIENUNGSANLEITUNG
BITTE ACHTEN SIE SORGFÄLTIG AUF DIE ANWEISUNGEN IN DIESER BEDIENUNGSANLEITUNG, BEVOR SIE DAS GERÄT
AUFSTELLEN UND IN BETRIEB NEHMEN.
BEWAHREN SIE BITTE DIESES HANDBUCH ZUM ZWECKE DES SPÄTEREN NACHSCHLAGENS AUF.
DIE ENTHALTENEN ABBILDUNGEN UND GRAFIKEN SIND NUR FÜR REFERENZZWECKE GEDACHT. ÄNDERUNGEN VORBEHALTEN.
ÜBERSICHT DES DVD-PLAYERS:
1. TFT-BILDSCHIRM
2. SENSOR DER FERNBEDIENUNG
3. PLAY/PAUSE-TASTE
4. STOP & USB/SD/MMC-KARTEN-TASTE
5. PREVIOUS & FAST BACKWARD-TASTE
(Vorherig & Schnell Rückwärts)
6. NEXT & FAST FORWARD-TASTE
(Weiter & Schnell Vorwärts)
7. SETUP-TASTE (Einstellungen)
8. SUBTITLE-TASTE (Untertitel)
9. VOLUME – (Lautstärke verringern)
10. VOLUME + (Lautstärke erhöhen)
11. LAUTSPRECHER
12. NAVIGATION-TASTE
13. OK-TASTE
14. LADEZUSTANDSANZEIGE
15. SD/MMC-KARTEN-EINSCHUB
16. KOPFHÖRER-AUSGANG
17. KOPFHÖRER-AUSGANG
18. VIDEO-AUSGANG
19. AUDIO-AUSGANG
20. USB-ANSCHLUSS
21. DISPLAY ON/OFF-SCHALTER (Anzeige ein/aus)
22. POWER ON/OFF-SCHALTER (Ein-/Ausschalter)
23. POWER-ANZEIGE (Ein/Aus-Anzeige)
24. BUCHSE FÜR GLEICHSTROM- &
ZIGARETTENANZÜNDEREINGANG
25. AUFHÄNGUNG
26. SCHNALLE
27. BATTERIEFACH
28. AUFSTELLARM
ZUSATZBILDSCHIRM
1. BRIGHTNESS-TASTEN (Helligkeit)
2. COLOR-TASTEN (Farbe)
3. VOL-TASTEN (Lautstärke)
4. TFT-BILDSCHIRM
5. POWER ON/OFF-SCHALTER (Gerät ein/aus)
6. BUCHSE FÜR GLEICHSTROMEINGANG
7. BUCHSE FÜR GLEICHSTROMAUSGANG
8. KOPFHÖRER-AUSGANG
9. KOPFHÖRER-AUSGANG
10. AUDIO-EINGANG
11. VIDEO-EINGANG
12. SCHNALLE
13. AUFHÄNGUNG
FERNBEDIENUNG
1
234
5
6789101112
14 15 16 18 20 22 24
17 19 21 23
252626
27
28
11
13
4
12 1213
1 2
3
8910
11
5
6
7
Page 25

24
1. SCREEN ON/OFF & BRI/COL ADJUST-TASTEN
(Anzeige ein/aus & Helligkeit/Farbe einstellen)
2. TITLE-TASTE (Titel)
3. PREV & FAST BACKWARD-TASTE
(Vorherig & schnell rückwärts)
4. NEXT & FAST FORWARD-TASTE
(Weiter & schnell vorwärts)
5. NAVIGATION-TASTEN
6. ZIFFERN-TASTEN
7. PROGRAMM/WINKEL-TASTE
8. VOLUME – (Lautstärke verringern)
9. MUTE-TASTE (Stummschaltung)
10. SETUP-TASTE (Einstellungen)
11. MENU-TASTE (Menü)
12. DISPLAY-TASTE (Anzeige)
13. STOP & USB/SD/MMC-KARTEN-TASTE
14. OK/ENTER(PLAY/PAUSE)-TASTE
15. SUBTITLE-TASTE (Untertitel)
16. AUDIO-TASTE
17. SEARCH-TASTE (Suche)
18. REPEAT-TASTE (Wiederholen)
19. ZOOM/SLOW-TASTE (Zoomen/langsam)
20. VOLUME + (Lautstärke erhöhen)
GRUNDLEGENDE ANSCHLÜSSE
Es wird empfohlen, das Gerät an ein Multiformat-TV anzuschließen.
Vergewissern Sie sich, dass sich dieser Player und die anderen anzuschließenden Geräte im Standby-Modus befinden oder
ausgeschaltet sind und die Stromversorgung abgetrennt ist, bevor Sie die Ersteinrichtung vornehmen.
Blockieren Sie nicht die Ventilationsöffnungen der Geräte und stellen Sie diese so auf, dass die Luft frei zirkulieren kann.
Lesen Sie die Anweisungen, bevor Sie die anderen Geräte anschließen.
Beachten Sie die Farbcodes beim Anschluss der Audio- und Videokabel, verbinden Sie beispielsweise den gelben Stecker mit
der gelben Buchse, den roten Stecker mit der roten Buchse usw. Wenn nur ein A/V-Verbindungskabel ( kombiniertes
Audio-/Videokabel) vorhanden ist, verbinden Sie bitte das eine Ende dieses Kabels entsprechend der Farbcodes mit dem
Gerät und das andere Ende dieses Kabels schließlich mit Ihrem TV-Gerät.
Hinweis:
Bei der DVD-Wiedergabe kann die Lautstärke am Fernsehgerät geringer sein als bei TV-Sendungen. Wenn dies der Fall ist,
erhöhen Sie die Lautstärke auf das gewünschte Niveau.
Wenn der DVD/CD-Player über einen VCR (Videokassettenrekorder) mit dem Fernsehgerät verbunden ist, kann das Bild
mancher DVDs möglicherweise nicht korrekt wiedergegeben werden. Schließen Sie in diesem Falle den Player nicht über den
VCR an.
An ein Stereo-TV-Gerät anschließen
AU DI O R
AU DI O L
VI DE O I N
S- VI DE O
YU V I NP UT
AV A UD IO /V ID EO IN PU T
An einen Zusatzbildschirm anschließen
Dieses Gerät wird mit einem Zusatzbildschirm ausgeliefert, der dazu benutzt werden kann, um die Wiedergabe gleichzeitig
sowohl auf dem Player als auch auf dem Zusatzbildschirm zu verfolgen, die nachfolgende Abbildung zeigt die Verkabelung am
Beispiel des Auto-Adapters (Zigarettenanzünders).
A/V-Kabel
TV-GERÄT
Page 26
25
BEDIENFUNKTIONEN
VOR DER INBETRIEBNAHME
Schalten Sie das TV-Gerät ein und wählen Sie den Video-Input-Modus.
Schalten Sie das am Player angeschlossene Audiosystem ein.
INBETRIEBNAHME
1. Betätigen Sie die POWER ON/OFF-Taste, um den Player einzuschalten.
2. Öffnen Sie die CD-Schublade und legen Sie eine Disk in das Diskfach.
3. Schließen Sie die Disk-Schublade. Die Wiedergabe startet automatisch.
4. Wenn auf dem TV ein Menübildschirm angezeigt wird, können Sie mit den Navigationstasten die gewünschte Titelnummer
auswählen, drücken Sie dann die PLAY/PAUSE-Taste zum Starten der Wiedergabe.
DIE LAUTSTÄRKE EINSTELLEN
Drücken Sie die Taste VOLUME+/-, um die Lautstärke zu erhöhen oder zu verringern.
MUTE (Stummschaltung)
Betätigen Sie die MUTE-Taste. Die Audioausgabe des Gerätes wird ausgeschaltet. Erneutes Drücken dieser Taste oder der
VOLUME-Taste stellt die Audioausgabe wieder her.
VOR- ODER RÜCKWÄRTS
Betätigen Sie die PREVIOUS- oder NEXT-Taste während der Wiedergabe einmal, um ein Kapitel (DVD) oder einen Titel (CD)
vor- oder zurückzuspringen.
SCHNELLES VOR-/ZURÜCKSPULEN
Halten Sie während der Wiedergabe mehrfach die F.BWD&PREVIOUS- oder F.FWD&NEXT-Taste gedrückt, um die Disk mit dem
2-, 4-, 8-, 16- und 32-Fachen der normalen Geschwindigkeit vor- oder rückwärts zu durchlaufen.
Drücken Sie die PLAY/PAUSE-Taste, um die normale Geschwindigkeit wiederherzustellen.
DIE WIEDERGABE STOPPEN
Betätigen Sie während der Wiedergabe die STOP-Taste, um die Wiedergabe anzuhalten; der Player aktiviert seine
Weiter-Funktion, wenn STOP im STOP-Modus gedrückt wurde; wenn Sie wieder die PLAY-Taste betätigen, setzt die Wiedergabe
an der vorher angehaltenen Position fort; öffnen Sie die Disk-Schublade oder drücken Sie die STOP-Taste einmal mehr, um die
Weiter-Funktion zu deaktivieren. Halten Sie diese Taste auf der Fernbedienung gedrückt, um zwischen DVD/KARTE und USB zu
wechseln.
ZEITLUPE (DVD)
Halten Sie während der Wiedergabe die ZOOM/SLOW-Taste auf der Fernbedienung gedrückt, dann wird die Disk zunächst mit
halber Geschwindigkeit abgespielt, jedes erneute Betätigen dieser Taste verringert die Abspielgeschwindigkeit auf 1/4, 1/8 und
1/16 der normalen Geschwindigkeit.
REPEAT (Wiederholen)
Betätigen Sie während der Wiedergabe die REPEAT-Taste, dann wird ein Kapitel/der Titel wiederholt oder alles (DVD), oder es
wird ein Titel wiederholt oder alle Titel (CD), oder es werden die Teilstücke zwischen zwei bestimmten Punkten (A-B) wiederholt.
EINE GEWÜNSCHTE SZENE SUCHEN
1. Betätigen Sie während der Wiedergabe die SEARCH-Taste mehrfach, damit Sie den gewünschten Titel eingeben können, der
abgespielt werden soll.
2. Geben Sie mit den Zifferntasten die gewünschte Nummer oder die Spielzeit ein.
3. Drücken Sie zur Bestätigung die OK/ENTER-Taste, und die Wiedergabe startet mit der gewünschten Szene.
4. Das Suche-Menü wird ohne weiteres Zutun automatisch ausgeblendet.
Anschluss des Zusatzbildschirms
Zum Zigarettenanzünder
Page 27

26
ON SCREEN DISPLAY-INFORMATIONEN (Bildschirmanzeige)
Wenn der Player läuft, halten Sie die DISPLAY-Taste auf der Fernbedienung gedrückt, der Bildschirm zeigt dann bestimmte
Informationen der Reihe nach an (aktueller Disktyp, Titelnummer, Kapitelnummer, Spielzeit, Audiosprache, Audiotyp,
Untertitelsprache, Multiwinkel usw.).
DIE SPRACHE DER AUDIOSPUR WECHSELN (DVD)
Wenn die Disks eine mehrsprachige Audiospur besitzen, kann man die Sprache der Audiospur zu einer anderen als der
standardmäßigen wechseln.
Betätigen Sie während der DVD-Wiedergabe die AUDIO-Taste, die Sprache der Audiospur wechselt dann zu der
Soundtracknummer, die aktuell auf dem TV-Bildschirm angezeigt wird.
Hinweis: Wenn keine verschiedenen Audiospuren vorhanden sind, führt das Betätigen dieser Taste zu keinem Ergebnis.
DIE SPRACHE DER UNTERTITEL WECHSELN (NUR DVD)
Betätigen Sie während der Wiedergabe die SUBTITLE-Taste, die Sprache der auf dem Bildschirm angezeigten Untertitel ändert
sich jedes Mal, wenn die Taste gedrückt wird.
Wenn die gewünschte Sprache auftaucht, lassen Sie die Taste los, um die Untertitel in dieser Sprache zu sehen.
Hinweis: Diese Funktion führt nur zu einem Ergebnis, wenn die DVD mit Untertiteln in mehreren Sprachen aufgezeichnet worden
ist.
ZUM HAUPTMENÜ ZURÜCKKEHREN UND DEN TITEL ABSPIELEN (DVD)
Betätigen Sie während der Wiedergabe die MENU-Taste, um zum Hauptmenü zurückzukehren. Betätigen Sie die TITLE-Taste,
um den Titel abzuspielen.
PROGRAMMIERTE WIEDERGABE (BIS ZU 20 GESPEICHERTE TITEL)
1. Betätigen Sie während der Wiedergabe PROGRAM, um das Programm-Menü anzuzeigen.
2. Wählen Sie mit den Navigationstasten den gewünschten Eintrag/die gewünschten Einträge und geben Sie dann mit den
Zifferntasten die Nummer des gewünschten Kapitels/Titels ein.
Hinweis: Die führende Null muss nicht eingegeben werden. Wenn die Kapitel- oder Titelnummer größer als die Grundzahl 10
ist, geben Sie die Ziffernstellen nacheinander ein. Die Zifferneingabe kann zu keinem Ergebnis führen, wenn die eingegebene
Zahl größer als die Gesamtzahl der Titel/Kapitel auf der Disk ist. Um weitere zehn Titel zu programmieren, betätigen Sie die
NEXT-Taste. Bis zu 20 Titel können programmiert werden.
Beispiel: Titel 3, drücken Sie "3"
Titel 12, drücken Sie "1" und dann "2"
Titel 21, drücken Sie "2" und dann "1"
3. Um die programmierte Wiedergabe zu starten, scrollen Sie zu START im Menü und betätigen Sie dann die
OK(PLAY/PAUSE)-Taste.
4. Um die Programmierung zu löschen, betätigen Sie zuerst die PROGRAM-Taste, um zum Programm-Menü zu gelangen, jetzt
wird im Menü STOP hervorgehoben, betätigen Sie zur Bestätigung einmal die OK(PLAY/PAUSE)-Taste, dann wird EXIT im
Menü hervorgehoben, drücken Sie die OK(PLAY/PAUSE)-Taste erneut, um alle programmierten Einträge zu löschen.
ZOOM-WIEDERGABE
Halten Sie die ZOOM-Taste gedrückt, um das Bild auf das 2-, 3- und 4-Fache zu zoomen.
Sie können mit den Navigationstasten im vergrößerten Bild scrollen.
MULTI-ANGLE-WIEDERGABE (verschiedene Kamerawinkel, NUR DVD)
Halten Sie während der Wiedergabe die ANGLE-Taste gedrückt, die verfügbaren Kamerawinkelnummern werden angezeigt.
Wählen Sie dann den gewünschten Winkel, um die entsprechende Szene zu sehen.
Hinweis: Nur DVDs mit Aufnahmen im Multi-Winkel-Format haben diese Funktion.
MP3/WMA/MPEG 4 WIEDERGEBEN
1. Legen Sie die Disk mit MP3/WMA/MPEG 4 in die Disk-Schublade, nach einigen Sekunden zeigt der TV-Bildschirm alle
verfügbaren Ordner an.
2. Wählen Sie mit den Navigationstasten den gewünschten Ordner und drücken Sie zur Bestätigung die OK/ENTER-Taste.
3. Die Dateien in diesem Ordner werden angezeigt, wählen Sie mit den Navigationstasten Ihren gewünschten Titel und betätigen
Sie die OK/ENTER-Taste, um die Wiedergabe zu starten.
4. Drücken Sie die NEXT- und PREV-Taste, um einen Titel direkt anzusteuern.
5. Drücken Sie die REPEAT-Taste, um den Wiedergabemodus zu ändern.
KODAK PICTURE CD / JPEG CD WIEDERGEBEN
Die Wiedergabe der Bilder einer Kodak Picture CD startet automatisch, wenn diese eingelegt wird; die Ordner einer JPEG
Picture CD werden auf dem TV-Bildschirm angezeigt, wenn diese eingelegt wird; wählen Sie mit den Navigationstasten den
gewünschten Ordner und drücken Sie zur Bestätigung die OK/ENTER-Taste. Die Dateien in diesem Ordner werden angezeigt,
wählen Sie mit den Up/Down-Navigationstasten Ihre gewünschten Bilder und betätigen Sie die OK/ENTER-Taste, um sie
anzuzeigen. Eine Vorschau des gewählten Bildes wird angezeigt, während Sie durch die Dateinamen scrollen.
BEDIENFUNKTIONEN EINER KODAK PICTURE CD / JPEG CD
Page 28

27
1. ANZEIGEMODI
Drücken Sie die REPEAT-Taste, um den Anzeigemodus zu ändern.
2. ZUM NÄCHSTEN/VORHERIGEN BILD
Betätigen Sie die NEXT-Taste, um das nächste Bild anzuzeigen, oder die PREV-Taste für das vorherige Bild.
Wenn für einige Sekunden keine Taste betätigt wird, wird automatisch das nächste Bild angezeigt.
3. BILD DREHEN
Betätigen Sie die RIGHT- und LEFT-Navigationstaste, um das Bild nach rechts (im Uhrzeigersinn) und entsprechend nach links
(entgegen dem Uhrzeigersinn) zu drehen.
4. BILD SPIEGELN
Betätigen Sie die UP-Navigationstaste, um das Bild vertikal zu drehen.
Betätigen Sie die DOWN-Navigationstaste, um das Bild horizontal zu spiegeln.
5. BILD EIN-/AUSZOOMEN
Halten Sie die ZOOM-Taste gedrückt, das Bild zoomt mit 125, 150 und 200 Prozent ein oder zoomt mit 75 und 50 Prozent der
Originalgröße heraus. Drücken Sie die Taste erneut, wenn das Bild 50% der Größe erreicht hat, um zur Originalgröße
zurückzukehren. Wenn das Bild vergrößert worden ist, können Sie die Navigationstasten benutzen, um Bildbereiche außerhalb
des Bildschirmrandes zu sehen.
FARBE UND HELLIGKEIT EINSTELLEN (LCD-Bildschirm)
Betätigen Sie die SCREEN ON/OFF-Taste auf der Fernbedienung, um die Farbdichte bzw. die Helligkeit einzustellen.
Halten Sie diese Taste einen Moment lang gedrückt, um das TFT-Display zu öffnen oder zu schließen.
BEDIENFUNKTIONEN EXTERNER SPEICHERMEDIEN (USB & SD/MMC-KARTE)
So bereiten Sie den Player auf die Verwendung externer Speichermedien vor
1. Schalten Sie den POWER-Schalter auf ON, stecken Sie einen USB-Datenträger mit Audio-/Videodateien in den
USB-Anschluss oder stecken Sie die SD/MMC-Karte in den Karteneinschub, der USB-Datenträger oder die SD/MMC-Karte
werden vom System erkannt und innerhalb weniger Sekunden eingelesen, gleichzeitig zeigt der TV-Bildschirm alle
verfügbaren Ordner an.
2. In der gleichen Weise wie bei der MP3-Disk können Sie die in den Speichermedien enthaltenen Inhalte wiedergeben.
Hinweis: Halten Sie die STOP-Taste gedrückt, um zwischen USB/SD/MMC-Karte und dem Disklaufwerk zu wechseln.
ACHTUNG: Um elektrostatische Entladungen zu vermeiden, berühren Sie während der Wiedergabe bitte nicht den
USB-Anschluss und den Karteneinschub.
STANDARDEINSTELLUNGEN
Die Seite mit den Standardeinstellungen ist für Sie gedacht, um Ihre bevorzugten Einstellungen für Ihren Player vorzunehmen.
Nachdem die Standardeinstellungen einmal vorgenommen sind, werden sie in der CPU des Players gespeichert, bis sie
anderweitig geändert werden.
ALLGEMEINE VORGEHENSWEISE FÜR DIE STANDARDEINSTELLUNGEN
1. Betätigen Sie die SETUP-Taste.
2. Wählen Sie mit den Navigationstasten den gewünschten Eintrag, drücken Sie zur Bestätigung die PLAY/PAUSE-Taste, die
Einstellungsseite mit weiteren Einstellungsmöglichkeiten wird auf dem TV-Bildschirm angezeigt. Betätigen Sie erneut die
Navigationstasten, um Änderungen vorzunehmen. Drücken Sie erneut die PLAY/PAUSE-Taste, um die Einstellungen zu
übernehmen.
3. Wechseln Sie mit den Navigationstasten zu einer anderen Einstellung auf der Haupt-Setupseite.
4. Betätigen Sie die SETUP-Taste, um die Haupt-Setupseite zu verlassen.
1. HAUPT-SETUP
G E N ERA L S ET UP PA GE
TV D IS P LAY P S
SC R EEN S AV E R ON
EX IT S E TU P
LC D M O DE W ID E
OSD L ANG ENG
1.1 TV DISPLAY – wird verwendet, um den Scan-Modus des TV auszuwählen, bitte stellen Sie diesen entsprechend Ihres
TV-Gerätes ein.
Optionen: Normal/PS (Progressive Scan)
Normal/LB (Letter Box)
Wide (Weit)
1.2 LCD MODE – wird verwendet, um den Modus der LCD-Anzeige auszuwählen.
Optionen: 4:3 16:9
1.3 OSD LANG – wird verwendet, um die Sprache des OSD (On Screen Display, der Bildschirmanzeige) für verschiedene
Benutzer auszuwählen.
1.4 SCREEN SAVER – wird verwendet, wenn der Player für einige Minuten nicht benutzt wird. Ein bewegtes DVD-Logo läuft
über den TV-Bildschirm, um diesen zu schützen (Bildschirmschoner).
Page 29

28
Optionen: Ein: Der Bildschirmschoner ist aktiv.
Aus: Der Bildschirmschoner ist inaktiv.
2. AUDIO-SETUP (Audioeinstellungen)
A U D IO S ETU P P A G E
DO W N M IX ST R
EX IT S E TUP
2.1 DOWNMIX
Optionen: LT/RT- Left/Right (Links/Rechts) Mix-Modus
STEREO – wählen Sie diese Option, wenn Sie keinen 5.1-Kanal-Verstärker haben.
3. VIDEOQUALITÄTS-SETUP (Einstellungen der Videoqualität)
V ID E O Q U ALITY S E TUP
SH A R PNES S
BR IGHT N ESS
CO N T RAST
HU E
SATU R AT IO N
EX IT SE TUP
3.1 SHARPNESS – zum Setzen der Schärfe der Anzeige.
Optionen: HIGH MEDIUM LOW (HOCH MITTEL NIEDRIG)
3.2 BRIGHTNESS – zum Setzen der Helligkeit der Anzeige.
3.3 CONTRAST – zum Setzen des Kontrastes der Anzeige.
3.4 HUE – zum Setzen des Farbtons der Anzeige.
3.5 SATURATION – zum Setzen der Sättigung der Anzeige (Buntheit).
4. SYSTEM-SETUP (Systemeinstellungen)
SY S TE M PA GE
TV T YPE
AU D IO
SU B TITLE
DISC MEN U
PAREN TA L
PASS W O R D
DE FAU LT
EX IT S E TUP
4.1 TV TYPE – wird verwendet, um den TV-Modus auszuwählen.
Bitte wählen Sie diese Option entsprechend Ihres TV-Gerätes.
4.2 AUDIO – wählen Sie Ihre gewünschte Audiosprache.
(Nur für DVD, die DVD-Software muss dies unterstützen.)
4.3 SUBTITLE – wählen Sie Ihre gewünschte Sprache der Untertitel.
(Nur für DVD, die DVD-Software muss dies unterstützen.)
4.4 DISC MENU – wählen Sie Ihre gewünschte Sprache des DVD-Menüs.
(Nur für DVD, die DVD-Software muss dies unterstützen.)
4.5 PARENTAL – wählen Sie die Freigaben (Jugendschutz). Sie müssen den PASSWORD MODE (Passwort-Modus) auf ON
(Ein) setzen und dann ein Passwort eingeben, um diese Auswahl zu ermöglichen. (Nur für DVD, die DVD-Software muss dies
unterstützen.)
4.6 PASSWORD – Passwort.
Option: Change (Ändern)
Wählen Sie diese Option, um das Passwort zu ändern.
So ändern Sie das Passwort:
1) Geben Sie in der Zeile OLD PASSWORD (altes Passwort) Ihr altes Passwort ein.
2) Geben Sie in der Zeile NEW PASSWORD (neues Passwort) Ihr neues Passwort ein.
3) Geben Sie in der Zeile CONFIRM PWD (Passwort bestätigen) Ihr neues Passwort erneut ein.
Wenn Sie das alte Passwort vergessen haben, können Sie das alte Passwort mithilfe des Supervisor-Passwortes löschen: 1389.
4.7 DEFAULT – die Werkseinstellungen wiederherstellen.
VORSICHT BEIM UMGANG MIT DISKS
Halten Sie die Disk stets am Rand fest, so dass deren Oberfläche nicht durch Fingerabdrücke verunreinigt wird.
Fingerabdrücke, Schmutz und Kratzer können Aussetzer und Verzerrungen hervorrufen.
Schreiben Sie nicht mit einem Kugelschreiber oder anderen Schreibutensilien auf die Beschriftungsseite.
Page 30

29
Verwenden Sie kein Waschbenzin, keine Verdünnung und kein Lösungsmittel gegen statische Aufladungen.
Gehen Sie vorsichtig mit der Disk um. Knicken Sie sie nicht. Lassen Sie sie nicht fallen.
Geben Sie stets nur eine Disk in das Disk-Schubfach.
Versuchen Sie nicht, das Disk-Schubfach zu schließen, wenn die Disk nicht ordnungsgemäß eingelegt ist.
Bewahren Sie die Disk bei Nichtgebrauch stets in ihrer Hülle auf.
FEHLERSUCHE
Wenn Ihr DVD-Player scheinbar nicht mehr ordnungsgemäß funktioniert, überprüfen Sie bitte die unten aufgeführten Hinweise,
bevor Sie ein autorisiertes Kundendienstzentrum um Hilfe bitten.
Symptom
Überprüfen
Das Gerät geht nicht an oder
geht plötzlich aus.
Überprüfen Sie, ob der Gerätestecker fest in der Netzsteckdose sitzt.
Schalten Sie das Gerät aus und dann wieder ein.
Kein Bild oder Ton
Überprüfen Sie, ob die A/V-Kabel ordnungsgemäß angeschlossen sind.
Die Disk muss eine DVD, eine DVD-RW oder eine AUDIO-CD sein.
Verwenden Sie keine Disk, die Kratzer hat oder verschmutzt ist.
Überprüfen Sie, ob die Beschriftungsseite der Disk nach oben zeigt.
Die Leselinse des DVD-Players ist möglicherweise verschmutzt. Setzen Sie sich für eine
Linsenreinigung mit einem Kundendienstzentrum in Verbindung.
Überprüfen Sie, ob der TV-Kanal auf VIDEO oder AV eingestellt ist, wenn Sie mit einem
TV-Gerät sehen möchten.
Kein Bild
Überprüfen Sie, ob die LCD-Anzeige eingeschaltet ist.
Kein Ton
Überprüfen Sie, ob das Anzeigefeld geöffnet ist. Wenn es geschlossen ist, erfolgt keine
Audioausgabe an die Lautsprecher.
Überprüfen Sie die Einstellung für die Lautstärke. Wenn sie auf Null gesetzt ist, erhöhen
Sie die Lautstärke.
Überprüfen Sie, ob die Kopfhörer im Kopfhörer-Ausgang stecken. Bei Verwendung von
Kopfhörern sind die Lautsprecher nicht verwendbar.
Kein Bild und Ton
Überprüfen Sie, ob die Batterie ordnungsgemäß eingelegt ist und der Gerätestecker
ordnungsgemäß angeschlossen ist.
Bild oder Ton verzerrt
Verwenden Sie nur Disks ohne Kratzer oder Rillen.
WICHTIGE SICHERHEITSHINWEISE
Das Gerät darf nicht Tropf- oder Spritzwasser ausgesetzt werden, und keine mit Flüssigkeiten gefüllten Objekte, wie zum
Beispiel Vasen, dürfen auf dem Gerät aufgestellt werden.
Wenn der Netzstecker oder eine Hausgeräte-Verlängerungsleitung als Stromversorgung verwendet wird, hat diese Leitung
leicht erreichbar zu sein. Um das Gerät vollständig von der Stromversorgung abzutrennen, ist der Netzstecker des Gerätes
oder die Verlängerungsleitung ordnungsgemäß vom Stromnetz abzuziehen.
Verwenden Sie kein offenes Feuer, wie zum Beispiel Kerzenlicht, auf dem Gerät.
Halten Sie einen Mindestabstand von 2,0 cm um das Gerät für eine ausreichende Luftzufuhr ein. Die Luftzufuhr darf nicht
durch Abdecken der Lüftungsöffnungen mit Gegenständen, wie zum Beispiel Zeitungen, Tischdecken, Vorhängen usw.,
behindert werden.
Der Gebrauch des Gerätes ist auf tropische und/oder gemäßigte Klimabedingungen beschränkt.
Im Entsorgungsfall der Batterie sind die Umweltschutzanforderungen zu beachten.
ACHTUNG: Die Batterie kann explodieren, wenn sie nicht ordnungsgemäß eingelegt wird. Verwenden Sie als Ersatz nur
gleiche oder gleichwertige Batterien.
Die Batterie darf nicht übermäßiger Hitze, wie zum Beispiel Sonnenlicht, Feuer oder Ähnlichem, ausgesetzt werden.
Zu starker Schalldruck aus den Lautsprechern oder Kopfhörern kann Gehörschäden verursachen.
Das Typenschild ist an der Rückseite des Gerätes angebracht.
Page 31

30
KUNDENDIENST
Sie können mit dem Ricatech Kundendienst Kontakt aufnehmen, wenn Sie eine Frage oder ein Problem mit Ihrem Ricatech
Produkt haben. Sie können uns per Telefon oder per E-Mail kontaktieren.
E-Mail
Im Falle des Kundendienstes per E-Mail senden Sie bitte eine E-Mail an support@ricatech.com. Bitte achten Sie darauf, dass
Sie das Modell und die Seriennummer Ihres Produktes benennen, Ihren Namen & Ihre Adresse nennen und Ihre Frage oder Ihr
Problem klar und deutlich beschreiben.
Telefon
Im Falle des Kundendienstes per Telefon rufen Sie bitte +32 3 3265694 an. Einer unserer Kundendienstmitarbeiter steht Ihnen
gern zur Verfügung.
Bitte besuchen Sie auch die Webseite von Ricatech unter: www.ricatech.com.
 Loading...