

Page 1
USER MANUAL
GEBRUIKERSHANDLEIDING
MODE D’EMPLOI
BEDIENUNGSANLEITUNG
Page 2

English
Table of Contents
Caution
Caution--------------------------------------------------------------------------
Package Content--------------------------------------------------------------
Hardware Overview
Hardware Overview-----------------------------------------------------------
Getting Started
Charging the Battery---------------------------------------------------------Turn On/Off---------------------------------------------------------------------
Operation Interface
Using the Touchscreen -------------------------------------------------------
Basics ---------------------------------------------------------------------------
Opening & Switching Applications------------------------------------------
Status Bar Overview ----------------------------------------------------------
Settings
Opening Settings--------------------------------------------------------------
Wireless & networks ---------------------------------------------------------Sound & display --------------------------------------------------------------Location & security-----------------------------------------------------------Applications -------------------------------------------------------------------Privacy --------------------------------------------------------------------------
SD Card & sevice storage---------------------------------------------------Language & keyboard --------------------------------------------------------
Date & time ---------------------------------------------------------------------
Touch panel calibration-------------------------------------------------------
USB Mode select --------------------------------------------------------------
Update Media Library -------------------------------------------------------Factory data reset-------------------------------------------------------------
About device -------------------------------------------------------------------
Software Installment And Management
APK Installer ------------------------------------------------------------------ES File Explorer---------------------------------------------------------------Android Market-----------------------------------------------------------------
Specication----------------------------------------------------------------
Page 3

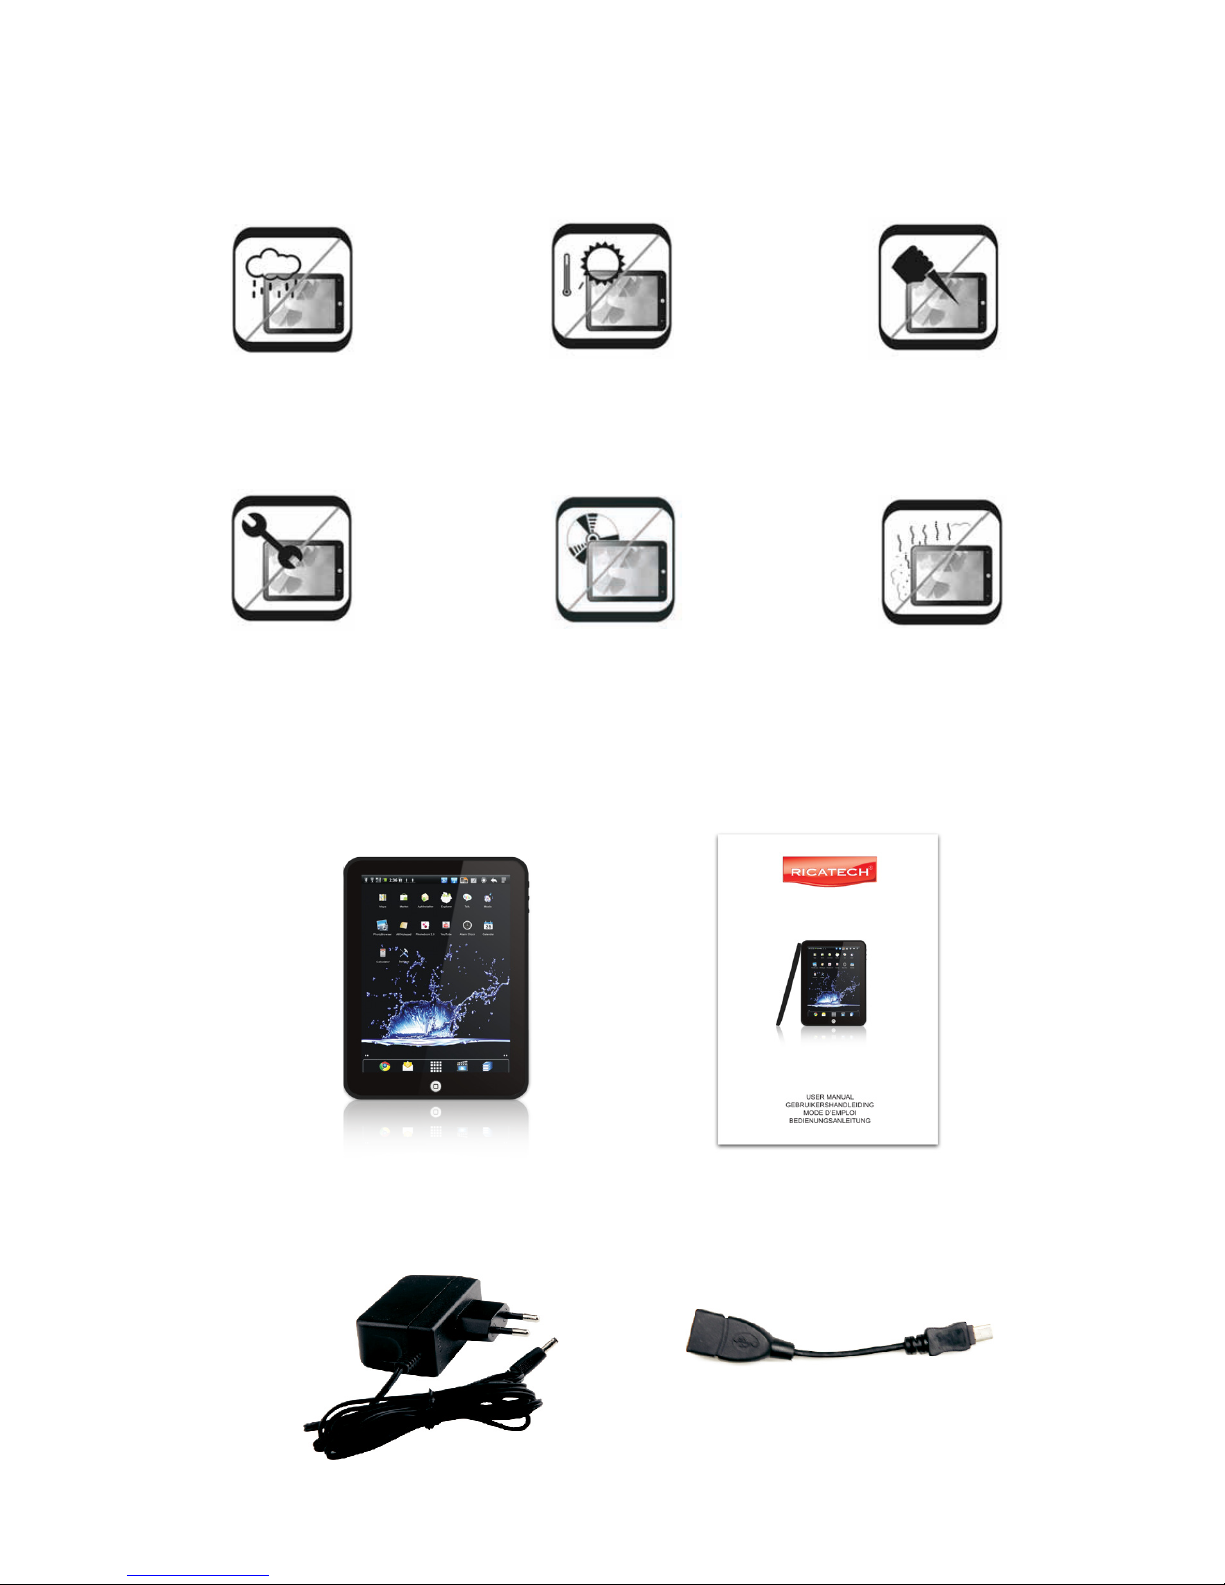
Caution
Moisture
Open without
Authorization
High Temperature
Poor Ventilation
Media Tablet User Manual
Mini USB Cable
Adapter
Hard Object Damage
Dust and smoke
Page 4
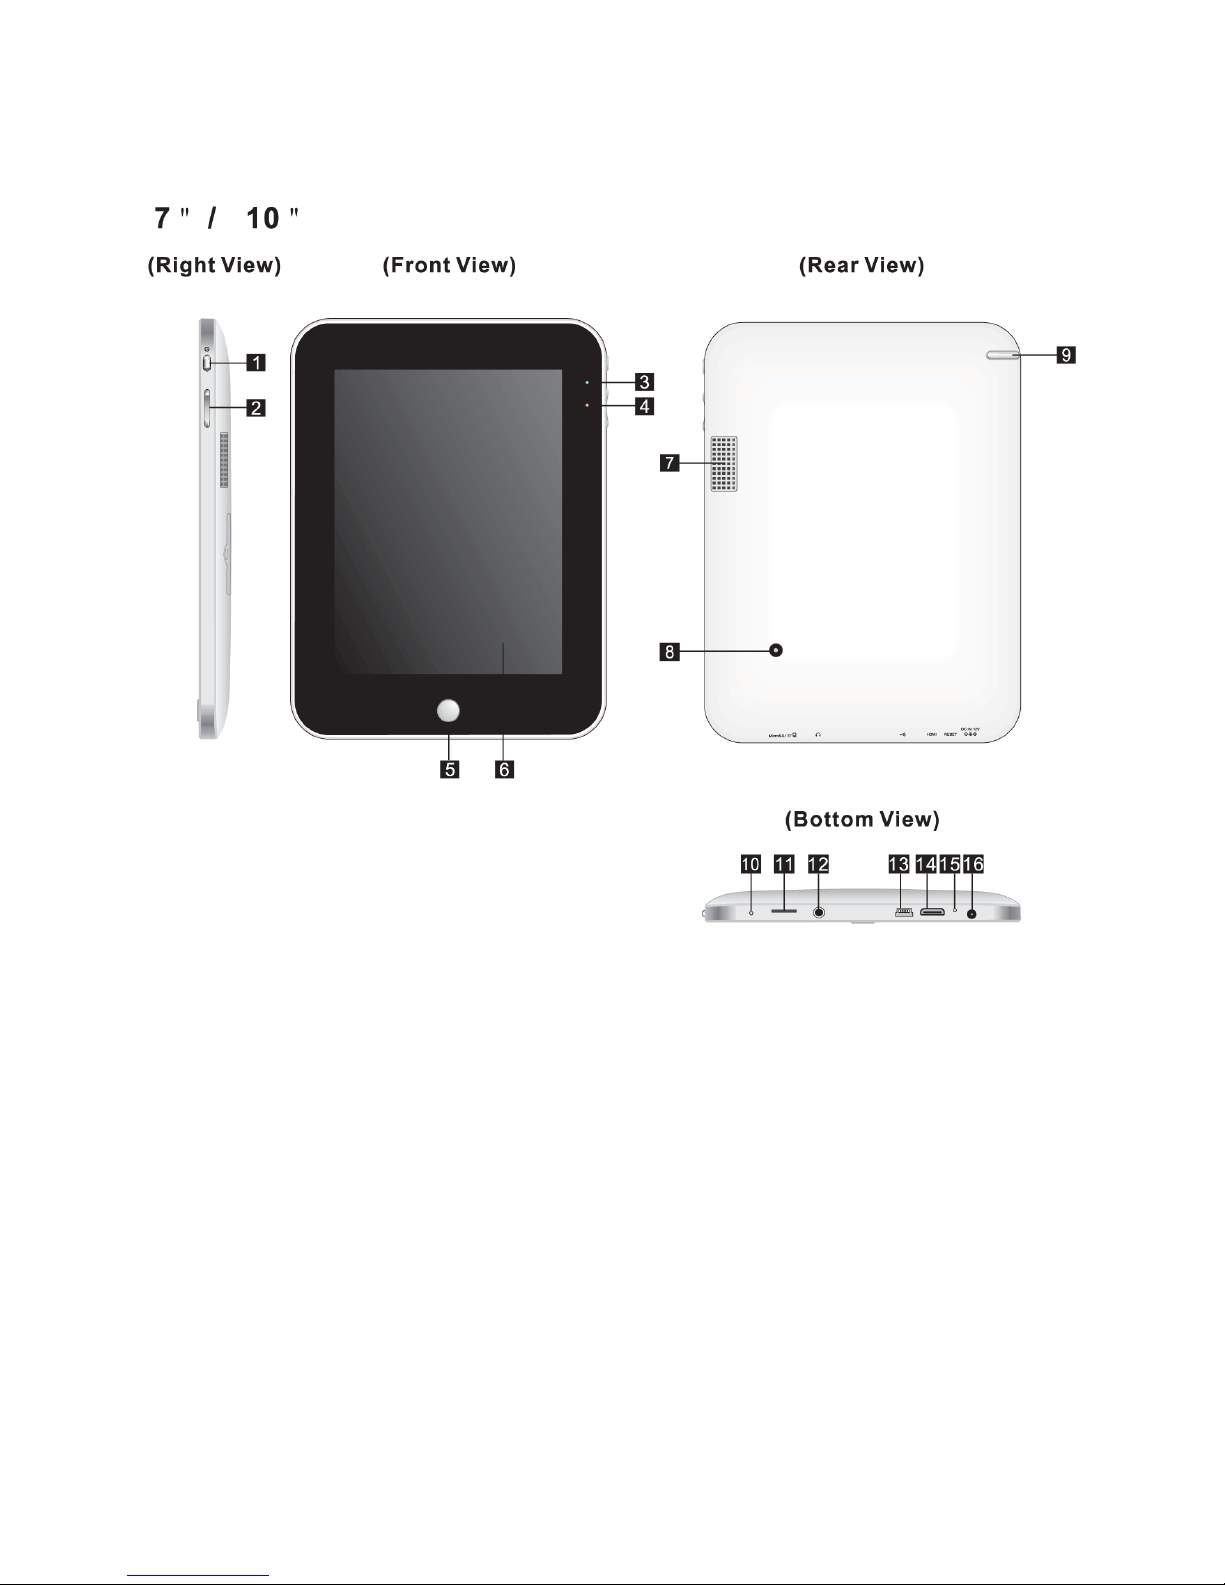
Hardware Overview
1. Power
2. Volume / Back
3. LED power indicator
4. LED charging indicator
5. Home
6. Touch screen
7. Speaker
8. Camera(optional)
9. Stylist
10. Microphone
11. Micro SD slot
12. Earphone jack
13. Mini USB port
14. Mini HDMI output jack
15. Reset
16. Power jack
Page 5
Getting Started
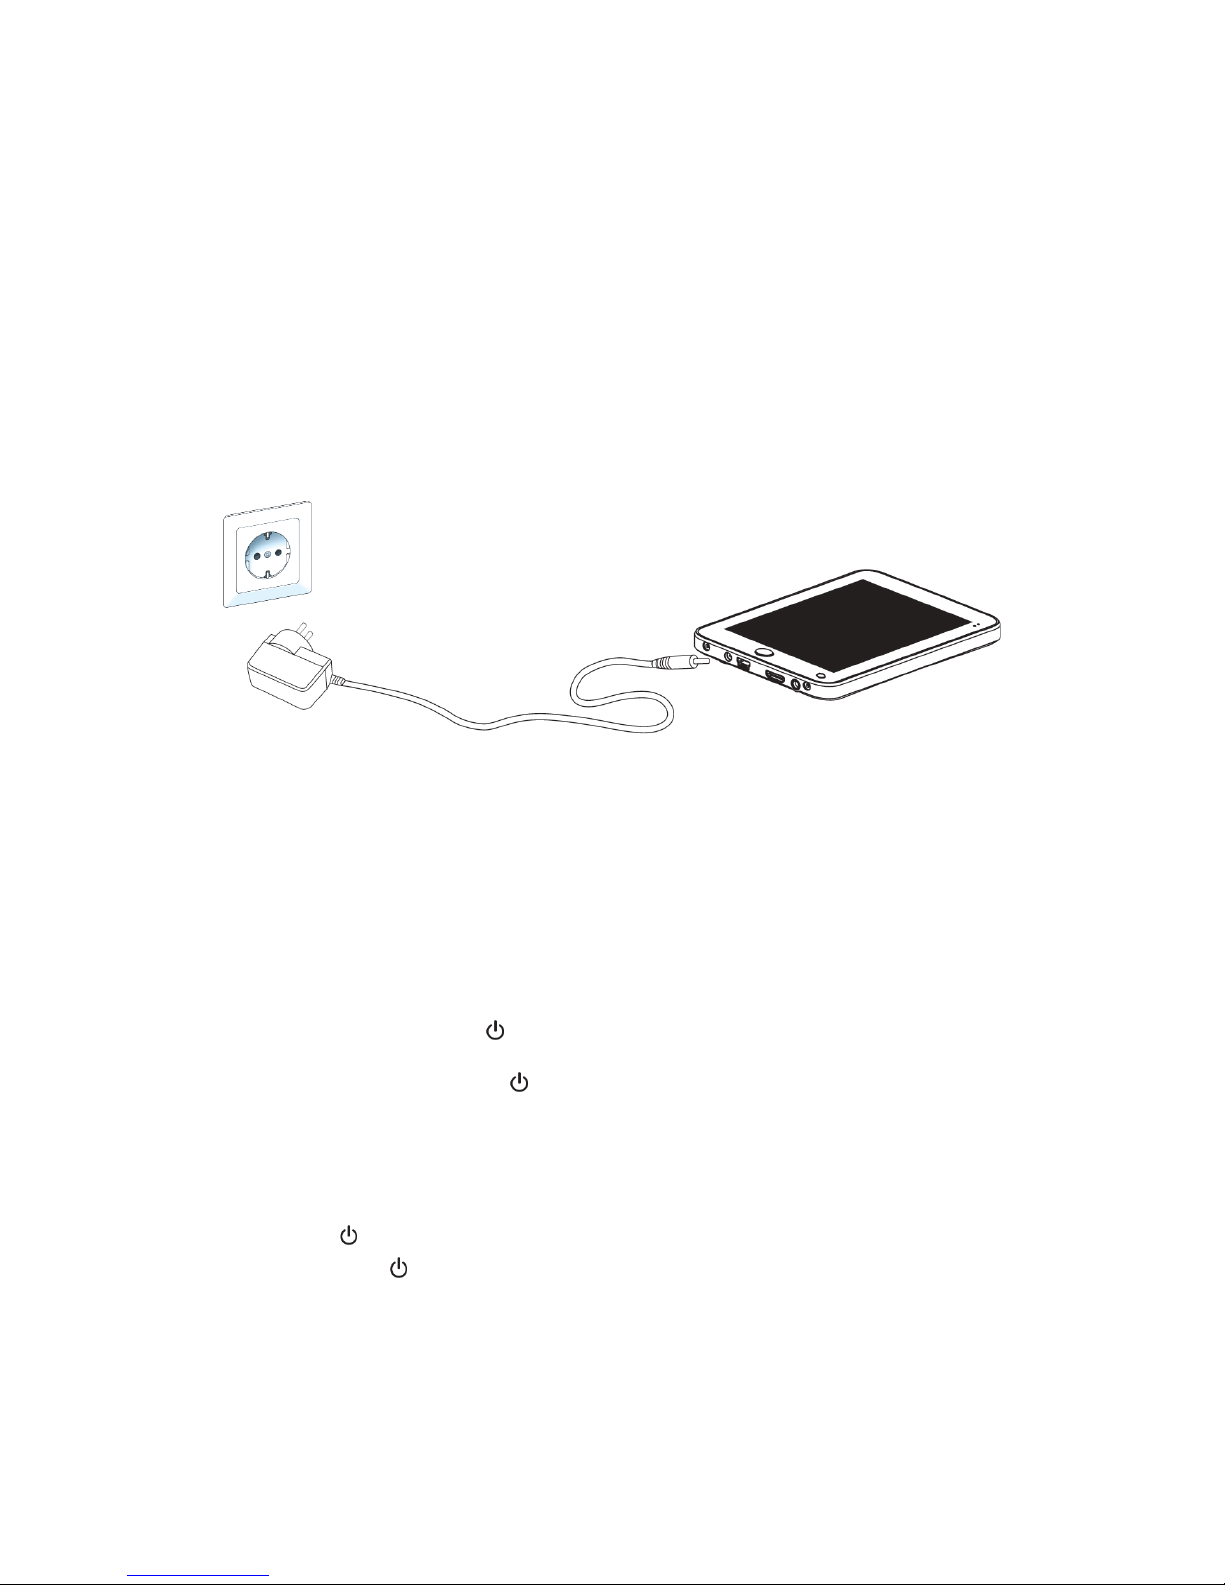
CHARGING THE BATTERY
1. Plug one end of the adaptor into a power outlet, the other end into the device. The LED
charging indicator turns red, indicating that the device is currently being charged.
2. During charging, the battery icon animation will appear on the screen. When the device is fully
charged, the battery animation icon will stop and turn green.
Note: If the device is completely out of power, please connect it to a power outlet. And the screen will
prompt “ the power is too low, charging now.” You must charge the device for few minutes before the
device can be operated.
Maximizing Battery Life
1. The device uses internal Lithium-ion polymer battery. and must be charged with the supplied adaptor.
2. It is recommended to fully charge your b attery for 8 hours rst two times. After that, the device can
be fully charged within 4 hours.
3. It is recommended to fully charge the device at least once a month to avoid permanent damage to
the battery.
TURN ON/OFF
To turn on the device, hold the power( ) button for three seconds.
To shutdown the device, hold the power( ) button for three seconds and select “OFF” then
“OK” on screen.
Note: 1. The device will be turned off automatically when it is low on battery.
2. If the device is not properly shutdown, the device will attempt to scan and repair
memory storage after restarted. This may cause the device take longer time to boot up.
3. By pressing power( )button it will put the device into power saving standby mode. To turn it back
on, simply press the power( ) button again.
Page 6
OPERATION INTERFACE
USING THE TOUCHSCREEN
The main way to control Android features is by using nger to
manipulate icons, buttons, menu items, the on-screen keyboard,
other items on the touchscreen, and to zoom in or out photos,
webpages, e-mail, and maps. You can also change the screen’s
orientation.
Touch:
To act on items on the screen, such as application and
setting icons, to type letters and symbols using the on-screen
keyboard, or to press on-screen buttons, you simply touch them
with your nger.
Touch & hold:
Touch & hold an item on the screen by touching it and not lifting your nger until an action occurs. For
example, to open a menu
for customizing the Home screen, you touch an empty area on the
Home screen until the menu opens.
Drag:
Touch & hold an item for a moment and then, without lifting your nger, move your nger on the screen
until you reach the target position. You drag items on the Home screen to reposition them.
Swipe or slide:
To swipe or slide, you quickly move your nger across the surface of the screen, without pausing when
you rst touch it. ( So you don’t drag an item instead ). For example, you slide the screen up or down
to scroll a list, and in some Calendar views you swipe quickly across the screen to change the range
of time visible.
Double-tap:
Tap quickly twice on a webpage, map, or other screen to zoom.
For example, you double-tap a section of a webpage in Browser
to zoom that section to t the width of the screen.Touch (+ /-) at
the lower right corner can do zooming action also.
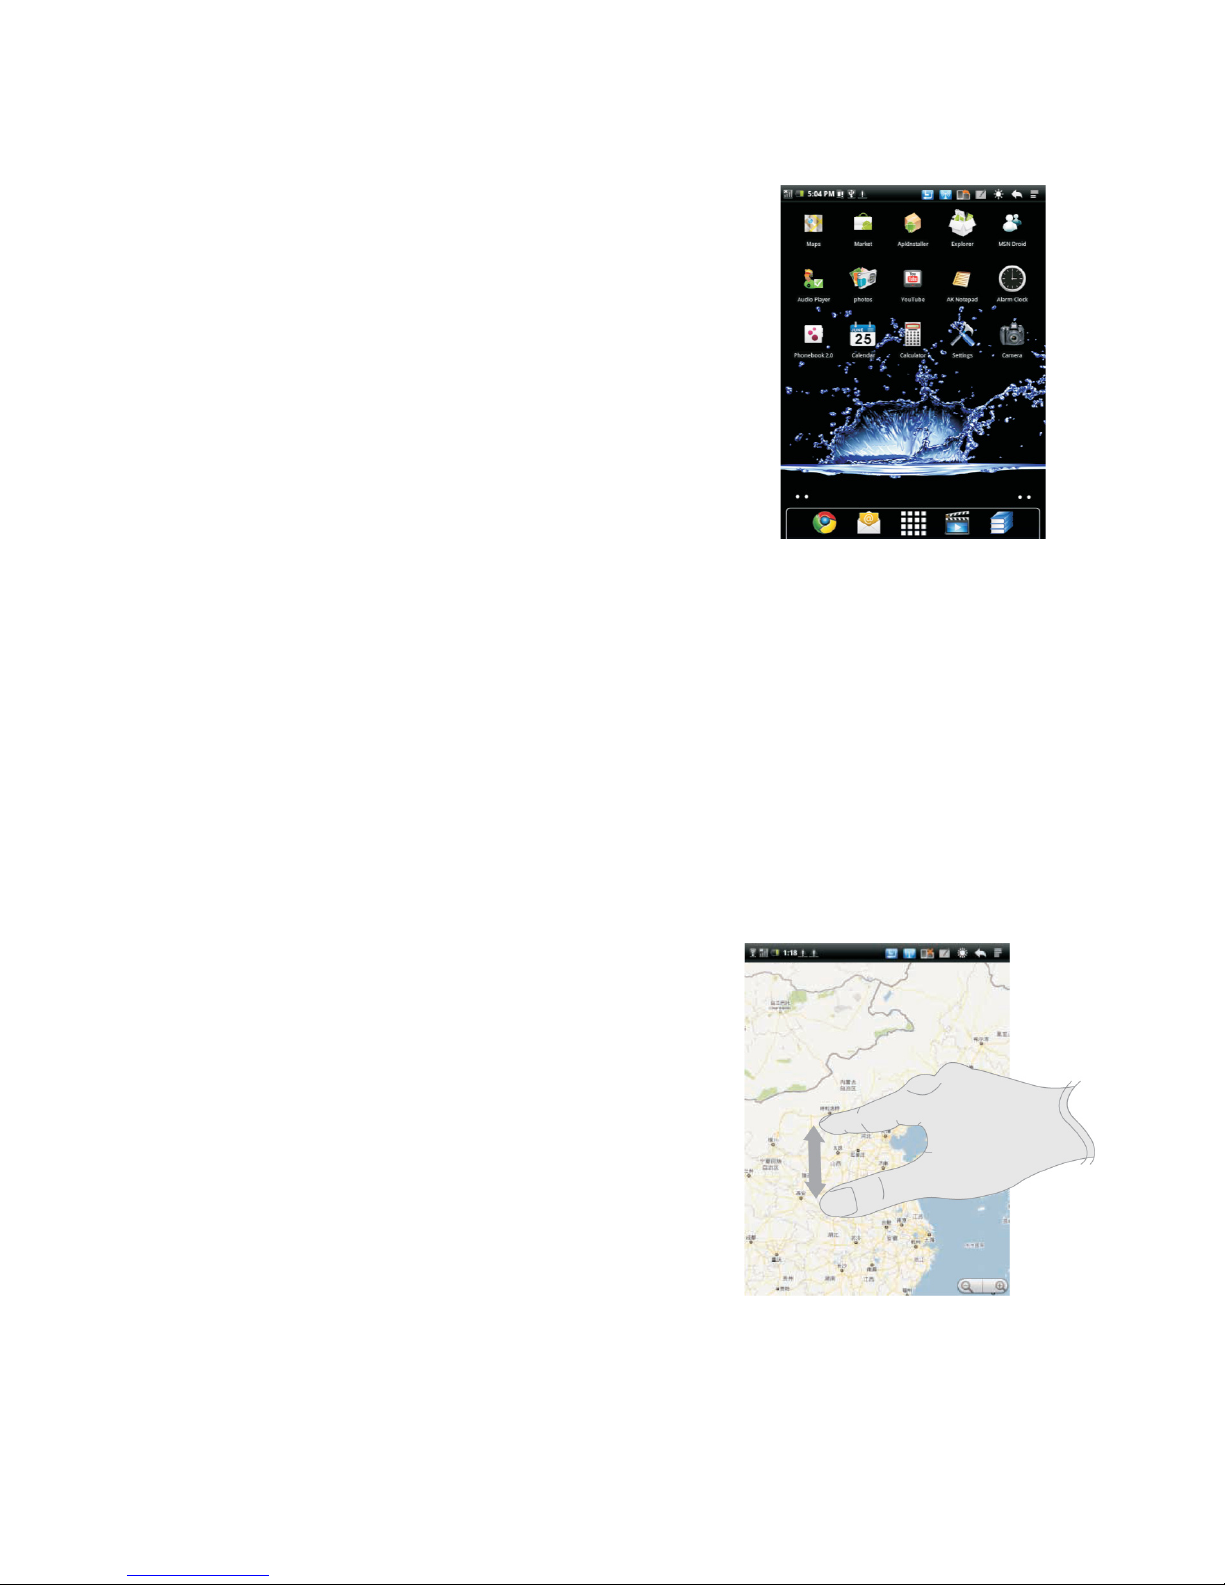
Pinch ngers together or apart
(only workable on multi-touch model):
When viewing photos, webpages, e-mail , or maps, you can
zoom in and zoom out by pinch your ngers together or apart.
Rotate the screen:
The orientation of the screen rotates with the device as you turn
it from upright to its side and back again.
Page 7

OPERATION INTERFACE
BASICS
1. Extended Home Screens:
There are ve extended home screens available to place your shortcuts, widgets and more.
To switch between each screen, swipe left or right across screen using nger or click the
page Icon.
2. Manage Home/Extended Screen Icon
2.1) To add an Item to the Home Screen:
2.1.1) Open the Home screen where you want to add the
Item.
2.1.2) Press Menu ( ) Or just touch & hold an empty
location on the Home screen.If there are no empty
spots on the Home screen, Add is dimmed; you must
delete or move an Item before you can add another Item,
or switch to another Home screen.
2.1.3) In the menu that opens, touch the type of Item to add.
2.2) To move around an item on the Home screen
2.2.1) Touch & hold the Item you want to move.
2.2.2) Drag the item to a new location on the screen. Pause
at the edge of the screen to drag the item onto another
home screen panel.
2.2.3) When the item is where you want, lift your nger.
2.3) To remove an Item from the Home screen.
2.3.1) Touch & hold the Item you want to remove.
2.3.2) Drag the Item to the Trash Can Icon.
2.3.3) When the Icon turns red, lift your nger.
2.4) To change the Home screen wallpaper
2.4.1) Touch & hold an empty area of the Home screen
and in the menu that opens, touch Wallpapers.
2.4.2) Touch Live wallpapers, Pictures, or Wallpapers.
2.4.3) Locate the wallpaper you like to use then touch
Save or Set wallpaper.
2.5) To rename a folder
2.5.1) Touch the folder to open it.
2.5.2) Touch & hold the folder window’s title bar.
2.5.3) Enter a new name in the dialog that appears.
2.5.4) Touch OK.
Page 8

OPERATION INTERFACE
OPENING & SWITCHING APPLICATIONS
1. To open and close the Launcher ( )
- On the Home screen, touch the Launcher Icon to open it.
(If you have more applications than it can t on the Launcher
in one view, you can slide the Launcher up or down to view more.)
- Touch Home button to close the Launcher.
2. To open an application
- Touch an application’s Icon on the Launcher. OR
- Touch an application’s Icon on the Home screen.
3. To switch to a recently used application
3.1) Press & hold the Home button. (A small window opens, with
icons of applications that you’ve used recently.)
3.2) Touch an Icon to open its application.
(Or press Back to return to the current application)
STATUS BAR OVERVIEW
1. Touch the Language setting ( ) icon to re-set the language.
2. Touch the Connection setting ( ) Icon to display wireless & network settings.
3. Touch the Screen orientation sensor ( ) Icon to enable or disable the screen orientation sensor.
4. Touch the Handwriting Recognition ( ) Icon to enable or disable the handwriting recognition
function.
5. Repeatedly touch the Brightnes control ( ) Icon to select the brightness level.
6. Touch the Back ( ) Icon to return to previous screen.
7. Touch the Menu ( ) Icon to display menu settings.
3G Status
WIFI Connection Status Screen orientation
Sensor on/off
Battery Status Connection Setting Brightness Control
Current Time Language Settings Back Menu
Handwriting
recognition on/off
Page 9
Settings
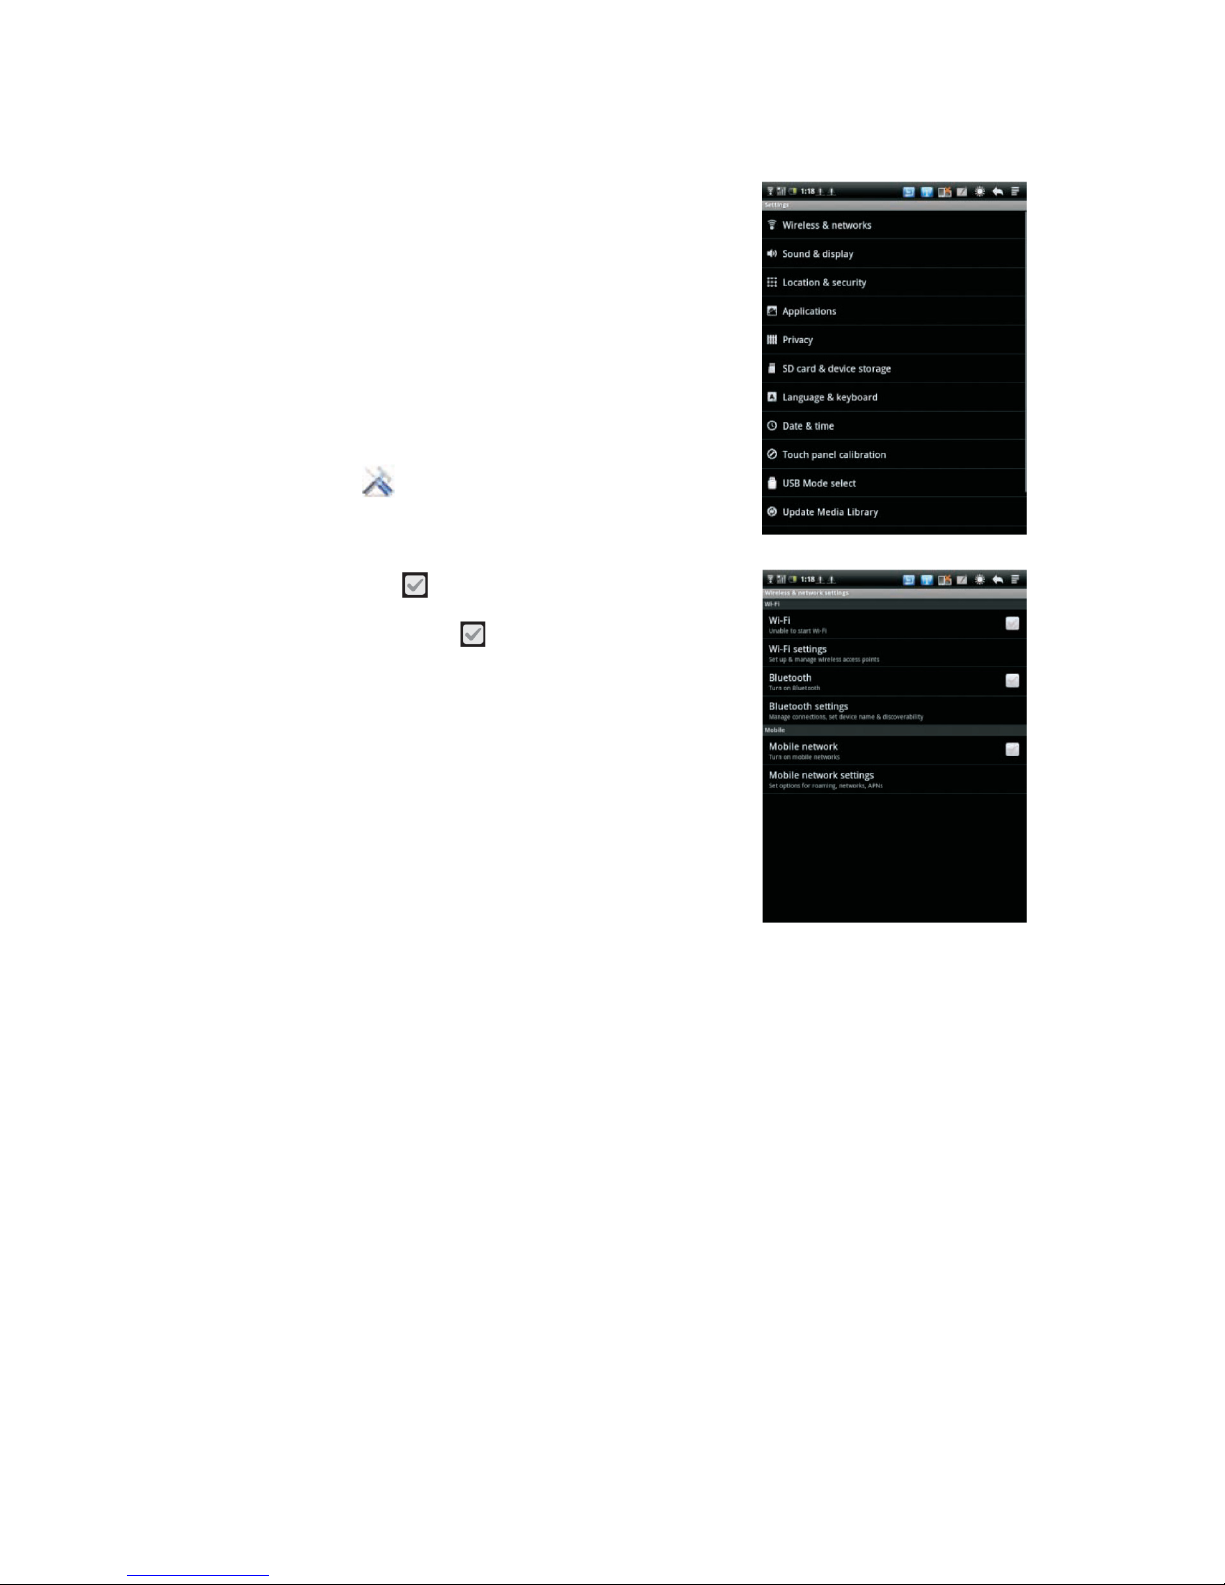
OPENING SETTINGS
The Settings application contains most of the tools for
customizing and conguring your device.
To open Settings:
- Press Home, press Menu, and touch Settings. OR
- Touch the Setting Icon on the Home screen or in the
Launcher.
WIRELESS & NETWORKS
Manage Wi-Fi setti ngs ( ) and connecting to
wireless network.
1) Wi-Fi
- Check to turn on Wi-Fi ( )so you can connect to Wi-Fi networks.
2) Wi-Fi settings
2.1) To connect to a Wi-Fi network( ), click on
the Wi-Fi settings and wait for the device to search
available network.
2.2) When the desired Wi-Fi network appeared, simply
touch the Wi-Fi network you like to connect to
establish connection.
2.3) If the Wi-Fi is a secured network, you will be
required to enter the password before you can
establish the Wi-Fi connection.
3) Bluetooth
Check to turn on Bluetooth so you can connect to
Bluetooth devices
4) Bluetooth settings
4.1) To scan for Bluetooth devices
4.1.1) Touch Scan for devices to begin scanning
Bluetooth devices in range.
4.1.2) Once the desired Bluetooth device name
appear in the list, simply touch it and begin paring
4.2) To make the device Discoverable
4.2.1) Check the Discoverable Check Box and the
device will become visible to other Bluetooth
device for 120 seconds
4.2.2) Your Bluetooth device should be able to scan for the device.
The device name will appear exactly
as what is being provided in the Device name setting.
4.2.3) To turn off Discoverable after pairing, simply uncheck the Discoverable or wait for 120
seconds the device will automatically become non-discoverable.
5) Mobile networks setting screen
- Data enabled: Uncheck to prevent the device from transmitting data on any mobile network.
- Data roaming: Uncheck to prevent the device from transmitting data on other carriers’ mobile network
when you can’t access your own carrier’s mobile network.
- Data usage: Only available if your carrier enforces a mobile network data use policy.
- Access Point Name: Opens the APNs screen, where you can select mobile access point conguration;
or press Menu to add a new APN. Consult your carrier about how to use the tools on this screen.
Page 10
Settings
Network operators:
Opens a screen that searches for and displays mobile networks thatare compatible with
the device. Consult your carrier to understand the billing implications of selecting another carrier.
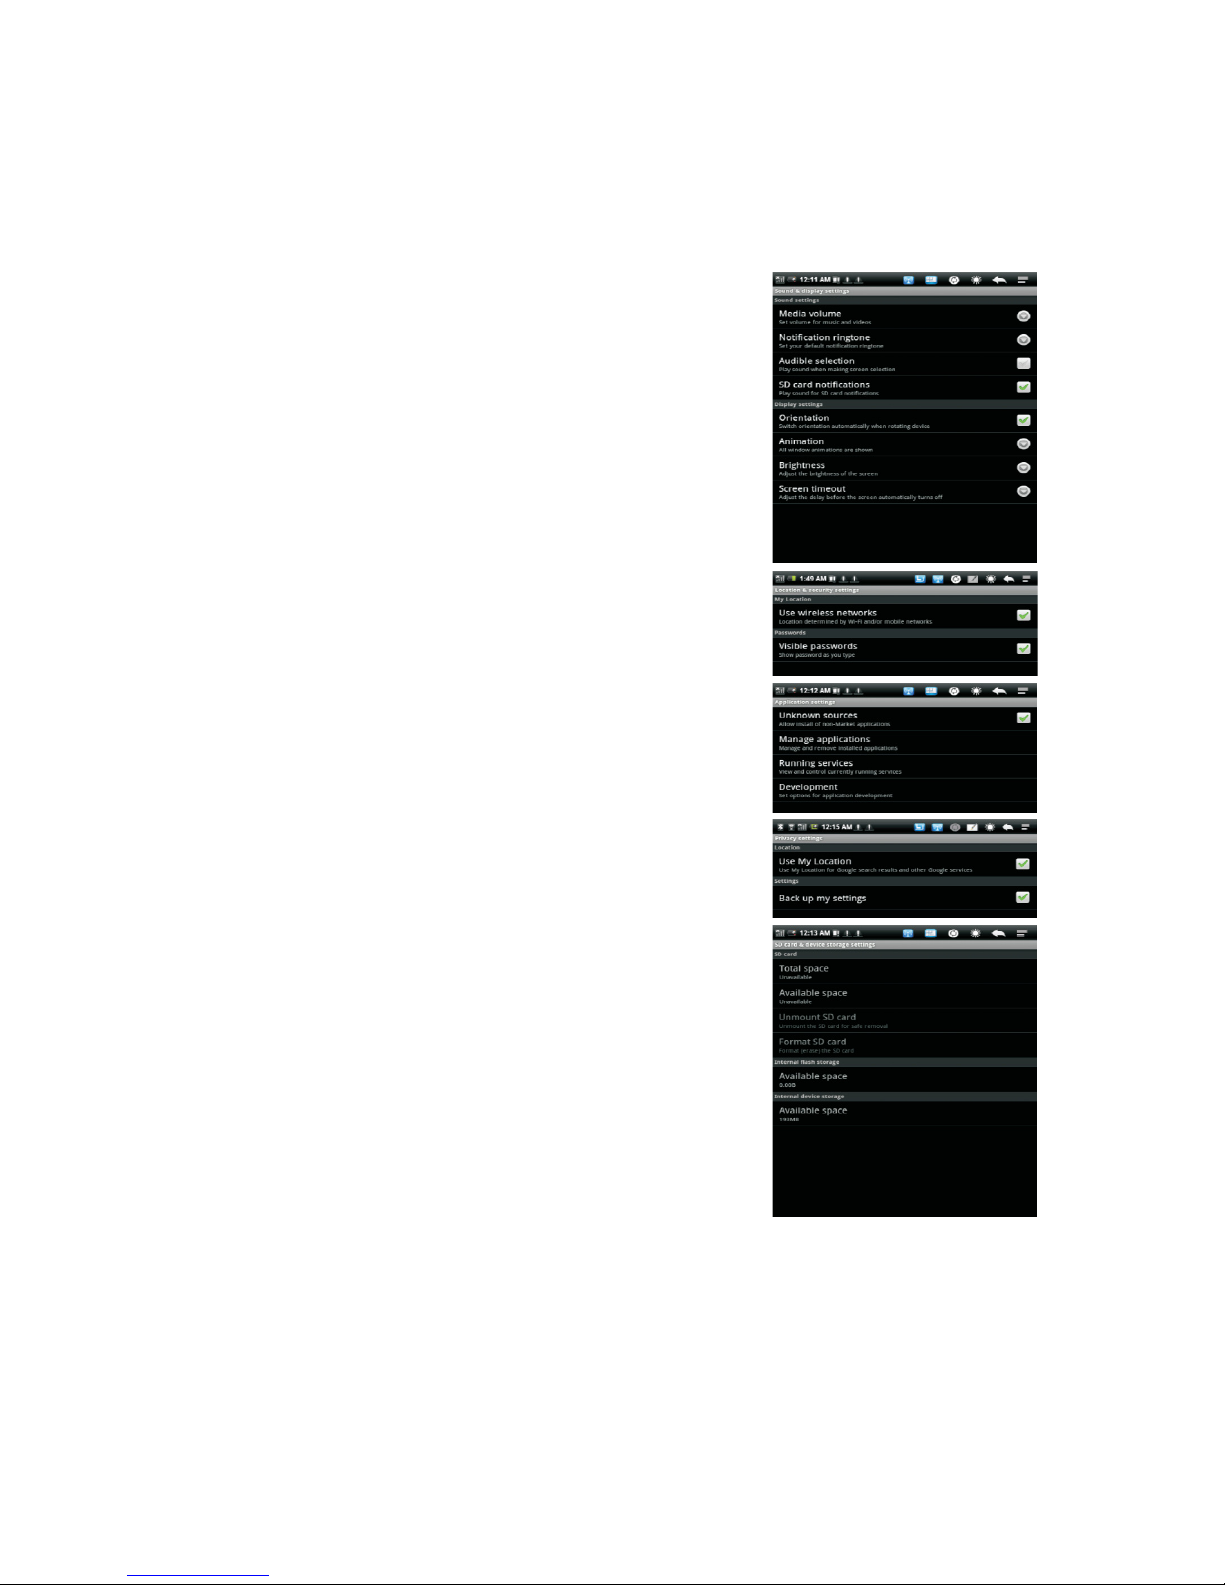
SOUND & DISPLAY
Sound Settings
1. Media volume: Set volume for music and videos.
2. Notication ringtone: Set your default notication ringtone.
3. Audible selection: Play sound when making screen selection.
4. SD card notication: Play sound for SD card notications.
Display Setting
1. Orientation: Switch orientation automatically when rotating
device.
2. Animation: All window animation are shown.
3. Brightness: Adjust the brightness of the screen.
4. Screen timeout: Adjust the delay before the
screen automatically turns off.
LOCATION & SECURITY
1. Use wireless networks: Location determined by
Wi-Fi and/or mobile networks.
3. Visible password: Show password as you type.
APPLICATIONS
1. Unknown sources: Allow install of non-Market
applications.
2. Manage applications: Manage and remove
installed applications.
3. Running services: View and control currently
running services.
4. Development: Set options for application
development.
PRIVACY
1. Use My Location: Use my location for Google
search results and other Google services.
2. Back up My settings: backup my setting or
delete all backup on Google server.
SD CARD & DEVICE STORAGE
Display available storage space on internal device
memory and SD card memory.
Note: To remove SD card safely from device when
the device is powered on, select Unmount SD card
to safely remove the SD card to avoid any damage.
Page 11
Settings
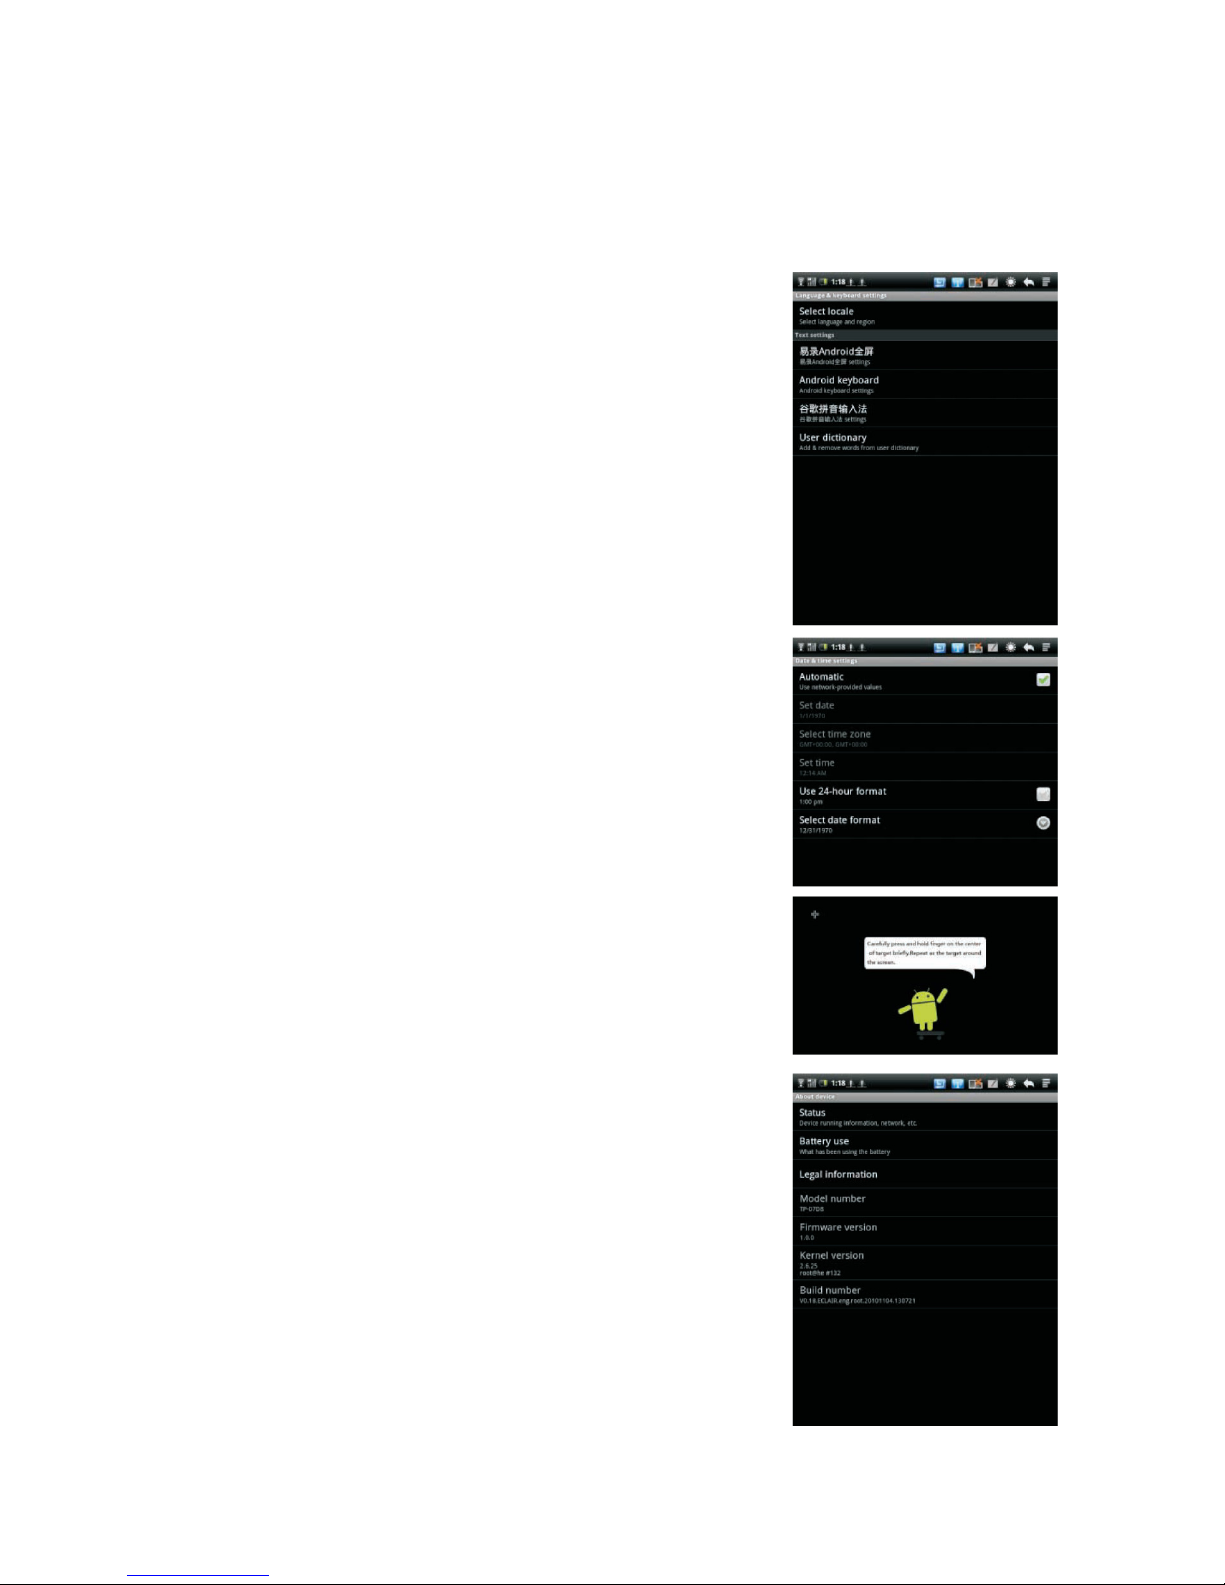
LANGUAGE & KEYBOARD
1. Select locale: Select language and region.
2. Android full-screen: Android full-screen settings.
3. Android keyboard: Android keyboard settings.
4. Pinyin IME: Pinyin IME settings.
5. User Dictionary: Add & remove words from user dictionary.
DATE & TIME
1. Set date: Setup current date.
2. Select time zone: Setup current time zone.
3. Set Time: Setup current time.
4. Use 24-hour format: Check to use 24-hour time format.
5. Select date format: Setup date format.
TOUCH PANEL CALIBRATION
To calibrate the touch screen, use your nger to touch
the( + )as it appear on each region of the screen.
USB MODE SELECT
Select USB mode: OTG/HOST/SLAVE
Host Mode: Select USB work as host mode, then you can
mount U-disk or 3G Modules.
UPDATE MEDIA LIBRARY
When inserting or removing SD memory card or USB,
please choose” update media library” to update data;
When copying le to the memory or delete les stored
in the memory, please choose “ “ update media library”
to update data.
FACTORY DATA RESET
This will erase alldata from your device including:
1. Your Google account
2. System and application data and settings
3. Downloaded applications
It will not erase:
1. Current system software and bundled applications
2. SD card les, such as music or photos
ABOUT DEVICE
About device includes information about your device.
Page 12
Software Installation & Management
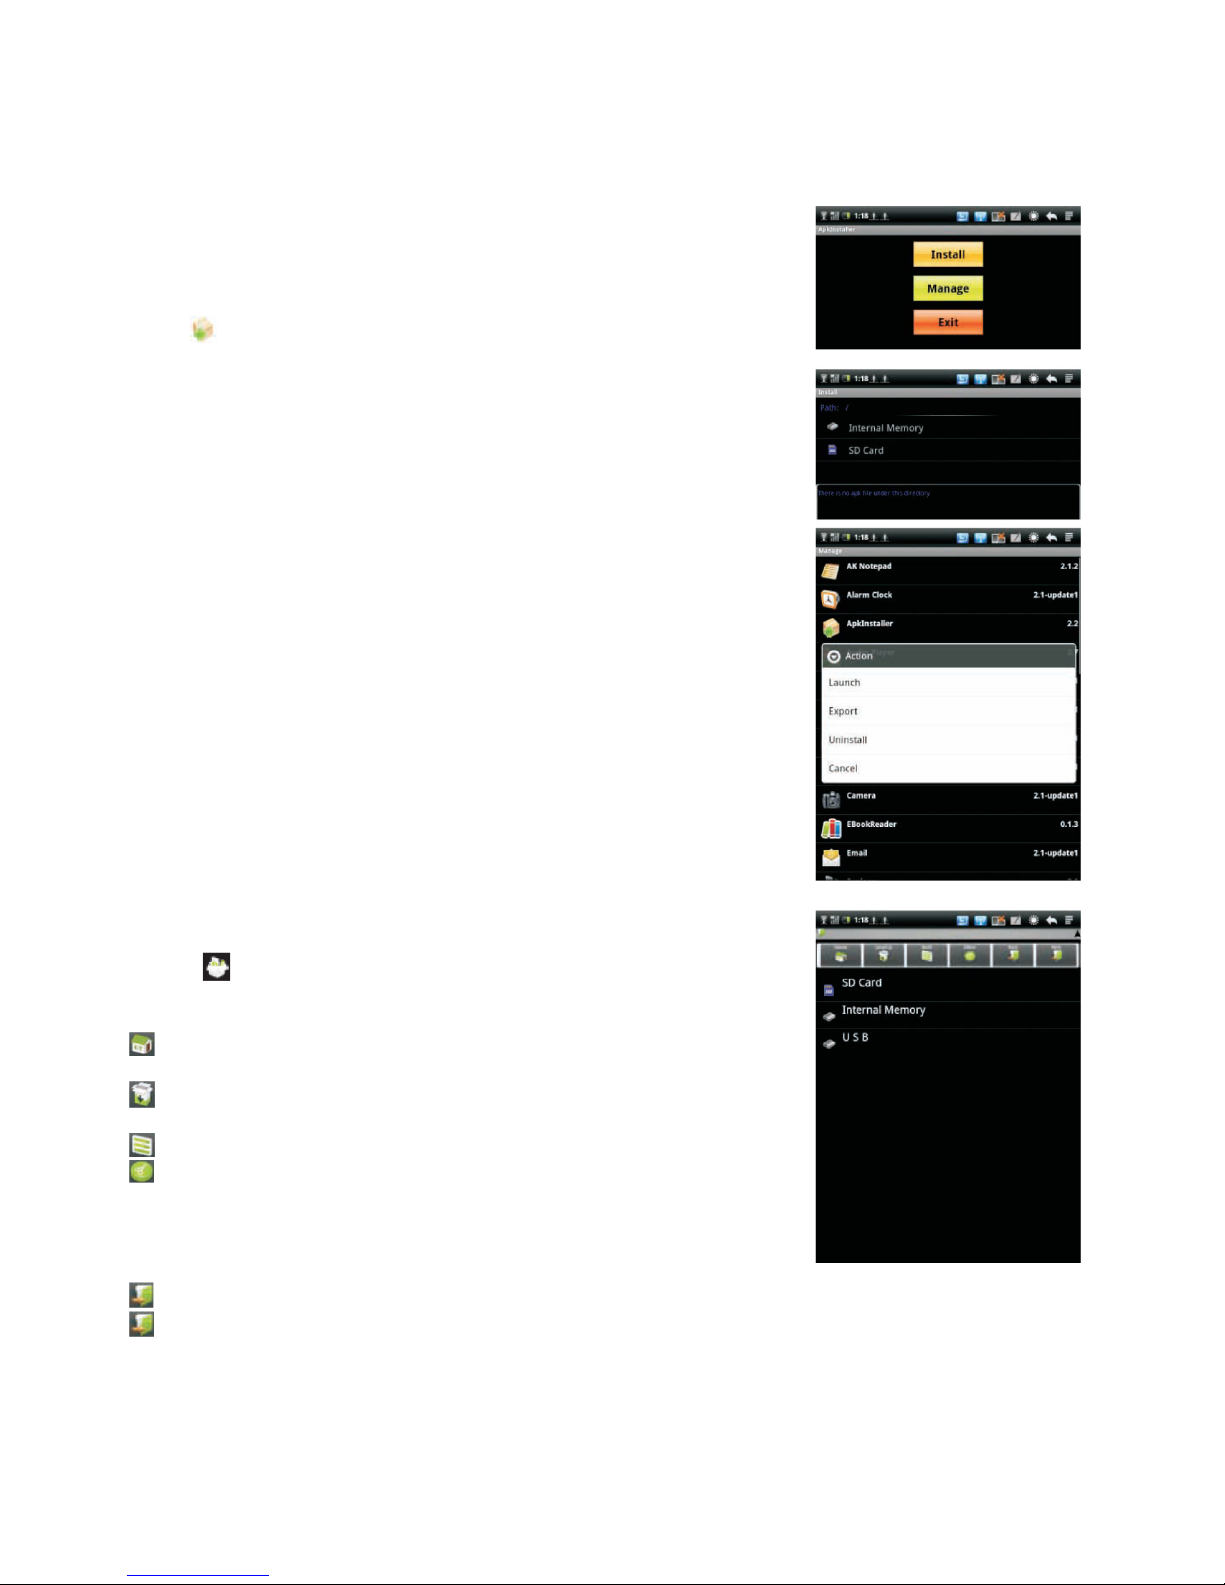
APK INSTALLER
The device uses third party application to access most
of the applications via network.
Click ( ) , APK installer options will pop up on the screen.
1. Install: click Install to enter APK installer interface, and
select the application in APK format that you wish to install.
After installation is done, the device will return to Home screen.
2. Manag: Click ‘‘Manag’’ to begin managing application.
Launch : Run the selected application.
Export to SD: Export the selected application to SD card.
Uninstall: Uninstall the selected application.
Search at market: Search the selected application at the Market.
Cancel: Cancel to return to previous screen.
How to install input method:
1. Connecting to the network
2. Enter Market
3. Flick Search button to search all needed input methods
4. Select the desired input method
5. Flick [Install/Conrm] to download and install the input method.
6. After installment is done, please enter SETTING from home
screen, and then open LANGUAGE AND KEYBOARD to
select the installed input method.
Note: The installed input methods can display in the list only
being selected.
ES FILE EXPLORER
Select ( ) to enter Explorer, you can browse through les
stored in the device. Touch following icons to perform different
operations.
Home: Access the explorer to display the path of SD Card,
Internal Memory and USB.
Level Up: Return to previous folder that’s one level higher
or exit the application.
Multi: Select more les or folders.
Editor: 1. Copy: Copy le or folder.
2. Delete: Delete le or folder.
3. Cut: Cut selected le or folder to other location.
4. Paste: Paste the cut le or folder to specic location.
5. Rename: Rename le or folder.
Back: Return to previous screen.
Next: Access the next screen.
ANDROID MARKET
Android Market provides direct access to applications
and games to download and install on the device.
Page 13

Item
Base Features
Processor Speed 600-800MHz
DDR2 256MB
See package
Micro SD Card
TFT LCD
4:3
Yes
Yes
Yes
Yes
Yes
Yes
12V, 1.25A
See Package
Virtual (Touchscreen)
English / Chinese
802.11 b/g
2.1+EDR
See package
MP3, WMA, APE, FLAC, AAC, OGG, AC3, WAV
JPEG, BMP, GIF, PNG
Android 2.1
Please refer to the actual product
MKV(H.264 HP), AVI, RM/RMVB, FLV, MPEG-1,
MPEG-2
Single-touch or Multi-touch (depending on what
kind of model you have purchased)
7’’-Inch (diagonal)
800 x 600 pixels
30H(stand by)
7.4 V, 1500mAH
10’’-Inch (diagonal)
1024 x 768 pixels
52H(stand by)
7.4 V, 2600mAH
System Memory
Flash Drive Capacity
Expansion Slot
Screen Type
Screen Size
Aspect Ratio
Native Screen Resolution
Auto Orientation
Integrated Microphone
Speakers
Headphone Jack
Battery Life
Battery
Adaptor
Keyboard
USB 2.0
Mini HDMI
3G(optional)
Video
Audio
Images
Operating System
Pre-Loaded Application
Handwriting Recognition
Pointing Device
Rear side 2 Mega pixel
CMOS Camera ( optional )
Integrated Wi-Fi
Integrated Bluetooth
Display
Audio
Power
Inputs & Outputs
Built in Decoders
Software
Connection
Model 7’’ 10’’
SPECIFICATION
Page 14

CUSTOMER SUPPORT
You can contact the Ricatech customer service when you have a question or a problem with your
Ricatech product. You can contact us by telephone and email.
Email
For customer support by email, please sent a email to support@ricatech.com Please make sure that
you mention the model number and serial number of the product, mention your name & address and
describe your question or problem clearly.
Telephone
For customer support by telephone, please dial +32 3 3265694. One of our service staff will be ready
to serve you.
For full procedure please visit the website of Ricatech at: www.ricatech.com
Page 15

Nederlands
Inhoud
Opgelet
Opgelet-------------------------------------------------------------------------Inhoud Verpakking------------------------------------------------------------
Hardwareoverzicht
Hardwareoverzicht-----------------------------------------------------------
Aan de slag
De Batterij opladen----------------------------------------------------------Aan-/Uitzetten-----------------------------------------------------------------
Bedieningsinterface
Het aanraakscherm gebruiken -------------------------------------------Basisbeginselen -------------------------------------------------------------Openen & Verwisselen van Toepassingen----------------------------Statusbalkoverzicht ----------------------------------------------------------
Instellingen
Openen Instellingen---------------------------------------------------------Draadloos & netwerken ----------------------------------------------------Geluid & weergave ----------------------------------------------------------Locatie & beveiliging---------------------------------------------------------Toepassingen -----------------------------------------------------------------Privacy --------------------------------------------------------------------------SD-kaart & service-opslag--------------------------------------------------Taal & Toetsenbord ----------------------------------------------------------Datum & tijd --------------------------------------------------------------------Kalibratie aanraakpaneel----------------------------------------------------USB-modus selecteren ------------------------------------------------------Mediabibliotheek updaten --------------------------------------------------Herstellen fabrieksgegevens------------------------------------------------Over het apparaat --------------------------------------------------------------
Software-installatie en Beheer
APK Installer--------------------------------------------------------------------ES-bestandsexplorer----------------------------------------------------------Android Market-------------------------------------------------------------------
Specicaties----------------------------------------------------------------------
Page 16
Opgelet
Condens
Open zonder
bevoegdheid
Hoge temperatuur
Slechte ventilatie
Media Tablet Bedienings handleiding
Mini USB Kabel
Adapter
Zwaar objectschade
Stof en rook
Page 17

Hardware Overzicht
1. Aan/uit
2. Volume / Terug
3. LED aan/uit-indicator
4. LED-oplaadindicator
5. Home
6. Aanraakscherm
7. Luidspreker
8. Camera (optioneel)
9. Schrijfstift
10. Microphone
11. Micro-SD-sleuf
12. Oortelefoonaansluiting
13. Mini-USB-poort
14. Mini-HDMI-uitgangsaansluiting
15. Reset
16. Stroomaansluiting
Page 18

Aan de slag
BATTERIJ OPLADEN
1. Steek het ene einde van de adapter in de voedingsuitgang, het andere einde in het apparaat. De
oplaadindicator van de LED
kleurt rood, vermeldend dat het apparaat momenteel aan het opladen is.
2. Tijdens het opladen verschijnt het animatiepictogram van de batterij op het scherm. Als het apparaat
volledig geladen is, stopt het animatiepictogram van de batterij en kleurt groen.
Opmerking: Als het apparaat volledig van de stroom af is, sluit het dan op een stopcontact aan. En
het scherm geeft de melding “batterijspanning is te laag, nu opladen.” Het apparaat moet een tpaar
minuten opgeladen worden voor het apparaat kan worden bediend.
Levensduur van de batterij optimaal benutten
1. Het apparaat gebruikt een interne Lithium-ion polymeerbatterij en dient opgeladen te worden met de
bijgeleverde adapter.
2. Het is raadzaam de batterij de eerste keer volledig te laden gedurende 8 uur. Nadien kan de batterij
volledig opgeladen worden in 4 uur.
3. Het is raadzaam om minimaal één keer per maand het apparaat volledig op te laden om permanente beschadiging van de batterij te voorkomen.
AAN/UIT ZETTEN
Om het apparaat aan te zetten, houd de aan/uit-knop ( ) 3 seconden ingedrukt.
Om het apparaat uit te zetten, houd de aan/uit-knop ( ) 3 seconden ingedrukt en selecteer “OFF” en
dan
“OK” op het scherm.
Opmerking: 1. Het apparaat schakelt automatisch uit wanneer de batterijspanning laag is.
2. Als het apparaat niet correct is uitgeschakeld, zal het apparaat proberen de geheugenopslag
te scannen en repareren na herstart. Dit kan ervoor zorgen dat het apparaat langer nodig heeft om op
te starten.
3. Door op de aan/uit-knop ( ) te drukken, wordt het apparaat in de stroombesparingsmodus gezet.
Om het weer aan te zetten, druk simpelweg nogmaals op de aan/uit-knop( )
Page 19

Bedienings interface
HET AANRAAKSCHERM GEBRUIKEN
De belangrijkste manier om de functies van de Android te
hanteren is met de vinger om de pictogrammen, knoppen,
menu-onderdelen, toetsenbord op het scherm, andere
onderdelen op het aanraakscherm, en het in- en uitzoomen
van foto’s, webpagina’s, e-mails en mappen te bedienen.
Het is ook mogelijk om de schermoriëntatie aan te passen.
Aanraken:
Om met de onderdelen op het scherm te werken, zoals het
toepassen en instellen van pictogrammen, het typen van
letters en symbolen met behulp van het toetsenbord op het
scherm, of om op de knoppen op het scherm te drukken,
raakt u deze simpelweg met uw vinger aan.
Aanraken en vasthouden:
Aanraken & vasthouden van een onderdeel op het scherm door deze aan te raken en de vinger niet
op te tillen totdat een actie geschiedt. Bijvoorbeeld om een menu te openen om het Home-scherm aan
te passen, drukt u op een lege plek op het Home-scherm totdat het menu opent.
Slepen:
Raak aan & houd het onderdeel een moment vast en dan, zonder de vinger op te tillen, verplaats
de vinger op het scherm totdat de gewenste positie is bereikt. De onderdelen op het Home-scherm
worden versleept om deze te herpositioneren.
Vegen of glijden:
Om te vegen of te glijden, beweeg de vinger snel over het
oppervlak van het scherm, zonder te pauzeren vanaf het
moment van aanraking. (Dus niet het onderdeel verslepen).
Bijvoorbeeld over het scherm glijden om in een lijst omhoog
of omlaag te scrollen, en in bepaalde kalenderweergaven
veegt u snel door het scherm om het tijdsbestek zichtbaar
te veranderen.
Dubbel-tikken:
Tik twee keer snel op een webpagina, map of ander scherm
om te zoomen. Bijvoorbeeld, dubbel-tikken op een vak van
een webpagina in de browser om dat vak te zoomen zodat
deze past in de wijdte van het scherm. De zoomactie werkt
ook door de hoek (+ /-) rechtsonder aan te raken.
Duw vingers tegen of uit elkaar
(alleen bruikbaar bij multi-touch model):
Bij het bekijken van foto’s, webpagina’s, e-mail of mappen
kan er in- en uitgezoomd worden door de vingers tegen of uit
elkaar te duwen.
Het scherm draaien:
De oriëntatie van het scherm draait met het apparaat mee,
als deze van rechtstaand naar zijdelings en terug wordt gedraaid.
Page 20

Bedienings Interface
1. Verlengde Home-schermen:
Er zijn vijf verlengde home-schermen beschikbaar waarop de snelkoppelingen, widgets enz. geplaatst
kunnen worden. Om tussen ieder scherm te schakelen, veeg links of rechts over het scherm met de
vinger of klik op het
paginapictogram.
2. Beheren Pictogram Home/Verlengd Scherm
2.1) Om een onderdeel aan het Home-scherm toe te voegen:
2.1.1) Open het Home-scherm waar het onderdeel geplaatst moet
worden.
2.1.2) Druk op Menu ( ) of raak aan & houd een lege locatie vast
op het Home-scherm. Als er geen lege plekken op het
Home-scherm zijn, is Toevoegen gedimd u moet een
onderdeel verwijderen of verplaatsen alvorens u een ander
onderdeel kunt toevoegen of naar een ander Home-scherm
kunt schakelen.
2.1.3) In het menu dat opent, raak het toe te voegen type onderdeel
aan.
2.2) Een onderdeel verplaatsen op het Home-scherm
2.2.1) Raak aan & houd het te verplaatsen onderdeel vast.
2.2.2) Sleep het onderdeel naar een nieuwe locatie op het scherm.
Plaats het onderdeel tijdelijk naar de rand van het scherm om
het naar een ander Home-scherm te slepen.
2.2.3) Til uw vinger op, zodra het onderdeel op de gewenste plaats is.
2.3) Een onderdeel van het Home-scherm verwijderen.
2.3.1) Raak aan & houd het te verwijderen onderdeel vast.
2.3.2) Sleep het onderdeel naar het pictogram van de Prullenbak.
2.3.3) Til uw vinger op, zodra het icoon rood is.
2.4) Achtergrond van het Home-scherm veranderen
2.4.1) Raak aan & houd een lege plek van het Home-scherm vast
en druk, in het menu dat opent, op Achtergronden.
2.4.2) Raak Live achtergronden, Afbeeldingen of Achtergronden aan.
2.4.3) Lokaliseer de voor gebruik gewenste achtergrond en raak
Opslaan of Instellen achtergrond aan.
2.5) De map een andere naam geven
2.5.1) Raak de map aan om het te openen.
2.5.2) Raak aan & houd de titelbalk van het mapvenster vast.
2.5.3) Voer in het dialoogvenster dat verschijnt een nieuwe naam in.
2.5.4) Raak OK aan.
Page 21

Bedienings Interface
OPENEN & VERWISSELEN VAN TOEPASSINGEN
1. Het openen en sluiten van de Launcher ( )
- Raak op het Home-scherm het Launcher-pictogram aan om
het te openen. (Als er meer toepassingen dan beschikbaar
zijn op de Launcher in één weergave, kunt u de Launcher
omhoog en omlaag schuiven om meer applicaties te bekijken.
- Raak de Home-knop aan om de Launcher te sluiten.
2. Een toepassing openen
- Raak een toepassingspictogram aan in de Launcher.
-Raak een toepassingspictogram aan in het Home-scherm.
3. Om te schakelen naar een recent gebruikte toepassing
3.1) Druk & houd de Home-knop vast. (Er opent een klein
venster met pictogrammen van toepassingen die u recent
hebt gebruikt).
3.2) Raak een pictogram aan om de toepassing te openen.
(Of druk op Terug om terug te keren naar de huidige toepassing)
STATUS BALK OVERZICHT
1. Raak het pictogram Taalinstelling ( ) aan om de taal opnieuw in te stellen.
2. Raak het pictogram Verbindingsinstelling ( ) aan om de draadloze & netwerkinstellingen weer
te geven.
3. Raak het pictogram Schermoriëntatiesensor ( ) aan om de schermoriëntatiesensor in of uit te
schakelen.
4. Raak het pictogram Handschriftherkenning ( ) aan om de schermoriëntatiesensor in of uit te
schakelen.
5. Raak het pictogram Helderheidcontrole ( ) herhaaldelijk aan om het helderheidniveau te
selecteren.
6. Raak het pictogram Terug ( ) aan om terug te keren naar het vorige scherm.
7. Raak het pictogram Menu ( ) aan om de menu-instellingen weer te geven.
3G Status
WIFI verbindings Status Schermoriëntatie
sensor aan/uit
Batterij Status Verbindings instelling Helderheid controle
Huidige tijd Taal Instelling Terug Menu
Handschrift
Herkenning Aan/Uit
Page 22

Instellingen
INSTELLINGEN OPENEN
De toepassing Instellingen bevat de meeste tools voor het
aanpassen en congureren van uw apparaat.
Instellingen openen:
- Druk op Home, druk op Menu, en raak Instellingen aan. OF
- Raak het Instellingenpictogram aan op het Home-scherm of
in de Launcher.
DRAADLOOS & NETWERKEN
Beheren van Wi-Fi-instellingen ( ) en verbinden met
draadloos netwerk.
1) Wi-Fi
- Vink aan om Wi-Fi ( ) in te schakelen, zodat het verbonden
kan worden met Wi-Fi-netwerken.
2) Wi-Fi-instellingen
2.1) Om met een Wi-Fi-netwerk ( ) te verbinden, klik op de
Wi-Fi-instellingen en wacht tot het apparaat naar een
beschikbaar netwerk zoekt.
2.2) Als het gewenste Wi-Fi-netwerk verschijnt, raak simpelweg
het gewenste Wi-Fi-netwerk aan om verbinding te maken
en een verbinding tot stand te brengen.
2.3) Indien Wi-Fi een beveiligd netwerk betreft, is het vereist een
wachtwoord in te voeren alvorens u de Wi-Fi-verbinding tot
stand kunt brengen.
3) Bluetooth
- Vink Bluetooth aan om in te schakelen, zodat u verbinding
kunt maken met Bluetooth-apparaten
4) Bluetooth-instellingen
4.1) Scannen naar Bluetooth-apparaten
4.1.1) Raak Scannen naar apparaten aan om te beginnen met scannen naar Bluetooth-apparaten in
de omgeving.
4.1.2) Als eenmaal de gewenste Bluetooth-apparaatnaam in de lijst verschijnt, raak simpelweg aan en
begin met paren
4.2) Het apparaat zichtbaar maken
4.2.1) Vink het Zichtbaar vakje aan en het apparaat wordt zichtbaar voor het andere
Bluetooth-apparaat gedurende 120 seconden
4.2.2) Het Bluetooth-apparaat is nu in staat om te scannen naar het andere apparaat. De apparaatnaam
verschijnt exact zoals aangegeven in de Apparaatnaaminstelling.
4.2.3) Om na het paren Zichtbaar uit te schakelen, schakel simpelweg het vinkje van Zichtbaar uit of
wacht gedurende 120
seconden tot het apparaat automatisch onzichtbaar wordt.
5) Instellingenscherm mobiele netwerken
- Gegevens ingeschakeld: Vink uit ter bescherming van het apparaat tegen overdracht van gegevens
op ieder mobiel netwerk.
- Gegevens roaming: Vink uit ter bescherming van het apparaat tegen overdracht van gegevens naar
andere mobiele netwerkproviders indien er geen toegang is tot de eigen mobiele netwerkprovider.
- Gegevensgebruik: Alleen beschikbaar indien de provider een gebruiksbeleid voor mobiele
netwerkgegevens afdwingt . Naam toegangspunt: Opent het APN-scherm waar u de conguratie voor
het mobiele toegangspunt kunt selecteren. Of druk op Menu om een nieuwe APN toe te voegen. Raad
pleeg uw provider over het gebruik van de tools op dit scherm.
Page 23

Instellingen
Netwerkoperators:
Opent een scherm dat zoekt naar beschikbare mobiele netwerken die compatibel zijn met dit apparaat
en geeft deze weer. Raadpleeg uw provider voor de gevolgen met betrekking tot de facturatie bij het
selecteren van een andere provider.
GELUID & WEERGAVE
Geluidsinstellingen
1. Mediavolume: Stelt het volume in voor muziek en video’s.
2. Noticatiebeltoon: Stelt de standaard noticatiebeltoon in.
3. Geluidsselectie: Speelt geluid af bij het maken van schermselecties.
4. Noticatie SD-kaart: Speelt geluid af voor noticaties van de SD-kaart.
Weergave-instelling
1. Oriëntatie: Wisselt automatisch de oriëntatie bij het draaien van
apparaat.
2. Animatie: Alle vensteranimaties worden weergegeven.
3. Helderheid: Past de helderheid van het scherm aan.
4. Time-out scherm: Past de vertraging waarin het scherm automatisch
uitschakelt aan.
LOCATIE & BEVEILIGING
1. Gebruik van draadloos netwerk: Locatie bepaald door
Wi-Fi en/of mobiele netwerken.
3. Zichtbaar wachtwoord: Wachtwoord weergeven tijdens het typen.
TOEPASSINGEN
1. Onbekende bronnen: Sta installatie van niet-Market-toepassingen
niet toe.
2. Beheren van toepassingen: Beheren en verwijderen van
geïnstalleerde toepassingen.
3. Lopende services: Bekijk en controleer momenteel lopende services.
4. Ontwikkeling: Stelt opties in voor toepassingsontwikkeling.
PRIVACY
1. Gebruik Mijn Locatie: Gebruik mijn locatie voor Google zoekresultaten
en andere Google services.
2. Back-up Mijn instellingen: Back-up mijn instellingen of verwijder alle
back-up op Google server.
SD-KAART & APPARAATOPSLAG
Geef beschikbare opslagruimte van intern apparaatgeheugen en
geheugen van de SD-kaart weer.
Opmerking: Om de SD-kaart veilig uit het apparaat te verwijderen
wanneer het apparaat is ingeschakeld, selecteer Ontgrendelen SD-kaart
om veilig de SD-kaart te verwijderen en zo beschadigingen te voorkomen.
Page 24

Settings
TAAL & TOETSENBORD
1. Selecteer plaats van handeling: Selecteer taal en regio.
2. Android volledig-scherm: Instellingen voor Android volledig-scherm.
3. Android-toetsenbord: Instellingen voor Android-toetsenbord.
4. Pinyin IME: Instellingen Pinyin IME.
5. Gebruikerswoordenboek: Voeg toe & verwijder woorden uit het
gebruikerswoordenboek.
DATUM & TIJD
1. Instellen datum: Stel huidige datum in.
2. Selecteren tijdzone: Stel huidige tijdzone in.
3. Instellen tijd: Stel huidige tijdzone in.
4. 24-uurs indeling gebruiken: Vink 24-uurs tijdsindeling aan om te
gebruiken.
5. Selecteren datumindeling: Selecteer datumindeling.
KALIBRATIE AANRAAKPANEEL
Om het aanraakscherm te kalibreren, gebruik uw vinger om
de ( + ) aan te raken als deze op elk vlak van het scherm verschijnt.
USB-MODUS SELECTEREN
Selecteren USB-modus: OTG/HOST/SLAVE
Host-modus: Selecteer de optie USB host-modus.
Vervolgens kunt u U-disk of 3G-modules aanbrengen.
MEDIABIBLIOTHEEK UPDATEN
Kies, bij het invoeren of verwijderen van een SD-geheugenkaart of
USB, “update mediabibliotheek” om de gegevens te updaten;
Kies, bij het kopiëren van een bestand naar het geheugen of bij het
verwijderen van opgeslagen bestanden in het geheugen, “update
mediabibliotheek” om de gegevens te updaten.
HERSTELLEN FABRIEKSGEGEVENS
Dit verwijdert alle gegevens van het apparaat inclusief:
1. Uw Google account
2. Systeem- en toepassingsgegevens en instellingen
3. Download-toepassingen
Het verwijdert niet:
1. Huidige systeemsoftware en gebundelde toepassingen
2. SD-kaartbestanden, zoals muziek of foto’s
OVER HET APPARAAT
Over het apparaat bevat informatie over uw apparaat.
Page 25

Software Installatie & Beheer
APK INSTALLER
Het apparaat maakt gebruik van toepassing van derden om zo de
meeste toepassingen via het netwerk beschikbaar te stellen.
Klik( ) , opties voor APK installer zullen als pop-up op het scherm
verschijnen.
1. Installeren: Klik Installeren om de interface voor APK installer te
openen, en selecteer de toepassingen in het gewenste, te installeren
APK-formaat. Nadat de installatie klaar is, keert het apparaat terug
naar het Home-scherm.
2. Beheer: Klik ‘‘ Beheer’’ om de beheertoepassing te starten.
Launch : Start de geselecteerde toepassing.
Exporteren naar SD: Exporteer de geselecteerde toepassing naar
een SD-kaart.
Installatie ongedaan maken: Maak de installatie van de geselecteerde
toepassing ongedaan.
Zoeken op market: Zoek de geselecteerde toepassing op Market.
Annuleren: Annuleren om terug te keren naar vorig scherm.
Het installeren van de invoermethode:
1. Maak verbinding met het netwerk
2. Ga naar Market
3. Klik op de knop Zoeken om alle benodigde invoermethodes te zoeken
4. Selecteer de gewenste invoermethode
5. Klik [Installeren/Bevestigen] om de invoermethode te downloaden en
installeren.
6. Nadat de installatie klaar is, open INSTELLING vanuit het
home-scherm en open vervolgens TAAL EN TOETSENBORD om de
geïnstalleerde invoermethode te selecteren.
Opmerking: De geïnstalleerde invoermethode kan alleen als
geselecteerd in de lijst worden weergegeven.
ES-BESTANDSEXPLORER
Selecteer ( ) om de Explorer te openen, u kunt door de opgeslagen
bestanden in het apparaat bladeren. Raak de volgende pictogrammen
aan om verschillende bewerkingen uit te voeren.
Home: Gebruik de explorer om het pad van de SD-Kaart, het Interne
Geheugen en USB weer te geven.
Niveau Omhoog: Keer terug naar vorige map welke een niveau
hoger ligt of verlaat de toepassing.
Multi: Selecteer meer bestanden of mappen.
Editor: 1. Kopiëren: Kopieer bestand of map.
2. Verwijderen: Kopieer bestand of map.
3. Knippen: Knip geselecteerd bestand of map naar een andere locatie.
4. Plakken: Plak geselecteerd bestand of map naar een andere locatie.
5. Hernoemen: Kopieer bestand of map.
Terug: Keer terug naar het vorige scherm. Volgende: Open het volgende scherm.
ANDROID MARKET
Android Market voorziet directe toegang tot toepassingen en spelletjes die u op het apparaat kunt
downloaden en installeren.
Page 26

Item
Basis functies
Processor Snelheid 600-800MHz
DDR2 256MB
See package
Micro SD Card
TFT LCD
4:3
Ja
Ja
Ja
Ja
Ja
Ja
12V, 1.25A
Zie verpakking
Virtueel (Aanraakscherm)
Engels / Chinees
802.11 b/g
2.1+EDR
Zie verpakking
MP3, WMA, APE, FLAC, AAC, OGG, AC3, WAV
JPEG, BMP, GIF, PNG
Android 2.1
Zie verpakking
MKV(H.264 HP), AVI, RM/RMVB, FLV, MPEG-1,
MPEG-2
Enkelvoudig-aanraken of Meervoudig-aanraken
(afhankelijk van het aangekochte model)
7’’-Inch (diagonal)
800 x 600 pixels
30H(stand by)
7.4 V, 1500mAH
10’’-Inch (diagonal)
1024 x 768 pixels
52H(stand by)
7.4 V, 2600mAH
Systeem Geheugen
Flash Drive Capaciteit
Expansie Slot
Scherm Type
Scherm Grootte
Beeldverhouding
Scherm Resolutie
Auto Orientation
Geïntegreerde Microfoon
Luidspreker
Hoofdtelefoon Plug
Batterijlevensduur
Batterij
Adapter
Toetsenbord
USB 2.0
Mini HDMI
3G(optional)
Video
Audio
Afbeeldingen
Besturingssysteem
Voorgeinstalleerd Toepas.
Handschrift Herkenning
Aanwijsapparaat
Achterzijde 2 Mega Pixel
CMOS camera (optioneel)
Geïntegreede Wi-Fi
Geïntegreerde Bluetooth
Weergave
Audio
Vermogen
Ingangen en
uitgangen
Ingebouwde
Decoders
Software
Verbinding
Model 7’’ 10’’
SPECIFICATIE
Page 27

KLANTENONDERSTEUNING
U kunt contact opnemen met Ricatech klantenservice als u een vraag of een probleem heeft met uw
Ricatech product. U kunt contact met ons opnemen per telefoon en e-mail.
E-mail
Voor klantenondersteuning per e-mail, gelieve een e-mail te sturen naar support@ricatech.com. Zorg
ervoor dat u het modelnummer en het serienummer van het product vermeldt, onder vermelding van
uw naam & adres en een duidelijke omschrijving van uw vraag of probleem.
Telefoon
Voor telefonische klantenondersteuning belt u naar +32 3 3265694. Een van onze servicemedewerkers zal u dan te woord staan.
Voor de volledige procedure kunt u terecht op de website van Ricatech: www.ricatech.com
Page 28

Francais
TABLE DES MATIERES
Mises en garde
Mises en garde--------------------------------------------------------------------Contenu de l’emballage----------------------------------------------------------
Aperçu du matérielt
Aperçu du matériel-----------------------------------------------------------------
Pour commencer
Recharger la batterie---------------------------------------------------------------
Mise en marche / Arrêt-------------------------------------------------------------
Interface de fonctionnement
Utilisation de l’écran tactile -------------------------------------------------------
Fonctions de base -----------------------------------------------------------------Ouverture & Changement d’applications-------------------------------------Aperçu de la barre d’état ----------------------------------------------------------
Paramètres
Ouverture des paramètres--------------------------------------------------------
Sans-l & réseaux -----------------------------------------------------------------Son & afchage ---------------------------------------------------------------------
Localisation & sécurité------------------------------------------------------------
Applications -------------------------------------------------------------------------
Condentialité -----------------------------------------------------------------------
Stockage de la carte SD & de l’appareil--------------------------------------Langue & clavier -------------------------------------------------------------------Date & heure -----------------------------------------------------------------------Calibration de l’écran tactile-----------------------------------------------------Sélection du mode USB ---------------------------------------------------------Mise à jour de la bibliothèque média ----------------------------------------Réinitialisation aux paramètres d’une-----------------------------------------A propos de l’appareil --------------------------------------------------------------
Installation et gestion du logiciel
Installateur APK ---------------------------------------------------------------------
Explorateur de chiers ES--------------------------------------------------------
Android Market----------------------------------------------------------------------
Caractéristiques---------------------------------------------------------------------
Page 29

ATTENTION
Humidité
Ouvert sans
autorisation
Température élevée
Mauvaise ventilation
Tablette média Manuel d’utilisation
Câble mini USB
Adaptateur
Dommages objet dur
Poussière et fumée
Page 30

APERÇU DU MATERIEL
1. Alimentation
2. Volume / Retour
3. Voyant DEL d’alimentation
4. Voyant DEL de charge
5. Accueil
6. Ecran tactile
7. Haut-parleur
8. Appareil photo (en option)
9. Styliste
10. Microphone
11. Fente pour micro SD
12. Prise pour écouteurs
13. Port mini USB
14. Prise de sortie mini HDMI
15. Réinitialisation
16. Prise d’alimentation
Page 31

POUR COMMENCER
RECHARGER LA BATTERIE
1. Brancher l’adaptateur à une prise de courant et connecter l’autre extrémité à l’appareil. Le voyant
DEL de charge s’allume en rouge, ce qui signie que l’appareil est en cours de charge.
2. Pendant la mise en charge, une icône de batterie animée apparaît à l’écran. Lorsque l’appareil est
entièrement chargé, l’icône de batterie animée s’immobilise et devient verte.
Remarque : Si l’appareil est entièrement déchargé, veuillez le connecter à une prise de courant. Le
message « Batterie faible, en cours de charge » s’afchera à l’écran. L’appareil doit être mis à charger
quelques minutes avant de pouvoir être utilisé.
Optimisation de l’autonomie de la batterie
1. Cet appareil fonctionne avec une batterie Li-Ion polymère interne, et doit être chargé au moyen de
l’adaptateur fourni.
2. Les deux premières fois, il est recommandé de charger entièrement la batterie pendant 8 heures.
Après cela, l’appareil pourra être entièrement chargé en 4 heures.
3. Il est recommandé de charger entièrement l’appareil au moins une fois par mois pour éviter
d’endommager la batterie de façon permanente.
MISE EN MARCHE / ARRET
Pour mettre l’appareil en marche, appuyez sur le bouton d’alimentation ( ) pendant 3trois secondes.
Pour arrêter l’appareil, appuyez sur le bouton d’alimentation ( ) pendant trois secondes, puis sélectionnez « ARRET » puis
« OK » à l’écran.
Remarque : 1. 1. L’appareil s’arrête automatiquement lorsque le niveau de batterie est faible.
2. Si l’appareil n’est pas arrêté correctement, il essaiera de scanner et réparer
les données stockées en mémoire après être remis en marche. Pour cette raison, il peut mettre plus
longtemps à démarrer.
3. Appuyez sur le bouton d’alimentation ( ) pour mettre l’appareil en mode de veille économie
d’énergie. Pour le rallumer, il vous suft d’appuyer à nouveau sur le bouton d’alimentation ( ).
Page 32

INTERFACE DE FONCTIONNEMENT
UTILISATION DE L’ECRAN TACTILE
Pour contrôler les fonctions d’Android, la meilleure façon est
d’utiliser le bout du doigt pour manipuler les icônes, les boutons,
les éléments de menu, le clavier à l’écran ainsi que les autres
éléments de l’écran tactile, pour zoomer et dézoomer sur des
photos, des pages Internet, des emails et des plans. Il est
également possible de changer l’orientation de l’écran.
Toucher :
Pour utiliser des éléments à l’écran, tels que des icônes
d’applications et de paramètres, pour entrer des lettres ou des
symboles au moyen du clavier à l’écran, ou encore pour appuyer
sur des boutons à l’écran, il suft de les toucher du doigt.
Toucher & Maintenir :
Vous pouvez toucher & maintenir un élément à l’écran en le touchant sans lever le doigt jusqu’à ce
qu’une action se produise. Par exemple, pour ouvrir un menu
an de personnaliser l’écran d’accueil, touchez une zone vide
de l’écran d’accueil jusqu’à ce que le menu s’ouvre.
Tirer :
Touchez & maintenez un élément pendant un certain temps puis déplacez le doigt sur l’écran sans le
lever jusqu’à ce que vous atteigniez la position souhaitée. Vous pouvez tirer des éléments sur l’écran
d’accueil pour les repositionner.
Faire déler ou glisser :
Pour faire déler ou glisser, passez rapidement le doigt sur l’écran sans vous arrêter au moment où
vous entrez en contact avec sa surface. (An d’éviter de tirer un élément à la place.) Vous pouvez par
exemple faire glisser l’écran de haut en bas pour faire déler une liste, et dans certains afchages du
Calendrier il vous est possible de glisser rapidement en travers
de l’écran pour modier la plage de temps afchée.
Double tapotement :
Tapotez rapidement à deux reprises sur une page Internet, une
carte, ou un autre écran pour zoomer. Vous pouvez par exemple
faire un double tapotement sur une section de page dans
le Navigateur pour zoomer sur cette section an qu’elle s’adapte
à la largeur de l’écran.Toucher (+/-) dans le coin inférieur droit
permet également de réaliser un zoom.
Pincement (resserrer ou écarter les doigts)
(ne fonctionne que sur les modèles multi-tactiles) :
Lorsque vous visualisez des photos, des pages Internet, des
emails ou des cartes, vous pouvez zoomer et dézoomer en
resserrant ou en écartant deux doigts.
Faire pivoter l’écran :
L’orientation de l’écran pivote en même temps que l’appareil si vous le faites tourner sur le côté quand
il est droit, et inversement.
Page 33

INTERFACE DE FONCTIONNEMENT
FONCTIONS DE BASE
1. Ecrans d’accueil extensifs :
Cinq écrans d’accueil extensifs sont disponibles pour vous permettre de placer vos raccourcis, vos
widgets etc. Pour basculer d’un écran à l’autre, glissez du bout du doigt vers la gauche ou la droite ou
cliquez sur l’icône de la page.
2. Gestion de l’icône d’écran d’accueil/extensif
2.1) Pour ajouter un élément à l’écran d’accueil :
2.1.1) Ouvrez l’écran d’accueil sur lequel vous souhaitez ajouter
l’élément.
2.1.2) Appuyez sur Menu ( ) ou appuyez & maintenez simplement
un emplacement vide de l’écran d’accueil. S’il n’y a pas
d’emplacements vides sur l’écran d’accueil, « Ajouter » est
grisé.
Vous devrez supprimer ou déplacer un élément avant de
pouvoir en ajouter un nouveau, ou passer à un autre écran
d’accueil.
2.1.3) Dans le menu qui s’ouvre, touchez le type d’élément à ajouter.
2.2) Pour déplacer un élément sur l’écran d’accueil
2.2.1) Touchez & maintenez l’élément que vous souhaitez déplacer.
2.2.2) Tirez l’élément jusqu’à un nouvel emplacement sur l’écran.
Arrêtez-vous un moment au bord de l’écran pour tirer l’élément jusqu’à un autre panneau de
l’écran d’accueil.
2.2.3) Ôtez votre doigt lorsque l’élément se trouve là où vous le souhaitez.
2.3) Pour ôter un élément de l’écran d’accueil :
2.3.1) Touchez & maintenez l’élément que vous souhaitez ôter.
2.3.2) Tirez l’élément jusqu’à l’icône de Corbeille.
2.3.3) Lorsque l’icône devient rouge, ôtez votre doigt.
2.4) Pour changer le papier peint de l’écran d’accueil
2.4.1) Touchez & maintenez une zone vide de l’écran d’accueil,
puis touchez Papiers peints dans le menu qui s’ouvre.
2.4.2) Touchez Papiers peints animés, Images, ou Papiers peints.
2.4.3) Sélectionnez le papier peint que vous souhaitez utiliser, puis
touchez Sauvegarder ou Dénir comme papier peint.
2.5) Pour renommer un dossier
2.5.1) Touchez le dossier pour l’ouvrir.
2.5.2) Touchez & maintenez la barre de titre de la fenêtre du dossier.
2.5.3) Entrez un nouveau nom dans la boîte de dialogue qui s’ouvre.
2.5.4) Touchez OK.
Page 34

INTERFACE DE FONCTIONNEMENT
OUVERTURE & CHANGEMENT D’APPLICATIONS
1. Pour ouvrir et fermer Launcher ( )
- Touchez l’icône Launcher dans l’écran d’accueil pour l’ouvrir.
(Si vous avez plus d’applications que Launcher ne peut en afcher
en une fois, vous pouvez faire glisser celui-ci vers le haut ou le bas
pour les afcher.)
- Touchez le bouton Accueil pour fermer Launcher.
2. Pour ouvrir une application
- Touchez l’icône d’une application dans Launcher. OU
- Touchez l’icône d’une application sur l’écran d’accueil.
3. Pour basculer vers une application récemment utilisée
3.1) Appuyez & maintenez le bouton Accueil. (Une petite fenêtre,
contenant les icônes des applications que vous avez utilisées
récemment, s’ouvre.)
3.2) Touchez une icône pour lancer son application. (Ou appuyez sur Retour pour retourner à
l’application en cours)
APERÇU DE LA BARRE D’ETAT
1. Touchez l’icône de paramètres de langue ( ) pour réinitialiser la langue.
2. Touchez l’icône de paramètres de connexion ( ) pour afcher les paramètres sans-l et de réseaux.
3. Touchez l’icône de capteur d’orientation de l’écran ( ) pour activer ou désactiver cette fonction.
4. Touchez l’icône de reconnaissance d’écriture manuscrite ( ) pour activer ou désactiver cette fonction.
5. Touchez à plusieurs reprises l’icône de contrôle de la luminosité ( ) pour sélectionner le niveau de
luminosité.
6. Touchez l’icône Retour ( ) pour retourner à l’écran précédent.
7. Touchez l’icône Menu ( ) pour afcher les paramètres de menu.
Etat 3G
Etat de connexion WIFI
Capteur d’orientation de l’écran
Marche/Arrêt
Etat de la batterie Paramètres de connexion Contrôle de la luminosité
Heure actuelle Paramètres de langue Retour Menu
Reconnaissance
d’écriture manuscrite
Marche/Arrêt
Page 35

PARAMETRES
OUVERTURE DES PARAMETRES
L’application Paramètres contient la plupart des outils qui vous
permettent de personnaliser et congurer votre appareil.
Pour ouvrir les Paramètres :
- Appuyez sur Accueil, puis sur Menu, et touchez Paramètres. OU
- Touchez l’icône Paramètres dans l’écran d’accueil ou dans
Launcher.
SANS-FIL & RESEAUX
Gestion des paramètres Wi ( ) et connexion au réseau
sans-l.
1) Wi
- Vériez que la Wi est activée ( ) an de pouvoir vous
connecter aux réseaux Wi.
2) Paramètres Wi
2.1) Pour vous connecter à un réseau Wi ( ), cliquez
sur les paramètres Wi et attendez que l’appareil trouve les
réseaux disponibles.
2.2) Lorsque les réseaux Wi souhaités apparaissent, touchez
simplement celui que vous avez choisi pour établir la
connexion.
2.3) S’il s’agit d’un réseau Wi sécurisé, il vous sera demandé
de saisir un mot de passe avant de pouvoir établir la connexion.
3) Bluetooth
- Vériez que le Bluetooth est activé an de pouvoir vous
connecter aux appareils Bluetooth
4) Paramètres Bluetooth
4.1) Pour rechercher des appareils Bluetooth
4.1.1) Appuyez sur Rechercher des appareils pour commencer à rechercher les appareils Bluetooth à
portée.
4.1.2) Une fois que le nom de l’appareil Bluetooth désiré apparaît dans la liste, touchez-le simplement
et commencez l’appariement
4.2) Pour permettre la détection de l’appareil
4.2.1) Cochez la case Détectable, et votre appareil pourra être détecté par les autres appareils
Bluetooth pendant 120 secondes
4.2.2) Votre appareil Bluetooth doit être capable de rechercher l’appareil. Le nom de l’appareil apparaîtra exactement tel qu’il est fourni selon le paramètre de nom.
4.2.3) Pour désactiver la fonction de détection après l’appariement, décochez simplement la case détectable ou attendez 120
secondes : l’appareil deviendra automatiquement non-détectable.
5) Ecran de paramétrage de réseaux mobiles
Activé pour données : Décochez pour empêcher l’appareil de transmettre des données sur tout ré-
seau mobile. Roaming data : Décochez pour empêcher l’appareil de transmettre des données sur les
réseaux mobiles d’autres fournisseurs lorsque vous ne pouvez pas accéder au réseau mobile de votre
propre fournisseur. Utilisation de données : Disponible uniquement si votre fournisseur applique une
politique d’utilisation des données sur réseau mobile.Nom de point d’accès : Ouvre l’écran APN, dans
lequel vous pouvez sélectionner la conguration du point d’accès mobile ; ou appuyez sur Menu pour
ajouter un nouvel APN. Consultez votre fournisseur pour savoir comment utiliser les fonctions de cet
écran.
Page 36

PARAMETRES
Opérateurs réseaux :
Ouvre un écran qui recherche et afche les réseaux mobiles compatibles
avec l’appareil. Consultez votre fournisseur pour connaître les répercussions qu’aura le choix d’un
autre fournisseur sur votre facture.
SON & AFFICHAGE
Paramètres de son
1. Volume médias : Dénit le volume de la musique et des vidéos.
2. Sonnerie de notication : Dénit votre sonnerie de notication par
défaut.
3. Sélection audible : Emet un son lorsque vous effectuez une sélection
à l’écran.
4. Notication carte SD : Emet un son pour les notications relatives à
la carte SD.
Paramètres d’afchage
1. Orientation: Bascule automatiquement l’orientation lorsque vous
tournez l’appareil.
2. Animation: Toutes les animations de fenêtre sont afchées.
3. Luminosité : Ajuste la luminosité de l’écran.
4. Délai de mise en veille de l’écran : Ajuste le délai avant l’arrêt
automatique de l’écran.
LOCALISATION & SECURITE
1. Utiliser les réseaux sans l : La position est déterminée par la
Wi et/ou les réseaux mobiles.
3. Mot de passe visible : Afche le mot de passe lors de la saisie.
APPLICATIONS
1. Sources inconnues : Sources inconnues : Permet l’installation
d’applications autres que Market.
2. Gestion des applications : Gère et supprime les applications
installées.
3. Services en cours : Visualisation et contrôle des services
actuellement en cours.
4. Développement : Dénit des options pour le développement
d’applications.
CONFIDENTIALITÉ
1. Utiliser ma position : Utiliser ma position pour les résultats de
recherche Google et autres services Google.
2. Sauvegarder les paramètres : Sauvegarde mes paramètres ou
supprime toutes les sauvegardes sur
le serveur Google.
STOCKAGE DE LA CARTE SD & DE L’APPAREIL
Afche l’espace de stockage disponible dans la mémoire interne de
l’appareil et sur la carte SD. Remarque : Pour ôter la carte SD en toute
sécurité lorsque l’appareil est en marche, sélectionnez Extraire la carte SD, pour l’ôter sans
dommages.
Page 37

PARAMETRES
LANGUE & CLAVIER
1. Sélection paramètres locaux : Sélectionne la langue et la région.
2. Android plein écran : Paramètres plein écran pour Android.
3. Clavier Android : Paramètres clavier Android.
4. Pinyin IME: Paramètres pour écrire en Pinyin IME.
5. Dictionnaire utilisateur : Ajoute & supprime des mots du dictionnaire
utilisateur.
DATE & HEURE
1. Paramètres de date : Dénit la date actuelle.
2. Sélection fuseau horaire : Dénit le fuseau horaire actuel.
3. Paramètres d’heure : Dénit l’heure actuelle.
4. Utiliser le format 24 heures : Cochez pour utiliser le format 24 heures.
5. Sélection format de date : Dénit le format de la date.
CALIBRATION DE L’ECRAN TACTILE
Pour calibrer l’écran tactile, touchez
le (+) du bout du doigt au fur et à mesure de son apparition sur
différentes zones de l’écran.
SELECTION DU MODE USB
Sélection du mode USB : OTG/HOST/SLAVE
Mode Host : Sélectionnez le mode Host pour l’USB, ce qui vous
permet de monter des modules U-Disk ou 3G.
MISE A JOUR DE LA BIBLIOTHEQUE MEDIA
Lorsque vous insérez ou retirez la carte mémoire SD ou un dispositif
USB, veuillez choisir « Mise à jour de la bibliothèque média » pour
mettre les données à jour.
Lorsque vous copiez des chiers dans la mémoire ou que vous
supprimez des chiers stockés en mémoire, veuillez choisir «
Mise à jour de la bibliothèque média » pour mettre les données à jour.
REINITIALISATION AUX PARAMETRES D’USINE
Cette manipulation effacera toutes les données de votre appareil,
y compris :
1. Votre compte Google
2. Les données et paramètres du système et des applications
3. Les applications téléchargées
Elle n’effacera pas :
1. Le logiciel actuel du système et les applications fournies
2. Les chiers de la carte SD, tels que de la musique ou des photos
A PROPOS DE L’APPAREIL
Cette section contient des informations au sujet de votre appareil.
Page 38

INSTALLATION & GESTION DE LOGICIEL
INSTALLATEUR APK
L’appareil utilise des applications de tierces parties pour accéder à la plupart des applications par le
biais d’un réseau.
Cliquez sur ( ), les options d’installation APK s’afcheront à l’écran.
1. Installer: Cliquez sur Installer pour entrer dans l’interface d’installation
APK, puis sélectionnez l’application au format APK que vous souhaitez
installer. Une fois l’installation terminée, l’appareil retournera à l’écran
d’accueil.
2. Gérer : Cliquez sur ‘‘Gérer’’ pour commencer à gérer l’application.
Exécuter : Exécute l’application sélectionnée.
Exporter vers SD : Exporte l’application sélectionnée vers la carte SD.
Désinstaller : Désinstalle l’application sélectionnée.
Chercher sur Market : Recherche l’application sélectionnée sur Market.
Annuler : Annule et retourne à l’écran précédent.
Comment installer la méthode d’entrée :
1. Connexion au réseau
2. Entrée dans Market
3. Cliquer sur le bouton Rechercher pour chercher toutes les méthodes
d’entrée nécessaires
4. Sélectionner la méthode d’entrée souhaitée
5. Cliquer sur [Installer/Conrmer] pour télécharger et installer la méthode
d’entrée
6. Une fois l’installation terminée, veuillez entrer PARAMETRES à partir
de l’écran d’accueil, puis ouvrir LANGUE ET CLAVIER pour
sélectionner la méthode d’entrée installée.
Remarque : Les méthodes d’entrée installées ne peuvent s’afcher
dans la liste que si elles sont sélectionnées.
EXPLORATEUR DE FICHIERS ES
Sélectionnez ( ) pour entrer dans l’Explorateur, qui vous permettra
de naviguer parmi les chiers stockés dans l’appareil. Touchez les icônes
suivantes pour réaliser différentes opérations.
Accueil : Accède à l’Explorateur pour afcher le chemin d’accès à la
carte SD, à la mémoire interne et au dispositif USB.
Niveau supérieur : Retourne au dossier précédent, un niveau plus
haut, ou quitte l’application.
Muilti: Sélectionne plusieurs chiers ou dossiers.
Editeur : 1. Copier : Copie le chier ou dossier.
2. Supprimer : Supprime le chier ou dossier.
3. Couper : Coupe le chier ou dossier sélectionné pour un autre emplacement.
4. Coller : Colle le chier ou dossier coupé dans un emplacement spécique.
5. Renommer : Renomme le chier ou dossier.
Retour : Retourne à l’écran précédent. Suivant : Passe à l’écran suivant.
ANDROID MARKET
Android Market fournit un accès direct aux applications et aux jeux pouvant être téléchargés et
installés sur l’appareil.
Page 39

Elément.
Caractéristiques
de base
Vitesse du processeur 600-800MHz
DDR2 256MB
Voir emballage
Micro carte SD
TFT LCD
4:3
Qui
Qui
Qui
Qui
Oui
Oui
12V, 1.25A
Voir emballage
Virtuel (Ecran tactile)
Anglais / Chinois
802.11 b/g
2.1+EDR
Voir emballage
MP3, WMA, APE, FLAC, AAC, OGG, AC3, WAV
JPEG, BMP, GIF, PNG
Android 2.1
Veuillez vous référer au produit lui-même
MKV(H.264 HP), AVI, RM/RMVB, FLV, MPEG-1,
MPEG-2
Toucher unique ou multiple (en fonction du
modèle que vous avez acheté)
7’’ pouces (diagonale)
800 x 600 pixels
30H (veille )
7.4 V, 1500mAH
10’’ pouces (diagonale)
1024 x 768 pixels
52H (veille )
7.4 V, 2600mAH
Mémoire système
Capacité de mémoire ash
Lecteur supplémentaire
Type d’écran
Taille d’écran
Format de l’image
Résolution de l’écran
Auto Orientation
Microphone intégré
Haut-parleurs
Prise pour casque
Autonomie de la batterie
Batterie
Adaptateur
Clavier
USB 2.0
Mini HDMI
3G (en option)
Video
Audio
Images
Système d’exploitation
Application préchargée
Reconnaissance de l’écriture
Stylet
Panneau arrière 2 MPX
Appareil photo à puce
Wi intégrée
Bluetooth intégré
Afchage
Audio
Alimentation
Entrées & Sorties
Décodeurs
intégrés
Logiciel
Connexion
Modèle 7’’ 10’’
CARACTERISTIQUES
Page 40

SERVICE CONSOMMATEUR
Vous pouvez contacter le service consommateur de Ricatech si vous avez une question ou un problème avec votre produit Ricatech. Vous pouvez nous contacter par téléphone ou par email.
Email
Pour une assistance par email, veuillez nous écrire à l’adresse support@ricatech.com. Assurezvous de bien nous communiquer le numéro de modèle et le numéro de série du produit, vos nom et
adresse ainsi qu’une description claire de votre problème ou votre question.
Téléphone
Pour contacter le service consommateur par téléphone, composez le +32 3 3265694. Un membre de
notre personnel se tiendra à votre service.
Pour toutes les procédures, rendez vous sur le site web de Ricatech : www.ricatech.com
Page 41

Deutch
INHALTSVERZEICHNIS
Vorsicht
Vorsicht----------------------------------------------------------------------Packungsinhalt-------------------------------------------------------------
Überblick über die Hardware
Überblick über die Hardware--------------------------------------------------------------------------
Erste Schritte
Laden des Akkus-----------------------------------------------Ein-/Ausschalten-----------------------------------------------------------
Benutzeroberäche
Verwendung des Touchscreens --------------------------------------Grundlagen ----------------------------------------------------------------Öffnen von & Wechsel zwischen Anwendungen------------------Überblick über die Statusleiste -----------------------------------------
Einstellungen
Einstellungen beim Start-------------------------------------------------(Drahtlos)netzwerke ------------------------------------------------------Töne & Anzeige ------------------------------------------------------------Ort & Sicherheit------------------------------------------------------------
Anwendungen ---------------------------------------------------------------
Privatsphäre -----------------------------------------------------------------SD-Karte & Gerätespeicher-----------------------------------------------
Sprache & Tastatur -------------------------------------------------------Datum & Zeit ----------------------------------------------------------------Kalibrierung des Touchpanels-------------------------------------------USB-Moduswahl -----------------------------------------------------------Aktualisieren der Medienbibliothek -----------------------------------Rücksetzen auf Werksdaten---------------------------------------------
Über das Gerät --------------------------------------------------------------
Softwareinstallation und Management
APK Installer -----------------------------------------------------------------ES File Explorer-------------------------------------------------------------Android Market----------------------------------------------------------------
Spezikationen----------------------------------------------------------------
Page 42

VORSICHT
Feuchtigkeit
Öffnen ohne
Genehmigung
Hohe Temperaturen
Schlechte Belüftung
Media Tablet Bedienungsanleitung
Mini USB-Anschluss
Adapter
Schäden durch
harte Gegenstände
Staub und Rauch
Page 43

ÜBERBLICK ÜBER DIE HARDWARE
1. Energieversorgung
2. Lautstärke / Zurück
3. LED-Bereitschaftsanzeige
4. LED-Ladeanzeige
5. Hauptseite
6. Touchscreen
7. Lautsprecher
8. Kamera (optional)
9. Zeigestift
10. Mikrofon
11. Mikro-SD-Slot
12. Klinkenstecker
13. Mini USB-Anschluss
14. Mini HDMI-Ausgang
15. Rücksetzung
16. Netzbuchse
Page 44

ERSTE SCHRITTE
LADEN DES AKKUS
1. Stecken Sie ein Ende des Adapters in eine Netzsteckdose, das andere in das Gerät. Die LEDLadeanzeige wird rot und zeigt so an, dass das Gerät aktuell geladen wird.
2. Während des Ladens erscheint eine Akku-Animation auf dem Bildschirm. Wenn das Gerät vollständig geladen ist, hält die Akku-Animation an und wechselt seine Farbe nach grün.
Hinweis: Ist das Gerät komplett entladen, schließen Sie es bitte an eine Netzsteckdose an. Der
Bildschirm wird anzeigen “Zu wenig Akkuladung, lade...” Sie müssen das Gerät für ein paar Minuten
laden, bevor Sie es betreiben können.
Maximierung der Akku-Lebensdauer
1. Das Gerät wird mit einem Lithium-Ionenpolymerakku betrieben und muss mit dem zugehörigen
Adapter geladen werden.
2. Es empehlt sich, den Akku bei den ersten beiden Verwendungen für 8 Stunden zu laden. Später
lädt sich das Gerät innerhalb von 4 Stunden vollständig.
3. Es empehlt sich, das Gerät mindestens einmal pro Monat vollständig zu laden, um Folgeschäden
am Akku zu vermeiden.
EIN-/AUSSCHALTEN
Um das Gerät einzuschalten, halten Sie die Ein-/Ausschalttaste ( ) drei Sekunden lang gedrückt.
Um das Gerät abzuschalten, halten Sie die Ein-/Ausschalttaste ( ) drei Sekunden lang gedrückt und
wählen Sie dann “OFF” und
“OK” auf dem Bildschirm.
Hinweis: 1. Das Gerät schaltet sich automatisch ab, wenn der Akku leer ist.
2. Wenn das Gerät nicht richtig heruntergefahren wird, wird es versuchen, nach dem Neustart
einen Scan und eine Speicherreparatur auszuführen. Dadurch fährt das Gerät möglicherweise lang-
samer hoch.
3. Durch Drücken der Ein-/Ausschalttaste ( ) wird das Gerät in den stromsparenden Standby-Modus
versetzt. Um es wieder einzuschalten, drücken Sie einfach die Ein-/Ausschalttaste ( ) erneut.
Page 45

BENUTZEROBERFLÄCHE
VERWENDUNG DES TOUCHSCREENS
Die Hauptmethode zur Steuerung der Android-Funktionen besteht
darin, mit dem Finger Icons, Schaltächen, Menüpunkte oder die
Bildschirmtastatur anzutippen oder damit andere Symbole auf dem
Touchscreen zu steuern sowie Fotos, Webseiten, E-Mails und
Karten zu vergrößern und verkleinern. Sie können auch die
Orientierung des Bildschirms ändern.
Antippen:
Um Symbole auf dem Bildschirm wie Anwendungen und
Einstellungssymbole anzuwählen, zum Eintippen von Buchstaben
und Symbolen mittels der Bildschirmtastatur oder zum Betätigen
von Schaltächen auf dem Bildschirm können Sie diese einfach
mit dem Finger antippen.
Antippen & gedrückt halten:
Tippen Sie ein Symbol an und lassen Sie Ihren Finger auf dem Bildschirm, bis eine Aktion ausgeführt
wird. Um beispielsweise ein Menü zu öffnen,
oder für die Anpassung des Hauptbildschirms berühren Sie einen leeren Fleck auf dem
Hauptbildschirm, bis sich das Menü öffnet.
Ziehen:
Lassen Sie den Finger auf einem Symbol und bewegen Sie diesen dann, ohne das Symbol loszulassen, auf dem Bildschirm fort, bis Sie die Zielposition erreicht haben. Sie können Symbole auf dem
Hauptbildschirm verschieben, um ihnen neue Positionen zu geben.
Blättern oder scrollen:
Um zu blättern oder zu scrollen, bewegen Sie Ihren Finger über die Bildschirmoberäche. Dabei
pausieren Sie nach der ersten Berührung nicht. ( Dies ist ein Unterschied zum Ziehen von Symbolen ).
Beispielsweise können Sie auf dem Bildschirm nach oben oder
unten blättern, um durch eine Liste zu scrollen. In einigen
Kalenderansichten können sie auch schnell über den Bildschirm
blättern, um den sichtbaren Zeitbereich zu verändern.
Doppeltipp:
Tippen Sie schnell zweimal auf eine Webseite, Karte oder einen
anderen Bildschirm, um die Ansicht zu zoomen. Tippen Sie
beispielsweise einen Ausschnitt einer Webseite im Browser an,
um diesen auf Seitenbreite zu vergrößern. Berühren Sie (+ / -)
in der rechten unteren Ecke, um ebenfalls zu zoomen.
Zusammen- oder Auseinanderziehen der Finger
(funktioniert nur auf Multitouch-Modellen):
Beim Betrachten von Fotos, Webseiten, E-Mails oder Karten können Sie mit einem Zusammen- oder
Auseinanderziehen der Finger ein- und auszoomen.
Drehen des Bildschirms:
Die Ausrichtung des Bildschirms ändert sich, wenn Sie das Gerät von der aufrechten Position auf die
Seite und zurückdrehen.
Page 46

BENUTZEROBERFLÄCHE
GRUNDLAGEN
1. Erweiterte Hauptbildschirme:
Es gibt fünf erweiterte Hauptbildschirme für Ihre Shortcuts, Widgets und andere Dinge. Um zwischen
den Bildschirmen hin- und herzuschalten, blättern sie auf den Bildschirm mit dem Finger nach links oder
rechts oder tippen Sie auf das Symbol
Seite.
2. Symbol Erweiterten Hauptbildschirm Ändern/Verwalten
2.1) Zum Hinzufügen eines Symbols zum Hauptbildschirm:
2.1.1) Öffnen Sie den Hauptbildschirm, auf den Sie das
Symbol platzieren möchten.
2.1.2 Drücken Sie Me ( ) Oder berühren Sie einfach einen leeren
Ort auf dem Hauptbildschirm. Wenn kein leerer Ort auf dem
Hauptbildschirm existiert, ist “Hinzufügen” ausgegraut. Sie
müssen ein Symbol löschen oder verschieben, bevor Sie ein
anderes Symbol hinzufügen können, oder aber auf einen
anderen Hauptbildschirm wechseln.
2.1.3) Im sich dann öffnenden Menü berühren Sie das
hinzuzufügende Symbol.
2.2) Um ein Symbol auf dem Hauptbildschirm zu verschieben
2.2.1) Berühren Sie das Symbol, das sie bewegen möchten, länger.
2.2.2) Ziehen Sie das Symbol dann auf eine neue Position auf dem Bildschirm. Halten Sie am
Bildschirmrand inne, um das Symbol auf einen anderen Bildschirm zu verschieben.
2.2.3) Wenn sich das Symbol am gewünschten Platz bendet, heben Sie Ihren Finger wieder vom
Bildschirm.
2.3) Zum Entfernen eines Symbols vom Hauptbildschirm
2.3.1) Berühren Sie das Symbol, das sie entfernen möchten, länger.
2.3.2) Bewegen Sie das Symbol auf den Papierkorb.
2.3.3) Wenn das Symbol rot wird, heben Sie Ihren Finger an.
2.4) Um das Hintergrundbild des Hauptbildschirms zu ändern
2.4.1) Halten Sie eine leere Fläche des Hauptbildschirms gedrückt
und berühren Sie im sich dann öffnenden Menü Hintergrundbilder.
2.4.2) Berühren Sie Live-Hintergrundbilder, Fotos oder Hintergrundbilder.
2.4.3) Suchen Sie das gewünschte Hintergrundbild und berühren Sie
dann Hintergrund speichern oder einstellen.
2.5) Um einen Ordner umzubenennen
2.5.1) Berühren Sie den Ordner, um ihn zu öffnen.
2.5.2) Halten Sie die Titelleiste des Ordners gedrückt.
2.5.3) Geben Sie im sich dann öffnenden Dialog einen neuen Namen ein.
2.5.4) Tippen Sie auf OK.
Page 47

BENUTZEROBERFLÄCHE
ÖFFNEN VON & WECHSEL ZWISCHEN ANWENDUNGEN
1. Öffnen und Schließen des Launchers ( )
- Berühren Sie auf dem Hauptbildschirm das Launcher-Symbol,
um diesen zu öffnen. (Wenn Sie mehr Anwendungen auf dem
Bildschirm haben, als auf eine Ansicht passen, können Sie den
Launcher nach oben oder unten schieben, um mehr zu sehen.)
- Berühren Sie die Home-Taste, um den Launcher zu schließen.
2. Öffnen einer Anwendung
- Berühren Sie das Symbol der Anwendung auf dem Launcher.
ODER
- Berühren Sie das Symbol der Anwendung auf dem
Hauptbildschirm.
3. Wechsel zu einer kürzlich aufgerufenen Anwendung
3.1) Halten Sie die Taste Home gedrückt. (Es öffnet sich ein kleines
Fenster mit den Symbolen der Anwendungen, die Sie kürzlich aufgerufen haben.)
3.2) Berühren Sie ein Symbol, um die zugehörige Anwendung zu öffnen. (Drücken Sie alternativ
Zurück, um zur aktuellen Anwendung zurückzukehren)
ÜBERBLICK ÜBER DIE STATUSLEISTE
1. Berühren Sie die Spracheinstellung ( ), um die Sprache neu einzustellen.
2. Berühren Sie das Symbol für die Verbindungseinstellung ( ), um die Drahtlosnetzwerk- &
Netzwerkeinstellungen anzuzeigen.
3. Berühren Sie das Symbol des Bildschirm-Orientierungssensors ( ), um den Sensor zu aktivieren
oder zu deaktivieren.
4. Berühren Sie das Symbol für die Handschrifterkennung ( ), um die Funktion zur
Handschriftenerkennung an- oder abzuschalten.
5. Berühren Sie das Symbol für die Helligkeitssteuerung ( ) mehrmals, um die Helligkeit
anzupassen.
6. Berühren Sie das Symbol Zurück ( ), um zum vorherigen Bildschirm zurückzukehren.
7. Berühren Sie das Symbol Menü ( ), um die Menüeinstellungen anzuzeigen.
3G Status
WIFI-Verbindungsstatus Bildschirm-
Orientierungssensor Ein/Aus
Akkustatus Verbindungseinstellung Helligkeitssteuerung
Huidige tijd Spracheinstellung Zurück Menü
HandschriftErkennung Ein/Aus:
Page 48

EINSTELLUNGEN
ÖFFNEN DER EINSTELLUNGEN
Die Einstellungs-Anwendung enthält die meisten Werkzeuge
zur Anpassung und Konguration Ihrs Gerätes.
Zum Öffnen der Einstellungen:
- Drücken Sie Home, dann Menü und dann Einstellungen. ODER
- Berühren Sie auf dem Hauptbildschirm oder im Launcher das
Einstellungs-Symbol, um diese zu öffnen.
(DRAHTLOS)NETZWERKE
Verwalten Sie die WiFi-Einstellungen ( ) und die Verbindung
zu Drahtlosnetzwerken.
1) WiFi
- Setzen Sie den Haken ( ), um sich mit
WiFi-Netzwerke zu verbinden.
2) WiFi-Einstellungen
2.1) Zur Verbindung mit einem WiFi-Netzwerk ( ) klicken Sie
auf die WiFi-Einstellungen und warten Sie, bis das Gerät nach
verfügbaren Netzwerken gesucht hat.
2.2) Erscheint das gewünschte WiFi-Netzwerk, berühren Sie
es einfach, um eine Verbindung damit herzustellen.
2.3) Handelt es sich bei dem WiFi-Netzwerk um ein gesichertes
Netzwerk, müssen Sie ein Passwort eingeben, bevor Sie eine
Verbindung aufbauen können.
3) Bluetooth
- Setzen Sie den Haken, um Bluetooth einzuschalten,
so dass Sie sich mit Bluetooth-Geräten verbinden können
4) Bluetooth-Einstellungen
4.1) Suche nach Bluetooth-Geräten
4.1.1) Berühren Sie Nach Geräten Suchen, um nach Bluetooth-Geräten in Reichweite zu suchen.
4.1.2) Erscheint der Name des gewünschten Bluetooth-Gerätes in der Liste, berühren Sie diesen und
beginnen Sie mit der Verbindung
4.2) Sichtbarmachen des Gerätes
4.2.1) Haken Sie die Checkbox Sichtbar an. Das Gerät wird dann für andere
Bluetooth-Geräte 120 Sekunden lang sichtbar
4.2.2) Ihr Bluetooth-Gerät sollte nun nach dem Gerät suchen können. Der Name des Gerätes erscheint
genau so, wie er in den Geräteeinstellungen eingegeben wurde.
4.2.3) Um die Sichtbarkeit nach dem Verbinden wieder abzustellen, deaktivieren Sie Sichtbarkeit ein
fach oder warten Sie 120 Sekunden, bis das Gerät automatisch unsichtbar wird.
5) Einstellbildschirm für mobile Netzwerke
- Datentransfer: Deaktivieren Sie diese Option, damit keine Daten über ein mobiles Netzwerk
übertragen werden.
- Datenroaming: Deaktivieren Sie diese Option, damit keine Daten über mobile Netzwerke von
Fremdanbietern gesendet werden, wenn das Netzwerk Ihres eigenen Dienstanbieters nicht zur
Verfügung steht.
- Datenverwendung: Steht nur zur Verfügung, wenn Ihr Dienstanbieter Nutzungsbedingungen für
mobilen Datentransfer verhängt hat.
- Accesspoint-Bezeichnung: Öffnet den APN-Bildschirm, auf dem Sie mobile Accesspoints
kongurieren können; drücken Sie alternativ Menü, um einen neuen APN hinzuzufügen. Wenden Sie
sich für die Verwendung der Werkzeuge auf diesem Bildschirm an Ihren Dienstanbieter.
Page 49

EINSTELLUNGEN
- Netzwerkbetreiber:
Öffnet einen Bildschirm, der nach mobilen Netzwerkbetreibern sucht, die mit
dem Gerät. Wenden Sie sich an Ihren Dienstanbieter, um die Kosten für die Wahl eines anderen
Dienstanbieters zu erfragen.t
TON & ANZEIGE
Toneinstellungen
1. Medienlautstärke: Stellen Sie die Lautstärke für Musik und Videos ein.
2. Benachrichtigungston: Stellen Sie den Standardton für
Benachrichtigungen ein.
3. Auswahlton: Tonwiedergabe bei Bildschirmauswahlen.
4. SD-Kartenbenachrichtigung: Tonwiedergabe für
SD-Kartenbenachrichtigungen.
Anzeigeeinstellungen
1. Orientierung: Schaltet die Orientierung bei Drehen des Gerätes
automatisch um.
2. Animation: Alle Fensteranimationen werden angezeigt.
3. Helligkeit: Stellt die Helligkeit des Bildschirms ein.
4. Bildschirmstandby: Stellt die Zeit an, bis sich der Bildschirm
automatisch abschaltet.
ORT & SICHERHEIT
1. Drahtlosnetzwerke verwenden: Der Standord wird durch
WiFi und/oder mobile Netzwerke ermittelt.
3. Passwortsichtbarkeit: Zeigt Passwörter beim Eintippen an.
ANWENDUNGEN
1. Unbekannte Quellen: Erlaubt die Installation von Anwendungen,
die nicht aus dem Market stammen.
2. Anwendungen verwalten: Verwalten und entfernen Sie installierte
Anwendungen.
3. Ausgeführte Dienste: Betrachten und steuern sie aktuell ausgeführte
Dienste.
4. Entwicklung: Stellen Sie Optionen für die Entwicklung von
Anwendungen ein.
PRIVATSPHÄRE
1. Meinen Standort verwenden: Verwenden Sie Ihren Standort für
Google-Suchergebnisse und andere Dienste von Google.
2. Meine Einstellungen sichern: Einstellungen sichern oder alle
Backups auf dem Google-Server löschen.
SD-KARTE & GERÄTESPEICHER
Zeigt den verfügbaren Speicher im internen Speicher und auf der
SD-Karte an. Hinweis: Um eine SD-Karte sicher zu entfernen, wenn das
Gerät eingeschaltet ist, wählen Sie SD-Karte auswerden, um die
SD-Karte ohne Schäden zu entfernen.
Page 50

EINSTELLUNGEN
SPRACHE & TASTATUR
1. Lokaleinstellungen: Wählen Sie Sprache und Region.
2. Android Vollbild: Android-Vollbildeinstellungen.
3. Android-Tastatur: Android-Tastatureinstellungen.
4. Pinyin IME: Einstellungen für den Pinyin IME.
5. Benutzerwörterbuch: Fügen Sie dem Wörterbuch Wörter hinzu
oder löschen Sie Einträge.
DATUM & ZEIT
1. Datum einstellen: Stellen Sie das aktuelle Datum ein.
2. Zeitzone wählen: Wählen Sie die aktuelle Zeitzone.
3. Zeit einstellen: Stellen Sie die aktuelle Zeit ein.
4. 24-Stundenformat wählen: Setzen Sie einen Haken, um die Zeit im 24-Stundenformat anzuzeigen.
5. Datenformat wählen: Stellen Sie das Datenformat ein.
KALIBRIERUNG DES TOUCHPANELS
Um den Touchscreen zu kalibrieren, verwenden Sie Ihren Finger,
um die ( + ) auf dem Bildschirm anzutippen, wenn diese erscheinen.
USB-MODUSWAHL
USB-Moduswahl: OTG/HOST/SLAVE
Host-Modus: Wählen Sie den USB-Hostmodus, wenn Sie U-disk
oder 3G-Module ausführen möchten.
AKTUALISIEREN DER MEDIENBIBLIOTHEK
Beim Einlegen oder Entfernen einer SD-Karte oder eines
USB-Speichers wählen Sie bitte “Medienbibliothek aktualisieren”,
um die Daten zu aktualisieren Beim Kopieren von Dateien auf den
Speicher oder zum Löschen von gespeicherten Daten wählen Sie
bitte “Medienbibliothek aktualisieren”, um die Daten zu aktualisieren.
RÜCKSETZEN AUF WERKSDATEN
Dies löscht alle Daten von Ihrem Gerät, darunter auch:
1. Ihren Google-Account
2. Systemanwendungen und Einstellungen
3. Heruntergeladene Anwendungen
Es löscht nicht:
1. Die aktuelle Systemsoftware und Bundle-Anwendungen
2. Dateien auf der SD-Karte wie Musik oder Fotos
ÜBER DAS GERÄT
Der Menüpunkt Über das Gerät enthät Informationen über Ihr Gerät.
Page 51

SOFTWAREINSTALLATION & VERWALTUNG
APK INSTALLER
Das Gerät verwendet Anwendungen von Drittanbietern, um auf die
meisten Anwendungen per Netzwerk zuzugreifen.
Klicken Sie auf ( ) und der APK Installer öffnet sich auf dem Bildschirm.
1. Installieren: Klicken Sie auf Installieren, um die Bedienoberäche von
APK Installer aufzurufen und wählen Sie die Anwendung im
APK-Format, die Sie installieren möchten. Nach der Installation kehrt
das Gerät zum Hauptbildschirm zurück.
2. Verwalten: Klicken Sie auf Verwalten, um mit der Verwaltung von
Anwendungen zu beginnen. Ausführen: Führen Sie die gewählte
Anwendung aus. Auf SD exportieren: Auf SD exportieren: Exportieren
Sie die gewählte Anwendung auf eine SD-Karte.
Deinstalieren: Deinstallieren Sie die gewählte Anwendung.
Im Market suchen: Suchen Sie die gewählte Anwendung im Market.
Abbrechen: Brechen Sie den Vorgang ab und kehren Sie zum
vorherigen Bildschirm zurück.
Installation von Eingabemethoden:
1. Verbinden Sie sich mit dem Netzwerk
2. Betreten Sie den Market
3. Betätigen Sie die Schaltäche Suchen, um alle benötigten
Eingabemethoden zu suchen
4. Wählen Sie die gewünschte Eingabemethode
5. Betätigen Sie [Installieren/Bestätigen] um die Eingabemethode
herunterzuladen und zu installieren.
6. Nach der Installation betreten Sie das Menü EINSTELLUNGEN auf
dem Hauptbildschirm und öffnen Sie dann SPRACHE UND
TASTATUR, um die installierte Eingabemethode zu wählen.
Hinweis: Die installierten Eingabemethoden können nur gewählt werden,
wenn sie in der Liste erscheinen.
ES FILE EXPLORER
Wählen Sie ( ), um den Explorer aufzurufen. Sie können dann alle
Dateien auf dem Gerät direkt durchsuchen. Berühren Sie die folgenden
Symbole, um verschiedene Vorgänge auszuführen.
Home: Verwenden Sie den Explorer zur Anzeige des SD-Kartenpfads,
des internen Speichers und des USB-Speichers.
Ebene nach oben: Kehren Sie zum vorherigen Ordner zurück, der eine Ebene höher liegt oder
verlassen Sie die Anwendung.
Muilti: Mehrfachauswahl von Dateien oder Ordnern.
Editor: 1. Kopieren: Datei oder Ordner kopieren.
2. Löschen: Datei oder Ordner löschen.
3. Ausschneien: Schneidet die gewählte Dateo oder den Ordner aus, um sie an einem
anderen Ort einzufügen.
4. Einfügen: Fügt die ausgeschnittene Datei oder den Ordner am gewünschten
Speicherort ein.
5. Umbenennen: Umbenennen einer Datei oder eines Ordners.
Zurück: Zum vorherigen Bildschirm zurückkehren. Weiter: Den nächsten Bildschirm aufrufen.
ANDROID MARKET : Über Android Market haben Sie direkten Zugriff auf Anwendungen und Spiele,
die Sie auf das Gerät downloaden und installieren können.
Page 52

Punkt
Basisfunktionen
Prozessorgeschwindigkeit 600-800MHz
DDR2 256MB
Siehe Verpackung
Micro SD Karte
TFT LCD
4:3
Ja
Ja
Ja
Ja
Ja
Ja
12V, 1.25A
Siehe Verpackung
Virtuell (Touchscreen)
Englisch / Chinesisch
802.11 b/g
2.1+EDR
Siehe Verpackung
MP3, WMA, APE, FLAC, AAC, OGG, AC3, WAV
JPEG, BMP, GIF, PNG
Android 2.1
Siehe Verpackung
MKV(H.264 HP), AVI, RM/RMVB, FLV, MPEG-1,
MPEG-2
Singletouch oder Multitouch (je nachdem,
welches Gerät Sie erworben haben)
7’’ Zoll (Diagonale)
800 x 600 pixels
30H(stand by)
7.4 V, 1500mAH
10’’ Zoll (Diagonale)
1024 x 768 pixels
52H(stand by)
7.4 V, 2600mAH
Systemspeicher
Kapazität Flash-Speicher
Erweiterungsslot
Bildschirmtyp
Bildschirmgröße
Seitenverhältnis
Bildschirmauösung
Automatische Orientierung
Integriertes Mikrofon
Lautsprecher
Kopfhörerbuchse
Batterie-Lebensdauer
Akku
Adapter
Tastatur
USB 2.0
Mini HDMI
3G(optional)
Video
Audio
Bilder
Betriebssystem
Vorinstallierte Anwendungen
Handschrifterkennung
Zeigegerät
Rückseite 2 Megapixel
CMOS-Kamera (optional)
Integriertes WiFi
Integriertes Bluetooth
Anzeige
Audio
Energieversorgung
Ein- und Ausgänge
Eingebaute Decoder
Software
Verbindungen
Model 7’’ 10’’
SPECIFICATIE
Page 53

KUNDENBETREUUNG
Sollten Sie eine Frage haben oder ein Problem mit Ihrem Ricatech-Produkt auftauchen, können Sie
den Ricatech-Kundenservice kontaktieren. Sie können uns per Telefon und E-Mail erreichen.
E-Mail
Senden Sie uns für die Kundenbetreuung per E-Mail bitte eine E-Mail an support@ricatech.com.
Achten Sie bitte darauf, dass Sie Ihre Modellnummer und die Seriennummer des Produkts angeben,
teilen Sie uns außerdem Ihren Namen & Ihre Adresse mit und beschreiben Sie Ihre Frage oder Problem deutlich.
Telefon
Für Kundenbetreuung per Telefon wählen Sie bitte +32 3 3265694. Ein Mitarbeiter aus unserem Serviceteam wird Ihnen gern behilich sein.
Besuchen Sie für ein vollständiges Verfahren die Webseite von Ricatech unter: www.ricatech.com
 Loading...