

Rheem IQ Owner's Manual
Owner’s Guide
and
Installation Instructions
Rheem IQ
TM
Tariff Intelligent Controller
Version 1.2B23
This Tariff Controller must be installed and serviced by a qualified person.
Please leave this guide with the householder or premises responsible officer.
Notice to Victorian Customers from the
This Tariff Controller
must be installed by a licensed person as required
by
Only a licensed person will give you a Compliance Certificate, showing that the
work complies with all the relevant standards. Only a licensed person will have
insurance protecting their workmanship for 6 years. Make sure you use a
licensed person to insta
Certificate.
Warning:
Upon completion of the installation and commissioning of the
Controller
, leave this guide with
DO NOT
leave this guide inside of the cover of the
with the safe operation of the
on.
21 Atkinson Street Liverpool NSW 2170
PO Box 146, Moorebank NSW 1875
ABN: 28 062 383 224
ACN: 062 383 224
This Tariff Controller
may be protected by one or more patents or registered designs
® Registered trademark of Rheem Australia Pty Ltd.
™ Trademark of Rheem Australia Pty Ltd.
Date of
installation:
Installed by
:
Purchased
from:
Victorian
Building Authority
The Victorian Building Act 1993
ll this Tariff Controller
and ask for your Compliance
the householder or
responsible officer.
heat pump
, as it may interfere
heat pump or ignite when the
heat pump
Installation Information
Rheem Thermal Systems
Advisory: 1300 132 950
National Service Line:
Email: sales@
www.rheem
PATENTS
Tariff
is turned
02 8706 8400
rheemthermal.com.au
thermal.com.au
.

3
CONTENTS
PREMISES HOUSEHOLDER OR RESPONSIBLE OFFICER
The ‘About Your Tariff Controller’ section is intended for the premises householder or
responsible officer
The ‘Installation' section is intended for the installer but may be of interest
ABOUT YOUR TARIFF CONTROLLER ..................................................................................... 4
HOW YOUR TARIFF CONTROLLER WORKS ........................................................................ 6
How to set up your controller ................................................................................................ 6
SAVE A SERVICE CALL .......................................................................................................... 7
CONTROLLER OPERATION ................................................................................................... 8
Controller Overview .............................................................................................................. 8
Operation Overview .............................................................................................................. 8
Setting The Current Date & Time .......................................................................................... 9
To Turn The Heat Pump ON by the keypad .......................................................................... 9
To Turn The Heat Pump OFF by the keypad ........................................................................ 9
Programming for Tariff Control ........................................................................................... 10
Programming for Scheduler Control ................................................................................... 11
Enabling or Disabling Scheduler and/or Tariffs ................................................................... 12
Adjusting the Setpoint Temperature ................................................................................... 12
Setting the Circulating Pump Control Method ..................................................................... 13
Alarm Indication .................................................................................................................. 14
Scheduler Special Event (For When Going on Holidays).................................................... 14
TROUBLESHOOTING ........................................................................................................... 16
INSTALLATION ......................................................................................................................... 17
Controller Installation Procedure ......................................................................................... 18
Controller Setup Procedure ................................................................................................ 18
ADVANCED SETUP & ADVANCED FUNCTIONS................................................................. 19
Initial System Setup Procedure ........................................................................................... 19
Manufacturer Screen Parameter Settings ........................................................................... 26
Programming Using SmartKey (Hotkey) ............................................................................. 34
Enable Unit ON / OFF by Flow Switch ................................................................................ 34
Viewing Inputs & Outputs on the Control Panel .................................................................. 34
System Monitoring Without BMS ........................................................................................ 35
BMS Monitoring .................................................................................................................. 35
Service Menu ...................................................................................................................... 40
ALARM INDICATION & TROUBLESHOOTING ..................................................................... 42
WIRING DIAGRAM ................................................................................................................ 43

4
ABOUT YOUR TARIFF CONTROLLER
INTRODUCTION & PRODUCT APPLICATION
This tariff controller is provided as part of a heat pump or chiller system and this document
pertains to the installation, operation and programming of the wall or panel mount controller only.
Refer to the Owners Guide and Installation Instructions supplied with the heat pump or chiller unit
for information regarding system installation and product application. Note: The term 'heat pump'
is used throughout this document and also refers to 'chiller unit' for installations using a chiller
system.
MODEL TYPE
Congratulations for choosing a Rheem® Tariff Controller. There are two types of controllers
available which are as follows:
• Rheem Panel Mount Tariff Controller that is suitable for either indoor or outdoor installation.
• Rheem Wall Mount Tariff Controller that is suitable for indoor installation only.
HOW DO I KNOW IF THE CONTROLLER IS INSTALLED CORRECTLY?
Installation requirements are detailed in the 'Installation' section starting on page 17. The
controller must be installed:
• by a qualified person, and
• in accordance with these installation instructions, the installation instructions supplied with
the heat pump and
• in compliance with Standards AS/NZS 3000, AS/NZS 3500.4, as applicable under local
regulations, and all local codes and regulatory authority requirements.
• In New Zealand, the installation must also conform with the New Zealand Building Code.
PRECAUTIONS
If this controller is to be used where uninterrupted heating or cooling is necessary for your
application or business, you should ensure that you have back up redundancy within the heating
or cooling system design. This should ensure the continuity of heating or cooling in the event that
this controller was to become inoperable for any reason. We recommend you seek advice from
your installer or specifier about your needs and building back up redundancy into your heating or
cooling system.
POWER OUTAGES
If the power supply to the heat pump is interrupted for any reason, the heat pump and controller
will shut down and cease to operate.
When power is restored, the heat pump will automatically operate in the last used mode of
operation and any settings programmed on the controller will remain unaffected i.e. will be the
same values as before the power outage.
CLEANING THE CONTROLLER
If the controller requires cleaning, wipe with a soft dry cloth. If controller buttons require cleaning,
ensure the heat pump is turned off at the electrical isolator located adjacent to the heat pump to
prevent the inadvertent alteration of controller settings. Note: Do not use a cleaning cloth with
thinners, benzene, acid or alkaline detergents as these products will discolour the display and
plastic components which is not covered by warranty.

ABOUT YOUR TARIFF
CONTROLLER
WARRANTY
The controller is
supported by a manufacturer’s warranty providi
i
nformation refer to the Installation Instructions supplied with the heat pump or contact
Thermal
Service department on
Thermal website
www.rheemthermal.com.au
GENERAL WARNINGS
& SAFETY ADVICE
Warning:
For your safety do not operate this
Warning: This controller
is only intended to be operated by persons who have the experience
or the knowledge and the capabilities to do so.
persons (including children)
with reduced physical, sensory or mental capabilities
experience and knowledge.
Warning:
Children should be supervised to ensure they do not interfere
controller.
Warning:
For continued safety of this
in accordance with the
Owner’s Guide and Installation Instructions
Improper installation, adjustment, alteration, service or maintenance can cause injury or property
damage. For assistance or additional information consult your R
Installer, or accredited Service
A
The warranty can become void
instructions.
• DO NOT use the controller
if any part is faulty or damaged. Immediately call
Service department or an a
ccredited
• DO NOT use the c
ontroller
Thermal
Service department
5
ng one year on parts. For more
02 8706 8400
. Information is also available on the Rheem
controller
before reading this instruction booklet.
This controller
is not intended to be operated by
controller it must be installed,
operated and maintained
.
heem
gent.
if the
installation is not in accordance with these
Service Agent t
o arrange for an inspection
if any part has been under water.
Immediately call
or an accredited S
ervice Agent to arrange for an inspection
Rheem
, or lack of
or play with the
Distributor, qualified
Rheem Thermal
.
Rheem
.

6
HOW YOUR TARIFF CONTROLLER WORKS
Congratulations on your choice of a Rheem Heat Pump Tariff Controller. Rheem is committed to
environmental sustainability and continually strives to be innovative in product development to
help Australian households reduce their energy usage. Your Rheem heat pump and tariff
controller are a strong reflection of this commitment.
The heat pump that you have purchased is designed to be energy efficient and the tariff
functionality of the controller enables you to optimise heat pump and recirculating pump operation
relative to the price of electricity.
The main energy source for your heat pump is naturally available heat; either from surrounding
air, water or from the earth itself. These heat sources are totally renewable and provide up to four
fifths of the energy that the heat pump requires to operate. The remaining energy required is
supplied by electricity and it is this energy usage that the tariff controller focuses on to enable you
to achieve lower heating costs.
The structure and pricing of electricity varies from state to state and supplier to supplier. The
simplest pricing structure is a flat rate, however digital metering now allows for off-peak, shoulder
and peak-time electricity use tariffs. The pricing structure may also vary according to the time of
day or if it is a work day, weekend or public holiday and even in some instances according to the
season.
Where electricity has a time of use basis, the opportunity is created to achieve substantial savings
in heating costs because the price of electricity in off-peak hours can be less than one quarter of
the day peak-time rate!
Control options can be as simple as restricting heat pump operation to off-peak times only or to
off-peak and shoulder periods only. The more sophisticated option is to set varying target water
temperatures and differentials by time of day and day of the week. This sounds complicated but is
easily achieved by following the step by step procedures outlined in the 'Controller Operation'
section of these instructions.
The development of this controller included detailed evaluation of all Australian electricity tariffs
and some common tariff options are preloaded into the controller. In these instances all that is
required is to nominate the target water temperature settings (setpoint) and differentials for these
periods. Programming of every possible tariff option is also readily performed, allowing you to fully
customise heat pump and recirculating pump operation both in terms of temperature needs and
tariff pricing. This allows you to minimise your running costs while retaining the benefits of your
heating or cooling system.
HOW TO SET UP YOUR CONTROLLER
1. Read 'Controller Overview' and 'Operation Overview' sections on page 8.
2. Set current date and time (refer to 'Setting the Current Date & Time on page 9).
3. Set and enable tariffs (refer to 'Programming for Tariff Control' on page 10).
4. Set and enable scheduler times if this option is required (refer to 'Programming For Scheduler
Control' on page 11).
5. Adjust the setpoint temperature (refer to 'Adjusting the Setpoint Temperature' on page 12).
6. Set the circulating pump control method (Refer to 'Setting the Circulating Pump Control
Method' on page 13).
7. Turn heat pump ON (refer to 'To Turn the Heat Pump ON by the Keypad' on page 9).
Your heat pump tariff controller has now been configured and will automatically operate according
to the settings you have programmed.

7
SAVE A SERVICE CALL
Check the items below before making a service call. Charges apply for attending to any
condition or fault that is not related to manufacture or failure of a part.
Note: The controller and heat pump will have a start delay when turned on. This is normal
operation.
HEAT PUMP OR CONTROLLER NOT OPERATING
• Is the electricity switched on?
If the controller display is blank, ensure power is available and that the heat pump is switched
on at the electrical isolator located adjacent to the heat pump.
• Is the heat pump manually turned on at the keypad?
Ensure the heat pump is turned ON at the controller keypad (refer to 'To Turn the Heat Pump
ON by the keypad' on page 9).
• Is the alarm ( ) button on the controller flashing red or is a message displayed?
Refer to 'Troubleshooting' on page 16 if an alarm condition occurs or if a message is
displayed on the controller.
• Is the controller programmed correctly?
Check to ensure any scheduled and/or tariff time periods are programmed correctly and that
'scheduler' and/or 'tariffs' are enabled. Also check to ensure the setpoint and differential
settings are correct for each period and that the current date and time is correctly set (refer to
'Controller Operation' section on page 8).
HEATER NOT SUFFICIENTLY HEATING
• Is the setpoint temperature too low?
Increase the setpoint temperature (refer to 'Adjusting the Setpoint Temperature' on page 12).
• Is the controller programmed correctly?
Refer to the same question in the 'Heat Pump or Controller Not Operating' section above.
• Is there excessive heat loss?
Swimming pools and spas can benefit from a cover to retain heat when not in use.
• Is the heat pump correctly sized?
The sizing guide in the Rheem sales literature and on the Rheem Thermal website
(www.rheemthermal.com.au) suggests average sizes that may be needed.
WATER GETS TOO HOT
• Is the setpoint temperature too high?
Decrease the setpoint temperature (refer to 'Adjusting the Setpoint Temperature' on page
12).
HIGH ELECTRICITY BILLS
Should you at any time feel your electricity account is too high, we suggest you check the
following points:
• Consider recent changes in weather or to your heating pattern (such as an increase in
heating periods or temperature settings) and check if there has been any increase in tariffs
since your previous account.
• Is there excessive heat loss? Swimming pools and spas can benefit from a cover to retain
heat when not in use.
IF YOU HAVE CHECKED ALL THE ABOVE AND STILL BELIEVE YOU NEED ASSISTANCE, PHONE RHEEM
THERMAL SERVICE DEPARTMENT ON 02 8706 8400 OR CONTACT YOUR INSTALLER.
8
CONTROLLER OPERATION
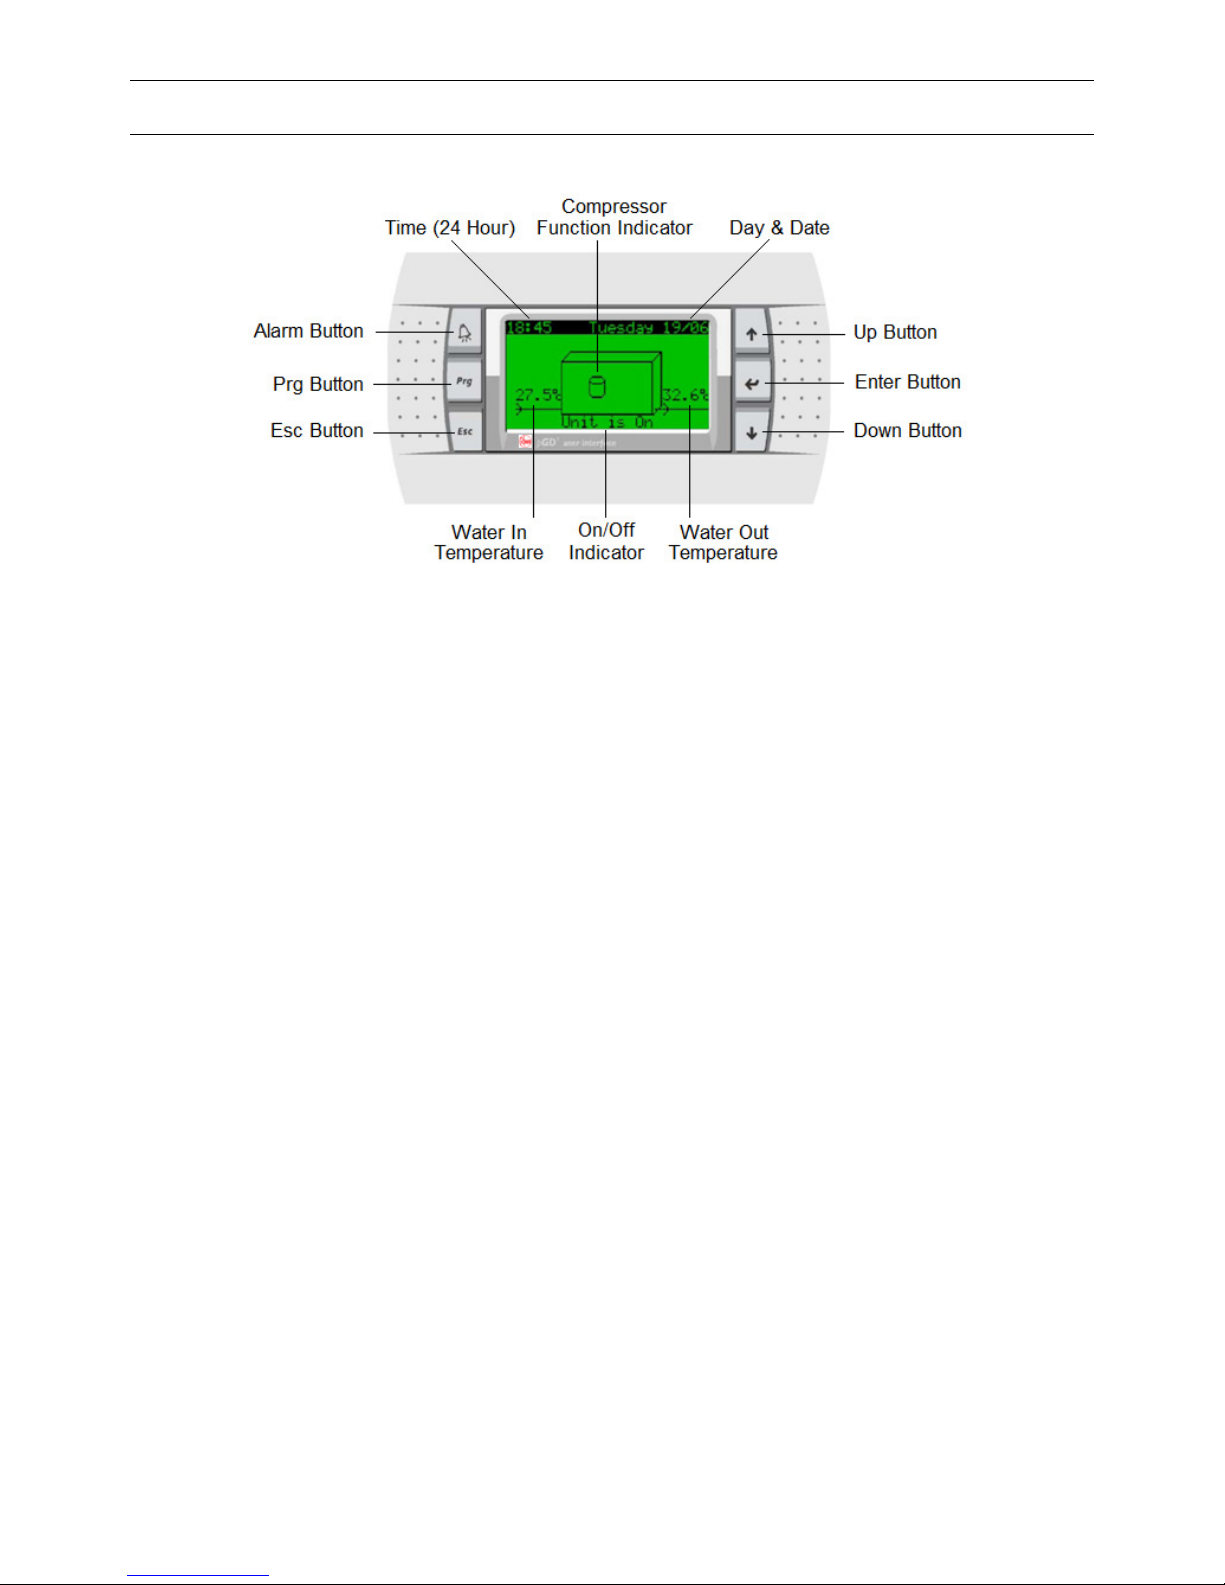
CONTROLLER OVERVIEW
The home screen is the default screen that the controller will display when first powered up and is
depicted in the illustration above. The controller will also revert to the home screen if the keypad
buttons have been inactive for a period of 60 seconds.
OPERATION OVERVIEW
There are three methods of heat pump control; scheduler, tariffs and keypad control.
• If only 'scheduler' is enabled, the heat pump will operate according to the programmed
scheduler ON and OFF time periods to maintain the target setpoint temperature. Note: When
in a scheduler OFF period, the control panel will display 'Unit OFF by SCHEDULE'.
• If only 'tariffs' are enabled, the heat pump will continuously operate according to the
programmed tariff settings to maintain the target setpoint temperature.
• If 'scheduler' and 'tariff' are both enabled, the heat pump will operate according to the
programmed scheduler ON and OFF time periods to maintain the target setpoint temperature
according to the programmed tariff settings.
• If 'scheduler' and 'tariff' are both disabled, the heat pump will not operate unless the heat
pump is manually turned ON by the keypad at which time the heat pump will continuously
operate to maintain the target setpoint temperature.
• The heat pump must be manually turned ON by the keypad for the heat pump to operate
according to the scheduler or tariffs.
• The heat pump can be manually turned OFF by the keypad regardless of programmed
scheduler or tariff settings. Note: When manually turned OFF by the keypad, the control panel
will display 'Unit OFF by KEYPAD'.
Note: Scheduler time periods and/or tariff periods must be correctly programmed and enabled,
the current date and time must be correctly set and the heat pump must be manually turned on by
the keypad for the heat pump to be able to operate according to scheduler time periods and/or
tariffs.
Going on Holidays?
Your tariff controller can be used to lower the water temperature of your pool or spa while you are
away to save running costs. Refer to 'Scheduler Special Event' on page 14.
CONTROLLER OPERATION
9
SETTING THE CURRENT DATE & TIME
The current date and time must be set correctly for the heat pump to be able to operate according
to scheduled time periods and/or tariff periods. The time is displayed in 24 hour time.
1. Whilst in the home screen, press and release . The screen will change to the 'Main menu'.
2. Press and release or until 'C. Clock/Scheduler' is selected.
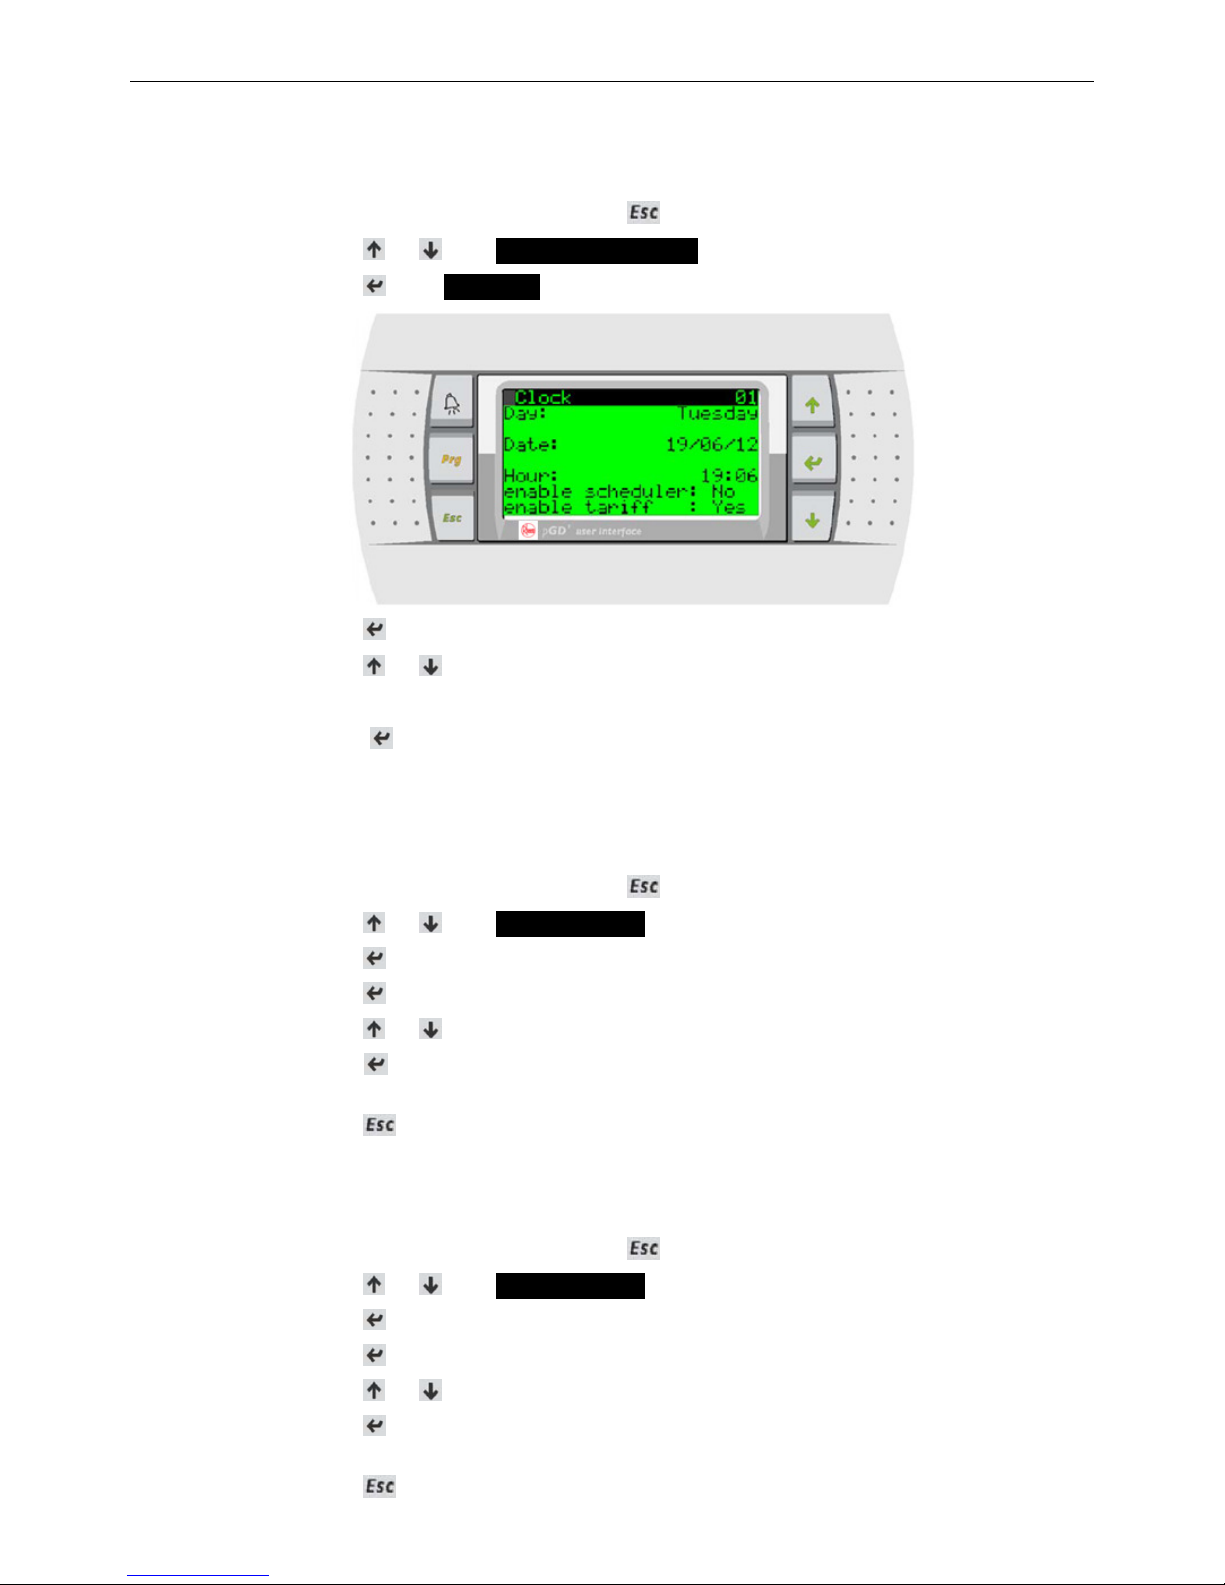
3. Press and release . The 'Clock 01' screen will be displayed as shown below.
4. Press and release to move the cursor to the value to be changed.
5. Press and release or until the desired setting is displayed.
6. Repeat steps 4 and 5 until all required changes have been made then proceed to step 7.
7. Press and release to confirm the selection. The screen will change back to the home
screen and the setting will be saved.
TO TURN THE HEAT PUMP ON BY THE KEYPAD
Perform the following procedure to turn the heat pump ON.
1. Whilst in the home screen, press and release . The screen will change to the 'Main menu'.
2. Press and release or until 'A. On/Off Unit' is selected.
3. Press and release . The screen will change to show 'OFF'.
4. Press and release . The 'O' in 'OFF' will start flashing.
5. Press and release or . The screen will change to show 'ON' with the 'O' flashing.
6. Press and release to confirm the selection. The 'O' in 'ON' will stop flashing and the heat
pump will be turned ON.
7. Press and release twice to go back to the home screen.
TO TURN THE HEAT PUMP OFF BY THE KEYPAD
Perform the following procedure to turn the heat pump OFF.
1. Whilst in the home screen, press and release . The screen will change to the 'Main menu'.
2. Press and release or until 'A. On/Off Unit' is selected.
3. Press and release . The screen will change to show 'ON'.
4. Press and release . The 'O' in 'ON' will start flashing.
5. Press and release or . The screen will change to show 'OFF' with the 'O' flashing.
6. Press and release to confirm the selection. The 'O' in 'OFF' will stop flashing and the heat
pump will be turned OFF.
7. Press and release twice to go back to the home screen.
CONTROLLER OPERATION
10
PROGRAMMING FOR TARIFF CONTROL
When the controller has been programmed and enabled for tariff control, the heat pump will
operate according to the programmed tariffs provided the heat pump is manually turned ON by
the keypad.
There are two methods of programming for tariff control. 'Programming Default Tariff Settings' or
'Programming Tariff Settings Manually'.
Note: The current date and time must be set correctly for the heat pump to be able to operate
according to programmed tariffs and if the scheduler is enabled, the scheduler must be in a
current ON period.
Programming Default Tariff Settings
Programming default tariff settings loads and enables the default tariff settings preloaded into the
controller.
1. Whilst in the home screen, press and release . The screen will change to the 'Main menu'.
2. Press and release or until 'C. Clock/Scheduler' is selected.
3. Press and release . The 'Clock 01' screen will be displayed. If 'enable tariff' is already set to
'Yes' proceed directly to step 7. If 'enable tariff' is set to 'No' proceed to step 4.
4. Press and release until the curser selects 'enable tariff: No'.
5. Press and release or to change to 'Yes'.
6. Press and release until the curser disappears.
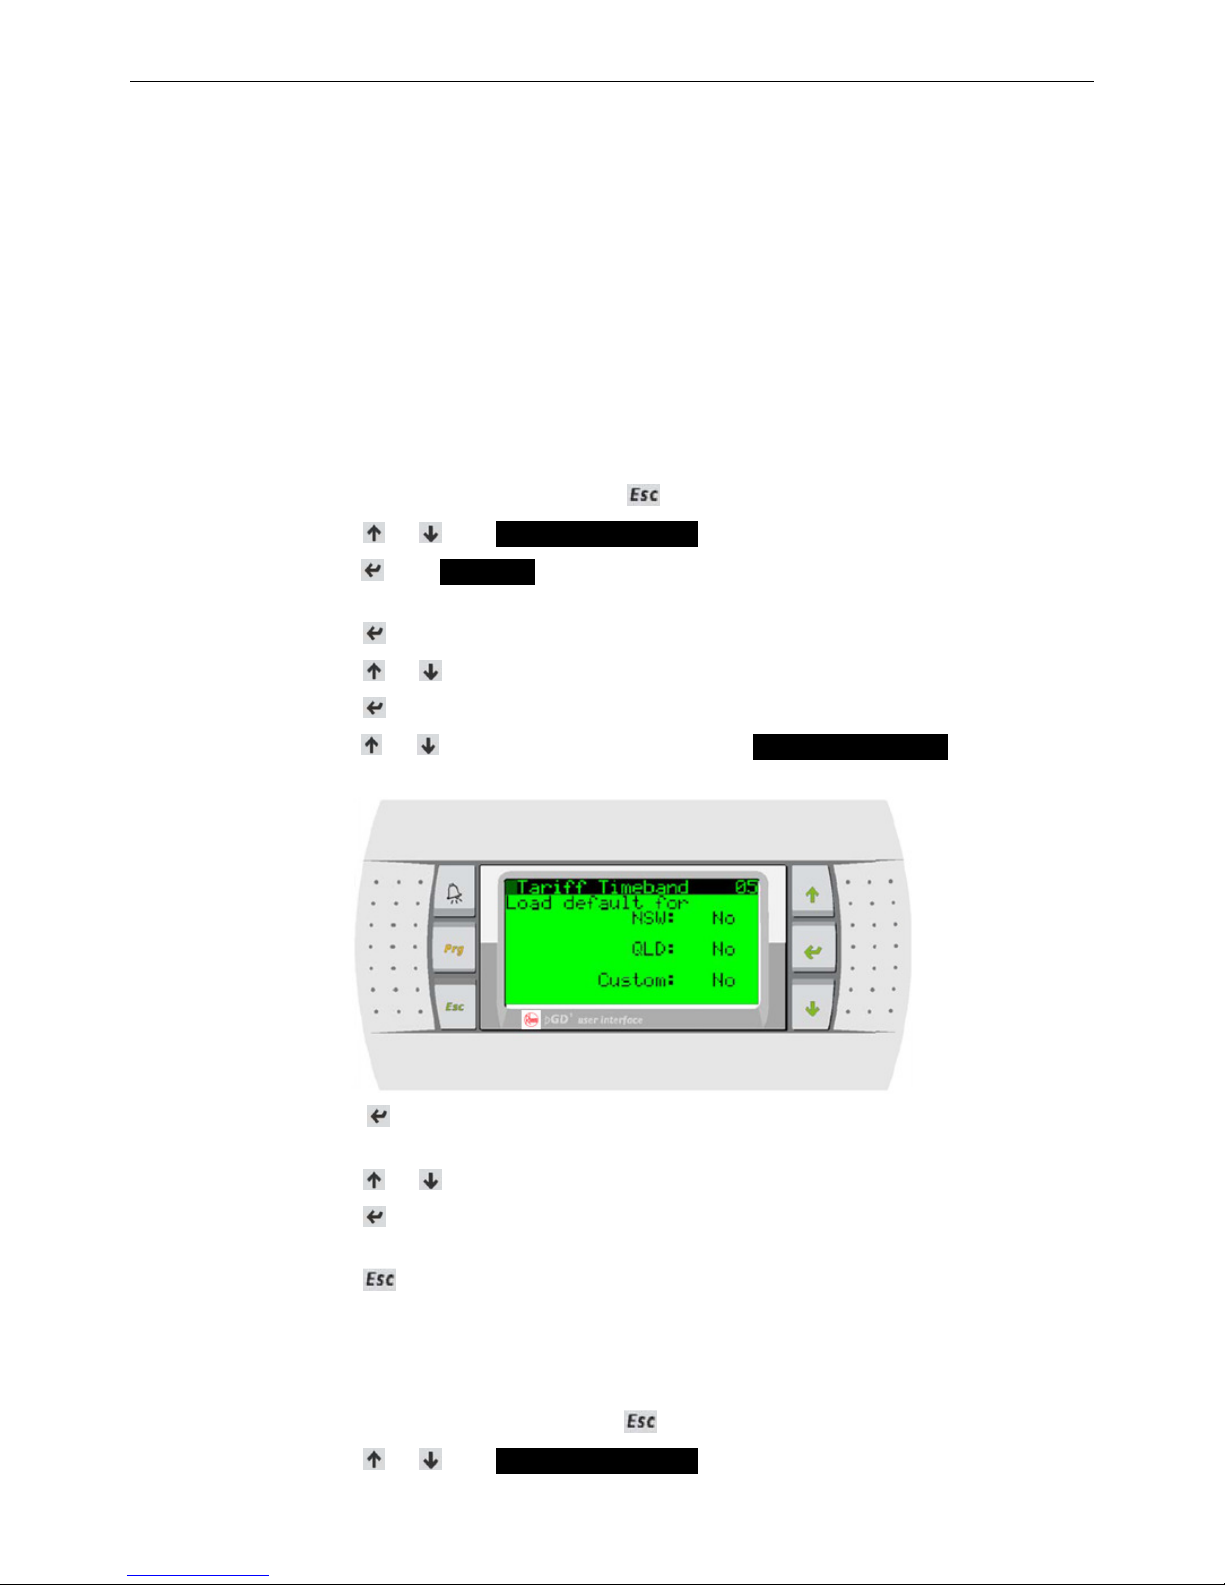
7. Press and release or until the screen changes to the 'Tariff Timeband 05' screen shown
below.
8. Press and release until the curser selects the desired state. Note: 'Custom' is for future
expansion and although default settings are loaded they are not currently valid.
9. Press and release or to change to 'Yes'.
10. Press and release to confirm the selection. **DEFAULT LOADED** should appear on the
bottom of the screen when the default tariff settings have been loaded.
11. Press and release twice to go back to the home screen.
Programming Tariff Settings Manually
Programming tariff settings manually enables you to tailor tariff settings according to your local
area or energy supplier if the tariff time periods differ to the default tariff settings.
1. Whilst in the home screen, press and release . The screen will change to the 'Main menu'.
2. Press and release or until 'C. Clock/Scheduler' is selected.
CONTROLLER OPERATION
11
3. Press and release . The 'Clock 01' screen will be displayed. If 'enable tariff' is already set to
'Yes' proceed directly to step 7. If 'enable tariff' is set to 'No' proceed to step 4.
4. Press and release until the curser selects 'enable tariff: No'.
5. Press and release or to change to 'Yes'.
6. Press and release until the curser disappears.
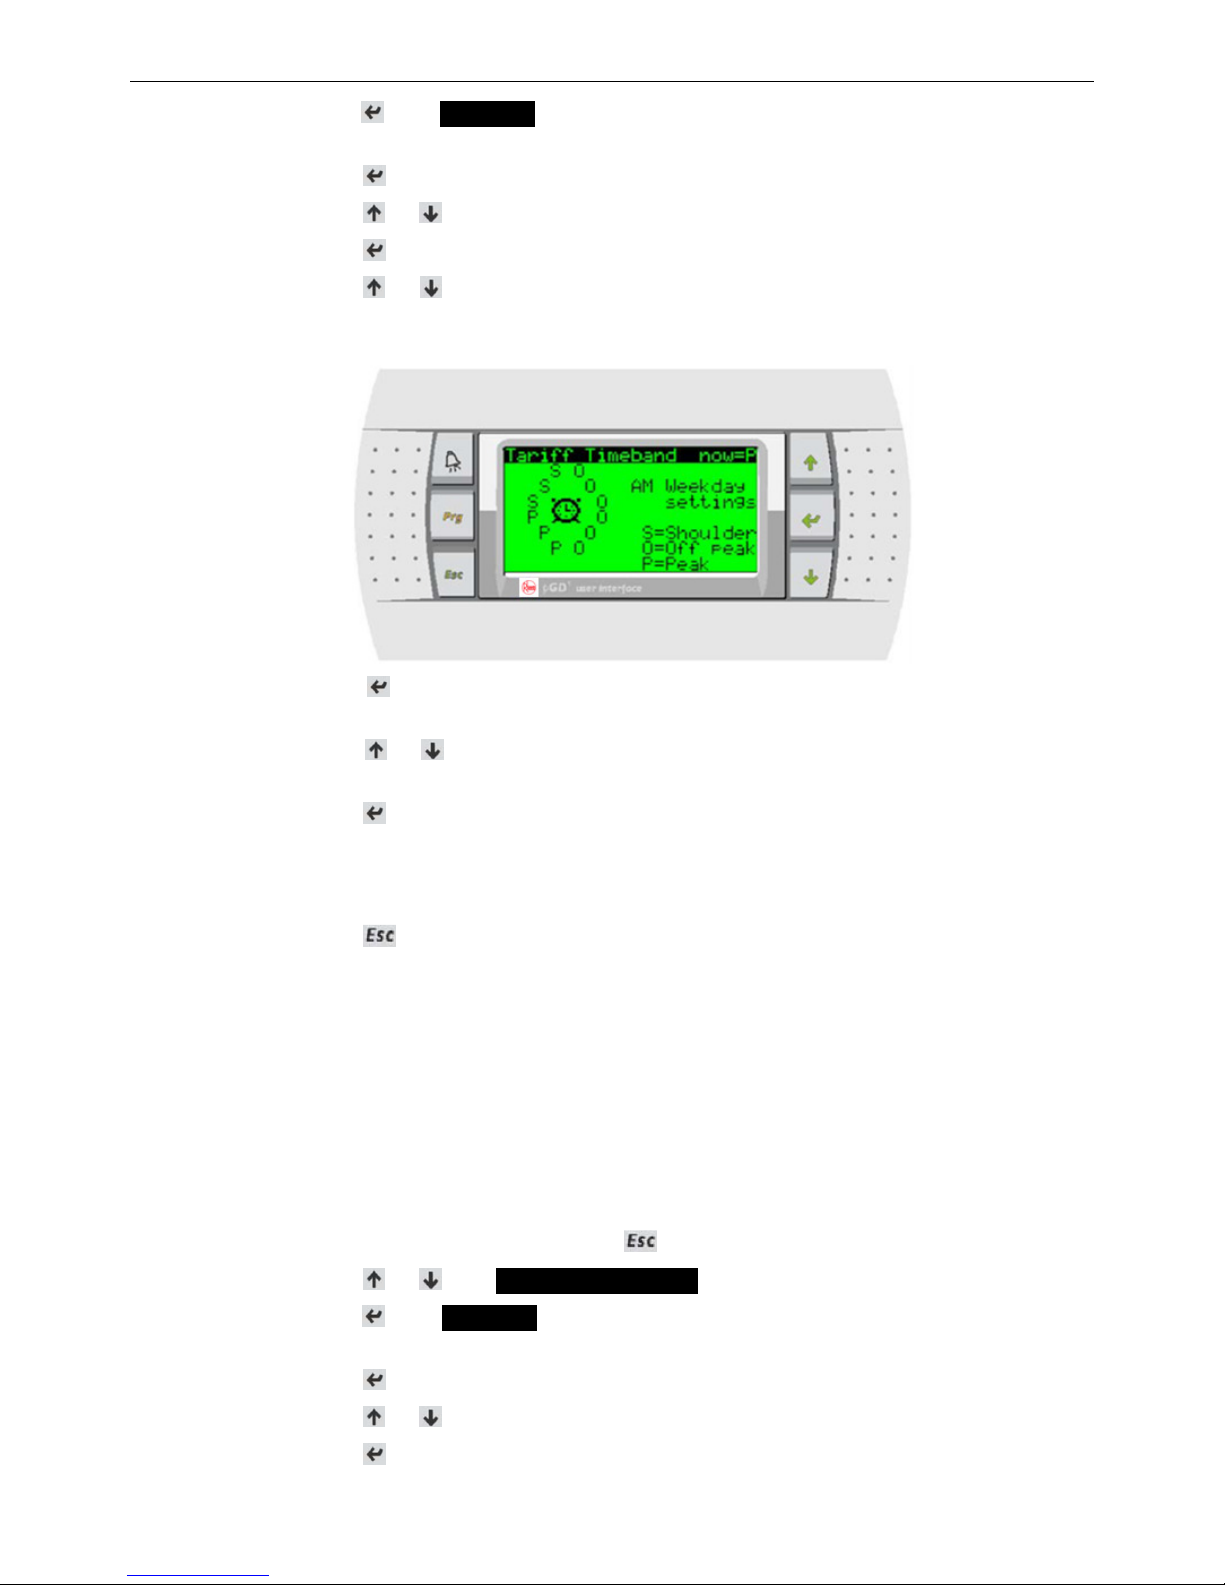
7. Press and release or until the screen changes to the 'Tariff Timeband' screen that you
would like to change a period for. There are four of these screens (PM Week-end, AM
Week-end, PM Weekday and AM Weekday).
8. Press and release until the curser selects the desired hour period to be changed (each
letter on the clock represent one hour).
9. Press and release or to change the selected hour to the desired tariff type (Shoulder,
Off-peak or Peak).
10. Press and release to confirm the selection.
11. Perform steps 8 ~ 10 until all time periods have been changed to the desired tariff types.
12. Perform steps 7 ~ 11 for all four Tariff Timeband' screens.
13. Press and release twice to go back to the home screen.
For example: In the screen illustration shown above, the three 'P' hours represent a peak period
from 6:00am to 9:00am for all weekdays.
PROGRAMMING FOR SCHEDULER CONTROL
When the controller has been programmed and enabled for scheduler control, the heat pump will
operate according to the programmed scheduler ON and OFF time periods provided the heat
pump is manually turned ON by the keypad.
Note: The current date and time must be set correctly for the heat pump to be able to operate
according to scheduler time periods.
1. Whilst in the home screen, press and release . The screen will change to the 'Main menu'.
2. Press and release or until 'C. Clock/Scheduler' is selected.
3. Press and release . The 'Clock 01' screen will be displayed. If 'enable scheduler' is already
set to 'Yes' proceed directly to step 7. If 'enable scheduler' is set to 'No' proceed to step 4.
4. Press and release until the curser selects 'enable scheduler: No'.
5. Press and release or to change to 'Yes'.
6. Press and release until the curser disappears.
CONTROLLER OPERATION
12
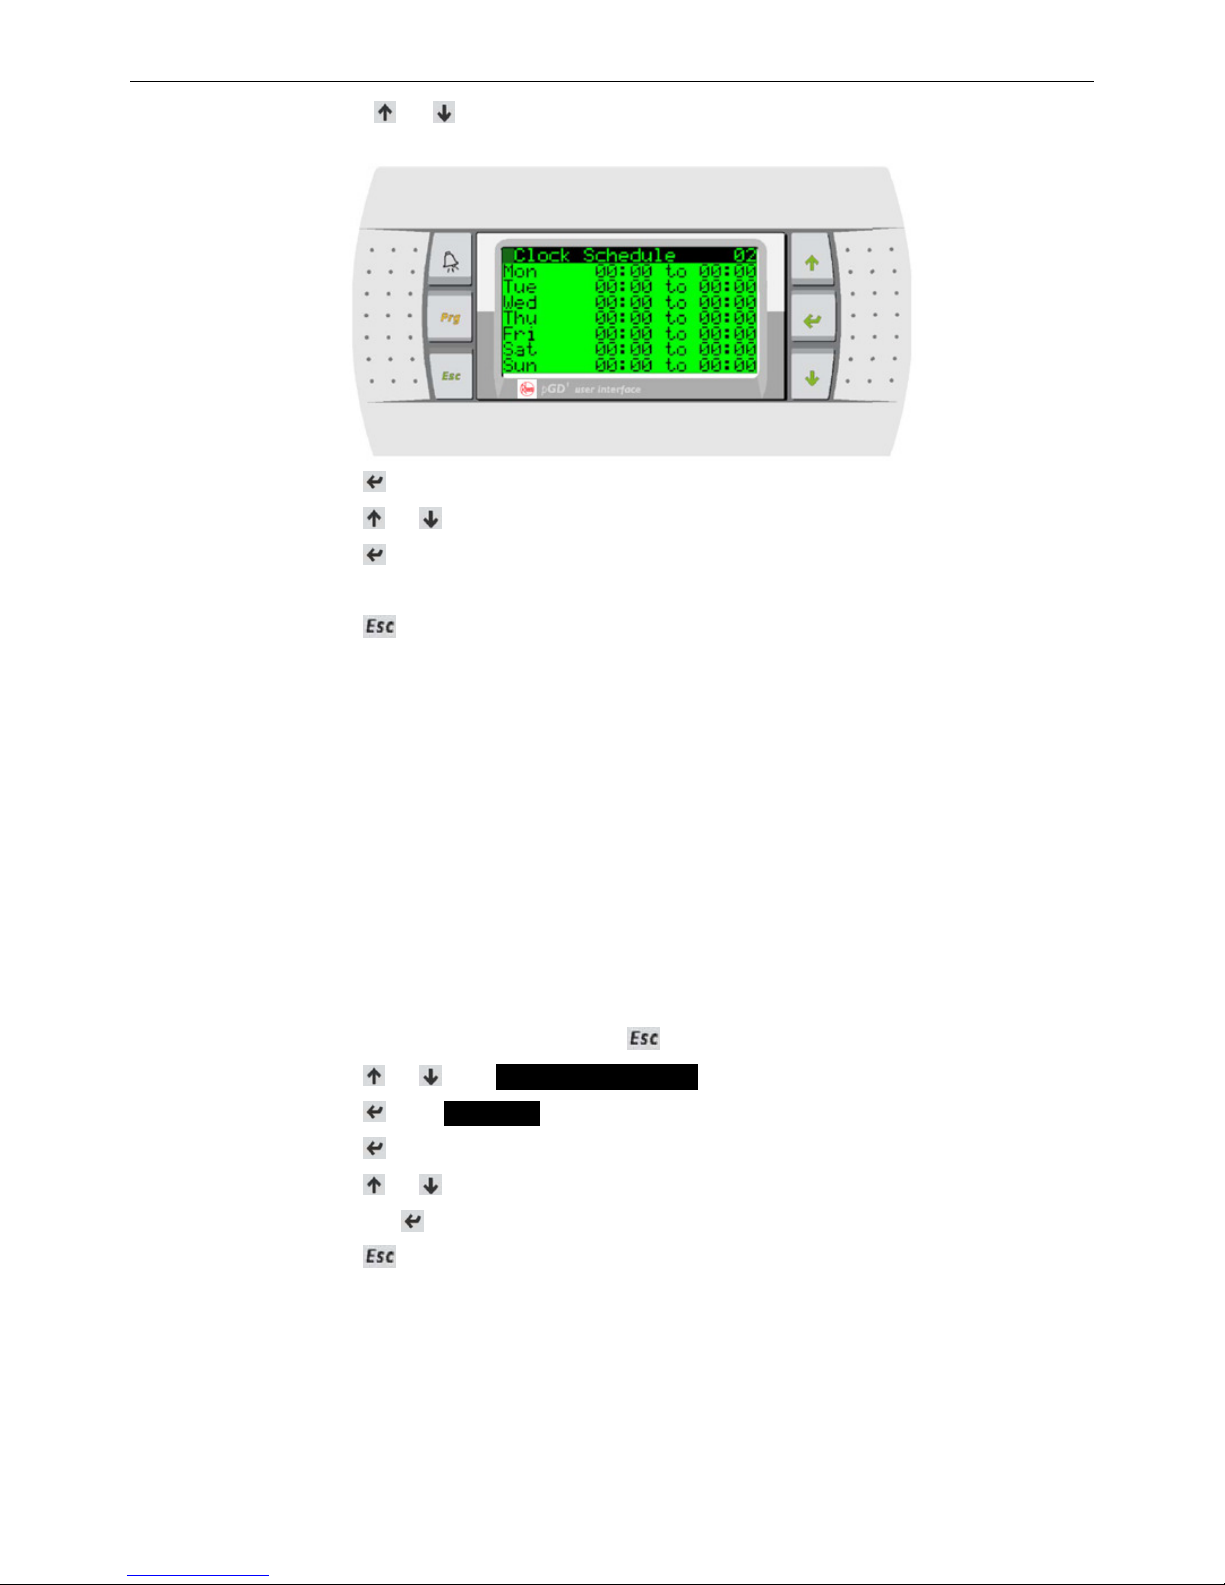
7. Press and release or until the screen changes to the 'Clock Schedule' screen as
depicted in the following illustration.
8. Press and release until the curser selects the desired day/time ON period to be set.
9. Press and release or to change the selected day/time/ period to the ON time required.
10. Press and release until the curser selects the desired day/time OFF period to be set.
11. Continue performing steps 8 ~ 10 for all day ON and OFF time periods required.
12. Press and release twice to go back to the home screen.
For example: MON 07:00 to 17:30 would represent an ON time of 7:00 am and an OFF time of
5:30 pm on Mondays.
ENABLING OR DISABLING SCHEDULER AND/OR TARIFFS
Refer to 'Operation Overview' on page 8 for various scheduler and tariff control methods to
determine enabling/disabling requirements. Disabling the scheduler and/or tariffs will not clear
any programmed scheduler time periods or tariffs, only disable their operation until they are
enabled again.
Note: Scheduler time periods and/or tariff periods must be correctly programmed and enabled,
the current date and time must be correctly set and the heat pump must be manually turned on by
the keypad for the heat pump to be able to operate according to scheduler time periods and/or
tariffs.
Scheduler time periods and/or tariffs periods can be enabled or disabled as follows:
1. Whilst in the home screen, press and release . The screen will change to the 'Main menu'.
2. Press and release or until 'C. Clock/Scheduler' is selected.
3. Press and release . The 'Clock 01' screen will be displayed.
4. Press and release until the cursor selects 'enable scheduler' or 'enable tariff'.
5. Press and release or until the desired setting (Yes or No) is displayed.
6. Press and release the button to confirm the selection.
7. Press and release twice to go back to the home screen.
ADJUSTING THE SETPOINT TEMPERATURE
The 'Setpoint temperature' is the target temperature for the heat pump to operate to.
There are two methods for adjusting the setpoint temperature depending whether tariffs are
enabled or disabled (for information on enabling or disabling tariffs, refer to 'Enabling or Disabling
Scheduler and/or Tariffs' detailed above). The setpoint can be adjusted with tariffs enabled or
disabled as follows:

CONTROLLER OPERATION
13
Adjusting the Setpoint Temperature With Tariffs Disabled
1. Whilst in the home screen, press and release . The screen will change to show 'Setpoint
01' and the setpoint value will start flashing.
2. Press and release or until the desired setpoint temperature is displayed.
3. Press and release to confirm the selection. The screen will change back to the home
screen and the setting will be saved.
Adjusting the Setpoint Temperature With Tariffs Enabled
When tariffs are enabled there are two types of settings that need to be set; the setpoint
temperature and the proportional band (differential).
The 'Setpoint temperature' is the target temperature for the heat pump to operate to. The
proportional band is the change in temperature away from the set point before the heat pump will
come on.
For example: If the heat pump has a set point of 30°C and a proportional band of 0.5°C, the heat
pump will come on if the water temperature falls below 29.5°C and turn off when the water
temperature reaches 30°C.
It is recommended to keep the same setpoint for each tariff time period and the proportional
bands at 0.5°C for off-peak periods, 1.0°C for shoulder periods and 2.0°C for peak periods. The
larger proportional band for peak periods will delay the onset of the heat pump which will save
power consumption during these more expensive operating periods.
1. Whilst in the home screen, press and release . The screen will change to show 'Setpoint –
Tariff 0X' (where X is the tariff period number).
2. Press and release or to navigate to the desired tariff period.
3. Press and release to confirm the selection. The setpoint value will start flashing.
4. Press and release or until the desired setpoint temperature is displayed.
5. Press and release to confirm the selection. The proportional band value will start flashing.
6. Press and release or until the desired proportional band value is displayed.
7. Press and release to confirm the selection. The proportional band value will stop flashing
and the settings will be saved.
8. Perform steps 2 ~ 7 for all other available tariff periods then proceed to step 9.
9. Press and release once to go back to the home screen.
SETTING THE CIRCULATING PUMP CONTROL METHOD
The circulating pump control method setting is utilised to control operation of the system water
pump(s) and should be set at time of installation by the Installer. This setting does not normally
require changing.
If set on 'PERMANENT', the water pump(s) will always be ON or controlled externally of the heat
pump.
If set on 'CYCLE TO TEST TEMP', the water pump(s) will automatically turn OFF after the heat
pump has reached the set temperature. When on this setting the water pump(s) will also be
automatically turned ON after the temperature test cycle time setting so that the heat pump can
check the current water temperature. This setting is the most economical if the water pump(s) are
to be controlled by the heat pump.
1. Whilst in the home screen, press and release . The screen will change to the 'Main menu'.
2. Press and release or until 'A. On/Off Unit' is selected.
CONTROLLER OPERATION
14
3. Press and release . The screen will change to show 'ON' or 'OFF'.
4. Press and release or . The screen will change to show 'Type of circulating pump control'
and the current setting.
5. Press and release . The first letter in the current setting will start flashing.
6. Press and release or until the desired setting is displayed.
7. Press and release to confirm the selection. If 'PERMANENT' was selected, the setting has
now been saved and you must proceed directly to step 10. If 'CYCLE TO TEST TEMP' was
selected, proceed to step 8.
8. The first digit in the 'temp test cycle' time will now be flashing. Press and release or
until the desired time setting is displayed. The time setting can be changed in 0.5 hour
increment from 0.0 to 5.0 hours.
9. Press and release to confirm the time selection. The first digit in the 'temp test cycle' time
will stop flashing and the setting will be saved.
10. Press and release twice to go back to the home screen.
ALARM INDICATION
If the system detects an alarm condition, the alarm button ( ) will illuminate and flash red.
1. Press and release to display the active alarm condition. The controller will display the
active alarm fault message (refer to 'Troubleshooting' on page 16 for a detailed list of all
available alarm messages and their meanings).
2. Press and hold for 2 seconds to clear the active alarm. If the alarm condition has cleared,
the alarm button will extinguish and the heater will resume normal operation. Note: If the
alarm condition is still present the alarm will immediately reactivate.
3. Press and release once to go back to the home screen.
Viewing Alarm History
All alarm conditions are logged in the controller's data logger which can log up to 150 alarm
conditions including information such as alarm type, date and time and various system
temperatures taken at the time the alarm condition occurred. Each alarm condition is numbered in
the top left hand corner in chronological order. i.e. #01, #02 e.t.c. where #02 was the last
occurring alarm condition. To view the alarm history, perform the following procedure:
1. Whilst in the home screen, press and release . The screen will change to the 'Main menu'.
2. Press and release or until 'E. Alarm History' is selected.
3. Press and release . The screen will change to show the last occurring (or last viewed)
alarm condition along with relevant alarm information. Each condition is numbered in the top
left hand corner in chronological order. i.e. #01, #02 e.t.c. where #02 was the last occurring
alarm condition.
4. Press and release or to navigate through the alarm history one alarm condition at a
time. Pressing and holding or will quickly navigate through the history.
5. Press and release twice to go back to the home screen.
SCHEDULER SPECIAL EVENT (FOR WHEN GOING ON HOLIDAYS)
If the premises will be vacant for a period of time, the controller can be programmed to reduce the
setpoint temperature and proportional band (differential) during the vacant period to save on
running costs. This method is preferable to turning the heat pump OFF because reheating a pool
 Loading...