

Page 1
1
SERVICE INSTRUCTIONS
18, 20,24, 26L Integrity
Electronic Gas Continuous Flow
Water Heater
TM031
R
R
R
e
e
e
v
v
v
i
i
i
s
s
s
i
i
i
o
o
o
n
n
n
:
:
:
B
B
B
P
P
P
u
u
u
b
b
b
l
l
l
i
i
i
s
s
s
h
h
h
e
e
e
d
d
d
:
:
:
F
F
F
e
e
e
b
b
b
r
r
r
u
u
u
a
a
a
r
r
r
y
y
y
0
0
0
8
8
8
871018
871020
871024
871024-B
871024-C
871026
871026-B
Page 2

TM031 Integrity 18, 20, 24, 26L Service Instructions REV: B
D.O.I: February 2008
This document is stored and maintained electronically by Service. All printed copies not bearing this statement in RED are deemed “uncontrolled”
2
Contents
Introduction ................................................................................................................................... 3
Water Heater Model Identification................................................................................................ 3
Preset Temperature Adjustment .................................................................................................. 4
Wiring Diagram - Models with Mechanical Bypass .................................................................... 5
Wiring Diagram - Models with Solenoid Operated Bypass ........................................................ 6
Sequence of Operation ................................................................................................................. 7
Specifications ............................................................................................................................... 8
Bypass Operation ......................................................................................................................... 9
Anti-Frost Heater Circuit ............................................................................................................ 10
Product Changes ........................................................................................................................ 10
Software Changes ................................ ........................................................................................ 10
Parts Replacement & Wiring Changes for 871024, 871024-B & 817026 Model Heaters Only ....... 10
In-series Gas Boosting ............................................................................................................... 15
Tempering Valves ....................................................................................................................... 20
Remote Controllers ..................................................................................................................... 20
How to Fault Find ........................................................................................................................ 23
Operational Flow Charts 1 & 2 ................................................................................................... 25
Error Codes ................................................................................................................................. 28
Diagnostic Test Points ............................................................................................................... 29
Maintenance Information ............................................................................................................ 30
Clearing Error Code History ....................................................................................................... 31
Resetting Error Codes ................................................................................................................ 32
Fault Diagnosis Sequence (Fault Finding Chart G) .................................................................. 33
Fault Finding Chart 1 .................................................................................................................. 34
Fault Finding Chart 2 .................................................................................................................. 36
Fault Finding Chart 3 .................................................................................................................. 38
Fault Finding Chart 3.1 ............................................................................................................... 40
Fault Finding Chart 3.2 ............................................................................................................... 41
Fault Finding Charts 3.3 and 3.5 ................................................................................................ 43
Fault Finding Chart 3.6 ............................................................................................................... 44
Fault Finding Chart 3.7 ............................................................................................................... 46
Fault Finding Chart 3.8 ............................................................................................................... 47
Fault Finding Charts 4 and 4.1 ................................................................................................... 48
Fault Finding Chart 4.2 ............................................................................................................... 49
Fault Finding Chart 4.3 ............................................................................................................... 50
Fault Finding Chart 5 .................................................................................................................. 51
Burner Gas Pressure Check....................................................................................................... 51
Component Replacement Procedures ................................ ...................................................... 52
Exploded View 1 871018 / 871020 / 871024 Replacement Parts List............................................ 61
Exploded View 2 871018 / 871020 / 871024 ................................................................................. 62
Exploded View 2 871018 / 871020 / 871024 Replacement Parts List............................................ 63
Exploded View 1 - 871024 Model ............................................................................................... 64
Exploded View 2 – 871024 Models ............................................................................................. 66
Exploded View 3 - 871024-B Model ............................................................................................ 68
Exploded View 4 - 871024-B Model ............................................................................................ 70
Exploded View 4 Replacement Parts List - 871024-B Model .................................................... 71
Exploded View 5 – 871024, 871026 & 871026-B Models ........................................................... 72
Exploded View 6 - 871024-C, 871026 & 871026-B Models ........................................................ 74
Gas Type Conversion Procedure ............................................................................................... 76
Warranty ...................................................................................................................................... 78
Page 3
TM031 Integrity 18, 20, 24, 26L Service Instructions REV: B
D.O.I: February 2008
This document is stored and maintained electronically by Service. All printed copies not bearing this statement in RED are deemed “uncontrolled”
3
Safety Warning
The purpose of this service manual is to provide sufficient information to allow a person
with the skills as required by the Regulatory Authorities to carry out effective repairs to a
Rheem Continuous Flow Gas Water Heater in the minimum of time.
Safety precautions or areas where extra care should be observed when conducting tests
outlined in this service manual are indicated by print in bold italics and/or a warning
symbol. Take care to observe the recommended procedure.
Certain diagnostic procedures outlined in these Service Instructions
require “live” testing to be conducted. Personal Protective Clothing (PPE)
shall be worn and an RCD shall be installed between the power point and
3-pin cord of the water heater to reduce the risk of electric shock.
If the supply cord is damaged, it must be replaced by the manufacturer or
its service agent or a similarly qualified person in order to avoid a hazard.
Introduction
The information provided in these instructions is based on the water heater being installed
in accordance with the Installation Instructions provided with each water heater.
Should you require further technical advice on a Rheem Integrity Water Heater, contact
your nearest Rheem Service Department where genuine replacement parts are also
available.
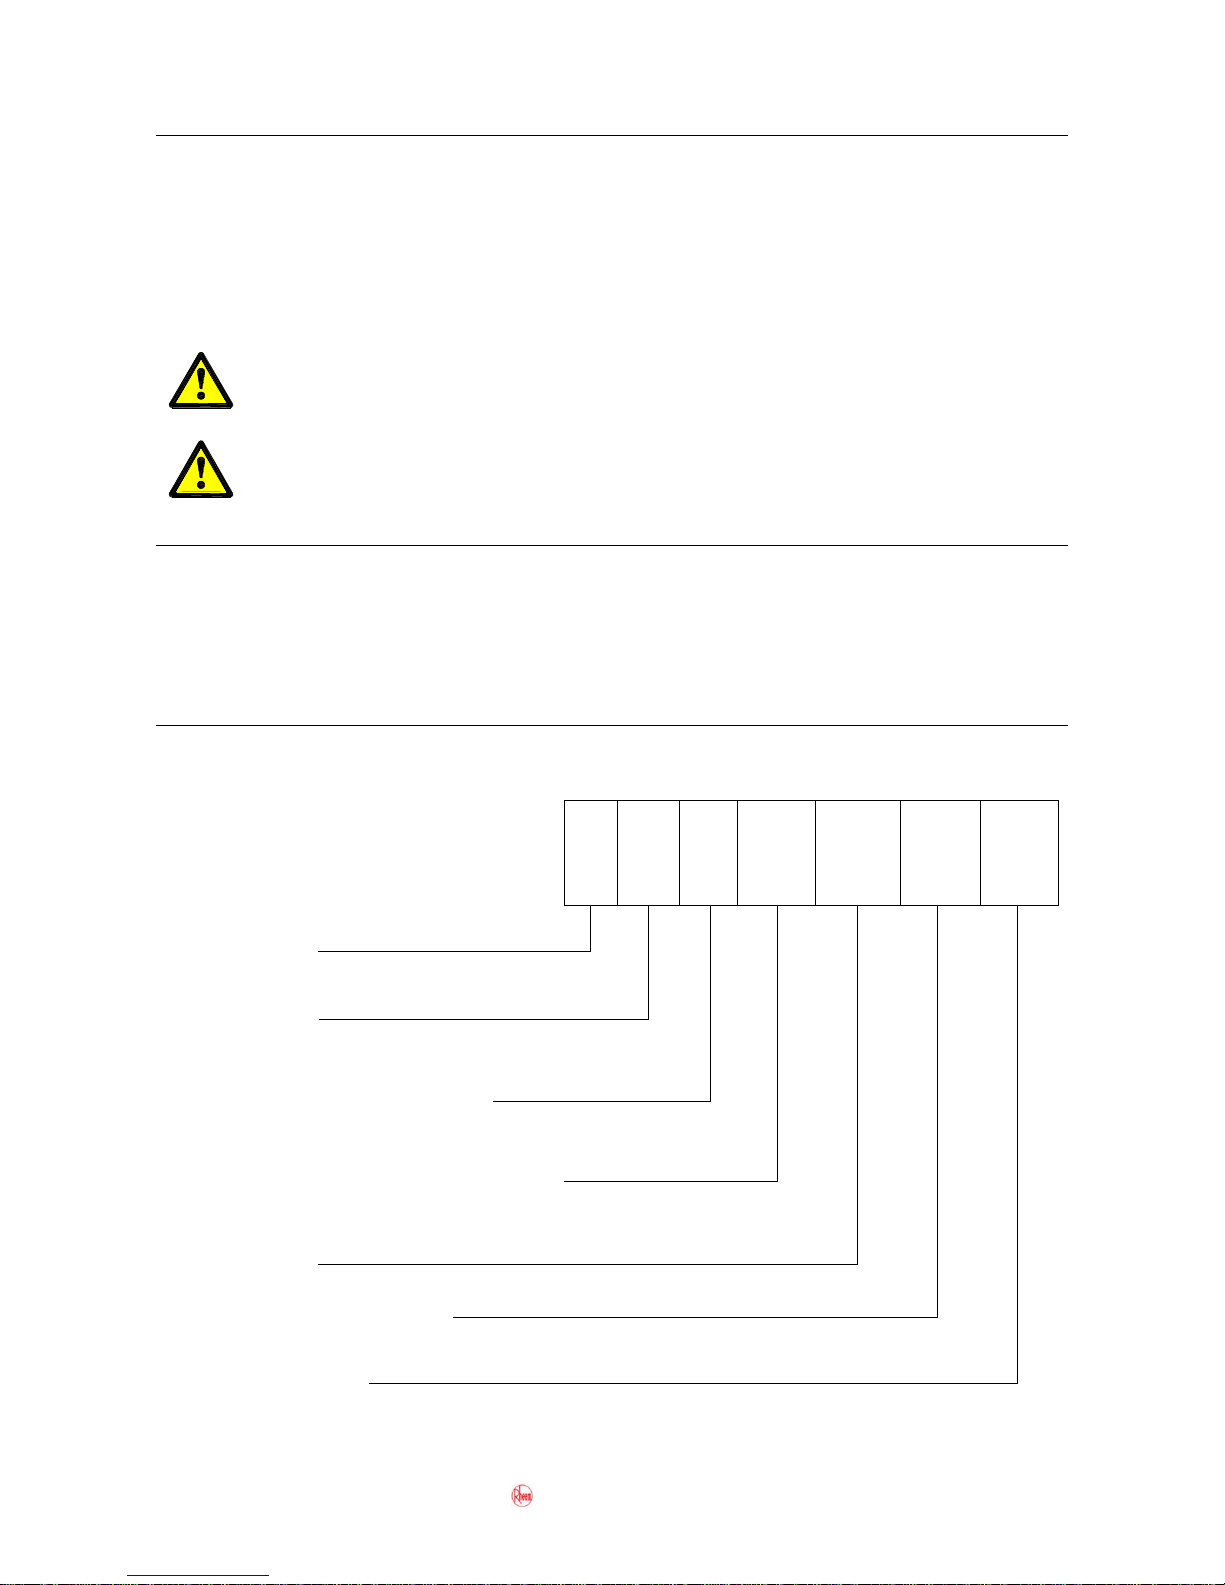
Water Heater Model Identification
The identification numbers are designed to convey detailed information about the water
heater to which it is attached. The model number consists of 6 digits and up to 3 letters.
8 7 1
018
020
024
026
N
F
-B
or
-C
Model Number
8 – Rheem
Location
7 – External
Ignition Type
1 - Electronic 60ºC Max temp
Capacity
Nominal litres/minute @ 25 ºC rise
Gas Type
N - Natural
L - LPG
F - Frost protection fitted
Version
Internal Use Only
Page 4
4
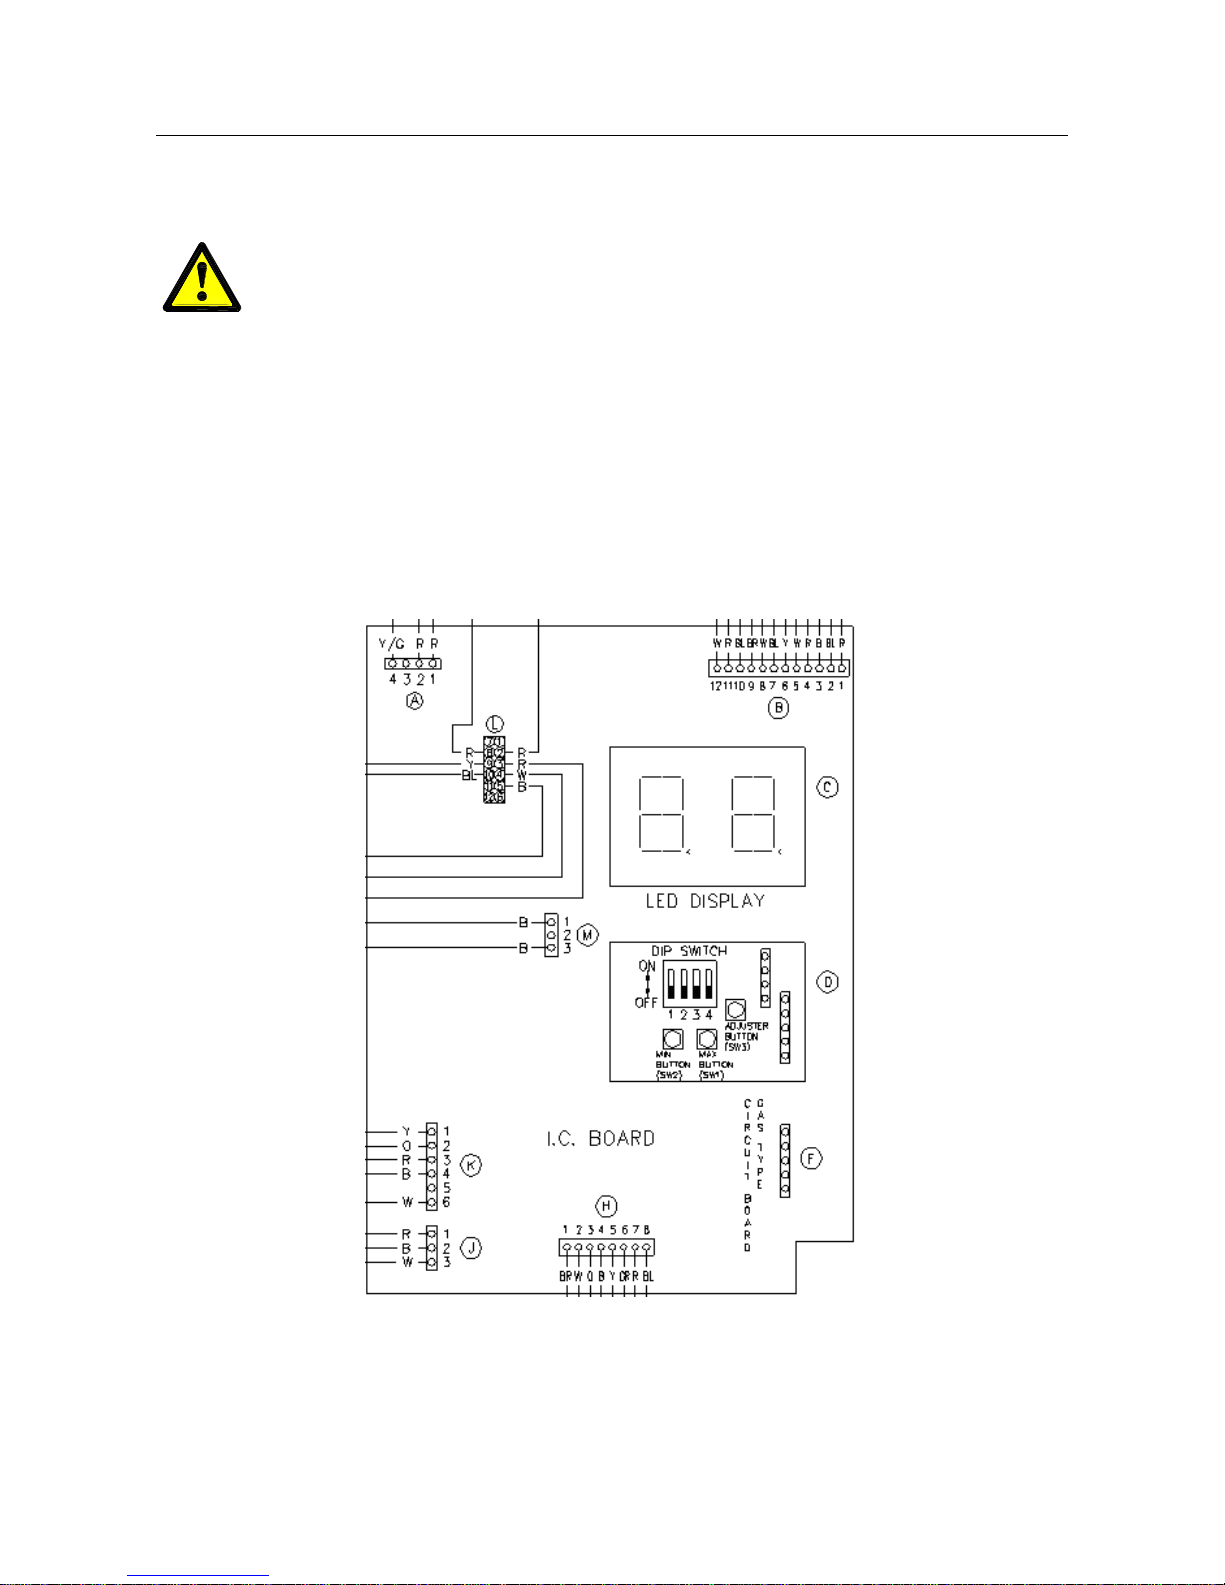
Preset Temperature Adjustment
It is possible to choose a preset outlet water temperature setting when remote controllers
are not fitted. The water heater comes factory set at 55ºC on 871 series models.
Voltages up to 240 volts will be present within the water heater, take care
not to touch wiring terminals. Use an insulated tool when operating the
DIP switch or MIN and MAX buttons.
To adjust the preset temperature:
1. Remove the front cover from the water heater.
2. Turn DIP SWITCHES 3 and 4 on (up position) on the I.C. Board. The current preset
temperature is displayed on the LED.
3. Press the MIN or MAX button, located under the DIP Switches, until the desired
temperature is displayed. Available temperatures are:
871 series models: 40ºC, 43ºC, 50ºC, 55ºC and 60ºC
4. Turn DIP SWITCHES 3 and 4 off (down position). The temperature display is now
turned off.
5. Refit the front cover to the water heater.
Page 5
TM031 Integrity 18, 20, 24, 26L Service Instructions REV: B
D.O.I: February 2008
This document is stored and maintained electronically by Service. All printed copies not bearing this statement in RED are deemed “uncontrolled”
5
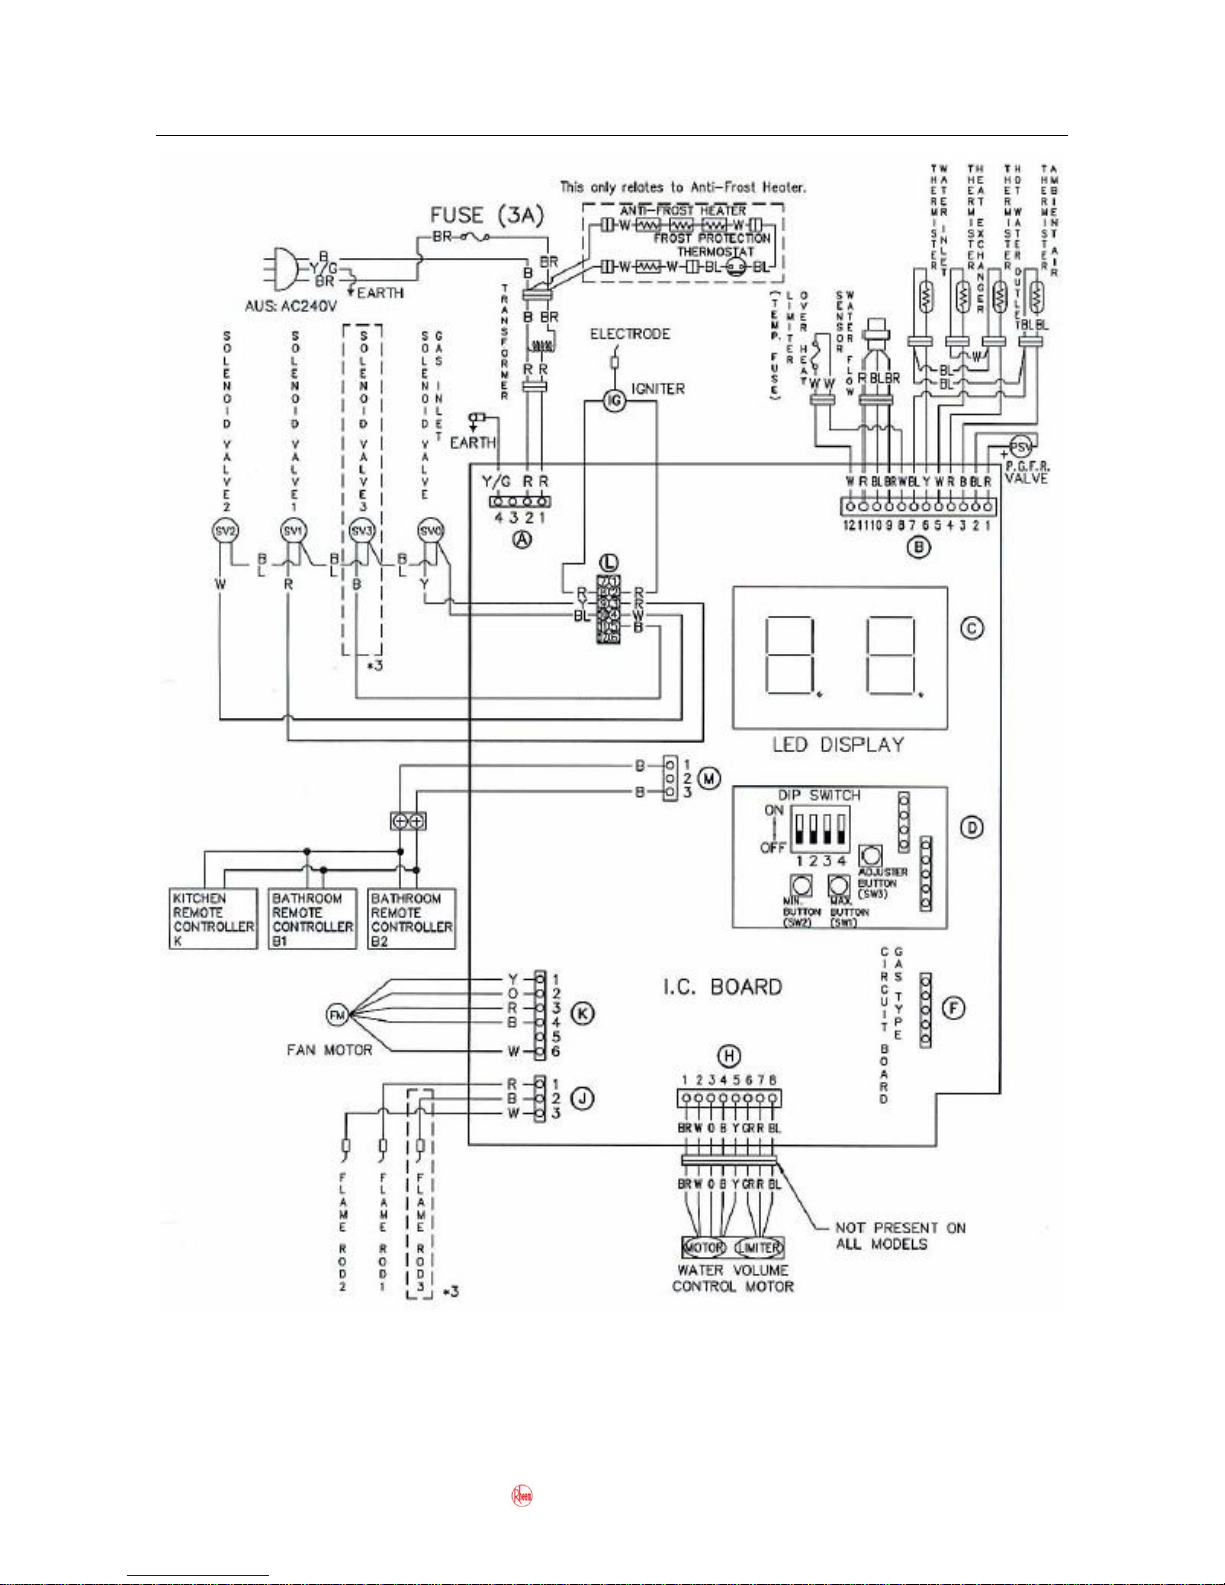
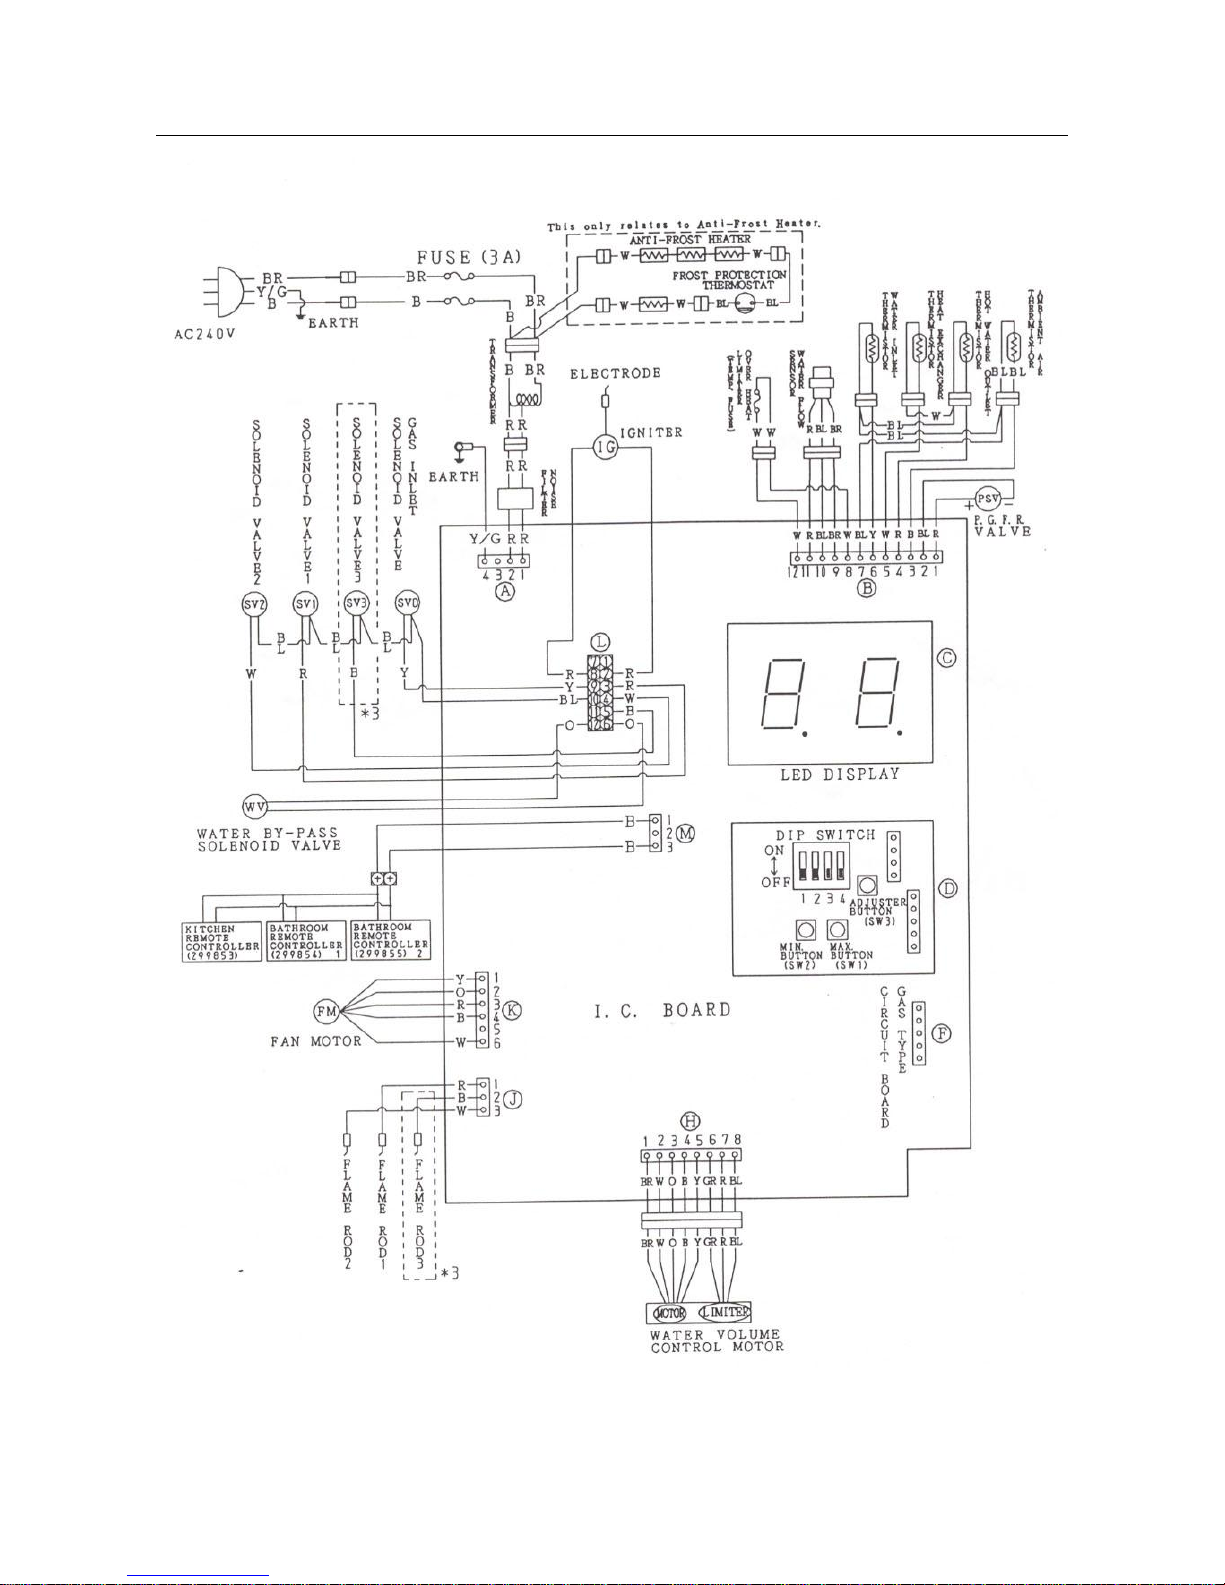
Wiring Diagram - Models with Mechanical Bypass
Page 6
6
Wiring Diagram - Models with Solenoid Operated Bypass
Page 7

7
Sequence of Operation
Refer to „Sequence of Operation Component Diagram‟ on page 9 to view components
shown in brackets e.g. (1)
1. When a hot water tap (1) is opened, cold water (or preheated water if a solar preheater
is installed) enters the water heater and passes through the Water Flow Sensor (3) and
Heat Exchanger (19). Note: For 871020, 871024, 871024-B, and 871026 model
heaters fitted with a comparator the inlet water temperature must be less than or equal
to 57ºC and for 871020-B, 871024-C and 871026-B models the inlet water temperature
must be less than or equal to 58ºC and less than or equal to the set point temperature
minus 2ºC for operation to occur past this point; otherwise water will pass straight
through the heat exchanger and fan and burner operation will not occur (for more
information on this subject refer to the section titled „In-series Gas Boosting‟ on page
15).
2. The Water Flow Sensor (3) sends a pulse signal to the PCB (27). Once the pulse
signal reaches a pre designated frequency (at minimum flow rate) the PCB (27)
activates the Fan Motor (25) and the Fan (24) starts rotating.
3. After the Fan (24) completes a pre purge, the Gas Inlet Solenoid Valve (9), Gas
Solenoid Valve 1 (10) and Gas Solenoid Valve 2 (11) open at the same time. The
Proportional Gas Flow Regulating Valve (13) adjusts the gas flow rate to ensure
adequate gas for ignition and gas is then supplied to the Burner (15).
4. At the same time the Gas Solenoid Valves open the Igniter (16) starts sparking
continuously and ignites the gas at the Burner (15). After the flame sensor (18) detects
burner flame, the Proportional Gas Valve (13) begins to control the gas flow rate. If
there is a difference between the hot water temperature detected by the Hot Water
Outlet Thermistor (6) and that set on the water heater or selected on the remote
controller (if fitted) the PCB (27) adjusts the hot water temperature by opening and
closing the Gas Solenoid Valves 1 (10), 2 (11) and 3 (12) and adjusting the
Proportional Gas Flow Regulating Valve (13). The water flow rate is also adjusted via
the Water Flow Servo Motor (7) to ensure the selected temperature of hot water is
delivered.
5. As the gas flow rate, controlled by the Proportional Gas Flow Regulating Valve (13)
changes the PCB (27) varies the speed of the Fan Motor (25) to maintain the correct air
gas mix ratio.
6. When the hot tap (1) is closed, the pulse signal from the Water Flow Sensor (3) stops
and the burner flame is extinguished by closing Gas Solenoid Valves 1 (10), 2 (11), 3
(12) and the Gas Inlet Solenoid Valve (9). The post purge operation then commences.
7. Once the post-purge operation ends (up to 6 minutes) power to the Fan Motor (25) is
cut and the Fan (24) stops.
Page 8

8
Specifications
Model
871018
871018
871020
871020
871024
871024-B
871024-C
871024
871024-B
871024-C
871026
871026-B
871026
871026-B
Specification
Natural
LPG
Natural
LPG
Natural
LPG
Natural
LPG
Max hourly gas cons.-MJ/Hr
157
157
157
157
188
188
199
199
Min hourly gas cons.-MJ/Hr
24
24
24
24
22
22
19
19
Min inlet wtr pressure-kPa
140
140
140
140
140
140
140
140
Max inlet wtr pressure-kPa
1000
1000
1000
1000
1000
1000
1000
1000
Min inlet gas pressure(kPa)
1.13
2.75
1.13
2.75
1.13
2.75
1.13
2.75
Max inlet gas pressure(kPa)
3.5
3.5
3.5
3.5
3.5
3.5
3.5
3.5
871024
871024-B
871024-C
871024
871024-B
871024-C
Max burner gas test
pressure (kPa)
0.903
1.5
0.903
1.5
0.71
0.912
0.71
1.078
0.965
1.2
Min burner gas test
pressure (kPa)
0.182
0.32
0.182
0.32
0.15
0.17
0.16
0.22
0.17
0.22
Ignition System
Continuous Spark
Power Cons.
(Watts)
Standard
66
66
66
66
64
64
anti-frost*
124
124
124
124
146
146
146
146
Gas connection diam.(mm)
R¾/20
R¾/20
R¾/20
R¾/20
R¾/20
R¾/20
R¾/20
R¾/20
Water connection
diam.(mm)
R½/15
R½/15
R½/15
R½/15
R¾/20
R¾/20
R¾/20
R¾/20
Relief Valve Pressure (kPa)
1750
1750
1750
1750
1750
1750
1750
1750
Accessories
Kitchen Controller
Y Y Y Y Y
Y
Y
Y
Bathroom 1 Controller
Y Y Y Y Y
Y
Y
Y
Bathroom 2 Controller
Y Y Y Y Y
Y
Y
Y
Recess box
Y Y Y Y Y
Y
Y
Y
Pipe cover
Y Y Y Y Y
Y
Y
Y
* Maximum power consumption when anti-frost heaters are energised.
Page 9
9
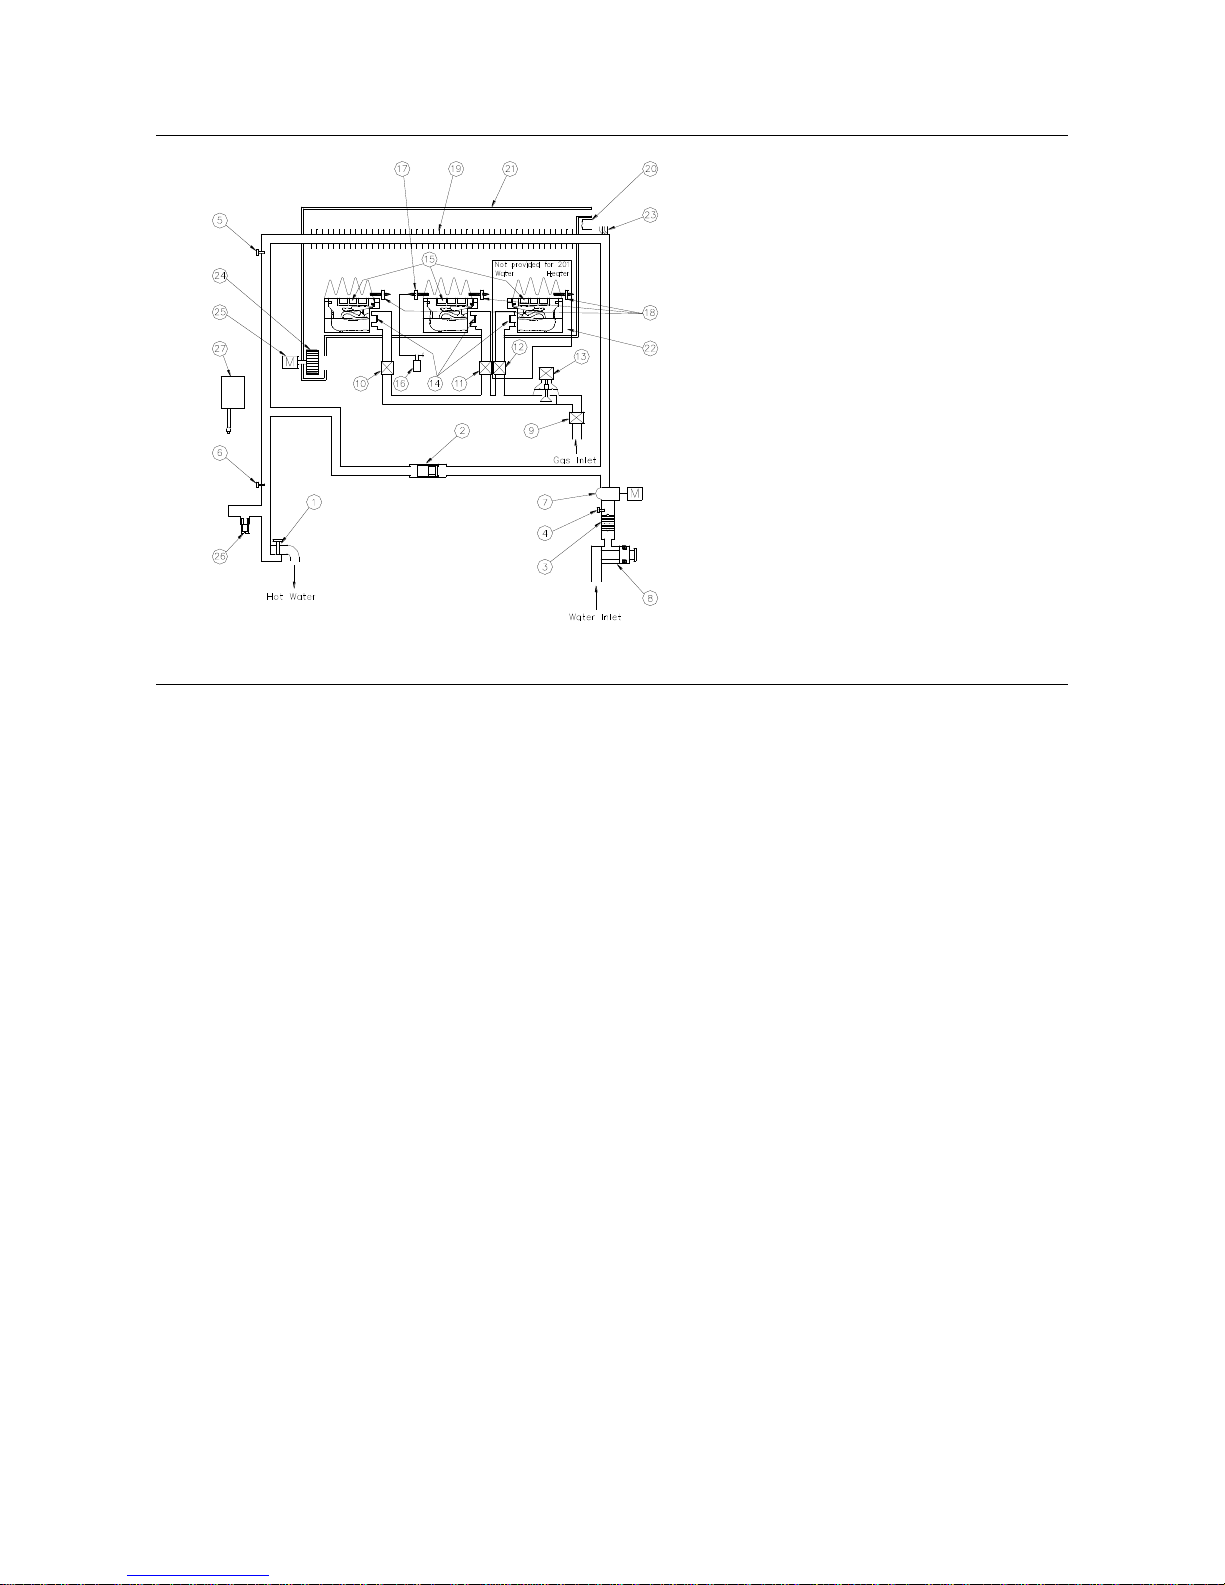
Sequence of Operation Component Diagram
1
Hot Water Tap
2
Bypass Control Valve
3
Water Flow Sensor
4
Inlet Water Temperature Thermistor
5
Combustion Chamber Thermistor
6
Outlet Water Temperature Thermistor
7
Water Flow Servo Motor
8
Water Filter (Strainer)
9
Gas Inlet Solenoid Valve
10
Gas Solenoid Valve 1
11
Gas Solenoid Valve 2
12
Gas Solenoid Valve 3
13
PGFR Valve
14
Nozzle
15
Burner
16
Igniter
17
Igniter Electrode
18
Flame Sensor
19
Heat Exchanger
20
Over Temperature Limiter
21
Exhaust (Flue) Outlet
22
Combustion Chamber
23
Anti Frost Heater (Models with F in model
number only e.g. 871024NF)
24
Fan
25
Fan Motor
26
Drain Plug With Relief Valve.
27
PCB
Bypass Operation
The bypass is a section of copper pipe work connected between the water body assembly
(effectively the cold water inlet) and the outlet of the heat exchanger and allows a quantity
of cold water to bypass the heat exchanger. The purpose of the bypass is to ensure the
heat exchanger operates at temperatures above the dew point of the combustion gases,
ensuring condensate is not produced, but low enough to maximise the heat exchangers
life. A valve fitted to the water body assembly controls the bypass. There are two types of
bypass valve utilised in the 18, 20 and 24 models. To determine what kind of bypass is
being utilized, compare the appliance to the wiring diagrams on pages 5 & 6.
Mechanical Bypass
The mechanical bypass is a small spring loaded valve located in the water body assembly.
The spring is temperature sensitive, as the cold water temperature decreases the spring
tension increases reducing the amount of cold water flowing through the bypass. The
bypass operates at all times when water is flowing.
Solenoid Operated Bypass
The solenoid operated bypass comprises a valve (located in the water body assembly)
that is controlled by a solenoid (mounted on the water body assembly). The PCB activates
the solenoid at the following predetermined temperatures:
Without Touch Pads: When the unit is preset at 40 or 43 degrees.
With Touch Pads: When temperatures from 37 to 46 degrees are selected.
At all other times the bypass does not operate.
Page 10

TM031 Integrity 18, 20, 24, 26L Service Instructions REV: B
D.O.I: February 2008
This document is stored and maintained electronically by Service. All printed copies not bearing this statement in RED are deemed “uncontrolled”
10
Anti-Frost Heater Circuit
Models with an „F‟ in the model number have an anti frost heater circuit e.g. 871024NF-B.
The anti-frost heaters are wired in series and operate independently from the water heater.
The 18 and 20 litre models have a 58-watt anti-frost system. The 24 and 26 litre models
have an 82-watt anti-frost system.
A thermostat sensing ambient air temperature, positioned in the wiring loom near the
bottom of the water heater, activates the anti-frost heaters when the ambient air
temperature falls to 4ºC +4ºC/-2ºC and deactivates the anti-frost heaters when the
temperature rises above 12ºC.
In the event a heater block becomes open circuit the total heater circuit is rendered
inoperable. The total heater circuit measures 993.2 ohms for the 18 and 20 litre models.
The total heater circuit measures 702.6 ohms for the 24 and 26 litre models.
The circuit is split into two sections with 4 heaters in total. To determine which section has
failed, isolate the power to the water heater and unplug the wiring connectors at the
thermostat, cord set and the water body assembly heater block. The heat exchanger and
hot water outlet heater‟s resistance (3 heater blocks) is 719.2 ohms for the 18 and 20 litre
models and 565.5 ohms for the 24 and 26 litre models. The resistance of the water body
assembly heater is 274 ohms for the 18 and 20 litre models. The resistance of the water
body assembly heater is 137.1 ohms for the 24 and 26 litre models. Refer to Procedure 10
on page 55 for replacement procedure.
Product Changes
Software Changes
18 and 20 litre models manufactured after July 2006 and 24 and 26 litre models
manufactured after May 2006 have a change to the software which controls the operation
of the heater. When an inlet water temperature of more than 58ºC and more than the set
point temperature minus 2ºC is detected by the inlet water temperature thermistor, the fan
and burner will not operate.
This function has been introduced to enhance the operation of the water heater and
remove the need for a Solar Bypass Valve when the Integrity is connected as an in-series
gas booster to a solar water heating system (for more information refer to „In-series Gas
Boosting‟ on page 15).
Models with the revised software have a –B or -C suffix added to the model number i.e.
817020NF-B or 871024NF-C.
Parts Replacement & Wiring Changes for 871024, 871024-B & 817026 Model Heaters
Only
Some parts for 871024, 871024-B & 871026 model heaters have been superseded and
are no longer available (refer to following tables). If any of these superseded parts are
found to be faulty they must be replaced with current parts available for 871024-C and
871026-B model heaters.
Some current parts utilise different wiring connectors/connections necessitating the
replacement of other interconnecting components when installed in 871024, 871024-B and
871026 model heaters (refer to „Parts Replacement Scenarios‟ on page 11). Part numbers
shown in the following tables which are not marked with an asterisk (*) can be considered
a direct replacement and require no additional components or modifications when installed
in 871024, 871024-B and 871026 model heaters.
Page 11

TM031 Integrity 18, 20, 24, 26L Service Instructions REV: B
D.O.I: February 2008
This document is stored and maintained electronically by Service. All printed copies not bearing this statement in RED are deemed “uncontrolled”
11
Note: The parts lists shown on pages 64 - 75 are for current 871026-B and 871024-C
model heaters; superseded part numbers for 871024 and 871026 model heaters are not
shown therein however they are listed in the following tables.
Item
Description
Superseded Model
Current Model
871024
871024-B
871026
871024-C
871026-B
115
Nozzle Plate NG
N/A
31-76238-00
Nozzle Plate LP
N/A
N/A
410
Water Body Assy
31-76285-00
31-76658-00
701
Overheat Limiter
54-02730-00
*31-79562-00
705
Anti-frost heater A
WH0020047
31-71644-00
706
Anti-frost heater B
WH0020048
31-71643-00
712
Thermistor (ambient air)
WH0020052
*Now part of item 758
713
Thermistor Outlet (B)
WH0020181
*20-64774-00
714
Anti-frost thermostat
WH0020054
20-57072-00
715
Thermistor HX
WH0020053
*Now part of item 758
717
Thermistor Inlet (A)
WH0020180
*20-64773-00
723
Hall IC Assy
31-28085-00
*20-43805-00
745
PCB
31-76604-0S
31-76623-0S
757
100V Line Cord
31-23674-00
31-76653-00
758
Signal Loom
WH0020067
*31-76655-00
773
Power Filter
WH0020079
*31-71642-00
780
Power cord
WH0020071
*31-76652-00
783
Transformer
WH0020073
*31-71646-00
784
Connecting Cord
31-23492-00
*31-71641-00
*When installed in 871024, 871024-B and 871026 model heaters these parts will require the replacement of
other interconnecting components. Refer to „Parts Replacement Scenarios‟ on page 11 for more information.
Parts Replacement Scenarios for 871024, 871024-B & 871026 Model Heaters Only
When replacing any of the following parts in 871024, 871024-B or 871026 models heaters
the additional components shown will also require replacing due to wiring/connection
changes between superseded and current parts. In some instances electrical BP
connectors may be utilised instead of replacing the additional listed parts and in
these cases this will be shown as an option. Note: Item numbers refer to the item
number on the exploded views and parts lists located on pages 64 - 75.
Power Cord (item 780)
Old Part Number WH0020071 / New Part Number 31-76652-00
This part may be connected to existing wiring utilising electrical BP connectors otherwise
in addition to the power cord it will also be necessary to replace:
Connecting Cord, Pt Nº 31-71641-00 (item 784)
Transformer, Pt Nº 31-71646-00 (item 783)
Power Filter, Pt Nº 31-71642-00 (item 773)
Page 12

TM031 Integrity 18, 20, 24, 26L Service Instructions REV: B
D.O.I: February 2008
This document is stored and maintained electronically by Service. All printed copies not bearing this statement in RED are deemed “uncontrolled”
12
Anti-frost heater A, Pt Nº 31-71644-00 (item 705)
Anti-frost heater B, Pt Nº 31-71643-00 (item 706)
Anti-frost thermostat, Pt Nº 20-57072-00 (item 714)
Transformer (item 783)
Old Part Number WH0020073 / New Part Number 31-71646-00
This part may be connected to existing wiring utilising electrical BP connectors otherwise
in addition to the transformer it will also be necessary to replace:
Connecting Cord, Pt Nº 31-71641-00 (item 784)
Power Cord, Pt Nº 31-76652-00 (item 780)
Power Filter, Pt Nº 31-71642-00 (item 773)
Anti-frost heater A, Pt Nº 31-71644-00 (item 705)
Anti-frost heater B, Pt Nº 31-71643-00 (item 706)
Anti-frost thermostat, Pt Nº 20-57072-00 (item 714)
Power Filter (item 773)
Old Part Number WH0020079 / New Part Number 31-71642-00
This part may be connected to existing wiring utilising electrical BP connectors otherwise
in addition to the power filter it will also be necessary to replace:
Connecting Cord, Pt Nº 31-71641-00 (item 784)
Power Cord, Pt Nº 31-76652-00 (item 780)
Transformer, Pt Nº 31-71646-00 (item 783)
Anti-frost heater A, Pt Nº 31-71644-00 (item 705)
Anti-frost heater B, Pt Nº 31-71643-00 (item 706)
Anti-frost thermostat, Pt Nº 20-57072-00 (item 714)
Connecting Cord (item 784)
Old Part Number 31-23492-00 / New Part Number 31-71641-00
This part may be connected to existing wiring utilising electrical BP connectors otherwise
in addition to the connecting cord it will also be necessary to replace:
Power Filter, Pt Nº 31-71642-00 (item 773)
Power Cord, Pt Nº 31-76652-00 (item 780)
Transformer, Pt Nº 31-71646-00 (item 783)
Anti-frost heater A, Pt Nº 31-71644-00 (item 705)
Anti-frost heater B, Pt Nº 31-71643-00 (item 706)
Anti-frost thermostat, Pt Nº 20-57072-00 (item 714)
Ambient Air Thermistor (item 712)
The ambient air thermistor is now part of the signal loom (item 758). In replacing the loom
the connectors on the replacement loom will now not fit any of the thermistors, water flow
sensor or overheat limiter requiring replacement of those items as well.
Old Part Number WH0020052 / New Part Number 31-76655-00 (signal loom)
Page 13

TM031 Integrity 18, 20, 24, 26L Service Instructions REV: B
D.O.I: February 2008
This document is stored and maintained electronically by Service. All printed copies not bearing this statement in RED are deemed “uncontrolled”
13
In addition to the signal loom it will also be necessary to replace:
Inlet thermistor, Pt Nº 20-64773-00 (item 717)
Heat Exchanger thermistor, now part of the signal loom Pt Nº 31-76655-00 (item 758)
Outlet thermistor, Pt Nº 20-64774-00 (item 713)
Overheat Limiter, Pt Nº 31-79562-00 (item 701)
Flow Sensor, Pt Nº 20-43805-00 (item 723)
Heat Exchanger Thermistor (item 715)
The heat exchanger thermistor is now part of the signal loom (item 758). In replacing the
loom the connectors on the replacement loom will now not fit any of the thermistors, water
flow sensor or overheat limiter requiring replacement of those items as well.
Old Part Number WH0020053 / New Part Number 31-76655-00 (signal loom)
In addition to the signal loom it will also be necessary to replace:
Inlet thermistor, Pt Nº 20-64773-00 (item 717)
Ambient air thermistor, now part of the signal loom Pt Nº 31-76655-00 (item 758)
Outlet thermistor, Pt Nº 20-64774-00 (item 713)
Overheat Limiter, Pt Nº 31-79562-00 (item 701)
Flow Sensor, Pt Nº 20-43805-00 (item 723)
Inlet thermistor (item 717)
Old Part Number WH0020180 / New Part Number 20-64773-00
In addition to the inlet thermistor it will also be necessary to replace:
Signal Loom, Pt Nº 31-76655-00 (item 758)
Ambient air thermistor, now part of the signal loom Pt Nº 31-76655-00 (item 758)
Heat Exchanger thermistor, now part of the signal loom Pt Nº 31-76655-00 (item 758)
Outlet thermistor, Pt Nº 20-64774-00 (item 713)
Overheat Limiter, Pt Nº 31-79562-00 (item 701)
Flow Sensor, Pt Nº 20-43805-00 (item 723)
Outlet Thermistor (item 713)
Old Part Number WH0020181 / New Part Number 20-64774-00
In addition to the outlet thermistor it will also be necessary to replace:
Signal Loom, Pt Nº 31-76655-00 (item 758)
Ambient air thermistor, now part of the signal loom Pt Nº 31-76655-00 (item 758)
Heat Exchanger thermistor, now part of the signal loom Pt Nº 31-76655-00 (item 758)
Inlet thermistor, Pt Nº 20-64773-00 (item 717)
Overheat Limiter, Pt Nº 31-79562-00 (item 701)
Flow Sensor, Pt Nº 20-43805-00 (item 723)
Page 14

TM031 Integrity 18, 20, 24, 26L Service Instructions REV: B
D.O.I: February 2008
This document is stored and maintained electronically by Service. All printed copies not bearing this statement in RED are deemed “uncontrolled”
14
Overheat Limiter (item 701)
Old Part Number 54-02730-00 / New Part Number 31-79562-00
In addition to the overheat limiter it will also be necessary to replace:
Signal Loom, Pt Nº 31-76655-00 (item 758)
Ambient air thermistor, now part of the signal loom Pt Nº 31-76655-00 (item 758)
Heat Exchanger thermistor, now part of the signal loom Pt Nº 31-76655-00 (item 758)
Inlet thermistor, Pt Nº 20-64773-00 (item 717)
Outlet thermistor, Pt Nº 20-64774-00 (item 713)
Flow Sensor, Pt Nº 20-43805-00 (item 723)
Flow Sensor (item 723)
Old Part Number 31-28085-00 / New Part Number 20-43805-00
This part may be connected to existing wiring utilising electrical BP connectors otherwise
in addition to the flow sensor it will also be necessary to replace:
Signal Loom, Pt Nº 31-76655-00 (item 758)
Ambient air thermistor, now part of the signal loom Pt Nº 31-76655-00 (item 758)
Heat Exchanger thermistor, now part of the signal loom Pt Nº 31-76655-00 (item 758)
Inlet thermistor, Pt Nº 20-64773-00 (item 717)
Outlet thermistor, Pt Nº 20-64774-00 (item 713)
Overheat Limiter, Pt Nº 31-79562-00 (item 701)
Signal Loom (item 758)
Old Part Number WH0020067 / New Part Number 31-76655-00
In addition to the signal loom it will also be necessary to replace:
Ambient air thermistor, now part of the signal loom Pt Nº 31-76655-00 (item 758)
Heat Exchanger thermistor, now part of the signal loom Pt Nº 31-76655-00 (item 758)
Inlet thermistor, Pt Nº 20-64773-00 (item 717)
Outlet thermistor, Pt Nº 20-64774-00 (item 713)
Flow Sensor, Pt Nº 20-43805-00 (item 723)
Overheat Limiter, Pt Nº 31-79562-00 (item 701)
Page 15
15
In-series Gas Boosting
Temperature controllers must not be fitted if this water heater is installed
as part of a solar water heater system because water at a temperature
much higher than the controller setting can be delivered.
If a solar pre-heater has been installed to an existing Integrity water heater
installation then a solar bypass valve or a comparator must be fitted at this
water heater and any controllers, if fitted, must be disconnected and
removed. Note: models 871024-C and 871026-B do not require a solar
bypass valve or a comparator.
18 litre Integrity’s are NOT suitable for use as in series gas booster.
871020-B, 871024-C and 871026-B Models
Where one of the above listed model Integrity is installed to provide in-series gas boosting
a solar bypass valve or a comparator is not required. These models have had a change
made to the operating software which eliminates the need for either of these components.
The software now electronically mimics a bypass valve so that when the inlet water
temperature is above 58°C the fan and burner will not operate despite water flowing
through the heat exchanger. When the inlet water temperature is less than or equal to
58°C the burner will fire and boost the outlet temperature to 60°C provided the flow rate is
greater than 3 litres per minute. 20 and 26 models with modified software can be identified
by a B suffix in the model number, whereas a 24 model with modified software can be
identified by a C suffix in the model number i.e. 871024NF-C.
The preset outlet temperature of the Integrity, when installed as an in-series gas booster to
a solar water heater, must be set at 60 C for the system to operate correctly.
The factory preset outlet temperature of all Integrity models is 55 C; during a new
installation it will be necessary to reset the outlet temperature to 60 C. Refer to page 4 for
details on checking and adjusting the outlet temperature.
Note: If a 20, 24, 24B or 26 model heater is replaced with an 20B, 24C or 26B model
heater and the existing 20, 24, 24B or 26 heater is used as an in-line booster and has a
solar bypass valve fitted, the solar bypass valve must be removed and the plumbing
connections remade directly to the Integrity inlet and outlet water connections (refer to
diagrams on pages 15 & 16).
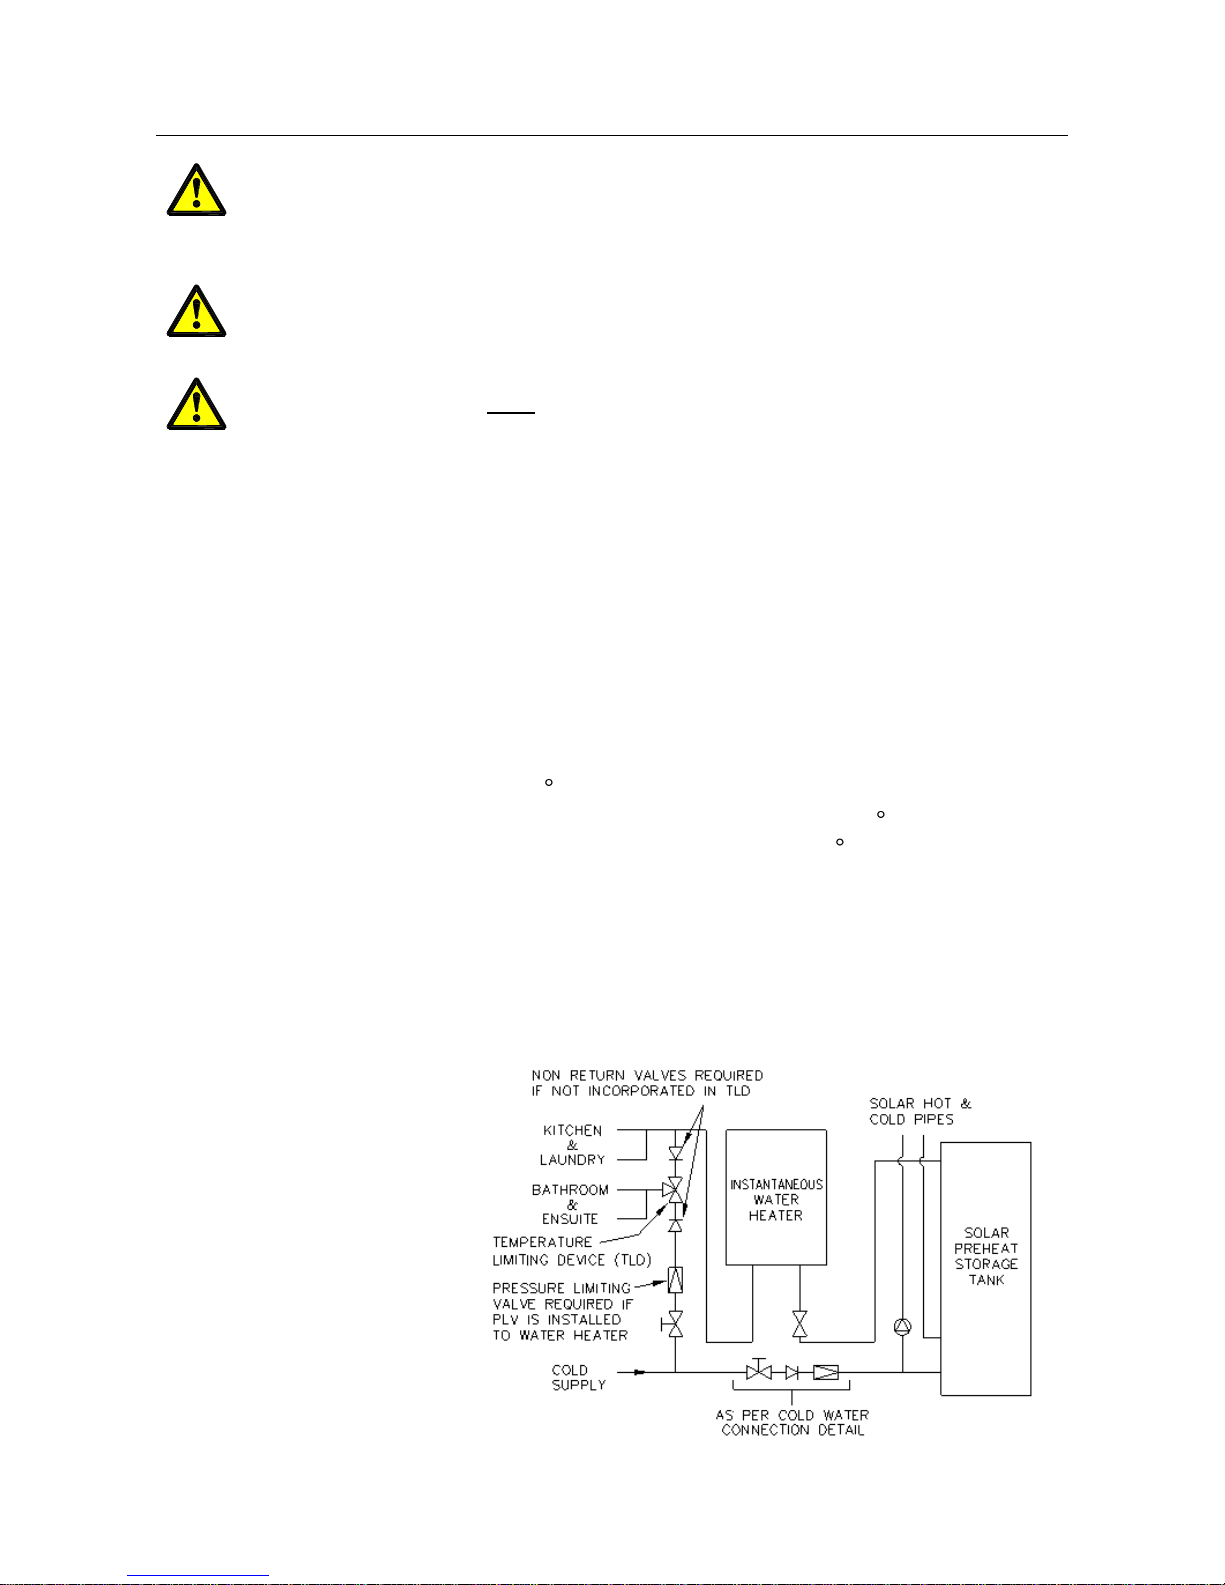
In-series Gas Boosting Integrity Solar Loline Installation
Note: This plumbing diagram is
also applicable to standard
model heaters fitted with a
comparator.
For more information on
comparators refer to page 17.
Page 16
TM031 Integrity 18, 20, 24, 26L Service Instructions REV: B
D.O.I: February 2008
This document is stored and maintained electronically by Service. All printed copies not bearing this statement in RED are deemed “uncontrolled”
16
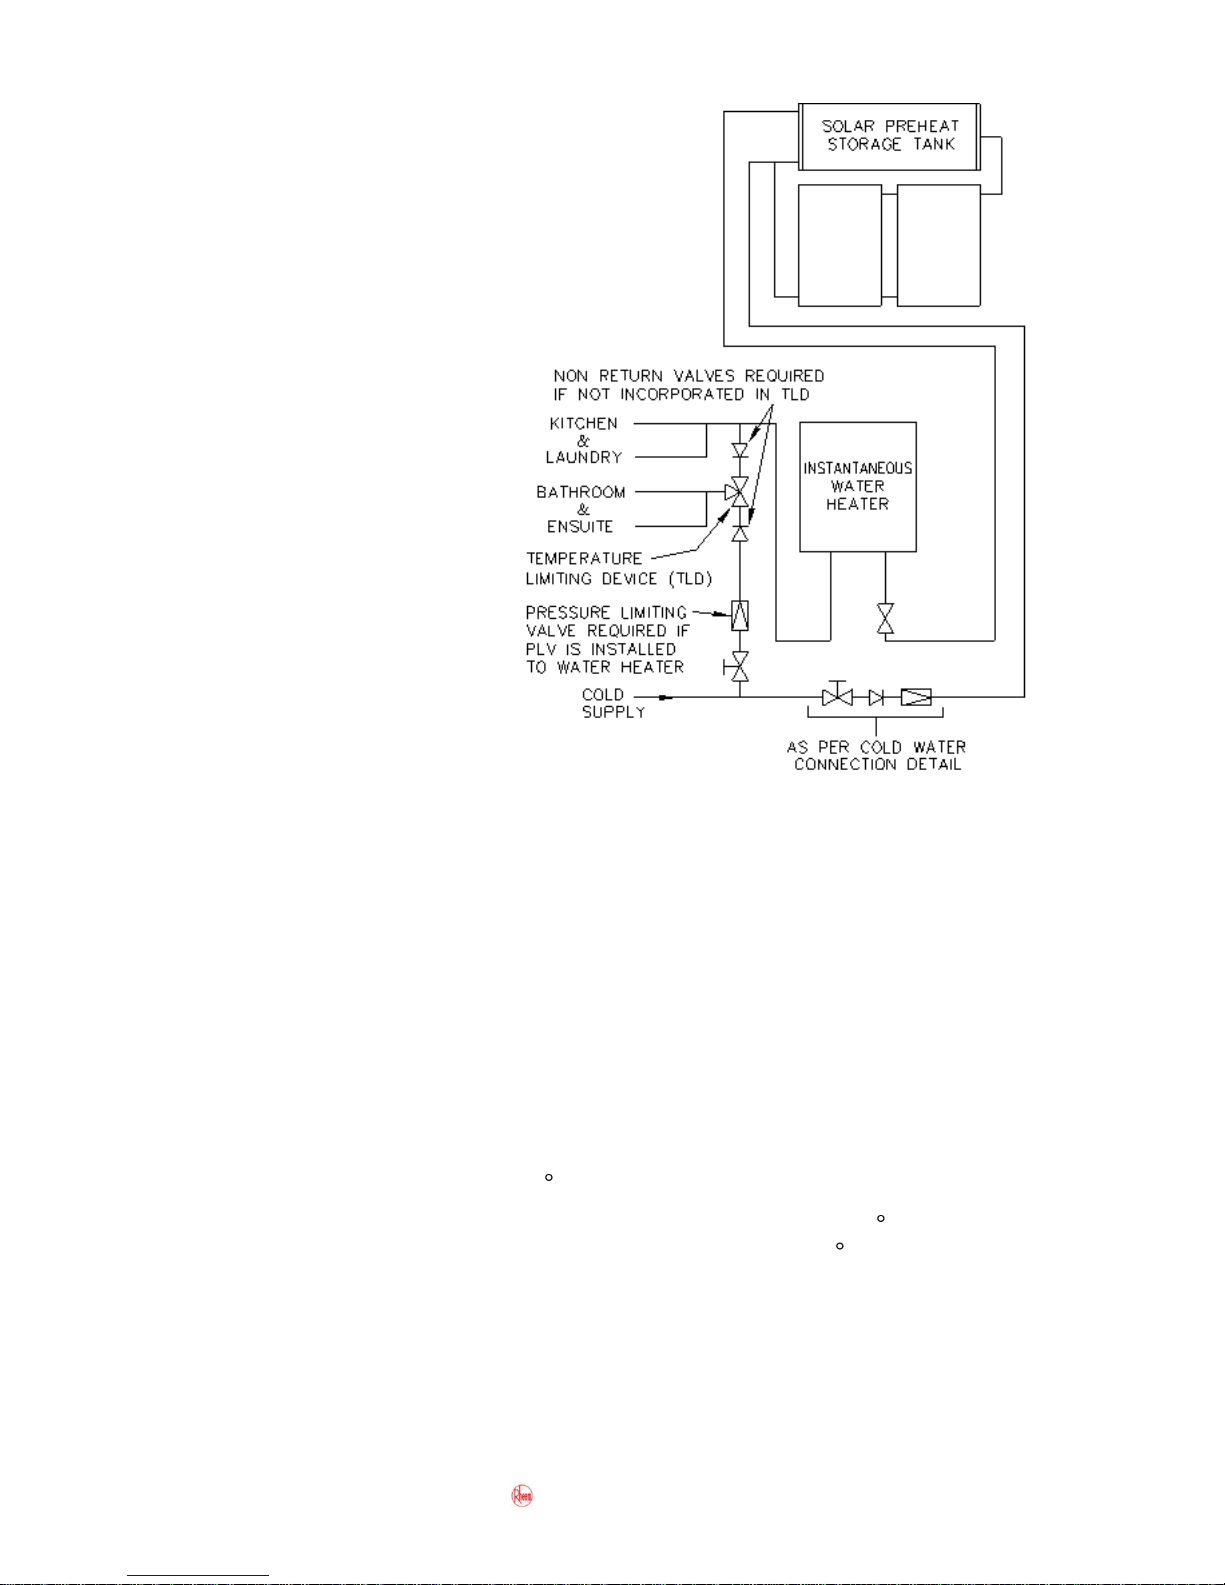
In-series Gas Boosting
Integrity Solar Hiline
Installation
Note: This plumbing diagram is
also applicable to standard model
heaters fitted with a comparator.
For more information on
comparators refer to page 17.
871020, 871024, 871024-B and 871026 Models
Where one of the above listed models is installed to provide in-series gas boosting, a solar
bypass valve is fitted across the Integrity inlet and outlet water connections to prevent the
water heater from operating when the outlet water temperature from the solar system is
above 57°C (refer to diagrams on page 17). A disconnection union must always be
provided at the solar preheated water inlet and hot water outlet on the solar bypass valve
to allow for removal of the valve.
The solar bypass valve has been specifically designed to work with Rheem Integrity
models listed above. 20 and 26 models ending with a B do not require a bypass valve. 24
models ending with -C do not require a bypass valve. 18 litre Integrity‟s are not suitable
for use as in-series boosters.
The preset outlet temperature of the Integrity, when installed as an in-series gas booster to
a solar water heater, must be set at 60 C for the system to operate correctly.
The factory preset outlet temperature of all Integrity models is 55 C; during a new
installation it will be necessary to reset the outlet temperature to 60 C. Refer to page 4 for
details on checking and adjusting the outlet temperature.
There are two types of solar bypass valves currently in use (Paloma & RMC) and whilst
both operate in the same manner the plumbing arrangement at the valve differs according
to the type of solar bypass valve used (refer to diagrams on page 17). Solar bypass valves
are no longer available and if faulty are to be removed and a Comparator installed. Refer
to pages 17 & 18 for information on comparators.
Page 17
TM031 Integrity 18, 20, 24, 26L Service Instructions REV: B
D.O.I: February 2008
This document is stored and maintained electronically by Service. All printed copies not bearing this statement in RED are deemed “uncontrolled”
17
Note: If a 821020, 821024, 821024-B or 821026 model heater is replaced with an 821020B, 821024-C or 821026-B model heater and the existing 871020, 871024, 871024-B or
871026 heater is used as an in-line booster and has a solar bypass valve fitted, the solar
bypass valve must be removed and the plumbing connections remade directly to the
Integrity inlet and outlet water connections (refer to diagrams on pages 15 & 16).
Solar Bypass Valve Operation
When the water temperature entering the solar bypass valve is above 57°C a temperature
sensitive mechanism moves the valve spindle preventing water from entering the Integrity
and allowing the water to flow through the solar bypass valve to the hot water outlet.
If the water temperature from the solar storage tank entering the solar bypass valve is
below 57°C the temperature sensitive mechanism retracts the valve allowing water to
enter the Integrity and preventing flow through the solar bypass valve. The Integrity will
boost the water temperature to 60°C at the hot water outlet provided the flow rate is
greater than 3 litres per minute.
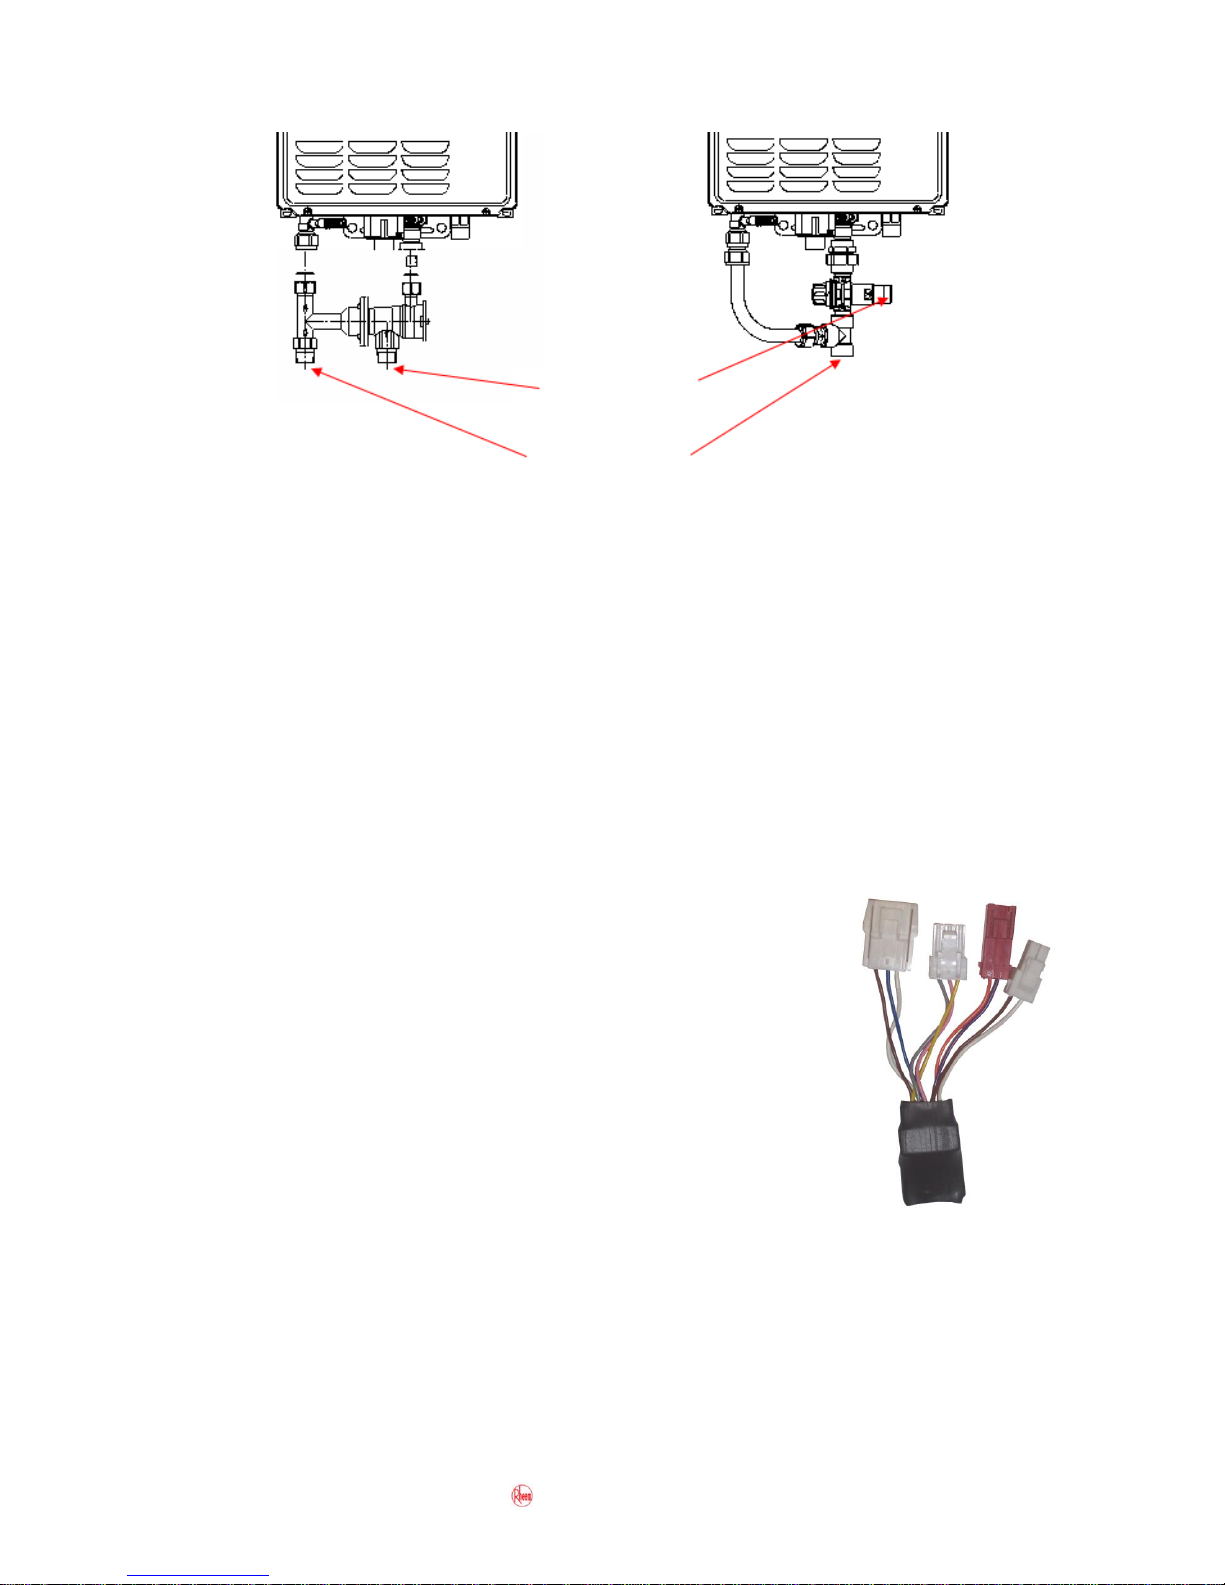
Replacement of Solar Bypass Valve with a Comparator
An electronic device called a Comparator (part number 052127) is
now available to replace the solar bypass valve and is suitable for
use on Rheem 871020, 871024, 871024-B and 871026 models
heaters. NOTE: 20 and 26L models with a B suffix and 24L models
with a C suffix in the model number do not require either a solar
bypass valve or a comparator.
Solar bypass valves are no longer available and if faulty are to be
removed and a Comparator installed. Refer to page 18 for the
procedure on installing a comparator.
The purpose of the comparator is to interrupt the operation of the
burner when the inlet water temperature rises above 57°C.
The comparator is connected to the water flow sensor wiring and the inlet temperature
sensor (cold sensor) wiring; both these components are mounted on the water body within
the gas booster. The comparator monitors the inlet water temperature and when the
temperature rises above 57°C the comparator interrupts the signal from the flow sensor to
the PCB causing the burner to shut down.
Paloma Solar Bypass Valve
RMC Solar Bypass Valve
Inlet water from
solar water heater
Hot water outlet
Page 18
18
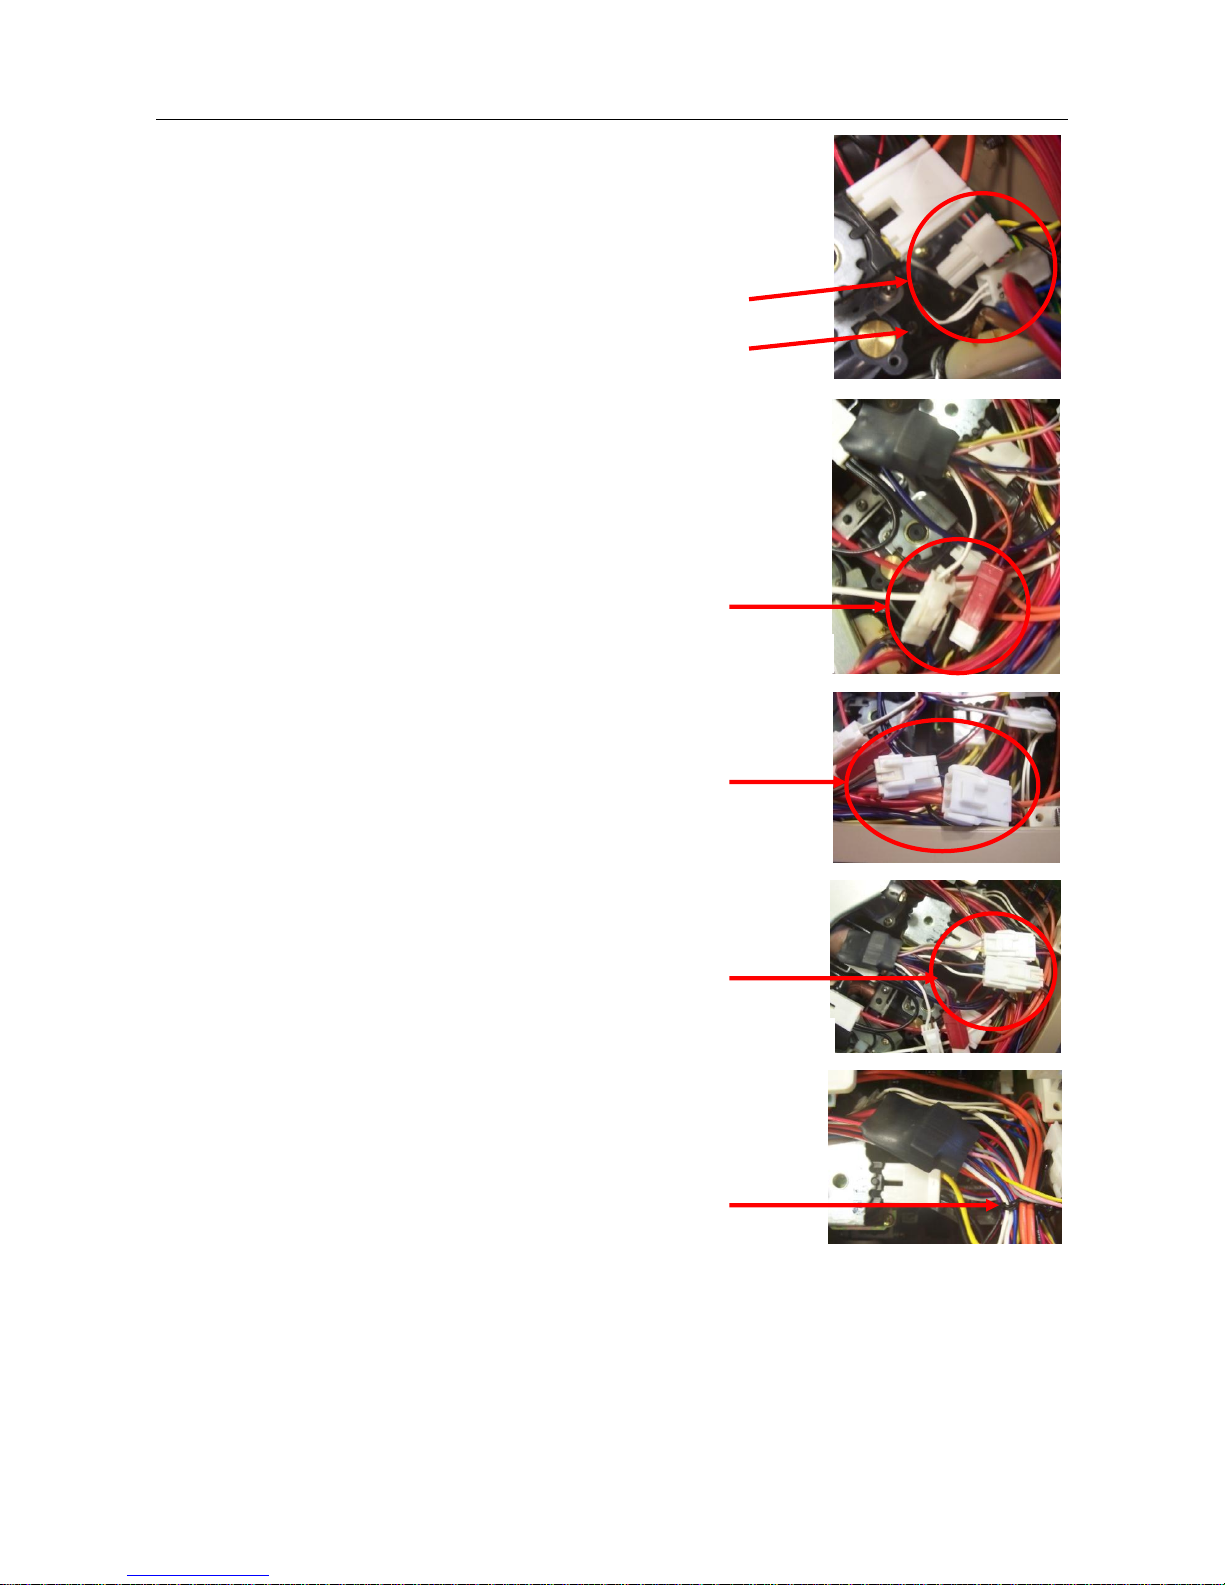
Removing a Solar Bypass Valve and Installing a Comparator
1. Ensure power and water to the water heater is isolated.
2. Remove the front cover (refer to component procedure 1 on
page 52).
3. Locate the 2 pin wiring plug in the wiring loom to the cold
sensor mounted on the water body (refer to fig 1) and
disconnect.
4. Plug the 2 pin male and female connectors from the
comparator into the plugs attached to the cold sensor and the
main wiring loom (refer to fig 2). NOTE: If the comparator
connectors do not fit the cold sensor and main wiring loom
plugs, the model is an 871020-B, 871024-C or 871026-B
model which does not require a comparator.
5. Locate the 3 pin wiring plug in the wiring loom to the flow
sensor (refer to fig 3) and disconnect
6. Plug the 3 pin male and female connectors from the
comparator into the plugs attached to the flow sensor and the
main wiring loom (refer to fig 4).
7. Position and secure the comparator in a safe position using
the existing wiring ties securing the wiring loom (refer to fig
5).
8. Refit the front cover.
9. Remove the bypass valve and associated fittings and connect the inlet and outlet pipe
work directly to the gas booster. NOTE: This may require the pipe work to be
extended; unions must be used at the inlet and outlet to enable removal of the gas
booster for serving if required (refer to diagrams on pages 15 & 16).
10. Restore water and power supplies.
Fig 1
Cold sensor
2 pin cold sensor wiring
plug disconnected
Fig 2
Comparator connected
to cold sensor wiring
Fig 3
3 pin flow sensor wiring
plug disconnected
Fig 4
Comparator connected to
flow sensor wiring
Fig 5
Comparator and wiring
secured in place
Page 19
TM031 Integrity 18, 20, 24, 26L Service Instructions REV: B
D.O.I: February 2008
This document is stored and maintained electronically by Service. All printed copies not bearing this statement in RED are deemed “uncontrolled”
19
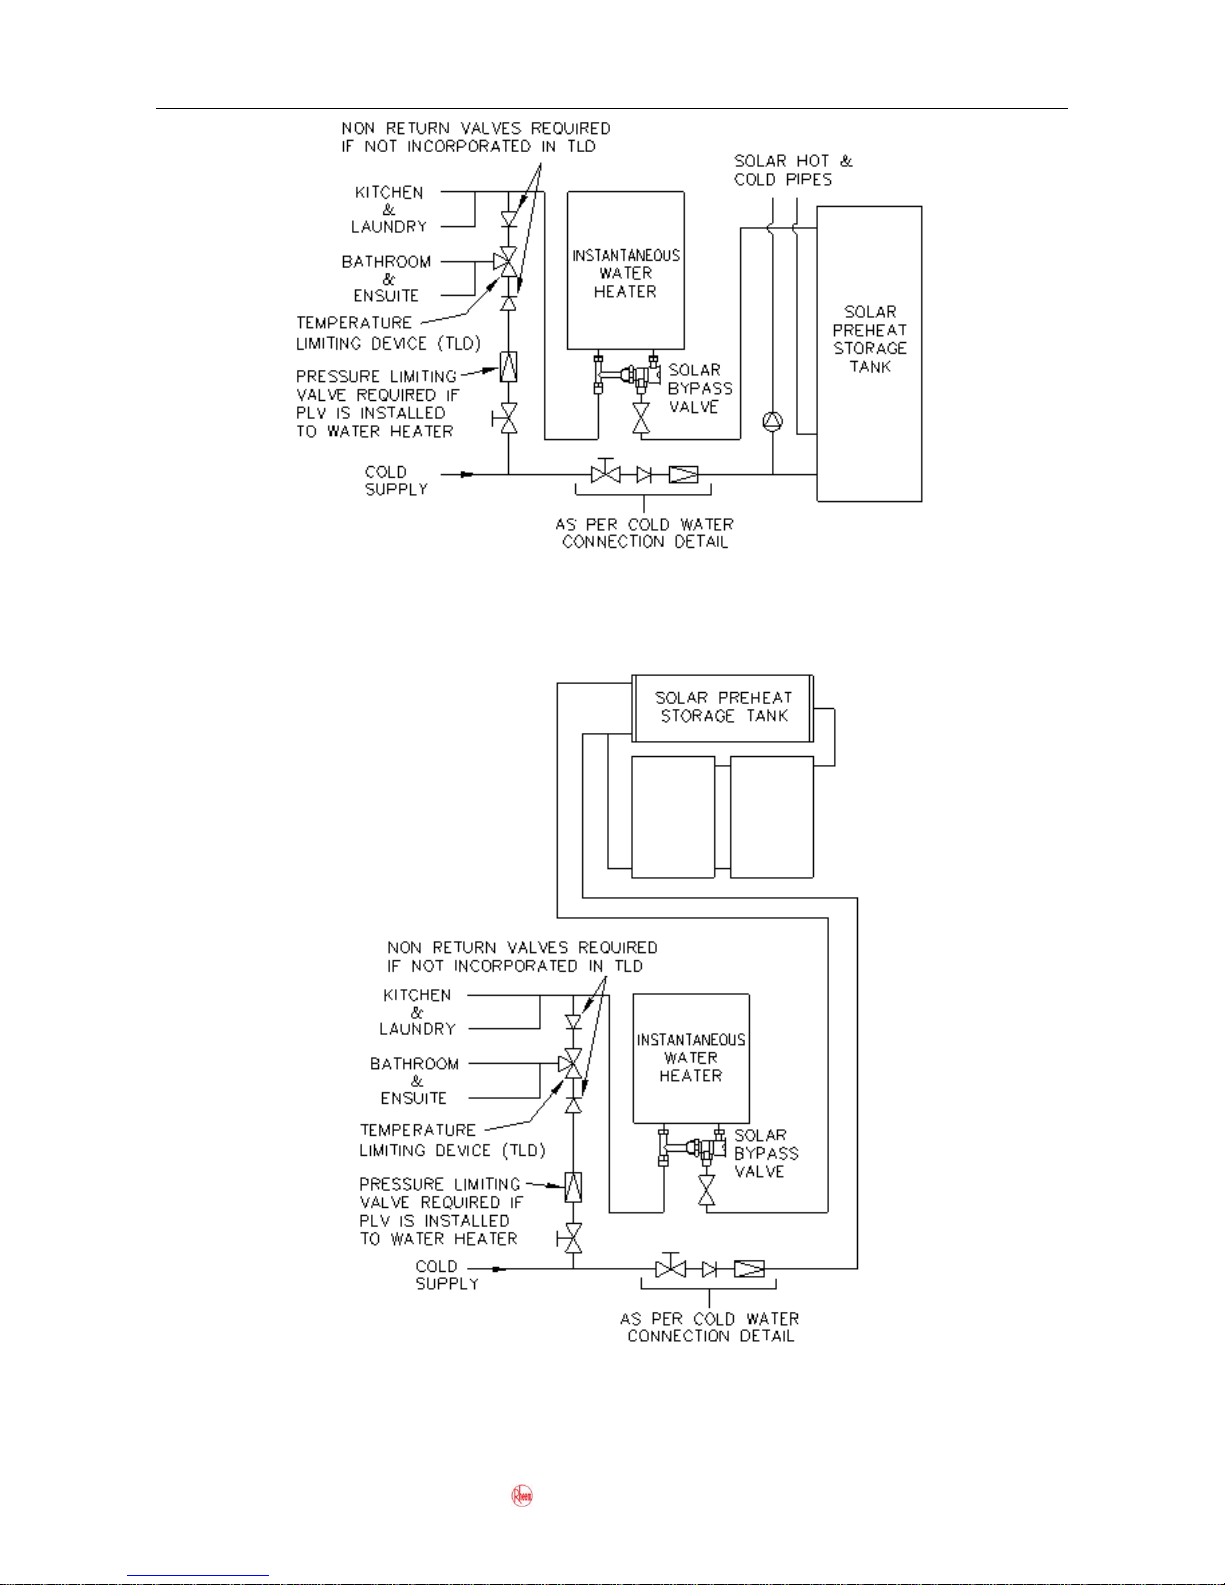
In-series Gas Boosting 871020, 871024, 871024-B & 871026 Solar Loline Installation
Note: For 871020, 871024 & 871024-B and 871026 model heaters fitted with a comparator
refer to diagram on page 15. For more information on comparators refer to page 17.
In-series Gas Boosting 871020, 871024, 871024-B & 871026 Solar Hiline Installation
Note: For 871020, 871024 & 871024-B and 871026 model heaters fitted with a comparator
refer to diagram on page 15. For more information on comparators refer to page 17.
Page 20
TM031 Integrity 18, 20, 24, 26L Service Instructions REV: B
D.O.I: February 2008
This document is stored and maintained electronically by Service. All printed copies not bearing this statement in RED are deemed “uncontrolled”
20
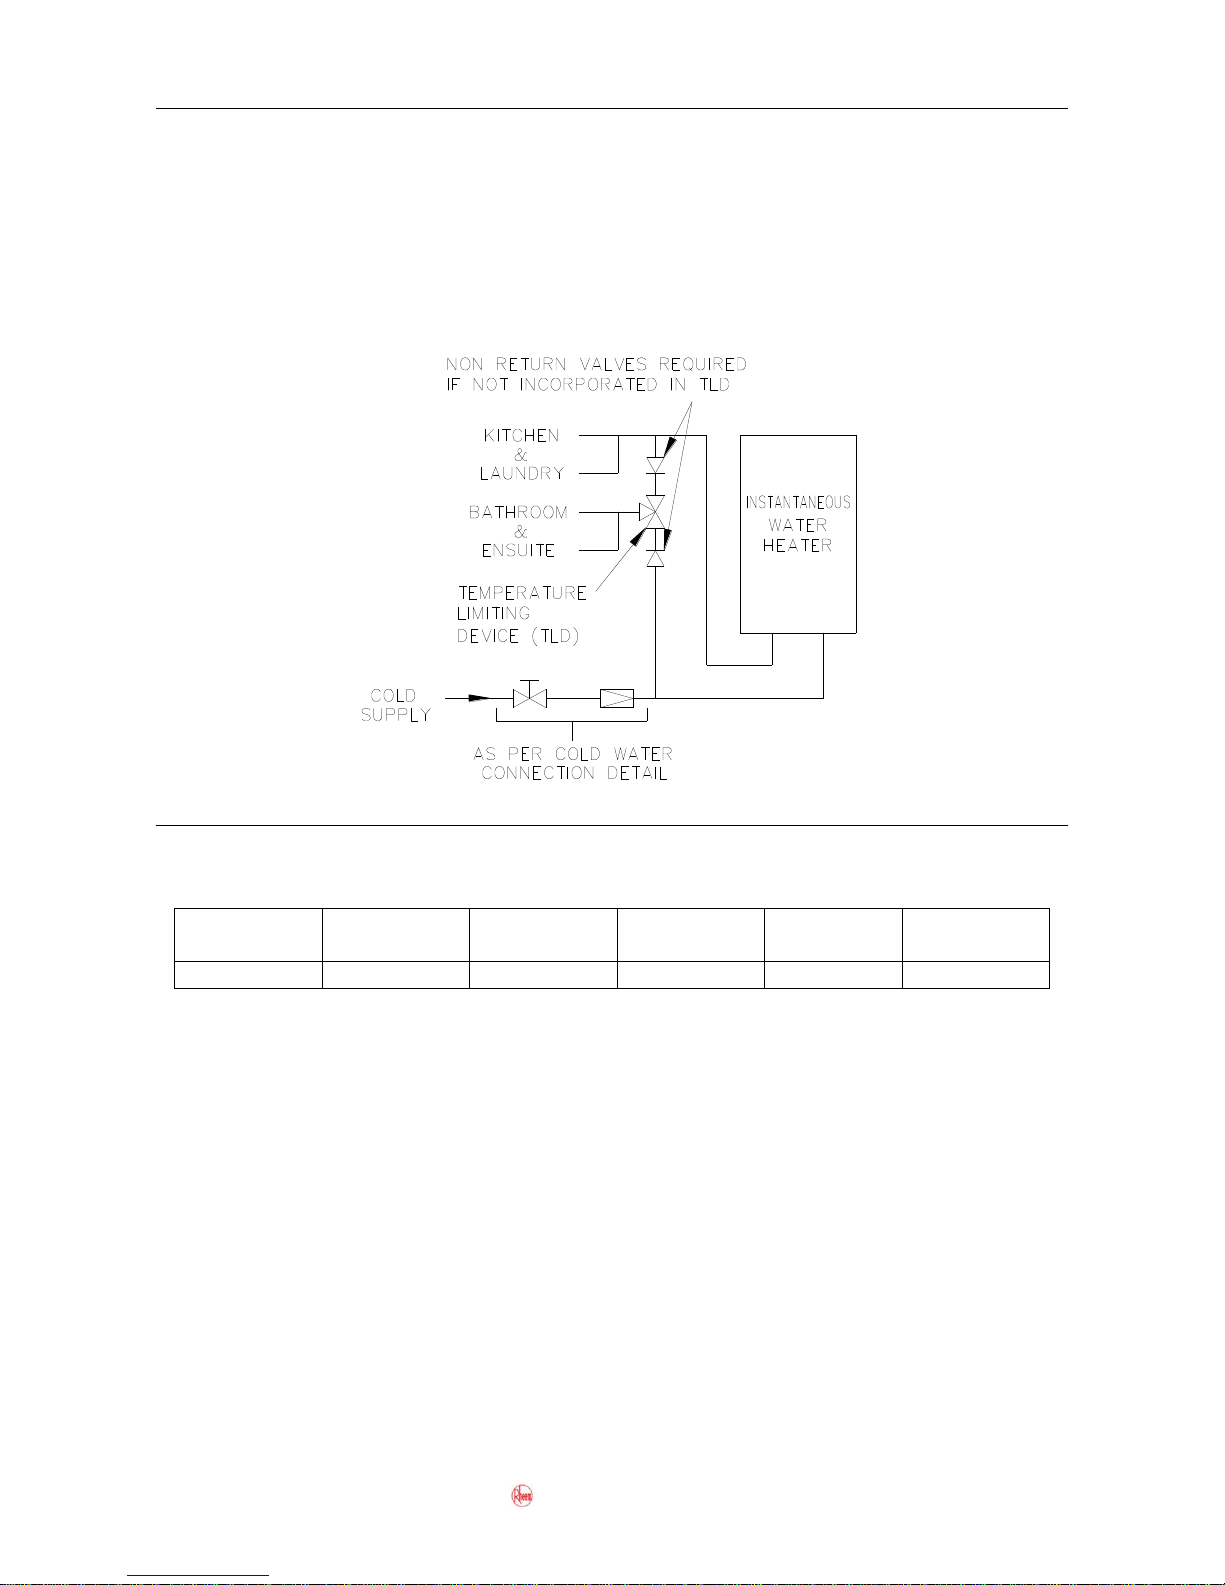
Tempering Valves
On 871 series models where a tempering valve is fitted and there is not a separate
untempered line for the kitchen or laundry areas, the Kitchen temperature controller will
not be able to display temperatures above 55oC and the delivered water temperature at
the tap will be that set by the tempering valve, which will be no hotter than 55oC.
To enable delivery of hot water at temperatures above 55oC a separate untempered line
must be provided that supplies hot water exclusively to kitchen and laundry areas (refer to
diagram below) and only where no controllers are fitted and 60°C is selected on the preset
temperature adjustment.
Remote Controllers
The Integrity 18, 20, 24 and 26 Litre electronic continuous flow gas water heater can be
fitted with optional remote controllers.
Controller
Type
Bathroom 1
Controller
Bathroom 2
Controller
Kitchen
Controller
Kitchen
Cable 20m
Bathroom
Cable 20m
Code
299854
299855
299853
299856
299857
Other manufacturers‟ controllers cannot be used.
One, two or three controllers can be installed, however if a Bathroom controller is installed
without a Kitchen controller then the maximum selectable hot water temperature will be
limited to 55oC when connected to an 871 series model.
When no hot water is flowing, temperatures can be selected between 37oC and 43oC by
pressing and holding the temperature control buttons, to select temperatures above 43oC
press the temperature control button once for each selection.
A controller must be turned on and must display the „PRIORITY‟ indicator in order to allow
adjustment of water temperature.
When hot water is flowing, the temperature can be increased from 37oC to 43oC only.
The water temperature can be decreased from any setting whether hot water is flowing or
not.
Page 21
TM031 Integrity 18, 20, 24, 26L Service Instructions REV: B
D.O.I: February 2008
This document is stored and maintained electronically by Service. All printed copies not bearing this statement in RED are deemed “uncontrolled”
21
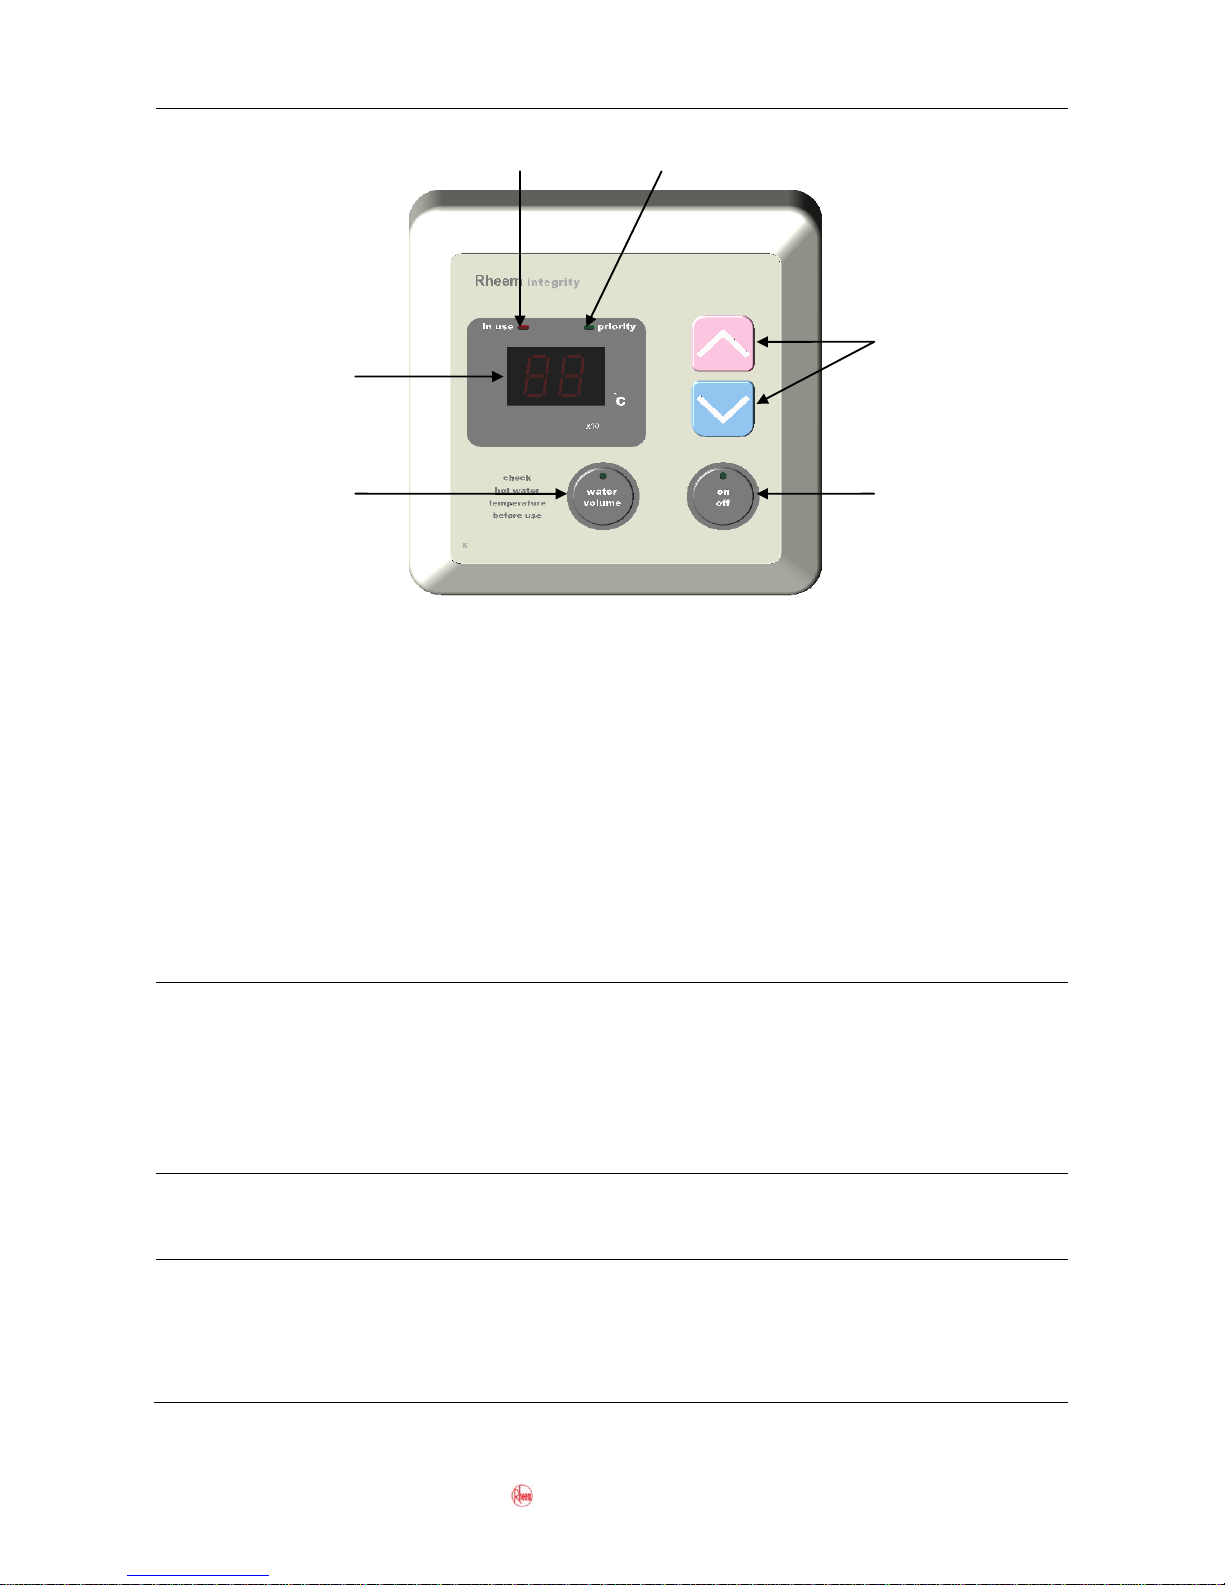
Standard Controller
Note: If one or more controllers are installed, at least one must be on for the water heater
to operate. If all controllers are off the water heater will only deliver cold water.
Selectable Temperatures:
Kitchen Controller:
37, 38, 39, 40, 41, 42, 43, 44, 45, 46, 47, 48, 50, 55oC
Bathroom Controllers:
37, 38, 39, 40, 41, 42, 43, 44, 45, 46, 47, 48, 50oC
ON / OFF button
This button must be pressed once to turn on the controller. The
light in the button will glow when the controller is on. A
controller cannot be turned on if water is flowing from a hot tap.
To turn off a controller, press the on / off button once. The light
will go out. A controller can be turned off whilst water is flowing.
Priority light
This light will glow on a controller when that controller has
priority. The Bathroom controller(s), if they are turned on, have
priority over the Kitchen controller. Priority means that controller
has control of the water heater temperature setting. The water
temperature setting can only be adjusted by the controller that
has priority.
In use light
This light will glow on all controllers, whether they are on or off,
when hot water is flowing, regardless of which controller has
priority.
Display panel
The current temperature setting is displayed on all controllers
(whether hot water is flowing or not), when any controller is on.
If all controllers are off, then the display remains blank. The
water volume can also be displayed on the Kitchen controller.
The x10l symbol glows when the water volume is displayed.
Controller
ON / OFF
button
Water
temperature
adjustment
buttons
Controller
display panel
(water temp or
water volume)
Controller
„priority‟ light
Controller
„In use‟ light
Water volume
button
Page 22

TM031 Integrity 18, 20, 24, 26L Service Instructions REV: B
D.O.I: February 2008
This document is stored and maintained electronically by Service. All printed copies not bearing this statement in RED are deemed “uncontrolled”
22
(up button)
The up button increases the temperature setting.
(down button)
The down button decreases the temperature setting.
Water volume button
(Kitchen controller only) – This feature enables an alarm to
sound when a set volume of water has flowed through the water
heater (refer to notes below).
Water volume notes:
The water volume function is designed to warn, by a beeping sound, that a certain
volume of water has been delivered from the water heater. It does not stop either the
flow of or the heating of water.
The Kitchen controller does not require priority nor to be on in order to set the water
volume function.
The water volume function can be set whilst a hot tap is open.
The water volume alarm will only sound from the kitchen controller.
The factory preset water volume is 180 litres.
To turn off the water volume function before the alarm sounds, press the water volume
button twice.
The water volume is measured as the water flows through the water heater. Therefore if
more than one hot tap is open, the alarm will respond to the total water volume drawn
from all taps and the expected water volume from the first tap will be decreased.
If the hot tap is closed before the set water volume flows through the water heater and
the water volume button is left on, then the alarm will sound when the remaining water
volume is consumed during a later operation. To prevent the alarm from sounding,
press the water volume button twice to turn it off.
Page 23

23
How to Fault Find
When conducting fault finding techniques it is important to understand that the same error
code with a different sequence number can be displayed at different points during the
operational sequence of the water heater. It is important to determine where the fault
occurred in relationship to the operational sequence of the water heater before
commencing fault finding tests, as the tests may differ even though the same error code
can be displayed.
If a fault occurs the LED display will alternate between the error code for the fault and a
sequence number that indicates where in the operational sequence of the water heater the
fault occurred. The operational flow charts are broken into 5 sections designated by boxed
numbers. The sequence number table on page 24 converts the sequence number
displayed on the LED to the appropriate operational flow chart section (shown directly
below where the Sequence Number falls).
The flow diagram below outlines the recommended procedure to successfully diagnose,
test and rectify faults on the Integrity range of water heaters.
1
Identify sequence number and error
code displayed on LED.
2
Convert the sequence number
to an operational flow chart
section number using the
sequence number table
3
Locate the operational
flow chart section
identified in step 2
4
Locate the error code within
the operational flow chart
section identified in step 2 and
take note of where the fault
occurred during the
operational sequence.
5
Knowing where the fault
occurred, use the fault
diagnosis sequence chart
on Page 33 to locate the
correct fault finding flow
chart to use.
6
Follow the fault finding
flow chart identified in
step 5 until the error
code displayed on the
Integrity LED is located.
7
Conduct the necessary tests
outlined to identify and rectify
the fault.
8
Additional information on components, performance and past
history can be gained from the maintenance information
stored in the PCB.
Page 24

24
About the Operational Flow Charts
The Operational Flow Charts provide information on the start up sequence and, in the
event a failure occurs at any point of the start up sequence, what error code will be
displayed.
When a fault occurs, an error code and sequence number will alternate in the LED display.
The Sequence Number Table below indicates the section of the operational sequence
(boxed numbers on the left hand side of the operational flow chart) where the fault
occurred.
Sequence Number Table
Sequence Number
- 0 to -9
A0 - A9
P0 - P9
C0 - C9
E0 - E9
H0 - H9
J0 - J9
L0 - L9
U0 - U9
Operational Flow Chart Section
1 2 3 4 5
Circled numbers, adjacent to the component or function, indicate the diagnostic test point
required to diagnose the fault. Refer to the table on page 29.
By locating the Error Code (displayed on the water heater or remote controller) in the
diagnosis charts the component/s or fault can be quickly identified and tested using the
diagnostic procedures outlined in this manual.
Notes and Abbreviations used on the Operational Flow Charts
P.G.F.R Valve
Proportional Gas Flow Regulating Valve
I.C
Integrated Circuit
G.I.S.V.
Gas Inlet solenoid Valve
S.V. 1
Solenoid Valve 1
O.H.L
Over Heat Limiter
S.V. 2
Solenoid Valve 2
C.I
Combustion Indicator
S.V. 3
Solenoid Valve 3
F.F
Flame Failure
Stepping gas rate change sequence by solenoid
Model
Step 1
Step 2
Step 3
Step 4
18/20L
S.V. 1 ON
S.V. 2 ON
S.V. 1 & 2 ON
24/26L
S.V. 1 ON
S.V. 2 ON
S.V. 1 & 2 ON
S.V. 1, 2 & 3 ON
Burner Configuration (Burner Change-Over Assembly)
Model
Burner 1
Burner 2
Burner 3
18/20L
Right Solenoid
(S.V. 1)
Left Solenoid
(S.V. 2)
24/26L
Centre Solenoid
(S.V. 1)
Left Solenoid
(S.V. 2)
Right Solenoid
(S.V. 3)
Test Equipment
A list of test equipment which will assist in conducting diagnostic procedures is provided
below. This equipment is available from Rheem Service Spare Parts Department.
Flame detection simulator
WH0020080
Flame sensor current (uA) detection kit
WH0020081
Fine probe adapter kit
WH0020082
Heat exchanger fin brush
WH0020083
Probe to alligator clip kit
WH0020084
Page 25

TM031 Integrity 18, 20, 24, 26L Service Instructions REV: B
D.O.I: February 2008
This document is stored and maintained electronically by Service. All printed copies not bearing this statement in RED are deemed “uncontrolled”
25
Operational Flow Charts 1 & 2
Note: see page 24 for details on interpreting chart abbreviations.
Plug In
Power On
Operation Flow Chart
1 & 2
1
Initial
check
normal
?
Functional
problem on gas
type circuit board
Communication
problem between
remote controller
and the heater
Fan motor current
detection failure
G . I . S . V control
failure
82
Flashing
76
Flashing
79
Flashing
71
Flashing
Error code cleared
Isolate Power
Remote controller
switched on
Remote controller
switched off
Remote controller
display off
Remote controller
display on
On / Off lamp Off
On / Off lamp On
Fan On
Fan Off
10
seconds later
5
14
Flashing
Over heat limiter
failure B Bath fill
operation
Water Flow Sensor
off
Hot water tap closed
Hot water tap open
2
Water
flow sensor
on
?
3
Max
&
Min
buttons off
?
YES
24
Flashing
NO
20
seconds later
Fan On
Fan On
4
Inlet
thermistor
ok
? 5 31
Flashing
NO
Heat
exchanger
thermistor
ok
?
YES
32
Flashing
NO
Outlet
thermistor
ok
? 6 33
Flashing
NO
YES
7
Ambient
air thermistor
ok
?
YES
8
34
Flashing
Fan
speed
normal
?
YES
4
61
Flashing
NO
5
seconds later
NO
YES
False flame
detected
?
YES
9
72
Flashing
YES
5
seconds later
Leakage
>
than 0 . 1 uA
P . G . F . R Valve on
NO
10
1 2 Y
Input temp
>
60
ºC or
>
set
temp
?
NO
YES
NO
NO
YES
Input temp
<
or
=
58
ºC
&
<
or
=
set temp
- 2
ºC ? YES
871024
-
C
/
875024
-
C
871024
/
871024
-
B
&
875024
- B F F 1
871024-C / 871026-B
871024 / 871024-B
871018 / 871020 / 871026
Page 26

TM031 Integrity 18, 20, 24, 26L Service Instructions REV: B
D.O.I: February 2008
This document is stored and maintained electronically by Service. All printed copies not bearing this statement in RE D are deemed “uncontrolled”
26
Note: see page 24 for details on interpreting chart abbreviations.
F F 1 G . I . S .
V ( SVO
)
on
11
Flashing
First
ignition
trial
?
11
Operational Flow Chart
3
Igniter on
P . G . F . R Valve off
12
S . V . 1 ( SV 1 )
on S . V .
2 ( SV 2 )
on
0 . 1
seconds later
13
14 P . G . F .
R Valve on
10 G . I . S .
V ( SVO
)
off
Igniter off
S . V
.
3 ( SV 3 )
off
P . G . F . R Valve off
S . V
.
2 ( SV 2 )
off S . V .
1 ( SV 1 )
off
C . I
.
Off
Flame
Detected ? Leakage
>
than 0 . 1 uA
NO
3
seconds later
NO
P . G . F . R Valve off
YES
G . I . S . V ( SVO
)
off S . V .
1 ( SV 1 )
off
S . V
.
2 ( SV 2 )
off
Igniter off
C . I
.
on
[
on
]
displayed
Igniter off
YES
Proportional temperature
adjustment
Gas rate change
-
over
done by solenoid valves
Hot water volume
adjustment
Set
temp
.
46
degrees
or lower
?
16
Solenoid bypass
valve off
YES
NO
Low rate
combustion
?
10
Flashing
YES
3
19
79
Flashing
14
Flashing
31
Flashing
32
Flashing
33
Flashing
34
Flashing
35
Flashing
11
Flashing
12
Flashing
56
Flashing
99
Flashing
16
Flashing
71
Flashing
76
Flashing
61
Flashing
81
Flashing
65
Flashing
52
Flashing
Safety
device
working
?
NO
NO Z Fan motor
current
detection
failure
YES
O . H . L failure
Outlet water
temp exceeded
97
degrees for
more than
15
seconds
15
Flashing
Water inlet
thermistor
disconnected
Outlet water
temperature
too high
Malfunction of
water by - pass
solenoid valve
.
Abnormal
combustion
Heat
exchanger
thermistor
disconnected
Flame Failure
Cross light
failure
Thermistor
connections
crossed
Ambient air
thermistor
disconnected
Outlet
thermistor
disconnected
G . I . S . V control
failure
Communication
problem between
remote controller
and water heater
Abnormal fan
speed
Post purge
failure
Malfunction of
water volume
control motor
P . G . F . R
control failure
Solenoid bypass
valve o
n
821018, 821020, 821026, 871026-B
871024-B , 871024-C
Mechanical Bypass Models
Page 27

TM031 Integrity 18, 20, 24, 26L Service Instructions REV: B
D.O.I: February 2008
This document is stored and maintained electronically by Service. All printed copies not bearing this statement in RED are deemed “uncontrolled”
27
Note: see page 24 for details on interpreting chart abbreviations.
Hot tap closed
Operation Flow Chart
4 & 5
G . I . S . V ( SVO
)
off
or [ S . V
. 1 -
3 ( SV 1 - 3 )
off ] Flame current
detected less than
0 . 1
uA ? YES
YES
Fan
motor speed
checked during
operation
?
YES
NO
YES
Approx
.
6
minutes later
P . G . F . R Valve at
minimum
4 5 Post Purge Shut Down Function
Water flow sensor off
Check gas cut off function by
alternating the closing order of
gas valves SVO and SV
1 - 3
at
each shut down
Fan motor at
minimum
LED off
Fan motor at
minimum
C . I
.
Off S . V . 1 -
3 ( SV 1 - 3 )
failure
80
Flashing
8
seconds later
NO G . I . S .
V ( SV 0 )
failure
51
Flashing
G . I . S . V ( SVO
)
off
or
[ S . V . 1 -
3 ( SV 1 - 3 )
off
]
P . G . F . R Valve off
Fan
motor current check
ok ? Fan off
YES
Abnormal combustion
NO
99
Flashing
Fan off
Isolate power
Locate and repair fault
Use procedure to
clear error code
99 S . V .
1 ( SV 1 )
off S . V .
2 ( SV 2 )
off S . V .
3 ( SV 3 )
off
Fan off
G . I . S . V ( SV 0 )
off P . G . F .
R valve off
Isolate power
Locate and repair fault
and restore power
10
seconds later
10
seconds later
Page 28

TM031 Integrity 18, 20, 24, 26L Service Instructions REV: B
D.O.I: February 2008
This document is stored and maintained electronically by Service. All printed copies not bearing this statement in RED are deemed “uncontrolled”
28
Error Codes
The following table outlines the error codes, possible causes and diagnostic tests to
conduct. More detailed diagnosis is outlined in the fault finding and operational flow charts.
Error
Code
Fault Condition
Items To Check
10
Abnormal low rate combustion
Blockage in the heat exchanger, fan, air intake or flue
11
Ignition failure at start up
Cross light failure
P.G.F.R Valve - diagnostic point 10
G.I.S Valve - diagnostic point 11
Igniter - diagnostic point 12
Solenoid valves 1, 2 & 3 - diagnostic points 13, 14 & 15
Flame sensors 1, 2 & 3 - diagnostic points 16 &17
12
Flame failure during operation
P.G.F.R Valve - diagnostic point 10
G.I.S Valve - diagnostic point 11
Solenoid valves 1, 2 & 3 - diagnostic points 13, 14 & 15
Flame sensors 1, 2 & 3 - diagnostic points 16 & 17
14
Over heating
Over Heat Limiter - diagnostic point 2
15
Very high temperature
Heat exchanger thermistor - diagnostic point 6
Hot water outlet thermistor - diagnostic point 7
P.G.F.R Valve - diagnostic point 10
16
Outlet water temp too high
P.G.F.R Valve - diagnostic point 10
24
Operational switch faulty
MAX or MIN button on IC board
31
Inlet thermistor open circuit
Water inlet thermistor - diagnostic point 5
32
Heat exchanger thermistor open
circuit
Heat exchanger thermistor - diagnostic point 6
33
Outlet thermistor open circuit
Hot water thermistor - diagnostic point 7
34
Ambient air thermistor open circuit
Ambient air thermistor - diagnostic point 8
35
Thermistor connections crossed
Connection points of thermistors
51
Gas cut off malfunction
G.I.S Valve - diagnostic point 11
Flame sensor 1, 2 & 3 - diagnostic points 16 & 17
52
P.G.F.R control failure
P.G.F.R Valve – diagnostic point 10
Gas type circuit board
IC Board
56
Bypass solenoid failure
Water Bypass solenoid – diagnostic point 19
61
Abnormal fan speed
Fan motor – diagnostic point 4
65
Malfunction of water volume control
motor
Water volume control motor - diagnostic points 18 & 19
71
G.I.S valve control failure
Gas. Inlet Solenoid Valve IC Board (PCB) - diagnostic
point 11
72
Detected false flame
Flame sensors 1, 2 & 3 - diagnostic point 9
76
Communication problem between
controller and water heater
Remote controller IC Board or cable
79
Fan motor current detection failure
Fan motor IC Board – diagnostic point 4
80
Gas cut off defective
Solenoid valve 1, 2 & 3 - diagnostic points 13, 14 & 15
Flame sensor 1, 2 & 3 - diagnostic points 16 & 17
81
Post purge malfunction (Solenoid
valve 1 failure)
Solenoid valve 1, 2 & 3 - diagnostic points 13, 14 & 15
Flame sensor 1, 2 & 3 - diagnostic point 9
82
Functional problem on gas type
circuit board
Gas type circuit board
99
Abnormal combustion
Blockage in the heat exchanger, fan, air intake or flue
way
Note: see page 24 for interpretation of abbreviations.
Page 29

TM031 Integrity 18, 20, 24, 26L Service Instructions REV: B
D.O.I: February 2008
This document is stored and maintained electronically by Service. All printed copies not bearing this statement in RED are deemed “uncontrolled”
29
Diagnostic Test Points
Refer to wiring diagram, page 5, for connector and wiring positions.
Test
Point
Measuring Point
Normal Condition
Items Under Test
Connector
Wire Nº
& colour
1 A R1 – R2
AC 85V – 120V
Main Power
2 B W8 – W12
50 kilo-ohms – 500 kilo-ohms
Overheat Limiter
3
B
BR9 – BL10
DC 2V– 5V(Pulse) *1
Water Flow Sensor pulse signal
More than 1310 pulse/min
R11 – BL10
DC 7V – 15V
Water Flow Sensor
4
K
B4 – W6
DC 120V – 170V
Fan Motor
R3 – B4
DC 11V – 19V
Y1 – B4
DC 4V – 10V(Pulse) *1
Fan Motor is pulse signal
More than 4800 pulse/min
5 B Y6 – BL7
@ 20ºC – 10.3 kilo-ohms
Water Inlet Thermistor
@ 40ºC – 4.9 kilo-ohms
6 B W5 – BL7
@ 20ºC – 10.3 kilo-ohms
Heat Exchanger Thermistor
@ 40ºC – 4.9 kilo-ohms
7 B R4 – BL7
@ 20ºC – 10.3 kilo-ohms
Hot Water Outlet Thermistor
@ 40ºC – 4.9 kilo-ohms
8 B B3 – BL7
@ 25ºC – 5.0 kilo-ohms
Ambient Air Thermistor
@ 5ºC – 12.7 kilo-ohms
9
J
R1 – Earth
AC 2V – 20V *2
Flame Sensor detecting flame
W3 – Earth
AC 2V – 20V *2
B2 - Earth
AC 2V – 20V *2
10
B
R1 – BL2
DC 1.5V – 8.0V
Proportional Gas Flow Regulating
42 ohms – 97 ohms
11
L
Y9 – BL10
DC 70V – 110V
Gas Inlet Solenoid Valve
0.8 kilo-ohms – 2.2 kilo-ohms
12
L
R2 – R8
AC 85V – 120V
Igniter
13
L
R3 – BL10
DC 70V – 110V
Solenoid Valve 1
0.8 kilo-ohms – 2.2 kilo-ohms
14
L
W4 – BL10
DC 70V – 110V
Solenoid Valve 2
0.8 kilo-ohms – 2.2 kilo-ohms
15
L
B5 – BL10
DC 70V – 110V
Solenoid Valve 3
0.8 kilo-ohms – 2.2 kilo-ohms
16
J
R1 – Earth
AC 2V – 20V *2
Flame Sensor not detecting flame.
W3 - Earth
AC 2V – 20V *2
17
J
B2 - Earth
AC 2V – 20V *2
18
H
W2 – BL8
DC 8V – 16V
Water Volume Control Motor
position switch
R7 – BL8
DC 8V – 16V
GR6 – BL8
Less than DC 1V (Limiter off)
DC 4V – 6V (Limiter on)
19
L
O6 – O12
DC 70 – 110V
0.6 kilo-ohms – 2.8 kilo-ohms
Water Bypass Solenoid (models
with -B or -C suffix in model number
only e.g. 871024-B)
NOTES:
*1: Approximate reading measured by digital multimeter on DC range.
*2: Approximate reading measured by digital multimeter on AC range.
Page 30

TM031 Integrity 18, 20, 24, 26L Service Instructions REV: B
D.O.I: February 2008
This document is stored and maintained electronically by Service. All printed copies not bearing this statement in RED are deemed “uncontrolled”
30
Maintenance Information
Information relating to both the current and past operation of the water heater can be
obtained from the memory; this information is referred to as the maintenance information.
The table below details the information that can be recalled from the memory i.e. to view
the current temperature being measured by the outlet thermistor select 5Y, refer to page
31 for the procedure to display maintenance information.
Maintenance Table
Left digit in LED display (Numerical)
0
1 2 3 4 5 6 7 8 9
Right digit in LED display (Alphabetical)
E
Null
Error Code for the previous 8 faults
Null
F
Null
Sequence number of the previous 8 faults
Null
C
Total combustion
starts X 10,000
Total combustion operations since last error X 10,000 hours
Null
D
Total combustion
starts X 100
Total combustion operations since last error X 100 hours
Null
H
Total combustion
period X 1000 hrs
Total combustion period since last error X 1,000 hours
Null
J
Total combustion
period X 10 hrs
Total combustion period since last error X 10 hours
Null
Y
Flame sensor status (See
table below)
Water Flow Sensor
Litres / minute
Ambient Air Thermistor
temp. ºC
Water Inlet Thermistor
temp. ºC
Heat Exchanger
Thermistor temp ºC
Hot Water Outlet
Thermistor temp ºC
Fan speed X100 RPM
Power for P.G.F.R
Valve
Null
Opening angle of
Water Volume Control
motor in degrees
A
Fan motor current curve
(average)
Fan Motor current curve
- after tap closure
Fan Motor current curve
-present combustion
Fan Motor Current
Null
Null
Bath fill flow volume drawn
Litres /minute X 10
Null
Null
Sequence number
Flame Sensor Status
Model
18, 20, 24, and 26 L models
R0y Information
00
01
02
03
04
05
06
07
Flame Sensor 1
X O X O X O X O Flame Sensor 2
X X O O X X O O Flame Sensor 3
X X X X O O O
O
X = Flame sensor is not detecting flame. O = Flame sensor is detecting flame
Page 31

TM031 Integrity 18, 20, 24, 26L Service Instructions REV: B
D.O.I: February 2008
This document is stored and maintained electronically by Service. All printed copies not bearing this statement in RED are deemed “uncontrolled”
31
Displaying Maintenance Information
Voltages up to 240 volts will be present within the water heater, take care
not to touch wiring terminals. Use an insulated tool when operating the
DIP switch or MIN and MAX buttons.
At the Water Heater
1. Remove the front panel from the water heater.
2. Using an insulated tool, turn DIP SWITCH 1 on (refer to figure 1).
3. Use the MIN button to change the left digit (0→1etc.) in the LED
display to the required maintenance code identified from the
maintenance table on page 30.
4. Use the MAX button to change the right digit (E→F etc.) in the LED
display to the required maintenance code identified from the
maintenance table on page 30.
5. The maintenance code and the value of that code will alternate on
the LED display.
6. Turn DIP SWITCH 1 off (down position) when diagnosis is
complete.
7. Refit the front panel to the water heater.
NOTE: Turning on DIP SWITCH 2 will lock the display if required.
Fig 1
From a Remote Controller
1. Ensure the Remote Controller is turned off.
2. Press the temperature increase and decrease buttons simultaneously for 3 seconds
3. Use Temperature decrease button to change the left digit (0→1etc.) in the LED display
to the required maintenance code identified from the maintenance table on page 30.
4. Use the Temperature increase button to change the right digit (E→F etc.) in the LED
display to the required maintenance code identified from the maintenance table on
page 30.
5. The maintenance code and the value of that code will alternate on the LED display of
the Remote Controller.
6. Press the on/off button twice on the Remote Controller to cancel maintenance
information.
Clearing Error Code History
After successfully repairing the water heater the existing Error Code history should be
cleared. This will allow fresh data to be stored and reduce the risk of confusion should it be
necessary to service the water heater in the future.
To clear the Error Code history:
1. Ensure all controllers (if fitted) are turned off and all hot taps are closed.
2. Remove the front panel of the water heater.
3. Turn DIP SWITCH 1 on (up position) and then off (down position) again.
4. Within 5 seconds of turning DIP SWITCH 1 off, press and hold either the MIN or MAX
button for more than 2 seconds. “CL” will flash in the LED display indicating the history
is cleared.
5. Refit the water heater front panel.
Page 32

TM031 Integrity 18, 20, 24, 26L Service Instructions REV: B
D.O.I: February 2008
This document is stored and maintained electronically by Service. All printed copies not bearing this statement in RED are deemed “uncontrolled”
32
Resetting Error Codes
Most Error Codes can be reset by shutting off the hot water flow and turning the controllers
(if fitted) off and then on again. It may also be necessary to isolate and restore the power.
Where controllers are not fitted it may be necessary to turn the power off at the water
heater to clear the error code.
Voltages up to 240 volts will be present within the water heater, take care
not to touch wiring terminals. Use an insulated tool when operating the DIP
switch or MIN and MAX buttons.
To reset Error Code 99 it is necessary to:
1. Ensure water is not flowing through the water heater.
2. Turn off remote controllers (if fitted).
3. Ensure all DIP SWITCHES are in the off position (down position).
4. Turn DIP SWITCH 2 on (up position) and then off (down position).
5. Within 5 seconds of turning DIP SWITCH 2 off, press and hold both the MIN and MAX
buttons for more than 2 seconds.
6. “UL” will flash in the LED display and then become steady.
7. Turn on a controller (if fitted) then open and close a hot water tap to complete the
procedure.
Page 33

TM031 Integrity 18, 20, 24, 26L Service Instructions REV: B
D.O.I: February 2008
This document is stored and maintained electronically by Service. All printed copies not bearing this statement in RED are deemed “uncontrolled”
33
Fault Diagnosis Sequence (Fault Finding Chart G)
Turn on the
controller using the
ON/OFF button
LED
in ON/OFF
indicator
glows?
1
Error Code is
displayed?
2
YES
Open a hot water tap
Did
the burner
light?
3
Fan
commences
operation?
4
NO No error code is displayed for this fault
Close the hot water tap
Error Code is
diplayed?
End
5
YES
NO
If the water heater operated normally, follow procedures 2, 3 or 5
depending on the previous error codes displayed in the maintenance
history accessed from the PCB
NOTE:
If the power has been disconnected from the
water heater wait 30seconds from power restoration
before commencing this procedure.
Error
Code is
displayed?
YES
YES
NO
Error Code is
displayed?
YES
Did
ignition spark
commence?
YES
NO
NO
NO
Turn on power to the
water heater
YES
NO
Are
controllers
fitted?
NO
NO
YES
Are
2 bars
displayed in the
LED?
NO
YES
Note: Bars are displayed for approx 10 seconds
If the water heater operated normally, follow flow charts 2, 3 or 5 depending
on the previous error codes displayed in the maintenance history accessed
from the PCB
3.5
Page 34

TM031 Integrity 18, 20, 24, 26L Service Instructions REV: B
D.O.I: February 2008
This document is stored and maintained electronically by Service. All printed copies not bearing this statement in RED are deemed “uncontrolled”
34
Fault Finding Chart 1
Voltages up to 240 volts will be present within the water heater, take care
not to touch wiring terminals. Use an insulated tool when operating the DIP
switch or MIN and MAX buttons.
Power Supply
Is 240
volts AC Present at
the power
point?
NO
No power supply. Check
household wiring.
YES
Test 1
Cordset open circuit? - replace.
Inline fuses open circuit – replace.
Internal wiring from terminal block
or transformer open circuit –
repair.
NO
YES
Test 2
Transformer failed – replace.NO
Test 3
Power filter open circuit – replace.NO
Test 4
YES
Error code
Displayed?
Remote controller failed –
replace.
Remote controller cable open
circuit – replace.
YES
PCB failed – replace.NO
1
Is
240 volts
AC Present at the
transformers primary
winding?
Is
The transformers
output voltage 90 - 110
volts AC?
Is
90 - 110 volts AC
Present at the
PCB?
Turn DIP
switch 1 on.
Page 35

TM031 Integrity 18, 20, 24, 26L Service Instructions REV: B
D.O.I: February 2008
This document is stored and maintained electronically by Service. All printed copies not bearing this statement in RED are deemed “uncontrolled”
35
Fault Finding Tests 1 – 4
Components will be “Live” when conducting tests, exercise caution.
Test 1
Test 2
Measure the voltage at the connector plug to
the transformer primary winding with a
multimeter set on the AC voltage scale. If the
voltage is between 230V and 250V the cord
set and inline fuses are ok.
Measure the voltage at the connector plug
from the transformer secondary winding with
a multimeter set on the AC voltage scale. If
the voltage is between 90V and 110V the
transformer is ok.
Test 3
Test 4
Measure the voltage at connector A between
R1 and R2 on the PCB with a multimeter set
on the AC voltage scale. If the voltage is
between 90V and 110V the power filter is ok.
Using an insulated tool, turn DIP switch 1 on
Page 36

TM031 Integrity 18, 20, 24, 26L Service Instructions REV: B
D.O.I: February 2008
This document is stored and maintained electronically by Service. All printed copies not bearing this statement in RED are deemed “uncontrolled”
36
Fault Finding Chart 2
Page 37

TM031 Integrity 18, 20, 24, 26L Service Instructions REV: B
D.O.I: February 2008
This document is stored and maintained electronically by Service. All printed copies not bearing this statement in RED are deemed “uncontrolled”
37
Fault Finding Tests 5 – 8
Isolate power before removing connector plugs
Test 5
Test 6
Unplug connector B from the PCB and measure
the resistance of the Over Heat Limiter Assembly.
Resistance should be between 50kilo-ohms and
500 kilo-ohms.
Unplug connector K from the PCB. Restore
power and check if error code 79 is displayed
within 30 seconds.
Isolate power when conducting resistance tests. “Live” components
present during voltage tests, exercise caution
Test 7
Test 8 – Diagnostic points 5, 6, 7 & 8
Error
code
Maintenance
Display
Code
Diag
Point
Test Point
Measured
Value
31
3y: Water
Inlet
Thermistor
5
6 Yellow
7 Black
20ºC –
10.3 kiloohms
40ºC –
4.9 kiloohms
32
4y:
Combustion
Chamber
Thermistor
6
5 White
7 Black
33
5y: Hot
Water Outlet
Thermistor
7
4 Red
7 Black
34
2y: Ambient
Air
Thermistor
8
3 Blue
7 Black
25ºC –
5.0 kiloohms
5ºC –
12.7 kiloohms
Use an insulated tool when operating the
DIP switch or MIN and MAX buttons.
Page 38

TM031 Integrity 18, 20, 24, 26L Service Instructions REV: B
D.O.I: February 2008
This document is stored and maintained electronically by Service. All printed copies not bearing this statement in RED are deemed “uncontrolled”
38
Fault Finding Chart 3
Ignition and Temperature Control
Is error
code 24
displayed?
YES
NO
Operation switch
malfunction
*Is error
code 31, 32, 33 or
34 displayed?
Thermistor
malfunction
Is error
code 61
displayed?
NO
Fan speed
abnormal
YES
Test 7
NO
Is error
code 24 shown on
error code display
also?
Replace the remote controller.NO
Also when
Min/Max button is
pressed?
YES
Release the Min/Max buttons and
re-open a hot tap.
YES
Replace the PCB assembly.
NO
YES
*Is the
resistance of the
relevant thermistor
normal?
*Thermistor error codes
31 = Water inlet thermistor
32 = Heat exchanger thermistor
33 = Hot water outlet thermistor
34 = Ambient air thermistor
YES
Replace the relevant thermistor.NO
Is
voltage being
supplied to the fan
motor?
Replace the PCB assembly.NO
Test 9
Test 8
Is
the fan motor
rotating?
YES
NO
Is a
pulse signal being
sent from the fan
motor?
NO
YES
Replace the PCB assembly.YES
Test 10
3
3.1
Replace the fan motor assembly.
Page 39

TM031 Integrity 18, 20, 24, 26L Service Instructions REV: B
D.O.I: February 2008
This document is stored and maintained electronically by Service. All printed copies not bearing this statement in RED are deemed “uncontrolled”
39
Fault Finding Tests 9 – 13
Isolate power when conducting resistance tests. “Live” components present
during voltage tests, exercise caution
Tests 9 and 10 – Diagnostic Point 4
Test 11
Diagnostic Point 4
Conduct test with water flowing
Test
Check Point
Measured Value
Isolate power before removing
connector plugs
Unplug connector J from the PCB and select
maintenance information 0y on the L.E.D
display.
If 01-07 is displayed the PCB has failed. If 00
is displayed there may be current leakage to
earth
9
4 Blue – 6 White
DC120 -160V
3 Red – 4 Blue
DC11 -19V
10
1 Yellow – 4
Blue
DC4 –10V
(or measurement by
pulse counter of not
less than 4800
pulses per minute)
Test 12 - Diagnostic Point 9
Test 13 - Diagnostic Point 12
Conduct test with no water flow
Measure the voltage between terminals 1, 2
and 3 on connector J and earth. Voltage should
be between AC2 – 20V
Conduct test with water flowing
When ignition sequence commences, normal
voltage should be between AC 85 - 110V
until flame is detected.
(Note: Duration is approximately 3 seconds)
Page 40

TM031 Integrity 18, 20, 24, 26L Service Instructions REV: B
D.O.I: February 2008
This document is stored and maintained electronically by Service. All printed copies not bearing this statement in RED are deemed “uncontrolled”
40
Fault Finding Chart 3.1
Is error
code 72
displayed?
YES
NO
False flame detection
malfunction
Ignition failure
or cross light
failure
Test 11
NO
Is flame
detection signal in
maintenance information
00?
Replace the PCB assembly.NO
YES
Clean or replace the combustion
chamber front panel assembly.
Replace the PCB assembly.
YES
NO
Did
the igniter
spark?
YES
Is
voltage supplied to
the igniter?
NO
NO
YES
Replace the igniter assembly,
electrode or cable.
3.1
3.3
Replace the PCB assembly.
Is error
code 11
displayed?
Did
the burner
ignite?
Is
there any voltage
at the flame
sensors?
YES
3.2
YES
NO
Test 12
Test 13
Page 41

TM031 Integrity 18, 20, 24, 26L Service Instructions REV: B
D.O.I: February 2008
This document is stored and maintained electronically by Service. All printed copies not bearing this statement in RED are deemed “uncontrolled”
41
Fault Finding Chart 3.2
YES
Is gas available?
Test 14
NO
Open the gas isolation valve.NO
Replace the PCB assembly.NO
Replace the proportional gas flow
regulating valve assembly.
NO
Replace the PCB assembly.NO
Test 18
YES
NO
Set burner pressure correctly.
Replace the combustion chamber
front panel assembly.
Clean the burner.
YES
Test 17
3.2
Replace the proportional gas flow
regulating valve assembly.
Is the
gas pressure correct
at the burner test
point?
YES
Is
there voltage at the
gas inlet solenoid
valve?
NO
Is the
resistance of the gas
inlet solenoid valve
normal?
YES
Test 15
Is there
voltage at solenoid
valves 1, 2 & 3?
YES
Is there
voltage at the
proportional gas flow
regulating
valve?
Is the
resistance of the
solenoid valves 1, 2 &
3 normal?
YES
YES
Test 19 Test 16
Is the
resistance of the
proportional gas flow
regulating valve
normal?
Replace the burner change over
assembly.
NO
Page 42

TM031 Integrity 18, 20, 24, 26L Service Instructions REV: B
D.O.I: February 2008
This document is stored and maintained electronically by Service. All printed copies not bearing this statement in RED are deemed “uncontrolled”
42
Fault Finding Tests 14 – 22
Isolate power when conducting resistance tests. “Live” components present
during voltage tests, exercise caution.
Tests 14, 15, 18, 19, 20 and 21
NOTE:
Measure the voltage with connector L
plugged into PCB
Measure the resistance with connector L
unplugged from the PCB
Test
Solenoid
Valve
Normal
Voltage
Test Point
Diagnostic
Point
Test
Solenoid
Valve
Normal
Resistance
Test Point
Diagnostic
Point
14
GISV
DC70 to DC100V
9 Yellow
10 Black
11
15
GISV
0.8kilo-ohms
to
2.2kilo-ohms
9 Yellow
10 Black
11
18
1
3 Red
10 Black
13
19
1
3 Red
10 Black
13
2
4 White
10 Black
14
2
4 White
10 Black
14
3
5 Blue
10 Black
15
3
5 Blue
10 Black
15
Tests 16 and 17 - Diagnostic Point 10
Test 22 – Diagnostic Points 6 and 7
Test 16 – Conduct test with water flowing
Measure the voltage with connector B
plugged into PCB. Normal voltage is
between DC1.5 and 8.0V.
Test 17 – Isolate power before conducting
test.
Measure the resistance with connector B
unplugged from the PCB. Normal resistance
is between 42 ohms and 97 ohms.
Error
Code
Maintenance
display code
Diagnostic
Point
Test Point
Measured
Value
32
4y:
Combustion
Chamber
Thermistor
6
5 White
7 Black
@20ºC –
10.3 kiloohms
@40ºC –
4.9 kiloohms
33
5y: Hot
Water Outlet
Thermistor
7
4 Red
7 Black
Page 43

TM031 Integrity 18, 20, 24, 26L Service Instructions REV: B
D.O.I: February 2008
This document is stored and maintained electronically by Service. All printed copies not bearing this statement in RED are deemed “uncontrolled”
43
Fault Finding Charts 3.3 and 3.5
Is error
code 12
displayed?
YES
NO
Flame failure
Is error
code 35
displayed?
Is error
code 81
displayed?
NO
NO
Purge failure
3.3
Adjust maximum and minimum
burner pressures.
YES
Does the
flame extinguish
completely?
YES
3.5
For error code 80 or 81 replace
the burner assembly.
For error code 51 replace the
proportional gas flow regulating
valve.
NO
Is the
flame detection
maintenance information
indicating 00?
Replace the PCB assembly.NO
YES
Test 11
Replace the combustion chamber
front panel or remove the upper
burner assembly and replace
flame sensors depending on the
model
YES
3.6
Clean the heat exchanger,
combustion chamber, fan and air
intake. For error code 99 reset the
PCB by following the procedure in
the section on „Error Codes‟.
NO
YES
Are the
max and min
burner pressures
correct?
3.2
Is error
code 10 or 99
displayed?
Abnormal
combustion
YES
Is error
code 15
displayed?
NO
NO
*Is the
resistance of the
thermistors
correct?
Replace the relevant thermistor.
Adjust maximum and minimum
burner pressures.
YES NO
YES
*Combustion chamber
and hot water outlet
thermistors
Thermistor connections crossed.
Reposition thermistor connections
correctly.
Test 22
Very high
temperature
Thermistor
connection
failure
Page 44

TM031 Integrity 18, 20, 24, 26L Service Instructions REV: B
D.O.I: February 2008
This document is stored and maintained electronically by Service. All printed copies not bearing this statement in RED are deemed “uncontrolled”
44
Fault Finding Chart 3.6
Is error
code 65
displayed?
YES
NO
Water flow
servo
malfunction
Tests 23,
24 & 25
3.6
Replace water body assembly.
3.7
Integrity temp
set below 46
degrees.
Integrity temp
set above 46
degrees.
Is
the bypass
solenoid open
circuit?
YES
Is the
PCB supplying
power to the
solenoid?
NO
Replace PCB assembly.
NO
Is
diagnostic point 18
normal?
Test 30
Note: the bypass solenoid is activated only
if the set temperature is below 46 degrees.
Is the
voltage at connector
between H2 & H8 and H7
& H8 normal?
Test 31
NO NO
Replace water body assembly.
YES
Tests 23 & 24
Is the water
flow servo motor at
ON position?
YES
Isolate and
then restore
power.
Is the water
flow servo motor
functional?
NO
Test 25
After power is restored the
water flow servo motor
limiter should move to the
fully open position
NO
Set the hot water
temperature at 60º
and fully open a
hot water tap.
YES
*Is
maintenance
information 5y
displaying
60?
NO
*5Y is the temperature of the
hot water outlet thermistor
YES
Is error
code 52
displayed?
NO
Is the
resistance of the
proportional gas flow
regulating valve
normal?
YES Replace PCB assembly.YES
Test 15
Replace the proportional gas flow
regulating valve.
NO
Mechanical
bypass (models
without -B or -C
suffix in model
number)
YES
Page 45

TM031 Integrity 18, 20, 24, 26L Service Instructions REV: B
D.O.I: February 2008
This document is stored and maintained electronically by Service. All printed copies not bearing this statement in RED are deemed “uncontrolled”
45
Fault Finding Tests 23 – 28
Test 23 - Diagnostic Point 18
Test 24 - Diagnostic Point 18
Conduct test with water flowing
Conduct test with water flowing
Test Point
Connector H
Measured Value
Test Point
Connector H
Measured Value
2 White - 8 Black
DC8 – 16V
7 Red - 8 Black
DC8 – 16V
Components will be “Live” when conducting tests, exercise caution
Test 25 - Diagnostic Point 18
Test 28 - Diagnostic Point 3
Test Point
Connector H
Measured Value
Conduct test with water flowing
Measure the voltage between 11 Red and 10
Black on connector B.
Voltage should be between DC7 – 15V
6 Green - 8 Black
On position < DC1V
Off position DC4 – 6V
Page 46

TM031 Integrity 18, 20, 24, 26L Service Instructions REV: B
D.O.I: February 2008
This document is stored and maintained electronically by Service. All printed copies not bearing this statement in RED are deemed “uncontrolled”
46
Fault Finding Chart 3.7
3 . 7
Is error
code
16
displayed
?
**
Is the
Integrity inlet
water temp
>
77
ºC
?
YES
Is a
solar bypass valve
fitted
?
YES
Faulty solar bypass valve
.
Remove solar bypass valve
and fit a comparator
.
YES
Is a
Comparator
fitted
?
NO
Replace the comparator
.
YES
Replace the PCB assembly
.
NO
*
Is the
Integrity used as
an in
-
series gas
Booster
?
YES
Fit a comparator
.
NO
Is
the heater an
871024
- model
?
Is the
Integrity outlet temp
set at
60
ºC ?
Set the Integrity
outlet temp to
60
ºC
NO
YES
**
Error code
16
will occur if the
Integrity heats the water to
20
º
above the set point
3
ºC
.
60 + 20 - 3 = 77
ºC
YES
Is the
resistance of the
proportional gas flow
regulating valve
normal
?
Replace the proportional gas flow
regulating valve
.
YES
NO
NO
NO
Is error
code
56
displayed
?
NO
Replace the PCB assembly
.
YES
NO
Replace the water body
assembly
.
YES
3 . 8
NO
Test
31
Test
15
Is the
PCB supplying
power to the
solenoid
?
Note
:
the bypass solenoid is activated only
if the set temperature is below
46
degrees
.
Outlet water
temp too high
Malfunction of
water bypass
solenoid
Mechanic
al Bypass
model
871024-B
871024-C
871026
871026-B
Is the heater an
871024-C or
871026 model?
*871018, 871020
871024, 871024-B
871026
model heaters are
unsuitable for use as
in-series gas boosters
Page 47

TM031 Integrity 18, 20, 24, 26L Service Instructions REV: B
D.O.I: February 2008
This document is stored and maintained electronically by Service. All printed copies not bearing this statement in RED are deemed “uncontrolled”
47
Fault Finding Chart 3.8
Fan current detecting
circuit failure
3.8
NO
2
Replace the PCB assembly.
Note: only replace the PCB
assembly if error code 79 is
displayed during combustion.
Was
Error code 79
displayed prior to
opening the hot
tap?
YES
Error code
79 displayed.
Fault Finding Tests 29 – 31
Test 29 - Diagnostic Point 3
Components will be
“Live” when conducting
tests, exercise caution
Conduct test with water flowing
Measure the voltage between 9
Brown and 10 Black on connector
B.
Voltage should be between DC2 –
5V
Test 30 and 31 - Diagnostic Point 19
Test 30
Isolate power when
conducting resistance
test.
Unplug connector L from the PCB
and measure the resistance
between 6 Orange and 12 Orange.
Resistance should be between
0.6kilo-ohms and 2.8kilo-ohms.
Test 31
Components will be
“Live” when conducting
tests, exercise caution
Conduct test with water flowing
Measure the voltage between 6
Orange and 12 Orange on
connector L.
Voltage should be between DC70 –
110V
Page 48

TM031 Integrity 18, 20, 24, 26L Service Instructions REV: B
D.O.I: February 2008
This document is stored and maintained electronically by Service. All printed copies not bearing this statement in RED are deemed “uncontrolled”
48
Fault Finding Charts 4 and 4.1
1y = Water flow
detected by water
flow sensor
4
Test 28
Is the
Integrity used as
an in-series gas
booster?
NO
Is the water
flow more than 3
litres/min?
Read
maintenance
information 1y
YES
NO
Is the
voltage between
connector B10 & 11
normal?
Replace the PCB assembly.NO
Is the
voltage between
connector B9 & 10
normal?
YES
YES
Replace the water flow sensor. If
the fault persists replace the
water body assembly.
NO
Are
Controllers
fitted?
YES
Controllers must not be
fitted when an Integrity
is used as an in-series
gas booster. Remove
controllers.
YES
Test 29
NO
Is a
solar bypass valve
fitted?
871024-C models do not require a
solar bypass valve. Remove the
solar bypass valve and remake
water connections directly to
Integrity.
YES
871024-C
NO
Water will flow straight through
the Integrity and the Integrity will
not operate. Normal operation.
Is the
water entering
the Integrity < or = 58ºC or
< or = the set temp
- 2ºC?
NO
4.1
YES
4.1
Read
maintenance
information 3y
3y = Water temp
detected by water
inlet thermistor
871024 or 871024-B
875024-B or 875024-C
875024-B & 875024-C models are
not suitable for use as in-series
gas boosters.
4.2
What is the
model
number?
Is the
flow sensor turbine
jammed?
NO
Test 33
Free the flow sensor turbine.YES
18L Model
18L Model is not suitable for use as
in-series gas boosters
871024, 871024-B or 871020
871024-C or 871026-B
871026-B & 871024-C models
do not require a solar bypass
valve. Remove the solar
bypass valve and remake water
connections directly to Integrity
Page 49

TM031 Integrity 18, 20, 24, 26L Service Instructions REV: B
D.O.I: February 2008
This document is stored and maintained electronically by Service. All printed copies not bearing this statement in RED are deemed “uncontrolled”
49
Fault Finding Chart 4.2
4.2
YES
Is a
comparator
fitted?
NO
Is a
solar bypass valve
fitted?
871024 & 871024-B models must have a
solar bypass valve or a comparator fitted
when used as an in-series gas booster. If
a solar bypass valve and a comparator
are fitted, remove the solar bypass valve.
If neither is fitted fit a comparator.
Is a
comparator
fitted?
YES
NO
4.3
NO
YES
Read
maintenance
information 3y
3y = Water temp
detected by water
inlet thermistor
Is the
water entering
the Integrity
> 57ºC?
YES
Water will flow straight through
the Integrity and the Integrity will
not operate. Normal operation.
Is the water
flow more than 3
litres/min?
Replace the PCB assembly.
YES
Is the
voltage between
connector B10 & 11
normal?
NO
NO
Test 28
Is the
voltage between
connector B9 & 10
normal?
YES
Test 29
YES
Is the
water flow sensor
working?
Test 32
NO
Replace the water flow sensor. If
the fault persists replace the
water body assembly.
Replace the comparator.
NO
YES
Read
maintenance
information 1y
NO
1y = Water flow
detected by water
flow sensor
Is the
flow sensor turbine
jammed?
Free the flow sensor turbine.YES
NO
Test 33
871020 & 871026, 871024 & 871024-B
models must have a solar bypass valve or
a comparator fitted when used as an inseries gas booster. If a solar bypass valve
and a comparator are fitted, remove the
solar bypass valve. If neither is fitted, fit a
comparator
Page 50

TM031 Integrity 18, 20, 24, 26L Service Instructions REV: B
D.O.I: February 2008
This document is stored and maintained electronically by Service. All printed copies not bearing this statement in RED are deemed “uncontrolled”
50
Fault Finding Chart 4.3
4.3
Replace the PCB assembly.
Is the
voltage between
connector B10 & 11
normal?
NO
Test 28
Is the
voltage between
connector B9 & 10
normal?
YES
Test 29
YES
NO
Is
the preheated
water to the solar
bypass valve >
57ºC?
Read
maintenance
information 1y
1y = Water flow
detected by water
flow sensor
Water will be diverted by the
solar bypass valve. No water will
flow through the Integrity
therefore it will not operate.
Normal operation.
YES
NO
Is the water
flow more than 3
litres/min?
Is water
flowing through the
solar bypass valve to the
Integrity water
inlet?
Remove the solar bypass valve
and fit a comparator.
NO
NO
YES
Replace the PCB assembly.YES
Replace the water flow sensor. If
the fault persists replace the
water body assembly.
Is the
flow sensor turbine
jammed?
Free the flow sensor turbine.
Test 33
YES
NO
Page 51

TM031 Integrity 18, 20, 24, 26L Service Instructions REV: B
D.O.I: February 2008
This document is stored and maintained electronically by Service. All printed copies not bearing this statement in RED are deemed “uncontrolled”
51
Fault Finding Chart 5
Fault Finding Tests 32 and 33
Test 32
Components will be “Live” when
conducting test, exercise caution
Conduct test with water flowing
Measure the voltage at the 3 pin connector
located between the water flow sensor and the
comparator. Measure the voltage between the
brown and black wires at this connector.
Voltage should be between DC2 – 5V.
Test 33
Remove flow sensor turbine by following
component replacement procedure 21 on page
58.
The flow sensor turbine should spin freely.
Check for wear or blockage by foreign material
such as thread tape.
Burner Gas Pressure Check
Voltages up to 240 volts will be present within the water heater, take care
not to touch wiring terminals. Use an insulated tool when operating the DIP
switch or MIN and MAX buttons.
Minimum Burner Gas Pressure
1. Remove the front panel from the water
heater.
2. Remove burner test point screw and fit
manometer.
3. Turn on the remote controller (If fitted).
4. Open a hot tap slowly, to achieve the
minimum flow rate at which the burners
will ignite.
5. Press and hold the MIN button (“1L” is
displayed on the LED) and observe the
reading on the manometer.
6. Release the MIN button. If the reading
observed in step 5 agrees with the rating
label, no further adjustment is required.
Maximum Burner Gas Pressure
7. Open the hot tap fully to achieve
maximum flow rate.
8. Press and hold the MAX button (“4H” is
displayed on the LED) and observe the
reading on the manometer.
9. Release the MAX button. If the reading
observed in step 8 agrees with the rating
label, no further adjustment is required.
10. Turn the hot tap off.
11. Remove manometer and refit the burner
test point screw ensuring the seal is gas
tight.
12. Refit the front panel to the water heater.
Page 52

TM031 Integrity 18, 20, 24, 26L Service Instructions REV: B
D.O.I: February 2008
This document is stored and maintained electronically by Service. All printed copies not bearing this statement in RED are deemed “uncontrolled”
52
Adjustment
Adjustment of the burner pressure will not overcome problems associated
with poor supply pressure or incorrect gas supply pipe sizing.
Minimum Burner Gas Pressure
1. Remove the front panel from the water heater.
2. Remove burner test point screw and fit manometer.
3. Turn on the remote controller (If fitted).
4. Open a hot tap slowly, to achieve the minimum flow rate at which the burners will ignite.
5. Press and hold the adjuster button (“LH” is displayed on the LED)
NOTE: The adjuster button must be held down continuously through steps 5 and 6.
6. Press the MIN button and observe the reading on the manometer.
NOTE: While the MIN button is pressed, the gas pressure will at first increase then
decrease, cycling between an upper gas pressure limit (39 on LED display) and a lower
gas pressure limit (01 on LED display).
7. Release the MIN and adjuster buttons when the minimum test point pressure shown on
the manometer agrees with the rating label.
NOTE: If the burners extinguish or an error code starts to flash on the LED display during
this procedure, release the MIN and adjuster buttons close the hot tap, clear the error
code, turn on the water heater and recommence the procedure from step 3. To reset an
error code, follow the procedure on page 32.
Maximum Burner Gas Pressure
8. Open the hot tap fully to achieve maximum flow rate.
9. Press and hold the adjuster button (“LH” is displayed on the LED).
NOTE: The adjuster button must be held down continuously through steps 10 and 11.
10. Press the MAX button and observe the reading on the manometer.
NOTE: While the MAX button is pressed, the gas pressure will at first increase then
decrease, cycling between an upper gas pressure limit (39 on LED display) and a lower
gas pressure limit (01 on LED display).
11. Release the MAX and adjuster buttons when the maximum test point pressure shown
on the manometer agrees with the rating label.
12. Turn the hot tap off, remove manometer and refit the burner test point screw ensuring
the seal is gas tight.
13. Refit the front panel to the water heater.
Component Replacement Procedures
Front Panel Removal: (Procedure 1)
1. Isolate power, gas and water supplies.
2. Remove four screws, two from the top and two from the bottom of the front panel.
3. Remove the front panel.
Page 53

TM031 Integrity 18, 20, 24, 26L Service Instructions REV: B
D.O.I: February 2008
This document is stored and maintained electronically by Service. All printed copies not bearing this statement in RED are deemed “uncontrolled”
53
Burner Change-Over Assembly: (Procedure 2)
1. Remove the front panel. Refer to Procedure 1.
2. Disconnect the wiring plug from each of the solenoid valves. (Note which plug goes
to each valve)
3. Remove the screw retaining the ignition pack to the Burner Change Over Assembly.
4. Remove the six screws retaining the Burner Change Over Assembly. Four from the
Combustion Chamber Front Panel and two from the Proportional Gas Flow Regulating
Valve Assembly.
5. Remove the Burner Change Over Assembly.
6. Reassemble in reverse order of above. Replace gaskets (item numbers 105 and 108) if
required.
7. Test for gas leaks using soapy water solution
Combustion Chamber Front Panel Assembly: (Procedure 3)
1. Remove the front panel and Burner Change Over Assembly. Refer to Procedures 1
and 2.
2. Remove screws (14 off) retaining the Combustion Chamber Front Panel (12 screws
around perimeter and 2 screws in centre).
3. Gently remove the Combustion Chamber Front Panel Assembly.
4. Reassemble in reverse order of above. Replace gaskets (item numbers 105 and 108)
if required.
5. Test for gas leaks using soapy water solution.
Lower Burner Assembly: (Procedure 4)
1. Remove the front panel, Burner Change Over Assembly and Combustion Chamber
Front Panel Assembly. Refer to Procedures 1, 2 and 3.
2. Remove the 2 screws retaining the Lower Burner Assembly.
3. Reassemble in reverse order of above. Replace gaskets (item numbers 105 and 108)
if required.
4. Test for gas leaks using soapy water solution.
Upper Burner Assembly: (Procedure 5)
1. Remove the front panel, Burner Change Over Assembly, Combustion Chamber Front
Panel Assembly and Lower Burner Assembly. Refer to Procedures 1, 2, 3 and 4.
2. Remove the Upper Burner Assembly by sliding forward out of the heat exchanger
assembly.
3. Reassemble in reverse order of above being careful not to pinch or damage wiring.
Replace gaskets (item numbers 105 and 108) if required.
4. Test for gas leaks using soapy water solution.
PCB Assembly: (Procedure 6)
1. Remove the front panel. Refer to Procedure 1.
2. Remove the screw retaining the PCB Assembly in the water heater.
3. Carefully remove the PCB Assembly complete.
4. Disconnect the multi-pin connectors from the PCB Assembly.
5. Remove the Gas Type Connector IC board and fit to replacement PCB Assembly.
6. Reassemble in reverse order of above.
Page 54

TM031 Integrity 18, 20, 24, 26L Service Instructions REV: B
D.O.I: February 2008
This document is stored and maintained electronically by Service. All printed copies not bearing this statement in RED are deemed “uncontrolled”
54
Proportional Gas Flow Regulating Valve: (Procedure 7)
1. Remove the front panel and Burner Change Over Assembly. Refer to Procedures 1
and 2.
2. Disconnect the gas supply pipe from the gas inlet connection.
3. Remove the three screws from the gas inlet connector and withdraw the connector and
o-ring from the base of the water heater.
4. Carefully remove the Proportional Gas Flow Regulating Valve from the water heater.
5. Disconnect the multi-pin wiring plug from the Gas Inlet Solenoid Valve and the red and
black wires from the proportioning valve. Note: The proportional valve terminals are
marked + for red and – for black.
6. Reassemble in reverse order of above. Replace gaskets (item numbers 105 and 108) if
required.
7. Test for gas leaks with soapy water solution.
Water Body Assembly: (Procedure 8)
Do not attempt to dismantle the servomotor, this is factory calibrated.
Adjustments will render the water heater either inoperable or cause incorrect
water temperature delivery.
1. Remove the front panel, Burner Change Over Assembly and Proportional Gas Flow
Regulating Valve. Refer to Procedures 1, 2 and 6.
2. Disconnect the cold water supply pipe from the cold-water inlet connection.
3. Unscrew the water drain plug (item 405) and relief valve (item 431) and drain the water
heater.
4. Remove the screw/s from the flange (item 419) and remove.
5. Carefully disengage the two pipes from the Water Body Assembly.
6. Disconnect the wiring to the bypass solenoid.
7. Remove the four screws from the cold water inlet connector and withdraw the
connector and o-ring from the base of the water heater.
8. Carefully remove the Water Body Assembly from the water heater.
9. Disconnect the multi-pin connectors from the motor, flow sensor and cold water
thermistor.
10. Remove the retaining screw from the anti-frost heater and remove. (If fitted)
11. Reassemble in reverse order of above, replacing pipe o‟rings (item 427) if required.
12. Test for gas and water leaks.
Combustion Fan Motor: (Procedure 9)
1. Remove the front panel. Refer to Procedure 1.
2. Remove the screw retaining the Cord Connector, item 008.
3. Remove the screw retaining the Terminal Block Assembly, item 768.
4. Remove the screws retaining the mounting bracket for the transformer and the power
filter to the Fan Motor Assembly and reposition the transformer and power filter
temporarily.
5. Remove the remaining screw retaining the Fan Motor Assembly and lift the Fan Motor
clear.
6. Disconnect the multi-pin wiring plug from the Fan Motor.
7. Reassemble in reverse order of above.
Page 55

TM031 Integrity 18, 20, 24, 26L Service Instructions REV: B
D.O.I: February 2008
This document is stored and maintained electronically by Service. All printed copies not bearing this statement in RED are deemed “uncontrolled”
55
Anti-Frost Heaters: (Procedure 10)
Note: Only models with an „F‟ in the model number are fitted with anti-frost heaters e.g.
871024NF.
1. Remove the front panel. Refer to Procedure 1.
Heat Exchanger and Hot Water Outlet Connection Heaters
1. Disconnect connector plugs at the sensing thermostat and at the power cord.
2. Remove Flange (item 445) to release the Hot Water Outlet Anti-frost Heater.
3. Unclip the 2 anti-frost heaters from the heat exchanger (Note the positions of both).
4. Remove the Anti-frost Heaters and wiring (Some wiring retainers will need to be
released to remove wiring).
5. Reassemble in reverse of above ensuring anti-frost heaters are fitted in correct
positions.
Water Body Assembly Heater
1. Disconnect connector plugs at the cord set and at the sensing thermostat.
2. Remove the Water Body Assembly (item 410). Refer to Procedure 7.
3. Remove the Anti-frost Heater retaining clip.
4. Remove the Anti-frost Heater and wiring (Some wiring retainers will need to be
released to remove wiring).
5. Reassemble in reverse order of above.
Heat Exchanger Removal/Replacement: (Procedure 11)
1. Follow the steps in Procedure 5, Upper Burner Assembly.
2. Remove the screw/s from the Water Body Assembly flange (item 419) and remove.
3. Carefully disengage the two pipes from the Water Body Assembly.
4. Remove the two screws from the hot water outlet flange (item 445) retaining the hot
water outlet pipe and carefully disengage the pipe.
5. Undo the 2 screws retaining the heat exchanger thermistor and remove the thermistor.
6. Disconnect the wiring loom connector at the thermostat (item 714) and the hot water
outlet heater (item 705).
7. Remove 5 screws retaining the heat exchanger assembly. One from each side of the
heat exchanger, two screws from the bracket above the flue outlet and one screw from
the fan case assembly (item 729).
8. Remove two screws retaining the bracket (above the flue terminal) and remove the
bracket. (Note: The bracket is glued in place; a small amount of force is required to
remove it).
9. Remove Heat Exchanger Assembly by gently moving the top forward out of the water
heater then lift the assembly up and clear.
10. Disconnect the multi-pin wiring plug from the Fan Motor to completely free Heat
Exchanger Assembly from water heater.
11. Remove the Anti-Frost Heaters (if fitted) and the Fan Motor and Cowling Assembly
from the old Heat Exchanger and refit to the replacement Heat Exchanger Assembly.
12. Replace the Over Heat Limiter if damaged or open circuit.
13. Reassemble in reverse order of above.
14. Test for gas leaks using soapy water solution
15. Check for water leaks.
16. Check and if necessary adjust MIN and MAX burner gas pressures. Refer to Procedure
on page 52.
Page 56

TM031 Integrity 18, 20, 24, 26L Service Instructions REV: B
D.O.I: February 2008
This document is stored and maintained electronically by Service. All printed copies not bearing this statement in RED are deemed “uncontrolled”
56
Ignition Pack Replacement: (Procedure 12) 18 - 20 Litre
1. Remove the front panel, Refer to Procedure 1.
2. Disconnect high voltage lead from spark electrode.
3. Disconnect the multi pin connector from the Ignition Pack.
4. Remove the retaining screw.
5. Remove the Ignition Pack.
6. Reassemble in reverse order of above. Test for gas leaks using soapy water solution.
Ignition Pack Replacement: (Procedure 12A) 24 - 26 Litre
1. Remove the front panel, Burner Change Over Assembly, Combustion Chamber Front
Panel Assembly, Lower Burner Assembly and Upper Burner Assembly. Refer to
Procedures 1, 2, 3, 4 and 5.
2. Disconnect high voltage lead from spark electrode.
3. Disconnect the multi pin connector from the Ignition Pack.
4. Remove the retaining screw.
5. Remove the Ignition Pack.
6. Reassemble in reverse order of above being careful not to pinch or damage wiring
when replacing Upper Burner Assembly. Replace gaskets (item numbers 105 and 108)
if required.
7. Test for gas leaks using soapy water solution.
Flow Sensor: (Procedure 13)
Note: When a flow sensor is installed as a spare part in any model heater other
interconnecting components may also require replacing. Refer to „Product Changes‟ on
page 10 and „Parts Replacement Scenarios‟ on page 11 for more information.
1. Isolate cold water supply.
2. Remove the front panel. Refer to Procedure 1.
3. Disconnect the multi-pin plug to the flow sensor.
4. Remove 2 Philips head retaining screws.
5. Remove Flow Sensor (Note: Water may escape during this procedure).
6. Reassemble in reverse order of above.
Bypass Solenoid: (Procedure 14)
Note: Models with a –B or –C suffix are fitted with a bypass solenoid. For models without
a suffix, compare the appliance to the wiring diagrams on pages 6 and 7 to determine
whether it has a mechanical or solenoid bypass.
The bypass solenoid is only available as part of the water body assembly, follow
procedure 7.
Thermistors: (Procedure 15)
Note: When a thermistor(s) is installed as a spare part in any model heater other
interconnecting components may also require replacing. Refer to „Product Changes‟ on
page 10 and „Parts Replacement Scenarios‟ on page 11 for more information.
1. Remove the front Panel. Refer to Procedure 1.
2. Relieve water pressure through a hot tap.
3. Locate the Thermistor requiring replacement.
4. Disconnect the multi-pin plug from the Thermistor.
5. Remove the retaining screws and withdraw the thermistor taking care not to damage
the o‟ring (Note: With the exception of the Ambient Air Thermistor, water may escape
during this procedure).
6. Reassemble in reverse order of above.
Page 57

TM031 Integrity 18, 20, 24, 26L Service Instructions REV: B
D.O.I: February 2008
This document is stored and maintained electronically by Service. All printed copies not bearing this statement in RED are deemed “uncontrolled”
57
Over Heat Limiter Assembly: (Procedure 15)
Note: When an over heat limiter is installed as a spare part in any model heater other
interconnecting components may also require replacing. Refer to „Product Changes‟ on
page 10 and „Parts Replacement Scenarios‟ on page 11 for more information.
Replacement of the Over Heat Limiter requires removal and possible replacement of the
Heat Exchanger.
1. Follow Procedure 11 to step 10.
2. Disconnect the multi-pin plug to the Over Heat Limiter Assembly.
3. Remove the screws retaining the Over Heat Limiter Assembly to the Jacket back and
remove the Over Heat Limiter Assembly.
4. Inspect the heat exchanger for holes or combustion damage.
5. Reassemble in reverse order of above (Note: Ensure all multi-pin plugs are
reconnected and all wiring is neatly repositioned and retained to prevent damage
during operation).
6. Test operation of water heater and ensure the MIN and MAX burner gas pressures are
correct. Refer to Procedure on page 52.
Remote Controller: (Procedure 16)
1. Isolate power at the water heater.
2. Remove the small Philips head screw from the bottom of the Remote Controller.
3. Gently pivot the Remote Controller up from the bottom and then lift up and off upper
retaining lugs.
4. Kitchen Controller: Disconnect the wiring from the terminals on the back of the
Controller (Note: The wiring is not polarity sensitive).
Bathroom Controllers: Disconnect the multi-pin plug.
5. Reassemble in reverse order of above.
Gas Type Circuit Board: (Procedure 17)
1. Remove the front panel. Refer to Procedure 1.
2. Gently unplug the Gas Type Circuit Board from the PCB.
3. Reassemble in reverse order of above.
4. Restore power.
5. Press the MAX button. On all 871024 & 871026 models 4H should be displayed. On all
871018 & 871020 models 3H should be displayed
6. Test operation of water heater and ensure the MIN and MAX burner gas pressures are
correct. Refer to Procedure on page 52.
Transformer: (Procedure 18)
Note: When a transformer is installed as a spare part in an 871024, 871024-B or 871026
model heater other interconnecting components will also require replacing. Refer to
„Product Changes‟ on page 10 and „Parts Replacement Scenarios‟ on page 11 for more
information.
1. Remove the front panel. Refer to Procedure 1.
2. Disconnect the primary and secondary winding multi-pin plugs to the Transformer.
3. Remove the 2 Philips head screws retaining the Transformer.
4. Reassemble in reverse order of above.
Page 58

TM031 Integrity 18, 20, 24, 26L Service Instructions REV: B
D.O.I: February 2008
This document is stored and maintained electronically by Service. All printed copies not bearing this statement in RED are deemed “uncontrolled”
58
Power Filter: (Procedure 19)
Note: When a power filter is installed as a spare part in an 871024, 871024-B model
heater other interconnecting components will also require replacing. Refer to „Product
Changes‟ on page 10 and „Parts Replacement Scenarios‟ on page 11 for more
information.
1. Remove the front panel. Refer to Procedure 1.
2. Disconnect the incoming and outgoing wiring loom plugs.
3. Remove the 2 Philips head screws retaining the filter to the mounting bracket.
4. Remove the Power Filter.
5. Reassemble in reverse order of above.
Solar Bypass Valve: (Procedure 20)
Solar bypass valves are no longer available and if faulty are to be removed and a
Comparator installed. Refer to page 18 for the procedure on installing a comparator.
NOTE: 20L and 26 L models with a –B suffix and 24L models with a -C suffix in the model
number do not require either a bypass valve or a comparator.
Flow Sensor Turbine: (Procedure 21)
1. Isolate cold water supply.
2. Remove the front panel. Refer to Procedure 1.
3. Unscrew the water drain plug (item 405) and relief valve (item 431) and drain the water
heater.
4. Disconnect the cold water supply pipe from the cold-water inlet connection.
5. Disconnect the bypass solenoid wiring loom plug.
6. Remove 2 Philips head retaining screws holding flow sensor to water body assembly
and remove flow sensor.
7. Using a flat bladed screwdriver lever the metal disc and o‟ring from flow sensor housing
on water body assembly. Lever the disc out by placing the shaft of the screwdriver
across the disc with the tip of the screwdriver on the far inside edge of the disc.
8. Remove the four screws from the cold water inlet connector and withdraw the
connector and o‟ring from the base of the water heater.
9. Gently withdraw flow sensor turbine out from water inlet of water body assembly using
a pair of long nose pliers.
10. Reassemble in reverse order of above ensuring open slot on turbine is centred and
facing towards the face of the flow sensor.
Power cord: (Procedure 22)
Note: When a power cord is installed as a spare part in any model heater other
interconnecting components may also require replacing. Refer to „Product Changes‟ on
page 10 and „Parts Replacement Scenarios‟ on page 11 for more information.
1. Switch off power at power point and unplug power cord from power point.
2. Unscrew screw on power inlet cover and remove power inlet cover.
3. Undo cord clamp screw located next to power filter and remove clamp.
4. Disconnect the power cable wiring loom plug and withdraw power cable through slot in
heater jacket.
5. Reassemble in reverse order of above.
Page 59

TM031 Integrity 18, 20, 24, 26L Service Instructions REV: B
D.O.I: February 2008
This document is stored and maintained electronically by Service. All printed copies not bearing this statement in RED are deemed “uncontrolled”
59
Connecting cord: (Procedure 23)
Note: When a connecting cord is installed as a spare part in any model heater other
interconnecting components may also require replacing. Refer to „Product Changes‟ on
page 10 and „Parts Replacement Scenarios‟ on page 11 for more information.
1. Isolate power at the water heater.
2. Disconnect connecting cord wiring loom plug to power cord.
3. Disconnect remaining two connecting cord wiring loom plugs and remove connecting
cord.
4. Reassemble in reverse order of above.
Nozzle Plate - NG appliances only: (Procedure 24)
1. Remove the front panel, Burner Change Over Assembly, Combustion Chamber Front
Panel Assembly and Lower Burner Assembly. Refer to Procedures 1, 2, 3 & 4.
2. Remove the three screws retaining the nozzle plate and remove nozzle plate.
3. Reassemble in reverse order of above. Replace gaskets (item numbers 105 and 108) if
required.
4. Test for gas leaks using soapy water solution.
Page 60

TM031 Integrity 18, 20, 24, 26L Service Instructions REV: B
D.O.I: February 2008
This document is stored and maintained electronically by Service. All printed copies not bearing this statement in RED are deemed “uncontrolled”
60
Exploded View 1 871018 / 871020 / 871024
Page 61

TM031 Integrity 18, 20, 24, 26L Service Instructions REV: B
D.O.I: February 2008
This document is stored and maintained electronically by Service. All printed copies not bearing this statement in RED are deemed “uncontrolled”
61
Exploded View 1 871018 / 871020 / 871024 Replacement Parts List
Ref.
No.
Description
871018
871020
871024
001
Front Panel Assembly
WH0020000
WH0020000
003
Jacket Assembly
WH0020001
WH0020001
004
Mounting Bracket
WH0020002
WH0020002
006
Reinforcing Plate
WH0020003
WH0020003
008
Cord Connector
WH0020004
WH0020004
066
Fixing Plate B
WH0020005
WH0020005
100
Gas Inlet Connector
WH0020006
WH0020006
103
Proportional Gas Flow Regulating Valve
WH0020007
WH0020007
104
„O‟ ring
WH0020009
WH0020009
105
Gasket
WH0020010
WH0020010
108
Gasket
WH0020012
WH0020012
111
Upper Burner Assembly
WH0020013
WH0020014
120
Lower Burner Assembly - NG
WH0020015
WH0020016
120
Lower Burner Assembly - LP
WH0020017
WH0020018
123
Primary Air Adjuster
WH0020085
NF
160
Burner Change-Over Assembly
WH0020019
WH0020020
401
Water Inlet Connector Assembly (¾)
WH0020021
WH0020021
Water Inlet Connector Assembly (½) - 18 litre only
WH0020086
NF
402
„O‟ ring
WH0020022
WH0020022
403
CS Type Snap Ring
WH0020023
WH0020023
405
Water Drain Valve Assembly (includes water filter)
WH0020024
WH0020024
407
Water Filter – use WH0020024
N/A
N/A
408
Plug Band
WH0020026
WH0020026
409
„O‟ ring
WH0020027
WH0020027
410
Water Body Assembly
WH0020028
WH0020028
415
Heat Exchanger and Combustion Chamber Kit
WH0020029
WH0020030
419
Flange
WH0020031
WH0020031
422
Combustion Chamber Front Panel Assembly
WH0020032
WH0020033
427
„O‟ ring
WH0020034
WH0020034
429
„O‟ ring
WH0020035
WH0020035
430
Hot water Outlet Connector (¾)
WH0020036
WH0020036
Hot water Outlet Connector (½) – 18 litre only
WH0020087
NF
431
Relief Valve Assembly
WH0020037
WH0020037
433
„O‟ ring
WH0020038
WH0020038
434
Safety Valve Band
WH0020039
WH0020039
445
Flange
WH0020040
WH0020040
701
Over Heat Limiter Assembly
WH0020042
WH0020042
768
Terminal Block Assembly
WH0020043
WH0020043
828
Truss Gasket Screw 4 x 10
WH0020044
WH0020044
Page 62

TM031 Integrity 18, 20, 24, 26L Service Instructions REV: B
D.O.I: February 2008
This document is stored and maintained electronically by Service. All printed copies not bearing this statement in RED are deemed “uncontrolled”
62
Exploded View 2 871018 / 871020 / 871024
Page 63

TM031 Integrity 18, 20, 24, 26L Service Instructions REV: B
D.O.I: February 2008
This document is stored and maintained electronically by Service. All printed copies not bearing this statement in RED are deemed “uncontrolled”
63
Exploded View 2 871018 / 871020 / 871024 Replacement Parts List
Ref.
No.
Description
871018
871020
871024
133
Silicone Tube (Insulator)
WH0020045
WH0020045
134
Silicone Tube (Insulator)
WH0020046
WH0020046
705
Anti-Frost Heater
WH0020047
WH0020008
706
Anti-Frost Heater Assembly
WH0020088
WH0020048
708
Anti-Frost Heater Clamp
WH0020049
WH0020049
710
Anti-Frost Heater “C” Clamp
WH0020050
WH0020050
711
Anti-Frost Heater Clamp
WH0020051
WH0020051
712
Ambient Air Temp Thermistor Assy
WH0020052
WH0020052
713
Inlet and Heat exchanger Thermistor
WH0020053
WH0020053
714
Thermostat Assembly
WH0020054
WH0020054
715
Outlet Thermistor
WH0020181
WH0020181
716
„O‟ ring – Thermistor
WH0020055
WH0020055
723
Hall Effect I.C. Assembly
WH0020056
WH0020056
728
Combustion Fan
WH0020057
WH0020057
729
Fan Case Assembly
WH0020058
WH0020058
735
Ignition Pack
WH0020059
WH0020059
737
Flame Sensor Loom
WH0020060
WH0020061
745
PCB Assembly
WH0020062
WH0020062
751
Gas Type Connector - NG
WH0020064
WH0020063
751
Gas Type Connector - LP
WH0020065
WH0020078
757
100 volt loom
WH0020089
WH0020066
758
Signal Loom
WH0020067
WH0020067
768
Terminal Block Assembly
WH0020068
WH0020068
771
Not Fitted (Australian Models)
N/F
N/F
773
Not Fitted (Australian Models)
N/F
N/F
775
Fuse - In line Note: PCB fuses not fitted
WH0020069
WH0020069
779
Power Filter
WH0020079
WH0020079
780
Power Cord With Clamp
WH0020071
WH0020071
781
Clamp – Power Cord
WH0020072
WH0020072
783
240-110 Volt Transformer Assembly
WH0020073
WH0020073
784
Not Fitted (Australian Models)
N/F
N/F
*
Gas Conversion Kit - LP to NG
WH0020074
WH0020075
*
Gas Conversion Kit - NG to LP
WH0020076
WH0020077
*
Kitchen Controller
299853
299853
*
Bathroom 1 Controller
299854
299854
*
Bathroom 2 Controller
299855
299855
*
Kitchen Controller Cable (20 metres)
299856
299856
*
Bathroom Controller Cable (20 metres)
299857
299857
* - Not Illustrated
Test Equipment
Flame detection simulator
WH0020080
Flame sensor current (uA) detection kit
WH0020081
Fine probe adapter kit
WH0020082
Heat exchanger fin brush
WH0020083
Probe to alligator clip kit
WH0020084
Page 64

TM031 Integrity 18, 20, 24, 26L Service Instructions REV: B
D.O.I: February 2008
This document is stored and maintained electronically by Service. All printed copies not bearing this statement in RED are deemed “uncontrolled”
64
Exploded View 1 - 871024 Model
Page 65

TM031 Integrity 18, 20, 24, 26L Service Instructions REV: B
D.O.I: February 2008
This document is stored and maintained electronically by Service. All printed copies not bearing this statement in RED are deemed “uncontrolled”
65
Exploded View 1 Replacement Parts List – 871024 Models
Ref. No.
Description
871024
001
Front Panel Assembly
31-76496-00
003
Jacket Assembly
31-23525-00
004
Mounting Bracket
WH0020002
006
Reinforcing Plate
WH0020003
008
Cord Connector
WH0020004
066
Fixing Plate B
WH0020005
100
Gas Inlet Connector ¾”
31-76255-00
103
Proportional Gas Flow Regulating Valve
WH0020007
104
O‟ring
WH0020009
105
Gasket
WH0020010
108
Gasket
WH0020012
111
Upper Burner Assembly
WH0020014
120
Lower Burner Assembly – NG
WH0020016
120
Lower Burner Assembly – LP
WH0020018
160
Burner Change-Over Assembly
WH0020020
401
Water Inlet Connector Assembly (¾)
10-65408-00
402
O‟ring
WH0020022
403
CS Type Snap Ring
WH0020023
405
Water Drain Valve Assembly (includes water filter)
WH0020024
407
Water Filter
21-14774-00
408
Plug Band
21-35376-00
409
O‟ring
WH0020027
410
Water Body Assembly
WH0020028
415
Heat Exchanger and Combustion Chamber Kit
WH0020030
419
Flange
WH0020031
422
Combustion Chamber Front Panel Assembly
WH0020033
427
O‟ring
WH0020034
429
O‟ring
WH0020035
430
Hot water Outlet Connector (¾)
31-20192-00
431
Relief Valve Assembly
04-04764-00
433
O‟ring
WH0020038
434
Safety Valve Band
WH0020039
445
Flange
WH0020040
701
Over Heat Limiter Assembly
*31-79562-00
768
Terminal Block Assembly
WH0020043
828
Truss Gasket Screw 4 x 10
09-14144-00
*When installed in an 871024, 871024-B or 871024-C model heater these parts will require the
replacement of other interconnecting components. Refer to „Product Changes‟ on page 10 and
„Parts Replacement Scenarios‟ on page 11 for more information.
Page 66

TM031 Integrity 18, 20, 24, 26L Service Instructions REV: B
D.O.I: February 2008
This document is stored and maintained electronically by Service. All printed copies not bearing this statement in RED are deemed “uncontrolled”
66
Exploded View 2 – 871024 Models
Page 67

TM031 Integrity 18, 20, 24, 26L Service Instructions REV: B
D.O.I: February 2008
This document is stored and maintained electronically by Service. All printed copies not bearing this statement in RED are deemed “uncontrolled”
67
Exploded View 2 Replacement Parts List – 871024 Models
Ref. No.
Description
871024
133
Silicone Tube (Insulator)
20-43376-00
134
Silicone Tube (Insulator)
20-43376-00
705
Anti-Frost Heater (Heater A) (Anti-frost models only)
31-71644-00
706
Anti-Frost Heater (heater B) (Anti-frost models only)
37-71643-00
708
Anti-Frost Heater Clamp (Anti-frost models only)
WH0020049
710
Anti-Frost Heater “C” Clamp (Anti-frost models only)
WH0020050
711
Anti-Frost Heater Clamp (Anti-frost models only)
WH0020051
712
Ambient Air Temp Thermistor Assy
N/A use *37-76655-00
713
Outlet Thermistor (Thermistor B)
*20-64774-00
714
Anti-frost Thermostat Assembly (Anti-frost models only)
20-57072-00
715
Heat Exchanger (HX) Thermistor
N/A use *31-76655-00
716
O‟ring – Thermistor
WH0020055
723
Hall Effect I.C. Assembly
*20-43805-00
728
Combustion Fan
WH0020057
729
Fan Case Assembly
10-88629-00
735
Ignition Pack
31-76722-00
737
Flame Sensor Loom
31-76721-00
745
PCB Assembly
31-76623-0S
751
Gas Type Connector – NG
WH0020063
Gas Type Connector – LP
WH0020078
757
100 volt loom
31-76653-00
758
Signal Loom (inc amb air & HX thermistor)
*31-76655-00
768
Terminal Block Assembly
WH0020068
771
Noise filter holder assembly
31-23360-00
773
Power filter
*31-71642-00
775
Fuse - In line Note: PCB fuses not fitted
WH0020069
780
Power Cord With Clamp
*31-76652-00
781
Clamp – Power Cord
WH0020072
783
240 -110 Volt Transformer Assembly
*31-71646-00
784
Connecting cord
*31-71641-00
Not Shown
Gas Conversion Kit - LP to NG
WH0020075
Not Shown
Gas Conversion Kit - NG to LP
WH0020077
*When installed in an 871024, 871024-B or 871024-C model heater these parts will require the
replacement of other interconnecting components. Refer to „Product Changes‟ on page 10 and
„Parts Replacement Scenarios‟ on page 11 for more information.
Note: For controller and controller cable part numbers refer to page 20
Page 68

TM031 Integrity 18, 20, 24, 26L Service Instructions REV: B
D.O.I: February 2008
This document is stored and maintained electronically by Service. All printed copies not bearing this statement in RED are deemed “uncontrolled”
68
Exploded View 3 - 871024-B Model
Fitted with solenoid operated bypass
Page 69

TM031 Integrity 18, 20, 24, 26L Service Instructions REV: B
D.O.I: February 2008
This document is stored and maintained electronically by Service. All printed copies not bearing this statement in RED are deemed “uncontrolled”
69
Exploded View 3 Replacement Parts List - 871024-B Model
Fitted with solenoid operated bypass
Ref.
No.
Description
871024-B
001
Front Panel Rheem Brand (50 & 60ºC Models)
31-76496-00
Front Panel Everhot Brand (50 & 60ºC Models)
31-76498-00
003
Jacket Assembly
31-23525-00
004
Mounting Bracket
WH0020002
006
Reinforcing Plate
WH0020003
008
Cord Connector
WH0020004
066
Fixing Plate B
WH0020005
100
Gas Inlet Connector ¾”
31-76255-00
103
Proportional Gas Flow Regulating Valve
WH0020176
104
O-ring
WH0020009
105
Gasket
WH0020010
108
Gasket
WH0020012
111
Upper Burner Assembly
WH0020014
120
Lower Burner Assembly – NG
WH0020016
120
Lower Burner Assembly – LP
WH0020018
160
Burner Change-Over Assy (Including solenoids)
WH0020020
401
Water Inlet Connector Assembly (¾)
10-65408-00
402
O-ring
WH0020022
403
CS Type Snap Ring
WH0020023
405
Water Drain Valve Assy (includes water filter)
WH0020024
407
Water Filter
21-14774-00
408
Plug Band
21-35376-00
409
O-ring
WH0020027
410
Water Body Assembly including solenoid bypass
WH0020177
415
Heat Exchanger and Combustion Chamber Kit
WH0020179
419
Flange
WH0020031
422
Combustion Chamber Front Panel Assembly
WH0020033
427
O-ring
WH0020034
429
O-ring
WH0020035
430
Hot water Outlet Connector (¾)
31-20192-00
431
Relief Valve Assembly
04-04764-00
433
O-ring
WH0020038
434
Safety Valve Band
WH0020039
445
Flange
WH0020040
701
Over Heat Limiter Assembly
*31-79562-00
768
Terminal Block Assembly
WH0020043
828
Truss Gasket Screw 4 x 10
09-14144-00
*When installed in an 871024, 871024-B or 871024-C model heater these parts will require the
replacement of other interconnecting components. Refer to „Product Changes‟ on page 10 and
„Parts Replacement Scenarios‟ on page 11 for more information.
Page 70

TM031 Integrity 18, 20, 24, 26L Service Instructions REV: B
D.O.I: February 2008
This document is stored and maintained electronically by Service. All printed copies not bearing this statement in RED are deemed “uncontrolled”
70
Exploded View 4 - 871024-B Model
Fitted with solenoid operated bypass
Page 71

TM031 Integrity 18, 20, 24, 26L Service Instructions REV: B
D.O.I: February 2008
This document is stored and maintained electronically by Service. All printed copies not bearing this statement in RED are deemed “uncontrolled”
71
Exploded View 4 Replacement Parts List - 871024-B Model
Fitted with solenoid operated bypass
Ref. No.
Description
871024-B
133
Silicone Tube (Insulator)
20-43376-00
134
Silicone Tube (Insulator)
20-43376-00
705
Anti-Frost Heater (Heater A)
31-71644-00
706
Anti-Frost Heater Assembly (heater B)
37-71643-00
708
Anti-Frost Heater Clamp
WH0020049
710
Anti-Frost Heater “C” Clamp
WH0020050
711
Anti-Frost Heater Clamp
WH0020051
712
Ambient Air Temp Thermistor Assy
N/A use *37-76655-00
713
Outlet Thermistor (Thermistor B)
*20-64774-00
714
Anti-frost Thermostat Assembly
20-57072-00
715
Heat Exchanger (HX) Thermistor
N/A use *31-76655-00
716
O-ring – Thermistor
WH0020055
723
Hall Effect I.C. Assembly
*20-43805-00
728
Combustion Fan
WH0020057
729
Fan Case Assembly
10-88629-00
735
Ignition Pack
31-76722-00
737
Flame Sensor Loom
31-76721-00
745
PCB Assembly
31-76623-0S
751
Gas Type Connector – NG
WH0020186
Gas Type Connector – LP
WH0020185
757
100 volt loom
31-76653-00
758
Signal Loom (inc amb air & HX thermistor)
*31-76655-00
768
Terminal Block Assembly
WH0020068
771
Noise filter holder assembly
31-23360-00
773
Power filter
*31-71642-00
775
Fuse – In line Note: PCB fuses not fitted
WH0020069
780
Power Cord With Clamp
*31-76652-00
781
Clamp – Power Cord
WH0020072
783
240 -110 Volt Transformer Assembly
*31-71646-00
784
Connecting cord
*31-71641-00
Not Shown
Gas Conversion Kit - LP to NG
WH0020189
Not Shown
Gas Conversion Kit - NG to LP
WH0020191
*When installed in an 871024, 871024-B or 871024-C model heater these parts will require the
replacement of other interconnecting components. Refer to „Product Changes‟ on page 10 and
„Parts Replacement Scenarios‟ on page 11 for more information.
Note: For controller and controller cable part numbers refer to page 20
Page 72

TM031 Integrity 18, 20, 24, 26L Service Instructions REV: B
D.O.I: February 2008
This document is stored and maintained electronically by Service. All printed copies not bearing this statement in RED are deemed “uncontrolled”
72
Exploded View 5 – 871024, 871026 & 871026-B Models
Fitted with solenoid operated bypass
Page 73

TM031 Integrity 18, 20, 24, 26L Service Instructions REV: B
D.O.I: February 2008
This document is stored and maintained electronically by Service. All printed copies not bearing this statement in RED are deemed “uncontrolled”
73
Exploded View Replacement Parts List 5 - 871024-C, 871026 & 871026B Models
Fitted with solenoid operated bypass
Item No
Description
871026
871026-B
871024-C
001
Front Panel Rheem Brand (50 & 60ºC Models)
31-76496-00
003
Jacket Assembly
31-23525-00
004
Mounting Bracket
WH0020002
006
Reinforcing Plate
WH0020003
008
Cord Connector
WH0020004
066
Fixing Plate B
WH0020005
100
Gas Inlet Connector ¾”
31-76255-00
103
Proportional Gas Flow Regulating Valve
54-02340-00
104
O-ring
WH0020009
105
Gasket
WH0020010
108
Gasket
WH0020012
111
Upper Burner Assembly
31-76231-00
115
Nozzle Plate – NG
31-76238-00
Nozzle Plate – LP
N/A
120
Lower Burner Assembly – NG
31-76241-00
Lower Burner Assembly – LP
31-76240-00
131
Electrode
31-76236-00
132
Flame rod assembly (3 x flame rods)
31-76237-00
160
Burner Change-Over Assembly
WH0020020
401
Water Inlet Connector Assembly 26 L (¾)
10-65408-00
402
O-ring
WH0020022
403
CS Type Snap Ring
WH0020023
405
Water Drain Valve Assy (includes water filter)
WH0020024
407
Water Filter
21-14774-00
408
Plug Band
21-35376-00
409
O-ring
WH0020027
410
Water Body Assy including solenoid bypass
31-76658-00
415
Heat Exchanger and Combustion Chamber
31-76500-00
419
Flange
10-88332-00
422
Combustion Chamber Front Panel Assembly
10-89636-00
427
O-ring
WH0020034
429
O-ring
WH0020035
430
Hot water Outlet Connector (¾)
31-20192-00
431
Relief Valve Assembly
04-04764-00
433
O-ring
WH0020038
434
Safety Valve Band
WH0020039
445
Flange
WH0020040
701
Over Heat Limiter Assembly
*31-79562-00
768
Terminal Block Assembly
WH0020068
828
Truss Gasket Screw 4 x 10
09-14144-00
860
Nozzle Plate Bind Screw 3 x 6
09-01872-00
*When installed in 871024-C, 871026 & 871026-B model heaters these parts will require the
replacement of other interconnecting components. Refer to „Product Changes‟ on page 10 and
„Parts Replacement Scenarios‟ on page 11 for more information.
Note: For controller and controller cable part numbers refer to page 20.
Page 74

TM031 Integrity 18, 20, 24, 26L Service Instructions REV: B
D.O.I: February 2008
This document is stored and maintained electronically by Service. All printed copies not bearing this statement in RED are deemed “uncontrolled”
74
Exploded View 6 - 871024-C, 871026 & 871026-B Models
Fitted with solenoid operated bypass
Page 75

TM031 Integrity 18, 20, 24, 26L Service Instructions REV: B
D.O.I: February 2008
This document is stored and maintained electronically by Service. All printed copies not bearing this statement in RED are deemed “uncontrolled”
75
Exploded View 6 Replacement Parts List - 871024-C, 871026 & 871026-B Models
Fitted with solenoid operated bypass
Item No
Description
871026
871026-B
871024-C
133
Silicone Tube (Insulator)
20-43376-00
134
Silicone Tube (Insulator)
20-43376-00
705
Anti-Frost Heater (Heater A)
31-71644-00
706
Anti-Frost Heater Assembly (Heater B)
31-71643-00
708
Anti-Frost Heater Clamp
WH0020049
710
Anti-Frost Heater “C” Clamp (for Heater A)
WH0020050
711
Anti-Frost Heater Clamp (for Heater B)
WH0020051
712
Ambient Air Temp Thermistor Assembly
N/A use *31-76655-00
713
Outlet Thermistor (Thermistor B)
*20-64774-00
714
Anti Frost Thermostat Assembly
20-57072-00
715
Heat Exchanger (HX) Thermistor
N/A use *31-76655-00
716
O-ring – Thermistor
WH0020055
717
Inlet Thermistor (Thermistor A)
*20-64773-00
723
Hall Effect I.C. Assembly
*20-43805-00
728
Combustion Fan
WH0020057
729
Fan Case Assembly
10-88629-00
735
Ignition Pack
31-76722-00
737
Flame Sensor Loom
31-76721-00
745
PCB Assembly
31-76623-0S
751
Gas Type Connector – NG
31-76581-00
31-76592-00
Gas Type Connector - LP
31-76582-00
31-76591-00
757
100 volt loom
31-76653-00
758
Signal Loom (inc amb air & HX thermistor)
*31-76655-00
768
Terminal Block Assembly
WH0020068
771
Noise filter holder assembly
31-23360-00
773
Power filter
*31-71642-00
775
Fuse – In line Note: PCB fuses not fitted
WH0020069
780
Power Cord With Clamp
*31-76652-00
781
Clamp – Power Cord
WH0020072
783
240 -110 Volt Transformer Assembly
*31-71646-00
784
Connecting cord
*31-71641-00
Not Shown
Gas Conversion
- LP to NG
Lower Burner Assy
31-76241-00
Gas Type Connector
31-76581-00
31-76592-00
Nozzle Plate
31-01872-00
31-67238-00
Nozzle Plate Bind Screw
(3 required)
09-46131-00
Not Shown
Gas Conversion
- NG to LP
Lower Burner Assy
31-76240-00
Gas Type Connector
31-76582-00
31-76591-00
*When installed in 871024-C, 871026 & 871026-B model heaters these parts will require the
replacement of other interconnecting components. Refer to „Product Changes‟ on page 10 and
„Parts Replacement Scenarios‟ on page 11 for more information.
Note: For controller and controller cable part numbers refer to page 20.
Page 76

TM031 Integrity 18, 20, 24, 26L Service Instructions REV: B
D.O.I: February 2008
This document is stored and maintained electronically by Service. All printed copies not bearing this statement in RED are deemed “uncontrolled”
76
Gas Type Conversion Procedure
1. Isolate the power and gas supply to the water heater.
2. Remove the front panel. (Refer to Procedure 1).
3. Remove the Burner Change Over Assembly (Refer to Figure 1 and Procedure 2).
4. Remove the Combustion Chamber Front Panel Assembly. (Refer to Figure 2 and
Procedure 3).
5. Remove the Lower Burner Assembly, (Refer to Figure 3 and Procedure 4).
NG - Propane
6. Remove and discard Nozzle Plate and nozzle plate screws – Models ending with
C suffix only (Refer to figure 3 and Procedure 23).
7. Fit replacement Propane lower burner assembly.
Propane - NG
6. Install Nozzle plate and nozzle plate screws – models ending with C suffix only
(Refer to figure 3 and Procedure 23).
7. Fit replacement NG lower burner assembly.
8. Refit the Combustion Chamber Front Panel Assembly.
9. Refit the Burner Change Over Assembly.
10. Remove the Gas Type Connector, (Refer to Figure 4 and Procedure 17) and refit
replacement for required gas type and water heater capacity.
11. Restore the power and gas supply.
12. Using an insulated tool, adjust the minimum and maximum burner gas pressures
(Figure 5) to that required for the size, model and gas type (refer to specifications
table on page Error! Bookmark not defined.) following the Burner Gas Pressure
Adjustment procedure on page 52.
13. Fit the correct gas type label and alter the test point pressures on the rating label
to reflect the new gas type.
Figure 1
Figure 2
Page 77

TM031 Integrity 18, 20, 24, 26L Service Instructions REV: B
D.O.I: February 2008
This document is stored and maintained electronically by Service. All printed copies not bearing this statement in RED are deemed “uncontrolled”
77
Figure 3
Figure 4
Figure 5
 Loading...