Rexton BiCore C R-Li Quick Start Guide

BiCore C R-Li
Connexx & App
Quick Guide
www.rexton.com

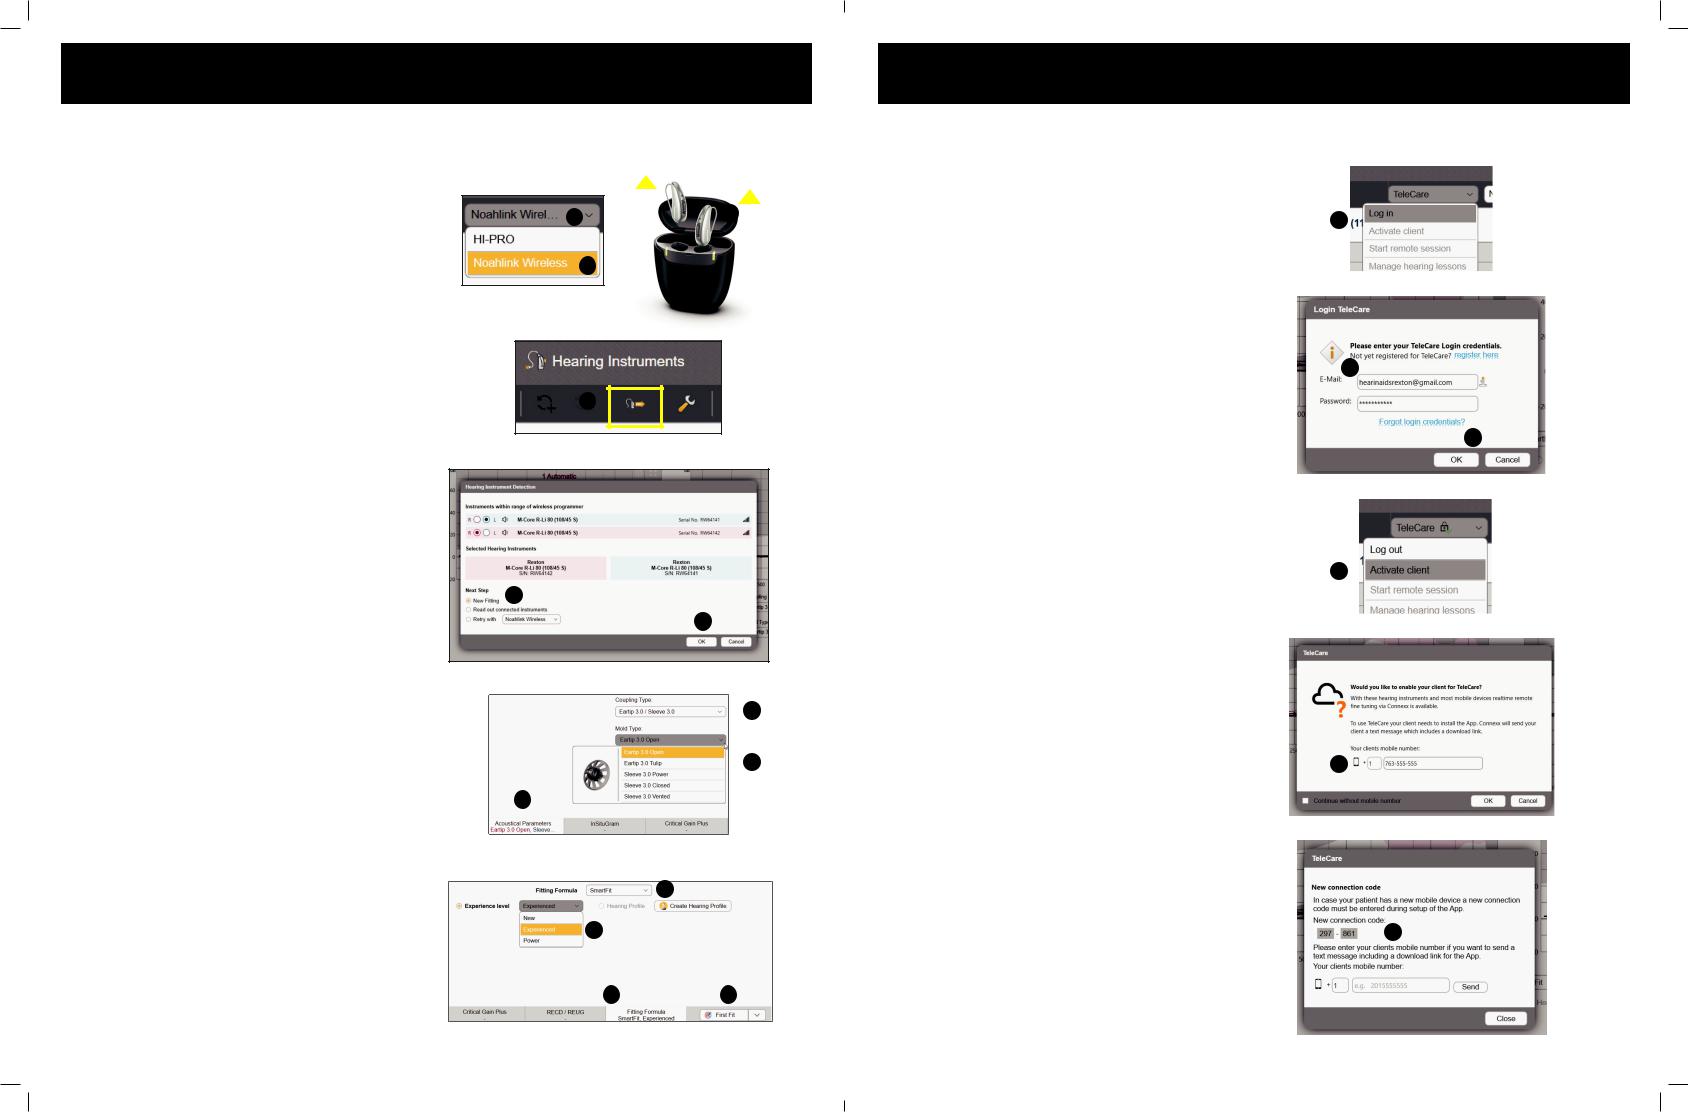
First Fit Process
First Fit
1.Click on Programmer Selection
2.Select Noahlink Wireless
3.Remove hearing aids from charger
•Wait 6 seconds for hearing aids to power on
4.Click Detect Hearing Instruments.
5.Click New Fitting
6.Click OK to begin First Fit
1 |
|
3 |
|
|
|
||
|
|
|
|
|
|
|
|
2
4
5
6
7. Click Acoustical Parameters tab |
8 |
|
|
|
|
8. |
Select Coupling Type |
|
|
• Select Click Dome / Eartip 3.0 or Earmold |
9 |
|
3.0 |
|
|
|
|
9. |
Select Mold Type |
7 |
•Select Eartip or Sleeve
10. |
Click Fitting Formula tab |
|
11 |
11. |
Select Fitting Formula |
|
|
12. |
Select Experience level |
12 |
|
|
|
||
13. |
Click First Fit |
|
|
|
|
10 |
13 |
TeleCare Activation
TeleCare may be activated at any time. The member doesn’t have to be present.
1. Click Login
1
2.Enter your credentials
3.Click Ok to close notification
2
3
4. Click Activate client
4
5.Enter the Member’s smart phone number
You may check the Continue without mobile number box if the app is going to be used on a tablet.
5
6.If using a phone, the member will get a text message with a single use connection code. If using a tablet, you may provide the code.
6
2 |
3 |

Soundpro 2.0
Customizing Soundpro 2.0
Soundpro Mode
The default setting, Balanced Focus, should |
|
|
be maintained during First Fit. If changes are |
1 |
2 |
required during follow up visits, proceed as |
|
|
follows: |
|
|
1.To shift the focus toward environmental sounds, move the slider to the left. You have 3 steps available.
This classification will more often choose microphone modes with less directionality.
This is more beneficial for people that require full processing support only in very demanding situations.
2.To increase the focus on speech components, move the slider to the right. You have 3 steps available.
This classification will more often choose microphone modes with more directionality and stronger noise reduction.
This is more beneficial for people that face challenges understanding speech even at low noise levels.
Manual Offsets |
3 |
||
Changing these offsets will affect all acoustic |
|||
4 |
|||
environments where that component is present. |
|||
(i.e. Noise as part of Speech in Noise or Noise as |
5 |
||
part of Background Noise, etc.). |
|||
3. |
Select the component to change |
|
|
4. |
Select a number of handles |
|
|
5. |
Click on the up or down arrows as needed |
|
|
|
These changes are made in 1 dB steps |
|
|
Manual Offsets - Bluetooth
You may adjust the audio streaming response for Bluetooth phone and TV streaming independently. The changes will carry over to the Audio Streaming in tab under Fine Tuning also.
Basic Tuning
Basic Tuning
Use the Basic Tuning tab to make adjustments for gain, loudness and comfort issues after First Fit.
•Master Gain adjusts overall gain for all frequencies and input levels.
Note: the number indicates an average of gain across all channels
•Soft Sounds adjusts the 50 dB curve
•Medium Sounds adjusts the 65 dB curve
•Loud Sounds adjusts the 80 dB curve
•Speech increases / decreases gain for speech intelligibility
•Too Sharp increases low and mid and decreases high frequencies.
•Too Muffled decreases low and mid and increases high frequencies
4 |
5 |
 Loading...