

Page 1

of Switzerland
of Switzerland
Re:system
M51
MK2
Source
Management
Dominating Entertainment.
Revox of Switzerland
.
Page 2

Introduction Re:system M51 II
1
Page 3

Introduction Re:system M51 II
Contents
Welcome
The modular manual
Safety
Installation and operation
Safety measures
M51- The concept
Getting started
The modular manual
Switch on
Operating elements
Display menu
Display Brightness
Display Contrast
Acoustic signal
Auto dimmer
Display Style
IR-Receiver
Source menu
Remote function
Calling Remote
Button selection
Source selection
Button disable
Reset remote menu
Quit Remote
Software version
Headphone operation
Overheat protection
Technical data – Analog Amp
Technical data – Digital Amp
Guarantee
Disposal of your old product
Accessories supplied
Notes
Remote Table
3
3
4
5
5
7
8
8-9
10
11
12
12
13
13
14
14
15
15
16
16
17
17
17
19
19
20
21
21
22
23
24
24
24
24
25
2
Page 4

Introduction Re:system M51 II
Welcome
Thank you for choosing to buy
this high quality product from
us. We are proud to have you
as a customer.
Before you start to set-up your
M51
up, we would recommend
that you take some time to
study this manual so that you
can get the most from the
audio-visual qualities and
features which the product
offers.
Starting from today, you will be
able to enjoy concert hall and
cinema sounds and pictures in
the quality which you would
expect from Revox products.
Enjoy!
The modular manual
The original concept of
modularity with the M51
been carried on in the design of
the manual. This means that
there isn't one big manual but
rather a set of basic instructions
for the main M51
an individual chapter for each
module.
If you expand your M51
the addition of an extra module,
you will just insert the new
chapter into your manual file,
thereby bringing your
documentation up to date.
unit and then
has
through
3
Page 5
Introduction Re:system M51 II
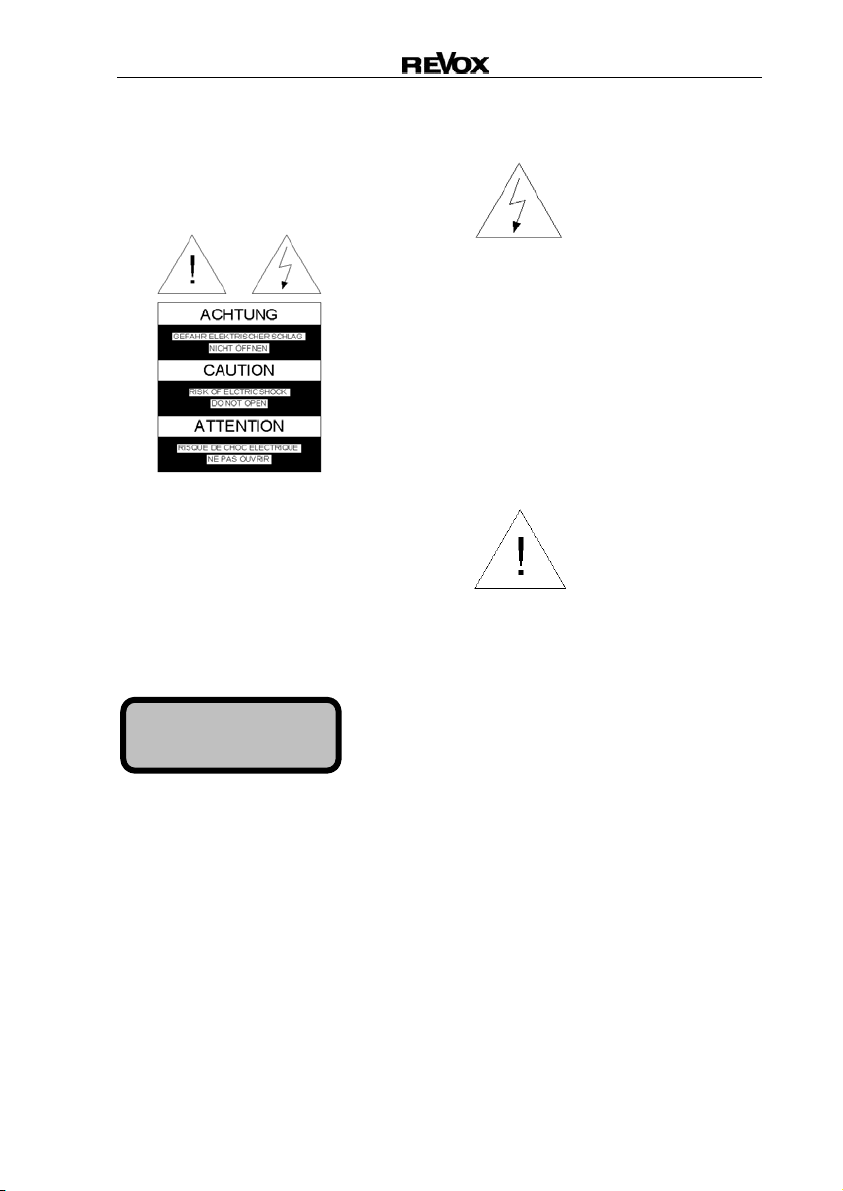
Safety
For your own safety, please
take note of the labels on the
rear of the unit:
In order to avoid the risk of an
electric shock, no parts of the
housing should be removed.
Maintenance and repairs should
only be carried out by qualified
personnel.
CLASS 1
LASER PRODUCT
This symbol indicates the
presence of potentially
dangerously high voltages
within the unit. An electric shock
can result if such components
are touched.
This symbol is used to highlight
important passages in the
documentation concerning the
operation and maintenance of
the unit.
WARNING
If the housing is opened,
dangerous laser and electromagnetic radiation could be
present.
4
Page 6

Introduction Re:system M51 II
Installation and operation
After unpacking the unit, please
check it for any damage which
may have been caused in
transit. Before setting the unit
up, please read the manual
through carefully. It should be
kept somewhere handy for
future reference.
The unit should not be powered
up if it shows evidence of any
mechanical damage or if liquid
may have got inside the unit.
Only use the power cable
supplied. Check the power
supply and the unit's electrical
connection values in terms of
voltage and frequency, before
connecting to the power. The
fuses used in the unit must
conform to the factory settings
detailed in the "Technical Data".
Safety measures
Unusual occurrences
If you notice any unusual noises
or smells coming from the unit,
remove the power cable
immediately. Take the unit to
your nearest Revox dealer to be
checked as soon as possible.
Don't open the unit
The unit should not be opened
to avoid the risk of
electrocution.
Periods of non-use
If the unit is not going to be
used for a while, we
recommend that the unit be
unplugged for safety reasons.
Foreign objects
Liquids, inflammables or other
objects should not be inserted
in any of the unit's openings, as
this could lead to unit failure,
fire or an electric shock.
Power cable
When plugging the unit in or
out, never pull on the cable but
always hold the plug body.
5
Page 7

Introduction Re:system M51 II
Guarantee conditions
Within countries of the
European Union, Revox offers a
guarantee in addition to the
legal guarantee rights which
you have from your vendor, for
units bought within EU
countries. The terms of the
guarantee cover material and
working time during the period
of the guarantee, which is
determined by the Sales
Partners in the individual EU
countries.
In all countries, the guarantee
from the Revox dealer is offered
in addition to the legal
regulations in force in the
country. It is only valid in the
country of purchase. If you wish
to make a claim on the
guarantee, you must be able to
show that the product was
bought from an authorised
Revox partner.
In the event of any unauthorised
work on the unit or any
incorrectly carried out repairs,
the guarantee is rendered
invalid.
Location of the unit
When choosing where to install
your unit, you should avoid a
location which:
- has direct sunlight
- is next to any source of heat
- has poor ventilation
- has a dusty atmosphere
- is unstable
- has high humidity
You must ensure that the
ventilation slots in your M51
not covered, in order to ensure
sufficient ventilation.
are
6
Page 8

Introduction Re:system M51 II
M51 - The concept
• Scalability
The M51
demands and requirements
grow. Using this modular
concept, you can build your
own personal M51. Simply
insert the required modules
into the corresponding slots
at the rear of the unit and
switch on.
• Future-secure
What type of signal
information will there be in
the future? It doesn't matter
because you'll always be up
to date. Revox will always
offer you new modules
based on cutting-edge
development technologies.
• Economics
We haven't forgotten the
economic and financial
aspects of the product
either. You just buy the
modules you need. There's
no component redundancy
and you don't have to pay
for anything you don't need.
will grow as your
• Communication
What do I need to connect
Unit A to Unit B and are
they going to understand
each other? No worries for
an M51
connections are integrated
and each module "speaks
the same language".
• The aesthetics of
operation
Many tasks, just one
component. Just let your
imagination run free. The
M51
commands to the letter.
• Philosophy of Excellence
It's not only the accuracy of
our clocks which links the
Black Forest to Switzerland,
but also the development
and production of the M51.
You can count on Revox
Quality and Service today,
tomorrow and for the rest of
your M51's working life.
owner. All
will follow all your
7
Page 9

Introduction Re:system M51 II
Getting started
Before you can enjoy your M51
for the first time, you'll need to
make a few connections.
Connections
Speaker Amplifier
The cable which you use to
connect your speakers with the
M51
should be of a suitable
diameter.
Revox recommends:
0 – 5 m length: min. 2.5 mm
( 13 AWG )
5 –10 m length: min. 4.0 mm
( 11 AWG )
Each speaker must have an
impedance of 4 Ω or more. You
must ensure that all the strands
of the cable are held within the
speaker connector and that
none of them touch any
neighbouring connectors or the
housing of the M51.
A good solution for speaker
connections is the use of fully
insulated banana plugs.
These are inserted into the
4 mm terminal block opening
having been firmly attached
beforehand.
2
2
You must be careful to keep the
correct polarity in order to
ensure perfect sound
reproduction. Crossed polarity
doesn't cause any damage to
the speaker or the M51, but it
leads to an imprecise bass and
a somewhat diffused sound
picture.
If you are not intending to attach
all 5 speakers, the other
terminal connections simply
remain unused.
Power cable
You should only use the Revox
supplied power cable and you
must ensure that the voltage
printed next to the power
connection i.e. (115V/230v) is
actually what the power supply
is delivering. If necessary, the
M51
can be retrofitted for a
different voltage, which should
only be carried out by an
authorized dealer.
Head phones
You will find the headphone
connection on the left at the
front of the unit. It can be used
with all normally available
headphones with a 6.3 mm
stereo jack plug and an
impedance of 16 Ω or more.
8
Page 10

Introduction Re:system M51 II
M51 Link
The M51 offers a wide range of
useful and practical extension
products. These so-called
interfaces enable access to
other systems and/ or offer
many control and operational
comfort solutions, through the
M51 Link.
Here are some examples:
M200 / M200 EIB
Intelligent domestic building
management with relay and
dimmer functions as well as a
serial interface for PC and
Revox video products and
domestic Building Management
Systems such as EIB.
M201
IR Interface for the connection
of external IR receivers (M204)
or wall-mounted panels (M218).
M202
Ethernet Interface to integrate
the M51 and all the Additional
rooms into one network (LAN)
or for the addition of a wireless
control unit with Pocket PCs
(WLAN).
All these interfaces are
connected to the M51 Link,
which is located on the rear of
the M51 above the power plug
(see leaflet Chapter –
Introduction). You need an
RJ11-4 telephone plug for the
connection.
PC-Link
The PC Link offers a USB
interface for the computer.
Using this, the M51 can be
controlled through the M230
Revox PC Control software.
The correct USB driver must be
installed on the PC in order to
be able to use the M230
software, which can be
downloaded free-of-charge from
www.revox.de. You will also find
this driver software in the
Download Area on the Revos
Homepage.
The PC-Link is located on the
rear of the M51 above the
power plug (see leaflet Chapter
– Introduction).
9
Page 11

Introduction Re:system M51 II
Switch on
Mains
There are two ways to turn your
M51
on and off. There is one
switch (AC-Power) on the rear
of the unit and another (Power)
on the front.
The switch on the rear of the
unit switches the M51
completely. In this case, you
cannot turn the unit on using the
switch on the front or the
remote control. In this condition,
the M51
energy.
Advice:
The M51 operating system is
loaded and then remains in
Standby mode the first time the
M51 is powered up.
is not consuming any
off
Power-Switch
You can use the remote to
activate your M51
mode.
If you are using your M51
Multiroom operation, the unit
must always be left in Standby
mode when not in full use.
Otherwise it can't be activated
from any of the neighbouring
rooms in the system.
Thanks to the highly developed
switching technology used by
Revox, the M51
minimum of 2 watts in this state.
Warning
Power continue to be applied to
the unit when it is in Standby
mode.
in Standby
in
only uses a
10
Page 12

Introduction Re:system M51 II
Operating elements
The complete operation of the
M51
is carried out using a very
few operating elements on the
front of the unit. The last two
fold-out pages from this chapter
give you an overview.
The following section gives you
a short description of what the
individual elements do.
Power
Switches into and out of
Standby mode.
Disc
Drives the disc drawer in and
out.
Setup
For setting up the basic
functions of the M51
modules.
Source
Calls up the option to select
your audio sources. If you press
the button twice, it takes you
direct to the menu for the
current source.
Amplifier
Calls up the Amplifier menu to
make all the sound-related
settings.
and its
Softkeys
Keys which have different
functions depending on which
menu you are currently in.
Rotary knob
In normal operation, this is the
volume control. When you are
in the set-up menu, it is used as
an input medium for certain
functions, as indicated by the
lighting of the Jog indicator.
Jog Indicator
Displays when the Rotary knob
can be used for editing a
particular menu setting.
11
Page 13

Introduction Re:system M51 II
Display menu
There are many ways of
customizing the M51's Display
through Setup Menu/ Display.
Press and hold the Setup key
for approx. 2 seconds to call the
Display menu. The following
menu then appears:
Press the Display softkey and
you are taken directly to the
Display menu.
Brightness
Using the Brightness softkeys,
you can alter the brightness of
the display in three steps.
The lowest setting has the value
1; the highest is 3.
The current Brightness setting
is shown in the inner display
field, shown here with a dark
background.
12
Page 14
Introduction Re:system M51 II
Contrast
Acoustic signal
Using the Contrast keys, you
can alter the contrast of the
display in nine steps.
The lowest setting has the value
1; the highest is 9.
The current Contrast setting is
shown in the inner display field,
shown here with a dark
background.
The Contrast is factory set to
the mid-position 5. Depending
on where the unit is installed, it
may be necessary to change
this contrast setting, in order to
achieve a better visual result.
Using the Beeper softkey, you
can define the setting of the
acoustic signal which confirms
the inputs you make on your
M51. There are three options:
1. Beeper Off
No audible key confirmation
2. Beeper On
With audible key confirmation
The current setting is shown in
the inner display field, shown
here with a dark background:
13
Page 15

Introduction Re:system M51 II
Auto dimmer
Style
Using the Auto dim softkey,
you can set up an automatic
dimming of the brightness, if no
input is made for a longer
period of time.
You can toggle between Auto
dim On and Auto dim Off by
repeated pressing of the Auto
dim softkey.
The current setting is shown in
the inner display field, shown
here with a dark background:
If Dimming is activated (On), the
backlighting is switched off after
a certain time and a green LED
on the right of the display lights
up. The background lighting can
be switched back on by
pressing a button on the M51.
Using the Style softkey, you
can select any one of the four
different Style options.
Each time you press the Style
key, the display changes to
show you the next alternative.
The Style currently being
shown is identified by the
numbers 1 – 4.
14
Page 16

Introduction Re:system M51 II
IR-Receiver
Source menu
You can switch off the integrated
remote control IR Receiver in the
M51 by pressing the Remote
softkey. You can toggle between
Off and On by repeated pressing
of the Remote softkey.
The current setting is shown in
the inner display field as
highlighted here. A remote
control symbol also appears in
the lower display field when in
deactivated state.
If there is a requirement that the
M51 should only be operated
through an external IR receiver,
e.g. M204 or just manually, the
integrated IR Receiver in the
M51 can be deactivated using
the Remote softkey.
If you are in Setup and you
press the Source softkey, you
can modify the basic settings of
the M51 module and/or the
source, which you have
currently selected in the Source
menu.
Example:
You want to modify the DVD
Player basic settings. First you
select the DVD source from the
Source menu (Source button on
the M51) and then press the
Setup button for approx. 2
seconds. Using the Source
softkey, you can now make the
basic settings.
The Source softkey offers the
basic settings for the selectable
sources. If, however, you want
to modify the basic Sound or
Multiroom System settings, you
should select the Amplifier or
the Multiroom softkey in the
Setup menu, respectively.
The basic setting options are
described in the corresponding
module manuals.
15
Page 17
Introduction Re:system M51 II
Remote function
The modularity of the M51
means that its remote control
unit is just as flexible.
The Remote function gives you
the option to modify the
assignment of module source
selection, to buttons on your
remote control.
This also guarantees that you
can always address external
devices with the available
button configuration.
The Remote function has no
influence on the direct source
selection on the M51. In this
case, the source shown on the
M51
display is still selected.
You will find a table for your
own personal Remote control
settings on the last page of the
Manual, Chapter –
Introduction..
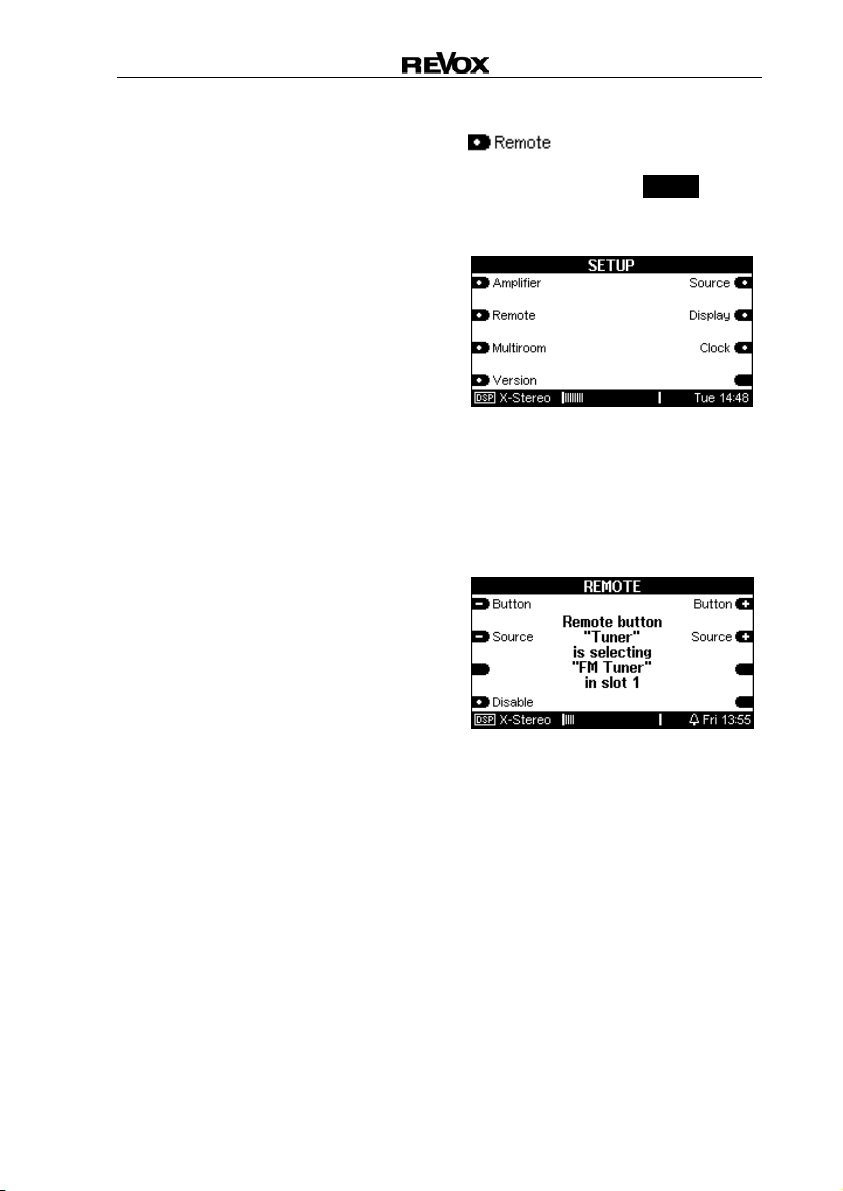
Calling Remote
Press and hold the Setup key
to call the Remote function. The
following menu appears:
Press the Remote softkey and
you are taken directly to the
Remote menu.
16
Page 18
Introduction Re:system M51 II
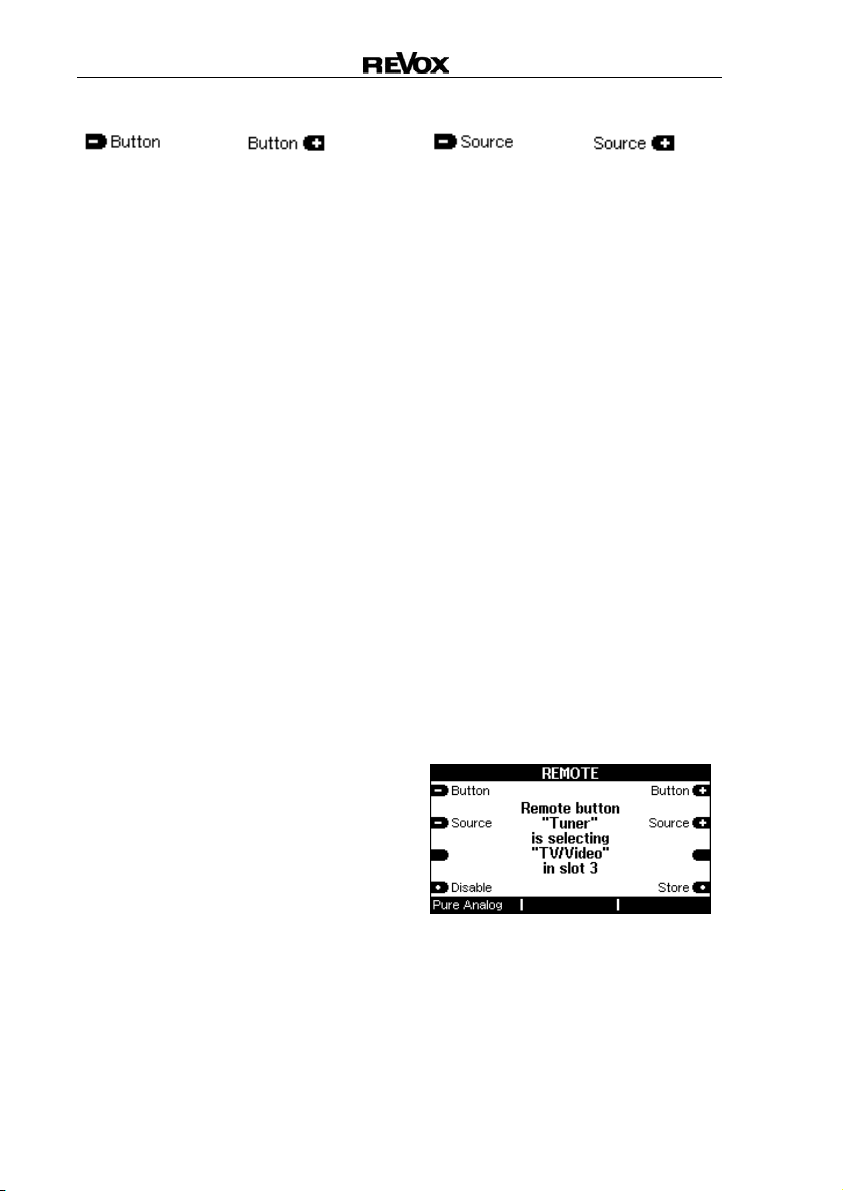
Button selection
Using the Button softkeys, first
select the source keys on your
remote control which you want
to assign to a particular M51
audio source. You can scroll
forwards and backwards
through the source keys using
Button+ and Button-
respectively.
The TV-Hold button has a
special function. This key will only
activate the assigned source if it
is pressed for a while. A short
press has no effect. This can
effectively avoid conflicts
between the M51 and some other
manufacturers’ TV remote
controls.
When using the button TV-Hold
the button TV must be disabled.
Otherwise the button TV-Hold
will be without effect.
Source selection
The Source softkeys are used
to assign an audio source to the
remote control keys selected
above. You can scroll forwards
and backwards through the
audio sources which the M51
offers by using the keys using
Source+ and Source-
respectively.
Each time the source is changed,
the softkey Store appears on the
display for confirmation of your
intention to make a change. If
you want to store the change,
press the Store key, else the
existing setting is maintained.
Example
In the graphic shown below, the
audio source “TV/Video” is
assigned to the source key
“Tuner” an then confirmed with
Store.
Now, if Tuner is selected on the
remote control, the M51 switches
to the TV/Video source.
17
Page 19

Introduction Re:system M51 II
The direct M51 source selection
is not affected by any changes
to the Remote control function.
Here, the Tuner will still be
selected when the Tuner
softkey is pressed.
Button disable
The Disable function allows you
to block or disable the source
keys on the remote control.
Using the –Button+ softkey,
select the required source key
and press the Disable softkey.
The Store softkey appears on
the display at the same time for
you to confirm your action. If
you don’t press Store, the
previous setting is maintained.
With the text:
Remote button
“DVD“
is disabled
the above graphic shows that
the DVD source key on the
remote control has been
disabled.
The direct M51 source selection
is not affected by any changes
to the Remote control function.
Here, the DVD will still be
selected when the DVD softkey
is pressed.
18
Page 20

Introduction Re:system M51 II
Reset remote menu
If you want to reset the Remote
menu to its factory settings, just
press the Disable softkey until
the Setup main menu appears
again.
Following this, all source
assignments have been reset
and set with the status
disabled. Only the DVD, Tuner
und TV source buttons get their
original assignment again.
Quit Remote
You quit the Remote function by
using the Source or Amplifier
buttons on the front of the M51.
19
Page 21

Introduction Re:system M51 II
Software version
The Version functions shows
you the software version
number for each module and
which slot position it's plugged
into.
Press and hold the Setup key
to call the Version function. The
following menu appears:
Press the Version softkey and
you are taken directly to the
Version menu.
You can scroll through the
various Version pages by
repeated pressing of the
Version softkey.
The first column with the
# symbol shows the module slot
number with the numbers
#1 - #6.
The Audio Control -Center
(ACC = 5.1 Decoder) is defined
with #9. All other # numbers
define internal M51
components.
The second column defines the
corresponding module. The
DVD module, for example, is
shown as DVD-3.
The last column defines the
software version of the
corresponding module.
Empty slot positions are
identified by the text Not used.
Example
#3 DVD-3 0.08
This line defines that the DVD
module with software version
0.08 is in slot 3.
20
Page 22

Introduction Re:system M51 II
Headphone operation
Overheat protection
You will find the headphone
connection on the left at the
front of the unit. It can be used
with all normally available
headphones with a 6.3 mm
stereo jack plug and an
impedance of 16 Ω or more.
As soon as you plug your
headphones in, the external
speakers are switched off and a
headphone symbol appears in
the bottom line of the display.
(See below)
At the same time, the M51
switches automatically to Pure
Analog so that you always
have the optimum sound quality
when using your headphones.
When you remove the
headphone jack, the M51
reverts automatically to the
sound setting which was being
used before.
The M51 's power outputs are
fitted with an active temperature
sensor which is constantly
monitoring their temperature,
and if necessary activates a 3speed fan.
If the temperature should still
exceed the maximum permitted
level, the M51 switches the
outputs down to 25% of their
maximum power. This is shown
by the overheat symbol being
shown in the bottom line of the
display. (See below)
This power level will be maintained until the temperature
comes back down under the
permitted maximum value. After
this, the volume can be
increased again.
21
Page 23

Introduction Re:system M51 II
gy
Technical data
Analog Amplifier Technolo
Amplifier:
Output power:
Frequency response
Damping coefficient:
Harmonic distortion:
Headphone output:
5 x 60 Watt at 4 Ohm / 1% distortion
20 Hz - 150 kHz / -3 dB
> 100 at 8 Ohm
0.003 % at 20 Watt
max. 1 V at 32 Ohm
General M51 data:
Power requirements:
Primary fuse:
Power consumption:
Operating conditions:
Dimensions:
Weight:
230 V / 50-60Hz 115 V / 50-60Hz
4 A slow-blow 8 A slow-blow
Max. 500 Watt
Operation: 70 Watt
Standby: 2 Watt
+10° ... 40°C / 50°…104°F
Humidity class in accordance with DIN 40040
Width: 460 mm 18.00 in
Height: 136 mm 5.25 in
Depth: 400 mm 15.50 in
15,6 kg / 34.4 lb
22
Page 24

Introduction Re:system M51 II
gy
Technical data
Max. music output power:
Output power - sine wave:
Frequency response
Damping coefficient:
Harmonic distortion:
Headphone output:
Power requirements:
Primary fuse:
Power consumption:
Operating conditions:
Dimensions:
Weight:
Errors excepted
Product subject to modification
Description: Version 0.71
Digital Amplifier Technolo
Amplifier:
5 x 200 Watt at 4 Ohm
2 x 200 Watt at 4 Ohm
3 Hz - 70 kHz / -3 dB
> 200 at 8 Ohm
< 0.005 % bei 50 Watt
max. 1 V at 32 Ohm
General M51 data:
230 V / 50-60Hz 115 V / 50-60Hz
4 A slow-blow 8 A slow-blow
Max. 500 Watt
Operation: 50 Watt
Standby: 2 Watt
+10° ... 40°C / 50°…104°F
Humidity class in accordance with DIN 40040
Width: 460 mm 18.00 in
Height: 136 mm 5.25 in
Depth: 400 mm 15.50 in
15,6 kg / 34.4 lb
23
Page 25

Introduction Re:system M51 II
Guarantee
The guarantee period is 24 months
from the date of purchase.
Your dealer should be your first
contact if you need service.
If he can't give you the help you
need, send your M51 prepaid and
without any accessories to your
national Sales Office.
Please supply a complete
description of the problem and a full
return postal address.
Disposal of your old product
Your product is
designed and
manufactured with
high quality
materials and
components, which
can be recycled
and reused.
When this crossed-out wheeled bin
symbol is attached to a product it
means the product is covered by the
European Directive 2002/96/EC.
Please inform yourself about the
local separate collection system for
electrical and electronic products.
Please act according to your local
rules and do not dispose of your old
products with your normal household waste. The correct disposal of
your old product will help prevent
potential negative consequences for
the environment and human health.
Notes
Manufactured under license from
Dolby Laboratories. „Dolby“, „ProLogic“. „ Dolby Digital “ and the
double D-Symbol are trademarks of
Dolby Laboratories. Confidential
Unpublished Works c 1992-1997
Dolby Laboratories, Inc. All rights
reserved. Manufactured under
license from Digital Theatre
Systems, Inc. US Pat No.
5,451,942 and other worldwide
patents issues and pending. „dts“, „
dts Digital Surround „ are
trademarks of Digital Theatre
Systems, Inc. C 1996 Digital
Theatre Systems, Inc. All rights
reserved.
Dolby, Pro-Logic, AC-3 and Dolby
Digital are registered trademarks of
the Dolby Laboratories Licensing
.
Corp
Accessories supplied
Operating manual
Remote control
Aerial cable
Power cable
SCART cable from Revox
Knurled screws ( Phono earth)
TORX screw driver
24
Page 26

Introduction Re:system M51 II
Remote Table
DVD/CD
FM Tuner
TV/Video
Aux-1 /
Phono
Aux-2
Aux-3
Rec-In
Optical
Coaxial
Server
Video-1
Video-2
Video-3
DVD
Tuner
Tape
Aux1
Aux2
Aux3
Local
TV
TV-Hold
Video1
Video2
Video3
Video4
Video-4
Video-5
Video-6
Disabled
Introduction M51 MK2 Operating instructions / Part no.: 10.30.3062
25
 Loading...