

Page 1
Model Number: REJCPTZ-2
REVO AMERICA
700 FREEPORT PARKWAY SUITE 100
COPPELL TX 75019 U.S.A TEL:1-866-625-REVO(7386)
PTZ KEYBOARD CONTROLLER SYSTEM
Please read this user manual carefully before installing or operating the unit
Page 2

©2013 REVO America
All rights reserved. No part of this document may be reproduced in any form or by
any electronic or mechanical means, including information storage and retrieval
systems, without written permission from REVO America.
Design and specifications are subject to change without notice.
Page 3

Quick Reference Commands
Part I Introduction
Keyboard Introduction ------------------------------------------------1
Keyboard Function ----------------------------------------------------1
Buzzer --------------------------------------------------------------------2
Quick Start Steps---------------------------------------------------------2
Part II Installation and Connection
Accessories---------------------------------------------------------------4
Size ------------------------------------------------------------------------5
Keyboard Explanation -----------------------------------------------5
Power On ----------------------------------------------------------------7
Keyboard Hints ---------------------------------------------------------7
Part III Keyboard Setup
Keyboard Setup --------------------------------------------------------8
How to Set up -----------------------------------------------------------8
Menu Index --------------------------------------------------------------9
Part IV Control of PTZ Camera
Connection between Keyboard and PTZ camera --------------- 11
Control PTZ Camera through Keyboard ------------------------ 12
Functional Keys Introduction -------------------------------------- 12
PTZ Camera Control Command Index -------------------------- 15
Dome Menu Operation ---------------------------------------- 16
Menu Operation ------------------------------------------------ 16
Content
----------------------------------- I
Page 4
Part V Appendix
Appendix A RS485 Bus Basic Knowledge ------------------------ 18
Appendix B Technology Parameters -------------------------- 20
If using REVO REJCPTZ-2 keyboard with NON REVO camera
please make sure Protocol and Baud Rate for keyboard and camera
match.
Keyboard by default is REVOTRAX protocol and 9600 Baud.
Most PTZ Cameras from other manufactures are Pelco D and 2400
baud by default.
See Part III “Keyboard Setup” for complete instructions.
To Change settings, remove power from keyboard. While holding
the Shift and F1 keys apply power back to keyboard.
Release keys when screen displays “Keyboard Set”.
Press Enter to make changes to menu. Continue pressing Enter to
change the value.
Pressing F1 will change the category. (Protocol, Baud, etc.)
Pressing Cancel will save and exit.
WARNING: DO NOT CONNECT THE KEYBOARD’S “COM” PORT TO ANY
INTERNET PROTOCOL DEVICE OR COMPUTER NETWORK!
ATTENTION!
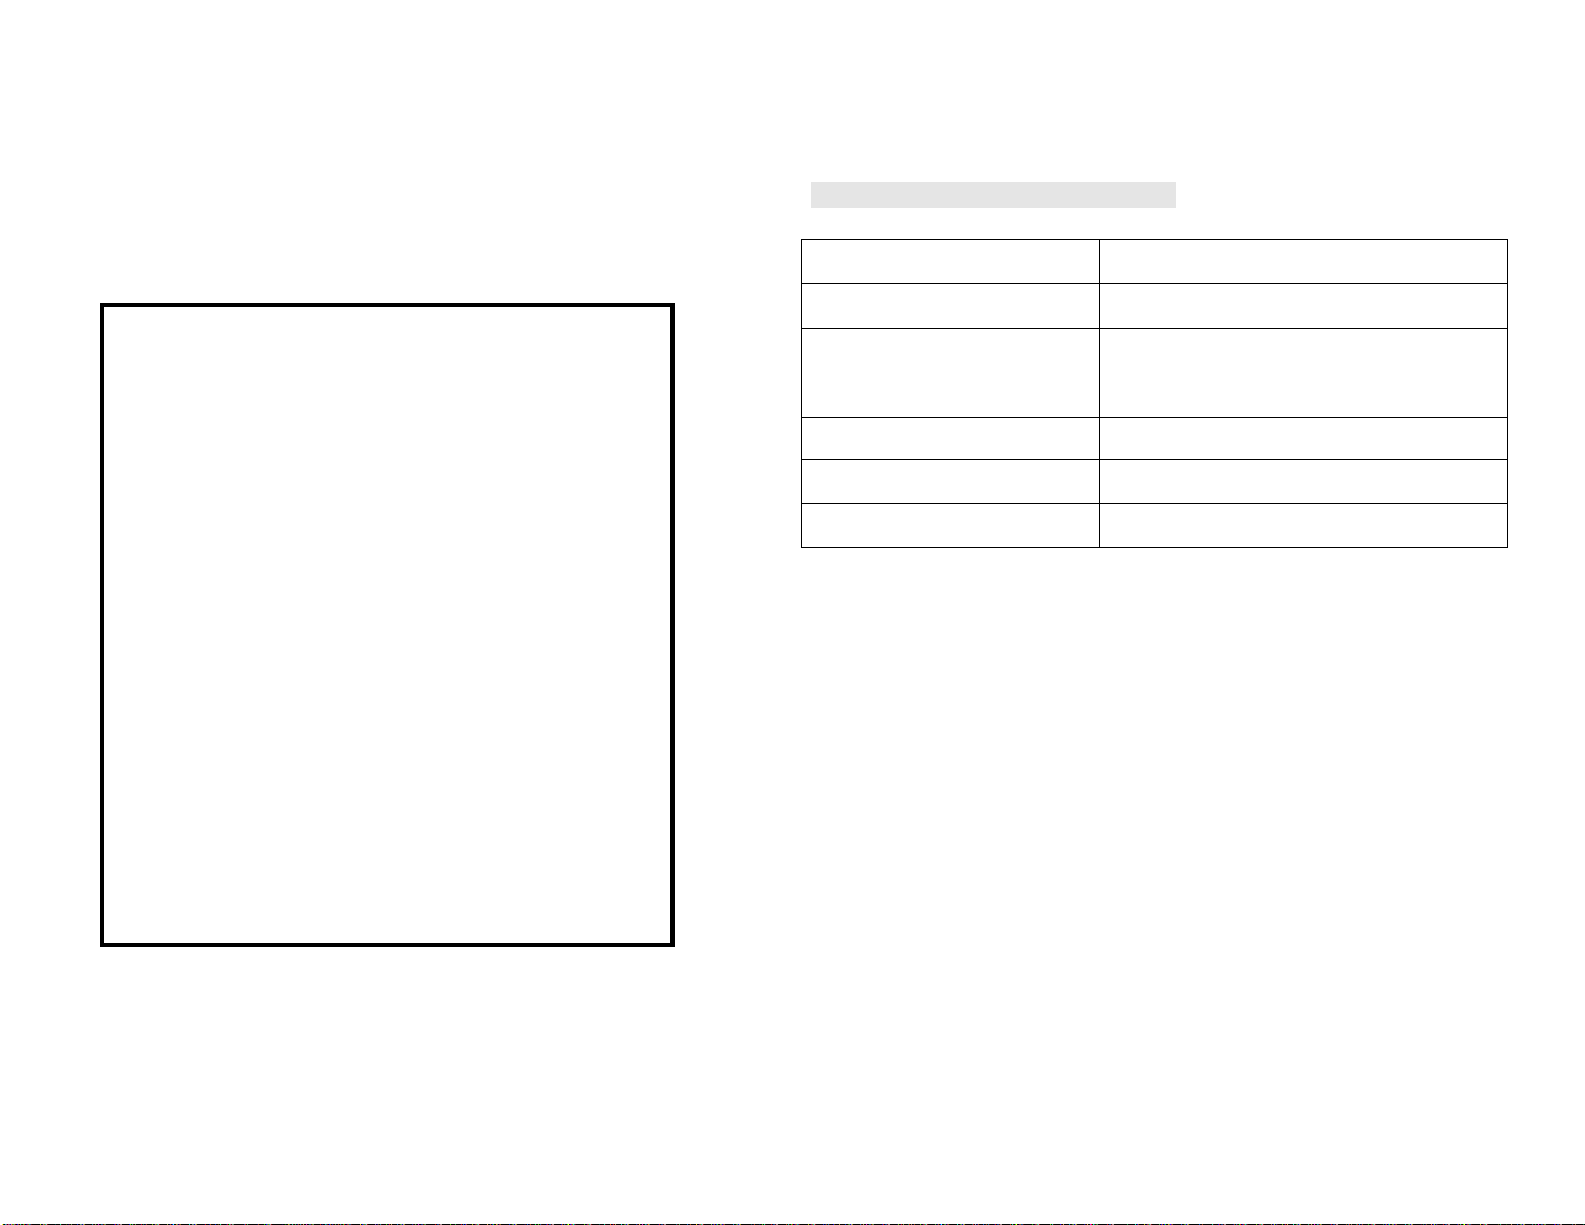
Appendix B Technology Parameters
LCD display English
Joystick Up/Down, Right/Left, Twist, Pushbutton.
Digital Communication RS485 half-duplex
REVOTRAX, Pelco D, Pelco P
(default = REVOTRAX)
Baud rate 1200, 2400, 4800, 9600 (default = 9600)
Power supply DC12V/1000mA
Power 4.5W
20
Page 5
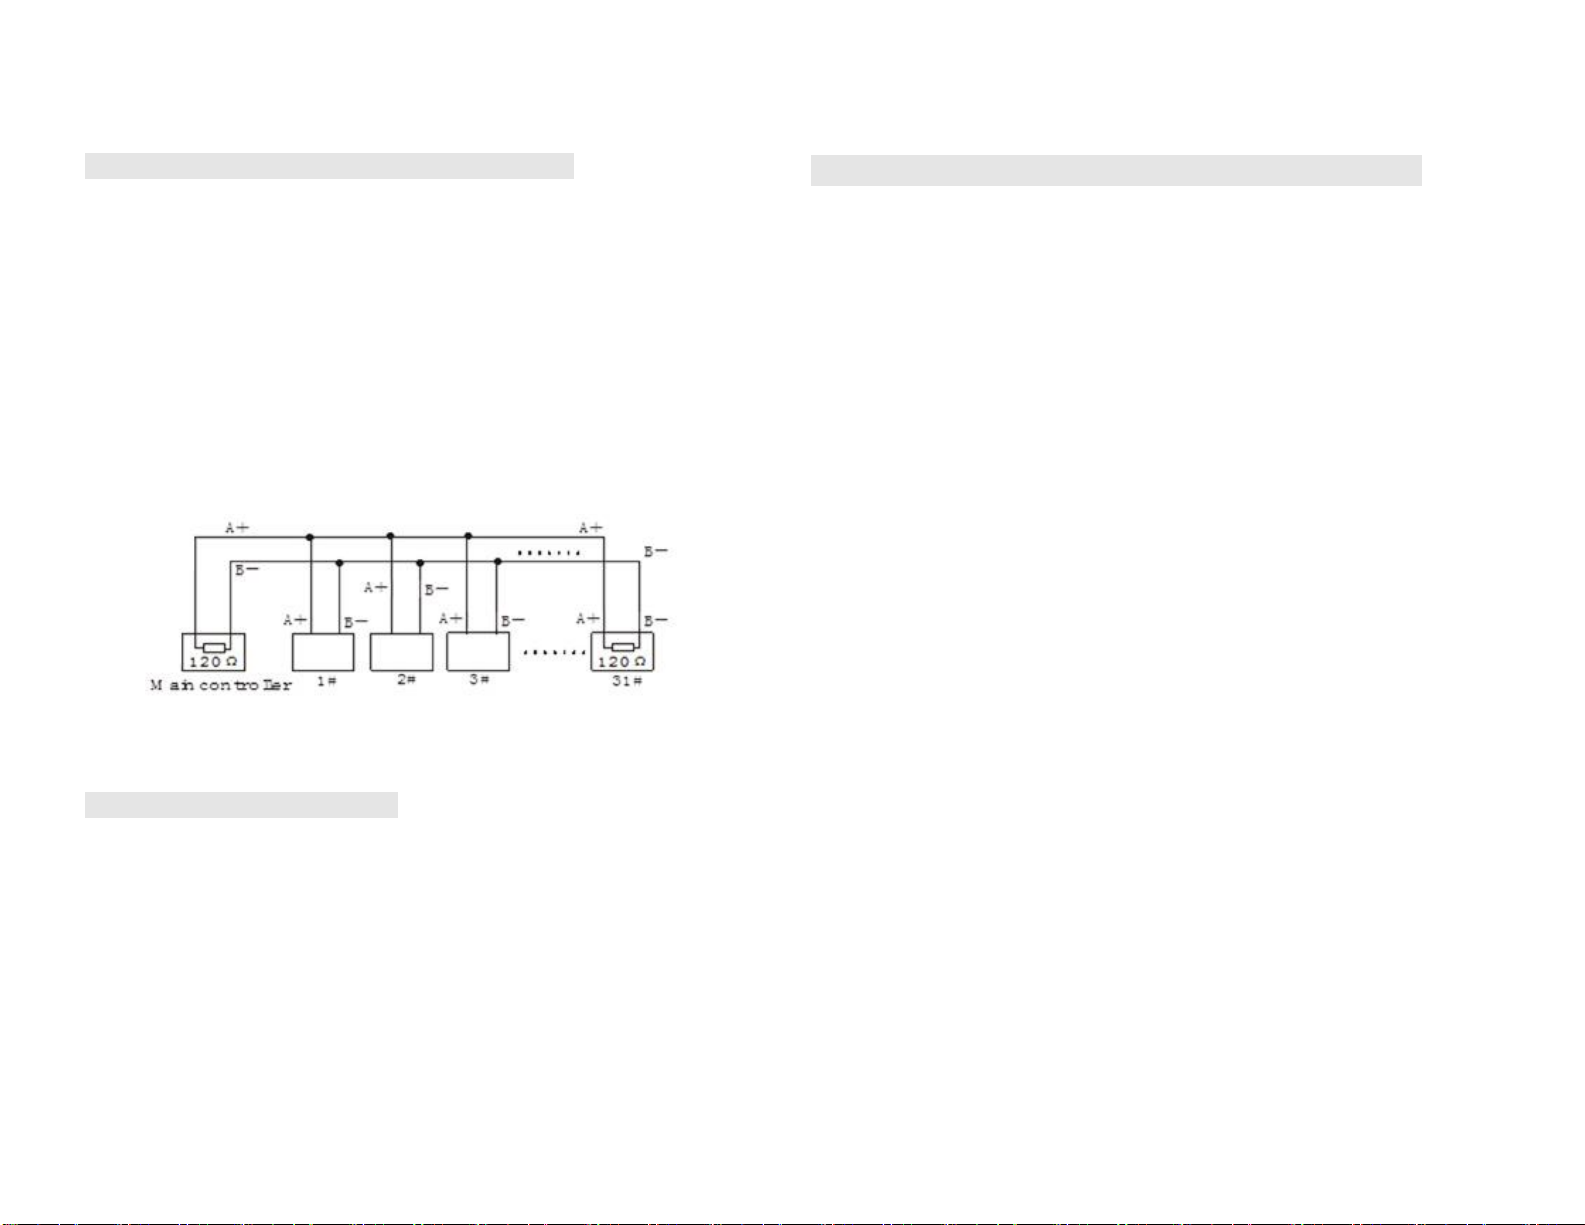
3. Element Connection and Termination Resistors:
The RS485 standard requires a daisy-chain connection between the
connected elements.
For reliable operation, there must be 120 Ohm termination resistors present at
both ends of the RS485 bus. (Refer to the following illustration.)
The last PTZ camera on the bus (the camera furthest from the controlling
device) should have its termination resistor enabled. On most cameras, the
termination resistor is enabled or disabled using a configuration switch on the
PTZ camera.
Only two termination resistors are allowed to be present on any RS485 bus.
The PTZ keyboard does not have a termination resistor.
4. Problems with RS485 Wiring:
Quick Reference for PTZ Camera Control Commands
All directions (up/down, right/left), twist, and pushbutton functions are present
on the joystick
Pressing the【CTRL】key acts as a turbo mode, momentarily speeding up the
camera’s pan and tilt functions
P/T right or left, up or down:【Joystick】move to right or left, up or down
Lens zoom:【Joystick】counterclockwise or clockwise rotation
Lens Focus:【SHIFT】+【Joystick】move to left or right
Lens Iris:【SHIFT】+【Joystick】move to up or down
Set preset:【#】+【SHIFT】+【PRESET】
Call preset:【#】+【PRESET】
Clear preset:【#】+【SHIFT】+【CANCEL】, CANCEL/OK is displayed
Run Auto Scan:【#】+【AUTO】
Run Tour: 【#】+【TOUR】
Run Pattern:【#】+【SHIFT】+【MENU】
On Command:【#】+【ON】
Off command:【#】+【SHIFT】+【AUTO】
NO. + PGM+ Tour:【#】+【SHIFT】+【TOUR】
NO. + PGM+ Scan:【#】+【ESC】
Press【PRESET】to enter Preset menu
RS485 elements should be daisy-chained together. The RS485 bus should connect the
keyboard to camera 1, camera 1 to camera 2, camera 2 to camera 3, etc.
19
Press【TOUR】to enter Tour menu
Press【MENU】to enter Dome menu
Press【SHIFT】+【MENU】to enter Pattern menu
Press【AUTO】to enter Auto scan menu
Press【SHIFT】+【ESC】to enter Alarm menu
Home key:【SHIFT】+【TOUR】
I
Page 6

Part I
Introduction
■Introduction
■Function
■Application
Keyboard Introduction
This small keyboard provides joystick and keyboard control for one or many
connected PTZ cameras.
The keyboard can be used to control PTZ cameras or similar devices that use the
REVOTRAX, Pelco D or Pelco P protocols. (REVOTRAX is the default protocol.)
The keyboard’s multi-function joystick can control Pan, Tilt, Zoom, Focus, and Iris
adjustments. A twist function and a control (CTRL) button are included.
The keyboard has a built-in backlit LCD screen that displays pertinent information
for easy use.
Keyboard Function
The keyboard is used to control REVO PTZ cameras (using the REVOTRAX
protocol) or other PTZ cameras (using Pelco D or Pelco P protocols).
The default keyboard settings are REVOTRAX, 9600 baud rate, Camera ID= 1
The keyboard’s current set-up information will be displayed on the LCD screen
for two seconds immediately after each power-up.
The keyboard is equipped with one RS-485 communication port and supports
Part V Appendix
Appendix A RS485 Bus Basic Knowledge
Appendix B Technology Parameters
Appendix A: RS485 Bus Basic Knowledge
1. Characteristics of RS485 Bus
As specified, an RS485 bus allows half-duplex data transmission over a pair of wires
having a characteristic impedance of about 120 Ohms. The maximum load capacity is
32 unit loads (this includes the main controller and the controlled equipment).
2. Transmission distances of RS485 Bus
When 24AWG (0.56mm) twisted-pair wires are used as data transmission cable, the
maximum theoretical transmitting distances are as follows:
Baud Rate Transmission Distance (Max.)
2400bps 5,906ft(1800m)
4800bps 3,937ft(1200m)
9600bps 2,625ft(800m)
If the user selects thinner cables, or installs the units in an environment with strong
electromagnetic interference, or connects many devices to the RS485 Bus, the
maximum transmitting distance will be decreased. To increase the maximum
transmitting distance, do the contrary.
1
18
Page 7

Dome Operation (Live Viewing):
half-duplex two ways communication to one or more devices.
Move the joystick to change the camera’s view.
Twist the knob to zoom in or out
Hold【SHIFT】and move the joystick left or right to change the focus
Hold【SHIFT】and move the joystick up or down to change the camera’s
Iris (light or dark exposure)
Hold【CTRL】and move joystick for Turbo speed
Hold【CTRL】and twist left or right to adjust the focus manually
The keyboard has a power input port for 12VDC (1000mA) operation.
Buzzer
The keyboard has a built-in buzzer that can indicate the operation of pressing keys.
The buzzer can be set ON or OFF in the keyboard’s function menu.
Quick Start Steps:
1. Connect the PTZ keyboard to a PTZ camera (or cameras) using twin RS485
wiring.
See Appendix A for proper wiring information.
Ensure that the camera and keyboard each have been powered up and that
the camera’s video output is connected to a monitoring device (a DVR or
monitor).
2. Verify that the Keyboard and PTZ camera settings match.
Make sure the PTZ camera’s protocol and baud rate match the keyboard’s
protocol and baud rate. (Keyboard default = REVOTRAX, 9600 Baud rate.)
Each camera will have a unique ID (1, 2, 3, etc.). This ID is usually set at
the PTZ camera using DIP switches or OSD menu.
Ensure that the keyboard is set to control the desired camera’s ID. The
keyboard’s default ID is 1. To change the keyboard’s command ID to control a
camera with ID=2, press the “2” button on the keyboard, then “Enter”. “0002”
will be displayed in the “CAM” field on the display. Any camera’s ID can be
entered in this way.
17
2
Page 8

3. Move the Joystick, Observe Camera Motion.
If the PTZ camera’s view cannot be changed with the joystick, check the
wiring, protocol, Baud rate, and the camera’s ID.
4. Enable The Camera’s OSD (On Screen Display) Menu.
To access the menu on the PTZ camera, ensure that the keyboard’s “CAM”
number matches the desired PTZ camera, and press the keyboard’s “MENU”
button. The camera’s OSD menu will appear on the video monitoring device.
Press【TOUR】to enter Tour menu
Press【MENU】to enter Dome menu
Press【SHIFT】+【MENU】to enter Pattern menu
Press【AUTO】to enter Auto scan menu
Press【SHIFT】+【ESC】to enter Alarm menu
Home key:【SHIFT】+【TOUR】
ESC key:【ESC】
Enter key:【ENTER】
Menu Control (Inside camera menu):
Twisting the joystick changes the alpha-numeric characters when entering
naming information.
Dome Menu Operation:
Press MENU to enter the dome’s OSD.
Up Joystick: Moves cursor up
Down Joystick: Moves cursor down
Twist Joystick Right: Moves cursor right, activates” Save and Exit” in some
menus.
Twist Joystick Left: Moves cursor left, activates” Save and Exit” in some
menus.
CTRL or Right Joystick: Selects a menu item.
ESC cancels a menu item, or functions as a “Back” command.
3
16
Page 9

PTZ Camera Control command Index
Control of a PTZ camera:
All directions on the joystick are functional
Pressing the Control key acts as a turbo mode, momentarily speeding
up the camera’s pan and tilt functions
P/T right or left:【Joystick】move to right or left
P/T up or down:【Joystick】move up or down
Lens Zoom:【Joystick】twist counterclockwise or clockwise
Lens Focus:【SHIFT】+【Joystick】move to left or right
Lens Iris:【SHIFT】+【Joystick】move to up or down
Set preset:【#】+【SHIFT】+【PRESET】
Call preset:【#】+【PRESET】
Clear preset:【#】+【SHIFT】+【CANCEL】, then select 【OK】
to clear preset
Run Auto Scan:【#】+【AUTO】
Run Tour:【#】+【TOUR】
Run Pattern:【#】+【SHIFT】+【MENU】
On Command:【#】+【ON】
Off command:【#】+【SHIFT】+【AUTO】
NO. + PGM+ Tour:【#】+【SHIFT】+【TOUR】
NO. + PGM+ Scan:【#】+【ESC】
Part II
Installation, Connection and Setting
■Accessories
■Size
■Introduction
■Power On
■Keyboard Hints
Installation, Connection and Setting
Before installation, please check to see that all accessories are present. If not, contact
your supplier.
Accessories:
Keyboard: 1 unit.
Power supply: 1 unit (AC110/220V input DC12V/1000mA output).
Testing cable: 1 piece (Two wires for (“A” or “+”) and (“B” or “-“) connections.)
User Manual: qty. 1
When Data is 0000,
Press【PRESET】to enter Preset menu
15
4
Page 10

Size: (Units: mm)
Keyboard Explanation:
Keyboard Front Panel:
12 + On Digital zoom on
12 + Menu Digital zoom off
13 + On Digital OSD on
13 + Menu Digital OSD off
150 + On Image Flip on
150 + Menu Image Flip off
151 + On Origin check
152 + On Place camera at 0 degrees horizontal
153 + On Go to the slow speed mode
153 + Menu Go to the normal speed mode
154 + On Display system information
155 + On Flip the camera 180 degrees horizontally
Another shortcut code, used with the PRESET key, is:
250 + PRESET: Factory setup menu (Dwell Time, Answer Delay)
【F1】Used to access and navigate the keyboard’s menu. See Part III – Keyboard
Setup.
【SHIFT】Used in combination with other keys. Hold【SHIFT】down and press the
next key to active an alternate function for that key.
5
14
Page 11

【#】+【PRESET】: The camera moves to Preset #.
Number Area:
【SHIFT】+【PRESET】: No function
【#】+【SHIFT】+【PRESET】: Shortcut to create a preset at value #
(Cancel/OK is displayed)
【250】+【PRESET】: Factory setup menu(Dwell Time, Answer Delay)
【AUTO】Brings up Auto scan setup menu
【AUTO】: Auto scan setup menu is displayed
【#】+【AUTO】:Auto scan # is started
【SHIFT】+【AUTO】: No function
【#】+【SHIFT】+【AUTO】: Writes to Preset# without asking for confirmation
【CANCEL】Exit Keyboard menu or clear data
【CANCEL】: Exit keyboard menu or exit key test menu
【#】+【CANCEL】: No function
【SHIFT】+【CANCEL】: No function
【#】+【SHIFT】+【CANCEL】Clear Preset # (Preset clear cancel/OK is displayed)
【ENTER】Confirm key or used to change value in some submenu
【ENTER】: Enter into keyboard menu, key test menu; change protocol,
baud rate, sound when entering corresponding submenu
【#】+【ENTER】: Change camera ID to # (when using more than
Number keys: 1, 2, 3, 4, 5, 6, 7, 8, 9, 0
Delete key: CANCEL
Confirmation key: ENTER
Function Area:
P/T Key: PRESET, MENU, AUTO, TOUR, ON,ESC
Special Function: F1
Assistant Function Key: SHIFT
Joystick: To control Pan and Tilt (Up/Down, Left/Right). Twist for zoom in
and out. Hold the CTRL button to increase the Pan/Tilt speed.
LCD Screen: Displays data.
CTRL key is on the top of the Joystick.
Keyboard Back Panel:
one PTZ camera)
【SHIFT】+【ENTER】: No function
【#】+【SHIFT】+【ENTER】: No function
【ON】This key can be used for some shortcuts.
Some shortcuts that work with the REVO 22x PTZ camera are shown below.
Other cameras may have similar shortcuts.
13
NOTE: The port marked “COM” has no function. Do not connect anything to this
port.
WARNING: DO NOT CONNECT THE KEYBOARD’S “COM” PORT TO ANY
INTERNET PROTOCOL DEVICE OR COMPUTER NETWORK!
6
Page 12

Back Port Function Introduction:
RS485 Port: Connect to the communication port(s) of other devices
(i.e. PTZ cameras).
Power Port: (12V @1000mA)
Green LED (on COM port): No user function.
Yellow LED (on COM port): Flickers when joystick is operated.
Power On:
Use the included DC12V 1000mA wall adapter to supply power to the keyboard.
Power on:
1. The keyboard will beep to indicate that it has powered up successfully.
2. The LCD screen will briefly display the communication protocol and baud
rate:
REVOTRAX
9600
Protocol
Baud rate
Keyboard hints:
Audible Annunciator:
The keyboard will beep one time to indicate each key press.
The keyboard will quickly beep multiple times to indicate an incorrect
operation.
7
Control PTZ Camera through Keyboard
Functional Keys Introduction:
【MENU】Brings up the camera’s menu when pressed
【MENU】: Camera’s menu is displayed on the video monitor
【#】+【MENU】: No function
【SHIFT】+【MENU】: Pattern Setup is displayed
【#】+【SHIFT】+【MENU】: Pattern # is started
【ESC】Normally escapes without saving changes when in camera menu mode
【ESC】: Exit and without saving changes
【#】+【ESC】: Auto scan setup # is displayed.(For # 1,2,3,4,5. 5 brings up auto
scan 9)
【SHIFT】+【ESC】: No function
【#】+【SHIFT】+【ESC】: No function
【 CTRL】 Activates the CTRL function(Either toggles or holds, depending on
function)
In PTZ control mode, holding the CTRL key increases the speed of the PTZ’s
movement
【TOUR】Brings up the Tour setup menu (If 0+Tour)
【TOUR】: The camera’s Tour setup is displayed.
【#】+【TOUR】: Tour # is started.
【SHIFT】+【TOUR】: Home function
【#】+【SHIFT】+【TOUR】: # Tour setup is displayed
【PRESET】Call or Set preset position and setup preset menu
【PRESET】: The preset setup menu is displayed
12
Page 13

Part IV Control of PTZ Camera
Part III
■ Connection between keyboard and PTZ camera
■ Control PTZ camera through keyboard
■ PTZ Camera control command index
RS485 Connection between keyboard and PTZ camera
Ensure the keyboard’s control Protocol and Baud rate (Default: REVOTRAX
protocol and 9600 Baud rate) matches the connected PTZ camera(s).
If different protocols or baud rates are needed, change them in the keyboard menu
set up. (See Section III – Keyboard Setup).
Ensure that all RS485 connections are correct – One wire should be connected to
all “A” (or “+”) contacts, and the other wire should be connected to all “B” (or “-“)
contacts. It’s not necessary to use the “G” (ground) terminal on the RS-485 connector
when connecting the keyboard to the other devices.
Keyboard Setup
■Setting Key
■Setting Procedure
■Menu Index
Joystick calibration, Protocol, Baud Rate, Camera ID and other functions can be set up
in the “Keyboard Set” mode.
Setting Keys: (Keys will be used)
【CANCEL】 Delete key/Exit key
【ENTER】 Confirmation key
【F1】 Special function key
【SHIFT】 Assistant function key
How to Set up
While holding the【SHIFT】+【F1】keys down at the same time, apply power to the
keyboard. The protocol and Baud rate will be displayed for a few seconds. Continue
holding the keys down, and the keyboard will enter the “Keyboard Set” mode.
Keyboard set
Enter to menu
Release the SHIFT and F1 keys and press “Enter” to change the keyboard’s settings.
Press【F1】to go to the next menu option (1, 2, 3, etc.). Press【CANCEL】to exit the
set-up menu. Press【ENTER】to change the setting or confirm setting information.
11
8
Page 14

Menu Index:
Ke yb o a r d s et
E n t er t o men u
Press【ENTER】to enter
into keyboard menu
Press【Cancel】to exit the menu.
1. Pr o t o c o l:
REVOTRAX
2. B a u d R a t e :
9600
3. S o u n d :
ON
4. L a n g u a g e :
English
5. J o y s t i ck Set:
M:000 M:000 M:000
6. Ke y Te s t
7. D e f a u l t S et
Vers i o n 1 . 0
Press【ENTER】to change the protocol. REVOTRAX is default; Pelco D and
Pelco P are optional.
Press【F1】to save setting and enter the next sub-menu.
Press【ENTER】to change the Baud rate: 1200/2400/4800/9600 (9600 is
default) . Press【F1】to save setting and enter the next sub-menu.
Press【ENTER】to turn the sound On or Off.
Press【F1】to save setting and enter into next sub-menu
Only English is available.
Press【F1】to save setting and enter into next sub-menu
Move the joystick and press the indicated button to calibrate the joystick.
Press【5】to Reference (hands-off) value; Press【2】to Up limit value
Press【8】to Down limit value; Press【4】to Left limit value
Press【6】to Right limit value;
Press【7】to counterclockwise twist limit value.
Press【9】to clockwise limit value
Press【ENTER】to enter into key test. Press any key and it will be displayed
on the LCD screen. Press【CANCEL】to exit key test.
Press【ENTER】to restore the keyboard’s factory settings.
Display the keyboard’s software version.
9
10
 Loading...