

REVELL US GATO Class Sub User Manual [bg, ru, ja, cs, zh, gr, en, ar, ch, da, de, nl, en, es, es, et, he, hi, hr, id, kk, ko, lv, lt, mk, hu, ms, gr, no, fa, pl, pt, pt, ro, sr, sq, sk, fi, sv, th, ch, tr, vi]
Page 1
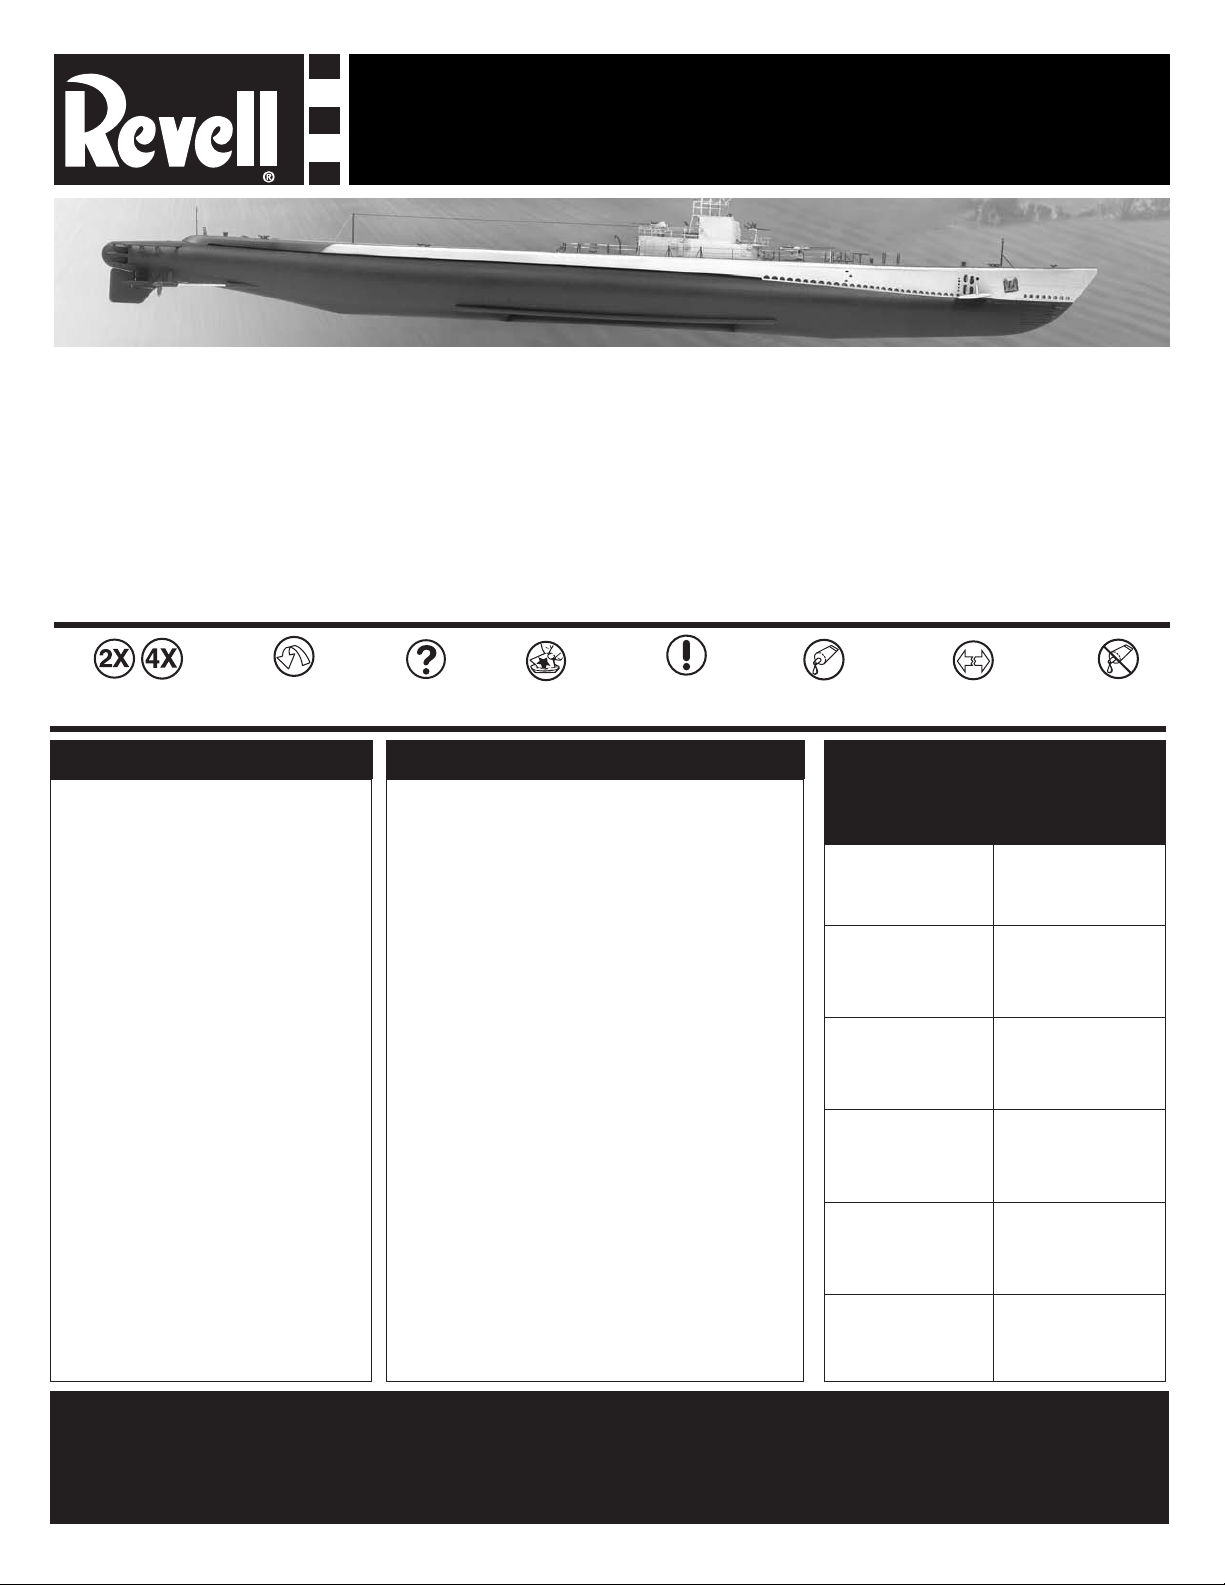
KIT 0384 85038410200
U.S. GATO CLASS
SUBMARINE
In the first few months immediately following the Japanese attack on
Pearl Harbor, it was the U. S. Navy’s submarine force that began unlimited
warfare against Japan. While the surfaces forces regrouped, the submarines
began attacking Japanese shipping across the Pacific. Throughout the war,
American submarines sunk the warships of the Imperial Japanese Navy and
cut the lifeline of merchant vessels that provided Japan with oil and other
vital raw materials. They also performed other important missions like staging
commando raids and rescuing downed pilots. The most successful of the
U. S. fleet submarines during World War II were those of the GATO class.
Designed to roam the large expanses of the Pacific Ocean, these submarines
were powered by two Diesel engines, generating 5,400 horse power for
operating on the surface, and batteries provided power while submerged.
Gato class submarines could reach speeds of over twenty knots on the
* REPEAT SEVERAL TIMES
* A REPETER PLUSIEURS FOIS
READ THIS BEFORE YOU BEGIN LIRE CE QUI SUIT AVANT DE COMMENCER
* Study the assembly drawings.
* Each plastic part is identified by a number.
* In the assembly drawings, some parts will be
marked by a star (H) to indicate chrome
plated plastic.
* For better paint and decal adhesion, wash
the plastic parts in a mild detergent solution.
Rinse and let air dry.
* Check the fit of each piece before cementing
in place.
* Use only cement for polystyrene plastic.
* Scrape plating and paint from areas
to be cemented.
* Allow paint to dry thoroughly before
handling parts.
* Any unused parts may be discarded.
DECAL APPLICATION INSTRUCTIONS
1. Cut desired decal from sheet.
2. Dip decal in water for a few seconds.
3. Place wet decal on paper towel.
4. Wait until decal is movable on paper backing.
5. Place decal in position on model, face up and
slide backing away.
6. Press out air bubbles with a soft damp cloth.
7. Milkiness that may appear is for better decal
adhesion and will dry clear. Wipe away any
excess adhesive.
8. Do not touch decal until fully dry.
9. Allow the decals 48 hours to dry before
applying clear coat.
NOTE: Decals are compatible with setting
solutions or solvents.
* REPEAT PROCEDURE
* REPETEZ LE PROCEDE
* OPTIONAL PARTS
`` ` ` ` `
* PIECES EN OPTION
* Etudier les schémas de montage.
* Chaque pièce en plastique est identifiée par un numéro.
* Sur les schémas de montage, certaines pièces sont
marquées d'une étoile (H) pour indiquer qu'elles sont en
plastique chromé.
* Pour une meilleure prise de la peinture et des autocollants,
laver les pièces en plastique avec une solution détergente
peu concentrée. Les rincer et les laisser sécher à l'air.
* Vérifier que chaque pièce s'ajuste bien avant
de la coller en place.
* N'utiliser que de la colle pour polystyrène.
* Gratter les parties à coller pour enlever le chrome et la peinture.
* Laisser la peinture bien sécher avant de manipuler les pièces.
* Toute pièce inutilisée peut être jetée.
DIRECTIVES D'APPLICATION DES AUTOCOLLANTS
1. Découper l'autocollant désiré de la feuille.
2. Tremper l'autocollant dans de l'eau pendant quelques secondes.
3. Placer l'autocollant mouillé sur une serviette en papier.
4. Attendez que l'autocollant puisse être déplacé sur son support
en papier.
5. Mettre l'autocollant en position sur le modèle face sur
le dessus et faire glisser le support pour l'enlever.
6. Appuyer avec un chiffon doux humide pour éliminer les bulles d'air.
7. La substance laiteuse qui peut apparaître est destinée à
améliorer l'adhésion de l'autocollant et devient incolore au
séchage. Essuyer pour enlever tout excédent d'adhésif.
8. Ne pas toucher l'autocollant tant qu'il n'est pas bien sec.
9. Laisser l'autocollant sécher pendant 48 heures avant
d'appliquer une couche transparente.
REMARQUE: Les autocollants sont compatibles avec les
* DECAL
* DECAL COMANIE
solutions de fixage ou les solvants.
*ATTENTION D ASSEMBLEE
surface and nine knots under water. Their primary armament consisted
of twenty-four 21-inch torpedoes which could be fired from six tubes in the
bow and four in the stern. Most GATO class submarines typically carried
one 3-inch, one 4-inch, or one 5-inch deck gun. To defend against aircraft
while on the surface, one or two 40-mm guns were usually fitted, and
these were supplemented by 20mm cannon as well as .50 caliber and
.30 caliber machine guns. Gato class subs were 311'9" long, displaced
2,415 tons while submerged, and carried a crew of eighty-five men.
Your hightly detailed Revell 1/72nd scale kit can be used to build one of
four different WWII GATO class submarines: USS COBIA, SS-245, USS
GROWLER, SS-215, USS SILVERSIDES, SS-236, and the USS FLASHER,
SS-249. Decals include hull markings and victory/signal flag sets for each boat.
* ASSEMBLY CAUTION
* CEMENT TOGETHER
* A COLLER
* REMOVE AND THROW AWAY
* A RETIRER ET JETER
* DO NOT CEMENT
* NE PAS COLLER
This optional paint guide is provided if
you choose to detail paint your model.
Ce guide de peinture vous sera fourni si vous choisis-
sez de peindre votre modèle en détail.
Light Gray
Light Ghost Gray
Semigloss Black
Silver
Flate White
Brass
Gris clair
Gris Fantóme clair
Noir satiné
Argent
Blanc mat
Laiton
If you have any questions or comments, call our hotline at: (800) 833-3570
or, please write to:
Revell Inc Consumer Service Department, 1850 Howard Street Unit A, Elk Grove Village, Illinois 60007
Be sure to include the plan number (85038410200), part number, description, your return address and phone number.
Visit our website: www.revell.com
Revell Inc Elk Grove Village, IL. Copyright © 2010. All rights reserved.
Page 2
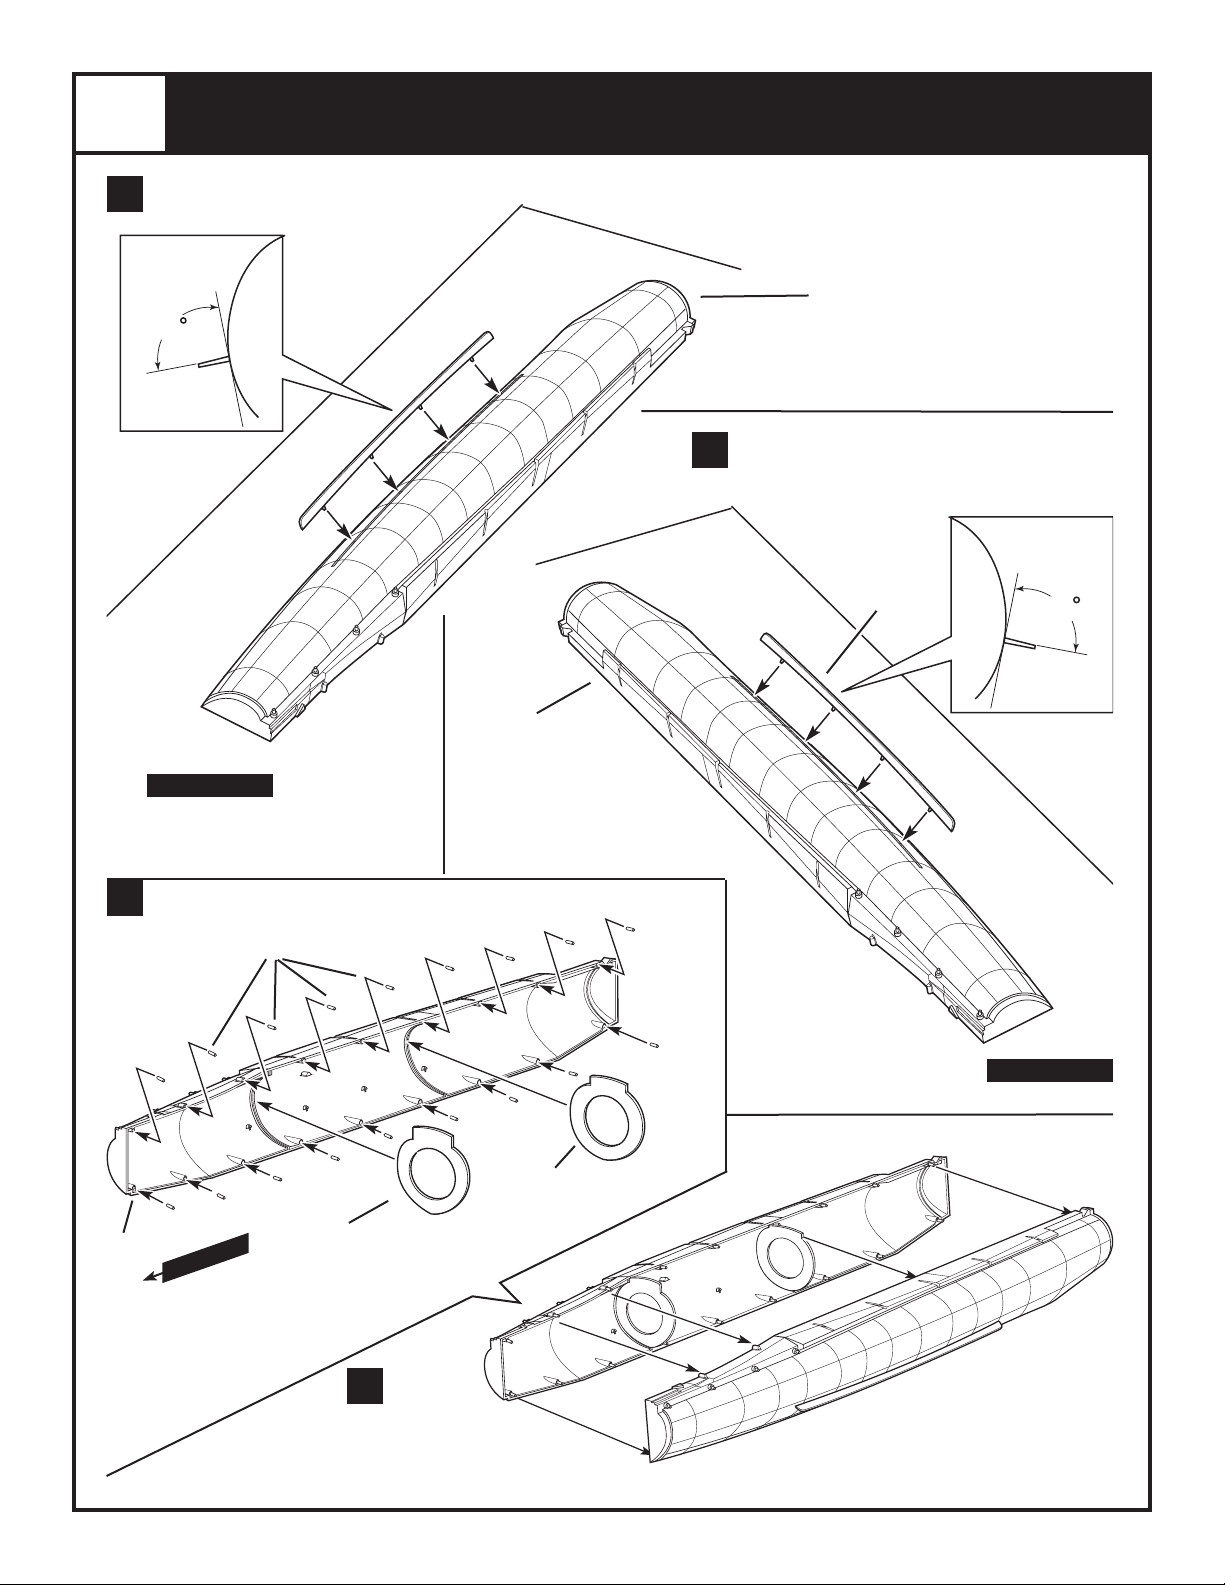
1
90
90
A
KEELS / HULL ASSEMBLY
2
RIGHT
CENTRAL HULL
see paint
guide
20
BILGE KEEL
see paint
guide
FORWARD
C
32
HULL ASSEMBLY
PINS
(18)
1
LEFT
CENTRAL HULL
see paint
guide
B
20
BILGE KEEL
see paint
guide
#2
FORWARD
183
FRONT
BULKHEAD
FORWARD
184
REAR
BULKHEAD
D
Page 3
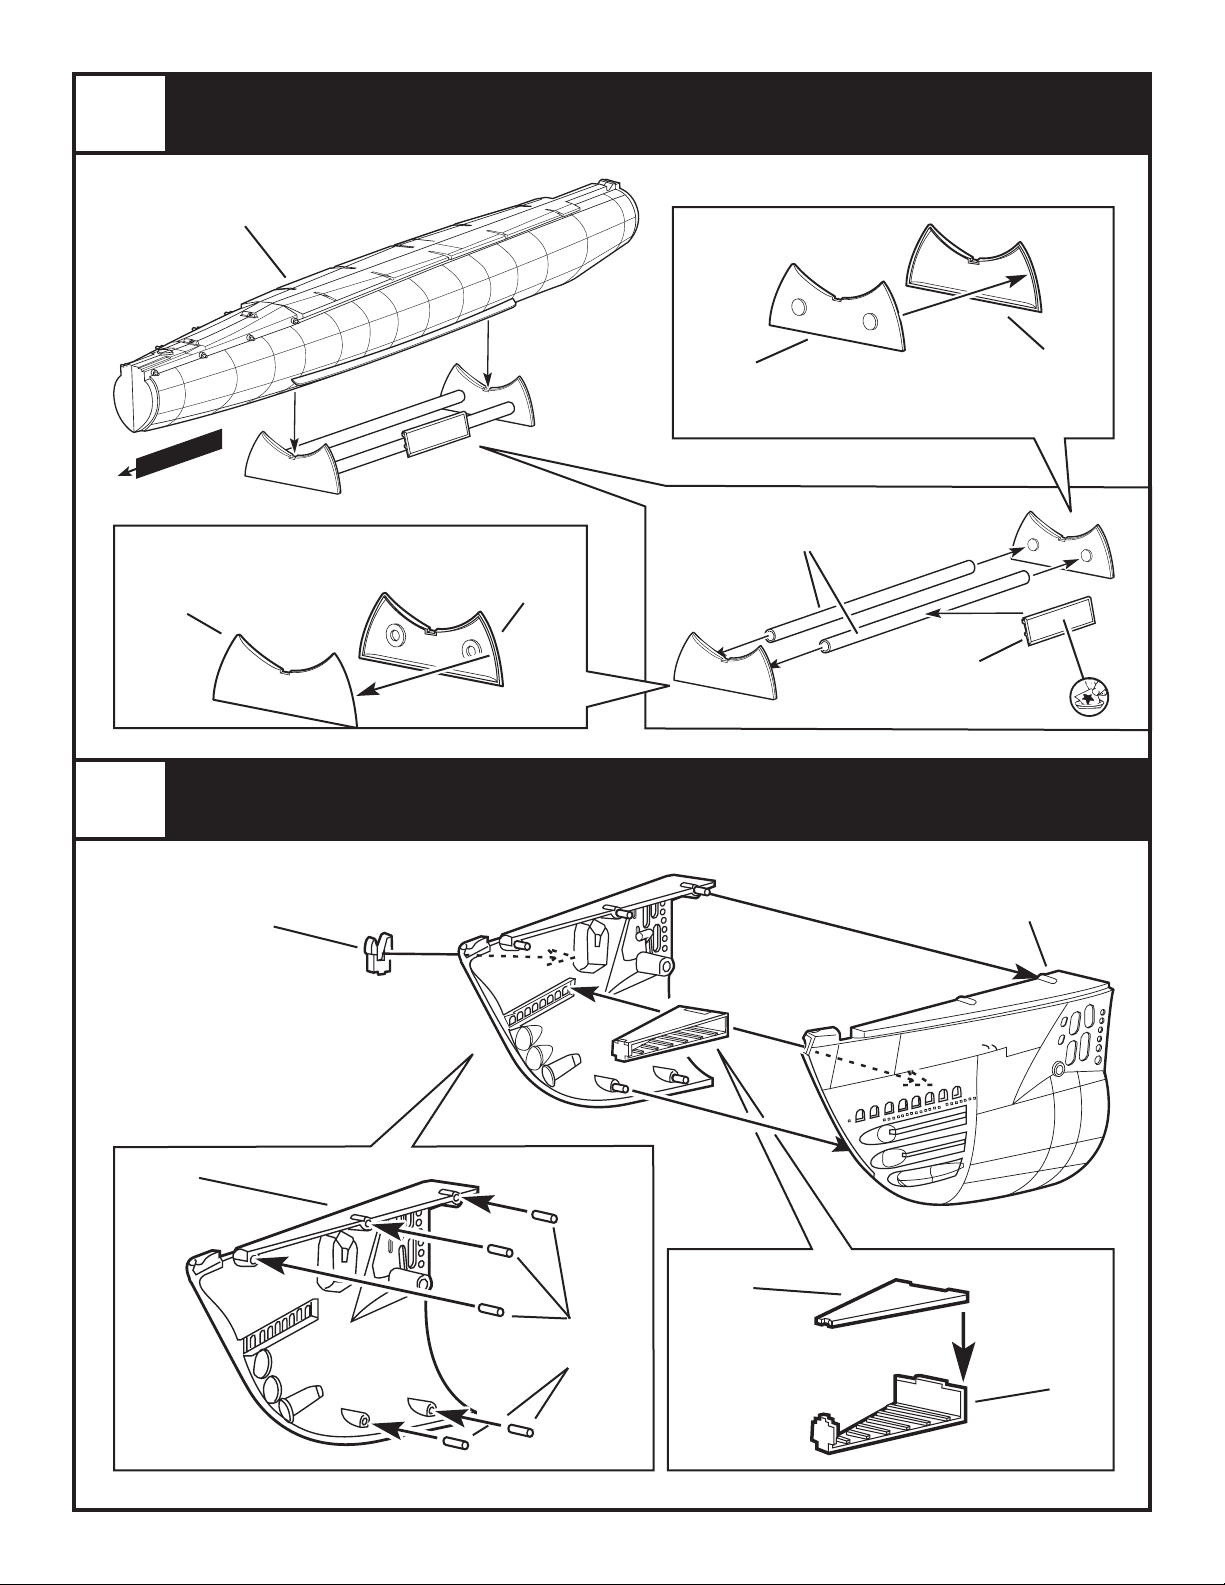
2
STAND ASSEMBLY
SUB HULLS
FORWARD
FRONT BASE
(OUTSIDE)
SEMIGLOSS BLACK
3
181
SEMIGLOSS
12
ANCHOR
BLACK
186
REAR BASE
(INSIDE)
SEMIGLOSS BLACK
BASE TUBES
180
FRONT BASE
(INSIDE)
SEMIGLOSS BLACK
SEMIGLOSS BLACK
BOW ASSEMBLY
SEMIGLOSS BLACK
182
NAME PLATE
SEMIGLOSS BLACK
FORWARD HULL
187
REAR BASE
(OUTSIDE)
3
LEFT
4
RIGHT
FORWARD HULL
32
HULL ASSEMBLY
PINS
13
TOP FORWARD
VENT CAP
14
BOTTOM
FORWARD
VENT CAP
Kit 0384 - Page 3Kit 0384 - Page 22
Page 4
4
BOW PLANES ASSEMBLY
A
23
BOW PLANE
PIVOT
SEMIGLOSS BLACK
LEFT
22
RIGHT
BOW PLANE
LIGHT GRAY
FORWARD
HULLS
B
23
BOW PLANE
PIVOT
SEMIGLOSS BLACK
CEMENT SNAP PIVOTS
TOGETHER IN CENTER
PIVOTS SNAPS TOGETHER IN CENTER
FIRST
C
24
BOW PLANE
STRUT
SEMIGLOSS
BLACK
21
BOW PLANE
SEMIGLOSS
BLACK
FIRST
STRAIGHT EDGE AFT
RIGHT
22
LEFT
BOW PLANE
SEMIGLOSS
BLACK
24
BOW PLANE
STRUT
SEMIGLOSS
BLACK
21
BOW PLANE
LIGHT GRAY
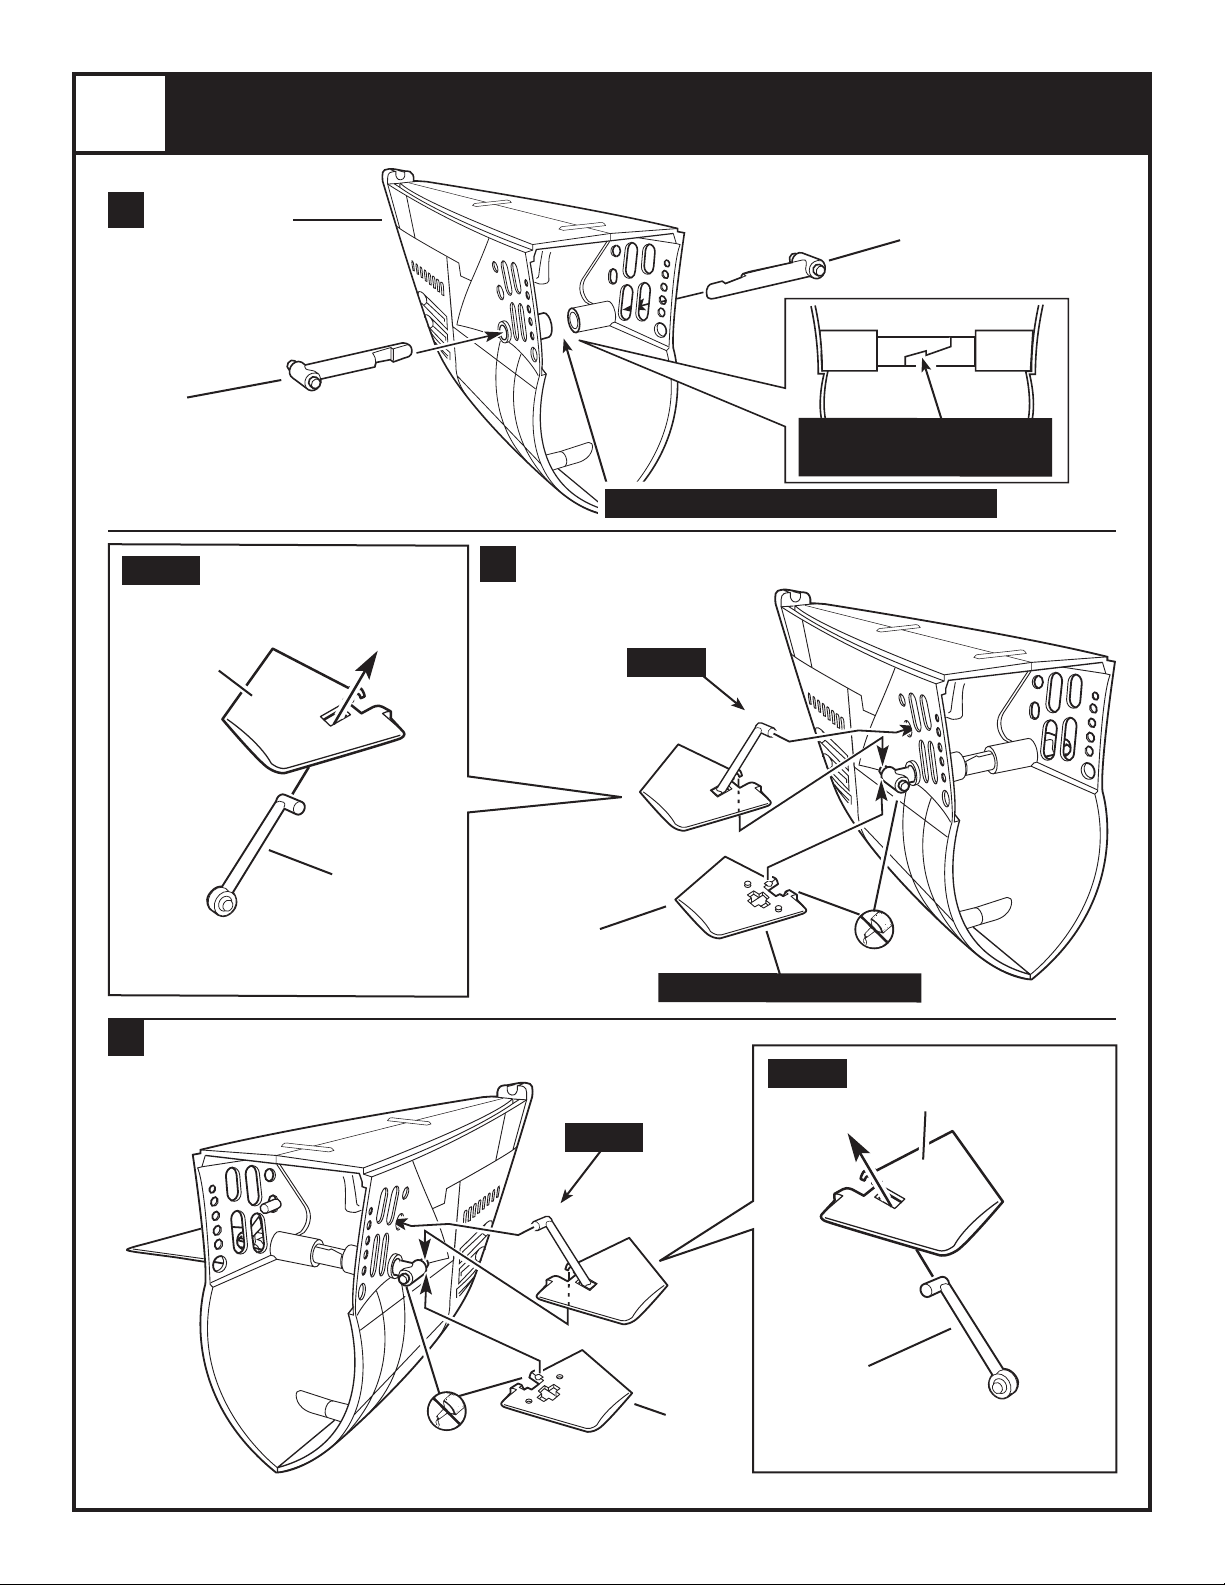
Page 5
5
REAR AFT ASSEMBLY
A
RIGHT
AFT HULL
D
HULL ASSEMBLY
6
(NOT USED)
32
PINS
32
HULL ASSEMBLY
PINS
32
HULL ASSEMBLY
PINS
29
REAR
TORPEDO TUBE
DOORS
B
SEMIGLOSS
BLACK
(ON BOTTOM)
C
33
ACCESS HATCH
SEMIGLOSS
BLACK
25
AFT PLANES
LIGHT GRAY
(ON TOP)
PROPELLER STRUTS
19
SEMIGLOSS BLACK
26
RUDDER
SEMIGLOSS
BLACK
6
RIGHT
PROPELLER
SEMIGLOSS BLACK
5
LEFT
AFT HULL
SEMIGLOSS
BLACK
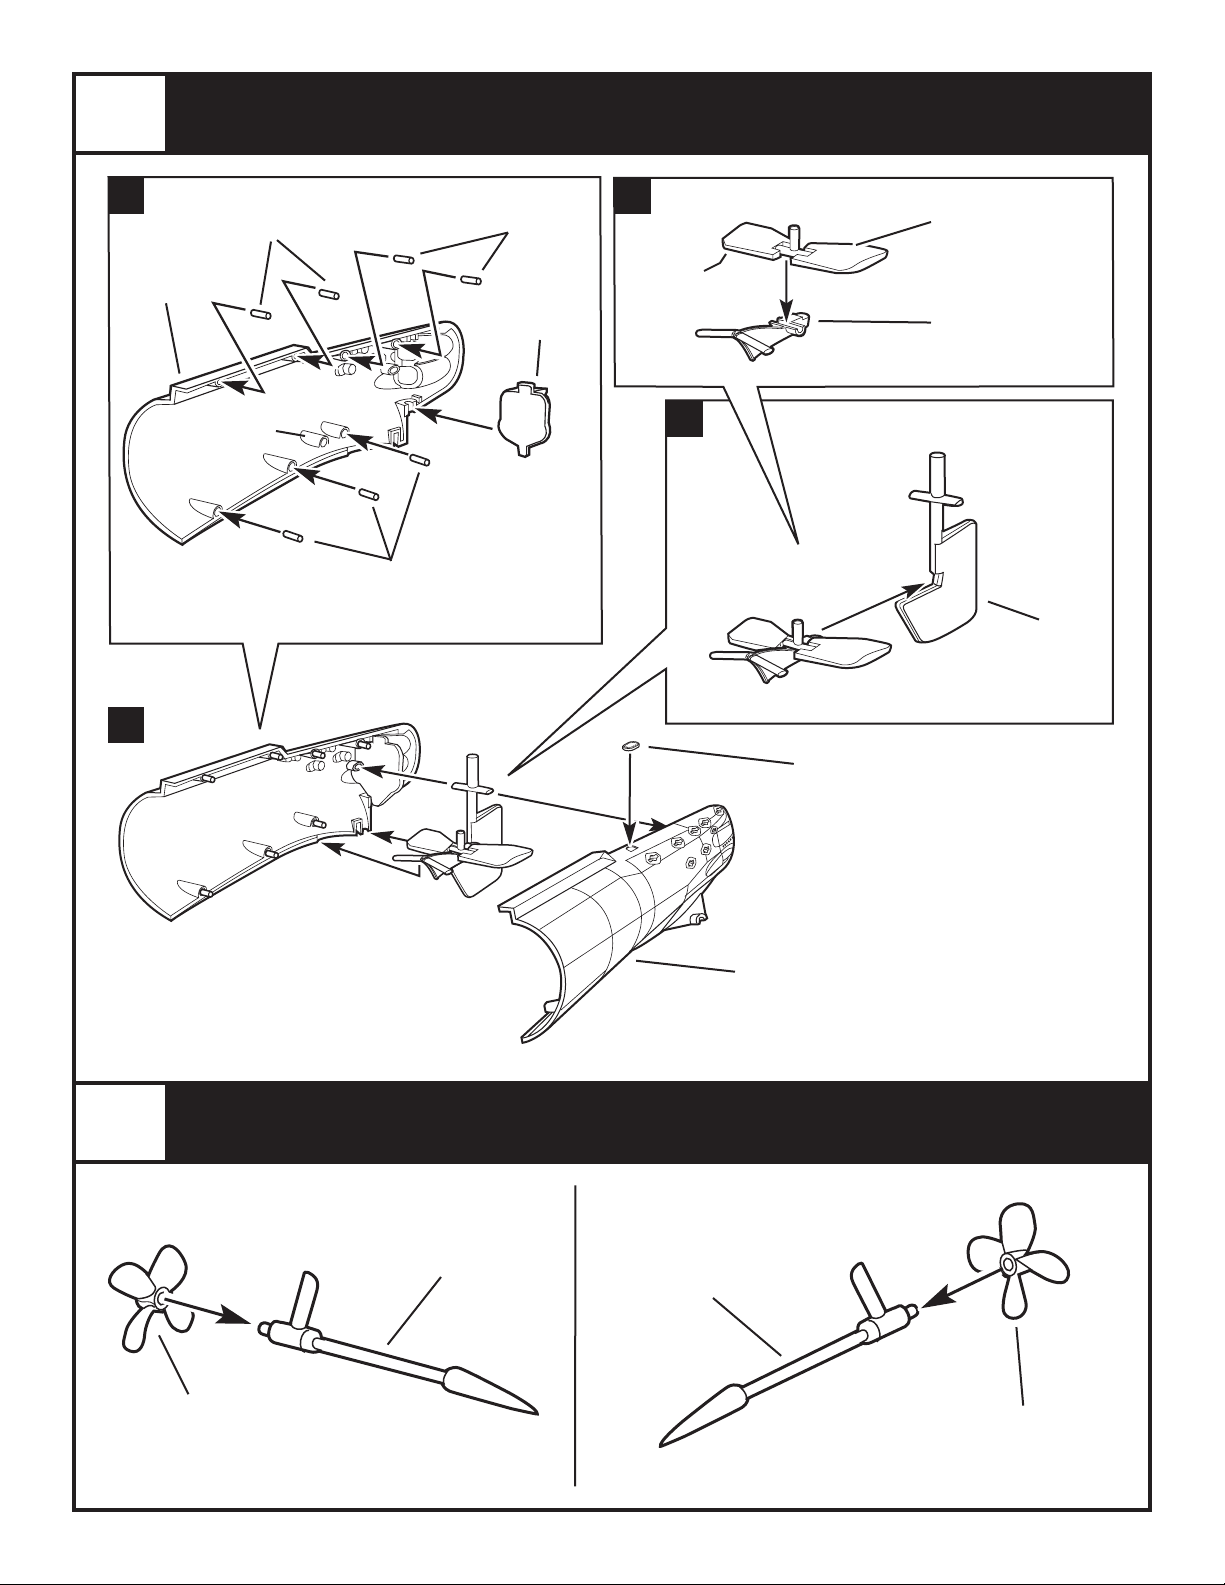
PROPELLER / SHAFT ASSEMBLY
16
RIGHT
PROPELLER SHAFT
SEMIGLOSS BLACK
17
15
LEFT
PROPELLER SHAFT
SEMIGLOSS BLACK
18
LEFT
PROPELLER
SEMIGLOSS BLACK
Kit 0384 - Page 5Kit 0384 - Page 20
Page 6

6
90
PROPELLER ASSEMBLY CONTINUED
LEFTRIGHT
7
28
RIGHT
PROPELLER GUARD
SEMIGLOSS BLACK
FORWARD
PROPELLER GUARD ASSEMBLY
228
(LONGEST)
RIGHT
RIGHT
428
(SHORTEST)
RIGHT
328
(MED)
RIGHT
RIGHT
PROPELLER
GUARD
SUPPORT
SEMIGLOSS BLACK
VIEW FROM REAR
27
LEFT
PROPELLER GUARD
SEMIGLOSS BLACK
FORWARD
227
(LONG)
LEFT
PROPELLER
GUARD SUPPORTS
427
(SHORTEST)
LEFT
327
(MED)
LEFT
LEFT
SEMIGLOSS
BLACK
LEFT
FORWARD
Page 7
8
REAR / FRONT ASSEMBLY
9
SIDE VENT PLATE
SEE PAINT GUIDE
8
RIGHT
VENT PLATE ASSEMBLY
35
COMPANIONWAY TRUNK
LEFT
SILVER
COMPANIONWAY TRUNK
36
RIGHT
SILVER
FORWARD
7
LEFT
SIDE VENT PLATE
SEE PAINT GUIDE
Kit 0384 - Page 7Kit 0384 - Page 18
Page 8
.
FOR DAVIT
FOR DAVIT
10
DECK ASSEMBLY
NOTE:
IF YOU USE THE (2) #41 DAVITS AT THIS POINT, CHOOSE WHICH HOLES YOU WANT TO DRILL
OUT. DRILL FROM THE UNDERSIDE OF THE DECK SECTION. THE DAVITS ARE EITHER LOCATED
AT THE FORWARD AND CENTRAL DECK OR AFT DECK. ONLY (2) #41 DAVITS ARE IN THE KIT
UNDER SIDE OF AFT DECK SECTION
DRILL OUT HOLES AT THIS POINT TO CHOOSE WHICH SIDE YOU WANT THE 4-INCH GUN.
FRONT
FRONT OR REAR OF SAIL.
UNDER SIDE OF CENTRAL DECK SECTION
10
CENTRAL DECK
11
AFT DECK
FOR DAVIT
FIRST
COMPANIONWAY LADDER
LIGHT GHOST GRAY
9
FORWARD
DECK
30
UNDER SIDE OF FORWARD DECK SECTION
Page 9

11
SAIL HALVES ASSEMBLY
RIGHT SIDE
SIDE STEPS.
DRILL FROM
OUTSIDE
"B"
189
STEPS
SEE DETAIL
BELOW
76
SMALL
LOCKER DOOR
LIGHT GHOST
GRAY
62
RIGHT
SAIL SIDE
LIGHT GRAY
CORNER STEPS "A" - #188 .030 THICK
SIDE STEPS "B" - #189 .040 THICK
FIRST
69
HIGH STEP
LIGHT GOAST GRAY
SEMIGLOSS BLACK
TOP
WIRE STEPS
76
SMALL
LOCKER DOORS
LIGHT GOAST GRAY
SECOND
126
RUNNING LIGHT
CLEAR
FLAT SHIM
"A"
188
STEPS
SEE DETAIL
BELOW
CORNER STEPS.
DRILL FROM
OUTSIDE
(DO NOT CEMENT)
SIDE STEPS
SHOWN, REPEAT
FOR CURVED
STEPS
LEFT SIDE
HIGH STEP
LIGHT GOAST GRAY
61
LEFT
SAIL SIDE
LIGHT GRAY
69
SEMIGLOSS
BLACK TOP
GUIDE
(DO NOT CEMENT)
SUPER GLUE FROM INSIDE
RUNNING LIGHT
126
CLEAR
74
TOP REAR
SAIL LOCKER TUBE
LIGHT GRAY
FLAT SHIM
WIRE
GUIDE
SAIL LOCKER TUBE
STEPS
SMALL
LOCKER DOORS
LIGHT GOAST GRAY
73
BOTTOM REAR
LIGHT GRAY
76
76
SMALL
LOCKER DOOR
LIGHT GOAST
GRAY
"B"
189
STEPS
SEE DETAIL ABOVE
SIDE STEPS.
DRILL FROM
OUTSIDE
76
SMALL
LOCKER DOORS
LIGHT GOAST GRAY
Kit 0384 - Page 9Kit 0384 - Page 16
Page 10

11
SAIL ASSEMBLY CONTINUED
71
TOP REAR DECK
LOCKER TUBE
LIGHT GRAY
BOTTOM REAR DECK
LOCKER TUBE
LIGHT GRAY
76
SMALL
LOCKER DOOR
LIGHT GOAST
GRAY
72
63
SAIL DECK
LIGHT GRAY
SEMIGLOSS BLACK TOP
SUPPORT STRUCTURE
FIRST
66
SUPPORT WEB
LIGHT GRAY
SECOND
65
LIGHT GRAY
SEMIGLOSS
BLACK TOP
80
BELL
BRASS
86
GUN AIMING
OPTICS
LIGHT GRAY
86
GUN AIMING
OPTICS
LIGHT GRAY
85
GUN AIMING
CRADLE
LIHGT GRAY
70
REAR DECK
GUN AIMING POST
LIGHT GRAY
128
COMPASS LENS
CLEAR
SAIL SIDES AND TOP
ASSEMBLY
68
BRIDGE BAFFLE
LIGHT GRAY
76
SMALL
LOCKER DOOR
LIGHT GOAST GRAY
190
RIGHT LARGE
LOCKER DOOR
LIGHT GOAST
GRAY
81
FOG HORN
LIGHT GRAY
75
LEFT LARGE
LOCKER DOOR
LIGHT GOAST GRAY
64
SAIL FRONT
LIGHT GRAY
77
FRONT GUN
DECK DOOR
LIGHTGRAY
85
GUN AIMING
CRADLE
LIGHT GRAY
67
BRIDGE DESK
LIGHT GRAY
SEMIGLOSS BLACK ON TOP
88
COMPASS
HOUSING
LIGHT GRAY
SEMIGLOSS
BLACK
Page 11

11
SAIL ASSEMBLY CONTINUED
192
RIGHT REAR
GUN DECK RAILING
LIGHT GOAST
GRAY
82
REAR
GUN DECK RAILING
LIGHT GOAST GRAY
78
FRONT GUN DECK
STANCHIONS
LIGHT GOAST GRAY
193
LEFT REAR
GUN DECK RAILING
LIGHT GOAST
GRAY
64
SAIL FRONT
78
FRONT GUN DECK
STANCHIONS
LIGHT GOAST
GRAY
78
FRONT GUN DECK
STANCHIONS
LIGHT GOAST GRAY
Kit 0384 - Page 11Kit 0384 - Page 14
Page 12

12
TOWER ASSEMBLY
A B
95
CROWS NEST
BRACE
SEMIGLOSS BLACK
96
DF LOOP
SEMIGLOSS
BLACK
93
TOWER CAP
SEMIGLOSS
BLACK
92
TOWER
SEMIGLOSS BLACK
103
SEARCHLIGHT
REAR CAP
SEMIGLOSS BLACK
SEARCHLIGHT FRONT
WITH YOKE
SEMIGLOSS BLACK
127
SEARCHLIGHT
LENS
CLEAR
102
C
97
FRONT
PERISCOPE
TOP
SEMIGLOSS
BLACK
98
REAR
PERISCOPE
TOP
SEMIGLOSS
BLACK
PERISCOPE
TUBES
SEMIGLOSS
BLACK
101
TOWER FRONT
BRACE
STEEL
WIRE ANTENNA
SUPER GLUE
ANTENNA AND BROOM
126
RUNNING
LIGHT
CLEAR
99
FRONT
RADAR MAST
STEEL
94
STEEL
100
RADAR
REFLECTOR
STEEL
101
TOWER FRONT
BRACE
STEEL
Page 13

13
TOWER / SAIL ASSEMBLY FINAL
D E
TOWER
TO
SAIL
OBSERVATION
DECK RAIL
LIGHT GOAST
91
OBSERVATION
DECK FRONT
RAILS
LIGHT GOAST
GRAY
90
RIGHT
GRAY
89
LEFT
OBSERVATION
DECK RAIL
LIGHT GOAST
GRAY
F
84
AERIAL
OUTRIGGER
LIGHT GHOST GRAY
(SEMIGLOSS BLACK
ON TOP)
191
RIGHT
SCUPPER
CHUTE
LIGHT GRAY
(SEMIGLOSS BLACK
TOP)
87
LEFT
SCUPPER CHUTE
LIGHT GRAY
(SEMIGLOSS BLACK
TOP)
83
GUN POST
BRACE
LIGHT GHOST
GRAY
79
LADDER
LIGHT GHOST
GRAY
LIGHT GHOST GRAY
(SEMIGLOSS BLACK
83
GUN POST
BRACE
LIGHT GHOST
GRAY
84
AERIAL
OUTRIGGER
ON TOP)
LADDER
LOCKER
TUBE
DECK
AERIAL
OUTRIGGER
GUN POST
BRACE
Kit 0384 - Page 13Kit 0384 - Page 12
Page 14

14
GUN MAGIzINE
SEMIGLOSS BLACK
136
20 MM GUN ASSEMBLY
129
GUN SIGHT
RING
CLEAR
GUN BASE
SEMIGLOSS BLACK
GUN BASE
SEMIGLOSS BLACK
15
A
132
RING
131
135
GUN BARREL
SEMIGLOSS BLACK
134
RIGHT
GUN MOUNT
SEMIGLOSS BLACK
40 MM GUN ASSEMBLY
152
GUNSIGHT BAR
SEMIGLOSS BLACK
133
LEFT
GUN MOUNT
SEMIGLOSS BLACK
151
GUN BARREL
SEMIGLOSS BLACK
150
SNUBBERS
SEMIGLOSS BLACK
Page 15

16
40 MM GUN ASSEMBLY FINAL
B C
149
ELEVATION CRANK
SEMIGLOSS BLACK
ELEVATION GEARBOx
148
SEMIGLOSS BLACK
147
LEFT
GUN MOUNT
SEMIGLOSS BLACK
D
146
RIGHT
GUN MOUNT
SEMIGLOSS BLACK
TRAVERSE GEARBOx
145
SEMIGLOSS BLACK
144
SEAT
SEMIGLOSS
BLACK
130
GUNSIGHT RINGS
CLEAR
144
SEAT
SEMIGLOSS
BLACK
EF
141
GUN BASE
SEMIGLOSS BLACK
143
FOOTRESTS
SEMIGLOSS BLACK
142
FRAME
SEMIGLOSS BLACK
Kit 0384 - Page 15Kit 0384 - Page 10
Page 16

17
20 / 40 MM GUNS TO SAIL ASSEMBLY
LOOP THREAD
LOOP THREAD
THROUGH HOLES
THROUGH HOLES
IN STANCHIONS
IN STANCHIONS
ATTACH THREAD
HERE TO START
ADD BLACK THREAD RAILING TO
FRONT GUN DECK STANCHIONS
USING A TWEEzERS, CAREFULLY
PUSH THREAD THROUGH TINY
HOLES IN STANCHIONS - USE
SMALL DROPS OF SUPER GLUE
APPLIED WITH A TOOTH PICK TO
SECURE THREAD. SEE BOx TOP
PICTURES FOR DETAILS.
NOTE:
18
A
SEMIGLOSS BLACK
B
174
SIGHT BAR
SEMIGLOSS BLACK
173
MUzzLE CAP
4 INCH GUN ASSEMBLY
171
GUN BARREL
SEMIGLOSS BLACK
BREECH BODY
SEMIGLOSS BLACK
172
BARREL BOTTOM
ACCESSORIES
SEMIGLOSS BLACK
177
178
BREECH CAP
SEMIGLOSS
BLACK
179
BREECH WET CAP
SEMIGLOSS BLACK
175
SIGHT TRIM
BOx
STEEL
176
SIGHT TRIM WHEEL
SEMIGLOSS BLACK
164
RIGHT TRUNNION
SEMIGLOSS BLACK
163
LEFT TRUNNION
SEMIGLOSS BLACK
165
SEATS
SEMIGLOSS BLACK
Page 17

19
4 INCH GUN ASSEMBLY CONTINUED
C
169
HAND CRANK
DISC
SEMIGLOSS BLACK
E
166
RIGHT
DRIVE GEAR
BOx
SEMIGLOSS BLACK
D
169
HAND CRANK
DISC
SEMIGLOSS BLACK
DRIVE GEAR
SEMIGLOSS BLACK
168
LEFT DRIVE
FOOTREST
SEMIGLOSS BLACK
167
LEFT
BOx
F G
170
PUSHROD
ASSEMBLY
STEEL
161
BASE
SEMIGLOSS BLACK
162
BARREL BRACE
SEMIGLOSS BLACK
Kit 0384 - Page 17Kit 0384 - Page 8
Page 18

20
GUN / SAIL TO HULL ASSEMBLY
Page 19
21
DECK TOP ASSEMBLY
FORWARD AND CENTRAL DECKS
ADD BLACK THREAD RAILINGS TO STAN-
CHIONS USING A TWEEzERS, CAREFULLY
PUSH THREAD THROUGH TINY HOLES
IN STANCHIONS - USE SMALL DROPS OF
SUPER GLUE APPLIED WITH A TOOTH
PICK TO SECURE THREAD. SEE BOx TOP
RUNNING
LIGHT
CLEAR
FRONT FLAG MAST
44
CLEAT
NOTE:
PICTURES FOR DETAILS.
125
50
43
CAPSTAN TOP
45
ROLLER
CLEATS
NOTE:
42
HYDROPHONE
34
COMPANION
WAY
STANCHONS
41
DAVITS
*
37
CABLE
STANCHONS
(16)
39
FRONT
CABLE
STANCHON
49
BREATHER
SAIL AND GUN NOT SHOWN FOR CLARITY
GUN STANCHON BRACE
GUN STANCHON POST
44
CLEAT
FRONT CABLE
STANCHON
140
41
DAVITS
*
40
39
44
CLEAT
44
CLEAT
40
GUN STANCHON
POST
38
REAR STANCHIONS
44
CLEAT
*
AFT DECK
THERE ARE TWO OPTIONAL LOCATIONS FOR THE (2) #41 DAVITS. EITHER
NOTE:
FORWARD AND CENTRAL DECK OR AFT DECK. SEE STEP 10 FOR LOCATIONS.
AERIAL MAST
44
CLEATS
ONLY (2) #41 DAVITS ARE IN THE KIT.
46
52
REAR
TORPEDO LOADING
HATCH
*
CATSTAN TOP
45
ROLLER CLEATS
41
DAVITS
43
48
TIE LUG
51
REAR
FLAG MAST
GUN STANCHON BRACE
140
RUNNING LIGHT
CLEAR
47
STERN CHOCK
125
Kit 0384 - Page 19Kit 0384 - Page 6
Page 20

22
U
.
S
.
S
.
C
O
B
I
A
S
.
S
.
2
4
5
U
.
S
.
S
.
C
O
B
I
A
S
.
S
.
2
4
5
DECAL PLACEMENT (COBIA)
USS Cobia (SS-245)
March 17, 1943: Laid down at Electric Bost Co. Croton, CT.
November 28, 1943: Launched. March 29, 1944: commissioned.
6 war patrols, 4 battle stars and 6 ships sunk totaling 16,835 tons.
2 US flyers rescued. Became a National land mark and historic place
at the Wisconsin Maritime Museum.
Page 21

23
DECAL PLACEMENT (SILVER SIDES)
USS Silversides (SS-236)
November 4, 1940: Laid down at Mare Island Navy Yard. Vallejo, Ca.
August 26, 1941: Launched. December 15, 1941:commissioned.
14 war patrols, 12 battle stars with 23 ships sunk ranking 3rd totaling
90,080 tons ranking 5th overall. 7 US Army bomber crew rescued.
Preserved as a memorial at Great Lakes Navel Memorial and Museum, MI.
Kit 0384 - Page 21Kit 0384 - Page 4
Page 22

24
DECAL PLACEMENT (FLASHER)
USS Flasher (SS-249)
Setember 30, 1942: Laid down at Electric Boat Co. Croton, CT.
June 20, 1943: Launched. September 25, 1943: Commissioned.
6 war patrols, Highly awarded with 3 Presidental Unit Citations.
Asiatic-Pacific Area Service Ribbon. 6 battle star, 21 ships sunk
ranking 4th with 100,231 tons ranking 1st. Her conning tower was
removed to become a memorial in Nautilus Park, Croton, CT.
Page 23

25
DECAL PLACEMENT (GROWLER)
USS Growler (SS-215)
February 10, 1940: Laid down at Elevtric Boat Co. Croton, Ct.
November 22, 1941: Launched. March 20, 1942: Commissioned.
11 war patrols, 8 battle stars, with 10 ships sunk totaling 32,607 tons.
November 8, 1944, lost in action against the enemy operating West
of the Philippine Group w/USS Hake and USS Hardhead in the South
China Sea West of Mindoro, Philippines.
Kit 0384 - Page 23Kit 0384 - Page 2
Page 24

26
GENERAL HULL PAINT GUIDE
US NAVY MEASURE 32/355-B
Kit 0384 - Page 24
SPECIAL THANKS TO:
 Loading...