

REVELL Piloto Airplane User Manual [en, fr, nl, it, gr, da, no, fi, sv, es, pt, de, en, hr, et, fi, hu, lv, lt, nl, pl, ro, ru, sr, sk, sl, cs, tr, gr, bg, uk, ch, he, ar, ja, ch, ch, ko, hi, id, kk, ms, fa, pt, es, th, vi, sq, mk]
Page 1
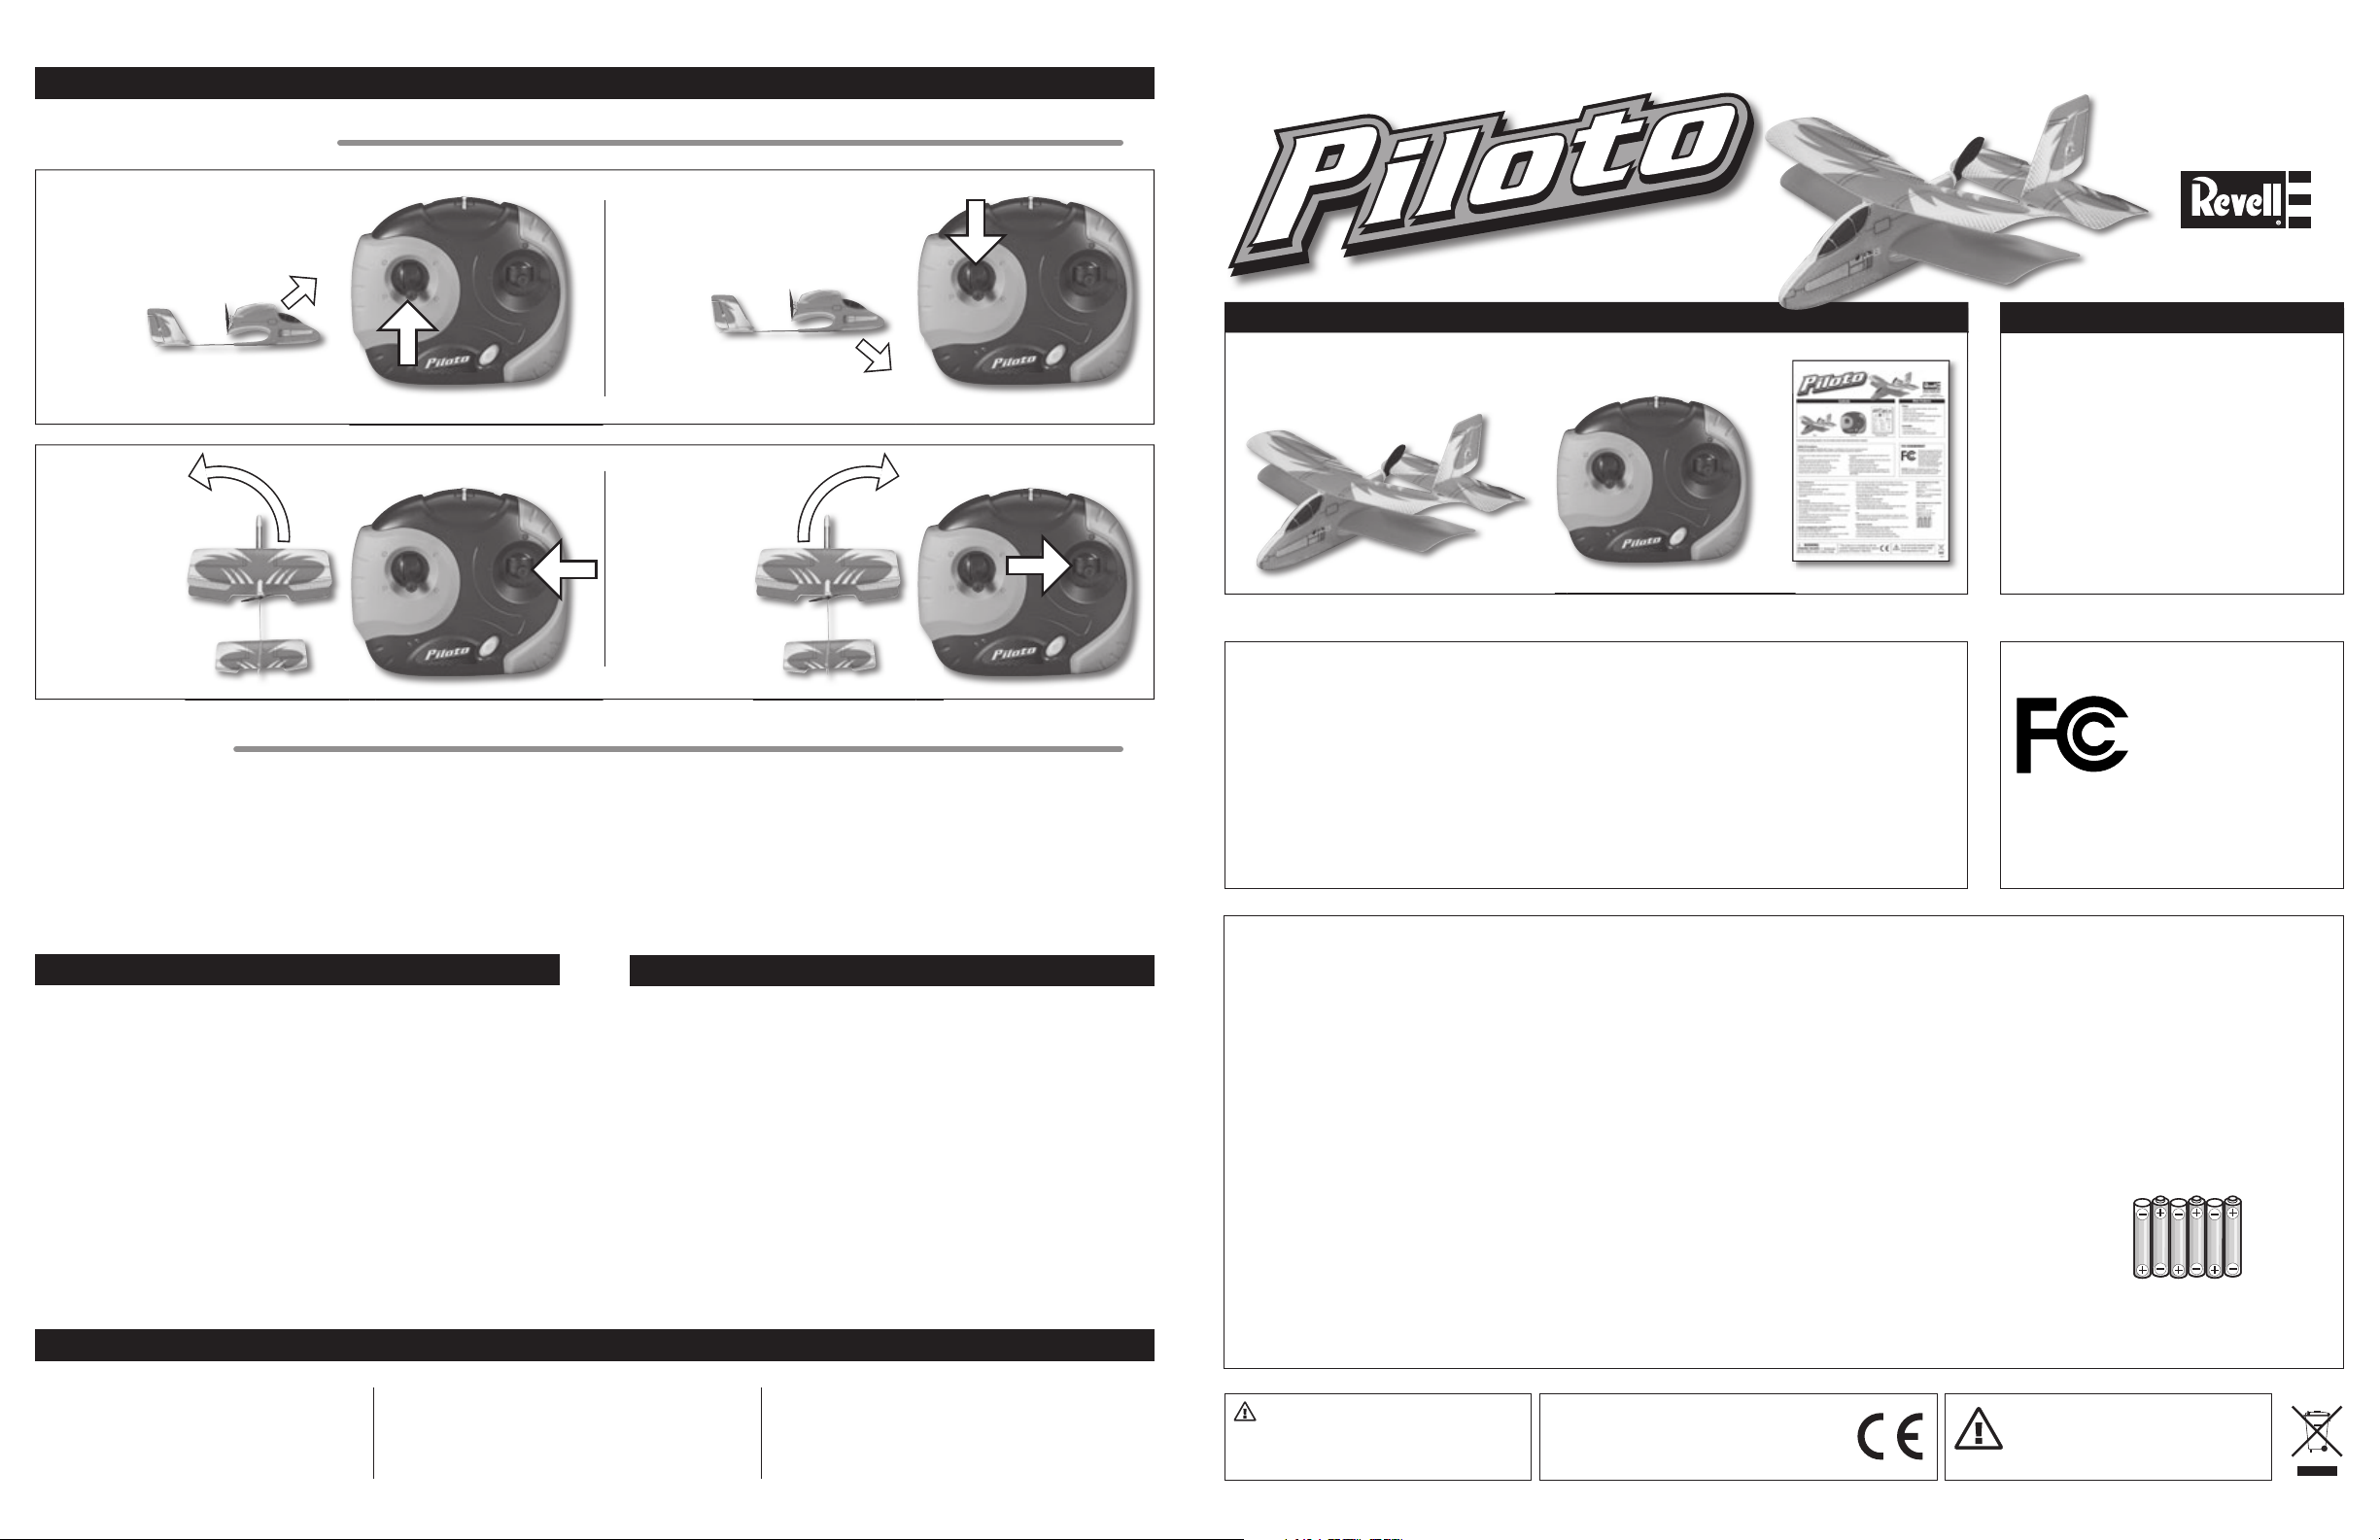
2. HOW TO CONTROL FLIGHT:
Flying Your Piloto (continued)
™
To Ascend:
Gain fl ying altitude by
moving the controller’s
throttle (left) stick upward.
To Turn Left:
Make left turns by moving
the controller’s rudder
(right) stick to the left.
3. HOW TO LAND:
• When you’re ready to land, just move the controller’s throttle (left) stick down
to its “off” position. As the Piloto glides to the ground, you can still make left
and right turns using the controller’s rudder (right) stick.
To Descend:
Fly lower by moving the
controller’s throttle (left)
stick downward.
To Turn Right:
Make right turns by
moving the controller’s
rudder (right) stick to
the right.
Contents
Piloto Instruction ManualController
Do not touch the spinning propeller or fl y over another person’s head. Adult supervision is required.
Safety Precautions:
Warning: Do not modify or alter this unit. Changes or modifi cations to this unit not expressly approved
by the party responsible for compliance could void the user’s authority to operate the equipment.
• Do not turn on the Piloto unless the controller has been turned
on fi rst.
• Keep hands, hair and loose clothing away from the spinning
propeller when the power switch is turned ON.
• Turn off the controller and Piloto when not in use.
• Remove the battery from the controller when not in use.
• Parental guidance is recommended while fl ying.
• Always keep your Piloto in sight while fl ying.
• For the best performance, use new alkaline batteries in the
controller.
• Replace the batteries in the controller with new ones as soon
as any function becomes diminished.
• Keep these instructions for future reference.
• Follow the operating instructions exactly.
• Your controller’s built-in charger is made specifi cally for the
rechargeable Piloto LiPo battery. Do not use it to charge any
other battery.
www.revell.com
Revell, Inc. a subsidiary of
®
Hobbico
, Inc., Champaign, IL 61826
Main Features
Piloto:
• Durable, pre-colored foam fuselage, wings and tail
• Carbon-fi ber frame
• On/off switch and charging jack
• Built-in LiPo (lithium-polymer) rechargeable fl ight battery
• Realistic rudder control
• Climbs, descends, and turns like a real airplane
Controller:
• Two-channel digital control
• Charge status and power-on LEDs
• Easy Piloto battery recharging from the controller
FCC REQUIREMENT
This device complies with Part 15 of
the FCC rules. Operation is subject
to the following two conditions: (1)
This device may not cause harmful
interference, and (2) this device
must accept any interference
received, including interference that
may cause undesired operation.
CAUTION: Changes or modifi cations to this product not
expressly approved by the party responsible for compliance
may void the user’s authority to operate the equipment.
Safety Tips
• Read through the entire instruction manual before fl ying your Piloto.
• This product should be fl own only indoors.
• Make sure that you and other people stay at least 3 feet (or 1 meter) away from the Piloto during
fl ight.
• Always keep your eye on the fl ying toy to prevent it from fl ying, landing, or crashing on or near your
head or body, or on other people.
• Never disassemble or attempt to modify the Piloto. You could damage the product and create the
potential for damage or injury.
• Never put your hands or face close to the spinning propeller. Doing so risks injury. Never operate the
Piloto while sitting on the fl oor or on a chair — always fl y from a position that lets you get out of the
way quickly if necessary.
• Always switch off both the Piloto and the controller when you leave the controller unattended. If the
power switch is left on, unintended stick operation might occur (for example, if the controller falls
face-forward onto the fl oor).
• Never let young children use this product. Doing so risks accidents caused by the rotating parts.
• Never use parts that are damaged.
Trouble Shooting
Problem: Propeller doesn’t turn.
Cause: • ON/OFF switch is OFF.
• Weak battery.
Solution: • Set switch to ON.
• Recharge the battery.
Problem: Piloto suddenly stops fl ying and drops.
Cause: Too little power.
Solution: Recharge the battery pack.
• Always move the controller’s throttle stick to the down position after a crash.
• Do not place any other labels or stickers onto the Piloto. These could interfere with its
• Two Piloto models cannot be fl own on the same radio band.
Safety Tips
performance.
Operating Tips
Problem: Loss of control.
Cause: • Another RF control device is interfering.
Solution: • Avoid fl ying around other radio-control devices.
• Choose another fl ying location.
Entire Contents © Copyright 2008 • 3005240
Care and Maintenance:
• Always remove batteries from the controller when it is not being used for a
long period of time.
• Wipe the toy gently with a clean, damp cloth.
• Keep the toy away from direct heat.
• Do not submerge the toy into water. This could damage the electronic
assemblies.
Battery Cautions:
• Non-rechargeable batteries are not to be recharged.
• If the controller uses rechargeable batteries, remove them before recharging.
• Rechargeable batteries should be recharged only by an adult.
• Do not power the controller by mixing different types of batteries, or old and
new batteries.
• Use only batteries of the same or equivalent type as those recommended.
• Install batteries following the correct polarity.
• Remove exhausted batteries from the controller.
• Do not short-circuit the supply terminals.
The Piloto is equipped with a rechargeable LiPo battery. Please pay
attention to the following cautions for safe use:
• Do not dispose of the battery into fi re or heat.
• Do not use or leave the battery near a heat source, such as fi re or a heater.
• Do not strike the battery or throw it against a hard surface.
WARNING:
CHOKING HAZARD — Small parts.
Not for children under 3 years of age.
“This product is in compliance with the
essential requirements and other relevant
provisions of Directive 1999/5/EC.”
• Do not immerse the battery into water. Keep the battery cool and dry.
• When recharging the battery, use only the charger designed for that purpose.
• Do not over-discharge the battery.
• Do not connect the battery to an electrical outlet.
• Do not directly solder the battery or pierce it with a nail or other sharp object.
• Do not transport or store the battery together with metal objects such as
necklaces, hairpins, etc.
• Do not disassemble or alter the battery.
• Charge the battery every six months.
• Turn off your equipment power switch after use.
• Recycle used batteries after covering the battery terminals with insulation
tape or inserting the battery into an individual polybag.
Note:
• Parental guidance is recommended when installing or replacing batteries.
• Static electricity may cause the toy to malfunction, requiring you to turn it off
and back on before fl ying again.
Specifi c Note to Adults:
• Regularly examine all parts of the toy for damage. If any is found, do not use
the toy again until the damage has been repaired.
• This toy is not intended for children under 3 years old.
• This toy must be used only with the recommended charger.
• Do not try to charge other batteries with the controller’s charger.
Do not touch the spinning propeller
or fl y over another person’s head.
Adult supervision is required.
Battery Requirements for Piloto:
Power Supply: =====
Rating: DC 3.7V
Batteries: 1 x 3.7V LiPo Rechargeable
Battery Pack
Requires: 1 x 3.7V LiPo Rechargeable
Battery Pack (included)
Battery Requirement for Controller:
Power Supply: ======
Rating: DC 9V
Batteries: 6 x 1.5V “AA”
Requires: 6 x 1.5V “AA” size
batteries (not included)
page 1page 4
Page 2
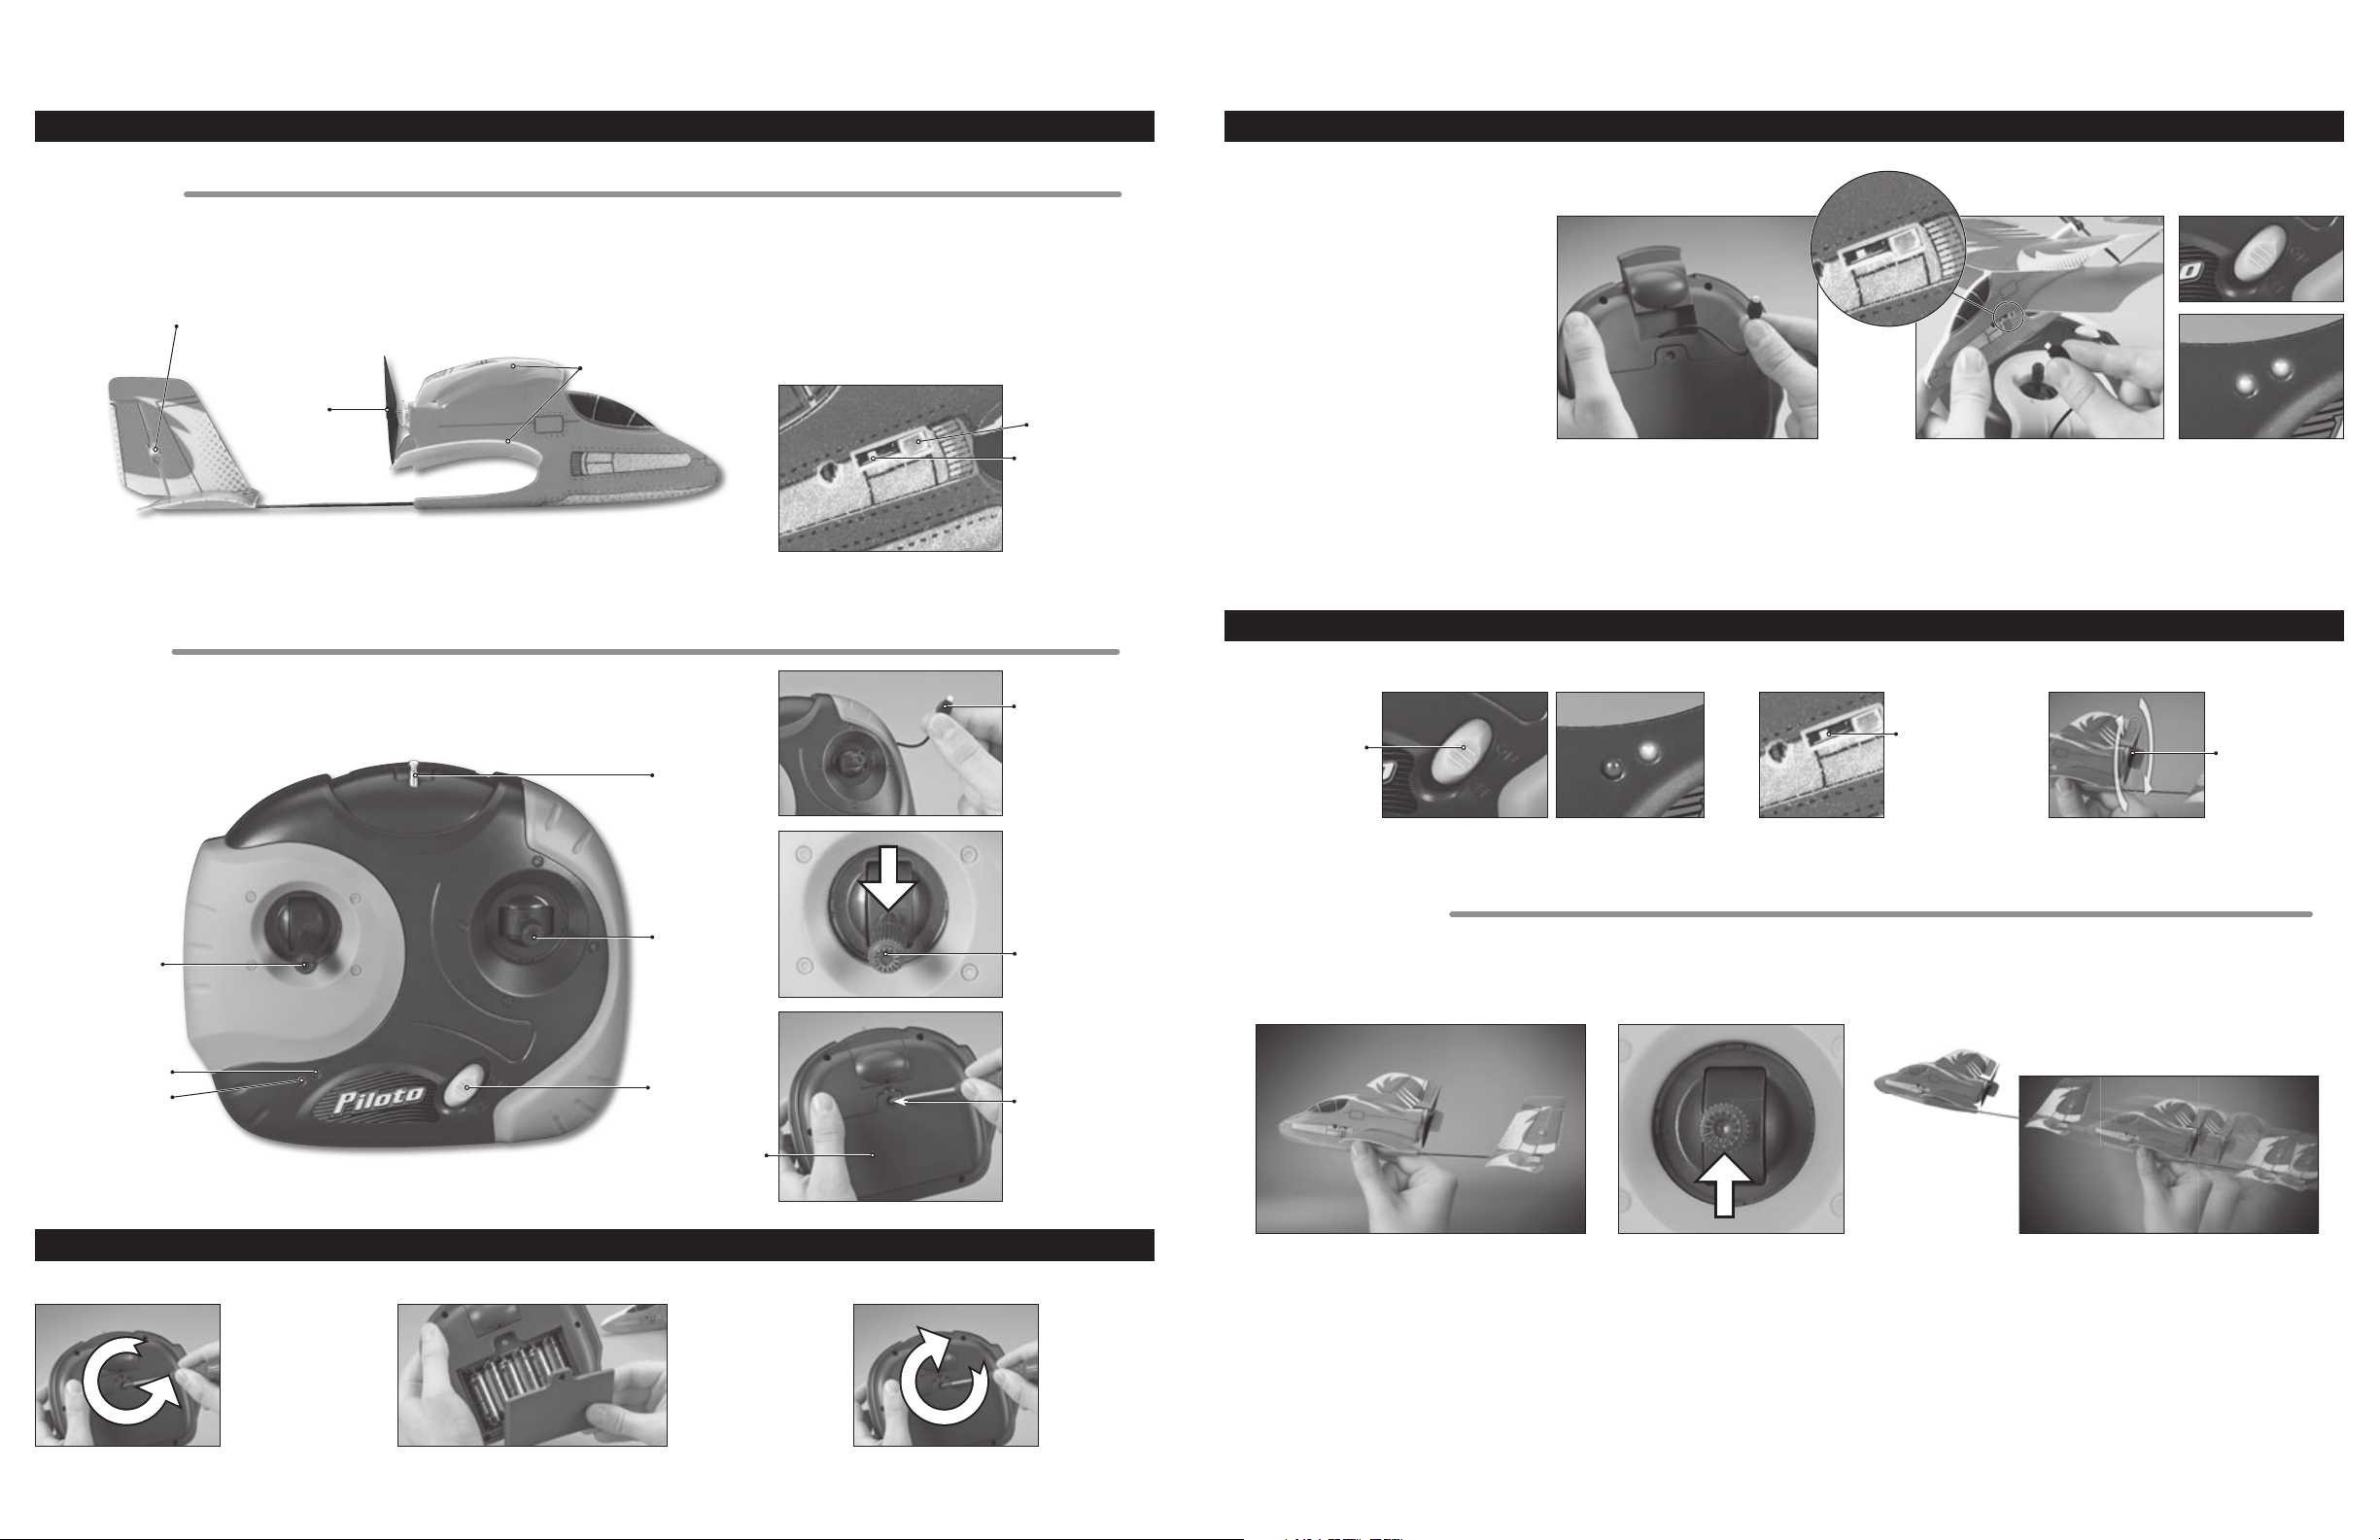
Piloto
Controller
Magnetic actuator
(for rudder control)
Pusher propeller
Piloto and Controller Parts
Biplane wing
Charging jack
On/Off Switch
Piloto Charging Procedure
Note: Before recharging the Piloto’s LiPo battery after fl ying, always wait 10-15 minutes for it to cool down.
1. Turn off both the Piloto and the controller.
2. Pull out the charge cord from the back of the controller.
(Pic 1).
3. Gently plug the charge cord into the Piloto (Pic. 2).
DO NOT FORCE. It only inserts one way. When inserted
properly, the charge cord should fi t easily into the charging
port. Incorrectly inserting the charge cord will damage the
Piloto and may create a hazard.
4. Push the controller’s power switch to the ON position (Pic. 3).
5. The green Power-on LED and red Charge Status LED will
both glow (Pic. 4).
6. Charging is complete when the red Charge Status LED
goes out.
7. Push the controller’s power switch to the OFF position and
remove the charge cord from the Piloto.
The Piloto can fl y for about 3-5 minutes after 10-15 minutes of charging.
Pic 1
Flying Your Piloto
Pic 3
Pic 4
Pic 2
Throttle stick
Power-on LED (green)
Charge status LED (red)
1. Remove the screw
from the battery
cover by turning it
counter-clockwise
using a Phillips-head
screwdriver.
Antenna (pull out
and extend before
fl ying — retract
when not in use for
safe storage)
Direction stick
On/off switch
Battery cover
Controller Battery Installation
2. Install 6 “AA” size
batteries in the battery
compartment following
the polarity shown
inside.
Charge cord for Piloto
battery recharging.
Throttle Down Position
Note: Before turning
on the controller, the
throttle stick must be
in the down position.
Remove the screw
to release the
battery cover for
battery installation
and removal.
3. Replace and
tighten the screw
clockwise.
With the throttle (left) stick in
the down position, move the
controller’s power switch to
the ON position. The green
Power-on LED will light.
1. HOW TO LAUNCH:
• An ideal fl ying site is an open, uncluttered room that measures approximately
20 ft (6 m) wide x 20 ft (6 m) long x 8 feet (2.5 m) high.
With one hand, grip the Piloto at the
bottom of the fuselage
With the other hand, slowly move the
controller’s throttle (left) stick from the
down position to halfway up.
Then, set the Piloto’s
ON/OFF switch to ON.
Keep fi ngers, hair,
clothing and all other
objects away from the
spinning propeller.
Now gently toss the Piloto into the air, at a slight
upward angle. The Piloto performs best in still
conditions. If you detect any air movement, launch
into the direction air is moving from.
page 3page 2
 Loading...