


 Loading...
CHAPTER 0 • |
1 |

Retrospect® 11.0
Windows User's Guide
COPYRIGHT © 2015 RETROSPECT, INC.
Protecting data since 1984. Copyright © 2016 Retrospect, Inc. All rights reserved.
Retrospect 11.0 Users Guide, first edition.
Use of this product (the “Software”) is subject to acceptance of the license agreement presented in the installer. You may not install, copy or otherwise use the Software except as expressly provided in that license agreement. Retrospect is a registered trademark of Retrospect, Inc. in the United States and/or other jurisdictions. All other trademarks are the properties of their respective owners.
iii
CHAPTER 0 •
Contents |
|
|
What's New..................................................................................................................... |
5 |
|
◦ |
Cloud Backup ................................................................................................... |
5 |
◦ |
Performance-Optimized Grooming................................................................. |
13 |
◦ |
Faster Catalog Rebuild.................................................................................... |
14 |
◦ Backup and Restore Performance Improvements.......................................... |
14 |
|
◦ Portable Backup Sets/Media Sets .................................................................. |
14 |
|
◦ Microsoft Exchange 2016 Database Certification........................................... |
15 |
|
◦ |
Bug fixes ......................................................................................................... |
15 |
Getting Started.............................................................................................................. |
16 |
|
◦ |
Overview of Retrospect................................................................................... |
16 |
◦ |
Requirements .................................................................................................. |
18 |
◦ Creating a Retrospect User Account .............................................................. |
19 |
|
◦ |
Installing Retrospect ....................................................................................... |
20 |
◦ |
Using Retrospect ............................................................................................ |
22 |
◦ Using Windows 8, 7, Vista, Server 2012 and Server 2008.............................. |
30 |
|
◦ Upgrading from a previous version of Retrospect .......................................... |
30 |
|
◦ |
Retrospect Updates ........................................................................................ |
30 |
Fundamentals ............................................................................................................... |
32 |
|
◦ |
How Retrospect Works ................................................................................... |
32 |
◦ |
Progressive Backup ........................................................................................ |
33 |
◦ Backup Sets and Their Components .............................................................. |
33 |
|
◦ |
Backup Actions ............................................................................................... |
35 |
◦ |
Catalog Files ................................................................................................... |
37 |
◦ |
Snapshots ....................................................................................................... |
37 |
◦ |
Retrospect and Clients.................................................................................... |
38 |
◦ |
High-level Dashboard...................................................................................... |
39 |
Hardware ...................................................................................................................... |
40 |
|
◦ |
Hardware Overview......................................................................................... |
40 |
◦ |
Communication Technologies......................................................................... |
40 |
◦ Seeing Your Backup Devices.......................................................................... |
42 |
|
◦ |
CD/DVD Drives................................................................................................ |
44 |
◦ |
Removable Disk Drives ................................................................................... |
48 |
◦ |
Hard Disk Drives ............................................................................................. |
50 |
◦ |
Tape Drives ..................................................................................................... |
51 |
◦ |
Tape Libraries.................................................................................................. |
63 |
◦ |
Removable Storage Manager ......................................................................... |
69 |
◦ Media Longevity and Storage ......................................................................... |
70 |
|
◦ |
Multiple Backup Drives ................................................................................... |
71 |
◦ Network Attached Storage (NAS) Devices...................................................... |
71 |
|
Immediate Operations .................................................................................................. |
76 |
|
◦ |
Backup ............................................................................................................ |
76 |
◦ |
Archive .......................................................................................................... |
103 |
◦ |
Restore.......................................................................................................... |
110 |
◦ |
Duplicate ....................................................................................................... |
136 |
◦ |
Transfer Backup Sets.................................................................................... |
155 |
◦ |
Transfer Snapshots ....................................................................................... |
160 |
◦ |
Controlling Immediate Operations ................................................................ |
167 |
1 |
WINDOWS USER'S GUIDE |
Automated Operations................................................................................................ |
168 |
|
◦ |
Overview of Scripts ....................................................................................... |
168 |
◦ |
Creating Scripts ............................................................................................ |
169 |
◦ |
Scripted Backup ........................................................................................... |
170 |
◦ |
Scripted Duplicate......................................................................................... |
199 |
◦ |
Scripted Archive............................................................................................ |
215 |
◦ |
Scripted Restore ........................................................................................... |
216 |
◦ Scripted Backup Set Transfer....................................................................... |
221 |
|
◦ |
Scripted Snapshot Transfer .......................................................................... |
226 |
◦ |
Scripted Grooming........................................................................................ |
234 |
◦ |
Scripted Verification ...................................................................................... |
236 |
◦ |
Scheduling Scripts ........................................................................................ |
240 |
◦ |
Saving Scripts ............................................................................................... |
248 |
◦ |
Testing Scripts .............................................................................................. |
250 |
◦ |
Executing Scripts .......................................................................................... |
251 |
◦ |
Controlling Scripts......................................................................................... |
253 |
◦ |
Proactive Backup Scripts.............................................................................. |
254 |
Controlling Operations................................................................................................ |
272 |
|
◦ |
Controlling Operations Overview .................................................................. |
272 |
◦ |
Stop Button ................................................................................................... |
272 |
◦ |
Activity Monitor ............................................................................................. |
273 |
◦ |
Media Request Window ................................................................................ |
284 |
◦ |
Multiple Concurrent Executions.................................................................... |
288 |
Networked Clients ...................................................................................................... |
295 |
|
◦ |
Networked Clients Overview......................................................................... |
295 |
◦ |
Installing Clients ............................................................................................ |
296 |
◦ |
Working with Clients ..................................................................................... |
300 |
◦ |
Updating Clients............................................................................................ |
309 |
◦ Uninstalling a Client and Its Software ........................................................... |
311 |
|
◦ |
Advanced Networking................................................................................... |
312 |
◦ New Retrospect Client software ................................................................... |
320 |
|
◦ User-initiated backups and restores............................................................. |
320 |
|
◦ Locking client features and preferences ....................................................... |
325 |
|
◦ |
Backing up Clients ........................................................................................ |
326 |
◦ Working with Windows Clients...................................................................... |
327 |
|
◦ Working with Mac OS Clients ....................................................................... |
328 |
|
◦ Working with UNIX Clients ............................................................................ |
329 |
|
◦ |
File System Conversions............................................................................... |
330 |
◦ |
Microsoft Networking Volumes ..................................................................... |
331 |
◦ |
Network Backup Guidelines.......................................................................... |
331 |
Disaster Recovery....................................................................................................... |
336 |
|
◦ Creating a Retrospect Emergency Recovery Disc........................................ |
336 |
|
◦ Using the Retrospect Emergency Recovery Disc ......................................... |
339 |
|
◦ Making your system bootable on different hardware ................................... |
349 |
|
Management ............................................................................................................... |
358 |
|
◦ |
Backup Strategies......................................................................................... |
358 |
◦ |
Log and Reports ........................................................................................... |
364 |
◦ |
Execution Options......................................................................................... |
372 |
◦ |
Managing Backup Sets ................................................................................. |
394 |
◦ |
Maintaining Scripts ....................................................................................... |
412 |
2
◦ |
Retrospect Preferences ................................................................................ |
419 |
◦ |
Moving Retrospect........................................................................................ |
433 |
◦ Catalog and Configuration Backups ............................................................. |
434 |
|
◦ Working with File Servers.............................................................................. |
435 |
|
◦ Working with Open Files ............................................................................... |
436 |
|
◦ Terminal Services and Remote Desktop....................................................... |
439 |
|
Tools ........................................................................................................................... |
|
442 |
◦ |
Working with Volumes................................................................................... |
442 |
◦ |
Browsing ....................................................................................................... |
453 |
◦ |
Using Selectors ............................................................................................. |
460 |
◦ |
Maintenance and Repair ............................................................................... |
479 |
◦ |
External Scripting .......................................................................................... |
488 |
Problems and Solutions.............................................................................................. |
492 |
|
◦ Tips and late-breaking information ............................................................... |
492 |
|
◦ |
Troubleshooting ............................................................................................ |
493 |
◦ |
Common Questions ...................................................................................... |
507 |
◦ |
Retrospect Error Messages .......................................................................... |
519 |
◦ |
Retrospect Error Numbers ............................................................................ |
522 |
◦ |
Retrospect Client Errors................................................................................ |
517 |
◦ |
Retrospect Support....................................................................................... |
530 |
Appendices
Block Level Incremental Backup ................................................................................ |
531 |
|
◦ |
Overview ....................................................................................................... |
531 |
◦ |
Storage Savings ............................................................................................ |
531 |
◦ |
Usage ............................................................................................................ |
532 |
◦ |
Logging ......................................................................................................... |
533 |
◦ |
Options.......................................................................................................... |
533 |
◦ |
Backward Compatibility ................................................................................ |
534 |
◦ |
Technical Details ........................................................................................... |
535 |
SQL Server Agent ....................................................................................................... |
536 |
|
◦ |
What's New ................................................................................................... |
536 |
◦ |
Security ......................................................................................................... |
537 |
◦ |
Installation ..................................................................................................... |
540 |
◦ |
General Use................................................................................................... |
542 |
◦ |
Backing Up.................................................................................................... |
544 |
◦ |
Database Backup History ............................................................................. |
545 |
◦ |
Restoring ....................................................................................................... |
546 |
◦ |
Disaster Recovery ......................................................................................... |
550 |
Exchange Server Agent .............................................................................................. |
553 |
|
◦ |
What's New ................................................................................................... |
553 |
◦ |
Security ......................................................................................................... |
555 |
◦ |
Installation ..................................................................................................... |
558 |
◦ |
General Use................................................................................................... |
560 |
◦ |
Backing Up.................................................................................................... |
564 |
◦ |
Database Backup History ............................................................................. |
565 |
◦ |
Restoring ....................................................................................................... |
566 |
◦ |
Disaster Recovery ......................................................................................... |
574 |
VMware Host Server Add-on ...................................................................................... |
575 |
|
3 |
WINDOWS USER'S GUIDE |
◦ |
Introduction ................................................................................................... |
575 |
◦ |
To Back up VMware Virtual Machines .......................................................... |
575 |
◦ |
Restoring from VMware Backups ................................................................. |
579 |
Instant Scan ................................................................................................................ |
580 |
|
Retrospect for iOS ...................................................................................................... |
587 |
|
Protecting virtual machines with VMware Consolidated Backup............................... |
589 |
|
◦ |
Requirements ................................................................................................ |
589 |
◦ Configuring VCB for backups ....................................................................... |
589 |
|
◦ Configuring Retrospect and Backing Up ...................................................... |
590 |
|
Legacy Client .............................................................................................................. |
593 |
|
◦ |
Client Preferences......................................................................................... |
593 |
◦ |
Access Master Control.................................................................................. |
595 |
◦ |
General Preferences...................................................................................... |
595 |
◦ |
Notification Preferences................................................................................ |
597 |
◦ |
Priority Preference......................................................................................... |
597 |
◦ |
Access Restrictions Preferences .................................................................. |
597 |
◦ |
Influencing Proactive Backups...................................................................... |
598 |
◦ Scheduling from a Client............................................................................... |
598 |
|
◦ |
Deferring Execution....................................................................................... |
599 |
◦ |
Client User Preferences ................................................................................ |
600 |
◦ |
Access Master Control.................................................................................. |
602 |
◦ |
General Preferences...................................................................................... |
602 |
◦ |
Notification Preferences................................................................................ |
605 |
◦ |
Controlling Proactive Backups...................................................................... |
605 |
Glossary ...................................................................................................................... |
609 |
|
Release Notes............................................................................................................... |
15 |
|
4

Chapter 1
What's New
This document contains important information about Retrospect 11 for Windows. Please read it carefully.
The Retrospect website is regularly updated with the most recent support information for Retrospect and related products, including the following:
•Retrospect Support
•Retrospect Updates
•Release Notes
•Cloud Backup
•Performance-Optimized Grooming
•Faster Catalog Rebuild
•Backup and Restore Performance Improvements
•Portable Backup Sets/Media Sets
•Microsoft Exchange 2016 Database Certification
•Bug fixes
Downloads – See the latest updates.
Cloud Backup
Retrospect v11 for Windows and Retrospect v13 for Mac both support cloud backup. Cloud backup to third-party cloud storage providers allows Retrospect customers a seamless way to protect their Windows, Mac, and Linux environment off-site. Retrospect is certified for cloud storage with worldwide cloud storage providers Amazon S3 and Google Cloud Storage, as well as regional cloud storage providers DreamHost, Dunkel, ArubaCloud, and Numergy.
See a full list of Certified Cloud Storage Providers. See our Knowledgbase for detailed instructions on setting up a cloud storage account.
Retrospect’s cloud backup support offers a number of advantages:
•Cost Effective – Public cloud storage providers like Amazon and Google offer the lowest prices for storage with a pay-for-use model, rather than flat-fee storage tiers.
•Zero Knowledge Security – Industry-standard AES-256 encryption assures customers that their data and their encryption keys remain theirs, regardless of whether their cloud storage provider suffers a security breach.
•No Cloud Storage Lock-in – The cloud storage landscape is evolving fast, and customers are always able to find the best fit for their environment by migrating between providers.
5 |
WINDOWS USER'S GUIDE |
•Advanced Seeding and Large Scale Recovery Support – Bandwidth is a limiting factor for cloud backup, so Retrospect supports seeding options for the initial backup and large scale recovery for large restore scenarios.
•Private Cloud Support – Retrospect is certified to back up to Basho Riak CS, an open-source software that allows partners to run a private cloud in their own data center. Partners can quickly set up their own private cloud for their customers to utilize.
Integration
Cloud backup is deeply integrated into Retrospect. It's supported by all of Retrospect's other powerful features, such as selectors and rules, backup set and media set transfer, grooming, and catalog rebuild.
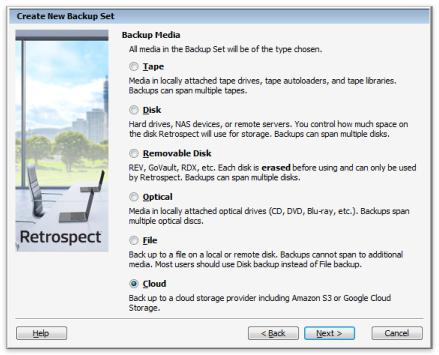
Adding Cloud Storage
Adding cloud storage as a destination is simple. Retrospect has a new set type called "Cloud". Create a new backup set/media set and select "Cloud" as the type.
Windows Interface
CHAPTER 1 • WHAT'S NEW |
6 |

Mac Interface
Next you'll need to enter your cloud storage credentials. You'll need to set up a cloud storage account first. This account will give you a URL to your new storage location, an "Access Key" (similar to a user name), and a "Secret Key" (similar to a password).
Different cloud storage providers offer different options. Retrospect allows customers to enable or disable SSL encryption (HTTP or HTTPS) and to set the maximum storage usage, up to 8TB per cloud member.
7 |
WINDOWS USER'S GUIDE |
Windows Interface
Mac Interface
Using Cloud Storage
Using cloud storage is simple. After you have created a cloud set, create a new script or add it to an existing one, and click "Run". The backup will begin with the contents of the set being uploaded to your cloud storage location. You can track the progress in the execution/activity.
CHAPTER 1 • WHAT'S NEW |
8 |

Disable Verification – Switch "Verification" to "No verification" when using cloud storage. Retrospect backups are automatically set to Thorough Verification. This verification process compares the files written to the backup set with the files on the original source, effectively reading back the new data from both the backup set and the backup source. Backup verification defaults to this mode to ensure Retrospect immediately identifies any issue with the underlying storage media that the set is stored on.
However, it is not necessary for cloud backups. Public cloud storage providers build redundancy and error checking into their systems to guarantee the safety of the data they store. Moreover, if verification is enabled during a backup, either Media Verification or Thorough Verification, Retrospect will download the newly finished backup from cloud storage, and that process can increase costs in terms of both time and cloud data download charge.
Windows Interface
9 |
WINDOWS USER'S GUIDE |

Mac Interface
Cloud Bandwidth Throttling
Throttling for cloud backup and cloud restore is available in Preferences.
Windows Interface
CHAPTER 1 • WHAT'S NEW |
10 |

Mac Interface
Seeding for Cloud Storage
Uploading to the cloud takes time. To shorten this time, a number of cloud storage providers offer seeding. Seeding allows customers to back up their data to a local hard drive and then send that hard drive to the cloud storage provider. The cloud storage provider then imports that data into the customer's storage location. This process enables customers to send a large amount of data to the provider faster than it would take to upload it. After the data is imported, the customer can change the set's location in Retrospect to the cloud location and begin incremental backups. It's a simple process with significant performance gains for large environments. See the screenshots below.
11 |
WINDOWS USER'S GUIDE |

Windows Interface
Mac Interface
Large Scale Recovery for Cloud Storage
Downloading from the cloud also takes time. Download speeds are significantly faster than upload speeds, but for a large restore, customers need a faster option. Similar to "Seeding for Cloud Storage", Large Scale Recovery for cloud storage enables customers to request their entire backup set from their cloud storage provider. If their provider offers this service, customers can order a hard drive that contains their data and have it sent to their
CHAPTER 1 • WHAT'S NEW |
12 |

office. When they receive it, they launch Retrospect and edit the cloud set member's location to the new local version. Retrospect can then start the large restore immediately.
Performance-Optimized Grooming
Retrospect v11 for Windows and Retrospect v13 for Mac include a new performanceoptimized grooming mode that is up to 5x faster. With grooming, customers stay protected with a long-term backup retention policy to ensure recovery from yesterday, last week, last month, or five years ago, using storage that fits their budget. Performanceoptimized grooming enables customers to quickly leverage this space-saving process.
Performance-optimized grooming complements the existing grooming mode, now called "Storage-optimized grooming". Storage-optimized grooming reclaims as much space as possible, rewriting the backup set to ensure it does not include any outdated backup information. Performance-optimized grooming makes certain decisions about what data to remove, only removing outdated backup information that it can quickly delete. On a technical level, this faster grooming mode only deletes whole RDB files instead of rewriting them. For this reason, cloud backup sets/media sets only support performance-optimized grooming. This requirement ensures customers can efficiently groom out old backup information without rewriting their cloud data set.
Windows Interface
13 |
WINDOWS USER'S GUIDE |

Mac Interface
Faster Catalog Rebuild
Retrospect v11 for Windows and Retrospect v13 for Mac both have under-the-hood performance improvements to catalog rebuild. Rebuild's performance has been a problem for customers. With this latest version, the rebuild process is now significantly faster, up to 3x in some cases. It supersedes the existing performance optimization, "Fast Catalog Rebuild", which has been removed.
The new process does require a backup operation to an existing set beforehand; this caches more information about the catalog in the set, so that if a rebuild is necessary, the operation can quickly reconstitute the original catalog.
Backup and Restore Performance Improvements
Retrospect v11 for Windows and Retrospect v13 for Mac also includes under-the-hood performance enhancements to backup and restore. Both operations are now up to 20% faster due to substantial matching improvements. Matching is Retrospect's process for comparing what files backup set/media set already contains, and Retrospect uses it during all backup and restore operations. Matching is now up to 6x faster.
Portable Backup Sets/Media Sets
Retrospect v11 for Windows and Retrospect v13 for Mac now allow customers to move the member folders of disk sets to new locations and let Retrospect know by simply editing the members and picking the new location. There are scenarios where moving these files is preferable to a set transfer.
CHAPTER 1 • WHAT'S NEW |
14 |
Microsoft Exchange 2016 Database Certification
Retrospect is certified for Microsoft Exchange 2016 database protection. Mailbox backup will be supported in a future release.
Bug fixes
This latest release of Retrospect includes fixes for numerous issues. For a list of bugs fixed in this release, please refer to the Release Notes.
15 |
WINDOWS USER'S GUIDE |

Chapter 2
Getting Started
•Overview of Retrospect
•Requirements
•Creating a Retrospect User Account
•Installing Retrospect
•Using Retrospect
•Using Windows 8, 7, Vista, Server 2012 and Server 2008
•Upgrading from a previous version of Retrospect
•Retrospect Updates
This chapter describes the hardware and system requirements necessary to use Retrospect, then explains how to install or upgrade the Retrospect software. It also provides a basic overview of how to use Retrospect. Requirements and installation of Retrospect Clients are described in Networked Clients.
Overview of Retrospect
Designed for use in small to mid-sized businesses, Retrospect Multi Server, Single Server, and Single Server (Disk-to-Disk) provide thorough, fast backups, and 100%-accurate restores of networked servers, desktops, notebook computers, and business critical applications. Retrospect Desktop delivers the proven capabilities of Retrospect’s enterprise-class products to the home and small business user. The Retrospect product line protects against loss due to viruses, newly installed software, user error, damaged hardware, hardware upgrades, hackers, and lost or stolen computers. The industry leader in data protection for more than a decade, Retrospect has received numerous awards and protects millions of computers worldwide.
Which Edition is Right for You?
There are four editions of Retrospect available. Depending on the needs of your organization, one of these editions is right for you. The following table lists some Retrospect features and shows which editions they are available with.
•Multi Server – Protects any number of networked Windows, Mac, and Linux servers, desktops, and notebooks from a single host computer running Retrospect. Supports disk and tape storage devices.
•Single Server – Protects one server and any number of networked Windows, Mac, and Linux desktops and notebooks from a single host computer running Retrospect. Additional server client licenses can be purchased to protect more networked Windows, Mac, or Linux servers. Supports disk and tape storage devices.
•Single Server (Disk-to-Disk) – Protects a single Windows Server and five workstations using local, network, and cloud diskbased storage. Formerly Retrospect Disk-to-Disk.
•Desktop – Protects a single non-server Windows PC and up to five additional Windows, Mac, and Linux desktops and notebooks. Formerly Retrospect Professional.
CHAPTER 2 • GETTING STARTED |
16 |
Retrospect Add-on Products
A number of advanced Retrospect features are only available if you have the appropriate license code. Click Configure>Licenses to view your current licenses or purchase new ones.
•VMware Host Server – Protects VMs with file-based agent-less backups and restores in ESX 4 and ESXi 5.0/5.1 environments.
•Open File Backup Unlimited – Protects open files on NTFS-formatted volumes on Windows servers, desktops, and laptops. This add-on makes it possible to protect line-of-business applications—such as accounting, CRM, and proprietary database systems—while they’re running, even those with data files spread across multiple volumes. Retrospect’s Open File Backup Unlimited add-on extends to all Windows systems protected by your Retrospect host server, including end-user desktops and laptops.
•Open File Backup Disk-to-Disk Edition – Protects open files on NTFS-formatted volumes on the one Windows server. This add-on makes it possible to protect line-of-business applications—such as accounting, CRM, and proprietary database systems—while they’re running, even those with data files spread across multiple volumes. Retrospect’s Open File Backup Disk-to-Disk Edition add-on covers your Retrospect host server only. Specifically for Retrospect Single Server (Disk-to-Disk) and Desktop (Professional).
•Dissimilar Hardware Restore Unlimited – Makes it possible to recover an entire boot volume—including the OS, applications, registry, and data—to a different physical computer, such as a newer model or even one from a different manufacturer entirely. Retrospect’s Dissimilar Hardware Restore Unlimited add-on extends to all Windows systems protected by your Retrospect host server, including end-user desktops and laptops.
•Dissimilar Hardware Restore Disk-to-Disk Edition – Makes it possible to recover your Windows server—including the OS, applications, registry, and data—to different physical hardware, such as a newer model or even one from a different manufacturer entirely. Retrospect’s Dissimilar Hardware Restore Disk-to- Disk Edition add-on covers your Retrospect host server only. Specifically for Retrospect Single Server (Disk-to-Disk) and Desktop (Professional).
•Microsoft SQL Server Agent – Provides hot backups of Microsoft SQL Server 2014, 2012, 2008, and 2005. Automatically restores a SQL Server or individual databases to a specific point in time. Licensed for use on a SQL server running either the Retrospect application or as a Retrospect Client; includes a Retrospect Server Client license.
•Microsoft Exchange Server Agent – Provides hot backups of Microsoft Exchange Server 2016, 2013, 2010, 2007, and 2003 storage groups, databases, and mailboxes. Automatically restores an Exchange Server or individual components to a specific point in time. Licensed for use on an Exchange Server running either the Retrospect application or as a Retrospect Client; includes a Retrospect Server Client license.
•Advanced Tape Support – Improves backup times by utilizing multiple tape drives in parallel, including multiple stand-alone drives, drives in libraries, or drives in autoloaders. The Advanced Tape Support add-on is licensed per Retrospect host server, not per tape drive. For example, only one Advanced Tape Support add-on license is required for a library with four tape drive mechanisms.
17 |
WINDOWS USER'S GUIDE |
•Retrospect Client Packs – Extends the number of networked desktops and notebook computers that can be backed up using Retrospect Disk-to-Disk or Desktop editions. Available in 1, 5, and 10 client license packs.
•Retrospect Server Client – Extends the number of networked servers that can be backed up using Retrospect Single Server editions. Each Retrospect Server Client adds a license for protecting one additional server as a network client.
•Annual Support & Maintenance (ASM) – Provides technical support via email and phone (available in select regions) and all upgrades/updates of purchased product at no additional cost for 1 year from the date of ASM purchase.
Requirements
In order to run and use Retrospect, certain minimum requirements of hardware, software, and memory must be met. Requirements of client computers are detailed in Networked Clients.
System Requirements
Retrospect 11 for Windows
Supported Operating Systems:
•Microsoft Windows 10/8/7/Vista/XP
•Microsoft Windows Server 2012 R2/2012/2008/2003*
•Microsoft Windows Server 2012 Essentials*
•Microsoft Windows SBS 2011/2008/2003*
•Microsoft Windows Storage Server 2008/2003*
*Retrospect Desktop doesn’t run on a Windows Server.
Supported Hardware:
•Pentium-class processor (32and 64-bit)
•1 GB for each concurrent activity; 3 GB minimum for 32-bit Windows, 4 GB minimum for 64-bit Windows
•10-15 GB of temp hard disk space for each concurrent activity (backup, restore, etc.)
•Adequate storage for backups
Recommended Configuration:
•Latest Service Pack
•One or more multicore processors
Retrospect 11 Client for Windows
•Microsoft Windows 10/8/7/Vista/XP
•Microsoft Windows Server 2012 R2/2012/2008/2003*
•Microsoft Windows Server 2012 Essentials*
•Microsoft Windows SBS 2011/2008/2003*
•Microsoft Windows Storage Server 2008/2003*
•Pentium processor or later
•RAM that meets Microsoft's guidelines for each OS
CHAPTER 2 • GETTING STARTED |
18 |
*Backing up server OS clients requires Retrospect Multi Server or other Server edition with available Server Client Licenses.
Retrospect 13 Client for Mac
•Mac OS X or Mac OS X Server 10.6.8 or later, including OS X Yosemite 10.10
•Intel processor
•RAM that meets Apple's guidelines for each OS
*Backing up server OS clients requires Retrospect Multi Server or other Server edition with available Server Client Licenses.
Retrospect 6.3 Client for Mac
•Mac OS X or Mac OS X Server 10.3.9, 10.4.11, or 10.5.8
•PowerPC G3, G4, or G5
•RAM that meets Apple's guidelines for each OS
*Backing up server OS clients requires Retrospect Multi Server or other Server edition with available Server Client Licenses.
Retrospect 11 Client for Linux
•x86or x64-based system running Red Hat Linux, Red Hat Enterprise Linux, CentOS, Debian, Ubuntu Server and SUSE Linux (Details)
•glibc version 2 or later
Storage Devices
Retrospect supports a wide variety of storage devices as the destination for backups, including hard drives (both directand network-attached), tape drives and libraries, flash storage, and removable disk drives (RDX, REV, etc.). See the Retrospect Device Support Database for a complete list of supported tape drives and libraries.
Creating a Retrospect User Account
In order to back up any disk, remote share, and SQL or Exchange database, Retrospect must be run under a user account that has access to those disks and databases.
Retrospect, Inc. recommends that you create an account that has administrator access to all resources before installing Retrospect.
For SQL and Exchange, make sure the account has the necessary privileges to access all the database servers you want to back up. Make this account a member of:
•Domain Users
•Domain Admins
•Administrators
•Backup Operators
See SQL Server Agent and Exchange Server Agent for more information.
19 |
WINDOWS USER'S GUIDE |
For network volumes, make sure the account has the necessary privileges to access any volume you want to use as a source, destination, or location for saving Catalog Files.
For more information about the Retrospect User Account and how to modify login information, see Security Preferences.
Installing Retrospect
The process for installing Retrospect is the same, regardless of whether you are installing the application for the first time, or upgrading from an earlier version of Retrospect. If you are upgrading, Retrospect automatically copies your previous configuration—including your scripts, schedules, selectors, and clients—for use with the new version. After installing Retrospect, it is a good idea to check for any updates to the application before starting to use it.
To install or upgrade Retrospect:
1.Save all unsaved documents in other running applications.
2.Under Windows, log in to the computer so that you have Administrator privileges.
3.Insert the Retrospect CD in the computer’s CD/DVD drive. In the menu that appears, click Install Retrospect.
If you downloaded the Retrospect installer, run Setup.exe.
4.Follow the instructions in the Setup Wizard to install the software or update an existing installation, then choose the option to restart the computer, if necessary.
5.Some Retrospect upgrades include new application license codes. If your upgrade includes a new code, you will need it. After running the installer, enter the new license code the first time you launch Retrospect.
Installation of Retrospect Clients is described in Networked Clients.
Retrospect Updates
Retrospect Updates are free downloads that provide additional device support or address issues with earlier versions of Retrospect. By default, Retrospect is set up to regularly check for Retrospect Updates and notify you if any are available. You can also manually check for updates at any time.
•You must have a valid internet connection to check for updates. If you use a proxy server to connect to the Internet make sure that Retrospect’s Updates preferences include the correct proxy server information. See Updates Preferences for more information.
•Automatically Checking for Retrospect Updates
•Manually Checking for Retrospect Updates
•Installing Retrospect Updates
Automatically Checking for Retrospect Updates
By default, Retrospect checks for free updates to your current version of Retrospect on a regular basis. To make sure Retrospect’s preference is enabled, choose
CHAPTER 2 • GETTING STARTED |
20 |
Configure>Preferences from Retrospect’s navigation bar. In the Notification category of preferences, click Updates and make sure the check box for “Automatically check for available updates” is selected. See Updates Preferences for more information.
If Retrospect finds an update, you can download it or install it immediately. See Installing Retrospect Updates for more information.
Manually Checking for Retrospect Updates
You can search for free updates to your current version of Retrospect by choosing Retrospect Updates from the Help menu. The dialog box that displays lists the currently installed versions of Retrospect, as well as any device support updates and hot fixes. It also lists the date of the last successful check for updates.
Click Check Now to check the Retrospect web site for available updates.
If there are any updates, Retrospect displays a list of the items available to download and install.
Installing Retrospect Updates
When Retrospect finds an update to your currently installed version of the application, it displays a list of available updates. Select an item from the list, then choose a command:
•Click “More info about this update” to view details about the selected update.
•Click Download to download an installer for the selected update to a location you choose. You can install the update at any time. After installing the update, you must delete the downloaded update installer manually.
•Click Install to download and install the update. Retrospect downloads the update, then prompts you to quit so it can run the update installer. After installing the update Retrospect automatically deletes the update installer. If you decide not to quit Retrospect after downloading the update, the update installer is deleted and the update is not installed.
•Select the “Ignore this update” check box to ignore an update you don’t want to install. The update will still appear in the list, but it will be grayed out.
•Click Close to close the dialog without downloading or installing any updates.
You can only download or install one update at a time. If you want to install multiple updates, select Help>Retrospect Updates and click Check Now after the first update is installed.
Adding Functionality to Retrospect
You can easily expand the functionality of Retrospect with add-on products or upgrade to a more powerful version of the Retrospect family.
To upgrade, choose License Manager from Retrospect’s Window menu. Click Purchase and then click Web to visit the Retrospect Online Store using your web browser.
21 |
WINDOWS USER'S GUIDE |

After you have received your purchased license code by e-mail, click Add in Retrospect’s License Manager window and enter the code, completing your upgrade.
Using Retrospect
Retrospect has a familiar, user-friendly interface. It includes a navigation bar, as well as a toolbar, and keyboard shortcuts, for quick access to frequently used commands.
Starting Retrospect
To start Retrospect, choose Retrospect 11.0 from the Retrospect program group in the Start menu.
Getting Started Wizard
The first time you start Retrospect, the Getting Started Wizard displays.
Enter your application license code in the space provided, then click Next.
If you do not have a license code, you can click the Purchase button for more information about obtaining one.
CHAPTER 2 • GETTING STARTED |
22 |

If you have separate license codes for any Retrospect add-on products, you can enter them here. You can always enter add-on codes later using the License Manager. Click Next to continue.
23 |
WINDOWS USER'S GUIDE |

Enter your name and company name and click Next.
At the registration screen prompt, select one of the following radio buttons, then click Next.
•Register Now, if you have not registered your copy of Retrospect and you would like to do so.
•Register Later, if you want to skip this step.
•Already Registered, if you have already registered your copy of Retrospect.
CHAPTER 2 • GETTING STARTED |
24 |

In order to back up any disk, remote share, and SQL or Exchange database, Retrospect must be running under a user account that has access to those disks and databases.
If you plan to back up remote shares, including SQL or Exchange, Retrospect, Inc. recommends that you create an account that has administrator access to all resources, and enter that information in the fields below “Always run Retrospect as the specified user”.
See Creating a Retrospect User Account for more information.
If you want to use Terminal Services to administer Retrospect when it is running on a remote server, see Terminal Services and Remote Desktop.
25 |
WINDOWS USER'S GUIDE |
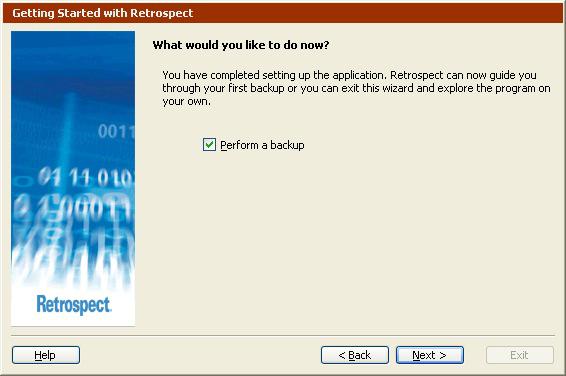
Retrospect is now set up. To start a backup immediately, click Next. To explore the application on your own, clear the “Perform a backup” check box and click Finish.
See Backing Up in Wizard Mode for more information on setting up your first backup.
Leaving Retrospect
Once the Retrospect application is started, you can leave it temporarily by clicking on a program window in the background, or by choosing another program from the Start menu or taskbar. This puts Retrospect in the background, and though it is not the active program, it will continue to perform its current operation, if any, and perform any scheduled operations which come up later.
To exit Retrospect entirely, choose Exit from its File menu. Before exiting, Retrospect informs you of the next scheduled operation, if any.
The Navigation Bar
When you start Retrospect, the program displays its main window, with a navigation bar on the left and a toolbar across the top.
CHAPTER 2 • GETTING STARTED |
26 |

You can access all areas of Retrospect through its navigation bar.
•Click
 to hide the navigation bar.
•Click
 to display the navigation bar.
The navigation bar is organized hierarchically with different categories of functions. Clicking a + icon reveals a category’s items.
Clicking a – icon hides the lower-level items. Clicking a top-level category item shows an overview window. (By default, the Backup overview window is shown when you open Retrospect.)
Each overview window has buttons along the left. To the right of each button is a description of its function or action. Each button’s function requires additional steps and involves more windows or dialogs and buttons.
Right-clicking anywhere in the navigation bar provides access to display options:
•Hide overview/Show overview
•Dock on right/Dock on left
•Right align text/Left align text
Use these option to customize how Retrospect displays the navigation bar.
27 |
WINDOWS USER'S GUIDE |
Loading...