

Page 1
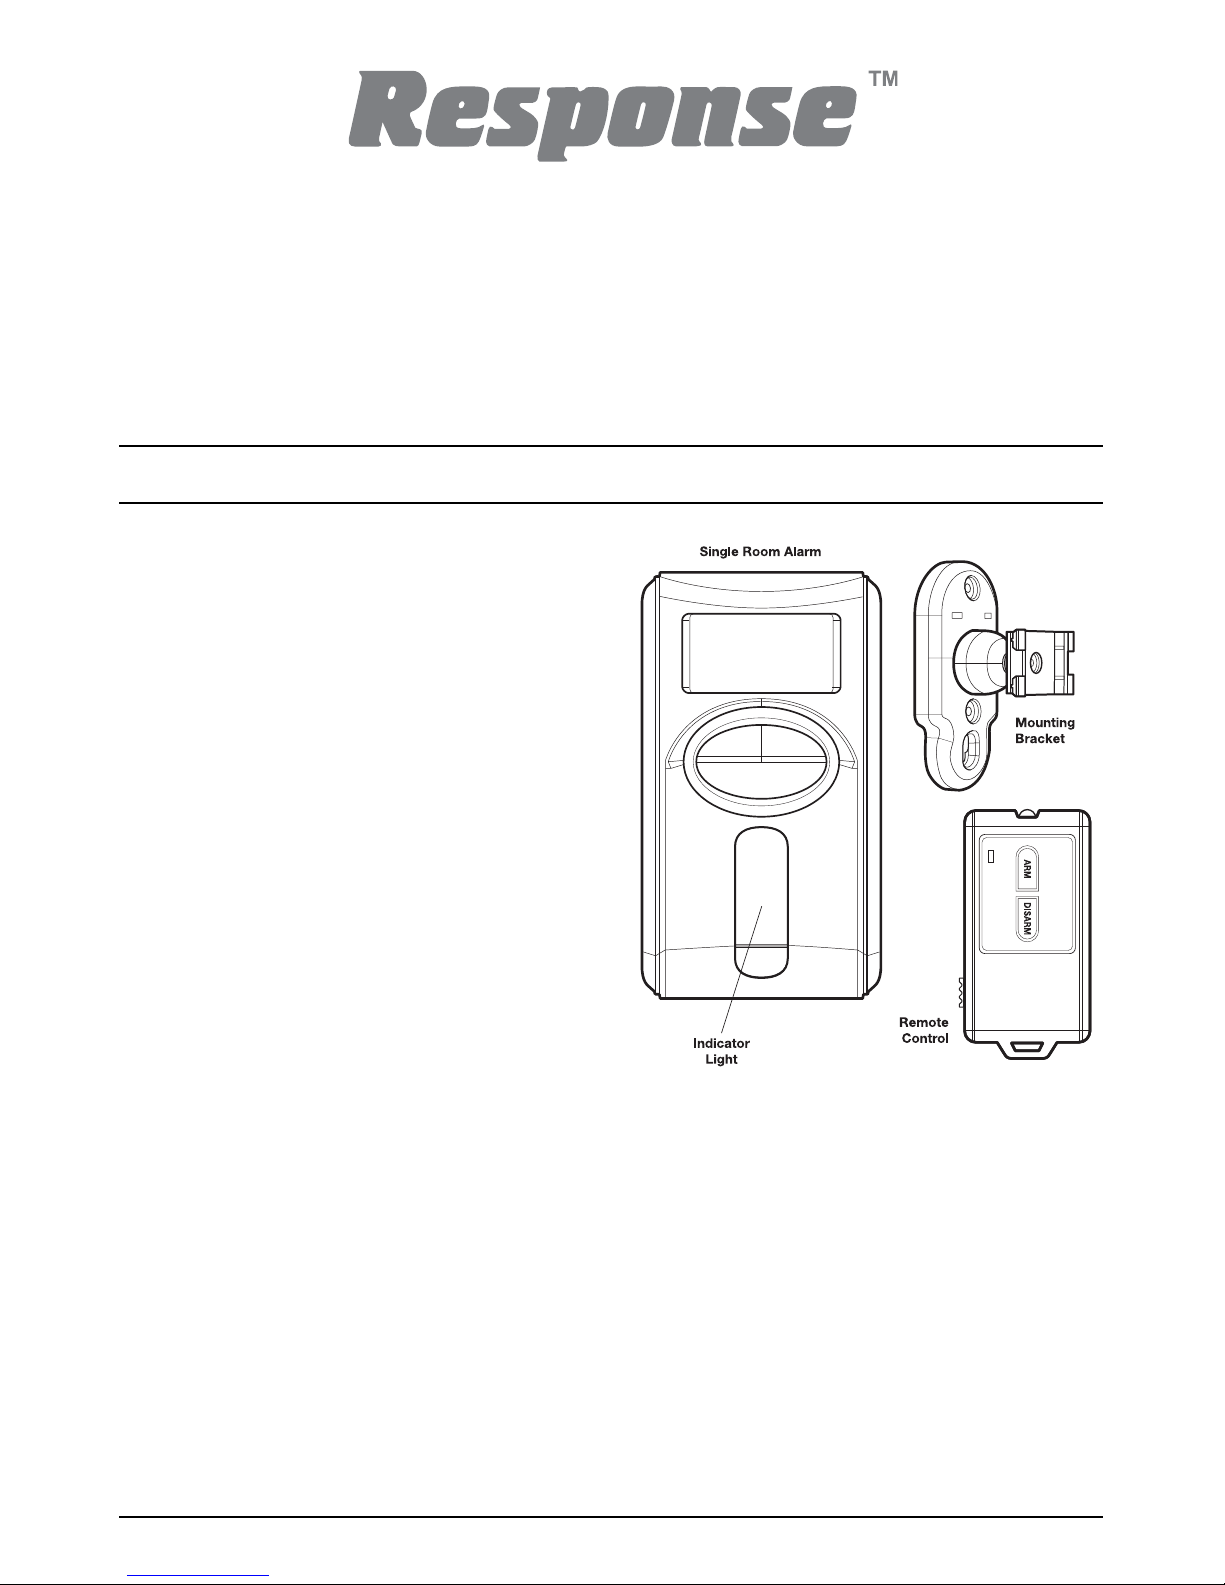
ML6 - Single Room PIR Alarm
with Remote Control
Installation and Operating Instructions
These instructions should be retained in a safe place for future reference.
INTRODUCTION
The Alarm can be either wall mounted using the
bracket supplied or used freestanding for
portable use.
The Remote Control is used to ARM and DISARM
the system. The Remote Control operates using
Infra Red so it must be pointing directly at the PIR
Alarm to function.
A Passive Infra-Red (PIR) detector is designed to
detect movement in an area by detecting changes
in infra-red radiation levels caused for example
when a person/animal moves within the devices
field of vision.
The system has 2 operating modes: ALARM and
CHIME. Chime Mode is a low security feature
that will produce a door-chime sound when the
alarm is triggered. In Alarm Mode the device will
produce a constant high volume alarm sound
when triggered.
Safety: Always follow the manufacturers advice
when using power tools; steps, ladders etc. and
wear suitable protective equipment (e.g. safety
goggles) when drilling holes etc.
Before drilling holes in walls, check for hidden
cables and pipes, the use of a cable/pipe locater
may be advisable if in doubt.
The use of ear protection is advisable when
working in close proximity to the Siren due to the
high sound level produced by this device.
Do not use in wet locations.
INSTALLATION
The alarm is designed to be wall mounted with the
ball and socket mount (included). The ball and
socket mount will provide the flexibility to aim the
motion sensor in a particular direction.
1. Select your desired location for the alarm, such
as the corner of a room. This will provide
maximum coverage.
Note: The sensor has a 6m. detection zone,
with approximate angles of 110° horizontal
and 70° vertical. Recommended installation
height is 1.8 - 2.4m.
Page 2
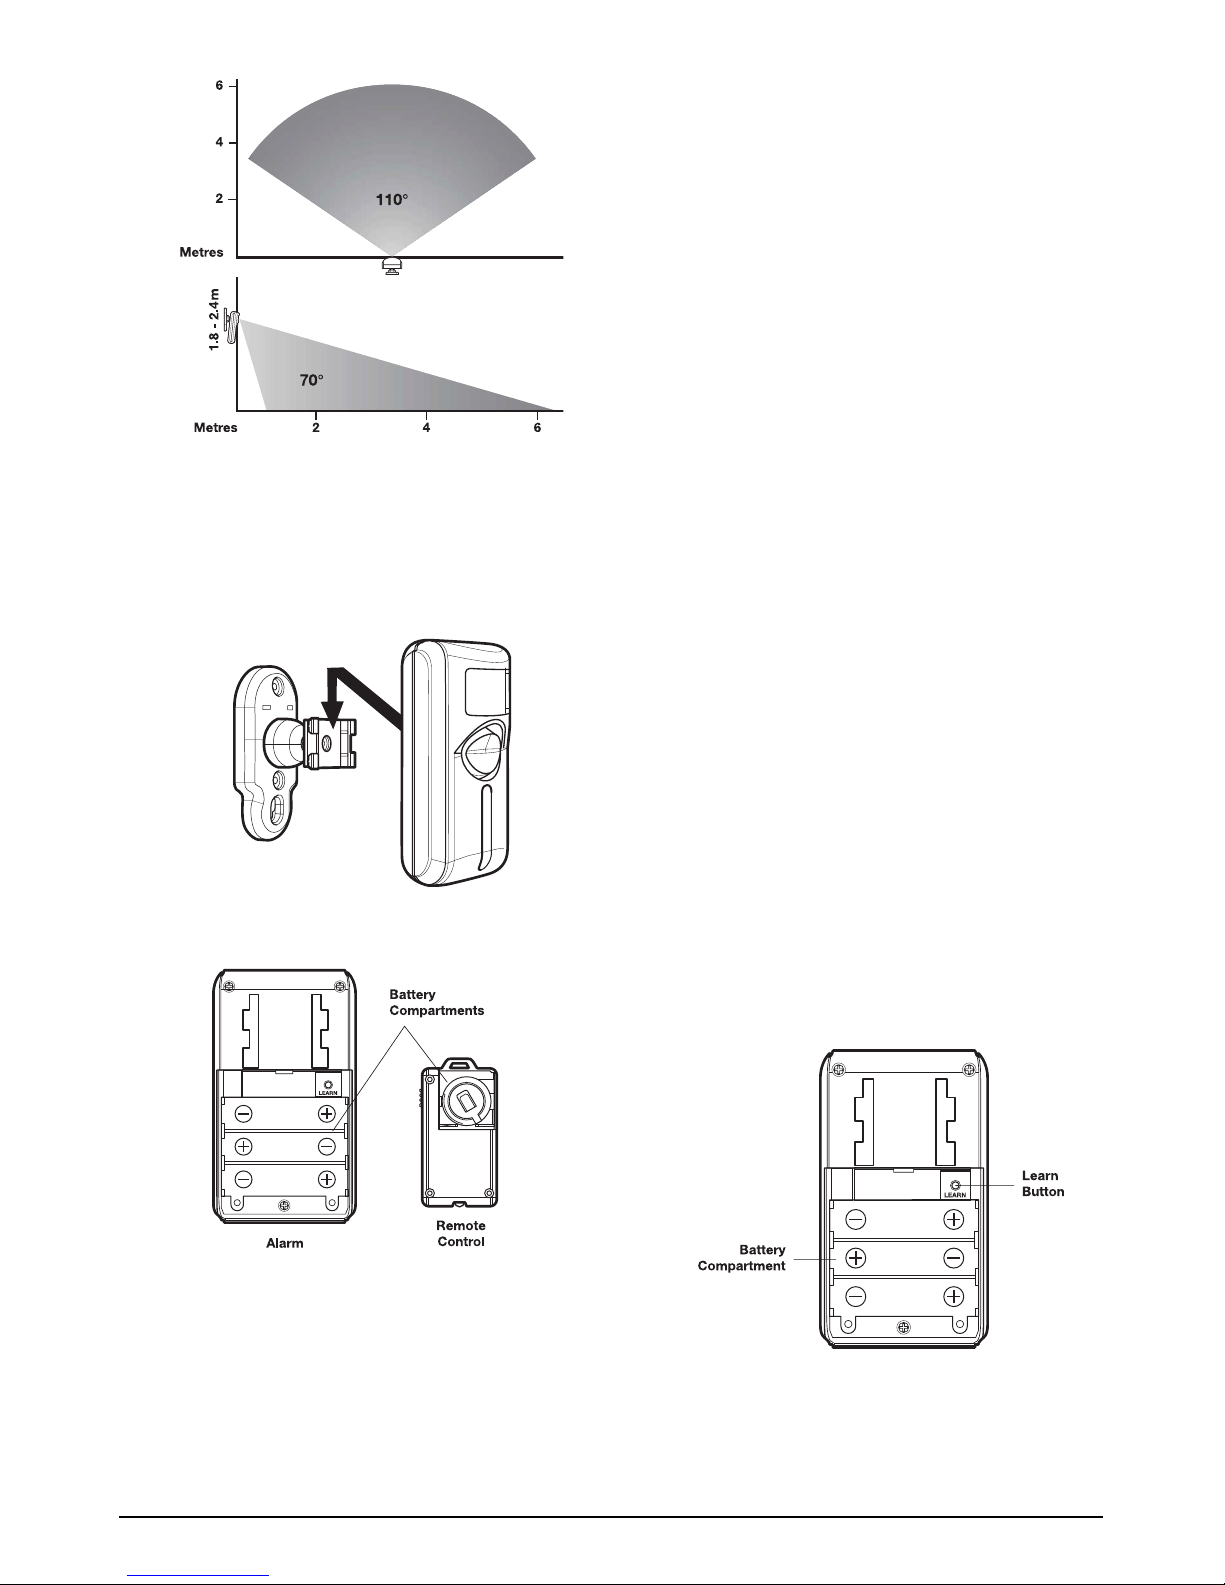
2. Secure the ball and socket mount to the wall
using either the provided wall anchors or by
screwing directly into a wall stud. Once
installed securely on the wall, slide the insert
bracket of the mount into the back of the unit
and lock in place. The mount will click when
secured to the alarm.
INSTALLING BATTERIES
Installing batteries in the Alarm:
The Motion Sensing Alarm requires three AA
Alkaline batteries (not included).
The battery compartment is located on the back of
the unit.
1.
Remove the battery compartment screw and slide
off the cover in the direction of the open arrow.
2. Insert three AA Alkaline batteries (not included).
Take care to note the polarity diagram inside the
battery compartment.
3. Replace battery compartment cover and secure
screw.
Installing the battery in the Remote Control:
The Remote Control is supplied fitted with one
CR2032 battery. Average battery life for typical
usage is up to one year.
The battery compartment is located on the back of
the unit.
1. Slide offthe battery compartment cover located
on the back of the Remote Control.
2. Carefully remove the battery isolation tab fitted.
3. Replace cover.
LOW BATTERY INDICATOR
The Remote Controlled Motion Sensing Alarm has
a low battery indicator light. When the batteries
need to be replaced, the indicator light will flash
slowly. Average battery life for typical usage is up
to one year.
LINKING THE REMOTE CONTROL
TO THE ALARM
Make sure you have installed the batteries before
proceeding.
1. Remove the screw from the battery
compartment cover and slide off the cover in
the direction of the open arrow. Locate the
LEARN button.
2. Press the LEARN button.
3. Immediately point the remote control towards
the front of the the alarm unit and press the
ARM button. The alarm will sound a single short
Page 3

tone, and the light will stop flashing to confirm
the remote has been linked to the Alarm. The
alarm unit will now respond to the remote.
4. Replace the battery compartment cover on the
main alarm unit and secure the screw. The
alarm is now in standby mode.
OPERATING IN ALARM MODE
1. Locate the ALARM/CHIME switch on the side
of the alarm.
2. Slide the switch to ALARM mode.
Arming the Alarm:
1. Point the remote control at the front of the alarm
and press the ARM button. The alarm will sound
a tone and the red indicator light will flash. There
will be a 45 second exit delay before the unit is
armed. The delay allows time for you to leave
the protected area without triggering the alarm.
2. When motion is detected, the alarm unit
will sound a short time and a red light will
flash. The alarm will activate after 30 seconds.
The siren will sound for 30 seconds (unless
disarmed by the remote) and then turn off.
After 15 seconds the alarm will check for motion.
If motion is detected, the siren will sound again.
The cycle will repeat until the unit is disarmed
with the remote.
Disarming the Alarm:
1. When returning to the protected area, the unit
will beep once if motion is sensed.
2. Point the remote control at the front of the
alarm unit and press the DISARM button within
30 seconds to disarm the alarm.
3.
If the disarm button is not pressed within 30
seconds, the alarm will sound. During the entrance
delay, the red indicator light will flash. Use the
remote control at any time to deactivate the alarm.
Note: To test, a cloth can be used to cover the
alarm to reduce risk of hearing damage.
OPERATING IN CHIME MODE
The chime is used to notify you when motion is
sensed in the area.
1. Locate the ALARM/CHIME switch on the side
of the remote.
2.
Slide the ALARM/CHIME switch to CHIME mode.
Activating the Chime:
To activate the chime point the remote control at the
alarm and press the ARM button. The chime will
sound immediately and again when motion is sensed.
Deactivating the Chime:
To deactivate the chime point the remote control at
the alarm and press the DISARM button.
Panic Feature:
For immediate alarm with no delay, point the
remote at the front of the alarm and press and hold
the ARM and DISARM buttons on the remote
control for 2 seconds. To turn off the panic alarm,
point the remote at the front of the alarm and press
the DISARM button.
TESTING MOTION SENSOR
OPERATION
1. Set the remote to CHIME mode and press the
ARM button; the chime will sound once.
2.
After the initial chime, wait 15 seconds and then
wave your hand in front of the sensor. If the chime
sounds immediately, the sensor is working correctly.
3. To discontinue the test, point the remote at the
front of the alarm and press DISARM. Set the
remote to ALARM mode.
MAINTENANCE
To clean the unit housing, use a soft cloth slightly
dampened with water and wipe dry. Do not use
chemical agents as this may damage and
discolor the unit.
Warning:
Risk of personal injury
●
Prolonged exposure to alarm siren may cause
permanent hearing loss.
Battery Warning:
●
Remove batteries before storing the Alarm for
extended periods.
Page 4

●
Batteries may leak harmful liquids or ignitable
materials or explode causing injury and product
damage.
●
Do not mix old and new or other battery types.
●
Replace all batteries at the same time.
●
Replace fully discharged batteries immediately.
●
Do not put the button cells in your mouth as this could
impair your health. Keep out of reach of young
children as they could swallow these and choke.
For indoor use only; do not use in wet locations.
TROUBLE SHOOTING
Remote Control not operating
●
Batteries low, flat, missing or are incorrectly fitted.
●
Infra-Red Transmitter LED obscured.
●
Remote Control not pointing directly at PIR
Alarm Unit
.
PIR Alarm Unit not operating
●
Batteries low, flat, missing or are incorrectly fitted.
●
House code not programmed.
PIR causing false alarms
●
PIR badly positioned, (e.g. in direct sunlight,
draughts and above a radiator etc.).
DISPOSAL AND
RECYCLING
At the end of their useful life the
packaging and product should be
disposed of via a suitable Recycling
Centre.
Do not dispose of with your normal household
waste.
DO NOT BURN.
GUARANTEE
Novar ED&S undertakes to replace or repair at its discretion goods (excluding non rechargeable batteries)
should they become defective within 1 year solely as a result of faulty materials and workmanship.
Understandably if the product has not been installed, operated or maintained in accordance with the
instructions, has not been used appropriately or if any attempt has been made to rectify, dismantle or alter
the product in any way the guarantee will be invalidated.
The guarantee states Novar ED&S entire liability. It does not extend to cover consequential loss or damage
or installation costs arising from the defective product. This guarantee does not in any way affect the
statutory or other rights of a consumer and applies to products installed within UK and Eire only.
If an item develops a fault, the product must be returned to the point of sale with:
1. Proof of purchase.
2. A full description of the fault.
3. All relevant batteries (disconnected).
Response is a trademark of Novar ED&S.
CUSTOMER HELPLINE
Most issues can be solved over the phone in a few minutes.
Please contact our Helpline Team on the number below for any installation
and general advice regarding our products:
0844 736 9149
Lines open 9.00am to 5.00pm, Monday to Friday. Calls charged at service providers national rate.
Novar Electrical Devices and Systems Limited. (A Honeywell Company)
The Arnold Centre, Paycocke Road, Basildon, Essex SS14 3EA. UK
www.friedland.co.uk
© Novar Electrical Devices and Systems Limited. 2009 50042372 Rev.A
 Loading...