


3G GPS Vehicle Tracker
User Manual
LA-9028
-1-
Read before using the product:
1.Power ON / OFF
Press the “ON/OFF” button till the Green/Red LED is ON, then release the button, the tracker is powered ON, when the LED flash means the tracker is working well.
Press the “ON/OFF” button till the all the LED turn off, then release the button, the tracker is powered OFF.
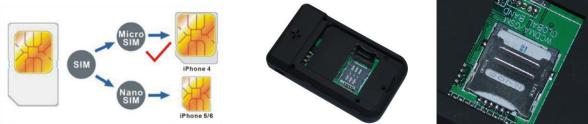
2.Install SIM card (Micro SIM Card)
At first to buy a 3G WCDMA or 2G GSM SIM card which have SMS service and incoming caller ID service & internet data service, in which the SIM card phone number is the very tracker number and all the operation for the tracker is to this number, such as locating immediately, add & delete preset number, change password, enable over speed alarm, enable move alarm etc.
Note:
1.This tracker use WCDMA/GSM network, and need about 10MB-30MB data per month according the different working mode, recommended order a internet data package for the SIM card.
2.This tracker use micro SIM card (bigger than SIM card used in iPhone 5/6), please see the following diagram to select the SIM card.
3.LED flash indicator
Green Power LED Flash once
Green Power LED Flash three times
Green Power LED ON continuously
Red GSM LED Flash once
Red GSM LED Flash twice
Blue GPS LED Flash once
Blue GPS LED ON continuously
:working well
:GSM/WCDMA and GPS working well but battery is low
:Searching GSM/WCDMA network
:Upload location to server OK
:Upload location to server Fail
:GPS OK
:Searching GPS signal
4.Recharge the Battery:
Please check and confirm that the adapter model is suit for this tracker, for which we recommend using OEM
charger to recharge the tracker.While charging, the Green led will flash slowly when the unit is working, and the Red
led will be on when the unit is powered off.
Warning: this tracker use the USB 5V DC voltage to recharge, so too high voltage or AC voltage may damage
-2-
the tracker or even cause accidents.
Use the car adapter or home charger or PC USB to recharge the tracker: insert the USB wire into the tracker and car adapter or home charger or PC USB, If the LED on the adapter is RED, it means it is recharging, if the LED on the adapter is GREEN, it means, it means the recharging is finished. This will take about 2-4 hours.
5.Battery Low Alarm:
When the battery voltage in the tracker is too low, the tracker green LED will flash 3 or 4 times, and send battery low alarm information to authorized number, and later if the battery power is too low, it will power off automatically.
6.Back to Factory Setting
Sending SMS “FACTORY*123456” to the tracker SIM card number, the tracker , the tracker will delete all the user setting (authorized number / Alarm setting / Password / APN / Working mode etc), reset to factory default setting, and then re-power on.
Before power on, press the button B and C simultaneity, then power on. After the GREEN led flashes 5
seconds, release the button, then the unit will re-power on, and reset to factory.
7.ANTENNA
The Antenna is built in the tracker.Pleas leave the tracker away from big metal, this will reduce the GSMWCDMA
or GPS signal.
8.Using Condition
The working temperature is -20 to 60 , over this range the specification maybe can not reach the standard level. the
storage temperature can reach to -40 to 80 .
Simply Using Step
1.First to buy a 2G GSM or 3G WCDMA mobile phone SIM card and enable data service, order a data package (Normally will use about 10M-30M GPRS data every month), install in the tracker, please refer the above Before Using 1 & 2..
2.Press ON/OFF button till the tracker power on, first time using please put the tracker outdoor for easy get GPS & GSM signal.
3.Send SMS “URL*123456” to the tracker, a few minutes later, the tracker will get the location with Google map link by SMS. Please refer the following Locate Operation & Setting 3.
4.This tracker default working mode is 1, the tracker locating & uploading is controlled by shock sensor, if the tracker is moving , the tracker will upload the location to server every 5 minutes (time interval can be set, please refer Locate Operation & Setting 6), if the tracker stop moving, 2 minutes later, the tracker will
-3-
stop locating & uploading location to server. 5 different geo-fence in or out alarm can be set, the alarm information will send to user by SMS, the battery working time can reach to 2-5 days at this working mode.
5.In the default working mode 1, if user need the tracker stop locate & upload location to server, user can send SMS (SLEEPON*123456*0*24) to make the tracker go to sleep mode, and then only SMS and calling can trigger the tracker locate & uploading location by GPRS or SMS, the tracker will not locate & upload location any more unless user turn off the sleep mode by sending SMS “SLEEPOFF*123456” to tracker.
6.If the tracker is used for tracking express goods, working mode can be set to 3, and the power on off time interval can be set, at this status, the tracker will power on every setting time (for example every 2 hours)
&locate and uploading location to server, and then auto power off to waiting another power on. The working mode changing please refer the following Locate Operation & Setting 5.
7.Visit & login the tracking platform www.responsegps.com , display current location, playback history tracking etc can be operated, platform user name and password is the last 7 digital numbers of the tracker’s ID (the ID is print on the battery, for example ID is : 026201612345678, and then the user name is : 2345678, password is :2345678 or 123456, user can change the password).
Different trackers can move to to one account, contact your distributor to do this.
8.iPhone Android App also use the same user name and password with website login, downloading & installation please refer the platform operation guide.
9.This tracker can auto download & configure APN & GPRS user name & password, if the auto configure is not right, the tracker can not upload location to server, then you need send SMS to tracker to change the APN & GPRS
manually, and send “CHECK*123456” to tracker can check the tracker setting, call the tracker SIM card supplier to confirm the APN & GPRS is right, please refer the following Senior Operation & Setting 6 to set APN & GPRS username and password.
10. Different working mode make the big different battery time, the battery can be from 1 days to 5 days.
In the following content, all the SMS content is mark by “”, and this “” is not include in the
SMS content, it is only to used to mark the SMS content.
Locate Operation & Setting
1. Add authorized phone number
Send SMS“ADDPHONE*123456*A*phonenumber” to tracker is OK, “ADDPHONE” is fixed command; “123456” is password; “A” is authorized number location, every tracker have 3 authorized phone number locations, A and B, and C, so you can set 3 phone numbers, phonenumber means the mobile phone number you want to set, if the add operation is success, the tracker will send back the information ”Add Preset Phone OK”, if the password is not right, the operation is fault, the tracker will send back information “Wrong Password”.
2. Making a call trigger reply Location Description by Text (Platform is not necessary):
Call the tracker SIM card number, after ring 3 times, the tracker will hang up the call automatically and locate immediately, a few seconds later, the tracker will send back SMS with current location text description, If the tracker has set the authorized phone number, only authorized number calling the tracker can trigger the tracker locate and
-4-
 Loading...