

Page 1

GSM/GPS Tracker
User Manual
Page 2

GSM/GPS Tracker
A GSM and GPS tracking solution to locate and track the where abouts of
your vehicle in real time via the Internet on a computer or smart phone.the
device is easy to install with only2-4wires to connect.Insert a GSM SIM card
(not included)and hide the device away on a metal surface or carpet using the
included velcro adhesive.It works by sending the vehicle'sGPS coordinates
via the GSM network to the free online tracking service,which shows the location
on google maps.It can also SMS longitude and latitude coordinates to up to 3
mobile phones,as well as alerts when vehicle exits a pre-determined area or
exceeds pre-set speed.
Other features include an engine kill function to remotely disable the petrol
pump,and movement sensor to extend battery life.an SOS/panic button is also
supplied which can send an SMS to the pre-programmed mobile phones.the
built-in rechargeable Li-ion battery will keep the device functioning for up to 4
days when power is disconnected, which could help you locate the vehicle
should it have been stolen and abandoned.
There is no installation or on-going tracking charges. You only pay for the
GSM SIM card and service.
1
1
3
4
12
17
18
19
21
INDEX
Page 3
OPEN
LOCK
Contents
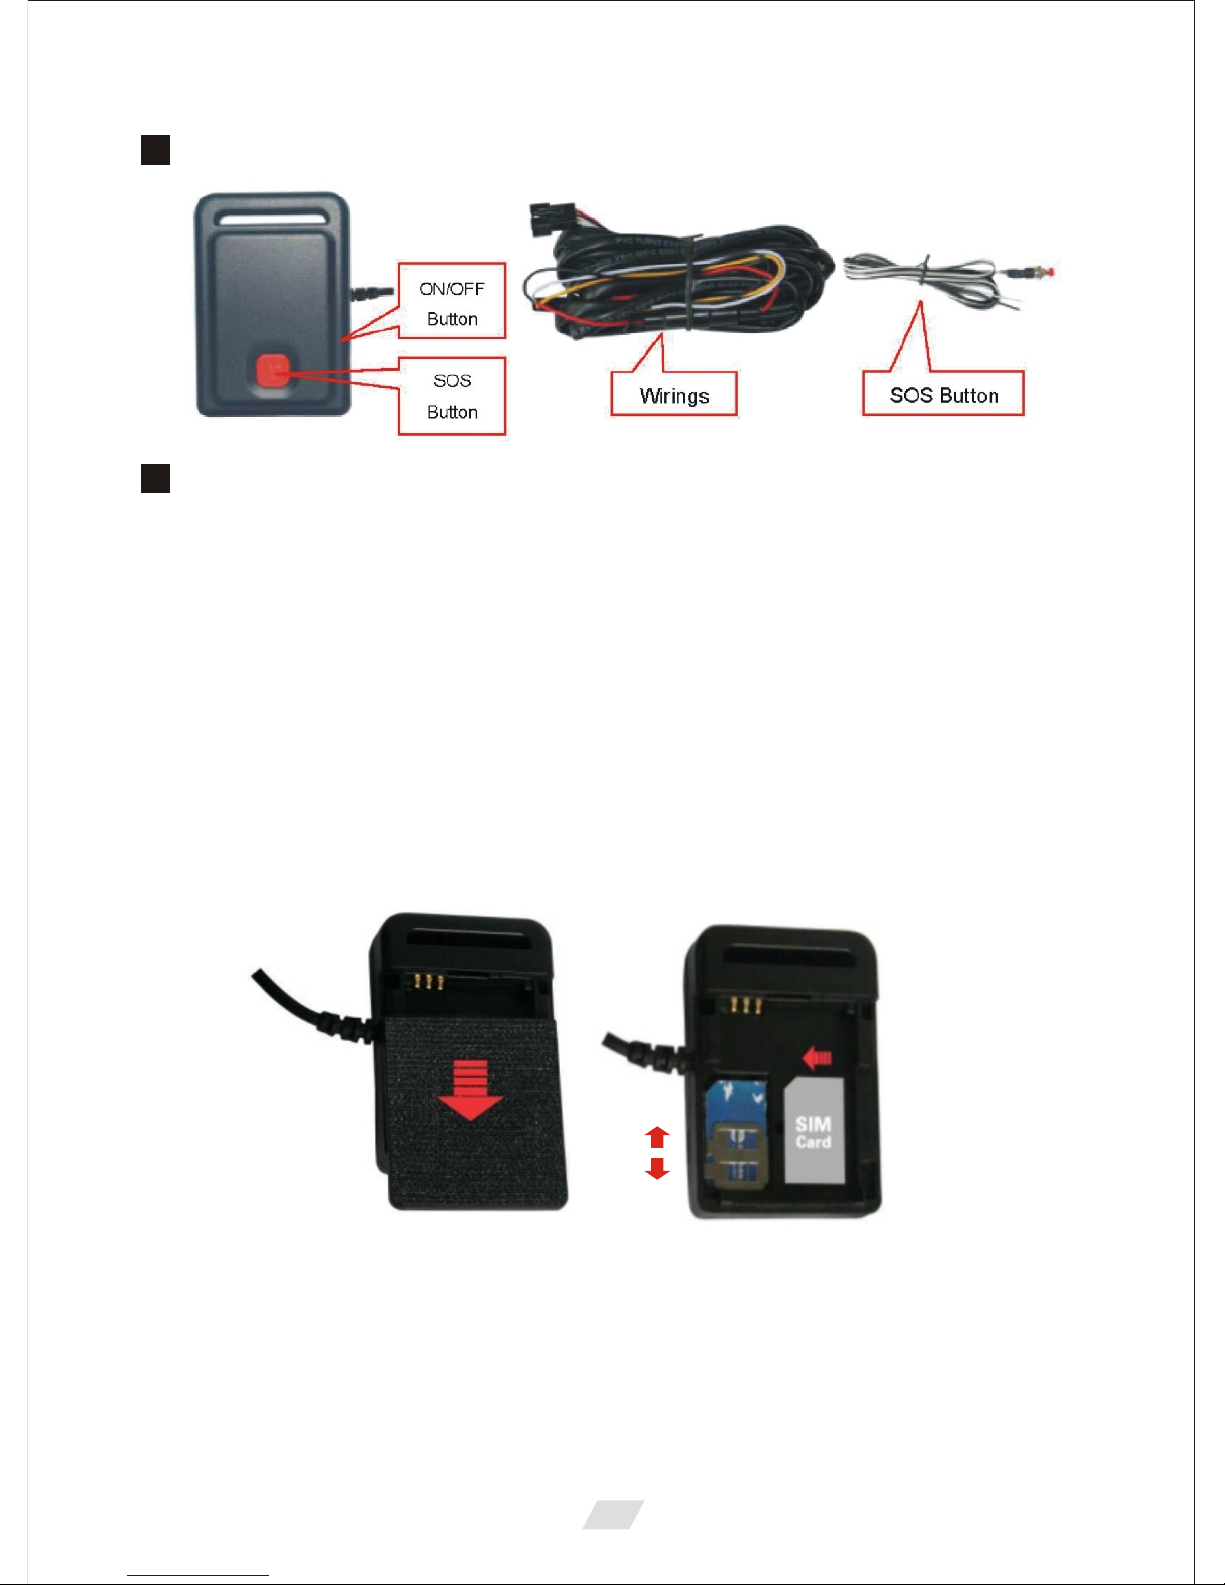
1. Installing The SIM Card
Remove the battery cover according to the following diagram below.
remove the battery exposing the SIM card socket.Push the SIM card metal
cover up to release the socket and place the SIM card into the socket(ensure
that the SIM card contact is facing down). Cover the SIM card metal cover and
push to the "LOCK" position to lock the SIM card, and then put the battery in
and lock the battery cover.
Note:
1.The tracker is compatible with 3G SIM cards, however it only uploads through
GPRS using a 2G band. It will not work on CDMA or 3G (WCDMA or CDMA2000)
networks.
2.Please confirm the PIN code of the SIM card is disabled.
3.Before installing or uninstalling the SIM card, phease power off the tracker.
Before Use
2.Power ON/OFF
When power is OFF,please press the"ON/OFF"button until the GREEN LED
turns ON.
When power is OFF, connect the power to12V or24V source,the tracker will
power on automatically.
When the power is ON,press and hold the "ON/OFF" button until the GREEN
LED flashes to turn the tracker OFF.
When the battery voltage in the tracker is too low, the tracker will power off
automatically.
1
Page 4
3.LED Flash Indicator
GREEN LED Flashes once :GSM &GPS work correctly
GREEN LED Flashes twice :GSM working correctly,no GPS signal
GREEN LED Flashes three times :GSM & GPS working correctly,battery is low
GREEN LED Flashes four times :GSM working correctly, battery is low and no
GPS signal
GREEN LED ON continuously :GSMsearching networks
GREEN LED OFF continuously :Power off
GREEN LED Flashes fast :Incoming call or sending an SMS
RED LED Flashes once :Uploading current tracking
RED LED Flashes twice :Can not upload tracking now
4. Recharging & Power Supply
Warning: this tracker is powered by 9-28VDC, high AC or DC voltage may
damage the unit, so please check the power supply first before installation.
For use in a vehicle, it is necessary to connect the tracker to the car battery
all of the time, after the back up battery is full, the built in recharging circuit will
stop recharging. If the tracker is not moving, then the tracker will go into sleep
mode to save power draining from the car battery.
RED----------12V/24Vcar battery
BLACK-------GND (Car Body)
YELLOW-----Cut Relay Driving (Immobilizer Control)
WHITE--------External SOS button
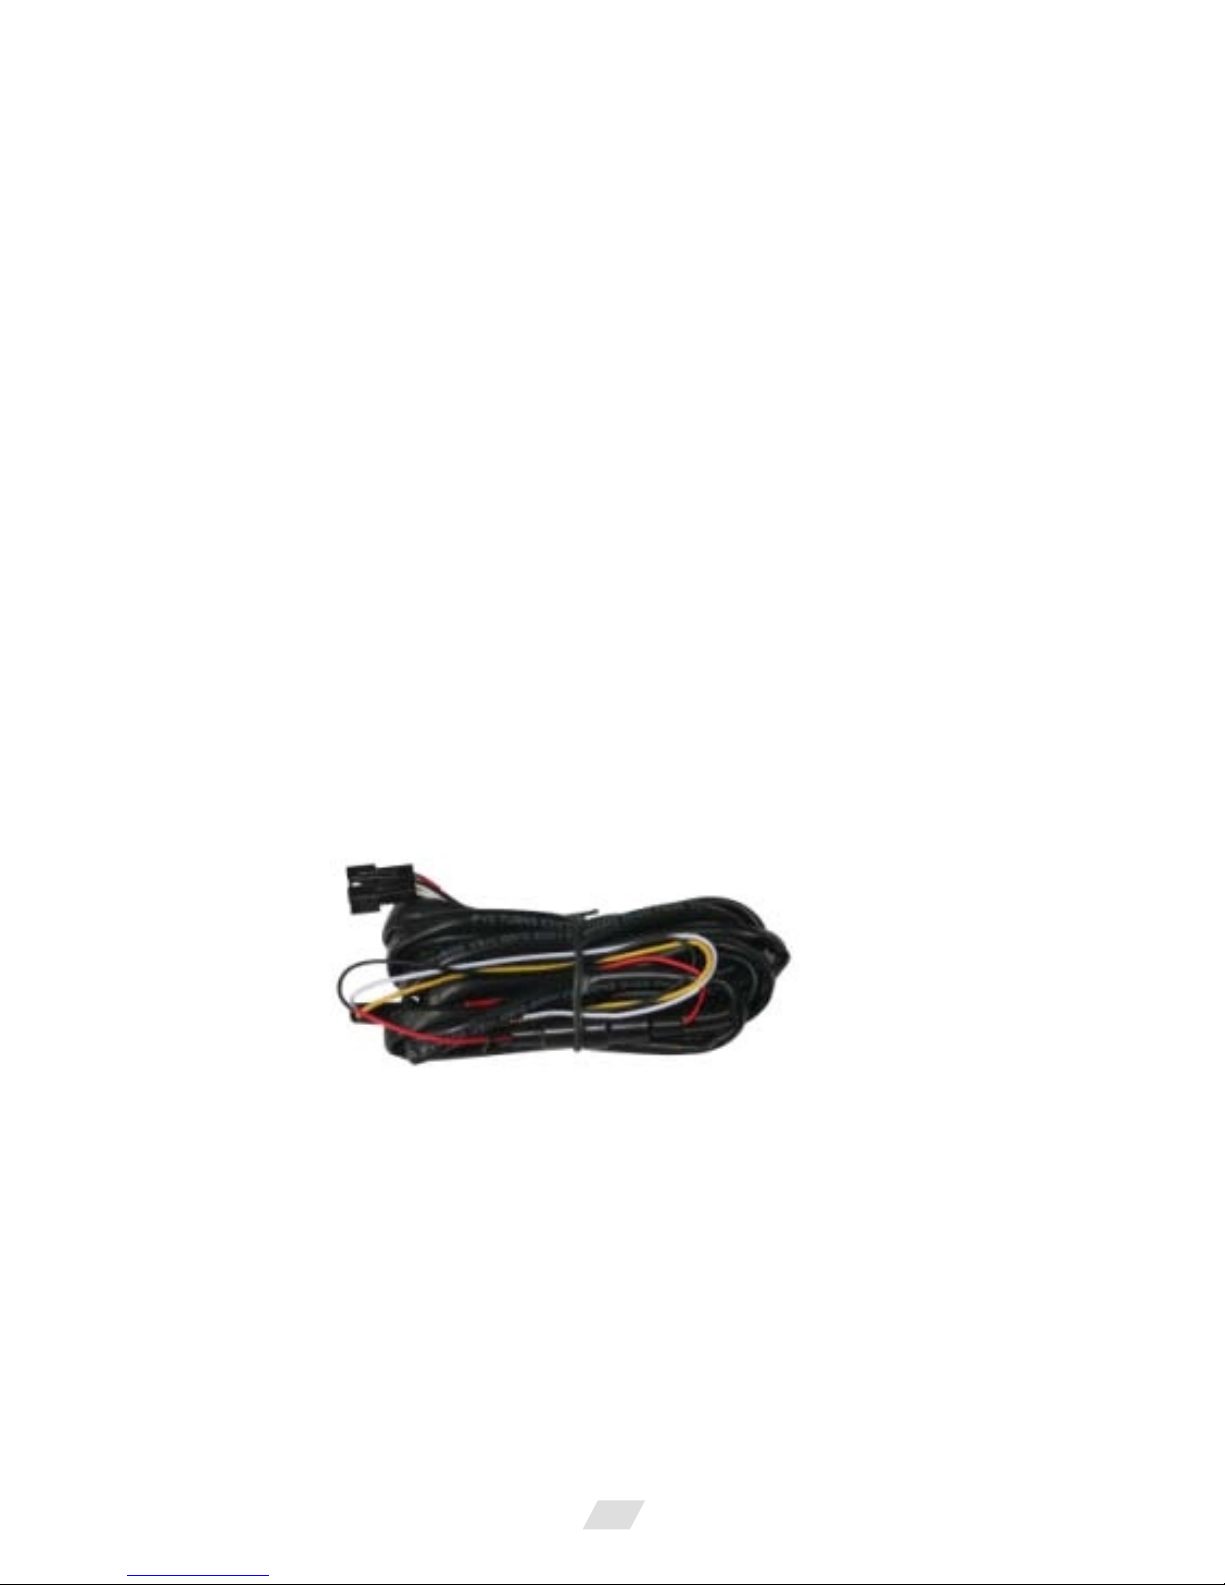
Wiring
Power off the tracker first,press the "ON/OFF" button and don`t release
(remove the battery and place it in the tracker or connect the power wire to the
car battery) to power automatically. A few seconds later the GREEN LED will
flash 10 times and turn ON continuously, Then release the "ON/OFF" button.
The tracker is now set to default configuration.
Notes: After default has been set,all IP/APN /GPRS/TIME ZONE settings are
reverted back to default,all preset phone numbers are deleted and the
password is changed to123456.All the alarm settings are cancelled,if the
IP/APN/GPRS name& password/TIMEZONE are changed.you need to set
these again by sending an SMS.
5. Restoring To Default (Factory Configuration)
2
Page 5

8. Working Conditions
OO
The working temperature is -20 C to 60 C, over this range the tracker may
not function correctly.
How To Use
Firstly purchase a 3G or 2G GSM phone SIM card, which needs SMS service and
incoming caller ID
display and GPRS function. Please disable the PIN code of
the SIM card, the SIM card phone number is the tracker number and all the
operations (calling and sending SMS) to the tracker has the same number.
After installing the SIM card in to the tracker,power on the tracker. Send an
SMS to the tracker for setting the APN name and GPRS username & password
first, but for some mobile service providers it is not necessary to set an APN or
GPRS user name & password, please call your mobile service provider to
confirm these.
Please confirm the tracker can receive the GPS signal and GSM signal
(you should be outdoors to get GPS signal,the green LED will flash once every
4 seconds meaning the GSM and GPS are receiving signal). When the tracker
begins to move, the tracker will upload the location to the website (Default IP
is 113.106.89.149,9066,you should set the IP first if the IP is changed.A notice
will display on the website if IP is changed).
,
Platform username and password is the last 6 digit number of the tracker s
ID number,the label on the back of the device has the S/N number.this number
is the ID number,also user can send an SMS"ID*password"(tracker default
password is 123456) to the tracker to check the ID number. the user can
change the password and user information (such as the car number plate and
phone number),you can not change the username, login to the website to see
the current location on Google maps,also user can display the history tracking
in the specified date and time.
For mobile phone use visit the website:www.999gps.mobi with the vehicle
name and check the password (defined in terminal management),the last
location information&location
map will display on your mobile phone.
The Real Time Tracking Platform: www.999gps.com .
Note: Using your mobile phone can not show tracking history
6. Antenna
The Antenna of GSM and GPS are built in to the tracker.
Please position the tracker away from metals,as this may reduce the GSM
and GPS signal.
7. Shock Sensor Control GPS ON/OFF & Power Saving
This tracker has a built in shock sensor,default is SHOCKCONTROL mode.
When the tracker begins to move the tracker will turn on GPS and upload the
location automatically, when the tracker stops moving 2 minutes, the tracker
will turn off GPS & GPRS automatically (Stop uploading location).
3
Page 6
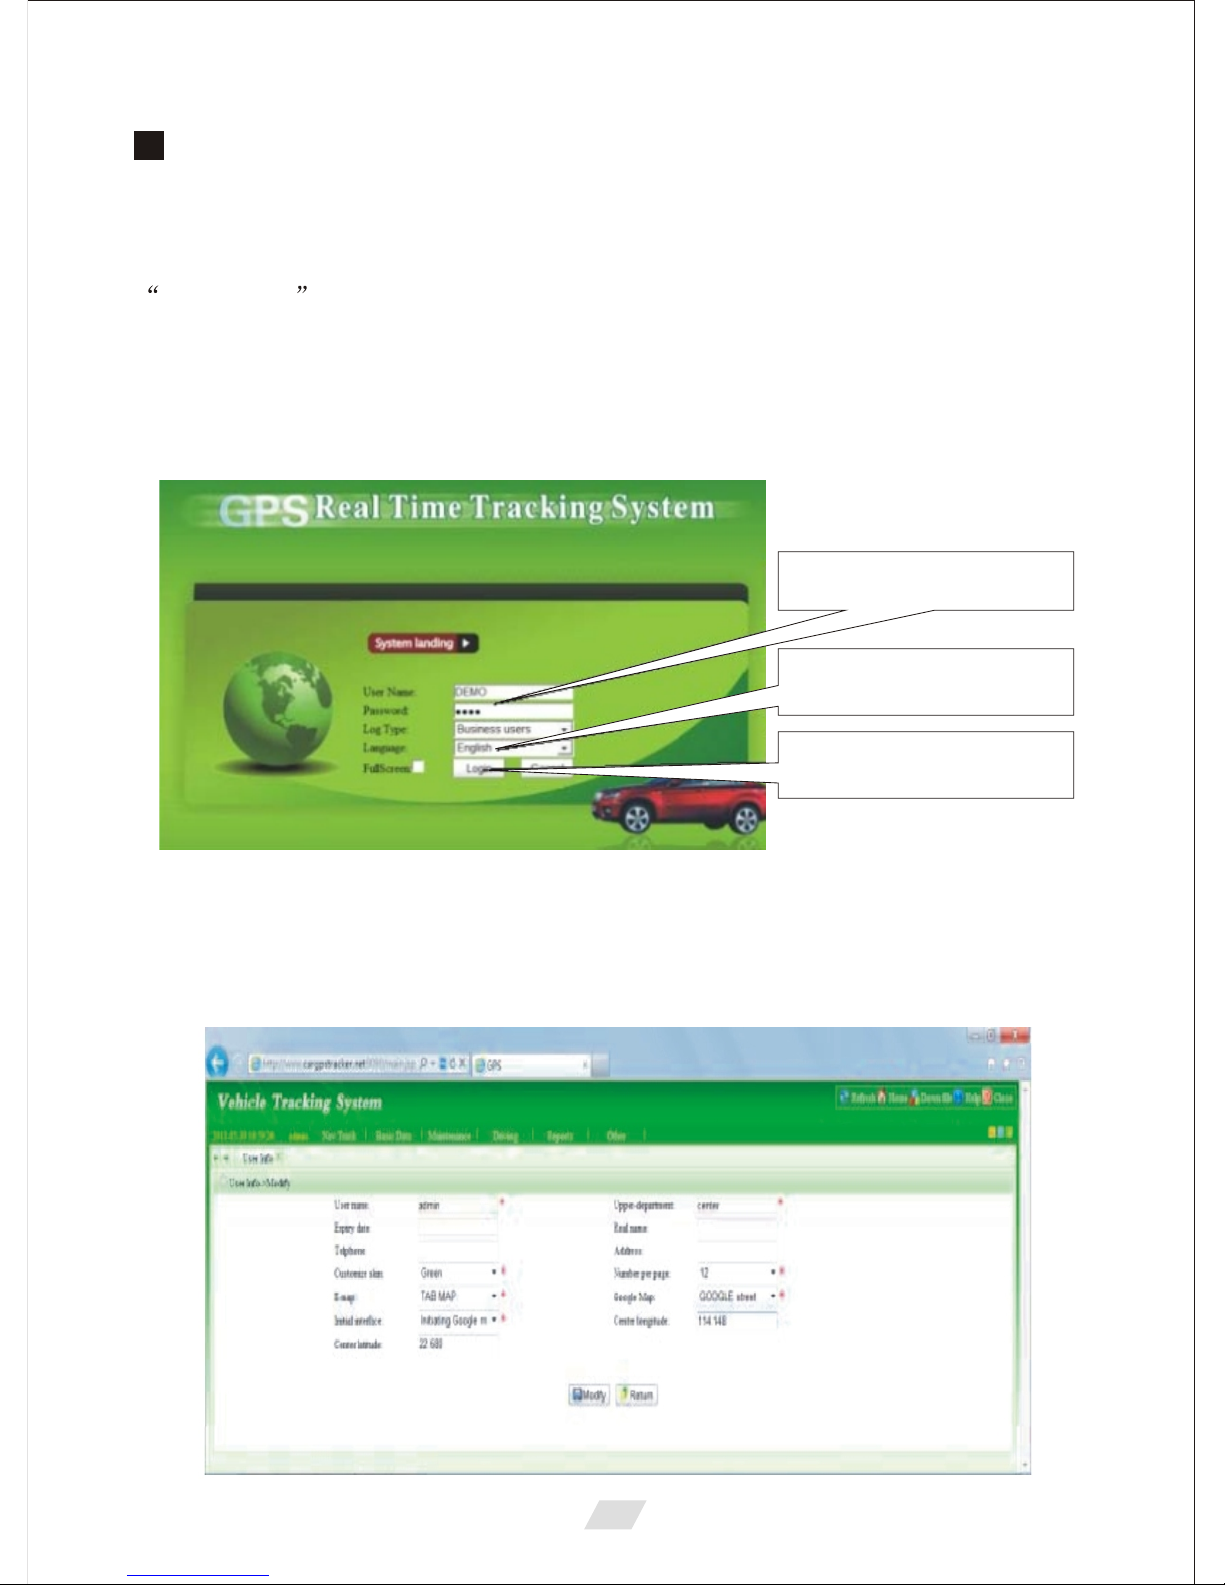
User name&password
Select language
Click "login" to login
Change User Information:
Click the menu"other"on the top of the page,there will be a pull-down menu.
click the"user Info"button,there will be a menu as follows:
Every tracker has a unique user name and password, the user name is the
last 6 digit number of the tracker.For example the tracker ID is:CW0810C1234
5678901 then the user name on the platform of the tracker is : 678901. The
platform password for this user name also is :678901. Please send an SMS
ID*123456 to tracker to check the tracker ID.
The user can change the password and user information (Such as a car
number plate, or phone number), but you can not change the user name.
Platform Login:
Visit the website ,select the language version and the
login page will display as follows:
www.999gps.com
Platform Operation Guide
4
Page 7

Changing the car number plate display and phone number:
The "user name" and "upper department" can not be changed. The Expire
date, Telephone, Number per page, real name and address is not necessary
to change.The "customized Skis" you can change to Green, Blue or Orange. If
you need to use local maps, you need to select E-map which is TAB MAP ,
otherwise it is not necessary to change. Google Map is " GOOGLRE map "
please do not change this selection, otherwise the map will not display
correctly. The Initial Interface is initial Google map please do not change
this selection, otherwise the map will not display correctly. Centre Longitude
and centre latitude is the map center location when you login, you can input
the longitude and latitude of your local centre location. Then every time you
login it will display the map of your local location.
After logging in to the platform,the upper left window will display the number
plate.Please see the first picture,you can change the car number plate and car
phone number that displays in the upper left window. You cannot change the
department that displays in the upper left window, Click the menu"Basic Data"
on the top menu,there will be a pull-down menu,click the"Terminal Management",
there will be a menu as the above second picture.
5
Page 8
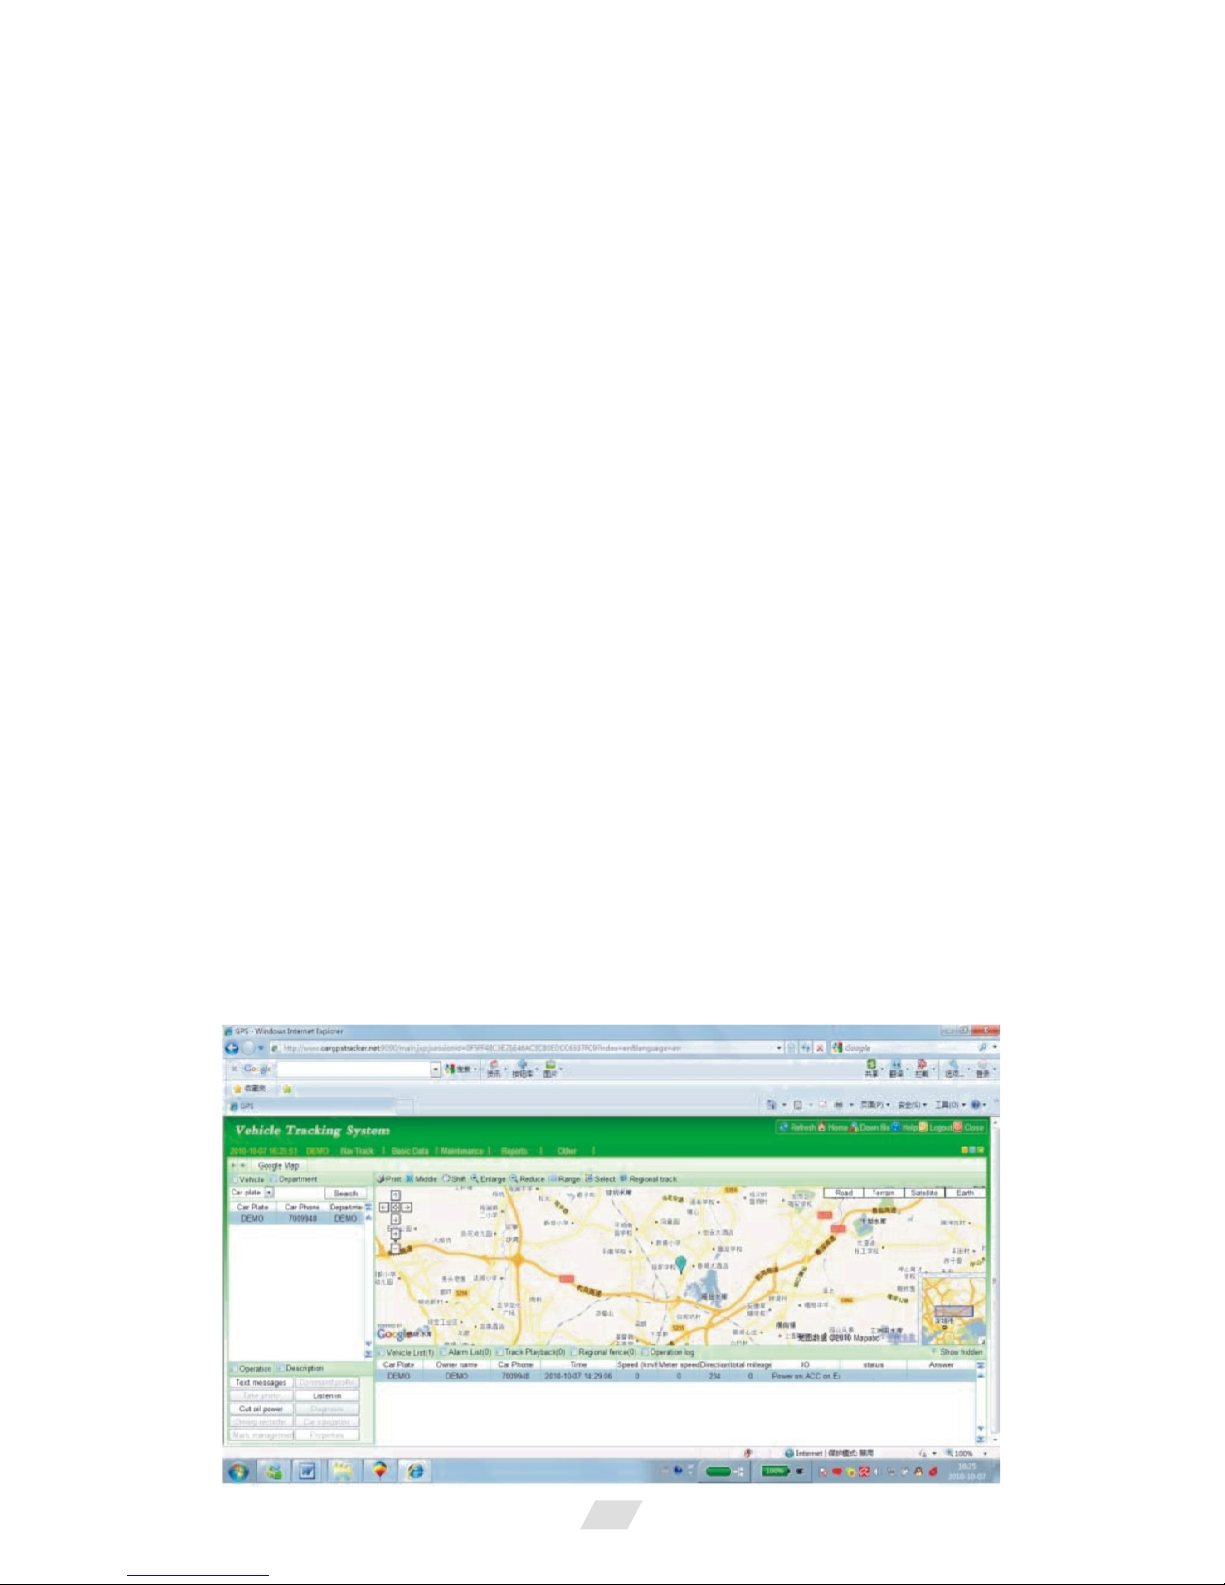
Platform Tracking Page:
After logging in to the platform the latest location of all the tracker will display
on the map. Every 2 minutes the display will update the new location of all the
tracker, if the tracker is moving then the icon of the tracker is GREEN. If the
tracker has stopped moving then the icon of the tracker is BLUE,if the tracker
is alarming,then icon of the tracker is RED.The icon type (Car, truck,bus etc.)
of the tracker you can change in the "Terminal management". This page can
be used if there is more than one tracker.
Click the left button of the mouse once on any car number plate display in
the upper left window,the latest location of the car will display on the map.
This can be used to check the latest car location,also the latest status of the
tracker will display below "Vehicle list" in the bottom right window, click the
right button of the mouse once on any car number plate in the upper left
window.There will be a pop up menu,and then move the mouse and click the
left button of the mouse to operate the instructions,such as"real time tracking",
"vehicle state", tracking playback" etc.
The"Terminal ID"and"Department"can not be changed;the"Vehicle name"
is the name displayed on the table of the"Car number plate" in the upper left
window. It is also the name of the www.999gps.mobi login name.The "On-car
phone" is the phone display on the table of the "Car phone" in the upper left
window; the "car owner" is the owner display on the table of the "Owner name"
,
in the down right window; the "owner phone"is the owner s phone number and
this phone will not be displayed on the screen. It is used as a service center to
,
contact the car owner;the"Protocol type"is"701 Protocol",(Please don t change
this selection). The "Icon type" is the tracker icon display on the map window,
you can select "Car,Bus,Truck" etc; The others is not necessary to change.
Changing The User password:
Click on the menu "other" on the top of the page,there will be a pull-down
menu. Click the "Modify Password", option, there will be another menu.
Inputting the old password and new password is ok.The user name can not be
changed by the user.
6
Page 9

Display Tracking History: Move the mouse over the car number plate, click
the right mouse button to display a pop up a menu. Click the "Track playback"
button,there will be a menu to let you select the date and time(Please note the
time period can not be longer than 24hours).
Select date and time, then click "Confirm", the tracking will be loaded on to
the computer.
Click"OK",click the "Track playback" menu with.there will be another track
display back menu,click the "Play"menu with left button,the tracking will begin
to display on the map.
7
Page 10

8
Page 11

Real Time Tracking:
Click the right mouse button to display a pop up a menu, then click the
"Real time tracking" button.This will track the selected car in real time.And the
information will be updated every 30 seconds.
Over Area Alarm (Geo-Fence Alarm):
This function is set on the platform,after logging in to the website.click the
"Regional fence" menu in the bottom right window, search and select your car
first and click the"Add fence"menu to add afence to the tracker. First select a
tracker first and then use the left button of the mouse to define the area and
right button of the mouse to end the definition.
You can select in or out of an area alarm, the alarm information will display
on the alarm list.Click the menu of "Remove Fence" or "Clear Fence" which
will cancel the over area alarm.
9
Page 12

10
Over Speed Alarm:
This function is set on the platform,after logging in to the website.click the
"Command profile"menu in the bottom left window. A menu will pop up,search
and select your car first then enable the"Set over speed alarm"menu.you can
define the speed of the over speed alarm,stop alarm etc,after defining the
speed alarm,the alarm information will display on the alarm list.you can check
and output the alarm list.
Click the menu of the"set over speed alarm"to make the selection disabled.
Login in to the platform,click the"Listen in"menu in the bottom left window.A
menu will pop up,search and select your car first,and then input the number of
telephone that you will use. the "License Password" is the "verify password"
defined in the"Terminal management"menu and click "Send" the instructions
will be sent to the tracker by the platform, then the tracker will call the number
that you just input in.when the phone rings,pick up the call, then you can listen
to the microphone in the tracker. The driver will not know you are listening.
Also you can Send SMS "MONITOR *123456" to the tracker to listen from
the microphone around the tracker, "MONITOR" is a command, "123456" is
password. The tracker will call back,pick up the call and listen in.
Listening To The Microphone
Page 13

Cut oil power(remote turn off car engine)
Login in to the platform, click the Cut oil power menu in the bottom left
window. A menu will pop up,search and select your car first,enable the "close
circuit" or "Close Oil Supply", and input the "Verify Password" defined in the
"Terminal Management" menu and click send. The instructions will be sent to
the tracker by the platform, and this will cut the relay connection and the car
engine will be turned off.The same operation,click the "Cut oil power" menu in
the bottom left window.
A menu will pop up,enable the"open circuit" or"open Oil Supply" and input
the "Verify Password" defined in the "terminal Management" menu, and click
"Send". The instructions will be sent to the tracker by the platform, and this
will make the cut relay back to the connection state, and then the car engine
will be turned on.
Also you can send SMS"STOPENGINE*123456"to tracker,"STOPENGINE"is
a command,"123456"is password,the car engine will be turned off immediately.
the tracker will send back the information "Car Engine turn off" if the password
is not right, the tracker will send back information Wrong Password .
Note: Turning off the engine is very dangerous when the car is moving, this
will make the car difficult to control and maybe cause an accident. It is
,
recommended to connect the relay cut the start motor wire, ensure the car s
engine can not be started again.
A relay is needed to be installed in order to turn off the car engine, also a
diode is necessary to protect the tracker driving wire.
The diagram is as follows:
11
Page 14

InstructionDescription
The tracker ID is printed on the label of the tracker,the S/N number on the
label is also the ID number. If the label is missing, send an SMS"ID*123456"
to tracker,in which,"ID" is the fixed command and "123456"is the password.
having successfully been made,there will be a SMS"ID:CW0800C123456789
01",in which,"CW0800C12345678901"is the ID and every tracker corresponds
to the only number. This number is used to differentiate the tracking uploaded
to the website from others.
The last 6 digit number of the tracker ID is the user name and password of
the tracker on the platform,for example the tracker ID is:CW0800C123456789
01,and then the user name on the platform of this tracker is:67890.the platform
password for this user name also is 678901, the user can then login to the
platform for changing the password.
Setting The Time Zone:
The data & time of the tracker uploaded to the website is GMT time (add or
minus a fixed digit is your local time), you can send a SMS to the tracker to
change your upload time from GMT to your local time automatically.Send
SMS "TIMEZONE*123456*XXX" to the tracker, in which, "TIMEZONE" is the
fixed command,"123456" is the password and XXX is the time zone of your
local time. It is from -12 to +12, for example: New York is -05, Paris is +01.
Having successfully been set, there will be a SMS TIME ZONE XXX .
Use mobile phone visit website:www.999gps.mobi with the vehicle name
and check password (defined in the Terminal management).The last location
information & location map will be displayed on your mobile phone,using your
mobile phone can not display tracking history.
Displaying Location By Mobile Phone:
12
Page 15

Note: please confirm your local time zone, and if the time zone is not set, the
tracker will upload tracking with GMT time.
Note: The tracker has a default IP address is: "113.106.89.149,906
6". It is not necessary to set again, unless our IP address has been changed
or your setting has been changed, If the IP is changed, it will be displayed on
the website.
Note: Some mobile service providers it is not necessary to set a APN or
GPRS username & password, please contact your mobile service provider to
confirm if a APN name is required. It will not connect properly if this is not set.
Note: Before uploading the tracking, the user needs to set IP, APN, GPRS
user name & password (2G GSM network APN, GPRS name & password).
This only needs to be set once, this will be then saved in the tracker. But if the
tracker is set back to default, then these setting need be set again.
Set Website Server IP:
Send SMS "IP*123456*113.106.89.149,9066" to the tracker, in which, "IP"
is the fixed command, "123456" is the password and "113.106.89.149,9066"
is the IP address of the server computer of our website. having successfully
been set, there will be a SMS"IP:113.106.89.149,9066".However,the IP
address may be changed with the upgrade of our service which will be
mentioned on the website.
Set APN name:
For some mobile service providers, the APN name must be set to get
through the internet by GPRS. Send SMS APN*123456*apn name to the
tracker, in which, APN is the fixed command. 123456 is the password
and apn name is the APN name of a mobile service provider. Having
successfully been made, there will be a SMS APN: apnname .
Set GPRS User Name & Password:
Send SMS "USERNAME*123456*username*password" to the tracker,
"USERNAME" is a command, "123456 " is the password of the tracker;
,
"username" is the mobile service providers GPRS user name."Password " is
the mobile company GPRS password,if the operation is successful then the
tracker will send back the information.
Username: username, Password: password , please call the mobile
service provider to get the GPRS username and password, some mobile
service providers do not need the GPRS username and password. If the
password is not right then the tracker will send back information Wrong
Password
Add/ Delete /Check preset number:
The preset phone number is used to send alarm information by SMS, or
use mobile phone to locate the tracker without platform. If the preset phone
number is not set, then the alarm information can not send to the user by SMS
(battery low, SOS, etc).
1. Add preset phone number by SMS
Send SMS ADDPHONE*123456*A*number (Not including the quotation
marks , Number means the telephone number you want preset) to tracker
is OK,"ADDPHONE"is a command;"123456"is password;"A"is preset number
location,every tracker has 3 preset phone number locations,A and B,and C.so
13
Page 16

you can preset 3phone numbers.If the add operation is successful,the tracker
will send back the information"Add Preset Phone OK",if the password is not
right,the tracker will send back information"Wrong Password".
2. Delete preset phone number by SMS
Send SMS "DELETEPHONE*123456*A" to the tracker, "DELETEPHONE"
is a command;"23456"is password;"A"is preset phone number location,there
are 3 locations "A" and "B" and "C" ; if the delete operation is successful, the
tracker will send back the information"Delete Preset Phone OK",if the password
is not right, the tracker will send back information "Wrong Password".
3. Check preset phone number by SMS
Send SMS "CHECKPHONE*123456" to tracker, "CHECKPHONE" is a
command; "123456" is password; if the operation is successful, the tracker
will send back the information"Preset Phone A:13322990998;B:13316868198;
C:13322990033. the phone number is just an example. If the password is not
right, the tracker will send back information or Wrong Password .
Change /Check Password
1. Change tracker password
Send SMS "CHANGEPASSWORD*123456*888888" to tracker, "CHANGE
PASSWORD" is a command; "123456" is old password; "888888" is new
password; if the operation is success, the tracker will send the information
"New Password: 888888" to every preset phone number.If the password is not
right,the tracker will send back information "Wrong Password".
2. Check tracker password
Send SMS "CHECKPASSWORD"to the tracker, "CHECKPASSWORD" is a
command, if the operation is successful, the tracker will send back the
information " Password:888888 " ; " 888888 " is an example.
Locate the tracker by calling the tracker(Platform is not necessary):
1. Using the preset phone to call the tracker, after ringing 3 times,
the tracker will hang up the call automatically and locate
immediately, 10 seconds later, the tracker will send back the
SMS location information (map web site link) of current location
to the caller. User can use mobile phone to click the website link,
and the location on map will display on the mobile phone(the
phone SIM card need enable the GPRS function). If the tracker
has not preset number, any phone call can trigger the tracker to
locate immediately. If the tracker has preset number, then only
preset phone call can trigger the tracker to locate immediately.
2. Basic Location information including Map Website Link, Battery
etc. The SMS information sample is as follow:
Note: Only preset phone can change the password.
Note: Only preset phone can check the password.
Http://www.followmegps.mobi/map.aspx?lat=40.756441&lng=-7
3.986378&l=en Battery:91%
14
Page 17

Send a SMS trigger locate by map link (Platform is not necessary)
Send SMS"LINKLOCATE*123456"to the tracker,"LINKLOCATE" is a
command,"123456"is password;the tracker will locate immediately and send
back the location information (map website internet link) of current location to
the caller.use smart phone to click the website link to visit internet, and the
location will display on the map on your phone (the smart phone SIM card
need enable the GPRS function), if the password is not right, the operation
will not proceed and the tracker will send back information "Wrong Password"
Enable Shock & Move Alarm (Can be used as car alarm):
Send SMS"SHOCKALARM*123456"to tracker,"SHOCKALARM" is a
command,"123456" is password, the tracker will send back the information
Set Shock Alarm OK to indicate the operation is success, if the password
is not right, the operation will not proceed and the tracker will send back
information "Wrong Password" after enable shock alarm,the system will
check shock sensor,if the shock sensor is trigger,the tracker will send alarm
and location information by SMS to who set the alarm, and also send the
alarm information to the website server,and later every 2 minutes the tracker
will send alarm information by SMS if the tracker keep moving. 3 times alarm
later, shock alarm will stop, user can send SMS to enable the shock alarm
again, this function will not turn on GPS continuously, it will turn on GPS only
when the shock alarm is trigger,so it will not reduce battery power.the
shock&move alarm SMS is as follows:shock alarm
http://www.followmegps.mobi/map.aspx?lat=40.756441&lng=-73.
986378&l=en Battery:91%
15
Page 18

SOS
Emergency
Press SOS
button until
the GREEN
LED turn off
HELP+
location
information
Auto Re-power
on&Resettracker
RESET*123
456
Any mobile
phone can
set
Tracker
Re-power
on and
cancel all
alarm setting
Reply to
operation
phone
Send SOS
HELP
information
to all preset
phone
Low Battery Alarm:
When the tracker battery voltage is low, the GREEN LED of the tracker will
flash 3 or 4 times,and then the tracker will automatically send battery low
information to the first preset phone number. the battery life can last about 12 days according the different using condition. (For example GPS and GSM
signal is poor it will reduce the battery time, and keep moving and uploading
will also make the battery time reduce to less 1 day.)
Cancel All Alarm Setting
Cancel all the alarm setting:send SMS"CANCELALARM*123456"to tracker,
"CANCELALARM" is a command, "123456" is password, the tracker will send
back information"All Alarm Cancel",and cancel all the shock alarm setting in
the tracker. if the password is not right, the tracker will send back information
"Wrong Password".
Auto Re-power On and Reset Tracker
Auto power off and power on and Cancel all the alarm setting: Send SMS
RESET*123456 to tracker, RESET is
a command,"123456"is password,The tracker will power off and then
power on automatically, this will take a few minutes, and then cancel all the
alarm setting in the tracker, including shock alarm, over area alarm, over
speed alarm, keep online(change to shock control), stop working(change to
start working), etc. the tracker will send back information Reset Tracker , if
the password is not right,the tracker will send back information"Wrong
Password".
16
Page 19

SOS Emergency
Press the SOS button for 6 seconds, the LED will flash quickly and then
the LED will turn OFF. Release the button and the tracker will send SOS help
information to all 3 preset phones. HELP ! ! !
If the tracker receive the HELP information, please note that the SOS
button must be pressed, please call the driver to confirm with the user is safe
or not or call the police. The SOS function need installing the external SOS
button, install the external SOS button in a hidden place that driver can press
the button, connect one wire of the SOS button to GND (car body), another
wire of the SOS button to tracker SOS wire,
1.The default password is 123456, you can change the password. 2.All the
SMS information is in English word,"*" is the star key, is not including in the
SMS information,it is just used to indicate the information.
Please confirm that the SIM card PIN code has been disabled (meaning if the
SIM card is used on a mobile phone is not necessary to input any password).
otherwise the tracker can not find GSM network, the Green LED will stay ON .
The tracker is compatible with 3G SIM cards, however it only uploads through
GPRS using a 2G band. It will not work on CDMA or 3G (WCDMA or CDMA2000)
network.
The antenna of GSM and GPS is built in to the tracker, please note that the
install location of the tracker must can receive the GPS signal. Normally
positioned at the back of the seat or arm rest box or under the back window.
Please keep the tracker away from metals or magnetic components.
The tracker built in high capacity Li battery, recharge one time can use
about 1-2 days (standby mode), also you can connect the tracker to the car
battery all the time, this can keep the tracker has power supply continuously,
and the charging circuit will control the recharging.
The GPS need 10-200 seconds to locate the position, when the GSM signal
is weak or the network is very busy ,the SMS maybe delay to send by the GSM
network, this is normal.
The tracking data on our server will be kept for 3-6 months, the old data will
be deleted.
http://www.followmegps.mobi/map.aspx?lat=40.756441&lng=-
73.986378&l=en Battery:91%
17
Notes:
Page 20

Trouble Shooting
The tracker auto power off: please confirm the tracker battery have enough
power. Confirm the adapter is working well (When charging the LED on the
adapter is RED, if the LED is GREEN means the charging is finished, the
charging process will cost over3hours).
After powering on the tracker and the GREEN LED is on, if the tracker does
not ring and respond please check that the SIM card has been installed
properly, the SIM card PIN code is disable, and the SIM card has enough
charge, and the mobile phone can work well in that place. If the tracker works
well the Green LED will flash once every 4seconds.
If the tracker can not upload the location to the website, please confirm the
SIM card has GPRS function, and has set the APN or GPRS username &
password (call the mobile service provider to confirm it is necessary to set
these or not). if the tracker does not move, the tracker will not upload tracking.
If the tracker can not send back information by SMS, please confirm the SIM
card has ID caller display function and SMS service function. Please read the
SMS information of the tracker and check the instruction& password is right or
not.
When calling the tracker it continuously rings without hanging up, please
check the tracker has set the preset phone number, use the preset phone or
delete the preset phone number or set the tracker back to default. Can not
login the platform: use SMS to check the ID of the tracker. if you are going in a
under ground park, some tracking will be lost. The GSM and GPS module will
take a few minutes to receive signal and re-locate, some tracking maybe lost,
this is normal.
18
Page 21

InstructionList
Check
tracker ID
Number
Set Time
Zone
Set IP
address
Set APN
name
Set GPRS
user name
&password
Add phone
number
Delete
phone
number
SMS
Instruction
TIMEZONE
*12345 6*X
XX
IP*123456*
113.10 6.89.
149,9066
APN*12345
6*apnn ame
USERNAM
E*1234 56*
username*
password
ID*123456
ADDPHON
E*1234 56*
A*1332299
0033
DELETEP
HONE*1 2
3456*A
Note
Any mobile
phone can
set
Any mobile
phone can
set
Any mobile
phone can
set
Any mobile
phone can
set
Any mobile
phone can
set
Any mobile
phone can
set
Any mobile
phone can
delete
Reply
Time Zone
is XXX
IP:113.106.
89.149,906
6
APN :
apnname
Username:
username,
Password:
password
ID:CW081
0C123456
78 901
Add Preset
Phone OK
Delete
Preset
Phone OK
Note
Reply to
operation
phone
Reply to
operation
phone
Reply to
operation
phone
Reply to
operation
phone
Reply to
operation
phone
Reply to the
operation
phone
Reply to the
operation
phone
19
Page 22

1920
Check
preset
phone
number
Change
password
Check
password
Send SMS
trigger map
link report
location
Listen &
Monitor
sound
Set shock
& move
alarm
Remote
turn off
car engine
Cancel
All Alarm
Setting
CHECKPH
ONE*1 234
56
CHANGEP
ASSWORD
*123456*88
8888
CHECKPA
SSWO RD
LINKLOC
ATE*1234
56
MONITOR
*12345 6
SHOCKA
LARM*12
3456
STOPEN
GINE*12
3456
CANCEL
ALARM*
123456
Any mobile
phone can
check
Only preset
phone can
change
Only preset
phone can
check
Any mobile
phone can
set
Any mobile
phone can
set
Any mobile
phone can
set
Only preset
phone can
set
Any mobile
phone can
set
A:13316868198;
B:13322990998;
C:13322990033;
New
Password:
F888888
Password:
888888
Current
location map
website link
Call back
and pick up
the calling
can listen
Set Shock&
Move Alarm
OK
Car Engine
Turn Off
All Alarm
Cancel
Reply to the
operation
phone
Reply to
operation
preset
phone
Reply to
operation
preset
phone
Reply to
operation
phone
Call backto
operation
phone
Reply to
operation
phone
Reply to
operation
phone
Reply to
operation
phone
Page 23

Specification:
GSM
Frequency
GSM/GPS
Antenna
Recharging
Current
Uploading
Current
Working
Temperature
Storage
Temperature
SIMCOM 900
900/1800MHz
or 4 Band
Built in
< 5V/300mA
<200mA/ 5V
OO
-20 C to+55 C
OO
-40 C to+80 C
GPS Module
GPS channel
Locate
precision
Standby
Current
Battery
Absolute
Temperature
Sirf-Star or MTK
32channels
5-20Meters
GPS Cold
Start Time
36seconds
GPS Hot
Start Time
1 second
< 10 mA
800mAh
OO
-35 C to+70 C
1921
Page 24

 Loading...