

Page 1
Wired Camera CCTV Kit
CWK1 Colour
CWK7 Black and White
Installation and Operating Instructions
These instructions should be retained in a safe place for future reference.
50053763-001Rev.A_CWK1|CWK7_Art 8/4/10 12:09 pm Page 1
Page 2
2
INTRODUCTION Section 1
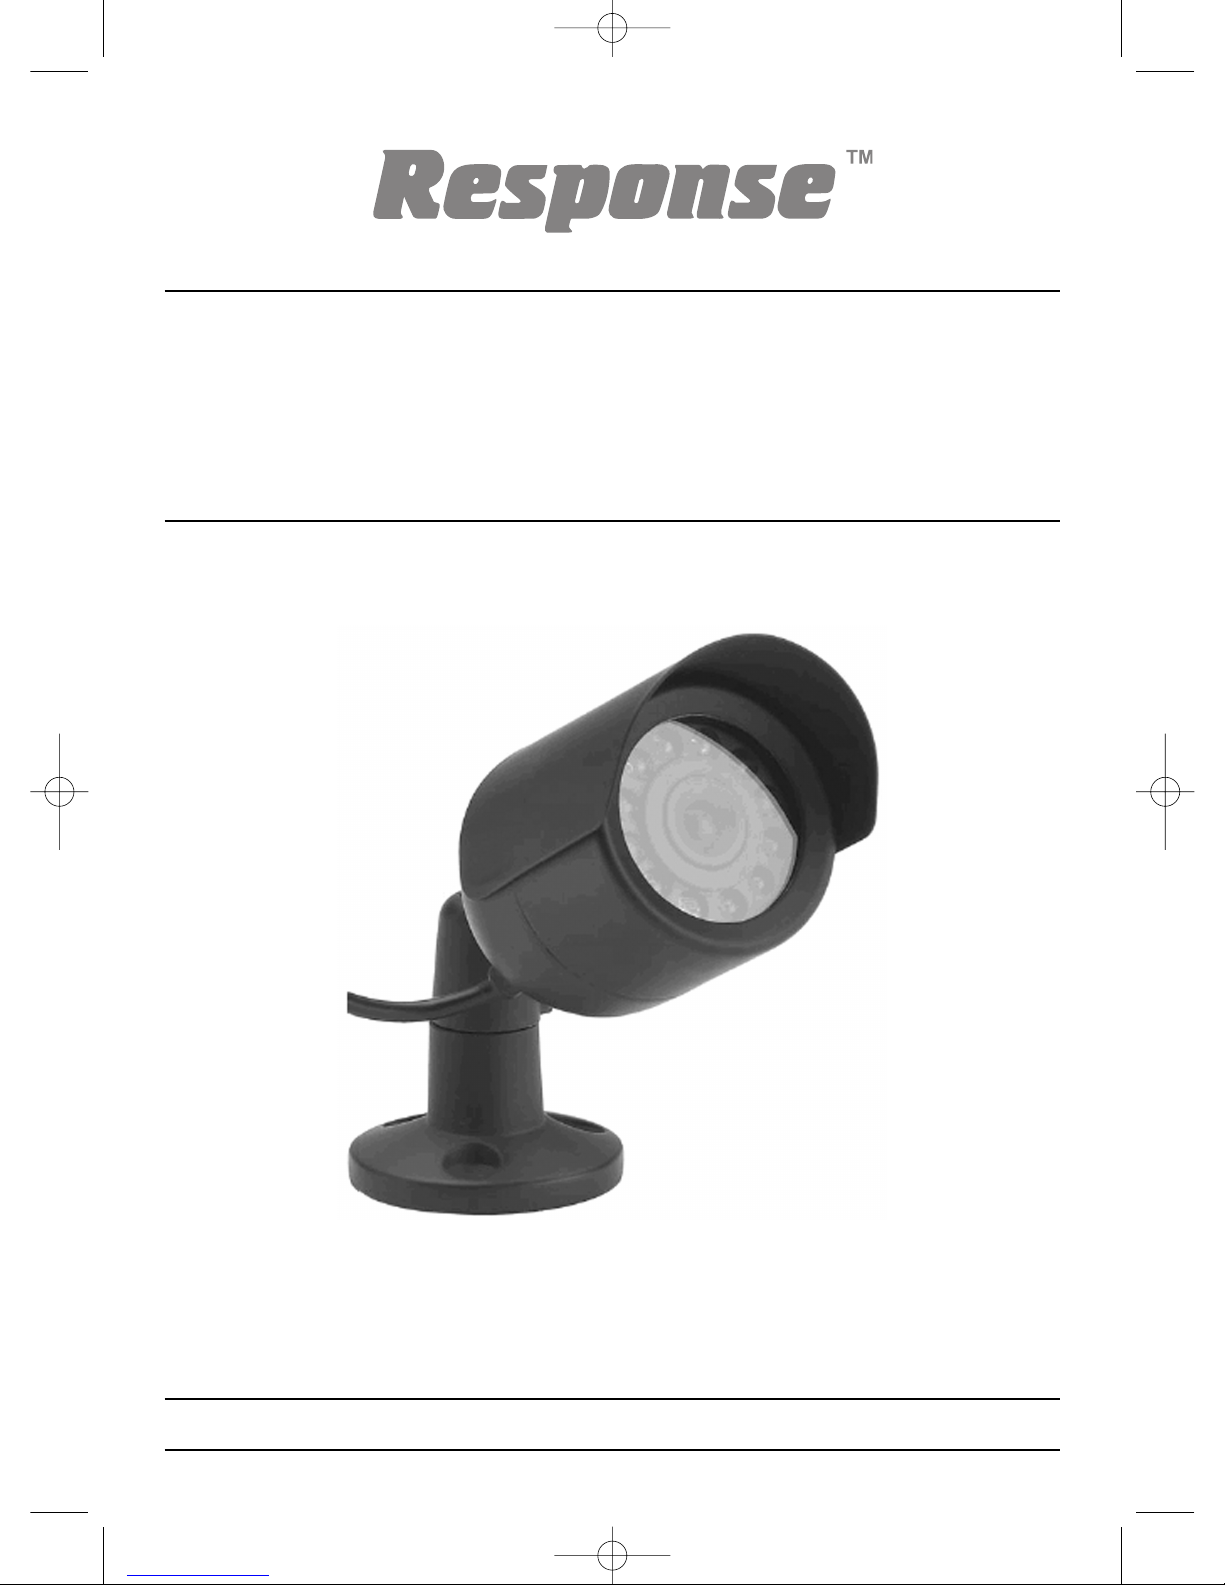
The Response Wired Camera is a weatherproof day/night camera. The camera easily
connects to your TV/VCR/DVR for the protection of your home or office, etc. The camera
is easily mounted on the wall or ceiling using the supplied mounting bracket.
SAFETY AND INSTALLATION TIPS:
Do not attempt to open the camera unit with the power adaptor plug connected to avoid
any risk of personal injury.
When installing CCTV camera(s), always follow manufacturer’s advice when using power
tools, steps, ladders, etc. and wear suitable protective equipment (e.g. safety goggles) when
drilling holes, etc. Before drilling holes through walls or ceilings check for hidden electricity
cables and water pipes. The use of a cable/pipe detector is advisable.
It is also advisable to avoid exposing any cameras to extreme weather conditions (e.g, under
a gutter which is prone to any water leaks). When installing this camera, it is advisable to
use cable conduit to protect any video/ power extension cables from being exposed
externally and to prevent/reduce the chances of the cables being tampered with. After
drilling any hole though an external wall for a cable, ensure the hole is sealed up around
the cable using a sealant to prevent drafts.
To prevent a fire or electrical shock hazard, do not attempt to open the housing while the
unit is exposed to rain, water or wet conditions. There are no user serviceable parts
inside. Refer servicing to qualified service personnel.
Avoid pointing the camera(s) directly at the sun.
NEED HELP
If you have any problems installing this CCTV system please refer to the
Troubleshooting section on pages 5-6 which should help solve any common
problems, or call the Customer Helpline on 0844 736 9149, available
Monday to Friday 9.00am to 5.00pm, see page 8 for details.
Please read before you start:
Always use discretion when installing CCTV surveillance equipment especially when
there is perceived policy. Enquire regarding local regulations applicable to the lawful
installation of video recording/surveillance. Third party consent may be required.
50053763-001Rev.A_CWK1|CWK7_Art 8/4/10 12:09 pm Page 2
Page 3
NIGHT VISION:
The camera has built-in infra-red LEDs to allow you to view at night for 24hrs surveillance.
The LEDs will automatically activate at night and the picture viewed will turn to black and
white for the colour models only. The night viewing range is up to 9m for the colour
camera and 7m for the black and white camera.
3
KIT CONTENTS Section 2
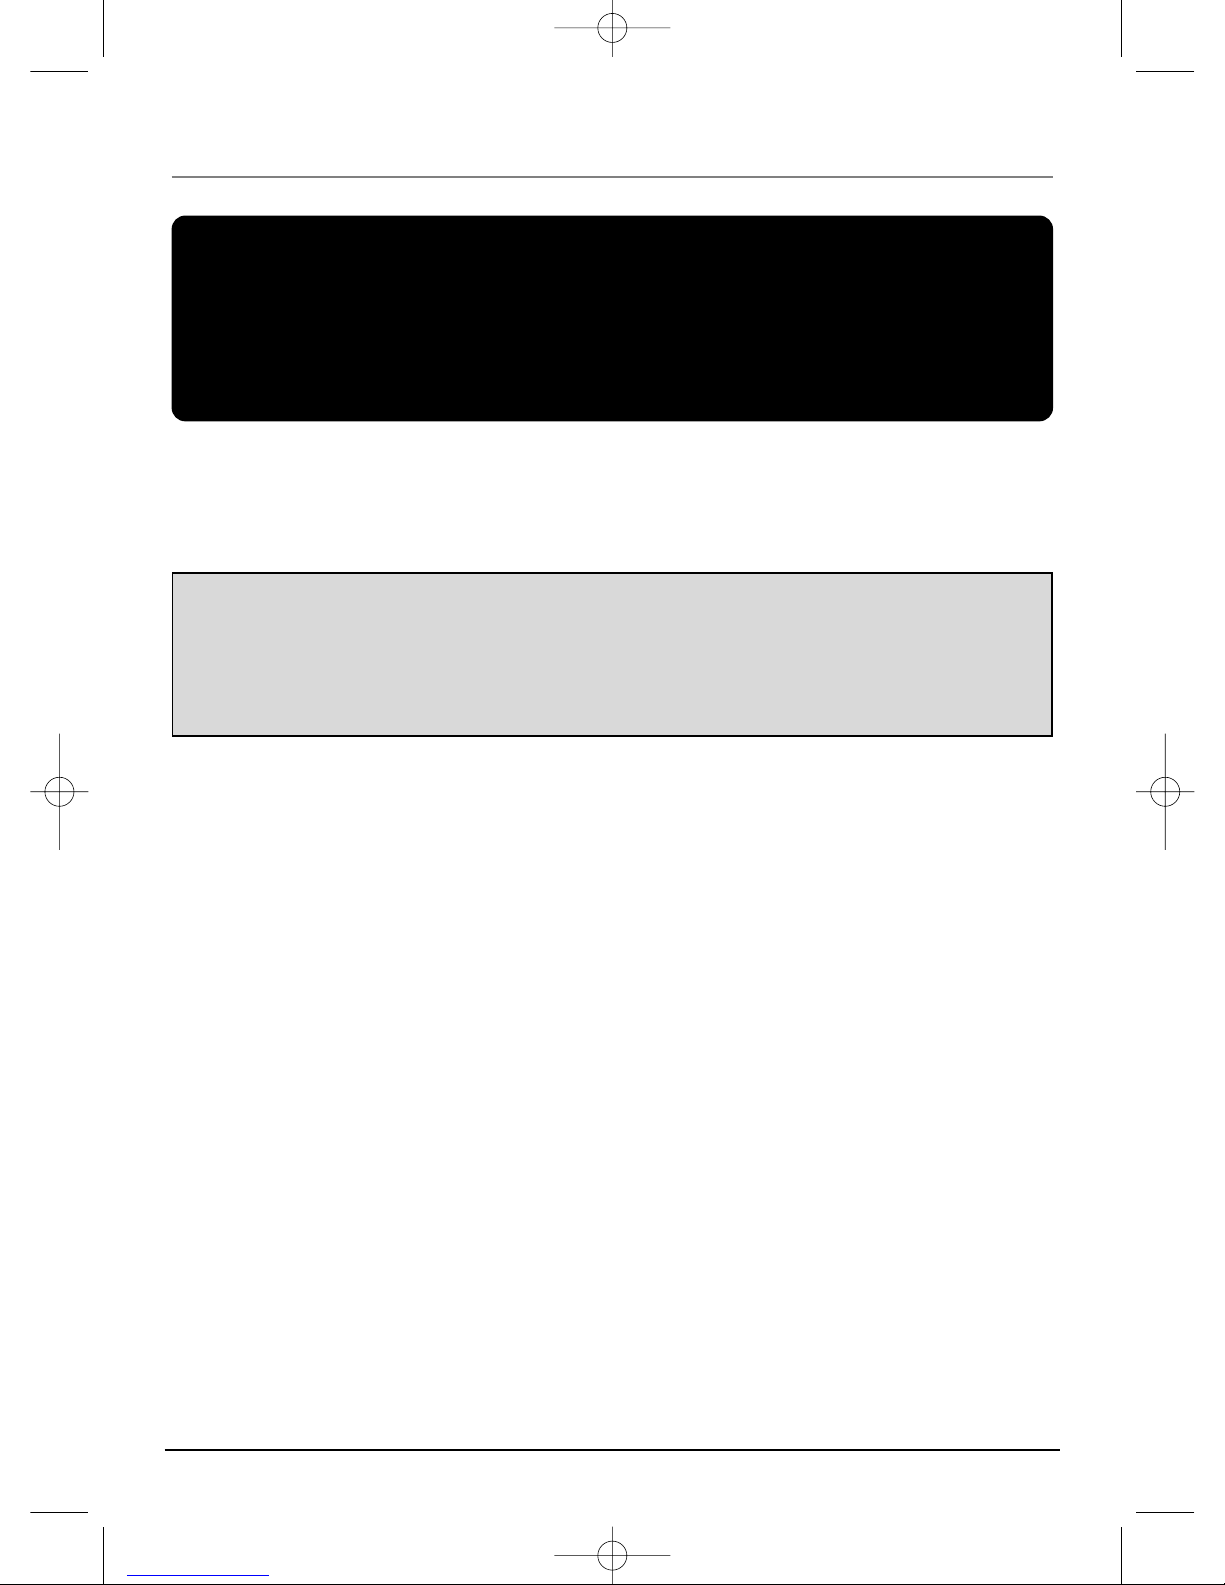
1 xWired Camera
1x10m RCA (male plug) to RCA (male plug)
extension cable
1xPower supply adaptor (12VDC/300mA)
1xCamera fixings kit - wall plugs and screws
1xInstallation and operating manual
1xWindow sticker
Tools Required:
Electric drill
5mm masonry drill bit
20mm masonry drill bit
No. 2 Philips screwdriver
3mm flat blade screwdriver
Wired Camera
10m RCA (male plug) to RCA
(male plug) extension cable
Power supply adaptor
Camera fixings kit
contents: Screws and wall plugs
Window sticker
50053763-001Rev.A_CWK1|CWK7_Art 8/4/10 12:09 pm Page 3
Page 4

4
INSTALLATION Section 3
1. Remove the bracket from the camera by unscrewing it from the main body as shown
below:
2. Use the base of the camera’s bracket to mark out the 3 mounting holes on the chosen
surface. Mark out a hole for the cable connectors to pass through into the property
next to the camera.
Note: It is recommended to pass the cable into the property as close to the camera as
possible to reduce the chances of any exposed cables being tampered with. If you
choose to run the cable along the wall outside the property, it is recommended to use
cable conduit to hide the cable and reduce the chances of it being tampered with.
3. Drill 3 x 5mm mounting holes for the bracket’s wall plugs and 1 x 20mm hole for the
camera’s power and video connectors to pass through the wall or ceiling.
4. Install the camera bracket using the supplied plugs and screws.
5. Feed the video/power leads through the hole in the wall or ceiling, starting with the
largest connector, and then refit the camera on to the bracket and adjust the position
of the camera body as required by loosening the adjustment screw.
6. The camera is supplied fitted with a 1m cable terminated with a RCA female plug and
a female power connector.
7. Connect the male end of the power connector from the extension cable into the
camera along with the male RCA connector.
8.
Connect the RCA video end of the extension cable into video input of your TV/VCR/DVR.
9. Tune your TV/VCR/DVR to auxiliary (AUX), A/V or video mode to view the camera.
(Note: Refer to your TV/VCR/DVR’s owner’s manual for setting this up).
10. Adjust the camera again if necessary to the desired viewing angle.
Camera body position
adjustment nut
Unscrew this washer nut to loosen Camera body
from the bracket and unscrew Camera
50053763-001Rev.A_CWK1|CWK7_Art 8/4/10 12:09 pm Page 4
Page 5

5
TROUBLE SHOOTING Section 4
PROBLEM SOLUTION
No picture can be viewed The power supply adaptor is not plugged in.
The TV/VCR/DVR is not tuned to view the
correct channel.
Poor picture quality Clean the camera lens.
Adjust the contrast/brightness on the TV.
Some colours viewed by the The colour camera’s lens is a CMOS type sensor.
colour camera do not appear
Its limitation is that it will not produce all colours
to look like true colours viewed outside accurately.
Connection Summary
Note: If the supplied extension cable is not long
enough, the extension cable for this camera can only be
extended up to
30m in total length due to power loss.
Extension Cable
12VDC Power
Supply Adaptor
TV / MONITOR
VCR / DVR
Video Signal
to Input
CAMERA
NEED HELP
Troubleshooting pages 5-6 or
call the
Customer Helpline
0844 736 9149
Monday to Friday 9.00am to 5.00pm
50053763-001Rev.A_CWK1|CWK7_Art 8/4/10 12:09 pm Page 5
Page 6

TECHNICAL SPECIFICATION Section 5
ITEM CWK1 CWK7
WIRED COLOUR CAMERA WIRED BLACK AND
WHITE CAMERA
Image sensor 1/4” colour CMOS 1/4” black and white CMOS
Video format PAL / NTSC PAL / NTSC
Pixel resolution PAL: 628 (H) x 582 (V) PAL: 628 (H) x 582 (V)
NTSC: 510 (H) x 492 (V) NTSC: 656 (H) x 492 (V)
Horizontal resolution 380 TV lines 380 TV lines
Minimum illumination 0 Lux when the IR lamps 0 Lux when the IR lamps
are turned on are turned on
Viewing angle 50° 45°
Lens size 6mm 3.6mm
Night vision range Up to 9m Up to 7m
Number of infra-red LEDs 11 11
IP rating IP54 IP54
Operating temperature
-
10°C to 55°C
-
10°C to 55°C
Power supply 12 VDC / 300mA 12VDC/300mA
Cable type connections Fitted with 1m video cable Fitted with 1m video cable
terminated with female RCA terminated with female RCA
and female jack (power) plugs and female jack (power) plugs
Dimensions (W x D x H) 50 x 50 x 135mm 50 x 50 x 135mm
Weight 280g 280g
6
TROUBLE SHOOTING - continued
A white image appears The camera’s infrared LEDs shine invisible light
at night that reflects off surfaces such as glass causing
white light. Place the camera on the other side of
windows or place the lens of camera flush against
the window to try to improve the night vision or
place the camera in a well lit area.
50053763-001Rev.A_CWK1|CWK7_Art 8/4/10 12:09 pm Page 6
Page 7

7
ACCESSORIES IN THE RANGE Section 6
There are a range of accessories available in the Response CCTV product range to expand
your system:
CA1 2 Channel Digital Video Image Recorder
CA2 LCD Screen for Wireless/ Wired CCTV Kits
CWFK1 Wireless Colour Camera CCTV Kit
CA3 Wireless Colour Accessory Camera
(requires CWFK1 CCTV KIT to operate)
CA5 Professional Heavy Duty Camera CCTV Kit
CA6 Dummy Professional Heavy Duty Camera
CA7 4 Channel Digital Video Image Recorder
CA8 Wired Internal Colour Dome Camera CCTV Kit
CA9 Dummy Internal Dome Camera
CA10 Heavy Duty Colour Camera CCTV Kit
CA11 Dummy Heavy Duty Camera
CA4 10m Extension Cable Kit
CA12 20m Extension Cable Kit
DISPOSAL – RECYCLING INSTRUCTIONS Section 7
Directive (2002/96/EC)
This product is classified by the Waste Electrical or Electronic
Equipment (WEEE) Directive. It should not be disposed of with other
household or commercial waste. At the end of its useful life the
packaging and product should be disposed of via a suitable recycling
centre. For information on available facilities, please contact your
local authority or the retailer from where the product was purchased.
50053763-001Rev.A_CWK1|CWK7_Art 8/4/10 12:09 pm Page 7
Page 8

GUARANTEE Section 8
Novar ED&S undertakes to replace or repair at its discretion goods (excluding non
rechargeable batteries) should they become defective within 1 year solely as a result of
faulty materials and workmanship.
If the product has not been installed, operated or maintained in accordance with the
instructions, has not been used appropriately or if any attempt has been made to rectify,
dismantle or alter the product in any way the guarantee will be invalidated.
The guarantee states Novar ED&S entire liability. It does not extend to cover consequential
loss or damage or installation costs arising from the defective product. This guarantee does
not in any way affect the statutory or other rights of a consumer and applies to products
installed within UK and Eire only.
If an item develops a fault, the product must be returned to the point of sale with:
1. Proof of purchase.
2. A full description of the fault.
3. All relevant batteries (disconnected).
Response is a trademark of Novar ED&S.
CUSTOMER HELPLINE
Most issues can be solved over the phone in a few minutes.
Please contact our Helpline Team on the number below for any
installation and general advice regarding our products:
0844 736 9149
Lines open 9.00am to 5.00pm, Monday to Friday. Calls are charged at national rates.
Network charges for mobiles may vary depending on your network and call plan.
www.friedland.co.uk
Novar Electrical Devices and Systems Limited. (A Honeywell Company)
The Arnold Centre, Paycocke Road, Basildon, Essex SS14 3EA. UK
© Novar Electrical Devices and Systems Limited. 2010 50053763-001 Rev.A
50053763-001Rev.A_CWK1|CWK7_Art 8/4/10 12:09 pm Page 8
 Loading...