

Response CA2 Installation And Operating Instructions Manual

LCD Screen for
Wireless/Wired CCTV Kits
CA2
Installation and Operating Instructions
These instructions should be retained in a safe place for future reference.
2
1 INTRODUCTION 3
2 KIT CONTENTS 5
3 FEATURES 5
4 INSTALLATION 6
4.1 Wireless Camera(s) Setup 6
4.2 Screen Installation and Setup 6
5 OPERATION 8
5.1 Wired/Wireless Source Function 9
5.2 Wireless Camera(s) Function 9
5.2.1 Manual Function 9
5.2.2 Auto Function 9
5.2.3 Scan Function 9
5.2.4 Cam 1 to 3 Function 9
5.3 Volume Adjustment for
A/V Input Source(s) 10
5.4 General Screen Settings 10
6 MAINTENANCE 11
7TROUBLESHOOTING 11
8ACCESSORIES IN
THE RANGE 12
9 TECHNICAL SPECIFICATION 13
10 APPENDIX 14
Screen Mounting Guide 14
11 DISPOSAL – RECYCLING
INSTRUCTIONS 15
12 GUARANTEE AND
CUSTOMER HELPLINE 16
CONTENTS
Please read before you start:
Always use discretion when installing CCTV surveillance equipment especially
when there is perceived policy. Enquire regarding local regulations applicable
to the lawful installation of video recording/ surveillance. Third party consent
may be required.
3
INTRODUCTION Section 1
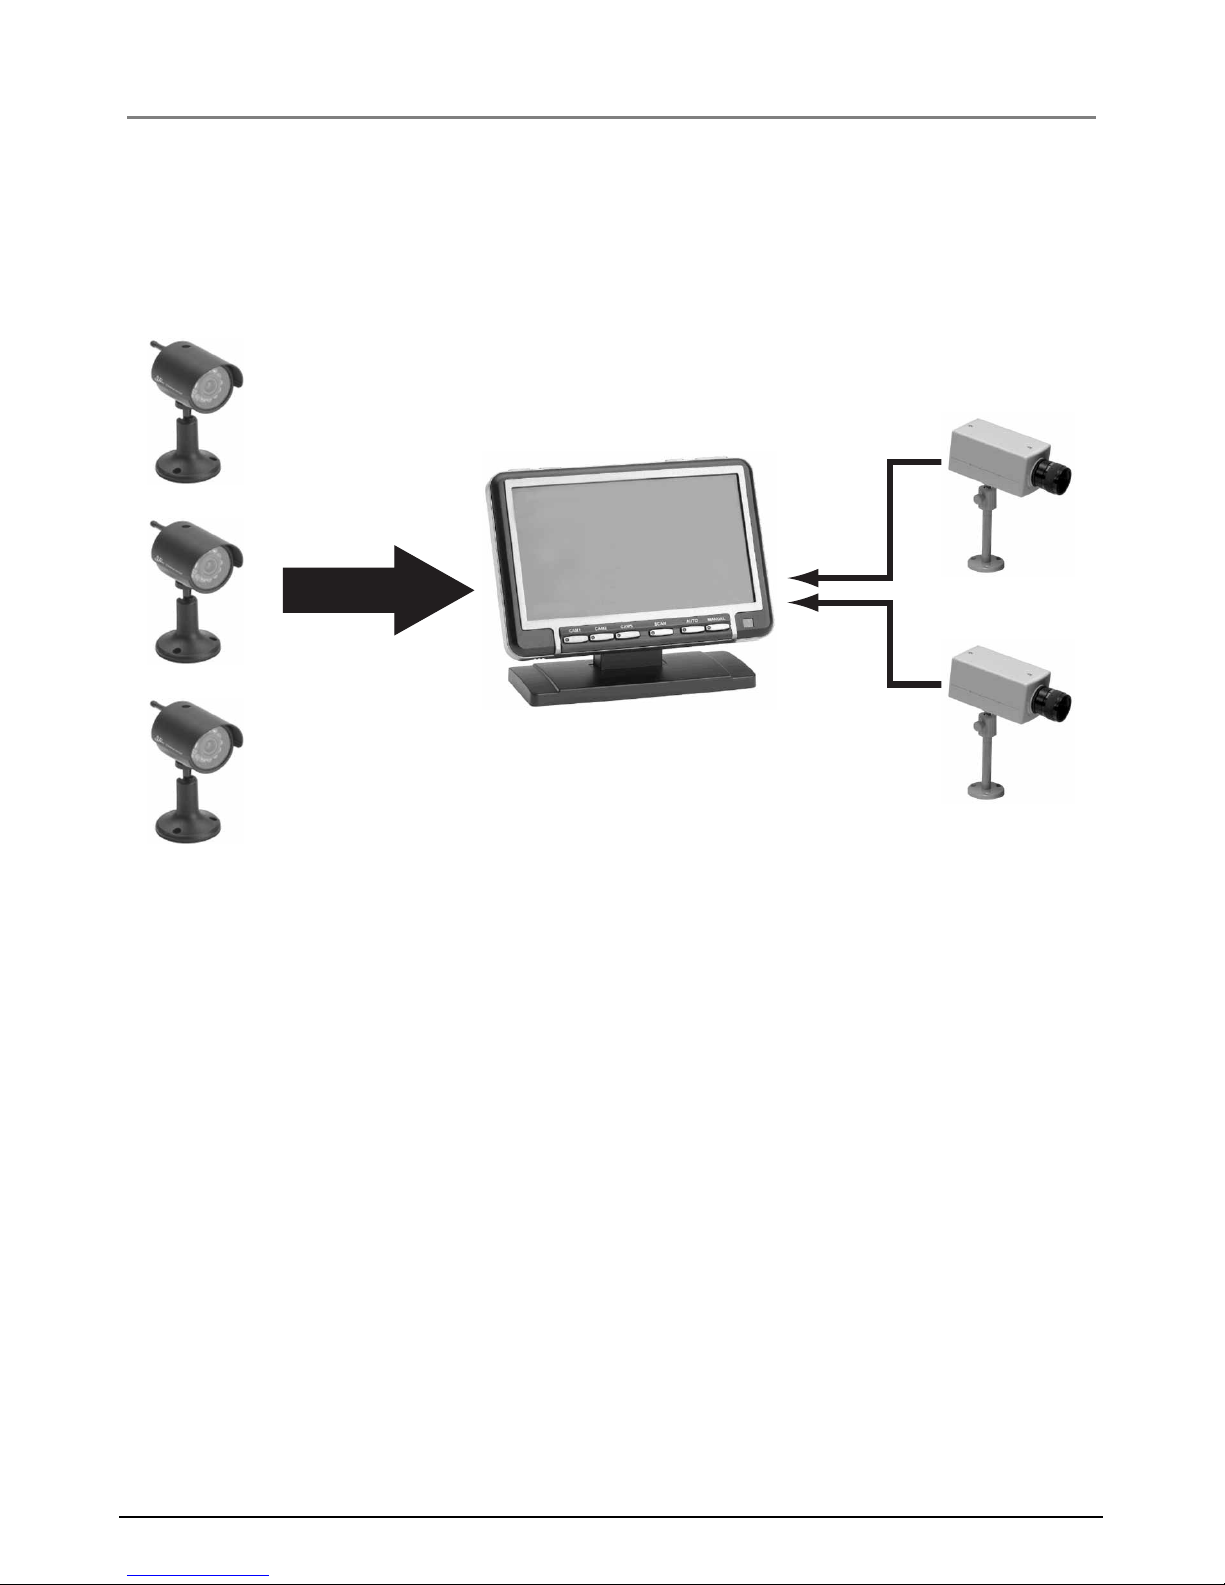
The Response Colour LCD Screen allows surveillance of any vulnerable places or areas
you wish to monitor. It allows you to connect both wired and wireless cameras (operating
on the 2.4GHz transmission frequency). You can connect up to 2 wired cameras and up
to 3 wireless cameras for surveillance.
The screen can also be used to view video and hear audio output from devices such as
DVD players, camcorders, etc, using any of the the 2 wired inputs via the supplied adaptors.
IMPORTANT:
Other devices transmitting on the 2.4GHz frequency may be picked up by this monitor on
any wireless channel. If this is experienced investigate the cause of interference. Typical
examples of devices operating on this frequency around the home can include wireless
routers or cordless phones. Avoid placing the LCD screen near to any potential source of
RF interference, a microwave oven or a metal radiator.
For best transmission, avoid installations where there are very thick walls or major
obstructions between the wireless camera and LCD screen.
2.4GHz
Up to 3 Wireless Cameras
2.4GHz transmission frequency
LCD Screen
2 Wired Cameras
+
5 Cameras can be used with the LCD Screen

4
SAFETY AND INSTALLATION TIPS:
The screen is intended for internal use only.
The Remote Control is supplied fitted with a CR2025 Lithium coin cell battery. If it is
removed, do not place in your mouth as this could impair your health. Keep these cells
out of reach from young children as they are a choking hazard.
The battery should not be exposed to excessive heat as this could reduce the battery’s life.
Damage to the unit may occur if the battery is replaced incorrectly according to the polarity
of the battery terminals in the Remote. Replace only with the same or equivalent type.
Do not attempt to open the unit with the power adaptor plug connected to avoid any risk
of personal injury. When installing any wired/wireless CCTV camera(s), always follow the
manufacturer’s advice when using power tools and wear suitable protective equipment
(e.g. safety goggles) when drilling holes, etc. Before drilling holes through walls check for
hidden electricity cables and water pipes. The use of a cable/pipe detector is advisable.
When installing the camera(s), it is advisable to use cable conduit to protect any
video/power extension cables from being exposed externally and to prevent/reduce the
chances of the cables being tampered. After drilling any hole though an external wall for
a cable, ensure the hole is sealed up around the cable using a sealant to prevent drafts.
There are no user serviceable parts inside. Refer servicing to qualified service personnel.

5
FEATURES Section 3
●
2.4GHz wireless technology to receive up to 3 wireless cameras
●
2 x wired inputs for viewing the output from wired cameras and other devices
such as DVD players, camcorders, VCR’s, etc.
●
7.0 inch LCD for good quality picture display
●
Remote control
●
Manual switching between wired and wireless cameras
●
Selectable screen ratio of 4:3 (standard), 16:9 (DVD movie) and extended 4:3
●
Up/down reverse function when the screen is installed upside down
●
Can be wall, table or ceiling mounted
●
Dwelling function for automatically viewing each wireless camera at a time
(
Note: this function is not available for wired cameras)
KIT CONTENTS Section 2
1 x7”Colour LCD Screen
1xRemote Control (supplied fitted with a 3V CR2025 battery)
2xWired cameras adaptor leads
1xPower supply adaptor
1xMonitor fixing kit – wall plugs and screws
1xInstallation and operating manual
Tools Required:
(only for wall/ceiling mounting the screen)
Electric drill
6mm drill bit
(use a masonry bit if mounting on concrete walls/ceilings)
 Loading...