

Page 1
B
Mask cushion
Mask frame
Mask elbow
Exhaust vent
Cuff
Short air tubing
Vent cover
Swivel
Crossover buckle
Side vertical strap
Rear strap
Strap loop
Lower strap
Angle Selector Tab
Headgear clip
Crossover
Ports cap
© 2004 ResMed Ltd.
Mask Parts
Manufactured by:
ResMed Ltd 1 Elizabeth MacArthur Drive Bella Vista NSW 2153 Australia
Tel: +61 (2) 8884 1000 or 1 800 658 189 (toll free) Fax: +61 (2) 8883 3114 Email: reception@resmed.com.au
ResMed Offices:
ResMed Corp 14040 Danielson Street Poway CA 92064-6857 USA
Tel: +1 (858) 746-2400 or 1-800-424-0737 (toll free) Fax: +1 (858) 746-2900 Email: reception@resmed.com
ResMed (UK) Ltd 65 Milton Park Abingdon Oxfordshire OX14 4RX UK
Tel: +44 (1235) 862 997 Fax: +44 (1235) 831 336 Email: reception@resmed.co.uk
ResMed Asia Pacific Ltd 97 Waterloo Road North Ryde NSW 2113 Australia
Tel: +61 (2) 9886 5000 or 1 800 991 900 (toll free) Fax: +61 (2) 9889 1471 Email: reception@resmed.com.au
ResMed Finland Niittykatu 6 FIN 02200 Espoo Suomi
Tel: +358 9 8676820 Fax: +358 9 86768222 Email: reception@resmed.fi
ResMed GmbH & Co. KG Rudolfstraße 10 D-41068 Mönchengladbach Deutschland
Tel: +49 (0) 2161-3521-0 (Reception), +49 (0) 180 22 22 668 (Service-Telefon; 0.06 s/Anruf),
+49 (0) 180 22 66 888 (Wartungstelefon; 0.06 s/Anruf) Fax: +49 (0) 2161-3521-1499 Email: reception@resmed.de
ResMed Hong Kong Ltd Room 1714 Miramar Tower 132-134 Nathan Road Tsim Sha Tsui Hong Kong
Tel: +852 2366 0707 Fax: +852 2366 4546 Email: reception@resmed.com.hk
ResMed Japan Nihonbashi Hisamatsu Bldg. 4F 2-28-1 Nihonbashi-Hamacho Chuo-Ku, Tokyo 103-0007 Japan
Tel: +81 (3) 3662 5056 Fax: +81 (3) 3662 5040
ResMed Malaysia Sdn Bhd Suite E-10-20, Plaza Mon’t Kiara No. 2, Jalan 1/70C Mon’t Kiara 50480 Kuala Lumpur
Malaysia Tel: +60 3 6201 7177 Fax: +60 3 6201 2177 Email: reception@resmed.com.my
ResMed NZ Ltd PO Box 51-048 Pakuranga Auckland New Zealand
Tel: +0800 737 633 (NZ toll free) or +64 274 737 633 Fax: +0800 737 634 (NZ toll free) or +64 9 239 0193
Email: reception@resmed.co.nz
ResMed SA Parc de la Bandonnière 2 rue Maurice Audibert 69800 Saint-Priest France
Tel: +33 (0) 4 37 251 251 Fax: +33 (0) 4 37 251 260 Email: reception@resmed.fr
ResMed Singapore Pte Ltd 238A Thomson Road # 12-03/04 Novena Square Tower A Singapore 307684
Tel: +65 6284 7177 Fax: +65 6284 7787 Email: reception@resmed.com.sg
ResMed Spain SL C/ Arturo Soria, 245 28033 Madrid España
Tel: +34 (93) 590 8154 Fax: +34 (93) 590 8153 Email: angelo@resmed.es
ResMed Sweden AB Industrigatan 2 S-461 37 Trollhättan Sverige
Tel: +46 520 420 110 Fax: +46 520 397 15 Email: reception@resmed.se
Labhardt AG Thannerstrasse 57 CH-4054 Basel Schweiz
Tel: +41 (061) 307 9711 Fax: +41 (061) 307 9722 Email: info@labhardt.ch
Reorder No. 61809/2 04 08
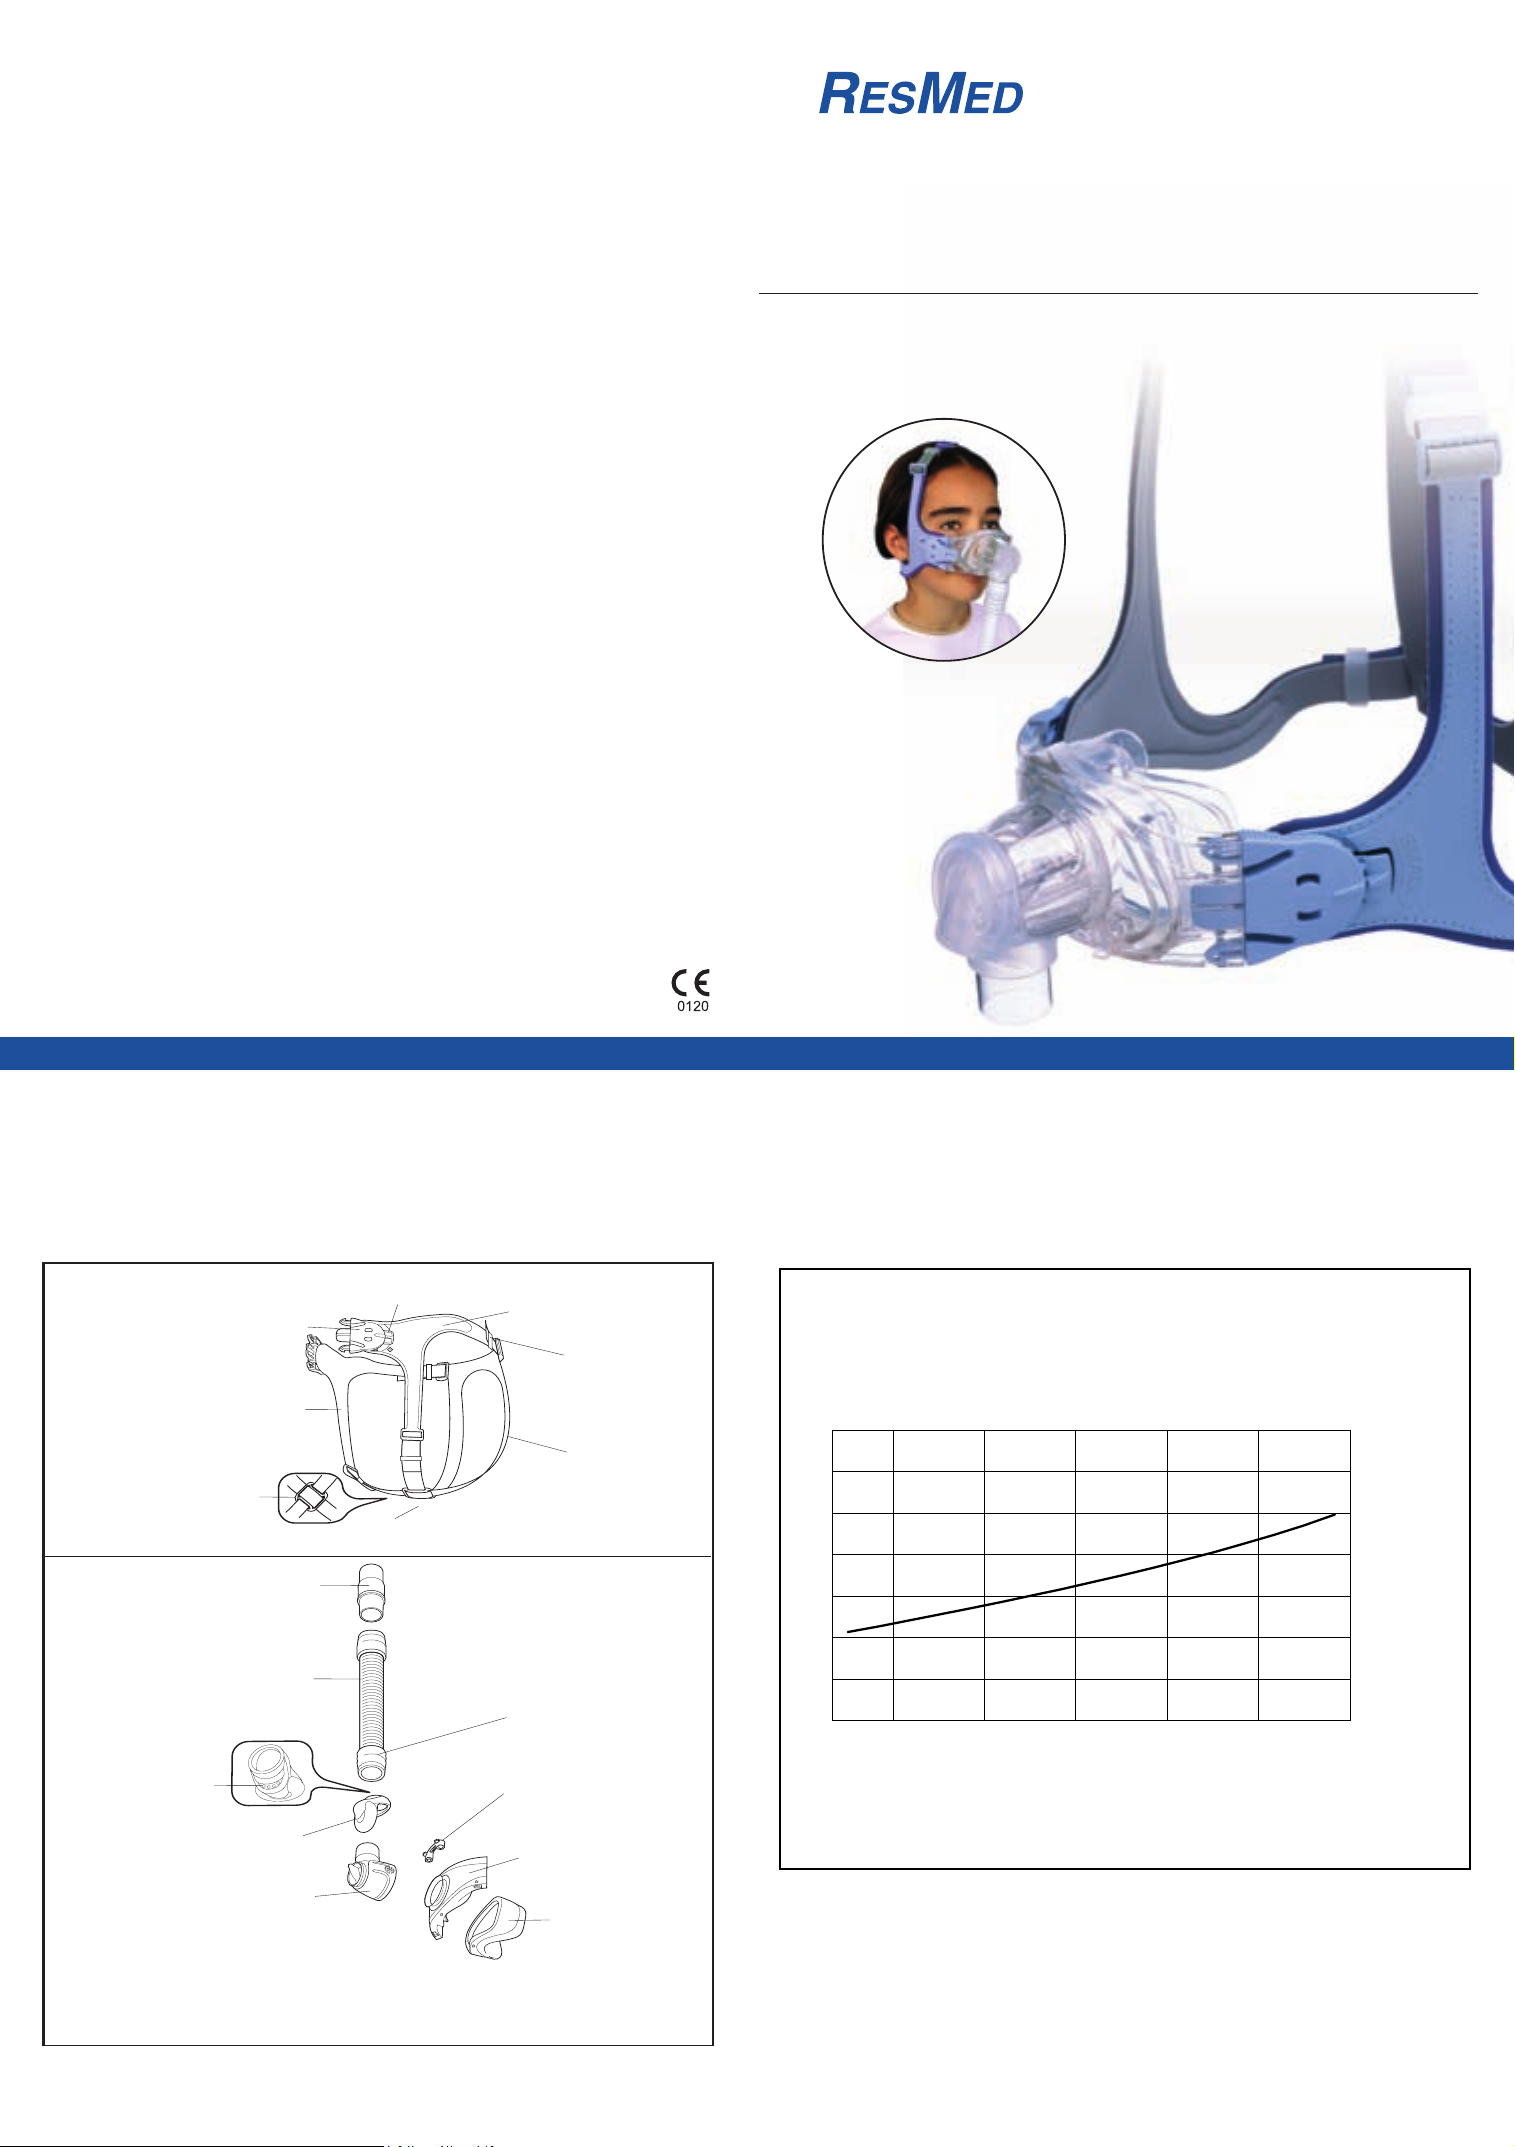
Mirage Kidsta
™
Nasal Mask
USER'S GUIDE
English
US DESIGNATED AGENT: ResMed Corp
EU AUTHORISED REPRESENTATIVE: ResMed (UK) Ltd
Mirage Kidsta Nasal Mask
Protected by patents: AU 710733, AU 712236, AU 724360, DE 29724224, US 6112746, US 6357441, US 6439230,
US 6561190, US 6561191, US 6581602, US 6634358. Other patents pending.
Protected by design registrations: AU 155372, CN 3302716.1, DE 40300897, FR 03 0845, GB 3010608, GB 3014182, GB 3014183,
GB 3014184, GB 3014185, GB 3014186, GB 3014187, GB 3014188, GB 3014189, JP 1200870, JP 1201246, NZ 403295,
SE 77095, US D485905. Others pending.
Mirage, Kidsta and Mirage Kidsta are trademarks of ResMed Ltd.
Dove is a registered trademark of Unilever.
© 2004 ResMed Ltd.
www.resmed.com
Waking people up to sleep
2
© 2004 ResMed Ltd.
O)
Mask Pressure (cmH
4567891011121314151617181920
0
10
Vent flow rate (L/min)
20
30
40
50
60
70
A
Pressure–Flow Curve
sheet.
Note: Note:
Note: For complete instructions, read the text section in conjunction with the illustrations on this
Note: Note:
Page 2
C
BL
BR
BR
BL
BR
BLBRBR
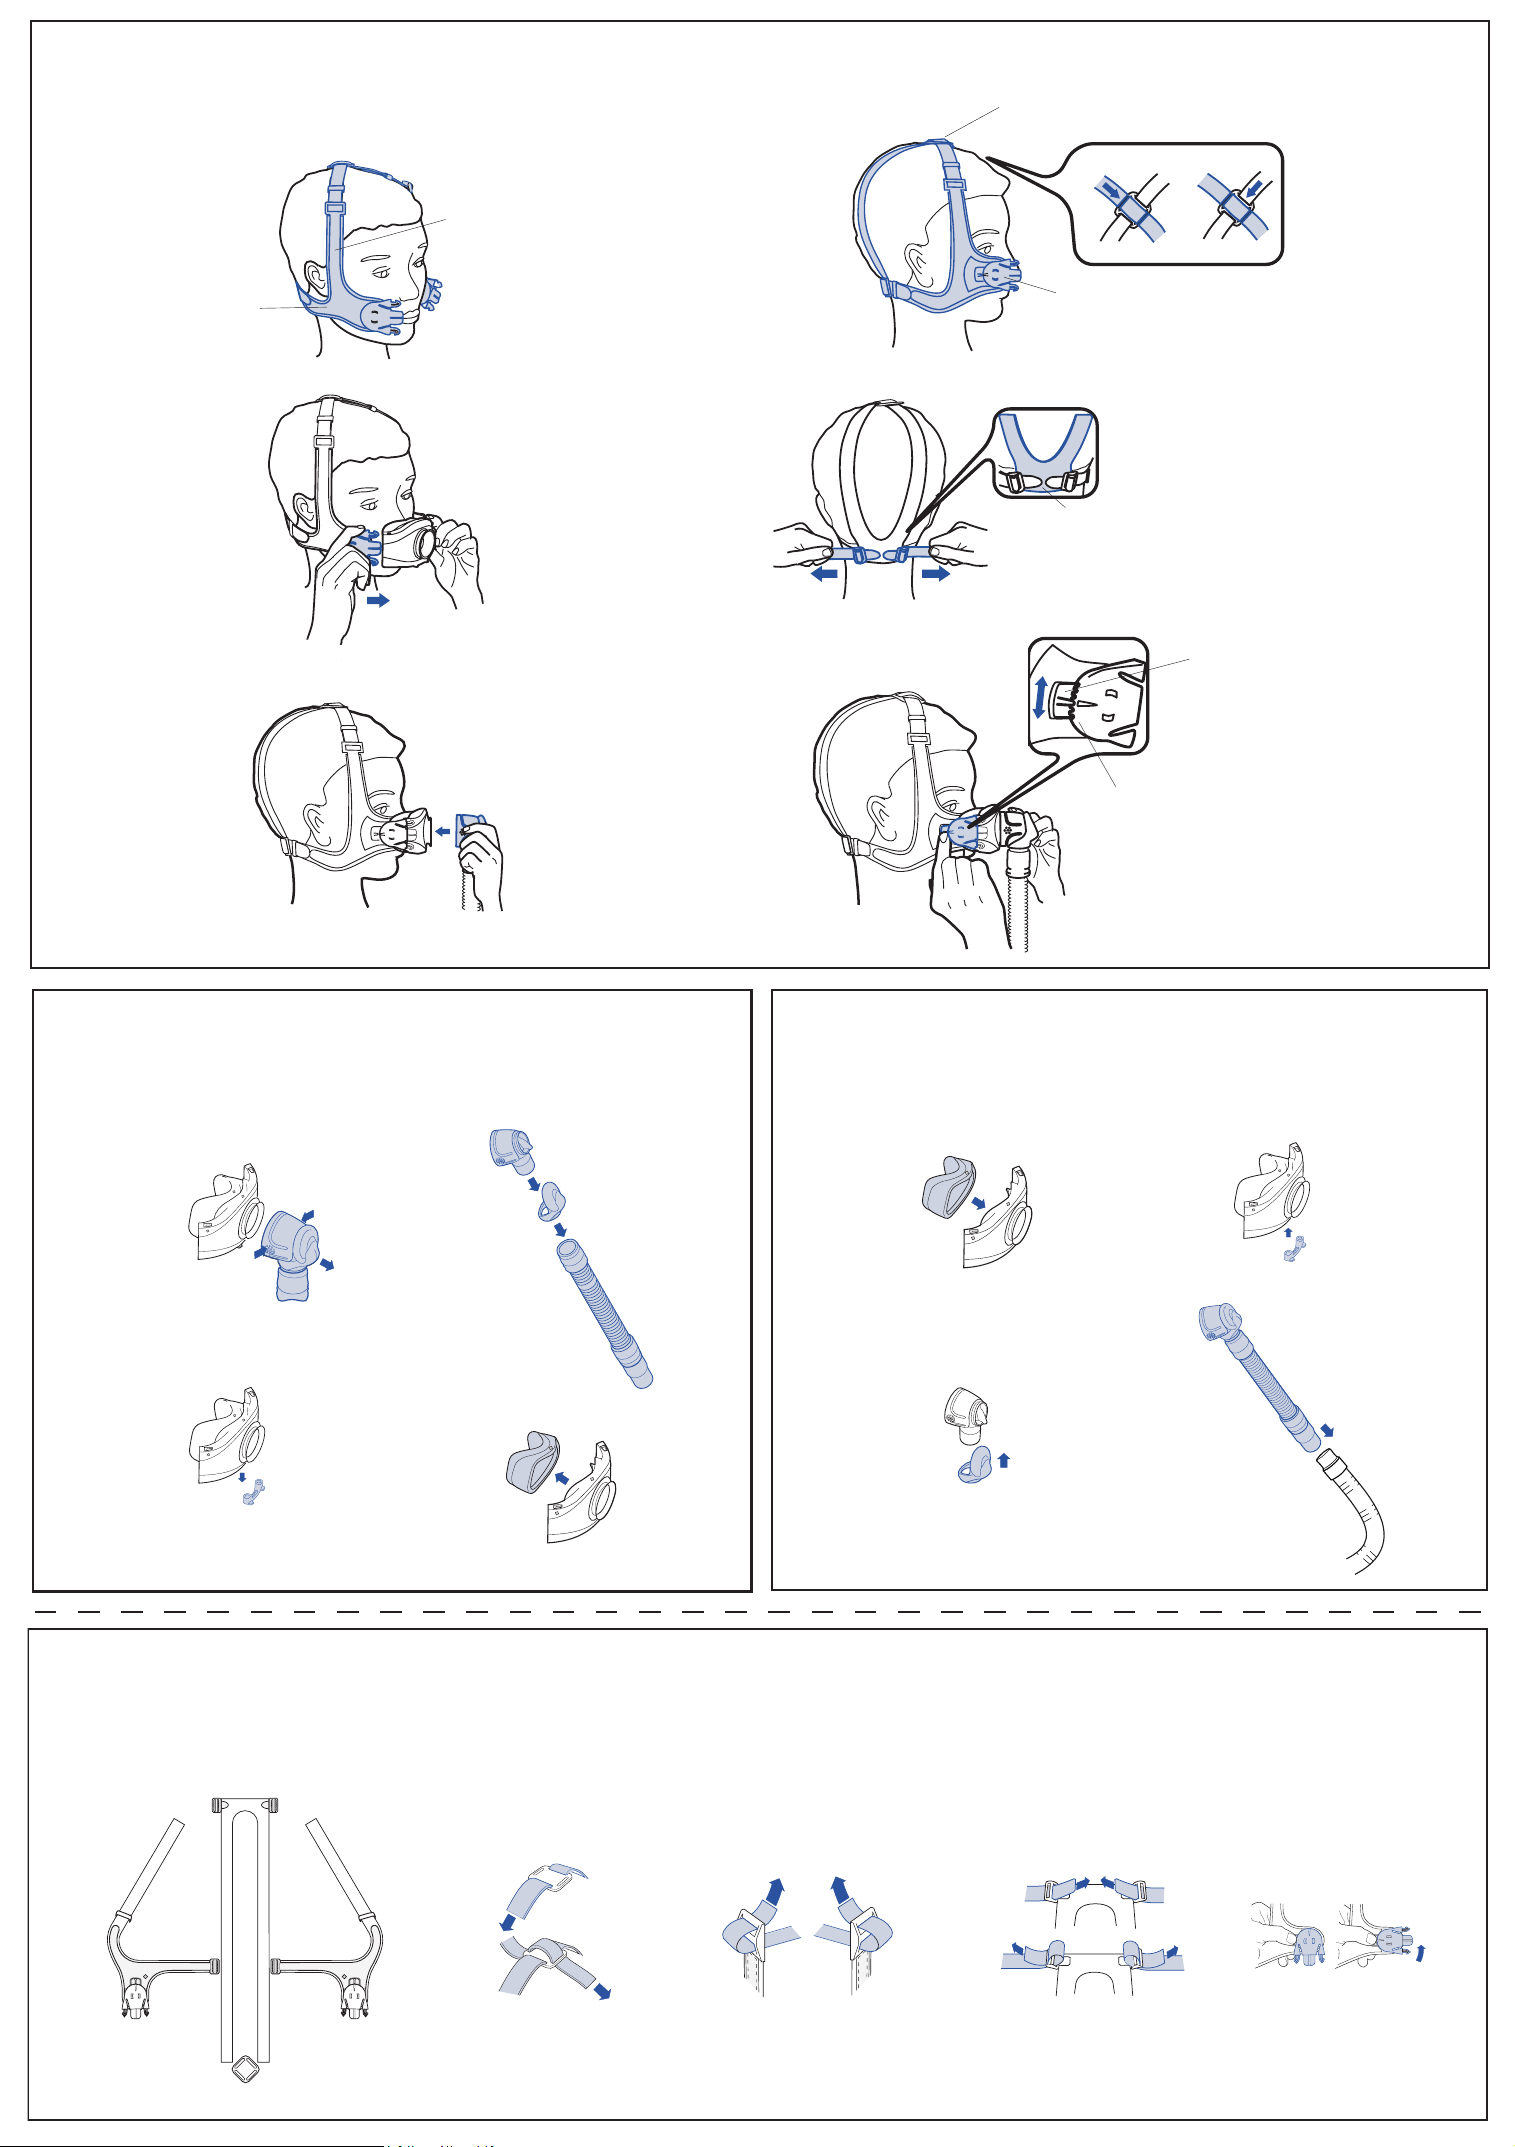
Fitting
Crossover as far forward as possible
C-1
Lower strap sits below ear
C-3
C-5
Side strap is vertical
C-2
C-4
C-6
a
Headgear clip aligned with nose
a
Straps fit securely at base of head
a
b
Angle Selector Tab
D
D-1
Disassembling
D-2
E
Reassembling
E-1
Settings
© 2004 ResMed Ltd.
E-2
D-3
Note: The headgear does not need to be disassembled for cleaning. Headgear reassembly instructions are provided here as additional information.
B
A
D
F-1
A D
D-4
BR
BR
F-2
© 2004 ResMed Ltd.
C
BR
BL
A
E-3
F-3
BL
D
E-4
© 2004 ResMed Ltd.
F-4
A
A
D
B
D
B
F-5
© 2004 ResMed Ltd.
BL
C
Page 3
Mirage Kidsta™ Nasal Mask
ENGLISH
The MIRAGE KIDSTA™ NASAL MASK is
intended for multipatient use for children
aged seven and over, prescribed
continuous positive airway pressure
(CPAP) or bilevel therapy in hospital, clinic
and/or home environments.
MEDICAL INFORMATION
Note: The mask system does not contain
latex materials. If you have ANY reaction to
any part of the mask system, discontinue
use and consult your sleep therapist.
. WARNINGS AND CAUTIONS
• Your physician should determine the
degree of arousability before
commencing CPAP treatment. Use of
secondary sensing devices such as
apnoea monitors and transcutaneous
carbon dioxide monitors is advisable.
These will help determine whether
nasal CPAP treatment should be
applied.
• Ensure that the nasal cushion does not
block the nostrils at any time during
fitting or use.
• The MIRAGE KIDSTA is designed to
provide a stable, effective air seal with
minimum headgear tension. High
headgear tension may lead to facial
deformities with long-term use. Regular
clinician review of growth patterns and
the use of different styles of mask is
recommended.
• The mask contains small parts which
could result in a choking risk. Your
clinician should assess the suitability of
the selected mask.
• This mask should be used only with
flow generators recommended by your
physician or respiratory therapist. A
mask should not be used unless the
flow generator is turned on and
operating properly. The exhaust vent
should never be blocked.
Explanation of the Warning: Flow
generators are intended to be used
with special masks with connectors
which may have vent holes or separate
exhaust vents to allow continuous flow
of air out of the mask. When the flow
generator is turned on and functioning
properly, new air from the flow
generator flushes the exhaled air out
through the attached mask exhaust
vent. However, when the flow
generator is not operating, enough
fresh air will not be provided through
the mask, and exhaled air may be
rebreathed. Rebreathing of exhaled air
for longer than several minutes can in
some circumstances lead to suffocation.
This warning applies to most models of
flow generators.
Page 4

• At low CPAP pressures, the flow
through the exhaust vent may be
ENGLISH
inadequate to clear all exhaled gas from
the tubing. Some rebreathing may occur.
Explanation of the Warning: The
exhaust vent flow is lower at lower mask
pressures (see Pressure/Flow curve—
Figure A). To avoid rebreathing it is
recommended that a mask pressure of
O or more be used.
4cmH
2
• The MIRAGE KIDSTA features an elbow
that can be easily removed while the
mask is fitted. The mask should not be
used with the elbow attached unless the
flow generator is turned on and
operating properly.
• If oxygen is used with the flow
generator, the oxygen flow must be
turned off when the flow generator is
not operating.
Explanation of the Warning: When the
flow generator is not in operation, and
the oxygen flow is left on, oxygen
delivered into the ventilator tubing may
accumulate within the flow generator
enclosure. Oxygen accumulated in the
flow generator will create a risk of fire.
This warning applies to most types of
flow generators.
• Please refrain from smoking while
oxygen is in use.
Note: At a fixed rate of supplemental
oxygen flow, the inhaled oxygen
concentration will vary, depending on the
pressure settings, patient breathing pattern,
mask selection and leak rate.
PARTS OF THE MASK
See Figure B.
FITTING THE MASK
See Figure C.
Note: Before fitting the mask, refer to the
section “Cleaning the Mask in the Home”.
1 Place the headgear on the head. Adjust
the side vertical straps so that the lower
strap sits just below the ear (not
touching it) and at the base of the head
(Fig. C-1).
2 The headgear clip should be parallel
with the nose and not in the line of
vision. Check that the crossover is as far
forward as possible (Fig. C-2).
To adjust the crossover to a forward
position, slide the crossover buckle
along one strap (Fig. C-2a) and then
along the other strap (Fig. C-2b).
Alternate the movement on each side
until the crossover is as far forward as
possible.
3 Ensure that the crossover and the rear
straps lie flat against the head.
4 Place the mask on the nose (Fig. C-3).
Clip the mask to the headgear.
5 Adjust the lower straps by pulling firmly
(Fig. C-4) so that the rear straps fit
securely around the base of the head
(Fig. C-4a).
Note: Ensure that the nostrils are not
blocked by the cushion.
6 Connect one end of the main air tubing
to your flow generator and the other
end to the swivel.
Note: The swivel, short air tubing and
mask elbow are supplied assembled.
7 Turn your flow generator on.
8 Connect the mask elbow to the mask
frame. To do this, hold the sides of the
mask elbow (Fig. C-5) and firmly push
the elbow onto the mask frame until it
clicks into place.
Page 5

Check that you have connected the
mask elbow correctly by rotating it. Be
careful not to squeeze the sides of the
elbow. If the mask elbow is fitted
correctly, it should rotate freely and not
separate from the mask frame.
9 Adjust the angle of the mask by selecting
the setting that provides a comfortable
fit with minimum or no leak.
To test each setting, hold down the
Angle Selector Tab (Fig. C-6) and move
the headgear clip up or down
(Fig. C-6a) as required. You may need
to raise the headgear clip when moving
it from one setting to the next.
The mask can be tilted at five different
positions. If you feel excessive pressure
on the middle of the nose, tilt the mask
down. Alternatively, if you feel excessive
pressure on your upper lip, tilt the mask
up.
10 If you feel air leaks around the cushion,
reposition the mask on your face to
achieve a better seal.
Take time to adjust all straps and the
position of the mask so that you can
achieve a secure and comfortable fit.
Notes:
• If you are unable to resolve any leaks you
may need to try another cushion size.
• Excess headgear length may be trimmed
to a suitable length if required. Leave at
least 30 mm free length on the straps.
• Select "Standard" as the mask option
when using the M
IRAGE KIDSTA with
ResMed flow generators that have mask
setting options.
REMOVING THE MASK
To remove the MIRAGE KIDSTA, squeeze
one of the headgear clips. This releases one
side of the headgear from the mask. Pull the
mask and headgear away from your head.
Notes:
• Do not pull the headgear off your head
without releasing the headgear clips first.
• You can detach the elbow from the mask
frame while wearing the mask. This is
useful when therapy needs to be stopped
for a short time; for example if you need to
go to the bathroom.
• Check that you can remove the headgear
clip, the quick release swivel or the
headgear unaided.
DISASSEMBLING FOR CLEANING
See Figure D.
1 Detach the mask elbow. To do this,
squeeze the sides of the mask elbow at
the finger grips while pulling it away from
the mask frame (Fig. D-1).
2 Disconnect and separate the main air
tubing, short air tubing, mask elbow and
vent cover (Fig. D-2).
Notes:
• To prevent damage to the short air
tubing, disconnect it by holding it at the
cuff.
• The swivel does not need to be
disconnected from the short air tubing.
3 Detach the headgear from the mask
frame by squeezing and releasing both
headgear clips.
4 Remove the ports cap from the mask
frame (Fig. D-3).
5 Firmly pull the mask cushion away from
the mask frame (Fig. D-4).
ENGLISH
Page 6

CLEANING THE MASK IN THE
OME
H
ENGLISH
Notes:
• Wash the headgear before first time use,
as the dye may run. It is important to
always handwash the headgear.
• The headgear may be washed without
being disassembled.
DAILY/AFTER EACH USE
Handwash the mask components in
lukewarm, soapy water. Use pure soap
(an example of pure soap is Dove®soap,
unscented; made by Unilever). Rinse the
components well and allow them to air dry
out of direct sunlight.
WEEKLY
Handwash the headgear in warm, soapy
water. Use pure soap. Rinse well and allow
it to air dry out of direct sunlight.
. CAUTIONS
• Do not use solutions containing
bleach, chlorine, alcohol, aromatics,
moisturisers, antibacterial agents, or
scented oils to clean any part of the
mask system or air tubing. These
solutions may cause damage and
reduce the life of the product.
• Do not expose any part of the mask
system or tubing to direct sunlight as
it may deteriorate.
• If any visible deterioration of a mask
component is apparent (cracking,
crazing, tears etc), the mask
component should be discarded and
replaced.
CLEANING THE MASK BETWEEN
ATIENTS
P
The mask system (excluding the swivel and
short tube) is validated for multipatient use.
Clinicians should refer to the Masks
Disinfection/Sterilisation Guide for details.
To clean the headgear between patients,
use the method described in the previous
section “Cleaning the Mask in the Home”.
REASSEMBLING THE MASK
See Figure E.
1 Insert the mask cushion into the groove
of the mask frame (Fig. E-1). Fit the top
section first and then work your way
around, pushing the mask cushion into
the mask frame.
Note: The diamond markers on the mask
frame and on the mask cushion (one on
top, two at the bottom) must line up.
2 Push the ports cap onto the mask ports
(Fig. E-2).
3 Attach the vent cover to the mask
elbow. To do this, insert the elbow into
the ring of the vent cover (Fig. E-3).
Push the ring to the top so that the vent
cover is over the back of the elbow.
Then, press the lip of the vent cover to
ensure that it is securely seated in the
groove of the elbow.
4 Connect the short air tubing to the mask
elbow.
5 Connect the swivel to the main air
tubing, ready for next use (Fig. E-4).
Page 7

ADDITIONAL INFORMATION
REASSEMBLING THE HEADGEAR
Note: You do not need to disassemble the
headgear for cleaning. However, if you choose
to do so, the reassembly procedure is
explained in this section.
When disassembled, the headgear has four
parts:
A: Left strap, B: Middle strap,
C: Crossover buckle, D: Right strap
1 Lay out the four parts of the headgear as
shown in Figure F-1.
2 As shown in Figure F-2, thread the
straps BR and BL through the crossover
buckle (Part C).
3 Thread strap BR through the buckle on
Part A. Thread strap BL through the
buckle on Part D (Fig. F-3).
4 Thread the straps of Part A and Part D
through the buckles on Part B (Fig. F-4).
5 With the headgear clip facing down, fit
the headgear clip onto the hole on the
headgear. While pressing the headgear
tab down, rotate the headgear clip away
from the tab to lock it into place
(Fig. F-5). Repeat this with the other
headgear clip.
TECHNICAL SPECIFICATIONS
PRESSURE–FLOW CURVE
See Figure A.
DEAD SPACE INFORMATION
Dead space is the empty volume of the
mask up to the swivel.
The dead space of the mask for all cushion
sizes is 81 mL.
REPLACEMENT PARTS
Part No. Item
61020 Headgear Assembly, Small
60013 Cushion, Small
61025 Headgear clip - blue (2 pk.)
61026 Headgear clip - blue (10 pk.)
60023 Crossover buckle - blue
60024 Crossover buckle - blue
(10 pk.)
60924 Mask Frame
60925 Elbow Assembly
60014 Swivel Assembly (10 pk.)
60926 Inlet Tube and Swivel Assembly
60927 Inlet Tube and Swivel Assembly
(10 pk.)
16570 Ports cap (2 pk.)
16571 Ports cap (10 pk.)
61011 Mask System, Small
LIMITED WARRANTY
ResMed warrants that your ResMed mask
system, including its components: mask
frame, cushion, headgear, tubing and other
accessories (“Product”) shall be free from
defects in material and workmanship for a
period of ninety (90) days from the date of
purchase by the initial consumer.
For further details refer to the Warranty.
ENGLISH
Note: Translations are based on the English version in this guide. However, there may be minor
variations based on the disinfection/sterilisation procedures applicable in some countries.
ResMed has reviewed these changes and all procedures included here have been validated.
Page 8

Component of: 61809/2 04 08
 Loading...