

Page 1
Mirage Activa™ Nasal Mask
The MIRAGE ACTIVA™ mask is an accessory to a non-continuous
ventilator (respirator), intended for multi-patient use for adult
patients prescribed continuous positive airway pressure (CPAP)
or bilevel therapy in hospital, clinic, and/or home environments.
MEDICAL INFORMATION
Note: The mask system does not contain latex materials.
!
WARNINGS
• This mask should be used only with CPAP or bilevel systems
recommended by your physician or respiratory therapist. A
mask should not be used unless the CPAP or bilevel system is
turned on and operating properly. The exhalation device
should never be blocked.
Explanation of the Warning: CPAP or bilevel systems are
intended to be used with special masks with connectors
which have vent holes or separate exhalation devices to allow
continuous flow of air out of the mask. When the CPAP or
bilevel device is turned on and functioning properly, new air
from the flow generator flushes the exhaled air out through
the attached mask exhalation port. However, when the CPAP
or bilevel device is not operating, enough fresh air will not be
provided through the mask, and exhaled air may be
rebreathed. Rebreathing of exhaled air for longer than several
ENGLISH
1
Page 2

minutes can in some circumstances lead to suffocation. This
warning applies to most models of CPAP or bilevel systems.
• The exhaust vent flow is lower at lower mask pressures (see
“Pressure/Flow Curve” on page 9). If the mask pressure during
expiration is too low, there may not be enough exhaust vent
flow to completely flush the air delivery hose of exhaled air
before the start of the next inspiration.
• The MIRAGE ACTIVA features an elbow that can be easily
removed while the mask is fitted. The mask should not be
used with the elbow attached unless the CPAP or bilevel
system is turned on and operating properly.
• The mask must be cleaned and disinfected/sterilised if it is
used between patients. Refer to the section “Cleaning the
Mask between Patients” for details.
• If oxygen is used with the CPAP or bilevel device, the oxygen
flow must be turned off when the flow generator is not
operating.
Explanation of the Warning: When the CPAP or bilevel
device is not in operation, and the oxygen flow is left on,
oxygen delivered into the ventilator tubing may accumulate
within the flow generator enclosure. Oxygen accumulated in
the CPAP or bilevel device enclosure will create a risk of fire.
This warning applies to most types of CPAP or bilevel flow
generators.
• Please refrain from smoking while oxygen is in use.
Note: At a fixed flow rate of supplemental oxygen flow, the inhaled
oxygen concentration will vary depending on: pressure settings,
patient breathing pattern, mask selection and leak rate.
PARTS OF THE MASK
See Figure A for a list of all parts.
2
Page 3

The MIRAGE ACTIVA mask cushion uses ResMed's innovative
CTIVECELL™ technology. The ACTIVECELL is an expandable
A
chamber that inflates during therapy. This technology means that
IRAGE ACTIVA is "self sealing" as it responds to factors that
the M
cause leak. This provides you with a better seal, especially when
you are moving during the night. The A
CTIVECELL technology
does not require as much headgear strap tension as other masks,
which makes the M
IRAGE ACTIVA more comfortable to use.
FITTING THE MASK
Note: Before fitting the mask, refer to the section on “Cleaning the
Mask in the Home” on page 6.
1 Squeeze one of the headgear clips to release it from the mask
frame (Fig. B-1).
2 Place the mask cushion over your nose.
3 Pull the headgear over your head (Fig. B-2). Make sure the
lower straps pass below your ears, and the upper straps pass
over your forehead.
4 Connect the free headgear clip to the mask frame (Fig. B-3).
5 Adjust the lower (Fig. B-4) and then the upper (Fig. B-5)
straps of the headgear so the cushion sits loosely on your
face. Do not tighten the headgear straps at this stage.
6 The pads of the forehead support should lightly touch your
forehead when the mask is in place.
Adjust the forehead support by depressing its tab and moving
it to one of the other slot positions (Fig. C-7).
7 Connect one end of the main air tubing to your CPAP or
bilevel device and the other end to the swivel (Fig. D-10).
Note: The swivel, short air tubing and mask elbow are supplied
assembled.
ENGLISH
3
Page 4

8 Connect the mask elbow to the mask frame. To do this, firmly
push the mask elbow onto the mask frame until it clicks into
place (Fig. B-6).
Check that you have connected the mask elbow correctly by
rotating it. Be careful not to squeeze the sides of the elbow as
it may release from the mask frame. If the mask elbow is fitted
correctly, it should rotate freely and not separate from the
mask frame.
9 The fitted mask should look like this (Fig. B-7).
10 Turn your flow generator on. If you feel air leaks around the
cushion, reposition the mask on your face to achieve a better
seal. You may also need to readjust the headgear straps or
forehead support.
Do not over-tighten the straps. The straps should be adjusted
so that the A
shown in Figure B-8.
The A
expanded (Fig. B-10).
Take time to adjust the straps and the position of the mask to
achieve a comfortable and secure fit. If you feel excessive
pressure on your nasal bridge or upper lip, adjust the
forehead support.
Note: Select ’Standard’ as the mask option, when using ResMed
AutoSet™ devices.
CTIVECELL is moderately and evenly expanded as
CTIVECELL should not be collapsed (Fig. B-9) or over-
REMOVING THE MASK
To remove the MIRAGE ACTIVA mask, squeeze the headgear clips
(Fig. C-a). This releases the headgear clips from the mask frame.
Pull the mask and headgear away from your head.
Note: Do not pull the headgear off your head without releasing the
headgear clips first.
4
Page 5

TIP!
You can detach the elbow from the mask frame while wearing the
mask (see “Disassembling For Cleaning”). This is useful when
therapy needs to be stopped for a short time; for example if you
need to go to the bathroom.
DISASSEMBLING FOR CLEANING
1 Detach the mask elbow. To do this, squeeze the raised dots
on the sides of the mask elbow while pulling it away from the
mask frame (Fig. C-1).
2 Disconnect and separate the main air tubing, short air tubing,
mask elbow and vent cover (Fig. C-2).
Notes
• To prevent damage to the short air tubing, disconnect it by
holding it at the cuff.
• The swivel does not need to be disconnected from the short air
tubing.
3 Squeeze the headgear clips to release them from the mask
frame. Unfasten the Velcro® straps and unthread the upper
headgear straps through the slots of the forehead support.
4 Remove the ports cap from the mask frame (Fig. C-3).
5 Detach the cushion assembly from the mask frame. To do
this, squeeze the two side latches on the cushion clip until
they disengage from the mask frame (Fig. C-4). Then pull the
mask cushion assembly out and away from the mask frame
(Fig. C-5).
6 Remove the cushion clip from the mask cushion. To do this,
roll back one end of the A
out (Fig. C-6).
7 Depress the forehead support tab and move it past the top
slot position (Fig. C-7). This allows you to remove the
forehead support from the mask frame.
CTIVECELL and pull the cushion clip
ENGLISH
5
Page 6

Pull firmly at the base of the forehead pad plugs to release the
forehead pads from the forehead support.
CLEANING THE MASK IN THE HOME
Note: Wash the headgear before first time use, as the dye may run.
It is important to always hand wash the headgear.
WEEKLY
Hand wash the headgear in lukewarm, soapy water. Use pure
soap. Rinse well and allow it to air dry out of direct sunlight.
DAILY/AFTER EACH USE
Hand wash the mask components in lukewarm, soapy water. Use
pure soap. Rinse the components well and allow them to air dry
out of direct sunlight.
!
CAUTIONS
• Do not use solutions containing bleach, chlorine, alcohol,
aromatics, moisturisers, antibacterial agents, or scented oils
to clean any part of the mask system or air tubing. These
solutions may cause damage and reduce the life of the
product.
• Do not expose any part of the mask system or tubing to
direct sunlight as it may cause the product to deteriorate.
• If any visible deterioration of a mask component is apparent
(cracking, crazing, tears, etc), the mask component should
be discarded and replaced.
6
Page 7

CLEANING THE MASK BETWEEN
PATIENTS
The mask system (excluding the swivel and short air tubing) is
validated for multipatient use. Clinicians should refer to the Masks
Disinfection/Sterilisation Guide for details.
To clean the headgear between patients use the method
described in the previous section “Cleaning the Mask in the
Home”.
REASSEMBLING THE MASK
1 Attach the forehead pads to the forehead support. To do this,
place the forehead pad plugs into the two round holes of the
forehead support. Then push firmly behind the base of the
forehead pad plugs (Fig. D-1) until the tip of the plug is
securely seated over the hole. The base of the forehead pad
plug should be flush against the forehead support.
2 Reconnect the forehead support to the mask frame
(Fig. D-2). Depress the tab and move the forehead support
into one of the four slot positions.
3 Fit the cushion clip into the groove of the mask cushion.
Ensure the cut outs under the cushion clip latches are aligned
with the blocks in the groove of the mask cushion.
Fit the top section first (Fig. D-3), then work your way
around, inserting the cushion clip into the mask cushion.
Ensure that the cushion clip does not pinch any part of the
mask cushion (Fig. D-4). The cushion clip should fit snugly
inside the groove of the mask cushion.
4 Attach the cushion assembly to the mask frame. To do this,
align the two side latches on the cushion clip to the top two
holes on the mask frame (Fig. D-5). Then push the cushion
ENGLISH
7
Page 8

assembly onto the mask frame firmly until the latches click
into place. Ensure the bottom latch is also secure (Fig. D-6).
5 Push the ports cap onto the mask ports (Fig. D-7).
6 Attach the vent cover to the mask elbow. To do this, slide the
vent cover along the elbow until the tops of the vent cover
(Fig. D-8b) and the ridge of the vent opening (Fig. D-8a) are
aligned. Then push the vent holes (Fig. D-9c) in and slide the
vent cover up over the ridge of the vent opening (Fig. D-9a &
Fig. D-9b). The fitted vent cover should look like Fig. D-10.
Ensure that the lip of the vent cover is securely seated over
the ridge of the vent opening. It should form a perfect circle
around the ridge of the vent opening and not be distorted.
7 Connect the short air tubing to the mask elbow.
8 Connect the headgear clips to the mask frame.
9 Thread the upper straps of the headgear through the slots on
the forehead support and fasten the Velcro straps (Fig. D-11).
The headgear label should face outwards and be near your
neck when fitted.
10 Connect the swivel to the main air tubing ready for next use
(Fig. D-12).
11 When ready for use, connect the mask elbow to the mask
frame (Fig. B-6).
8
Page 9
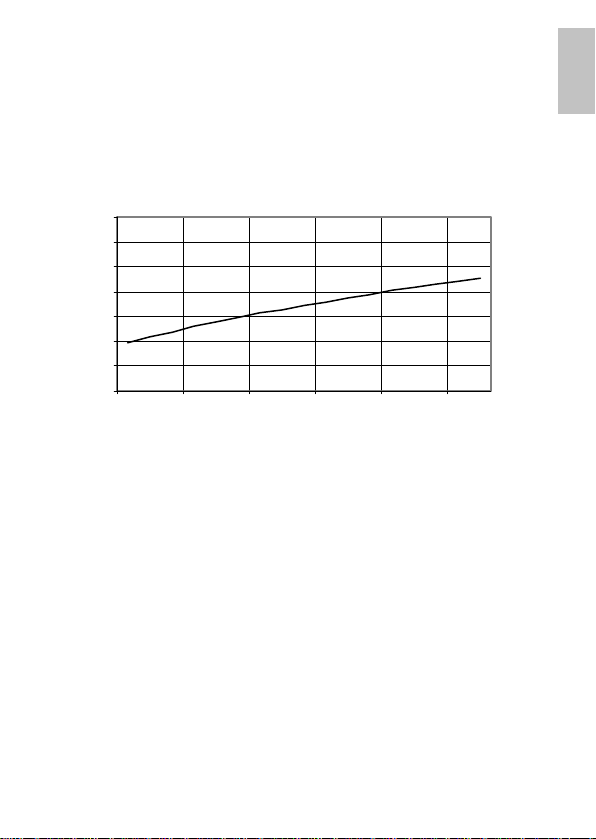
TECHNICAL SPECIFICATIONS
PRESSURE/FLOW CURVE
The following graph shows the rate of air flow through the mask
vents at varying mask pressures.
Exhaust Vent Pressure / Flow Characteristics
70
60
50
40
30
20
Flow (L/min)
10
0
4 5 6 7 8 9 10 11 12 1 3 14 15 16 17 1 8 19 20
Pressure (cm H2O)
DEAD SPACE INFORMATION
The dead space of the MIRAGE ACTIVA mask is 127mL.
Explanation: Dead space is the empty volume of the mask up to
the elbow.
LIMITED WARRANTY
ResMed warrants that your ResMed mask system, including its
components: mask frame, cushion, headgear, tubing and other
accessories (“Product”) shall be free from defects in material and
workmanship for a period of ninety (90) days from the date of
purchase by the initial consumer.
For further details refer to the Warranty.
ENGLISH
9
Page 10

10
Page 11
Mirage Activa™ Nasenmaske
Die MIRAGE ACTIVA™ Maske ist ein Zubehörteil für ein
diskontinuierliches Beatmungssystem (Respirator), das für den
mehrfachen Gebrauch durch erwachsene Patienten ausgelegt ist,
die im Krankenhaus, in der Klinik oder zu Hause mit kontinuierlich
positivem Atemwegsdruck (CPAP) oder der Bilevel-Therapie
behandelt werden.
MEDIZINISCHE HINWEISE
Hinweis: Das Maskensystem ist latexfrei.
!
WARNUNGEN
• Diese Maske sollte nur mit von Ihrem Arzt oder
Atemtherapeuten empfohlenen CPAP- oder BilevelSystemen verwendet werden. Eine Maske sollte nur benutzt
werden, wenn das CPAP- bzw. Bilevel-System eingeschaltet
ist und ordnungsgemäß funktioniert. Die Exhalationskomponenten sollten niemals blockiert sein.
Erläuterung zur Warnung: CPAP- oder Bilevel-Systeme sind
für die Verwendung mit Spezialmasken vorgesehen, die
Verbindungsstücke mit Luftauslassöffnungen haben oder mit
separaten Exhalationskomponenten ausgestattet sind, um
einen kontinuierlichen Luftfluss aus der Maske heraus zu
gewährleisten. Wenn das CPAP- oder Bilevel-System
eingeschaltet ist und ordnungsgemäß funktioniert, führt die
vom Luftstromgenerator in die Maske strömende frische Luft
DEUTSCH
11
Page 12

die ausgeatmete Luft durch die montierten
Luftauslassöffnungen aus der Maske heraus. Ist das CPAPoder Bilevel-System jedoch nicht in Betrieb, wird
unzureichend frische Luft durch die Maske zugeführt und
es kann zur Rückatmung ausgeatmeter Luft kommen.
Die Rückatmung ausgeatmeter Luft über mehrere Minuten
hinweg kann u. U. zum Ersticken führen. Diese Warnung
bezieht sich auf die meisten CPAP- oder Bilevel-Modelle.
• Der Luftfluss durch diese Auslassöffnungen ist bei niedrigen
Maskendrücken geringer (siehe „Druck-/Flusskurve“ auf Seite
20). Ist der Maskendruck beim Ausatmen zu niedrig, kann es
sein, dass der Luftfluss durch die Auslassöffnungen nicht
ausreicht, um die ausgeatmete Luft vor dem nächsten
Einatmen vollständig aus dem Luftzufuhrschlauch zu führen.
• Die MIRAGE ACTIVA verfügt über ein Kniestück, dass
problemlos bei angelegter abgenommen Maske werden kann.
Diese sollte nur dann mit angeschlossenem Kniestück
verwendet werden, wenn das CPAP- bzw. Bilevel-System
eingeschaltet ist und ordnungsgemäß funktioniert.
• Zur Vorbereitung auf einen neuen Patienten muss die Maske
gereinigt und desinfiziert/sterilisiert werden. Weitere
Informationen dazu finden Sie im Abschnitt „Reinigung der
Maske zur Vorbereitung auf einen neuen Patienten“.
• Wenn das CPAP- oder Bilevel-System mit Sauerstoff
verwendet wird, sollte darauf geachtet werden, dass die
Sauerstoffzufuhr abgeschaltet wird, wenn der
Luftstromgenerator außer Betrieb ist.
Erläuterung zur Warnung: Wenn die Sauerstoffzufuhr auch
dann eingeschaltet ist, wenn das CPAP- bzw. Bilevel-System
außer Betrieb ist, kann sich Sauerstoff, der in die
Luftstromgeneratorschläuche geleitet wurde, im Gehäuse
12
Page 13

ansammeln und damit eine Brandgefahr darstellen. Diese
Warnung bezieht sich auf die meisten CPAP- oder BilevelLuftstromgeneratoren.
• Während der Verwendung von Sauerstoff nicht rauchen.
Hinweis: Wird eine konstante Menge an zusätzlichem Sauerstoff
zugeführt, ist die Konzentration des eingeatmeten Sauerstoffs je
nach Druckeinstellung, Atemmuster des Patienten, Maskentyp und
Luftaustrittsrate unterschiedlich.
TEILE DER MASKE
Eine Liste aller Teile finden Sie in Abbildung A.
Der M
IRAGE ACTIVA Maskeneinsatz wurde anhand der
innovativen A
Die A
CTIVECELL™ Technologie von ResMed entwickelt.
CTIVECELL ist eine dehnbare Kammer, die sich während der
Behandlung aufbläht. Dank dieser Technologie ist die
IRAGE ACTIVA „selbstversiegelnd“, da sie auf Faktoren reagiert,
M
die Leckagen verursachen. Dadurch wird eine bessere Dichtigkeit
erzielt, insbesondere wenn Sie sich im Schlaf bewegen. Mit der
CTIVECELL Technologie muss das Kopfband nicht so stark
A
angezogen werden, wie bei anderen Masken, wodurch der
Tragekomfort der M
IRAGE ACTIVA erhöht wird.
ANLEGEN DER MASKE
Hinweis: Lesen Sie bitte vor dem Anlegen der Maske den Abschnitt
„Reinigung der Maske zu Hause“ auf Seite 17.
1 Drücken Sie einen der Kopfbandclips zusammen, um ihn am
Maskenhalter zu öffnen (Abb. B-1).
2 Legen Sie den Maskeneinsatz über ihre Nase.
3 Ziehen Sie das Kopfband über Ihren Kopf (Abb. B-2). Achten
Sie darauf, dass die unteren Bänder unter Ihren Ohren und
die oberen Bänder auf Ihrer Stirn sitzen.
DEUTSCH
13
Page 14

4 Schließen Sie den Kopfbandclip am Maskenhalter (Abb. B-3).
5 Stellen Sie zuerst das untere (Abb. B-4) und dann das obere
Kopfband (Abb. B-5) auf die richtige Länge ein, so dass der
Maskeneinsatz locker auf dem Gesicht aufliegt. Ziehen Sie sie
noch nicht an.
6 Die Maske sitzt richtig, wenn die Stirnpolster Ihre Stirn leicht
berühren.
Wenn Sie den Sitz des Stirnbauteils korrigieren möchten,
drücken Sie den Steg herunter und schieben Sie diesen in eine
der anderen Positionen (Abb. C-7).
7 Schließen Sie ein Ende des Hauptschlauches an Ihr CPAP-
oder Bilevel-Gerät und das andere Ende am Drehadapter an
(Abb. D-10).
Hinweis: Der Drehadapter, der kurze Luftschlauch und das
Maskenkniestück werden zusammengebaut geliefert.
8 Schließen Sie das Maskenkniestück am Maskenhalter an.
Drücken Sie dazu das Maskenkniestück fest auf den
Maskenhalter, bis er einrastet (Abb. B-6).
Stellen Sie sicher, dass Sie das Maskenkniestück richtig
angeschlossen haben, indem Sie versuchen, es zu drehen.
Achten Sie darauf, dass Sie das Kniestück nicht seitlich
drücken, da es vom Maskenhalter getrennt werden könnte.
Wenn das Maskenkniestück korrekt angebracht wurde, sollte
es sich ganz leicht drehen lassen, ohne sich dabei vom
Maskenhalter zu lösen.
9 Eine korrekt angelegte Maske sollte so aussehen (Abb. B-7).
10 Schalten Sie Ihren Luftstromgenerator ein. Korrigieren Sie bei
Leckagen um den Maskeneinsatz herum den Sitz der Maske,
bis eine bessere Dichtigkeit erreicht ist. Unter Umständen
müssen Sie das Kopfband oder das Stirnbauteil nochmals
korrigieren.
14
Page 15

Ziehen Sie die Bänder nicht zu stramm an. Sie können so
eingestellt werden, dass die A
angemessen und gleichmäßig gedehnt ist.
Die A
CTIVECELL darf weder kollabiert (Abb. B-9) noch
überdehnt (Abb. B-10) sein.
Nehmen Sie sich die Zeit, um die Bänder richtig einzustellen
und die Maske sorgfältig anzulegen, um einen guten und
bequemen Sitz zu erreichen. Wenn Sie einen übermäßigen
Druck auf Ihrem Nasenrücken oder Ihrer Oberlippe spüren,
korrigieren Sie den Sitz des Stirnbauteils.
Hinweis: Wählen Sie „Standard“ als Maskenoption aus, wenn Sie
ResMed AutoSet™-Geräte verwenden.
CTIVECELL wie in Abbildung B-8
ABNEHMEN DER MASKE
Um die MIRAGE ACTIVA Maske abzunehmen, drücken Sie die
Kopfbandclips zusammen (Abb. C-a). Damit lösen Sie den
Kopfbandclip vom Maskenhalter. Ziehen Sie die Maske und das
Kopfband vom Kopf.
Hinweis: Ziehen Sie das Kopfband nicht vom Kopf, ohne vorher
einen der Kopfbandclips zu öffnen.
TIPP!
Sie können das Kniestück vom Maskenhalter abnehmen, während
Sie die Maske tragen (siehe “Auseinanderbau zu
Reinigungszwecken”). Das ist besonders nützlich, wenn die
Behandlung nur für kurze Zeit unterbrochen werden muss, z. B.
wenn Sie zur Toilette gehen möchten.
DEUTSCH
15
Page 16

AUSEINANDERBAU ZU
REINIGUNGSZWECKEN
1 Nehmen Sie das Maskenkniestück ab. Drücken Sie dazu die
hervorgehobenen Punkte an den Seiten des
Maskenkniestückes und ziehen Sie es gleichzeitig vom
Maskenhalter ab (Abb. C-1).
2 Nehmen Sie den Hauptluftschlauch, den kurzen Luftschlauch,
das Maskenkniestück und die Ventilabdeckung ab und
auseinander (Abb. C-2).
Hinweis:
• Um den kurzen Luftschlauch nicht zu beschädigen, halten Sie ihn
beim Abnehmen an der Manschette fest.
• Das Drehgelenk muss nicht vom kurzen Schlauch abgenommen
werden.
3 Öffnen Sie die Kopfbandclips am Maskenhalter, indem Sie sie
zusammendrücken. Öffnen Sie außerdem die Velcro® Bänder
und ziehen Sie die oberen Bänder durch die Schlitze des
Stirnbauteils heraus.
4 Nehmen Sie die Anschlusskappe vom Maskenhalter ab
(Abb. C-3).
5 Entfernen Sie den Maskeneinsatz vom Maskenhalter. Drücken
Sie dazu die beiden seitlichen Laschen am Maskeneinsatzclip
zusammen, bis sie sich vom Maskenhalter lösen (Abb. C-4).
Ziehen Sie den Maskeneinsatz vom Maskenhalter ab
(Abb. C-5).
6 Nehmen sie den Maskeneinsatzclip vom Maskeneinsatz ab.
Rollen Sie dazu ein Ende der A
Sie den Maskeneinsatzclip heraus (Abb. C-6).
CTIVECELL zurück und ziehen
16
Page 17

7 Drücken Sie den Steg des Stirnbauteils herunter, und
schieben Sie ihn über die obere Schlitzposition (Abb. C-7).
Anschließend können Sie das Stirnbauteil vom Maskenhalter
abnehmen.
Ziehen Sie fest an den Stöpseln des Stirnpolsters, um diese
vom Stirnbauteil zu trennen.
REINIGUNG DER MASKE ZU HAUSE
Hinweis: Waschen Sie das Kopfband vor der ersten Benutzung,
da es abfärben könnte. Das Kopfband darf nur von Hand
gewaschen werden.
WÖCHENTLICH
Waschen Sie das Kopfband in einer lauwarmen Seifenlauge.
Verwenden Sie dazu Kernseife. Gut abspülen und vor direktem
Sonnenlicht geschützt an der Luft trocknen lassen.
TÄGLICH/NACH JEDEM GEBRAUCH
Waschen Sie die Maskenteile von Hand in einer warmen
Seifenlauge. Verwenden Sie dazu Kernseife. Die Maskenteile gut
abspülen und vor direktem Sonnenlicht geschützt an der Luft
trocknen lassen.
!
VORSICHTSHINWEISE
• Verwenden Sie weder chlor- oder alkoholhaltige
Reinigungsmittel noch aromatische Lösungen, Bleichmittel,
Duftöle, feuchtigkeitsspendende oder antibakterielle Mittel
für die Reinigung jeglicher Teile des Maskensystems oder
Luftschlauches. Diese Mittel können das Material
beschädigen und somit die Lebensdauer des Produktes
verkürzen.
DEUTSCH
17
Page 18

• Alle Teile des Maskensystems bzw. alle Schläuche sollten
vor direkter Sonneneinstrahlung geschützt werden, da diese
schädigend für das Produkt sein kann.
• Weist eines der Maskenteile sichtbare
Verschleißerscheinungen auf (wie z. B. Brüche oder Risse),
sollte dieses entfernt und durch ein neues ersetzt werden.
REINIGUNG DER MASKE ZUR
VORBEREITUNG AUF EINEN NEUEN
PATIENTEN
Das Maskensystem (ausschließlich Drehadapter und kurzer
Luftschlauch) ist für den Gebrauch durch mehrere Patienten
ausgelegt. Weitere Einzelheiten können vom Arzt in den
Hinweisen zur Desinfektion/Sterilisation von Masken nachgelesen
werden.
Reinigen Sie das Kopfband zur Vorbereitung für einen neuen
Patienten wie im vorherigen Abschnitt „Reinigen der Maske zu
Hause“ beschrieben.
WIEDERZUSAMMENBAU DER MASKE
1 Befestigen Sie die Stirnpolster am Stirnbauteil. Stecken Sie
dazu die Stöpsel des Stirnpolsters in die beiden runden
Bohrungen am Stirnbauteil. Drücken Sie die Stirnpolster dann
an der Basis kräftig an (Abb. D-1), bis die Spitzen der Stöpsel
fest in den Bohrungen sitzen. Die Basis der Stirnpolsterstöpsel
sollte mit dem Stirnbauteil abschließen.
2 Bringen Sie das Stirnbauteil wieder am Maskenhalter an.
(Abb. D-2). Drücken Sie den Steg herunter und schieben Sie
die Stirnstütze in eine der vier Schlitzpositionen.
3 Setzen Sie den Maskeneinsatzclip in die Rille am
18
Page 19

Maskeneinsatz ein. Stellen Sie sicher, dass die Auslassungen
unter den Laschen des Maskeneinsatzclips mit den Blöcken in
der Rille des Maskeneinsatzes ausgerichtet werden.
Legen Sie den oberen Abschnitt zuerst an (Abb. D-3) und
drücken Sie dann den Maskeneinsatzclip rundherum in den
Maskenhalter ein. Achten Sie darauf, dass der
Maskeneinsatzclip den Maskeneinsatz an keiner Stelle
einklemmt (Abb. D-4). Der Maskeneinsatzclip sollte sicher in
der Rille des Maskeneinsatzes sitzen.
4 Bringen Sie den Maskeneinsatz am Maskenhalter an. Richten
Sie dazu die beiden seitlichen Laschen am Maskeneinsatzclip
mit den oberen beiden Bohrungen am Maskenhalter aus
(Abb. D-5). Drücken Sie dann den Maskeneinsatz fest auf den
Maskenhalter, bis die Laschen einrasten. Stellen Sie sicher,
dass die untere Lasche fest sitzt (Abb. D-6).
5 Drücken Sie die Anschlusskappen auf die Maskenanschlüsse
(Abb. D-7).
6 Bringen Sie die Ventilabdeckung am Maskenkniestück an.
Schieben Sie dazu die Ventilabdeckung am Kniestück entlang,
bis die Ventilabdeckung (Abb. D-8b) mit der Leiste der
Ventilöffnung (Fig. D-8a) ausgerichtet ist. Drücken Sie dann
die Luftauslassöffnungen (Fig. D-9c) hinein und schieben sie
die Ventilabdeckung hoch und über die Leiste der
Ventilöffnung (Abb. D-9a und Abb. D-9b). Die montierte
Ventilabdeckung sollte wie in Abb. D-10. abgebildet
aussehen. Stellen Sie sicher, dass die Lasche der
Ventilabdeckung richtig auf der Leiste der Ventilöffnung sitzt.
Sie sollte einen perfekten Kreis um die Leiste der
Ventilöffnung bilden und in keiner Weise verzogen sein.
7
Schließen Sie den kurzen Luftschlauch am Maskenkniestück an.
8 Bringen Sie die Kopfbandclips am Maskenhalter an.
9 Ziehen Sie die oberen Kopfbänder durch die Schlitze
DEUTSCH
19
Page 20
am Stirnbauteil und schließen Sie die Velcro-Verschlüsse
(Abb. D-11). Das Etikett am Kopfband sollte nach außen
zeigen und bei angelegter Maske in Ihrem Nacken sitzen.
10 Schließen Sie den Drehadapter für den nächsten Gebrauch
am Hauptluftschlauch an (Abb. D-12).
11 Schließen Sie für den Gebrauch das Maskenkniestück am
Maskenhalter an (Abb. B-6).
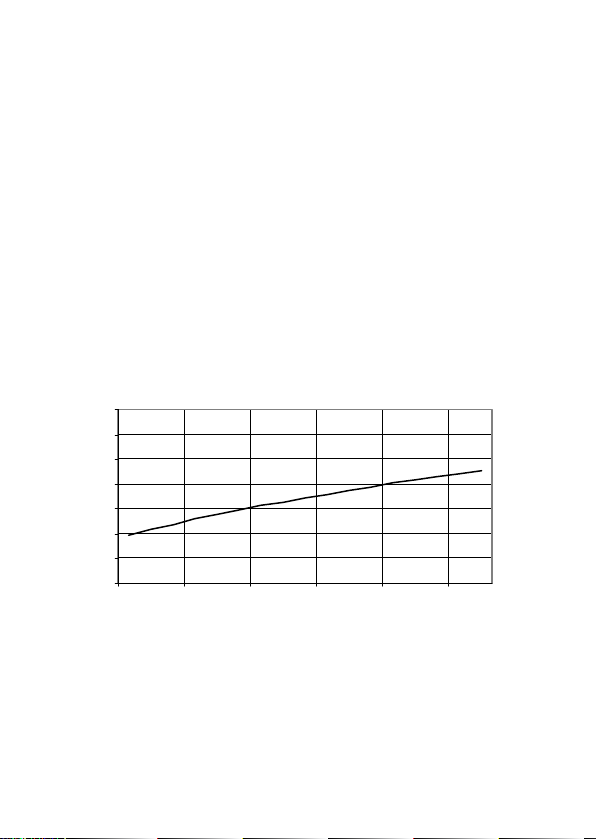
TECHNISCHE DATEN
DRUCK-/FLUSSKURVE
Das folgende Diagramm zeigt die Luftdurchflussrate durch die
Luftauslassöffnungen bei unterschiedlichem Maskendruck.
Druck-/Durchflusskurve der Luftauslassöffnungen
70
60
50
40
30
20
Durchfluss (l/Min.)
10
0
4 5 6 7 8 9 1011121314151617181920
Druck (cmH2O)
INFORMATIONEN ZUM TOTRAUM
Der Totraum der MIRAGE ACTIVA Maske beträgt 127 ml.
Erläuterung: Der Totraum ist das Leervolumen der Maske bis
zum Winkeladapter.
20
Page 21

BESCHRÄNKTE GARANTIE
ResMed sichert mit einer Haftungsperiode von neunzig (90)
Tagen ab Datum des Kaufes durch den ersten Käufer zu, dass Ihr
ResMed Maskensystem, einschließlich aller Komponenten wie
Maskenhalter, Maskeneinsatz, Kopfband, Schläuche und anderes
Zubehör („Produkt“), frei von Material- und Verarbeitungsfehlern
ist.
Weitere Einzelheiten entnehmen Sie bitte der Garantie.
DEUTSCH
21
Page 22

22
Page 23
Masque nasal Mirage Activa
Le masque MIRAGE ACTIVA™ est un accessoire de ventilateur non
continu (respirateur) pouvant être utilisé sur plusieurs patients et
prévu pour le traitement par pression positive continue (PPC) ou
à deux niveaux de pression des patients adultes en milieu
hospitalier, clinique et/ou à domicile.
™
INFORMATIONS MEDICALES
Remarque : le masque ne contient pas de latex.
!
AVERTISSEMENTS
• Ce masque doit être utilisé uniquement avec l’appareil de
PPC ou le système d’aide inspiratoire avec PEP recommandé
par votre médecin ou votre pneumologue. Un masque ne
doit être porté que si l’appareil de PPC ou le système d’aide
inspiratoire avec PEP est sous tension et s’il fonctionne
correctement. Le dispositif de ventilation ne doit jamais
être obstrué.
Explication de cet avertissement : les appareils de PPC et les
systèmes d’aide inspiratoire avec PEP ont été conçus pour
une utilisation avec des masques spécifiques possédant des
raccords avec des orifices de ventilation ou d’autres dispositifs
de ventilation afin de permettre l’écoulement continu de l’air
hors du masque. Lorsque l’appareil de PPC ou le système
d’aide inspiratoire avec PEP est sous tension et qu’il
fonctionne correctement, de l’air propre provenant de
FRANÇAIS
23
Page 24

l’appareil expulse l’air expiré via le port de ventilation du
masque. Cependant, lorsque l’appareil de PPC ou le système
d’aide inspiratoire avec PEP n’est pas en marche, l’air n’est pas
renouvelé dans le masque et l’air expiré peut être ré-inspiré.
Dans certaines circonstances, la ré-inspiration de l’air expiré
pendant une durée supérieure à quelques minutes peut
entraîner la suffocation. Cet avertissement s’applique à la
plupart des appareils de PPC et des systèmes d’aide
inspiratoire avec PEP.
• Le débit aux orifices de ventilation diminue avec les pressions
au masque (voir « Courbe Pression/Debit » page 32).
Lorsque la pression au masque est trop basse durant
l’expiration, le débit aux orifices de ventilation peut s’avérer
insuffisant pour expulser tout l’air expiré du circuit respiratoire
avant le début de l’inspiration suivante.
• Le masque MIRAGE ACTIVA possède un coude qui peut se
retirer facilement une fois le masque en place. Le masque ne
peut être utilisé avec le coude que si l’appareil de PPC ou
d’aide inspiratoire avec PEP est sous tension et s’il fonctionne
correctement.
• Le masque doit être nettoyé et désinfecté/stérilisé entre les
patients. Veuillez vous référer à la section « Nettoyage du
masque entre les patients » pour plus de détails.
• Si de l’oxygène est utilisé avec l’appareil de PPC ou le système
d’aide inspiratoire avec PEP, l’alimentation en oxygène doit
être fermée lorsque l’appareil n’est pas en marche.
Explication de cet avertissement : lorsque l’appareil de PPC
ou le système d’aide inspiratoire avec PEP n’est pas en
marche et que l’alimentation en oxygène n’est pas fermée,
l’oxygène délivré dans le circuit du ventilateur peut
s’accumuler dans l’appareil. L’oxygène accumulé dans un
appareil de PPC ou un système d’aide inspiratoire avec PEP
24
Page 25

crée un risque d’incendie. Cet avertissement s’applique à la
plupart des appareils de PPC et des systèmes d’aide
inspiratoire avec PEP.
• Eviter de fumer lorsque de l’oxygène est utilisé.
Remarque : lorsque de l’oxygène additionnel est délivré à un débit
fixe, la concentration de l’oxygène inhalé varie en fonction des
réglages de pression, de la fréquence respiratoire du patient, du
masque sélectionné ainsi que du taux de fuite.
COMPOSANTS DU MASQUE
Voir Figure A pour la liste complète des composants.
La bulle du masque M
innovatrice A
CTIVECELL™ de ResMed. ACTIVECELL est une
IRAGE ACTIVA est dotée de la technologie
chambre expansible qui se remplit d’air durant le traitement.
Cette technologie assure l’étanchéité du masque M
IRAGE ACTIVA
et réagit automatiquement en réponse aux facteurs susceptibles
de provoquer des fuites. L’étanchéité est donc améliorée, surtout
lorsque vous bougez durant la nuit. Grâce à la technologie
CTIVECELL, les sangles du harnais ne doivent pas être aussi
A
serrées que celles des autres masques, ce qui rend le masque
IRAGE ACTIVA plus confortable à utiliser.
M
MISE EN PLACE DU MASQUE
Remarque : avant de mettre le masque en place, veuillez vous
référer à la section « Nettoyage du masque à domicile » page 29.
1 Appuyez des deux côtés de l’un des clips du harnais pour le
détacher de l’entourage rigide (Fig. B-1).
2 Couvrez votre nez avec la bulle du masque.
3 Passez le harnais par-dessus votre tête (Fig. B-2). Veillez à ce
que les sangles inférieures passent sous vos oreilles et les
sangles supérieures sur votre front.
FRANÇAIS
25
Page 26

4 Fixez le clip détaché du harnais à l’entourage rigide
(Fig. B-3).
5 Ajustez les sangles inférieures du harnais (Fig. B-4), puis les
sangles supérieures (Fig. B-5), de manière à ce que la bulle
épouse parfaitement les contours de votre visage. Ne serrez
pas les sangles du harnais à ce stade.
6 Les tampons du support frontal devraient légèrement reposer
sur votre front lorsque le masque est en place.
Ajustez la position du support frontal en appuyant sur la
languette et en mettant le support sur une des positions
disponibles (Fig. C-7).
7 Raccordez une extrémité du circuit respiratoire à votre
appareil de PPC ou d’aide inspiratoire avec PEP et l’autre
extrémité à la pièce pivotante (Fig. D-10).
Remarque : la pièce pivotante, le tuyau à air court et le coude du
masque sont fournis assemblés.
8 Raccordez le coude du masque à l’entourage rigide. Pour cela,
poussez fermement le coude du masque sur l’entourage
rigide jusqu’à ce qu’il se verrouille en position (Fig. B-6).
Vérifiez que le coude du masque est correctement en place
en le faisant tourner. N’appuyez pas sur les côtés du coude
car il risque de se détacher de l’entourage rigide. Vous pouvez
considérer que le coude du masque est correctement en
place lorsqu’il tourne librement et qu’il ne se détache pas de
l’entourage rigide.
9 Une fois ajusté, le masque devrait se présenter comme
indiqué Fig. B-7.
10 Mettez votre appareil en marche. Si vous sentez des fuites
d’air autour de la bulle, positionnez à nouveau le masque sur
votre visage pour obtenir une meilleure étanchéité. Vous
26
Page 27

devrez peut-être réajuster les sangles du harnais ou le support
frontal.
Ne serrez pas trop les sangles. Vous devez les ajuster de
manière à ce que la chambre A
également gonflée comme indiqué à la Fig. B-8.
La chambre A
ni trop gonflée (Fig. B-10).
Prenez le temps de régler les sangles ainsi que la position et
l’inclinaison du masque afin d’obtenir un ajustement à la fois
confortable et stable. Si la pression exercée sur l’arête de
votre nez ou votre lèvre supérieure vous gêne, ajustez le
support frontal.
Remarque : lorsque vous utilisez un appareil AutoSet™ de ResMed,
sélectionnez « Standard » comme option de masque.
CTIVECELL ne doit pas être affaissée (Fig. B-9)
CTIVECELL soit légèrement et
RETRAIT DU MASQUE
Pour retirer le masque MIRAGE ACTIVA, appuyez des deux côtés
d’un des clips du harnais (Fig. C-a). Les clips du harnais se
dégagent de l’entourage rigide. Retirez le masque et le harnais.
Remarque : n’essayez pas de retirer le harnais avant d’avoir
détaché l’un des clips du harnais.
ASTUCE
Vous pouvez retirer le coude de l’entourage rigide lorsque vous
portez le masque (voir “Demontage pour le nettoyage”). Cette
caractéristique peut s’avérer utile lorsque le traitement doit être
brièvement interrompu, par exemple si vous avez besoin d’aller
aux toilettes.
FRANÇAIS
27
Page 28

DEMONTAGE POUR LE NETTOYAGE
1 Retirez le coude du masque. Pour cela, appuyez sur les deux
petits boutons des deux côtés du coude du masque tout en
tirant sur le coude pour le retirer de l’entourage rigide
(Fig. C-1).
2 Détachez et séparez le circuit respiratoire, le tuyau à air court,
le coude du masque et le cache des orifices de ventilation
(Fig. C-2).
Remarques
• Pour éviter d’abîmer le tuyau à air court, retirez-le en le tenant
par le manchon.
• Il n’est pas nécessaire de détacher la pièce pivotante du tuyau à
air court.
3 Appuyez des deux côtés des clips du harnais pour les
détacher de l’entourage rigide. Détachez les bandes Velcro®,
et les sangles supérieures du harnais en les faisant passer par
les fentes du support frontal.
4 Retirez le bouchon des entrées de l’entourage rigide
(Fig. C-3).
5 Retirez la bulle de l’entourage rigide. Pour cela, appuyez sur
les deux fermetures latérales du clip de la bulle pour libérer
l’entourage rigide (Fig. C-4). Tirez fermement sur la bulle du
masque pour la retirer de l’entourage rigide (Fig. C-5).
6 Ensuite, retirez le clip de la bulle. Pour cela, soulevez la
chambre A
pour le retirer (Fig. C-6).
7 Appuyez sur la languette du support frontal et faites-la passer
au-delà de la position supérieure (Fig. C-7). Cela vous permet
de retirer le support frontal de l’entourage rigide.
Tirez fermement sur la base des tiges du tampon du support
frontal pour retirer les tampons du support.
28
CTIVECELL d’un côté et tirez sur le clip de la bulle
Page 29

NETTOYAGE DU MASQUE À DOMICILE
Remarque : lavez le harnais avant la première utilisation car il risque
de déteindre. Il est important de toujours laver le harnais à la main.
HEBDOMADAIRE
Lavez le harnais à la main dans de l’eau tiède savonneuse. Utilisez
du savon pur. Rincez soigneusement et laissez-le sécher à l’abri de
la lumière directe du soleil.
QUOTIDIEN/APRES CHAQUE UTILISATION
Lavez les composants du masque à la main dans de l’eau tiède
savonneuse. Utilisez du savon pur. Rincez tous les composants
soigneusement et laissez-les sécher à l’abri de la lumière directe
du soleil.
!
PRECAUTIONS
• Ne pas utiliser de solutions contenant de l’eau de Javel, du
chlore, de l’alcool ou des aromates, ni des agents
hydratants ou antibactériens ni d’huiles parfumées pour
nettoyer les composants du masque ou le circuit
respiratoire. Ces solutions peuvent endommager le produit
et réduire sa durée de vie.
• Ne pas exposer les composants du masque ni le circuit
respiratoire à la lumière directe du soleil au risque de les
abîmer.
• En cas de détérioration visible d’un des composants du
masque (p. ex. fissures, fendillements, déchirures etc.), le
composant en question doit être jeté et remplacé.
FRANÇAIS
29
Page 30

NETTOYAGE DU MASQUE ENTRE LES
PATIENTS
Le masque (à l'exception de la pièce pivotante et du tuyau court)
peut être utilisé sur plusieurs patients. Les cliniciens doivent se
référer au Guide de désinfection/stérilisation des masques pour
de plus amples informations.
Pour nettoyer le harnais entre les patients, suivez l'une des
méthodes décrites dans la section précédente " Nettoyage du
masque à domicile ".
REMONTAGE DU MASQUE
1 Remettez les tampons du support frontal en place. Pour cela,
placez les tiges des tampons frontaux dans les deux orifices
du support frontal prévus à cet effet. Poussez ensuite
fermement à la base des tiges (Fig. D-1) jusqu’à ce que le
haut du cache soit correctement en place sur le trou. La base
du cache des tampons frontaux doit reposer à niveau contre
le support frontal.
2 Raccordez à nouveau le support frontal à l’entourage rigide
(Fig. D-2). Appuyez sur la languette du support frontal et
mettez le support dans l’une des quatre positions.
3 Mettez le clip de la bulle dans la rainure de la bulle. Assurez-
vous que les trous sous les fermetures du clip de la bulle sont
alignés avec leurs blocs respectifs situés dans la rainure de la
bulle du masque.
Commencez par monter la section supérieure (Fig. D-3) et
poursuivez en faisant le tour tout en insérant le clip de la bulle
dans la bulle du masque. Veillez à ce qu’aucune partie de la
bulle du masque ne soit pincée par le clip de la bulle
(Fig. D-4). Le clip de la bulle doit être bien en place dans la
rainure de la bulle du masque.
30
Page 31

4 Fixez la bulle à l’entourage rigide. Pour cela, alignez les deux
fermetures latérales du clip de la bulle avec les deux trous en
haut de l’entourage rigide (Fig. D-5). Poussez ensuite la bulle
sur l’entourage rigide jusqu’à ce que les fermetures se
verrouillent en position. Vérifiez également que la fermeture
inférieure est bien fermée (Fig. D-6).
5 Mettez le bouchon sur les ports du masque (Fig. D-7).
6 Fixez le cache des orifices de ventilation au coude du masque.
Pour cela, faites glisser le cache le long du coude jusqu’à ce
que le haut du cache (Fig. D-8b) et le bord de l’ouverture
(Fig. D-8a) soient alignés. Appuyez ensuite sur les orifices de
ventilation pour les rentrer (Fig. D-9c) et faites glisser le cache
vers le haut en suivant le bord de l’ouverture (Fig. D-9a et
Fig. D-9b). Une fois ajusté, le cache devrait se présenter
comme indiqué Fig. D-10. Veillez à ce que le bord du cache
des orifices soit bien aligné avec le bord de l’ouverture. Le
cercle qu’il forme avec le bord de l’ouverture doit être parfait
et non décentré.
7 Raccordez le tuyau à air court au coude du masque.
8 Fixez les clips du harnais à l’entourage rigide.
9 Faites passer les sangles supérieures du harnais dans les fentes
du support frontal et fermez les bandes Velcro (Fig. D-11).
L’étiquette du harnais doit être tournée vers l’extérieur et se
trouver près de votre cou lorsque le masque est en place.
10 Raccordez la pièce pivotante au circuit respiratoire prêt pour
la prochaine utilisation (Fig. D-12).
11 Lorsque vous êtes prêt à commencer le traitement, raccordez
le coude du masque à l’entourage rigide (Fig. B-6).
FRANÇAIS
31
Page 32

CARACTERISTIQUES
COURBE PRESSION/DEBIT
Le graphique suivant présente le débit d’air aux orifices de
ventilation du masque à différentes pressions.
Courbe Pression aux orifices de ventilation / Débit
70
60
50
40
30
20
Débit (l/min)
10
0
4 5 6 7 8 9 1011121314151617181920
Pression (cmH2O)
INFORMATION CONCERNANT L'ESPACE MORT
L'espace mort du masque MIRAGE ACTIVA est de 127 ml.
Explication : l'espace mort correspond au volume vide entre le
masque et le coude.
GARANTIE LIMITÉE
ResMed garantit votre masque ResMed, y compris les
composants tels que l'entourage rigide, la bulle, le harnais, le
circuit respiratoire et les autres accessoires (« Produit »), contre
tout défaut de matériaux et de main d’œuvre pour une période
de quatrevingtdix jours à compter de la date d’achat par le client
d’origine.
Pour plus de détails, veuillez vous référer à la garantie.
32
Page 33

Maschera nasale Mirage Activa
La maschera MIRAGE ACTIVA™ è un accessorio per ventilatori
(respiratori) non continuativi realizzata per l'uso multipaziente da
parte di pazienti adulti cui sia stata prescritta pressione positiva
continua alle vie respiratorie (CPAP) o terapia bilevel presso un
ospedale, una clinica o il proprio domicilio.
™
INFORMAZIONI MEDICHE
Nota: La maschera non contiene lattice.
!
AVVERTENZE
• La maschera va utilizzata solo con i sistemi CPAP o bilevel
consigliati dal proprio medico o specialista nella cura dei
disturbi respiratori. La maschera non va usata a meno che il
sistema CPAP o bilevel non sia acceso e funzioni
correttamente. Il dispositivo d’esalazione non va mai bloccato.
Spiegazione dell’avvertenza: I sistemi CPAP e bilevel sono
concepiti per essere utilizzati con speciali maschere dotate di
connettori che presentano fori o dispositivi per l’esalazione
tali da permettere il flusso continuo dell’aria fuori dalla
maschera. Quando l’apparecchio CPAP o bilevel è acceso e
funziona correttamente, il flusso di nuova aria da esso
generato permette di eliminare l’aria espirata attraverso
l’apertura per l’esalazione della maschera. Tuttavia, quando
l’apparecchio CPAP o bilevel non è in funzione, il flusso di
nuova aria attraverso la maschera diventa insufficiente e può
ITALIANO
33
Page 34

verificarsi la reinalazione dell’aria precedentemente espirata.
L’inspirazione dell’aria già espirata per più di qualche minuto
può, in alcuni casi, causare il soffocamento. Questa avvertenza
vale per la maggior parte dei sistemi CPAP e bilevel.
• Il flusso dell’apertura per l’esalazione è più basso alle pressioni
di maschera inferiori (ver “Curva di pressione e flusso” a
pagina 42). Se durante l’espirazione la pressione della
maschera risulta troppo bassa, il flusso di esalazione della
maschera potrebbe essere insufficiente ad espellere l’aria
espirata dal tubo di somministrazione dell’aria prima
dell’inspirazione successiva.
• La maschera MIRAGE ACTIVA è dotata di un gomito che può
essere facilmente rimosso quando si indossa la maschera. La
maschera non va usata con il gomito attaccato a meno che il
sistema CPAP o bilevel non sia acceso e funzioni
correttamente.
• La maschera va pulita e disinfettata/sterilizzata se riutilizzata
con un altro paziente. Vedere la sezione “Pulizia della
maschera tra un paziente e l’altro” per maggiori dettagli.
• Se si utilizza un sistema CPAP o bilevel insieme ad ossigeno, è
necessario spegnere il flusso d’ossigeno quando il generatore
di flusso non è in funzione.
Spiegazione dell’avvertenza: Se si lascia acceso il flusso
d’ossigeno ad apparecchio CPAP o bilevel spento, la quantità
d’ossigeno erogata nel tubo di ventilazione può accumularsi
all’interno del generatore di flusso . L’ossigeno accumulato
all’interno dell’apparecchio CPAP o bilevel può causare il
rischio di incendio. Questa avvertenza vale per la maggior
parte dei generatori di flusso CPAP e bilevel.
• Si prega di non fumare quando l’ossigeno è in uso.
Nota: Ad un flusso fisso di ossigeno supplementare, la
concentrazione dell’ossigeno inspirato varia a seconda delle
34
Page 35

impostazioni di pressione, dell’andamento della respirazione del
paziente, della maschera scelta e del coefficiente di perdite.
PARTI DELLA MASCHERA
Per un elenco completo delle parti, vedere la Figura A.
Il cuscinetto della maschera M
tecnologia A
CTIVECELL™ di ResMed. La ACTIVECELL è un
IRAGE ACTIVA fa uso dell’innovativa
comparto dilatabile che si gonfia durante la terapia. Essa fa sì che
la maschera M
IRAGE ACTIVA regoli automaticamente la propria
tenuta a fronte delle varie possibile cause di perdite d’aria. Ciò
consente di ridurre le perdite, specie se ci si muove molto durante
la notte. La tecnologia A
CTIVECELL permette inoltre di mantenere
una tensione delle cinghie del copricapo inferiore rispetto a quella
necessaria con altre maschere, e rende pertanto la M
CTIVA più confortevole.
A
IRAGE
COME INDOSSARE LA MASCHERA
Nota: Prima di indossare la maschera, consultare la sezione “Pulizia
della maschera presso l’abitazione” a pagina 38.
1 Stringere uno dei fermagli del copricapo per sganciarlo dal
telaio della maschera (Fig. B-1).
2 Sistemarsi il cuscinetto sul naso.
3 Farsi passare il copricapo sopra la testa (Fig. B-2). Assicurarsi
che le cinghie inferiori passino sotto le orecchie, quelle
superiori sopra la fronte.
4 Collegare il fermaglio del copricapo libero al telaio della
maschera (Fig. B-3).
5 Sistemare prima le cinghie inferiori (Fig. B-4) e poi le cinghie
superiori (Fig. B-5) del copricapo, in modo che il cuscinetto
poggi delicatamente sul viso. In questa fase non vanno strette
le cinghie del copricapo.
ITALIANO
35
Page 36

6 Le imbottiture del supporto frontale devono toccare
leggermente la fronte quando la maschera è in posizione.
Regolare il supporto frontale premendo la sua linguetta e
spostandolo in una delle altre posizioni disponibili (Fig. C-7).
7 Collegare un’estremità del tubo principale dell’aria
all’apparecchio CPAP o bilevel e l’altra estremità al giunto
rotante (Fig. D-10).
Nota: Il giunto rotante, il tubo corto dell’aria ed il gomito della
maschera sono forniti già assemblati.
8 Collegare il gomito della maschera al telaio della maschera.
Per farlo, spingere con fermezza il gomito della maschera sul
telaio finché esso non scatta in posizione (Fig. B-6).
Verificare che il gomito sia nella posizione corretta
ruotandolo. Prestare attenzione a non stringere i lati del
gomito, in quanto esso potrebbe staccarsi dal telaio della
maschera. Se il gomito della maschera è inserito
correttamente, esso ruoterà liberamente senza staccarsi
dal telaio.
9 Una volta indossata, la maschera dovrebbe avere il seguente
aspetto (Fig. B-7).
10 Accendere il generatore di flusso. Se si avvertono perdite
d’aria intorno al cuscinetto, risistemare la maschera sul viso in
modo da ottenere una migliore tenuta. Potrebbe inoltre
risultare necessario regolare le cinghie di velcro o il supporto
frontale.
Non stringere eccessivamente le cinghie. Le cinghie vanno
regolate in modo che la A
CTIVECELL sia gonfiata parzialmente
e in modo uniforme, come mostrato in Figura B-8.
Essa non deve essere né completamente sgonfia (Fig. B-9)
né troppo gonfia (Fig. B-10).
36
Page 37

Spendere il tempo necessario a regolare le cinghie del
copricapo e la posizione della maschera in modo da ottenere
una tenuta salda e confortevole. Se si avverte una pressione
eccessiva sul ponte nasale o sul labbro superiore, sistemare il
supporto del copricapo.
Nota: Se si utilizza la maschera insieme ad apparecchi AutoSet™ di
ResMed, selezionare l’opzione di maschera “Standard”.
COME TOGLIERSI LA MASCHERA
Per togliersi la maschera MIRAGE ACTIVA, premere i fermagli del
copricapo (Fig. C-a). Ciò farà sì che i fermagli si stacchino dal
telaio della maschera. A questo punto sarà possibile sfilarsi
maschera e copricapo dalla testa.
Nota: Non sfilarsi il copricapo dalla testa senza averne prima
staccato i fermagli.
SUGGERIMENTO!
È possibile staccare il gomito dal telaio della maschera mentre si
indossa quest’ultima (vedi “Smontaggio per la pulizia”). Ciò risulta
comodo quando occorre interrompere il trattamento per un
breve periodo, ad esempio se ci si deve recare in bagno.
SMONTAGGIO PER LA PULIZIA
1 Staccare il gomito della maschera. Per farlo, premere i puntini
in rilievo sui lati del gomito e tirare il gomito stesso in
direzione opposta rispetto al telaio della maschera (Fig. C-1).
2 Staccare e separare gli uni dagli altri il tubo dell’aria principale,
il tubo dell’aria corto, il gomito della maschera e il coperchio
dell’apertura per l’esalazione (Fig. C-2).
Note
• Per prevenire il rischio di danni al tubo dell’aria corto, staccarlo
tenendolo per il manicotto.
ITALIANO
37
Page 38

• Non è necessario staccare il giunto rotante dal tubo dell’aria
corto.
3 Stringere i fermagli del copricapo in modo da separarli dal
telaio della maschera. Slacciare le cinghie di Velcro®e sfilare le
cinghie superiori del copricapo dalle fessure sul supporto
frontale.
4 Staccare il coperchio delle porte dal telaio della maschera
(Fig. C-3).
5 Staccare il cuscinetto e le sue parti telaio. Per farlo, stringere i
due ganci laterali del fermaglio del cuscinetto fino a staccarli
dal telaio della maschera (Fig. C-4). Tirare quindi il cuscinetto
e le sue parti in direzione opposta rispetto al telaio della
maschera (Fig. C-5).
6 Staccare il fermaglio del cuscinetto dal cuscinetto stesso. Per
farlo, arrotolare una estremità della A
fermaglio all’infuori (Fig. C-6).
7 Premere la linguetta del supporto frontale e spingerla oltre la
fessura superiore (Fig. C-7). Questo consente di staccare il
supporto frontale dal telaio della maschera.
Tirare con fermezza in corrispondenza della base dei tasselli
delle imbottiture del supporto frontale in modo da separare
le imbottiture dal supporto.
CTIVECELL e tirare il
PULIZIA DELLA MASCHERA PRESSO
L’ABITAZIONE
Nota: Lavare il copricapo prima di utilizzarlo per la prima volta, in
quanto esso potrebbe scolorire. E’ importante che il copricapo sia
sempre lavato a mano.
38
Page 39

OPERAZIONI SETTIMANALI
Lavare a mano il copricapo in acqua tiepida insaponata. Utilizzare
sapone puro. Sciacquare bene e lasciare asciugare all’aria e al
riparo dalla luce solare diretta.
OPERAZIONI QUOTIDIANE/DOPO CIASCUN USO
Lavare a mano i componenti della maschera in acqua tiepida
insaponata. Utilizzare sapone puro. Sciacquare accuratamente i
componenti e lasciarli asciugare all’aria e al riparo dalla luce solare
diretta.
!
PRECAUZIONI
• Per la pulizia delle parti della maschera e del tubo dell’aria, è
sconsigliato l’uso di soluzioni a base di candeggina, cloro,
alcool o aromi, olî profumati, o prodotti idratanti o
antibatterici. Tali soluzioni possono causare danni al
prodotto e ridurne la durata.
• Non esporre i componenti della maschera o della tubazione
alla luce solare diretta, in quanto potrebbero deteriorarsi.
• In caso di deterioramento visibile (ad esempio incrinature,
screpolature, strappi, ecc.) di un componente della
maschera, esso va gettato e sostituito.
PULIZIA DELLA MASCHERA TRA UN
ITALIANO
PAZIENTE E L'ALTRO
La maschera (esclusi giunto rotante e tubo corto dell’aria) è
approvata per l’uso multipaziente. Per maggiori dettagli si invita il
medico a consultare la Guida alla disinfezione e alla sterilizzazione
della maschera.
39
Page 40

Per pulire il copricapo tra un paziente e l’altro, seguire la
procedura descritta nella sezione precedente, “Pulizia della
maschera presso l’abitazione”.
RIASSEMBLAGGIO DELLA MASCHERA
1 Attaccare le imbottiture frontali al supporto frontale. Per farlo,
inserire i loro tasselli nei due fori tondi sul supporto. Spingere
quindi con fermezza in corrispondenza della base dei tasselli
delle imbottiture (Fig. D-1) fino a che la punta di ciascun
tassello poggia saldamente nel relativo foro. La base di ciascun
tassello deve risultare a filo del supporto frontale.
2 Riattaccare il supporto frontale al telaio della maschera.
(Fig. D-2). Premere la linguetta e posizionare il supporto
frontale in una delle quattro fessure a disposizione.
3 Inserire il fermaglio del cuscinetto nella scanalatura sul
cuscinetto stesso. Assicurarsi che le sagome ritagliate sotto i
ganci del fermaglio del cuscinetto siano allineate con i blocchi
nella scanalatura del cuscinetto.
Inserire prima il lato superiore (Fig. D-3), e seguire poi il
contorno spingendo il fermaglio del cuscinetto nel cuscinetto.
Assicurarsi che il fermaglio non pizzichi il cuscinetto in nessun
punto (Fig. D-4). Esso deve poggiare in modo agevole nella
scanalatura del cuscinetto.
4 Montare il cuscinetto e le sue parti sul telaio della maschera.
Per farlo, allineare i due ganci laterali del fermaglio ai due fori
superiori sul telaio (Fig. D-5). Spingere quindi con fermezza il
cuscinetto nel telaio della maschera, assicurandosi che i suoi
ganci scattino in posizione. Verificare che anche il gancio
inferiore sia ben saldo (Fig. D-6).
5 Montare l’apposito coperchio sulle porte della maschera
(Fig. D-7).
40
Page 41

6 Attaccare il coperchio dell’apertura per l’esalazione al gomito
della maschera. Per farlo, infilare il coperchio dell’apertura per
l’esalazione fino a che la sommità del coperchio stesso
(Fig. D-8b) e la sezione in rilievo dell’apertura per l’esalazione
(Fig. D-8a) risultano allineate. Spingere quindi i fori per
l’esalazione (Fig. D-9c) verso l’interno e far scorrere il
coperchio sopra il rilievo dell’apertura per l’esalazione
(Fig. D-9a e Fig. D-9b). Una volta inserito, il coperchio
dell’apertura per l’esalazione deve avere il seguente aspetto
Fig. D-10. Assicurarsi che il margine del coperchio
dell’apertura per l’esalazione poggi in maniera corretta sul
rilievo dell’apertura stessa. Esso deve formare una perfetta
circonferenza intorno al rilievo dell’apertura per l’esalazione, e
non risultare sghembo.
7 Collegare il tubo corto dell’aria al gomito della maschera.
8 Collegare i fermagli del copricapo al telaio della maschera.
9 Infilare le cinghie superiori del copricapo nelle fessure sul
supporto frontale e allacciare le cinghie di velcro (Fig. D-11).
L’etichetta sul copricapo dovrà essere rivolta verso l’esterno
ed essere posizionata accanto al vostro collo una volta che la
maschera è stata indossata.
10 Collegare il giunto rotante al tubo principale dell’aria, pronto
per l’utilizzo successivo (Fig. D-12).
11 Una volta pronti, collegare il gomito della maschera al telaio
della maschera (Fig. B-6).
ITALIANO
41
Page 42

SPECIFICHE TECNICHE
CURVA DI PRESSIONE E FLUSSO
Il seguente grafico mostra il coefficiente di flusso dell’aria
attraverso i fori per l’esalazione della maschera a vari valori di
pressione della maschera stessa.
Caratteristiche di pressione e flusso dell’apertura per l’esalazione
70
60
50
40
30
20
Flusso (l/min)
10
0
4 5 6 7 8 9 1011121314151617181920
Pressione (cmH2O)
INFORMAZIONI SULLO SPAZIO MORTO
Lo spazio morto della maschera MIRAGE ACTIVA è pari a 127ml.
Spiegazione: Lo spazio morto è il volume vuoto della maschera
fino al gomito.
GARANZIA LIMITATA
ResMed garantisce la maschera e i suoi componenti, vale a dire
telaio, cuscinetto, copricapo, tubazione e altri accessori (di seguito
“il prodotto”), da difetti dei materiali o di fabbricazione per un
periodo di novanta (90) giorni a partire dalla data di acquisto da
parte del cliente originale.
Per maggiori dettagli vedere la Garanzia.
42
Page 43

Mascarilla Nasal Mirage Activa
La mascarilla MIRAGE ACTIVA™ es un accesorio para ventiladores
(respiradores) no continuos, diseñada para uso por parte de
múltiples pacientes adultos a los que se les ha indicado
tratamiento con presión positiva y continua en las vías
respiratorias (CPAP) o binivel, tanto en el medio hospitalario
como en clínicas o en el domicilio.
™
INFORMACIÓN MÉDICA
Nota: El sistema de mascarilla no contiene materiales de látex.
!
ADVERTENCIAS
• Esta mascarilla sólo se debe usar con sistemas CPAP o binivel
recomendados por su médico o terapeuta respiratorio. No
deberá colocarse una mascarilla a menos que el sistema
CPAP o binivel esté encendido y funcionando correctamente.
El dispositivo para la exhalación nunca se debe obstruir.
Explicación de la advertencia: Los sistemas CPAP o binivel se
han diseñado para utilizarse con mascarillas especiales con
conectores que tienen orificios de salida o con dispositivos
para la exhalación independientes que permiten un flujo de
aire continuo hacia fuera de la mascarilla. Mientras el
dispositivo CPAP o binivel esté encendido y funcionando
correctamente, el aire fresco del generador de aire empujará
el aire espirado hacia fuera de la mascarilla a través del puerto
de exhalación adjunto de la mascarilla. No obstante, cuando
ESPAÑOL
43
Page 44

el dispositivo CPAP o binivel no está funcionando, no se
suministrará suficiente aire fresco a través de la mascarilla y es
posible que se vuelva a respirar el aire espirado. La
reinspiración de aire espirado durante varios minutos puede
llevar, en algunas circunstancias, a la asfixia. Esta advertencia se
aplica a la mayoría de los modelos de sistemas CPAP o
binivel.
• El flujo de salida es menor a presiones de mascarilla menores
(consulte “Curva de flujo / presión” en la página 52). Si la
presión en la mascarilla durante la espiración es demasiado
baja, puede suceder que no haya un flujo suficiente por los
orificios de ventilación como para lavar totalmente el aire
espirado de la manguera de suministro de aire antes del
comienzo de la inspiración siguiente.
• La mascarilla MIRAGE ACTIVA incluye un codo que puede
quitarse fácilmente con la mascarilla puesta. Las mascarilla no
debe usarse con el codo colocado a menos que el sistema
CPAP o binivel esté encendido y funcionando correctamente.
• La mascarilla deberá limpiarse y desinfectarse o esterilizarse si
va a ser utilizada por otro paciente. Remítase a la sección
“Limpieza de la mascarilla entre pacientes” para obtener más
información.
• Si se utiliza oxígeno con el dispositivo CPAP o binivel, el flujo
del oxígeno deberá estar cerrado mientras el generador de
aire no esté en funcionamiento.
Explicación de la advertencia: Mientras el dispositivo CPAP o
binivel no esté funcionando, si se deja abierto el flujo de
oxígeno, el oxígeno suministrado al tubo de ventilación podría
acumularse dentro del generador de aire. El oxígeno
acumulado dentro del dispositivo CPAP o binivel implicará un
riesgo de incendio. Esta advertencia se aplica a la mayoría de
los tipos de generadores de aire CPAP o binivel.
• Evite fumar cuando se utiliza oxígeno.
44
Page 45

Nota: A un caudal de flujo de oxígeno suplementario fijo, la
concentración de oxígeno inhalado variará de acuerdo con: los
parámetros de presión, el patrón respiratorio del paciente, la
mascarilla utilizada y la fuga.
PIEZAS DE LA MASCARILLA
Consulte la figura A para una lista de todas las piezas.
La almohadilla de la mascarilla M
innovadora de ResMed A
IRAGE A CTIVA utiliza la tecnología
CTIVECELL™. ACTIVECELL es una cámara
expandible que se infla durante el tratamiento. Esta tecnología
implica que la M
IRAGE ACTIVA es “autosellante”, en el sentido que
responde a los factores que provocan fugas. Esto le proporciona
un mejor ajuste, especialmente al moverse durante la noche. La
tecnología A
CTIVECELL no requiere que las correas del arnés
estén tan tensas como en otras mascarillas, lo cual hace que la
IRAGE ACTIVA sea más cómoda de usar.
M
COLOCACIÓN DE LA MASCARILLA
Nota: Antes de ponerse la mascarilla, consulte la sección sobre
“Limpieza de la mascarilla en el hogar“ en la página 48.
1 Presione uno de los broches del arnés para liberarlo del
armazón de la mascarilla (Fig. B-1).
2 Póngase la almohadilla de la mascarilla sobre la nariz.
3 Póngase el arnés tirando del mismo por encima de la cabeza
(Fig. B-2). Asegúrese de que las correas inferiores queden por
debajo de las orejas y que las superiores pasen por encima de
la frente.
4 Conecte el broche del arnés que está suelto al armazón de la
mascarilla (Fig. B-3).
5 Ajuste las correas inferiores del arnés (Fig. B-4) y luego las
superiores (Fig. B-5) de manera que la almohadilla se apoye
ESPAÑOL
45
Page 46

sobre la cara sin ejercer presión. No ajuste las correas del
arnés por el momento.
6 Las almohadillas del apoyo para la frente deberían apenas
tocarle la frente cuando la mascarilla está bien colocada.
Ajuste el apoyo para la frente presionando la lengüeta y
deslizándola a una de las otras ranuras de posición (Fig. C-7).
7 Conecte un extremo del tubo de aire principal al dispositivo
CPAP o binivel y el otro extremo a la pieza giratoria
(Fig. D-10).
Nota: La pieza giratoria, el tubo de aire corto y el codo de la
mascarilla vienen montados.
8 Conecte el codo de la mascarilla al armazón de la mascarilla.
Para ello, presione el codo de la mascarilla sobre el armazón
de la mascarilla hasta que calce en su lugar (Fig. B-6).
Gire el codo de la mascarilla para verificar que el mismo se
haya conectado correctamente. Tenga cuidado de no
presionar los lados del codo, ya que podría separarlo del
armazón de la mascarilla. Si el codo de la mascarilla está
ajustado correctamente debe poder girar libremente sin
separarse del armazón de la mascarilla.
9 La mascarilla puesta se debe ver así (Fig. B-7).
10 Ponga en marcha el generador de aire. Si siente que hay fugas
de aire en el contorno de la almohadilla, vuelva a ponerse la
mascarilla sobre la cara cambiando ligeramente la posición, de
manera de lograr un mejor cierre. Es probable que también
tenga que volver a ajustar las correas del arnés o el apoyo
para la frente.
Las correas no deben quedar demasiado apretadas. Las
correas deberían estar ajustadas de manera que A
CTIVECELL
se expanda en forma moderada y uniforme como se muestra
en la Figura B-8.
46
Page 47

ACTIVECELL no debería estar colapsado (Fig. B-9) ni inflado en
exceso (Fig. B-10).
Tómese el tiempo necesario para ajustar las correas y la
posición de la mascarilla de forma de poder obtener un ajuste
cómodo y seguro. Si siente demasiada presión sobre el
puente de la nariz o el labio superior, ajuste el apoyo para la
frente.
Nota: Seleccione "Estándar" como opción de mascarilla cuando use
los dispositivos AutoSet™ de ResMed.
REMOCIÓN DE LA MASCARILLA
Para quitarse la mascarilla MIRAGE ACTIVA, presione los broches
del arnés (Fig. C-a). Esto liberará los broches del arnés del
armazón de la mascarilla. Saque la mascarilla y el arnés de su
cabeza.
Nota: No se quite el arnés de la cabeza sin primero liberar los
broches del arnés.
¡CONSEJO!
Es posible retirar el codo del armazón de la mascarilla con la
mascarilla puesta (consulte “Desmontaje para la limpieza”). Esto
es útil cuando se desea detener el tratamiento por un período
corto; por ejemplo, si necesita ir al baño.
DESMONTAJE PARA LA LIMPIEZA
ESPAÑOL
1 Retire el codo de la mascarilla. Para ello, presione los puntos
elevados a los lados del codo de la mascarilla al tiempo que lo
separa del armazón de la mascarilla (Fig. C-1).
2 Desconecte y separe el tubo de aire principal, el tubo de aire
corto, el codo de la mascarilla y la cubierta de la ventilación
(Fig. C-2).
47
Page 48

Notas
• Para evitar que se dañe el tubo de aire corto al desconectarlo,
tómelo del mango.
• La pieza giratoria no requiere ser desmontada del tubo de aire
corto.
3 Presione los broches del arnés para separarlos del armazón
de la mascarilla. Desabroche las correas de Velcro®y
desenhebre las correas superiores del arnés a través de las
ranuras del apoyo para la frente.
4 Retire la tapa de los puertos del armazón de la mascarilla
(Fig. C-3).
5 Separe la almohadilla del armazón de la mascarilla. Para esto,
presione los dos cerrojos laterales de la traba de la
almohadilla hasta que se desenganchen del armazón de la
mascarilla (Fig. C-4). Después tire de la almohadilla de la
mascarilla para retirarla del armazón (Fig. C-5).
6 Retire la traba de la almohadilla de la almohadilla de la
mascarilla. Para esto, empuje hacia atrás un extremo del
A
CTIVECELL y tire de la traba de la almohadilla (Fig. C-6).
7 Presione la lengüeta del apoyo para la frente y deslícela más
allá de la ranura de posición superior (Fig. C-7). Esto le
permitirá separar el apoyo para la frente del armazón de la
mascarilla.
Tire con firmeza de la base de los tapones de las almohadillas
para la frente para separarlas del apoyo para la frente.
LIMPIEZA DE LA MASCARILLA EN EL
HOGAR
Nota: Lave el arnés para la cabeza antes de usarlo por primera vez,
ya que podría desteñir. Es importante lavar siempre a mano el arnés
para la cabeza.
48
Page 49

SEMANALMENTE
Lave el arnés para la cabeza a mano en agua tibia con jabón. Use
jabón puro. Enjuague bien y deje secar al aire alejado de la luz
directa del sol.
DIARIAMENTE O DESPUÉS DE CADA USO
Lave los componentes de la mascarilla a mano en agua tibia con
jabón. Use jabón puro. Enjuague bien todas las piezas y déjelas
secar al aire alejadas de la luz directa del sol.
!
PRECAUCIONES
• No utilice soluciones que contengan lejía, cloro, alcohol,
sustancias aromáticas, hidratantes, agentes antibacterianos
ni aceites perfumados para limpiar las piezas del sistema de
mascarilla ni los tubos de aire. Estas soluciones podrían
ocasionar daños al producto y reducir la vida útil del
mismo.
• No exponga ninguna pieza del sistema de mascarilla o tubo
de aire a la luz del sol directa ya que esto podría provocar
el deterioro de los mismos.
• Si se advierte algún signo de deterioro visible (como grietas,
rajaduras, roturas, etc.) en uno de los componentes de la
mascarilla, dicho componente debería ser desechado y
cambiado por uno nuevo.
ESPAÑOL
LIMPIEZA DE LA MASCARILLA ENTRE
PACIENTES
El sistema de mascarilla (con exclusión de la pieza giratoria y el
tubo de aire corto) está validado para ser usado en varios
pacientes. Para más detalles, los médicos deben consultar la Guía
de desinfección / esterilización de las mascarillas.
49
Page 50

Para limpiar el arnés para la cabeza entre un paciente y otro,
utilice el método descrito en la sección anterior, “Limpieza de la
mascarilla en el hogar”.
MONTAJE DE LA MASCARILLA
1 Junte las almohadillas para la frente con el apoyo para la
frente. Para esto, coloque los tapones de las almohadillas para
la frente en los dos orificios redondos del apoyo para la
frente. Después presione con firmeza la base de los tapones
de las almohadillas para la frente (Fig. D-1) hasta que la punta
del tapón esté calzada correctamente en el orificio. La base
del tapón de la almohadilla para la frente debe quedar
alineado con el apoyo para la frente.
2 Vuelva a conectar el apoyo para la frente al armazón de la
mascarilla (Fig. D-2). Presione la lengüeta e inserte el apoyo
para la frente deslizándolo hasta una de las cuatro ranuras de
posición.
3 Coloque la traba de la almohadilla en la ranura de la
almohadilla de la mascarilla. Asegúrese de que los espacios
bajo los cerrojos de la traba de la almohadilla queden
alineados con los topes respectivos en la ranura de la
almohadilla de la mascarilla.
Coloque primero la parte superior (Fig. D-3), después siga el
contorno insertando la traba de la almohadilla en la
almohadilla de la mascarilla. Asegúrese de que la traba de la
almohadilla no atrape ninguna parte de la almohadilla de la
mascarilla (Fig. D-4). La traba de la almohadilla debe calzar
perfectamente en la ranura de la almohadilla de la mascarilla.
4 Junte la almohadilla con el armazón de la mascarilla. Para esto,
alinee los dos cerrojos laterales de la traba de la almohadilla
con los dos orificios superiores del armazón de la mascarilla
(Fig. D-5). Después presione firmemente la almohadilla sobre
50
Page 51

el armazón de la mascarilla hasta que los cerrojos hagan clic
en su lugar. Asegúrese de que el cerrojo inferior también esté
ajustado (Fig. D-6).
5 Inserte los tapones de los puertos en los puertos de la
mascarilla (Fig. D-7).
6 Ajuste la cubierta de la ventilación al codo de la mascarilla.
Para esto, deslice la cubierta de la ventilación sobre el codo
hasta que queden alineados la parte superior de la cubierta de
la ventilación (Fig. D-8b) con el borde de la abertura de
ventilación (Fig. D-8a). Después empuje los orificios de
ventilación (Fig. D-9c) hacia dentro y deslice la cubierta de la
ventilación hacia arriba sobre el borde de la abertura de
ventilación (Fig. D-9a y Fig. D-9b). La cubierta de la
ventilación colocada se debe ver como en la Fig. D-10.
Asegúrese de que el relieve de la cubierta de la ventilación
calce firmemente en el borde de la abertura de ventilación.
Debería formar un círculo perfecto alrededor del borde de la
abertura de ventilación y no debería estar deformada.
7 Conecte el tubo de aire corto al codo de la mascarilla.
8 Conecte los broches del arnés al armazón de la mascarilla.
9 Enhebre las correas superiores del arnés para la cabeza a
través de las ranuras del apoyo para la frente y ajuste las
correas de Velcro (Fig. D-11). Cuando tiene puesto el arnés,
la etiqueta debe quedar sobre el lado de afuera y próximo a
su cuello.
10 Conecte la pieza giratoria al tubo de aire principal para que
quede listo pronto para la próxima sesión (Fig. D-12).
11 Cuando esté listo para usarla, conecte el codo de la mascarilla
al armazón de la mascarilla (Fig. B-6).
ESPAÑOL
51
Page 52

ESPECIFICACIONES TÉCNICAS
CURVA DE FLUJO / PRESIÓN
La gráfica siguiente muestra el caudal de flujo de aire a través de
los orificios de ventilación de la mascarilla a diferentes presiones
de mascarilla.
Características Presión de salida de ventilación / Flujo
70
60
50
40
30
20
Flujo (l/min)
10
0
4 5 6 7 8 9 1011121314151617181920
Presión (cmH2O)
INFORMACIÓN SOBRE EL ESPACIO MUERTO
El espacio muerto de la mascarilla MIRAGE ACTIVA es 127 ml.
Explicación: El espacio muerto es el volumen vacío dentro de la
mascarilla hasta la altura del codo.
GARANTÍA LIMITADA
ResMed garantiza que el sistema de mascarilla ResMed,
incluyendo el armazón, la almohadilla, el arnés, el tubo y los demás
accesorios (el “producto”) no tendrá defectos de material ni de
mano de obra durante un período de noventa (90) días a partir
de la fecha de compra por parte del consumidor inicial.
Para más detalles remítase a la Garantía.
52
Page 53

Máscara Nasal Mirage Activa
A máscara MIRAGE ACTIVA™ é um acessório para ventiladores
(respiradores) não contínuos, desenhada para ser usada por
pacientes múltiplos aos quais foi prescrito o tratamento por
pressão contínua e positiva das vias respiratórias (CPAP) ou por
sistemas de dois níveis no hospital, na clínica ou em casa.
™
INFORMAÇÃO MÉDICA
Nota: O sistema de máscara não contém materiais em látex.
!
AVISOS
• Esta máscara só deverá ser utilizada com sistemas CPAP ou
de dois níveis recomendados pelo seu médico ou terapeuta
de doenças respiratórias. A máscara só deverá ser usada
quando o sistema CPAP ou de dois níveis estiver ligado e a
funcionar adequadamente. O dispositivo de exalação jamais
deverá ser bloqueado.
Explicação do aviso: os sistemas CPAP ou de dois níveis são
destinados a serem utilizados com máscaras especiais que
têm conectores com orifícios de ventilação ou dispositivos de
exalação aparte de modo a permitirem uma saída contínua de
ar da máscara. Quando o dispositivo CPAP ou de dois níveis
se encontrar ligado e a funcionar adequadamente, o novo ar
que é proveniente do gerador de fluxo expele o ar exalado
através do orifício respiratório da máscara. Contudo, quando
o dispositivo CPAP ou de dois níveis não se encontrar em
PORTUGUÊS
53
Page 54

funcionamento, não existe a possibilidade de fornecer
suficiente ar fresco através da máscara, sendo que o ar
exalado poderá vir a ser respirado de novo. A respiração de
ar exalado em períodos que excedam alguns minutos pode,
em certas circunstâncias, causar sufocação. Este aviso aplica-se
à maioria dos modelos de sistemas CPAP ou de dois níveis.
• A baixas pressões na máscara, o fluxo de ar através das
portas de exalação é menor (ver “Curva de Pressão/Fluxo” na
página 62). Se a pressão da máscara durante a exalação for
demasiadamente baixa, poderá não haver fluxo de ar
suficiente através do orifício de ventilação para expelir
completamente o ar exalado do tubo de fornecimento de ar
antes do início da próxima inspiração.
• A MIRAGE ACTIVA possui um cotovelo que pode ser
facilmente removido quando a máscara se encontra em
posição. A máscara só deverá ser utilizada com o cotovelo
quando o sistema CPAP ou de dois níveis estiver ligado e a
funcionar adequadamente.
• A máscara deve ser limpa e desinfectada/esterilizada se for
utilizada em vários pacientes. Consulte a secção “Limpeza da
máscara entre pacientes” para obter mais informações.
• Se se utilizar oxigénio com o dispositivo CPAP ou de dois
níveis, o fluxo de oxigénio deverá ser desligado quando o
gerador de fluxo não estiver em funcionamento.
Explicação do aviso: Quando o dispositivo CPAP ou de dois
níveis não estiver em funcionamento e o fluxo de oxigénio é
mantido, o oxigénio fornecido através da tubagem do
ventilador pode acumular-se dentro do gerador de fluxo. A
acumulação de oxigénio dentro de um dispositivo CPAP ou
de dois níveis cria o risco de incêndio. Este aviso aplica-se à
maioria de geradores de fluxo CPAP e de dois níveis.
• Evite fumar quando o oxigénio estiver a ser utilizado.
54
Page 55

Nota: Aquando de um caudal fixo do fluxo suplementar de oxigénio,
a concentração de oxigénio inalado pode variar consoante os ajustes
de pressão, o tipo de respiração do paciente, a selecção da máscara
e o regime de fuga.
PARTES DA MÁSCARA
Ver Figura A para uma lista de todas as partes.
A almofada da máscara M
tecnologia A
CTIVECELL™ da ResMed. A ACTIVECELL é uma
IRAGE ACTIVA usa a inovadora
câmara expansível que se enche de ar durante a terapêutica. Esta
tecnologia significa que a M
IRAGE ACTIVA dispõem de auto-
vedação, uma vez que responde a factores que provocam a fuga.
Isto proporciona-lhe uma melhor vedação, particularmente
quando se move durante o sono. A tecnologia A
CTIVECELL™ faz
com que não seja necessária tanta tensão nas correias do arnês
como aquela que é necessária com outras máscaras, tornando a
IRAGE ACTIVA uma máscara mais confortável de usar.
M
COLOCAÇÃO DA MÁSCARA
Nota: Antes de colocar a máscara, consulte a secção acerca da
“Limpeza da máscara em casa” na página 58.
1 Aperte um dos clipes do arnês para o soltar da armação da
máscara (Fig. B-1).
2 Coloque a almofada da máscara sobre o seu nariz.
3 Puxe o arnês sobre a sua cabeça (Fig. B-2). Certifique-se de
que as correias inferiores passam debaixo das suas orelhas e
de que as superiores passam sobre a sua testa.
4 Conecte o clipe do arnês livre à armação da máscara
(Fig. B-3).
5 Ajuste primeiro as correias inferiores do arnês (Fig. B-4) e em
seguida as superiores (Fig. B-5) de modo a que a almofada
PORTUGUÊS
55
Page 56

repouse suavemente sobre a sua face. Não aperte as correias
do arnês neste momento.
6 As almofadas do suporte da testa deverão tocar ligeiramente
na sua testa quando a máscara estiver no seu lugar.
Ajuste o suporte da testa pressionando a sua lingueta e
movendo-o para uma das outras posições de encaixe
(Fig. C-7).
7 Conecte uma extremidade do tubo principal de ar ao seu
dispositivo CPAP ou de dois níveis e a outra extremidade à
peça giratória (Fig. D-10).
Nota: A peça giratória, tubo de ar curto e cotovelo da máscara são
fornecidos já montados.
8 Conecte o cotovelo da máscara à armação da máscara. Para
o fazer, empurre firmemente o cotovelo da máscara sobre a
armação da máscara até que este encaixe em lugar (Fig. B-6).
Gire o cotovelo de máscara para verificar que o conectou
correctamente. Tenha cuidado de não apertar os lados do
cotovelo uma vez que isto poderá soltá-lo da armação da
máscara. Se o cotovelo da máscara for ajustado
correctamente, o mesmo deverá girar à vontade sem se
separar da armação da máscara.
9 Após ser montada, a máscara deverá ter o seguinte aspecto
(Fig. B-7).
10 Ligue o seu gerador de fluxo. Se sentir ar a escapar à volta da
almofada, reposicione a máscara sobre a sua face para obter
uma melhor vedação. É possível que também tenha de voltar
a ajustar as correias do arnês ou suporte da testa.
Não aperte as correias em demasia. As correias deverão ser
ajustadas de modo a que o A
CTIVECELL se encontre
moderada e uniformemente expandido tal como é ilustrado
na Figura B-8.
56
Page 57

O ACTIVECELL não deverá ser esvaziado (Fig. B-9) ou
expandido em demasia (Fig. B-10).
Não se apresse em ajustar as correias e a posição da máscara
de modo a poder obter um ajuste confortável e seguro. Se
sentir pressão excessiva sobre a cana do nariz ou lábio
superior, ajuste o suporte da testa.
Nota: Seleccione "Standard" como opção de máscara, quando
estiver a usar dispositivos AutoSet™da ResMed.
REMOÇÃO DA MÁSCARA
Para remover a máscara MIRAGE ACTIVA, aperte os clipes do
arnês (Fig. C-a). Isto faz com que os clipes do arnês sejam soltos
da armação da máscara. Remova a máscara e o arnês da sua
cabeça.
Nota: Não retire o arnês da sua cabeça antes de ter solto os clipes
do arnês.
SUGESTÃO!
Pode soltar o cotovelo da armacão máscara enquanto que usa a
máscara (ver “Desmontagem para limpeza”). Isto pode vir a ser
útil quando é necessário interromper a terapêutica durante um
curto período de tempo, como por exemplo quando precisa de
ir à casa de banho.
DESMONTAGEM PARA LIMPEZA
PORTUGUÊS
1 Remova o cotovelo da máscara. Para o fazer, aperte os
pontos elevados nos lados do cotovelo da máscara enquanto
que o afasta da armação da máscara (Fig. C-1).
2 Desligue e separe o tubo de ar principal, tubo de ar curto,
cotovelo da máscara e tampa do dispositivo de ventilação
(Fig. C-2).
57
Page 58

Notas
• Para evitar danos ao tubo de ar curto, desligue-o enquanto que o
segura pela manga.
• A peça giratória não necessita de ser desligada do tubo de ar
curto.
3 Aperte os clipes do arnês para os soltar da armação da
máscara. Desaperte as correias de Velcro®e solte-as através
das ranhuras que se encontram no suporte da testa.
4 Remova a tampa das portas da armação da máscara
(Fig. C-3).
5 Afaste a almofada da máscara da armação da máscara. Para o
fazer, aperte em ambas linguetas laterais do clipe da almofada
até que estas se soltem da armação da máscara (Fig. C-4).
Em seguida, puxe a almofada da máscara para fora da
armação da máscara (Fig. C-5).
6 Remova o clipe da almofada da almofada da máscara. Para o
fazer, dobre para dentro uma das extremidades da
A
CTIVECELL e puxe o clipe da almofada para fora (Fig. C-6).
7 Pressione a lingueta do suporte da testa e mova-a passando-a
por cima da última posição de encaixe (Fig. C-7). Tal irá
permitir-lhe remover o suporte da testa da armação da
máscara.
Puxe com firmeza na base das tampas da almofada da testa
para soltar as almofadas da testa do suporte da testa.
LIMPEZA DA MÁSCARA EM CASA
Nota: Lave o arnês antes de o utilizar pela primeira vez, uma vez
que a tinta poderá escorrer. É importante lavar sempre à mão o
arnês.
58
Page 59

SEMANALMENTE
Lave à mão o arnês para a cabeça em água morna e sabão. Use
um sabão puro. Enxagúe bem e deixe a secar fora da luz directa
do sol.
DIARIAMENTE/APÓS CADA UTILIZAÇÃO
Lave à mão o arnês para a cabeça em água morna e sabão. Use
um sabão puro. Enxagúe bem e deixe a secar fora da luz directa
do sol.
!
AVISOS
• Não utilize soluções com bases de lixívia, cloro, álcool ou
aromáticas, agentes hidratantes ou antibacterianos ou óleos
perfumados na limpeza das peças do sistema de máscara ou
da tubagem de ar. Estas soluções podem causar danos que
irão reduzir a vida do produto.
• Não exponha qualquer uma das peças do sistema de
máscara ou da tubagem a luz directa do sol uma vez que
poderia deteriorar o produto.
• Se for observada a deterioração de qualquer um dos
componentes da máscara (quebrado, rachado, rompido,
etc.), o componente da máscara deverá ser substituído.
LIMPEZA DA MÁSCARA ENTRE PACIENTES
O sistema de máscara (excluindo a peça giratória e o tubo curto)
são passíveis de serem utilizados por vários utilizadores. O pessoal
médico deverá consultar o Guia de Desinfecção/Esterilização
para mais informações.
Para limpar o arnês entre pacientes, use o método descrito na
secção anterior: "Limpeza da Máscara em Casa".
PORTUGUÊS
59
Page 60

REMONTAR A MÁSCARA
1 Una as almofadas da testa ao suporte da testa. Para o fazer,
coloque as tampas da almofada da testa nos dois orifícios
circulares do suporte da testa. Em seguida empurre
firmemente atrás da base das tampas da almofada da testa
(Fig. D-1) até que a ponta da tampa esteja bem assente sobre
o orifício. A base da tampa da almofada da testa dever-se-á
encontrar bem assente sobre o suporte da testa.
2 Volte a conectar o suporte da testa à armação da máscara
(Fig. D-2). Pressione a lingueta e mova o suporte da testa
para uma das quatro posições de encaixe.
3 Coloque o clipe da almofada no sulco da almofada da
máscara. Certifique-se de que os relevos debaixo dos fechos
do clipe da almofada se encontram alinhados com os blocos
que se encontram no sulco da almofada da máscara.
Comece por ajustar a secção superior (Fig. D-3), continuando
em seguida a assentar o restante da almofada à volta da
máscara, empurrando para este efeito o clipe da almofada na
almofada da máscara. Certifique-se de que o clipe da
almofada não está a prender nenhuma parte da almofada da
máscara (Fig. D-4). O clipe da almofada dever-se-á encontrar
bem assente dentro do sulco da almofada da máscara.
4
Fixe a montagem de almofada à armação da máscara. Para o
fazer, alinhe os dois fechos laterais do clipe da almofada aos
dois orifícios superiores da armação da máscara
seguida, empurre o conjunto de almofada sobre a armação da
máscara até que este encaixe em lugar. Certifique-se de que o
fecho inferior também está bem apertado
5 Empurre a tampa das portas sobre as portas da máscara
(Fig. D-7).
(Fig. D-5)
(Fig. D-6)
. Em
.
60
Page 61

6 Una a tampa do dispositivo de ventilação ao cotovelo da
máscara. Para o fazer, deslize a tampa do dispositivo de
ventilação ao longo do cotovelo até que as partes superiores
da tampa do dispositivo de ventilação (Fig. D-8b) e a aresta
da abertura do dispositivo de ventilação (Fig. D-8a) se
encontrem alinhadas. Em seguida, empurre os orifícios de
ventilação (Fig. D-9c) para dentro e deslize a tampa dos
mesmos sobre a aresta da abertura do dispositivo de
ventilação (Fig. D-9a e Fig. D-9b). Após montagem, a tampa
do dispositivo de ventilação deverá ter o aspecto da
Fig. D-10. Certifique-se de que a borda da tampa do
dispositivo de ventilação se encontra bem assente sobre a
aresta da abertura do dispositivo de ventilação. Este deverá
formar um círculo perfeito ao redor da aresta da abertura do
dispositivo de ventilação e não se encontrar torcido.
7 Ligue o tubo de ar curto ao cotovelo da máscara.
8 Conecte os clipes do arnês à armação da máscara.
9 Introduza as correias do arnês superiores através das ranhuras
no suporte da testa e aperte as correias de Velcro
(Fig. D-11).
A etiqueta do arnês dever-se-á encontrar virada para fora e
perto do seu pescoço depois da máscara ser colocada.
10 Ligue a peça giratória ao tubo de ar principal de modo a que
o dispositivo se encontre pronto para a próxima utilização
(Fig. D-12).
11 Quando estiver pronta para ser usada, conecte o cotovelo da
máscara à armação da máscara (Fig. B-6).
PORTUGUÊS
61
Page 62

ESPECIFICAÇÕES TÉCNICAS
CURVA DE PRESSÃO/FLUXO
O gráfico seguinte apresenta o regime de fluxo de ar através dos
orifícios de ventilação da máscara a diversas pressões na máscara.
Pressão no orificio de ventilação / Características de fluxo
70
60
50
40
30
20
Fluxo (L/min)
10
0
4 5 6 7 8 9 1011121314151617181920
Pressão (cmH2O)
INFORMAÇÃO ACERCA DE ESPAÇO MORTO
O espaço morto da máscara MIRAGE ACTIVA é de 127ml.
Explicação: O espaço morto é o volume vazio da máscara até ao
cotovelo.
GARANTIA LIMITADA
A ResMed garante que o seu sistema de máscara ResMed,
incluindo os seus componentes, armação da máscara, almofada,
arnês, tubagem e outros acessórios (“Produto”) serão isentos de
defeitos de material e de mão-de-obra durante um período de
noventa (90) dias com início na data de compra pelo consumidor
inicial.
Para mais informações, consulte a Garantia.
62
Page 63

Mirage Activa™ Nasal Mask
MIRAGE ACTIVA™ masken är ett tillbehör till en icke-kontinuerlig
ventilator (respirator). Masken är avsedd för flerpatientanvändning för vuxna patienter som har ordinerats CPAP
(continuous positive airway pressure) eller bilevel behandling på
sjukhus, klinik och/eller i hemmet.
MEDICINSK INFORMATION
Obs! Masksystemet innehåller inte latexmaterial.
!
VARNINGAR
• Masken bör endast användas med de CPAP eller bilevel
system som läkaren eller andningsterapeuten har
rekommenderat. Masken bör endast användas om CPAP
eller bilevel systemet har kopplats på och fungerar ordentligt.
Utandningsanordningen får aldrig blockeras.
Förklaring: CPAP eller bilevel system är avsedda att användas
med speciella masker som är försedda med kontaktdon med
ventilöppningar eller separata utandningsanordningar som
tillåter ett kontinuerligt luftflöde ut från masken. När CPAP
eller bilevel utrustningen är påkopplad och fungerar ordentligt
kommer färsk luft från flödesgeneratorn att driva bort utandad
luft genom utandningsporten på den inkopplade masken.
Om CPAP eller bilevel utrustningen däremot inte är i arbete,
kommer otillräcklig mängd frisk luft in genom masken och
utandad luft kan komma att andas in på nytt. Återinandning av
SVENSK A
63
Page 64

utandad luft under längre tid än några minuter kan under vissa
omständigheter leda till kvävning. Den här varningen gäller för
de flesta CPAP eller bilevel utrustningar.
• Flödet från utloppsventilen är lägre vid lägre masktryck
(se “Tryck/flödesdiagram” på sidan 71). Om masktrycket
under utandningen är alltför lågt kan utloppsventilflödet
eventuellt vara otillräckligt för att helt driva bort all utandad
luft från luftslangen före nästa inandning.
• MIRAGE ACTIVA masken är försedd med en maskbåge som
lätt kan tas bort även när masken sitter på. Masken bör inte
användas med inkopplad båge om inte CPAP eller bilevel
systemet har kopplats på och fungerar ordentligt.
• Masken måste rengöras och desinfekteras/steriliseras om den
används av flera olika patienter. Se avsnittet ”Rengöra masken
mellan olika patienter” för mer information.
• Om syrgas används med CPAP eller bilevel utrustningen
måste syrgasflödet stängas av när flödesgeneratorn inte är i
arbete.
Förklaring: Om syrgasflödet fortsätter även när CPAP eller
bilevel utrustningen kopplats av, kan den syrgas som förs in i
ventilatorslangen byggas upp inne i flödesgeneratorn och
utgöra en brandfara. Den här varningen gäller för de flesta
CPAP eller bilevel flödesgeneratorer.
• Rökning får inte förekomma vid syrgasanvändning.
Obs! Vid en fast flödestakt av tilläggssyre kommer den inandade
syrekoncentrationen att variera beroende på tryckinställningarna,
patientens andningsmönster, maskval och graden av läckage.
DELAR I MASKEN
Se bild A för en lista på alla delar i masken.
Kudden på M
CTIVECELL™ teknik. ACTIVECELL är en utvidgbar kammare
A
64
IRAGE ACTIVA masken använder ResMeds innovativa
Page 65

som blåses upp under behandlingen. Tekniken innebär att
IRAGE ACTIVA är "självförseglande" eftersom masken reagerar på
M
de faktorer som ger upphov till läckan. Du får på det här
sättet bättre försegling särskilt när du rör dig under natten.
CTIVECELL tekniken innebär dessutom att du inte behöver dra
A
åt remmarna så stramt som med andra masker vilket gör att
IRAGE ACTIVA masken är behagligare att använda.
M
PASSA IN MASKEN
Obs! Innan du passar in masken bör du läsa avsnittet “Rengöring av
masken i hemmet” på sidan 68.
1 Tryck på en av klämmorna på hättan för att ta loss den från
maskramen (bild B-1).
2 Placera maskkudden över näsan.
3 Dra hättan över huvudet (bild B-2). Se till att de lägre
remmarna förs under öronen och att de övre remmarna sitter
över pannan.
4 Koppla fast hättans fria klämma vid maskramen (bild B-3).
5 Justera de lägre (bild B-4) och sedan de övre (bild B-5)
remmarna på hättan så att kudden sitter löst mot ansiktet.
Dra inte åt hättans remmar ännu.
6 Dynorna på pannstödet bör snudda lätt mot pannan när
masken sitter på plats.
Justera pannstödet genom att trycka in fliken på stödet och
flytta den till en av de andra springorna (bild C-7).
7 Koppla ena ändan av huvudluftslangen till CPAP eller bilevel
utrustningen och den andra ändan till svängtappen
(bild D-10).
Obs! Svängtappen, den korta luftslangen och maskbågen levereras
färdigmonterade.
SVENSK A
65
Page 66

8 Koppla maskbågen till maskramen. Gör så här: Skjut med fast
hand över maskbågen på maskramen tills den klickar in sig i
rätt läge (bild B-6).
Du har kopplat in maskbågen på rätt sätt om du kan rotera
den. Se till att du inte klämmer sidorna på bågen eftersom
den då kan lossna från maskramen. Om maskramen sitter
korrekt bör den kunna rotera fritt och inte lossna från
maskramen.
9 Den inpassade masken bör se ut så här (bild B-7).
10 Sätt på flödesgeneratorn. Om du känner att luft läcker ut runt
kudden bör du passa in masken över ansiktet på nytt för att få
en bättre försegling. Du kanske också behöver justera om
remmarna eller pannstödet.
Dra inte åt remmarna alltför hårt. Remmarna bör justeras så
att A
CTIVECELL utvidgas lagom mycket och jämt som visas på
bild B-8.
CTIVECELL bör inte falla ihop (bild B-9) eller utvidgas alltför
A
mycket (bild B-10).
Ta god tid på dig för att justera remmarna och passa in
masken så att masken sitter bekvämt och stadigt. Justera
pannstödet om du känner att det trycker alltför mycket över
näsryggen eller överläppen.
Obs! Välj maskalternativet ”Standard” när du använder
ResMeds AutoSet™.
TA BORT MASKEN
För att ta bort MIRAGE ACTIVA masken trycker du in klämmorna
på hättan (bild C-a) vilket frigör klämmorna från maskramen. Dra
sedan bort masken och hättan från huvudet.
Obs! Dra inte bort hättan från huvudet utan att först frigöra
klämmorna på hättan.
66
Page 67

TIPS!
Du kan ta bort bågen från maskramen även när du har masken på
dig (se “Ta isär maskdelarna för rengöring”). Detta är praktiskt när
du behöver göra ett kort behandlingsavbrott t.ex. för att gå på
toaletten.
TA ISÄR MASKDELARNA FÖR RENGÖRING
1 Ta bort maskbågen. Gör så här: Tryck in de upphöjda
punkterna på sidan av maskbågen medan du samtidigt drar
bort bågen från maskramen (bild C-1).
2 Koppla ur och ta bort huvudluftslangen, den korta luftslangen
och ventillocket (bild C-2).
Obs!
• Håll fast den korta luftslangen vid manschetten när du kopplar
bort den så att den inte blir skadad.
• Du behöver inte koppla bort svängtappen från den korta
luftslangen.
3 Tryck på klämmorna på hättan för att frigöra dem från
maskramen. Lossa på Velcro®(kardborr) remmarna och
trä ur de övre remmarna på hättan genom springorna på
pannstödet.
4 Ta bort portlocket från maskramen (bild C-3).
5 Ta bort kuddmonteringen från maskramen. Gör så här:
Tryck på de två spärrarna på sidan på kuddklämman tills de
kommer loss från maskramen (bild C-4). Dra sedan bort
kuddmonteringen från maskramen (bild C-5).
6 Ta bort klämman från maskkudden. Gör så här: Rulla tillbaka
ena ändan av A
CTIVECELL och dra ut klämman (bild C-6).
SVENSK A
67
Page 68

7 Tryck ner fliken på pannstödet och flytta den förbi den
översta springan (bild C-7). Du kan sedan lätt ta bort
pannstödet från maskramen.
Dra kraftigt i foten på pannstödspluggarna för att ta loss
panndynorna från pannstödet.
RENGÖRING AV MASKEN I HEMMET
Obs! Tvätta hättan innan du använder den för första gången efter
som färgen kan fälla. Det är viktigt att alltid tvätta hättan för hand.
VARJE VECKA
Tvätta hättan för hand i ljummet tvålvatten. Använd ren tvål.
Skölj hättan ordentligt och låt den lufttorka men utsätt den inte
för direkt solljus.
DAGLIGEN/EFTER VARJE ANVÄNDNING
Tvätta delarna i masken för hand i ljummet tvålvatten. Använd ren
tvål. Skölj delarna ordentligt och låt dem lufttorka men utsätt dem
inte för direkt solljus.
!
SE UPP
• Använd inte lösningar som innehåller blekningsmedel,
klor-, alkohol, aromatiska lösningar, fuktighetsbevarande
eller bakteriedödande medel eller parfymerade oljor för att
rengöra någon del i masken eller slangarna. Sådana lösningar
kan vara skadliga och förkorta produktens livslängd.
• Utsätt inga delar av masksystemet eller slangarna för direkt
solljus eftersom detta kan skada produkten.
• Om du kan se att någon del i masken är klart försämrad
(sprickor, krackelering, revor osv.) bör du kasta bort den
defekta delen och byta ut den.
68
Page 69

RENGÖRING AV MASKEN MELLAN OLIKA
PATIENTER
Masksystemet (med undantag för svängtappen och den korta
luftslangen) är godkänt för flerpatient-användning. Klinisk personal
hänvisas till Guide för desinfektion & sterilisering av masker för mer
information.
Följ anvisningarna i föregående avsnitt ”Rengöring av masken i
hemmet” för rengöring av hättan mellan olika patienter.
SÄTTA IHOP MASKEN PÅ NYTT
1 Sätt fast panndynorna vid pannstödet. Gör så här: Sätt in
pluggarna i de två runda hålen på pannstödet. Skjut sedan
kraftigt in foten på pluggarna (bild D-1) tills pluggspetsen sitter
ordentligt fast över hålet. Pluggfoten bör sitta rakt mot
pannstödet.
2 Koppla tillbaka pannstödet på maskramen (bild D-2). Tryck
ner fliken och skjut in pannstödet i en av de fyra springorna.
3 Passa in kuddens klämma i skåran på maskkudden. Se till att
frånkopplingarna under spärrarna på kudden ligger i linje med
blockeringarna i skåran på maskkudden.
Passa först in den övre delen (bild D-3), och gå sedan hela
vägen runt och sätt in kuddklämman på maskkudden. Se till att
klämman inte nyper tag i någon del av kudden (bild D-4).
Klämman bör passa in behändigt i skåran på maskkudden.
4 Sätt fast kuddmonteringen på maskramen. Gör så här:
rikta in de två sidohakarna på klämman med de två hålen på
maskramen (bild D-5). Skjut sedan med fast hand över
kuddmonteringen på maskramen tills spärrarna klickar in
sig på rätt plats. Se till att den lägre spärren också sitter
ordentligt fastlåst (bild D-6).
5 Skjut över portlocken på maskportarna (bild D-7).
SVENSK A
69
Page 70

6 Sätt fast ventillocket på maskbågen. Gör så här: skjut
ventillocket längs med bågen tills överdelarna på ventillocket
(bild D-8b) och kanten på ventilöppningen (bild D-8a) ligger i
linje med varandra. Tryck sedan in ventilhålen (bild D-9c) och
skjut ventillocket upp över kanten på ventilöppningen
(bild D-9a & bild D-9b). Det inpassade ventillocket bör se ut
som på bild D-10. Se till att läppen på ventillocket sitter
stadigt över kanten på ventilöppningen. Det bör bilda en
perfekt cirkel runt kanten på ventilöppningen och får inte sitta
snett.
7 Koppla den korta luftslangen till maskbågen.
8 Koppla hättans klämmor till maskramen.
9 Trä de övre remmarna på hättan genom springorna på
pannstödet och sätt fast Velcro (karborr) remmarna
(bild D-11). Etiketten på hättan bör peka utåt och vara nära
nacken när hättan är rätt inpassad.
10 Koppla svängtappen till huvudluftslangen så att allt är klart för
nästa användning (bild D-12).
11 När du är klar att använda masken kopplar du maskbågen till
maskramen (bild B-6).
70
Page 71

TEKNISKA SPECIFIKATIONER
TRYCK/FLÖDESDIAGRAM
Följande diagram visar luftflödestakten genom maskventilerna vid
olika masktryck.
Utloppsventiltryck / Flödesegenskaper
70
60
50
40
30
20
Flöde (l/min)
10
0
4 5 6 7 8 9 10 11 12 1 3 14 15 16 17 1 8 19 20
Tryck (cmH2O)
INFORMATION OM DEAD SPACE
Dead space i MIRAGE ACTIVA masken är 127 ml.
Förklaring: Med Dead space avses den tomma volymen i masken,
upp till maskbågen.
BEGRÄNSAD GARANTI
ResMed garanterar att ditt masksystem från ResMed inkl. följande
ingående delar: maskram, kudde, hätta, slang och andra tillbehör
(“Produkten”) skall vara felfritt med avseende på material och
utförande under en period på nittio (90) dagar från det datum då
den första användaren inköpte produkten.
Se Garantin för ytterligare upplysningar.
SVENSK A
71
Page 72

72
Page 73

Mirage Activa™ neusmasker
Het MIRAGE ACTIVA™ masker is een accessoire bij een nietcontinue ventilator (respirator), bedoeld voor gebruik door
meerdere volwassen patiënten in een ziekenhuis, kliniek en/of een
thuissituatie aan wie nasale continue overdrukbeademing (CPAP)
of bilevel-therapie is voorgeschreven.
MEDISCHE INFORMATIE
N.B.: Het maskersysteem bevat geen latex materialen.
!
WAARSCHUWINGEN
• Dit masker mag alleen worden gebruikt met CPAP- of bilevel-
systemen die worden aanbevolen door uw arts of
ademtherapeut. Een masker mag alleen worden gebruikt als
het CPAP- of bilevel-systeem is ingeschakeld en op correcte
wijze functioneert. De uitademingsopeningen mogen nooit
worden geblokkeerd.
Verklaring van de waarschuwing: CPAP- of bilevel- systemen
zijn bedoeld om te worden gebruikt met speciale maskers die
zijn voorzien van connectors met ventilatieopeningen of een
aparte uitademingsopening voor een continue luchtstroom uit
het masker. Wanneer het CPAP- of bilevel-apparaat is
ingeschakeld en correct functioneert, doet nieuwe lucht uit de
flow-generator de uitgeademde lucht uitstromen via de
uitademingspoort in het aangesloten masker. Wanneer het
CPAP- of bilevel-apparaat echter niet in werking is, wordt er
NEDERLANDS
73
Page 74

onvoldoende verse lucht geleverd via het masker en kan de
uitgeademde lucht weer worden ingeademd. Het langer dan
enkele minuten inademen van uitgeademde lucht kan in
sommige omstandigheden leiden tot verstikking. Deze
waarschuwing is van toepassing op de meeste modellen van
CPAP- of bilevel-apparaten.
• De uitlaat-ventilatiestroom is minder bij een lagere
maskerdruk (see “Druk/Flow-curve” op pagina 82). Als de
maskerdruk tijdens de uitademing te laag is, is er wellicht niet
genoeg uitlaat-ventilatiestroom om de uitgeademde lucht
voor de start van de volgende inademing volledig te laten
uitstromen via de ventilatieslang.
• Het MIRAGE ACTIVA bevat een bocht die gemakkelijk kan
worden verwijderd terwijl het masker is aangesloten. Het
masker mag niet worden gebruikt wanneer de bocht is
aangesloten, tenzij het CPAP- of bilevel-systeem is
ingeschakeld en op correcte wijze functioneert.
• Het masker moet worden gereinigd en gedesinfecteerd/
gesteriliseerd als het door verschillende patiënten wordt
gebruikt. Raadpleeg het hoofdstuk “Het reiningen van het
masker tussen twee patiënten door” voor bijzonderheden.
• Als het CPAP- of bilevel-apparaat wordt gebruikt in
combinatie met zuurstof, moet de zuurstoftoevoer worden
uitgeschakeld wanneer de flow-generator niet aan staat.
Verklaring van de waarschuwing: Wanneer het CPAP- of
bilevel-apparaat buiten gebruik is en de zuurstoftoevoer niet
wordt onderbroken, kan de zuurstof uit de ventilatieslang zich
in de flow-generator ophopen. Zuurstof die zich ophoopt in
het CPAP- of bilevel-apparaat kan gevaar voor brand
opleveren. Deze waarschuwing is van toepassing op de
meeste types CPAP- of bilevel flow generators.
• Niet roken terwijl de zuurstof is ingeschakeld.
74
Page 75

N.B.: Bij een vaste mate van zuurstofvoorziening varieert de
ingeademde zuurstofconcentratie, afhankelijk van: de ingestelde
druk, het ademhalingspatroon van de patiënt, het gekozen masker
en de mate van lekkage.
ONDERDELEN VAN HET MASKER
Zie Fig. A voor een lijst van alle onderdelen.
Bij het M
innovatieve ResMed A
IRAGE A CTIVA maskerkussentje is gebruik gemaakt van de
CTIVECELL™ technologie. De ACTIVECELL is
een uitzetbare kamer die tijdens de therapie met lucht wordt
gevuld. Deze technologie houdt in dat de M
IRAGE ACTIVA
"zelfafdichtend" is, omdat deze reageert op factoren die lekkage
veroorzaken. Dit geeft u een betere afdichting, vooral wanneer u
's nachts beweegt. Dankzij deze A
CTIVECELL technologie hoeft de
hoofdband niet zo strak te worden bevestigd als bij andere
maskers, wat de M
IRAGE ACTIVA comfortabeler in gebruik maakt.
HET MASKER OPZETTEN
N.B.: Raadpleeg voordat u het masker past/opzet het hoofdstuk
“Het reinigen van het masker in de thuissituatie” op pagina 78.
1 Druk op een van de klemmen van de hoofdband om deze los
te maken van de maskerframe (Fig. B-1).
2 Plaats het maskerkussentje over uw neus.
3 Trek de hoofdband over uw hoofd (Fig. B-2). Let er op dat
de onderste banden onder uw oren zitten en de bovenste
banden over uw voorhoofd lopen.
4 Sluit de losse hoofdbandklem aan op het maskerframe
(Fig. B-3).
5 Stel de onderste (Fig. B-4) en daarna de bovenste (Fig. B-5)
hoofdband bij, zodat het kussentje losjes op uw gezicht zit.
Trek de hoofdbanden in dit stadium niet te strak aan.
NEDERLANDS
75
Page 76

6 Het kussentje van uw voorhoofdsteun moet uw voorhoofd
lichtjes aanraken wanneer het masker op zijn plaats zit.
Stel de voorhoofdsteun in door de tab in te drukken en deze
naar een andere sleufpositie te verplaatsen (Fig. C-7).
7 Sluit een uiteinde van de hoofdluchtslang aan op uw CPAP-
of bilevel-apparaat en sluit het andere uiteinde op de
draaibare kop (Fig. D-10).
N.B.: De draaibare kop, korte luchtslang en maskerbocht worden
gemonteerd geleverd.
8 Sluit de maskerbocht aan op het maskerframe. Druk daartoe
de maskerbocht stevig op het maskerframe, totdat deze op
zijn plaats klikt (Fig. B-6).
Controleer of u de aankoppeling correct heeft aangesloten
door deze te draaien. Let op dat u niet in de zijkanten van de
bocht knijpt, omdat deze anders kan loskomen van het
maskerframe. Als de maskerbocht correct is bevestigd, kan
deze vrij draaien en zal niet loskomen van het maskerframe.
9 Het bevestigde masker moet er als volgt uitzien (Fig. B-7).
10 Zet uw flow generator aan. Als u luchtlekkage rondom het
kussentje voelt, plaats het masker dan opnieuw om een
betere afdichting te verkrijgen. U moet wellicht ook de
hoofdbanden of de voorhoofdsteun opnieuw instellen.
Trek de banden niet te strak aan. De banden moeten zo
worden afgesteld dat de A
CTIVECELL niet teveel en gelijkmatig
uitzet, zoals afgebeeld in Figuur B-8.
CTIVECELL mag niet worden samengedrukt (Fig. B-9) of
De A
teveel uitzetten (Fig. B-10).
Neem de tijd om de banden en de positie van het masker in
te stellen om een comfortabele en veilige pasvorm te
bereiken. Als u een overmatige druk voelt op uw neusbrug of
bovenlip, moet u de voorhoofdsteun aanpassen.
76
Page 77

N.B.: Selecteer bij gebruik van ResMed AutoSet™-apparaten
"Standaard" als maskeroptie.
HET MASKER VERWIJDEREN
Druk, om het MIRAGE ACTIVA masker te verwijderen, op de
hoofdbandklemmen (Fig. C-a). Hierdoor komen de klemmen los
van het maskerframe. Trek het masker en de hoofdband van uw
hoofd.
N.B.: Trek de hoofdband niet van uw hoofd zonder de klemmen
eerst los te maken.
TIP!
U kunt de bocht losmaken van het maskerframe terwijl u het
masker draagt (zie “Demontage voor reiniging”). Dit is handig
wanneer de therapie korte tijd moet worden gestopt;
bijvoorbeeld als u naar het toilet moet.
DEMONTAGE VOOR REINIGING
1 Maak de maskerbocht los. Druk hiertoe op de verhoogde
punten aan de zijkant van de maskerbocht en trek de bocht
los van het maskerframe (Fig. C-1).
2 Koppel de hoofdluchtslang, de korte luchtslang, de
maskerbocht en de ventilatiekap los en haal deze uit elkaar
(Fig. C-2).
Opmerkingen
• Houd de korte luchtslang, om schade te voorkomen, bij de
manchet vast terwijl u deze losmaakt.
• De draaibare kop hoeft niet te worden losgemaakt van de korte
luchtslang.
3 Druk op de hoofdbandklemmen om deze los te maken van
het maskerframe. Trek de Velcro®klittenbandsluiting los en
NEDERLANDS
77
Page 78

trek de bovenste banden door de sleuven van de
voorhoofdsteun.
4 Verwijder de poortafdichtingen van het maskerframe
(Fig. C-3).
5 Maak het kussentje los van het maskerframe. Druk hiertoe de
beide zijvergrendelingen op de kussenklem in totdat deze
loskomen van het maskerframe (Fig. C-4). Trek dan het
maskerkussentje los van het maskerframe (Fig. C-5).
6 Verwijder de kussenklem van het maskerkussentje. Rol
hiertoe een uiteinde van de A
kussenklem eruit (Fig. C-6).
7 Druk de tab van de voorhoofdsteun in en verplaats deze
voorbij de bovenste sleufpositie (Fig. C-7). Nu kunt u de
voorhoofdsteun van het maskerframe verwijderen.
Trek stevig aan de onderzijde van de proppen van het
voorhoofdkussen om deze vrij te maken van de
voorhoofdsteun.
CTIVECELL terug en trek de
HET REINIGEN VAN HET MASKER IN DE
THUISSITUATIE
N.B.: Reinig de hoofdband voor het eerste gebruik, omdat de verf
misschien kan afgeven. Het is belangrijk om de hoofdband altijd op
de hand te wassen.
WEKELIJKS
Was de hoofdband op de hand, in een lauwe zeepoplossing.
Gebruik zuivere zeep. Goed uitspoelen en laten drogen, maar niet
in direct zonlicht.
78
Page 79

DAGELIJKS/NA ELK GEBRUIK
Was de maskeronderdelen op de hand, in een lauwe
zeepoplossing. Gebruik zuivere zeep. De onderdelen goed
spoelen en laten drogen, maar niet in direct zonlicht.
!
WAARSCHUWING
• Gebruik voor reiniging van de onderdelen van het masker
of de luchtslangen geen bleekmiddel, chloor, alcohol,
aroma’s, nachtcrème, antibacteriële zeep of oliën. Deze
oplossingen kunnen schade veroorzaken en de levensduur
van het product bekorten.
• Stel het maskersysteem of de slangen niet bloot aan direct
zonlicht, omdat dat ten koste gaat van de levensduur van
het product.
• Als er sprake is van zichtbare gebreken van een
maskeronderdeel (scheuren, haarscheuren, barsten, enz.),
moet dit worden weggegooid en vervangen.
HET REINIGEN VAN HET MASKER VOOR
GEBRUIK DOOR EEN NIEUWE PATIËNT
Het maskersysteem (zonder de draaibare kop en de korte
ademslang) is gevalideerd voor gebruik door meerdere patiënten.
Artsen dienen voor verdere bijzonderheden de Handleiding voor
desinfectie/sterilisatie van maskers te raadplegen.
Volg, om de hoofdband te reinigen voor overgang naar de
volgende patiënt, de methode die wordt beschreven in het vorige
hoofdstuk “Het reinigen van het masker in de thuissituatie”.
79
NEDERLANDS
Page 80

HET MASKER OPNIEUW MONTEREN
1 Bevestig de voorhoofdkussentjes aan de voorhoofdsteun.
Plaats daartoe de pluggen van het voorhoofdkussentje in de
twee ronde openingen op de voorhoofdsteun. Druk dan
stevig op de onderzijde op de plugs van het
voorhoofdkussentje (Fig. D-1), totdat de bovenkant van de
plug goed vastzit in de opening. De onderzijde van de plug
van het voorhoofdkussentje moet gelijk liggen met de
voorhoofdsteun.
2 Sluit de voorhoofdsteun weer aan op het maskerframe
(Fig. D-2). Druk op de tab en plaats de voorhoofdsteun in
een van de sleufposities.
3 Druk de kussenklem in de groef van het maskerkussentje. Let
erop dat de uitsnijdingen onder de
kussenklemvergrendelingen op een lijn liggen met de blokjes
in de groef van het maskerkussentje.
Plaats het bovenste gedeelte eerst (Fig. D-3), ga dan verder
en plaats de kussenklem in het maskerkussentje. Let op dat de
kussenklem geen andere onderdelen van het maskerkussentje
afknijpt (Fig. D-4). De kussenklem dient goed in de groef van
het maskerkussentje te passen.
4 Bevestig het kussentje aan het maskerframe. Daartoe moeten
de twee zijvergrendelingen van de kussenklem op een lijn
liggen met de bovenste twee openingen in het maskerframe
(Fig. D-5). Druk dan het kussentje stevig op het maskerframe
totdat de vergrendelingen op hun plaats klikken. Let op of de
onderste vergrendeling stevig vastzit (Fig. D-6).
5 Druk de poortafdichting op de maskerpoorten (Fig. D-7).
6 Bevestig de ventilatiekap op de maskerbocht. Schuif hiertoe
de ventilatiekap langs de bocht tot de bovenzijde van de kap
(Fig. D-8b) en de rug van de ventilatieopening (Fig. D-8a) op
80
Page 81

een lijn liggen. Druk daarna de ventilatieopeningen
(Fig. D-9c) in en schuif de ventilatiekap omhoog, over de rand
van de ventilatieopening (Fig. D-9a & Fig. D-9b). De
gemonteerde ventilatiekap moet er uitzien zoals op Fig. D-10.
Controleer of het lipje van de ventilatiekap stevig over de
rand van de ventilatieopening zit. Deze moet een perfecte
cirkel vormen om de rand van de ventilatieopening en mag
niet vervormd zijn.
7 Sluit de korte luchtslang aan op de maskerbocht.
8 Maak de klemmen van de hoofdband vast aan het
maskerframe.
9 Trek de bovenste hoofdbanden door de sleuven van de
voorhoofdsteun en maak de klittenbandsluitingen vast
(Fig. D-11). Het label op de hoofdband moet naar buiten zijn
gericht en zich ter hoogte van uw nek bevinden wanneer de
banden zijn geplaatst.
10 Sluit de draaibare kop aan op de luchtslang, zodat het masker
klaar is voor de volgende patiënt (Fig. D-12).
11 Als dat het geval is, sluit dan de maskerbocht aan op het
maskerframe (Fig. B-6).
81
NEDERLANDS
Page 82

TECHNISCHE SPECIFICATIES
DRUK/FLOW-CURVE
De volgende grafiek toont de luchtstroom door de
maskeropeningen bij verschillende maskerdrukken.
Uitlaatventilatiedruk / Flow-karakteristieken
70
60
50
40
30
20
Flow (L/min)
10
0
4 5 6 7 8 9 10 11 12 1 3 14 15 16 17 1 8 19 20
Druk (cmH
O)
2
INFORMATIE OMTRENT DODE RUIMTE
De dode ruimte van het MIRAGE ACTIVA masker is 127mL.
Verklaring: Met ´dode ruimte´ wordt het lege volume van het
masker tot aan de bocht bedoeld.
BEPERKTE GARANTIE
ResMed garandeert dat uw ResMed maskersysteem, met inbegrip
van de onderdelen maskerframe, kussentje, hoofdband, slangen
en andere accessoires (hierna te noemen het product), vrij is van
fouten in materialen en vakmanschap voor een periode van
negentig (90) dagen vanaf de aanschafdatum door de eerste
consument.
Voor meer bijzonderheden verwijzen wij u naar de garantie.
82
Page 83

83
NEDERLANDS
Page 84

84
Component of 60880/2 05 10
Page 85

Manschette / Manchon / Manicotto /
Mango / Manga / Manschett / Manchet
Upper Velcro®straps
Obere Velcro®Verschlüsse / Bandes Velcro®supérieures /
Cinghie di Velcro®superiori / Correas superiores de Velcro®/
Correias de Velcro®superiores / Övre Velcro®remmar / Bovenste
Velcro® klittenbandbevestiging
Lower Velcro straps
Untere Velcro Verschlüsse / Bandes Velcro inférieures /
Cinghie di Velcro inferiori / Correas inferiores de Velcro /
Correias de Velcro inferiores / Lägre Velcro remmar /
Onderste Velcro® klittenbandbevestiging
Headgear clips
Kopfbandclips / Clips du harnais / Fermagli del copricapo /
Broches del arnés para la cabeza / Clipes do arnês / Hättans
klämmor / Klemmen voor hoofdband
Zusammenbau des Kopfbandes / Harnais /
Headgear assembly
Complesso del copricapo / Arnés para la cabeza /
Montagem do arnês / Hättans montering / Hoofdband
C-a
2005 ResMed Ltd.
©
C-6
C-5
C-2
B-7
B-1
B-2
D
D-12
C-4
D-1
C-3
D-2
D-3
“click”
Page 86

Manufactured by: ResMed Ltd 1 Elizabeth MacArthur Drive Bella Vista NSW 2153
Australia Tel: +61 (2) 8884 1000 or 1 800 658 189 (toll free) Fax: +61 (2) 8883 3114 Email:
reception@resmed.com.au ResMed Offices: ResMed Corp (US Designated Agent)
14040 Danielson Street Poway CA 92064-6857 USA Tel: +1 (858) 746-2400 or 1-800-4240737 Fax: +1 (858) 746-2900 • ResMed (UK) Ltd (EU Authorised Representative) 65
Milton Park Abingdon Oxfordshire OX14 4RX UK Tel: +44 (1235) 862 997 Fax: +44 (1235)
831 336 • ResMed SA Parc de la Bandonnière 2 rue Maurice Audibert 69800 Saint-Priest
France Tel: +33 (0) 4 37 251 251 Fax: +33 (0) 4 37 251 260 • ResMed GmbH & Co. KG
Fraunhoferstraße 16, 82152 Martinsried Deutschland Tel: +49 (0) 89 / 99 01 - 00 or 49 (0)
800 2 777 000 (gebührenfrei) Fax: +49 (0) 89 / 99 01 - 10 55 • ResMed Asia Pacific Ltd
North Ryde Australia • ResMed Austria GmbH Villach Österreich • ResMed BV Den
Haag Nederland • ResMed Finland Masala Suomi • ResMed Hong Kong Tsim Sha Tsui
Hong Kong • ResMed Japan Tokyo Japan • ResMed Malaysia Sdn Bhd Kuala Lumpur
Malaysia • ResMed NZ Ltd Auckland New Zealand • ResMed Singapore Pte Ltd
Novena Square Singapore • ResMed Spain SL Madrid España • ResMed Sweden AB
Trollhättan Sverige • ResMed Schweiz Basel Schweiz
www.resmed.com
Velcro is a registered trademark of Velcro Industries B.V.
Mirage Activa
Reorder number: 60880/2 05 10
 Loading...