

Page 1
HumidAire 3i
™
Reorder number: 33804/2 05 05
USER’S MANUAL
English
Svenska
Dansk
Norsk
Suomi
www.resmed.com Waking people up to sleep
Page 2
HumidAire 3i
TM
A
B
12
4
D
1 4
1
2
566a
234
3
© 2005 ResMed Ltd.
© 2005 ResMed Ltd. © 2005 ResMed Ltd.
© 2005 ResMed Ltd. © 2005 ResMed Ltd.
C
E
1
2
3
(a)
(a)
Component of 33804/2
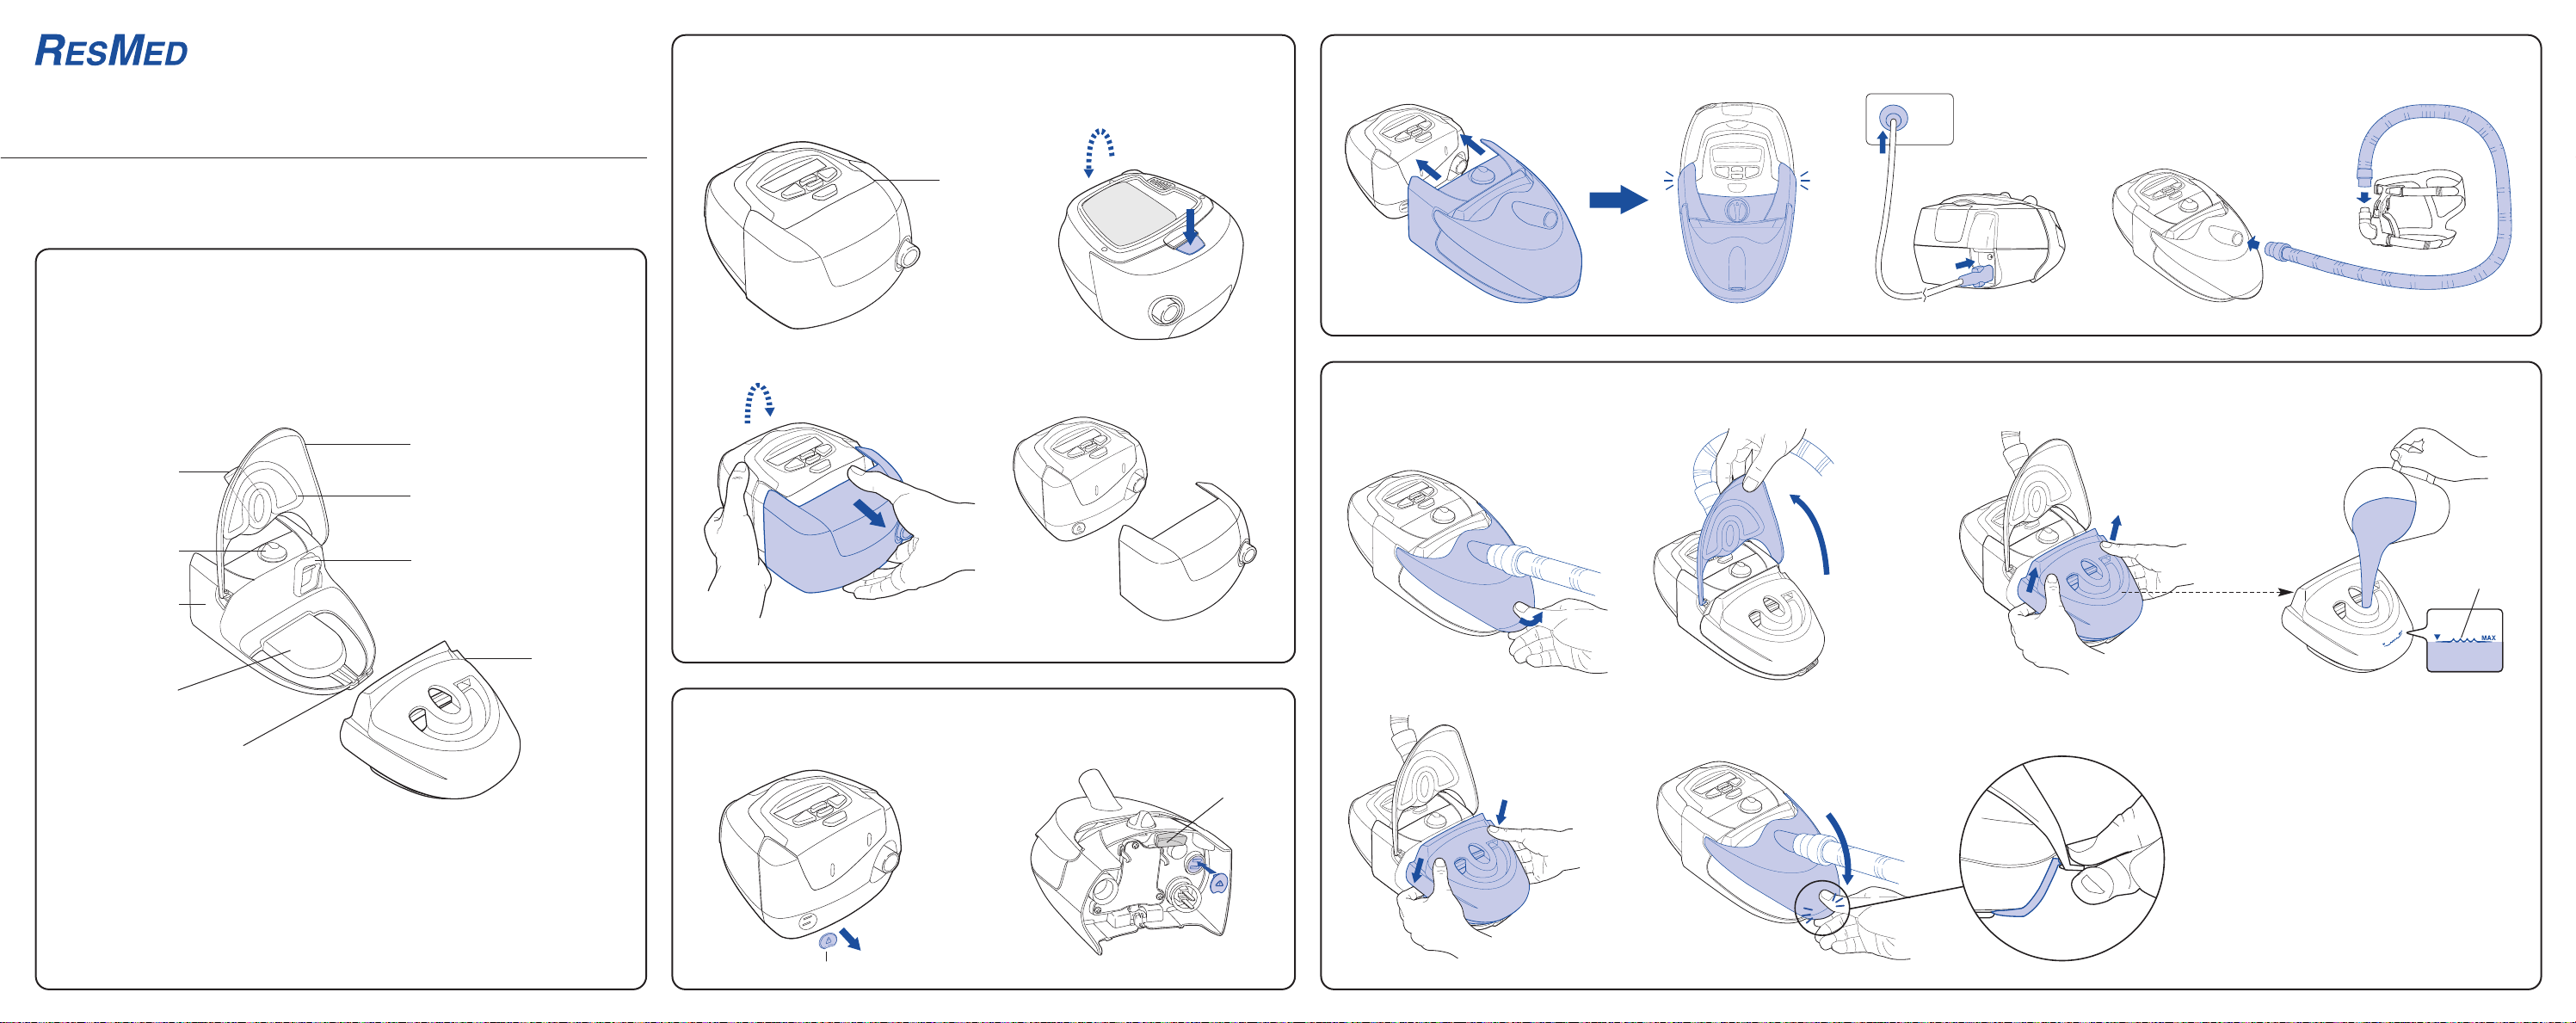
ILLUSTRATIONS
ILLUSTRATIONS
ILLUSTRATIONER
ILLUSTRASJONER
KUVAT
Air outlet / Luftutsläpp /
Luftudtag / Luftuttak /
Ilmantuloaukko
Control dial /
Kontrollknapp /
Kontrolknap /
Kontrollskive / Säädin
Docking station /
Dockingstation /
Dockningstation /
Forankringsstasjon /
Liitäntäasema
Heater plate /
Värmeplatta / Varmeplade /
Varmeplate / Lämmityslevy
Latch / Spärrhake /
Klinke / Haspe /
Salpa
Cover / Framstycke / Dæksel /
Deksel / Kansi
Cover seal / Framstyckets försegling /
Tætning til dæksel / Dekselkapsling /
Kannen tiiviste
Connector seal / Kopplingsförsegling /
Tætning til kobling / Koblingsstykkekapsling /
Liitännän tiiviste
Water chamber /
Vannbeholder /
Vattenbehållare /
Vesisäiliö
REMOVING THE FRONT CAP (IF FITTED) / TA BORT FRONTKÅPAN (OM DEN
ÄR INPASSAD) / FJERNELSE AF FRONTDÆKSEL (HVIS RELEVANT) / SLIK TAR DU AV
FRONTDEKSLET (HVIS UTSTYRT MED) / ETUKANNEN IRROTTAMINEN (JOS SE ON
PAIKOILLAAN)
Front cap /
Lock på framsidan /
Frontdæksel /
Frontdeksel /
Etukansi
REMOVING AND STORING THE CONNECTOR PLUG / BORTTAGNING OCH
FÖRVARING AV KOPPLINGSKONTAKTEN / FJERNELSE OG OPBEVARING AF
KOBLINGSFORBINDELSEN / TA AV OG OPPBEVARE TILKOBLINGSPLUGGEN /
LIITÄNTÄTULPAN IRROTTAMINEN JA SÄILYTTÄMINEN
Connector plug / Kopplingskontakt /
Koblingsforbindelse / Tilkoblingsplugg / Liitäntätulppa
ATTACHING YOUR HUMIDAIRE 3i / SÄTTA FAST HUMIDAIRE 3i / PÅSÆTNING AF HUMIDAIRE 3i / KOBLE TIL HUMIDAIRE 3i-APPARATET /
HUMIDAIRE 3i -ILMANKOSTUTTIMEN LIITTÄMINEN
FILLING THE WATER CHAMBER / FYLLA VATTENBEHÅLLAREN / OPFYLDNING AF VANDBEHOLDER / FYLLE VANNBEHOLDEREN / VESISÄILIÖN TÄYTTÄMINEN
Page 3
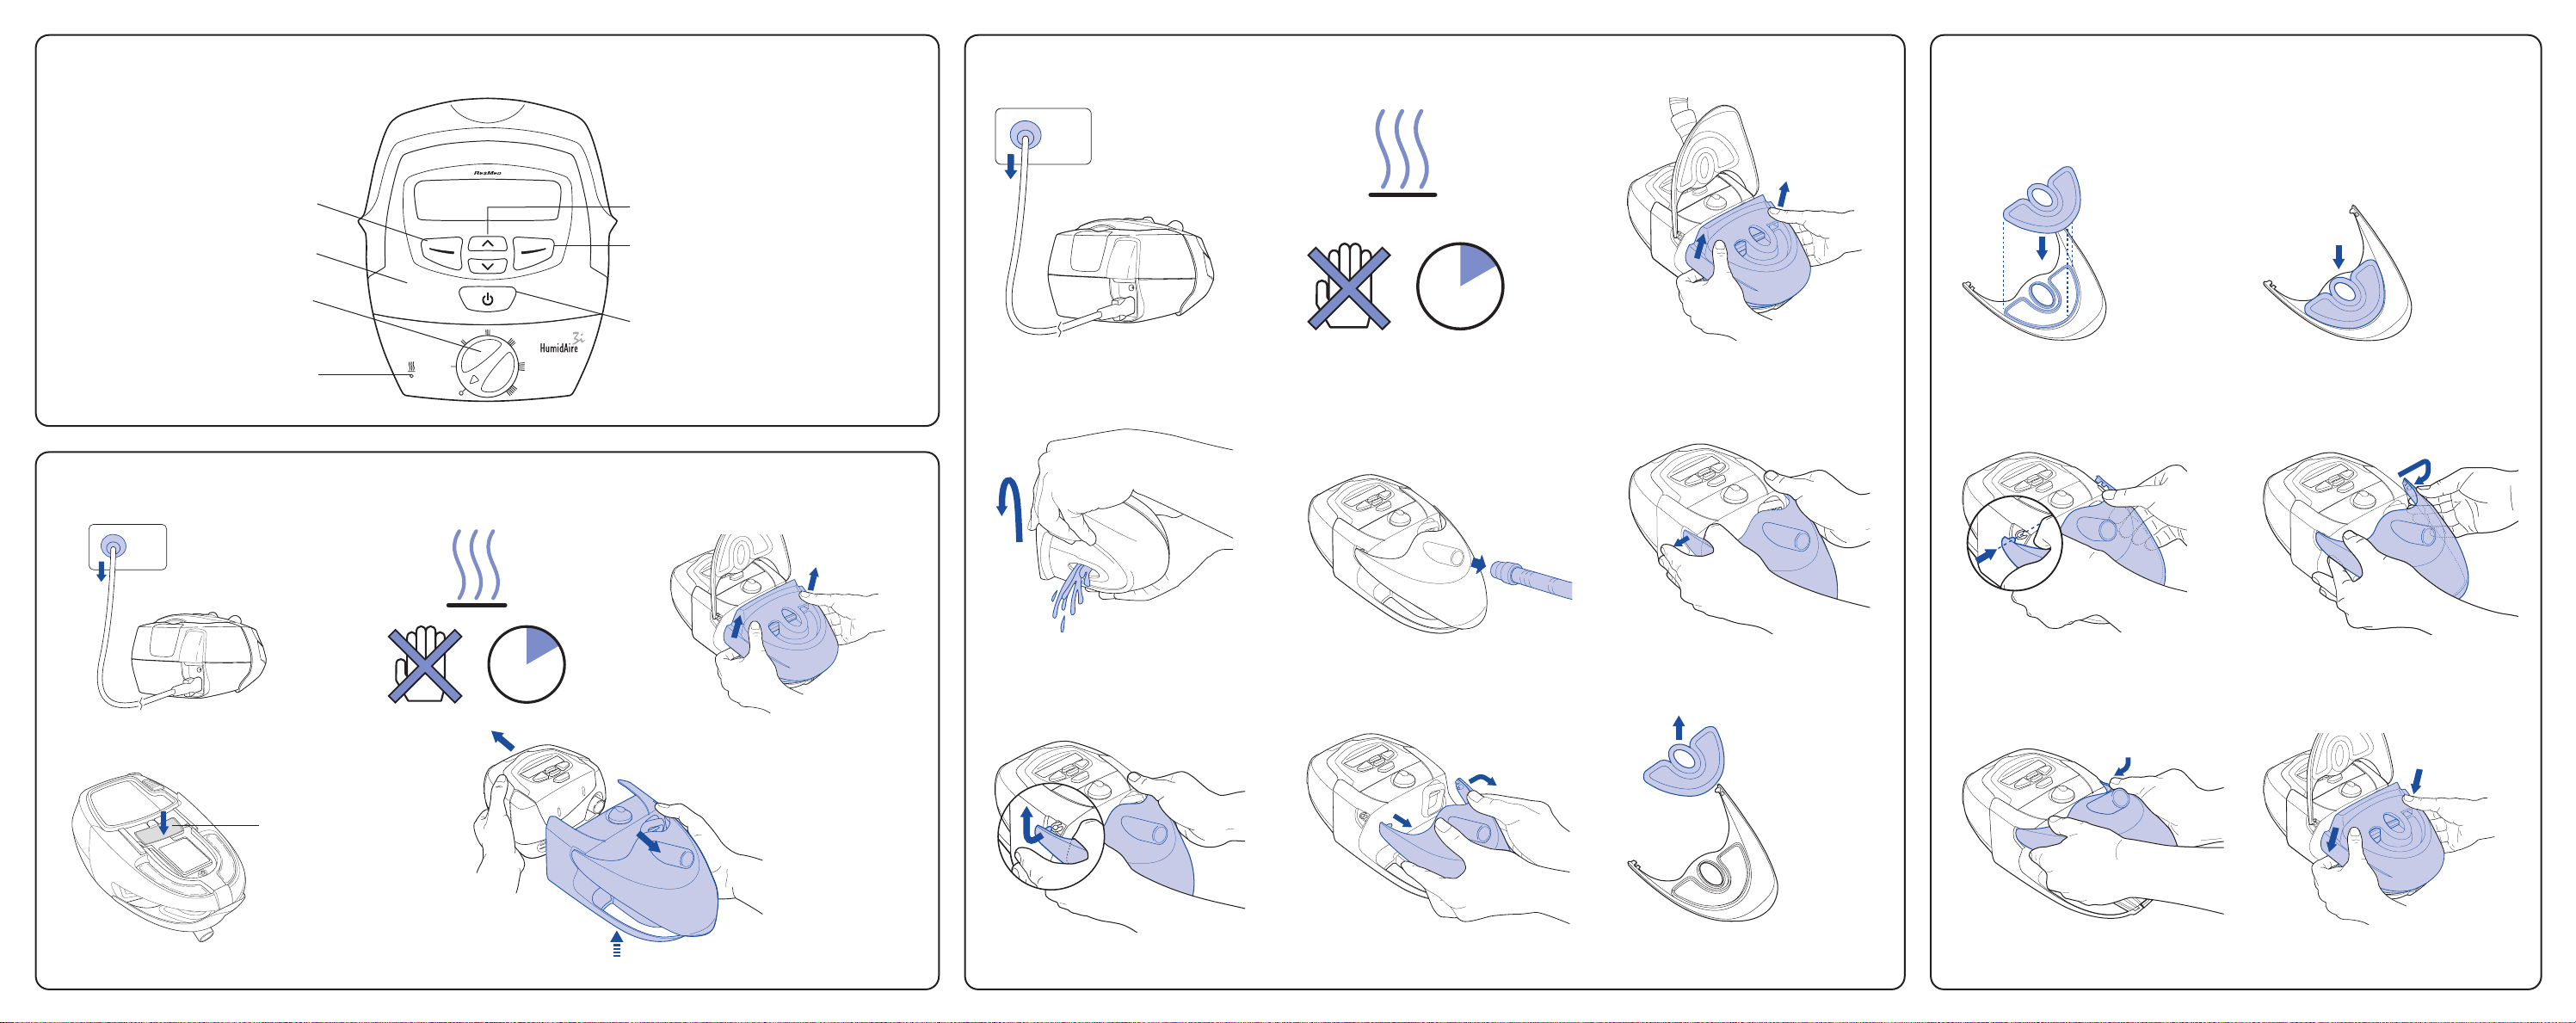
I
1 2
34
5
© 2005 ResMed Ltd.
6
F H
3
56
9
1
4
10 min
G
© 2005 ResMed Ltd.© 2005 ResMed Ltd.
© 2005 ResMed Ltd.
2
3
5
4
UNDERSIDE VIEW / BILD UNDERIFRÅN / SET FRA UNDERSIDEN /
VISNING AV UNDERSIDE / NÄKYMÄ ALHAALTA
7
8
1
10 min
2
Large silver button /
Stor silverknapp /
Stor sølvknap /
Stor sølvfarget knapp /
Hopeanvärinen painike
Press button and pull apart / Tryck på knappen och dra isär /
Tryk på knappen og træk delene fra hinanden / Trykk inn knappen og
trekk fra hverandre / Paina painiketta ja vedä osat erilleen
STARTING YOUR TREATMENT / STARTA BEHANDLINGEN / INDLEDNING AF
BEHANDLINGEN / START AV BEHANDLING / HOIDON ALOITTAMINEN
Right key / Höger knapp /
Højre tast / Høyre tast /
Oikea näppäin
Up/Down keys /
Upp/Ner knappar /
Op/Ned-taster /
Opp/ned-taster /
Ylös/alas-näppäimet
Start/Stop key / Start/Stop knapp /
Start/Stop-tast / Start/Stans-tast /
Käynnistys/pysäytys-näppäin
Control dial /
Kontrollknapp/
Kontrolknap/ Kontrollskive
/ Säädin
Indicator light / Ljusindikator /
Indikatorlys / Indikatorlampe /
Merkkivalo
Control panel / Kontrollpanel /
Kontrolpanel / Kontrollpanel /
Ohjauspaneeli
Left key / Vänster knapp /
Venstre tast / Venstre tast /
Vasen näppäin
DETACHING YOUR HUMIDAIRE 3i / TA BORT HUMIDAIRE 3i / FRAKOBLING AF HUMIDAIRE 3i /
FRAKOBLING AV HUMIDAIRE 3i-APPARATET / HUMIDAIRE 3i -ILMANKOSTUTTIMEN IRROTTAMINEN
DISASSEMBLING YOUR HUMIDAIRE 3i / TA ISÄR HUMIDAIRE 3i / DEMONTERING AF HUMIDAIRE 3i /
DEMONTERING AV HUMIDAIRE 3i-APPARATET / HUMIDAIRE 3i -ILMANKOSTUTTIMEN PURKAMINEN
RE-ASSEMBLING YOUR HUMIDAIRE 3i / SÄTTA IHOP HUMIDAIRE 3i /
SAMLING AF HUMIDAIRE 3i / SETTE SAMMEN HUMIDAIRE 3i-APPARATET IGJEN /
HUMIDAIRE 3i -ILMANKOSTUTTIMEN KOKOAMINEN
Page 4

USER’S MANUAL 1
B
RUKSANVISNING 21
B
RUGERMANUAL 41
B
RUKERHÅNDBOK 61
HUMIDAIRE 3i
™
ENGLISHSVENSKANORSK DANSKSUOMI
KÄYTTÖOHJE 83
Page 5

Manufactured by:
ResMed Ltd 1 Elizabeth MacArthur Drive Bella Vista NSW 2153 Australia
Tel: +61 (2) 8884 1000 or 1 800 658 189 (toll free) Fax: +61 (2) 8883 3114 Email: reception@resmed.com.au
Distributed by:
ResMed Corp 14040 Danielson Street Poway CA 92064-6857 USA
Tel: +1 (858) 746-2400 or 1-800-424-0737 (toll free) Fax: +1 (858) 746-2900 Email: reception@resmed.com
ResMed (UK) Limited 65 Milton Park Abingdon Oxfordshire OX14 4RX UK
Tel: +44 (1235) 862 997 Fax: +44 (1235) 831 336 Email: reception@resmed.co.uk
ResMed Asia Pacific Ltd 97 Waterloo Road North Ryde NSW 2113 Australia
Tel: +61 (2) 9886 5000 or 1 800 991 900 (toll free) Fax: +61 (2) 9889 1471 Email: reception@resmed.com.au
ResMed Austria GmbH Purtscherstraße 18, 9500 Villach Österreich
Tel: 43 (4242) 430 830 Fax: +43 (4242) 430 830-4 Email: reception@resmed.at
ResMed BV Nieuwe Parklaan 86, 2587 BV Den Haag Nederland
Tél: +31 (70) 358 6263 Fax: +31 (70) 358 4333 Email: receptiondh@resmed.nl
ResMed Finland Niittykatu 6 FIN 02200 ESPOO Suomi
Puh: +358 9 8676820 Faksi: +358 9 86768222 Sähköposti: reception@resmed.fi
ResMed GmbH & Co. KG Fraunhoferstraße 16, 82152 Martinsried Deutschland
Tel: +49 (0) 89/99 01-00 Fax: +49 (0) 89/99 01-10 55 Email: reception@resmed.de
ResMed Hong Kong Limited Room 1714, Miramar Tower 132-134 Nathan Road Tsim Sha Tsui Hong Kong
Tel: +852 2366 0707 Fax: +852 2366 4546 Email: reception@resmed.com.hk
ResMed Japan Nihonbashi Hisamatsu Bldg. 4F, 2-28-1 Nihonbashi-Hamacho, Chuo-Ku, Tokyo 103-0007, Japan
Tel: +81 (3) 3662 5056 Fax: +81 (3) 3662 5040
ResMed Malaysia Sdn Bhd Suite E-10-20, Plaza Mon’t Kiara No. 2 Jalan 1/70C Mon’t Kiara 50480 Kuala Lumpur
Malaysia Tel: +60 3 6201 7177 Fax: +60 3 6201 2177 Email: reception@resmed.com.my
ResMed NZ Ltd PO Box 51-048 Pakuranga Auckland New Zealand
Tel:+64 274 737 633 Fax:+64 9 239 0193 Email: reception@resmed.co.nz
ResMed SA Parc de la Bandonnière 2, rue Maurice Audibert 69800 Saint-Priest France
Tél. : +33 (0) 4 37 251 251 Fax : +33 (0) 4 37 251 260 Email: reception@resmed.fr
ResMed Singapore Pte Ltd 238A Thomson Road #12-03/04, Novena Square, Tower A Singapore 307684
Tel: +65 6284 7177 Fax: +65 6284 7787 Email: reception@resmed.com.sg
ResMed Spain SL C/Arturo Soria, 245 28033 Madrid España
Tel: +34 (93) 5908154 Fax: +34 (93) 5908153 Email:angelo@resmed.es
ResMed Sweden AB Industrigatan 2 S-461 37 Trollhättan Sverige
Tel: +46 520 420 110 Fax: +46 520 397 15 Email: reception@resmed.se
Labhardt AG Thannerstrasse 57 CH-4054 Basel Schweiz
Tel: +41 (061) 307 9711 Fax: +41 (061) 307 9722 Email: info@labhardt.ch
US DESIGNATED AGENT: ResMed Corp
EU AUTHORISED REPRESENTATIVE: ResMed (UK) Ltd
Internet: www.resmed.com
Patents and designs pending.
HumidAire, HumidAire 3i, S8 and SmartStart are trademarks of ResMed Ltd and HumidAire is registered in
U.S. Patent and Trademark Office.
© 2005 ResMed Ltd.
Page 6

ENGLISH
HumidAire 3i
USER’S MANUAL
English
™
1
Page 7

CONTENTS
WELCOME . . . . . . . . . . . . . . . . . . . . . . . . . . . . . . . . . . . . . . . . . . . . . . . . . . . 3
WHAT IS THE HUMIDAIRE 3i? . . . . . . . . . . . . . . . . . . . . . . . . . . . . . . . . . . . 3
Y
OUR RESPONSIBILITY 3
MEDICAL INFORMATION . . . . . . . . . . . . . . . . . . . . . . . . . . . . . . . . . . . . . . . 4
I
NTENDED USE 4
C
ONTRAINDICATIONS 4
W
ARNINGS 4
COMPONENTS OF YOUR HUMIDAIRE 3i . . . . . . . . . . . . . . . . . . . . . . . . . . 5
SETTING UP YOUR HUMIDAIRE 3i FOR USE . . . . . . . . . . . . . . . . . . . . . . . 5
R
EMOVING THE FRONT CAP (IF FITTED) 5
R
EMOVING AND STORING THE CONNECTOR PLUG 6
A
TTACHING YOUR HUMIDAIRE 3i 6
F
ILLING THE WATER CHAMBER 6
STARTING AND STOPPING TREATMENT . . . . . . . . . . . . . . . . . . . . . . . . . . . 7
S
TARTING YOUR TREATMENT 7
S
TOPPING YOUR TREATMENT 8
D
ETACHING YOUR HUMIDAIRE 3i 8
FREQUENTLY ASKED QUESTIONS . . . . . . . . . . . . . . . . . . . . . . . . . . . . . . . . 9
CLEANING AND MAINTENANCE . . . . . . . . . . . . . . . . . . . . . . . . . . . . . . . . . 10
D
ISASSEMBLING YOUR HUMIDAIRE 3i 10
C
LEANING YOUR HUMIDAIRE 3i 11
R
EASSEMBLING YOUR HUMIDAIRE 3i 11
S
ERVICING 12
TROUBLESHOOTING . . . . . . . . . . . . . . . . . . . . . . . . . . . . . . . . . . . . . . . . . . 13
TECHNICAL SPECIFICATIONS . . . . . . . . . . . . . . . . . . . . . . . . . . . . . . . . . . . 15
LIMITED WARRANTY . . . . . . . . . . . . . . . . . . . . . . . . . . . . . . . . . . . . . . . . . . 17
INDEX . . . . . . . . . . . . . . . . . . . . . . . . . . . . . . . . . . . . . . . . . . . . . . . . . . . . . . 19
2
Page 8

WELCOME
Thank you for choosing the ResMed HUMIDAIRE 3i™ humidifier. The HUMIDAIRE 3i
is designed to humidify (moisten) the air delivered to your airway during CPAP
(continuous positive airway pressure) therapy. The H
ResMed S8™ Series CPAP flow generator with a simple ‘click-in’ mechanism.
This user manual contains the information you need for the correct use of your
H
UMIDAIRE 3i.
UMIDAIRE 3i attaches to your
WHAT IS THE HUMIDAIRE 3i?
The HUMIDAIRE 3i is designed to form a single unit with a ResMed CPAP flow
generator. The combined unit provides humidification during CPAP therapy, and can
make therapy more comfortable.
You may have experienced nasal congestion or dryness of the nose, mouth, or throat
during CPAP therapy. These symptoms are caused by dry climates, cold air
temperatures, the airflow delivered from your flow generator, or mouth leak. Moist air
may help relieve these symptoms of dryness.
Refer to your flow generator manual to see whether it is compatible with the
UMIDAIRE 3i. Contact your equipment supplier or ResMed office if you require
H
further information.
YOUR RESPONSIBILITY
You or the user of this system shall have sole responsibility and liability for any injury
to persons or damage to property resulting from:
• operation which is not in accordance with the operating instructions supplied
• maintenance or modifications carried out unless in accordance with authorised
instructions and by authorised persons.
Please read this manual carefully before use.
This manual contains special terms and icons that appear in the margins to draw your
attention to specific and important information.
• Warning alerts you to possible injury.
• Caution explains special measures for the safe and effective use of the device.
• Note is an informative or helpful note.
ENGLISH
WELCOME
3
Page 9

MEDICAL INFORMATION
INTENDED USE
The HUMIDAIRE 3i is indicated for humidification of the air delivered from the ResMed
S8 Series CPAP devices. The H
physician.
CONTRAINDICATIONS
The HUMIDAIRE 3i is contraindicated for use with patients whose upper (supraglottic)
airway has been bypassed. Please also refer to the relevant system manual for
contraindications associated with CPAP therapy.
WARNINGS
The following are general warnings. Specific warnings and cautions appear next to the
relevant instructions in the manual.
WARNINGS
!
• Use the HUMIDAIRE 3i only for its intended use as described in this manual.
• Make sure that the water chamber is empty and thoroughly dried before
transporting the H
• The HUMIDAIRE 3i is designed only for use with specific ResMed CPAP devices.
Do not use the H
• The HUMIDAIRE 3i should only be used with delivery tubes or accessories
recommended by ResMed. Connection of other delivery tubes or accessories
could result in injury, or damage to the device.
• The HUMIDAIRE 3i, including the associated tubing, is for single-patient use and
must not be re-used on another person. This is to avoid the risk of cross-infection.
• Always place the HUMIDAIRE 3i device lower than the level of the patient. If it is
placed at or above the level of the patient, heated water may flow down the air
tubing and into the mask.
• There exists the possibility that if the device is placed above the level of the patient
and is tipped over, or if the tubing is filled with condensate, the mask might fill with
water. The H
are unable to guard their airways, or are unable to pull the mask off, for example
following a stroke. Attention should be given to the relative risks and benefits.
• Do not attempt to dismantle the HUMIDAIRE 3i docking station. There are no
user-serviceable parts inside. Repairs and internal servicing should only be
performed by an authorised service agent.
• Take care when handling the HUMIDAIRE 3i. The heater plate and the water in the
water chamber may be hot.
• If liquids are inadvertently spilled into or on the HUMIDAIRE 3i docking station,
unplug the CPAP device from the power outlet. Disconnect the docking station
from the CPAP device and allow the docking station to drain and dry before using.
UMIDAIRE 3i.
UMIDAIRE 3i with any other CPAP device.
UMIDAIRE 3i should therefore be used with caution in patients who
UMIDAIRE 3i is for use only as recommended by a
4
Page 10

• Do not operate the HUMIDAIRE 3i if the CPAP device has a damaged power cord
or plug.
• Do not operate the HUMIDAIRE 3i if it is not working properly or if any part of it
has been dropped or damaged.
• Keep the CPAP device power cord away from heated surfaces.
• Do not drop or insert any object into any opening or tubes.
• Do not use the HUMIDAIRE 3i in the presence of flammable or explosive
materials.
• Explosion hazard—do not use in the vicinity of flammable anaesthetics.
• If oxygen is used with this device, the oxygen flow must be turned off when the
device is not operating.
If oxygen has been left on, turn off the flow generator, then wait 30 minutes before
turning on the flow generator again.
Explanation: When the CPAP device is not in operation and the oxygen flow is
left on, oxygen delivered into the air delivery tubing may accumulate within the
CPAP machine enclosure and create a risk of fire. This applies to most types of
CPAP machines.
• Oxygen supports combustion. Oxygen should not be used while you are
smoking or in the presence of an open flame.
• Always ensure airflow is being generated by the device before the oxygen
supply is turned on.
• Always turn the oxygen supply off before stopping the airflow from the device.
Note: At a fixed rate of supplemental oxygen flow, the inhaled oxygen concentration
will vary, depending on where the oxygen is introduced, the pressure settings, patient
breathing pattern, mask selection and leak rate.
ENGLISH
COMPONENTS OF YOUR HUMIDAIRE 3i
Please refer to the illustrations in section A of the illustration sheet.
SETTING UP YOUR HUMIDAIRE 3i FOR USE
WARNING
!
Make sure your flow generator is switched off at the power outlet before
connecting the HumidAire 3i.
REMOVING THE FRONT CAP (IF FITTED)
Please refer to the illustrations in section B of the illustration sheet.
Your flow generator may be fitted with a front cap (B-1). Before you can attach the
UMIDAIRE 3i, press the button underneath the front cap (B-2) and pull it away from
H
the body of your flow generator (B-3 & B-4).
COMPONENTS OF YOUR HUMIDAIRE 3i
5
Page 11

Notes
• To replace the front cap, align it with your flow generator (B-4) and push it firmly until it
clicks into place.
• Remember to take the front cap with you when travelling, in case you need CPAP
therapy without a humidifier.
REMOVING AND STORING THE CONNECTOR PLUG
Please refer to the illustrations in section C of the illustration sheet.
Before attaching the H
generator (C-1) and attach it to the back of the docking station (C-2).
UMIDAIRE 3i, remove the connector plug from your flow
ATTACHING YOUR HUMIDAIRE 3i
Please refer to the illustrations in section D of the illustration sheet.
1 Align your HUMIDAIRE 3i with your flow generator (D-1) and push them together
until they click into place (D-2).
WARNING
!
• The HumidAire 3i docking station should only be connected or disconnected
when the water chamber is empty.
• Water must be prevented from entering your flow generator. Do not transport
the flow generator with the HumidAire 3i attached.
Insert the power cord into the socket at the rear of your flow generator. Plug the other
2
end of the power cord into a power outlet (D-3).
Note: If your flow generator is powered via the DC input, the HumidAire 3i is not powered
and humidification output will be reduced.
Place the combined unit on a firm, level surface near your bed at a level lower than
3
your sleeping position. Ensure the surface is not sensitive to heat and/or moisture, or
use a protective mat.
CAUTION
!
Be careful not to place the unit where it can be bumped into and knocked over.
Connect one end of the air tubing firmly onto the air outlet of your HUMIDAIRE 3i
4
and the other end to your mask (D-4).
FILLING THE WATER CHAMBER
Please refer to the illustrations in section E of the illustration sheet.
WARNING
!
Take care when handling your HumidAire 3i. The water and the water chamber
base may both be hot. Allow ten minutes for the heater plate and any excess water
to cool.
1 Release the cover latch (E-1) and lift the cover until it rests in the upright position (E-2).
6
Page 12

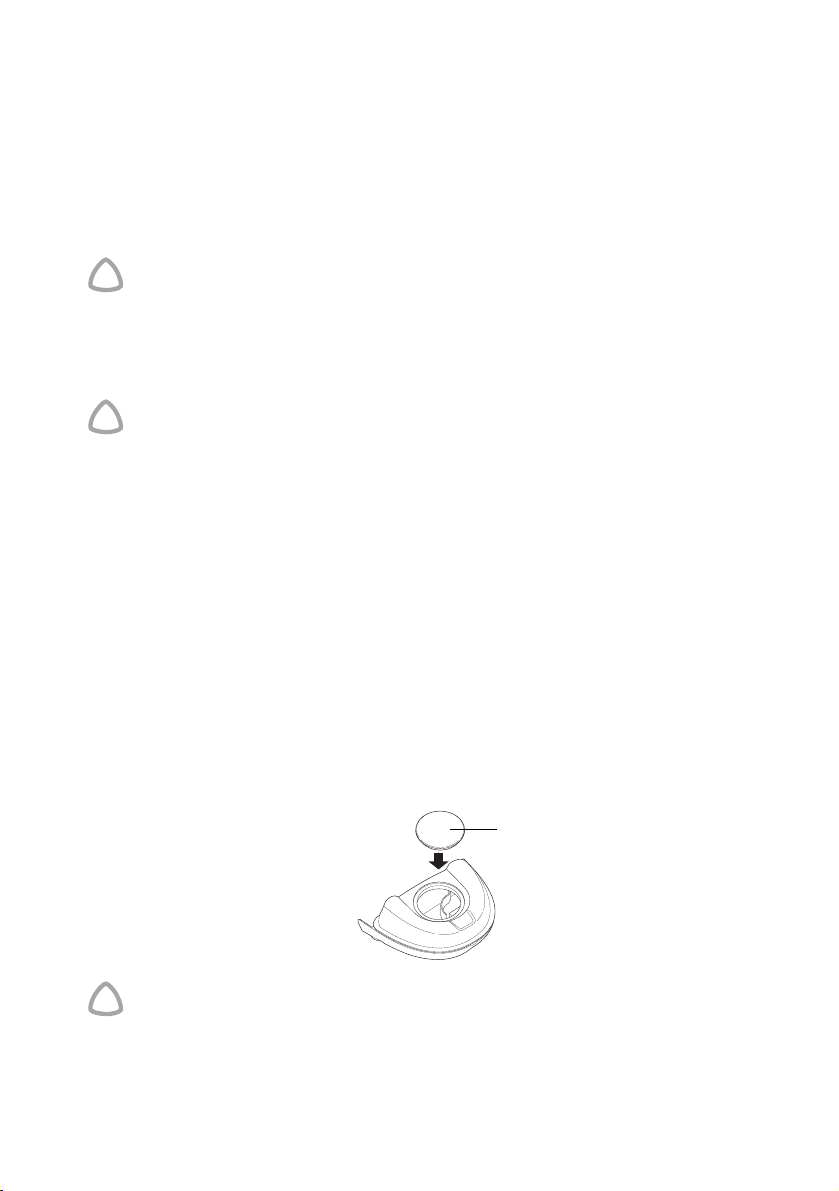
Remove the water chamber (E-3) and carefully fill it with fresh, clean water (E-4). Make
2
sure you keep the level of the water under the maximum water level mark (E-4a).
Always ensure that the water chamber is clean. See “Cleaning and Maintenance” on
page 10.
WARNING
!
Do not overfill the water chamber, as water may enter your flow generator and air
tubing.
CAUTION
!
Do not use any additives (eg scented oils and perfumes). They may reduce the
humidification output of the HumidAire 3i and/or cause deterioration of the water
chamber materials.
Carefully place the filled water chamber into the humidifier docking station (E-5) and
3
latch the cover (E-6 & E-6a).
UMIDAIRE 3i is now ready for use.
The H
STARTING AND STOPPING TREATMENT
STARTING YOUR TREATMENT
Please refer to the illustration in section F of the illustration sheet.
1 When your HUMIDAIRE 3i is attached and the flow generator is powered, the
indicator light lights up on the H
(not available on all models) may appear.
UMIDAIRE 3i. A prompt for the Warm-Up feature
RAMP: 10min
warmup
menu
ENGLISH
When activated, this feature allows the water to warm up before you start treatment.
If the Warm-Up feature is available, use it to pre-heat the water before starting your
2
treatment. Skip this step if you wish to start treatment immediately.
WARM-UP FEATURE (NOT AVAILABLE IN ALL MODELS)
Note: Check your flow generator user’s manual to see if this feature is available.
To start the Warm-Up feature:
i. Select Warmup by pressing the Right key on the control panel.
The following message is displayed for 2 seconds:
HUMIDIFIER
WARMING
ii. After 2 seconds the WARMING screen is displayed.
WARMING
menu exit
STARTING AND STOPPING TREATMENT
7
Page 13

iii. While your HUMIDAIRE 3i is in Warm-Up mode you can:
• Start treatment at any time by pressing the Start/Stop key.
• Access the menus by pressing Menu (Left key).
• Stop the Warm-Up feature at any time by pressing Exit (Right key).
The Warm-Up feature will automatically turn off after 30 minutes if treatment has not
started.
Turn the humidity control dial to the desired setting. The setting switches heated
3
humidification off and delivers minimum humidification. The indicator light will remain
lit to indicate standby mode. A setting of 6 ( ) delivers maximum humidification.
We recommend that you initially set the control dial to 3 ( ). If necessary, adjust the
control dial up or down to find the setting that is most comfortable and effective for
you. You can adjust the humidity setting at any time.
The aim is to have moist air delivered to your mask but to avoid condensation forming
in the air tubing. The temperature and humidity of the surrounding air will affect the
setting you need.
See “Frequently Asked Questions” for further tips on the correct humidity setting.
Fit your mask as described in your mask user instructions.
4
Press the Start/Stop key on the control panel. Alternatively, if your flow generator
5
has the SmartStart™ function available, simply breathe into your mask and air should
begin to flow.
Note: During operation, the indicator light becomes brighter to indicate that the heating
element is active. Your HumidAire 3i has a rapid heating element which allows very short
heating times. Do not be concerned if the light only brightens very briefly.
Lie down and arrange the air tubing so that it is free to move if you turn in your sleep.
6
WARNING
!
Do not leave an excessive length of air tubing around the top of your bed. It could
twist around your head or neck while you are sleeping.
STOPPING YOUR TREATMENT
To stop your treatment at any time, remove your mask and press the Start/Stop key.
Alternatively, if your flow generator has the SmartStart function available, simply
remove your mask and treatment will end.
Some flow generators continue to blow air gently after you have stopped your
treatment. This can continue for up to one hour to assist the heater plate in cooling.
However, you can unplug the device from the power outlet at any time and allow the
heater plate to cool without airflow.
DETACHING YOUR HUMIDAIRE 3i
Please refer to the illustrations in section G of the illustration sheet.
8
Page 14
1 Unplug the power cord from the power outlet (G-1).
WARNING
!
Take care when handling your HumidAire 3i. The water and the water chamber
base may both be hot. Allow ten minutes for the heater plate and any excess water
to cool (G-2).
Remove the water chamber from the docking station (G-3).
2
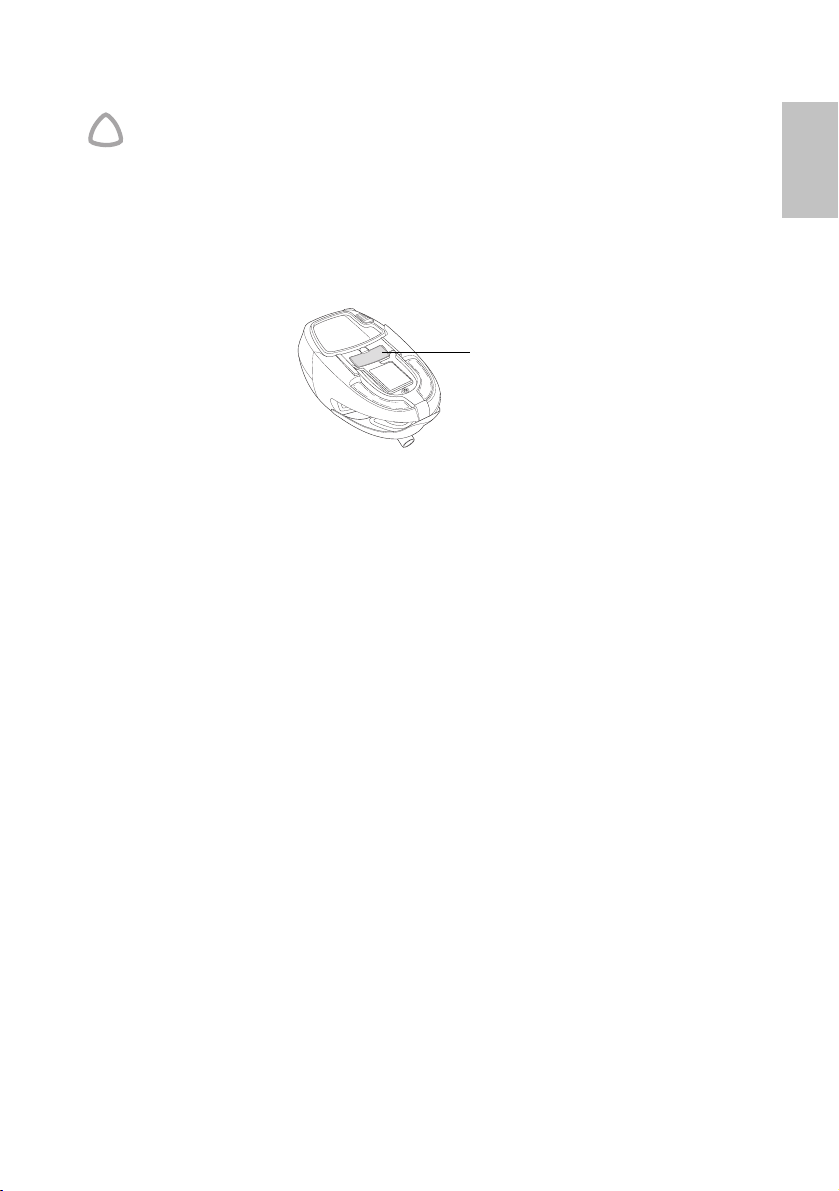
Press the large silver button located midway underneath the docking station
3
(G-4) and pull the H
Note: Re-attach the connector plug firmly to your flow generator.
UMIDAIRE 3i and flow generator apart (G-5).
Large silver button
UNDERSIDE VIEW
FREQUENTLY ASKED QUESTIONS
WHY IS THERE CONDENSATION IN MY MASK AND/OR AIR TUBING?
You may experience excessive condensation in your mask or air tubing. This may occur
seasonally, particularly when the room temperature is low or cool air is circulating
around the tube. Turn the control dial down to a lower setting until the condensation
decreases.
You may have to adjust your humidity setting from season to season.
DO I HAVE TO USE DISTILLED WATER IN THE WATER CHAMBER?
Using distilled water will maximise the life of the water chamber and reduce mineral
deposits. See “Cleaning your HumidAire 3i” on page 11 for further details.
WHAT IF I STILL HAVE SYMPTOMS OF DRYNESS?
If you still experience symptoms of dryness, then your humidity setting may be set too
low to be effective. Gradually turn the humidity control dial up over a few nights until
the symptoms disappear.
If you are still experiencing symptoms of dryness, even after increasing the humidity
setting, you may be breathing through your mouth. Mouth breathing or mouth leaks
cause drying and irritation of the upper airway. If this is a problem, a full face mask or
chin strap may help. Consult your clinician or equipment supplier for details.
ENGLISH
FREQUENTLY ASKED QUESTIONS
9
Page 15
CLEANING AND MAINTENANCE
You should regularly carry out the cleaning and maintenance of the water chamber,
cover and cover seal as described in this section.
DISASSEMBLING YOUR HUMIDAIRE 3i
Please refer to the illustrations in section H of the illustration sheet.
WARNING
!
Beware of electrocution. Do not immerse your flow generator, docking station or
power cord in water. Always unplug the device before cleaning and be sure that it
is dry before plugging it back in.
1 Unplug the power cord from the power outlet (H-1).
WARNING
!
Take care when handling your HumidAire 3i. The water and the water chamber
base may both be hot. Allow ten minutes for the heater plate and any excess water
to cool (H-2).
Remove the water chamber from the docking station (H-3) and discard any excess
2
water (H-4).
Detach the air tubing from the air outlet (H-5).
3
Gently flex one cover arm away and up from the docking station until the cover
4
detaches completely (H-6 to H-8). Peel the cover seal away from the cover (H-9).
TUB PLATE
The tub plate should not be removed from the water chamber. If removed, replace
the tub plate by:
i. Turning the water chamber base upside down.
ii. As shown below, position the tub plate so that the open side is facing down. Then
firmly press the tub plate down into the water chamber.
10
tub plate
CAUTION
!
The water chamber may leak if the tub plate is refitted incorrectly.
Note: The tub plate will not fit into the water chamber if it is facing up. Before fitting the
tub plate, make sure the O-ring is fitted snugly inside the groove of the tub plate.
Page 16

CLEANING YOUR HUMIDAIRE 3i
CAUTION
!
• Do not use any of the following to clean any part of the HumidAire 3i. These
solutions may cause damage and reduce the life of the product.
• bleach, chlorine-, alcohol- or ammonia-based solutions
• moisturising, antibacterial or glycerine based soaps
• water softening and unapproved descaling agents.
• Do not wash the water chamber in a dishwasher.
WATER CHAMBER
DAILY
Wash the water chamber and tubing in warm water, using a mild detergent
(see previous caution). Rinse them thoroughly with clean water and allow them to dry
away from direct sunlight.
WEEKLY
Inspect the water chamber for wear and deterioration. Replace the water chamber if
any component has cracked, become cloudy or pitted. Replace immediately if there is
any leaking from the water chamber.
If you notice white powder or deposits in the water chamber:
i. Fill the water chamber to the maximum water level mark with a solution of one
part vinegar to ten parts water.
ii. Let the solution soak for ten minutes.
iii. Discard the solution and rinse the water chamber with clean water.
COVER AND COVER SEAL
Inspect the cover and cover seal weekly for wear and deterioration. Replace any
damaged parts. When required, wash the cover and cover seal in warm water, using a
mild detergent (see previous caution). Rinse them thoroughly with clean water and
allow them to dry away from direct sunlight.
DOCKING STATION
Periodically wipe the outside of the docking station (including the connector seal) with
a damp cloth.
ENGLISH
REASSEMBLING YOUR HUMIDAIRE 3i
Please refer to the illustrations in section I of the illustration sheet.
Reassemble the parts when they are clean and dry.
1 Align the cover seal to the guides on the cover (I-1) and press along the edges to
ensure it is fitted properly (I-2).
Put one cover arm into its pivot point on the docking station (I-3) and gently flex the
2
other arm into its corresponding point (I-4 & I-5).
CLEANING AND MAINTENANCE
11
Page 17

The cover should be able to open and close freely while securely attached to the
docking station.
Replace the water chamber in the humidifier docking station (I-6).
3
SERVICING
With normal use of a HUMIDAIRE 3i, the water chamber needs to be replaced every
two years.
This product (H
Centre 5 years from the date of manufacture. Prior to this, the device is intended to
provide safe and reliable operation provided that it is operated and maintained in
accordance with the instructions provided by ResMed. Applicable ResMed warranty
details are provided with the device at the time of original supply. Of course, as with
all electrical devices, if any irregularity becomes apparent, you should exercise caution
and have the device inspected by an authorised ResMed Service Centre.
UMIDAIRE 3i) should be inspected by an authorised ResMed Service
12
Page 18
TROUBLESHOOTING
If there is a problem, try the following suggestions. If the problem cannot be solved,
contact your equipment supplier or ResMed. Do not attempt to open the unit.
WARNING
!
Service and repair should only be performed by an authorised service agent.
Problem Possible Cause Solution
ENGLISH
Device not working
(no display on LCD
screen and/or
indicator light not
lighting up)
Indicator light
flickering
Indicator light is
permanently dull
and/or air does not
feel warm
Leaking water
chamber
Power cord is not plugged
in properly.
Faulty power outlet.
Flow generator and
docking station not
connected correctly.
Indicator light periodically
becomes brighter to
indicate that the heating
element is active.
HumidAire 3i reflector (see
illustration C-2a) is dirty.
The water chamber may be
damaged or cracked.
Cover is not attached
correctly.
Check that the power cord is plugged
firmly into the power outlet and the
switch (if available) is on at the outlet.
Try another power outlet.
Check that the docking station is
securely attached to the flow generator.
• Your HumidAire 3i has a rapid
heating element which allows very
short heating times. Do not be
concerned if the light only brightens
very briefly.
• Turn the dial to the setting to
switch heated humidification off. The
indicator light will remain lit to
indicate standby mode.
Clean the reflector with a damp cloth.
Contact your supplier for a replacement.
Make sure the cover is fitted correctly.
TROUBLESHOOTING
13
Page 19

Problem Possible Cause Solution
No/low air flow The air tubing is not
connected properly.
The air tubing is blocked,
pinched or punctured.
The flow generator is not
working correctly.
The water chamber is
overfilled.
The cover is not latched
correctly.
The cover seal is not fitted
correctly.
Condensation is forming in
the air tube.
Water splashing on
your face
Air does not feel
moist
The water chamber is
overfilled.
Condensation is forming in
the air tube and mask.
The control dial is set too
low.
Connect the air tubing as described in
“Setting Up your HumidAire 3i For Use”
on page 5.
Unblock or free the air tubing. Check the
air tubing for punctures.
See the Troubleshooting section in the
flow generator manual.
Make sure that the water level is not
above the maximum water level mark.
Make sure the cover is latched onto the
docking station correctly.
Make sure the cover seal is facing the
right way up and fitted securely.
• Turn the control dial down.
• Insulate the air tubing.
Empty some water from the water
chamber.
• Turn the control dial down.
• Insulate the air tubing.
Turn the control dial up.
14
HumidAire 3i heating
element is not working.
Air too moist Control dial is set too high.
High relative humidity in
your room.
White powder or
deposits in the water
chamber
The water leaves scaly
mineral deposits.
Contact your equipment supplier.
Turn the control dial down.
Adjust your humidity setting.
• Use distilled water.
• To remove these mineral deposits, see
“Cleaning your HumidAire 3i” on
page 11.
Page 20

TECHNICAL SPECIFICATIONS
PERFORMANCE
Maximum heater plate temperature: 85°C
Temperature cut-out: 93°C
Maximum output humidity: 95% relative humidity (control dial set to maximum setting,
flow rate 50 L/min, ambient temperature of 20°C, ambient relative humidity of 40%).
Maximum gas temperature: 41°C
DIMENSIONS (H X W X D)
Docking station and water chamber: 118 mm x 170 mm x 212 mm
WEIGHT
Docking station and unfilled water chamber: 670 g
Water capacity to maximum fill line: 385 mL
POWER SUPPLY
Input range for RESMED S8 flow generator with HUMIDAIRE 3i: 100–240V, 50/60Hz;
110V, 400Hz; 2.5A <140 VA (110 W) (maximum power consumption). Instantaneous
peak power consumption <340 VA.
Actual average power consumption will vary, depending on factors such as
temperature setting, set pressure, the use of accessories, height above sea level and
ambient temperature.
Maximum heater element power: 85 W.
HOUSING CONSTRUCTION
Docking station: Flame retardant engineering thermoplastic, plated cast aluminium.
Water chamber: Injection molded plastic, stainless steel.
ENVIRONMENTAL CONDITIONS
Operating temperature: +5°C to +40°C
Operating humidity: 10–95% non-condensing
Storage and transport temperature: -20°C to +60°C
Storage and transport humidity: 10–95% non-condensing
IEC 60601-1 CLASSIFICATION
Class II (double insulation)
Type CF
ELECTROMAGNETIC COMPATIBILITY
Please refer to your flow generator user's manual for details.
Note: The manufacturer reserves the right to change these specifications without notice.
ENGLISH
TECHNICAL SPECIFICATIONS
15
Page 21
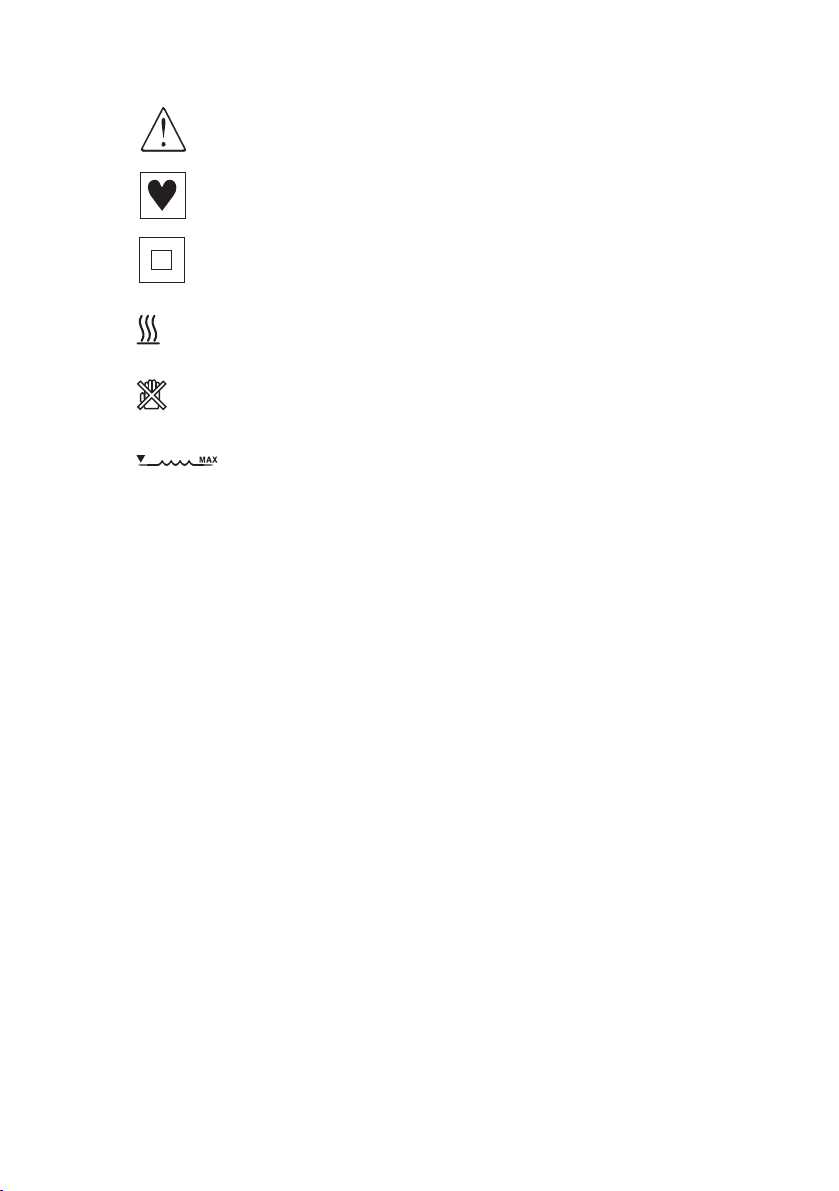
YMBOLS WHICH APPEAR ON THE DEVICE
S
Attention, consult accompanying documents
Type CF equipment
Class II equipment
Hot surface
Do not touch
Maximum water level
16
Page 22

LIMITED WARRANTY
ResMed warrants that your ResMed product shall be free from defects in material and
workmanship for the period specified below from the date of purchase by the initial
consumer. This warranty is not transferable.
Product Warranty Period
ResMed humidifiers, ResControl™, ResLink™ 1 Year
ResMed flow generators 2 Years
ENGLISH
Accessories, mask systems (including mask frame, cushion,
headgear and tubing). Excludes single-use devices.
90 Days
Note: Some models are not available in all regions.
If the product fails under conditions of normal use, ResMed will repair or replace, at its
option, the defective product or any of its components. This Limited Warranty does
not cover:
a) any damage caused as a result of improper use, abuse, modification or alteration of
the product;
b) repairs carried out by any service organization that has not been expressly
authorized by ResMed to perform such repairs;
c) any damage or contamination due to cigarette, pipe, cigar or other smoke;
d) any damage caused by water being spilled on or into a flow generator.
To make a warranty claim, the initial consumer must return the defective product to
the point of purchase, freight prepaid.
This warranty is in lieu of all other express or implied warranties, including any implied
warranty of merchantability or fitness for a particular purpose. Some regions or states
do not allow limitations on how long an implied warranty lasts, so the above limitation
may not apply to you.
ResMed shall not be responsible for any incidental or consequential damages claimed
to have occurred as a result of the sale, installation or use of any ResMed product.
Some regions or states do not allow the exclusion or limitation of incidental or
consequential damages, so the above limitation may not apply to you. This warranty
gives you specific legal rights, and you may also have other rights which vary from
region to region.
For further information on your warranty rights, contact your local ResMed dealer or
ResMed office.
LIMITED WARRANTY
R001-307/1 05 02
17
Page 23

18
Page 24

INDEX
A
Attaching
connector plug
front cap
HumidAire 3i
C
Cleaning
Compatible flow generators
Components
Condensation
Connector plug
Contraindications
Control dial
Cover
Cover seal
D
Detaching your HumidAire 3i
Dimensions
Docking station
Dryness
E
Electromagnetic compatibility
Environmental conditions
F
FAQ 9
Filling the water chamber
Front cap
10
cover
11
cover seal
docking station
water chamber
re-attach 9
removing
6
storing
cleaning 11
disassembling
reassembling
cleaning
reassembling
removing
cleaning
symptoms
attaching 6
removing
9
6
6
11
11
11
3
5
8, 9, 14
6
4
8
10
11
11
11
10
15
11
9
15
6
5
8
15
H
Heater plate cooling 8
Housing construction
HumidAire 3i
attaching 6
cleaning
detaching
disassembling
reassembling
Humidification settings
Humidity control dial
I
IEC 60601-1 Classification
Indicator light
flickering
Intended use
L
Limited warranty
M
Medical information 4
Mineral deposits
P
Performance
Placement
Power supply
R
Removing
connector plug
cover seal
front cap
water chamber
S
Setting up your HumidAire
Settings
humidification
SmartStart
Special terms and icons
Starting treatment
Stopping your treatment
T
Technical specifications
11
8
13
4
15
6
15
10
5
8
15
10
11
8
8
7, 8
17
14
6
7
8
3
7
8
15
ENGLISH
15
5
INDEX
19
Page 25

Troubleshooting 13
W
Warm-Up feature
Warnings
Water chamber
Weight
Y
Your responsibility
4
cleaning
13
leaking
maximum capacity
maximum water level mark
15
7
11
15
3
7
20
Page 26

HumidAire 3i
™
BRUKSANVISNING
Svenska
SVENSKA
21
Page 27

INNEHÅLL
VÄLKOMMEN . . . . . . . . . . . . . . . . . . . . . . . . . . . . . . . . . . . . . . . . . . . . . . . . 23
VAD ÄR HUMIDAIRE 3i? . . . . . . . . . . . . . . . . . . . . . . . . . . . . . . . . . . . . . . . 23
D
ITT ANSVAR 23
MEDICINSK INFORMATION . . . . . . . . . . . . . . . . . . . . . . . . . . . . . . . . . . . . 24
A
VSEDD ANVÄNDNING 24
K
ONTRAINDIKATIONER 24
V
ARNINGAR 24
DELAR I HUMIDAIRE 3i . . . . . . . . . . . . . . . . . . . . . . . . . . . . . . . . . . . . . . . 25
INSTALLERA HUMIDAIRE 3I . . . . . . . . . . . . . . . . . . . . . . . . . . . . . . . . . . . . 25
T
A BORT FRONTKÅPAN (OM INPASSAD) 25
T
A BORT OCH FÖRVARA KOPPLINGSKONTAKTEN 26
A
NSLUTA HUMIDAIRE 3i 26
F
YLLA VATTENBEHÅLLAREN 26
STARTA OCH AVBRYTA BEHANDLINGEN . . . . . . . . . . . . . . . . . . . . . . . . . . 27
S
TARTA BEHANDLINGEN 27
A
VBRYTA BEHANDLINGEN 29
K
OPPLA BORT HUMIDAIRE 3I 29
OFTA FÖREKOMMANDE FRÅGOR . . . . . . . . . . . . . . . . . . . . . . . . . . . . . . . 29
RENGÖRING OCH UNDERHÅLL . . . . . . . . . . . . . . . . . . . . . . . . . . . . . . . . . 31
T
A ISÄR HUMIDAIRE 3I 31
R
ENGÖRA HUMIDAIRE 3i 32
S
ÄTTA IHOP HUMIDAIRE 3i 32
S
ERVICE 33
FELSÖKNING . . . . . . . . . . . . . . . . . . . . . . . . . . . . . . . . . . . . . . . . . . . . . . . . 34
TEKNISKA SPECIFIKATIONER . . . . . . . . . . . . . . . . . . . . . . . . . . . . . . . . . . . . 36
BEGRÄNSAD GARANTI . . . . . . . . . . . . . . . . . . . . . . . . . . . . . . . . . . . . . . . . . 38
SAKREGISTER . . . . . . . . . . . . . . . . . . . . . . . . . . . . . . . . . . . . . . . . . . . . . . . . 39
22
Page 28

VÄLKOMMEN
Tack för att du har valt ResMeds HUMIDAIRE 3i™ befuktare. HUMIDAIRE 3i är avsedd
att befukta (tillföra fuktighet till) den luft som förs in i dina luftvägar under CPAP
(continuous positive airway pressure) behandlingen. Med hjälp av en enkel
låsmekanism klickar du fast H
S8™ serien. Bruksanvisningen innehåller den information du behöver för att kunna
använda H
UMIDAIRE 3i på rätt sätt.
UMIDAIRE 3i vid din ResMed CPAP flödesgenerator i
VAD ÄR HUMIDAIRE 3i?
HUMIDAIRE 3i är avsedd att bilda en enda enhet med en ResMed CPAP
flödesgenerator. Det integrerade systemet tillför befuktning under CPAP behandlingen
vilket kan göra behandlingsupplevelsen mer behaglig.
Du kanske har känt av besvär som nästäppa eller torrhetskänslor i näsa, mun eller svalg
under CPAP behandlingen. Sådana symptom orsakas av torra klimatförhållanden, kyliga
lufttemperaturer, luftflödet från flödesgeneratorn eller läckor från munnen. Fuktig luft
kan lindra dessa torrhetssymptom.
Läs bruksanvisningen för din flödesgenerator för att se om den är kompatibel med
UMIDAIRE 3i. Kontakta utrustningsleverantören eller ResMeds kontor för ytterligare
H
information.
DITT ANSVAR
Du eller den person som använder systemet, är ensam ansvarig för eventuell
personskada eller skada på egendom som uppstår till följd av:
• användning som strider mot medföljande anvisningar
• underhåll eller ändringar som ej har utförts i enlighet med godkända anvisningar
eller av auktoriserade personer.
Var god läs bruksanvisningen noga innan du använder utrustningen.
Bruksanvisningen innehåller speciella termer och ikoner som visas i marginalerna för att
göra dig uppmärksam på specifik och viktig information.
• Varning. Varnar om risk för personskada.
• Se upp! Ger anvisningar för säker och effektiv användning av utrustningen.
• Obs! En upplysande eller vägledande anmärkning.
SVENSKA
VÄLKOMMEN
23
Page 29

MEDICINSK INFORMATION
AVSEDD ANVÄNDNING
HUMIDAIRE 3i rekommenderas för befuktning av den luft som tillförs av ResMeds
CPAP utrustningar i S8 serien. H
KONTRAINDIKATIONER
HUMIDAIRE 3i bör inte användas av patienter som har genomgått bypass-operation i
de övre luftvägarna. Vi hänvisar också till relevant systembruksanvisning för information
om kontraindikationer i samband med CPAP behandling.
VARNINGAR
Här följer allmänna varningar. Specifika varningar och säkerhetsanvisningar visas bredvid
relevanta instruktioner i bruksanvisningen.
VARNINGAR
!
• Använd endast HUMIDAIRE 3i för det ändamål som beskrivs i bruksanvisningen.
• Se till att vattenbehållaren är tom och helt torr innan du transporterar
UMIDAIRE 3i.
H
• HUMIDAIRE 3i är endast avsedd att användas med särskilda CPAP utrustningar
från ResMed. Använd inte H
• Använd endast HUMIDAIRE 3i med de luftslangar eller tillbehör som har
rekommenderats av ResMed. Inkoppling av andra slangar eller tillbehör kan leda till
skador på person eller utrustning.
• För att förhindra infektionsspridning, får HUMIDAIRE 3i, inkl. tillhörande
slangsystem, endast användas av en enda patient och får inte återanvändas av en
annan person.
• Placera alltid HUMIDAIRE 3i enheten på en lägre nivå än patienten. Om enheten
placeras på samma nivå som eller ovanför patienten, kan uppvärmt vatten rinna
ner i luftslangen och tränga in i masken.
• Om enheten placeras ovanför patienten och sedan välter eller om slangen fylls
med kondens, finns det risk för att masken fylls med vatten. H
därför användas med försiktighet för patienter som inte har full kontroll över sina
luftvägar eller för exempelvis stroke-patienter som inte kan ta bort masken från
ansiktet. I sådana fall bör man noga överväga relativa risker och fördelar för
patienten.
• Försök inte ta isär dockningsstationen på enheten. Det finns inga interna delar som
användaren själv kan reparera. Reparationer och intern service får endast utföras
av auktoriserad servicepersonal.
• Handskas varsamt med HUMIDAIRE 3i. Värmeplattan kan vara mycket varm och
vattnet i behållaren kan vara hett.
UMIDAIRE 3i bör endast användas på läkarordination.
UMIDAIRE 3i med någon annan CPAP utrustning.
UMIDAIRE 3i bör
24
Page 30

• Koppla bort CPAP utrustningen från strömuttaget om någon vätska av misstag
spills in i eller på dockningsstationen på H
dockningsstationen från CPAP utrustningen och låt vattnet rinna bort från
dockningsstationen som också måste torka innan den används på nytt.
• Använd inte HUMIDAIRE 3i om skador har uppstått på CPAP utrustningens
nätsladd eller kontakt.
• Använd inte HUMIDAIRE 3i om utrustningen inte fungerar ordentligt eller om
någon del har tappats eller skadats.
• CPAP utrustningens nätsladd får inte komma i närheten av uppvärmda ytor.
• Tappa inte eller för inte in föremål i någon öppning eller i slangarna.
• Använd inte HUMIDAIRE 3i i närvaro av lättantändliga eller explosiva ämnen.
• Explosionsrisk – använd inte HUMIDAIRE 3i i närheten av lättantändliga
narkosmedel.
• Om syrgas används med utrustningen, måste syrgasflödet stängas av när
utrustningen inte är i gång.
Om syrgasflödet har lämnats inkopplat, bör du koppla av flödesgeneratorn och
sedan vänta i 30 minuter innan du kopplar på flödesgeneratorn igen.
Förklaring: Om syrgasflödet fortsätter när CPAP utrustningen inte är i drift, kan
den syrgas som levereras in i luftslangen byggas upp inne i CPAP enheten vilket kan
utgöra en brandrisk. Detta är fallet med de flesta CPAP utrustningar.
• Syrgas påskyndar förbränning. Syrgas får inte användas vid rökning eller i
närheten av öppen låga.
• Se alltid till att luftflödet från utrustningen är i gång innan du kopplar på
syrgastillförseln.
• Koppla alltid av syrgastillförseln innan du stänger av luftflödet från utrustningen.
Obs! Vid en fast flödeshastighet av tilläggssyre kommer den inandade
syrgaskoncentrationen att variera beroende på var i systemet syrgasen förs in,
tryckinställningarna, patientens andningsmönster, typ av mask och graden av läckage.
UMIDAIRE 3i. Koppla bort
SVENSKA
DELAR I HUMIDAIRE 3i
Se illustrationerna i del A på illustrationsbladet.
INSTALLERA HUMIDAIRE 3i
VARNING
!
Se till att flödesgeneratorn är avstängd vid strömuttaget innan du ansluter
HumidAire 3i.
TA BORT FRONTKÅPAN (OM INPASSAD)
Se illustrationerna i del B på illustrationsbladet.
DELAR I HUMIDAIRE 3i
25
Page 31

Din flödesgenerator kan vara försedd med en frontkåpa (B-1). Innan du kan ansluta
UMIDAIRE 3i, måste du trycka på knappen under frontkåpan (B-2) och sedan dra
H
bort den från själva flödesgeneratorn (B-3 & B-4).
Obs!
• För att sätta tillbaka frontkåpan: rikta in den med flödesgeneratorn (B-4) och skjut in
den med fast hand tills den klickar in sig på rätt plats.
• Kom ihåg att ta med frontkåpan när du reser i fall du behöver CPAP behandling utan
befuktare.
TA BORT OCH FÖRVARA KOPPLINGSKONTAKTEN
Se illustrationerna i del C på illustrationsbladet.
Innan du ansluter H
(C-1) och sätt fast den på dockningsstationens baksida (C-2).
UMIDAIRE 3i: ta bort kopplingskontakten från flödesgeneratorn
ANSLUTA HUMIDAIRE 3i
Se illustrationerna i del D på illustrationsbladet.
1 Rikta in HUMIDAIRE 3i med flödesgeneratorn (D-1) och tryck ihop de två enheterna
tills de klickar i varandra (D-2).
VARNING
!
• Dockningsstationen på HumidAire 3i bör endast kopplas in eller bort när
vattenbehållaren är tom.
• Låt aldrig vatten tränga in i flödesgeneratorn. Transportera inte
flödesgeneratorn när HumidAire 3i är inkopplad.
26
Sätt in nätsladden i uttaget på baksidan av flödesgeneratorn. Sätt in nätsladdens andra
2
ända i ett strömuttag (D-3).
Obs! När flödesgeneratorn DC-drivs, är HumidAire 3i inte strömförsörjd och befuktningen
kommer således att minskas.
Placera den integrerade enheten på en fast, plan yta nära sängen och på en nivå som
3
är lägre än din sovposition. Om ytan är känslig för hetta och/eller fuktighet kan du
placera en skyddsmatta under enheten.
SE UPP!
!
Var noga med att placera enheten på en plats där den inte kan knuffas till eller vältas
omkull.
Koppla stadigt in luftslangens ena ända i luftutsläppet på HUMIDAIRE 3i och den andra
4
ändan till masken (D-4).
FYLLA VATTENBEHÅLLAREN
Se illustrationerna i del E på illustrationsbladet.
Page 32

VARNING
!
Handskas försiktigt med HumidAire 3i. Vattnet kan vara hett och
vattenbehållarbasen kan också vara mycket varm. Låt vattenbehållaren och
eventuellt överflödigt vatten svalna i 10 minuter.
1 Frigör haken på framstycket (E-1) och lyft det tills det sitter i en upprätt position (E-2).
Ta bort vattenbehållaren (E-3) och fyll den försiktigt med färskt, rent vatten (E-4). Se
2
till att vattennivån ligger under maximal fyllningsnivå (E-4a). Se alltid till att
vattenbehållaren är ren. Se ”Rengöring och underhåll” på sidan 31.
VARNING
!
Överfyll inte vattenbehållaren eftersom vatten då kan tränga in flödesgeneratorn
och luftslangen.
SE UPP!
!
Använd inga tillsatser (som t.ex. doftande oljor och parfymer). De kan minska den
mängd fuktighet som tillförs av HumidAire 3i och/eller bryta ner materialen i
vattenbehållaren.
Placera försiktigt den fyllda vattenbehållaren på befuktarens dockningsstation (E-5) och
3
haka fast framstycket (E-6 & E-6a).
H
UMIDAIRE 3i är nu klar för användning.
STARTA OCH AVBRYTA BEHANDLINGEN
SVENSKA
STARTA BEHANDLINGEN
Se illustrationen i del F på illustrationsbladet.
1 När du har satt fast HUMIDAIRE 3i och när flödesgeneratorn är strömförsörjd, tänds
ljusindikatorn på H
på alla modeller) kan visas.
När uppvärmningsfunktionen är aktiverad, kommer vattnet att värmas upp innan du
startar behandlingen.
Om du har tillgång till uppvärmningsfunktionen, kan du värma upp vattnet i förväg innan
2
du startar behandlingen. Hoppa över det här steget om du vill starta behandlingen
omedelbart.
UPPVÄRMINGSFUNKTION (FINNS INTE PÅ ALLA MODELLER)
Obs! Bruksanvisningen för din flödesgenerator kommer att ange om du har tillgång till
uppvärmningsfunktionen.
För att välja Uppvärmning:
UMIDAIRE 3i. En uppmaning för uppvärmningsfunktionen (finns inte
RAMP: 10min
meny
uppvär
STARTA OCH AVBRYTA BEHANDLINGEN
27
Page 33

i. tryck på höger knapp på kontrollpanelen.
Följande meddelande visas i 2 sekunder:
BEFUKTARE
UPPVÄRMNING
ii. Efter 2 sekunder visas displaybilden UPPVÄRMNING.
UPPVÄRMNING
meny exit
iii. När H
UMIDAIRE 3i är i uppvärmningsfunktion, kan du:
• Starta behandlingen när som helst genom att trycka på Start/Stopp knappen.
• Komma in på menyerna genom att trycka på Meny (vänster knapp).
• Stoppa uppvärmningsfunktionen när som helst genom att trycka på Exit
(höger knapp).
Uppvärmningsfunktionen kommer att stängas av automatiskt efter 30 minuter om
behandlingen inte har börjat.
Vrid fuktighetskontrollknappen till önskad inställning. Inställningen kopplar bort
3
uppvärmd befuktning och levererar minimal befuktning. Ljusindikatorn kommer
fortfarande att lysa som tecken på att enheten är i standby. En inställning på ”6” ( )
tillför maximal befuktning.
Vi rekommenderar att du till en början ställer in kontrollknappen på ”3” ( ). Du kan
vid behov sedan justera kontrollknappen upp eller ner tills du finner den inställning som
känns mest behaglig och effektiv. Du kan justera fuktighetsinställningen när som helst.
Målet är att tillföra fuktig luft till masken men att samtidigt undvika att kondens byggs
upp i luftslangen. Temperaturen och fuktigheten i den omgivande luften kommer att
påverka den inställning du behöver.
Se avsnittet ”Ofta förekommande frågor” för fler tips om korrekt fuktighetsinställning.
Passa in masken enligt den bruksanvisning som medföljer masken.
4
Tryck på Start/Stopp knappen på kontrollpanelen. Om du har tillgång till
5
SmartStart™ funktionen på din flödesgenerator kan du i stället helt enkelt andas in i
masken och luftflödet bör börja automatiskt.
Obs! Under användningen kommer ljusindikatorn att lysa starkare för att visa att
uppvärmningselementet är aktivt. HumidAire 3i har ett snabbuppvärmningselement som
möjliggör mycket snabb uppvärmning. Var inte orolig om ljusindikatorn lyser upp helt kort.
28
Lägg dig ner och placera luftslangen så att den kan röra sig fritt om du vänder dig under
6
sömnen.
VARNING
!
Lämna inte alltför långa delar av luftslangen runt sängens huvudända. Slangen kan
slingra sig runt huvudet eller nacken medan du sover.
Page 34

AVBRYTA BEHANDLINGEN
Du kan avbryta behandlingen när som helst genom att ta bort masken och trycka på
Start/Stopp knappen. Om du har tillgång till SmartStart funktionen på din
flödesgenerator, kan du helt enkelt ta bort masken och behandlingen upphör.
Vissa flödesgeneratorer fortsätter att mjukt blåsa fram luft efter det att du har avbrutit
behandlingen. Detta kan fortsätta under upp till en timme vilket bidrar till att kyla ner
värmeplattan. Du kan emellertid koppla bort utrustningen från strömuttaget när som
helst och låta värmeplattan svalna utan luftflöde.
KOPPLA BORT HUMIDAIRE 3i
Se illustrationerna i del G på illustrationsbladet.
1 Koppla bort nätsladden från strömuttaget (G-1).
VARNING
!
Handskas varsamt med HumidAire 3i. Vattnet kan vara hett och
vattenbehållarbasen kan också vara mycket varm. Låt vattenbehållaren och
eventuellt överflödigt vatten svalna i 10 minuter (G-2).
Ta bort vattenbehållaren från dockningsstationen (G-3).
2
Tryck på den stora silverknappen som du finner mitt på dockningsstationens
3
undersida (G-4) och dra bort H
UMIDAIRE 3i från flödesgeneratorn (G-5).
Stor silverknapp
SVENSKA
BILD UNDERIFRÅN
Obs! Sätt tillbaka kopplingskontakten i flödesgeneratorn.
OFTA FÖREKOMMANDE FRÅGOR
VARFÖR UPPSTÅR KONDENS I MASKEN OCH/ELLER LUFTSLANGEN?
Kraftig kondens kan uppstå i masken eller luftslangen. Det kan vara årstidsbetingat,
speciellt vid låga rumstemperaturer eller om kylig luft cirkulerar runt slangen. Vrid ner
kontrollknappen till en lägre inställning tills kondensen minskar.
Du kommer kanske att behöva justera om fuktighetsinställningen vid olika tider på året.
MÅSTE JAG ANVÄNDA DESTILLERAT VATTEN I VATTENBEHÅLLAREN?
Vattenbehållarens livslängd förbättras om du använder destillerat vatten och dessutom
minskas mineralavlagringar. Se avsnittet ”Rengöra HumidAire 3i” på sidan 32 för mer
information.
OFTA FÖREKOMMANDE FRÅGOR
29
Page 35

AD GÖR JAG OM JAG INTE KAN FÅ BUKT MED MINA TORRHETSSYMTOM?
V
Om du fortfarande har torrhetssymtom, kan din fuktighetsinställning vara alltför låg för
att vara effektiv. Öka gradvis fuktighetsinställningen under ett par nätter tills
symptomen försvinner.
Om symptomen fortsätter även efter det att du har ökat fuktighetsinställningen, kan
det vara ett tecken på att du andas genom munnen. Andning genom munnen eller
luftläckor från munnen orsakar uttorkning och irritation i de övre luftvägarna. Om detta
är ett problem, kan en hel ansiktsmask eller en hakrem vara lösningen. Rådgör med
klinikern eller utrustningsleverantören.
30
Page 36

RENGÖRING OCH UNDERHÅLL
Du bör regelbundet rengöra och underhålla vattenbehållaren, framstycket och
förseglingen enligt nedanstående anvisningar.
TA ISÄR HUMIDAIRE 3i
Se illustrationerna i del H på illustrationsbladet.
VARNING
!
Se upp för elektriska stötar. Sänk inte ner flödesgeneratorn, dockningsstationen
eller nätsladden i vatten. Koppla alltid bort utrustningen före rengöringen och se till
att den är torr innan du kopplar tillbaka den.
1 Ta ut nätsladden från strömuttaget (H-1).
VARNING
!
Handskas försiktigt med HumidAire 3i. Vattnet kan vara hett och
vattenbehållarbasen kan också vara mycket varm. Låt vattenbehållaren och
eventuellt överflödigt vatten svalna i 10 minuter (H-2).
Ta bort vattenbehållaren från dockningsstationen (H-3) och häll bort eventuellt
2
överflödigt vatten (H-4).
Ta bort luftslangen från luftutsläppet (H-5).
3
Böj försiktigt en av armarna på framstycket uppåt och bort från dockningsstationen tills
4
framstycket lossnar helt (H-6 til H-8). Dra bort förseglingen från framstycket
(H-9).
BEHÅLLARPLATTAN
Ta inte bort behållarplattan från vattenbehållaren. Om den har tagits bort sätter du
tillbaka den så här:
i. Vänd vattenbehållarbasen uppochned.
ii. Sätt behållarplattan (se nedan) så att den öppna sidan är vänd neråt. Tr yck sedan
med fast hand ner plattan i vattenbehållaren.
SVENSKA
behållarplatta
SE UPP!
!
Vattenbehållaren kan läcka om behållarplattan inte har satts tillbaka på rätt sätt.
Obs! Behållarplattan kommer inte att passa i vattenbehållaren om den är uppåtvänd.
Innan du passar in behållarplattan måste du se till att O-ringen passar precis i skåran på
behållarplattan.
RENGÖRING OCH UNDERHÅLL
31
Page 37

RENGÖRA HUMIDAIRE 3i
SE UPP!
!
• Använd inte något av följande för att rengöra delar av HumidAire 3i. Sådana
lösningar kan vara skadliga och förkorta produktens livslängd.
• blekningsmedel, klor-, alkohol- eller ammoniakbaserade lösningar
• fuktighetsbevarande, bakteriedödande eller glycerinbaserade tvålar
• medel för vattenavhärdning eller ej godkända medel för borttagning av
avlagringar.
• Rengör inte vattenbehållaren i diskmaskin.
VATTENBEHÅLLARE
VARJE DAG
Rengör vattenbehållaren och slangen i varmt vatten och ett milt rengöringsmedel (se
föregående säkerhetsanvisning). Skölj delarna ordentligt och låt dem torka. Utsätt dem
inte för direkt solljus.
VARJE VECKA
Inspektera vattenbehållaren för att se till att den inte är sliten eller skadad. Byt ut
vattenbehållaren om någon del är sprucken, grumlig eller anfrätt. Byt omedelbart ut
vattenbehållaren om den läcker.
Om du lägger märke till något vitt pulver eller avlagringar i vattenbehållaren:
i. Fyll vattenbehållaren upp till maximal fyllningsnivå med en lösning bestående av 1
del hushållsättika till 10 delar vatten.
ii. Lämna lösningen i behållaren i 10 minuter.
iii. Häll bort lösningen och skölj vattenbehållaren med rent vatten.
FRAMSTYCKE OCH FÖRSEGLING
Inspektera framstycket och förseglingen varje vecka för att se till att delarna inte har
förslitits eller skadats. Byt ut defekta delar. Tvätta framstycket och förseglingen vid
behov i varmt vatten och ett milt rengöringsmedel (se föregående säkerhetsanvisning).
Skölj delarna ordentligt och låt dem torka. Utsätt dem inte för direkt solljus.
DOCKNINGSSTATION
Torka regelbundet av utsidan på dockningsstationen (inkl. kopplingsförseglingen) med
en fuktig trasa.
32
SÄTTA IHOP HUMIDAIRE 3i
Se illustrationerna i del I på illustrationsbladet.
Sätt ihop delarna igen när de är rena och torra.
1 Rikta in framstyckets försegling med markeringarna på framstycket (I-1) och tryck ner
runt kanterna så att förseglingen sitter tätt (I-2).
Placera in en av armarna i svängtappen på dockningsstationen (I-3) och böj försiktigt in
2
den andra armen i motsvarande svängtapp (I-4 & I-5).
Page 38

Du bör lätt kunna öppna och stänga framstycket även när det sitter stadigt fast vid
dockningsstationen.
Sätt tillbaka vattenbehållaren på befuktarens dockningsstation (I-6).
3
SERVICE
Vid normal användning av HUMIDAIRE 3i, behöver vattenbehållaren bytas ut vartannat
år.
Denna produkt (H
servicecenter fem år från tillverkningsdagen. Dessförinnan är utrustningen avsedd att
fungera på ett säkert och tillförlitligt sätt under förutsättning att den används och
underhålls enligt de anvisningar som tillhandahålls av ResMed. Tillämplig
garantiinformation från ResMed medföljer utrustningen vid leveransen. Som naturligtvis
är fallet med alla elektriska utrustningar, bör du vara försiktig om eventuella
funktionsstörningar uppstår och i sådant fall bör utrustningen besiktigas av ett
auktoriserat ResMed servicecenter.
UMIDAIRE 3i) bör besiktigas av ett auktoriserat ResMed
SVENSKA
RENGÖRING OCH UNDERHÅLL
33
Page 39

FELSÖKNING
Om problem uppstår kan du pröva följande förslag. Kontakta utrustningsleverantören
eller ResMed om du inte kan lösa problemet. Försök inte själv öppna enheten.
VARNING
!
Service och reparationer bör endast utföras av auktoriserad servicepersonal.
Problem Möjlig orsak Lösning
Enheten fungerar
inte (ingen bild på
LCD displayen och/
eller ljusindikatorn
tänds inte)
Ljusindikatorn
flimrar
Ljusindikatorn lyser
permanent svagt
och/eller luften
känns inte varm
Vattenbehållaren
läcker.
Nätsladden har inte satts in
ordentligt.
Defekt strömuttag.
Flödesgeneratorn och
dockningsstation inte rätt
sammankopplade.
Ljusindikatorn lyser då och
då starkare för att visa att
uppvärmningselementet är
aktivt.
HumidAire 3i reflektorn (se
illustration C-2a) är
smutsig.
Vattenbehållaren kan vara
skadad eller spräckt.
Se till att nätsladden sitter stadigt i
strömuttaget och att strömbrytarknappen
(om sådan finns) har kopplats på vid
uttaget.
Pröva att använda ett annat strömuttag.
Se till att dockningsstationen sitter
stadigt fast vid flödesgeneratorn.
• HumidAire 3i har ett
snabbuppvärmningselement som
möjliggör mycket snabb
uppvärmning. Var inte orolig om
ljusindikatorn bara lyser upp helt
kort.
• Vrid kontrollknappen till
inställning för att koppla av uppvärmd
befuktning. Ljusindikatorn kommer
att fortsätta att lysa för att visa att
utrustningen är i standby.
Rengör reflektorn med en fuktig trasa.
Rekvirera ny behållare från leverantören.
34
Behållarlocket kan vara fel
påsatt.
Se till att locket sitter rätt.
Page 40

Problem Möjlig orsak Lösning
Inget/lågt luftflöde Luftslangen ej korrekt
inkopplad.
Luftslangen är blockerad,
klämd eller punkterad.
Flödesgenerator fungerar
inte korrekt.
För mycket vatten i
vattenbehållaren.
Framstycket inte korrekt
påsatt.
Framstyckets försegling inte
korrekt inpassat.
Kondens byggs upp i
luftslangen.
Vatten stänker på
ansiktet.
Luften känns inte
fuktig.
För mycket vatten i
vattenbehållaren.
Kondens byggs upp i
luftslangen och masken.
Fuktighetsinställningen är
för låg.
Koppla in luftslangen enligt
anvisningarna i avsnittet ”Installera
HumidAire 3i” på sidan 25.
Deblockera eller räta ut luftslangen. Se
till att slangen inte är punkterad.
Se felsökningsavsnittet i
bruksanvisningen för flödesgeneratorn.
Se till att vattennivån inte är högre än
markerad gräns.
Se till att framstycket har låst fast sig
korrekt på dockningsstationen.
Se till att framstyckets försegling är
rättvänd och att den sitter stadigt
• Vrid ner kontrollknappen.
• Isolera luftslangen.
Häll bort lite vatten från behållaren.
• Vrid ner kontrollknappen.
• Isolera luftslangen.
Vrid upp kontrollknappen.
SVENSKA
Luften är alltför
fuktig
Vitt pulver eller
avlagringar i
vattenbehållaren.
Uppvärmningselementet
på HumidAire 3i fungerar
inte
Fuktighetsinställningen är
för hög.
Hög relativ fuktighet i
rummet.
Vattnet avger flagande
mineralavlagringar.
Kontakta utrustningsleverantören.
Vrid ner kontrollknappen.
Justera fuktighetsinställningen.
• Använd destillerat vatten.
• Se avsnittet ”Rengöra HumidAire 3i”
på sidan 32 för anvisningar om hur
du tar bort mineralavlagringar.
FELSÖKNING
35
Page 41

TEKNISKA SPECIFIKATIONER
PRESTANDA
Värmeplattans max. temperatur: 85°C
Temperaturfrånslagning: 93°C
Max. utgångsfuktighet: 95 % relativ fuktighet (fuktighetskontrollknappen vid max.
inställning, flödeshastighet 50 l/min, omgivningens temperatur 20°C, relativ
omgivningsfuktighet 40 %).
Max. gastemperatur: 41°C
DIMENSIONER (H X B X D)
Dockningsstation och vattenbehållare: 118 mm x 170 mm x 212 mm
VIKT
Dockningsstation och ofylld vattenbehållare: 670 g
Vattenkapacitet till max. fyllningsmarkering: 385 ml
STRÖMFÖRSÖRJNING
Ineffekt för RESMED S8 flödesgenerator med HUMIDAIRE 3i: 100–240V, 50/60Hz;
110V, 400Hz; 2,5A < 140 VA (110 W) (max. strömförbrukning).
Momentan (peak) strömförbrukning <340 VA.
Verklig strömförbrukning kommer att variera beroende på faktorer som
temperaturinställning, inställt tryck, användning av tillbehör, höjd över havet och
omgivningens temperatur.
Max. ström på värmeelementet: 85 W.
YTTERHÖLJETS KONSTRUKTION
Dockningsstation: flamfördröjande teknisk termoplast, pläterad gjuten aluminium.
Vattenbehållare: injektionsgjuten plast, rostfritt stål.
MILJÖFÖRHÅLLANDEN
Drifttemperatur: +5°C till +40°C
Driftfuktighet: 10-95 %, ej kondenserande
Temperatur vid transport och förvaring: -20°C till +60°C
Fuktighet vid transport och förvaring: 10–95 %, ej kondenserande
IEC 60601-1 KLASSIFIKATION
Klass II (dubbelisolerad)
Type CF
ELEKTROMAGNETISK KOMPATIBILITET
Se bruksanvisningen för din flödesgenerator för utförlig information.
Obs! Tillverkaren förbehåller sig rätten att ändra specifikationerna utan varsel.
36
Page 42

SYMBOLER PÅ UTRUSTNINGEN
Obs! Läs medföljande dokument
Typ CF utrustning
Klass II utrustning
Het yta
Undvik beröring
Maximal vattennivå
SVENSKA
TEKNISKA SPECIFIKATIONER
37
Page 43

BEGRÄNSAD GARANTI
ResMed garanterar att din ResMed produkt är felfri med avseende på material och
utförande under nedan angivna tidsperiod från det datum då den första kunden
inköpte produkten. Denna garanti kan ej överlåtas.
Produkt Garantiperiod
ResMed befuktare, ResControl™, ResLink™ 1 år
ResMed flödesgeneratorer 2 år
Tillbehör, masksystem (inkl. maskram, kudde, hätta och slangar).
Omfattar inte enheter avsedda för engångsbruk.
90 dagar
Obs! Vissa modeller finns inte i alla omoråden.
Om produkten visar sig vara bristfällig under normala användningsförhållanden,
kommer ResMed att efter eget gottfinnande reparera eller byta ut den defekta
produkten eller delar av produkten. Denna begränsade garanti täcker ej:
a) skador som uppstår till följd av otillbörlig användning, missbruk, modifiering eller
ändring av produkten;
b) reparationer som utförts av en serviceorganisation som ej uttryckligen erhållit
tillstånd av ResMed att utföra sådana reparationer;
c) eventuell skada eller kontamination som uppstår till följd av cigarett-, pip-, cigarrök
eller annan form av rök;
d) eventuella skador som uppstår till följd av att vatten spillts på eller in i en
flödesgenerator.
För att göra anspråk under garantin, måste den första användaren sända tillbaka den
defekta produkten till inköpsstället. Transportkostnaden ska på förhand erläggas av
kunden.
Denna garanti ersätter alla andra uttryckliga eller underförstådda garantier, inkl.
underförstådd garanti beträffande produktens säljbarhet eller lämplighet för ett visst
ändamål. Vissa områden eller länder tillåter ej tidsbegränsningar för en underförstådd
garanti och ovanstående begränsning kan av denna anledning eventuellt ej komma att
beröra dig.
ResMed ska ej hållas ansvarigt för några tillfälliga skador eller följdskador som uppges
ha inträffat till följd av försäljning, installation eller användning av en ResMed produkt.
Vissa områden eller länder tillåter ej undantag eller begränsning av tillfälliga skador eller
följdskador och ovanstående begränsning kan av denna anledning eventuellt ej komma
att beröra dig. Denna garanti ger dig bestämda juridiska rättigheter och du kan
eventuellt också ha andra rättigheter som kan variera från område till område.
38
För mer information om dina rättigheter enligt garantin, var god kontakta närmaste
ResMed leverantör eller ResMed kontor.
R001-307/1 05 02
Page 44

SAKREGISTER
A
Ansluta HumidAire 3i 26
Avbryta behandlingen
Avsedd användning
B
Befuktningsinställningar 28
Begränsad garanti
D
Dimensioner
Ditt ansvar
Dockningsstation
rengöring
E
Elektromagnetisk kompatibilitet 36
F
Fastsättning
frontkåpan 26
kopplingskontakt
Felsökning
Framstycke
rengöring 32
sätta fast
ta bort
Frontkåpan
sätta fast 26
ta bort
Fuktighetskontrollknappen
Fylla vattenbehållaren
Försegling
rengöring
sätta fast
ta bort
H
HumidAire 3i
ansluta
rengöring
sätta ihop
ta bort
ta isär
I
IEC 60601-1 klassifikation
Installera HumidAire 3i
36
23
32
34
32
31
25
32
32
31
26
32
32
29
31
29
24
38
29
28
26
36
25
Inställningar
befuktning
K
Kompatibla flödesgeneratorer 23
Komponenter
Kondensering
Kontraindikationer
Kontrollknappen
Koppla bort HumidAire 3i
Kopplingskontakt
förvara 26
sätta fast
ta bort
L
Ljusindikator
flimrande
M
Medicinsk information 24
Miljöförhållanden
Mineralavlagringar
O
Ofta förekommande frågor 29
P
Placering
Prestanda
R
Rengöring 31
dockningsstation
framstycke
försegling
vattenbehållare
S
SmartStart
Speciella termer och ikoner
Starta behandlingen
Strömförsörjning
T
Ta bort
frontkåpan
försegling
28
25
28, 29, 35
24
28
29
29
26
27, 28
34
36
35
26
36
32
32
32
32
28, 29
23
27
36
25
31
SVENSKA
SAKREGISTER
39
Page 45

kopplingskontakt 26
vattenbehållare
Tekniska specifikationer
U
Uppvärmningsfunktionen
Uttorkning
symptom 30
V
Varningar
Vattenbehållare
Vikt
Värmeplattans avsvalning
Y
Ytterhöljets konstruktion 36
24
läckage 34
max. fyllningsgräns
max. kapacitet
rengöring
36
27
36
27
36
32
27
29
40
Page 46

HumidAire 3i
BRUGERMANUAL
Dansk
™
DANSK
41
Page 47

INDHOLD
VELKOMMEN . . . . . . . . . . . . . . . . . . . . . . . . . . . . . . . . . . . . . . . . . . . . . . . . 43
HVAD ER EN HUMIDAIRE 3i? . . . . . . . . . . . . . . . . . . . . . . . . . . . . . . . . . . . 43
D
IT ANSVAR 43
MEDICINSKE OPLYSNINGER . . . . . . . . . . . . . . . . . . . . . . . . . . . . . . . . . . . . 44
A
NVENDELSE 44
K
ONTRAINDIKATIONER 44
A
DVARSLER 44
DELE TIL HUMIDAIRE 3i . . . . . . . . . . . . . . . . . . . . . . . . . . . . . . . . . . . . . . . 45
KLARGØRING AF HUMIDAIRE 3i . . . . . . . . . . . . . . . . . . . . . . . . . . . . . . . . 46
F
JERNELSE AF FRONTDÆKSEL (HVIS RELEVANT) 46
F
JERNELSE OG OPBEVARING AF KOBLINGSFORBINDELSEN 46
P
ÅSÆTNING AF HUMIDAIRE 3i 46
O
PFYLDNING AF VANDBEHOLDER 47
INDLEDNING OG STANDSNING AF BEHANDLINGEN . . . . . . . . . . . . . . . . 47
I
NDLEDNING AF BEHANDLINGEN 47
S
TANDSNING AF BEHANDLINGEN 49
A
FMONTERING AF HUMIDAIRE 3i 49
HYPPIGT STILLEDE SPØRGSMÅL . . . . . . . . . . . . . . . . . . . . . . . . . . . . . . . . . 50
RENGØRING OG VEDLIGEHOLDELSE . . . . . . . . . . . . . . . . . . . . . . . . . . . . . 50
A
FMONTERING AF HUMIDAIRE 3i 50
R
ENGØRING AF HUMIDAIRE 3i 51
S
AMLING AF HUMIDAIRE 3i 52
S
ERVICE 52
FEJLFINDING . . . . . . . . . . . . . . . . . . . . . . . . . . . . . . . . . . . . . . . . . . . . . . . . . 53
TEKNISKE SPECIFIKATIONER . . . . . . . . . . . . . . . . . . . . . . . . . . . . . . . . . . . . 55
GARANTI . . . . . . . . . . . . . . . . . . . . . . . . . . . . . . . . . . . . . . . . . . . . . . . . . . . 57
INDEKS . . . . . . . . . . . . . . . . . . . . . . . . . . . . . . . . . . . . . . . . . . . . . . . . . . . . . 59
42
Page 48

VELKOMMEN
Tak fordi du har valgt ResMeds HUMIDAIRE 3i™ fugter. HUMIDAIRE 3i er beregnet
til at fugte den luft, der tilføres luftvejene under behandling med CPAP (continuous
positive airway pressure). H
flowgenerator med en enkel låsemekanisme.
Brugermanualen indeholder alle de oplysninger, der er nødvendige for korrekt
anvendelse af H
UMIDAIRE 3i.
UMIDAIRE 3i sættes fast på din ResMed S8™ CPAP
HVAD ER EN HUMIDAIRE 3i?
HUMIDAIRE 3i er beregnet til at fungere sammen med en ResMed CPAP flowgenerator som en samlet enhed. Den samlede enhed leverer fugtning ved CPAPbehandling, og kan gøre behandlingen mere behagelig.
Du har muligvis oplevet at have forstoppet næse eller tørhed i næse, mund eller svælg
under CPAP-behandling. Disse symptomer forårsages af tørt klima, kold luft,
luftstrømmen fra din flowgenerator samt mundlækage. Fugtig luft kan lindre disse
tørhedssymptomer.
Læs brugsanvisningen til din flowgenerator for at se, om den er kompatibel med
UMIDAIRE 3i. Kontakt din forhandler eller ResMed, hvis du har behov for yderligere
H
oplysninger.
DIT ANSVAR
Du eller brugeren af dette udstyr har det fulde ansvar for enhver skade på person eller
ting som følge af:
• Anvendelse af udstyret i strid med den medfølgende brugsanvisning
• Vedligeholdelse eller ændringer af apparatet, medmindre disse er udført i
overensstemmelse med godkendte anvisninger og af autoriserede personer.
Denne manual bør læses omhyggeligt før brug.
Denne manual indeholder specielle udtryk og ikoner, der vises i marginen og henleder
opmærksomheden på specifikke og vigtige oplysninger.
• En ”Advarsel” gør opmærksom på risiko for skade.
• En ”Forsigtighedsregel” forklarer særlige forholdsregler med henblik på at gøre
brugen af apparatet sikker og effektiv.
• ”Bemærk” er en informativ og nyttig kommentar.
DANSK
VELKOMMEN
43
Page 49

MEDICINSKE OPLYSNINGER
ANVENDELSE
HUMIDAIRE 3i er beregnet til fugtning af luften fra bestemte ResMed S8 CPAP-udstyr.
UMIDAIRE 3i må kun anvendes på anbefaling af en læge.
H
KONTRAINDIKATIONER
HUMIDAIRE 3i er kontraindiceret for brug til patienter, som har undergået bypass af
supraglottis. Der henvises også til manualen for det pågældende system for oplysninger
om kontraindikationer ved CPAP-behandling.
ADVARSLER
Efterfølgende er generelle advarsler. Specielle advarsler og forsigtighedsregler er
angivet ud for de dertil hørende anvisninger i manualen.
ADVARSLER
!
• HUMIDAIRE 3i bør kun anvendes til det tilsigtede formål som angivet i denne
manual.
• Sørg for, at vandbeholderen er tom og fuldstændig tør før transport af
UMIDAIRE 3i.
H
• HUMIDAIRE 3i er kun beregnet til brug med bestemte ResMed CPAP-udstyr.
UMIDAIRE 3i må ikke anvendes sammen med andre CPAP-udstyr.
H
• HUMIDAIRE 3i bør kun anvendes med tilførselsslanger og tilbehør, der er anbefalet
af ResMed. Tilslutning af andre tilførselsslanger eller andet tilbehør kan medføre
personskade eller beskadigelse af apparatet.
• HUMIDAIRE 3i, og de dertil hørende slanger, må kun anvendes til én patient og må
ikke anvendes igen på en anden patient. Formålet med dette er at undgå
krydsinfektion.
• Anbring altid HUM IDAIRE 3i på et lavere niveau end patienten. Hvis apparatet
anbringes på samme niveau eller højere end patienten, kan opvarmet vand løbe
ned gennem luftslangen og ind i masken.
• Der er mulighed for, at masken kan blive fyldt med vand, hvis apparatet anbringes
over patienthøjde og væltes, eller hvis slangen er fyldt med kondensvand. Der bør
derfor udvises forsigtighed ved brug af H
fuld kontrol over deres luftveje eller ikke er i stand til at rive masken af, f.eks.
patienter der har haft et slagtilfælde. Man bør overveje de relative fordele og
ulemper.
• Forsøg ikke at skille dockingstationen til HUMIDAIRE 3i ad. Den indeholder ingen
dele, der kan vedligeholdes af brugeren. Reparation og vedligeholdelse af
indvendige dele må kun udføres af en autoriseret servicetekniker.
• Vær forsigtig ved håndtering af HUMIDAIRE 3i. Varmepladen og vandet i
vandbeholderen kan være varmt.
UMIDAIRE 3i til patienter, som ikke har
44
Page 50

• Hvis man ved et uheld kommer til at spilde væske ned i eller på dockingstationen
UMIDAIRE 3i, skal man tage ledningen til CPAP-udstyret ud af stikket. Kobl
til H
dockingstationen fra CPAP-udstyret, lad eventuelt vand løbe ud og lad den tørre,
før den anvendes igen.
• HUMIDAIRE 3i må ikke anvendes, hvis ledning og/eller stik til CPAP-udstyret er
beskadiget.
• HUMIDAIRE 3i må ikke anvendes, hvis det ikke fungerer korrekt, eller hvis nogen
del af udstyret er blevet tabt eller beskadiget.
• Hold ledningen til CPAP-udstyret væk fra opvarmede flader.
• Sørg for ikke at tabe eller indføre genstande i apparatets åbninger eller slanger.
• HUMIDAIRE 3i må ikke anvendes i nærheden af brændbare eller eksplosive stoffer.
• Eksplosionsfare – må ikke anvendes i nærheden af brændbare anæstesigasser.
• Hvis der anvendes ilt sammen med dette udstyr, skal der slukkes for ilttilførslen, når
udstyret ikke er i gang.
Hvis der er tændt for ilttilførslen, skal du slukke for flowgeneratoren og vente en
halv time, før du tænder for den igen.
Forklaring: Hvis CPAP-udstyret ikke er i gang, og der fortsat er tændt for
ilttilførslen, kan den ilt, der indføres i tilførselsslangen, blive ophobet i CPAPudstyret og skabe risiko for brand. Dette gælder for de fleste typer CPAP-udstyr.
• Ilt nærer forbrænding og bør ikke anvendes, mens du ryger eller i nærheden af
åben ild.
• Sørg altid for, at luftstrømmen fra udstyret er i gang, før der tændes for
iltforsyningen.
• Der skal altid slukkes for iltforsyningen, før der slukkes for luftstrømmen fra
udstyret.
Bemærk: Den iltkoncentration, der indåndes ved tilførsel af en fast mængde
supplerende ilt, kan variere, afhængig af hvor ilten tilsluttes, trykindstillinger, patientens
vejrtrækningsmønster, maskevalg og omfanget af lækage.
DANSK
DELE TIL HUMIDAIRE 3i
Se illustrationen i afsnit A på illustrationsarket.
DELE TIL HUMIDAIRE 3i
45
Page 51

KLARGØRING AF HUMIDAIRE 3i
ADVARSEL
!
Sørg for, at der er slukket for flowgeneratoren på stikkontakten, før apparatet
tilsluttes HumidAire 3i.
FJERNELSE AF FRONTDÆKSEL (HVIS RELEVANT)
Se illustrationen i afsnit B på illustrationsarket.
Din flowgenerator kan være udstyret med et frontdæksel (B-1). Før påsætning af
H
UMIDAIRE 3i, skal frontdækslet fjernes som følger: Tryk på knappen under dækslet
(B-2), og træk det væk fra selve flowgeneratoren (B-3 & B-4).
Bemærkninger
• Frontdækslet sættes på plads igen som følger: Anbring dækslet på linie med
flowgeneratoren (B-4), og skub det på plads med fast hånd, indtil der høres et klik.
• Husk at tage frontdækslet med, når du rejser, i tilfælde af at du får brug for at anvende
CPAP-udstyret uden fugter.
FJERNELSE OG OPBEVARING AF KOBLINGSFORBINDELSEN
Se illustrationen i afsnit C på illustrationsarket.
Før påsætning af H
(C-1) og sættes i bag på dockingstationen (C-2).
PÅSÆTNING AF HUMIDAIRE 3i
Se illustrationen i afsnit D på illustrationsarket.
UMIDAIRE 3i, skal koblingsforbindelsen tages ud af flowgeneratoren
46
1 Anbring HUMIDAIRE 3i på linie med flowgeneratoren (D-1), og skub delene sammen,
indtil de falder på plads med et klik (D-2).
ADVARSEL
!
• Dockingstationen til HumidAire 3i bør kun kobles til og fra, når vandbeholderen
er tom.
• Der må ikke komme vand ind i flowgeneratoren. Flowgeneratoren må ikke
transporteres, mens den er koblet sammen med HumidAire 3i.
Sæt ledningen i stikket bag på flowgeneratoren. Sæt den anden ende af stikket i en
2
stikkontakt (D-3).
Bemærk: Hvis din flowgenerator får strøm fra jævnstrømsindgangen, er der ikke strøm på
HumidAire 3i, og der vil blive tilført mindre fugtighed.
Anbring den samlede enhed på en fast, jævn overflade i nærheden af sengen, så den er
3
lavere end dig selv, når du sover. Sørg for, at overfladen ikke er følsom over for varme
og/eller fugtighed, eller brug et beskyttende underlag.
FORSIGTIG
!
Sørg for ikke at anbringe apparatet, hvor det kan blive skubbet til og væltet.
Page 52

Sæt den ene ende af luftslangen godt fast på luftudtaget på HUMIDAIRE 3i og den
4
anden ende på masken (D-4).
OPFYLDNING AF VANDBEHOLDER
Se illustrationen i afsnit E på illustrationsarket.
ADVARSEL
!
Vær forsigtig ved håndtering af HumidAire 3i. Både vandet og vandbeholderens
bund kan være meget varme. Vent 10 minutter, så varmepladen og eventuelt
resterende vand kan køle af.
1 Løsgør klinken (E-1), og løft dækslet, indtil det er i lodret position (E-2).
Fjern vandbeholderen (E-3) og fyld den forsigtigt op med friskt, rent vand (E-4). Sørg
2
for, at vandstanden ikke overstiger mærket for maks. vandstand (E-4a).
Sørg altid for at vandbeholderen er ren. Se ”Rengøring og vedligeholdelse” på side 50.
ADVARSEL
!
Vandbeholderen må ikke overfyldes, da vand så kan trænge ind i flowgeneratoren
og luftslangen.
FORSIGTIG
!
Der må ikke anvendes tilsætningsstoffer (f.eks. parfumerede olier og parfumer). De
kan mindske apparatets fugtningseffekt og/eller forårsage nedbrydning af
vandbeholderens materialer.
Anbring forsigtigt den fyldte vandbeholder i fugterens dockingstation (E-5), og fastgør
3
dækslet med klinken (E-6 & E-6a).
H
UMIDAIRE 3i er nu klar til brug.
DANSK
INDLEDNING OG STANDSNING AF BEHANDLINGEN
INDLEDNING AF BEHANDLINGEN
Se illustrationen i afsnit F på illustrationsarket.
1 Når HUMIDAIRE 3i er koblet til, og der er strøm på flowgeneratoren, kommer der lys
i indikatoren på H
opvarmningsfunktionen (findes ikke på alle modeller).
Når denne funktion er aktiveret, bliver vandet opvarmet, før behandling påbegyndes.
Brug opvarmningsfunktionen, hvis en sådan findes, til at varme vandet, før behandlingen
2
indledes. Hvis du ønsker at starte behandlingen med det samme, springes dette trin
over.
UMIDAIRE 3i. Der bliver eventuelt vist et prompt for
RAMPE: 10min
opvarm
menu
INDLEDNING OG STANDSNING AF BEHANDLINGEN
47
Page 53

PVARMNINGSFUNKTION (FINDES IKKE PÅ ALLE MODELLER)
O
Bemærk: Se i brugermanualen til flowgeneratoren, om denne funktion er tilgængelig.
Opvarmningsfunktionen startes som følger:
i. Vælg Opvarmning ved at trykke på Højre tast på kontrolpanelet.
Følgende besked vises i 2 sekunder:
FUGTER
OPVARMER
ii. Efter 2 sekunder vises skærmbilledet OPVARMER.
OPVARMER
menu exit
iii. Mens H
UMIDAIRE 3i er i opvarmningsfunktion, kan man:
• Starte behandlingen på et hvilket som helst tidspunkt ved at trykke på
Start/Stop-tasten.
• Gå til menuerne ved at trykke på Menu (Venstre tast).
• Stoppe opvarmningsfunktionen når som helst ved at trykke på Exit (Højre
tast).
Opvarmningsfunktionen slår automatisk fra efter 30 minutter, medmindre behandling
er blevet påbegyndt.
Sæt fugtighedskontrollen til den ønskede indstilling. indstillingen slår opvarmet
3
fugtning fra og leverer minimum fugtning. Indikatoren bliver ved med at lyse, for at
angive at apparatet er i standby. En indstilling på 6 ( ) leverer maksimum fugtning.
Vi anbefaler, at du begynder med at sætte kontrolknappen til 3 ( ). Om nødvendigt
kan kontrolknappen justeres op og ned, indtil man finder den indstilling, der er mest
behagelig og effektiv. Fugtighedsindstillingen kan ændres til enhver tid.
Målet er at få fugtig luft tilført masken, mens kondensering i luftslangen samtidig undgås.
Den omgivende lufts temperatur og fugtighed har indflydelse på, hvilken indstilling du
skal bruge.
Se ”Hyppigt stillede spørgsmål” for andre gode råd om korrekt fugtighedsindstilling.
Masken tages på som beskrevet i brugsanvisningen for masken.
4
Tryk på Start/Stop-tasten på kontrolpanelet. Hvis du har en SmartStart™-funktion
5
på din flowgenerator, kan du også simpelthen ånde ind i masken, hvorefter
luftstrømmen skulle gå i gang.
Bemærk: Under drift lyser indikatoren kraftigere for at angive, at varmelegemet er aktivt.
HumidAire 3i har et hurtigtvirkende varmelegeme, som sikrer meget hurtig opvarmning.
Det bør ikke give anledning til bekymring, at lyset kun blinker et kort øjeblik.
48
Læg dig ned og anbring luftslangen, så den kan bevæge sig frit, hvis du vender dig i
6
søvne.
Page 54

ADVARSEL
!
Du bør ikke lade et større stykke af luftslangen ligge oppe omkring hovedgærdet.
Slangen kan sno sig rundt om hoved og hals, mens du sover.
STANDSNING AF BEHANDLINGEN
Du kan standse behandlingen på et hvilket som helst tidspunkt ved at fjerne masken
og trykke på Start/Stop -tasten. Hvis din flowgenerator har en SmartStart-funktion,
behøver du blot tage masken af, og behandlingen vil stoppe.
Visse flowgeneratorer fortsætter med at blæse luft ganske sagte, efter at du har
standset behandlingen. Dette kan fortsætte i op til en time for at hjælpe med at afkøle
varmepladen. Du kan dog til enhver tid tage ledningen ud af stikket og lade
varmepladen køle af uden luftstrøm.
AFMONTERING AF HUMIDAIRE 3i
Se illustrationerne i afsnit G på illustrationsarket.
1 Tag el-ledningen ud af stikket (G-1).
ADVARSEL
!
Vær forsigtig ved håndtering af HumidAire 3i. Både vandet og vandbeholderens
bund kan være meget varme. Vent 10 minutter, så varmepladen og eventuelt
resterende vand kan køle af (G-2).
Tag vandbeholderen ud af dockingstationen (G-3).
2
Tryk på den store sølvknap der sidder midt under dockingstationen (G-4), og træk
3
UMIDAIRE 3i og flowgeneratoren fra hinanden (G-5).
H
Stor sølvknap
SET FRA UNDERSIDEN
Bemærk: Sæt koblingsforbindelsen godt fast igen på flowgeneratoren.
DANSK
INDLEDNING OG STANDSNING AF BEHANDLINGEN
49
Page 55

HYPPIGT STILLEDE SPØRGSMÅL
HVORFOR ER DER KONDENSVAND I MIN MASKE OG/ELLER LUFTSLANGE?
Der kan forekomme overdreven kondensation i maske og luftslange. Dette kan være
sæsonbestemt og forekommer især, når rumtemperaturen er lav, eller der cirkulerer
kølig luft rundt om slangen. Drej kontrolknappen nedad til en lavere indstilling, indtil
kondensationen mindskes.
Det kan blive nødvendigt at justere fugtighedsindstillingen fra den ene årstid til den
anden.
SKAL JEG BRUGE DESTILLERET VAND I VANDBEHOLDEREN?
Brug af destilleret vand vil forlænge vandbeholderens levetid og mindske
mineralaflejringer. Se ”Rengøring af HumidAire 3i” på side 51 for yderligere
oplysninger.
HVAD GØR JEG, HVIS JEG STADIG LIDER AF TØRHED?
Hvis du stadig lider af tørhedssymptomer, er det muligt, at din fugtighedsindstilling er
sat for lavt til at være effektiv. Skru gradvist op for kontrolknappen i løbet af et par
nætter, indtil symptomerne forsvinder.
Hvis du fortsat har symptomer, selv efter at have øget fugtighedsindstillingen, er det
muligt, du trækker vejret gennem munden. Vejrtrækning gennem munden eller
mundlækage medfører tørhed og irritation i de øvre luftveje. Hvis dette er et problem,
kan en hel ansigtsmaske eller en rem under hagen muligvis hjælpe. Rådfør dig med din
læge eller leverandøren af udstyret.
50
RENGØRING OG VEDLIGEHOLDELSE
Vandbeholder, låg og tætning bør rengøres og vedligeholdes med jævne mellemrum,
som beskrevet i dette afsnit.
AFMONTERING AF HUMIDAIRE 3i
Se illustrationen i afsnit H på illustrationsarket.
ADVARSEL
!
Fare for elektrisk stød! Hverken flowgenerator, dockingstation eller ledning må
nedsænkes i vand. Ledningen til apparatet bør altid tages ud af stikket før rengøring,
og det skal sikres, at apparatet er tørt, før strømmen tilsluttes igen.
1 Tag ledningen ud af stikket (H-1).
ADVARSEL
!
Vær forsigtig ved håndtering af HumidAire 3i. Både vandet og vandbeholderens
bund kan være meget varme. Vent 10 minutter, så varmepladen og eventuelt
resterende vand kan køle af (H-2).
Page 56

Tag vandbeholderen ud af dockingstationen (H-3) og hæld overskydende vand bort
2
(H-4).
Tag luftslangen af luftudtaget (H-5).
3
Bøj forsigtigt den ene arm på dækslet væk og op fra dockingstationen, indtil det
4
kommer helt fri (H-6 til H-8). Træk tætningen af dækslet (H-9).
BUNDPLADE
Bundpladen må ikke fjernes fra vandbeholderen. Hvis den er blevet fjernet, sættes den
på plads igen på følgende måde:
i. Vend bunden i vejret på vandbeholderen.
ii. Anbring bundpladen med den åbne side nedad, som vist nedenfor. Derefter
trykkes den godt ned i vandbeholderen.
bundplade
FORSIGTIGHEDSREGEL
!
Vandbeholderen kan lække, hvis bundpladen ikke bliver sat rigtigt på plads.
Bemærk: Bundpladen passer ikke ind i vandbeholderen, hvis den vender opad. Før
bundpladen anbringes, skal man sikre sig, at O-ringen er rigtigt anbragt i rillen i
bundpladen.
DANSK
RENGØRING AF HUMIDAIRE 3i
FORSIGTIG
!
• Ingen af følgende opløsninger må anvendes til rengøring af dele på HumidAire 3i.
Disse opløsninger kan beskadige produktet og mindske dets holdbarhed.
• blegemiddel, klorin-, alkohol- eller ammoniakbaserede opløsninger
• fugtighedsbevarende og bakteriedræbende sæber og sæber indeholdende
glycerin
• afspændings- og ikke godkendte afkalkningsmidler
• Vandbeholderen må ikke vaskes i opvaskemaskine.
VANDBEHOLDER
HVER DAG
Vask vandbeholder og slanger i varmt vand med et mildt rengøringsmiddel. (se
forsigtighedsreglen ovenfor). Skyl delene grundigt, og lad dem tørre væk fra direkte
sollys.
RENGØRING OG VEDLIGEHOLDELSE
51
Page 57

HVER UGE
Inspicer vandbeholderen for tegn på slid og forringelse. Udskift vandbeholderen, hvis
nogen af delene er revnede eller blevet uklare, eller der er små huller i overfladen.
Udskift øjeblikkeligt vandbeholderen, hvis den lækker.
Hvis du bemærker et hvidt pulver eller hvide aflejringer på bunden af vandbeholderen:
i. Fyld vandbeholderen op til mærket for maks. vandstand med en opløsning i
forholdet en del eddike til ti dele vand.
ii. Lad opløsningen stå i 10 minutter.
iii. Hæld opløsningen bort, og skyld vandbeholderen med rent vand.
DÆKSEL OG TÆTNING
Inspicér dæksel og tætning en gang om ugen for slid og forringelse. Udskift eventuelle
beskadigede dele. Vask dækslet og tætningen i varmt vand med et mildt
rengøringsmiddel efter behov (se forsigtighedsreglen ovenfor). Skyl delene grundigt
med rent vand, og lad dem tørre væk fra direkte sollys.
DOCKINGSTATION
Tør regelmæssigt dockingstationens yderside (inkl. koblingstætningen) af med en fugtig
klud.
SAMLING AF HUMIDAIRE 3i
Se illustrationerne i afsnit I på illustrationsarket.
Delene samles igen, når de er rene og tørre.
1 Anbring tætningen som anvist på dækslet (I-1), og tryk langs kanterne, så det sidder
ordentligt (I-2).
52
Anbring dækslets ene arm i omdrejningspunktet på dockingstationen (I-3), og bøj
2
forsigtigt den anden arm ind i det tilsvarende punkt (I-4 & I-5).
Dækslet bør kunne åbne og lukke uhindret, mens det sidder godt fast på
dockingstationen.
Sæt vandbeholderen tilbage i dockingstationen på fugteren (I-6).
3
SERVICE
Ved normal anvendelse af
Når der er gået fem år fra fremstillingsdatoen, bør dette produkt (H
efterses af et autoriseret ResMed servicecenter. Apparatet er konstrueret, så det skulle
fungere sikkert og pålideligt indtil da, forudsat at det betjenes og vedligeholdes som
angivet i den brugsanvisning, der udleveres af ResMed. ResMeds garanti for produktet
fremgår af den dokumentation, der medfølger ved købet. Som for andre elektriske
udstyr gælder det, at man bør udvise forsigtighed, hvis der opstår driftsforstyrrelser, og
i så fald få apparatet efterset på et autoriseret ResMed servicecenter.
H
UMIDAIRE
3i
, skal vandbeholderen udskiftes hvert andet år.
UMIDAIRE 3i)
Page 58

FEJLFINDING
Prøv nedenstående løsninger, hvis der opstår problemer. Hvis du ikke får løst
problemet, bør du kontakte udstyrsleverandøren eller ResMed. Forsøg ikke at åbne
apparatet.
ADVARSEL
!
Eftersyn og reparation bør kun udføres af en autoriseret servicetekniker.
Problem Mulig årsag Løsning
Apparatet virker ikke
(intet skærmbillede
og/eller indikatoren
bliver ikke tændt)
Indikatorlyset flimrer Under drift lyser
Indikatorlyset er hele
tiden svagt, og/eller
luften føles ikke varm.
Vandbeholderen
lækker
Ledningen er ikke sat
ordentligt i.
Defekt stikkontakt
Flowgenerator og
dockingstation ikke
forbundet korrekt.
indikatoren en gang
imellem kraftigere for at
angive, at varmelegemet er
aktivt.
HumidAire 3i reflektor (se
illustration C-2a) er snavset.
Vandbeholderen er
muligvis beskadiget eller
revnet
Dækslet er ikke sat
ordentligt på.
Kontrollér, at ledningen er sat ordentligt
i stikkontakten, og at der er tændt for
denne (hvis relevant).
Prøv en anden stikkontakt.
Kontrollér, at dockingstationen er sat
ordentligt fast på flowgeneratoren.
• HumidAire 3i har et hurtigtvirkende
varmelegeme, som sikrer meget
hurtig opvarmning Det bør ikke give
anledning til bekymring, at lyset kun
blinker et kort øjeblik.
• Der slukkes for opvarmet fugtning
ved at dreje knappen til indstillingen
. Indikatoren bliver ved med at
lyse, for at angive at apparatet er i
standby.
Rengør reflektoren med en fugtig klud.
Kontakt leverandøren, og få den
udskiftet.
Sørg for, at dækslet er anbragt korrekt.
DANSK
FEJLFINDING
53
Page 59

Problem Mulig årsag Løsning
Der er ingen/ringe
luftgennemstrømning.
Du får vandstænk i
ansigtet.
Luften føles ikke
fugtig.
Luftslangen er ikke
ordentligt tilsluttet.
Luftslangen er blokeret,
klemt sammen eller
punkteret.
Flowgeneratoren virker
ikke, som den skal.
Vandbeholderen er
overfyldt.
Dækslet er ikke låst
ordentligt fast med klinken.
Tætningen er ikke sat
ordentligt på.
Der dannes kondensation i
luftslangen.
Vandbeholderen er
overfyldt.
Der dannes kondensation i
luftslange og maske.
Kontrolknappen er sat for
lavt.
Tilslut luftslangen som beskrevet i
”Klargøring af HumidAire 3i” på
side 46.
Fjern blokagen eller gør slangen fri.
Kontrollér, at luftslangen ikke er
punkteret.
Se afsnittet Fejlfinding i manualen til
flowgeneratoren.
Sørg for, at vandniveauet ikke er højere
end mærket, der angiver maksimal
vandstand.
Sørg for, at dækslet er låst ordentligt fast
på dockingstationen med klinken.
Sørg for, at tætningen på dækslet
vender den rigtige vej og sidder godt
fast.
• Skru ned for kontrolknappen.
• Isolér luftslangen.
Tøm noget af vandet ud af
vandbeholderen.
• Skru ned for kontrolknappen.
• Isolér luftslangen.
Skru op for kontrolknappen.
54
Varmeelementet i
HumidAire 3i virker ikke.
Luften er for fugtig. Kontrolknappen er sat for
højt.
Høj relativ fugtighed i
værelset.
Hvidt pulver eller
bundfald i
vandbeholderen.
Vandet efterlader flager af
mineralaflejringer.
Kontakt leverandøren af udstyret.
Skru ned for kontrolknappen.
Justér fugtighedsindstillingen.
• Brug destilleret vand.
• For fjernelse af mineralaflejringer, Se
”Rengøring af HumidAire 3i” på
side 51.
Page 60

TEKNISKE SPECIFIKATIONER
YDELSE
Varmepladens maksimale temperatur: 85°C
Temperaturen slår fra ved: 93°C
Maksimal fugtighedsydelse: 95% relativ fugtighed (kontrolknap indstillet til maksimum,
gennemstrømningsrate 50 l/min, rumtemperatur 20°C, relativ fugtighed i omgivende
luft 40%).
Maksimal gastemperatur: 41°C
DIMENSIONER (H X B X D)
Dockingstation og vandbeholder 118 mm x 170 mm x 212 mm
VÆGT
Dockingstation og tom vandbeholder: 670 g
Vandkapacitet op til mærket for maks. vandstand: 385 ml
STRØMFORSYNING
Inputområde for RESMED S8 flowgenerator med HUMIDAIRE 3i: 100–240V, 50/60Hz;
110V, 400Hz; 2,5A <140 VA (110 W) (maksimalt strømforbrug). Øjebliksværdi af
toppunktseffekt <340 VA
Det faktiske strømforbrug vil afhænge af faktorer som temperaturindstilling, indstillet
tryk, brug af tilbehør, højde over havet og rumtemperatur.
Maksimal strøm på varmelegeme: 85 W.
HUSETS KONSTRUKTION
Dockingstation: Brandhæmmende teknisk termoplast, pletteret, støbt aluminium.
Vandbeholder: Sprøjtestøbt plastik, rustfrit stål.
MILJØFORHOLD
Driftstemperatur: +5°C til +40°C
Driftsfugtighed: 10–95% uden kondensering
Temperatur under opbevaring og transport: -20°C til +60°C
Fugtighed under opbevaring og transport: 10–95% uden kondensering
IEC 60601-1 KLASSIFIKATION
Klasse II (dobbeltisoleret)
Type CF
ELEKTROMAGNETISK KOMPATIBILITET
Der henvises til brugermanualen for flowgeneratoren for yderligere oplysninger.
Bemærk: Producenten forbeholder sig ret til at ændre disse specifikationer uden varsel.
DANSK
TEKNISKE SPECIFIKATIONER
55
Page 61

YMBOLER PÅ APPARATET
S
OBS! Læs medfølgende dokumentation
Type CF udstyr
Klasse II udstyr
Varm overflade
Må ikke berøres
Maks. vandstand
56
Page 62

GARANTI
ResMed garanterer, at dit ResMed produkt er fri for fabrikations- og materialefejl i den
nedenfor angivne periode, fra og med den dato produktet blev købt af den første
forbruger. Denne garanti kan ikke overdrages.
Produkt Garantiperiode
ResMed fugtere, ResControl™, ResLink™ 1 år
ResMed flowgeneratorer 2 år
Tilbehør, maskesystemer (inklusive maskeramme, pude,
hovedtøj og slanger). Gælder ikke for genstande til
engangsbrug.
90 dage
Bemærk: Det er ikke alle modeller, der er tilgængelige i alle lande.
Hvis produktet svigter under normale anvendelsesforhold, vil ResMed efter eget skøn
reparere eller udskifte det defekte produkt eller dets komponenter. Denne
begrænsede garanti dækker ikke:
a) skade som følge af ukorrekt brug, misbrug eller ændringer af produktet;
b) reparationer udført af en servicevirksomhed der ikke udtrykkeligt er blevet
godkendt af ResMed til at udføre sådanne reparationer;
c) skade eller forurening som følge af cigaret-, pibe-, cigar- eller anden røg;
d) skade som følge af, at der er blevet spildt vand på eller ind i en flowgenerator.
For at gøre et garantikrav gældende skal den oprindelige køber returnere det defekte
produkt til købsstedet med porto betalt.
Denne garanti erstatter alle andre udtrykkelige eller underforståede garantier, inklusive
enhver underforstået garanti for salgbarhed eller egnethed til et bestemt forhold. Visse
lande eller områder tillader ikke begrænsninger i varigheden af en underforstået garanti,
så ovennævnte begrænsning gælder muligvis ikke for dig.
ResMed er ikke ansvarlig for tilfældige skader eller følgeskader, som hævdes at være en
følge af salg, installation eller brug af noget ResMed produkt. Visse lande eller områder
tillader ikke udelukkelse eller begrænsning af ansvar for tilfældige skader eller
følgeskader, så den ovennævnte begrænsning gælder muligvis ikke for dig. Denne
garanti giver dig bestemte juridiske rettigheder, og du har muligvis også andre
rettigheder, som kan variere fra land til land.
For yderligere oplysninger om dine rettigheder under garantien bedes du kontakte din
lokale ResMed forhandler eller det lokale ResMed kontor.
DANSK
GARANTI
R001-307/1 05 02
57
Page 63

58
Page 64

INDEKS
A
Advarsler 44
Afkøling af varmeplade
Afmontering af HumidAire 3i
Anbringelse
Anvendelse
D
Dele
Dimensioner
Dit ansvar
Dockingstation
rengøring 52
Dæksel
afmontering af
rengøring
samling
E
Elektromagnetisk kompatibilitet
F
Fejlfinding 53
Fjernelse af
frontdæksel
koblingsforbindelse
Tætning
vandbeholder
Frontdæksel
fjernelse 46
påsætning
Fugtighedsindstilling
Fugtighedskontrol
G
Garanti
H
HumidAire 3i
afmontering af
påsætning
rengøring
samling
Husets konstruktion:
Hyppigt stillede spørgsmål
I
IEC 60601-1 Klassifikation 55
46
44
45
55
43
52
52
46
51
46
57
46
51
52
49
49
51
46
47
48
48
49, 50
55
50
55
Indikatorlys 47, 48
flimrer
Indledning af behandlingen
53
Indstillinger
fugtning
K
Klargøring af HumidAire 46
Koblingsforbindelse
fastgør
fjernelse
opbevaring af
Kompatible flowgeneratorer
Kondensation
Kontraindikationer
Kontrolknap
M
Medicinske oplysninger 44
Miljøforhold
Mineralaflejringer
O
Opfyldning af vandbeholder 47
Opvarmningsfunktion
P
Påsætning af
frontdæksel
HumidAire 3i
koblingsforbindelse
R
Rengøring 50
dockingstation
dæksel
Tætning
vandbeholder
S
SmartStart
Standsning af behandlingen
Strømforsyning
Særlige udtryk og ikoner
T
Tekniske specifikationer
Tætning
48
49
46
46
48, 50, 54
44
48
55
54
46
46
52
52
52
51
48, 49
55
47
43
47
49
49
43
55
DANSK
INDEKS
59
Page 65

fjernelse 51
rengøring
samling
Tørheds-
symptomer
V
Vandbeholder
lækker
mærke for maks. vandstand
maksimal kapacitet
rengøring
Vægt
Y
Ydelse 55
52
52
50
53
55
51
55
47
60
Page 66

HumidAire 3i
BRUKERHÅNDBOK
Norsk
™
NORSK
61
Page 67

INNHOLD
VELKOMMEN! . . . . . . . . . . . . . . . . . . . . . . . . . . . . . . . . . . . . . . . . . . . . . . . . 63
HVA ER HUMIDAIRE 3i? . . . . . . . . . . . . . . . . . . . . . . . . . . . . . . . . . . . . . . . 63
D
ITT ANSVAR 63
MEDISINSK INFORMASJON . . . . . . . . . . . . . . . . . . . . . . . . . . . . . . . . . . . . . 64
T
ILTENKT BRUK 64
K
ONTRAINDIKASJONER 64
A
DVARSLER 64
KOMPONENTENE I HUMIDAIRE 3i-APPARATET . . . . . . . . . . . . . . . . . . . . 65
SLIK KLARGJØR DU HUMIDAIRE 3i FOR BRUK . . . . . . . . . . . . . . . . . . . . 66
S
LIK TAR DU AV FORHETTEN (HVIS UTSTYRT MED) 66
T
A AV OG OPPBEVARE TILKOBLINGSPLUGGEN 66
K
OBLE TIL HUMIDAIRE 3i-APPARATET 66
F
YLLE VANNBEHOLDEREN 67
STARTE OG STANSE BEHANDLING . . . . . . . . . . . . . . . . . . . . . . . . . . . . . . . 67
S
TART AV BEHANDLING 67
S
TANSING AV BEHANDLINGEN 69
F
RAKOBLING AV HUMIDAIRE 3i 69
VANLIGE SPØRSMÅL . . . . . . . . . . . . . . . . . . . . . . . . . . . . . . . . . . . . . . . . . . 69
RENGJØRING OG VEDLIKEHOLD . . . . . . . . . . . . . . . . . . . . . . . . . . . . . . . . 71
D
EMONTERING AV HUMIDAIRE 3i 71
R
ENGJØRING AV HUMIDAIRE 3i 72
S
ETTE SAMMEN HUMIDAIRE 3i IGJEN 72
V
EDLIKEHOLD 73
FEILSØKING . . . . . . . . . . . . . . . . . . . . . . . . . . . . . . . . . . . . . . . . . . . . . . . . . 74
TEKNISKE SPESIFIKASJONER . . . . . . . . . . . . . . . . . . . . . . . . . . . . . . . . . . . . . 76
BEGRENSET GARANTI . . . . . . . . . . . . . . . . . . . . . . . . . . . . . . . . . . . . . . . . . 79
REGISTER . . . . . . . . . . . . . . . . . . . . . . . . . . . . . . . . . . . . . . . . . . . . . . . . . . . 81
62
Page 68

VELKOMMEN!
Takk for at du valgte ResMed HUMIDAIRE 3i™-luftfukteren. HUMIDAIRE 3i-apparatet
er konstruert for å fukte luften som tilføres luftveiene dine under behandling med
CPAP (kontinuerlig positivt luftveistrykk). H
ventilatoren i ResMed S8™-serien med en enkel “knepp-på-plass”-mekanisme.
Denne brukerhåndboken inneholder informasjonen du trenger for riktig bruk av
H
UMIDAIRE 3i-apparatet.
UMIDAIRE 3i-apparatet festes til CPAP-
HVA ER HUMIDAIRE 3i?
HUMIDAIRE 3i-apparatet er konstruert for å utgjøre én enhet sammen med en
ResMed CPAP-ventilator. Denne kombinerte enheten sørger for luftfukting under
CPAP-behandlingen og kan gjøre behandlingen mer behagelig.
Under CPAP-behandling kan pasienten bli tett i nesen eller tørr i nesen, munnen eller
halsen. Disse symptomene skyldes tørt klima, kald luft, luftstrømmen som tilføres ved
hjelp av ventilatoren, samt lekkasje gjennom munnen. Fuktig luft kan bidra til å lindre
disse tørrhetssymptomene.
Slå opp i håndboken for ventilatoren for å se om den er kompatibel med
UMIDAIRE 3i-apparatet. Ta kontakt med utstyrsleverandøren din eller ResMed-
H
kontoret dersom du trenger nærmere opplysninger.
DITT ANSVAR
Brukeren eller eieren av dette systemet skal ha det hele og fulle ansvaret for enhver
personskade eller ødeleggelse av eiendom som er en følge av:
• bruk som ikke er i samsvar med de medfølgende bruksanvisningene,
• vedlikehold eller modifikasjoner som ikke er utført i henhold til de godkjente
anvisningene eller av ikke-autorisert personell.
Les nøye gjennom håndboken før du tar utstyret i bruk.
Denne håndboken inneholder spesielle begreper og symboler som vises i margen for
å gjøre deg oppmerksom på bestemt og viktig informasjon.
• Advarsel advarer deg om fare for personskade.
• Forsiktighetsregel forklarer spesielle tiltak for sikker og effektiv bruk av apparatet.
• Merk er en informativ eller nyttig opplysning.
NORSK
VELKOMMEN!
63
Page 69

MEDISINSK INFORMASJON
TILTENKT BRUK
HUMIDAIRE 3i er indikert for fukting av luft tilført fra CPAP-apparater i ResMed S8-
serien. H
KONTRAINDIKASJONER
HUMIDAIRE 3i-apparatet er kontraindikert for bruk på pasienter hvor luftveiene over
stemmebåndene er forbiledet. Se også etter om håndboken for andre
behandlingsapparater som brukes, inneholder kontraindikasjoner mot behandling med
CPAP.
ADVARSLER
Følgende er generelle advarsler. Bestemte advarsler og forsiktighetsregler vises ved
siden av relevante anvisninger i håndboken.
ADVARSLER
!
• Bruk HUMIDAIRE 3i kun til tiltenkt bruk som beskrevet i denne brukerhåndboken.
• Kontroller at vannbeholderen er tom og helt tørr før du flytter på HUMIDAIRE 3i.
• HUMIDAIRE 3i er konstruert kun for bruk sammen med bestemte ResMed CPAP-
• HUMIDAIRE 3i-apparatet bør kun brukes sammen med tilførselsslanger eller
• HUMIDAIRE 3i inkludert det tilhørende luftslangesystemet skal bare benyttes av én
• Plasser alltid HUMIDAIRE 3i-apparatet på lavere nivå enn pasienten. Hvis det er
• Hvis apparatet plasseres høyere enn pasienten og velter eller slangen er full av
• Forsøk ikke å ta HUMIDAIRE 3i-forankringsstasjonen fra hverandre. Den
• Vær varsom ved håndtering av HUMIDAIRE 3i. Varmeplaten og vannet i
UMIDAIRE 3i skal bare brukes som anbefalt av lege.
apparater. Bruk ikke H
UMIDAIRE 3i-apparatet sammen med noe som helst annet
CPAP-apparat.
tilbehør som anbefales av ResMed. Tilkobling av andre tilførselsslanger eller annet
tilbehør kan føre til personskade eller skade på apparatet.
pasient, og skal ikke brukes på nytt av noen annen person. Dette for å unngå
smittefare.
plassert jevnhøyt med eller på høyere nivå enn pasienten, kan oppvarmet vann
renne ned gjennom luftslangen og inn i masken.
kondensat, er det en viss fare for at masken fylles med vann. H
UMIDAIRE 3i skal
derfor brukes med varsomhet av pasienter som ikke kan verne luftveiene sine, eller
som ikke er i stand til å ta masken av seg, for eksempel de som har hatt slag. Vær
oppmerksom på de relative farene og fordelene.
inneholder ingen deler som brukeren selv kan vedlikeholde eller skifte ut.
Reparasjon og indre ettersyn skal bare utføres på autorisert serviceverksted.
vannbeholderen kan være varme.
64
Page 70

• Dersom væske ved en feiltagelse skulle søles på eller komme inn i HUMIDAIRE 3i-
forankringsstasjonen, skal du ta kontakten til CPAP-apparatet ut av strømuttaket.
Koble forankringsstasjonen fra CPAP-apparatet, og la forankringsstasjonen renne
av seg og tørke før du tar den i bruk.
• Bruk ikke HUMIDAIRE 3i-apparatet dersom CPAP-apparatet har en ødelagt
strømledning eller -kontakt.
• HUMIDAIRE 3i skal ikke brukes hvis det ikke fungerer helt som det skal, eller hvis
noen del av det har falt i bakken eller blitt skadet.
• Hold strømledningen til CPAP-apparatet unna varme overflater.
• Du skal ikke slippe eller stikke noen gjenstand inn i noen åpning eller slange.
• HUMIDAIRE 3i skal ikke anvendes i nærvær av brannfarlige eller eksplosive
materialer.
• Eksplosjonsfare – Skal ikke anvendes i nærheten av brannfarlige bedøvelsesmidler.
• Hvis oksygen brukes sammen med dette apparatet, må oksygenstrømmen slås av
når apparatet ikke er i drift.
Hvis oksygentilførselen har blitt stående på, skal du slå av ventilatoren og deretter
vente i 30 minutter før du slår ventilatoren på igjen.
Begrunnelse: Når CPAP-apparatet ikke er i drift og oksygenstrømmen forblir
påslått, kan oksygen som tilføres gjennom lufttilførselsslangen, samles opp i
apparatets kabinett og forårsake brannfare. Dette gjelder de fleste typer CPAPapparater.
• Oksygen er brannfarlig. Oksygen skal ikke brukes i forbindelse med røyking eller
i nærheten av åpen ild.
• Kontroller at luftstrømmen alltid genereres av apparatet før oksygentilførselen
slås på.
• Slå alltid av oksygentilførselen før luftstrømmen stanses fra apparatet.
Merk: Hvis det brukes ekstra oksygentilførsel med konstant gjennomstrømning, vil den
innåndede oksygenkonsentrasjonen variere avhengig av hvor oksygenet tilføres,
trykkinnstillinger, pasientens pustemønster, valg av maske og lekkasjefrekvens.
NORSK
KOMPONENTENE I HUMIDAIRE 3i-apparatet
Se illustrasjonene i figur A på illustrasjonsarket.
KOMPONENTENE I HUMIDAIRE 3i-APPARATET
65
Page 71

SLIK KLARGJØR DU HUMIDAIRE 3i FOR BRUK
ADVARSEL!
!
Påse at ventilatoren er skrudd av ved strømuttaket før du kobler til HumidAire 3iapparatet.
SLIK TAR DU AV FORHETTEN (HVIS UTSTYRT MED)
Se illustrasjonene i figur B på illustrasjonsarket.
Ventilatoren kan være utstyrt med en forhette (B-1). Før du kan koble til
H
UMIDAIRE 3i, må du trykke inn knappen under forhetten (B-2) og dra den bort fra
selve ventilatoren (B-3 og B-4).
Merknader
• Hvis du vil sette på forhetten igjen, skal du rette den inn med ventilatoren (B-4) og
skyve den med fast hånd helt til den knepper på plass.
• Husk å ta med forhetten når du er ute på reise, i tilfelle du trenger å bruke CPAP-
apparatet uten en luftfukter.
TA AV OG OPPBEVARE TILKOBLINGSPLUGGEN
Se illustrasjonene i figur C på illustrasjonsarket.
Før du kobler til H
ventilatoren (C-1) og koble den til baksiden av forankringsstasjonen (C-2).
KOBLE TIL HUMIDAIRE 3i-APPARATET
Se illustrasjonene i figur D på illustrasjonsarket.
UMIDAIRE 3i-apparatet, må du ta av tilkoblingspluggen fra
66
1 Rett HUMIDAIRE 3i-apparatet inn med ventilatoren (D-1) og skyv dem sammen helt
til de knepper på plass (D-2).
ADVARSEL!
!
• HumidAire 3i-apparatets forankringsstasjon bør bare kobles til eller fra når
vannbeholderen er tom.
• Det må forhindres at det kommer vann inn i ventilatoren. Ventilatoren skal ikke
fraktes mens HumidAire 3i-apparatet er tilkoblet.
Sett strømledningen i kontakten bakpå ventilatoren. Sett den andre enden av
2
strømledningen i en stikkontakt (D-3).
Merk: Hvis ventilatoren får strøm via likestrøminntaket, er ikke HumidAire 3i slått på, og
det tilføres mindre luftfuktighet.
Sett den kombinerte enheten på et fast, flatt underlag nær sengen din, på et lavere nivå
3
enn der du sover. Kontroller at underlaget tåler varme og fuktighet, eller bruk en
beskyttelsesmatte.
FORSIKTIGHETSREGEL
!
Pass på at du ikke plasserer apparatet et sted der det kan dultes borti eller falle
overende.
Page 72

Sett den ene enden av luftslangen bestemt inn i luftuttaket på HUMIDAIRE 3i-
4
apparatet, og koble den andre enden til masken din (D-4).
FYLLE VANNBEHOLDEREN
Se illustrasjonene i figur E på illustrasjonsarket.
ADVARSEL!
!
Vær varsom ved håndtering av HumidAire 3i. Både vannet og vannbeholderen kan
være varme. La det gå ti minutter slik at varmeplaten og eventuelt overflødig vann
kan kjøles ned.
1 Løsne dekselhaspen (E-1) og løft dekslet helt til det står i oppreist stilling (E-2).
Ta ut vannbeholderen (E-3) og fyll den forsiktig med friskt, rent vann (E-4). Pass på at
2
du holder vannivået lavere enn merket for maksimalt vannivå (E-4a).
Påse alltid at vannbeholderen er ren. Se ”Rengjøring og vedlikehold” på side 71.
ADVARSEL!
!
Pass på at vannbeholderen ikke overfylles, da vannet kan trenge inn i ventilatoren
og luftslangen.
FORSIKTIGHETSREGEL
!
Det må ikke anvendes tilsetningsstoffer (f.eks. duftoljer og parfymer). De kan gi
redusert luftfuktighet fra HumidAire 3i og/eller bryte ned materialet i
vannbeholderen.
Sett forsiktig den fulle vannbeholderen på plass i luftfukterens forankringsstasjon (E-5)
3
og smekk dekselet igjen (E-6 og E-6a).
H
UMIDAIRE 3i-apparatet er nå klart til bruk.
NORSK
STARTE OG STANSE BEHANDLING
START AV BEHANDLING
Se illustrasjonene i figur F på illustrasjonsarket.
1 Når HUMIDAIRE 3i-apparatet er tilkoblet og ventilatoren er slått på, tennes
indikatorlampen på H
tilgjengelig for alle modeller) kan komme til syne.
Når funksjonen er aktivert, kan vannet varmes opp før du begynner behandlingen.
Hvis oppvarmingsfunksjonen er tilgjengelig, kan den brukes til å foroppvarme vannet
2
før du setter i gang behandlingen. Hopp over dette dersom du ønsker å begynne
behandlingen med det samme.
UMIDAIRE 3i. En klarmelding for oppvarmingsfunksjonen (ikke
RAMP: 10min
meny
oppvar
STARTE OG STANSE BEHANDLING
67
Page 73

PPVARMINGSFUNKSJON (IKKE TILGJENGELIG PÅ ALLE MODELLER)
O
Merk: Kontroller i brukerhåndboken for ventilatoren om denne funksjonen er tilgjengelig.
Slik starter du oppvarmingsfunksjonen:
i. Velg Oppvarm ved å trykke på den høyre tasten på kontrollpanelet.
Følgende melding vises i 2 sekunder:
FUKTER
OPPVARMING
ii. Etter 2 sekunder vises OPPVARMING-skjermen.
OPPVARMING
meny avsl.
iii. Mens H
UMIDAIRE 3i-apparatet er i oppvarmingsmodus, kan du:
• Når som helst begynne behandlingen ved å trykke på Start/stans-tasten.
• Få adgang til menyene ved å trykke på den venstre tasten for meny.
• Stanse oppvarmingsfunksjonen når som helst ved å trykke på den høyre tasten
for avslutt.
Oppvarmingsfunksjonen slås automatisk av etter en halvtime hvis behandlingen ikke
har begynt.
Drei kontrollskiven for luftfukting til ønsket innstilling. Innstillingen slår av luftfuktighet
3
med varmeelement og tilfører minst luftfuktighet. Indikatorlampen fortsetter å lyse for
å angi ventemodus. En innstilling på 6 ( ) gir maksimal luftfuktighet.
Vi anbefaler at du i utgangspunktet stiller kontrollskiven på 3 ( ). Hvis det er
nødvendig, skal du justere kontrollskiven opp eller ned til du finner den mest behagelige
og effektive innstillingen. Luftfuktighetsinnstillingen kan justeres til enhver tid.
Siktemålet er å tilføre masken fuktig luft, uten at det oppstår kondens i luftslangen.
Lufttemperaturen og -fuktigheten i omgivelsene dine vil ha innvirkning på hvilken
innstilling du trenger.
Se “Vanlige spørsmål” for å få flere tips om riktig luftfuktighetsinnstilling.
Sett på masken som beskrevet i bruksanvisningen for masken.
4
Trykk på Start/stans-tasten på kontrollpanelet. Eventuelt, hvis
5
SmartStart™-funksjonen er tilgjengelig for ventilatoren, kan du ganske enkelt puste inn
i masken, så skal luften begynne å strømme.
Merk: Under bruk lyser indikatorlampen jevnlig for å vise at varmeelementet er aktivt.
HumidAire 3i-apparatet har et hurtigvirkende varmeelement som gjør at vannet varmes
opp på svært kort tid. Det er ingen grunn til bekymring hvis lampen bare er tent et
øyeblikk.
68
Legg deg ned, og legg luftslangen slik at den fritt kan bevege seg selv om du skulle snu
6
deg i søvne.
Page 74

ADVARSEL!
!
Du skal ikke la større lengder av luftslangen ligge øverst i sengen. Dette kan i så fall
tvinnes rundt hodet eller halsen på deg mens du sover.
STANSING AV BEHANDLINGEN
Hvis du på noe tidspunkt vil stanse behandlingen, skal du ta av deg masken og trykke
på Start/stans-tasten. Eventuelt, hvis ventilatoren har aktivert SmartStart-funksjonen,
skal du ganske enkelt ta av deg masken, så stanser behandlingen.
Enkelte ventilatorer fortsetter å blåse luft varsomt etter at du har stanset behandlingen.
Dette kan fortsette i opptil en time for å framskynde nedkjølingen av varmeplaten. Du
kan imidlertid slå av apparatet når som helst, slik at varmeplaten nedkjøles uten
luftstrøm.
FRAKOBLING AV HUMIDAIRE 3i
Se illustrasjonene i figur G på illustrasjonsarket.
1 Trekk ut strømledningen fra stikkontakten (G-1).
ADVARSEL!
!
Vær varsom ved håndtering av HumidAire 3i. Både vannet og vannbeholderen kan
være varme. La det gå ti minutter slik at varmeplaten og eventuelt overflødig vann
kan kjøles ned (G-2).
Ta vannbeholderen ut av forankringsstasjonen (G-3).
2
Trykk på den store sølvfargede knappen midtveis under forankringsstasjonen
3
(G-4), og trekk H
UMIDAIRE 3i og ventilatoren (G-5) fra hverandre.
NORSK
Stor sølvfarget knapp
VISNING AV UNDERSIDE
Merk: Koble til tilkoblingspluggen på ventilatoren igjen slik at den sitter godt.
VANLIGE SPØRSMÅL
HVORFOR ER DET KONDENS I MASKEN OG/ELLER LUFTSLANGEN MIN?
Du kan oppleve at det er for mye kondens i masken eller luftslangen. Dette kan være
årstidsbetont, og forekommer særlig når romtemperaturen er lav eller det sirkulerer
kjølig luft omkring slangen. Drei kontrollskiven ned til en lavere innstilling inntil
kondensen minsker.
Det kan hende at du må justere luftfuktighetsinnstillingen fra årstid til årstid.
VANLIGE SPØRSMÅL
69
Page 75

RENGER JEG Å BRUKE DESTILLERT VANN I VANNBEHOLDEREN?
T
Ved bruk av destillert vann får vannbeholderen lengre levetid og mindre
mineralavleiringer. Se “Rengjøring av HumidAire 3i” på side 72 hvis du vil ha nærmere
informasjon.
HVA OM JEG FORTSATT HAR SYMPTOMER PÅ TØRRHET?
Hvis du fortsatt har problemer med tørrhet, kan luftfuktighetsinnstillingen være for lav
til å ha noen virkning. I løpet av de neste få nettene skal du gradvis øke
kontrollskiveinnstillingen for luftfuktighet til symptomene forsvinner.
Hvis du fortsatt har problemer med tørrhet, selv etter å ha økt
luftfuktighetsinnstillingen, kan det hende at du puster gjennom munnen. Pusting
gjennom munnen eller lekkasjer fra munnen kan føre til uttørking eller irritasjon av de
øvre luftveiene. Hvis du har et slikt problem, kan en heldekkende ansiktsmaske eller
hakestropp være til hjelp. Rådfør deg med legen eller utstyrsleverandøren for å få mer
informasjon.
70
Page 76

RENGJØRING OG VEDLIKEHOLD
Du bør med jevne mellomrom utføre rengjøring og vedlikehold av vannbeholderen,
dekselet og dekselkapslingen som beskrevet i dette avsnittet.
DEMONTERING AV HUMIDAIRE 3i
Se illustrasjonene i figur H på illustrasjonsarket.
ADVARSEL!
!
Pass på så du ikke får elektrisk støt. Verken ventilatoren, forankringsstasjonen eller
strømledningen skal legges i vann. Trekk alltid ut strømledningen til apparatet før
du rengjør det, og kontroller at det er helt tørt før du setter i strømledningen igjen.
1 Trekk ut strømledningen fra stikkontakten (H-1).
ADVARSEL!
!
Vær varsom ved håndtering av HumidAire 3i. Både vannet og vannbeholderen kan
være varme. La det gå ti minutter slik at varmeplaten og eventuelt overflødig vann
kan kjøles ned (H-2).
Ta vannbeholderen ut av forankringsstasjonen (H-3) og tøm ut eventuelt overflødig
2
vann (H-4).
Koble fra luftslangen fra luftuttaket (H-5).
3
Bøy den ene dekselarmen varsomt bort og opp fra forankringsstasjonen til dekselet
4
løsner fullstendig (H-6 til H-8). Pirk dekselkapslingen av dekselet (H-9).
VARMEPLATE
Varmeplaten skal ikke fjernes fra vannbeholderen. Hvis du vil ta av varmeplaten, gjøres
dette på følgende måte:
i. Snu vannbeholdersokkelen opp ned.
ii. Som vist nedenfor, skal varmeplaten plasseres slik at den åpne siden vender
nedover. Trykk deretter varmeplaten ned i vannbeholderen.
NORSK
varmeplate
FORSIKTIG!
!
Vannbeholderen kan få lekkasje hvis varmeplaten settes feil i.
Merk: Varmeplaten passer ikke i vannbeholderen hvis den vender opp. Før varmeplaten
settes på plass, skal du forsikre deg om at O-ringen sitter godt fast i sporet på
varmeplaten.
RENGJØRING OG VEDLIKEHOLD
71
Page 77

RENGJØRING AV HUMIDAIRE 3i
FORSIKTIGHETSREGEL
!
• Det skal ikke brukes noen av følgende midler ved rengjøring av HumidAire 3i.
Disse løsningene kan nemlig skade utstyret og gi det redusert levetid.
• blekemiddel-, klor-, alkohol- eller ammoniumbaserte løsninger
• såpe med hudkrem, antibakteriesåpe eller glyserinsåpe
• mykgjøringsmidler og ikke godkjente avskallingsmidler.
• Vannbeholderen skal ikke vaskes i oppvaskmaskin.
VANNBEHOLDER
DAGLIG
Vask vannbeholderen og slangen i varmt vann med et mildt vaskemiddel (se tidligere
forsiktighetsregel). Skyll dem grundig med rent vann og la dem tørke utenfor direkte
sollys.
UKENTLIG
Se etter om vannbeholderen har slitasje eller skade. Skift vannbeholderen hvis noen
komponent har sprekker, har blitt mindre gjennomsiktig eller har groptæring. Skift
umiddelbart hvis det er noe tegn til lekkasje fra vannbeholderen.
Hvis du finner et hvitt pulver eller avleiringer i vannbeholderen:
i. Fyll vannbeholderen til merket for maksimalt vannivå med en løsning på en del
eddik til ti deler vann.
ii. La løsningen stå i ti minutter.
iii. Hell ut løsningen og skyll vannbeholderen med rent vann.
DEKSEL OG DEKSELKAPSLING
Se etter ukentlig om dekslet og dekselkapslingen har slitasje eller svekkelse. Hvis én
eller flere av delene er skadet, skal de skiftes ut. Vask ved behov dekslet og
dekselkapslingen i varmt vann med et mildt vaskemiddel (se tidligere forsiktighetsregel).
Skyll dem grundig med rent vann og la dem tørke utenfor direkte sollys.
FORANKRINGSSTASJON
Tørk med jevne mellomrom utsiden av forankringsstasjonen (inkludert
koblingsstykkekapslingen) med en fuktig klut.
72
SETTE SAMMEN HUMIDAIRE 3i IGJEN
Se illustrasjonene i figur I på illustrasjonsarket.
Sett sammen delene igjen når de er rene og tørre.
1 Rett dekselkapslingen inn med styresporene på dekselet (I-1) og trykk langs kantene
for å sikre at det settes ordentlig på plass (I-2).
Sett den ene dekselarmen inn i dreiepunktet sitt på forankringsstasjonen (I-3) og bøy
2
varsomt den andre armen inn i sitt tilsvarende punkt (I-4 og I-5).
Page 78

Det skal gå an å åpne og lukke dekselet uanstrengt når det er forsvarlig festet til
forankringsstasjonen.
Plasser vannbeholderen i luftfukterens forankringsstasjon igjen (I-6).
3
VEDLIKEHOLD
Ved vanlig bruk av HUMIDAIRE 3i må vannbeholderen skiftes hvert annet år.
Fem år etter produksjonsdatoen skal dette produktet (H
et godkjent ResMed-verksted. Inntil den tid skal apparatet gi sikker og pålitelig drift
forutsatt at det betjenes og vedlikeholdes i henhold til ResMeds anvisninger. Ved
opprinnelig levering av produktet følger det med gjeldende garantiinformasjon fra
ResMed. Som med alt elektrisk utstyr må du selvsagt ved enhver uregelmessighet utvise
varsomhet og få apparatet kontrollert på et godkjent ResMed-verksted.
UMIDAIRE 3i) kontrolleres på
NORSK
RENGJØRING OG VEDLIKEHOLD
73
Page 79

FEILSØKING
Hvis det oppstår et problem, skal du prøve følgende forslag. Hvis feilen ikke kan rettes
opp, skal du ta kontakt med utstyrsleverandøren eller ResMed. Du skal ikke prøve å
åpne apparatet.
ADVARSEL!
!
Reparasjon og serviceettersyn skal bare utføres på autoriserte serviceverksteder.
Problem Mulig årsak Løsning
Apparatet virker ikke
(ingenting vises på
LCD-skjermen, og/
eller
indikatorlampen
tennes ikke)
Indikatorlampe
flimrer
Indikatorlampen er
hele tiden matt og/
eller luften kjennes
ikke varm
Lekkasje fra
vannbeholderen
Strømledningen er ikke
riktig tilkoblet.
Feil på stikkontakten.
Ventilator og
forankringsstasjon ikke
riktig sammenkoblet.
Indikatorlampen lyser med
jevne mellomrom sterkere
for å angi at
varmeelementet er aktivt.
HumidAire 3i-refleksen (se
illustrasjon C-2a) er skitten.
Det kan være skade på
eller sprekk i
vannbeholderen.
Forviss deg om at strømledningen sitter
godt i stikkontakten og at eventuell
bryter ved kontakten er slått på.
Prøv en annen stikkontakt.
Forviss deg om at forankringsstasjonen er
solid koblet til ventilatoren.
• HumidAire 3i-apparatet har et
hurtigvirkende varmeelement som
gjør at vannet varmes opp på svært
kort tid. Det er ingen grunn til
bekymring hvis lampen bare er tent et
øyeblikk.
• Drei skiven til -innstillingen som
skrur av den oppvarmede
luftfuktingen. Indikatorlampen
fortsetter å lyse, hvilket angir
ventemodus.
Rengjør refleksen med en fuktig klut.
Ta kontakt med leverandøren for å få en
ny vannbeholder.
74
Dekslet er ikke riktig festet.
Kontroller at dekslet sitter riktig.
Page 80

Problem Mulig årsak Løsning
Ingen/lav luftstrøm Luftslangen er ikke riktig
tilkoblet.
Luftslangen er tilstoppet,
sammenklemt eller
punktert.
Ventilatoren virker ikke
som den skal.
Det er for mye vann i
vannbeholderen.
Dekselet er ikke riktig
lukket.
Dekselkapslingen er ikke
riktig satt på.
Det danner seg kondens i
luftslangen.
Vannsprut i ansiktet Det er for mye vann i
vannbeholderen.
Det danner seg kondens i
luftslangen og masken.
Luften kjennes ikke
fuktig
Kontrollskiven er stilt for
lavt.
Koble til luftslangen som beskrevet i
“Slik klargjør du HumidAire 3i for bruk”
på side 66.
Fjern tilstoppingen, eller la luftslangen
ligge løst. Kontroller at luftslangen ikke
er punktert.
Les problemløsningsavsnittet i
brukerhåndboken for ventilatoren.
Kontroller at vannivået ikke står høyere
enn merket for maksimalt vannivå.
Forviss deg om at dekselet er riktig
lukket på forankringsstasjonen.
Forviss deg om at dekselkapslingen er
vendt riktig vei og at den er godt festet.
• Drei kontrollskiven til lavere
innstilling.
• Isoler luftslangen.
Tøm noe av vannet ut av
vannbeholderen.
• Drei kontrollskiven til lavere
innstilling.
• Isoler luftslangen.
Drei kontrollskiven til høyere innstilling.
NORSK
Varmeelementet i
HumidAire 3i fungerer
ikke.
Luften er for fuktig Kontrollskiven er stilt for
Hvitt pulver eller
avleiringer i
vannbeholderen
høyt.
Høy relativ luftfuktighet i
rommet.
Vannet etterlater seg
skjellete mineralavleiringer.
Ta kontakt med utstyrsleverandøren.
Drei kontrollskiven til lavere innstilling.
Juster innstillingen for luftfuktighet.
• Bruk destillert vann.
• Hvis du vil fjerne disse
mineralavleiringene, se ”Rengjøring
av HumidAire 3i” på side 72.
FEILSØKING
75
Page 81

TEKNISKE SPESIFIKASJONER
YTELSE
Maksimal varmeplatetemperatur: 85 °C
Avbrytningstemperatur: 93 °C
Maksimal utgangsfuktighet: 95 % relativ luftfuktighet (kontrollknappen innstilt på
maksimal innstilling, luftstrømsfrekvensen på 50 l/min, lufttemperatur på 20 °C, relativ
luftfuktighet i rommet på 40 %).
Maksimal gasstemperatur: 41 °C
MÅL (H X B X D)
Forankringsstasjon og vannbeholder: 118 mm x 170 mm x 212 mm
VEKT
Forankringsstasjon og tom vannbeholder: 670 g
Vannkapasitet til linje for maksimal fylling: 385 ml
STRØMFORSYNING
Innsignalområde for RESMED S8-ventilator med HUMIDAIRE 3i: 100–240 V, 50/60 Hz;
110 V, 400 Hz; 2,5 A <140 VA (110 W) (maksimalt strømforbruk). Momentant
maksimalt strømforbruk <340 VA.
Faktisk gjennomsnittlig strømforbruk varierer, avhengig av faktorer som
temperaturinnstilling, trykkinnstilling, bruk av tilbehør, høyde over havet og
lufttemperatur.
Maksimal effekt for varmeelement: 85 W.
KABINETTKONSTRUKSJON
Forankringsstasjon: Flammehemmende konstruksjonstermoplast, plettert
aluminiumsstøpegods.
Vannbeholder: Sprøytestøpt plast, rustfritt stål.
MILJØFORHOLD
Driftstemperatur: +5 til +40 °C
Luftfuktighet under drift: 10–95 % luftfuktighet (ikke-kondenserende)
Temperatur ved oppbevaring og transport: -20 til +60 °C
Luftfuktighet under oppbevaring og transport: 10–95 % luftfuktighet (ikkekondenserende)
IEC 60601-1-KLASSIFISERING
Klasse II (dobbel isolasjon)
Type CF
ELEKTROMAGNETISK KOMPATIBILITET
Brukerhåndboken for ventilatoren inneholder nærmere opplysninger.
Merk: Produsenten forbeholder seg retten til å endre disse spesifikasjonene uten forvarsel.
76
Page 82

SYMBOLER SOM VISES PÅ APPARATET
NB! Les gjennom medfølgende dokumentasjon.
Utstyr av CF-type
Utstyr i klasse II
Varm overflate
Skal ikke berøres
Maksimalt vannivå
NORSK
TEKNISKE SPESIFIKASJONER
77
Page 83

78
Page 84

BEGRENSET GARANTI
ResMed garanterer at ResMed-produktet skal være uten mangler i materialer og
utførelse i perioden angitt nedenfor, målt fra opprinnelig kjøpers kjøpsdato. Denne
garantien kan ikke overføres til andre.
Produkt Garantiperiode
ResMed-luftfuktere, ResControl™, ResLink™ 1 år
ResMed-ventilatorer 2 år
Tilbehør, maskesystemer (herunder maskeramme, pute,
hodeutstyr og slange). Unntatt engangsutstyr.
90 dager
Merk: Enkelte modeller er ikke tilgjengelige i alle land.
Hvis produktet svikter under vanlige bruksforhold, vil ResMed, etter eget
forgodtbefinnende, enten reparere eller erstatte det defekte produktet eller noen av
dets deler. Denne begrensede garantien dekker ikke:
a) noen skade som skyldes feilaktig bruk, misbruk, modifikasjoner eller endringer på
produktet;
b) reparasjoner utført av noe verksted som ikke er uttrykkelig godkjent av ResMed til
å utføre slike reparasjoner;
c) noen form for skade eller kontaminering på grunn av røyk fra sigaretter, pipe, sigar
eller annen form for røyk;
d) noen skade forårsaket av vannsøl på eller inn i en ventilator.
Opprinnelig kjøper må returnere det defekte produktet til kjøpstedet med
forhåndsbetalt porto for å reise et garantikrav.
Denne garantien erstatter alle andre garantier, uttrykte eller underforståtte, herunder
underforståtte garantier om salgbarhet eller egnethet for noe bestemt formål. Noen
rettsområder tillater ikke begrensning av hvor lenge underforståtte garantier varer, og
følgelig er det ikke sikkert at ovenstående begrensninger gjelder deg.
ResMed skal ikke være erstatningsansvarlig for eventuelle tilfeldige eller følgemessige
tap, skader, eller kostnader som hevdes å ha oppstått som følge av salg, montering eller
bruk av noe ResMed-produkt. Enkelte rettsområder tillater ikke utelukkelse av eller
begrensninger i forbindelse med tilfeldige eller følgemessige skader, og følgelig er det
ikke sikkert at ovenstående begrensninger gjelder for deg. Denne garantien gir deg
bestemte juridiske rettigheter, og du kan muligens også ha andre rettigheter, som
varierer fra et rettsområde til et annet.
Hvis du vil ha mer informasjon om garantirettighetene dine, kan du kontakte den lokale
ResMed-forhandleren eller nærmeste ResMed-kontor.
NORSK
BEGRENSET GARANTI
R001-307/1 05 02
79
Page 85

80
Page 86

REGISTER
A
Advarsler 64
B
Begrenset garanti
D
Deksel
demontering
rengjøring
sette sammen igjen
Dekselkapsling
rengjøring 72
sette sammen igjen
71
ta ut
Dimensjoner
Ditt ansvar
E
Elektromagnetisk kompatibilitet 76
F
Feilsøking
Forankringsstasjon
rengjøring 72
Forhette
koble til
66
ta ut
Frakobling av HumidAire 3i
Fylle vannbeholderen
H
HumidAire 3i
demontering
frakobling
koble til
rengjøring
sette sammen igjen
76
Hylster
I
IEC 60601-1-klassifisering
Indikatorlampe
flimrer
Innstillinger
74
luftfukting 68
79
71
72
72
72
76
63
74
66
69
67
71
69
66
72
72
76
67, 68
K
Klargjøring av HumidAire 66
Koble til
forhette
66
HumidAire 3i
tilkoblingsplugg
Kompatible ventilatorer
Komponenter
Kondens
Kontraindikasjoner
Kontrollskive
Kontrollskive for luftfuktighet
L
Luftfuktingsinnstillinger
M
Medisinsk informasjon 64
Miljøforhold
Mineralavleiringer
N
Nedkjøling av varmeplate 69
O
Oppvarmingsfunksjon
P
Plassering
R
Rengjøring 71
deksel
dekselkapsling
forankringsstasjon
vannbeholder
S
SmartStart
Spesielle begreper og symboler
Stansing av behandlingen
Start av behandling
Strømforsyning
T
Ta av
dekselkapsling
forhette
66
69
63
65
68, 69, 75
64
68
68
68
76
75
67
66
72
72
72
72
68, 69
69
67
76
71
66
NORSK
63
REGISTER
81
Page 87

tilkoblingsplugg 66
vannbeholder
Tekniske spesifikasjoner
Tilkoblingsplugg
koble til igjen
oppbevare
ta ut
66
Tiltenkt bruk
Tørrhet
symptomer 70
V
Vanlige spørsmål
Vannbeholder
lekkasje 74
maksimal kapasitet
merke for maksimalt vannivå
rengjøring
Vekt
76
Y
Ytelse 76
67
76
69
66
64
69
76
72
67
82
Page 88

HumidAire 3i
KÄYTTÖOHJE
Suomi
™
SUOMI
83
Page 89

SISÄLLYSLUETTELO
TERVETULOA . . . . . . . . . . . . . . . . . . . . . . . . . . . . . . . . . . . . . . . . . . . . . . . . . 85
MIKÄ HUMIDAIRE 3i ON? . . . . . . . . . . . . . . . . . . . . . . . . . . . . . . . . . . . . . 85
K
ÄYTTÄJÄN VASTUU 85
HOITOA KOSKEVAT TIEDOT . . . . . . . . . . . . . . . . . . . . . . . . . . . . . . . . . . . . 86
K
ÄYTTÖTARKOITUS 86
K
ONTRAINDIKAATIOT 86
V
AROITUKSET 86
HUMIDAIRE 3i -LAITTEEN OSAT . . . . . . . . . . . . . . . . . . . . . . . . . . . . . . . . 87
HUMIDAIRE 3i -LAITTEEN KÄYTTÖÖNOTTO . . . . . . . . . . . . . . . . . . . . . . 88
E
TUKANNEN IRROTTAMINEN (JOS SELLAINEN ON) 88
L
IITÄNTÄTULPAN IRROTTAMINEN JA SÄILYTTÄMINEN 88
H
UMIDAIRE 3i -ILMANKOSTUTTIMEN LIITTÄMINEN 88
V
ESISÄILIÖN TÄYTTÄMINEN 89
HOIDON ALOITTAMINEN JA LOPETTAMINEN . . . . . . . . . . . . . . . . . . . . . . 89
H
OIDON ALOITTAMINEN 89
H
OIDON LOPETTAMINEN 91
H
UMIDAIRE 3i -ILMANKOSTUTTIMEN IRROTTAMINEN 91
YLEISIMMIN ESITETTYJÄ KYSYMYKSIÄ . . . . . . . . . . . . . . . . . . . . . . . . . . . . 91
PUHDISTUS JA HUOLTO . . . . . . . . . . . . . . . . . . . . . . . . . . . . . . . . . . . . . . . 93
H
UMIDAIRE 3i -ILMANKOSTUTTIMEN PURKAMINEN 93
H
UMIDAIRE 3i -KOSTUTTIMEN PUHDISTAMINEN 94
H
UMIDAIRE 3i -KOSTUTTIMEN KOKOAMINEN 94
H
UOLTO 95
ONGELMIEN SELVITTÄMINEN . . . . . . . . . . . . . . . . . . . . . . . . . . . . . . . . . . . 96
TEKNISET TIEDOT . . . . . . . . . . . . . . . . . . . . . . . . . . . . . . . . . . . . . . . . . . . . . 98
RAJOITETTU TAKUU . . . . . . . . . . . . . . . . . . . . . . . . . . . . . . . . . . . . . . . . . . 101
HAKEMISTO . . . . . . . . . . . . . . . . . . . . . . . . . . . . . . . . . . . . . . . . . . . . . . . . 103
84
Page 90

TERVETULOA
Kiitos, kun olet valinnut ResMed HUMIDAIRE 3i™ -ilmankostuttimen. HUMIDAIRE 3i
on tarkoitettu kostuttamaan hengitysteihin johdettavaa ilmaa CPAP (continuous
positive airway pressure, jatkuva hengitysteiden ylipaine) -hoidon aikana.
UMIDAIRE 3i liitetään ResMed S8™ -sarjan CPAP-virtausgeneraattoriin
H
yksinkertaisella napsautusmekanismilla.
Tässä käyttöohjeessa on tarvittavat tiedot H
käyttöä varten.
UMIDAIRE 3i -ilmankostuttimen oikeaa
MIKÄ HUMIDAIRE 3i ON?
HUMIDAIRE 3i on suunniteltu muodostamaan yhtenäisen yksikön ResMed CPAP
-virtausgeneraattorin kanssa. Tämä laiteyhdistelmä tarjoaa kostutettua ilmaa CPAPhoidossa, mikä voi auttaa tekemään hoidosta miellyttävämpää.
Olet ehkä havainnut CPAP-hoidon aikana nenän tukkoisuutta tai nenän, suun ja nielun
kuivumista. Tällaisia oireita aiheuttavat kuiva ilma, alhainen ilman lämpötila,
virtausgeneraattorin antama ilma tai ilman vuotaminen suun kautta. Kostea ilma voi
auttaa näitä kuivumisesta aiheutuvia oireita.
Katso virtausgeneraattorisi käyttöohjeesta, sopiiko se käytettäväksi H
-ilmankostuttimen kanssa. Tarkempia tietoja saat laitteiden myyjältä tai ResMededustajalta.
KÄYTTÄJÄN VASTUU
Sinulla tai laitteen käyttäjällä on yksistään vastuu henkilö- tai omaisuusvahingoista, jotka
aiheutuvat siitä, että:
• laitetta on käytetty vastoin laitteen käyttöohjeita
• laitetta on korjattu tai muutettu ohjeiden vastaisesti ja korjaukset tai muutokset on
tehnyt joku muu kuin valtuutettu huolto.
Lue tämä käyttöohje huolellisesti ennen kuin alat käyttää laitetta.
Tämän käyttöohjeen reunoissa on käytetty merkintätapoja ja symboleja, jotka
ilmaisevat erityisiä ja tärkeitä tietoja.
• Varoitus ilmaisee vammautumisen mahdollisuutta.
• Huomio ilmaisee erityisiä toimenpiteitä laitteen turvallisen ja tehokkaan käytön
kannalta.
• Huomautus antaa lisätietoja tai neuvoja, joista voi olla apua.
UMIDAIRE 3i
SUOMI
TERVETULOA
85
Page 91

HOITOA KOSKEVAT TIEDOT
KÄYTTÖTARKOITUS
HUMIDAIRE 3i on tarkoitettu kostuttamaan ResMed S8 -sarjan CPAP-laitteiden
puhaltamaa ilmaa. H
KONTRAINDIKAATIOT
HUMIDAIRE 3i ei sovellu käytettäväksi potilailla, joiden ylemmät (supraglottaaliset)
hengitystiet on ohitettu. Katso myös virtausgeneraattorin käyttöohjeessa mainitut
CPAP-hoitoon liittyvät kontraindikaatiot.
VAROITUKSET
Seuraavat ovat yleisluontoisia varoituksia. Erityiset varoitukset ja huomioitavat seikat
käyvät ilmi käyttöohjeen eri kohdista.
VAROITUKSET
!
• Käytä HUMIDAIRE 3i -ilmankostutinta vain tässä käyttöohjeessa kuvattuun
tarkoitukseen.
• Varmista, että vesisäiliö on tyhjä ja täysin kuiva ennen kuin alat kuljettaa
UMIDAIRE 3i -laitetta.
H
• HUMIDAIRE 3i on tarkoitettu käytettäväksi vain tiettyjen ResMed CPAP -laitteiden
kanssa. Älä käytä H
• HUMIDAIRE 3i -laitteen kanssa saa käyttää vain ResMedin suosittelemia letkuja ja
lisävarusteita. Muiden letkujen ja lisävarusteiden liittäminen voi aiheuttaa vammoja
tai vaurioittaa laitetta.
• HUMIDAIRE 3i ja siihen kuuluva letku on tarkoitettu vain yhden potilaan käyttöön,
eikä niitä saa käyttää kukaan muu. Näin vältytään tartuntavaaralta.
• Aseta HUMIDAIRE 3i -laite aina alemmalle tasolle kuin potilas. Jos se asetetaan
potilaan yläpuolelle tai samalle tasolle, maskiin voi valua letkun kautta lämmintä
vettä.
• On olemassa mahdollisuus, että jos laite asetetaan potilaan yläpuolelle ja laite
kaatuu tai letku täyttyy kondensoituneesta vedestä, maski voi täyttyä vedellä.
UMIDAIRE 3i -laitetta on siksi käytettävä erityistä varovaisuutta noudattaen
H
potilailla, jotka eivät pysty hallitsemaan hengitysteitään tai eivät pysty vetämään
maskia kasvoiltaan esim. halvauksen takia. Laitteen käytössä on punnittava siihen
liittyviä riskejä ja siitä saatavaa hyötyä.
• Älä yritä purkaa HUMIDAIRE 3i -liitäntäasemaa. Laitteen sisällä ei ole osia, joita
käyttäjä voi huoltaa. Laitetta saa huoltaa ja sen sisäosia saa korjata vain valtuutettu
huoltoliike.
• Ole varovainen, kun käsittelet HUMIDAIRE 3i -laitetta. Lämmityslevy ja vesisäiliössä
oleva vesi voivat olla kuumia.
UMIDAIRE 3i on tarkoitettu vain lääkärin määräämään käyttöön.
UMIDAIRE 3i -kostutinta minkään muun CPAP-laitteen kanssa.
86
Page 92

• Jos HUMIDAIRE 3i -liitäntäaseman päälle kaatuu vahingossa jotain nestettä, irrota
CPAP-laite pistorasiasta. Irrota liitäntäasema CPAP-laitteesta ja anna liitäntäaseman
valua ja kuivua ennen käyttöä.
• Älä käytä HUMIDAIRE 3i -kostutinta, jos CPAP-laitteen virtajohto tai pistoke on
rikkinäinen.
• Älä käytä HUMIDAIRE 3i -laitetta, jos se ei toimi kunnolla tai jos sen jokin osa on
pudonnut tai mennyt rikki.
• Katso, ettei CPAP-laitteen virtajohto joudu kosketuksiin kuumien pintojen kanssa.
• Älä pudota tai laita mitään laitteen aukkoihin tai letkuihin.
• Älä käytä HUMIDAIRE 3i -laitetta tiloissa, joissa on syttyviä tai räjähdysherkkiä
materiaaleja.
• Räjähdysvaara — älä käytä laitetta syttyvien anestesia-aineiden lähettyvillä.
• Jos virtausgeneraattorin kanssa käytetään happea, hapen virtaus on laitettava pois
päältä, kun laite ei ole päällä.
Jos happi on jätetty virtaamaan, laita virtausgeneraattori pois päältä ja odota 30
minuuttia ennen kuin laitat virtausgeneraattorin taas päälle.
Selitys: Jos CPAP-laite ei ole päällä ja hapen virtaus on jätetty päälle, ilmaletkuun
virtaava happi voi kerääntyä CPAP-laitekotelon sisään ja saada aikaan
tulipalovaaran. Tämä koskee useimpia CPAP-laitetyyppejä.
• Happi edesauttaa palamista. Happea ei saa käyttää tupakoitaessa tai avotulen
läheisyydessä.
• Varmista aina, että virtausgeneraattorista virtaa ilmaa ennen kuin laitat hapen
syötön päälle.
• Laita hapen syöttö aina pois päältä ennen kuin katkaiset laitteen ilmanvirtauksen.
Huomautus: Kun lisähappea annetaan kiinteällä virtausnopeudella, hengitetyn hapen
pitoisuus vaihtelee riippuen siitä, mihin järjestelmän kohtaan happea annetaan,
paineasetuksista, potilaan hengitystavasta, valitusta maskista ja ilman
vuotamisnopeudesta.
SUOMI
HUMIDAIRE 3i -LAITTEEN OSAT
Katso kuvasivun kohdassa A olevia kuvia.
HUMIDAIRE 3i -LAITTEEN OSAT
87
Page 93

HUMIDAIRE 3i -LAITTEEN KÄYTTÖÖNOTTO
VAROITUS
!
Varmista, että virtausgeneraattorissa ei ole virta päällä ennen kuin liität
HumidAire 3i -ilmankostuttimen.
ETUKANNEN IRROTTAMINEN (JOS SELLAINEN ON)
Katso kuvasivun kohdassa B olevia kuvia.
Virtausgeneraattorissa voi olla etukansi (B-1). Ennen kuin voit liittää H
-ilmankostuttimen, paina etukannen (B-2) alla olevaa painiketta ja vedä etukansi pois
virtausgenerattorista (B-3 ja B-4).
Huomautukset
• Kun laitat etukannen paikoilleen, katso, että se tulee kohdalleen virtausgeneraattorin
(B-4) kanssa ja työnnä sitä lujasti niin, että se naksahtaa paikoilleen.
• Muista ottaa etukansi mukaan, kun lähdet matkoille, jos käytät CPAP-hoitoa ilman
kostutinta.
LIITÄNTÄTULPAN IRROTTAMINEN JA SÄILYTTÄMINEN
Katso kuvasivun kohdassa C olevia kuvia.
Ennen kuin liität H
virtausgeneraattorista (C-1) ja kiinnitä se liitäntäaseman (C-2) taakse.
HUMIDAIRE 3i -ILMANKOSTUTTIMEN LIITTÄMINEN
Katso kuvasivun kohdassa D olevia kuvia.
UMIDAIRE 3i -ilmankostuttimen, irrota liitäntätulppa
UMIDAIRE 3i,
88
1 Aseta HUMIDAIRE 3i kohdalleen virtausgeneraattorin (D-1) kanssa ja työnnä laitteita
vastakkain, kunnes ne naksahtavat paikoilleen (D-2).
VAROITUS
!
• HumidAire 3i -liitäntäaseman saa liittää tai irrottaa vain, kun vesisäiliö on tyhjä.
• On varottava, ettei virtausgeneraattoriin pääse vettä. Älä kuljeta
virtausgeneraattoria niin, että HumidAire 3i on liitettynä siihen.
Laita virtajohto virtausgeneraattorin takana olevaan liitäntään. Liitä virtajohdon toinen
2
pää pistorasiaan (D-3).
Huomautus: Jos virtausgeneraattori saa virran tasavirransyötöstä, HumidAire 3i ilmankostutin ei saa virtaa ja ilmankostutus ei ole yhtä tehokasta.
Aseta laiteyhdistelmä tasaiselle, tukevalle alustalle sängyn viereen nukkumakorkeutta
3
alemmalle tasolle. Varmista, että alusta kestää lämpöä ja/tai kosteutta, tai suojaa alusta
sopivalla tavalla.
HUOMIO
!
Katso, ettet sijoita laitetta niin, että siihen voi kompastua ja laite voi kaatua.
Page 94

Liitä ilmaletkun toinen pää lujasti HUMIDAIRE 3i -ilmankostuttimen ilmantuloaukkoon
4
ja toinen pää maskiin (D-4).
VESISÄILIÖN TÄYTTÄMINEN
Katso kuvasivun kohdassa E olevia kuvia.
VAROITUS
!
Ole varovainen, kun käsittelet HumidAire 3i -laitetta. Vesi ja vesisäiliön pohjaosa
voivat olla kuumia. Anna lämmityslevyn ja säiliössä olevan veden jäähtyä
10 minuuttia.
1 Avaa kannen lukitus (E-1) ja nosta kantta niin, että se on pystyssä (E-2).
Irrota vesisäiliö (E-3) ja täytä se varovasti raikkaalla, puhtaalla vedellä (E-4). Katso, että
2
veden määrä jää enimmäismäärää ilmaisevan merkin (E-4a) alapuolelle.
Varmista aina, että vesisäiliö on puhdas. Ks. “Puhdistus ja huolto” sivulla 93.
VAROITUS
!
Älä täytä vesisäiliötä liian täyteen, koska silloin vettä voi päästä virtausgeneraattoriin
ja hengitysletkuun.
HUOMIO
!
Älä käytä mitään lisäaineita (esim. tuoksuöljyjä tai hajusteita). Ne voivat heikentää
HumidAire 3i -ilmankostuttimen tehoa ja/tai vaurioittaa vesisäiliön
valmistusmateriaaleja.
Aseta vesisäiliö varovasti ilmankostuttimen liitäntäasemaan (E-5) ja lukitse kansi (E-6 ja
3
E-6a).
H
UMIDAIRE 3i on nyt käyttövalmis.
HOIDON ALOITTAMINEN JA LOPETTAMINEN
HOIDON ALOITTAMINEN
Katso kuvasivun kohdassa F olevia kuvia.
1 Kun HUMIDAIRE 3i on liitettynä ja virtausgeneraattorissa on virta päällä, merkkivalo
syttyy H
lämmitystoiminnosta ilmoittava viesti (ei kaikissa malleissa).
Kun toiminto on käytössä, ilmankostuttimen vesi lämpenee ennen hoidon aloittamista.
Jos lämmitystoiminto on käytettävissä, käytä sitä lämmittääksesi ilmankostuttimen
2
veden ennen hoidon aloittamista. Ohita tämä vaihe, jos haluat aloittaa hoidon heti.
UMIDAIRE 3i -ilmankostuttimessa. Näytölle tulee näkyviin
VIIVE: 10min
valikko
lämmit
HOIDON ALOITTAMINEN JA LOPETTAMINEN
SUOMI
89
Page 95

ÄMMITYSTOIMINTO (EI KAIKISSA MALLEISSA)
L
Huomautus: Katso virtausgeneraattorisi käyttöohjeesta, onko tämä toiminto
käytettävissä.
Käynnistä lämmitys näin:
i. Valitse Lämmitys painamalla ohjauspaneelin oikeanpuoleista näppäintä.
Seuraava viesti näkyy 2 sekunnin ajan:
KOSTUTIN
LÄMMITYS
ii. Kahden sekunnin kuluttua näkyviin avautuu LÄMMITYS -näyttö.
LÄMMITYS
valikko lopeta
iii. Kun H
UMIDAIRE 3i on lämmitystilassa, voit:
• käynnistää hoidon milloin vain painamalla Start/Stop -näppäintä,
• selata valikoita painamalla Valikko (vasenta näppäintä),
• päättää lämmitystoiminnon milloin vain painamalla Lopeta (oikeanpuoleista
näppäintä).
Lämmitystoiminto menee automaattisesti pois päältä 30 minuutin kuluttua, jos hoitoa
ei ole aloitettu.
Käännä ilmankosteuden säädin halutulle asetukselle. asetuksella lämmitettävä
3
ilmankostutus menee pois päältä ja ilmankostutin kostuttaa ilmaa vain hiukan.
Merkkivalo jää palamaan ja ilmaisee valmiustilaa. Asetusta 6 ( ) käyttäen
ilmankostutin antaa kosteinta ilmaa.
On suositeltavaa käyttää aluksi asetusarvoa 3 ( ). Käännä säädintä tarpeen mukaan
suuremmalle tai pienemmälle niin, että löydät miellyttävimmän ja tehokkaimman
asetuksen. Voit säätää kostutusasetusta milloin vain.
Tarkoituksena on, että maskiin tuleva ilma on kosteaa, mutta että vältetään veden
kondensoituminen ilmaletkuun. Ympäristön ilman lämpötila ja kosteus vaikuttavat
tarvittavaan asetusarvoon.
Ks. kohta “Yleisimmin esitettyjä kysymyksiä”, josta saat vihjeitä oikean asetuksen
löytämiseen.
Sovita maski sen käyttöohjeen mukaisesti.
4
Paina ohjauspaneelin Käynnistys/pysäytys -näppäintä. Tai jos
5
virtausgeneraattorissasi on SmartStart™-toiminto, voit vain alkaa hengittää maskiin, niin
ilma alkaa virrata.
Huomautus: Käytön aikana merkkivalo tulee kirkkaammaksi, mikä tarkoittaa, että
lämmityselementti on toiminnassa. HumidAire 3i -ilmankostuttimen lämmityselementti on
nopea, jolloin lämmitysajat ovat hyvin lyhyitä. Älä huolestu, vaikka merkkivalo kirkastuisi
vain pieneksi hetkeksi.
90
Asetu makuulle ja laita ilmaletku niin, että pystyt kääntymään nukkuessasi.
6
Page 96

VAROITUS
!
Älä jätä letkua liian pitkäksi sängyn pääpuolessa. Letku voi kiertyä pään ja kaulan
ympärille, kun nukut.
HOIDON LOPETTAMINEN
Voit lopettaa hoidon milloin vain ottamalla maskin pois ja painamalla Käynnistys/
pysäytys -näppäintä. Tai jos virtausgeneraattorissa on käytössä SmartStart-toiminto,
ota vain maski pois kasvoiltasi, niin hoito päättyy.
Jotkut virtausgeneraattorit puhaltavat hiukan ilmaa myös hoidon lopettamisen jälkeen.
Tätä voi jatkua jopa tunnin ja tarkoituksena on auttaa lämmityslevyä jäähtymään. Voit
kuitenkin irrottaa laitteen pistorasiasta milloin vain ja antaa lämmityslevyn jäähtyä ilman
ilmapuhallusta.
HUMIDAIRE 3i -ILMANKOSTUTTIMEN IRROTTAMINEN
Katso kuvasivun kohdassa G olevia kuvia.
1 Irrota virtajohto pistorasiasta (G-1).
VAROITUS
!
Ole varovainen, kun käsittelet HumidAire 3i -laitetta. Vesi ja vesisäiliön pohjaosa
voivat olla kuumia. Anna lämmityslevyn ja säiliössä olevan veden jäähtyä 10 minuuttia
(G-2).
Irrota vesisäiliö liitäntäasemasta (G-3).
2
Paina suurta hopeanväristä painiketta, joka on keskellä, liitäntäaseman alla,
3
(G-4) ja vedä H
UMIDAIRE 3i ja virtausgeneraattori erilleen (G-5).
Suuri hopeanvärinen
painike
NÄKYMÄ ALAPUOLELTA
Huomautus: Kiinnitä liitäntätulppa lujasti virtausgeneraattoriin.
YLEISIMMIN ESITETTYJÄ KYSYMYKSIÄ
MIKSI MASKIIN JA/TAI LETKUUN KONDENSOITUU VETTÄ?
Maskiin tai ilmaletkuun voi kondensoitua paljon vettä. Näin voi käydä joinain
vuodenaikoina varsinkin, jos huoneen lämpötila on alhainen tai letkuun puhaltaa viileää
ilmaa. Käännä säädintä pienemmälle asetukselle, kunnes kondensoituminen vähenee.
Voit joutua joinain vuodenaikoina säätämään ilmankostutusasetusta.
YLEISIMMIN ESITETTYJÄ KYSYMYKSIÄ
SUOMI
91
Page 97

NKO VESISÄILIÖSSÄ KÄYTETTÄVÄ TISLATTUA VETTÄ?
O
Tislatun veden käyttö pidentää vesisäiliön käyttöikää ja vähentää mineraalikertymiä.
Tarkempia tietoja kohdassa “HumidAire 3i -kostuttimen puhdistaminen” sivulla 94.
MITÄ TEEN, JOS KUIVUUDESTA JOHTUVAT OIREET JATKUVAT?
Jos kuivuudesta johtuvat oireet jatkuvat, kostutusasetus on säädetty liian alhaiseksi, jotta
kostutus olisi tehokasta. Käännä ilmankostutussäädintä asteittain suuremmalle
muutamaksi yöksi, kunnes oireet häviävät.
Jos kuivuudesta johtuvat oireet jatkuvat, vaikka olet suurentanut ilmankostutusasetusta,
voi olla, että hengität suun kautta. Suun kautta hengittäminen tai ilman vuotaminen suun
kautta aiheuttavat ylempien hengitysteiden kuivumista ja ärsytystä. Jos tästä on syntynyt
ongelma, kokokasvomaskista tai leukahihnasta voi olla apua. Kysy neuvoja sinua
hoitavalta lääkäriltä tai laitteiden myyjältä.
92
Page 98

PUHDISTUS JA HUOLTO
Vesisäiliö, sen kansi ja kannen tiiviste on puhdistettava ja huollettava säännöllisin
väliajoin tässä luvussa olevien ohjeiden mukaisesti.
HUMIDAIRE 3i -ILMANKOSTUTTIMEN PURKAMINEN
Katso kuvasivun kohdassa H olevia kuvia.
VAROITUS
!
Sähköiskunvaara. Älä upota virtausgeneraattoria, liitäntäasemaa tai virtajohtoa
veteen. Irrota laitteen virtajohto aina pistorasiasta ennen puhdistamista ja varmista,
että laite on kuiva ennen kuin liität virtajohdon pistorasiaan.
1 Irrota virtajohto pistorasiasta (H-1).
VAROITUS
!
Ole varovainen, kun käsittelet HumidAire 3i -laitetta. Vesi ja vesisäiliön pohjaosa
voivat olla kuumia. Anna lämmityslevyn ja säiliössä olevan veden jäähtyä 10 minuuttia
(H-2).
Irrota vesisäiliö liitäntäasemasta (H-3) ja kaada pois jäljellä oleva vesi (H-4).
2
Irrota ilmaletku ilmantuloaukosta (H-5).
3
Taivuta varovaisesti jompikumpi kannen ulokkeista poispäin ja ylös liitäntäasemasta,
4
kunnes kansi irtoaa kokonaan (H-6 – H-8). Irrota kannen tiiviste kannesta (H-9).
POHJAOSAN LEVY
Pohjaosan levyä ei pidä irrottaa vesisäiliöstä. Jos pohjaosan levy irrotetaan vesisäiliöstä,
se laitetaan paikalleen näin:
i. Vesisäiliö käännetään ylösalaisin.
ii. Pohjaosan levy asetetaan kuvan mukaan niin, että sen avonainen puoli on alaspäin.
Pohjaosan levy painetaan sitten lujasti kiinni vesisäiliöön.
SUOMI
pohjaosan levy
HUOMIO
!
Vesisäiliö voi vuotaa, jos pohjaosan levyä ei ole laitettu kunnolla paikalleen.
Huomautus: Pohjaosan levyä ei saa kiinni vesisäiliöön, jos se on ylöspäin. Ennen kuin
laitat pohjaosan levyn paikalleen, varmista, että O-rengas on paikallaan pohjaosan levyn
urassa.
PUHDISTUS JA HUOLTO
93
Page 99

HUMIDAIRE 3i -KOSTUTTIMEN PUHDISTAMINEN
HUOMIO
!
• Älä käytä mitään seuraavista aineista HumidAire 3i -ilmankostuttimen
puhdistuksessa. Nämä aineet voivat vaurioittaa ilmankostutinta ja lyhentää sen
käyttöikää.
• valkaisuaine-, kloori-, alkoholi- tai ammoniakkipohjaiset liuokset
• kosteuttavat tai antibakteerisia aineita sisältävät tai glyseriinipohjaiset
saippuat
• vedenpehmennysaineet tai muut kuin hyväksytyt sakanpoistoaineet.
• Älä pese vesisäiliötä astianpesukoneessa.
VESISÄILIÖ
JOKA PÄIVÄ
Pese vesisäiliö ja ilmaletku lämpimällä vedellä ja miedolla pesuaineella (ks. edellinen
Huomio-kohta). Huuhdo osat perusteellisesti puhtaalla vedellä ja anna niiden kuivua
suoralta auringonvalolta suojattuina.
KERRAN VIIKOSSA
Tarkista, ettei vesisäiliössä ole kulumia tai vaurioita. Vaihda vesisäiliö, jos sen jossakin
osassa on halkeamia, kulumia tai jos se on muuttunut himmeäksi. Vaihda vesisäiliö heti,
jos siitä vuotaa vettä.
Jos vesisäiliöön muodostuu valkeaa jauhetta tai epäpuhtauksia:
i. Täytä vesisäiliö enimmäismäärän merkkiin saakka liuoksella, jossa on 1 osa etikkaa ja
10 osaa vettä.
ii. Anna liuoksen vaikuttaa 10 minuuttia.
iii. Kaada liuos pois ja huuhdo vesisäiliö puhtaalla vedellä.
KANSI JA KANNEN TIIVISTE
Tarkista kerran viikossa, että kannessa tai sen tiivisteessä ei ole kulumia tai vaurioita.
Vaihda vaurioituneet osat. Pese kansi ja kannen tiiviste tarvittaessa lämpimällä vedellä
ja miedolla pesuaineella (ks. edellinen Huomio-kohta). Huuhdo osat perusteellisesti
puhtaalla vedellä ja anna niiden kuivua suoralta auringonvalolta suojattuina.
LIITÄNTÄASEMA
Pyyhi liitäntäaseman ulkopuoli (ja liitännän kansiosa) silloin tällöin kostealla
puhdistusliinalla.
94
HUMIDAIRE 3i -KOSTUTTIMEN KOKOAMINEN
Katso kuvasivun kohdassa I olevia kuvia.
Kokoa osat, kun ne ovat puhtaat ja kuivat.
1 Laita kannen tiiviste paikoilleen kannen uriin (I-1) ja paina reunoja pitkin niin, että tiiviste
tulee kunnolla paikoilleen (I-2).
Page 100

Laita toinen kannen ulokkeista liitäntäaseman saranakohtaan (I-3) ja taivuta toinen
2
uloke varovaisesti omalle paikalleen (I-4 ja I-5).
Kannen pitäisi aueta ja mennä kiinni vaivatta, kun se on kunnolla kiinni liitäntäasemassa.
Aseta vesisäiliö takaisin ilmankostuttimen liitäntäasemaan (I-6).
3
HUOLTO
Normaalissa käytössä HUMIDAIRE 3i -ilmankostuttimen vesisäiliö on vaihdettava joka
toinen vuosi.
Tämä tuote (H
tarkastettavaksi 5 vuoden kuluttua valmistuspäivästä. Ennen tätä ajankohtaa laitteen on
tarkoitus toimia turvallisesti ja luotettavasti sillä edellytyksellä, että laitetta käytetään ja
hoidetaan ResMedin ohjeiden mukaisesti. ResMedin takuuta koskevat tiedot on
toimitettu laitteen mukana, kun laite on hankittu. Jos laitteessa ilmenisi jotain
epätavallista, sen kanssa, kuten muiden sähkölaitteiden, on oltava varovainen ja laite on
toimitettava valtuutettuun ResMed-huoltoon tarkastettavaksi.
UMIDAIRE 3i), on annettava valtuutetun ResMed-huollon
PUHDISTUS JA HUOLTO
SUOMI
95
 Loading...