

Page 1
HumidAire 3i™
User’s Manual
English • Français • Español • Português
Page 2
HumidAire 3i™
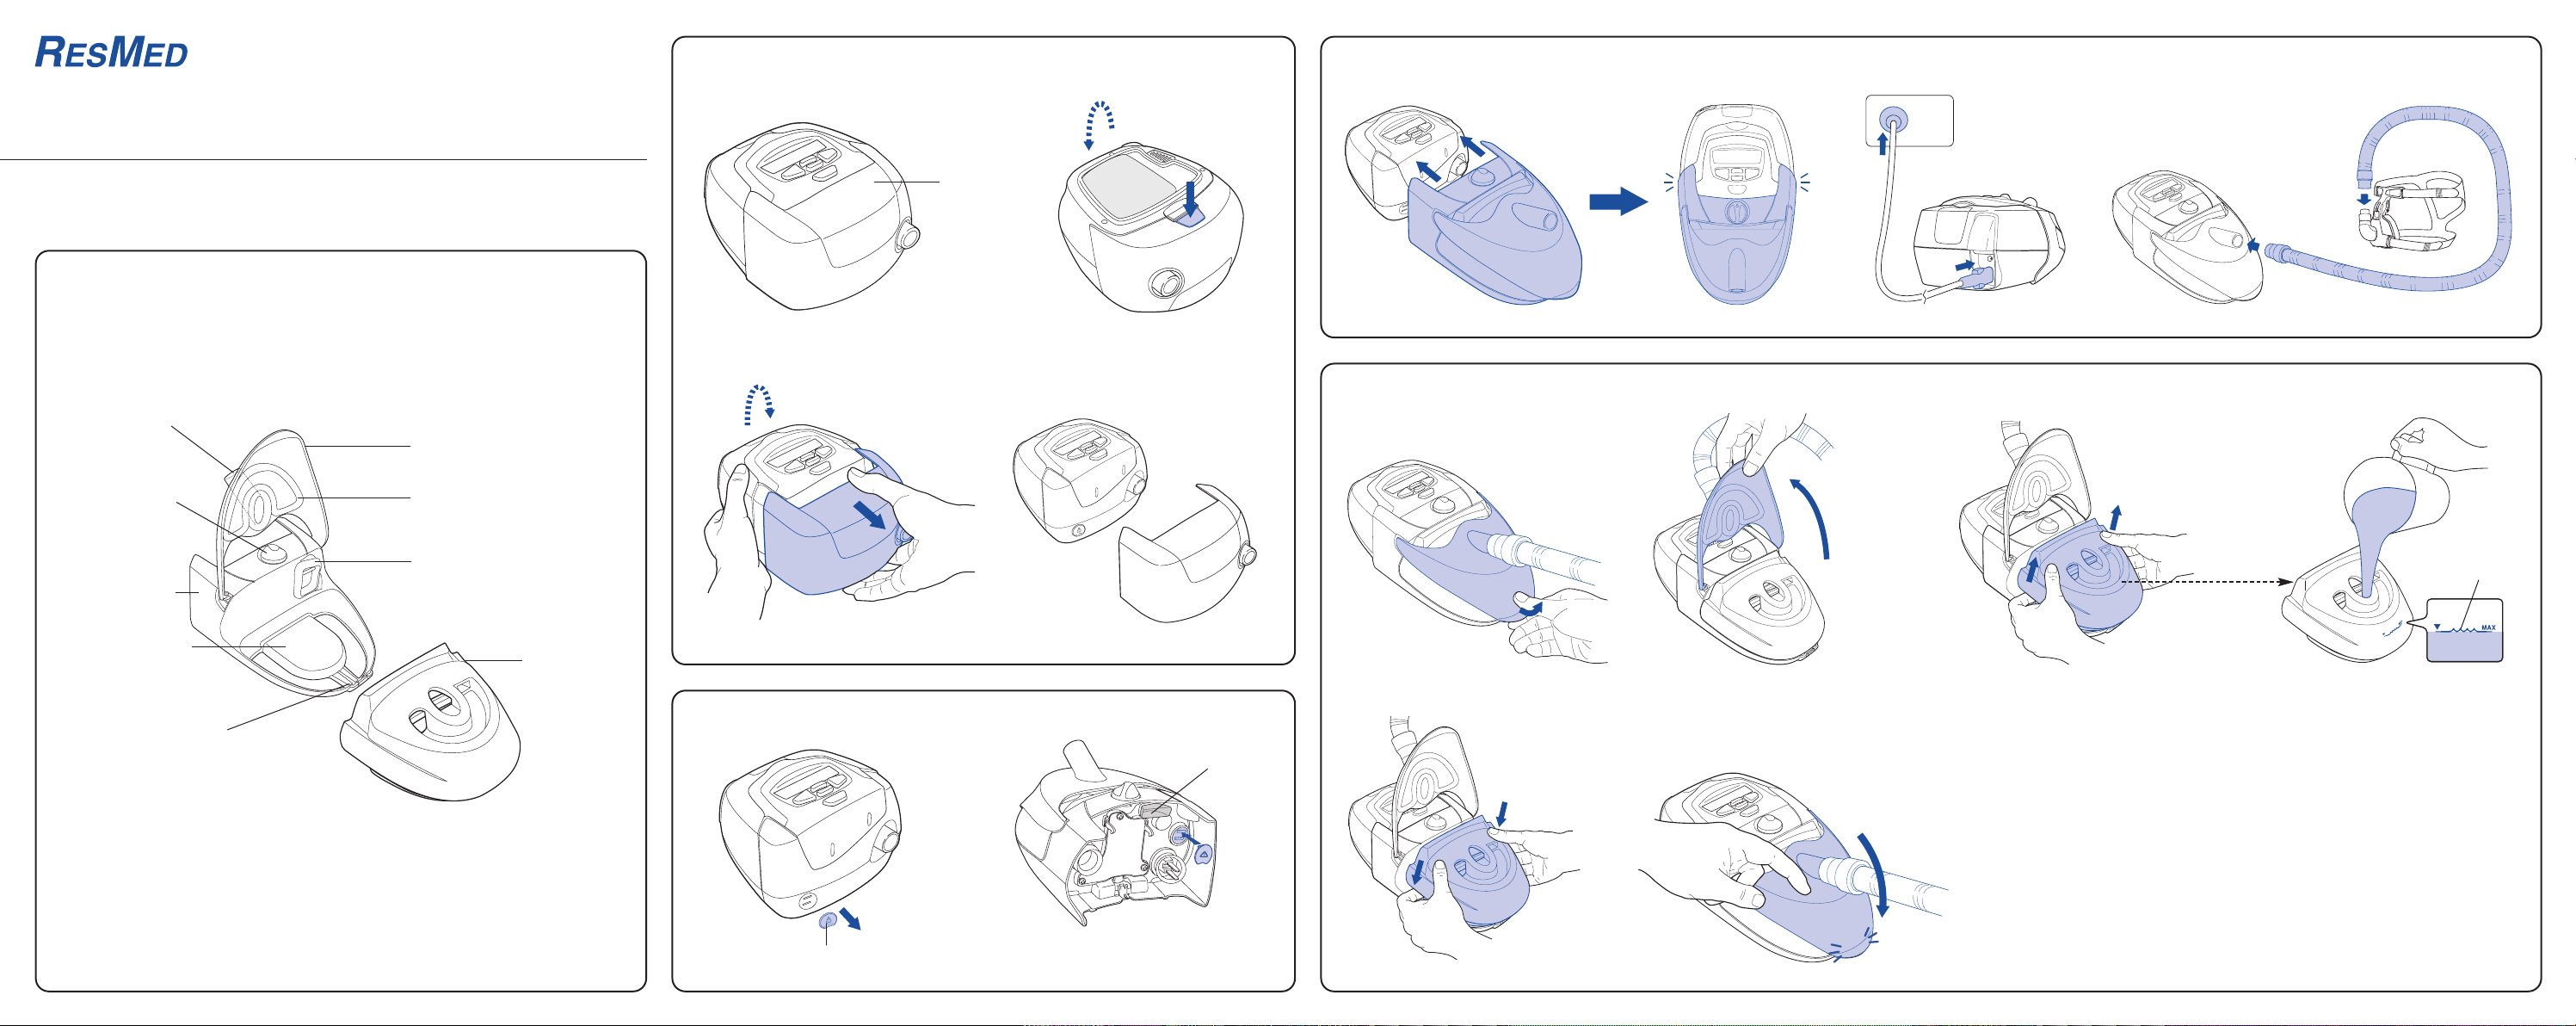
REMOVING THE FRONT CAP (IF FITTED) / RETRAIT DU CAPOT AVANT (LE CAS
ECHEANT) / PARA QUITAR LA CUBIERTA DELANTERA (SI ESTÁ INSTALADA) /
B
REMOÇÃO DA TAMPA DA FRENTE (NO CASO DESTA SE ENCONTRAR EM POSIÇÃO)
ATTACHING YOUR HUMIDAIRE 3i / FIXATION DE VOTRE HUMIDAIRE 3i / ACOPLE DEL HUMIDAIRE 3i / COMO FIXAR O SEU HUMIDAIRE 3i
D
Component of 338282/3
Composant du 338282/3
Componente de 338282/3
Componente de 338282/3
A
Air outlet / Sortie
d'air / Salida de aire /
Saída de ar
Control dial /
Bouton de réglage /
Escala de control /
Botão de controle
Docking station /
Support / Estación
de carga / Estação de
ancoragem
Heater plate / Plaque
chauffante / Placa de
calefacción / Placa de
aquecimento
Latch / Languette /
Cerrojo / Trinco
ILLUSTRATIONS
ILLUSTRATIONS
FIGURAS
ILUSTRAÇÕES
Cover / Capot / Cubierta / Tampa
Cover seal / Joint du capot / Junta
de la cubierta / Vedação da tampa
Connector seal / Joint du
connecteur / Junta conectora /
Vedação do conector
Water chamber /
Réservoir / Cámara
de agua / Câmara
de água
Front cap /
Capot avant /
Cubierta
delantera /
Tampa da frente
12
E
3
REMOVING AND STORING THE CONNECTOR PLUG / RETRAIT ET RANGEMENT DU
CACHE DU CONNECTEUR / PARA QUITAR Y GUARDAR EL ENCHUFE CONECTOR / REMOÇÃO
C
E ARMAZENAGEM DO TAMPÃO DO CONECTOR
4
(a)
1 4
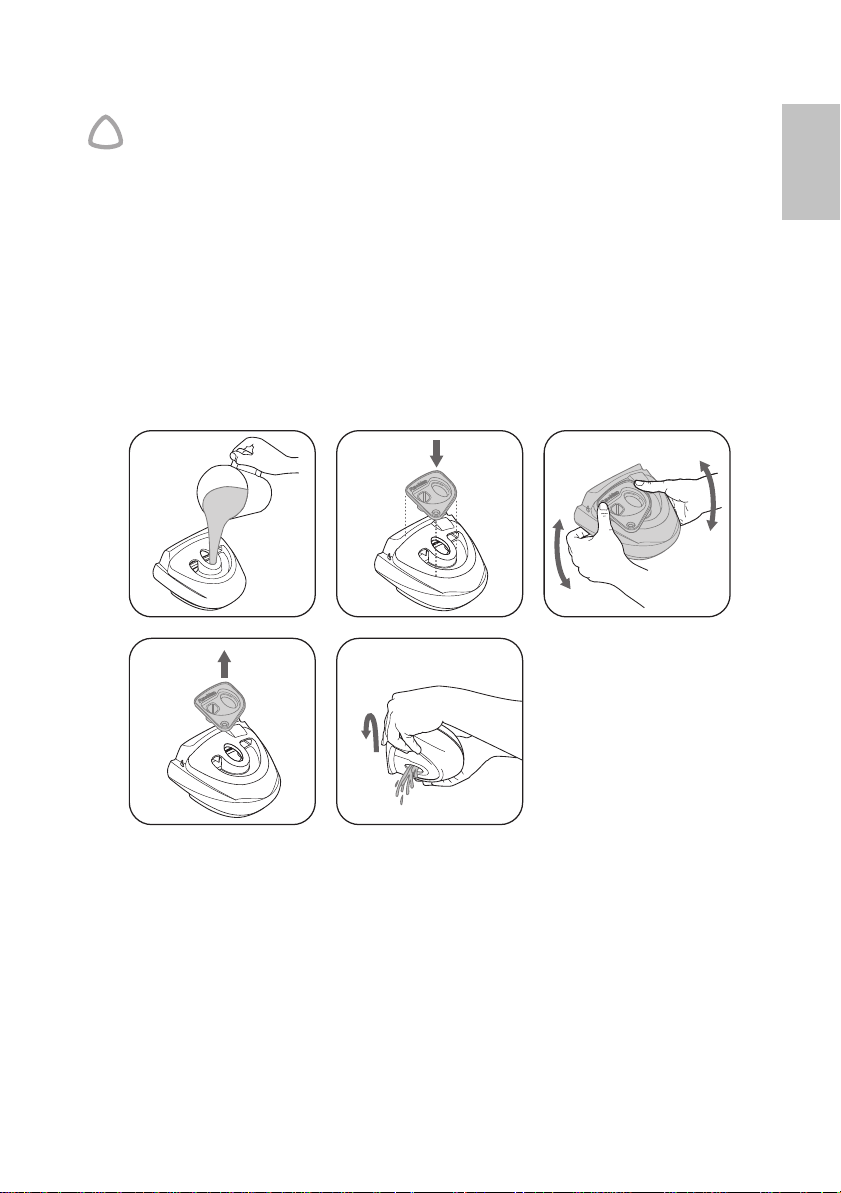
FILLING THE WATER CHAMBER / REMPLISSAGE DU RESERVOIR / LLENADO DE LA CÁMARA DE AGUA / ENCHER A CÂMARA DE ÁGUA
1
2
3
234
(a)
© 2006 ResMed Ltd.
1
Connector plug / Cache du connecteur /
Enchufe conector / Tampão do conector
2
© 2006 ResMed Ltd. © 2006 ResMed Ltd.
56
© 2006 ResMed Ltd. © 2006 ResMed Ltd.
Page 3
STARTING YOUR TREATMENT / DEBUT DE VOTRE TRAITEMENT / INICIO DEL TRATAMIENTO / INICIAR O TRATAMENTO
10 min
10 min
F
Up/Down keys / Touches de déplacement vers
le haut et vers le bas / Teclas Superior/Inferior /
Left key / Touche de gauche /
Tecla Izquierda / Tecla Esquerda
Control panel / Panneau de contrôle /
Panel de control / Painel de controle
Control dial / Bouton de réglage /
Escala de control / Botão de controle
Indicator light / Témoin lumineux /
Luz indicadora / Indicador luminoso
DETACHING YOUR HUMIDAIRE 3i / RETRAIT DE VOTRE HUMIDAIRE 3i / DESACOPLAMIENTO DEL HUMIDAIRE 3i /
SEPARANDO O SEU HUMIDAIRE 3i
G
Teclas Para cima/Para baixo
Right key / Touche de droite /
Tecla Derecha / Tecla Direita
Start/Stop key / Touche Marche/Arrêt /
Tecla de Inicio/Detención /
Tecla de Iniciar/Parar
H
1
© 2006 ResMed Ltd.© 2006 ResMed Ltd.
DISSASEMBLING YOUR HUMIDAIRE 3i / DEMONTAGE DE VOTRE HUMIDAIRE 3i / DESMONTAJE DEL HUMIDAIRE 3i /
COMO DESMONTAR O SEU HUMIDAIRE 3i
2
3
RE-ASSEMBLING YOUR HUMIDAIRE 3i / REMONTAGE DE VOTRE HUMIDAIRE 3i /
MONTAJE DEL HUMIDAIRE 3i / COMO VOLTAR A MONTAR O SEU HUMIDAIRE 3i
I
1 2
1
Large silver
button / Gros
bouton argenté /
Botón plateado
grande / Botão
prateado grande
UNDERSIDE VIEW / VUE DU DESSOUS /
4
VISTA INFERIOR / VISTA INFERIOR
4
2
3
Press button and pull apart /
Appuyez sur le bouton et tirez
pour détacher / Oprima el botón y
separe / Premir o botão e separar
7
5
56
8
9
© 2006 ResMed Ltd.
34
5
6
© 2006 ResMed Ltd.
Page 4

USER’S MANUAL 1
ANUEL UTILISATEUR 21
M
M
ANUAL DEL USUARIO 43
M
ANUAL DO UTILIZADOR 65
HUMIDAIRE 3i™
ENGLISHFRANÇAISPORTUGUÊS ESPAÑOL
Page 5

ResMed Ltd (Manufacturer) 1 Elizabeth Macarthur Drive Bella Vista NSW 2153 Australia
ResMed Corp (US Designated Agent) 14040 Danielson Street Poway CA 92064-6857 USA
ResMed (UK) Ltd (EU Authorized Representative) 65 Milton Park Abingdon Oxfordshire OX14 4RX UK
ResMed Offices Australia, Austria, Brazil, Finland, France, Germany, Hong Kong, Japan, Malaysia, Netherlands,
New Zealand, Singapore, Spain, Sweden, Switzerland, UK, USA (see www.resmed.com for contact details).
Patents and designs pending.
HumidAire, HumidAire 3i, S8 and SmartStart are trademarks of ResMed Ltd and HumidAire is registered in U.S. Patent
and Trademark Office.
© 2006 ResMed Ltd.
Page 6

HumidAire 3i™
USER’S MANUAL
English
ENGLISH
1
Page 7

CONTENTS
WELCOME . . . . . . . . . . . . . . . . . . . . . . . . . . . . . . . . . . . . . . . . . . . . . . . . . . . 3
WHAT IS THE HUMIDAIRE 3i? . . . . . . . . . . . . . . . . . . . . . . . . . . . . . . . . . . . 3
OUR RESPONSIBILITY 3
Y
MEDICAL INFORMATION . . . . . . . . . . . . . . . . . . . . . . . . . . . . . . . . . . . . . . . 4
NTENDED USE 4
I
C
ONTRAINDICATIONS 4
W
ARNINGS 4
COMPONENTS OF YOUR HUMIDAIRE 3i . . . . . . . . . . . . . . . . . . . . . . . . . . 5
SETTING UP YOUR HUMIDAIRE 3i FOR USE . . . . . . . . . . . . . . . . . . . . . . . 6
EMOVING THE FRONT CAP (IF FITTED) 6
R
R
EMOVING AND STORING THE CONNECTOR PLUG 6
A
TTACHING YOUR HUMIDAIRE 3i 6
F
ILLING THE WATER CHAMBER 7
STARTING AND STOPPING TREATMENT . . . . . . . . . . . . . . . . . . . . . . . . . . . 7
TARTING YOUR TREATMENT 7
S
S
TOPPING YOUR TREATMENT 9
D
ETACHING YOUR HUMIDAIRE 3i 9
FREQUENTLY ASKED QUESTIONS . . . . . . . . . . . . . . . . . . . . . . . . . . . . . . . . 9
CLEANING AND MAINTENANCE . . . . . . . . . . . . . . . . . . . . . . . . . . . . . . . . . 10
ISASSEMBLING YOUR HUMIDAIRE 3i 10
D
C
LEANING YOUR HUMIDAIRE 3i 11
R
EASSEMBLING YOUR HUMIDAIRE 3i 12
S
ERVICING 12
TROUBLESHOOTING . . . . . . . . . . . . . . . . . . . . . . . . . . . . . . . . . . . . . . . . . . 13
TECHNICAL SPECIFICATIONS . . . . . . . . . . . . . . . . . . . . . . . . . . . . . . . . . . . 15
LIMITED WARRANTY . . . . . . . . . . . . . . . . . . . . . . . . . . . . . . . . . . . . . . . . . . 17
INDEX . . . . . . . . . . . . . . . . . . . . . . . . . . . . . . . . . . . . . . . . . . . . . . . . . . . . . . 19
2
Page 8

WELCOME
Thank you for choosing the ResMed HUMIDAIRE 3i™ humidifier. The HUMIDAIRE 3i
is designed to humidify (moisten) the air delivered to your airway during CPAP
(continuous positive airway pressure) therapy. The H
ResMed S8™ Series CPAP flow generator with a simple ‘click-in’ mechanism.
This user manual contains the information you need for the correct use of your
H
UMIDAIRE 3i.
UMIDAIRE 3i attaches to your
WHAT IS THE HUMIDAIRE 3i?
The HUMIDAIRE 3i is designed to form a single unit with a ResMed CPAP flow
generator. The combined unit provides humidification during CPAP therapy, and can
make therapy more comfortable.
You may have experienced nasal congestion or dryness of the nose, mouth, or throat
during CPAP therapy. These symptoms are caused by dry climates, cold air
temperatures, the airflow delivered from your flow generator, or mouth leak. Moist air
may help relieve these symptoms of dryness.
Refer to your flow generator manual to see whether it is compatible with the
H
UMIDAIRE 3i. Contact your equipment supplier or ResMed office if you require
further information.
YOUR RESPONSIBILITY
You or the user of this system shall have sole responsibility and liability for any injury
to persons or damage to property resulting from:
• operation which is not in accordance with the operating instructions supplied
• maintenance or modifications carried out unless in accordance with authorized
instructions and by authorized persons.
Please read this manual carefully before use.
This manual contains special terms and icons that appear in the margins to draw your
attention to specific and important information.
• Warning alerts you to possible injury.
• Caution explains special measures for the safe and effective use of the device.
• Note is an informative or helpful note.
ENGLISH
WELCOME
3
Page 9

MEDICAL INFORMATION
INTENDED USE
The HUMIDAIRE 3i is indicated for humidification of the air delivered from the ResMed
S8 Series CPAP devices. The H
physician.
CAUTION (USA ONLY)
!
Federal law restricts this device to sale by or on the order of a physician.
CONTRAINDICATIONS
The HUMIDAIRE 3i is contraindicated for use with patients whose upper (supraglottic)
airway has been bypassed. Please also refer to the relevant system manual for
contraindications associated with CPAP therapy.
WARNINGS
The following are general warnings. Specific warnings and cautions appear next to the
relevant instructions in the manual.
WARNINGS
!
• Use the HUMIDAIRE 3i only for its intended use as described in this manual.
• Make sure that the water chamber is empty before transporting the
H
UMIDAIRE 3i.
• The HUMIDAIRE 3i is designed only for use with specific ResMed CPAP devices.
Do not use the H
• The HUMIDAIRE 3i should only be used with delivery tubes or accessories
recommended by ResMed. Connection of other delivery tubes or accessories
could result in injury, or damage to the device.
• The HUMIDAIRE 3i, including the associated tubing, is for single-patient use and
must not be re-used on another person. This is to avoid the risk of cross-infection.
• Always place the HUMIDAIRE 3i device lower than the level of the patient. If it is
placed at or above the level of the patient, heated water may flow down the air
tubing and into the mask.
• There exists the possibility that if the device is placed above the level of the patient
and is tipped over, or if the tubing is filled with condensate, the mask might fill with
water. The H
are unable to guard their airways, or are unable to pull the mask off, for example
following a stroke. Attention should be given to the relative risks and benefits.
• Do not attempt to dismantle the HUMIDAIRE 3i docking station. There are no
user-serviceable parts inside. Repairs and internal servicing should only be
performed by an authorized service agent.
• Take care when handling the HUMIDAIRE 3i. The heater plate and the water in the
water chamber may be hot.
UMIDAIRE 3i with any other CPAP device.
UMIDAIRE 3i should therefore be used with caution in patients who
UMIDAIRE 3i is for use only as recommended by a
4
Page 10

• If liquids are inadvertently spilled into or on the HUMIDAIRE 3i docking station,
unplug the CPAP device from the power outlet. Disconnect the docking station
from the CPAP device and allow the docking station to drain and dry before using.
• Do not operate the HUMIDAIRE 3i if the CPAP device has a damaged power cord
or plug.
• Do not operate the HUMIDAIRE 3i if it is not working properly or if any part of it
has been dropped or damaged.
• Keep the CPAP device power cord away from heated surfaces.
• Do not drop or insert any object into any opening or tubes.
• Do not use the HUMIDAIRE 3i in the presence of flammable or explosive
materials.
• Explosion hazard—do not use in the vicinity of flammable anesthetics.
• If oxygen is used with this device, the oxygen flow must be turned off when the
device is not operating.
If oxygen has been left on, turn off the flow generator, then wait 30 minutes before
turning on the flow generator again.
Explanation: When the CPAP device is not in operation and the oxygen flow is
left on, oxygen delivered into the air delivery tubing may accumulate within the
CPAP machine enclosure and create a risk of fire. This applies to most types of
CPAP machines.
• Oxygen supports combustion. Oxygen should not be used while you are
smoking or in the presence of an open flame.
• Always ensure airflow is being generated by the device before the oxygen
supply is turned on.
• Always turn the oxygen supply off before stopping the airflow from the device.
Note: At a fixed rate of supplemental oxygen flow, the inhaled oxygen concentration
will vary, depending on where the oxygen is introduced, the pressure settings, patient
breathing pattern, mask selection and leak rate.
ENGLISH
COMPONENTS OF YOUR HUMIDAIRE 3i
Please refer to the illustrations in section A of the illustration sheet.
COMPONENTS OF YOUR HUMIDAIRE 3i
5
Page 11

SETTING UP YOUR HUMIDAIRE 3i FOR USE
WARNING
!
Make sure your flow generator is switched off at the power outlet before
connecting the HumidAire 3i.
REMOVING THE FRONT CAP (IF FITTED)
Please refer to the illustrations in section B of the illustration sheet.
Your flow generator may be fitted with a front cap (B-1). Before you can attach the
H
UMIDAIRE 3i, press the button underneath the front cap (B-2) and pull it away from
the body of your flow generator (B-3 & B-4).
Notes
• To replace the front cap, align it with your flow generator (B-4) and push it firmly until it
clicks into place.
• Remember to take the front cap with you when travelling, in case you need CPAP
therapy without a humidifier.
REMOVING AND STORING THE CONNECTOR PLUG
Please refer to the illustrations in section C of the illustration sheet.
Before attaching the H
generator (C-1) and attach it to the back of the docking station (C-2).
ATTACHING YOUR HUMIDAIRE 3i
Please refer to the illustrations in section D of the illustration sheet.
UMIDAIRE 3i, remove the connector plug from your flow
1 Align your HUMIDAIRE 3i with your flow generator (D-1) and push them together
until they click into place (D-2).
WARNING
!
• The HumidAire 3i docking station should only be connected or disconnected
when the water chamber is empty.
• Water must be prevented from entering your flow generator. Do not transport
the flow generator with the HumidAire 3i attached.
Insert the power cord into the socket at the rear of your flow generator. Plug the other
2
end of the power cord into a power outlet (D-3).
Note: If your flow generator is powered via the DC input, the HumidAire 3i is not powered
and humidification output will be reduced.
Place the combined unit on a firm, level surface near your bed at a level lower than
3
your sleeping position. Ensure the surface is not sensitive to heat and/or moisture, or
use a protective mat.
CAUTION
!
Be careful not to place the unit where it can be bumped into and knocked over.
6
Page 12

Connect one end of the air tubing firmly onto the air outlet of your HUMIDAIRE 3i
4
and the other end to your mask (D-4).
FILLING THE WATER CHAMBER
Please refer to the illustrations in section E of the illustration sheet.
WARNING
!
Take care when handling your HumidAire 3i. The water and the water chamber
base may both be hot. Allow ten minutes for the heater plate and any excess water
to cool.
1 Release the cover latch (E-1) and lift the cover until it rests in the upright position (E-2).
Remove the water chamber (E-3) and carefully fill it with fresh, clean water (E-4). Make
2
sure you keep the level of the water under the maximum water level mark (E-4a).
Always ensure that the water chamber is clean. See “Cleaning and Maintenance” on
page 10.
WARNING
!
Do not overfill the water chamber, as water may enter your flow generator and air
tubing.
CAUTION
!
Do not use any additives (eg, scented oils and perfumes). They may reduce the
humidification output of the HumidAire 3i and/or cause deterioration of the water
chamber materials.
Carefully place the filled water chamber into the humidifier docking station (E-5) and
3
latch the cover (E-6).
UMIDAIRE 3i is now ready for use.
The H
ENGLISH
STARTING AND STOPPING TREATMENT
STARTING YOUR TREATMENT
Please refer to the illustration in section F of the illustration sheet.
1 When your HUMIDAIRE 3i is attached and the flow generator is powered, the
indicator light lights up on the H
(not available on all models) may appear.
When activated, this feature allows the water to warm up before you start treatment.
If the Warm-Up feature is available, use it to pre-heat the water before starting your
2
treatment. Skip this step if you wish to start treatment immediately.
UMIDAIRE 3i. A prompt for the Warm-Up feature
RAMP: 10min
menu
warmup
STARTING AND STOPPING TREATMENT
7
Page 13

ARM-UP FEATURE (NOT AVAILABLE IN ALL MODELS)
W
Note: Check your flow generator user’s manual to see if this feature is available.
To start the Warm-Up feature:
i. Select Warmup by pressing the Right key on the control panel.
The following message is displayed for 2 seconds:
HUMIDIFIER
WARMING
ii. After 2 seconds the WARMING screen is displayed.
WARMING
menu exit
iii. While your H
• Star t treatment at any time by pressing the Start/Stop key.
• Access the menus by pressing Menu (Left key).
• Stop the Warm-Up feature at any time by pressing Exit (Right key).
UMIDAIRE 3i is in Warm-Up mode you can:
The Warm-Up feature will automatically turn off after 30 minutes if treatment has not
started.
Turn the humidity control dial to the desired setting. The setting switches heated
3
humidification off and delivers minimum humidification. The indicator light will remain
lit to indicate standby mode. A setting of 6 ( ) delivers maximum humidification.
We recommend that you initially set the control dial to 3 ( ). If necessary, adjust the
control dial up or down to find the setting that is most comfortable and effective for
you. You can adjust the humidity setting at any time.
The aim is to have moist air delivered to your mask but to avoid condensation forming
in the air tubing. The temperature and humidity of the surrounding air will affect the
setting you need.
See “Frequently Asked Questions” for further tips on the correct humidity setting.
Fit your mask as described in your mask user instructions.
4
Press the Start/Stop key on the control panel. Alternatively, if your flow generator
5
has the SmartStart function available, simply breathe into your mask and air should
begin to flow.
Note: During operation, the indicator light becomes brighter to indicate that the heating
element is active. Your HumidAire 3i has a rapid heating element which allows very short
heating times. Do not be concerned if the light only brightens very briefly.
Lie down and arrange the air tubing so that it is free to move if you turn in your sleep.
6
WARNING
!
Do not leave an excessive length of air tubing around the top of your bed. It could
twist around your head or neck while you are sleeping.
8
Page 14
STOPPING YOUR TREATMENT
To stop your treatment at any time, remove your mask and press the Start/Stop key.
Alternatively, if your flow generator has the SmartStart function available, simply
remove your mask and treatment will end.
Some flow generators continue to blow air gently after you have stopped your
treatment. This can continue for up to one hour to assist the heater plate in cooling.
However, you can unplug the device from the power outlet at any time and allow the
heater plate to cool without airflow.
DETACHING YOUR HUMIDAIRE 3i
Please refer to the illustrations in section G of the illustration sheet.
1 Unplug the power cord from the power outlet (G-1).
WARNING
!
Take care when handling your HumidAire 3i. The water and the water chamber
base may both be hot. Allow ten minutes for the heater plate and any excess water
to cool (G-2).
Remove the water chamber from the docking station (G-3).
2
Press the large silver button located midway underneath the docking station
3
(G-4) and pull the H
UMIDAIRE 3i and flow generator apart (G-5).
Large silver button
ENGLISH
UNDERSIDE VIEW
Note: Re-attach the connector plug firmly to your flow generator.
FREQUENTLY ASKED QUESTIONS
WHY IS THERE CONDENSATION IN MY MASK AND/OR AIR TUBING?
You may experience excessive condensation in your mask or air tubing. This may occur
seasonally, particularly when the room temperature is low or cool air is circulating
around the tube. Turn the control dial down to a lower setting until the condensation
decreases.
You may have to adjust your humidity setting from season to season.
DO I HAVE TO USE DISTILLED WATER IN THE WATER CHAMBER?
Using distilled water will maximize the life of the water chamber and reduce mineral
deposits. See “Cleaning your HumidAire 3i” on page 11 for further details.
FREQUENTLY ASKED QUESTIONS
9
Page 15

HAT IF I STILL HAVE SYMPTOMS OF DRYNESS?
W
If you still experience symptoms of dryness, then your humidity setting may be set too
low to be effective. Gradually turn the humidity control dial up over a few nights until
the symptoms disappear.
If you are still experiencing symptoms of dryness, even after increasing the humidity
setting, you may be breathing through your mouth. Mouth breathing or mouth leaks
cause drying and irritation of the upper airway. If this is a problem, a full face mask or
chin strap may help. Consult your clinician or equipment supplier for details.
CLEANING AND MAINTENANCE
You should regularly carry out the cleaning and maintenance of the water chamber,
cover and cover seal as described in this section.
DISASSEMBLING YOUR HUMIDAIRE 3i
Please refer to the illustrations in section H of the illustration sheet.
WARNING
!
Beware of electrocution. Do not immerse your flow generator, docking station or
power cord in water. Always unplug the device before cleaning and be sure that it
is dry before plugging it back in.
1 Unplug the power cord from the power outlet (H-1).
WARNING
!
Take care when handling your HumidAire 3i. The water and the water chamber
base may both be hot. Allow ten minutes for the heater plate and any excess water
to cool (H-2).
10
Remove the water chamber from the docking station (H-3) and discard any excess
2
water (H-4).
Detach the air tubing from the air outlet (H-5).
3
Gently flex one cover arm away and up from the docking station until the cover
4
detaches completely (H-6 to H-8). Peel the cover seal away from the cover (H-9).
CAUTION
!
Do not remove the tub plate from the water chamber.
Page 16
CLEANING YOUR HUMIDAIRE 3i
CAUTION
!
• Do not use any of the following to clean any part of the HumidAire 3i. These
solutions may cause damage and reduce the life of the product.
• bleach, chlorine-, alcohol- or ammonia-based solutions
• moisturizing, antibacterial or glycerine based soaps
• water softening and unapproved descaling agents.
• Do not wash the water chamber in a dishwasher.
WATER CHAMBER
DAILY
Wash the water chamber and tubing in warm water, using a mild detergent
(see previous caution). Use the yellow cleaning plug to assist in the cleaning process
(see steps 1 to 5 below).
ENGLISH
1
2
3
45
Rinse them thoroughly with clean water and allow them to dry away from direct
sunlight.
WEEKLY
Inspect the water chamber for wear and deterioration. Replace the water chamber if
any component has cracked, become cloudy or pitted. Replace immediately if there is
any leaking from the water chamber.
If you notice white powder or deposits in the water chamber:
i. Fill the water chamber to the maximum water level mark with a solution of one
part vinegar to ten parts water.
ii. Let the solution soak for ten minutes.
iii. Discard the solution and rinse the water chamber with clean water.
CLEANING AND MAINTENANCE
11
Page 17

OVER AND COVER SEAL
C
Inspect the cover and cover seal weekly for wear and deterioration. Replace any
damaged parts. When required, wash the cover and cover seal in warm water, using a
mild detergent (see previous caution). Rinse them thoroughly with clean water and
allow them to dry away from direct sunlight.
DOCKING STATION
Periodically wipe the outside of the docking station (including the connector seal) with
a damp cloth.
REASSEMBLING YOUR HUMIDAIRE 3i
Please refer to the illustrations in section I of the illustration sheet.
Reassemble the parts when they are clean and dry.
1 Align the cover seal to the guides on the cover (I-1) and press along the edges to
ensure it is fitted properly (I-2).
Put one cover arm into its pivot point on the docking station (I-3) and gently flex the
2
other arm into its corresponding point (I-4 & I-5).
The cover should be able to open and close freely while securely attached to the
docking station.
Replace the water chamber in the humidifier docking station (I-6).
3
SERVICING
With normal use of a HUMIDAIRE 3i, the water chamber needs to be replaced every
two years.
This product (H
Center 5 years from the date of manufacture. Prior to this, the device is intended to
provide safe and reliable operation provided that it is operated and maintained in
accordance with the instructions provided by ResMed. Applicable ResMed warranty
details are provided with the device at the time of original supply. Of course, as with
all electrical devices, if any irregularity becomes apparent, you should exercise caution
and have the device inspected by an authorized ResMed Service Center.
UMIDAIRE 3i) should be inspected by an authorized ResMed Service
12
Page 18

TROUBLESHOOTING
If there is a problem, try the following suggestions. If the problem cannot be solved,
contact your equipment supplier or ResMed. Do not attempt to open the unit.
WARNING
!
Service and repair should only be performed by an authorized service agent.
Problem Possible Cause Solution
ENGLISH
Device not working
(no display on LCD
screen and/or
indicator light not
lighting up)
Indicator light
flickering
Indicator light is
permanently dull
and/or air does not
feel warm
Leaking water
chamber
Power cord is not plugged
in properly.
Faulty power outlet.
Flow generator and
docking station not
connected correctly.
Indicator light periodically
becomes brighter to
indicate that the heating
element is active.
HumidAire 3i reflector (see
illustration C-2a) is dirty.
The water chamber may be
damaged or cracked.
Cover is not attached
correctly.
Check that the power cord is plugged
firmly into the power outlet and the
switch (if available) is on at the outlet.
Try another power outlet.
Check that the docking station is
securely attached to the flow generator.
• Your HumidAire 3i has a rapid
heating element which allows very
short heating times. Do not be
concerned if the light only brightens
very briefly.
• Turn the dial to the setting to
switch heated humidification off. The
indicator light will remain lit to
indicate standby mode.
Clean the reflector with a damp cloth.
Contact your supplier for a replacement.
Make sure the cover is fitted correctly.
TROUBLESHOOTING
13
Page 19

Problem Possible Cause Solution
No/low air flow The air tubing is not
connected properly.
The air tubing is blocked,
pinched or punctured.
The flow generator is not
working correctly.
The water chamber is
overfilled.
The cover is not latched
correctly.
The cover seal is not fitted
correctly.
Condensation is forming in
the air tube.
Water splashing on
your face
Air does not feel
moist
The water chamber is
overfilled.
Condensation is forming in
the air tube and mask.
The control dial is set too
low.
Connect the air tubing as described in
“Setting Up your HumidAire 3i For Use”
on page 6.
Unblock or free the air tubing. Check the
air tubing for punctures.
See the Troubleshooting section in the
flow generator manual.
Make sure that the water level is not
above the maximum water level mark.
Make sure the cover is latched onto the
docking station correctly.
Make sure the cover seal is facing the
right way up and fitted securely.
Turn the control dial down.
Insulate the air tubing.
Empty some water from the water
chamber.
Turn the control dial down.
Insulate the air tubing.
Turn the control dial up.
14
HumidAire 3i heating
element is not working.
Air too moist Control dial is set too high.
High relative humidity in
your room.
White powder or
deposits in the water
chamber
The water leaves scaly
mineral deposits.
Contact your equipment supplier.
Turn the control dial down.
Adjust your humidity setting.
Use distilled water.
To remove these mineral deposits, see
“Cleaning your HumidAire 3i” on
page 11.
Page 20

TECHNICAL SPECIFICATIONS
PERFORMANCE
Maximum heater plate temperature: 185°F (85°C)
Temperature cut-out: 199°F (93°C)
Maximum output humidity: 95% relative humidity (control dial set to maximum setting,
flow rate 50 L/min, ambient temperature of 68°F [20°C], ambient relative humidity of
40%).
Maximum gas temperature: 106°F (41°C)
DIMENSIONS (H X W X D)
Docking station and water chamber: 4.6" x 6.7" x 8.3" (118 mm x 170 mm x 212 mm)
WEIGHT
Docking station and unfilled water chamber: 1.5 lb. (670 g)
Water capacity to maximum fill line: 415 mL
POWER SUPPLY
Input range for ResMed S8 flow generator with HUMIDAIRE 3i: 100–240V, 50/60Hz;
110V, 400Hz; 2.5A <140 VA (110 W) (maximum power consumption). Instantaneous
peak power consumption <340 VA.
Actual average power consumption will vary, depending on factors such as
temperature setting, set pressure, the use of accessories, height above sea level and
ambient temperature.
Maximum heater element power: 85 W.
HOUSING CONSTRUCTION
Docking station: Flame retardant engineering thermoplastic, plated cast aluminium.
Water chamber: Injection molded plastic, stainless steel.
ENVIRONMENTAL CONDITIONS
Operating temperature: +41°F to +104°F (+5°C to +40°C)
Operating humidity: 10–95% non-condensing
Storage and transport temperature: -4°F to +140°F (-20°C to +60°C)
Storage and transport humidity: 10–95% non-condensing
IEC 60601-1 CLASSIFICATION
Class II (double insulation)
Type CF
ELECTROMAGNETIC COMPATIBILITY
Please refer to your flow generator user's manual for details.
Note: The manufacturer reserves the right to change these specifications without notice.
ENGLISH
TECHNICAL SPECIFICATIONS
15
Page 21
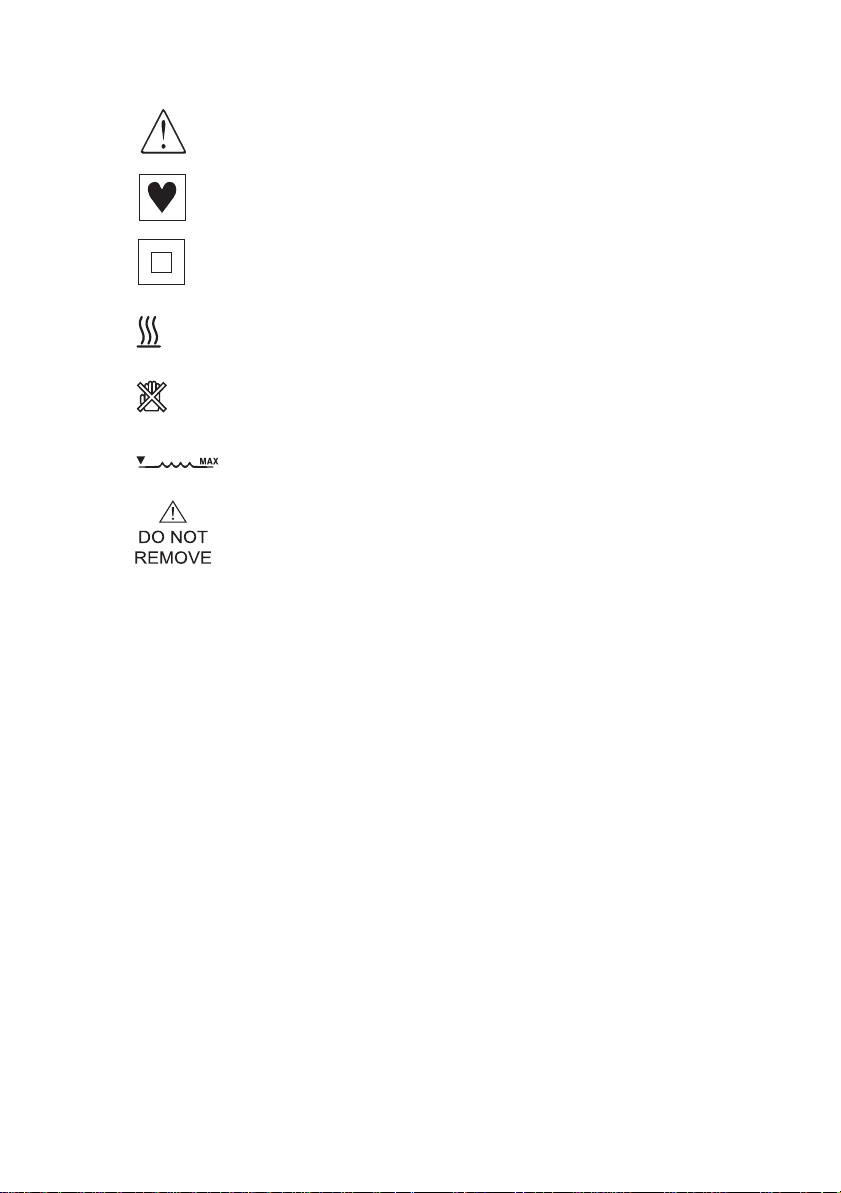
YMBOLS WHICH APPEAR ON THE DEVICE
S
Attention, consult accompanying documents
Type CF equipment
Class II equipment
Hot surface
Do not touch
Maximum water level
Do not remove the tub plate from the water chamber
16
Page 22

LIMITED WARRANTY
ResMed warrants that your ResMed product shall be free from defects in material and
workmanship for the period specified below from the date of purchase by the initial
consumer. This warranty is not transferable.
Product Warranty Period
ResMed humidifiers, ResControl™, ResLink™, ResTraxx™ 1 Year
ResMed flow generators 2 Years
ENGLISH
Accessories, mask systems (including mask frame, cushion,
headgear and tubing). Excludes single-use devices.
90 Days
Note: Some models are not available in all regions.
If the product fails under conditions of normal use, ResMed will repair or replace, at its
option, the defective product or any of its components. This Limited Warranty does
not cover:
a) any damage caused as a result of improper use, abuse, modification or alteration of
the product;
b) repairs carried out by any service organization that has not been expressly
authorized by ResMed to perform such repairs;
c) any damage or contamination due to cigarette, pipe, cigar or other smoke;
d) any damage caused by water being spilled on or into a flow generator.
Warranty is void on product sold, or resold, outside the region of original purchase.
Warranty claims on defective product must be made by the initial consumer at the
point of purchase.
This warranty is in lieu of all other express or implied warranties, including any implied
warranty of merchantability or fitness for a particular purpose. Some regions or states
do not allow limitations on how long an implied warranty lasts, so the above limitation
may not apply to you.
ResMed shall not be responsible for any incidental or consequential damages claimed
to have occurred as a result of the sale, installation or use of any ResMed product.
Some regions or states do not allow the exclusion or limitation of incidental or
consequential damages, so the above limitation may not apply to you. This warranty
gives you specific legal rights, and you may also have other rights which vary from
region to region.
For further information on your warranty rights, contact your local ResMed dealer or
ResMed office.
R001-307/2 05 06
LIMITED WARRANTY
17
Page 23

18
Page 24

INDEX
A
Attaching
connector plug
front cap 6
HumidAire 3i
C
Cleaning 10
cover 12
cover seal
docking station
water chamber 11
Compatible flow generators
Components
Condensation 8, 9, 14
Connector plug
re-attach
removing 6
6
storing
Contraindications
Control dial 8
Cover
cleaning
disassembling 10
reassembling
Cover seal
cleaning
reassembling
removing
9
6
12
12
5
9
4
12
12
12
12
10
H
Heater plate cooling 9
Housing construction
HumidAire 3i
attaching
cleaning
detaching 9
disassembling
reassembling
Humidification settings 8
Humidity control dial
3
I
IEC 60601-1 Classification 15
Indicator light 7, 8
flickering
Intended use
L
Limited warranty
M
Medical information 4
Mineral deposits
P
Performance
Placement
Power supply
6
11
13
4
15
6
15
10
12
14
17
15
8
ENGLISH
D
Detaching your HumidAire 3i
Dimensions
Docking station
cleaning
Dryness
symptoms
E
Electromagnetic compatibility
Environmental conditions
F
FAQ 9
Filling the water chamber 7
Front cap
attaching
removing 6
15
12
10
15
6
9
15
R
Removing
connector plug
cover seal
front cap 6
water chamber
S
Setting up your HumidAire 6
Settings
humidification
SmartStart
Special terms and icons 3
Starting treatment
Stopping your treatment
T
Technical specifications
6
10
7
8
8, 9
7
9
15
INDEX
19
Page 25

Troubleshooting 13
W
Warm-Up feature
Warnings
Water chamber
Weight
Y
Your responsibility 3
4
cleaning
13
leaking
maximum capacity
maximum water level mark 7
15
7
11
15
20
Page 26

HumidAire 3i™
MANUEL UTILISATEUR
Français
FRANÇAIS
21
Page 27

SOMMAIRE
BIENVENUE . . . . . . . . . . . . . . . . . . . . . . . . . . . . . . . . . . . . . . . . . . . . . . . . . . 23
L’ HUMIDAIRE 3i, DE QUOI S’AGIT-IL ? . . . . . . . . . . . . . . . . . . . . . . . . . . . 23
OTRE RESPONSABILITÉ 23
V
INFORMATIONS MÉDICALES . . . . . . . . . . . . . . . . . . . . . . . . . . . . . . . . . . . . 24
SAGE PRÉVU 24
U
C
ONTRE-INDICATIONS 24
A
VERTISSEMENTS 24
COMPOSANTS DE VOTRE HUMIDAIRE 3i . . . . . . . . . . . . . . . . . . . . . . . . . 25
INSTALLATION DE VOTRE HUMIDAIRE 3i . . . . . . . . . . . . . . . . . . . . . . . . . 26
ETRAIT DU CAPOT AVANT (LE CAS ÉCHÉANT) 26
R
R
ETRAIT ET RANGEMENT DU CACHE DU CONNECTEUR 26
F
IXATION DE VOTRE HUMIDAIRE 3i 26
R
EMPLISSAGE DU RÉSERVOIR 27
DÉBUT ET ARRÊT DU TRAITEMENT . . . . . . . . . . . . . . . . . . . . . . . . . . . . . . . 27
ÉBUT DE VOTRE TRAITEMENT 27
D
A
RRÊT DE VOTRE TRAITEMENT 29
R
ETRAIT DE VOTRE HUMIDAIRE 3i 29
FOIRE AUX QUESTIONS . . . . . . . . . . . . . . . . . . . . . . . . . . . . . . . . . . . . . . . . 30
NETTOYAGE ET ENTRETIEN . . . . . . . . . . . . . . . . . . . . . . . . . . . . . . . . . . . . . 31
ÉMONTAGE DE VOTRE HUMIDAIRE 3i 31
D
N
ETTOYAGE DE VOTRE HUMIDAIRE 3i 32
R
EMONTAGE DE VOTRE HUMIDAIRE 3i 33
R
ÉPARATIONS 33
22
STRATÉGIE DE DÉPANNAGE . . . . . . . . . . . . . . . . . . . . . . . . . . . . . . . . . . . . 34
CARACTÉRISTIQUES . . . . . . . . . . . . . . . . . . . . . . . . . . . . . . . . . . . . . . . . . . . 37
GARANTIE LIMITÉE . . . . . . . . . . . . . . . . . . . . . . . . . . . . . . . . . . . . . . . . . . . . 39
INDEX . . . . . . . . . . . . . . . . . . . . . . . . . . . . . . . . . . . . . . . . . . . . . . . . . . . . . . 41
Page 28

BIENVENUE
Merci d’avoir choisi l’humidificateur HUMIDAIRE 3i™ ResMed. L’HUMIDAIRE 3i a été
conçu pour humidifier l’air délivré dans vos voies aériennes pendant le traitement par
PPC (pression positive continue). L’H
de la gamme S8™ ResMed grâce à un mécanisme simple de cliquage.
Ce manuel utilisateur contient les informations dont vous avez besoin pour pouvoir
utiliser votre H
UMIDAIRE 3i correctement.
UMIDAIRE 3i se fixe sur votre appareil de PPC
L’HUMIDAIRE 3i, DE QUOI S’AGIT-IL ?
L’HUMIDAIRE 3i a été conçu pour former un seul ensemble avec l’appareil de PPC
ResMed. Cet ensemble assure l’humidification de l’air délivré pendant le traitement par
PPC et peut ainsi rendre ce traitement plus confortable.
Il est possible que vous souffriez de congestion nasale ou de sécheresse nasale, buccale
ou de la gorge pendant votre traitement par PPC. Ces symptômes peuvent être causés
par un climat sec, une température de l’air basse, l’air sous pression délivré par votre
appareil ou des fuites buccales. L’humidification de l’air peut permettre de soulager ces
symptômes de sécheresse.
Veuillez vous référer au manuel de votre appareil pour vérifier s’il est compatible avec
l’H
UMIDAIRE 3i. Contactez votre prestataire de santé ou ResMed pour de plus amples
informations.
VOTRE RESPONSABILITÉ
Vous ou l’utilisateur de cet appareil serez tenu pour seul responsable de toute blessure
ou de tout dommage matériel résultant :
• d’une utilisation non conforme aux instructions fournies
• d’un entretien ou de modifications réalisés non conformément aux instructions
et/ou par des personnes non autorisées.
Veuillez lire ce manuel attentivement avant d’utiliser l’appareil.
Ce manuel contient des termes et icônes spéciaux qui apparaissent dans la marge et
ont pour but d’attirer votre attention sur des informations spécifiques importantes.
• Un avertissement vous met en garde contre le risque de blessure.
• Une précaution (Attention) explique des mesures particulières permettant
d’assurer une utilisation efficace et sûre de l’appareil.
• Une remarque correspond à une remarque ou information utile.
FRANÇAIS
BIENVENUE
23
Page 29

INFORMATIONS MÉDICALES
USAGE PRÉVU
L’HUMIDAIRE 3i est prévu pour humidifier l’air délivré par les appareils de PPC de la
gamme S8 ResMed. L’H
un médecin.
ATTENTION (USA UNIQUEMENT)
!
Selon la loi fédérale américaine, ce dispositif ne peut être vendu aux U.S.A. que par
un médecin ou sur prescription médicale.
CONTRE-INDICATIONS
L’utilisation de l’HUMIDAIRE 3i est contre-indiquée chez les patients trachéotomisés
ou intubés. Veuillez également vous référer au manuel de votre appareil pour les
contre-indications relatives au traitement par PPC.
AVERTISSEMENTS
Les avertissements suivants sont d’ordre général. Les avertissements et précautions
spécifiques sont donnés en marge des instructions auxquelles ils se rapportent dans le
manuel.
AVERTISSEMENTS
!
• Utiliser l’HUMIDAIRE 3i uniquement pour l’usage prévu comme indiqué dans ce
manuel.
• Vérifier que le réservoir est vide avant de transporter l’HUMIDAIRE 3i.
• L’HUMIDAIRE 3i est conçu exclusivement pour une utilisation avec certains
appareils de PPC ResMed. Ne pas utiliser l’H
de PPC.
• L’HUMIDAIRE 3i doit être utilisé uniquement avec les tuyaux et accessoires
recommandés par ResMed. Le raccordement d'autres tuyaux ou accessoires peut
causer des blessures ou endommager l’appareil.
• L’HUMIDAIRE 3i, y compris les tuyaux associés, est prévu pour une utilisation sur
un seul patient et ne peut pas être réutilisé sur quelqu’un d’autre. Cette précaution
permet d’éviter les risques d’infection croisée.
• Systématiquement placer l’HUMIDAIRE 3i à un niveau inférieur à celui du patient.
Si vous le placez au même niveau ou à un niveau supérieur, de l’eau chaude risque
de s’écouler dans le masque le long du circuit respiratoire.
• Si l’appareil est placé à un niveau supérieur à celui du patient et s’il est renversé ou
si le tuyau se remplit de condensation, le masque risque de se remplir d’eau.
L’H
UMIDAIRE 3i doit donc être utilisé avec précaution chez les patients qui ne
sont pas capables, par exemple à la suite d’un accident vasculaire cérébral,
d’empêcher l’eau de pénétrer dans leurs voies aériennes ou de retirer le masque.
Les risques et avantages relatifs devront être évalués.
UMIDAIRE 3i doit être utilisé uniquement comme indiqué par
UMIDAIRE 3i avec d’autres appareils
24
Page 30

• Ne pas essayer de démonter le support de l’HUMIDAIRE 3i. Des pièces ne
pouvant être entretenues par l’utilisateur se trouvent à l’intérieur. Les réparations
et l’entretien interne doivent être effectués par un technicien agréé.
• Manipuler l’HUMIDAIRE 3i avec précaution. La plaque chauffante et l'eau présente
dans le réservoir peuvent être brûlantes.
• En cas de déversement accidentel de liquides dans ou sur le support de
l’H
UMIDAIRE 3i, débrancher l’appareil de PPC de la prise de courant. Détacher le
support de l’appareil de PPC et le laisser se vider et sécher avant de le réutiliser.
• Ne pas utiliser l’HUMIDAIRE 3i si le câble d’alimentation ou la prise de l’appareil de
PPC est endommagé.
• Ne pas utiliser l’HUMIDAIRE 3i s’il ne fonctionne pas correctement ou si l’une de
ses pièces est tombée par terre ou a été endommagée.
• Tenir le câble d’alimentation de l’appareil de PPC à l’écart de toute surface chaude.
• Ne pas laisser tomber ni insérer d’objet dans les ouvertures ou les tuyaux.
• Ne pas utiliser l’HUMIDAIRE 3i en présence de matières inflammables ou
explosives.
• Danger d’explosion — Ne pas utiliser l’appareil à proximité d’anesthésiques
inflammables.
• Si de l’oxygène est utilisé avec cet appareil, l’alimentation en oxygène doit être
fermée lorsque l’appareil n’est pas en mode de fonctionnement.
Si l'alimentation en oxygène a été laissée ouverte, mettre l'appareil hors tension,
puis attendre 30 minutes avant de le remettre sous tension.
Explication : lorsque l’appareil de PPC n’est pas en marche et que l’alimentation
en oxygène n’est pas coupée, l’oxygène délivré dans le circuit respiratoire peut
s’accumuler dans l’appareil et créer un risque d’incendie. Cela vaut pour la plupart
des appareils de PPC.
• L’oxygène est inflammable. Ne pas fumer ni approcher de flamme nue de
l’appareil lors de l’utilisation d’oxygène.
• Systématiquement vérifier qu’un débit d’air est généré par l’appareil avant
d’ouvrir l’alimentation en oxygène.
• Systématiquement couper l’alimentation en oxygène avant d’arrêter le débit
d’air de l’appareil.
Remarque : lorsque de l’oxygène additionnel est délivré à un débit fixe, la
concentration de l’oxygène inhalé varie en fonction du point d’entrée de l’oxygène, des
réglages de pression, de la respiration du patient, du masque sélectionné ainsi que du
niveau de fuite.
FRANÇAIS
COMPOSANTS DE VOTRE HUMIDAIRE 3i
Veuillez vous référer aux figures de la section A de la fiche d’illustrations.
COMPOSANTS DE VOTRE HUMIDAIRE 3i
25
Page 31

INSTALLATION DE VOTRE HUMIDAIRE 3i
AVERTISSEMENT
!
Vérifier que votre appareil est débranché au niveau de la prise de courant avant de
raccorder l’HumidAire 3i.
RETRAIT DU CAPOT AVANT (LE CAS ÉCHÉANT)
Veuillez vous référer aux figures de la section B de la fiche d’illustrations.
Il est possible que votre appareil possède un capot avant (B-1). Avant de fixer
l’H
UMIDAIRE 3i, appuyez sur le bouton situé sous le capot avant (B-2) et tirez sur le
capot pour le détacher de l’appareil (B-3 et B-4).
Remarques
• Pour remettre le capot avant en place, alignez-le avec votre appareil (B-4) et
poussez-le fermement jusqu’à ce qu’il se verrouille en position.
• N’oubliez pas d’emporter le capot avant lors de vos déplacements pour le cas où vous
auriez besoin d’utiliser le traitement par PPC sans humidificateur.
RETRAIT ET RANGEMENT DU CACHE DU CONNECTEUR
Veuillez vous référer aux figures de la section C de la fiche d’illustrations.
Avant de fixer l’H
(C-1) et fixez-le à l’arrière du support (C-2).
FIXATION DE VOTRE HUMIDAIRE 3i
Veuillez vous référer aux figures de la section D de la fiche d’illustrations.
UMIDAIRE 3i, retirez le cache du connecteur de votre appareil
26
1 Alignez votre HUMIDAIRE 3i avec votre appareil (D-1) et poussez jusqu’à ce qu’ils
s’emboîtent (D-2).
AVERTISSEMENT
!
• Le support de l’HumidAire 3i ne doit être raccordé ou détaché que lorsque le
réservoir est vide.
• Les mesures nécessaires devront être prises pour empêcher que de l’eau ne
s’écoule dans l’appareil. Ne pas transporter l’appareil avec l’HumidAire 3i fixé
dessus.
Branchez le câble d’alimentation à la prise à l’arrière de l’appareil. Branchez l’autre
2
extrémité du câble d’alimentation à une prise de courant (D-3).
Remarque : si votre appareil est alimenté via une entrée CC, l'HumidAire 3i n'est pas
alimenté et la performance d'humidification est réduite.
Placez l’ensemble sur une surface plane stable à proximité de votre lit et à un niveau
3
inférieur au vôtre lorsque vous êtes couché. Veillez à ce que la surface choisie ne soit
pas sensible à la chaleur ni à l’humidité ou utilisez un napperon de protection.
Page 32

ATTENTION
!
Veiller à ne pas placer l’appareil à un endroit où quelqu’un risque de le faire tomber.
Raccordez fermement une extrémité du circuit respiratoire à la sortie d’air de votre
4
H
UMIDAIRE 3i et l’autre extrémité au masque (D-4).
REMPLISSAGE DU RÉSERVOIR
Veuillez vous référer aux figures de la section E de la fiche d’illustrations.
AVERTISSEMENT
!
Manipuler votre HumidAire 3i avec précaution. L’eau et la base du réservoir
peuvent être brûlantes. Laissez la plaque chauffante et l’eau résiduelle refroidir
pendant 10 minutes.
1 Détachez l’attache du capot (E-1) et soulevez le capot jusqu’à ce qu’il reste en place à
la verticale (E-2).
Retirez le réservoir (E-3) et remplissez-le d’eau fraîche propre (E-4). Vérifiez que le
2
niveau d’eau ne dépasse pas le repère de niveau maximum (E-4a).
Vérifiez systématiquement que le réservoir est propre. Voir « Nettoyage et entretien »
page 31.
AVERTISSEMENT
!
Ne pas trop remplir le réservoir sans quoi de l’eau risque de s’écouler dans votre
appareil et dans le circuit respiratoire.
ATTENTION
!
Ne pas utiliser d’additifs (p. ex. huiles parfumées et parfums). Ils risquent de réduire
la performance d’humidification de l’HumidAire 3i et/ou d’endommager les
matériaux du réservoir.
FRANÇAIS
Placez le réservoir rempli avec précaution dans le support de l’humidificateur (E-5) et
3
refermez le capot (E-6).
L’H
UMIDAIRE 3i est maintenant prêt à l’emploi.
DÉBUT ET ARRÊT DU TRAITEMENT
DÉBUT DE VOTRE TRAITEMENT
Veuillez vous référer à la section F de la fiche d'illustrations.
1 Une fois que votre HUMIDAIRE 3i est fixé et que l’appareil est sous tension, le témoin
lumineux de l’H
certains modèles uniquement) peut s’afficher.
UMIDAIRE 3i s’allume. La fonction de préchauffage (disponible sur
RAMP: 10min
menu
chauff
DÉBUT ET ARRÊT DU TRAITEMENT
27
Page 33

Lorsqu’elle est activée, cette fonction permet à l’eau de chauffer avant le début du
traitement.
Si la fonction de préchauffage est disponible sur votre humidificateur, servez-vous en
2
pour préchauffer l’eau avant de commencer votre traitement. Sautez cette étape si
vous souhaitez immédiatement commencer le traitement.
FONCTION DE PRÉCHAUFFAGE (DISPONIBLE SUR CERTAINS MODÈLES
UNIQUEMENT)
Remarque : consultez le manuel utilisateur de votre appareil pour voir si cette fonction
est disponible.
Pour démarrer la fonction de préchauffage :
i. Sélectionnez Préchauffage en appuyant sur la touche de droite du panneau de
contrôle.
Le message suivant s’affiche pendant 2 secondes :
HUMIDIFICATEUR
CHAUFFAGE
ii. Au bout de deux secondes, l’écran CHAUFFAGE s’affiche.
CHAUFFAGE
menu quitter
iii. Pendant que votre H
• Commencer le traitement à tout moment en appuyant sur la touche
Marche/Arrêt.
• Accéder aux menus en appuyant sur Menu (touche de gauche).
• Arrêter la fonction de préchauffage en appuyant sur Quitter (touche de
UMIDAIRE 3i est en mode de préchauffage, vous pouvez :
droite).
La fonction de préchauffage s’arrête automatiquement au bout de 30 minutes si le
traitement n’a pas commencé.
Mettez le bouton de réglage de l’humidité sur la position désirée. Si vous le mettez sur
3
la position , l’humidification chauffante est désactivée et la performance
d’humidification réduite au minimum. Le témoin lumineux reste allumé pour indiquer
que l’humidificateur est en mode d’attente. Lorsqu’il est réglé sur 6 ( ),
l’humidificateur délivre une humidification maximale.
Nous vous recommandons de mettre le bouton de réglage d’abord sur 3 ( ). Si
nécessaire, augmentez ou réduisez le réglage pour trouver celui qui est le plus
confortable et le plus efficace pour vous. Vous pouvez ajuster le réglage de l’humidité
à tout moment.
L’objectif est d’humidifier l’air délivré dans votre masque tout en évitant la formation
de condensation dans le circuit respiratoire. La température et l’humidité de l’air
ambiant affectent le réglage requis.
Voir « Foire aux questions » pour d’autres conseils sur la façon d’obtenir un réglage
d’humidité correct.
28
Page 34

Mettez votre masque comme indiqué dans son mode d’emploi.
4
Appuyez sur la touche Marche/Arrêt du panneau de contrôle. Sinon, si la fonction
5
SmartStart est disponible sur votre appareil, respirez simplement dans le masque pour
que le débit d’air démarre.
Remarque : pendant le fonctionnement, la lumière du témoin lumineux devient plus vive
pour indiquer que la résistance est active. Votre HumidAire 3i est équipé d’une résistance
puissante qui permet des temps de chauffage courts. Ne vous inquiétez pas si la lumière
devient plus vive pendant un court instant seulement.
Allongez-vous et placez le circuit respiratoire de manière à ce qu’il puisse suivre vos
6
mouvements pendant que vous dormez.
AVERTISSEMENT
!
Ne pas laisser de longueurs inutiles de tuyau en haut du lit. Elles pourraient
s’enrouler autour de votre tête ou de votre cou pendant que vous dormez.
ARRÊT DE VOTRE TRAITEMENT
Pour arrêter le traitement à tout moment, retirez votre masque et appuyez sur la
touche Marche/Arrêt. Sinon, si la fonction SmartStart est disponible sur votre
appareil, retirez simplement votre masque pour arrêter le traitement.
Certains appareils continuent à produire un débit d’air faible après l’arrêt du traitement.
Celui-ci peut continuer pendant une heure (maximum) pour aider au refroidissement
de la plaque chauffante. Néanmoins, vous pouvez débrancher l’appareil au niveau de
la prise de courant à tout moment et laisser la plaque chauffante refroidir sans débit
d’air.
FRANÇAIS
RETRAIT DE VOTRE HUMIDAIRE 3i
Veuillez vous référer aux figures de la section G de la fiche d’illustrations.
1 Débranchez le câble d’alimentation au niveau de la prise de courant (G-1).
AVERTISSEMENT
!
Manipuler votre HumidAire 3i avec précaution. L’eau et la base du réservoir
peuvent être brûlantes. Laissez la plaque chauffante et l’eau résiduelle refroidir
pendant 10 minutes (G-2).
Retirez le réservoir du support (G-3).
2
DÉBUT ET ARRÊT DU TRAITEMENT
29
Page 35

Appuyez sur le gros bouton argenté situé à mi-chemin sous le support (G-4) et
3
tirez sur l’H
Remarque : remettez le cache du connecteur bien en place à l'arrière de votre appareil.
UMIDAIRE 3i et l’appareil pour les séparer (G-5).
Gros bouton argenté
VUE DU DESSOUS
FOIRE AUX QUESTIONS
POURQUOI Y A-T-IL DE LA CONDENSATION DANS MON MASQUE ET/OU MON
CIRCUIT RESPIRATOIRE ?
Il est possible que trop de condensation se forme dans votre masque ou votre circuit
respiratoire. Ce phénomène se produit en fonction de la saison, particulièrement
lorsque la température ambiante est basse ou lorsque de l’air froid circule autour des
tuyaux. Réduisez le réglage de l’humidité jusqu’à ce que la condensation diminue.
Vous devrez peut-être ajuster le réglage de l’humidité d’une saison à l’autre.
EST-CE QUE JE DOIS UTILISER DE L’EAU DISTILLÉE POUR REMPLIR LE RÉSERVOIR ?
L’utilisation d’eau distillée permet de maximiser la durée de vie du réservoir et de
réduire les dépôts minéraux. Voir « Nettoyage de votre HumidAire 3i » page 32 pour
de plus amples informations.
QUE DOIS-JE FAIRE SI MES SYMPTÔMES DE SÉCHERESSE PERSISTENT ?
Si vos symptômes de sécheresse ne disparaissent pas, cela signifie que votre réglage
d’humidité est peut-être trop bas pour être efficace. Augmentez le réglage de
l’humidité progressivement sur plusieurs nuits jusqu’à ce que les symptômes
disparaissent.
Si les symptômes de sécheresse ne disparaissent toujours pas après l’augmentation du
réglage de l’humidité, cela signifie que vous respirez sans doute par la bouche. La
respiration par la bouche ou les fuites buccales peuvent provoquer la sécheresse et
l’irritation des voies aériennes supérieures. Si les fuites buccales vous posent problème,
vous avez la possibilité d’utiliser un masque facial ou une mentonnière. Consultez votre
clinicien ou votre prestataire de santé pour plus de détails.
30
Page 36

NETTOYAGE ET ENTRETIEN
Vous devez effectuer régulièrement le nettoyage et l’entretien décrits dans cette
section pour le réservoir, le capot et le joint du capot.
DÉMONTAGE DE VOTRE HUMIDAIRE 3i
Veuillez vous référer aux figures de la section H de la fiche d’illustrations.
AVERTISSEMENT
!
Risque d’électrocution. Ne pas immerger l’appareil ni le support ou le câble
d’alimentation dans l’eau. Systématiquement débrancher l’appareil avant de le
nettoyer et vérifier qu’il est bien sec avant de le rebrancher.
1 Débranchez le câble d’alimentation au niveau de la prise de courant (H-1).
AVERTISSEMENT
!
Manipuler votre HumidAire 3i avec précaution. L’eau et la base du réservoir
peuvent être brûlantes. Laisser la plaque chauffante et l’eau résiduelle refroidir
pendant 10 minutes (H-2).
Retirez le réservoir du support (H-3) et jetez l’eau résiduelle (H-4).
2
Détachez le circuit respiratoire de la sortie d’air (H-5).
3
Tirez légèrement sur l’un des côtés du capot et poussez-le vers le haut jusqu’à ce que
4
le capot se détache complètement du support (H-6 à H-8). Retirez le joint du capot
(H-9).
ATTENTION
!
La plaque de la cuve ne doit pas être enlevée du réservoir.
FRANÇAIS
NETTOYAGE ET ENTRETIEN
31
Page 37

NETTOYAGE DE VOTRE HUMIDAIRE 3i
ATTENTION
!
• Ne pas utiliser les produits suivants pour nettoyer les composants de
l’HumidAire 3i. Ils risquent d’endommager le produit et de réduire sa durée de
vie.
• Solutions à base d’eau de Javel, de chlore, d’alcool ou d’ammoniac.
• Savons hydratants, antibactériens ou à base de glycérine.
• Adoucissants et produits détartrants non approuvés.
• Ne pas passer le réservoir au lave-vaisselle.
RÉSERVOIR
QUOTIDIEN
Nettoyez le réservoir et les tuyaux dans de l’eau chaude à l’aide d’un détergent doux
(voir les précautions ci-dessus). Utilisez le cache de nettoyage jaune pour faciliter le
nettoyage (voir étapes 1 à 5 ci-dessous).
1
2
3
45
Rincez-les soigneusement à l’eau claire et laissez-les sécher à l’abri de la lumière directe
du soleil.
HEBDOMADAIRE
Inspectez le réservoir pour vérifier qu’il n’est ni usé ni endommagé. Remplacez le
réservoir si l’un des composants est fissuré, piqué ou a pris une coloration trouble.
Remplacez immédiatement en cas de fuite du réservoir.
En présence de dépôts de poudre blanche ou autre dans le réservoir :
i. Remplissez le réservoir jusqu'au repère de niveau maximum avec une solution
composée d'une mesure de vinaigre pour dix mesures d'eau.
ii. Laissez tremper dix minutes.
iii. Jetez la solution et rincez le réservoir à l'eau claire.
32
Page 38

CAPOT ET JOINT DU CAPOT
Inspectez le capot et le joint du capot une fois par semaine pour vérifier qu’ils ne sont
ni usés ni endommagés. Remplacez toute pièce endommagée. Si nécessaire, nettoyez
le capot et le joint du capot dans de l’eau chaude à l’aide d’un détergent doux (voir les
précautions ci-dessus). Rincez-les soigneusement à l’eau claire et laissez-les sécher à
l’abri de la lumière directe du soleil.
SUPPORT
Essuyez régulièrement l’extérieur du support (y compris le joint du connecteur) à l’aide
d’un chiffon humide.
REMONTAGE DE VOTRE HUMIDAIRE 3i
Veuillez vous référer aux figures de la section I de la fiche d’illustrations.
Remontez les composants une fois qu’ils sont propres et secs.
1 Alignez le joint du capot avec les rainures du capot (I-1) et appuyez au niveau des
bords pour le mettre correctement en place (I-2).
Mettez l’un des côtés du capot dans son point de pivot sur le support (I-3) et tirez
2
légèrement sur l’autre côté pour le mettre dans l’autre point de pivot (I-4 et I-5).
Le capot devrait s’ouvrir et se fermer sans résistance tout en étant bien fixé au support.
Remettez le réservoir dans le support de l’humidificateur (I-6).
3
RÉPARATIONS
Dans des conditions normales d’utilisation, le réservoir de l’HUMIDAIRE 3i doit être
remplacé tous les deux ans.
Ce produit (H
5 ans après la date de fabrication. Avant cette date, l’appareil devrait assurer un
fonctionnement fiable et sûr à condition qu’il soit utilisé et entretenu conformément
aux instructions fournies par ResMed. Les informations concernant la garantie ResMed
sont fournies avec l’appareil lors de sa livraison initiale. Comme avec tous les appareils
électriques, si vous constatez un défaut quelconque, vous devez faire vérifier l’appareil
par un service technique agréé ResMed.
UMIDAIRE 3i) doit être inspecté par un service technique agréé ResMed
FRANÇAIS
NETTOYAGE ET ENTRETIEN
33
Page 39

STRATÉGIE DE DÉPANNAGE
En cas de problème, reportez-vous aux suggestions suivantes. Si le problème persiste,
contactez votre prestataire de santé ou ResMed. N’essayez pas d’ouvrir l’appareil.
AVERTISSEMENT
!
L’entretien et les réparations doivent être effectués par un technicien agréé.
Problème Cause possible Solution
L’appareil ne
fonctionne pas (rien
ne s’affiche sur
l’écran LCD et/ou le
témoin lumineux ne
s’allume pas).
Le témoin lumineux
clignote.
La lumière du
témoin lumineux est
terne en permanence
et/ou l’air ne semble
pas chaud.
Le câble d’alimentation
n’est pas correctement
branché.
La prise de courant est
défectueuse.
L’appareil et le support ne
sont pas correctement
raccordés.
La lumière du témoin
lumineux devient
régulièrement plus vive
pour indiquer que la
résistance est active.
Le réflecteur de
l’HumidAire 3i (voir Figure
C-2a) est sale.
Vérifiez que le câble d’alimentation est
correctement branché à la prise de
courant et que l’interrupteur (le cas
échéant) de la prise est sur marche.
Essayez une autre prise de courant.
Vérifiez que le support est bien fixé à
l’appareil.
• Votre HumidAire 3i est équipé d’une
résistance puissante qui permet des
temps de chauffage courts. Ne vous
inquiétez pas si la lumière devient
plus vive pendant un court instant
seulement.
• Tournez le bouton de réglage jusqu’à
la position pour désactiver
l’humidification chauffante. Le
témoin lumineux reste allumé pour
indiquer que l’humidificateur est en
mode d’attente.
Nettoyez le réflecteur à l’aide d’un
chiffon humide.
34
Le réservoir fuit. Le réservoir est peut-être
endommagé ou fissuré.
Le capot n’est pas bien mis
en place.
Contactez votre prestataire de santé pour
obtenir une pièce de rechange.
Vérifiez que le capot est correctement
mis en place.
Page 40

Problème Cause possible Solution
Absence de débit
d’air/Débit d’air
faible.
Projections d’eau sur
votre visage.
Le circuit respiratoire n’est
pas correctement raccordé.
Le circuit respiratoire est
obstrué, pincé ou percé.
L’appareil ne fonctionne
pas correctement.
Le réservoir est trop rempli.
L’attache du capot n’est pas
correctement fermée.
Le joint du capot n’est pas
correctement mis en place.
De la condensation se
forme dans le circuit
respiratoire.
Le réservoir est trop rempli.
De la condensation se
forme dans le circuit
respiratoire et dans le
masque.
Raccordez le circuit respiratoire comme
décrit dans la section « Installation de
votre HumidAire 3i » page 26.
Débouchez ou libérez le circuit
respiratoire. Vérifiez que le circuit
respiratoire n’est pas percé.
Voir la section Stratégie de dépannage
du manuel de l’appareil.
Vérifiez que le niveau d’eau ne dépasse
pas le repère de niveau maximum.
Vérifiez que le capot est correctement
fixé au support à l’aide de l’attache.
Vérifiez que le joint du capot est dans le
bon sens et correctement mis en place.
Mettez le bouton de réglage de
l’humidité sur une valeur inférieure.
Isolez le circuit respiratoire.
Videz un peu le réservoir.
Mettez le bouton de réglage de
l’humidité sur une valeur inférieure.
Isolez le circuit respiratoire.
FRANÇAIS
L’air ne semble pas
humidifié.
L’air est trop humide. Le bouton de réglage de
Le bouton de réglage de
l’humidité est sur une
valeur trop basse.
La résistance de
l’HumidAire 3i ne
fonctionne pas.
l’humidité est sur une
valeur trop élevée.
L’humidité relative
ambiante est élevée.
Mettez le bouton de réglage de
l’humidité sur une valeur supérieure.
Contactez votre prestataire de santé.
Mettez le bouton de réglage de
l’humidité sur une valeur inférieure.
Ajustez votre réglage d’humidité.
STRATÉGIE DE DÉPANNAGE
35
Page 41

Problème Cause possible Solution
Dépôts de poudre
blanche ou autre
dans le réservoir.
L’eau laisse des dépôts
minéraux.
Utilisez de l’eau distillée.
Pour retirer ces dépôts minéraux,
voir « Nettoyage de votre HumidAire 3i »
page 32.
36
Page 42

CARACTÉRISTIQUES
PERFORMANCE
Température maximale de la plaque chauffante : 185°F (85°C)
Température de coupure : 199°F (93°C)
Humidité maximale : 95 % d’humidité relative (avec le bouton de réglage sur la valeur
maximale, un débit de 50 l/min, une température ambiante de 68°F [20°C] et une
humidité relative ambiante de 40 %).
Température maximale de l’air humidifié : 106°F (41°C)
DIMENSIONS (H X L X P)
Support et réservoir : 4,6” x 6,7” x 8,3” (118 mm x 170 mm x 212 mm)
POIDS
Support et réservoir vide : 1,5 lb (670 g)
Capacité du réservoir jusqu’au repère de niveau maximum : 415 ml
ALIMENTATION ÉLECTRIQUE
Courant pour une S8 ResMed avec l’HUMIDAIRE 3i : 100 – 240V, 50/60 Hz ; 110V,
400 Hz ; 2,5A < 140 VA (110 W) (consommation maximale de courant). Puissance
maximale instantanée < 340 VA.
La consommation effective de courant varie en fonction de différents facteurs tels que
le réglage de la température, la pression réglée, l’utilisation d’accessoires, l’altitude
d’utilisation et la température ambiante.
Puissance maximale de la résistance : 85 W.
BOÎTIER
Support : thermoplastique ignifugé, plaqué aluminium moulé.
Réservoir : plastique moulé par injection, acier inoxydable.
CONDITIONS AMBIANTES
Température de service : + 41°F à + 104°F (+ 5°C à + 40°C)
Humidité de service : 10 à 95 % sans condensation
Température de stockage et de transport : - 4°F à + 140°F (- 20°C à + 60°C)
Humidité de stockage et de transport : 10 à 95 % sans condensation
CLASSIFICATION CEI 60601-1
Classe II (double isolation)
Type CF
COMPATIBILITÉ ÉLECTROMAGNÉTIQUE
Veuillez vous référer au manuel utilisateur de votre appareil pour plus de détails.
Remarque : le fabricant se réserve le droit de modifier ces caractéristiques sans
notification préalable.
FRANÇAIS
CARACTÉRISTIQUES
37
Page 43

YMBOLES APPARAISSANT SUR L’APPAREIL
S
Attention, veuillez consulter la documentation jointe.
Équipement de type CF
Équipement de classe II
Surface chaude
Ne pas toucher
Repère de niveau maximum d’eau
La plaque de la cuve ne doit pas être enlevée du réservoir.
38
Page 44

GARANTIE LIMITÉE
ResMed garantit votre produit ResMed contre tout défaut de matériaux et de maind’œuvre pour la période spécifiée ci-après à compter de la date d’achat par le client
d’origine. Cette garantie n’est pas cessible.
Produit Durée de garantie
Humidificateurs ResMed, ResControl™, ResLink™, ResTraxx™ 1 an
Appareils de traitement ResMed 2 ans
Accessoires, masques (y compris entourage rigide, bulle, harnais
et circuit respiratoire). Les appareils à usage unique sont exclus.
90 jours
Remarque : certains de ces modèles ne sont pas disponibles dans tous les pays.
En cas de défaillance du produit dans des conditions normales d’utilisation, ResMed, à
son entière discrétion, répare ou remplace le produit défectueux ou toute pièce. Cette
garantie limitée ne couvre pas :
a) tout dommage résultant d'une utilisation incorrecte, d’un usage abusif ou d’une
modification ou transformation opérée sur le produit ;
b) les réparations et l’entretien effectués par tout service de réparation sans
l’autorisation expresse de ResMed ;
c) tout dommage ou contamination causé par de la fumée de cigarette, de pipe, de
cigare ou autre ;
d) tout dommage causé par de l’eau renversée sur ou dans un appareil.
La garantie s’annule pour les produits vendus ou revendus dans un pays autre que celui
où ils ont été achetés à l'origine. Les réclamations au titre de la garantie pour produits
défectueux doivent être présentées au lieu d'achat par le client d’origine.
Cette garantie remplace toute autre garantie expresse ou implicite, y compris toute
garantie de qualité marchande ou d’adéquation à un usage particulier. Certains pays ou
états n’autorisent pas les limitations de durée pour les garanties implicites ; il est donc
possible que la limitation susmentionnée ne s’applique pas à votre cas.
ResMed ne peut être tenue pour responsable de tout dommage accessoire ou indirect
résultant de la vente, de l’installation ou de l’utilisation de tout produit ResMed.
Certains pays ou états n’autorisent ni l’exclusion ni la limitation des dommages
accessoires ou indirects ; il est donc possible que la limitation susmentionnée ne
s’applique pas à votre cas. Cette garantie vous octroie des droits reconnus par la loi,
et vous pouvez également avoir d’autres droits qui varient en fonction du pays où vous
habitez.
FRANÇAIS
Pour de plus amples informations sur vos droits de garantie, veuillez contacter votre
prestataire de santé ou ResMed.
R001-307/2 05 06
GARANTIE LIMITÉE
39
Page 45

40
Page 46

INDEX
A
Alimentation électrique
Appareils compatibles
Arrêt de votre traitement 29
Avertissements
B
Boîtier 37
Bouton de réglage 28
Bouton de réglage de l’humidité
C
Cache du connecteur
rangement 26
remise en place
retrait
Capot
démontage
nettoyage
remontage 33
Capot avant
fixation
retrait 26
Caractéristiques
Classification CEI 60601-1
Compatibilité électromagnétique 37
Composants
Condensation
Conditions ambiantes 37
Contre-indications
D
Début du traitement 27
Dépôts minéraux 36
Dimensions
F
FAQ 30
Fixation
cache du connecteur
capot avant
HumidAire 3i 26
Fonction de préchauffage
G
Garantie limitée 39
24
26
31
33
26
25
28, 30, 35
37
26
37
23
28
30
37
37
24
30
27
H
HumidAire 3i
démontage
fixation 26
nettoyage
remontage
retrait 29
I
Informations médicales 24
Installation de votre HumidAire 3i
J
Joint du capot
nettoyage
remontage
retrait 31
N
Nettoyage 31
capot
joint du capot 33
réservoir
support
P
Performance
37
Poids
Positionnement
R
Refroidissement de la plaque chauffante
Réglages
humidification
Réglages de l’humidification
Remplissage du réservoir
Réservoir
capacité maximale
fuite
nettoyage 32
repère de niveau maximum
Retrait
cache du connecteur
capot avant
joint du capot
réservoir 27
Retrait de votre HumidAire 3i
31
32
33
26
33
33
33
32
33
37
26
29
28
28
27
37
34
27
26
26
31
29
FRANÇAIS
INDEX
41
Page 47

S
Sécheresse
symptômes
SmartStart 29
Stratégie de dépannage
Support
nettoyage
T
Témoin lumineux 27, 29
clignotement
Termes et icônes spéciaux 23
U
Usage prévu 24
V
Votre responsabilité 23
30
34
33
34
42
Page 48

HumidAire 3i™
MANUAL DEL USUARIO
Español
ESPAÑOL
43
Page 49

ÍNDICE
BIENVENIDO . . . . . . . . . . . . . . . . . . . . . . . . . . . . . . . . . . . . . . . . . . . . . . . . . 45
¿QUÉ ES EL HUMIDAIRE 3i? . . . . . . . . . . . . . . . . . . . . . . . . . . . . . . . . . . . . 45
U RESPONSABILIDAD 45
S
INFORMACIÓN MÉDICA . . . . . . . . . . . . . . . . . . . . . . . . . . . . . . . . . . . . . . . 46
NDICACIONES 46
I
C
ONTRAINDICACIONES 46
A
DVERTENCIAS 46
COMPONENTES DEL HUMIDAIRE 3i . . . . . . . . . . . . . . . . . . . . . . . . . . . . . 47
INSTALACIÓN DEL HUMIDAIRE 3i . . . . . . . . . . . . . . . . . . . . . . . . . . . . . . . 48
ARA QUITAR LA CUBIERTA DELANTERA (SI ESTÁ INSTALADA) 48
P
P
ARA QUITAR Y GUARDAR EL ENCHUFE CONECTOR 48
A
COPLE DEL HUMIDAIRE 3i 48
L
LENADO DE LA CÁMARA DE AGUA 49
INICIO Y DETENCIÓN DEL TRATAMIENTO . . . . . . . . . . . . . . . . . . . . . . . . . 49
NICIO DEL TRATAMIENTO 49
I
D
ETENCIÓN DEL TRATAMIENTO 51
D
ESACOPLAMIENTO DEL HUMIDAIRE 3i 51
PREGUNTAS FRECUENTES . . . . . . . . . . . . . . . . . . . . . . . . . . . . . . . . . . . . . . 52
LIMPIEZA Y MANTENIMIENTO . . . . . . . . . . . . . . . . . . . . . . . . . . . . . . . . . . . 53
ESMONTAJE DEL HUMIDAIRE 3i 53
D
L
IMPIEZA DEL HUMIDAIRE 3i 54
M
ONTAJE DEL HUMIDAIRE 3i 55
S
ERVICIO DE MANTENIMIENTO 55
44
SOLUCIÓN DE PROBLEMAS . . . . . . . . . . . . . . . . . . . . . . . . . . . . . . . . . . . . 56
ESPECIFICACIONES TÉCNICAS . . . . . . . . . . . . . . . . . . . . . . . . . . . . . . . . . . 59
GARANTÍA LIMITADA . . . . . . . . . . . . . . . . . . . . . . . . . . . . . . . . . . . . . . . . . 61
ÍNDICE ALFABÉTICO . . . . . . . . . . . . . . . . . . . . . . . . . . . . . . . . . . . . . . . . . . . 63
Page 50

BIENVENIDO
Gracias por haber escogido el humidificador HUMIDAIRE 3i™ de ResMed. El
H
UMIDAIRE 3i está diseñado para humidificar el aire suministrado a las vías
respiratorias durante el tratamiento con presión positiva continua en las vías
respiratorias (CPAP por sus siglas en inglés). El H
de aire CPAP de la Serie S8™ de ResMed por medio de un sencillo mecanismo de un
clic.
El presente manual del usuario contiene la información necesaria para un uso correcto
del H
UMIDAIRE 3i.
UMIDAIRE 3i se acopla a su generador
¿QUÉ ES EL HUMIDAIRE 3i?
El HUMIDAIRE 3i está diseñado para formar una sola unidad con un generador de aire
CPAP de ResMed. La unidad combinada suministra humidificación durante el
tratamiento con CPAP y puede hacer que el tratamiento sea más cómodo.
Durante el tratamiento con CPAP es posible que haya experimentado congestión
nasal o sequedad de la nariz, boca o garganta. Estos son síntomas ocasionados por los
climas secos, las bajas temperaturas del aire, el flujo de aire suministrado por el
generador de aire o las fugas por la boca. El aire humedecido le puede ayudar a aliviar
estos síntomas de sequedad.
Consulte el manual del generador de aire para corroborar que sea compatible con el
H
UMIDAIRE 3i. Si necesita más información comuníquese con su proveedor de
equipos o con una oficina de ResMed.
ESPAÑOL
SU RESPONSABILIDAD
Usted o el usuario de este sistema será enteramente responsable por cualquier lesión
a personas o daños a bienes que resulten de:
• una operación no conforme con las instrucciones de funcionamiento suministradas
• un mantenimiento o modificaciones efectuadas a menos que sean acordes con
instrucciones autorizadas y realizadas por personas autorizadas.
Antes de usar el equipo lea este manual detenidamente.
Este manual contiene términos e iconos especiales que aparecen en los márgenes, para
llamar su atención hacia información específica e importante.
• Una Advertencia le alerta sobre la posibilidad de lesiones.
• Una Precaución explica medidas especiales a tomar para el uso seguro y eficaz del
dispositivo.
• Una Nota se trata de una nota informativa o útil.
BIENVENIDO
45
Page 51

INFORMACIÓN MÉDICA
INDICACIONES
El HUMIDAIRE 3i está indicado para la humidificación del aire suministrado por los
equipos CPAP de la Serie S8 de ResMed. El H
únicamente siguiendo las recomendaciones de un médico.
PRECAUCIÓN (SÓLO EE.UU.)
!
La ley federal estipula que este aparato solamente puede ser vendido por un médico
o por su orden.
CONTRAINDICACIONES
El HUMIDAIRE 3i está contraindicado en pacientes que no respiran por sus vías
respiratorias superiores (supraglóticas). Remítase también al manual del sistema
correspondiente para ver las contraindicaciones de los tratamientos con CPAP.
ADVERTENCIAS
Las siguientes son advertencias generales. Las advertencias y precauciones específicas
aparecen en el manual junto a las instrucciones pertinentes.
ADVERTENCIAS
!
• Utilice el HUMIDAIRE 3i únicamente para el fin para el que ha sido diseñado, tal
como se describe en este manual.
• Asegúrese de que la cámara de agua esté vacía antes de transportar el
H
UMIDAIRE 3i.
• El HUMIDAIRE 3i está diseñado para ser usado únicamente con equipos CPAP de
ResMed específicos. No use el H
• El HUMIDAIRE 3i deberá utilizarse únicamente con los accesorios o tubos de
suministro recomendados por ResMed. Su uso con otros accesorios o tubos de
suministro podría resultar en una lesión o en daños al equipo.
• El HUMIDAIRE 3i, incluidos sus tubos asociados, es para ser usado por un único
paciente y no debe volver a utilizarse por parte de ninguna otra persona. Esto es
para evitar el riesgo de infecciones cruzadas.
• El HUMIDAIRE 3i deberá colocarse siempre por debajo del nivel del paciente. Si
se coloca al mismo nivel o por encima del paciente, cabe la posibilidad de que el
agua caliente fluya por el tubo hacia la mascarilla.
• Si el dispositivo se coloca a un nivel superior al del paciente y se vuelca, o si el tubo
se llena de condensación de agua, existe la posibilidad de que la mascarilla se llene
de agua. El H
que no puedan cuidar sus vías respiratorias, o que no puedan quitarse la mascarilla
por sí mismos, por ejemplo en aquéllos que hayan sufrido un ataque
cerebrovascular. Se deberán ponderar cuidadosamente los riesgos y beneficios
relativos.
UMIDAIRE 3i debe entonces ser usado con precaución en pacientes
UMIDAIRE 3i con ningún otro equipo CPAP.
UMIDAIRE 3i debe ser usado
46
Page 52

• No intente desmontar la estación de carga del HUMIDAIRE 3i. No contiene
partes que puedan recibir un servicio de mantenimiento por parte del usuario. Las
reparaciones y el mantenimiento interno deberán ser efectuados únicamente por
un agente de servicio autorizado.
• Tenga cuidado al manipular el HUMIDAIRE 3i. La placa de calefacción y el agua en
la cámara de agua pueden estar calientes.
• En caso de que inadvertidamente se derramen líquidos sobre la estación de carga
del H
UMIDAIRE 3i o hacia su interior, desenchufe el equipo CPAP de la fuente de
alimentación. Desconecte la estación de carga del equipo CPAP y permita que la
estación de carga se seque antes de volver a utilizarla.
• No encienda el HUMIDAIRE 3i si el equipo CPAP tiene un cable de conexión o un
enchufe dañado.
• No utilice el HUMIDAIRE 3i si el mismo no está funcionando adecuadamente o si
alguna de sus piezas ha caído al suelo o ha sido dañada.
• Mantenga el cable de conexión del equipo CPAP lejos de superficies
calefaccionadas.
• No deje caer ni inserte ningún objeto en ninguna de las aberturas ni en los tubos.
• No use el HUMIDAIRE 3i en presencia de materiales inflamables o explosivos.
• Peligro de explosión: no utilizar cerca de anestésicos inflamables.
• Si se utiliza oxígeno con este dispositivo, el flujo del mismo deberá estar cerrado
mientras el equipo no esté en funcionamiento.
Si el oxígeno se ha dejado abierto, apague el generador de aire y espere
30 minutos antes de encender el generador de aire nuevamente.
Explicación: mientras el equipo CPAP no esté funcionando, si se deja abierto el
flujo de oxígeno, el oxígeno suministrado al tubo de respiración podrá acumularse
dentro del dispositivo CPAP, creando así un riesgo de incendio. Esto se aplica a la
mayoría de los tipos de equipos CPAP.
• El oxígeno favorece la combustión. Por tanto no debe utilizarse en presencia de
una llama expuesta o mientras se fuma.
• Siempre asegúrese de que se genere flujo de aire por parte del equipo antes de
encender el suministro de oxígeno.
• Siempre apague el suministro de oxígeno antes de detener el flujo de aire
desde el equipo.
Nota: a un caudal fijo de oxígeno suplementario, la concentración de oxígeno
inhalado variará dependiendo del punto en que éste se introduce, los ajustes de presión
programados, el patrón respiratorio del paciente, la mascarilla elegida y el nivel de fuga.
ESPAÑOL
COMPONENTES DEL HUMIDAIRE 3i
Consulte las figuras en la sección A de la hoja de figuras.
COMPONENTES DEL HUMIDAIRE 3i
47
Page 53

INSTALACIÓN DEL HUMIDAIRE 3i
ADVERTENCIA
!
Antes de conectar el HumidAire 3i verifique que su generador de aire esté apagado
a nivel de la fuente de alimentación.
PARA QUITAR LA CUBIERTA DELANTERA (SI ESTÁ INSTALADA)
Consulte las figuras en la sección B de la hoja de figuras.
Es posible que su generador de aire tenga colocada una cubierta delantera (B-1). Antes
de acoplar el H
sepárela del cuerpo del generador de aire (B-3 y B-4).
Notas
• Para volver a colocar la cubierta delantera, hágala coincidir con su generador de aire
(B-4) y empújela con firmeza hasta que se ajuste en su lugar por medio de un clic.
• Recuerde llevar la cubierta delantera con usted si va de viaje, en caso de que necesite
tratamiento con CPAP sin un humidificador.
PARA QUITAR Y GUARDAR EL ENCHUFE CONECTOR
Consulte las figuras en la sección C de la hoja de figuras.
Antes de acoplar el H
(C-1) y colóquelo en la parte trasera de la estación de carga (C-2).
ACOPLE DEL HUMIDAIRE 3i
Consulte las figuras en la sección D de la hoja de figuras.
UMIDAIRE 3i, oprima el botón bajo la cubierta delantera (B-2) y
UMIDAIRE 3i, retire el enchufe conector de su generador de aire
48
1 Alinee el HUMIDAIRE 3i con el generador de aire (D-1) y aproxímelos hasta que se
ajusten en su lugar por medio de un clic (D-2).
ADVERTENCIA
!
• Sólo se debe conectar y desconectar la estación de carga del HumidAire 3i
cuando la cámara de agua esté vacía.
• Se debe impedir que el agua entre en el generador de aire. No transporte el
generador de aire con el HumidAire 3i acoplado.
Conecte el cable de corriente al enchufe en la parte trasera del generador de aire.
2
Conecte el otro extremo del cable de corriente a una fuente de alimentación (D-3).
Nota: si el generador de aire recibe alimentación a través de la entrada de CC, el
HumidAire 3i no recibirá corriente y la producción de humidificación será menor.
Coloque la unidad combinada sobre una superficie firme y plana cerca de su cama, a
3
un nivel más bajo que el que usted adopte para dormir. Verifique que la superficie no
sea sensible al calor o la humedad, o use un paño protector.
PRECAUCIÓN
!
Tenga cuidado de no colocar la unidad en un lugar donde pueda ser empujada y
tirada al suelo.
Page 54

Conecte firmemente un extremo del tubo de aire a la salida de aire del HUMIDAIRE 3i,
4
y el otro extremo a su mascarilla (D-4).
LLENADO DE LA CÁMARA DE AGUA
Consulte las figuras en la sección E de la hoja de figuras.
ADVERTENCIA
!
Tenga cuidado al manipular el HumidAire 3i. El agua y la base de la cámara de agua
pueden alcanzar altas temperaturas. Espere 10 minutos para que se enfríe la placa
de calefacción y todo resto de agua.
1 Libere el cerrojo de la cubierta (E-1) y levántela hasta que quede en su posición vertical
(E-2).
Retire la cámara de agua (E-3) y con cuidado llénela con agua fresca y limpia (E-4).
2
Verifique que el nivel del agua permanezca por debajo de la marca de nivel máximo
(E-4a).
Siempre asegúrese de que la cámara de agua esté limpia. Consulte “Limpieza y
mantenimiento” en la página 53.
ADVERTENCIA
!
No llene demasiado la cámara de agua, ya que podría entrar agua en el generador
de aire y en el tubo de aire.
PRECAUCIÓN
!
No utilice ningún aditivo (como por ej. perfumes o aceites aromáticos). Estos
productos podrían reducir la capacidad de humidificación del HumidAire 3i y/o
provocar un deterioro de los materiales de la cámara de agua.
ESPAÑOL
Con cuidado coloque la cámara de agua llena en la estación de carga del humidificador
3
(E-5) y vuelva a cerrar la cubierta (E-6).
UMIDAIRE 3i está ya listo para ser usado.
El H
INICIO Y DETENCIÓN DEL TRATAMIENTO
INICIO DEL TRATAMIENTO
Consulte la figura en la sección F de la hoja de figuras.
1 Cuando el HUMIDAIRE 3i se acopla y el generador de aire se enciende, la luz
indicadora se enciende en el H
función de Calentamiento (no disponible en todos los modelos).
Al activarla, esta función permite que el agua se caliente antes de comenzar el
tratamiento.
UMIDAIRE 3i. Puede aparecer un mensaje acerca de la
RAMPA: 10min
menú
calen
INICIO Y DETENCIÓN DEL TRATAMIENTO
49
Page 55

Si la función de Calentamiento está disponible, utilícela para calentar el agua antes de
2
iniciar el tratamiento. Si desea iniciar el tratamiento inmediatamente, omita este paso.
FUNCIÓN DE CALENTAMIENTO (NO DISPONIBLE EN TODOS LOS MODELOS)
Nota: consulte el manual del usuario de su generador de aire para saber si esta función
está disponible.
Para iniciar la función de Calentamiento:
i. Seleccione Calentamiento oprimiendo la tecla Derecha en el panel de control.
El siguiente mensaje aparece durante 2 segundos:
HUMIDIFICADOR
CALENTANDO
ii. Después de 2 segundos aparece la pantalla CALENTAMIENTO.
CALENTANDO
menú salir
iii. Mientras el H
• Iniciar el tratamiento en cualquier momento, oprimiendo la tecla Inicio/Parada.
• Acceder a los menús oprimiendo Menú (tecla Izquierda).
• Detener la función de Calentamiento en cualquier momento pulsando Salir
UMIDAIRE 3i está en modo de Calentamiento, usted puede:
(tecla Derecha).
La función de Calentamiento se apagará automáticamente después de 30 minutos si
el tratamiento no ha comenzado.
Gire la escala de control de humedad a la configuración deseada. La opción apaga
3
la humidificación térmica y suministra una humidificación mínima. La luz indicadora
permanecerá encendida para indicar modo en espera. Con la opción 6 ( ) se
suministra una humidificación máxima.
Recomendamos que inicialmente coloque la escala de control en la posición 3 ( ).
De ser necesario, ajuste aumentando o reduciendo la escala de control para encontrar
el nivel que le resulte más cómodo y efectivo. Puede ajustar el nivel de humedad en
cualquier momento.
El objetivo es recibir aire húmedo en la mascarilla pero evitar la formación de
condensación en el tubo de aire. La temperatura y la humedad del aire circundante
afectarán el nivel que usted necesita.
Consulte “Preguntas frecuentes” para obtener más consejos acerca de la configuración
correcta del nivel de humedad.
Colóquese la mascarilla siguiendo las instrucciones para el usuario de dicha mascarilla.
4
Oprima la tecla Inicio/Parada en el panel de co ntrol. De lo contrario, si su generador
5
de aire cuenta con la función SmartStart, simplemente respire en su mascarilla y el aire
debería comenzar a fluir.
50
Page 56

Nota: durante el funcionamiento, la luz indicadora periódicamente se torna más brillante
para indicar que el calentador está encendido. El HumidAire 3i tiene un calentador rápido
que posibilita tiempos de calentamiento muy cortos. No se preocupe si la luz únicamente
se torna más brillante durante un breve lapso.
Acuéstese y acomode el tubo de aire de forma que pueda moverse libremente si se
6
da la vuelta mientras duerme.
ADVERTENCIA
!
No deje excesivos tramos de tubo de aire encima de la cabecera de su cama. Se
podrían enrollar alrededor de su cabeza o cuello mientras duerme.
DETENCIÓN DEL TRATAMIENTO
Para detener el tratamiento en cualquier momento, quítese la mascarilla y pulse la tecla
Inicio/Parada. De lo contrario, si su generador de aire tiene la función SmartStart,
simplemente quítese la mascarilla y el tratamiento se detendrá.
Algunos generadores de aire continúan emitiendo un poco de aire una vez detenido
el tratamiento. Esto puede continuar durante un máximo de una hora para ayudar a
enfriar la placa de calefacción. Sin embargo, usted puede en cualquier momento
desenchufar el equipo de la fuente de alimentación y permitir que la placa de
calefacción se enfríe sin flujo de aire.
DESACOPLAMIENTO DEL HUMIDAIRE 3i
Consulte las figuras en la sección G de la hoja de figuras.
1 Desenchufe el cable de corriente de la toma (G-1).
ADVERTENCIA
!
Tenga cuidado al manipular el HumidAire 3i. El agua y la base de la cámara de agua
pueden alcanzar altas temperaturas. Espere 10 minutos para que se enfríe la placa
de calefacción y todo resto de agua (G-2).
ESPAÑOL
Retire la cámara de agua de la estación de carga (G-3).
2
Oprima el botón plateado grande ubicado en la parte central debajo de la
3
estación de carga (G-4) y separe el H
VISTA INFERIOR
Nota: vuelva a colocar firmemente el enchufe conector en el generador de aire.
UMIDAIRE 3i del generador de aire (G-5).
Botón plateado
grande
INICIO Y DETENCIÓN DEL TRATAMIENTO
51
Page 57

PREGUNTAS FRECUENTES
¿POR QUÉ HAY CONDENSACIÓN EN MI MASCARILLA Y/O TUBO DE AIRE?
Tal vez experimente una condensación excesiva en la mascarilla o en el tubo de aire.
Esto puede ocurrir en algunos periodos, sobre todo cuando la temperatura ambiente
es baja o cuando circula aire frío alrededor del tubo. Gire la escala de control hacia
abajo para disminuir el nivel de humidificación hasta que la condensación disminuya.
Es posible que con los cambios de estación deba ajustar el nivel de humidificación.
¿DEBO USAR AGUA DESTILADA EN LA CÁMARA DE AGUA?
El agua destilada prolongará la vida útil de la cámara de agua y reducirá los depósitos
minerales. Para más detalles consulte “Limpieza del HumidAire 3i” en la página 54.
¿QUÉ PUEDO HACER SI PERSISTEN LOS SÍNTOMAS DE SEQUEDAD?
Si sigue experimentando síntomas de sequedad, es probable que su nivel de
humidificación sea demasiado bajo para ser efectivo. Aumente gradualmente el nivel
de humidificación con la escala de control durante unas cuantas noches hasta que los
síntomas desaparezcan.
Si aún después de incrementar el nivel de humidificación sigue experimentando
síntomas de sequedad, es probable que esté respirando por la boca. La respiración por
la boca o las fugas por la boca ocasionan sequedad e irritación de las vías respiratorias
superiores. Si esto resulta ser un problema, una mascarilla facial o una correa para el
mentón podrían serle de utilidad. Para obtener más información póngase en contacto
con su médico o proveedor de equipos.
52
Page 58

LIMPIEZA Y MANTENIMIENTO
Periódicamente debe llevar a cabo la limpieza y el mantenimiento de la cámara de
agua, la cubierta y la junta de la cubierta tal como se describe en esta sección.
DESMONTAJE DEL HUMIDAIRE 3i
Consulte las figuras en la sección H de la hoja de figuras.
ADVERTENCIA
!
Peligro de electrocución. No sumerja el generador de aire, la estación de carga ni
el cable de alimentación en agua. Siempre desconecte el equipo antes de limpiarlo
y asegúrese de que esté seco antes de conectarlo nuevamente.
1 Desenchufe el cable de corriente de la toma (H-1).
ADVERTENCIA
!
Tenga cuidado al manipular el HumidAire 3i. El agua y la base de la cámara de agua
pueden alcanzar altas temperaturas. Espere 10 minutos para que se enfríen la placa
de calefacción y todo resto de agua (H-2).
Retire la cámara de agua de la estación de carga (H-3) y deseche todo resto de agua
2
(H-4).
Separe el tubo de aire de la salida de aire (H-5).
3
Con suavidad tire de uno de los brazos de la cubierta hacia fuera y hacia arriba de la
4
estación de carga hasta que la cubierta se separe por completo (H-6 a H-8). Retire de
la cubierta la junta de la cubierta (H-9).
PRECAUCIÓN
!
No retire la placa de cubeta de la cámara de agua.
ESPAÑOL
LIMPIEZA Y MANTENIMIENTO
53
Page 59

LIMPIEZA DEL HUMIDAIRE 3i
PRECAUCIÓN
!
• No utilice ninguno de los siguientes productos para limpiar las piezas del
HumidAire 3i. Estas soluciones podrían ocasionar daños al producto y reducir la
vida útil del mismo.
• lejía, soluciones a base de cloro, alcohol o amoníaco
• jabones humectantes, antibacterianos o a base de glicerina
• agentes desmineralizadores y decapantes no aprobados.
• No lave la cámara de agua en un lavavajillas.
CÁMARA DE AGUA
DIARIAMENTE
Lave la cámara de agua y el tubo en agua tibia con un detergente suave (consulte la
precaución anterior). Utilice el tapón amarillo de limpieza para facilitar el proceso de
limpieza (consulte los pasos 1 a 5 a continuación).
1
2
3
45
Enjuáguelos cuidadosamente en agua limpia y déjelos secar sin exponerlos a la luz
directa del sol.
SEMANALMENTE
Inspeccione la cámara de agua para verificar que no haya desgaste ni deterioro.
Sustitúyala si alguno de sus componentes se ha agrietado, marcado o se ha puesto
opaco. Sustitúyala de inmediato si presenta fugas.
Si nota un polvo blanco o depósito en la cámara de agua:
i. Llene la cámara de agua hasta la marca del nivel máximo con una solución que
contenga una parte de vinagre por cada 10 partes de agua.
54
Page 60

ii. Deje reposar durante 10 minutos.
iii. Deseche la solución y enjuague la cámara de agua con agua limpia.
CUBIERTA Y JUNTA DE LA CUBIERTA
Inspeccione semanalmente la cubierta y la junta de la cubierta en busca de desgaste o
deterioro. Cambie cualquier pieza dañada. Cuando sea necesario, lave la cubierta y la
junta de la cubierta en agua tibia con un detergente suave (consulte la precaución
anterior). Enjuáguelas cuidadosamente en agua limpia y déjelas secar sin exponerlas a
la luz directa del sol.
ESTACIÓN DE CARGA
Periódicamente pase un paño húmedo por el exterior de la estación de carga (incluida
la junta conectora).
MONTAJE DEL HUMIDAIRE 3i
Consulte las figuras en la sección I de la hoja de figuras.
Monte las piezas cuando estén limpias y secas.
1 Alinee la junta con las guías de la cubierta (I-1) y oprímala a lo largo de los bordes para
asegurarse de que quede instalada correctamente (I-2).
Coloque un brazo de la cubierta en su punto de apoyo en la estación de carga (I-3) y
2
con suavidad separe el otro brazo para colocarlo en su apoyo correspondiente (I-4 e
I-5).
La cubierta debe poder abrir y cerrar libremente y al mismo tiempo permanecer unida
a la estación de carga.
Vuelva a colocar la cámara de agua en la estación de carga del humidificador (I-6).
3
SERVICIO DE MANTENIMIENTO
Con el uso normal de un HUMIDAIRE 3i, la cámara de agua deberá ser sustituida cada
dos años.
Al cumplirse 5 años de su fabricación, este producto (H
inspeccionado por un Centro de Servicio ResMed autorizado. Hasta ese momento, el
equipo está diseñado para funcionar de manera segura y fiable, siempre que se maneje
y mantenga de acuerdo con las instrucciones suministradas por ResMed. Al entregarse
el equipo, se proporcionan los detalles correspondientes de la garantía ResMed. Como
en el caso de todos los dispositivos eléctricos, si aparece alguna irregularidad en su
funcionamiento, se deberán tomar las precauciones necesarias y el equipo deberá ser
revisado por un Centro de Servicio ResMed autorizado.
UMIDAIRE 3i) debe ser
ESPAÑOL
LIMPIEZA Y MANTENIMIENTO
55
Page 61

SOLUCIÓN DE PROBLEMAS
Si hay un problema, intente las siguientes sugerencias. Si el problema no puede ser
resuelto, comuníquese con su proveedor de equipos o con ResMed. No intente abrir
la unidad.
ADVERTENCIA
!
El servicio de mantenimiento y las reparaciones deberán ser efectuados únicamente
por un agente de servicio autorizado.
Problema Causa posible Solución
El equipo no
funciona (no aparece
nada en el visor y/o
la luz indicadora no
se enciende)
La luz indicadora
parpadea
La luz indicadora
está siempre tenue
y/o el aire no se
siente caliente
Cámara de agua con
fuga
El cable de corriente no
está debidamente
conectado.
Toma de corriente o fuente
de alimentación
defectuosa.
El generador de aire y la
estación de carga no están
correctamente conectados.
La luz indicadora
periódicamente se torna
más brillante para indicar
que el calentador está
encendido.
El reflector del HumidAire
3i (consulte la figura C-2a)
está sucio.
La cámara de agua puede
estar dañada o fisurada.
Verifique que el cable de alimentación
esté firmemente enchufado en la fuente
de alimentación y que el interruptor de
ésta (en caso de haberlo) esté
encendido.
Pruebe otra fuente de alimentación o
toma de corriente.
Verifique que la estación de carga esté
firmemente acoplada al generador de
aire.
• El HumidAire 3i tiene un calentador
rápido que posibilita tiempos de
calentamiento muy cortos. No se
preocupe si la luz únicamente se
torna más brillante durante un breve
lapso.
• Gire la escala a la posición para
apagar la humidificación térmica. La
luz indicadora permanecerá
encendida para indicar modo en
espera.
Limpie el reflector con un paño
húmedo.
Contacte a su proveedor para obtener un
repuesto.
56
La cubierta no está
correctamente colocada.
Asegúrese de que la cubierta esté
colocada correctamente.
Page 62

Problema Causa posible Solución
No hay flujo de aire
o éste es muy bajo
El agua le salpica en
el rostro
El tubo de aire no está
debidamente conectado.
El tubo de aire está
obstruido, torcido o roto.
El generador de aire no está
funcionando
correctamente.
La cámara de agua está
demasiado llena.
La cubierta no está
correctamente trabada.
La junta de la cubierta no
está correctamente
instalada.
Se forma condensación en
el tubo de aire.
La cámara de agua está
demasiado llena.
Conecte el tubo de aire como se
describe en “Instalación del HumidAire
3i” en la página 48.
Desobstruya o libere el tubo de aire.
Verifique que el tubo de aire no esté
perforado.
Consulte la sección "Solución de
problemas" del manual del generador de
aire.
Asegúrese de que el nivel de agua no
sobrepase la marca del nivel máximo de
agua.
Asegúrese de que la cubierta esté
correctamente trabada en la estación de
carga.
Asegúrese de que la junta de la cubierta
no esté invertida y de que esté instalada
correctamente.
Disminuya el nivel en la escala de
control.
Aísle el tubo de aire.
Extraiga un poco de agua de la cámara
de agua.
ESPAÑOL
El aire no se siente
húmedo
El aire está
demasiado húmedo
Se forma condensación en
el tubo de aire y en la
mascarilla.
El nivel en la escala de
control es muy bajo.
El calentador del
HumidAire 3i no está
funcionando.
La escala de control está en
un nivel muy alto.
Hay alta humedad relativa
en su habitación.
Disminuya el nivel en la escala de
control.
Aísle el tubo de aire.
Aumente el nivel en la escala de control.
Contacte a su proveedor de equipos.
Disminuya el nivel en la escala de
control.
Ajuste el nivel de humidificación.
SOLUCIÓN DE PROBLEMAS
57
Page 63

Problema Causa posible Solución
Aparecen depósitos
o un polvo blanco
en la cámara de
agua
El agua deja depósitos
minerales.
Use agua destilada.
Para quitar estos depósitos minerales,
consulte “Limpieza del HumidAire 3i”
en la página 54.
58
Page 64

ESPECIFICACIONES TÉCNICAS
RENDIMIENTO
Temperatura máxima de la placa de calefacción: 185°F (85°C)
Temperatura de apagado: 199°F (93°C)
Máxima producción de humedad: 95% de humedad relativa (escala de control al
máximo, flujo de 50 l/min, temperatura ambiente de 68°F [20°C], humedad relativa
ambiente del 40%).
Máxima temperatura del gas: 106°F (41°C)
DIMENSIONES (ALTURA X ANCHO X PROFUNDIDAD)
Estación de carga y cámara de agua: 4,6 x 6,7 x 8,3 pulgadas
(118 mm x 170 mm x 212 mm)
PESO
Estación de carga y cámara de agua vacía: 1,5 lb. (670 g)
Capacidad de agua hasta la línea de llenado máximo: 415 ml
ALIMENTACIÓN
Rango de entrada para el generador de aire S8 de ResMed con HUMIDAIRE 3i:
100–240 V, 50/60 Hz; 110 V, 400 Hz; 2,5 A <140 VA (110 W) (máximo consumo de
energía). Potencia máxima instantánea <340 VA.
La cifra real del consumo promedio de energía variará en función de factores tales
como la configuración de la temperatura, la presión fijada, el uso de accesorios, la altura
sobre el nivel del mar y la temperatura ambiente.
Potencia máxima de la resistencia: 85 W.
CONSTRUCCIÓN DE LA CARCASA
Estación de carga: termoplástico de ingeniería ignífuga, aluminio fundido recubierto.
Cámara de agua: plástico moldeado por inyección, acero inoxidable.
CONDICIONES AMBIENTALES
Temperatura de funcionamiento: +41°F a +104°F (+5°C a +40°C)
Humedad para el funcionamiento: 10–95% sin condensación
Temperatura de almacenamiento y transporte: -4°F a +140°F (-20°C a +60°C)
Humedad para el almacenamiento y el transporte: 10–95% sin condensación
CLASIFICACIÓN CEI 60601-1
Clase II (doble aislamiento)
Tipo CF
COMPATIBILIDAD ELECTROMAGNÉTICA
Para detalles acerca de este aspecto, consulte el manual del usuario de su generador
de aire.
Nota: el fabricante se reserva el derecho de cambiar estas especificaciones sin previo
aviso.
ESPAÑOL
ESPECIFICACIONES TÉCNICAS
59
Page 65

ÍMBOLOS QUE APARECEN EN EL DISPOSITIVO
S
Atención, consultar la documentación adjunta
Equipo tipo CF
Equipo Clase II
Superficie caliente
No tocar
Nivel máximo de agua
No retire la placa de cubeta de la cámara de agua.
60
Page 66

GARANTÍA LIMITADA
ResMed garantiza que su producto ResMed estará libre de todo defecto de material y
mano de obra durante el plazo estipulado a continuación a partir de la fecha de
adquisición por parte del consumidor inicial. Esta garantía no es transferible.
Producto Plazo de la garantía
Humidificadores ResMed, ResControl™, ResLink™, ResTraxx™ 1 año
Generadores de aire ResMed 2 años
Accesorios, sistemas de mascarilla (incluidos el armazón de la
mascarilla, la almohadilla, el arnés para la cabeza y los tubos).
Excluye los dispositivos desechables.
90 días
Nota: algunos modelos no se encuentran disponibles en todas las regiones.
Si el producto falla bajo condiciones de utilización normales, ResMed reparará o
reemplazará, a opción suya, el producto defectuoso o cualquiera de sus componentes.
Esta Garantía limitada no cubre:
a) cualquier daño causado como resultado de una utilización indebida, abuso,
modificación o alteración del producto;
b) reparaciones llevadas a cabo por cualquier organización de servicio que no haya sido
expresamente autorizada por ResMed para efectuar dichas reparaciones;
c) cualquier daño o contaminación debida a humo de cigarrillo, pipa, cigarro u otras
fuentes de humo;
d) cualquier daño causado por el derrame de agua sobre un generador de aire o hacia
su interior.
La garantía es nula en el caso de un producto vendido o revendido fuera de la región
donde se realizó la compra original. Los reclamos que se realicen bajo la garantía a
causa de un producto defectuoso debe realizarlos el consumidor inicial en el punto de
compra.
Esta garantía revoca toda otra garantía expresa o implícita, incluso cualquier garantía
implícita de comerciabilidad o idoneidad para un propósito en particular. Algunas
regiones o estados no permiten limitaciones respecto de la duración de una garantía
implícita, por lo que es posible que lo que precede no sea aplicable en su caso.
ResMed no será responsable por ningún daño incidental ni emergente que se reclame
por haber ocurrido como resultado de la venta, instalación o utilización de cualquier
producto de ResMed. Algunas regiones o estados no permiten la exclusión ni la
limitación de daños incidentales o emergentes, por lo que es posible que lo que
precede no sea aplicable en su caso. Esta garantía le otorga derechos legales
específicos, y es posible que usted tenga otros derechos que pueden variar de una
región a otra.
Para más información sobre los derechos que le otorga esta garantía, póngase en
contacto con su distribuidor local ResMed o con una oficina de ResMed.
R001-307/2 05 06
ESPAÑOL
GARANTÍA LIMITADA
61
Page 67

62
Page 68

ÍNDICE ALFABÉTICO
A
Acople
HumidAire 3i
Advertencias 46
Alimentación
C
Cámara de agua
capacidad máxima 59
56
fuga
limpieza
marca de nivel máximo de agua 49
Clasificación CEI 60601-1
Colocación
cubierta delantera
enchufe conector
Compatibilidad electromagnética
Componentes 47
Condensación
Condiciones ambientales
Construcción de la carcasa 59
Contraindicaciones
Cubierta
desmontaje
limpieza
montaje
Cubierta delantera
colocación
48
retiro
D
Depósitos minerales
Desacoplamiento del HumidAire 3i
Dimensiones
E
Enchufe conector
colocación
guardado
retiro 48
Enfriamiento de la placa de calefacción
Escala de control 50
Escala de control de humedad
Especificaciones técnicas
Estación de carga
48
59
54
59
48
51
59
50, 52, 57
59
46
53
55
55
48
58
51
59
51
48
51
50
59
limpieza
F
Función de Calentamiento
G
Garantía limitada 61
Generadores de aire compatibles
H
HumidAire 3i
acople
desacoplamiento
desmontaje 53
limpieza
montaje
I
Indicaciones
Información médica
Inicio del tratamiento
Instalación del HumidAire 48
J
Junta de la cubierta
limpieza
montaje 55
retiro
L
Limpieza 53
cámara de agua 54
cubierta
estación de carga
junta de la cubierta 55
Llenado de la cámara de agua
Luz indicadora
parpadeo 56
N
Niveles de humidificación 50
P
Parada del tratamiento 51
Peso 59
Preguntas frecuentes
55
49
45
48
51
54
55
ESPAÑOL
46
46
49
55
53
55
55
49
49, 51
52
ÍNDICE ALFABÉTICO
63
Page 69

R
Rendimiento
Retiro
cámara de agua
cubierta delantera
enchufe conector
junta de la cubierta 53
S
Sequedad
síntomas
SmartStart 50, 51
Solución de problemas
Su responsabilidad
T
Términos e iconos especiales
U
Ubicación 48
59
49
48
48
52
56
45
45
64
Page 70

HumidAire 3i™
MANUAL DO UTILIZADOR
Português
PORTUGUÊS
65
Page 71

ÍNDICE
BOAS VINDAS . . . . . . . . . . . . . . . . . . . . . . . . . . . . . . . . . . . . . . . . . . . . . . . 67
O QUE É O HUMIDAIRE 3i? . . . . . . . . . . . . . . . . . . . . . . . . . . . . . . . . . . . . 67
S SUAS RESPONSABILIDADES 67
A
INFORMAÇÃO MÉDICA . . . . . . . . . . . . . . . . . . . . . . . . . . . . . . . . . . . . . . . . 68
SO DESTINADO 68
U
C
ONTRA-INDICAÇÕES 68
A
VISOS 68
COMPONENTES DO HUMIDAIRE 3i . . . . . . . . . . . . . . . . . . . . . . . . . . . . . 69
MONTAGEM DO HUMIDAIRE 3i PARA USO . . . . . . . . . . . . . . . . . . . . . . 70
EMOÇÃO DA TAMPA DA FRENTE (NO CASO DESTA SE ENCONTRAR EM POSIÇÃO)
R
70
R
EMOÇÃO E ARMAZENAGEM DA TAMPA DO CONECTOR 70
I
NSTALAR O HUMIDAIRE 3i 70
E
NCHER A CÂMARA DE ÁGUA 71
INICIAR E PARAR O TRATAMENTO . . . . . . . . . . . . . . . . . . . . . . . . . . . . . . . 72
NICIAR O TRATAMENTO 72
I
P
ARAR O TRATAMENTO 73
S
EPARAR O HUMIDAIRE 3i 73
PERGUNTAS FREQUENTES . . . . . . . . . . . . . . . . . . . . . . . . . . . . . . . . . . . . . . 74
LIMPEZA E MANUTENÇÃO . . . . . . . . . . . . . . . . . . . . . . . . . . . . . . . . . . . . . . 75
ESMONTAR O HUMIDAIRE 3i 75
D
L
IMPAR O HUMIDAIRE 3i 76
V
OLTAR A MONTAR O HUMIDAIRE 3i 77
M
ANUTENÇÃO 77
66
DETECÇÃO E RESOLUÇÃO DE PROBLEMAS . . . . . . . . . . . . . . . . . . . . . . . . 78
ESPECIFICAÇÕES TÉCNICAS . . . . . . . . . . . . . . . . . . . . . . . . . . . . . . . . . . . . 81
GARANTIA LIMITADA . . . . . . . . . . . . . . . . . . . . . . . . . . . . . . . . . . . . . . . . . 83
ÍNDICE REMISSIVO . . . . . . . . . . . . . . . . . . . . . . . . . . . . . . . . . . . . . . . . . . . . 85
Page 72

BOAS VINDAS
Obrigado por ter escolhido o humidificador HUMIDAIRE 3i™ da ResMed. O
H
UMIDAIRE 3i foi desenhado para humedecer o ar fornecido à sua via respiratória
durante o tratamento por CPAP (pressão contínua e positiva das vias respiratórias). O
H
UMIDAIRE 3i é fixo ao gerador de fluxo CPAP da Série S8™ da ResMed através de
um simples mecanismo de encaixe.
Este manual do utilizador contém as informações necessárias para o uso adequado do
seu H
UMIDAIRE 3i.
O QUE É O HUMIDAIRE 3i?
O HUMIDAIRE 3i foi desenhado para ser integrado com o gerador de fluxo CPAP da
ResMed de modo a formar uma única unidade de tratamento. A unidade resultante
desta união proporciona humidificação durante a terapia por CPAP que pode
aumentar o conforto durante a terapia.
Poderá ter experimentado congestão nasal ou secura do nariz, boca ou garganta
durante a terapia por CPAP. Estes sintomas são causados por climas secos,
temperatura de ar baixa, o fluxo de ar fornecido a partir do gerador de fluxo ou fugas
de ar pela boca. O ar húmido pode ajudar a aliviar os sintomas de secura.
Consulte o manual do seu gerador de fluxo para verificar se este é compatível com o
H
UMIDAIRE 3i. Entre em contacto com o seu fornecedor de equipamento ou com a
ResMed se desejar obter mais informações.
PORTUGUÊS
AS SUAS RESPONSABILIDADES
Você ou o utilizador deste sistema será o responsável único por quaisquer danos
pessoais ou danos a propriedade resultantes de:
• utilização do dispositivo não respeitando as instruções de funcionamento
fornecidas
• manutenção ou modificações a não ser que estas sejam feitas de acordo com
instruções autorizadas e por pessoas autorizadas.
Leia este manual cuidadosamente antes de usar.
Este manual contém termos e ícones especiais que aparecerão junto às margens do
texto de forma a chamar a sua atenção para informações específicas e importantes.
• Aviso: alerta-o da possibilidade de ferimentos.
• Precaução: explica cuidados especiais a ter para a utilização segura e eficaz do
dispositivo.
• Nota: é uma observação informativa ou útil.
BOAS VINDAS
67
Page 73

INFORMAÇÃO MÉDICA
USO DESTINADO
O HUMIDAIRE 3i é destinado para a humidificação do ar fornecido a partir de
dispositivos CPAP da Série S8 da ResMed. O H
acordo com as recomendações de um médico.
PRECAUÇÃO (APENAS PARA OS EUA)
!
A lei federal limita a venda deste dispositivo a médicos ou por ordem destes.
CONTRA-INDICAÇÕES
O HUMIDAIRE 3i é contraindicado para utilização em pacientes cuja via respiratória
superior (supraglótica) foi desviada. Consulte também o manual do sistema relevante
para contra-indicações associadas à terapia por CPAP.
AVISOS
Os seguintes são avisos gerais. Precauções e avisos específicos aparecerão junto às
instruções relevantes no manual.
AVISOS
!
• Use o HUMIDAIRE 3i apenas para aquilo que este foi concebido tal como é
descrito neste manual.
• Certifique-se de que a câmara de água se encontra vazia antes de transportar o
H
UMIDAIRE 3i.
• O HUMIDAIRE 3i foi concebido para ser usado apenas com dispositivos CPAP da
ResMed específicos. Não utilize o H
• O HUMIDAIRE 3i só deverá ser usado com tubos de fornecimento e acessórios
recomendados pela ResMed. A ligação de outros tubos de fornecimento ou
acessórios pode provocar lesões ou danificar o dispositivo.
• O HUMIDAIRE 3i, e toda a tubagem associada, devem ser usados por um só
paciente e não devem ser reutilizados por outras pessoas. Isto é de modo a que se
possa evitar o risco de infecção cruzada.
• Coloque sempre o dispositivo HUMIDAIRE 3i a um nível abaixo da posição do
paciente. Se este for colocado ao mesmo nível ou acima do paciente, a água
poderá escorrer pela tubagem de ar e para dentro da máscara.
• Há a possibilidade da máscara encher-se de água no caso do dispositivo ser
colocado acima do nível do paciente e posteriormente derrubado, ou se a
tubagem se encher com condensação. Por esta razão, o H
usado com cuidado em pacientes incapazes de proteger a sua via respiratória ou
incapazes de remover a máscara, como após uma apoplexia. Dever-se-á dar
atenção aos relativos riscos e benefícios.
UMIDAIRE 3i com outros dispositivos CPAP.
UMIDAIRE 3i só deve ser usado de
UMIDAIRE 3i deverá ser
68
Page 74

• Não tente desmontar a estação de ancoragem do HUMIDAIRE 3i. Não existem
peças dentro da mesma que possam ser reparadas pelo utilizador. Inspecções e
consertos do interior só deverão ser levados a cabo por um agente de serviços
autorizado.
• Tenha cuidado quando estiver a manusear o HUMIDAIRE 3i. A placa de
aquecimento e a água na câmara de água poderão estar quentes.
• No caso de líquidos serem derramados inadvertidamente sobre ou para dentro
da estação de ancoragem do H
UMIDAIRE 3i, desligue o dispositivo CPAP da sua
tomada de corrente eléctrica. Desconecte a estação de ancoragem do dispositivo
CPAP e deixe-a escorrer e secar antes de a voltar a usar.
• Não ponha o HUMIDAIRE 3i em funcionamento se a ficha ou cabo eléctrico do
dispositivo CPAP se encontrarem danificados.
• Não use o HUMIDAIRE 3i se este não estiver a funcionar adequadamente ou se
qualquer parte do mesmo tiver sido derrubada ou danificada.
• Mantenha o cabo eléctrico do dispositivo CPAP afastado de superfícies quentes.
• Não deixe cair ou introduza objectos dentro das aberturas ou tubos.
• Não use o HUMIDAIRE 3i na presença de materiais inflamáveis ou explosivos.
• Risco de explosão—não use na proximidade de anestésicos inflamáveis.
• Se utilizar oxigénio com este dispositivo, o fluxo de oxigénio deverá ser desligado
quando o dispositivo não estiver em funcionamento.
Se o oxigénio tiver sido deixado ligado, desligue o gerador de fluxo e aguarde
30 minutos antes de voltar a ligar o gerador de fluxo.
Explicação: quando o dispositivo CPAP não se encontra em funcionamento e o
fluxo de oxigénio é mantido, o oxigénio fornecido à tubagem de ar pode
acumular-se dentro do dispositivo CPAP e criar o risco de incêndio. Tal aplica-se à
maioria dos modelos de dispositivos de CPAP.
• O oxigénio favorece a combustão. O oxigénio não deverá ser usado enquanto
que se estiver a fumar ou na presença de uma chama.
• Certifique-se sempre de que o dispositivo se encontra a gerar um fluxo de ar
antes do fornecimento de oxigénio ser ligado.
• Desligue sempre o fornecimento de oxigénio antes de parar o fluxo de ar do
dispositivo.
Nota: Aquando da existência de um caudal fixo do fluxo suplementar de oxigénio, a
concentração de oxigénio inalado pode variar consoante o local de introdução do
oxigénio, os ajustes de pressão, o padrão de respiração do paciente, a selecção da
máscara e o regime de fuga.
PORTUGUÊS
COMPONENTES DO HUMIDAIRE 3i
Consulte as ilustrações na secção A do folheto de ilustrações.
COMPONENTES DO HUMIDAIRE 3i
69
Page 75

MONTAGEM DO HUMIDAIRE 3i PARA USO
AVISO
!
Certifique-se de que o seu gerador de fluxo se encontra desligado na tomada de
corrente eléctrica antes de o conectar ao HumidAire 3i.
REMOÇÃO DA TAMPA DA FRENTE (NO CASO DESTA SE ENCONTRAR EM
POSIÇÃO)
Consulte as ilustrações na secção B do folheto de ilustrações.
O seu gerador de fluxo poderá ter uma tampa da frente (B-1). Antes de poder fixar
UMIDAIRE 3i, prima o botão que se encontra por baixo da tampa da frente (B-2)
o H
e puxe-a para fora do gerador de fluxo (B-3 e B-4).
Notas
• Para voltar a colocar a tampa da frente, alinhe-a com o gerador de fluxo (B-4) e
empurre-a com firmeza até esta se encaixar em lugar.
• Não se esqueça de levar consigo a tampa da frente quando estiver a viajar, no caso de
necessitar de usar o dispositivo CPAP sem o humidificador.
REMOÇÃO E ARMAZENAGEM DA TAMPA DO CONECTOR
Consulte as ilustrações na secção C do folheto de ilustrações.
Antes de poder fixar o H
fluxo (C-1) e fixe-a à parte de trás da estação de ancoragem (C-2).
INSTALAR O HUMIDAIRE 3i
Consulte as ilustrações na secção D do folheto de ilustrações.
UMIDAIRE 3i, remova a tampa do conector do gerador de
70
1 Alinhe o HUMIDAIRE 3i com o gerador de fluxo (D-1) e empurre-os um contra o
outro até se encaixarem (D-2).
AVISO
!
• A estação de ancoragem do HumidAire 3i só deverá ser conectada ou
desconectada quando a câmara de água se encontrar vazia.
• Deverá evitar a entrada de água para dentro do gerador de fluxo. Não
transporte o gerador de fluxo com o HumidAire 3i conectado.
Conecte o cabo eléctrico à tomada que se encontra na parte de trás do gerador de
2
fluxo. Conecte a outra extremidade do cabo eléctrico a uma tomada de corrente
eléctrica (D-3).
Nota: Se a alimentação do gerador de fluxo for feita através de uma entrada CC, o
HumidAire 3i não se encontrará alimentado e a humidificação será reduzida.
Coloque a unidade sobre uma superfície firme e plana junto à sua cama a um nível
3
inferior em relação à sua posição de dormir. Certifique-se de que a superfície não é
sensível ao calor e/ou humidade, ou use uma placa protectora.
Page 76

PRECAUÇÃO
!
Tenha o cuidado de não colocar a unidade num local onde possa ser facilmente
derrubada.
Conecte uma das extremidades da tubagem de ar firmemente à saída de ar do
4
H
UMIDAIRE 3i e conecte a outra extremidade à máscara (D-4).
ENCHER A CÂMARA DE ÁGUA
Consulte as ilustrações na secção E do folheto de ilustrações.
AVISO
!
Tenha cuidado quando estiver a manusear o HumidAire 3i. A água e a base da
câmara de água poderão estar quentes. Deixe a placa de aquecimento e qualquer
excesso de água a arrefecer durante dez minutos.
1 Desprenda o trinco da tampa (E-1) e levante a tampa até que esta fique numa posição
vertical (E-2).
Remova a câmara de água (E-3) e, com cuidado, encha-a com água fresca e limpa
2
(E-4). Certifique-se de que o nível de água não se encontra acima da linha de nível
máximo de água (E-4a).
Certifique-se sempre de que a câmara de água se encontra limpa. Ver “Limpeza e
manutenção” na página 75.
AVISO
!
Não encha a câmara de água em demasia, uma vez que a água poderá entrar no
gerador de fluxo e na tubagem de ar.
PRECAUÇÃO
!
Não use aditivos (tais como óleos aromáticos e perfumes). Estes poderão reduzir
a capacidade de humidificação do HumidAire 3i e/ou causar a deterioração dos
materiais da câmara de água.
PORTUGUÊS
Com cuidado, coloque a câmara de água cheia na estação de ancoragem do
3
humidificador (E-5) e feche a tampa com o trinco (E-6).
UMIDAIRE 3i encontra-se agora pronto a ser utilizado.
O H
MONTAGEM DO HUMIDAIRE 3i PARA USO
71
Page 77

INICIAR E PARAR O TRATAMENTO
INICIAR O TRATAMENTO
Consulte a ilustração na secção F do folheto de ilustrações.
1 Quando o HUMIDAIRE 3i se encontrar conectado e o gerador de fluxo estiver ligado,
os indicadores luminosos acendem-se no H
apresentada uma mensagem a solicitar a função de Aquecimento (que não se encontra
disponível em todos os modelos).
Quando activada, esta função permite o aquecimento da água antes do tratamento ser
iniciado.
Se a função de Aquecimento se encontrar disponível, use-a para aquecer a água antes
2
de iniciar o tratamento. Omita este passo se desejar iniciar o tratamento
imediatamente.
FUNÇÃO DE AQUECIMENTO (DISPONÍVEL APENAS EM ALGUNS MODELOS)
Nota: Consulte o manual do utilizador do seu gerador de fluxo para verificar se esta
função é disponibilizada.
Para iniciar a função de Aquecimento:
i. Seleccione Aquecimento premindo a tecla Direita no painel de controle.
A seguinte mensagem será apresentada durante 2 segundos:
UMIDAIRE 3i. Nesta altura, poderá ser
SUBIDA: 10min
menu
HUMIDIFICADOR
aqueci
A AQUECER
72
ii. Passados 2 segundos, o ecrã de AQUECIMENTO é apresentado.
A AQUECER
menu sair
iii. Enquanto que o H
UMIDAIRE 3i se encontra no modo de Aquecimento, você
pode:
• Iniciar o tratamento a qualquer altura premindo a tecla de Iniciar/Parar.
• Aceder aos menus premindo Menu (tecla Esquerda).
• Pare a função de Aquecimento a qualquer altura premindo Sair (tecla Direita).
A função de Aquecimento desligar-se-á automaticamente passados 30 minutos se o
tratamento não tiver sido iniciado.
Gire o botão de controle de humidade para o parâmetro desejado. O parâmetro
3
desliga a humidificação aquecida e fornece um mínimo de humidificação. O indicador
luminoso da placa de aquecimento manter-se-á aceso a indicar o modo de espera. Um
parâmetro de 6 ( ) oferece máxima humidificação.
Page 78

Recomendamos que ajuste o botão de controle a 3 ( ) para iniciar. Caso seja
necessário, regule o botão de controle para cima ou para baixo até encontrar o
parâmetro mais eficaz e confortável para si. Pode ajustar o parâmetro de humidade a
qualquer altura.
O objectivo é o de fornecer ar humidificado à sua máscara evitando no entanto a
ocorrência de condensação na tubagem de ar. A temperatura e a humidade do ar
ambiente irão afectar o parâmetro a ser usado.
Consulte “Perguntas Frequentes” para mais sugestões em como encontrar o correcto
parâmetro de humidificação.
Coloque a sua máscara tal como é descrito nas instruções para o utilizador da máscara.
4
Prima a tecla Iniciar/Parar no painel de controle. Como alternativa, se a função
5
SmartStart se encontrar disponível no gerador de fluxo, basta simplesmente respirar
para dentro da máscara para iniciar o fluxo de ar.
Nota: Durante o funcionamento, o indicador luminoso irá tornar-se mais intenso
indicando que a base de aquecimento se encontra activa. O seu HumidAire 3i possui uma
base de aquecimento rápido que permite períodos de aquecimento muito curtos. Não se
preocupe no caso do indicador luminoso só se tornar mais intenso durante breves
períodos.
Deite-se e disponha a tubagem de ar de modo a que esta se possa mover no caso de
6
se voltar enquanto dorme.
AVISO
!
Não deixe grandes comprimentos de tubagem de ar à volta da cabeceira da sua
cama. A tubagem pode-se enrolar à volta da sua cabeça ou pescoço enquanto
dorme.
PORTUGUÊS
PARAR O TRATAMENTO
Para parar o tratamento a qualquer altura, remova a máscara e prima a tecla Iniciar/
Parar. Como alternativa, se a função SmartStart se encontrar disponível no seu
gerador de fluxo, basta simplesmente remover a máscara para parar o tratamento.
Alguns geradores de fluxo continuam a fornecer ar suavemente após o fim do
tratamento. Isto pode continuar durante uma hora para ajudar o arrefecimento da
placa de aquecimento. No entanto, pode retirar a ficha do dispositivo da tomada
eléctrica a qualquer altura e deixar que a placa de aquecimento arrefeça sem a ajuda
do fluxo de ar.
SEPARAR O HUMIDAIRE 3i
Consulte as ilustrações na secção G do folheto de ilustrações.
1 Retire a ficha da tomada eléctrica (G-1).
INICIAR E PARAR O TRATAMENTO
73
Page 79

AVISO
!
Tenha cuidado quando estiver a manusear o HumidAire 3i. A água e a base da
câmara de água poderão estar quentes. Deixe a placa de aquecimento e qualquer
excesso de água a arrefecer durante 10 minutos (G-2).
Remova a câmara de água da estação de ancoragem (G-3).
2
Em seguida, prima o botão prateado grande que se encontra debaixo e a meio
3
da estação de ancoragem (G-4) e separe o H
VISTA INFERIOR
Nota: Volte a colocar a tampa do conector no gerador de fluxo.
UMIDAIRE 3i do gerador de fluxo (G-5).
Botão prateado
grande
PERGUNTAS FREQUENTES
PORQUE É QUE HÁ CONDENSAÇÃO NA MINHA MÁSCARA E/OU TUBAGEM DE AR?
Pode experimentar condensação excessiva na sua máscara ou tubagem de ar. Isto
pode ocorrer a certas alturas do ano, particularmente quando a temperatura ambiente
for baixa ou quando ar frio se encontrar a circular à volta do tubo. Gire o botão de
controle para um parâmetro mais baixo até que a condensação diminua.
Poderá ter de ajustar o parâmetro de humidificação de acordo com as estações do
ano.
TENHO QUE USAR ÁGUA DESTILADA NA CÂMARA DE ÁGUA?
O uso de água destilada prolongará a vida útil da câmara de água e reduzirá o
aparecimento de depósitos minerais. Consultar “Limpar o HumidAire 3i” na página 76
para mais informações.
O QUE DEVO FAZER NO CASO DE AINDA SENTIR SECURA NA BOCA, GARGANTA OU
NARIZ?
Se ainda estiver a sentir sintomas de secura, é provável que o seu parâmetro de
humidificação seja demasiadamente baixo para ser eficaz. Aumente o valor de
humidificação gradualmente com o botão de controle no decorrer de algumas noites
até que os sintomas desapareçam.
Se ainda estiver a sentir sintomas de secura, mesmo após ter aumentado o parâmetro
de humidificação, é possível que esteja a respirar pela boca. A respiração pela boca ou
fugas de ar pela mesma causam a secura e a irritação da via respiratória superior. Se a
secura ou as fugas de ar pela boca forem um problema, experimente usar uma máscara
facial ou uma correia para o queixo. Entre em contacto com o seu médico ou
fornecedor de equipamento para mais informações.
74
Page 80

LIMPEZA E MANUTENÇÃO
Deverá levar a cabo regularmente a limpeza e manutenção da câmara de água, tampa
e vedação da tampa tal como é descrito nesta secção.
DESMONTAR O HUMIDAIRE 3i
Consulte as ilustrações na secção H do folheto de ilustrações.
AVISO
!
Tome precauções contra o risco de electrocussão. Não mergulhe o gerador de
fluxo, estação de ancoragem ou cabo eléctrico em água. Antes de limpar, remova
sempre o cabo eléctrico da unidade e certifique-se de que este se encontra seco
antes de o voltar a conectar.
1 Desconecte o cabo eléctrico da tomada de corrente eléctrica (H-1).
AVISO
!
Tenha cuidado quando estiver a manusear o HumidAire 3i. A água e a base da
câmara de água poderão estar quentes. Deixe a placa de aquecimento e qualquer
excesso de água a arrefecer durante 10 minutos (H-2).
Remova a câmara de água da estação de ancoragem (H-3) e deite fora o excesso de
2
água (H-4).
Separe o tubo de ar da saída de ar (H-5).
3
Com cuidado, afaste um dos braços da tampa para fora e para cima da estação de
4
ancoragem até que a tampa se separe completamente (H-6 a H-8). Remova a vedação
da tampa separando-a da tampa (H-9).
PRECAUÇÃO
!
Não remova a placa da cuba da câmara de água.
LIMPEZA E MANUTENÇÃO
PORTUGUÊS
75
Page 81

LIMPAR O HUMIDAIRE 3i
PRECAUÇÃO
!
• Não utilize nenhum dos seguintes produtos na limpeza dos componentes do
HumidAire 3i. Estas soluções podem causar danos que irão reduzir a vida útil
do produto.
• soluções com bases de lixívia, cloro, álcool ou amoníaco
• sabões hidratantes, antibacterianos ou com base de glicerina
• agentes de desmineralização de água e desincrustação.
• Não lave a câmara de água numa máquina de lavar louça.
CÂMARA DE ÁGUA
DIARIAMENTE
Lave a câmara de água e a tubagem em água morna e detergente suave (ver precaução
anterior). Use a tampa amarela de limpeza para assistir no processo de limpeza (ver
os passos 1 a 5 mais abaixo).
1
2
3
45
Enxague bem com água limpa e deixe-os secar fora da luz directa do sol.
SEMANALMENTE
Inspeccione a câmara de água para a possibilidade de desgaste ou danos. Substitua a
câmara de água se um dos seus componentes quebrar, ou tornar-se opaco ou
indentado. Substitua a câmara de água imediatamente se esta começar a verter água.
Se notar pó branco ou resíduos na câmara de água:
i. Encha a câmara de água até à linha de nível máximo de água com uma solução
composta por uma parte de vinagre por dez partes de água.
ii. Deixe a solução na câmara de água durante dez minutos.
iii. Despeje a câmara de água e passe-a por água fresca.
76
Page 82

TAMPA E VEDAÇÃO DA TAMPA
Inspeccione a tampa e a vedação da tampa semanalmente para a possibilidade de
desgaste ou danos. Substitua qualquer parte que se encontre danificada. Quando
necessário, lave a tampa e a vedação da tampa com água morna e detergente suave
(ver precaução anterior). Enxague bem com água limpa e deixe-os secar fora da luz
directa do sol.
ESTAÇÃO DE ANCORAGEM
Limpe o exterior da estação de ancoragem (excluindo a vedação do conector)
periodicamente com um pano húmido.
VOLTAR A MONTAR O HUMIDAIRE 3i
Consulte as ilustrações na secção I do folheto de ilustrações.
Volte a montar o dispositivo quando todos os componentes estiverem limpos e secos.
1 Alinhe a vedação da tampa com os guias da tampa (I-1) e exerça pressão ao longo do
rebordo para se certificar da sua colocação adequada (I-2).
Coloque um dos braços da tampa no seu ponto de articulação na estação de
2
ancoragem (I-3) e, com cuidado, dobre o outro braço para a sua posição
correspondente (I-4 e I-5).
Deverá ser possível abrir e fechar a tampa livremente enquanto que esta se encontra
bem presa à estação de ancoragem.
Volte a colocar a câmara de água na estação de ancoragem do humidificador (I-6).
3
MANUTENÇÃO
Com a utilização normal de uma unidade HUMIDAIRE 3i, a câmara de água precisa de
ser substituída uma vez em cada dois anos.
Este produto (H
técnica autorizado da ResMed 5 anos após a data de fabrico. Antes disto, o dispositivo
destina-se a proporcionar um funcionamento seguro e fiável desde que a sua utilização
e manutenção respeitem as instruções fornecidas pela ResMed. Os detalhes referentes
à garantia ResMed aplicável são fornecidos com o dispositivo aquando da sua compra
original. No entanto, e como é o caso de todos os dispositivos eléctricos, deverá ter
cuidado e enviar o dispositivo a um centro de assistência técnica autorizado da
ResMed no caso de detectar anomalias no mesmo.
UMIDAIRE 3i) deverá ser inspeccionado por um centro de assistência
PORTUGUÊS
LIMPEZA E MANUTENÇÃO
77
Page 83

DETECÇÃO E RESOLUÇÃO DE PROBLEMAS
Aquando da ocorrência de um problema, tente as sugestões seguintes. Se o problema
não puder ser resolvido, contacte o seu fornecedor de equipamento ou a ResMed.
Não tente abrir a unidade.
AVISO
!
Inspecções e consertos só deverão ser levados a cabo por um agente de serviços
autorizado.
Problema Possível causa Solução
O dispositivo não
está a funcionar
(nada é apresentado
no mostrador LCD e/
ou o indicador
luminoso não está
aceso)
Indicador luminoso
a piscar
O indicador
luminoso está
permanentemente
opaco e/ou o ar não
está quente
O cabo eléctrico não foi
conectado
adequadamente.
Avaria na tomada de
corrente eléctrica.
O gerador de fluxo e a
estação de ancoragem não
foram conectados
correctamente.
O indicador luminoso irá
periodicamente tornar-se
mais intenso indicando que
a base de aquecimento se
encontra activa.
O reflector do HumidAire
3i (ver ilustração C-2a) está
sujo.
Certifique-se de que o cabo eléctrico
está bem conectado à tomada de
corrente eléctrica e de que o interruptor
da tomada eléctrica (caso haja um) se
encontra ligado.
Experimente usar uma outra tomada
eléctrica.
Verifique que a estação de ancoragem se
encontra bem conectada ao gerador de
fluxo.
• O seu HumidAire 3i possui uma base
de aquecimento rápido que permite
períodos de aquecimento muito
curtos. Não se preocupe no caso do
indicador luminoso só se tornar mais
intenso durante breves períodos.
• Gire o botão para o parâmetro
para desligar a humidificação
aquecida. O indicador luminoso
manter-se-á aceso a indicar o modo
de espera.
Limpe o reflector com um pano húmido.
78
Fuga na câmara de
água
A câmara de água poderá
estar danificada ou
quebrada.
A tampa não foi colocada
correctamente.
Entre em contacto com o seu fornecedor
de equipamento para obter uma nova.
Certifique-se de que a tampa foi
colocada correctamente.
Page 84

Problema Possível causa Solução
O fluxo de ar é
pouco ou inexistente
Água a salpicar na
sua face
A tubagem de ar não foi
conectada
adequadamente.
Os tubos de ar encontramse bloqueados, entalados
ou perfurados.
O gerador de fluxo não
está a funcionar
correctamente.
A câmara de água foi cheia
em demasia.
A tampa não foi presa
correctamente.
A vedação da tampa não
foi colocada
correctamente.
Condensação no tubo de
ar.
A câmara de água foi cheia
em demasia.
Conecte a tubagem de ar tal como é
descrito em “Montagem do HumidAire
3i para uso” na página 70.
Desbloqueie ou solte os tubos de ar.
Verifique que os tubos de ar não se
encontram perfurados.
Consulte a secção de Detecção e
Resolução de Problemas no manual do
gerador de fluxo.
Certifique-se de que o nível de água não
se encontra acima da linha de nível
máximo de água.
Certifique-se de que a tampa foi presa à
estação de ancoragem correctamente.
Certifique-se de que a vedação da tampa
está virada para o lado correcto e de que
se encontra bem segura.
Regule o botão de controle a um
parâmetro mais baixo.
PORTUGUÊS
Isole a tubagem de ar.
Deite fora qualquer excesso de água da
câmara de água.
O ar não parece ter
sido humidificado
O ar contém
demasiada
humidade
Condensação no tubo de ar
e máscara.
O botão de controle foi
regulado a um parâmetro
demasiadamente baixo.
A base de aquecimento do
HumidAire 3i não está a
funcionar.
O botão de controle foi
regulado a um parâmetro
demasiadamente alto.
Existência de humidade
relativa alta no seu quarto.
Regule o botão de controle a um
parâmetro mais baixo.
Isole a tubagem de ar.
Regule o botão de controle a um
parâmetro mais alto.
Contacte o seu fornecedor de
equipamento.
Regule o botão de controle a um
parâmetro mais baixo.
Ajuste os parâmetros do seu
humidificador.
DETECÇÃO E RESOLUÇÃO DE PROBLEMAS
79
Page 85

Problema Possível causa Solução
Pó branco ou
depósitos na base da
câmara de água
A água deixa depósitos
minerais.
Use água destilada.
Para remover estes depósitos minerais,
ver “Limpar o HumidAire 3i” na
página 76.
80
Page 86

ESPECIFICAÇÕES TÉCNICAS
DESEMPENHO
Temperatura máxima da placa de aquecimento: 185°F (85°C)
Corte de temperatura: 199°F (93°C)
Humidade máxima: 95% de humidade relativa (botão de controle regulado ao
parâmetro máximo, caudal de fluxo a 50 l/min, temperatura ambiente a 68°F [20°C]
e humidade relativa ambiente de 40%).
Temperatura de gás máxima: 106°F (41°C)
DIMENSÕES (A X L X P)
Estação de ancoragem e câmara de água: 4,6 pol. x 6,7 pol. x 8,3 pol.
(118 mm x 170 mm x 212 mm)
PESO
Estação de ancoragem e câmara de água vazia: 1,5 lb. (670 g)
Capacidade de água até à linha de nível máximo de água: 415 ml
FORNECIMENTO DE ENERGIA
Tensão e corrente de alimentação para o gerador de fluxo ResMed S8 com o
HUMIDAIRE 3i: 100–240 V, 50/60 Hz; 110 V, 400 Hz; 2,5 A <140 VA (110 W)
(consumo máximo de energia). Consumo de energia de pico instantânea <340 VA.
O consumo de energia real irá variar de acordo com vários factores tais como o ajuste
de temperatura, o valor de pressão, a utilização de acessórios, a altitude acima do nível
do mar e a temperatura ambiente.
Potência máxima da base de aquecimento: 85 W.
CONSTRUÇÃO DA CAIXA
Estação de ancoragem: Construída com termoplástico retardante à chama e alumínio
anodizado.
Câmara de água: Plástico moldado por injecção e aço inoxidável.
CONDIÇÕES AMBIENTAIS
Temperatura de funcionamento: +41°F a +104°F (+5°C a +40°C)
Humidade de funcionamento: 10–95% sem condensação
Temperatura de armazenamento e transporte: -4°F a +140°F (-20°C a +60°C)
Humidade de armazenamento e transporte: 10–95% sem condensação
CLASSIFICAÇÃO IEC 60601-1
Classe II (isolamento duplo)
Tipo CF
COMPATIBILIDADE ELECTROMAGNÉTICA
Consulte o manual do seu gerador de fluxo para mais informações.
Nota: O fabricante reserva o direito de fazer alterações a estas especificações sem aviso
prévio.
PORTUGUÊS
ESPECIFICAÇÕES TÉCNICAS
81
Page 87

S SÍMBOLOS QUE SÃO APRESENTADOS NO DISPOSITIVO
O
Atenção, consulte documentos anexos
Equipamento do tipo CF
Equipamento de Classe II
Superfície quente
Não tocar
Linha de nível máximo de água
Não remova a placa da cuba da câmara de água.
82
Page 88

GARANTIA LIMITADA
A ResMed garante que o seu produto da ResMed está livre de defeitos de material e
mão-de-obra durante o período de tempo abaixo especificado, a partir da data de
compra pelo consumidor original. Esta garantia não é transferível.
Produto Período da Garantia
Humidificadores da ResMed, ResControl™, ResLink™, ResTraxx™ 1 Ano
Geradores de fluxo da ResMed 2 Anos
Acessórios, sistemas de máscara (incluindo armação da máscara,
almofada, arnês e tubo). Exclui dispositivos de utilização única.
90 Dias
Nota: Alguns modelos não se encontram disponíveis em todas as regiões.
Se o produto falhar nas condições normais de utilização, a ResMed irá proceder, ao
seu critério, à reparação ou substituição do produto defeituoso ou de qualquer um
dos seus componentes. Esta Garantia Limitada não cobre:
a) qualquer dano provocado em consequência de utilização inadequada, abuso,
modificação ou alteração do produto;
b) reparações efectuadas por qualquer entidade de assistência técnica que não tenha
sido expressamente autorizada pela ResMed para efectuar esse tipo de reparação;
c) qualquer dano ou contaminação devidas ao fumo de cigarros, cachimbos, charutos
ou outros;
d) qualquer dano provocado pelo derrame de água sobre ou para dentro de um
gerador de fluxo.
A garantia deixa de ser válida se o produto for vendido, ou revendido, fora da região
da compra original. Os pedidos de reparação ou substituição de um produto
defeituoso no âmbito da garantia devem ser feitos pelo consumidor original no local
de compra.
Esta garantia substitui todas as outras, explícitas ou implícitas, incluindo qualquer
garantia implícita de mercantibilidade ou de adequabilidade para determinada
utilização. Algumas regiões ou estados não permitem limitações de tempo sobre a
duração de uma garantia implícita, pelo que a limitação acima pode não se aplicar ao
seu caso.
A ResMed não é responsável por quaisquer danos incidentais ou consequentes
reivindicados como decorrentes da venda, instalação ou uso de qualquer produto da
ResMed. Algumas regiões ou estados não permitem a exclusão ou limitação de danos
incidentais ou consequentes, pelo que a limitação acima pode não se aplicar ao seu
caso. Esta garantia confere-lhe direitos legais específicos e pode ter outros direitos que
variam de região para região.
PORTUGUÊS
Para mais informações sobre os seus direitos de garantia, contacte o seu revendedor
local da ResMed ou os escritórios da ResMed.
R001-307/2 05 06
GARANTIA LIMITADA
83
Page 89

84
Page 90

ÍNDICE REMISSIVO
A
Arrefecimento da placa de aquecimento
As suas responsabilidades 67
Avi sos
B
Botão de controle 72
Botão de controle da humidade 72
C
Câmara de água
Classificação IEC 60601-1 81
Colocação
Compatibilidade electromagnética
Componentes 69
Condensação
Condições ambientais
Construção da caixa 81
Contra-indicações
D
Depósitos minerais 80
Desempenho 81
Detecção e Resolução de Problemas
Dimensões
E
Encher a câmara de água
Especificações técnicas
Estação de ancoragem
F
Fornecimento de energia 81
Função de Aquecimento
G
Garantia Limitada
Geradores de fluxo compatíveis
H
HumidAire 3i
73
68
capacidade máxima
fuga 78
limpeza
linha de nível máximo de água
76
81
70
73, 74, 79
81
68
81
71
81
limpeza
77
72
83
desmontagem 75
71
81
78
67
instalação 70
limpeza 76
remontagem
separação
I
Indicador luminoso
piscar
Informação médica
Iniciar o tratamento 72
Instalação
HumidAire 3i
tampa da frente 70
tampa do conector
L
Limpeza 75
câmara de água 76
estação de ancoragem
tampa
vedação da tampa 77
M
Montagem do HumidAire 70
77
73
72, 73
78
68
70
74
77
77
PORTUGUÊS
P
Parâme tro s
humidificação 72
Parâmetros de humidificação
Parar o tratamento
Perguntas Frequentes 74
81
Peso
R
Remoção
câmara de água 71
tampa da frente
tampa do conector
vedação da tampa 75
S
Secura
sintomas
Separar o HumidAire 3i 73
SmartStart
T
Ta mp a
73
73
70
70
74
73
ÍNDICE REMISSIVO
85
Page 91

desmontagem 75
limpeza 77
remontagem
Tampa da frente
instalação
remoção
Tampa do conector
armazenamento
reinstalar
remoção
Termos e ícones especiais 67
U
Uso destinado 68
V
Vedação da tampa
limpeza 77
remoção
remontagem
77
70
70
70
74
70
75
77
86
 Loading...