

Page 1
USER’S MANUAL 1
ANUEL UTILISATEUR 39
M
M
ANUAL DEL USUARIO 79
ANUAL DO UTILIZADOR 117
M
S8 Escape™ System
ENGLISHESPAÑOLPORTUGUÊS FRANÇAIS
Page 2

Manufactured by:
ResMed Ltd 1 Elizabeth MacArthur Drive Bella Vista NSW 2153 Australia
Tel: +61 (2) 8884 1000 or 1 800 658 189 (toll free) Fax: +61 (2) 8883 3114 Email: reception@resmed.com.au
ResMed Offices:
ResMed Corp 14040 Danielson Street Poway CA 92064-6857 USA
Tel: +1 (858) 746-2400 or 1-800-424-0737 (toll free) Fax: +1 (858) 746-2900 Email: reception@resmed.com
ResMed (UK) Ltd 65 Milton Park Abingdon Oxfordshire OX14 4RX UK
Tel: +44 (1235) 862 997 Fax: +44 (1235) 831 336 Email: reception@resmed.co.uk
ResMed Asia Pacific Ltd 97 Waterloo Road North Ryde NSW 2113 Australia
Tel: +61 (2) 9886 5000 or 1 800 991 900 (toll free) Fax: +61 (2) 9889 1471 Email: reception@resmed.com.au
ResMed Austria Purtscherstraße 18, 9500 Villach Österreich
Tel: +43 (4242) 430 830 Fax: +43 (4242) 430 830-4 Email: reception@resmed.at
ResMed BV Nieuwe Parklaan 86, 2587 BV Den Haag Nederland
Tél: +31 (70) 358 6263 Fax: +31 (70) 358 4333 Email: receptiondh@resmed.nl
ResMed Finland Niittykatu 6 FIN 02200 Espoo Suomi
Tel: +358 9 8676820 Fax: +358 9 86768222 Email: reception@resmed.fi
ResMed GmbH & Co. KG Fraunhoferstraße 16 82152 Martinsried Deutschland
Tel: +49 (0) 89 / 99 01 - 00 or +49 (0) 800 2 777 000 (gebührenfrei) Fax: +49 (0) 89 / 99 01 - 10 55
Email: reception@resmed.de
ResMed Hong Kong Ltd Room 1714 Miramar Tower 132-134 Nathan Road Tsim Sha Tsui Hong Kong
Tel: +852 2366 0707 Fax: +852 2366 4546 Email: reception@resmed.com.hk
ResMed Japan Nihonbashi Hisamatsu Bldg. 4F 2-28-1 Nihonbashi-Hamacho Chuo-Ku, Tokyo 103-0007 Japan
Tel: +81 (3) 3662 5056 Fax: +81 (3) 3662 5040
ResMed Malaysia Sdn Bhd Suite E-10-20, Plaza Mon’t Kiara No. 2, Jalan 1/70C Mon’t Kiara 50480 Kuala Lumpur
Malaysia Tel: +60 3 6201 7177 Fax: +60 3 6201 2177 Email: reception@resmed.com.my
ResMed NZ Ltd PO Box 51-048 Pakuranga Auckland New Zealand
Tel: +0800 737 633 (NZ toll free) or +64 25 737 633 Fax: +0800 737 634 (NZ toll free) or +64 9 239 0193
Email: reception@resmed.co.nz
ResMed SA Parc de la Bandonnière 2 rue Maurice Audibert 69800 Saint-Priest France
Tel: +33 (0) 4 37 251 251 Fax: +33 (0) 4 37 251 260 Email: reception@resmed.fr
ResMed Singapore Pte Ltd 238A Thomson Road # 12-03/04 Novena Square Tower A Singapore 307684
Tel: +65 6284 7177 Fax: +65 6284 7787 Email: reception@resmed.com.sg
ResMed Spain SL C/ Arturo Soria, 245 28033 Madrid España
Tel: +34 (93) 590 8154 Fax: +34 (93) 590 8153 Email: angelo@resmed.es
ResMed Sweden AB Industrigatan 2 S-461 37 Trollhättan Sverige
Tel: +46 520 420 110 Fax: +46 520 397 15 Email: reception@resmed.se
Labhardt AG Thannerstrasse 57 CH-4054 Basel Schweiz
Tel: +41 (061) 307 9711 Fax: +41 (061) 307 9722 Email: info@labhardt.ch
US DESIGNATED AGENT: ResMed Corp
EU AUTHORIZED REPRESENTATIVE: ResMed (UK) Ltd
www.myresmed.com
Protected by patents: US 4944310, US 5199424, US 5522382, US 6705315. Other patents pending.
Protected by design registrations: AU 302180, AU 302181, AU 302182, AU 302183, AU 302184, AU 302185,
AU 302186, EP 269436, HK 0412901.9. Others pending.
S8, S8 Escape, HumidAire, HumidAire 3i, Mirage, Mirage Activa, Mirage Vista, Protégé, Ultra Mirage, Mirage Swift, and
ResScan are trademarks of ResMed Ltd. Papillon is a trademark of MAP Medizin-Technologie GmbH.
© ResMed Ltd 2005.
Page 3
S8 Escape™ System
USER’S MANUAL
English
ENGLISH2ENGLISH
1
Page 4

Page 5

CONTENTS
INTRODUCTION . . . . . . . . . . . . . . . . . . . . . . . . . . . . . . . . . . . . . . . . . . . . 5
Y
OUR RESPONSIBILITY 5
MEDICAL INFORMATION . . . . . . . . . . . . . . . . . . . . . . . . . . . . . . . . . . . . . 5
A
BOUT THE S8 ESCAPE™ 5
C
ONTRAINDICATIONS 6
W
ARNINGS 6
C
AUTIONS 7
A
DVERSE EFFECTS 8
THE S8 ESCAPE SYSTEM . . . . . . . . . . . . . . . . . . . . . . . . . . . . . . . . . . . . . . 9
S8 E
SCAPE 9
M
ASKS 9
UMIDIFIERS 10
H
R
ESSCAN DATA CARD MODULE 10
A
CCESSORIES 10
HOW TO USE THE S8 ESCAPE . . . . . . . . . . . . . . . . . . . . . . . . . . . . . . . . 11
S
ET UP THE S8 ESCAPE 11
A
SSEMBLE THE MASK 11
TART TREATMENT 11
S
S
TOP TREATMENT 12
HOW TO ATTACH A HUMIDIFIER . . . . . . . . . . . . . . . . . . . . . . . . . . . . . . 13
A
TTACH A HUMIDAIRE 3I HUMIDIFIER 13
A
TTACH A HUMIDAIRE HUMIDIFIER 13
TTACH A RESMED PASSOVER HUMIDIFIER 14
A
HOW TO USE THE KEYPAD . . . . . . . . . . . . . . . . . . . . . . . . . . . . . . . . . . . 15
H
OW TO CHANGE THE SETTINGS ON YOUR S8 ESCAPE 16
S8 MODULES . . . . . . . . . . . . . . . . . . . . . . . . . . . . . . . . . . . . . . . . . . . . . 19
U
SING A BLANK MODULE 19
U
SING A RESSCAN DATA CARD MODULE 19
CLEANING AND MAINTENANCE . . . . . . . . . . . . . . . . . . . . . . . . . . . . . . . 22
D
AILY CLEANING 22
W
EEKLY CLEANING 22
ERIODIC CLEANING 22
P
R
EPLACING THE AIR FILTER 23
S
ERVICING 23
FREQUENTLY ASKED QUESTIONS . . . . . . . . . . . . . . . . . . . . . . . . . . . . . . 24
TROUBLESHOOTING . . . . . . . . . . . . . . . . . . . . . . . . . . . . . . . . . . . . . . . . 26
CONTENTS
3
Page 6

SYSTEM SPECIFICATIONS . . . . . . . . . . . . . . . . . . . . . . . . . . . . . . . . . . . . . 29
S8 E
SCAPE 29
A
CCESSORIES 29
LIMITED WARRANTY . . . . . . . . . . . . . . . . . . . . . . . . . . . . . . . . . . . . . . . . 35
INDEX . . . . . . . . . . . . . . . . . . . . . . . . . . . . . . . . . . . . . . . . . . . . . . . . . . . 37
4
Page 7

INTRODUCTION
Thank you for choosing the S8 ESCAPE™ flow generator. The S8 ESCAPE is a compact,
all-in-one package with an inbuilt power supply and the option of integrated data
management and humidification.
This user manual contains the information you need for the correct use of your
S8 ESCAPE.
YOUR RESPONSIBILITY
The owner or user of this system shall have sole responsibility and liability for any injury
to persons or damage to property resulting from:
• operation which is not in accordance with the operating instructions supplied
• maintenance or modifications carried out unless in accordance with authorized
instructions and by authorized persons.
Please read this manual carefully before use.
This manual contains special terms and icons that appear in the margins to draw your
attention to specific and important information.
• Warning alerts you to possible injury.
• Caution explains special measures for the safe and effective use of the device.
• Note is an informative or helpful note.
MEDICAL INFORMATION
ENGLISH
ABOUT THE S8 ESCAPE™
The S8 ESCAPE continuous positive airway pressure (CPAP) system is indicated for the
treatment of obstructive sleep apnea (OSA) in adult patients.
The
S8 ESCAPE CPAP system is intended for home and hospital use.
CAUTION
!
In the US, Federal law restricts this device to sale by or on the order of a physician.
INTRODUCTION
5
Page 8

CONTRAINDICATIONS
The S8 ESCAPE is not a life support device and may stop operating during power failure
or certain fault conditions. It should not be used by patients who are dependent on
continuous therapy.
Positive airway pressure therapy may be contraindicated in some patients with the
following pre-existing conditions:
• severe bullous lung disease
• pneumothorax
• pathologically low blood pressure
• dehydration
• cerebrospinal fluid leak, recent cranial surgery, or trauma.
WARNINGS
• Read the entire manual before using the S8 ESCAPE.
• Advice contained in this manual should not supersede instructions given by the
prescribing physician.
• A patient should not connect a device to the data communication port unless
instructed to do so by their health care provider or physician. Only ResMed
products are designed to be connected to the data communication port.
Connecting other devices could result in injury, or damage to the
device.
• The S8 ESCAPE should only be used with masks (and connectors)* recommended
by ResMed, or by a physician or respiratory therapist. A mask should not be used
unless the
S8 ESCAPE device is turned on and operating properly. The vent hole or
holes associated with the mask should never be blocked.
Explanation: The
connectors)
*
S8 ESCAPE is intended to be used with special masks (or
which have vent holes to allow continuous flow of air out of the
mask. When the device is turned on and functioning properly, new air from the
device flushes the exhaled air out through the mask vent holes.
However, when the device is not operating, insufficient fresh air will be provided
through the mask, and the exhaled air may be rebreathed. Rebreathing of exhaled
air for longer than several minutes can, in some circumstances, lead to suffocation.
This applies to most models of CPAP devices.
• In the event of power failure or machine malfunction, remove the mask.
• The S8 ESCAPE can be set to deliver pressures up to 20 cm H
event of certain fault conditions, pressures up to 30 cm H
S8 ESCAPE
O. In the unlikely
2
O are possible.
2
* Ports may be incorporated into the mask or in connectors that are near the mask.
6
Page 9

• If oxygen is used with this device, the oxygen flow must be turned off when the
device is not operating.
If oxygen has been left on, turn off the flow generator, then wait 30 minutes before
turning on the flow generatory again.
Explanation: When the CPAP device is not in operation and the oxygen flow is
left on, oxygen delivered into the air delivery tubing may accumulate within the
CPAP machine enclosure and create a risk of fire. This applies to most types of
CPAP machines.
• Oxygen supports combustion. Oxygen should not be used while you are
smoking or in the presence of an open flame.
• Always ensure airflow is being generated by the device before the oxygen
supply is turned on.
• Always turn the oxygen supply off before stopping the airflow from the device.
Note: At a fixed rate of supplemental oxygen flow, the inhaled oxygen concentration will
vary, depending on where the oxygen is introduced, the pressure settings, patient breathing
pattern, mask selection, and leak rate.
• Do not use the S8 ESCAPE if there are obvious external defects or unexplained
changes in performance.
• Do not open the S8 ESCAPE case. There are no user serviceable parts inside.
Repairs and internal servicing should only be performed by an authorized service
agent.
• Explosion hazard—do not use in the vicinity of flammable anesthetics.
CAUTIONS
• At low pressures, the flow through the exhalation ports of your mask may not
clear all exhaled gas from the tubing. Some rebreathing may occur.
• The airflow for breathing produced by this device can be as much as 11
higher than the temperature of the room. Caution should be exercised if the room
temperature is warmer than 90
• When AC mains power (100–240V AC) is not available, always use a ResMed
DC-12 converter. (The DC-12 converter is available as an optional accessory. It is
not supplied with all models.)
• If supplied, the Data Card module is designed for use with specific ResMed
devices.
• Only use the Data Card module (if supplied) as specified in this manual.
o
F (32oC).
o
F (6oC)
ENGLISH
Note: The above are general warnings and cautions. Specific warnings, cautions, and
notes appear with the relevant instructions in the manual.
MEDICAL INFORMATION
7
Page 10

ADVERSE EFFECTS
Patients should report unusual chest pain, severe headache, or increased
breathlessness to their prescribing physician. An acute upper respiratory tract infection
may require temporary discontinuation of treatment.
The following side effects may arise during the course of therapy with the CPAP
device:
• drying of the nose, mouth, or throat
• nosebleed
• bloating
• ear or sinus discomfort
• eye irritation
• skin rashes
• chest discomfort.
8
Page 11

THE S8 ESCAPE SYSTEM
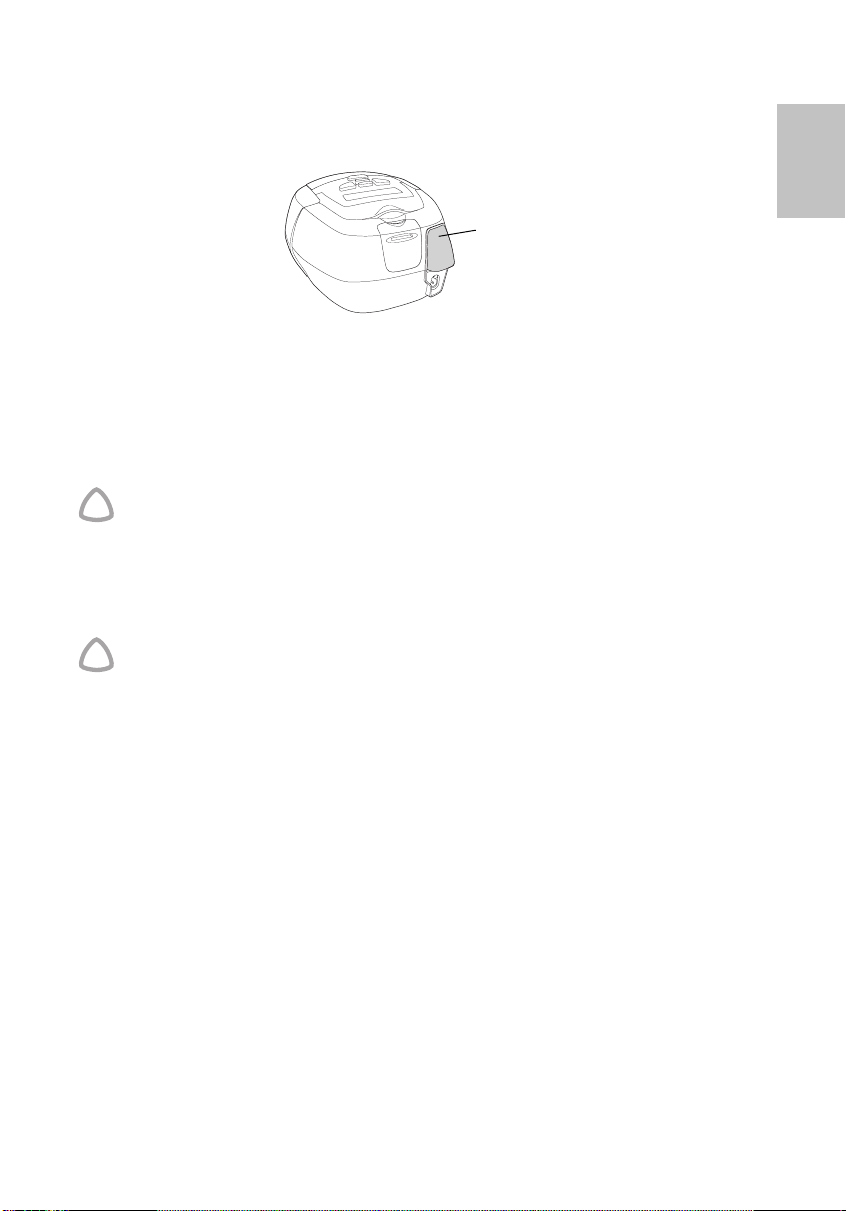
The S8 ESCAPE device is part of a system that consists of five elements:
• S8 ESCAPE flow generator
• Mask
• Humidifier
• Data management products
• Accessories.
S8 ESCAPE
Please refer to the illustrations in section A of the illustration sheet.
FRONT VIEW (A-1)
Shows the keypad and LCD screen, and the air outlet.
REAR VIEW (A-2)
Shows where the module attaches, and the location of the air filter and power sockets.
POWER CORD (A-3)
Power cord to attach the S8 ESCAPE to the AC (mains) power.
CARRY BAG (A-4)
The S8 ESCAPE carry bag contains two pouches: one for storing the S8 device, the other
for storing the
HUMIDAIRE 3
larger, mesh pouch.
AIR TUBING
The 6’6” (2 m) air tubing (A-5) connects the S8 ESCAPE to your mask . You will need
medium 21” (52 cm) air tubing (see
HUMIDAIRE™ and ResMed PASSOVER humidifiers.
i™
. When storing the HUMIDAIRE 3i, always put it in the
C-3) to connect the S8 ESCAPE to the
ENGLISH
MASKS
You will also need a ResMed mask system (supplied separately).
The ResMed mask systems that are recommended for use with the
NASAL MASKS
MODULAR NASAL MASK
•
• MIRAGE VISTA™ NASAL MASK
• ULTRA MIRAGE™ NASAL MASK
• MIRAGE™ NASAL MASK
• PROTEGE™ NASAL MASK
• MIRAGE ACTIVA™ NASAL MASK
• PAPILLON™.
NASAL PILLOWS SYSTEMS
•
MIRAGE SWIFT™ NASAL PILLOWS SYSTEM.
S8 ESCAPE are:
THE S8 ESCAPE SYSTEM
9
Page 12

ULL FACE MASKS
F
MIRAGE™ FULL FACE MASK
•
• MIRAGE™ FULL FACE MASK SERIES 2
• ULTRA MIRAGE™ FULL FACE MASK.
WARNING
!
Only ResMed mask systems are compatible for use with the S8 Escape. Please refer
to “Warnings” on page 6.
HUMIDIFIERS
A humidifier may be required if you are experiencing dryness of the nose, throat, or
mouth. The
• HUMIDAIRE 3i integrated heated humidifier (Figure B on the illustrations sheet)
• HUMIDAIRE heated humidifier (Figure I on the illustrations sheet)
• ResMed PASSOVER humidifier (Figure J on the illustrations sheet).
S8 ESCAPE is compatible for use with:
RESSCAN DATA CARD MODULE
The RESSCAN™ Data Card module and RESSCAN Data Card (C-1) may be used with
S8 ESCAPE either to help your clinician to monitor your treatment or to provide
the
you with updates to your device settings. See “Using a ResScan Data Card Module”
on page 19 for information about how to use the Data Card module and Data Card.
ACCESSORIES
Please refer to the illustrations in section C of the illustration sheet.
Other accessories for use with the
• Air tubing 9‘10” (3 m) (C-2)
• Medium air tubing 21” (52 cm) for HUMIDAIRE and ResMed PASSOVER connection
(C-3)
• DC-12 converter (C-4)
• Blank module (C-5).
S8 ESCAPE:
10
Note: ResMed regularly releases new products. Please check our website at
<www.myresmed.com>.
Page 13

HOW TO USE THE S8 ESCAPE
Please refer to the illustrations in section D of the illustration sheet.
SET UP THE S8 ESCAPE
1 Place the S8 ESCAPE on a table near the head of your bed.
CAUTION
!
Be careful not to place the device where it can be bumped or where someone is
likely to trip over the power cord.
Note: You can also place your S8 Escape on the floor beside or underneath your bed.
Ensure that the area is free from dust and clear of bedding, clothes, or any other objects
that could block the air inlet.
2 Connect the power cord to the socket at the rear of the flow generator (D-1). Plug
the other end of the power cord into the power outlet.
WARNING
!
Make sure the power cord and plug are in good condition and the equipment is not
damaged.
3 Connect one end of the air tubing firmly onto the air outlet (D-2).
WARNING
!
• Only ResMed air tubing should be used with your flow generator. A different
type of air tubing may alter the pressure you actually receive, reducing the
effectiveness of your treatment.
• Blocking the hose while in operation could lead to overheating of the device.
• In the clinical environment any personal computer that is used with your CPAP
system must be at least 5’ (1.5 m) away from, or at least 8’ (2.5 m) above, the
patient. It must also comply with the relevant test standard. For personal
computers the international standard is IEC 60950 or equivalent.
ENGLISH
ASSEMBLE THE MASK
1 Assemble your mask system according to the mask user instructions.
2 Connect your mask system to the free end of the air tubing (D-3).
S8 ESCAPE is now ready for use (D-4).
The
START TREATMENT
1 Make sure the power is on.
The product name is displayed briefly on the LCD screen, then the standby (Ramp)
screen appears. The key and LCD backlights also turn on.
HOW TO USE THE S8 ESCAPE
11
Page 14

2 Lie down and arrange the air tubing so that it is free to move if you turn in your sleep.
CAUTION
!
• Do not leave long lengths of air tubing around the top of your bed. They could
twist around your head or neck while you are sleeping.
• Make sure the area around the flow generator is dry and clean. It should also be
clear of bedding, clothes, and other potential blockages.
3 Alter the ramp time if required (see “How to Change the Ramp Time” on page 17).
4 To start treatment, press the Start/Stop key.
5 Fit your mask as described in the mask user instructions.
WARNING
!
A mask should not be used unless the S8 Escape device is turned on and operating
properly.
6 When ramping begins the LCD will display the word "RAMPING", with the current
pressure indicated as dashes. Each dash is approximately equivalent to 2 cm H
example, 6 dashes represents approximately 12 cm H
O pressure.
2
O. For
2
STOP TREATMENT
To stop treatment at any time, remove your mask and press the Start/Stop key.
12
Page 15

HOW TO ATTACH A HUMIDIFIER
ATTACH A HUMIDAIRE 3i HUMIDIFIER
Please refer to the illustration in section E of the illustration sheet, and your HumidAire 3i
manual.
HUMIDAIRE 3
The
humidification. No other accessories are required for its use.
Notes:
a. Make sure the water chamber of the HumidAire 3i is empty before you attach or
detach the humidifier.
b. Remove the connector plug on the S8 Escape (see section A of the illustration
sheet) before you attach the HumidAire 3i. Reattach the connector plug firmly
after you detach the HumidAire 3i.
S
TORING THE HUMIDAIRE 3
Store the HUMIDAIRE 3i in the larger, mesh-top pouch of the S8 ESCAPE carry bag when
not in use.
ATTACH A HUMIDAIRE HUMIDIFIER
Please refer to the illustrations in section I of the illustration sheet.
To connect your
21” (52 cm) air tubing.
1 Fill the HUMIDAIRE water chamber and place inside the HUMIDAIRE. Connect the
medium 21” (52 cm) and long 6’6” (2 m) air tubing (I-1), and close the humidifier lid.
i
attaches to the front of the S8 ESCAPE to provide heated
i
S8 ESCAPE to a HUMIDAIRE humidifier you need medium sized
ENGLISH
2 Place the S8 ESCAPE on top of the HUMIDAIRE (I-2) and connect the free end of the
medium air tubing to the air outlet (I-3).
Note: To avoid water spilling into the
S8 ESCAPE, do not put it underneath the humidifier.
3 Assemble your mask system and connect it to the free end of the long air tubing (I-4).
4 Plug the HUMIDAIRE power cord into a power outlet. Connect the S8 ESCAPE power
cord to the socket at the rear of the
outlet.
Please refer to the HumidAire User’s Manual for further details.
S8 ESCAPE and plug the other end into a power
WARNING
!
Make sure that the power cord and plug are in good condition and the equipment
is not damaged.
The
S8 ESCAPE is now ready for use with the HUMIDAIRE.
HOW TO ATTACH A HUMIDIFIER
13
Page 16

ATTACH A RESMED PASSOVER HUMIDIFIER
Please refer to the illustrations in section J of the illustration sheet.
To connect your
21” (52 cm) air tubing.
1
Fill the
PASSOVER
6’6” (2 m)
S8 ESCAPE to a ResMed PASSOVER humidifier you need medium sized
with water and connect the medium
air tubing (
J-1
).
21” (52 cm)
and long
2 Place the S8 ESCAPE on top of the PASSOVER (J-2) and connect the free end of the
medium air tubing to the air outlet (J-3).
Note: To avoid water spilling into the
humidifier.
S8 ESCAPE, do not place it underneath the
3 Assemble your mask system and connect it to the free end of the long air tubing (J-4).
4 Connect the power cord to the socket at the rear of the S8 ESCAPE and plug the other
end into a power outlet.
Please refer to the ResMed Passover User’s Manual for further details.
WARNING
!
Make sure that the power cord and plug are in good condition and the equipment
is not damaged.
The
S8 ESCAPE is now ready for use with the PASSOVER.
14
Page 17
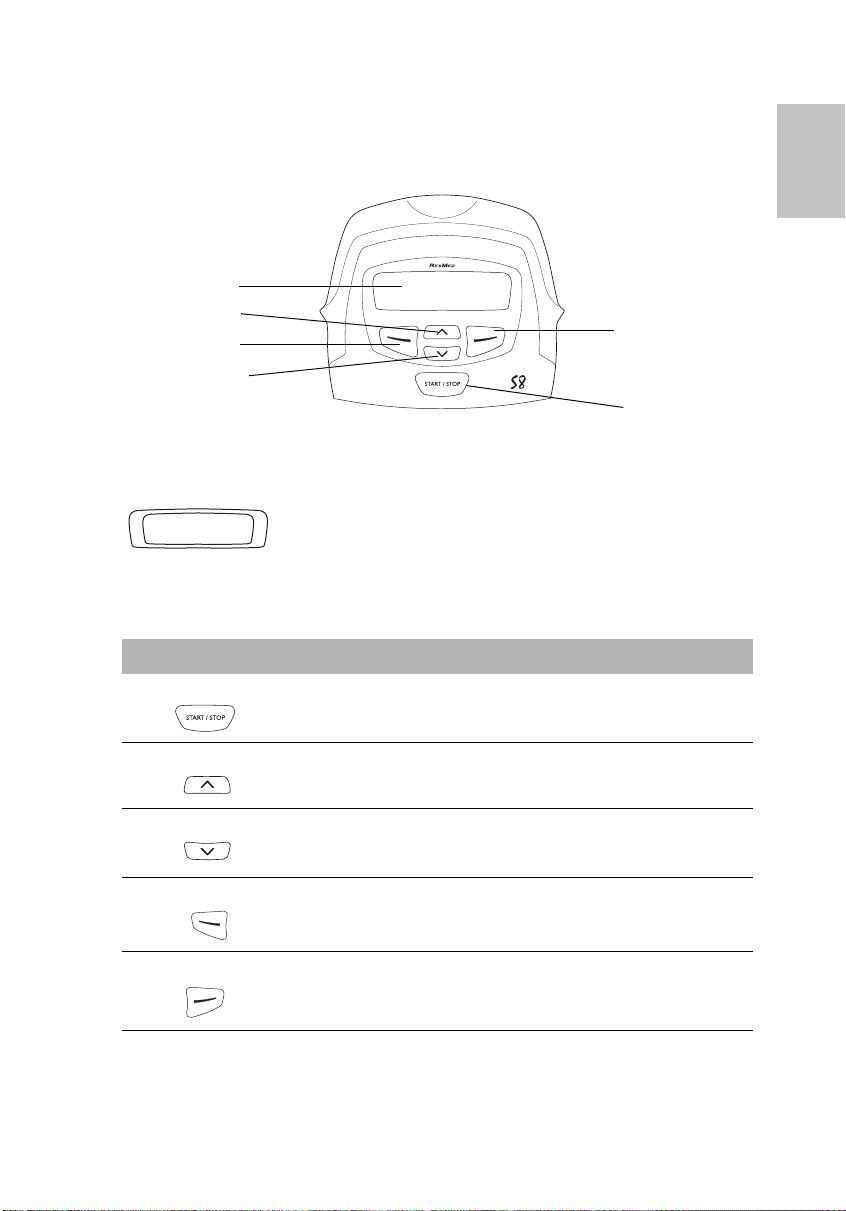
HOW TO USE THE KEYPAD
The control panel of the S8 ESCAPE includes an LCD screen and keypad for navigating
through the menus and delivering treatment.
LCD screen
Up key
Left key
Down key
LCD SCREEN
The LCD screen displays the menus and treatment screens.
KEYPAD KEYS
The S8 ESCAPE keypad has the following keys:
Key Function
Start/Stop
• Starts or stops treatment.
Right key
Start/Stop key
ENGLISH
Up
Down
Left
Right
• Allows you to increase settings options and scroll through
S8 ESCAPE menu.
the
• Allows you to decrease settings options and scroll through
S8 ESCAPE menu.
the
• Performs the function indicated by the guiding text displayed
above it on the LCD screen. Guiding text includes menu,
change, and apply.
• Performs the function indicated by the guiding text displayed
above it on the LCD screen. Guiding text includes exit and
.
cancel
BACKLIGHTS
The keypad and LCD are equipped with backlights that come on when the device is
powered. The LCD backlight turns off after two minutes of inactivity, and comes back
HOW TO USE THE KEYPAD
15
Page 18
on when you press a key. Once the Start/Stop key has been pressed to start
treatment, the LCD backlight stays on for two minutes. The keypad backlight is always
on while the
S8 ESCAPE is on.
HOW TO CHANGE THE SETTINGS ON YOUR S8 ESCAPE
You can change settings (such as Ramp Time, Altitude) on the S8 ESCAPE by using the
keypad and LCD. When the
screens (a menu) on the LCD screen in order to view and change the settings for a
particular function.
S8 ESCAPE
PATIENT MENU
S8 CLASSIC
S8 CLASSICRAMP 10min
Menu
ALT: 0-2000ft
Change Exit
S: 960
HR
USED
Exit
USAGE: 120/180
Exit
LANG: ENGLISH US
Change Exit
SW: SX123456789
Exit
Use the menu screens to change the ramp time, altitude compensation, and language.
You can also view details about the usage and software version of your
HOW TO ENTER THE MENU SCREENS
When the S8 ESCAPE standby screen is displayed you will see the word ‘Menu’ in the
left-hand corner. To select the
HOW TO SCROLL THROUGH THE MENU
When you are in the menu, scroll through items by pressing the Up or Down keys.
HOW TO CHANGE A SETTING OPTION
When you have scrolled to the item you require:
1. Press the Left key (Change).
2. Press the Up or Down keys until you see the setting option that you require.
3. Press the Left key (Apply) to select the setting option.
If you wish to exit without changing the option, press the Right key (Cancel).
S8 ESCAPE is in standby mode you can display a series of
S8 ESCAPE menu, press the Left key.
S8 ESCAPE.
16
Page 19

HOW TO EXIT OUT OF A MENU
Press the Right key (Exit). This will take you back to the Patient Menu screen.
HOW TO EXIT OUT OF AN ITEM WITHIN THE MENU
Press the Right key (Exit).
HOW TO CHANGE THE RAMP TIME
During ramp time, the pressure increases from a low pressure to the prescribed
treatment pressure. You can set the ramp time in 5-minute intervals, from 0 minutes
(OFF) up to a maximum ramp time set by your clinician.
The standby screen displays the current ramp time in the right-hand corner. To change
the ramp time, press the Up or Down key until the desired ramp time appears.
Once a ramp time is selected, begin therapy by pressing the Start/Stop key.
When ramping begins the LCD will display the word "RAMPING", with the current
pressure indicated as dashes. Each dash is approximately equivalent to 2 cm H
example, six dashes represents approximately 12 cm H
O pressure.
2
2
HOW TO CHANGE THE ALTITUDE SETTING
If you move or travel with your S8 ESCAPE to areas of different altitude, you will need
to adjust the altitude compensation setting. Changes in altitude will affect the pressure
delivered by the
You can use the Altitude setting (ALT) to specify the altitude range at which you are
using your
standby (RAMP) screen. Scroll to ALT and select Change (Left key). Press the Up or
Down keys until you see the setting option that you require.
There are four altitude settings to choose from:
• 0–2000ft (0–609 m)
• 2001–4000ft (610–1219 m)
• 4001–6000ft (1220–1828 m)
• 6001–8500ft (1829–2591 m).
For example, if you are at an altitude of 3107’ (947 m), your altitude compensation
setting would be 2001–4000ft (610–1219 m), as 3107’ (947 m) falls within that range.
Press the Left key (Apply) to select the correct setting.
S8 ESCAPE.
S8 ESCAPE. Select the S8 ESCAPE menu by pressing the Left key in the
ENGLISH
O. For
HOW TO CHANGE THE LANGUAGE SETTING
To display menus and messages in a different language, select the S8 ESCAPE menu by
pressing the Left key in the standby (Ramp) screen. Scroll to LANG and select Change
(Left key). Press the Up or Down keys until you see the language that you require.
OTHER VIEWABLE INFORMATION
You can also view the total number of hours of treatment (USED HRS); the number
of sessions that the
software version installed on your unit (SW). Access to all of these screens is provided
via the menu. See “How to enter the menu screens” on page 16.
S8 ESCAPE was used in a usage period (USAGE); and the current
HOW TO USE THE KEYPAD
17
Page 20

MESSAGES ON THE S8 ESCAPE LCD
Your clinician may have set your S8 ESCAPE to remind you about important events,
such as when to replace your mask, when to insert your Data Card (if your device is
Data Card enabled) and so on.
The reminder message is displayed on the LCD and is visible if the device is not
delivering therapy. The backlight on the LCD flashes when a message is displayed.
Your clinician can set any of the following reminders on your LCD:
Message Description Action
INSERT CARD
REPLACE
MASK
CALL
PROVIDER
REPLACE
FILTER
SERVICE DUE
May appear if
your device is
Data Card
enabled.
May appear when
your mask is due
for replacement.
May appear as a
reminder to
contact your
clinician; for
example to
discuss how your
therapy is going.
May appear as a
reminder to
replace the air
filter on your
device.
May appear as a
reminder to
return your
device for service.
Insert your Data Card and follow any
instructions that your clinician has given
you. When you have done this, the
message will disappear from the LCD.
Pressing the Left (Ok) key will also
remove the message.
Press the Left (Ok) key to remove the
message from your LCD, and replace your
mask with a new one.
Press the Left (Ok) key to remove the
message from your LCD, and contact your
clinician.
Press the Left (Ok) key to remove the
message from your LCD, and replace the
air filter.
Press the Left (Ok) key to remove the
message from your LCD, and contact your
clinician.
18
Page 21

S8 MODULES
Note: Do not remove modules while power is connected to the S8 Escape.
S8 ESCAPE will have one of two modules fitted to the back: a blank module or a
Your
RESSCAN™ Data Card module.
USING A BLANK MODULE
Please refer to the illustrations in section F of the illustration sheet.
The blank module is a protective cover on the
remove or attach this module, for example to use the serial adapter.
To remove the blank module, pull it off the back of the
communications port (F-1).
To attach the blank module, push the blank module onto the data communications
port, until the module clicks into place (F-2).
Note: To protect the data communications port, always ensure there is a module
attached to the device.
USING A RESSCAN DATA CARD MODULE
Please refer to the illustrations in section G of the illustration sheet.
RESSCAN Data Card module is an accessory to the S8 ESCAPE. Use a RESSCAN
The
Card with the Data Card module to collect data and update settings in the
The module and card give your clinician convenient access to data about your
treatment, and can provide you with new device settings from your clinician without
you having to leave home.
S8 ESCAPE. At times, you may wish to
S8 ESCAPE to show the data
Data
S8 ESCAPE.
ENGLISH
ATTACHING THE MODULE
To attach the Data Card module, push it onto the data communications port at the
back of your
S8 ESCAPE until it clicks into place (G-1).
REMOVING THE MODULE
To remove the Data Card module, pull it off the back of the S8 ESCAPE (G-2).
Note: To protect the data communications port, always ensure there is a module
attached to the device.
USING THE DATA CARD TO COLLECT DATA
Please refer to the illustrations in section H of the illustration sheet.
If your clinician needs to review your treatment, they will ask you to use the Data Card
to copy data from your
be provided in a convenient mailback envelope.
Data that is copied to a Data Card is still stored and available on the
It takes approximately five seconds to copy data onto the Data Card.
S8 ESCAPE, and to return the card to them. The Data Card will
S8 ESCAPE.
S8 MODULES
19
Page 22

NSERT THE DATA CARD
1 I
Switch on the S8 ESCAPE and wait until you see the standby (Ramp) screen.
•
• Hold the Data Card with the arrow facing up and insert it into the slot in the Data
Card module (H-1).
• Push the card in smoothly until it stops moving (H-2) and messages start
appearing on the LCD.
2 COPY DATA ONTO THE DATA CARD
Data copying starts automatically when the Data Card is inserted into the Data
•
Card module.
• The “Card Inserted Please Wait” message is displayed on the S8 ESCAPE LCD
while data is being copied. Copying takes approximately five seconds.
• The “Copy Complete Remove Card” message is displayed on the LCD when
copying has finished.
• Remove the Data Card from the Data Card module.
3 REMOVE THE DATA CARD
Grip the end of the Data Card and pull it out of the Data Card module (H-3).
4 STORE THE DATA CARD
Your Data Card should be stored in its mailback envelope when not in use.
5 MAIL THE DATA CARD TO YOUR CLINICIAN
A bubble mailer envelope is provided to ensure safe transportation of the Data Card.
When mailing the Data Card to your clinician:
1. Insert the Data Card into the pocket provided on the mailback envelope. Fold up
the mailback envelope.
2. Place the mailback envelope containing the Data Card in the bubble mailer
envelope and seal it.
3. Make sure that your clinician’s name and address details are on the bubble mailer
envelope, and mail it back immediately.
20
USING THE DATA CARD TO UPDATE SETTINGS
If your clinician has provided a Data Card with new device settings:
• With the device in standby (Ramp) mode, insert the Data Card into the slot on
the Data Card module. Updating will start automatically.
• The “Card Inserted Please Wait” message is displayed on the LCD while updating
is in progress. Updating takes approximately five seconds.
• The “Settings Success Remove Card” message is displayed on the LCD if the
settings were updated successfully.
Note: This message only appears once. If you re-insert the Data Card after you have
updated your settings, this message is not displayed.
• Remove the Data Card from the Data Card module.
• Store the Data Card in its mailback envelope when not in use.
Page 23

WARNING
!
If your clinician has told you to use this Data Card to update the settings on your
device and the “Settings Success” message does not appear, contact your clinician
immediately.
ENGLISH
S8 MODULES
21
Page 24

CLEANING AND MAINTENANCE
You should regularly carry out the cleaning and maintenance described in this section.
Refer to your mask manual for detailed instructions.
DAILY CLEANING
Mask
Clean the mask according to the instructions supplied with the mask.
Air tubing
Disconnect the air tubing from the S8 ESCAPE (and humidifier, if used) and hang the
tubing and mask in a clean, dry place until next use.
Humidifier
If you are using a humidifier, clean it according to the instructions in the humidifier
user’s manual.
WEEKLY CLEANING
1. Remove the air tubing from the S8 ESCAPE and the mask.
2. Wash the air tubing in warm water using mild detergent. Rinse thoroughly, hang,
and allow to dry.
3. Before next use, assemble the mask and headgear according to the user
instructions.
4. Reconnect the air tubing to the air outlet and mask.
PERIODIC CLEANING
22
1. Clean the exterior of the S8 ESCAPE with a damp cloth and mild detergent.
2. Check the air filter for blockage or holes (see “Replacing the Air Filter” on
page 23).
WARNING
!
• Beware of electric shock. Do not immerse the unit or power cord in water.
Always unplug the unit before cleaning and be sure it is dry before plugging back
in.
• The mask system and air tubing are subject to normal wear and tear. Inspect
them regularly for damage.
Page 25
REPLACING THE AIR FILTER
To replace the air filter:
1. Remove the air filter cover at the back of the
2. Remove and discard the old air filter.
3. Insert a new filter with the blue tinted side facing out from the device.
4. Replace the air filter cover.
Inspect the air filter every month to check if it is blocked by dirt or contains holes. With
normal use of an
more often if your device is in a dusty environment).
S8 ESCAPE, the air filter needs to be replaced every six months (or
S8 ESCAPE.
Air filter cover
WARNING
!
• Do not wash the air filter. The air filter is not washable or reusable.
• The air filter cover protects the device in the event of accidental liquid spillage
onto the device. Ensure the air filter and air filter cover are fitted at all times.
SERVICING
CAUTION
!
• Do not attempt to open the S8 Escape case. There are no user serviceable
parts inside.
• Inspection and repair should only be performed by an authorized agent. Under
no circumstances should you attempt to service or repair the flow generator
yourself.
This product (
Center five years from the date of manufacture. Prior to this, the device is intended to
provide safe and reliable operation provided that it is operated and maintained in
accordance with the instructions provided by ResMed. Applicable ResMed warranty
details are provided with the device at the time of original supply. Of course, as with
all electrical devices, if any irregularity becomes apparent, you should exercise caution
and have the device inspected by an Authorized ResMed Service Center.
If you feel that your flow generator is not performing properly, see “Troubleshooting”
on page 26.
S8 ESCAPE) should be inspected by an authorized ResMed Service
ENGLISH
CLEANING AND MAINTENANCE
23
Page 26

FREQUENTLY ASKED QUESTIONS
HOW WILL IT FEEL WHEN I AM BREATHING WITH THE S8 ESCAPE?
When you first use your S8 ESCAPE, you may feel uncomfortable breathing against the
airflow. This is normal. You will continue to breathe normally while you sleep. Take
time to adjust to this new sensation.
WHAT DO I DO WHEN I WANT TO GET UP IN THE NIGHT?
If you need to get up during the night, remove your mask and stop therapy. Always
remember to restart therapy and put your mask on when you return to bed.
WHAT DO I DO IF I FEEL AIR LEAKING OUT OF THE MASK?
The flow generator delivers the most effective treatment when the mask is well fitted
and comfortable. Treatment can be affected by leaks, so it is important to eliminate
any leaks that may arise. For example, try repositioning the mask and adjusting the
straps.
If you are using a nasal mask, try to keep your mouth closed during treatment. Air leaks
from your mouth can decrease the effectiveness of your treatment. If mouth leaks are
a problem, a full face mask or chin strap may help. Contact your clinician or equipment
supplier for further details.
If you are using a full face mask and you have problems trying to get a comfortable
mask fit, contact your sleep clinic or equipment supplier. You may benefit from a
different size or style of mask.
ANYTHING SPECIAL I SHOULD DO BEFORE PUTTING THE MASK ON?
Before wearing your mask, wash your face to remove excess facial oils. This will allow
a better fit and prolong the life of the mask cushion.
Do not use moisturizer when wearing a mask.
MY MOUTH FEELS DRY DURING TREATMENT—WHAT CAN I DO?
You may experience dryness of the nose, mouth, and/or throat during the course of
treatment, especially during winter. In many cases, a humidifier may resolve this
discomfort. Contact your clinician for advice.
MY NOSE IS IRRITATED DURING TREATMENT—WHAT CAN I DO?
You may experience sneezing and/or a runny or blocked nose during the first few
weeks of treatment. In many cases, nasal irritation can be resolved with a humidifier.
Consult your clinician or equipment supplier for advice.
CAN I TRAVEL WITH THE S8 ESCAPE?
24
International use
Your S8 ESCAPE flow generator has an internal power supply that enables it to operate
in other countries. It will operate on power supplies of 100–240 V and 50/60 Hz. No
special adjustment is necessary, but you may need a plug adapter for the power outlet.
Page 27

Altitude changes
If you are moving or traveling to a higher or lower altitude, see “How to change the
Altitude setting” on page 17.
On an aircraft
Please consult the medical services department of your carrier if you intend to use your
S8 ESCAPE on an aircraft. The S8 ESCAPE complies with US FCC Part 15, Class B
requirements.
Note: Do not use your S8 Escape while the aircraft is taking off or landing.
CAN I USE MY S8 ESCAPE IF MAINS (AC) POWER IS NOT AVAILABLE?
A DC-12 converter is available to connect the S8 ESCAPE to a 12V or 24V DC power
source. Contact your clinician for details.
CAUTION
!
The device should not be connected to both AC and DC power sources
simultaneously.
ENGLISH
FREQUENTLY ASKED QUESTIONS
25
Page 28

TROUBLESHOOTING
If there is a problem, try the following suggestions. If the problem cannot be solved,
contact your equipment supplier or ResMed. Do not attempt to open the device.
Problem Possible Cause Solution
No display. Power not connected. Ensure the appropriate power
Insufficient air
delivered from
S8 Escape.
Excessive air delivered
from the S8 Escape.
Ramp Time is in use. Wait for air pressure to build up
Air filter is dirty. Replace air filter.
Air tubing is kinked or
punctured.
Air tubing not connected
properly.
Mask and headgear not
positioned correctly.
Cap(s) missing from access
port(s) on mask.
Altitude compensation setting is
incorrect.
Pressure required for treatment
may have changed.
Altitude compensation setting is
incorrect.
cord is connected to your
S8 Escape and the power switch
(if available) is on.
or change ramp time.
Straighten or replace tubing.
Check air tubing.
Adjust position of mask and
headgear.
Replace cap(s).
Adjust altitude compensation
setting to the correct altitude
range.
See your clinician to adjust the
pressure.
Adjust altitude compensation
setting to the correct altitude
range.
26
Page 29

Problem Possible Cause Solution
Display error message:
Exxxx
Call Service
(where xxxx defines
an error)
or
MOTOR FAULT
Call Service
or
UPLOAD LANGUAGES
Call Service
or
DATA LOST
Call Service
The following message
is displayed on the
LCD after you try to
update settings using
the Data Card:
Card Error
Remove Card
Component failure. Call Service.
The Data Card is not inserted
correctly.
The Data Card is only partly
inserted.
You may have removed the Data
Card before settings were copied
to the S8 Escape.
Ensure that the Data Card is
inserted with the arrow facing up
and pointing towards the device.
Ensure that the device is switched
on and in standby mode before
you insert the Data Card.
Ensure that the Data Card is
inserted into the slot on the Data
Card module as far as it will go.
Reinsert the Data Card and wait
for the Settings Success
Remove Card message to
appear on the LCD.
ENGLISH
The following message
is displayed on the
LCD after you try to
copy data to a Data
Card:
Card Error
Remove Card
The following message
is displayed on the
LCD after you try to
update the settings
using the Data Card:
Settings Invalid
Remove Card
The card is not a ResScan Data
Card.
The Data Card is not inserted
correctly.
The card is not a ResScan Data
Card.
The identification details on the
Data Card do not match the
details on your device.
Only use a ResScan Data Card.
Ensure that the Data Card is
inserted with the arrow facing up
and pointing toward the device.
Use a ResScan Data Card, as
specified in this manual.
Contact your clinician
immediately.
TROUBLESHOOTING
27
Page 30

Problem Possible Cause Solution
The following message
is displayed on the
LCD after you try to
update the settings
using the Data Card:
Settings Error
Remove Card
The following message
is NOT displayed on
the LCD after you try
to update the settings
using the Data Card:
Settings Success
Remove Card
There is a data error on the Data
Card.
The settings were not updated. Contact your clinician
Contact your clinician
immediately.
immediately.
28
Page 31

SYSTEM SPECIFICATIONS
S8 ESCAPE
Performance: Operating pressure range: 4 to 20 cm H2O
Dimensions (H x W x D): 4.6” x 6.5” x 5.7” (112 mm x 164 mm x 145 mm)
Weight: 2.9lb (1.3 kg)
Power Supply
• Input range for S8 ESCAPE with HUMIDAIRE 3i:100–240V, 50/60Hz; 110V, 400Hz;
2.5A < 140VA (110W) (maximum power consumption). Instantaneous peak
power consumption <340 VA.
• Refer to the DC-12 converter instructions for DC ratings. Only use the ResMed
DC-12 converter for DC input.
Actual power consumption will vary, depending on factors such as the use of
accessories, height above sea level, and ambient temperature. Power consumption
values for typical treatment conditions (using a breathing machine set to 0.5 L and
15 breaths/min with 2 m (6’6”) air tubing and an
following table.
ULTRA MIRAGE mask) are given in the
ENGLISH
Device
SCAPE
S8 E
Pressure
O)
(cm H
2
5178
10 23 12
15 29 16
20 34 20
Power
(VA)
Power
(W)
Power outlet for HumidAire 3i
Outlet range: 100–240V, 50/60Hz; 110V, 400Hz; 2.0A
Air Filter: Two-layered, powder-bonded, polyester non-woven fiber
Air Tubing: Flexible plastic, 6’6” (2 m)
Air Outlet: The 22 mm conical outlet complies with EN 1281-1
IEC 60601-1 Classifications: Class II (double insulation), Type CF
Noise Level: Radiated sound pressure is measured at <30dBA at 10 cm H
3’3.36” (1 m) according to ISO17510-1.
ACCESSORIES
DATA CARD
Dimensions (L x W x D): 2.56” x 0.87” x 0.03” (65.04 mm x 22.15 mm x 0.85 mm)
O and
2
SYSTEM SPECIFICATIONS
29
Page 32

DATA CARD MODULE
Dimensions (H x W x D): 1.95” x 1.66” x 0.47” (49.7 mm x 42.2 mm x 12 mm)
ALL DEVICES (WHERE APPLICABLE)
Housing Construction: Flame retardant engineering thermoplastic
Environmental Conditions
Operating Temperature: +41°F to +104°F (+5°C to +40°C)
Operating Humidity: 10%–95% non-condensing
Storage and Transport Temperature: -4°F to +140°F (-20°C to +60°C)
Storage and Transport Humidity: 10%–95% non-condensing
Operating Altitude: sea level to 8500’ (2591 m)
Electromagnetic Compatibility
Product complies with all applicable electromagnetic compatibility requirements
(EMC) according to IEC60601-1-2, for residential, commercial, and light industry
environments. For further details, see “Guidance and Manufacturer’s Declaration Electromagnetic Emissions and Immunity” on page 31.
Note: The manufacturer reserves the right to change these specifications without notice.
SYMBOLS WHICH APPEAR ON THE DEVICE
Attention, consult accompanying documents
Type CF equipment
30
Class II equipment
Drip proof
Dangerous voltage
Start/Stop
Page 33

GUIDANCE AND MANUFACTURER’S DECLARATION - ELECTROMAGNETIC
E
MISSIONS AND IMMUNITY
Guidance and manufacturer’s declaration—electromagnetic emissions
The S8 series of devices is intended for use in the electromagnetic environment specified below. The
customer or the user of the S8 device should assure that the device is used in such an environment.
Emissions test Compliance
RF emissions CISPR11 Group 1 The S8 device uses RF energy only for its
RF emissions CISPR 11 Class B* The S8 device is suitable for use in all
Harmonic Emissions
IEC 61000-3-2
Voltage Fluctuations/Flicker
Emissions IEC 61000-3-3
* Class B for all system configurations except when a PC is attached to the S8 device via a serial adapter,
in which case the system is Class A compliant. Class A is suitable for use in all establishments other than
domestic and those directly connected to a low voltage power supply network which supplies buildings
used for domestic purposes.
Medical Electrical Equipment needs special precautions regarding EMC and needs to be installed and put
into service according to EMC information provided in this document.
Warnin gs: The S8 device should not be used adjacent to or stacked with other equipment.
If adjacent or stacked use is necessary, the S8 device should be observed to verify normal operation in
the configuration in which it will be used.
The use of accessories (eg humidifiers) other than those specified in this manual is not recommended.
They may result in increased emissions or decreased immunity of the S8 device.
Class A
Complies
Electromagnetic environment—
guidance
internal function. Therefore, its RF
emissions are very low and are not likely
to cause any interference in nearby
electronic equipment.
establishments, including domestic
establishments and those directly
connected to the public low-voltage
network that supplies buildings used for
domestic purposes.
ENGLISH
SYSTEM SPECIFICATIONS
31
Page 34

Guidance and manufacturer’s declaration—electromagnetic immunity
The S8 series of devices is intended for use in the electromagnetic environment specified below. The
customer or the user of the S8 device should assure that the device is used in such an environment.
Immunity test
Electrostatic
discharge (ESD)
IEC 61000-4-2
Electrical fast
transient/burst
IEC 61000-4-4
Surge
IEC 61000-4-5
Voltage di ps, short
interruptions and
voltage variations on
power supply input
lines.
IEC 61000-4-11
IEC60601-1-2
test level
±6 kV contact
±8 kV air
±2 kV for power
supply lines
±1 kV for input/
output lines
±1 kV differential
mode
±2 kV common
mode
<5% Ut
(>95% dip in Ut)
for 0.5 cycle
40% Ut
(60% dip in Ut)
for 5 cycles
70% Ut
(30% dip in Ut)
for 25 cycles
<5% Ut
(>95%dip in Ut)
for 5 sec
Compliance level
±6 kV contact
±8 kV air
±2 kV
Not Applicable
±1 kV differential
mode
±2 kV common
mode
< 12V
(>95% dip in 240V)
for 0.5 cycle
96V
(60% dip in 240V)
for 5 cycles
168V
(30% dip in 240V)
for 25 cycles
<12V
(>95%dip in 240V)
for 5 sec
Electromagnetic
environment—guidance
Floors should be wood,
concrete or ceramic tile. If
floors are covered with
synthetic material, the
relative humidity should be
at least 30%.
Mains power quality should
be that of a typical
commercial or hospital
environment.
Mains power quality should
be that of a typical
commercial or hospital
environment.
Mains power quality should
be that of a typical
commercial or hospital
environment.
If the user of the S8 device
requires continued operation
during power mains
interruptions, it is
recommended that the S8
device be powered from an
uninterruptible power
source.
32
Power frequency
(50/60 Hz)
magnetic field
IEC 61000-4-8
NOTE: Ut is the AC mains voltage prior to application of the test level.
3 A/m 3 A/m Power frequency magnetic
fields should be at levels
characteristic of a typical
location in a typical
commercial or hospital
environment.
Page 35

Guidance and manufacturer’s declaration—electromagnetic immunity
The S8 series of devices is intended for use in the electromagnetic environment specified below. The customer or
the user of the S8 device should assure that the device is used in such an environment.
Immunity test
Conducted RF
IEC 61000-4-6
IEC60601-1-2
test level
3 Vrms
150 kHz to 80 MHz
Compliance
level
3 Vrms d = 1.17 √P
Electromagnetic environment—guidance
Portable and mobile RF communications
equipment should be used no closer to any part
of the S8 device, including cables, than the
recommended separation distance calculated
from the equation applicable to the frequency of
the transmitter.
Recommended separation distance
ENGLISH
Radiated RF
IEC 61000-4-3
NOTE 1: At 80 MHz and 800 MHz, the higher frequency range applies.
NOTE 2: These guidelines may not apply in all situations. Electromagnetic propagation is affected by absorption
and reflection from structures, objects and people.
a
Field strengths from fixed transmitters, such as base stations for radio (cellular/cordless) telephones and land
mobile radios, amateur radio, AM and FM radio broadcast and TV broadcast cannot be predicted theoretically
with accuracy. To assess the electromagnetic environment due to fixed RF transmitters, an electromagnetic site
survey should be considered. If the measured field strength in the location in which the S8 device is used exceeds
the applicable RF compliance level above, the S8 device should be observed to verify normal operation. If
abnormal performance is observed, additional measures may be necessary, such as reorienting or relocating the
S8 device.
b
Over the frequency range 150 kHz to 80 MHz, field strengths should be less than 10 V/m.
10 V/m
80 MHz to 2.5 GHz
10 V/m d = 0.35 √P 80 MHz to 800 MHz
d = 0.70 √P 800 MHz to 2.5 GHz
where P is the maximum output power rating of
the transmitter in watts (W) according to the
transmitter manufacturer and d is the
recommended separation distance in meters (m).
Field strengths from fixed RF transmitters, as
determined by an electromagnetic site survey,a
should be less than the compliance level in each
frequency range.
Interference may occur in the vicinity of
equipment marked with the following symbol:
b
SYSTEM SPECIFICATIONS
33
Page 36

Recommended separation distances between portable and mobile RF communications
equipment and the S8 series of devices
The S8 series of devices is intended for use in an environment in which radiated RF disturbances are controlled.
The customer or the user of the S8 device can help prevent electromagnetic interference by maintaining a
minimum distance between portable and mobile RF communications equipment (transmitters) and the S8 device
as recommended below, according to the maximum output power of the communications equipment.
Separation distance according to frequency of transmitter
m
Rated maximum output
power of transmitter
W
0.01 0.17 0.04 0.07
0.1 0.37 0.11 0.22
1 1.17 0.35 0.7
10 3.69 1.11 2.21
100 11.70 3.50 7.0
For transmitters rated at a maximum output power not listed above, the recommended separation distance d in
metres (m) can be determined using the equation applicable to the frequency of the transmitter, where P is the
maximum output power rating of the transmitter in watts (W) according to the transmitter manufacturer.
NOTE 1: At 80 MHz and 800 MHz, the separation distance for the higher frequency range applies.
NOTE 2: These guidelines may not apply in all situations. Electromagnetic propagation is affected by absorption
and reflection from structures, objects and people.
150 kHz to 80 MHz
d = 1.17 √P
80 MHz to 800 MHz
d = 0.35 √P
800MHz to 2.5 GHz
d = 0.7 √P
34
Page 37

LIMITED WARRANTY
ResMed warrants that your ResMed product shall be free from defects in material and
workmanship for the period specified below from the date of purchase by the initial
consumer. This warranty is not transferable.
Product Warranty Period
ResMed humidifiers, ResControl™, ResLink™ 1 Year
ResMed flow generators 2 Years
ENGLISH
Accessories, mask systems (including mask frame, cushion,
headgear and tubing). Excludes single-use devices.
90 Days
Note: Some models are not available in all regions.
If the product fails under conditions of normal use, ResMed will repair or replace, at its
option, the defective product or any of its components. This Limited Warranty does
not cover:
a) any damage caused as a result of improper use, abuse, modification or alteration of
the product;
b) repairs carried out by any service organization that has not been expressly
authorized by ResMed to perform such repairs;
c) any damage or contamination due to cigarette, pipe, cigar or other smoke;
d) any damage caused by water being spilled on or into a flow generator.
To make a warranty claim, the initial consumer must return the defective product to
the point of purchase, freight prepaid.
This warranty is in lieu of all other express or implied warranties, including any implied
warranty of merchantability or fitness for a particular purpose. Some regions or states
do not allow limitations on how long an implied warranty lasts, so the above limitation
may not apply to you.
ResMed shall not be responsible for any incidental or consequential damages claimed
to have occurred as a result of the sale, installation or use of any ResMed product.
Some regions or states do not allow the exclusion or limitation of incidental or
consequential damages, so the above limitation may not apply to you. This warranty
gives you specific legal rights, and you may also have other rights which vary from
region to region.
For further information on your warranty rights, contact your local ResMed
dealer or ResMed office.
LIMITED WARRANTY
R001-307/1 05 02
35
Page 38

36
Page 39

INDEX
A
accessories
air filter 9, 26
replacing
air pressure
air tubing 9
cleaning
connect to air outlet
kinked 26
positioning
aircraft
airflow
breathing with
altitude setting
B
backlight
LCD and keypad
C
carry bag 9
cleaning
periodic
contraindications
CPAP 5
D
daily cleaning 22
Data Card
copying data 20
inserting
mailback envelope
removing 20
data card
Data Card module
DC-12 converter 25
down key
dryness
mouth, nose or throat
E
error message 27
F
frequently asked questions 24
H
headgear
10
23
26
22
11
12
25
24
17, 25, 26
15
22
6
19
20
20
27
19
15
24
26
HumidAire
attaching
HumidAire 3i
attaching
storage
humidifier
cleaning 22
humidifiers
I
international use 24
K
keypad
keypad keys
functions
L
language setting
LCD
error messages
messages 18
left key
M
mailback envelope 20
mask 24, 26
air leak
attaching
cleaning 22
removing
mask leak
mask port 26
masks
medical information
menu screens 16
access
change
exit 17
scrolling
module
attaching
blank
Data Card
modules 19
blank
13
13
9
24
10
9, 15
15
17
9, 11, 15
27
15
24
11
24
24
9
5
16
16
16
9
19
19
19
ENGLISH
INDEX
37
Page 40

N
nasal irritation
P
Passover
attaching 14
power cord
connecting
power sockets 9
power sources
power supply
R
ramp time
reminder
replace mask
reminders 18
ResScan Data Card module
right key
S
S8 Escape
dimensions
servicing
settings 16
set-up
start treatment
stop treatment 12
travelling with
setting up
software version number 17
standby screen
start/stop key
SW 17
system specifications
24
9, 26
11
25
29
12, 17, 26
18
15
29, 30
23
11
12
24
11
11
15
29
10
38
T
troubleshooting 26
U
15
up key
17
Usage
use on aircraft
Used hours 17
W
weekly cleaning 22
25
Page 41

S8 Escape
™
MANUEL UTILISATEUR
Français
FRANÇAIS40FRANÇAIS
39
Page 42

Page 43

SOMMAIRE
INTRODUCTION . . . . . . . . . . . . . . . . . . . . . . . . . . . . . . . . . . . . . . . . . . . 43
V
OTRE RESPONSABILITÉ 43
INFORMATIONS MÉDICALES . . . . . . . . . . . . . . . . . . . . . . . . . . . . . . . . . . 43
À
PROPOS DE LA S8 ESCAPE™ 43
C
ONTRE-INDICATIONS 44
A
VERTISSEMENTS 44
P
RÉCAUTIONS 45
E
FFETS SECONDAIRES 46
LA S8 ESCAPE . . . . . . . . . . . . . . . . . . . . . . . . . . . . . . . . . . . . . . . . . . . . . 47
S8 E
SCAPE 47
M
ASQUES 47
UMIDIFICATEURS 48
H
M
ODULE DE CARTE DE DONNÉES RESSCAN 48
A
CCESSOIRES 48
UTILISATION DE LA S8 ESCAPE . . . . . . . . . . . . . . . . . . . . . . . . . . . . . . . . 49
I
NSTALLATION DE LA S8 ESCAPE 49
A
SSEMBLAGE DU MASQUE 49
ÉBUT DU TRAITEMENT 50
D
A
RRÊT DU TRAITEMENT 50
FIXATION D’UN HUMIDIFICATEUR . . . . . . . . . . . . . . . . . . . . . . . . . . . . . 51
F
IXATION D’UN HUMIDIFICATEUR HUMIDAIRE 3I 51
FIXATION D’UN HUMIDIFICATEUR HUMIDAIRE 51
IXATION D’UN HUMIDIFICATEUR PASSOVER RESMED 52
F
UTILISATION DU CLAVIER . . . . . . . . . . . . . . . . . . . . . . . . . . . . . . . . . . . . 53
P
OUR MODIFIER LES RÉGLAGES DE VOTRE S8 ESCAPE 54
MODULES S8 . . . . . . . . . . . . . . . . . . . . . . . . . . . . . . . . . . . . . . . . . . . . . 58
U
TILISATION D’UN MODULE VIERGE 58
U
TILISATION D’UN MODULE DE CARTE DE DONNÉES RESSCAN 58
NETTOYAGE ET ENTRETIEN . . . . . . . . . . . . . . . . . . . . . . . . . . . . . . . . . . . 61
N
ETTOYAGE QUOTIDIEN 61
N
ETTOYAGE HEBDOMADAIRE 61
ETTOYAGE PÉRIODIQUE 61
N
R
EMPLACEMENT DU FILTRE À AIR 62
R
ÉPARATIONS 62
FOIRE AUX QUESTIONS . . . . . . . . . . . . . . . . . . . . . . . . . . . . . . . . . . . . . . 63
STRATÉGIE DE DÉPANNAGE . . . . . . . . . . . . . . . . . . . . . . . . . . . . . . . . . . . 65
SOMMAIRE
41
Page 44

CARACTÉRISTIQUES . . . . . . . . . . . . . . . . . . . . . . . . . . . . . . . . . . . . . . . . . 68
S8 E
SCAPE 68
A
CCESSOIRES 69
OUS LES APPAREILS (LE CAS ÉCHÉANT) 69
T
GARANTIE LIMITÉE . . . . . . . . . . . . . . . . . . . . . . . . . . . . . . . . . . . . . . . . . . 75
INDEX . . . . . . . . . . . . . . . . . . . . . . . . . . . . . . . . . . . . . . . . . . . . . . . . . . . 77
42
Page 45

INTRODUCTION
Merci d’avoir choisi la S8 ESCAPE™. La S8 ESCAPE est un appareil compact tout-en-un
avec alimentation intégrée offrant une fonction de gestion des données et
l’humidification totalement intégrées.
Ce manuel utilisateur contient les informations dont vous avez besoin pour pouvoir
utiliser votre
VOTRE RESPONSABILITÉ
Le propriétaire ou l’utilisateur de cet appareil sera tenu pour seul responsable de toute
blessure ou de tout dommage matériel résultant :
• d’une utilisation non conforme aux instructions fournies
• d’un entretien ou de modifications réalisés non conformément aux instructions
et/ou par des personnes non autorisées.
Veuillez lire ce manuel attentivement avant d’utiliser l’appareil.
Ce manuel contient des termes et des icônes spéciaux qui apparaissent dans la marge
et dont la fonction est d’attirer votre attention sur des informations spécifiques
importantes.
• Un avertissement vous met en garde contre le risque de blessure.
• Une précaution (Attention) explique des mesures particulières permettant
d’assurer une utilisation efficace et sûre de l’appareil.
• Une remarque correspond à une remarque ou information utile.
S8 ESCAPE correctement.
FRANÇAIS
INFORMATIONS MÉDICALES
À PROPOS DE LA S8 ESCAPE™
L’appareil de pression positive continue (PPC) S8 ESCAPE est prévu pour le traitement
du syndrome d’apnée obstructive du sommeil (SAOS) chez l’adulte.
S8 ESCAPE est prévue pour une utilisation à domicile ou en milieu hospitalier.
La
ATTENTION
!
Selon la loi fédérale américaine, ce dispositif ne peut être vendu aux U.S.A. que par
un médecin ou sur prescription médicale.
INTRODUCTION
43
Page 46

CONTRE-INDICATIONS
La S8 ESCAPE n’est pas un appareil de suppléance fonctionnelle et son fonctionnement
peut être interrompu à la suite d’une coupure de l’alimentation ou dans le cas d’une
panne. Elle ne doit pas être utilisée chez les patients dont le traitement ne peut pas
être interrompu.
Le traitement par PPC est contre-indiqué chez certains patients présentant l’une des
pathologies préexistantes suivantes :
• affection pulmonaire bulleuse grave
• pneumothorax
• hypotension
• déshydratation
• fuite de liquide céphalo-rachidien, récente intervention chirurgicale crânienne ou
traumatisme.
AVERTISSEMENTS
• Lire le manuel entièrement avant d’utiliser la S8 ESCAPE.
• Les conseils donnés dans ce manuel ne remplacent pas les instructions du médecin
traitant.
• Un patient ne doit connecter aucun appareil au port de communication de
données sauf si son prestataire de santé ou son médecin lui a demandé de le faire.
Seuls les produits ResMed peuvent être connectés au port de communication de
données. La connexion d'autres appareils peut causer des blessures ou
endommager la
• La S8 ESCAPE doit être utilisée uniquement avec les masques (et raccords)*
recommandés par ResMed, un médecin ou un thérapeute respiratoire. Le masque
ne peut être porté que si la
correctement. Les orifices de ventilation ou autres orifices du masque ne doivent
jamais être obstrués.
Explication : la
raccords) spéciaux
l’écoulement continu de l’air hors du masque. Lorsque l’appareil est sous tension
et qu’il fonctionne correctement, de l’air propre provenant de l’appareil expulse
l’air expiré via les orifices de ventilation du masque.
Cependant, lorsque l’appareil ne fonctionne pas, le débit d’air propre délivré dans
le masque est insuffisant et une réinhalation de l’air expiré peut se produire. Si la
réinhalation de l’air expiré dure plus de quelques minutes, elle peut, dans certains
cas, entraîner une suffocation. Cela vaut pour la plupart des appareils de PPC.
• En cas de coupure de courant ou de dysfonctionnement de l'appareil, retirer le
masque.
S8 ESCAPE.
S8 ESCAPE est sous tension et si elle fonctionne
S8 ESCAPE est conçue pour être utilisée avec des masques (ou
*
possédant des orifices de ventilation qui permettent
44
* Des ports peuvent être intégrés au masque ou à des raccords proches du masque.
Page 47

• La S8 ESCAPE peut être réglée pour délivrer des pressions allant jusqu’à
20 cm H
jusqu’à 30 cm H
• Si de l’oxygène est utilisé avec cet appareil, l’alimentation en oxygène doit être
O. Dans le cas peu probable d’une panne, les pressions peuvent s’élever
2
O.
2
fermée lorsque l’appareil n’est pas en mode de fonctionnement.
Si l'alimentation en oxygène a été laissée ouverte, mettre l'appareil hors tension,
puis attendre 30 minutes avant de le remettre sous tension.
Explication : lorsque l’appareil de PPC n’est pas en marche et que l’alimentation
en oxygène n’est pas coupée, l’oxygène délivré dans le circuit respiratoire peut
s’accumuler dans l’appareil et créer un risque d’incendie. Cela vaut pour la plupart
des appareils de PPC.
• L’oxygène est inflammable. Ne pas fumer ni approcher de flamme nue de
l’appareil lors de l’utilisation d’oxygène.
• Systématiquement vérifier qu’un débit d’air est généré par l’appareil avant
d’ouvrir l’alimentation en oxygène.
• Systématiquement couper l’alimentation en oxygène avant d’arrêter le débit
d’air de l’appareil.
Remarque : lorsque de l’oxygène additionnel est délivré à un débit fixe, la concentration
de l’oxygène inhalé varie en fonction du point d’entrée de l’oxygène, des réglages de
pression, de la respiration du patient, du masque sélectionné ainsi que du niveau de fuite.
• Ne pas utiliser la S8 ESCAPE en cas de défauts externes évidents ou si sa
performance devient aléatoire.
• Ne pas ouvrir le boîtier de la S8 ESCAPE. Des pièces ne pouvant être entretenues
par l’utilisateur se trouvent à l’intérieur. Les réparations et l’entretien interne
doivent être effectués par un technicien agréé.
• Danger d’explosion — Ne pas utiliser l’appareil à proximité d’anesthésiques
inflammables.
FRANÇAIS
PRÉCAUTIONS
• À basses pressions, le débit aux orifices de ventilation de votre masque peut
s’avérer insuffisant pour expulser tous les gaz expirés hors du circuit respiratoire.
Une réinhalation peut se produire.
• La température du débit d’air produit par cet appareil peut être supérieure de
o
C (11oF) à la température ambiante. Des précautions particulières devront être
6
prises lorsque la température ambiante est supérieure à 32
• En l’absence d’alimentation secteur CA (100 – 240V CA), systématiquement
utiliser un convertisseur DC-12 ResMed. (Le convertisseur DC-12 est vendu
comme accessoire optionnel. Il n’est pas fourni avec tous les modèles.)
• S’il est fourni, le module de carte de données ne peut être utilisé qu’avec certains
appareils ResMed.
• Utiliser le module de carte de données (s’il est fourni) uniquement comme
indiqué dans ce manuel.
o
C (90oF).
INFORMATIONS MÉDICALES
45
Page 48

Remarque : les avertissements et précautions précédents sont d’ordre général. Les
avertissements, précautions et remarques spécifiques sont donnés avec les instructions
auxquelles ils se rapportent dans le manuel.
EFFETS SECONDAIRES
Les patients doivent avertir leur médecin traitant en cas de douleurs thoraciques
inhabituelles, de maux de tête sévères ou d’une dyspnée accrue. Une infection aiguë
des voies aériennes supérieures peut nécessiter l’arrêt temporaire du traitement.
Les effets secondaires suivants peuvent apparaître au cours du traitement par PPC :
• sécheresse nasale, buccale ou de la gorge
• saignements de nez
• ballonnements
• gêne au niveau de l’oreille ou des sinus
• irritation des yeux
• érythèmes cutanés
• gêne au niveau de la poitrine.
46
Page 49

LA S8 ESCAPE
La S8 ESCAPE fait partie d’un système qui comprend cinq éléments :
• S8 ESCAPE
• Masque
• Humidificateur
• Produits de gestion des données
• Accessoires.
S8 ESCAPE
Veuillez vous référer aux figures de la section A de la fiche d’illustrations.
VUE AVANT (A-1)
Représente le clavier et l’écran LCD, ainsi que la sortie d’air.
VUE ARRIÈRE (A-2)
Indique le point de fixation du module et l’emplacement du filtre à air et des prises
d’alimentation.
CÂBLE D’ALIMENTATION (A-3)
Câble d’alimentation pour brancher la S8 ESCAPE à l’alimentation (secteur) CA.
SAC DE TRANSPORT (A-4)
Le sac de transport de la S8 ESCAPE comprend deux poches : une pour le rangement
de la S8 et l’autre pour le rangement de l’
HUMIDAIRE 3i dans la plus grande poche en maille filet.
l’
CIRCUIT RESPIRATOIRE
Le circuit respiratoire de 2 m (6’ 6”) (A-5) permet de raccorder la S8 ESCAPE à votre
masque. Un tuyau à air d’une longueur moyenne 52 cm (21”) (voir
requis pour raccorder la
S8 ESCAPE aux humidificateurs HUMIDAIRE™ et PASSOVER
ResMed.
HUMIDAIRE 3i™. Rangez toujours
C-3) est également
FRANÇAIS
MASQUES
Vous aurez également besoin d’un masque ResMed (fourni séparément).
Les masques ResMed suivants sont recommandés pour utilisation avec la
MASQUES NASAUX
MASQUE NASAL MODULAIRE
•
• MASQUE NASAL MIRAGE VISTA™
• MASQUE NASAL ULTRA MIRAGE™
• MASQUE NASAL MIRAGE™
• MASQUE NASAL PROTEGE™
• MASQUE NASAL MIRAGE ACTIVA™
• PAPILLON™.
S8 ESCAPE :
LA S8 ESCAPE
47
Page 50

ASQUES NARINAIRES
M
•
MASQUE NARINAIRE MIRAGE SWIFT™.
MASQUES FACIAUX
•
MASQUE FACIAL MIRAGE™
• MASQUE FACIAL MIRAGE™ SÉRIE 2
• MASQUE FACIAL ULTRA MIRAGE™.
AVERTISSEMENT
!
Seuls les masques ResMed peuvent être utilisés avec la S8 Escape. Veuillez vous
référer à la section « Avertissements » page 44.
HUMIDIFICATEURS
Il est possible que vous ayez besoin d'un humidificateur pour pallier les problèmes de
sécheresse nasale, buccale ou de la gorge auxquels vous êtes confronté. La
est compatible avec :
• L’humidificateur chauffant intégré HUMIDAIRE 3i (Figure B de la fiche
d’illustrations
• L’humidificateur chauffant HUMIDAIRE (Figure I de la fiche d’illustrations)
• Humidificateur PASSOVER ResMed (Figure J de la fiche d'illustrations).
)
MODULE DE CARTE DE DONNÉES RESSCAN
Le module de carte de données RESSCAN™ et la carte de données RESSCAN (C-1)
peuvent être utilisés avec la
traitement ou pour vous donner des informations sur les ajustements de réglage
effectués sur votre appareil. Voir « Utilisation d’un module de carte de données
ResScan » page 58 pour de plus amples informations sur l’utilisation du module de
carte de données et de la carte de données.
S8 ESCAPE pour aider votre clinicien à contrôler votre
S8 ESCAPE
48
ACCESSOIRES
Veuillez vous référer aux figures de la section C de la fiche d’illustrations.
Autres accessoires pouvant être utilisés avec la
• Circuit respiratoire (3 m/9‘ 10”) (C-2)
• Tuyau à air de longueur moyenne (52 cm/21”) pour le raccordement de
HUMIDAIRE ou du PASSOVER ResMed (C-3)
l’
• Convertisseur DC-12 (C-4)
• Module vierge (C-5).
Remarque : ResMed lance régulièrement des nouveaux produits. Veuillez consulter notre
site Web <www.myresmed.com>.
S8 ESCAPE :
Page 51

UTILISATION DE LA S8 ESCAPE
Veuillez vous référer aux figures de la section D de la fiche d’illustrations.
INSTALLATION DE LA S8 ESCAPE
1 Placez la S8 ESCAPE sur une table à proximité du dosseret de votre lit.
ATTENTION
!
Veiller à placer l’appareil de façon à éviter que quelqu’un puisse le faire tomber ou
se prendre les pieds dans le câble d’alimentation.
Remarque : vous pouvez placer la S8 Escape par terre, à côté de votre lit ou sous votre
lit. Veillez à ce que l’endroit choisi soit exempt de poussière, de literie, de vêtements ou de
tout autre objet susceptible d'obstruer l'entrée d'air.
2 Branchez le câble d’alimentation à la prise à l’arrière de l’appareil (D-1). Branchez
l’autre extrémité du câble d’alimentation à une prise de courant.
AVERTISSEMENT
!
Vérifier que le câble d’alimentation et la fiche sont en bon état et que l’équipement
n’est pas endommagé.
3 Raccordez fermement une extrémité du circuit respiratoire à la sortie d’air (D-2).
AVERTISSEMENTS
!
• Seul le circuit respiratoire ResMed peut être utilisé avec votre appareil. Les
circuits respiratoires d’un autre type risquent de modifier la pression reçue et
de réduire l’efficacité de votre traitement.
• L’obstruction du circuit pendant le fonctionnement risque de causer une
surchauffe de l’appareil.
• En milieu hospitalier, tout ordinateur personnel utilisé avec votre appareil de
PPC doit se trouver à une distance minimale de 1,5 m (5’) ou au moins 2,5 m
(8’) au-dessus du patient. L’ordinateur doit également être conforme à la norme
d’essai applicable. Pour les ordinateurs personnels, il s’agit de la norme
CEI 60950 ou équivalent.
ASSEMBLAGE DU MASQUE
FRANÇAIS
1 Assemblez votre masque conformément à son mode d'emploi.
2 Raccordez le masque à l’extrémité libre du circuit respiratoire (D-3).
S8 ESCAPE est prête à être utilisée (D-4).
La
UTILISATION DE LA S8 ESCAPE
49
Page 52

DÉBUT DU TRAITEMENT
1 Vérifiez que l’appareil est sous tension.
Le nom du produit s’affiche brièvement sur l’écran LCD, après quoi l’écran d’attente
(Rampe) s’affiche. Le rétro-éclairage du clavier et de l’écran LCD s’allume également.
2 Allongez-vous et placez le circuit respiratoire de manière à ce qu’il puisse suivre vos
mouvements pendant que vous dormez.
ATTENTION
!
• Ne pas laisser de longueurs inutiles de tuyau en haut du lit. Elles pourraient
s’enrouler autour de votre tête ou de votre cou pendant que vous dormez.
• Vérifier que la zone autour de l’appareil est propre et sèche. Elle doit également
être exempte de literie, de vêtements ou de toute autre source potentielle de
blocage de l'alimentation en air.
3 Modifiez la durée de rampe si nécessaire (voir « Pour modifier la durée de rampe »
page 55).
4 Pour commencer le traitement, appuyez sur la touche Marche/Arrêt.
5 Mettez votre masque comme indiqué dans son mode d’emploi.
AVERTISSEMENT
!
Le masque ne peut être porté que si la S8 Escape est sous tension et si elle
fonctionne correctement.
6 Lorsque la montée en pression commence, "MONTEE PRES" s’affiche à l’écran LCD,
avec la pression actuelle indiquée sous forme de pointillés. Chaque pointillé
correspond approximativement à 2 cm H
à une pression d’environ 12 cm H
O. Par exemple, 6 pointillés correspondent
2
O.
2
50
ARRÊT DU TRAITEMENT
Pour arrêter le traitement à tout moment, retirez votre masque et appuyez sur la
touche Marche/Arrêt.
Page 53

FIXATION D’UN HUMIDIFICATEUR
FIXATION D’UN HUMIDIFICATEUR HUMIDAIRE 3i
Veuillez vous référer à la section E de la fiche d'illustrations et au manuel de votre
HumidAire 3i.
HUMIDAIRE 3i se fixe sur le devant de la S8 ESCAPE dans le but de procurer une
L’
humidification chauffante. Aucun autre accessoire n’est requis pour l’utiliser
Remarques :
a. Assurez-vous que le réservoir de l’HumidAire 3i est vide avant de fixer ou de retirer
l’humidificateur.
b. Retirez le cache du connecteur de la S8 Escape (voir section A de la fiche
d'illustrations) avant de fixer l'HumidAire 3i. Remettez le cache du connecteur bien
en place après avoir retiré l'HumidAire 3i.
R
ANGEMENT DE L’HUMIDAIRE 3i
Lorsque vous ne l’utilisez pas, rangez l’HUMIDAIRE 3i dans la plus grande poche en
maille filet du sac de transport de la
S8 ESCAPE.
FIXATION D’UN HUMIDIFICATEUR HUMIDAIRE
Veuillez vous référer aux figures de la section I de la fiche d’illustrations.
Un tuyau à air d’une longueur moyenne (52 cm/21”) est requis pour raccorder la
S8 ESCAPE à un humidificateur HUMIDAIRE.
1 Remplissez le réservoir de l’HUMIDAIRE et placez-le à l'intérieur de l’HUMIDAIRE.
Raccordez le tuyau à air de longueur moyenne (52 cm/21”) et le long tuyau à
air (2 m/6’ 6”) (I-1) et fermez le couvercle de l’humidificateur.
.
FRANÇAIS
2 Placez la S8 ESCAPE sur l’HUMIDAIRE (I-2) et raccordez l’extrémité libre du tuyau à air
de longueur moyenne à la sortie d’air (I-3).
Remarque : pour éviter que de l’eau s’écoule dans la
l’humidificateur.
S8 ESCAPE, ne la placez pas sous
3 Assemblez votre masque et raccordez-le à l’extrémité libre du long tuyau à air (I-4).
4 Branchez le câble d’alimentation de l’HUMIDAIRE à une prise de courant. Branchez une
extrémité du câble d’alimentation de la
l’arrière de la
Veuillez vous référer au manuel utilisateur de l’HumidAire pour des informations plus
détaillées.
S8 ESCAPE et l’autre extrémité à une prise de courant.
S8 ESCAPE à la prise d’alimentation située à
AVERTISSEMENT
!
Vérifier que le câble d’alimentation et la fiche sont en bon état et que l’équipement
n’est pas endommagé.
Vous pouvez maintenant utiliser la
S8 ESCAPE avec l’HUMIDAIRE.
FIXATION D’UN HUMIDIFICATEUR
51
Page 54

FIXATION D’UN HUMIDIFICATEUR PASSOVER RESMED
Veuillez vous référer aux figures de la section J de la fiche d'illustrations.
Un tuyau à air d'une longueur moyenne 52 cm (21”) est requis pour raccorder votre
S8 ESCAPE à un humidificateur PASSOVER ResMed.
1
Remplissez le
52 cm (21”) et le long tuyau à air 2 m (6’ 6”) (
PASSOVER
d'eau et raccordez le tuyau à air de longueur moyenne
J-1
).
2 Placez la S8 ESCAPE sur le PASSOVER (J-2) et raccordez l'extrémité libre du tuyau à air
de longueur moyenne à la sortie d'air (J-3).
Remarque : pour éviter que de l'eau s'écoule dans la
l'humidificateur.
S8 ESCAPE, ne la placez pas sous
3 Assemblez votre masque et raccordez-le à l'extrémité libre du circuit respiratoire
(J-4).
4 Branchez une extrémité du câble d'alimentation à la prise d'alimentation située à
l'arrière de la
Veuillez vous référer au manuel utilisateur du Passover pour des informations plus
détaillées.
S8 ESCAPE et l'autre extrémité à une prise de courant.
AVERTISSEMENT
!
Vérifier que le câble d'alimentation et la fiche sont en bon état et que l'équipement
n'est pas endommagé.
Vous pouvez maintenant utiliser la
S8 ESCAPE avec le PASSOVER.
52
Page 55

UTILISATION DU CLAVIER
Le panneau de contrôle de la S8 ESCAPE comprend un écran LCD et un clavier pour
naviguer dans les écrans de menu et délivrer le traitement.
Écran LCD
Touche de déplacement
vers le haut
Touche de gauche
Touche de déplacement
vers le bas
ÉCRAN LCD
Les menus et les écrans de traitement s’affichent sur l’écran LCD.
TOUCHES DU CLAVIER
Le clavier de la S8 ESCAPE comprend les touches suivantes :
Touche Fonction
Marche/Arrêt
• Permet de démarrer ou d’arrêter le traitement.
Touche de droite
Touche Marche/Arrêt
FRANÇAIS
Déplacement vers
le haut
Déplacement vers
le bas
Gauche
Droite
• Vous permet d’augmenter les valeurs de réglage et de
naviguer dans le menu de la
• Vous permet de réduire les valeurs de réglage et de naviguer
dans le menu de la
• Permet d'exécuter la fonction indiquée par le texte
d'explication affiché sur l’écran LCD au-dessus de cette
touche. Le texte d'explication comprend les éléments
suivants : menu, changer et appliquer.
• Permet d'exécuter la fonction indiquée par le texte
d'explication affiché sur l’écran LCD au-dessus de cette
touche. Le texte d'explication comprend les éléments
suivants : quitter et annuler.
S8 ESCAPE.
S8 ESCAPE.
UTILISATION DU CLAVIER
53
Page 56

RETRO-ÉCLAIRAGE
Le clavier et l’écran LCD sont équipés d’un rétro-éclairage qui s’allume lorsque
l’appareil est en marche. Le rétro-éclairage de l’écran LCD s’éteint au bout de deux
minutes d’inactivité et se rallume dès que vous appuyez sur une touche. Une fois que
vous avez appuyé sur la touche Marche/Arrêt pour commencer le traitement, le
rétro-éclairage de l’écran LCD reste allumé pendant 2 minutes. Le rétro-éclairage du
clavier est allumé en permanence lorsque la
S8 ESCAPE est sous tension.
POUR MODIFIER LES RÉGLAGES DE VOTRE S8 ESCAPE
Vous pouvez modifier les réglages (tels que la durée de rampe et l’altitude) de la
S8 ESCAPE en vous servant du clavier et de l’écran LCD. Lorsque la S8 ESCAPE est en
mode d’attente, vous pouvez afficher une série d’écrans (menu) sur l’écran LCD afin
de voir et de modifier les réglages d’une fonction particulière.
S8 ESCAPE
MENU PATIENT
S8 CLASSIC
S8 CLASSICRAMPE 10min
Menu
ALT: 0-609m
Changer Quit
UTIL: 960
HRS
Quitter
UTIL.: 120/180
Quitter
LANG: FRANCAIS
Changer Quit
LOG: SX123456789
Quitter
54
Utilisez les écrans de menu pour modifier la durée de rampe, la compensation
automatique de l’altitude et la langue. Vous pouvez également afficher les détails sur la
durée d’utilisation et sur la version logicielle de votre
S8 ESCAPE.
POUR ACCÉDER AUX ÉCRANS DE MENU
Lorsque l’écran d’attente de la S8 ESCAPE s’affiche, le mot "Menu" est affiché dans le
coin inférieur gauche. Pour accéder au menu de la
S8 ESCAPE, appuyez sur la touche
de gauche.
POUR FAIRE DÉFILER LE MENU
Lorsque vous êtes dans le menu, faites défiler les options en appuyant sur la touche de
déplacement vers le haut ou de déplacement vers le bas.
Page 57

POUR MODIFIER UN RÉGLAGE
Lorsque vous avez navigué jusqu’à l’option requise :
1. Appuyez sur la touche de gauche (Changer).
2. Appuyez sur la touche de déplacement vers le haut ou de déplacement
vers le bas jusqu’à ce que le réglage désiré s’affiche.
3. Appuyez sur la touche de gauche (Appliquer) pour sélectionner le réglage.
Pour quitter sans modifier l’option, appuyez sur la touche de droite (Annuler).
POUR QUITTER UN MENU
Appuyez sur la touche de droite (Quitter). Cette opération vous ramène au menu
Patient.
POUR QUITTER UNE OPTION DU MENU
Appuyez sur la touche de droite (Quitter).
POUR MODIFIER LA DURÉE DE RAMPE
Pendant la durée de rampe, la pression augmente d’une pression basse confortable à
la pression prescrite pour le traitement. Vous pouvez régler la durée de rampe par
incréments de 5 minutes sur n’importe quelle valeur comprise entre 0 minute (OFF)
et la durée maximale fixée par votre clinicien.
La durée de rampe actuelle est affichée dans le coin droit de l’écran d’attente. Pour
modifier la durée de rampe, appuyez sur la touche de déplacement vers le haut
ou de déplacement vers le bas jusqu’à ce que la durée de rampe souhaitée
s’affiche.
Une fois qu’une rampe a été sélectionnée, démarrez le traitement en appuyant sur la
touche Marche/Arrêt.
Lorsque la rampe commence, "MONTEE PRES" s’affiche à l’écran LCD, avec la
pression actuelle indiquée sous forme de pointillés. Chaque pointillé correspond
approximativement à 2 cm H
pression d’environ 12 cm H
O. Par exemple, 6 pointillés correspondent à une
2
O.
2
POUR MODIFIER LE RÉGLAGE DE L’ALTITUDE
Si vous déménagez ou vous rendez dans un endroit d’une altitude différente avec votre
S8 ESCAPE, vous devez ajuster le réglage de compensation de l’altitude. Le changement
d’altitude a une incidence sur la pression délivrée par la
Vous pouvez vous servir du paramètre Altitude (ALT) pour spécifier la fourchette
d’altitudes auxquelles vous utilisez votre
S8 ESCAPE, appuyez sur la touche de gauche dans le menu d’attente (RAMPE). Faites
S8 ESCAPE. Pour retourner au menu de la
défiler les options jusqu’à l’affichage de ALT puis sélectionnez Changer (touche de
gauche). Appuyez sur la touche de déplacement vers le haut ou de
déplacement vers le bas jusqu’à ce que le réglage désiré s’affiche.
Vous avez le choix entre quatre fourchettes d’altitudes :
• 0 – 609 m (0 – 2000 ft)
• 610 – 1219 m (2001 – 4000 ft)
S8 ESCAPE.
FRANÇAIS
UTILISATION DU CLAVIER
55
Page 58

• 1220 – 1828 m (4001 – 6000 ft)
• 1829 – 2591 m (6001 – 8500 ft)
Par exemple, si vous vous trouvez à 947 m (3107’) d’altitude, votre réglage de
compensation de l’altitude doit être réglé sur 610 – 1219 m (2001 – 4000’), parce que
947 m (3107’) tombe dans cette fourchette.
Appuyez sur la touche de gauche (Appliquer) pour sélectionner le réglage correct.
POUR MODIFIER LE RÉGLAGE DE LA LANGUE
Pour afficher les menus et les messages dans une langue différente, sélectionnez le
menu de la
S8 ESCAPE en appuyant sur la touche de gauche dans le menu d’attente
(RAMPE). Faites défiler les options jusqu’à l’affichage de LANG puis sélectionnez
Changer (touche de gauche). Appuyez sur la touche de déplacement vers le
haut ou de déplacement vers le bas jusqu’à ce que la langue désirée s’affiche.
AUTRES INFORMATIONS AFFICHABLES
Vous pouvez également afficher le nombre total d’heures de traitement (HRS UTIL),
le nombre de sessions dans la période d’utilisation de la
S8 ESCAPE (UTIL) et la version
logicielle courante installée sur votre appareil (LOG). L’accès à tous ces écrans se fait
via le menu. Voir « Pour accéder aux écrans de menu » page 54.
MESSAGES AFFICHÉS SUR L’ÉCRAN LCD DE LA S8 ESCAPE
Votre clinicien a peut-être réglé votre S8 ESCAPE pour qu’elle vous rappelle des choses
importantes, comme le moment où vous devez remplacer votre masque, le moment
où vous devez insérer votre carte de données (si votre appareil est activé pour la carte
de données), etc.
Le message de rappel s’affiche sur l’écran LCD et peut être lu même lorsque l’appareil
ne délivre pas de traitement. Le rétro-éclairage de l’écran LCD clignote lorsqu’un
message s’affiche.
Votre clinicien peut régler les rappels suivants sur votre écran LCD :
56
Message Description Action
INSERER
CARTE
Peut s’afficher si la
fonction Carte de
données est
activée sur votre
appareil.
Insérez votre carte de données et suivez
les instructions que votre clinicien vous a
données. Une fois que vous avez terminé,
le message disparaît de l’écran. Vous
pouvez également l’effacer en appuyant sur
la touche de gauche (OK).
REMPLACER
MASQUE
Peut s’afficher
lorsque votre
masque doit être
Appuyez sur la touche de gauche (OK)
pour effacer le message de l’écran et
remplacez votre masque par un neuf.
remplacé.
Page 59

Message Description Action
APPEL
CLINICIEN
REMPLACER
FILTRE
ENTRETIEN
ÉCHU
Peut s’afficher
pour vous
rappeler de
contacter votre
clinicien, par
exemple pour
discuter de votre
traitement.
Peut s’afficher
pour vous
rappeler de
remplacer le filtre
à air de votre
appareil.
Peut s'afficher
pour vous
rappeler de
retourner votre
appareil pour
entretien.
Appuyez sur la touche de gauche (OK)
pour effacer le message de l’écran et
contactez votre clinicien.
Appuyez sur la touche de gauche (OK)
pour effacer le message de l’écran et
remplacez le filtre à air.
Appuyez sur la touche de gauche (OK)
pour effacer le message de l'écran et
contactez votre clinicien.
FRANÇAIS
UTILISATION DU CLAVIER
57
Page 60

MODULES S8
Remarque : ne retirez pas les modules lorsque la S8 Escape est sous tension.
S8 ESCAPE est équipée d’un des deux modules disponibles : le module vierge ou
Votre
le module de carte de données
UTILISATION D’UN MODULE VIERGE
Veuillez vous référer aux figures de la section F de la fiche d’illustrations.
Le module vierge sert de cache de protection pour la
éventuellement besoin d’enlever ou de fixer ce module, par exemple pour utiliser
l’adaptateur série.
Pour retirer le module vierge, retirez-le de l’arrière de la
port de communication de données (F-1).
Pour fixer le module vierge, poussez-le dans le port de communication de données,
jusqu’à ce qu’il se verrouille en position (F-2).
Remarque : pour protéger le port de communication de données, veillez à ce qu’un
module soit fixé à l’appareil en permanence.
UTILISATION D’UN MODULE DE CARTE DE DONNÉES RESSCAN
Veuillez vous référer aux figures de la section G de la fiche d’illustrations.
Le module de
carte de données RESSCAN avec le module de carte de données afin de collecter
une
des données et de modifier les réglages de la
permettent à votre clinicien d’accéder facilement aux données relatives à votre
traitement et de mettre les réglages de votre appareil à jour sans que vous deviez
quitter votre domicile.
carte de données RESSCAN est un accessoire de la S8 ESCAPE. Utilisez
RESSCAN™.
S8 ESCAPE. Vous aurez
S8 ESCAPE afin d’accéder au
S8 ESCAPE. Le module et la carte
58
FIXATION DU MODULE
Pour fixer le module de carte de données, poussez-le sur le port de communication
de données à l’arrière de votre
(G-1).
S8 ESCAPE jusqu’à ce qu’il se verrouille en position
RETRAIT DU MODULE
Pour retirer le module de carte de données, tirez dessus pour le détacher de la
S8 ESCAPE (G-2).
Remarque : pour protéger le port de communication de données, veillez à ce qu’un
module soit fixé à l’appareil en permanence.
UTILISATION DE LA CARTE DE DONNÉES POUR COLLECTER DES DONNÉES
Veuillez vous référer aux figures de la section H de la fiche d’illustrations.
Lorsque votre clinicien veut consulter les données de votre traitement, il vous
demande d’utiliser la carte de données pour copier les données de votre
de lui envoyer la carte. La carte de données est fournie dans une enveloppe de retour.
S8 ESCAPE et
Page 61

Les données copiées sur une carte de données sont toujours stockées et disponibles
S8 ESCAPE.
dans la
La copie des données sur la carte de données prend environ cinq secondes.
1 INSERTION DE LA CARTE DE DONNÉES
Mettez la S8 ESCAPE sous tension et attendez que l’écran d’attente (Rampe)
•
s’affiche.
• Prenez la carte de données avec la flèche dirigée vers le haut et insérez-la dans la
fente du module de carte de données (H-1).
• Poussez la carte sans forcer jusqu’à la butée (H-2) et jusqu’à ce que des messages
commencent à s’afficher sur l’écran LCD.
2 COPIE DES DONNÉES SUR LA CARTE DE DONNÉES
•
La copie des données commence automatiquement une fois que la carte de
données a été insérée dans le module de carte de données.
• Le message "CARTE INSEREE Patientez SVP" s’affiche sur l’écran LCD de la
S8 ESCAPE pendant la copie des données. La copie prend environ cinq secondes.
• Le message "COPIE TERMINEE Retirez carte" s’affiche sur l’écran LCD une fois
que la copie est terminée.
• Retirez la carte de données du module de carte de données.
3 RETRAIT DE LA CARTE DE DONNÉES
Prenez la carte de données par le bout qui dépasse et tirez pour retirer la carte du
module de carte de données (H-3).
4 RANGEMENT DE LA CARTE DE DONNÉES
Votre carte de données doit être conservée dans son enveloppe de retour lorsqu’elle
n’est pas utilisée.
5 ENVOI DE LA CARTE DE DONNÉES À VOTRE CLINICIEN
Une enveloppe à bulles est fournie pour garantir que la carte de données n'est pas
endommagée pendant le transport. Procédure à suivre pour l'envoi de la carte de
données à votre clinicien :
1. Insérez la carte de données dans la poche de l'enveloppe de retour prévue à cet
effet. Pliez l'enveloppe de retour.
2. Mettez l'enveloppe de retour avec la carte de données dans l'enveloppe à bulles
et fermez cette dernière.
3. Vérifiez que les coordonnées de votre clinicien sont bien indiquées sur l'enveloppe
à bulles, et renvoyez cette dernière par la poste immédiatement.
FRANÇAIS
UTILISATION DE LA CARTE DE DONNÉES POUR METTRE LES RÉGLAGES À JOUR
Si votre clinicien vous a fourni une carte de données qui contient de nouveaux réglages
pour votre appareil :
• Avec l’appareil en mode d’attente (Rampe), insérez la carte de données dans la
fente du module de carte de données. La mise à jour des réglages commence
immédiatement.
MODULES S8
59
Page 62

• Le message "CARTE INSEREE Patientez SVP" s’affiche sur l’écran LCD pendant la
mise à jour. La mise à jour prend environ cinq secondes.
• Le message "CHARG. REUSSI Retirez carte" s’affiche sur l’écran LCD si la mise à
jour des réglages a réussi.
Remarque : ce message ne s’affiche qu’une seule fois. Si vous insérez la carte de
données une nouvelle fois après avoir mis vos réglages à jour, il ne s’affiche pas.
• Retirez la carte de données du module de carte de données.
• La carte de données doit être conservée dans son enveloppe de retour lorsqu’elle
n’est pas utilisée.
AVERTISSEMENT
!
Si votre clinicien vous a demandé d’utiliser la carte de données pour mettre les
réglages de votre appareil à jour et si le message "CHARG. REUSSI" ne s’affiche pas,
contacter votre clinicien immédiatement.
60
Page 63

NETTOYAGE ET ENTRETIEN
Vous devez effectuer régulièrement le nettoyage et l’entretien décrits dans cette
section. Veuillez vous référer au manuel du masque pour les instructions détaillées.
NETTOYAGE QUOTIDIEN
Masque
Nettoyez le masque conformément aux instructions fournies.
Circuit respiratoire
Détachez le circuit respiratoire au niveau de la S8 ESCAPE (et de l’humidificateur le cas
échéant) et suspendez le circuit respiratoire et le masque dans un endroit propre et
sec jusqu’à la prochaine utilisation.
Humidificateur
Si vous utilisez un humidificateur, nettoyez-le conformément à son mode d’emploi.
NETTOYAGE HEBDOMADAIRE
1. Détachez le circuit respiratoire de la S8 ESCAPE et du masque.
2. Lavez le circuit respiratoire à l’eau tiède avec un détergent doux. Rincez
soigneusement et suspendez-le pour le faire sécher.
3. Avant de les réutiliser, assemblez le masque et le harnais conformément au mode
d’emploi.
4. Raccordez le circuit respiratoire à la sortie d’air et au masque.
NETTOYAGE PÉRIODIQUE
FRANÇAIS
1. Nettoyez l’extérieur de la S8 ESCAPE à l’aide d’un chiffon humide et d’un détergent
doux.
2. Vérifiez que le filtre à air n’est ni obstrué ni percé (voir « Remplacement du filtre à
air » page 62).
AVERTISSEMENT
!
• Risque de chocs électriques. Ne pas immerger l’appareil ni le câble
d’alimentation dans l’eau. Systématiquement débrancher l’appareil avant de le
nettoyer et vérifier qu’il est bien sec avant de le rebrancher.
• Le masque et le circuit respiratoire subissent une usure normale. Les inspecter
régulièrement pour vérifier qu’ils ne sont pas endommagés.
NETTOYAGE ET ENTRETIEN
61
Page 64

REMPLACEMENT DU FILTRE À AIR
Pour remplacer le filtre à air :
1. Retirez le couvercle du logement du filtre à air à l'arrière de la
Couvercle du logement
du filtre à air
2. Retirez et jetez le filtre à air usagé.
3. Insérez un nouveau filtre à air avec la face bleue dirigée vers l’extérieur.
4. Remettez le couvercle du logement du filtre à air en place.
Inspectez le filtre à air une fois par mois pour vérifier qu’il n’est ni obstrué ni percé.
Dans des conditions normales de fonctionnement, le filtre à air de la
être remplacé tous les six mois (ou plus souvent si votre appareil se trouve dans un
environnement poussiéreux).
S8 ESCAPE.
S8 ESCAPE doit
AVERTISSEMENT
!
• Ne pas laver le filtre à air. Il n’est ni lavable ni réutilisable.
• Le couvercle du logement du filtre à air protège l’appareil contre tout
déversement accidentel de liquides. Veiller à ce que le filtre à air et le couvercle
de son logement soient toujours en place.
RÉPARATIONS
ATTENTION
!
• Ne pas tenter d’ouvrir le boîtier de la S8 Escape. Des pièces ne pouvant être
entretenues par l’utilisateur se trouvent à l’intérieur.
• L’inspection et les réparations doivent être effectuées par un technicien agréé.
Vous ne devez en aucun cas essayer d’entretenir ou de réparer l’appareil
vous-même.
Ce produit (
ans après la date de sa fabrication. Avant cette date, l'appareil devrait assurer un
fonctionnement fiable et sûr à condition qu’il soit utilisé et entretenu conformément
aux instructions données par ResMed. Les informations concernant la garantie ResMed
sont fournies avec l'appareil lors de sa livraison initiale. Comme avec tous les appareils
électriques, si vous constatez un défaut quelconque, vous devez faire vérifier l'appareil
par un service technique agréé ResMed.
Si vous pensez que votre appareil ne fonctionne pas correctement, voir « Stratégie de
dépannage » page 65.
S8 ESCAPE) doit être inspecté par un service technique agréé ResMed 5
62
Page 65

FOIRE AUX QUESTIONS
QUELLE SENSATION EST-CE QUE JE VAIS RESSENTIR LA PREMIÈRE FOIS QUE JE
RESPIRERAI AVEC LA S8 ESCAPE ?
Lors de la première utilisation de votre S8 ESCAPE, il est possible que vous ressentiez
une gêne lorsque vous respirez contre le débit d’air. Ceci est normal. Vous continuerez
à respirer normalement pendant que vous dormez. Prenez le temps de vous habituer
à cette nouvelle sensation.
QU’EST-CE QUE JE DOIS FAIRE SI J’AI BESOIN DE ME LEVER LA NUIT ?
Si vous devez vous lever pendant la nuit, retirez votre masque et arrêtez le traitement.
N'oubliez pas de remettre le masque et de redémarrer l’appareil lorsque vous
retournez vous coucher.
QU’EST-CE QUE JE DOIS FAIRE SI JE SENS DES FUITES D’AIR AU NIVEAU DU
MASQUE ?
L’appareil délivre un traitement optimal lorsque le masque est bien ajusté et
confortable sans être trop serré. Le traitement peut être affecté par les fuites, c'est
pourquoi il est important de les éliminer lorsqu'elles se produisent. Vous pouvez par
exemple essayer de repositionner le masque et d’ajuster les sangles.
Si vous utilisez un masque nasal, essayez de garder la bouche fermée pendant le
traitement. Les fuites d'air buccales peuvent diminuer l'efficacité de votre traitement.
Si les fuites buccales vous posent problème, vous avez la possibilité d'utiliser un masque
facial ou une mentonnière. Contactez votre clinicien ou votre prestataire de santé pour
de plus amples informations.
Si vous utilisez un masque facial et avez du mal à ajuster votre masque
confortablement, contactez votre laboratoire du sommeil ou votre prestataire de
santé. Il est possible qu'une autre taille ou un autre type de masque permette de
résoudre votre problème.
EST-CE QUE JE DOIS PRENDRE DES PRÉCAUTIONS SPÉCIALES AVANT DE METTRE LE
MASQUE ?
Avant de mettre votre masque, lavez-vous le visage pour éliminer tout excès de
sébum. Cette précaution permet un meilleur ajustement du masque et prolonge la
durée de vie de la bulle du masque.
N’utilisez pas de crème hydratante lorsque vous portez le masque.
J’AI LA BOUCHE SÈCHE PENDANT LE TRAITEMENT — QU’EST-CE QUE JE PEUX FAIRE ?
Il est possible que vous souffriez de sécheresse nasale, buccale ou de la gorge pendant
le traitement, notamment pendant les mois d'hiver. Dans de nombreux cas, l'utilisation
d'un humidificateur permet de pallier ce problème. Contactez votre clinicien pour plus
de détails.
FRANÇAIS
FOIRE AUX QUESTIONS
63
Page 66

AI LE NEZ IRRITÉ PENDANT LE TRAITEMENT — QU’EST-CE QUE JE PEUX FAIRE ?
J’
Il est possible que vous éternuiez et/ou que votre nez coule ou se bouche lors des
premières semaines de traitement. Dans de nombreux cas, ces symptômes d’irritation
nasale peuvent être éliminés à l’aide d’un humidificateur. Consultez votre clinicien ou
votre prestataire de santé pour plus de détails.
EST-CE QUE JE PEUX EMPORTER LA S8 ESCAPE AVEC MOI EN VOYAGE ?
Utilisation à l’étranger
Votre S8 ESCAPE est équipée d'une carte d’alimentation qui lui permet de fonctionner
dans différents pays. Elle peut fonctionner avec des courants de 100 – 240 V et
50/60 Hz. Aucun réglage spécial n'est requis, mais l'utilisation d'un adaptateur de prise
de courant peut s'avérer nécessaire.
Changements d’altitude
Si vous changez d’altitude (déménagement ou voyage), voir « Pour modifier le réglage
de l’altitude » page 55.
En avion
Veuillez consulter le service médical de votre compagnie aérienne si vous souhaitez
utiliser votre
règlements de la FCC (USA), Partie 15, normes applicables aux équipements de
Classe B.
Remarque : n'utilisez pas votre S8 Escape pendant le décollage ou l'atterrissage.
S8 ESCAPE à bord d’un avion. La S8 ESCAPE est conforme avec les
EST-CE QUE JE PEUX UTILISER MA S8 ESCAPE S’IL N’Y A PAS D’ALIMENTATION
SECTEUR (CA) ?
Un convertisseur DC-12 a été prévu pour la connexion de la S8 ESCAPE à une
alimentation de 12 ou 24 V CC. Contactez ResMed pour plus de détails.
ATTENTION
!
L’appareil ne doit pas être connecté simultanément à une alimentation CA et à une
alimentation CC.
64
Page 67

STRATÉGIE DE DÉPANNAGE
En cas de problème, reportez-vous aux suggestions suivantes. Si le problème persiste,
contactez votre prestataire de santé ou ResMed. N’essayez pas d’ouvrir l’appareil.
Problème Cause possible Solution
Aucun affichage. L’alimentation n’est pas
Débit d’air délivré par
la S8 Escape
insuffisant.
connectée.
La durée de rampe est activée. Attendez que la pression
Le filtre à air est sale. Remplacez le filtre à air.
Le circuit respiratoire est
entortillé ou percé.
Le circuit respiratoire n’est pas
correctement raccordé.
Le masque et le harnais sont mal
mis en place.
Un ou des bouchons manquent
au niveau du/des port(s) du
masque.
Le réglage de la compensation
de l’altitude est incorrect.
La pression requise pour le
traitement a peut-être changé.
Vérifiez que le câble
d’alimentation correct est
connecté à votre S8 Escape et
que l’interrupteur de la prise de
courant (le cas échéant) est sur
marche.
augmente ou modifiez la durée
de rampe.
Désentortillez ou remplacez le
circuit respiratoire.
Vérifiez le circuit respiratoire.
Ajustez la position du masque et
du harnais.
Remplacez le(s) bouchon(s).
Réglez la compensation de
l’altitude sur la bonne fourchette
d’altitudes.
Consultez votre clinicien pour
ajuster la pression.
FRANÇAIS
Débit d’air délivré par
la S8 Escape excessif.
Le réglage de la compensation
de l’altitude est incorrect.
Réglez la compensation de
l’altitude sur la bonne fourchette
d’altitudes.
STRATÉGIE DE DÉPANNAGE
65
Page 68

Problème Cause possible Solution
Affichage du message
d’erreur :
Exxxx
Appel SERVICE!
(où xxxx correspond
à la dénomination de
l’erreur).
ou
DEFAUT MOTEUR
Appel SERVICE!
ou
CHARGER LANGUES
Appel SERVICE!
ou
DONNEES PERDUES
Appel SERVICE!
Le message suivant
s’affiche sur l’écran
LCD après que vous
avez essayé de mettre
les réglages à jour à
l’aide de la carte de
données :
ERREUR CARTE
Retirez carte
Composant défectueux. Contactez le service après-vente.
La carte de données n’est pas
correctement insérée.
La carte de données est
seulement insérée partiellement.
Vérifiez que la carte de données
est insérée avec la flèche dirigée
vers le haut et pointant vers
l’appareil. Vérifiez que l’appareil
est sous tension et en mode
d’attente avant d’insérer la carte
de données.
Vérifiez que la carte de données
est insérée dans le module de
carte de données jusqu’à la
butée.
66
Le message suivant
s’affiche sur l’écran
LCD après que vous
avez essayé de copier
les données sur une
carte de données :
ERREUR CARTE
Retirez carte
Vous avez peut-être retiré la
carte de données avant que les
réglages n’aient été copiés sur la
S8 Escape.
La carte n’est pas une carte de
données ResScan.
La carte de données n’est pas
correctement insérée.
La carte n’est pas une carte de
données ResScan.
Insérez la carte de données à
nouveau et attendez que le
message CHARG. REUSSI
Retirez carte s’affiche sur
l’écran LCD.
Utilisez uniquement une carte de
données ResScan.
Vérifiez que la carte de données
est insérée avec la flèche dirigée
vers le haut et pointant vers
l’appareil.
Utilisez une carte de données
ResScan comme indiqué dans ce
manuel.
Page 69

Problème Cause possible Solution
Le message suivant
s’affiche sur l’écran
LCD après que vous
avez essayé de mettre
les réglages à jour à
l’aide de la carte de
données :
REGL. INVALIDES
Retirez carte
Le message suivant
s’affiche sur l’écran
LCD après que vous
avez essayé de mettre
les réglages à jour à
l’aide de la carte de
données :
ERREUR REGLAGES
Retirez carte
Le message suivant ne
s’affiche PAS sur
l’écran LCD après que
vous avez essayé de
mettre les réglages à
jour à l’aide de la carte
de données :
CHARG. REUSSI
Retirez carte
Les données d’identification de
la carte de données ne
correspondent pas à celles de
votre appareil.
Erreur de données sur la carte de
données.
Les réglages n’ont pas été mis à
jour.
Contactez votre clinicien
immédiatement.
Contactez votre clinicien
immédiatement.
Contactez votre clinicien
immédiatement.
FRANÇAIS
STRATÉGIE DE DÉPANNAGE
67
Page 70

CARACTÉRISTIQUES
S8 ESCAPE
Performance : échelle de la pression de service : 4 à 20 cm H2O
Dimensions (H x L x P) : 112 mm x 164 mm x 145 mm (4,6” x 6,5” x 5,7”)
Poids : 1,3 kg (2.9 lb)
Alimentation électrique
• Courant pour la S8 ESCAPE avec l'HUMIDAIRE 3i : 100 – 240V, 50/ 60 Hz ; 110V,
400 Hz ; 2,5 A < 140 VA (110W) (consommation maximale de courant).
Puissance maximale instantanée < 340 VA.
• Veuillez vous référer au mode d’emploi du convertisseur DC-12 pour les valeurs
nominales de courant alternatif. Utilisez uniquement le convertisseur DC-12
ResMed avec l’entrée CC.
La consommation effective de courant varie en fonction de différents facteurs tels que
l’utilisation d’accessoires, l’altitude d’utilisation et la température ambiante. Les valeurs
de consommation de courant pour des conditions typiques de traitement (avec un
respirateur médical réglé à 0,5 l et 15 respirations/min, un circuit respiratoire de
2 m (6’ 6”) et un masque
ULTRA MIRAGE) sont indiquées dans le tableau suivant.
Appareil
SCAPE
S8 E
Pression
O)
(cm H
2
5178
10 23 12
15 29 16
20 34 20
Consommation
(VA)
Consommation
(W)
Prise pour l'HumidAire 3i
Courant : 100 – 240V, 50/60 Hz; 110V, 400 Hz; 2.0 A
Filtre à air : deux couches de mousse à cellules ouvertes de polyester, imprégnées
de fibres polyester
Circuit respiratoire : plastique flexible, longueur 2 m (6’ 6”)
Sortie d'air : le raccord conique 22 mm de sortie d'air est conforme à la norme
EN 1281-1
Classification CEI 60601-1 : Classe II (double isolation), Type CF
Niveau de bruit : le niveau de pression acoustique est <30 dBA, conformément à
ISO17510-1, lorsqu'il est mesuré à 10 cm H
O et 1 m (3’ 3.36”).
2
68
Page 71

ACCESSOIRES
CARTE DE DONNÉES
Dimensions (L x l x épaisseur) :
65,04 mm x 22,15 mm x 0,85 mm (2,56” x 0,87” x 0,03”)
MODULE DE CARTE DE DONNÉES
Dimensions (H x L x P) : 49,7 mm x 42,2 mm x 12 mm (1,95” x 1,66” x 0,47”)
TOUS LES APPAREILS (LE CAS ÉCHÉANT)
Boîtier : thermoplastique ignifugé
Conditions ambiantes
Température de service : +5°C à +40°C (+41°F à +104°F)
Humidité de service : 10 à 95 % sans condensation
Température de stockage et de transport : -20°C à +60°C (-4°F à +140°F)
Humidité de stockage et de transport : 10 à 95 % sans condensation
Altitude de service : niveau de la mer à 2591 m (8500’)
Compatibilité électromagnétique
Le produit est conforme à toutes les exigences de compatibilité électromagnétique
(CEM) applicables, conformément à CEI60601-1-2, pour les environnements
commerciaux, résidentiels et l’industrie légère. Pour de plus amples informations, voir
« Guide et déclaration du fabricant - Émissions et immunité électromagnétiques »
page 71.
FRANÇAIS
Remarque : le fabricant se réserve le droit de modifier ces caractéristiques sans
notification préalable.
SYMBOLES APPARAISSANT SUR L’APPAREIL
Attention, veuillez consulter la documentation jointe.
Équipement de type CF
Équipement de classe II
Protection anti-gouttes
CARACTÉRISTIQUES
69
Page 72

Haute tension
Marche/Arrêt
70
Page 73

GUIDE ET DÉCLARATION DU FABRICANT - ÉMISSIONS ET IMMUNITÉ
ÉLECTROMAGNÉTIQUES
Guide et déclaration du fabricant — Émissions électromagnétiques
Les appareils de la série S8 sont prévus pour une utilisation dans l’environnement électromagnétique
décrit ci-dessous. Le client ou l’utilisateur de la S8 doit s’assurer que celle-ci est utilisée dans un
environnement de ce type.
Essai de contrôle des
émissions
Conformité
Environnement électromagnétique
— Guide
Émissions RF CISPR11 Groupe 1 La S8 utilise de l’énergie RF uniquement
Émissions RF CISPR 11 Classe B* La S8 peut être utilisée dans tous les
Rayonnements harmoniques
CEI 61000-3-2
Émissions dues aux fluctuations de
tension/au papillotement
CEI 61000-3-3
* Classe B pour toutes les configurations sauf lorsqu'un PC est connecté à la S8 via un adaptateur série,
auquel cas l'appareil est conforme à la Classe A. Les équipements de Classe A peuvent être utilisés dans
tous les établissements autres que les établissements domestiques et ceux directement raccordés au
réseau public de distribution à basse tension qui fournit de l'électricité aux bâtiments utilisés à des fins
domestiques.
Des précautions particulières doivent être prises avec l’équipement électrique médical quant à la
compatibilité électromagnétique, et son installation et sa mise en service doivent être effectuées
conformément aux informations sur la compatibilité électromagnétique fournies dans ce document.
Avertissements : la S8 ne doit pas être utilisée à proximité d’autres équipements ni posée sur ou sous
d’autres équipements.
S’il est impossible de l’utiliser autrement, vous devez vous assurer qu’elle fonctionne normalement
lorsqu’elle est placée à l’endroit où elle sera utilisée.
Il est déconseillé d’utiliser des accessoires (par exemple des humidificateurs) autres que ceux spécifiés
dans ce manuel. Ils peuvent entraîner une augmentation des émissions ou une réduction de l’immunité
de la S8.
Classe A
Conforme
pour son fonctionnement interne. Par
conséquent, ses émissions RF sont très
faibles et il est peu probable qu’elles
causent des interférences avec
l’équipement électronique environnant.
établissements, y compris les
établissements domestiques et ceux
directement raccordés au réseau public
de distribution à basse tension qui
fournit de l’électricité aux bâtiments
utilisés à des fins domestiques.
FRANÇAIS
CARACTÉRISTIQUES
71
Page 74

Guide et déclaration du fabricant — Immunité électromagnétique
Les appareils de la série S8 sont prévus pour une utilisation dans l’environnement électromagnétique
décrit ci-dessous. Le client ou l’utilisateur de la S8 doit s’assurer que celle-ci est utilisée dans un
environnement de ce type.
Essai de contrôle
de l’immunité
Décharge
électrostatique
CEI 61000-4-2
Tr an si to ir es
électriques rapides/
salve
CEI 61000-4-4
Surtension
CEI 61000-4-5
Baisses de tension,
brèves coupures de
courant et variations
de tension sur les
lignes d’alimentation
CEI 61000-4-11
Champ magnétique
de la fréquence
d’alimentation
(50/60 Hz)
CEI 61000-4-8
Niveau d’essai
CEI60601-1-2
Contact ± 6 kV
Air ± 8 kV
± 2 kV pour les
lignes
d’alimentation
± 1 kV pour les
lignes
d’alimentation/de
signalisation
± 1 kV en mode
différentiel
± 2 kV en mode
commun
< 5 % Ut
(> 95 % de baisse
en Ut)
pour 0,5 cycle
40 % Ut
(60 % de baisse
en Ut)
pour 5 cycles
70 % Ut
(30 % de baisse
en Ut)
pour 25 cycles
< 5 % Ut
(> 95 % de baisse
en Ut)
pour 5 sec.
3 A/m 3 A/m Le niveau des champs
Niveau de
conformité
Contact ± 6 kV
Air ± 8 kV
± 2 kV
Sans objet
± 1 kV en mode
différentiel
± 2 kV en mode
commun
< 12V
(> 95 % de baisse
en 240V)
pour 0,5 cycle
96V
(60 % de baisse
en 240V)
pour 5 cycles
168V
(30 % de baisse
en 240V)
pour 25 cycles
< 12V
(> 95 % de baisse
en 240V)
pour 5 sec.
Environnement
électromagnétique —
Guide
Les sols doivent être en bois,
en ciment ou carrelés. Si le
revêtement des sols est
synthétique, l’humidité
relative doit être d’au moins
30 %.
La qualité du secteur
électrique doit être celle d’un
environnement commercial
ou hospitalier typique.
La qualité du secteur
électrique doit être celle d’un
environnement commercial
ou hospitalier typique.
La qualité du secteur
électrique doit être celle d’un
environnement commercial
ou hospitalier typique.
Si l’utilisateur de la S8 ne
peut pas supporter
l’interruption du traitement
en cas de coupure de
courant, il est recommandé
d’utiliser la S8 avec une
source d’alimentation
ininterruptible.
magnétiques de la fréquence
d’alimentation doit être
caractéristique d’un endroit
typique dans un
environnement commercial
ou hospitalier typique.
72
REMARQUE : Ut correspond à la tension secteur CA avant l’application du niveau d’essai.
Page 75

Guide et déclaration du fabricant — Immunité électromagnétique
Les appareils de la série S8 sont prévus pour une utilisation dans l’environnement électromagnétique décrit
ci-dessous. Le client ou l’utilisateur de la S8 doit s’assurer que celle-ci est utilisée dans un environnement de ce type.
Essai de
contrôle de
l’immunité
RF transmises par
conduction
CEI 61000-4-6
RF transmises par
radiation
CEI 61000-4-3
CEI60601-1-2
Niveau d’essai
3 Vrms
150 kHz à 80 MHz
10 V/m
80 MHz à 2,5 GHz
Niveau de
conformité
3 Vrms d = 1,17 √P
10 V/m d = 0,35 √P 80 MHz à 800 MHz
Environnement électromagnétique —
Guide
Les équipements de communication RF portables
et mobiles ne doivent pas être utilisés à proximité
des composants de la S8, y compris les câbles, à
une distance inférieure à la distance de séparation
recommandée calculée sur la base de l’équation
applicable à la fréquence de l’émetteur.
Distance de séparation recommandée
d = 0,70 √P 800 MHz à 2,5 GHz
où P correspond à la puissance nominale de
sortie maximale de l’émetteur en watts (W)
indiquée par le fabricant de l’émetteur et d
correspond à la distance de séparation
recommandée en mètres (m).
L’intensité des champs d’émetteurs RF fixes, telle
qu’elle est déterminée par l’étude d’un site
électromagnétique
niveau de conformité pour chaque plage de
fréquences.
Des interférences peuvent se produire à
proximité d’équipements portant le symbole
suivant :
a
doit être inférieure au
b
FRANÇAIS
REMARQUE 1 : à 80 MHz et 800 MHz, la plage de fréquences la plus élevée s’applique.
REMARQUE 2 : il est possible que ces directives ne s’appliquent pas à toutes les situations. La propagation
électromagnétique est affectée par l’absorption et la réflexion des structures, des objets et des personnes.
a
L’intensité des champs d’émetteurs fixes, tels que des stations de base pour des radiotéléphones (cellulaires/sans
fil) et des radios mobiles, la radio amateur, les radios AM et FM et la télévision, ne peut pas être prédite
théoriquement avec précision. Pour évaluer l’environnement électromagnétique créé par des émetteurs RF fixes,
une étude du site électromagnétique devrait être considérée. Si l’intensité du champ mesurée à l’endroit où la S8
est utilisée dépasse le niveau de conformité RF applicable figurant ci-dessus, il faudra s’assurer du bon
fonctionnement de la S8 dans un tel environnement. En cas d’anomalie, des mesures supplémentaires devront
peut-être être prises, par exemple changement de position ou d’endroit pour la S8.
b
Pour la plage de fréquences 150 kHz à 80 MHz, l’intensité des champs doit être inférieure à 10 V/m.
CARACTÉRISTIQUES
73
Page 76

Distances de séparation recommandées entre les équipements de communication RF portables
et mobiles et la S8
La S8 est prévue pour une utilisation dans un environnement dans lequel les perturbations radioélectriques par
radiation sont contrôlées. Le client ou l’utilisateur de la S8 peut prévenir les perturbations électromagnétiques en
respectant les distances minimales recommandées ci-dessous pour la séparation entre les équipements de
communication RF portables et mobiles (émetteurs) et la S8, en fonction de la puissance maximale de sortie de
l’équipement de communication.
Distance de séparation en fonction de la fréquence de l’émetteur
(m)
Puissance nominale de
sortie maximale de
l’émetteur
W
0,01 0,17 0,04 0,07
0,1 0,37 0,11 0,22
1 1,17 0,35 0,7
10 3,69 1,11 2,21
100 11,70 3,50 7,0
Pour les émetteurs avec une puissance nominale de sortie maximale ne figurant pas dans le tableau ci-dessus, la
distance de séparation recommandée d en mètres (m) peut être déterminée à l’aide de l’équation applicable à la
fréquence de l’émetteur, où P correspond à la puissance nominale de sortie maximale de l’émetteur en watts (W)
indiquée par le fabricant de l’émetteur.
REMARQUE 1 : à 80 MHz et 800 MHz, la distance de séparation pour la plage de fréquences la plus élevée
s’applique.
REMARQUE 2 : il est possible que ces directives ne s’appliquent pas à toutes les situations. La propagation
électromagnétique est affectée par l’absorption et la réflexion des structures, des objets et des personnes.
150 kHz à 80 MHz
d = 1,17 √P
80 MHz à 800 MHz
d = 0,35 √P
800 MHz à 2,5 GHz
d = 0,7 √P
74
Page 77

GARANTIE LIMITÉE
ResMed garantit votre produit ResMed contre tout défaut de matériaux et de maind’œuvre pour la période spécifiée ci-après à compter de la date d’achat par le client
d’origine. Cette garantie n’est pas cessible.
Produit Durée de garantie
Humidificateurs ResMed, ResControl™, ResLink™ 1 an
Appareils de traitement ResMed 2 ans
Accessoires, masques (y compris entourage rigide, bulle, harnais
et circuit respiratoire). Les appareils à usage unique sont exclus.
90 jours
Remarque : certains de ces modèles ne sont pas disponibles dans tous les pays.
En cas de défaillance du produit dans des conditions normales d’utilisation, ResMed, à
son entière discrétion, répare ou remplace le produit défectueux ou toute pièce. Cette
garantie limitée ne couvre pas :
a) tout dommage résultant d'une utilisation incorrecte, d’un usage abusif ou d’une
modification ou transformation opérée sur le produit ;
b) les réparations et l’entretien effectués par tout service de réparation sans
l’autorisation expresse de ResMed ;
c) tout dommage ou contamination causé par de la fumée de cigarette, de pipe, de
cigare ou autre ;
d) tout dommage causé par de l’eau renversée sur ou dans un appareil.
Pour faire une réclamation dans le cadre de la garantie, le client initial doit retourner le
produit défectueux au lieu de vente, port payé.
Cette garantie remplace toute autre garantie expresse ou implicite, y compris toute
garantie de qualité marchande ou d’adéquation à un usage particulier. Certains pays ou
états n’autorisent pas les limitations de durée pour les garanties implicites ; il est donc
possible que la limitation susmentionnée ne s’applique pas à votre cas.
ResMed ne peut être tenue pour responsable de tout dommage accessoire ou indirect
résultant de la vente, de l’installation ou de l’utilisation de tout produit ResMed.
Certains pays ou états n’autorisent ni l’exclusion ni la limitation des dommages
accessoires ou indirects ; il est donc possible que la limitation susmentionnée ne
s’applique pas à votre cas. Cette garantie vous octroie des droits reconnus par la loi,
et vous pouvez également avoir d’autres droits qui varient en fonction du pays où vous
habitez.
FRANÇAIS
Pour de plus amples informations sur vos droits de garantie, veuillez contacter votre
prestataire de santé ou ResMed.
R001-307/1 05 02
GARANTIE LIMITÉE
75
Page 78

76
Page 79

INDEX
A
accessoires
alimentation électrique 68
alimentations
avion
C
câble d’alimentation
branchement
caractéristiques
Carte de données 58
copie des données
enveloppe de retour
insertion 59
retrait
carte de données
circuit respiratoire 47
entortillé
nettoyage
positionnement 50
raccordement à la sortie d’air
clavier
contre-indications 44
convertisseur DC-12
D
débit d’air
respiration avec 63
durée de rampe
E
écran d’attente 50
écran LCD 47, 50, 53
messages
messages d’erreur
écrans de menu 54
accès
défilement
modification 55
quitter
enveloppe de retour
F
filtre à air
remplacement
foire aux questions
fuite au masque 63
48
64
64
47, 65
49
68
59
59
59
66
65
61
47, 53
64
50, 55, 65
56
66
54
54
55
59
47, 65
62
63
49
H
harnais
65
Heures d’utilisation 56
HumidAire
HumidAire 3i
humidificateur 63
humidificateurs
I
informations médicales
installation
irritation nasale
L
LOG
M
masque 63, 65
masques 47
message d’erreur
module
module de carte de données ResScan 48
modules
N
nettoyage
nettoyage hebdomadaire
nettoyage quotidien 61
numéro de version du logiciel
P
Passover
port du masque
PPC
51
fixation
51
fixation
rangement
nettoyage
47
61
48
49
64
56
49
fixation
fuites d’air 63
nettoyage
retrait
61
63
66
Carte de données
47
fixation
58
vierge
58
58
vierge
périodique
fixation 52
61
65
43
43
58
61
56
FRANÇAIS
INDEX
77
Page 80

pression d’air 65
prises d’alimentation 47
R
rappels 56
insérer carte
réglage de l’altitude 55, 64, 65
réglage de la langue
rétro-éclairage
écran LCD et clavier
S
S8 Escape
arrêt du traitement.
début du traitement 50
dimensions
installation
réglages 54
réparations
voyage
sac de transport 47
sécheresse
buccale, nasale ou de la gorge
stratégie de dépannage 65
T
touche de déplacement vers le bas 53
touche de déplacement vers le haut
touche de droite 53
touche de gauche
touche Marche/Arrêt
touches du clavier
fonctions
56
56
54
50
69
49
62
64
63
53
53
53
53
78
U
Utilisation 56
utilisation à l’étranger 64
utilisation en avion
64
Page 81

Sistema S8 Escape™
MANUAL DEL USUARIO
Español
ESPAÑOL80ESPAÑOL
79
Page 82

Page 83

ÍNDICE
INTRODUCCIÓN . . . . . . . . . . . . . . . . . . . . . . . . . . . . . . . . . . . . . . . . . . . 83
S
U RESPONSABILIDAD 83
INFORMACIÓN MÉDICA . . . . . . . . . . . . . . . . . . . . . . . . . . . . . . . . . . . . . 83
A
CERCA DEL S8 ESCAPE™ 83
C
ONTRAINDICACIONES 84
A
DVERTENCIAS 84
P
RECAUCIONES 85
E
FECTOS SECUNDARIOS 86
EL SISTEMA S8 ESCAPE . . . . . . . . . . . . . . . . . . . . . . . . . . . . . . . . . . . . . . 87
S8 E
SCAPE 87
M
ASCARILLAS 87
UMIDIFICADORES 88
H
M
ÓDULO TARJETA DE DATOS RESSCAN 88
A
CCESORIOS 88
CÓMO USAR EL S8 ESCAPE . . . . . . . . . . . . . . . . . . . . . . . . . . . . . . . . . . 89
I
NSTALACIÓN DEL S8 ESCAPE 89
M
ONTAJE DE LA MASCARILLA 89
NICIO DEL TRATAMIENTO 90
I
P
ARADA DEL TRATAMIENTO 90
CÓMO ACOPLAR UN HUMIDIFICADOR . . . . . . . . . . . . . . . . . . . . . . . . . . 91
A
COPLE DE UN HUMIDIFICADOR HUMIDAIRE 3I 91
ACOPLE DE UN HUMIDIFICADOR HUMIDAIRE 91
COPLE DE UN HUMIDIFICADOR PASSOVER DE RESMED 92
A
CÓMO UTILIZAR EL TECLADO . . . . . . . . . . . . . . . . . . . . . . . . . . . . . . . . . 93
C
ÓMO CAMBIAR LOS PARÁMETROS DEL S8 ESCAPE 94
MÓDULOS DEL S8 . . . . . . . . . . . . . . . . . . . . . . . . . . . . . . . . . . . . . . . . . 98
U
SO DE UN MÓDULO EN BLANCO 98
U
SO DE UN MÓDULO TARJETA DE DATOS RESSCAN 98
LIMPIEZA Y MANTENIMIENTO . . . . . . . . . . . . . . . . . . . . . . . . . . . . . . . . 101
L
IMPIEZA DIARIA 101
L
IMPIEZA SEMANAL 101
IMPIEZA PERIÓDICA 101
L
C
ÓMO CAMBIAR EL FILTRO DE AIRE 102
S
ERVICIO DE MANTENIMIENTO 102
PREGUNTAS FRECUENTES . . . . . . . . . . . . . . . . . . . . . . . . . . . . . . . . . . . 103
SOLUCIÓN DE PROBLEMAS . . . . . . . . . . . . . . . . . . . . . . . . . . . . . . . . . . 105
ÍNDICE
81
Page 84

ESPECIFICACIONES DEL SISTEMA . . . . . . . . . . . . . . . . . . . . . . . . . . . . . . 108
S8 E
SCAPE 108
A
CCESORIOS 108
ODOS LOS DISPOSITIVOS (CUANDO CORRESPONDA) 109
T
GARANTÍA LIMITADA . . . . . . . . . . . . . . . . . . . . . . . . . . . . . . . . . . . . . . . 114
ÍNDICE ALFABÉTICO . . . . . . . . . . . . . . . . . . . . . . . . . . . . . . . . . . . . . . . 115
82
Page 85

INTRODUCCIÓN
Gracias por escoger el generador de aire S8 ESCAPE™. El S8 ESCAPE es una unidad
compacta con una fuente de alimentación integrada y con opciones para gestión
integrada de datos y humidificación.
El presente manual del usuario contiene la información necesaria para un uso correcto
S8 ESCAPE.
del
SU RESPONSABILIDAD
El propietario o usuario de este sistema será enteramente responsable de cualquier
lesión a personas o daños a bienes que resulten de:
• una operación no conforme con las instrucciones de funcionamiento suministradas
• mantenimiento o modificaciones efectuadas a menos que sean acordes con
instrucciones autorizadas y realizadas por personas autorizadas.
Antes de usar el equipo lea este manual detenidamente.
Este manual contiene términos e iconos especiales que aparecen en los márgenes, para
llamar su atención hacia información específica e importante.
• Una Advertencia le alerta sobre la posibilidad de lesiones.
• Una Precaución explica medidas especiales a tomar para el uso seguro y eficaz del
equipo.
• Una Nota se trata de una nota informativa o útil.
INFORMACIÓN MÉDICA
ESPAÑOL
ACERCA DEL S8 ESCAPE™
El sistema de presión positiva continua en las vías respiratorias (CPAP) S8 ESCAPE está
indicado para el tratamiento del síndrome de apnea obstructiva del sueño (SAOS) en
pacientes adultos.
El sistema CPAP
S8 ESCAPE está diseñado para uso hospitalario y en domicilio.
PRECAUCIÓN
!
En los EE.UU., la ley federal exige que este equipo sea vendido únicamente por un
médico o por su orden.
INTRODUCCIÓN
83
Page 86

CONTRAINDICACIONES
El S8 ESCAPE no es un equipo de apoyo vital y puede dejar de funcionar en caso de
fallos en el suministro de energía o debido a desperfectos. No debe ser usado por
pacientes que requieran un tratamiento continuo.
El tratamiento con presión positiva continua en las vías respiratorias puede estar
contraindicado en algunos pacientes que presenten las siguientes afecciones previas:
• enfermedad pulmonar bullosa severa
• neumotórax
• presión arterial patológicamente baja
• deshidratación
• fuga de líquido cefalorraquídeo, cirugía o traumatismo craneanos recientes.
ADVERTENCIAS
• Antes de usar el S8 ESCAPE lea el presente manual en su totalidad.
• Los consejos que se dan en este manual no deben sustituir las instrucciones dadas
por el médico que indica el tratamiento.
• El paciente no debe conectar ningún dispositivo en el puerto de comunicación de
datos a menos que su médico o proveedor de asistencia sanitaria se lo indique.
Únicamente los productos ResMed han sido diseñados para ser conectados al
puerto de comunicación de datos. La conexión de otros dispositivos puede
provocar lesiones o daños al equipo
• El S8 ESCAPE debe utilizarse únicamente con las mascarillas (y conectores)*
recomendados por ResMed o por un médico o terapeuta respiratorio. No se
coloque una mascarilla a menos que el equipo
funcionando correctamente. Nunca se debe obstruir el o los orificios de
ventilación asociados con la mascarilla.
Explicación: El equipo
conectores)
*
especiales cuyos orificios de ventilación permiten un flujo continuo
S8 ESCAPE se ha diseñado para utilizarse con mascarillas (o
de aire hacia fuera de la mascarilla. Mientras el equipo esté encendido y
funcionando correctamente, el aire fresco del dispositivo desplaza el aire espirado
hacia fuera de la mascarilla a través de sus orificios de ventilación.
No obstante, cuando el equipo no está funcionando, no se suministrará suficiente
aire fresco a través de la mascarilla y es probable que se vuelva a respirar aire
exhalado. El volver a respirar aire exhalado durante varios minutos, en algunas
circunstancias puede conducir a la asfixia. Esto se aplica a la mayoría de los
modelos de dispositivos CPAP.
• En caso de cese en el suministro de energía o de malfuncionamiento del equipo,
quítese la mascarilla.
S8 ESCAPE.
S8 ESCAPE esté encendido y
84
* Puede haber puertos integrados en la mascarilla o en los conectores próximos a la
mascarilla.
Page 87

• El S8 ESCAPE puede configurarse para suministrar presiones de hasta 20 cmH
O.
2
En el caso improbable de que se produzcan ciertos errores en el funcionamiento,
este equipo puede suministrar presiones de hasta 30 cmH
• Si se utiliza oxígeno con este dispositivo, el flujo del mismo deberá estar cerrado
O.
2
mientras el dispositivo no esté en funcionamiento.
Si el oxígeno se ha dejado abierto, apague el generador de aire y espere 30
minutos antes de encender el generador de aire nuevamente.
Explicación: Mientras el equipo CPAP no esté funcionando, si se deja abierto el
flujo de oxígeno, el oxígeno suministrado al tubo de respiración podrá acumularse
dentro del dispositivo CPAP, creando así un riesgo de incendio. Esto se aplica a la
mayoría de los tipos de equipos CPAP.
• El oxígeno favorece la combustión. Por tanto no debe utilizarse en presencia de
una llama expuesta o mientras fuma.
• Siempre asegúrese de que se genere flujo de aire por parte del equipo antes de
encender el suministro de oxígeno.
• Siempre apague el suministro de oxígeno antes de detener el flujo de aire
desde el equipo.
Nota: A un caudal fijo de oxígeno suplementario, la concentración de oxígeno inhalado
variará dependiendo del punto en que éste se introduce, los niveles de presión
programados, el ritmo de respiración del paciente, la mascarilla elegida y el nivel de fuga.
• No utilice el S8 ESCAPE si presenta defectos externos obvios u ocurren cambios
inexplicados en su funcionamiento.
• No abra la caja del S8 ESCAPE. No hay dentro piezas que el usuario pueda reparar.
Las reparaciones y el mantenimiento interno deberán ser efectuados únicamente
por un agente de servicio autorizado.
• Peligro de explosión – no utilizar cerca de anestésicos inflamables.
ESPAÑOL
PRECAUCIONES
• A bajas presiones, el flujo de aire a través de los puertos de exhalación de su
mascarilla puede no ser suficiente para eliminar todos los gases exhalados del
tubo. Puede darse cierto grado de reinspiración.
• El flujo de aire generado por este equipo para la respiración puede llegar a estar
• Cuando no haya disponibilidad de energía de red (CA de 100–240V), utilice
• Si se suministrara, el módulo Tarjeta de datos está diseñado para ser usado con
• Únicamente utilice el módulo Tarjeta de datos (si se suministra) tal como se
o
hasta 6
cuidado si la temperatura ambiente es superior a los 32
C (11oF) por encima de la temperatura ambiente. Se deberá tener
o
C (90oF).
siempre un transformador DC-12 de ResMed. (El transformador DC-12 se puede
obtener como accesorio opcional. El mismo no se suministra con todos los
modelos.)
equipos ResMed determinados.
especifica en este manual.
INFORMACIÓN MÉDICA
85
Page 88

Nota: Lo que se ha expuesto son advertencias y precauciones generales. Las
advertencias, precauciones y notas específicas aparecen en el manual junto a las
instrucciones pertinentes.
EFECTOS SECUNDARIOS
Los pacientes deben informar a su médico acerca de todo dolor torácico inusual, un
dolor de cabeza severo o un aumento en su dificultad respiratoria. Una infección
respiratoria alta aguda puede requerir la suspensión temporaria del tratamiento.
Durante el curso del tratamiento con el equipo CPAP pueden aparecer los siguientes
efectos colaterales:
• sequedad de la nariz, boca o garganta
• sangrado nasal
• hinchazón por tragar aire
• molestias sinusales o del oído
• irritación ocular
• erupciones cutáneas
• molestias torácicas.
86
Page 89

EL SISTEMA S8 ESCAPE
El equipo S8 ESCAPE es parte de un sistema que está integrado por cinco elementos:
• Generador de aire S8 ESCAPE
• Mascarilla
• Humidificador
• Productos de gestión de datos
• Accesorios.
S8 ESCAPE
Consulte las figuras en la sección A de la hoja de figuras.
VISTA FRONTAL (A-1)
Muestra el teclado, el visor y la salida de aire.
VISTA TRASERA (A-2)
Muestra dónde se acopla el módulo y la ubicación del filtro de aire y de los enchufes
de alimentación.
CABLE DE ALIMENTACIÓN (A-3)
Cable de alimentación para conectar el S8 ESCAPE a la fuente de energía de CA (red).
BOLSA PARA EL TRANSPORTE (A-4)
La bolsa para el transporte del S8 ESCAPE tiene dos compartimentos: uno para el
equipo S8, y otro para colocar el
colóquelo siempre en el compartimento más grande hecho de malla.
TUBO DE AIRE
El tubo de aire de 2 m (6’ 6”) (A-5) conecta el S8 ESCAPE con la mascarilla. Para
conectar el
S8 ESCAPE con el humidificador HUMIDAIRE™ o PASSOVER de ResMed,
necesitará el tubo de aire mediano de 52 cm (21”) (consulte la figura C-3).
HUMIDAIRE 3i™. Cuando guarde el HUMIDAIRE 3i,
ESPAÑOL
MASCARILLAS
También necesitará un sistema de mascarilla ResMed (suministrado aparte).
Los sistemas de mascarillas ResMed recomendados para el uso con el
MASCARILLAS NASALES
MASCARILLA NASAL MODULAR
•
• MASCARILLA NASAL MIRAGE VISTA™
• MASCARILLA NASAL ULTRA MIRAGE™
• MASCARILLA NASAL MIRAGE™
• MASCARILLA NASAL PROTEGE™
• MASCARILLA NASAL MIRAGE ACTIVA™
• PAPILLON™.
SISTEMAS DE ALMOHADILLAS NASALES
SISTEMA DE ALMOHADILLAS NASALES MIRAGE SWIFT™.
•
EL SISTEMA S8 ESCAPE
S8 ESCAPE son:
87
Page 90

ASCARILLAS FACIALES
M
•
MASCARILLA FACIAL MIRAGE™
• MASCARILLA FACIAL MIRAGE™ SERIE 2
• MASCARILLA FACIAL ULTRA MIRAGE™.
ADVERTENCIA
!
Únicamente los sistemas de mascarillas ResMed son compatibles para su uso con el
S8 Escape. Sírvase remitirse a “Advertencias” en la página 84.
HUMIDIFICADORES
Si experimentara sequedad de la nariz, boca o garganta es probable que necesite
utilizar un humidificador. El
• humidificador térmico integrado HUMIDAIRE 3i (Figura B en la hoja de figuras)
• humidificador térmico HUMIDAIRE (Figura I en la hoja de figuras)
• humidificador PASSOVER de ResMed (Figura J en la hoja de figuras).
S8 ESCAPE es compatible con:
MÓDULO TARJETA DE DATOS RESSCAN
El módulo Tarjeta de datos RESSCAN™y la Tarjeta de datos RESSCAN (C-1) se pueden
usar con el
S8 ESCAPE ya sea para ayudar a su médico a monitorizar su tratamiento o
para recibir actualizaciones de los parámetros del dispositivo. Para más información
acerca de cómo usar el módulo Tarjeta de datos y la Tarjeta de datos, consulte “Uso
de un Módulo Tarjeta de datos ResScan” en la página 98.
ACCESORIOS
Consulte las figuras en la sección C de la hoja de figuras.
Otros accesorios para usar con el
• Tubo de aire de 3 m (9‘ 10”) (C-2)
• Tubo de aire mediano de 52 cm (21”) para el HUMIDAIRE y el
PASSOVER de ResMed (C-3)
• Tran s f o rmad o r DC-12 (C-4)
• Módulo en blanco (C-5).
S8 ESCAPE:
88
Nota: ResMed lanza nuevos productos en forma periódica. Consulte nuestra página en
internet en <www.myresmed.com>.
Page 91

CÓMO USAR EL S8 ESCAPE
Consulte las figuras en la sección D de la hoja de figuras.
INSTALACIÓN DEL S8 ESCAPE
1 Coloque el S8 ESCAPE sobre una mesa cerca de la cabecera de su cama.
PRECAUCIÓN
!
Tenga cuidado de no colocar el equipo en un lugar donde pueda ser golpeado o
donde alguien pueda tropezar con el cable de alimentación.
Nota: También puede colocar el S8 Escape en el suelo, al lado o debajo de la cama.
Asegúrese de que no haya polvo en el área y que no haya ropa, ropa de cama ni ningún
otro objeto que pudiera bloquear la entrada de aire.
2 Conecte el el cable de alimentación en el enchufe de la parte trasera del generador de
aire (D-1). Conecte el otro extremo del cable de corriente a una toma de corriente.
ADVERTENCIA
!
Asegúrese de que el cable de corriente y el enchufe estén en buenas condiciones y
que el equipo no esté dañado.
3 Conecte firmemente uno de los extremos del tubo de aire en la salida de aire (D-2).
ADVERTENCIAS
!
• Solamente deberá utilizar tubos de aire ResMed con este generador de aire. Un
tubo de aire diferente podría modificar la presión que efectivamente recibe, lo
cual reduciría la eficacia del tratamiento.
• La obstrucción de la manguera podría provocar un sobrecalentamiento del
equipo.
• En el entorno clínico, todo equipo informático que se utilice con el sistema
CPAP deberá estar al menos a 1,5 m (5’) del paciente o al menos 2,5 m (8’) por
encima de él. También deberá cumplir con la norma de prueba correspondiente.
Para las computadoras personales, la norma internacional es la CEI 60950 o su
equivalente.
ESPAÑOL
MONTAJE DE LA MASCARILLA
1 Monte el sistema de mascarilla siguiendo las instrucciones para el usuario de la
mascarilla.
2 Conecte su sistema de mascarilla al extremo libre del tubo de aire (D-3).
S8 ESCAPE está ya listo para ser usado (D-4).
El
CÓMO USAR EL S8 ESCAPE
89
Page 92

INICIO DEL TRATAMIENTO
1 Asegúrese de que la alimentación esté encendida.
En el visor aparecerá el nombre del producto durante un breve lapso de tiempo y
luego la pantalla de espera (Rampa). También se encienden el teclado y la luz de fondo
del visor.
2 Acuéstese y acomode el tubo de aire de forma que pueda moverse libremente si se
da la vuelta mientras duerme.
PRECAUCIÓN
!
• No deje largos tramos de tubo de aire encima de la cabecera de su cama. Se
podrían enrollar alrededor de su cabeza o cuello mientras duerme.
• Asegúrese de que el área alrededor del generador de aire esté limpia y seca.
Tampoco debería haber ropa, ropa de cama ni ningún otro tipo de
obstrucciones potenciales.
3 Si es necesario, modifique el tiempo de rampa (consulte “Cómo cambiar el Tiempo
de rampa” en la página 95).
4 Para comenzar el tratamiento oprima la tecla Inicio/Detención.
5 Colóquese la mascarilla siguiendo las instrucciones para el usuario de dicha mascarilla.
ADVERTENCIA
!
No se coloque una mascarilla a menos que el equipo S8 Escape esté encendido y
funcionando correctamente.
90
6 Al iniciarse el tiempo de rampa, en el visor aparecerá la leyenda “EN RAMPA”, y la
presión actual estará indicada en forma de guiones. Cada guión representa
aproximadamente 2 cmH
12 cmH
O de presión.
2
O. Por ejemplo, 6 guiones equivalen aproximadamente a
2
PARADA DEL TRATAMIENTO
Para detener el tratamiento en cualquier momento, quítese la mascarilla y pulse la tecla
Inicio/Detención.
Page 93

CÓMO ACOPLAR UN HUMIDIFICADOR
ACOPLE DE UN HUMIDIFICADOR HUMIDAIRE 3i
Consulte la figura en la sección E de la hoja de figuras y el manual del HumidAire 3i.
HUMIDAIRE 3i se conecta en la parte frontal del S8 ESCAPE para proporcionar
El
humidificación térmica. No se requiere ningún otro accesorio para su utilización
Notas:
a. Antes de acoplar o desacoplar el humidificador verifique que la cámara de agua
del HumidAire 3i esté vacía.
b. Antes de conectar el HumidAire 3i retire el enchufe conector del S8 Escape
(consulte la sección A de la hoja de figuras). Después de desacoplar el
HumidAire 3i vuelva a colocar firmemente el enchufe conector.
G
UARDADO DEL HUMIDAIRE 3i
Cuando no esté en uso, guarde el HUMIDAIRE 3i en el compartimento más grande,
hecho de malla, de la bolsa para el transporte del
S8 ESCAPE.
ACOPLE DE UN HUMIDIFICADOR HUMIDAIRE
Consulte las figuras en la sección I de la hoja de figuras.
Para conectar el
mediano 52 cm (21”).
S8 ESCAPE a un humidificador HUMIDAIRE necesitará el tubo de aire
1 Llene la cámara de agua del HUMIDAIRE y colóquela dentro del HUMIDAIRE. Conecte
los tubos de aire mediano 52 cm (21”) y largo 2 m (6’6”) (I-1), y cierre la tapa del
humidificador.
.
ESPAÑOL
2 Coloque el S8 ESCAPE encima del HUMIDAIRE (I-2) y conecte el extremo libre del tubo
de aire mediano a la salida de aire (I-3).
Nota: A fin de evitar que se derrame agua hacia el interior del
debajo del humidificador.
S8 ESCAPE, no lo coloque
3 Monte el sistema de mascarilla y conéctelo al extremo libre del tubo de aire largo
(I-4).
4 Enchufe el cable de alimentación del HUMIDAIRE a una toma de corriente. Conecte el
cable de alimentación del
enchufe el otro extremo en una toma de corriente.
Para más detalles sírvase remitirse al Manual del Usuario del HumidAire.
S8 ESCAPE en el enchufe de la parte trasera del S8 ESCAPE, y
ADVERTENCIA
!
Asegúrese de que el cable de alimentación y la toma de corriente estén en buenas
condiciones y que el equipo no esté dañado.
S8 ESCAPE ya está listo para ser utilizado con el HUMIDAIRE.
El
CÓMO ACOPLAR UN HUMIDIFICADOR
91
Page 94

ACOPLE DE UN HUMIDIFICADOR PASSOVER DE RESMED
Consulte las figuras en la sección J de la hoja de figuras.
Para conectar el
de aire mediano de 52 cm (21”).
1
Llene el
y largo 2 m (6’6”) (
S8 ESCAPE a un humidificador PASSOVER de ResMed necesitará el tubo
PASSOVER
con agua y conecte los tubos de aire mediano 52 cm (21”)
J-1
).
2 Coloque el S8 ESCAPE encima del PASSOVER (J-2) y conecte el extremo libre del tubo
de aire mediano a la salida de aire (J-3).
Nota: A fin de evitar que se derrame agua hacia el interior del
debajo del humidificador.
S8 ESCAPE, no lo coloque
3 Monte el sistema de mascarilla y conéctelo al extremo libre del tubo de aire largo
(J-4).
4 Conecte el cable de alimentación en el enchufe de la parte trasera del S8 ESCAPE,
y enchufe el otro extremo en una toma de corriente.
Para más detalles sírvase remitirse al Manual del Usuario del Passover de ResMed.
ADVERTENCIA
!
Asegúrese de que el cable de alimentación y la toma de corriente estén en buenas
condiciones y que el equipo no esté dañado.
El
S8 ESCAPE ya está listo para ser usado con el PASSOVER.
92
Page 95

CÓMO UTILIZAR EL TECLADO
El panel de control del S8 ESCAPE incluye un visor y un teclado para navegar por los
menús y suministrar el tratamiento.
Visor
Tecla Superior
Tecla Izquierda
Tecla Inferior
Tecla Derecha
Tecla de
Inicio/Detención
VISOR
En el visor aparecen los menús y las pantallas de tratamiento.
TECLADO
El teclado del S8 ESCAPE tiene las siguientes teclas:
Te cl a Función
Inicio/Detención
Superior
Inferior
Izquierda
Derecha
• Inicia o detiene el tratamiento.
• Permite incrementar los valores de las opciones de los
parámetros y desplazarse por el menú del
• Permite disminuir los valores de las opciones de los
parámetros y desplazarse por el menú del
• Realiza la función indicada por el texto guía que aparece
justo encima de ella en el visor. El texto guía puede ser
menú, cambiar y aplicar.
• Realiza la función indicada por el texto guía que aparece
justo encima de ella en el visor. El texto guía puede ser salir
y cancelar
.
ESPAÑOL
S8 ESCAPE.
S8 ESCAPE.
CÓMO UTILIZAR EL TECLADO
93
Page 96

LUCES DE FONDO
El teclado y el visor están equipados con luces de fondo que se encienden al encender
el equipo. La luz de fondo del visor se apaga después de dos minutos de inactividad y
se enciende nuevamente al oprimir una tecla. Una vez que se ha oprimido la tecla
Inicio/Detención para iniciar el tratamiento, la luz de fondo del visor permanece
encendida durante dos minutos. La luz de fondo del teclado permanece siempre
encendida mientras esté encendido el
S8 ESCAPE.
CÓMO CAMBIAR LOS PARÁMETROS DEL S8 ESCAPE
Usted puede modificar la configuración del S8 ESCAPE (como por ej. el Tiempo de
rampa o la Altitud) por medio del teclado y el visor. Cuando el
modo de espera, puede navegar por una serie de pantallas (un menú) en el visor a
efectos de ver y cambiar los parámetros de una función determinada.
S8 ESCAPE
MENU PACIENTE
S8 CLASSIC
S8 CLASSICRAMPA 10min
Menu
ALT: 0-609m
Cambiar Salir
USADO: 960
HS
Salir
USO: 120/180
Salir
LEN.: ESPANOL
Cambiar Salir
VS: SX123456789
Salir
S8 ESCAPE está en
94
Para cambiar el tiempo de rampa, la compensación por altitud y el idioma, utilice las
pantallas de menú. También puede ver detalles sobre uso y la versión de software de
S8 ESCAPE.
su
CÓMO ACCEDER A LAS PANTALLAS DE MENú
Cuando aparezca la pantalla de espera del S8 ESCAPE, verá la palabra “Menú” en la
esquina izquierda. Para seleccionar el menú del
S8 ESCAPE, oprima la tecla Izquierda.
CÓMO DESPLAZARSE POR EL MENú
Cuando esté en el menú, desplácese por las diferentes opciones oprimiendo las teclas
Superior o Inferior.
Page 97

CÓMO CAMBIAR UNA OPCIÓN DE CONFIGURACIÓN
Cuando haya llegado a la opción que desee:
1. Oprima la tecla Izquierda (Cambiar).
2. Oprima las teclas Superior o Inferior hasta que vea la opción de configuración
que desee.
3. Oprima le tecla Izquierda (Aplicar) para seleccionar la opción de configuración.
Si desea salir sin modificar la opción, oprima la tecla Derecha (Cancelar).
CÓMO SALIR DE UN MENú
Oprima la tecla Derecha (Salir). Esto lo hará regresar a la pantalla Menú del Paciente.
CÓMO SALIR DE UNA OPCIÓN DENTRO DEL MENú
Oprima la tecla Derecha (Salir).
CÓMO CAMBIAR EL TIEMPO DE RAMPA
Durante el tiempo de rampa, la presión se va incrementando a partir de una presión
baja hasta la presión indicada para el tratamiento. El tiempo de rampa se puede fijar en
intervalos de 5 minutos, desde 0 minutos (APAG) hasta un tiempo de rampa máximo
fijado por su médico.
La pantalla de espera muestra el tiempo de rampa actual en la esquina derecha. Para
cambiar el tiempo de rampa, oprima la tecla Superior o Inferior hasta que aparezca
el tiempo de rampa deseado.
Después de seleccionar un tiempo de rampa, comience el tratamiento oprimiendo la
tecla Inicio/Detención.
Al iniciarse el tiempo de rampa, en el visor aparecerá la leyenda “EN RAMPA”, y la
presión actual estará indicada en forma de guiones. Cada guión representa
aproximadamente 2 cmH
12 cmH
O de presión.
2
O. Por ejemplo, seis guiones equivalen aproximadamente a
2
CÓMO CAMBIAR LA CONFIGURACIÓN DE LA ALTITUD
Si se desplaza o viaja con el S8 ESCAPE hacia zonas de diferente altitud, deberá ajustar
la configuración de la compensación por altitud. Los cambios en la altitud afectarán la
presión suministrada por el
Puede usar la configuración de altitud (ALT) para especificar el rango de altitudes en
el que usará su
S8 ESCAPE. Seleccione el menú del S8 ESCAPE oprimiendo la tecla
Izquierda en la pantalla de espera (RAMPA). Desplácese hasta ALT y seleccione
Cambiar (tecla Izquierda). Oprima las teclas Superior o Inferior hasta que vea la
opción de configuración que desee.
Existen cuatro tipos de configuración de altitud:
• 0–609 m (0–2000 pies)
• 610–1219 m (2001–4000 pies)
• 1220–1828 m (4001–6000 pies)
• 1829–2591 m (6001–8500 pies).
S8 ESCAPE.
ESPAÑOL
CÓMO UTILIZAR EL TECLADO
95
Page 98

Por ejemplo, si se encontrase a una altitud de 947 m (3107’), la configuración de la
compensación por altitud debería ser de 610–1219 m (2001–4000’), ya que
947 m (3107’) cae dentro de ese rango.
Oprima la tecla Izquierda (Aplicar) para seleccionar la configuración correcta.
CÓMO CAMBIAR LA CONFIGURACIÓN DEL IDIOMA
Para que los menús y los mensajes aparezcan en una lengua distinta, seleccione el
menú del
S8 ESCAPE oprimiendo la tecla Izquierda en la pantalla de espera (Rampa).
Desplácese hasta LEN y seleccione Cambiar (tecla Izquierda). Oprima las teclas
Superior o Inferior hasta que vea el idioma que desee.
OTRA INFORMACIÓN DISPONIBLE
También puede ver la cantidad total de horas de tratamiento (HS USADO); la
cantidad de sesiones en las que el
S8 ESCAPE se usó durante un determinado periodo
de tiempo (USO); y la versión de software actual instalada en su equipo (VS). El acceso
a todas estas pantallas es a través del menú. Consulte “Cómo acceder a las pantallas
de menú” en la página 94.
MENSAJES EN EL VISOR DEL S8 ESCAPE
Su médico tal vez haya configurado el S8 ESCAPE para que le recuerde acerca de
hechos importantes, tales como cambiar la mascarilla, insertar la Tarjeta de datos (si su
equipo es compatible con la Tarjeta de datos), etc.
El mensaje recordatorio aparece en el visor y sólo cuando el equipo no está
suministrando tratamiento. Cuando aparece un mensaje, la luz de fondo del visor
parpadea.
Su médico puede configurar cualquiera de los siguientes recordatorios en su visor:
96
Mensaje Descripción Acción
INSERTAR
TARJETA
Aparece si su
equipo es
compatible con la
Tarjeta de datos.
Inserte la Tarjeta de datos y siga las
instrucciones que su médico le haya dado.
Una vez que lo haya hecho, el mensaje
desaparecerá del visor. Si oprime la tecla
Izquierda (acept), el mensaje también
desaparecerá.
CAMBIAR
MASCARILLA
Aparece cuando
es tiempo de
cambiar su
Oprima la tecla Izquierda (acept) para
que desaparezca el mensaje del visor y
sustituya la mascarilla por una nueva.
mascarilla.
Page 99

Mensaje Descripción Acción
LLAMAR
PROVEEDOR
CAMBIAR
FILTRO
REALIZAR
SERVICIO
Aparece como
recordatorio para
ponerse en
contacto con su
médico: por
ejemplo para
hablar sobre la
marcha del
tratamiento.
Aparece como
recordatorio para
cambiar el filtro
de aire de su
equipo.
Aparece como un
recordatorio para
que envíe el
equipo a fin de
que se le realice
un servicio de
mantenimiento.
Oprima la tecla Izquierda (acept) para
que desaparezca el mensaje del visor y
comuníquese con su médico.
Oprima la tecla Izquierda (acept) para
que desaparezca el mensaje del visor y
sustituya el filtro de aire.
Oprima la tecla Izquierda (acept) para
que desaparezca el mensaje del visor y
envíe el equipo al servicio de
mantenimiento.
ESPAÑOL
CÓMO UTILIZAR EL TECLADO
97
Page 100

MÓDULOS DEL S8
Nota: No separe ningún módulo mientras el S8 Escape esté conectado a la fuente de
alimentación.
S8 ESCAPE tendrá instalado en su parte trasera uno de los siguientes dos módulos:
Su
un módulo en blanco o un módulo Tarjeta de datos
USO DE UN MÓDULO EN BLANCO
Consulte las figuras en la sección F de la hoja de figuras.
El módulo en blanco es una cubierta protectora para el
situaciones tal vez desee retirar o conectar este módulo, por ejemplo para usar el
adaptador serial.
Para retirar el módulo en blanco, tire de él a fin de separarlo de la parte trasera del
S8 ESCAPE y para que aparezca el puerto de comunicación de datos (F-1).
Para conectar el módulo en blanco, empújelo hacia el puerto de comunicación de datos
hasta que se ajuste en su lugar por medio de un clic (F-2).
Nota: Para proteger el puerto de comunicación de datos, verifique que en todo momento
haya un módulo acoplado al equipo.
USO DE UN MÓDULO TARJETA DE DATOS RESSCAN
Consulte las figuras en la sección G de la hoja de figuras.
El módulo Tarjeta de datos
de datos
parámetros del
acceso a la información acerca de su tratamiento, y con ellos su médico le puede
suministrar a usted una nueva configuración para el equipo sin necesidad de que usted
salga de su casa.
RESSCAN
con el módulo Tarjeta de datos para recoger datos y actualizar los
S8 ESCAPE. El módulo y la tarjeta le proporcionan a su médico un fácil
RESSCAN es un accesorio del S8 ESCAPE. Utilice una Tarjeta
RESSCAN™.
S8 ESCAPE. En determinadas
98
CONEXIÓN DEL MÓDULO
Para conectar el Módulo Tarjeta de datos, presiónelo hacia el puerto de comunicación
de datos en la parte trasera de su
de un clic (G-1).
S8 ESCAPE hasta que se ajuste en su lugar por medio
DESCONEXIÓN DEL MÓDULO
Para quitar el módulo Tarjeta de datos, tírelo para separarlo de la parte trasera del
S8 ESCAPE (G-2).
Nota: Para proteger el puerto de comunicación de datos, verifique que en todo momento
haya un módulo acoplado al equipo.
USO DE LA TARJETA DE DATOS PARA RECOGER DATOS
Consulte las figuras en la sección H de la hoja de figuras.
Si su médico necesita examinar su tratamiento, le pedirá que use la Tarjeta de datos a
efectos de copiar datos desde su
de datos se suministra en un práctico sobre de retorno postal.
S8 ESCAPE y que luego le envíe la tarjeta. La Tarjeta
 Loading...