

Page 1

RESMED
Proprietary Information, not to be reproduced or made available to third parties
without prior consent from ResMed and not to be used in any unauthorised way.
© ResMed Ltd. 2006
SPECIFICATION - PRINTED MATERIALS
DOC NO
REV
PAGE
268106
1
1 of 195
Rev Change
1 C16389 24 Nov 06
Note
Date Document Prepared by Document Checked by
Roberto Fermin
VPAP Malibu User Guide USA Multilingual
1. ORACLE DESCRIPTION
VPAP Malibu User Gd USA ML
2. DETAILS
Cover
Dimensions: Trimmed to A5 Portrait (210 H x 148 W ± 2 mm)
Style: Covers printed one side only. Inside cover is blank.
Stock: 250gsm Chorus Silk
Colour of printing: 4 colour process
TEXT
Dimensions: A5 Portrait (210 H x 148 W)mm ± 2mm
(Name)
Andrew Cheung or delegate
(refer to Change Note)
Style: Printed double-sided, bound and trimmed to make A5 portrait sized booklet.
80 gsm offset.
Colour of printing: Black.
Art Work: As shown on following pages. If re-typeset, the same styles and sizes must
be maintained.
Manufacturer: Small quantities may be printed in-house and large quantities externally.
3. RESMED QC INSPECTION
Refer to AU10006 - Printed Materials/Labels/CDs/Videos Section 19.1
Page 2

VPAP Malibu™
User Guide
English • Français • Español • Português
Front Cover - User.qxp 30/11/2006 3:43 PM Page 1
Page 3
Global leaders in sleep and respiratory medicine www.myresmed.com
268106/1
06 12
VPAP Malibu
User
AMER ML
Bleed this panel onto spine (if applicable) but NOT onto Front Cover
268106
Front Cover - User.qxp 30/11/2006 3:43 PM Page 2
Page 4

268106r1.book Page iii Thursday, November 30, 2006 2:35 PM
VPAP Malibu™
User Guide 1
Guide Utilisateur 45
Guía del Usuario 93
EnglishFrançaisPortuguês Español
Manual do Usuário 141
Page 5
268106r1.book Page iv Thursday, November 30, 2006 2:35 PM
ResMed Ltd (Manufacturer) 1 Elizabeth Macarthur Drive Bella Vista NSW 2153 Australia
ResMed Corp (US Designated Agent) 14040 Danielson Street Poway CA 92064-6857 USA
ResMed (UK) Ltd (EU Authorized Representative) 65 Milton Park Abingdon Oxfordshire OX14 4RX UK
ResMed Offices Australia, Austria, Brazil, Finland, France, Germany, Hong Kong, Japan, Malaysia, Netherlands,
New Zealand, Norway, Singapore, Spain, Sweden, Switzerland, UK, USA (see www.resmed.com for contact details).
Protected by patents: AU 691200, AU 697652, AU 699726, AU 702820, AU 709279, AU 713679, AU 724589, AU 764761,
EP 0651971, EP 0661071, EP 0858352, EP 0920845, EP 0927538, EP 0934723, JP 3638613, US 4944310, US 5199424,
US 5245995, US 5522382, US 5704345, US 6029665, US 6138675, US 6213119, US 6363933, US 6398739, US
6591834, US 6635021, US 6675797, US 6705315, US 6745768, US 6770037, US 6935337, US 7004908. Other patents
pending.
Protected by design registrations: AU 147283, AU 147336, CH 128709, CH 128710, DE 40202007.3, DE 40202020.0, ES
153514, ES 153515, FR 021396, FR 021397, GB 3001791, GB 3001819, JP 1164087, JP 1164265, SE 75599, SE 75600, US
D467335, US D468011. Others pending.
Humidaire, Meridian, Mirage, Mirage Swift, Mirage Vista, SmartStart, ResLink, Ultra Mirage, VPAP and VPAP Malibu are
trademarks of ResMed Ltd. Humidaire, Mirage, SmartStart, Vista and VPAP are registered in U.S. Patent and Trademark
Office. SmartMedia is a registered trademark of Toshiba.
© 2006 ResMed Ltd.
Page 6
268106r1.book Page 1 Thursday, November 30, 2006 2:35 PM
VPAP Malibu™
User Guide
English
English
1
Page 7

268106r1.book Page 2 Thursday, November 30, 2006 2:35 PM
Contents
Introduction . . . . . . . . . . . . . . . . . . . . . . . . . . . . . . . . . . . . . . . . . . . . . . . 3
Definitions 3
User/Owner Responsibility 3
Medical Information . . . . . . . . . . . . . . . . . . . . . . . . . . . . . . . . . . . . . . . 5
What the VPAP™ Malibu Is Intended For 5
Tell Your Doctor If... 5
Warnings 5
Cautions 7
The VPAP Malibu System . . . . . . . . . . . . . . . . . . . . . . . . . . . . . . . . . . 9
Mask 9
Supplemental Oxygen 11
Preparing for Use . . . . . . . . . . . . . . . . . . . . . . . . . . . . . . . . . . . . . . . . . 13
Setting Up the VPAP Malibu 13
Operating Instructions . . . . . . . . . . . . . . . . . . . . . . . . . . . . . . . . . . . . 21
Starting Treatment 21
Stopping Treatment 23
Using the Mask-Fitting Feature 24
Using DC Power to Run the VPAP Malibu 25
Helpful Hints 25
Cleaning and Maintenance . . . . . . . . . . . . . . . . . . . . . . . . . . . . . . . . 27
Daily 27
Weekly 27
Periodically 27
Replacing the Air Filter 28
Replacing the Antibacterial Filter 28
Servicing 28
Troubleshooting . . . . . . . . . . . . . . . . . . . . . . . . . . . . . . . . . . . . . . . . . . 31
Technical Specifications . . . . . . . . . . . . . . . . . . . . . . . . . . . . . . . . . . . 35
Limited Warranty . . . . . . . . . . . . . . . . . . . . . . . . . . . . . . . . . . . . . . . . . 41
Index . . . . . . . . . . . . . . . . . . . . . . . . . . . . . . . . . . . . . . . . . . . . . . . . . . . . . 43
2
Page 8
268106r1.book Page 3 Thursday, November 30, 2006 2:35 PM
Introduction
Definitions
This guide contains special terms and icons that appear in the margins to draw
your attention to specific and important information.
WARNING
!
Alerts you to possible injury.
CAUTION
!
Explains special measures for the safe and effective use of the device.
Note: Is an informative or helpful note.
User/Owner Responsibility
The user or owner of this system shall have sole responsibility and liability for any
injury to persons or damage to property resulting from:
• operation which is not in accordance with the operating instructions supplied
• maintenance or modifications carried out unless in accordance with
authorized instructions and by authorized persons.
Please read this guide carefully before use.
English
3Introduction
Page 9

268106r1.book Page 4 Thursday, November 30, 2006 2:35 PM
4
Page 10

268106r1.book Page 5 Thursday, November 30, 2006 2:35 PM
Medical Information
What the VPAP Malibu™ Is Intended For
The VPAP Malibu is indicated for the treatment of adult patients with obstructive
sleep apnea (OSA). It is intended for use in the hospital and home.
CAUTION (USA ONLY)
!
Federal law restricts this device to sale by or on the order of a physician.
Tell Your Doctor If...
You must tell your doctor if you have any of the following conditions, and CPAP
(continuous positive airway pressure) or bilevel therapy must not be used:
• pneumothorax or pneumomediastinum
• severe heart failure, low blood pressure, or dehydration
• surgery to the brain, middle or inner ear, pituitary gland, or sinuses
• respiratory distress syndrome
• middle ear infection or perforated ear drum
• severe nosebleed.
Warnings
CPAP or bilevel therapy should be used with caution if you have any of the
following conditions:
• respiratory failure
• cavities or cysts in the lung, or previous history of pneumothorax
• previous history of severe nosebleed
• sinus infection.
Tell your doctor if you have any of these conditions. Your doctor will advise you
whether the likely benefits of CPAP or bilevel therapy outweigh the expected
risks.
Special care should be exercised if you are dehydrated, or may become
dehydrated, for example as a result of fluid restriction or diuretic therapy
(including changes in therapy).
Discontinue therapy and seek medical advice if, during therapy or when you start
therapy each night, you feel faint or light-headed.
The following are general warnings that pertain to your use of a VPAP Malibu
unit. Specific warnings appear next to the relevant instructions in this guide.
English
5Medical Information
Page 11
268106r1.book Page 6 Thursday, November 30, 2006 2:35 PM
WARNING
!
• This is NOT a life support device. It may stop operating with power failure
or if a fault occurs in the unit.
• The air flow for breathing produced by this device can be as much as 11
(6oC) higher than the temperature of the room. Caution should be exercised if
the room temperature is warmer than 90oF (32oC).
• The VPAP Malibu unit should only be used with masks (and connectors)
recommended by ResMed, or by your physician or respiratory therapist. A
mask should not be used unless the VPAP Malibu unit is turned on and
operating properly. The vent hole or holes associated with the mask should
never be blocked.
Explanation: The VPAP Malibu unit is intended to be used with special
masks (or connectors) which have vent holes to allow continuous flow of air
out of the mask. When the device is turned on and functioning properly, new
air from the device flushes the exhaled air out through the mask vent holes.
However, when the device is not operating, insufficient fresh air will be
provided through the mask, and the exhaled air may be rebreathed.
Rebreathing of exhaled air for longer than several minutes can, in some
circumstances, lead to suffocation. This applies to most models of CPAP or
bilevel devices.
• The VPAP Malibu unit should only be connected to the components,
humidifiers, or accessories specified in this guide. Connection of other items
may result in injury, or damage to the VPAP Malibu unit.
• At low pressures, the flow through the exhalation ports of your mask may not
clear all exhaled gas from the tubing. Some rebreathing may occur.
• Explosion hazard—do not use in the vicinity of flammable anesthetics.
• If oxygen is used with this device, the oxygen flow must be turned off when
the device is not operating.
Explanation of the warning: When the device is not in operation and the
oxygen flow is left on, oxygen delivered into the ventilator tubing may
accumulate within the device enclosure. Oxygen accumulated in the device
enclosure will create a risk of fire. This warning applies to most types of flow
generators.
• Oxygen supports combustion. Oxygen should not be used while smoking or
in the presence of an open flame.
• Always ensure air flow is being generated by the device before the oxygen
supply is turned on.
• Always turn the oxygen supply off before stopping the air flow from the
device.
Note: At a fixed rate of supplemental oxygen flow, the inhaled oxygen
concentration will vary, depending on where the oxygen is introduced, pressure
settings, patient breathing pattern, mask selection, and leak rate. This applies to
most types of CPAP machines.
o
F
6
Page 12
268106r1.book Page 7 Thursday, November 30, 2006 2:35 PM
Warnings Related to Treatment
WARNING
!
• If you stop your CPAP or bilevel treatment, your sleep apnea will return
immediately.
• Always consult your clinician if you expect to be in a situation where you
cannot use your VPAP Malibu unit.
• If you are admitted to a hospital or prescribed any other form of medical
treatment, always inform the medical staff that you are being treated with
CPAP or bilevel. It is also important to contact the clinician who is treating
you for sleep apnea.
• If you experience an infection of the upper respiratory tract, middle ear, or
sinuses, contact your clinician before continuing your CPAP or bilevel
treatment. You may be advised to stop treatment until the infection has
cleared. If you continue with treatment during an infection, be sure to clean
your mask and tubing after every use.
Cautions
The following are general cautions. Specific cautions appear next to the relevant
instructions in this guide.
English
CAUTION
!
• Do not open the VPAP Malibu case. There are no user serviceable parts
inside. Repairs and internal servicing should only be performed by an
authorized service agent.
Possible Side Effects
The VPAP Malibu flow generator is designed to help you have a good night’s
sleep. However, you need to be aware of possible problems that may arise
during CPAP or bilevel treatment.
WARNING
!
Consult your clinician immediately if you experience any of the following
symptoms during your CPAP or bilevel treatment:
• headache
• middle ear or sinus discomfort
• dryness of the nose, mouth, or throat
• feeling bloated due to air swallowing
• air continually leaking out of the mouth while sleeping
• recurrence of any sleep apnea symptoms while on CPAP or bilevel.
Skin irritation may occur from sensitivity to the mask materials or from
excessively tight headgear straps. A correctly fitted mask and appropriately
adjusted straps will often prevent skin irritation. If problems persist, contact your
clinician for advice.
7Medical Information
Page 13

268106r1.book Page 8 Thursday, November 30, 2006 2:35 PM
8
Page 14
268106r1.book Page 9 Thursday, November 30, 2006 2:35 PM
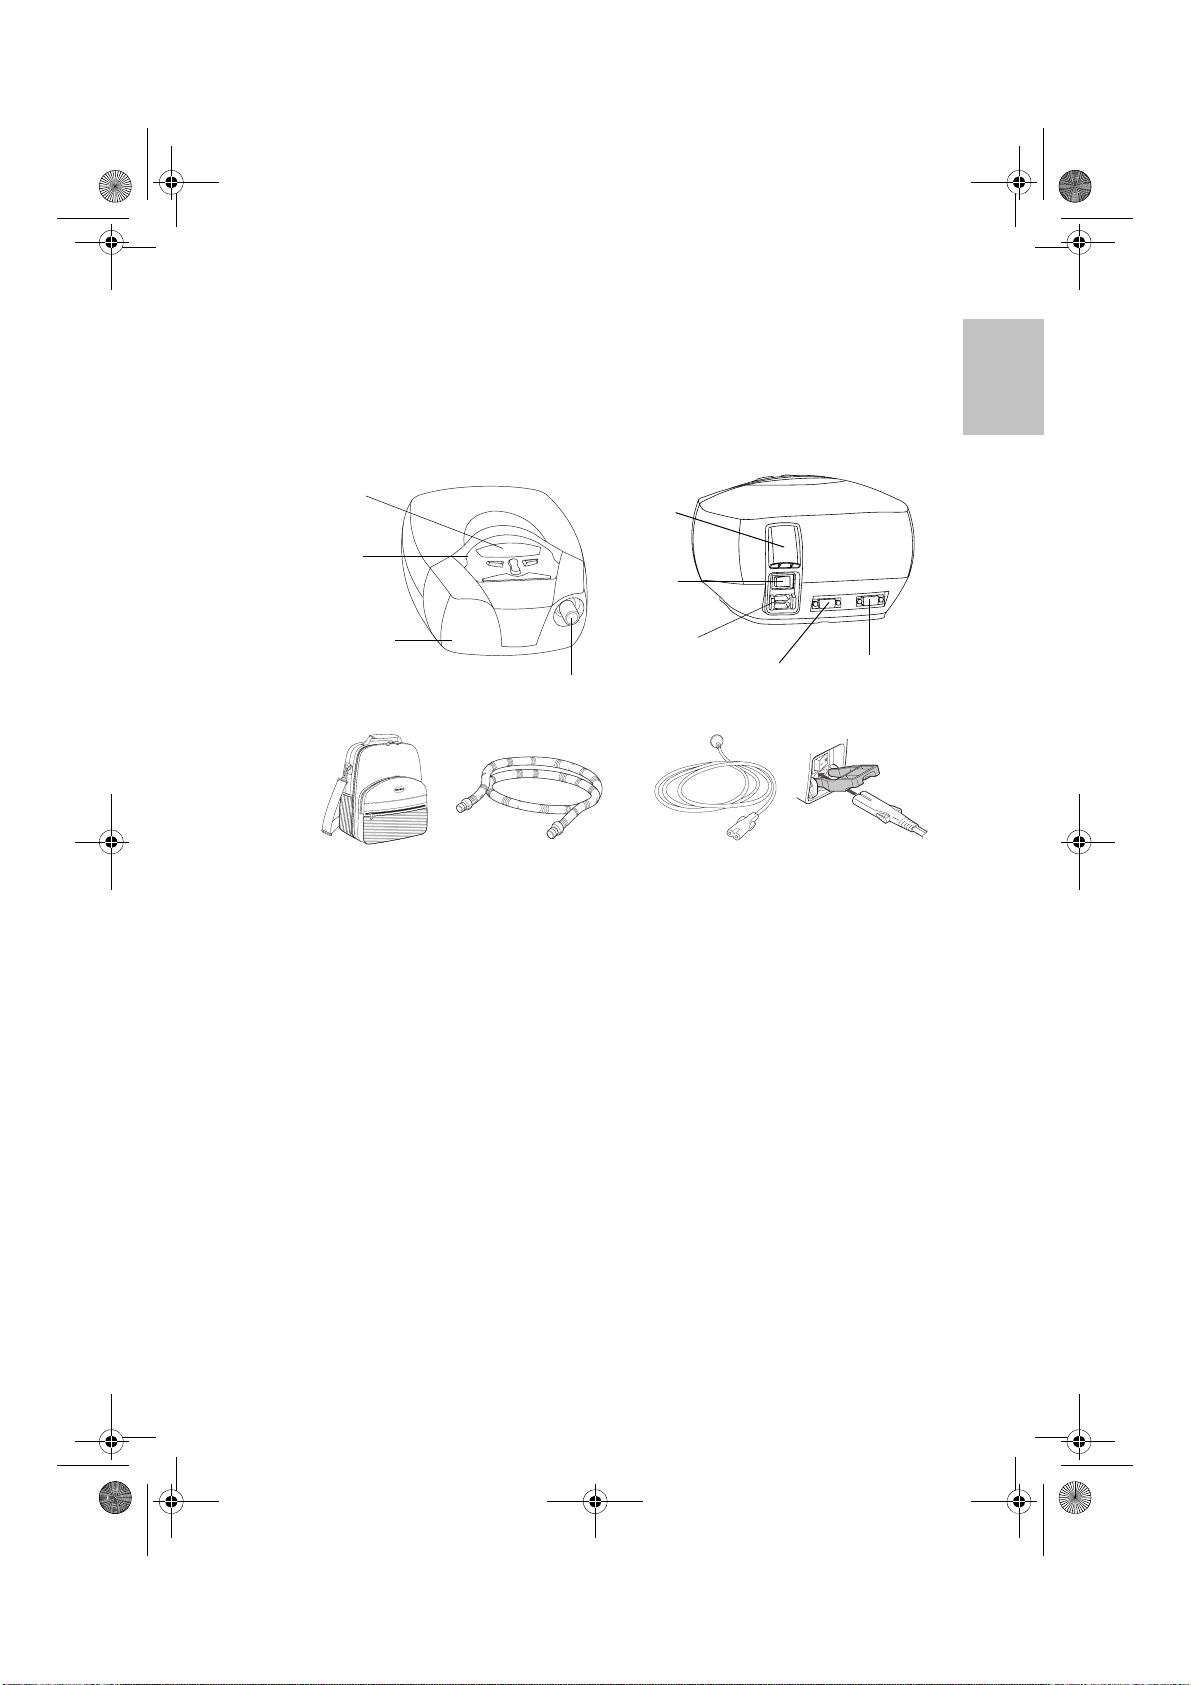
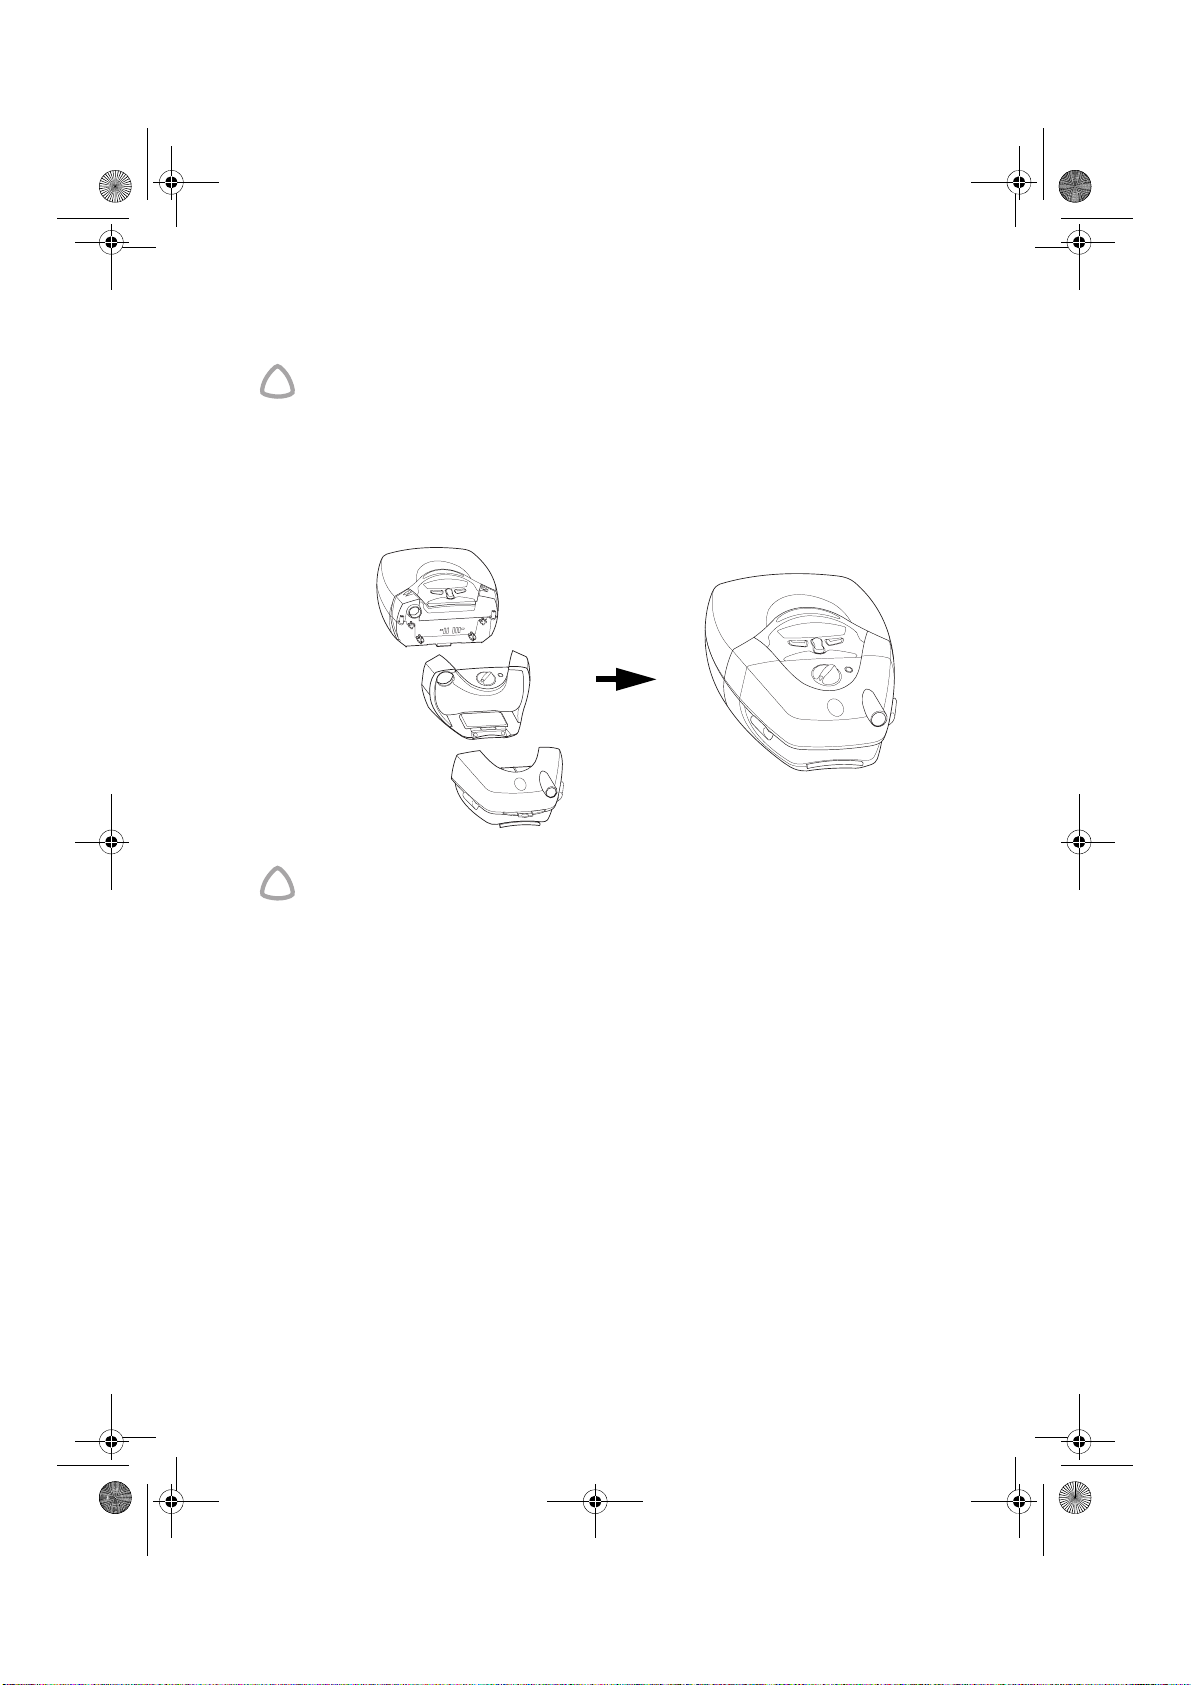
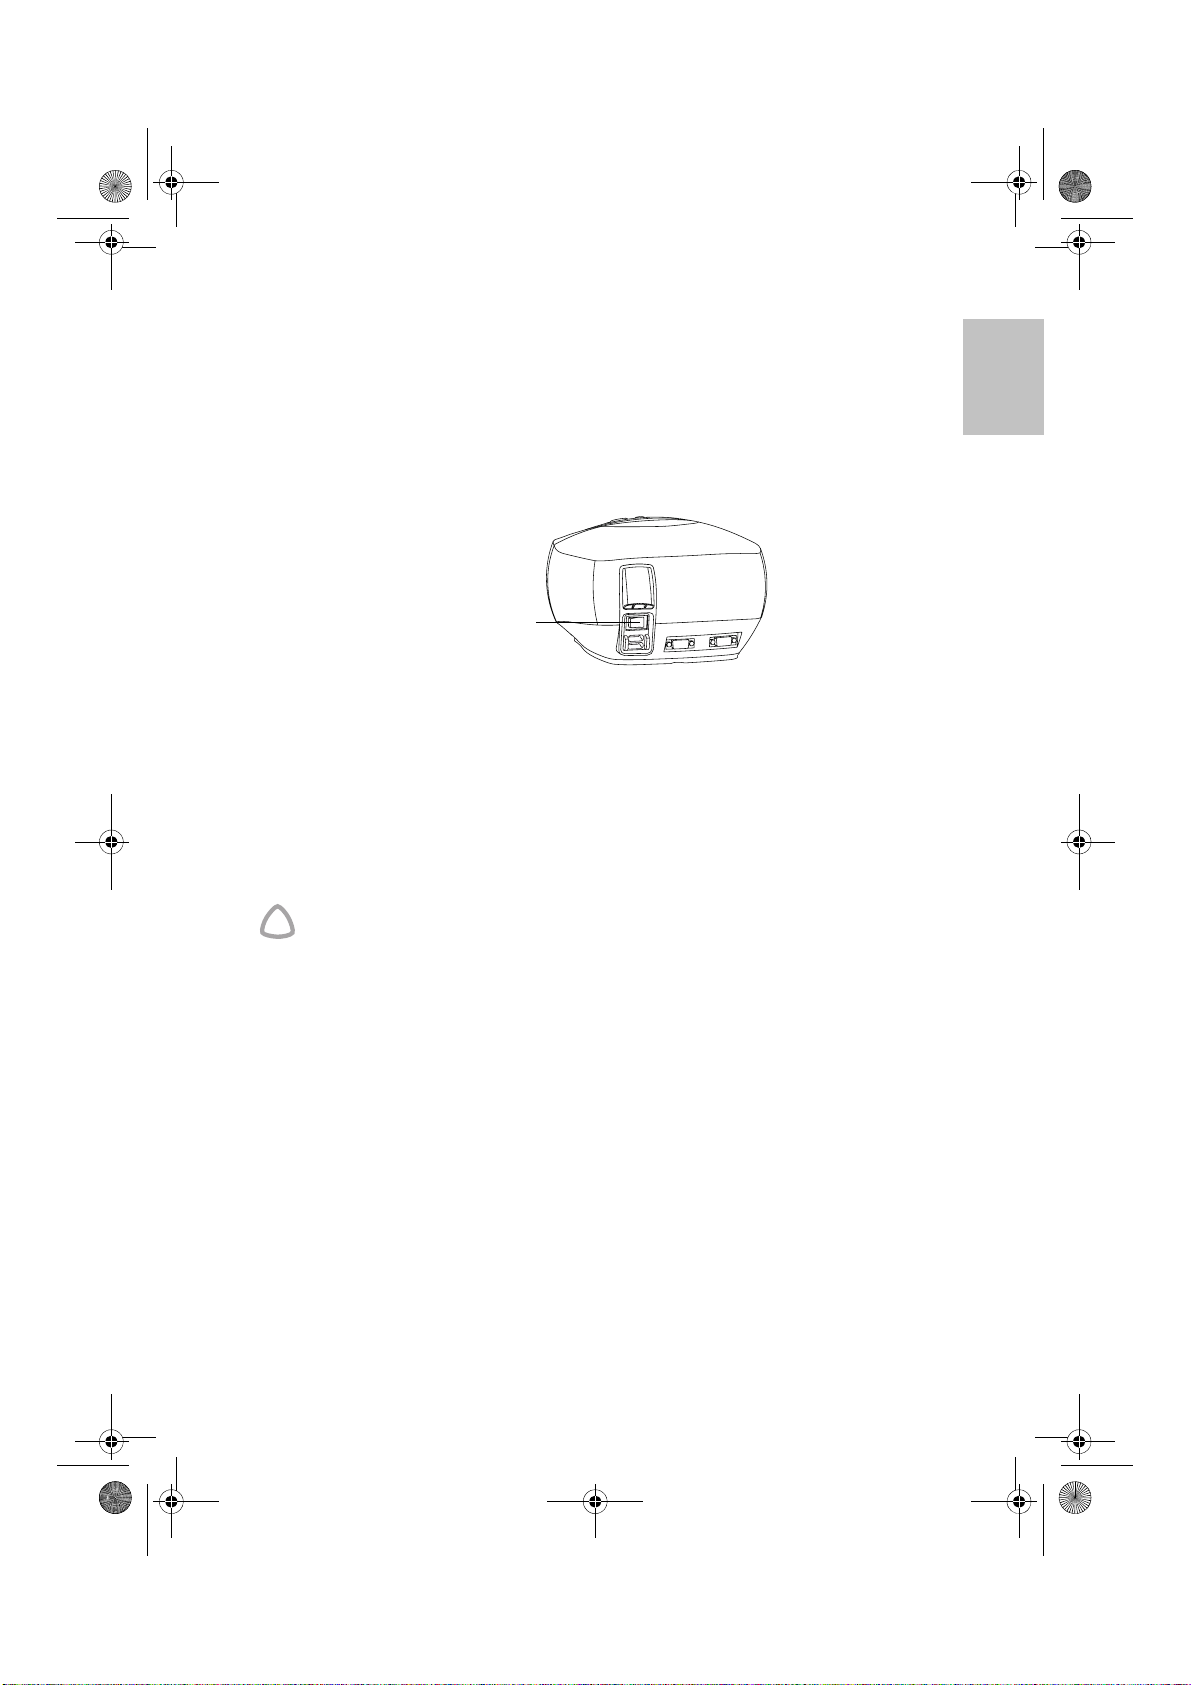
The VPAP Malibu System
Please identify and familiarize yourself with the following components of the
VPAP Malibu system:
VPAP Malibu Unit
Front View
LCD
screen
Control
panel
English
Rear View
Filter
cover
AC power
switch
Removable
front cap
Carry bag
Air outlet
Air tubing
6’6" (2 m)
Power
sockets
Power cord
Auxiliar y
port
communications
Power cord clip
Mask
You will also need a ResMed mask system (supplied separately). The following
ResMed mask systems are recommended for use with the VPAP Malibu:
Nasal Masks
• Meridian™ Nasal Mask
• Mirage Vista™ Nasal Mask
• Ultra Mirage™ Nasal Mask
• Ultra Mirage II Nasal Mask.
Nasal Pillow System
• Mirage Swift™ Nasal Pillows System.
Full Face Masks
• Ultra Mirage Full Face Mask.
Notes:
• ResMed devices have been designed and manufactured to provide optimum
performance using ResMed vented mask systems. Other mask systems
may be used, however performance and data outputs may be affected.
Serial
port
9The VPAP Malibu System
Page 15

268106r1.book Page 10 Thursday, November 30, 2006 2:35 PM
• In VSet mode, only ResMed masks are compatible for use with the
VPAP Malibu.
• Your clinician needs to set up your VPAP Malibu for use with your particular
mask.
Humidifier
A humidifier may be required if you are experiencing dryness of the nose, throat,
or mouth. The VPAP Malibu is compatible for use with the following humidifier.
HumidAire 2i™ heated humidifier
Please refer to the relevant clinician’s guide for details.
WARNING
!
Only the HumidAire 2i is compatible for use with the VPAP Malibu. Please
refer to Warnings on page 6.
Accessories
10
The following accessories are available for use with the VPAP Malibu:
VPAP Malibu Accessories
• Hypoallergenic air filter (not shown)
Air tubing 9’9" (3 m)
Antibacterial air filter
Note: ResMed recommends the following tubing products for use with the
VPAP Malibu: 3 m air tubing, gray (PN: 14980); 2 m air tubing, gray
(PN: 14948); disposable air tubing, clear (PN: 14912).
DC-24/30 Converter
Page 16
268106r1.book Page 11 Thursday, November 30, 2006 2:35 PM
Supplemental Oxygen
The VPAP Malibu is designed to be compatible with the use of low flow oxygen
therapy provided from an external source and supplied at a fixed rate of up to
15 L/min (S mode, CPAP mode) or 5 L/min (VSet mode). At a fixed flow rate of
supplemental oxygen flow, the inhaled oxygen concentration will vary,depending
on the pressure settings, patient breathing pattern,mask selection,and the leak
rate. This warning applies to most types of CPAP machines.
WARNING
!
• If oxygen is used with this device, the oxygen flow must be turned off
when the device is not operating.
Explanation: When the device is not in operation, and the oxygen flow is
left on, oxygen delivered into the ventilator tubing may accumulate
within the device enclosure and create a risk of fire.
• Always begin VPAP Malibu therapy before the oxygen supply is turned
on.
• Always turn the oxygen supply off before stopping VPAP Malibu
therapy.
• Oxygen supports combustion. Oxygen should not be used while
smoking or in the presence of an open flame.
English
11The VPAP Malibu System
Page 17
268106r1.book Page 12 Thursday, November 30, 2006 2:35 PM
12
Page 18
268106r1.book Page 13 Thursday, November 30, 2006 2:35 PM
Preparing for Use
Setting Up the VPAP Malibu
WARNING
!
• Do not connect any device (other than the ResLink™ module) to the
auxiliary port. Although your health care provider may connect specially
designed devices to the auxiliary port of the VPAP Malibu unit,
connection of other devices could result in injury to persons, or damage
to the unit.
• In the clinical environment any PC that is used with the VPAP Malibu
system must be at least 5’ (1.5 m) away from, or at least 8’ (2.5 m) above
the patient. It must also comply with IEC 60950 or equivalent.
Note: The air filter cover protects the device in the event of accidental liquid
spillage onto the device. Ensure that the air filter and air filter cover are fitted at
all times.
1 Place the VPAP Malibu unit on a flat surface near the head of your bed. If the unit
is placed on the floor, ensure that the area is free from dust and clear of bedding,
clothes, or any other objects that could block the air inlet.
CAUTION
!
Be careful not to place the device where it can be bumped or where
someone is likely to trip over the power cord.
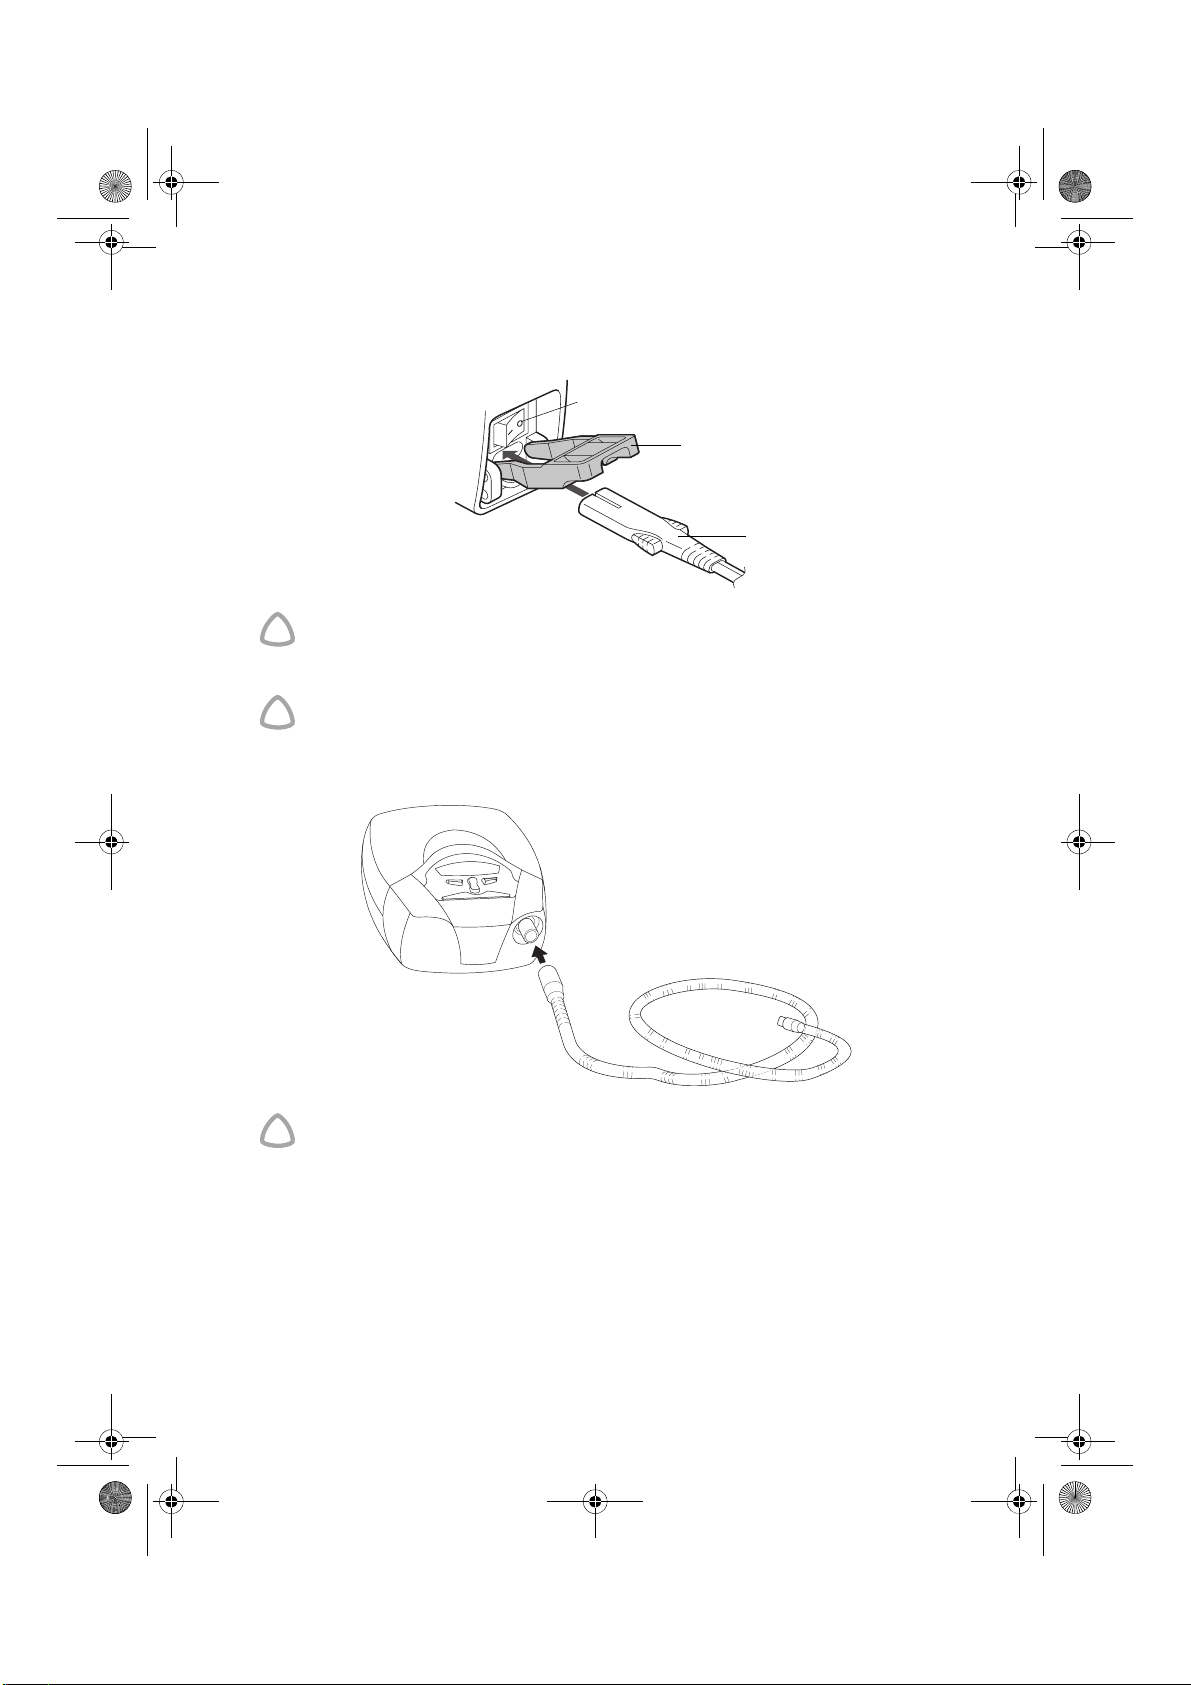
Connect the power cord:
2
There are two sockets at the rear of the flow generator—the top one for an AC
(standard mains electricity) and the lower one for a DC power cord (see “Using
DC Power to Run the VPAP Malibu” on page 25). ResMed recommends using
the AC power cord supplied with the unit.
The customized ResMed power cord can be held in place with the locking clips.
To insert the locking clip, pinch the free ends together and fit the pins into the
holes on both sides of the socket. Insert the power cord into the socket. Push
the locking clip down so that the groove holds the power cord in place. Plug one
English
13Preparing for Use
Page 19
268106r1.book Page 14 Thursday, November 30, 2006 2:35 PM
end of the power cord into the power socket at the rear of the unit, and the other
end into a power outlet.
CAUTION
!
Do not connect both AC and DC power cords to the VPAP Malibu at the
same time.
WARNING
!
Make sure the power cord and plug are in good condition and the
equipment is not damaged.
Connect one end of the air tubing firmly onto the air outlet of the unit.
3
AC power switch
Locking clip
AC power cord
14
WARNING
!
Only ResMed air tubing should be used with your flow generator. A
different type of air tubing may alter the pressure you actually receive
reducing the effectiveness of your treatment.
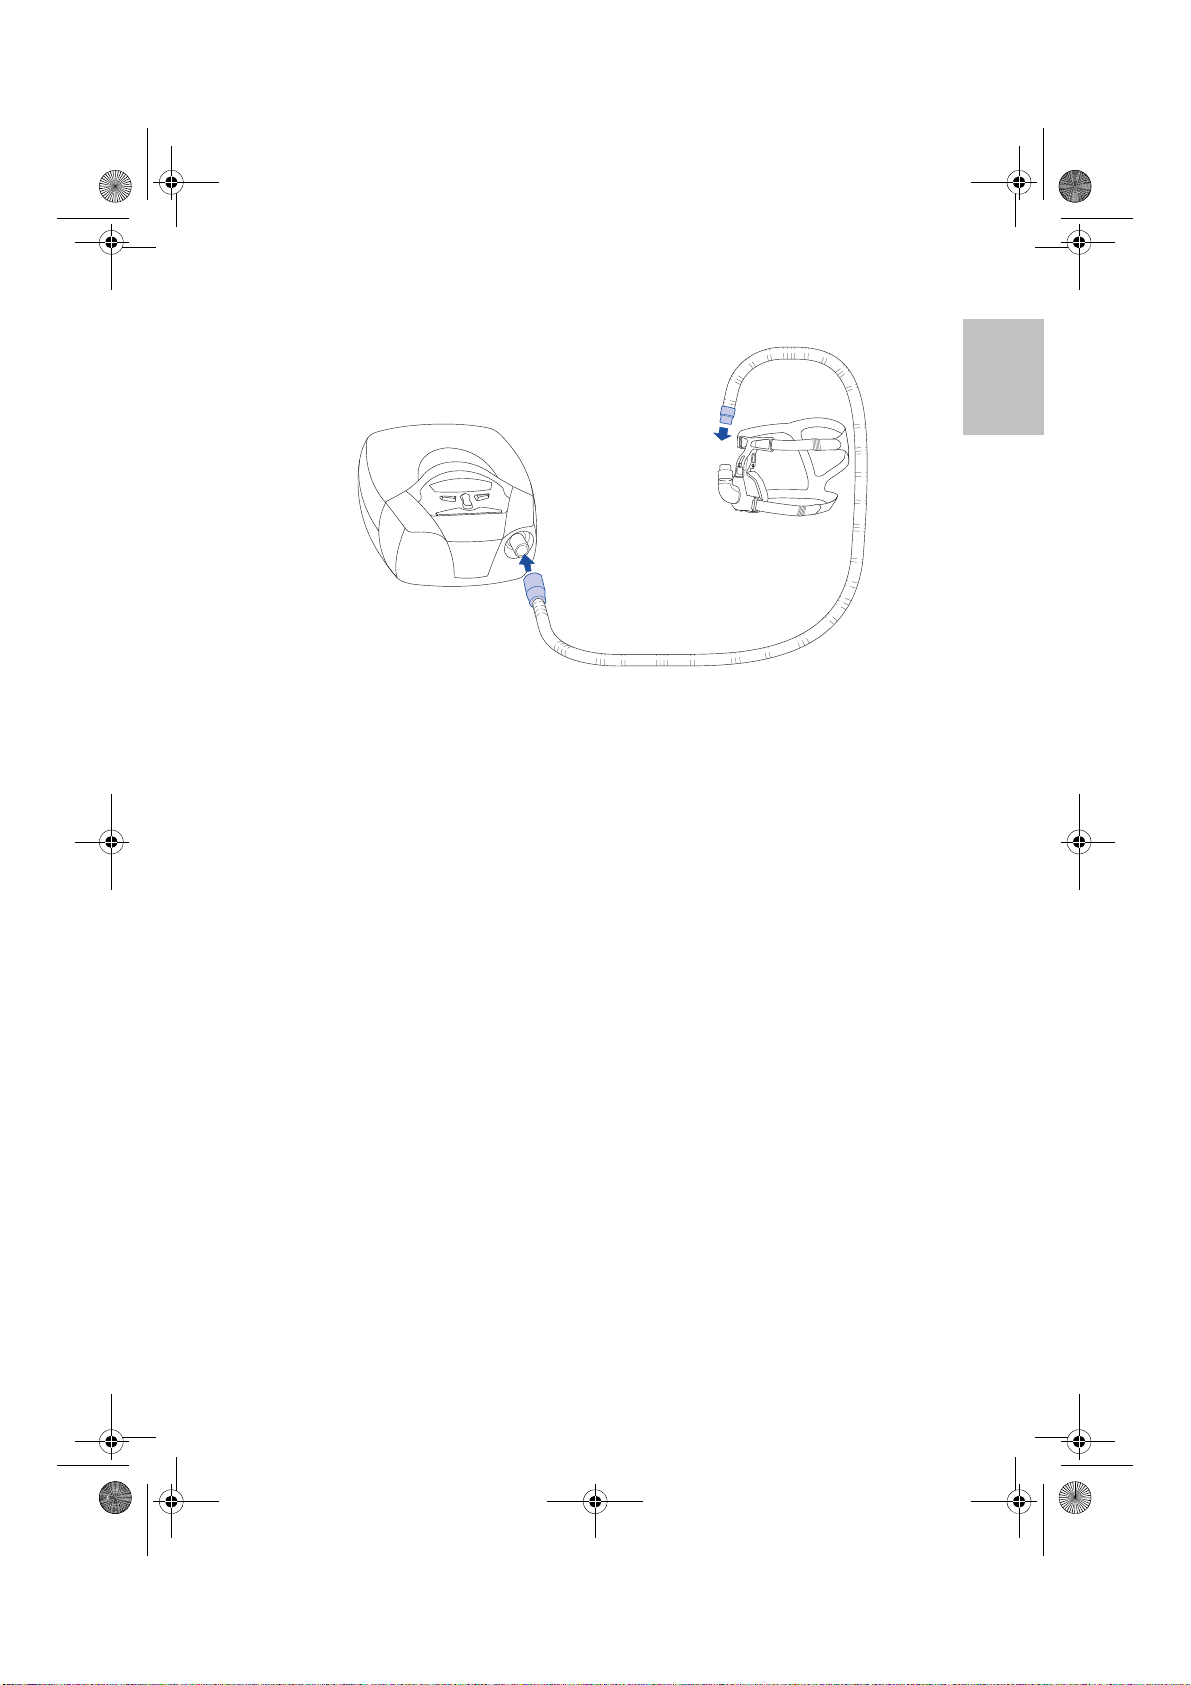
Assemble your mask system according to the mask user instructions.
4
Page 20
268106r1.book Page 15 Thursday, November 30, 2006 2:35 PM
Connect your mask system to the free end of the air tubing.
5
The VPAP Malibu is now ready for use. To start treatment, see “Operating
Instructions” on page 21.
English
15Preparing for Use
Page 21
268106r1.book Page 16 Thursday, November 30, 2006 2:35 PM
Humidifier Use
WARNING
!
The VPAP Malibu is not compatible with external humidifiers.
HumidAire 2i
The HumidAire 2i attaches to the front of the VPAP Malibu to provide heated
humidification. No other accessories are required for its use. The VPAP Malibu
automatically detects the presence of the HumidAire 2i. No menu changes are
required. Please refer to the relevant user manual for details.
16
WARNING
!
• Make sure that the power cord and plug are in good condition and the
equipment is not damaged.
• Make sure that the water chamber is empty and thoroughly dried before
transporting the HumidAire 2i.
• When using the carry bag, always separate the VPAP Malibu unit and the
Humidaire 2i before placing in their respective compartments.
The VPAP Malibu is now ready for use. To start treatment, see “Operating
Instructions” on page 21.
Page 22
268106r1.book Page 17 Thursday, November 30, 2006 2:35 PM
Features of the VPAP Malibu
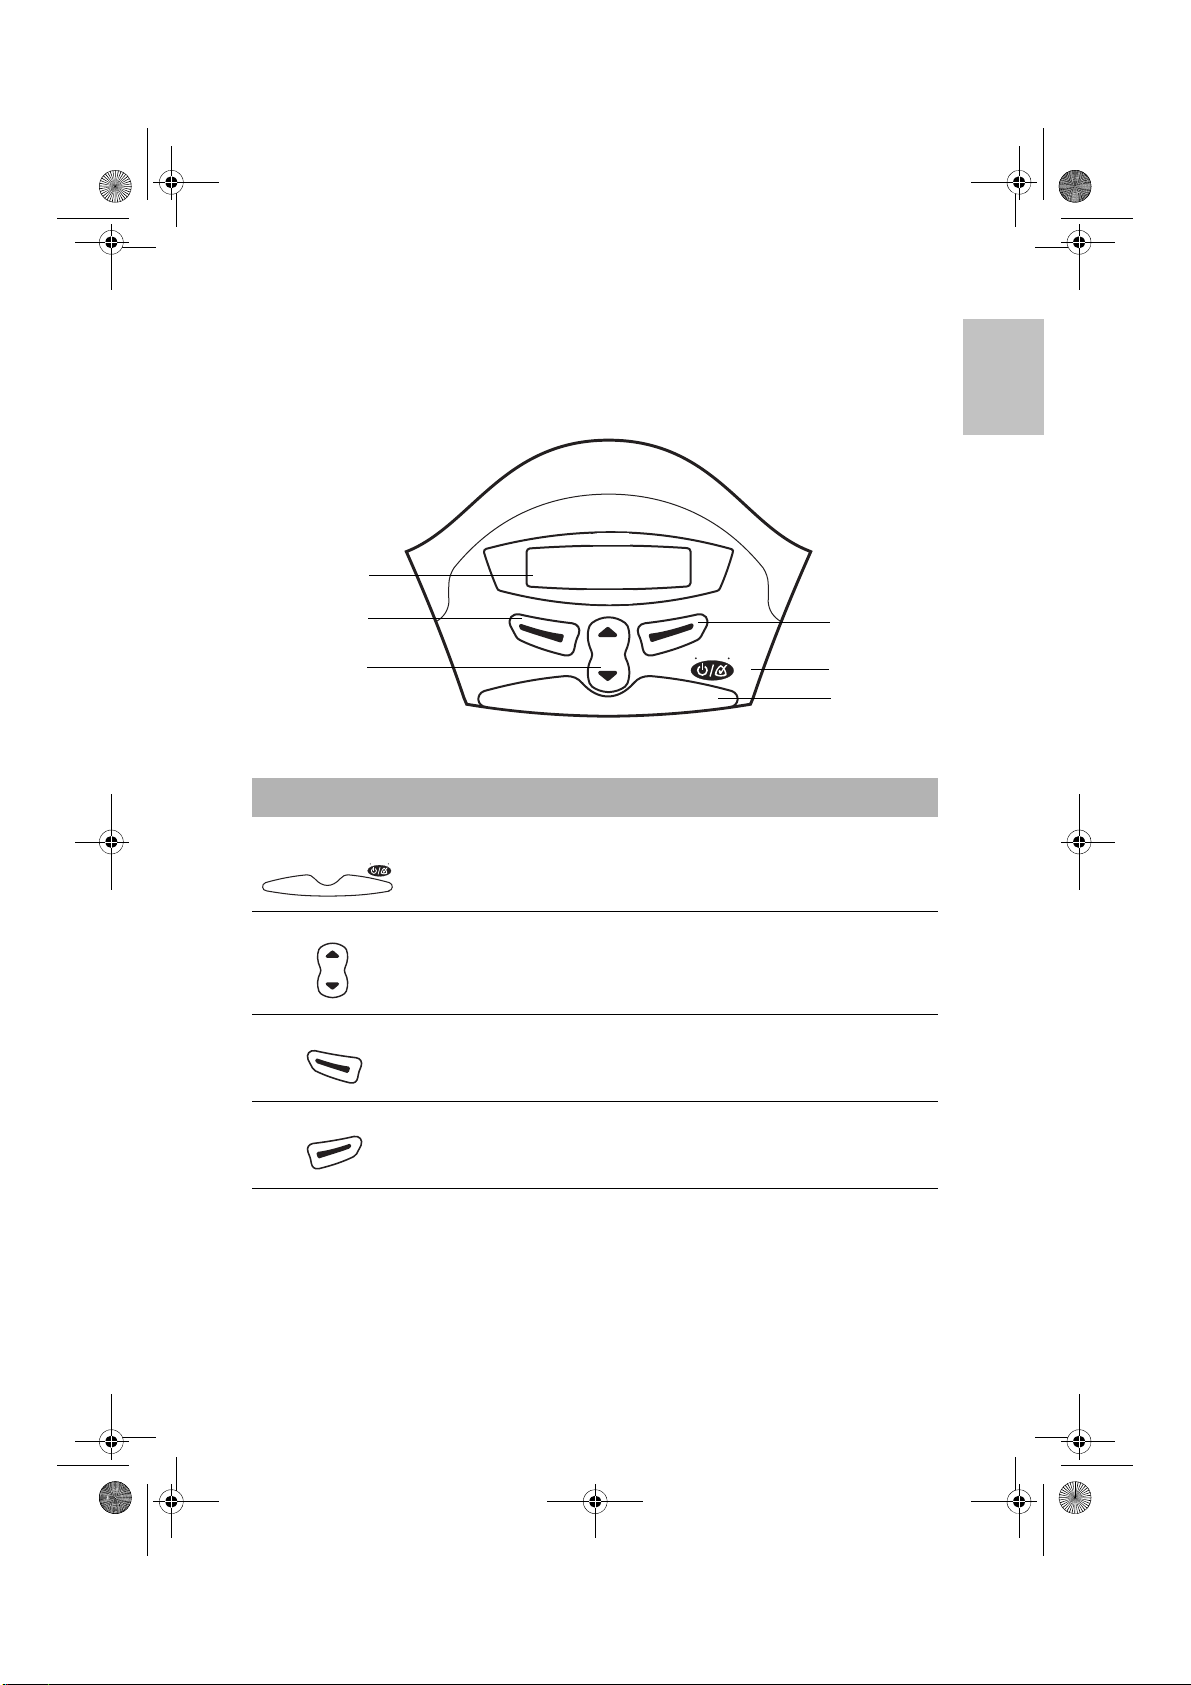
LCD Screen and Keypad
The control panel of the VPAP Malibu includes an LCD screen and keypad.
LCD screen
English
Left key
Up/down key
The VPAP Malibu keypad has the following keys:
Key Function
Front
• Starts or stops treatment.
• Extended hold for at least 3 seconds starts the Mask-Fitting
Start/Stop
Mask-fit
feature.
Up/Down
• Allows you to scroll through the VPAP Malibu menus, submenus,
and setting options.
Left
• Performs the function indicated by the guiding text displayed above
it on the LCD screen. Guiding text includes menu, enter, change,
and apply.
Right
• Performs the function indicated by the guiding text displayed above
it on the LCD screen. Guiding text includes exit and cancel
Start/Stop
Right key
sk-fit
a
M
Keypad
Front key
.
To assist you in adjusting the VPAP Malibu, the keypad and LCD are equipped
with a backlight. The LCD backlight comes on when the unit is turned on or when
you press a key, and turns off after two minutes. The keypad backlight is on at
all times when the VPAP Malibu is powered.
17Preparing for Use
Page 23
268106r1.book Page 18 Thursday, November 30, 2006 2:35 PM
Using the Menus
The VPAP Malibu unit provides a set of functions which are arranged in menus
and submenus. Via the LCD screen, the menus and submenus allow you to view
and change the settings for a particular function. You can access the menus
regardless of whether the VPAP Malibu is in standby mode or delivering therapy.
After the Welcome screen appears and device self-checks are complete, you will
see either the Ramp screen (S mode and CPAP mode) or the Settling screen
(VSet mode).
Ramp Screen
(S mode, CPAP mode) If your clinician has set a maximum ramp time, the Ramp
screen is displayed after the Welcome screen. On the Ramp screen, you can
immediately set a ramp time. Ramp time is the period during which the pressure
increases from a low pressure to the prescribed treatment pressure. See “Ramp
Time” on page 23.
Ramp time can be altered in five minute increments (from OFF to a maximum
ramp time set by your clinician) by the using the Up/Down key.
Settling Screen
(VSet mode) If your clinician has set a maximum settling time, the Settling screen
is displayed after the Welcome screen. On the Settling screen, you can
immediately set a settling time. Settling time is the period for which the
VPAP Malibu remains at Minimum Pressure, before increasing pressure in
response to events. See “Settling Time” on page 23.
Settling time can be altered in five minute increments (from OFF to a maximum
settling time set by your clinician) by the using the Up/Down key.
18
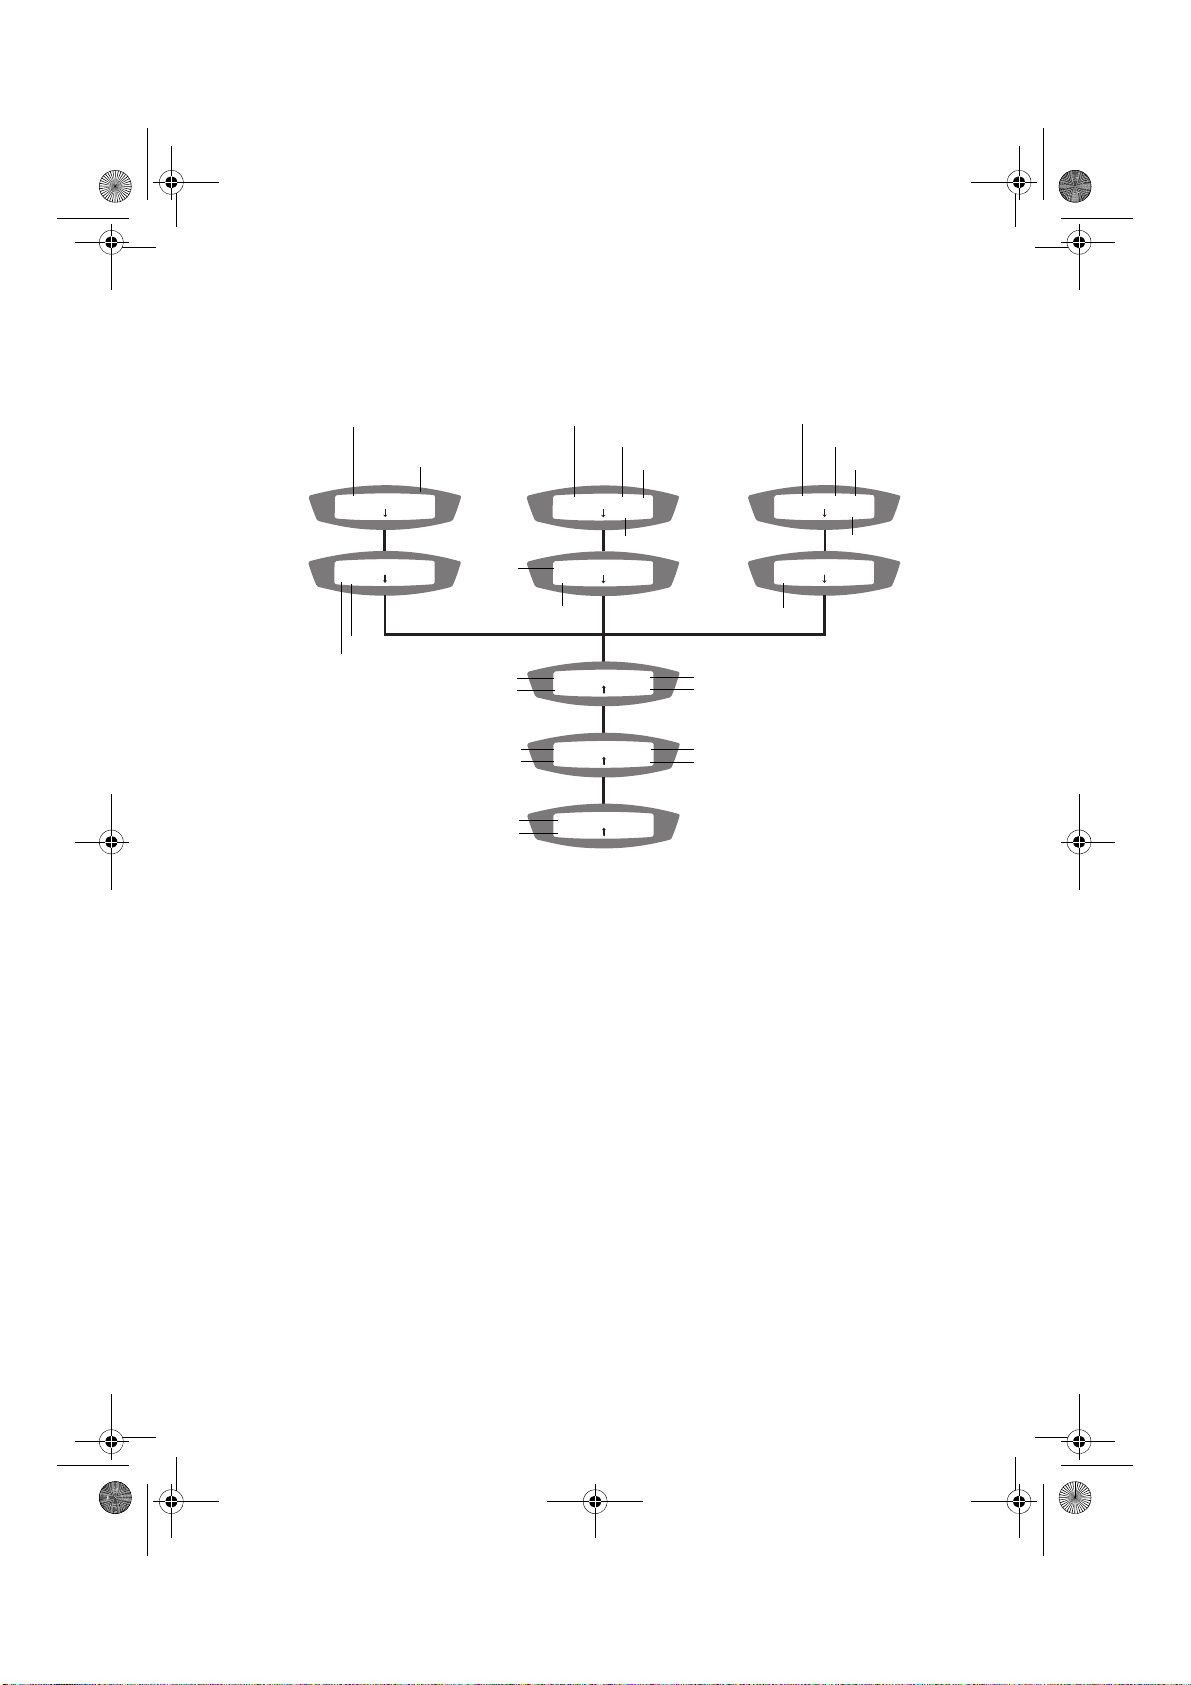
Menus
The menu allows you to view details about the time used and the current
software version of your VPAP Malibu. The Used (time) screen displays the total
number of hours for which you have used the device since it was last reset by
the clinician. It also displays the number of days the VPAP Malibu was used out
of the total number of days available for use. The SW screen displays the current
software version that is installed in your VPAP Malibu.
Figure 1 summarizes the VPAP Malibu standard menu series.
• To access the VPAP Malibu menus:
Press the Left key (menu) while the VPAP Malibu (or Ramp or Settling)
screen is displayed.
• To scroll through items within the menu:
Press the Up/Down key
• To exit out of the menu:
Press the Right key (exit)
Page 24
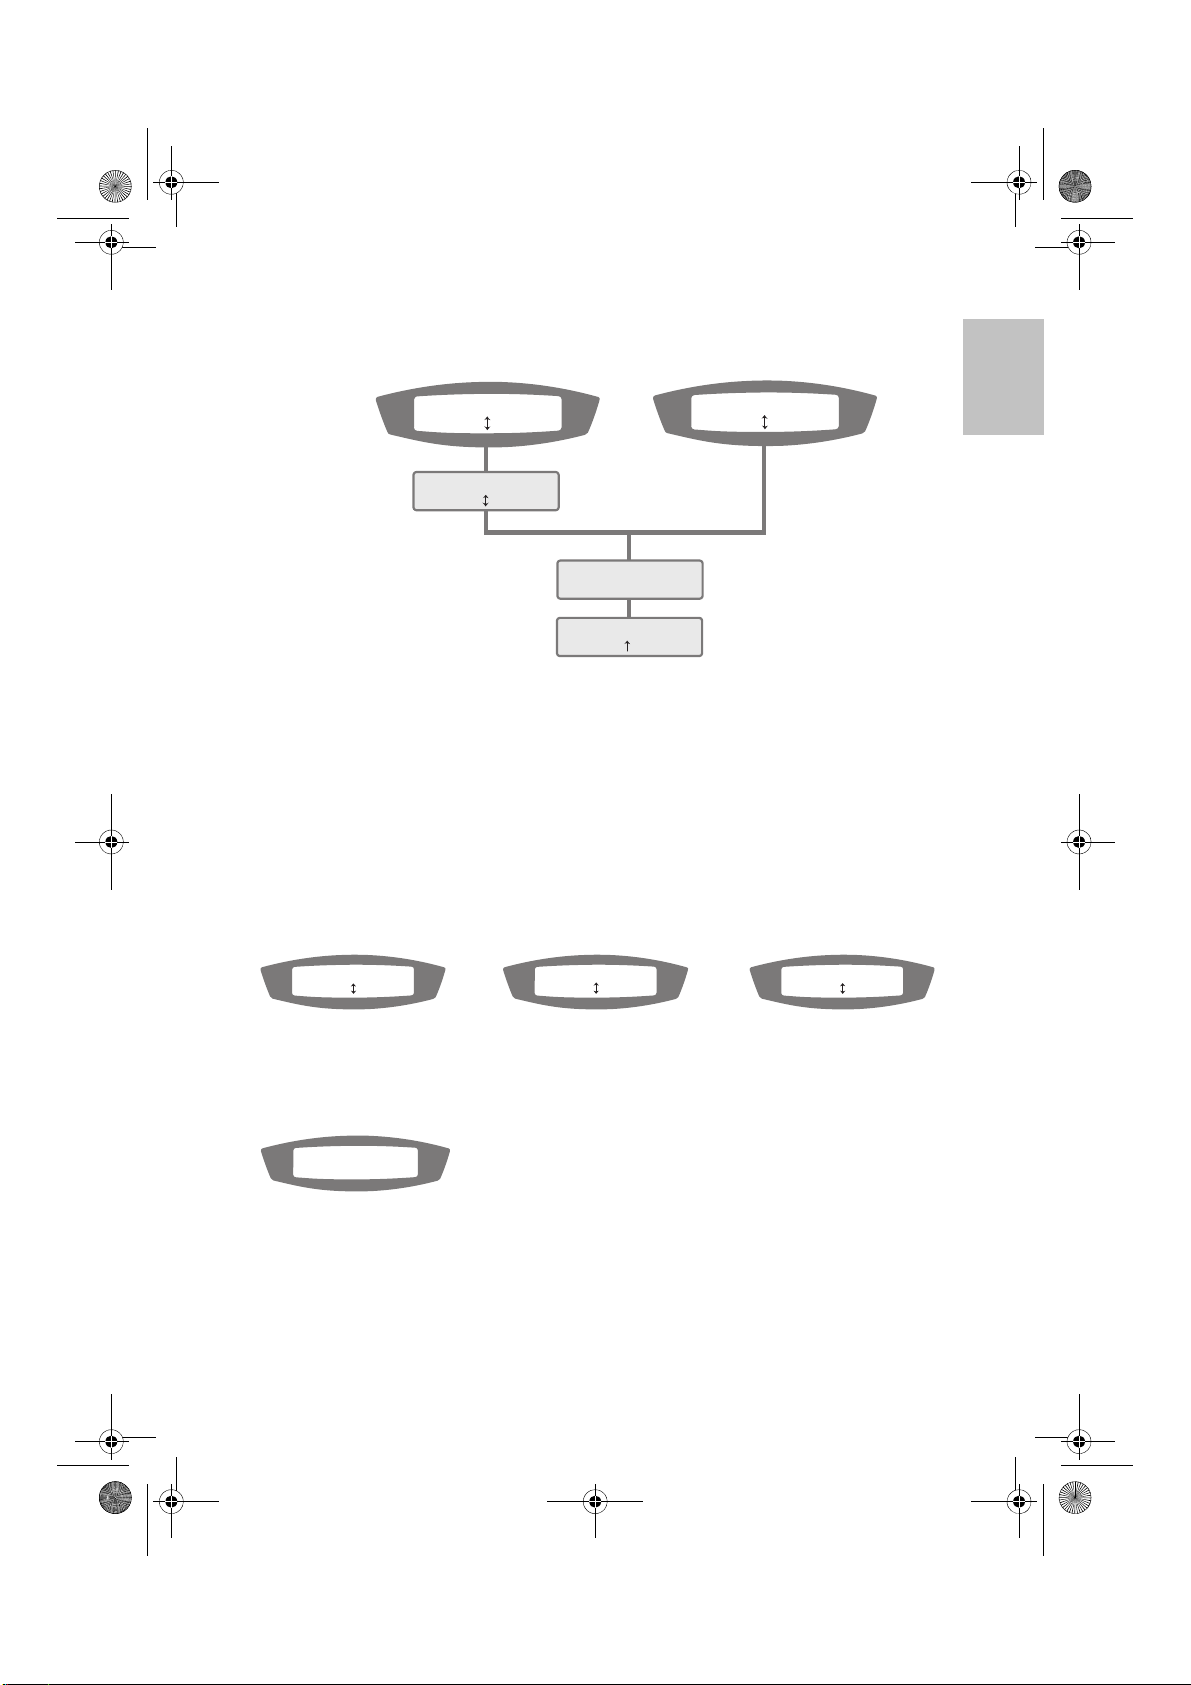
268106r1.book Page 19 Thursday, November 30, 2006 2:35 PM
VSet mode S mode & CPAP mode
SETTLE: 20min
menu
EXHALATION: MED
change exit
USED: 0000hrs
000/000days exit
SX3650201
SW:
exit
RAMP: 30min
menu
Figure 1: VPAP Malibu Menu Series
Notes:
• The Settling and Ramp screens are only available if Max Settle or Max Ramp
has been set by a clinician.
• The Exhalation screen is only available if enabled by a clinician.
Menus with a Humidifier
If the HumidAire 2i is connected to the VPAP Malibu, and treatment has not
commenced, the VPAP Malibu will display one of the following screens:
Prior to starting treatment:
VPAP Malibu
menu warmup
RAMP : 20min
menu warmup
SETTLE : 20min
menu warmup
English
Max Ramp set to 0 CPAP and S modes VSet mode
or
Max Settle set to 0
After starting treatment:
VPAP Malibu
menu
Note: The VPAP Malibu screen displays for three seconds, then defaults to the
treatment screens (see “Starting Treatment” on page 19).
Figure 2: Menu display with humidifier
19Preparing for Use
Page 25
268106r1.book Page 20 Thursday, November 30, 2006 2:35 PM
Menus with a ResLink and Oximeter
If your clinician has recommended that you use a ResLink module, and the
ResLink and an oximeter are connected to the VPAP Malibu, then display of
SpO
(oxygen saturation) and HR (heart rate) takes priority. If treatment has not
2
commenced, the VPAP Malibu will display one of the following screens, whether
a humidifier is connected or not:
Prior to starting treatment:
SpO2 : 98%
menu HR : 60
RAMP: 20min 98%
menu HR: 60
SETTLE: 20min 98%
menu HR: 60
Max Ramp off Max Ramp set Max Settle set
or to non-zero value to non-zero value
Max Settle off
Figure 3: Menu display with ResLink and oximeter
20
Page 26
268106r1.book Page 21 Thursday, November 30, 2006 2:35 PM
Operating Instructions
Starting Treatment
The VPAP Malibu unit should be assembled beside your bed with the air tubing
and mask system connected. See “Setting Up the VPAP Malibu” on page 13.
1 Turn the main power switch at the back of the unit to on (I).
AC
power
switch
When the VPAP Malibu is turned on, a welcome message is displayed on the
LCD screen. The VPAP Malibu (or Ramp or Settling) screen then appears.
Note: If you have the HumidAire 2i attached, please refer to the relevant user
manual for operating instructions.
Fit your mask as described in the mask user instructions.
2
Lie down and arrange the air tubing so that it is free to move if you turn in your
3
sleep.
CAUTION
!
• Do not leave long lengths of air tubing around the top of your bed. It
could twist around your head or neck while you are sleeping.
• Make sure the area around the flow generator is dry and clean. It should
also be clear of bedding, clothes, and other potential blockages.
English
To start treatment, simply breathe into the mask (see “SmartStart™/SmartStop”
4
on page 23).
Air will begin flowing slowly and will build up to full operating pressure in about
10 to 15 seconds.
Note: If the VPAP Malibu does not start automatically, you can also press the
Front key.
21Operating Instructions
Page 27
268106r1.book Page 22 Thursday, November 30, 2006 2:35 PM
CPAP mode S mode VSet mode
(First screens only display if Ramp or Settling are selected)
Mode/Ramping Indicator
CPAP pressure
C:RAMP 8.0
A> exit
CPAP 15.0
A>>> exit
Pressure Graph
Apnea Indicator
Minute ventilation (L/min)
Breath/phase/expiration
Average inspiration time
Note: (Set) values are those selected by the clinician.
(last 5 breaths)
Oxygen saturation (%)
Heart rate (BPM)
Mode/Ramping Indicator
S:RAMP 8.0-11.0
S>>>> PS 3.0
Mode
Trigger Indicator
Leak
SPONT: 8.0-11.0
S>>>> PS 3.0
LK: 24L/min RR: 12
MV: 12.0 VT:1000
S**TiMn TiMx 4.0
Ti 2.1s 1: 1.6
SpO2 : 12%
HR : 57 exit
(Set) EPAP pressure
(Set) IPAP pressure
Pressure Support
Respiratory rate (bpm)
Tidal volume (mL)
(Top row: VSet and S mode only)
Ti Max setting (sec)
Average I:E ratio (last 5 breaths)
Mode/Settling Indicator
EPAP
IPAP
VS:SETL 8.0-11.0
A>>>> PS 3.0
(Set) PS
VSET 8.0-11.0
A>>>> PS 3.0
Apnea Indicator
(This screen only displays if ResLink
and an oximeter are connected)
The treatment screens contain the following information:
Treatment mode: Mode of treatment set by your clinician. Options are: CPAP,
S and VSet.
Ramping indicator: (CPAP mode, S mode) Appears if the VPAP Malibu is in
ramp mode. This disappears once the ramp time has elapsed.
Settling indicator: (VSet mode) Appears if the VPAP Malibu is in settling mode.
This disappears once the settling time has elapsed.
Set pressure(s): In CPAP mode, this displays the set treatment pressure
(centimeters of water). In S mode, it displays exhalation and inhalation pressures
(centimeters of water). In VSet mode, it displays the AutoSet pressure (mean
mid-point pressure between inhalation and exhalation).
Trigger indicator: (S mode) How the VPAP Malibu changes the pressure when
you are inhaling. "S" (Spontaneous) indicates a patient triggered change.
Apnea indicator: (CPAP mode, VSet mode) Visual indicator that displays an "A"
to indicate an apnea is occurring.
Pressure bar graph: Graphical display of the changing pressure.
Leak: Current mask leak (liters per minute).
Respiratory rate: Number of breaths per minute.
22
Page 28
268106r1.book Page 23 Thursday, November 30, 2006 2:35 PM
Minute ventilation: Volume of air inhaled per minute (liters per minute).
Tidal volume: Volume of air inhaled per breath (milliliters per breath).
Breath/phase/expiration: This screen item displays in the format: breath type/
phase display/expiration type as shown below (eg, S**TiMn):
Breath type: S=spontaneous
Phase display: **=inspiration, (blank)=expiration
Expiration type:
TiMn=expiration triggered at completion of minimum inspiration-hold time
TiMx=expiration triggered at completion of maximum inspiration-hold time
C=expiration triggered spontaneously within TiMin and TiMax
Oxygen saturation: The saturation of blood hemoglobin (%).
Heart rate: The number of hearts beats in a 60-second time frame (beats per
minute).
Ramp Time
(S mode, CPAP mode) Ramp time is a feature which can be enabled by your
clinician. If you have difficulty falling asleep with full pressure, select a ramp time.
The airflow will start very gently while you fall asleep. The pressure will slowly
increase to full operating pressure over the selected ramp time. The clinician has
set a maximum ramp time; you may select any value up to the maximum.
English
Settling Time
(VSet mode) Settling time is a feature which can be enabled by your clinician. If
you have difficulty falling asleep with the VPAP Malibu operating, select a
settling time. The airflow will remain at Minimum Pressure for the period of time
that you set, giving you time to fall asleep. After this time, the VPAP Malibu will
be able to increase pressure in response to events
The clinician will set a maximum settling time; you may select any value up to
the maximum.
SmartStart™/SmartStop
The VPAP Malibu has a function SmartStart which starts therapy automatically
when you breathe into the mask. If SmartStop is enabled, therapy will
automatically stop when you take your mask off. This means you do not have to
press the Front key to begin or end treatment.
Note: SmartStop will not work if:
• you have selected FULL FACE for your mask type.
• your clinician has enabled Mask Alarm.
Stopping Treatment
To stop treatment at any time, simply remove your mask and treatment will end
(if your clinician has enabled SmartStop).
or
remove your mask and press the Front key.
23Operating Instructions
Page 29
268106r1.book Page 24 Thursday, November 30, 2006 2:35 PM
Using the Mask-Fitting Feature
The VPAP Malibu Mask-Fitting feature can be used to help you fit your mask
properly. The mask-fitting feature delivers air pressure for a three-minute period,
prior to starting treatment, for checking and adjusting your mask fit to minimize
leaks. If a Ramp time (S mode, CPAP mode) or Settling time (VSet mode) is
selected, this allows you to adjust the mask at a pressure closer to the prescribed
pressure. To use the mask-fitting feature:
1 Fit your mask as described in the user instructions.
Hold down the Front key for at least three seconds until air pressure delivery
2
starts.
The following display will appear on the LCD screen indicating that the Mask-
Fitting feature is in operation. The flow generator will ramp to the Mask-Fit
pressure and will remain at this pressure for three minutes. A Mask-Fit star rating
is also displayed. See “Definitions of Mask-Fit Star Rating” on page 25.
Mask Fit
excelnt
Notes:
• The Mask-Fit star rating display disappears after three minutes.
• Mask-Fit is accessible when the LCD shows the VPAP Malibu screen. It is
also accessible from the Ramp screen or Settling screen (these are only
displayed if a maximum ramp or settling time has been set).
• In S and CPAP modes the Mask-Fit pressure is the set treatment pressure or
10 cm H20, whichever is greater.
• In VSet mode, the mask-fit pressure is 10 cm H
• Mask Alarm and SmartStop functions are disabled while using Mask Fit.
Adjust your mask, mask cushion, and headgear until you have a secure and
3
comfortable fit.
Once you have a secure and comfortable fit, check your Mask-Fit star rating on
the LCD screen. Definitions of the Mask-Fit star ratings are presented in Table 1.
Note: If there is another person nearby to check your Mask-Fit star rating, you
can adjust your mask, mask cushion, and headgear while lying down.
After three minutes, treatment will begin.
4
• If you do not wish to wait three minutes, hold down the Front key for at
least three seconds and treatment will begin immediately.
• If you press the Front key for less than three seconds, the unit will return
to standby mode (the VPAP Malibu, Ramp or Settling screen is displayed).
*****
Mask-Fit Star rating
O.
2
24
Page 30
268106r1.book Page 25 Thursday, November 30, 2006 2:35 PM
Table 1: Definitions of Mask-Fit Star Rating
Star rating Definition
***** Excellent
****- Very good
***- - Good
**- - - Adjust mask
*- - - - Adjust mask
HIGH LEAK Adjust mask
Using DC Power to Run the VPAP Malibu
The VPAP Malibu can be run on DC in the case of power failure. ResMed
supplies separately a converter that allows a 12V or 24V battery to be connected
to the DC input of the VPAP Malibu. When using DC, power is turned on and off
via the switch on the connector to the power source, not the power switch at the
back of the VPAP Malibu. The DC converter is a separate accessory that can be
purchased through your ResMed distributor.
The humidifier heater will be automatically disabled when the VPAP Malibu is
operating from the DC supply.
Power consumption of the VPAP Malibu varies with treatment settings.
Adequate battery type and size is required before operation on DC, and it is
recommended that you contact ResMed’s Technical Services division or
ResMed's website for information on your specific application.
CAUTION
!
• The VPAP Malibu uses 24V DC power. Only connect the VPAP Malibu to
DC power using the ResMed DC-24/30 Converter specified for this
application.
• Do not connect both AC and DC power cords to the VPAP Malibu at the
same time.
English
Helpful Hints
Starting Out
Mouth Leaks
When using a nasal mask, try to keep your mouth closed during treatment. Air
leaks from your mouth can decrease the effectiveness of your treatment. If
mouth leaks are a problem, a full face mask or chin strap may help. Contact your
clinician or equipment supplier for further details.
25Operating Instructions
Page 31

268106r1.book Page 26 Thursday, November 30, 2006 2:35 PM
Mask-Fitting
The flow generator delivers the most effective treatment when the mask is well
fitted and comfortable. Treatment can be affected by leaks, so it is important to
eliminate any leaks that may arise.
If you have problems trying to get a comfortable mask fit, contact your sleep
clinic or equipment supplier. You may benefit from a different mask size.
You can also use the Mask-Fitting feature to help you fit your mask properly. See
“Using the Mask-Fitting Feature” on page 24.
Before wearing your mask, wash your face to remove excess facial oils. This will
allow a better fit and prolong the life of the mask cushion.
Nasal Irritation
Dryness
You may experience dryness of the nose, mouth, and/or throat during the course
of treatment, especially during winter. In many cases, a humidifier may resolve
this discomfort. Contact your clinician for advice.
Runny or Blocked Nose
You may experience sneezing and/or a runny or blocked nose during the first few
weeks of treatment. In many cases, nasal irritation can be resolved with a
humidifier. Consult your clinican for advice.
Traveling with the VPAP Malibu
International Use
Your VPAP Malibu flow generator has an internal power adapter that enables it
to operate in other countries. It will operate on power supplies of 100–240V and
50–60Hz. No special adjustment is necessary, but you will require an approved
power cord for the region for which you are using the device.
26
Page 32

268106r1.book Page 27 Thursday, November 30, 2006 2:35 PM
Cleaning and Maintenance
You should regularly carry out the cleaning and maintenance described here.
Daily
1. Disconnect the air tubing and hang it in a clean, dry place until next use. Do
not hang the air tubing in direct sunlight as it may harden and crack over time.
2. Clean the mask according to the mask user instructions.
3. If you are using a humidifier, clean it according to the instructions in the
manual.
Weekly
1. Remove the air tubing from the VPAP Malibu unit and the mask.
2. Wash the mask system according to the instructions supplied with it.
3. Wash the air tubing in warm water using mild detergent. Rinse thoroughly,
hang and allow to dry.
4. Before next use, assemble the mask and headgear according to the mask
user instructions.
5. Reconnect the air tubing to the air outlet and mask.
English
CAUTION
!
• Do not use bleach, chlorine-, alcohol- or aromatic-based solutions
(including all scented oils), moisturizing, or antibacterial soaps to clean
the cushion, mask, air tubing, or the VPAP Malibu. These solutions may
cause hardening and reduce the life of the product.
• Do not wash or dry the mask frame at a temperature above 176
Exposure to higher temperatures may reduce the life of the product.
• Do not hang the air tubing in direct sunlight as the tubing may harden
over time and eventually crack.
Periodically
1. The mask and air tubing are subject to normal wear and tear. Inspect them
regularly for damage.
2. Clean the exterior of the flow generator with a damp cloth and mild
detergent.
3. Inspect the air filter to check if it is blocked by dirt or contains holes. See
“Replacing the Air Filter” on page 28.
WARNING
!
Beware of electric shock. Do not immerse the flow generator or power cord
in water. Always unplug the flow generator before cleaning and be sure that
it is dry before reconnecting.
o
F (80oC).
27Cleaning and Maintenance
Page 33

268106r1.book Page 28 Thursday, November 30, 2006 2:35 PM
CAUTION
!
Do not attempt to open the VPAP Malibu. There are no user serviceable
parts inside. Repairs and internal servicing should only be performed by an
authorized service agent.
Replacing the Air Filter
Inspect the air filter every month to check if it is blocked by dirt or contains holes.
With normal use of a VPAP Malibu unit, the air filter needs to be replaced every
six months (or more often if your unit is in a dusty environment). To replace the
air filter:
Note: For details of how to check and replace the hypoallergenic filter (if used)
see the Hypoallergenic Air Filter User Instructions.
1. Remove the air filter cover at the back of the VPAP Malibu.
Air
filter
cover
2. Remove and discard the old air filter.
3. Insert a new filter with the blue tinted side facing out.
4. Replace the air filter cover.
WARNING
!
Do not wash the air filter. The air filter is not washable or reusable.
Replacing the Antibacterial Filter
You should regularly inspect and replace the antibacterial filter, as outlined in the
Antibacterial Filter User Instructions.
Note: ResMed recommends that you use the Pall BB50TE filter.
Servicing
This product (VPAP Malibu) should be inspected by an authorized ResMed
Service Center 5 years from the date of manufacture. Prior to this, the device is
intended to provide safe and reliable operation provided that it is operated and
maintained in accordance with the instructions provided by ResMed. Applicable
ResMed warranty details are provided with the device at the time of original
supply. Of course, as with all electrical devices, if any irregularity becomes
apparent, you should exercise caution and have the device inspected by an
Authorized ResMed Service Center.
28
Page 34

268106r1.book Page 29 Thursday, November 30, 2006 2:35 PM
If you feel that your unit is not performing properly, see “Troubleshooting” on
page 31.
CAUTION
!
Inspection and repair should only be performed by an authorized agent.
Under no circumstances should you attempt to service or repair the flow
generator yourself.
English
29Cleaning and Maintenance
Page 35

268106r1.book Page 30 Thursday, November 30, 2006 2:35 PM
30
Page 36

268106r1.book Page 31 Thursday, November 30, 2006 2:35 PM
Troubleshooting
If there is a problem, try the following suggestions. If the problem cannot be
solved, contact your equipment supplier or ResMed. Do not attempt to open the
unit.
Problem Possible Cause Solution
English
No display. Power not connected or
switch at back is not on.
Insufficient air
delivered from the
VPAP Malibu.
The VPAP Malibu does
not start when you
breathe into the mask.
Ramp or Settling function is
in use.
Air filter is dirty. Replace air filter.
Air tubing is kinked or
punctured.
Air tubing not connected
properly.
Mask and headgear not
positioned correctly.
Plug(s) missing from access
port(s) on mask.
Pressure required for
treatment may have
changed.
Power cord not connected
properly.
Power outlet may be faulty. Try another power outlet.
Ensure the power cable is
connected and that the
switch at the back of the
unit is in the ON position.
Wait for air pressure to
build up.
Straighten or replace
tubing.
Check air tubing.
Adjust position of mask and
headgear.
Replace plug(s).
See your clinician to adjust
the pressure.
Connect power cord firmly
at both ends.
The VPAP Malibu unit not
switched on.
Breath is not deep enough
to trigger SmartStart.
Switch power switch at rear
of the VPAP Malibu to ON.
Take a deep breath in and
out through the mask.
31Troubleshooting
Page 37

268106r1.book Page 32 Thursday, November 30, 2006 2:35 PM
Problem Possible Cause Solution
There is excessive leak. Adjust position of mask and
VPAP Malibu unit does
not stop when you
remove your mask.
Mask Alarm has been
enabled; SmartStop has
automatically been
disabled.
headgear.
Plugs may be missing from
ports on mask. Replace
them.
Air tubing not connected
properly. Connect firmly at
both ends.
Air tubing kinked or
punctured. Straighten or
replace.
Disable Mask Alarm to
enable SmartStop.
SmartStop is enabled
but the flow generator
does not stop
automatically when
you remove your mask.
Display error message:
Check tube!!
Key if done
Use of a full face mask. SmartStop does not work
with a full face mask.
Incompatible humidifier or
mask system being used.
The air tubing is loose.
Air tubing is blocked.
The device motor may not
be running at the correct
speed..
Use only equipment as
recommended and supplied
by ResMed.
Check that the air tubing is
connected securely to your
mask and the air outlet on
the front of the
VPAP Malibu.
Check air tubing for
blockage.
Return your unit for
servicing.
To clear the error message,
press any key on the
VPAP Malibu keypad.
32
Page 38

268106r1.book Page 33 Thursday, November 30, 2006 2:35 PM
Problem Possible Cause Solution
Displays error
message:
SYSTEM ERROR
Call service!
Excessive motor noise. Component failure. Return your unit for
Component failure. Return your VPAP Malibu
for servicing.
servicing.
English
33Troubleshooting
Page 39

268106r1.book Page 34 Thursday, November 30, 2006 2:35 PM
34
Page 40

268106r1.book Page 35 Thursday, November 30, 2006 2:35 PM
Technical Specifications
Performance
Operating pressure range: 3 to 25 cm H2O
Maximum single fault pressure: 40 cm H2O
Pressure measurement tolerance: ±0.5 cm H2O + 4% of the measured reading
Flow measurement tolerance: ±0.2 L/s
Dynamic pressure characteristics
VSet mode: 4 to 25 cm H
AutoSet Max pressure: 20 cm H
S mode: IPAP: 3 to 25 cm H
EPAP: 3 to 25 cm H2O (measured at the end of standard 6’6" air tubing)
CPAP mode: 4 to 20 cm H2O (measured at the end of standard 6’6" air tubing)
Dynamic flow characteristics
130 L/min at 3 to 25 cm H
Sound pressure level: <30 dB (tested in accordance with the requirements of
ISO 17510-1:2002)
Data storage: 365 days of usage, leak, pressure, AHI and AI data
Dimensions (L x W x H): 10.6" x 9.1" x 5.6"
Weight: 5.1lb
Power supply: Input range 100–240V, 50–60Hz, 40VA (typical power
consumption), < 100VA (maximum power consumption)
Housing construction: Flame retardant engineering thermoplastic
Environmental conditions
Operating temperature: 41
Operating humidity: 10–95% non-condensing
Storage and transport temperature: -4oF to 140oF (-20oC to +60oC)
Storage and transport humidity: 10–95% non-condensing
Electromagnetic Compatibility
Product complies with all applicable electromagnetic compatibility requirements
(EMC) according to IEC60601-1-2, for residential, commercial, and light industry
environments. For further details, see “Guidance and Manufacturer’s
Declaration - Electromagnetic Emissions and Immunity” on page 37.
Air filter: Two-layered, powder-bonded, polyester non-woven fiber
Air tubing: Flexible plastic, 1 x 6’6" (2 m) or 1 x 9’10" (3 m) length
Air outlet: 22mm taper, compatible with EN 1281-1:1997 Anaesthetic &
Respiratory Equipment - Conical Connectors
IEC 60601-1 classification: Class II (double insulated), Type CF
Note: The manufacturer reserves the right to change these specifications
without notice.
O (measured at the end of standard 6’6" air tubing);
2
O (measured at the end of standard 6’6" air tubing);
2
O
2
o
F to 104oF (+5oC to +40oC)
O; Pressure Support: 0 to 10 cm H2O
2
English
35Technical Specifications
Page 41

268106r1.book Page 36 Thursday, November 30, 2006 2:35 PM
Table 2: Displayed values
Val ue Range Accuracy Display Resolution
Pressure sensor at air outlet
Pressure -5 to 30 cm H2O ±0.5 cm H2O 0.1 cm H2O
Flow sensor in flow generator*
Leak 0–120 L/min ** 1 L/min
Tidal volume 100–3000 mL ** 1 mL
Respiratory rate 6–60 BPM ±0.5 BPM 0.1 BPM
Minute ventilation 0.6–60 L/min ** 0.25 L/min
* Results may be inaccurate in the presence of leaks.
** The displayed values are estimates. They are provided for trending purposes only.
Table 3: Maximum low impedance flow at stated pressures
Pressure
(cm H
O)
2
6.6 177
13.2 202
20.0 202
Flow
(L/min)
Note: The manufacturer reserves the right to change these specifications
without notice.
Symbols which appear on the product
Attention, consult accompanying documents
Class II equipment
Type CF equipment
Drip Proof
Start/Stop
Mask-fit
Start/Stop or Mask-Fit
36
Page 42

268106r1.book Page 37 Thursday, November 30, 2006 2:35 PM
Guidance and Manufacturer’s Declaration - Electromagnetic
Emissions and Immunity
Guidance and manufacturer’s declaration – electromagnetic emissions
The VPAP Malibu is intended for use in the electromagnetic environment specified below. The
customer or the user of the VPAP Malibu should assure that it is used in such an environment.
Emissions test Compliance
RF emissions CISPR 11 Group 1 The VPAP Malibu uses RF energy only
RF emissions CISPR 11 Class B The VPAP Malibu is suitable for use in
Harmonic Emissions
IEC 61000-3-2
Voltage Fluctuations/Flicker
Emissions IEC 61000-3-3
Medical Electrical Equipment needs special precautions regarding EMC and needs to be installed
and put into service according to EMC information provided in this document.
Warnings: The VPAP Malibu should not be used adjacent to or stacked with other equipment.
If adjacent or stacked use is necessary, the VPAP Malibu should be observed to verify normal
operation in the configuration in which it will be used.
The use of accessories (eg, humidifiers) other than those specified in this guide is not
recommended. They may result in increased emissions or decreased immunity of the
VPAP Malibu.
Class A
Complies
Electromagnetic environment guidance
for its internal function. Therefore, its
RF emissions are very low and are not
likely to cause any interference in
nearby electronic equipment.
all establishments, including domestic
establishments and those directly
connected to the public low-voltage
network that supplies buildings used
for domestic purposes.
English
37Technical Specifications
Page 43

268106r1.book Page 38 Thursday, November 30, 2006 2:35 PM
Guidance and manufacturer’s declaration – electromagnetic immunity
The VPAP Malibu is intended for use in the electromagnetic environment specified below. The
customer or the user of the VPAP Malibu should assure that it is used in such an environment.
Immunity test
Electrostatic
discharge (ESD)
IEC 61000-4-2
Electrical fast
transient/burst
IEC 61000-4-4
Surge
IEC 61000-4-5
Voltage dips, short
interruptions and
voltage variations on
power supply input
lines.
IEC 61000-4-11
Power frequency
(50/60 Hz)
magnetic field
IEC 61000-4-8
NOTE: Ut is the AC. mains voltage prior to application of the test level.
IEC60601-1-2
test level
±6 kV contact
±8 kV air
±2 kV for power
supply lines
±1 kV for input/
output lines
±1 kV differential
mode
±2 kV common
mode
<5% Ut
(>95% dip in Ut)
for 0.5 cycle
40% Ut
(60% dip in Ut)
for 5 cycles
70% Ut
(30% dip in Ut)
for 25 cycles
<5% Ut
(>95%dip in Ut)
for 5 sec
3 A/m 3 A/m Power frequency magnetic
Compliance
level
±6 kV contact
±8 kV air
±2 kV
Not Applicable
±1 kV differential
mode
±2 kV common
mode
< 12V
(>95% dip in 240V)
for 0.5 cycle
96V
(60% dip in 240V)
for 5 cycles
168V
(30% dip in 240V)
for 25 cycles
<12V
(>95%dip in 240V)
for 5 sec
Electromagnetic
environment –
guidance
Floors should be wood,
concrete or ceramic tile. If
floors are covered with
synthetic material, the
relative humidity should be
at least 30%.
Mains power quality should
be that of a typical
commercial or hospital
environment.
Mains power quality should
be that of a typical
commercial or hospital
environment.
Mains power quality should
be that of a typical
commercial or hospital
environment.
If the user of the
VPAP Malibu requires
continued operation during
power mains interruptions,
it is recommended that the
VPAP Malibu be powered
from an uninterruptible
power source
fields should be at levels
characteristic of a typical
location in a typical
commercial or hospital
environment
38
(Continued next page)
Page 44

268106r1.book Page 39 Thursday, November 30, 2006 2:35 PM
Guidance and manufacturer’s declaration – electromagnetic immunity (Continued)
The VPAP Malibu is intended for use in the electromagnetic environment specified below. The customer or
the user of the VPAP Malibu should assure that it is used in such an environment.
Immunity
test
Conducted RF
IEC 61000-4-6
Radiated RF
IEC 61000-4-3
IEC60601-1-2
test level
3 Vrms
150 kHz to 80
MHz
10 V /m
80 MHz to 2.5
GHz
Compliance
level
3 Vrms d = 1.17 √P
10 V/m d = 0.35 √P 80 MHz to 800 MHz
Electromagnetic environment –
guidance
Portable and mobile RF communications
equipment should be used no closer to any
part of the VPAP Malibu, including cables,
than the recommended separation distance
calculated from the equation applicable to the
frequency of the transmitter.
Recommended separation distance
d = 0.70 √P 800 MHz to 2.5 GHz
where P is the maximum output power rating
of the transmitter in watts (W) according to
the transmitter manufacturer and d is the
recommended separation distance in meters
(m).
Field strengths from fixed RF transmitters, as
determined by an electromagnetic site
a
should be less than the compliance
survey,
level in each frequency range.
Interference may occur in the vicinity of
equipment marked with the following symbol:
b
English
NOTE 1: At 80 MHz and 800MHz, the higher frequency range applies.
NOTE 2: These guidelines may not apply in all situations. Electromagnetic propagation is affected by
absorption and reflection from structures, objects and people.
a
Field strengths from fixed transmitters, such as base stations for radio (cellular/cordless) telephones and
land mobile radios, amateur radio, AM and FM radio broadcast and TV broadcast cannot be predicted
theoretically with accuracy. To assess the electromagnetic environment due to fixed RF transmitters, an
electromagnetic site survey should be considered. If the measured field strength in the location in which
the VPAP Malibu is used exceeds the applicable RF compliance level above, the VPAP Malibu should be
observed to verify normal operation. If abnormal performance is observed, additional measures may be
necessary, such as reorienting or relocating the VPAP Malibu.
b
Over the frequency range 150 kHz to 80 MHz, field strengths should be less than 10 V/m.
39Technical Specifications
Page 45

268106r1.book Page 40 Thursday, November 30, 2006 2:35 PM
Recommended separation distances between portable and mobile RF communications
equipment and the VPAP Malibu
The VPAP Malibu is intended for use in an environment in which radiated RF disturbances are controlled.
The customer or the user of the VPAP Malibu can help prevent electromagnetic interference by maintaining
a minimum distance between portable and mobile RF communications equipment (transmitters) and the
VPAP Malibu as recommended below, according to the maximum output power of the communications
equipment.
Separation distance according to frequency of transmitter
m
Rated maximum output
power of transmitter
W
0.01 0.17 0.04 0.07
0.1 0.37 0.11 0.22
1 1.17 0.35 0.70
10 3.69 1.11 2.21
100 11.70 3.50 7.00
For transmitters rated at a maximum output power not listed above, the recommended separation distance
d in meters (m) can be determined using the equation applicable to the frequency of the transmitter, where
P is the maximum output power rating of the transmitter in watts (W) according to the transmitter
manufacturer.
NOTE 1: At 80 MHz and 800 MHz, the separation distance for the higher frequency range applies.
NOTE 2: These guidelines may not apply in all situations. Electromagnetic propagation is affected by
absorption and reflection from structures, objects and people.
150 kHz to 80 MHz
d = 1.17 √P
80 MHz to 800 MHz
d = 0.35 √P
800 MHz to 2.5 GHz
d = 0.70 √P
40
Page 46

268106r1.book Page 41 Thursday, November 30, 2006 2:35 PM
Limited Warranty
ResMed warrants that your ResMed product shall be free from defects in
material and workmanship for the period specified below from the date of
purchase by the initial consumer. This warranty is not transferable.
Product Warranty Period
ResMed humidifiers, ResControl™, ResLink™, ResTraxx™ 1 Year
ResMed flow generators 2 Years
English
Accessories, mask systems (including mask frame, cushion,
headgear and tubing). Excludes single-use devices.
90 Days
Note: Some models are not available in all regions.
If the product fails under conditions of normal use, ResMed will repair or replace,
at its option, the defective product or any of its components. This Limited
Warranty does not cover:
a) any damage caused as a result of improper use, abuse, modification or
alteration of the product;
b) repairs carried out by any service organization that has not been expressly
authorized by ResMed to perform such repairs;
c) any damage or contamination due to cigarette, pipe, cigar or other smoke;
d) any damage caused by water being spilled on or into a flow generator.
Warranty is void on product sold, or resold, outside the region of original
purchase. Warranty claims on defective product must be made by the initial
consumer at the point of purchase.
This warranty is in lieu of all other express or implied warranties, including any
implied warranty of merchantability or fitness for a particular purpose. Some
regions or states do not allow limitations on how long an implied warranty lasts,
so the above limitation may not apply to you.
ResMed shall not be responsible for any incidental or consequential damages
claimed to have occurred as a result of the sale, installation or use of any ResMed
product. Some regions or states do not allow the exclusion or limitation of
incidental or consequential damages, so the above limitation may not apply to
you. This warranty gives you specific legal rights, and you may also have other
rights which vary from region to region.
For further information on your warranty rights, contact your local ResMed dealer
or ResMed office.
R001-307/2 05 06
41Limited Warranty
Page 47

268106r1.book Page 42 Thursday, November 30, 2006 2:35 PM
42
Page 48

268106r1.book Page 43 Thursday, November 30, 2006 2:35 PM
Index
A
Accessories 10
Air filter
28
Antibacterial filter
B
Backlight, LCD and keypad 17
C
Cleaning 27
Components
D
Daily cleaning 27
DC power
using
25
Definitions
Dryness
Dynamic pressure characteristics
E
Electromagnetic emissions and immunity
Error messages
F
Features of the VPAP Malibu 17
Filter
Flow characteristics
Front key
H
Helpful hints 25
HumidAire 2i
Humidifier
Humidifier use
I
International use 26
K
Keys, functions 17
L
LCD screen and keypad 17
Left key
Limited Warranty
26
28
17
17
28
9
3
35
37
32
35
16
10, 16
16
41
M
Maintenance 27
Mask
9
Mask-Fit star rating, definitions
Mask-Fitting
Medical information
Menus
using
with humidifier
with ResLink and oximeter
Mouth leaks
N
Nasal irritation 26
O
Operating instructions 21
Oxygen
supplemental
P
Periodic cleaning 27
Preparing for use
R
Ramp screen 18
Ramp time
Replacing the air filter
Replacing the antibacterial filter
Responsibility, user/owner
Right key
Runny or blocked nose
S
Servicing 28
Setting up
Settling screen
Settling time
Side effects
SmartStart
SmartStop
Starting treatment
Stopping treatment
Supplemental oxygen
Symbols
24, 26
5
18
18
19
20
25
11
13
18, 23
28
3
17
26
13
18
18, 23
7
23
23
21
23
11
36
English
25
28
43Index
Page 49

268106r1.book Page 44 Thursday, November 30, 2006 2:35 PM
T
Technical specifications 35
Traveling
Troubleshooting
U
Up/Down key 17
Used (time) screen
User/owner responsibility
Using the Mask-Fitting feature
Using the menus
W
Warnings related to treatment 7
Warranty
Weekly cleaning
26
31
18
3
24
18
41
27
44
Page 50

268106r1.book Page 45 Thursday, November 30, 2006 2:35 PM
VPAP Malibu™
Guide Utilisateur
Français
Français
45
Page 51

268106r1.book Page 46 Thursday, November 30, 2006 2:35 PM
Sommaire
Introduction . . . . . . . . . . . . . . . . . . . . . . . . . . . . . . . . . . . . . . . . . . . . . . 47
Définitions 47
Responsabilité de l’utilisateur/du propriétaire 47
Informations médicales . . . . . . . . . . . . . . . . . . . . . . . . . . . . . . . . . . . 49
Usage prévu pour la VPAP™ Malibu 49
Avertissez votre médecin si... 49
Avertissements 49
Précautions 51
Le système VPAP Malibu . . . . . . . . . . . . . . . . . . . . . . . . . . . . . . . . . . 53
Masque 53
Oxygène additionnel 55
Préparation avant l’utilisation . . . . . . . . . . . . . . . . . . . . . . . . . . . . . 57
Installation de la VPAP Malibu 57
Instructions d’utilisation . . . . . . . . . . . . . . . . . . . . . . . . . . . . . . . . . . 65
Début du traitement 65
Arrêt du traitement 68
Utilisation de la fonction d’ajustement du masque 68
Utilisation d’un convertisseur CC avec la VPAP Malibu 69
Astuces 70
Nettoyage et entretien . . . . . . . . . . . . . . . . . . . . . . . . . . . . . . . . . . . . 73
Quotidien 73
Hebdomadaire 73
Périodique 73
Remplacement du filtre à air 74
Remplacement du filtre antibactérien 74
Réparations 75
Stratégie de dépannage . . . . . . . . . . . . . . . . . . . . . . . . . . . . . . . . . . 77
Caractéristiques . . . . . . . . . . . . . . . . . . . . . . . . . . . . . . . . . . . . . . . . . . 81
Garantie limitée . . . . . . . . . . . . . . . . . . . . . . . . . . . . . . . . . . . . . . . . . . 89
Index . . . . . . . . . . . . . . . . . . . . . . . . . . . . . . . . . . . . . . . . . . . . . . . . . . . . . 91
46
Page 52

268106r1.book Page 47 Thursday, November 30, 2006 2:35 PM
Introduction
Définitions
Ce guide contient des termes et icônes spéciaux qui apparaissent dans la marge
et ont pour but d’attirer votre attention sur des informations spécifiques
importantes.
AVERTISSEMENT
!
Vous met en garde contre le risque de blessure.
ATTENTION
!
Explique des mesures particulières permettant d’assurer une utilisation
efficace et sûre de l’appareil.
Remarque : remarque ou information utile.
Responsabilité de l’utilisateur/du propriétaire
L’utilisateur ou le propriétaire de cet appareil sera tenu pour seul responsable de
toute blessure ou de tout dommage matériel résultant :
• d’une utilisation non conforme aux instructions fournies
• d’un entretien ou de modifications réalisés non conformément aux
instructions et/ou par des personnes non autorisées.
Veuillez lire ce guide attentivement avant d’utiliser l’appareil.
Français
47Introduction
Page 53

268106r1.book Page 48 Thursday, November 30, 2006 2:35 PM
48
Page 54

268106r1.book Page 49 Thursday, November 30, 2006 2:35 PM
Informations médicales
Usage prévu pour la VPAP Malibu™
La VPAP Malibu est prévue pour le traitement des patients adultes atteints du
Syndrome d'Apnée Obstructive du Sommeil (SAOS). Elle est prévue pour une
utilisation en milieu hospitalier ou à domicile.
ATTENTION (USA UNIQUEMENT)
!
Selon la loi fédérale américaine, ce dispositif ne peut être vendu aux USA.
que par un médecin ou sur prescription médicale.
Avertissez votre médecin si...
Vous devez prévenir votre médecin si vous présentez l’une des pathologies
suivantes, auquel cas le traitement par PPC (pression positive continue – CPAP)
ou à deux niveaux de pression ne doit pas être utilisé :
• pneumothorax ou pneumomédiastin
• insuffisance cardiaque sévère, hypotension ou déshydratation
• intervention chirurgicale sur le cerveau, l’oreille moyenne ou interne,
l’hypophyse ou les sinus
• syndrome de détresse respiratoire
• otite moyenne ou perforation du tympan
• saignements de nez sévères.
Français
Avertissements
Le traitement par PPC ou à deux niveaux de pression doit être utilisé avec
précaution si vous présentez l’une des pathologies suivantes :
• insuffisance respiratoire
• cavités ou kystes pulmonaires ou antécédent de pneumothorax
• antécédent de saignements de nez sévères
• sinusite.
Vous devez prévenir votre médecin si vous présentez une de ces pathologies.
Votre médecin vous dira si les avantages que vous pouvez retirer du traitement
par PPC ou à deux niveaux de pression l’emportent sur les risques qu’il présente
pour vous.
Des précautions particulières devront être prises si vous êtes déshydraté ou le
devenez, par exemple à la suite d’une limitation de prise de liquide ou d’un
traitement diurétique (y compris les changements dans ledit traitement).
Arrêtez le traitement et consultez un médecin si, au cours du traitement ou au
début du traitement le soir, vous avez l’impression que vous allez vous évanouir
ou vous vous sentez étourdi.
Les avertissements suivants sont d’ordre général et concernent l’utilisation de
votre VPAP Malibu. Les avertissements spécifiques sont donnés en marge des
instructions auxquelles ils se rapportent dans le guide.
49Informations médicales
Page 55

268106r1.book Page 50 Thursday, November 30, 2006 2:35 PM
AVERTISSEMENT
!
• Ceci n’est PAS un appareil de suppléance fonctionnelle. Il peut s’arrêter
de fonctionner en cas de coupure de courant ou de panne de l’appareil.
• La température du débit d’air produit par cet appareil peut être supérieure de
11 oF (6 oC) à la température ambiante. Des précautions particulières devront
être prises lorsque la température ambiante est supérieure à 90 oF (32 oC).
• La VPAP Malibu doit être utilisée uniquement avec des masques (et
raccords) recommandés par ResMed, votre médecin ou votre thérapeute
respiratoire. Le masque ne peut être porté que si la VPAP Malibu est sous
tension et si elle fonctionne correctement. Les orifices de ventilation ou
autres orifices du masque ne doivent jamais être obstrués.
Explication : la VPAP Malibu est conçue pour être utilisée avec des masques
(ou raccords) spéciaux possédant des orifices de ventilation qui permettent
l'écoulement continu de l'air hors du masque. Lorsque l’appareil est sous
tension et qu’il fonctionne correctement, de l’air propre provenant de
l’appareil expulse l’air expiré via les orifices de ventilation du masque.
Cependant, lorsque l’appareil ne fonctionne pas, le débit d’air propre délivré
dans le masque est insuffisant et une réinhalation de l’air expiré peut se
produire. Si la réinhalation de l’air expiré dure plus de quelques minutes, elle
peut, dans certains cas, entraîner une suffocation. Cet avertissement
s’applique à la plupart des appareils de PPC ou d’aide inspiratoire avec PEP.
• La VPAP Malibu doit être raccordée uniquement aux composants,
humidificateurs ou accessoires spécifiés dans ce guide. Le raccordement
d'autres appareils ou accessoires peut causer des blessures ou endommager
la VPAP Malibu.
• À basses pressions, le débit aux orifices de ventilation de votre masque peut
s’avérer insuffisant pour expulser tous les gaz expirés hors du circuit
respiratoire. Une réinhalation peut se produire.
• Danger d’explosion — Ne pas utiliser l’appareil à proximité d’anesthésiques
inflammables.
• Si de l’oxygène est utilisé avec cet appareil, l’alimentation en oxygène doit
être fermée lorsque l’appareil n’est pas en mode de fonctionnement.
Explication de cet avertissement : lorsque l’appareil n’est pas en marche et
que l’alimentation en oxygène n’est pas fermée, l’oxygène délivré dans le
circuit du ventilateur peut s’accumuler dans l’appareil. L’oxygène accumulé
dans un appareil crée un risque d’incendie. Ceci est vrai pour la plupart des
appareils.
• L’oxygène est inflammable. Ne pas fumer ni approcher de flamme nue de
l’appareil lors de l’utilisation d’oxygène.
• Systématiquement vérifier qu’un débit d’air est généré par l’appareil avant
d’ouvrir l’alimentation en oxygène.
• Systématiquement couper l’alimentation en oxygène avant d’arrêter
l’appareil.
50
Page 56

268106r1.book Page 51 Thursday, November 30, 2006 2:35 PM
Remarque : lorsque de l’oxygène additionnel est délivré à un débit fixe, la
concentration de l’oxygène inhalé varie en fonction du point d’entrée de
l’oxygène, des réglages de pression, de la respiration du patient, du masque
sélectionné ainsi que du niveau de fuite. Cela vaut pour la plupart des appareils
de PPC.
Avertissements à propos du traitement
AVERTISSEMENT
!
• Votre apnée du sommeil réapparaîtra immédiatement si vous arrêtez votre
traitement par PPC ou à deux niveaux de pression.
• Systématiquement consulter votre médecin si vous pensez que vous allez
vous trouver dans une situation où vous ne serez pas en mesure d’utiliser
votre VPAP Malibu.
• En cas d'hospitalisation ou d'autres formes de traitement médical,
systématiquement informer le personnel médical de votre traitement par
PPC ou à deux niveaux de pression. Il est également important de contacter
le clinicien qui vous suit pour votre syndrome d’apnée du sommeil.
• En cas d'infection des voies aériennes supérieures, de l'oreille moyenne ou
des sinus, consulter votre médecin avant de poursuivre votre traitement par
PPC ou à deux niveaux de pression. Il est possible qu’il vous conseille
d’arrêter le traitement jusqu’à la disparition de l’infection. Si vous poursuivez
le traitement malgré l’infection, nous vous conseillons de laver le masque et
le circuit respiratoire après chaque utilisation.
Français
Précautions
La précaution supplémentaire suivante est d’ordre général. Les précautions
spécifiques sont données en marge des instructions auxquelles elles se
rapportent dans le guide.
ATTENTION
!
• Ne pas ouvrir le boîtier de la VPAP Malibu. Des pièces ne pouvant être
entretenues par l’utilisateur se trouvent à l’intérieur. Les réparations et
l’entretien interne doivent être effectués par un technicien agréé.
Effets secondaires possibles
La VPAP Malibu est conçue pour vous aider à passer une bonne nuit de sommeil.
Néanmoins, vous devez être conscient des problèmes éventuels qui peuvent se
produire au cours du traitement par PPC ou à deux niveaux de pression.
AVERTISSEMENT
!
Immédiatement consulter votre médecin si vous souffrez des symptômes
suivants au cours du traitement par PPC ou à deux niveaux de pression :
• maux de tête
• gêne au niveau de l’oreille moyenne ou des sinus
• sécheresse nasale, buccale ou de la gorge
• ballonnements dus à l’ingestion d’air
51Informations médicales
Page 57

268106r1.book Page 52 Thursday, November 30, 2006 2:35 PM
• fuite buccale permanente pendant le sommeil
• récurrence de symptômes d’apnée du sommeil en cours de traitement par
PPC ou à deux niveaux de pression.
Une irritation cutanée peut survenir suite à une réaction aux matériaux du
masque ou à des sangles de harnais trop serrées. En règle générale, l’irritation
cutanée peut être évitée en ajustant correctement le masque et les sangles. Si
le problème persiste, consultez votre médecin.
52
Page 58

268106r1.book Page 53 Thursday, November 30, 2006 2:35 PM
Le système VPAP Malibu
Veuillez identifier les composants suivants du système VPAP Malibu et vous y
familiariser :
VPAP Malibu
Port
auxiliaire
Vue arrière
de communication
Écran
LCD
Panneau de
contrôle
Capot avant
amovible
Sac de transport
Vue de face
Circuit respiratoire
6’6" (2 m)
Couvercle
du logement
du filtre
Interrupteur
principal (CA)
Prises
d'alimentation
Sortie d’air
Câble d’alimentation
Masque
Vous aurez également besoin d’un masque ResMed (fourni séparément). Les
masques ResMed suivants sont recommandés pour utilisation avec la
VPAP Malibu :
Masques nasaux
• Masque nasal Meridian™
• Masque nasal Mirage Vista™
• Masque nasal Ultra Mirage™
• Masque nasal Ultra Mirage II.
Masque narinaire
• Masque narinaire Mirage Swift™.
Masques faciaux
• Masque facial Ultra Mirage.
Français
Port série
Clip du câble
d'alimentation
53Le système VPAP Malibu
Page 59

268106r1.book Page 54 Thursday, November 30, 2006 2:35 PM
Remarques :
• Les appareils ResMed ont été conçus et fabriqués pour procurer une
performance optimale avec les masques avec fuite intentionnelle ResMed.
D’autres masques peuvent être utilisés, mais ils peuvent affecter la
performance et les données obtenues.
• En mode VSet, seuls les masques ResMed sont compatibles avec la
VPAP Malibu.
• Votre clinicien devra configurer votre VPAP Malibu pour l'utilisation avec votre
type de masque.
Humidificateur
Il est possible que vous ayez besoin d’un humidificateur pour pallier les
problèmes de sécheresse nasale, buccale ou de la gorge auxquels vous êtes
confronté. La VPAP Malibu est compatible avec l’humidificateur suivant :
Humidificateur chauffant HumidAire 2i™
Veuillez vous référer au guide clinique correspondant pour des informations plus
détaillées.
AVERTISSEMENT
!
Seul l’HumidAire 2i est compatible avec la VPAP Malibu. Veuillez vous
référer aux avertissements page 50.
54
Page 60

268106r1.book Page 55 Thursday, November 30, 2006 2:35 PM
Accessoires
Les accessoires suivants peuvent être utilisés avec la VPAP Malibu :
Accessoires de la VPAP Malibu
• Filtre à air hypoallergénique (non représenté)
Français
Circuit respiratoire 9’9" (3 m)
Filtre antibactérien
Remarque : ResMed recommande d'utiliser les circuits respiratoires suivants
avec la VPAP Malibu : circuit respiratoire 3 m, gris (Code produit : 14980) ; circuit
respiratoire 2 m, gris (Code produit : 14948) ; circuit respiratoire jetable,
transparent (Code produit : 14912).
Convertisseur DC-24/30
Oxygène additionnel
La VPAP Malibu est compatible avec l’oxygénothérapie à faible débit prodiguée
par une source externe et assurée à un débit fixe maximal de 15 l/min (mode S,
mode CPAP) ou 5 l/min (mode VSet). Lorsque de l’oxygène additionnel est
délivré à un débit fixe, la concentration de l’oxygène inhalé varie en fonction des
réglages de pression, de la respiration du patient, du masque sélectionné ainsi
que du niveau de fuite. Cet avertissement vaut pour la plupart des appareils de
PPC.
AVERTISSEMENT
!
• Si de l’oxygène est utilisé avec cet appareil, l’alimentation en oxygène
doit être fermée lorsque l’appareil n’est pas en mode de
fonctionnement.
Explication : lorsque l’appareil n’est pas en marche et que l’alimentation
en oxygène n’est pas coupée, l’oxygène délivré dans le circuit du
ventilateur peut s’accumuler dans l’appareil et créer un risque
d’incendie.
55Le système VPAP Malibu
Page 61

268106r1.book Page 56 Thursday, November 30, 2006 2:35 PM
• Systématiquement commencer le traitement avec la VPAP Malibu avant
d’ouvrir l’alimentation en oxygène.
• Toujours couper l’alimentation en oxygène avant d’interrompre le
traitement avec la VPAP Malibu.
• L’oxygène est inflammable. Ne pas fumer ni approcher de flamme nue
de l’appareil lors de l’utilisation d’oxygène.
56
Page 62

268106r1.book Page 57 Thursday, November 30, 2006 2:35 PM
Préparation avant l’utilisation
Installation de la VPAP Malibu
AVERTISSEMENT
!
• Ne connecter aucun appareil (autre que le ResLink™) au port auxiliaire.
Bien que votre prestataire de santé puisse raccorder des appareils
spécialement prévus à cet effet au port auxiliaire de la VPAP Malibu, le
raccordement d'autres appareils peut causer des blessures ou
endommager l'appareil.
• En milieu hospitalier, tout PC utilisé avec la VPAP Malibu doit se trouver
à une distance minimale de 5’ (1,5 m) du patient ou au moins 8’ (2,5 m)
au-dessus de lui. L’ordinateur doit également être conforme à la norme
CEI 60950 ou équivalente.
Remarque : le couvercle du logement du filtre à air protège l’appareil contre
tout déversement accidentel de liquides. Veiller à ce que le filtre à air et le
couvercle de son logement soient toujours en place.
1 Placez la VPAP Malibu sur une surface plane à proximité du dosseret de votre lit.
Si l’appareil est posé sur le sol, veillez à ce qu’il le soit dans un endroit exempt
de poussière, de literie, de vêtements ou de tout autre objet susceptible
d’obstruer l’entrée d’air.
Français
ATTENTION
!
Veiller à placer l’appareil de façon à éviter que quelqu’un puisse buter
dedans, le faire tomber ou se prendre les pieds dans le câble d’alimentation.
Branchez le câble d’alimentation :
2
Il y a deux prises à l’arrière de l’appareil : celle du haut pour un câble CA (courant
alternatif : alimentation secteur standard) et celle du bas pour un câble CC
(courant continu : alimentation de secours) (voir « Utilisation d’un convertisseur
CC avec la VPAP Malibu » page 69). ResMed vous recommande d’utiliser le
câble d’alimentation CA fourni avec l’appareil.
Ce câble développé spécifiquement par ResMed est maintenu en place par un
clip de verrouillage.
Pour insérer le clip de verrouillage, pincez les deux extrémités et insérez les
broches dans les trous prévus à cet effet des deux côtés de la prise. Branchez le
câble d’alimentation à la prise. Poussez le clip de verrouillage vers le bas de
manière à ce que le câble soit maintenu en place. Branchez une extrémité du
câble d’alimentation à la prise d’alimentation située à l’arrière de l’appareil et
l’autre extrémité à une prise de courant.
57Préparation avant l’utilisation
Page 63

268106r1.book Page 58 Thursday, November 30, 2006 2:35 PM
ATTENTION
!
Ne pas connecter un câble d'alimentation CA et un câble d'alimentation CC
simultanément à la VPAP Malibu.
AVERTISSEMENT
!
Vérifier que le câble d’alimentation et la fiche sont en bon état et que
l’équipement n’est pas endommagé.
Raccordez fermement une extrémité du circuit respiratoire à la sortie d’air de
3
l’appareil.
Interrupteur principal (CA)
Clip de verrouillage
Câble d’alimentation CA
58
AVERTISSEMENT
!
Seul le circuit respiratoire ResMed peut être utilisé avec votre appareil. Les
circuits respiratoires d’un autre type risquent de modifier la pression reçue
et de réduire l’efficacité de votre traitement.
Assemblez votre masque conformément à son mode d’emploi.
4
Page 64

268106r1.book Page 59 Thursday, November 30, 2006 2:35 PM
Raccordez le masque à l’extrémité libre du circuit respiratoire.
5
La VPAP Malibu est maintenant prête à l’emploi. Pour commencer le traitement,
voir « Instructions d’utilisation » page 65.
Français
59Préparation avant l’utilisation
Page 65

268106r1.book Page 60 Thursday, November 30, 2006 2:35 PM
Utilisation d’un humidificateur
AVERTISSEMENT
!
La VPAP Malibu n’est pas compatible avec les humidificateurs non intégrés.
HumidAire 2i
L’HumidAire 2i se fixe sur le devant de la VPAP Malibu pour procurer une
humidification chauffante. Aucun autre accessoire n’est requis pour l’utiliser. La
VPAP Malibu détecte automatiquement la présence de l’HumidAire 2i. Il n’est
pas nécessaire de modifier le menu. Veuillez vous référer au manuel utilisateur
correspondant pour des informations plus détaillées.
60
AVERTISSEMENT
!
• Vérifier que le câble d’alimentation et la fiche sont en bon état et que
l’équipement n’est pas endommagé.
• Vérifier que le réservoir est vide et bien sec avant de transporter
l’HumidAire 2i.
• Lors de l'utilisation du sac de transport, systématiquement détacher
l'HumidAire 2i de la VPAP Malibu avant de les ranger dans leurs poches
respectives.
La VPAP Malibu est maintenant prête à l’emploi. Pour commencer le traitement,
voir « Instructions d’utilisation » page 65.
Page 66

268106r1.book Page 61 Thursday, November 30, 2006 2:35 PM
Caractéristiques de la VPAP Malibu
Écran LCD et clavier
Le panneau de contrôle de la VPAP Malibu comprend un écran LCD et un clavier.
Écran LCD
Français
Touche de gauche
Touche de déplacement
Start/Stop
vers le haut/bas
Le clavier de la VPAP Malibu comprend les touches suivantes :
Touche Fonction
Bas
• Permet de démarrer ou d’arrêter le traitement.
• En maintenant cette touche enfoncée pendant au moins 3
Start/Stop
Mask-fit
secondes, on active la fonction d'ajustement du masque.
Déplacement
vers le haut/bas
Gauche
• Permet de naviguer dans les menus, les sous-menus et les options
de réglage de la VPAP Malibu.
• Permet d'exécuter la fonction indiquée par le texte d'explication
affiché sur l’écran LCD au-dessus de cette touche. Le texte
d'explication comprend les éléments suivants : menu, entrée,
changer et appliquer.
Droite
• Permet d'exécuter la fonction indiquée par le texte d'explication
affiché sur l’écran LCD au-dessus de cette touche. Le texte
d'explication comprend les éléments suivants : quitter et annuler.
Touche de
sk-fit
a
M
droite
Clavier
Touche du bas
Pour vous aider à régler la VPAP Malibu, le clavier et l’écran LCD sont équipés
d’un rétro-éclairage. Le rétro-éclairage de l’écran LCD s’allume lorsque l’appareil
est mis sous tension ou lorsque vous appuyez sur une touche. Il s’éteint au bout
de deux minutes. Le rétro-éclairage du clavier est allumé en permanence lorsque
la VPAP Malibu est sous tension.
61Préparation avant l’utilisation
Page 67

268106r1.book Page 62 Thursday, November 30, 2006 2:35 PM
Utilisation des menus
La VPAP Malibu offre un ensemble de fonctions organisées en menus et sousmenus. Les menus et sous-menus, accessibles via l’écran LCD, vous permettent
de visualiser et de modifier les paramètres d’une fonction particulière. Vous
pouvez accéder aux menus que la VPAP Malibu soit en mode d’attente ou qu’elle
délivre un traitement.
Après l’affichage de l’écran Bienvenue et une fois que les tests automatiques de
l’appareil sont terminés, l’écran Rampe (mode S et mode CPAP) ou Attente
(mode VSet) s’affiche.
Écran Rampe
(Mode S et mode CPAP) Si votre clinicien a réglé une durée de rampe maximale,
l’écran Rampe s’affiche après l’écran Bienvenue. Dans l’écran Rampe, vous
pouvez régler une durée de rampe immédiatement. La durée de rampe est la
période pendant laquelle la pression augmente d’une pression basse confortable
à la pression prescrite pour le traitement. Voir « Durée de rampe » page 67.
La durée de rampe peut être modifiée par incréments de cinq minutes (de OFF
à la durée de rampe maximale fixée par votre clinicien) à l’aide de la touche de
déplacement vers le haut/bas.
Écran Attente
(Mode VSet) Si votre clinicien a réglé un temps d’attente maximal, l’écran
Attente s’affiche après l’écran Bienvenue. Dans l’écran Attente, vous pouvez
régler un temps d’attente immédiatement. Le temps d’attente correspond à la
durée pendant laquelle la VPAP Malibu reste à la pression minimale avant de
commencer à augmenter la pression en réponse aux événements. Voir « Temps
d’attente » page 67.
Le temps d’attente peut être modifié par incréments de cinq minutes (de OFF au
temps d’attente maximal fixé par votre clinicien) à l’aide de la touche de
déplacement vers le haut/bas.
62
Menu
Le menu vous permet d’afficher le nombre d’heures d’utilisation et la version du
logiciel de votre VPAP Malibu. Le nombre total d’heures pendant lesquelles vous
avez utilisé l’appareil depuis sa dernière réinitialisation par le clinicien est affiché
sur l’écran Hrs Util. (durée). Cet écran indique également le nombre de jours
pendant lesquels la VPAP Malibu a été utilisée par rapport au nombre total de
jours disponibles. L’écran LOG indique la version du logiciel actuellement installé
sur votre VPAP Malibu.
Page 68

268106r1.book Page 63 Thursday, November 30, 2006 2:35 PM
La Figure 1 donne un récapitulatif du menu standard de la VPAP Malibu.
• Pour accéder aux menus de la VPAP Malibu :
Appuyez sur la touche de gauche (menu) pendant l’affichage de l’écran
VPAP Malibu (ou Rampe ou Attente).
• Pour faire défiler les options d’un menu :
Appuyez sur la touche de déplacement vers le haut/bas.
• Pour quitter le menu :
Appuyez sur la touche de droite (quitter).
Mode VSet Mode S et mode CPAP
ATTENT: 20min
menu
EXPIR.: MOYENNE
changer quit
HRS UTIL: 0000h
changer quit
LOG: SX3650201
quit
RAMP: 30min
menu
Figure 1 : Menu de la VPAP Malibu
Remarques :
• Les écrans Attente et Rampe ne sont disponibles que si un clinicien a réglé
les paramètres Att. Max et Rampe Max.
• L'écran Expiration s'affiche uniquement si l'accès à cet écran a été activé par
un clinicien.
Français
63Préparation avant l’utilisation
Page 69

268106r1.book Page 64 Thursday, November 30, 2006 2:35 PM
Menu avec un humidificateur
Si un HumidAire 2i est raccordé à la VPAP Malibu et si le traitement n’a pas
commencé, l’un des écrans suivants s’affiche sur l’écran LCD de la
VPAP Malibu :
Avant le début du traitement :
VPAP Malibu
menu chauff
Rampe Max réglée sur 0
RAMP: 20min
menu chauff
Modes CPAP et S
ATTENT: 20min
menu chauff
Mode VSet
ou
Attente Max réglée sur 0
Après le début du traitement :
VPAP Malibu
menu
Remarque : l'écran VPAP Malibu est affiché pendant trois secondes, puis passe aux
écrans de traitement (voir « Début du traitement » page 65).
Figure 2 : Écrans avec un humidificateur
Menu avec un ResLink et un oxymètre
Si votre clinicien vous a recommandé d’utiliser un ResLink, et si le ResLink et un
oxymètre sont connectés à la VPAP Malibu, alors la SpO2 (saturation en
oxygène) et le RC (rythme cardiaque) s’affichent en premier. Si le traitement n’a
pas commencé, l’un des écrans suivants s’affiche sur la VPAP Malibu, qu’un
humidificateur soit raccordé ou non :
Avant le début du traitement :
SpO2: 98%
menu RC: 60
RAMP: 20min 98%
menu RC: 60
ATTENT: 20min 98%
menu RC: 60
64
Rampe Max désactivée
ou Attente Max désactivée
Rampe Max réglée sur
une valeur autre que zéro
Figure 3 : Écrans avec un ResLink et un oxymètre
Attente Max réglée sur
une valeur autre que zéro
Page 70

268106r1.book Page 65 Thursday, November 30, 2006 2:35 PM
Instructions d’utilisation
Début du traitement
À ce stade, la VPAP Malibu devrait être installée à côté de votre lit et raccordée
au circuit respiratoire et au masque. Voir « Installation de la VPAP Malibu »
page 57.
1 Mettez l’interrupteur principal situé à l’arrière de l’appareil sur marche (I).
Interrupteur
principal (CA)
Lorsque la VPAP Malibu est mise sous tension, un message de bienvenue
s’affiche sur l’écran LCD. Ensuite, l’écran VPAP Malibu (ou Rampe ou Attente)
s’affiche.
Remarque : si vous utilisez l’appareil avec un HumidAire 2i, veuillez vous
référer au manuel utilisateur correspondant pour les instructions de
fonctionnement.
Mettez votre masque comme indiqué dans son mode d’emploi.
2
Français
Allongez-vous et placez le circuit respiratoire de manière à ce qu’il puisse suivre
3
vos mouvements pendant que vous dormez.
ATTENTION
!
• Ne pas laisser de longueurs inutiles de tuyau en haut du lit. Elles
pourraient s’enrouler autour de votre tête ou de votre cou pendant que
vous dormez.
• Vérifier que la zone autour de l’appareil est propre et sèche. Elle doit
également être exempte de literie, de vêtements ou de toute autre
source potentielle de blocage de l'alimentation en air.
Pour commencer le traitement, il vous suffit de respirer dans le masque (voir
4
« SmartStart™/SmartStop » page 67).
L’air commence à s’écouler lentement, et le débit augmente progressivement
pour atteindre la pression de service au bout de 10 à 15 secondes environ.
Remarque : si la VPAP Malibu ne démarre pas automatiquement, vous pouvez
alors appuyer sur la touche du bas.
65Instructions d’utilisation
Page 71

268106r1.book Page 66 Thursday, November 30, 2006 2:35 PM
Mode CPAP Mode S Mode VSet
(Les premiers écrans ne s'affichent que si l'option Rampe ou Attente est sélectionnée)
Indicateur de mode/rampe
Pression PPC (CPAP)
C:RAMP 8.0
A> quit
CPAP 15.0
A>>> quit
Indicateur de déclenchement
de l'inspiration
Graphique de pression
Indicateur d'apnée
Ventilation minute (l/min)
Respiration/phase/expiration
Temps inspiratoire moyen
(5 dernières respirations)
Saturation en oxygène (%)
Fréquence cardiaque (BPM)
Remarque : les valeurs (réglées) sont celles sélectionnées par le clinicien.
Indicateur de mode/rampe
S:RAMP 8.0-11.0
S>>>> AI 3.0
Mode
Fuite s
SPONT: 8.0-11.0
S>>>> AI 3.0
FT: 24L/min FR: 12
VM: 12.0 VC:1000
S**TiMn TiMx 4.0
Ti 2.1s 1: 1.6
SpO2 : 12%
RC: 57 quit
Pression EPAP (réglée)
Pression IPAP (réglée)
Aide inspiratoire
Fréquence respiratoire (bpm)
Volume courant (ml)
(Ligne du haut : modes VSet et S
uniquement)
Réglage TiMax (sec)
Rapport I:E moyen (5 dernières
respirations)
Indicateur de mode/attente
EPAP
IPAP
VS:ATT. 8.0-11.0
A>>>> AI 3.0
AI (réglée)
VSET 8.0-11.0
A>>>> AI 3.0
Indicateur d'apnée
(Cet écran ne s'affiche que si un
ResLink et un oxymètre sont
connectés)
Les écrans de traitement contiennent les informations suivantes :
Mode de traitement : le mode de traitement est réglé par votre clinicien. Les
options sont les suivantes : CPAP, S et VSet.
Indicateur de rampe : (mode CPAP, mode S) s’affiche si la VPAP Malibu est en
mode de rampe. Disparaît une fois que la durée de rampe s’est écoulée.
Indicateur d'attente : (mode VSet) s’affiche si la VPAP Malibu est en mode
d’attente. Disparaît une fois que le temps d’attente s’est écoulé.
Pression(s) réglée(s) : en mode CPAP, il s’agit de la pression de traitement
réglée (en centimètres d’eau). En mode S, il s’agit des pressions d’expiration et
d’inspiration (en centimètres d’eau). En mode VSet, il s’agit de la pression
AutoSet (valeur centrale moyenne de pression entre l’inspiration et l’expiration).
Indicateur de déclenchement : (mode S) manière dont la VPAP Malibu change
de pression lorsque vous inspirez. « S » (Spontané) indique un changement
généré par le patient.
Indicateur d’apnée : (mode CPAP, mode VSet) indicateur visuel ; un « A »
s’affiche pour indiquer qu’une apnée est en train de se produire.
Histogramme de pression : représentation graphique des variations de
pression.
Fuite : fuite au masque actuelle (en litres par minute).
66
Page 72

268106r1.book Page 67 Thursday, November 30, 2006 2:35 PM
Fréquence respiratoire : nombre de respirations par minute.
Ventilation minute : volume d’air inspiré par minute (en litres par minute).
Volume courant : volume d’air inspiré par respiration (en millilitres par
respiration).
Respiration/phase/expiration : cette option s’affiche dans le format « type de
respiration/affichage de la phase/type d’expiration » comme indiqué ci-dessous
(p. ex. S**TiMn) :
Type de respiration : S = spontanée
Affichage de la phase : ** = inspiration, (blanc) = expiration
Type d'expiration :
TiMn = expiration déclenchée à la fin de la durée d'inspiration minimale
TiMx = expiration déclenchée à la fin de la durée d'inspiration maximale
C = expiration déclenchée spontanément dans les limites de TiMin et
TiMax
Saturation en oxygène : saturation de l’hémoglobine en oxygène (en %).
Fréquence (rythme) cardiaque : nombre de battements de cœur en 60
secondes (en battements par minute).
Durée de rampe
(Mode S, mode CPAP) La fonction Rampe (durée) peut être activée par votre
clinicien. Si vous avez du mal à vous endormir à la pression maximum,
sélectionnez une durée de rampe. Le débit d’air démarre lentement pendant que
vous vous endormez. La pression augmente progressivement jusqu’à la
pression de service sur la durée de rampe sélectionnée. Le clinicien a défini une
durée de rampe maximale ; vous pouvez sélectionner toute valeur jusqu’au
maximum.
Français
Temps d’attente
(Mode VSet ) Le temps d’attente est une fonction que votre clinicien peut
activer. Si vous avec du mal à vous endormir lorsque la VPAP Malibu est en mode
de fonctionnement, sélectionnez un temps d’attente. Le débit reste à la pression
minimale pendant la durée que vous avez réglée, vous donnant le temps de vous
endormir. Une fois cette durée écoulée, la VPAP Malibu est en mesure
d’augmenter la pression en réponse aux événements.
Le clinicien définit un temps d’attente maximal ; vous pouvez sélectionner toute
valeur jusqu’au maximum.
SmartStart™/SmartStop
La VPAP Malibu offre une fonction appelée SmartStart qui démarre le traitement
automatiquement lorsque vous respirez dans le masque. Si SmartStop est
activée, le traitement s’arrête automatiquement lorsque vous retirez votre
masque. Cela signifie que vous n’avez pas besoin d’appuyer sur la touche du bas
pour commencer ou arrêter le traitement.
67Instructions d’utilisation
Page 73

268106r1.book Page 68 Thursday, November 30, 2006 2:35 PM
Remarque : SmartStop ne fonctionne pas si :
• vous avez sélectionné FACIAL comme option de masque.
• votre clinicien a activé l'alarme de masque.
Arrêt du traitement
Pour arrêter le traitement à tout moment, il vous suffit de retirer votre masque
(si votre clinicien a activé SmartStop)
ou
retirez votre masque et appuyez sur la touche du bas.
Utilisation de la fonction d’ajustement du masque
La fonction d’ajustement du masque de la VPAP Malibu vous aide à mettre votre
masque correctement en place. La fonction d’ajustement du masque génère une
pression d’air pendant trois minutes avant le début du traitement pour permettre
l’ajustement du masque dans le but de minimiser les fuites. Si une durée de
rampe (mode S, mode CPAP) ou un temps d’attente (mode VSet) est
sélectionné, vous avez la possibilité d’ajuster le masque à une pression plus
proche de la pression prescrite. Pour utiliser la fonction d’ajustement du
masque :
1 Mettez votre masque comme indiqué dans son mode d’emploi.
Maintenez la touche du bas enfoncée pendant au moins trois secondes jusqu’à
2
ce que le débit d’air démarre.
Le message suivant est affiché sur l’écran LCD indiquant que la fonction
d’ajustement du masque est activée. L’appareil augmente progressivement la
pression jusqu’à la pression d’ajustement du masque qu’il maintient pendant
trois minutes. Une note d’ajustement du masque (en étoiles) est également
affichée. Voir « Signification des notes d’ajustement du masque (en étoiles) »
page 69.
Ajus.Masque
excel.
Remarques :
• La note d’ajustement du masque (en étoiles) disparaît au bout de trois
minutes.
• La fonction d’ajustement du masque est disponible lorsque l’écran
VPAP Malibu est affiché sur l’écran LCD. Elle est également accessible à
partir de l'écran Rampe ou Attente (qui ne s'affiche que si une rampe
maximale ou un temps d'attente maximal a été réglé).
• Dans les modes S et CPAP, la pression d’ajustement du masque est
10 cm H2O ou la pression fixe de traitement si celle-ci est supérieure.
• En mode VSet, la pression d'ajustement du masque est 10 cm H
*****
Note d’ajustement du
masque (en étoiles)
2
O.
68
Page 74

268106r1.book Page 69 Thursday, November 30, 2006 2:35 PM
• Les fonctions Alarme de masque et SmartStop sont désactivées lorsque la
fonction d'ajustement du masque est utilisée.
Ajustez votre masque, la bulle du masque et le harnais jusqu’à ce que le masque
3
soit à la fois bien en place et confortable.
Une fois que votre masque est bien en place et confortable, vérifiez la note
d’ajustement sur l’écran LCD. La signification des notes d’ajustement du
masque (en étoiles) est donnée dans le Tableau 1.
Remarque : si quelqu’un d’autre peut vérifier la note d’ajustement de votre
masque à votre place, allongez-vous pour ajuster le masque, la bulle et le
harnais.
Le traitement commence au bout de trois minutes.
4
• Si vous ne voulez pas attendre trois minutes, maintenez la touche du bas
enfoncée pendant au moins trois secondes pour commencer le traitement
immédiatement.
• Si vous appuyez sur la touche du bas pendant moins de trois secondes,
l’appareil retourne en mode d’attente (l’écran VPAP Malibu, Rampe ou
Attente s’affiche).
Tableau 1 : Signification des notes d’ajustement du masque (en étoiles)
Français
Note (en étoiles) Définition
***** Excellent
****- Très bon
***- - Bon
**- – - Ajuster le masque
*- – - - Ajuster le masque
FUITE IMPORTANTE Ajuster le masque
Utilisation d’un convertisseur CC avec la VPAP Malibu
La VPAP Malibu peut fonctionner sur courant continu en cas de panne de
courant. ResMed propose un convertisseur qui permet le branchement d’une
batterie 12V ou 24V à l’entrée CC de la VPAP Malibu. Lorsque vous faites
fonctionner l’appareil sur courant continu, la mise sous ou hors tension se fait au
niveau de l’interrupteur du connecteur à la source d’alimentation, et pas au
niveau de l’interrupteur principal à l’arrière de la VPAP Malibu. Le convertisseur
CC est un accessoire séparé que vous pouvez vous procurer auprès de votre
distributeur ResMed.
Le dispositif de chauffage de l’humidificateur est automatiquement désactivé
lorsque la VPAP Malibu fonctionne sur l’alimentation CC.
69Instructions d’utilisation
Page 75

268106r1.book Page 70 Thursday, November 30, 2006 2:35 PM
La consommation de courant de la VPAP Malibu varie en fonction du réglage des
paramètres de traitement. Vous devez déterminer le type et la taille de batterie
requis pour le fonctionnement sur courant continu et nous vous recommandons
de contacter le service technique de ResMed ou de consulter le site Internet de
ResMed pour obtenir les informations relatives à votre application.
ATTENTION
!
• La VPAP Malibu fonctionne sur courant CC 24V. Ne connecter la
VPAP Malibu à une alimentation CC qu’à l’aide du convertisseur
DC-24/30 ResMed spécifié pour cette application.
• Ne pas connecter un câble d'alimentation CA et un câble d'alimentation
CC simultanément à la VPAP Malibu.
Astuces
Initialement
Fuites buccales
Lorsque vous utilisez un masque nasal, essayez de garder la bouche fermée
pendant le traitement. Les fuites d’air buccales peuvent diminuer l’efficacité de
votre traitement. Si les fuites buccales vous posent problème, vous avez la
possibilité d’utiliser un masque facial ou une mentonnière. Contactez votre
clinicien ou votre prestataire de santé pour de plus amples informations.
Ajustement du masque
L’appareil délivre un traitement optimal lorsque le masque est bien ajusté et
confortable sans être trop serré. Le traitement peut être affecté par les fuites ;
c’est pourquoi il est important de les éliminer lorsqu’elles se produisent.
Si vous avez du mal à ajuster votre masque confortablement, contactez votre
laboratoire du sommeil ou votre prestataire de santé. Il est possible qu’une autre
taille de masque permette de résoudre votre problème.
Vous pouvez également vous servir de la fonction d’ajustement du masque pour
vous aider à mettre votre masque correctement en place. Voir « Utilisation de la
fonction d’ajustement du masque » page 68.
Avant de mettre votre masque, lavez-vous le visage pour éliminer tout excès de
sébum. Cette précaution permet un meilleur ajustement du masque et prolonge
la durée de vie de la bulle du masque.
70
Irritation nasale
Sécheresse
Il est possible que vous souffriez de sécheresse nasale, buccale et/ou de la gorge
pendant le traitement, notamment pendant les mois d’hiver. Dans de nombreux
cas, l’utilisation d’un humidificateur permet de pallier ce problème. Contactez
votre clinicien pour plus de détails.
Page 76

268106r1.book Page 71 Thursday, November 30, 2006 2:35 PM
Rhinorrhée ou nez bouché
Il est possible que vous éternuiez et/ou que votre nez coule ou se bouche lors
des premières semaines de traitement. Dans de nombreux cas, ces symptômes
d’irritation nasale peuvent être éliminés à l’aide d’un humidificateur. Contactez
votre clinicien pour plus de détails.
Voyager avec la VPAP Malibu
Utilisation à l’étranger
Votre VPAP Malibu est équipée d’une carte d’alimentation qui lui permet de
fonctionner dans différents pays. Elle peut fonctionner avec des courants de 100
– 240V et 50 – 60 Hz. Aucun réglage spécial n’est requis, mais vous aurez besoin
d’un câble d’alimentation homologué pour le pays où vous voulez utiliser
l’appareil.
Français
71Instructions d’utilisation
Page 77

268106r1.book Page 72 Thursday, November 30, 2006 2:35 PM
72
Page 78

268106r1.book Page 73 Thursday, November 30, 2006 2:35 PM
Nettoyage et entretien
Vous devez effectuer régulièrement le nettoyage et l’entretien décrits dans cette
section.
Quotidien
1. Détachez le circuit respiratoire et suspendez-le dans un endroit propre et sec
jusqu’à la prochaine utilisation. Ne suspendez pas le circuit respiratoire à la
lumière directe du soleil afin d’éviter qu’il ne durcisse ou ne se fissure avec le
temps.
2. Nettoyez votre masque conformément à son mode d’emploi.
3. Si vous utilisez un humidificateur, nettoyez-le conformément à son mode
d’emploi.
Hebdomadaire
1. Détachez le circuit respiratoire de la VPAP Malibu et du masque.
2. Nettoyez le masque conformément aux instructions fournies.
3. Lavez le circuit respiratoire à l’eau tiède avec un détergent doux. Rincez
soigneusement et suspendez-le pour le faire sécher.
4. Avant de les réutiliser, assemblez le masque et le harnais conformément au
mode d’emploi du masque.
5. Raccordez le circuit respiratoire à la sortie d’air et au masque.
Français
ATTENTION
!
• Ne pas utiliser de solutions à base d’eau de Javel, de chlore, d’alcool ou
d’aromates (y compris les huiles parfumées), ni de savons hydratants ou
antibactériens pour le lavage de la bulle, du masque, du circuit
respiratoire ou de la VPAP Malibu. Ces solutions peuvent causer le
durcissement du produit et réduire sa durée de vie.
• Ne pas laver ni sécher l’entourage rigide à une température supérieure à
o
176
F (80 oC). L’exposition à des températures supérieures peut
entraîner une réduction de la durée de vie du produit.
• Ne pas suspendre le circuit respiratoire à la lumière directe du soleil afin
d’éviter qu’il ne durcisse ou ne se fissure avec le temps.
Périodique
1. Le masque et le circuit respiratoire subissent une usure normale. Inspectezles régulièrement pour vérifier qu’ils ne sont pas endommagés.
2. Nettoyez l’extérieur de l’appareil à l’aide d’un chiffon humide et d’un
détergent doux.
3. Inspectez le filtre à air pour vérifier qu’il n’est ni obstrué par des impuretés ni
percé. Voir « Remplacement du filtre à air » page 74.
73Nettoyage et entretien
Page 79

268106r1.book Page 74 Thursday, November 30, 2006 2:35 PM
AVERTISSEMENT
!
Risque de chocs électriques. Ne pas immerger l’appareil ni le câble
d’alimentation dans l’eau. Systématiquement débrancher l’appareil avant
de le nettoyer et vérifier qu’il est bien sec avant de le brancher à nouveau.
ATTENTION
!
Ne pas tenter d’ouvrir la VPAP Malibu. Des pièces ne pouvant être
entretenues par l’utilisateur se trouvent à l’intérieur. Les réparations et
l’entretien interne doivent être effectués par un technicien agréé.
Remplacement du filtre à air
Inspectez le filtre à air une fois par mois pour vérifier qu’il n’est ni bloqué par des
impuretés ni percé. Dans des conditions normales de fonctionnement, le filtre à
air de la VPAP Malibu doit être remplacé tous les six mois (ou plus souvent si
votre appareil se trouve dans un environnement poussiéreux). Pour remplacer le
filtre à air :
Remarque : pour les détails concernant la vérification et le remplacement du
filtre hypoallergénique (si vous en utilisez un), veuillez vous référer au mode
d'emploi du filtre à air hypoallergénique.
1. Retirez le couvercle du logement du filtre à air à l'arrière de la VPAP Malibu.
Couvercle du
logement du
filtre à air
2. Retirez et jetez le filtre à air usagé.
3. Insérez un nouveau filtre à air avec la face bleue tournée vers l’extérieur.
4. Remettez le couvercle du logement du filtre à air en place.
AVERTISSEMENT
!
Ne pas laver le filtre à air. Il n’est ni lavable ni réutilisable.
Remplacement du filtre antibactérien
Vous devez régulièrement vérifier et remplacer le filtre antibactérien, comme
indiqué dans son mode d’emploi.
Remarque : ResMed recommande d'utiliser le filtre Pall BB50TE.
74
Page 80

268106r1.book Page 75 Thursday, November 30, 2006 2:35 PM
Réparations
Ce produit (VPAP Malibu) doit être inspecté par un service technique agréé
ResMed 5 ans après la date de fabrication. Avant cette date, l’appareil devrait
assurer un fonctionnement fiable et sûr à condition qu’il soit utilisé et entretenu
conformément aux instructions fournies par ResMed. Les informations
concernant la garantie ResMed sont fournies avec l’appareil lors de sa livraison
initiale. Comme avec tous les appareils électriques, si vous constatez un défaut
quelconque, vous devez faire vérifier l’appareil par un service après-vente agréé
ResMed.
Si vous pensez que votre appareil ne fonctionne pas correctement, voir
« Stratégie de dépannage » page 77.
ATTENTION
!
L’inspection et les réparations doivent être effectuées par un technicien
agréé. Vous ne devez en aucun cas essayer d’entretenir ou de réparer
l’appareil vous-même.
Français
75Nettoyage et entretien
Page 81

268106r1.book Page 76 Thursday, November 30, 2006 2:35 PM
76
Page 82

268106r1.book Page 77 Thursday, November 30, 2006 2:35 PM
Stratégie de dépannage
En cas de problème, reportez-vous aux suggestions suivantes. Si le problème
persiste, contactez votre prestataire de santé ou ResMed. N’essayez pas
d’ouvrir l’appareil.
Problème Cause possible Solution
Aucun affichage. L’appareil n’est pas branché
au secteur ou l’interrupteur
à l’arrière de l’appareil n’est
pas sur marche.
Le débit d'air délivré
par la VPAP Malibu est
insuffisant.
La VPAP Malibu ne
démarre pas lorsque
vous respirez dans le
masque.
La durée de rampe ou le
temps d'attente est utilisé.
Le filtre à air est sale. Remplacez le filtre à air.
Le circuit respiratoire est
entortillé ou percé.
Le circuit respiratoire n’est
pas correctement raccordé.
Le masque et le harnais
sont mal mis en place.
Un ou des bouchons
manquent au niveau du ou
des ports du masque.
La pression requise pour le
traitement a peut-être
changé.
Le câble d’alimentation
n’est pas correctement
branché.
La prise de courant est
peut-être défectueuse.
Vérifiez que le câble
d’alimentation est branché
et que l’interrupteur à
l’arrière de l’appareil est sur
MARCHE.
Attendez que la pression
augmente.
Désentortillez ou remplacez
le circuit respiratoire.
Vérifiez le circuit
respiratoire.
Ajustez la position du
masque et du harnais.
Remplacez le ou les
bouchons.
Consultez votre clinicien
pour ajuster la pression.
Branchez le câble
d’alimentation
correctement aux deux
extrémités.
Essayez une autre prise de
courant.
Français
La VPAP Malibu n’est pas
sous tension.
La respiration n’est pas
assez profonde pour
déclencher SmartStart.
Mettez l’interrupteur
principal à l’arrière de la
VPAP Malibu sur MARCHE.
Respirez profondément
dans le masque.
77Stratégie de dépannage
Page 83

268106r1.book Page 78 Thursday, November 30, 2006 2:35 PM
Problème Cause possible Solution
Il y a une fuite excessive. Ajustez la position du
La VPAP Malibu ne
s'arrête pas lorsque
vous retirez le masque.
L’alarme de masque a été
activée ; SmartStop a donc
été désactivée
automatiquement.
masque et du harnais.
Il est possible que des
bouchons manquent au
niveau des ports du
masque. Remplacez-les le
cas échéant.
Le circuit respiratoire n’est
pas correctement raccordé.
Raccordez le circuit
respiratoire correctement
aux deux extrémités.
Le circuit respiratoire est
entortillé ou percé.
Désentortillez ou remplacez
le circuit respiratoire.
Désactivez l’alarme de
masque pour activer
SmartStop.
78
SmartStop est activée
mais l’appareil ne
s’arrête pas
automatiquement
lorsque vous retirez
votre masque.
Vous utilisez un masque
facial.
L’humidificateur ou le
masque utilisé est
incompatible.
SmartStop ne fonctionne
pas avec un masque facial.
Utilisez uniquement
l’équipement recommandé
et fourni par ResMed.
Page 84

268106r1.book Page 79 Thursday, November 30, 2006 2:35 PM
Problème Cause possible Solution
Affichage du message
d'erreur : Vérifier
tuyaux!
App. s/touche
Affichage du message
d’erreur :
ERREUR SYSTÈME
Appel SERVICE!
Bruit de moteur
excessif.
Le circuit respiratoire n’est
pas correctement raccordé.
Le circuit respiratoire est
obstrué.
Le moteur de l'appareil ne
fonctionne peut-être pas à
la bonne vitesse.
Composant défectueux. Retournez votre
Composant défectueux. Retournez votre appareil
Vérifiez que le circuit
respiratoire est fermement
raccordé à votre masque et
à la sortie d’air située sur le
devant de la VPAP Malibu.
Vérifiez que le circuit
respiratoire n'est pas
obstrué.
Retournez votre appareil
pour réparation.
Pour effacer le message
d’erreur, appuyez sur
n’importe quelle touche du
clavier de la VPAP Malibu.
VPAP Malibu pour
réparation.
pour réparation.
Français
79Stratégie de dépannage
Page 85

268106r1.book Page 80 Thursday, November 30, 2006 2:35 PM
80
Page 86

268106r1.book Page 81 Thursday, November 30, 2006 2:35 PM
Caractéristiques
Performance
Échelle de la pression de service : 3 à 25 cm H2O
Pression maximale délivrée en cas de défaillance : 40 cm H2O
Tolérance pour la mesure de la pression : ±0,5 cm H2O + 4 % de la valeur
mesurée
Tolérance pour la mesure du débit : ±0,2 l/sec
Caractéristiques de pression dynamique
Mode VSet : 4 à 25 cm H2O (mesurée à l’extrémité du circuit respiratoire
standard de 6’6") ; Pression AutoSet Max : 20 cm H2O ; Aide inspiratoire : 0 à
10 cm H2O
Mode S : IPAP : 3 à 25 cm H2O (mesurée à l’extrémité du circuit respiratoire
standard de 6’6") ; EPAP : 3 à 25 cm H2O (mesurée à l’extrémité du circuit
respiratoire standard de 6’6")
Mode CPAP : 4 à 20 cm H2O (mesurée à l’extrémité du circuit respiratoire
standard de 6’6")
Caractéristiques de débit dynamique
130 l/min de 3 à 25 cm H
Niveau de pression acoustique : < 30 dB (testé conformément aux exigences
de la norme ISO 17510-1:2002)
Stockage des données : 365 jours de données sur l’utilisation, les fuites, la
pression, l’IAH et l’IA
Dimensions (L x l x H) : 10,6" x 9,1" x 5,6" (env. 27 x 23 x 14 cm)
Poids : 5,1 lb (2,3 kg)
Alimentation électrique : Courant 100 – 240V, 50 – 60 Hz, 40 VA
(consommation de courant typique), < 100 VA (consommation de courant
maximale)
Boîtier : thermoplastique ignifugé
Conditions ambiantes
Température de service : 41
Humidité de service : 10 à 95 % sans condensation
Température de stockage et de transport : -4 oF à 140 oF (-20 oC à +60 oC)
Humidité de stockage et de transport : 10 à 95 % sans condensation
Compatibilité électromagnétique
Le produit est conforme à toutes les exigences de compatibilité
électromagnétique (CEM) applicables, conformément à CEI 60601-1-2, pour les
environnements commerciaux, résidentiels et l’industrie légère. Pour de plus
amples informations, voir « Guide et déclaration du fabricant – Émissions et
immunité électromagnétiques » page 84.
Filtre à air : deux couches de mousse à cellules ouvertes de polyester,
imprégnées de fibres polyester
Circuit respiratoire : plastique flexible, 1 x 6’6" (2 m) ou 1 x 9’10" (3 m)
O
2
o
F à 104 oF (+5 oC à +40 oC)
Français
81Caractéristiques
Page 87

268106r1.book Page 82 Thursday, November 30, 2006 2:35 PM
Sortie d’air : 22 mm conique, conforme à EN 1281-1:1997 Matériel respiratoire
et d’anesthésie – Raccords coniques
Classification CEI 60601-1 : Classe II (double isolation), Type CF
Remarque : le fabricant se réserve le droit de modifier ces caractéristiques
sans notification préalable.
Tableau 2 : Valeurs affichées
Val eur Plage Précision
Résolution
d’affichage
Capteur de pression à la sortie d’air
Pression -5 à 30 cm H2O ± 0,5 cm H2O 0,1 cm H2O
Capteur de débit intégré*
Fuites 0 – 120 l/min ** 1 l/min
Volume courant 100 – 3000 ml ** 1 ml
Fréquence
respiratoire
Ventilation minute 0,6 – 60 l/min ** 0,25 l/min
* La précision des résultats risque d’être affectée par les fuites.
** Les valeurs affichées sont des estimations. Elles sont fournies à des fins de détermination
de tendances uniquement.
6 – 60 respirations
par minute (BPM)
± 0,5
respiration par
minute (BPM)
0,1 BPM
Tableau 3 : Débit maximum à faible impédance aux pressions indiquées
Pression
(cm H
O)
2
6,6 177
13,2 202
20,0 202
Débit
(l/min)
82
Remarque : le fabricant se réserve le droit de modifier ces caractéristiques
sans notification préalable.
Page 88

268106r1.book Page 83 Thursday, November 30, 2006 2:35 PM
Symboles figurant sur l’appareil
Attention, veuillez consulter la documentation jointe
Équipement de classe II
Équipement de type CF
Start/Stop
Protection anti-gouttes
Mask-fit
Marche/Arrêt ou ajustement du masque
Français
83Caractéristiques
Page 89

268106r1.book Page 84 Thursday, November 30, 2006 2:35 PM
Guide et déclaration du fabricant – Émissions et immunité
électromagnétiques
Guide et déclaration du fabricant – Émissions électromagnétiques
La VPAP Malibu est prévue pour une utilisation dans l’environnement électromagnétique décrit cidessous. Le client ou l’utilisateur de la VPAP Malibu doit s’assurer que celle-ci est utilisée dans un
environnement de ce type.
Essai de contrôle des
émissions
Conformité
Environnement
électromagnétique – Guide
Émissions RF CISPR 11 Groupe 1 La VPAP Malibu utilise de l’énergie RF
Émissions RF CISPR 11 Classe B La VPAP Malibu peut être utilisée
Rayonnements harmoniques
CEI 61000-3-2
Émissions dues aux fluctuations
de tension/au papillotement
CEI 61000-3-3
Des précautions particulières doivent être prises avec l’équipement électrique médical quant à la
compatibilité électromagnétique, et son installation et sa mise en service doivent être effectuées
conformément aux informations sur la compatibilité électromagnétique fournies dans ce
document.
Avertissements : la VPAP Malibu ne doit pas être utilisée à proximité d’autres équipements ni
posée sur ou sous d’autres équipements.
S’il est impossible de l’utiliser autrement, vous devez vous assurer qu'elle fonctionne normalement
lorsqu’elle est placée à l’endroit où elle sera utilisée.
Il est déconseillé d’utiliser des accessoires (par exemple des humidificateurs) autres que ceux
spécifiés dans ce guide. Ils peuvent entraîner une augmentation des émissions ou une réduction
de l’immunité de la VPAP Malibu.
Classe A
Conforme
uniquement pour son fonctionnement
interne. Par conséquent, ses
émissions RF sont très faibles et il est
peu probable qu’elles causent des
interférences avec l’équipement
électronique environnant.
dans tous les établissements, y
compris les établissements
domestiques et ceux directement
raccordés au réseau public de
distribution à basse tension qui fournit
de l’électricité aux bâtiments utilisés à
des fins domestiques.
84
Page 90

268106r1.book Page 85 Thursday, November 30, 2006 2:35 PM
Guide et déclaration du fabricant – Immunité électromagnétique
La VPAP Malibu est prévue pour une utilisation dans l’environnement électromagnétique décrit cidessous. Le client ou l’utilisateur de la VPAP Malibu doit s’assurer que celle-ci est utilisée dans un
environnement de ce type.
Essai de
contrôle de
l’immunité
Décharge
électrostatique
CEI 61000-4-2
Transitoires électriq
ues rapides/
salve
CEI 61000-4-4
Surtension
CEI 61000-4-5
Baisses de tension,
brèves coupures de
courant et variations
de tension sur les
lignes
d’alimentation
CEI 61000-4-11
Niveau d’essai
CEI 60601-1-2
Contact ± 6 kV
Air ± 8 kV
± 2 kV pour les
lignes
d’alimentation
± 1 kV pour les
lignes
d’alimentation/de
signalisation
± 1 kV en mode
différentiel
± 2 kV en mode
commun
< 5 % Ut
(> 95 % de baisse
en Ut)
pour 0,5 cycle
40 % Ut
(60 % de baisse
en Ut)
pour 5 cycles
70 % Ut
(30 % de baisse
en Ut)
pour 25 cycles
< 5 % Ut
(> 95 % de baisse
en Ut)
pour 5 sec
Niveau de
conformité
Contact ± 6 kV
Air ± 8 kV
± 2 kV
Sans objet
± 1 kV en mode
différentiel
± 2 kV en mode
commun
< 12V
(> 95 % de baisse
en 240V)
pour 0,5 cycle
96V
(60 % de baisse en
240V)
pour 5 cycles
168V
(30 % de baisse en
240V)
pour 25 cycles
< 12V
(> 95 % de baisse
en 240V)
pour 5 sec
Environnement
électromagnétique –
Guide
Les sols doivent être en
bois, en ciment ou carrelés.
Si le revêtement des sols
est synthétique, l’humidité
relative doit être d’au moins
30 %.
La qualité du secteur
électrique doit être celle
d’un environnement
commercial ou hospitalier
typique.
La qualité du secteur
électrique doit être celle
d’un environnement
commercial ou hospitalier
typique.
La qualité du secteur
électrique doit être celle
d’un environnement
commercial ou hospitalier
typique.
Si l’utilisateur de la
VPAP Malibu ne peut pas
supporter l’interruption du
traitement en cas de
coupure de courant, il est
recommandé d’utiliser la
VPAP Malibu avec une
source d’alimentation
ininterruptible.
Français
Champ magnétique
de la fréquence
d’alimentation
(50/60 Hz)
CEI 61000-4-8
REMARQUE : Ut correspond à la tension secteur CA avant l’application du niveau d’essai.
3 A/m 3 A/m Le niveau des champs
magnétiques de la
fréquence d’alimentation
doit être caractéristique
d’un endroit typique dans
un environnement
commercial ou hospitalier
typique.
(suite page suivante)
85Caractéristiques
Page 91

268106r1.book Page 86 Thursday, November 30, 2006 2:35 PM
Guide et déclaration du fabricant – Immunité électromagnétique (suite)
La VPAP Malibu est prévue pour une utilisation dans l’environnement électromagnétique décrit ci-dessous.
Le client ou l’utilisateur de la VPAP Malibu doit s’assurer que celle-ci est utilisée dans un environnement de
ce type.
Essai de
contrôle de
l’immunité
RF transmises
par conduction
CEI 61000-4-6
RF transmises
par radiation
CEI 61000-4-3
CEI 60601-1-2
Niveau d’essai
3 Vrms
150 kHz à
80 MHz
10 V /m
80 MHz à
2,5 GHz
Niveau de
conformité
3 Vrms d = 1,17 √P
10 V/m d = 0,35 √P 80 MHz à 800 MHz
Environnement électromagnétique –
Guide
Les équipements de communication RF
portables et mobiles ne doivent pas être utilisés
à proximité des composants de la VPAP Malibu,
y compris les câbles, à une distance inférieure à
la distance de séparation recommandée calculée
sur la base de l’équation applicable à la
fréquence de l’émetteur.
Distance de séparation recommandée
d = 0,70 √P 800 MHz à 2,5 GHz
où P correspond à la puissance nominale de
sortie maximale de l’émetteur en watts (W)
indiquée par le fabricant de l’émetteur et d
correspond à la distance de séparation
recommandée en mètres (m).
L’intensité des champs d’émetteurs RF fixes,
telle qu’elle est déterminée par l’étude d’un site
électromagnétique
niveau de conformité pour chaque plage de
fréquences.
Des interférences peuvent se produire à
proximité d’équipements portant le symbole
suivant :
a
doit être inférieure au
b
86
REMARQUE 1 : à 80 MHz et 800 MHz, la plage de fréquences la plus élevée s’applique.
REMARQUE 2 : il est possible que ces directives ne s’appliquent pas à toutes les situations. La propagation
électromagnétique est affectée par l’absorption et la réflexion des structures, des objets et des personnes.
a
L’intensité des champs d’émetteurs fixes, tels que des stations de base pour des radiotéléphones
(cellulaires/sans fil) et des radios mobiles, la radio amateur, les radios AM et FM et la télévision, ne peut pas
être prédite théoriquement avec précision. Pour évaluer l’environnement électromagnétique créé par des
émetteurs RF fixes, une étude du site électromagnétique devrait être considérée. Si l’intensité du champ
mesurée à l’endroit où la VPAP Malibu est utilisée dépasse le niveau de conformité RF applicable figurant cidessus, il faudra s’assurer du bon fonctionnement de la VPAP Malibu dans un tel environnement. En cas
d’anomalie, des mesures supplémentaires devront peut-être être prises, par exemple changement de
position ou d’endroit pour la VPAP Malibu.
b
Pour la plage de fréquences 150 kHz à 80 MHz, l’intensité des champs doit être inférieure à 10 V/m.
Page 92

268106r1.book Page 87 Thursday, November 30, 2006 2:35 PM
Distances de séparation recommandées entre les équipements de communication RF
portables et mobiles et la VPAP Malibu
La VPAP Malibu est prévue pour une utilisation dans un environnement dans lequel les perturbations
radioélectriques par radiation sont contrôlées. Le client ou l’utilisateur de la VPAP Malibu peut prévenir les
perturbations électromagnétiques en respectant les distances minimales recommandées ci-dessous pour
la séparation entre les équipements de communication RF portables et mobiles (émetteurs) et la
VPAP Malibu, en fonction de la puissance maximale de sortie de l’équipement de communication.
Distance de séparation en fonction de la fréquence de l’émetteur
(m)
Puissance nominale de
sortie maximale de
l’émetteur
W
0,01 0,17 0,04 0,07
0,1 0,37 0,11 0,22
1 1,17 0,35 0,70
10 3,69 1,11 2,21
150 kHz à 80 MHz
d = 1,17 √P
80 MHz à 800 MHz
d = 0,35 √P
Français
800 MHz à 2,5 GHz
d = 0,70 √P
100 11,70 3,50 7,00
Pour les émetteurs avec une puissance nominale de sortie maximale ne figurant pas dans le tableau cidessus, la distance de séparation recommandée d en mètres (m) peut être déterminée à l’aide de
l’équation applicable à la fréquence de l’émetteur, où P correspond à la puissance nominale de sortie
maximale de l’émetteur en watts (W) indiquée par le fabricant de l’émetteur.
REMARQUE 1 : à 80 MHz et 800 MHz, la distance de séparation pour la plage de fréquences la plus élevée
s’applique.
REMARQUE 2 : il est possible que ces directives ne s’appliquent pas à toutes les situations. La propagation
électromagnétique est affectée par l’absorption et la réflexion des structures, des objets et des personnes.
87Caractéristiques
Page 93

268106r1.book Page 88 Thursday, November 30, 2006 2:35 PM
88
Page 94

268106r1.book Page 89 Thursday, November 30, 2006 2:35 PM
Garantie limitée
ResMed garantit votre produit ResMed contre tout défaut de matériaux et de
main-d’œuvre pour la période spécifiée ci-après à compter de la date d’achat par
le client d’origine. Cette garantie n’est pas cessible.
Produit
Humidificateurs ResMed, ResControl™, ResLink™, ResTraxx™ 1 an
Appareils de traitement ResMed 2 ans
Accessoires, masques (y compris entourage rigide, bulle, harnais
et circuit respiratoire). Les appareils à usage unique sont exclus.
Durée de la
garantie
90 jours
Remarque : certains de ces modèles ne sont pas disponibles dans tous les
pays.
En cas de défaillance du produit dans des conditions normales d’utilisation,
ResMed, à son entière discrétion, répare ou remplace le produit défectueux ou
toute pièce. Cette garantie limitée ne couvre pas :
a) tout dommage résultant d’une utilisation incorrecte, d’un usage abusif ou
d’une modification ou transformation opérée sur le produit ;
b) les réparations et l’entretien effectués par tout service de réparation sans
l’autorisation expresse de ResMed ;
c) tout dommage ou contamination causé par de la fumée de cigarette, de pipe,
de cigare ou autre ;
d) tout dommage causé par de l’eau renversée sur ou dans un appareil.
La garantie est annulée pour les produits vendus ou revendus dans un pays autre
que celui où ils ont été achetés à l’origine. Les réclamations au titre de la garantie
pour les produits défectueux doivent être présentées au lieu d’achat par le client
initial.
Cette garantie remplace toute autre garantie expresse ou implicite, y compris
toute garantie implicite de qualité marchande ou d’adéquation à un usage
particulier. Certains pays ou états n’autorisent pas les limitations de durée pour
les garanties implicites ; il est donc possible que la limitation susmentionnée ne
s’applique pas à votre cas.
ResMed ne peut être tenue pour responsable de tout dommage accessoire ou
indirect résultant de la vente, de l’installation ou de l’utilisation de tout produit
ResMed. Certains pays ou états n’autorisent ni l’exclusion ni la limitation des
dommages accessoires ou indirects ; il est donc possible que la limitation
susmentionnée ne s’applique pas à votre cas. Cette garantie vous octroie des
droits reconnus par la loi, et vous pouvez également avoir d’autres droits qui
varient en fonction du pays où vous habitez.
Pour de plus amples informations sur vos droits de garantie, veuillez contacter
votre prestataire de santé ou ResMed.
Français
R001-307/2 05 06
89Garantie limitée
Page 95

268106r1.book Page 90 Thursday, November 30, 2006 2:35 PM
90
Page 96

268106r1.book Page 91 Thursday, November 30, 2006 2:35 PM
Index
A
Accessoires 55
Ajustement du masque
Alimentation CC
utilisation
Arrêt du traitement
Astuces
Avertissements à propos du traitement
C
Caractéristiques 81
Caractéristiques de débit
Caractéristiques de la VPAP Malibu
Caractéristiques de pression dynamique
Composants
D
Début du traitement 65
Définitions
Durée de rampe
E
Ecran Attente 62
Ecran Hrs Util (durée)
Ecran LCD et clavier
Ecran Rampe
Effets secondaires
Emissions et immunité
Entretien
F
Filtre 74
Filtre à air
Filtre antibactérien
Fuites buccales
69
70
81
53
47
62
électromagnétiques
73
74
70
68, 70
68
81
61
62, 67
62
61
51
84
74
51
I
Informations médicales 49
Installation
Instructions d’utilisation
Irritation nasale
M
Masque 53
Menus
avec un humidificateur
avec un ResLink et un oxymètre
utilisation
Messages d’erreur
62
57
65
70
Français
64
64
62
79
N
Nettoyage 73
Nettoyage hebdomadaire
Nettoyage périodique
Nettoyage quotidien
Note d’ajustement du masque (en
étoiles), signification
O
Oxygène additionnel 55
P
Préparation avant l’utilisation 57
R
Remplacement du filtre à air 74
Remplacement du filtre antibactérien
Réparations
Responsabilité de l’utilisateur/du
Responsabilité, utilisateur/propriétaire
Rétro-éclairage, écran LCD et clavier
Rhinorrhée ou nez bouché
75
propriétaire
73
73
73
69
74
47
47
61
71
G
Garantie 89
Garantie limitée
H
HumidAire 2i 60
Humidificateur
89
54
S
Sécheresse 70
SmartStart
SmartStop
Stratégie de dépannage
Symboles
67
67
83
77
91Index
Page 97

268106r1.book Page 92 Thursday, November 30, 2006 2:35 PM
T
Temps d’attente 62, 67
Touche de déplacement vers le haut/bas
61
Touche de droite
Touche de gauche
Touche du bas
Touches, fonctions
U
Utilisation 60
Utilisation à l’étranger
Utilisation d’un humidificateur
Utilisation de la fonction d’ajustement du
Utilisation des menus
V
Voyage 71
61
masque
61
61
61
71
60
68
62
92
Page 98

268106r1.book Page 93 Thursday, November 30, 2006 2:35 PM
VPAP Malibu™
Guía del Usuario
Español
Español
93
Page 99

268106r1.book Page 94 Thursday, November 30, 2006 2:35 PM
Índice
Introducción . . . . . . . . . . . . . . . . . . . . . . . . . . . . . . . . . . . . . . . . . . . . . . 95
Definiciones 95
Responsabilidad del usuario/propietario 95
Información médica . . . . . . . . . . . . . . . . . . . . . . . . . . . . . . . . . . . . . . 97
Para qué está diseñado el VPAP™ Malibu 97
Consulte a su médico si... 97
Advertencias 97
Precauciones 99
Sistema VPAP Malibu . . . . . . . . . . . . . . . . . . . . . . . . . . . . . . . . . . . . 101
Mascarilla 101
Oxígeno suplementario 103
Preparación para el uso . . . . . . . . . . . . . . . . . . . . . . . . . . . . . . . . . . 105
Configuración del Sistema VPAP Malibu 105
Funciones del VPAP Malibu 108
Modo de uso . . . . . . . . . . . . . . . . . . . . . . . . . . . . . . . . . . . . . . . . . . . . . 113
Inicio del tratamiento 113
Detención del tratamiento 116
Uso de la función Ajuste de la mascarilla 116
Utilización de energía de CC para ejecutar el VPAP Malibu 117
Consejos útiles 118
Limpieza y mantenimiento . . . . . . . . . . . . . . . . . . . . . . . . . . . . . . . 121
Diariamente 121
Semanalmente 121
Periódicamente 121
Cambio del filtro de aire 122
Cambio del filtro antibacteriano 122
Servicio de mantenimiento 123
Solución de problemas . . . . . . . . . . . . . . . . . . . . . . . . . . . . . . . . . . 125
Especificaciones técnicas . . . . . . . . . . . . . . . . . . . . . . . . . . . . . . . . 129
Garantía limitada . . . . . . . . . . . . . . . . . . . . . . . . . . . . . . . . . . . . . . . . 137
Índice temático . . . . . . . . . . . . . . . . . . . . . . . . . . . . . . . . . . . . . . . . . . 139
94
Page 100

268106r1.book Page 95 Thursday, November 30, 2006 2:35 PM
Introducción
Definiciones
Este manual contiene términos e íconos especiales que aparecen en los
márgenes, para dirigir su atención hacia información específica e importante.
ADVERTENCIA
!
Alerta sobre la posibilidad de lesiones.
PRECAUCIÓN
!
Explica medidas especiales a tomar para el uso seguro y eficaz del
dispositivo.
Nota: Se trata de una nota informativa o útil.
Responsabilidad del usuario/propietario
El usuario o propietario de este sistema será enteramente responsable de
cualquier lesión a personas o daños a bienes que resulten de:
• una operación no conforme con las instrucciones de funcionamiento
suministradas
• mantenimiento o modificaciones efectuadas, a menos que sean conformes
con instrucciones autorizadas o realizadas por personas autorizadas.
Sirvase leer este manual detenidamente antes de usar el equipo.
Español
95Introducción
 Loading...