

Page 1
ApneaLink™ Plus
�
�
Patient Kit Instructions
English
Getting started
Before fitting, lay out all the system components and read these instructions first.
Note: Wear ApneaLink Plus and belt over pajamas or nightshirts with long sleeves, to avoid any
discomfort from the belt.
Fitting
Recorder and sensor
1 2
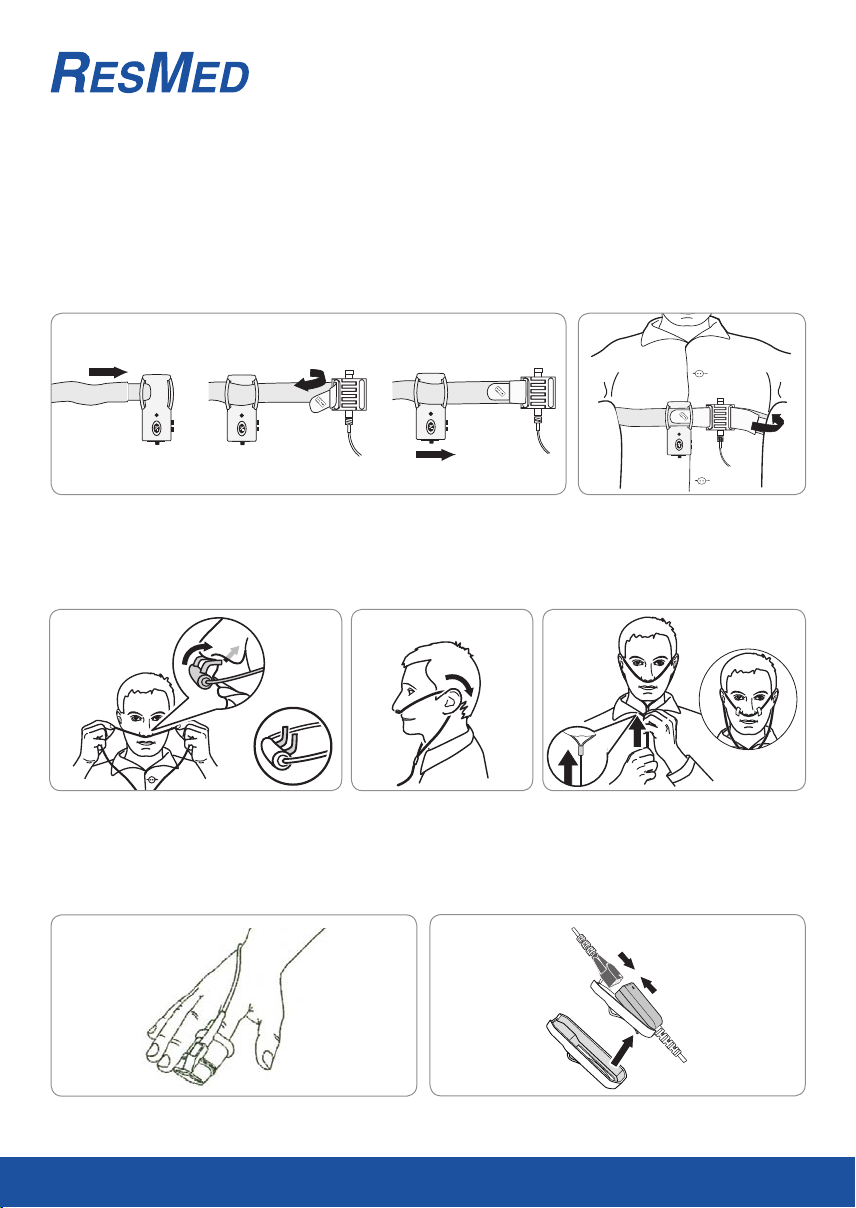
Thread the belt through the brackets of the ApneaLink Plus and the
effort sensor. Fix the Velcro® fastener on the belt and move the
recorder to a comfortable position.
Nasal cannula
3 4
Fit the nasal pressure cannula so that
the two small open tubes point towards
your nostrils. When doing this, ensure
that the ends point downwards.
Finger pulse sensor
6
Fit the loop around
your ears and then
back around your neck,
without pulling over
your head.
Oximeter
7
Wear the belt with recorder.
The easiest way to put on the
device is while standing in front
of a mirror.
5
Draw the cannula to a comfortable
position under your chin. If tape or
adhesive pads have been provided
place them as indicated to help
secure the cannula.
Insert the index finger into the sensor. The finger
must reach the end of the sensor.
Fit the pulse oximeter into the clip-on holder.
Page 2
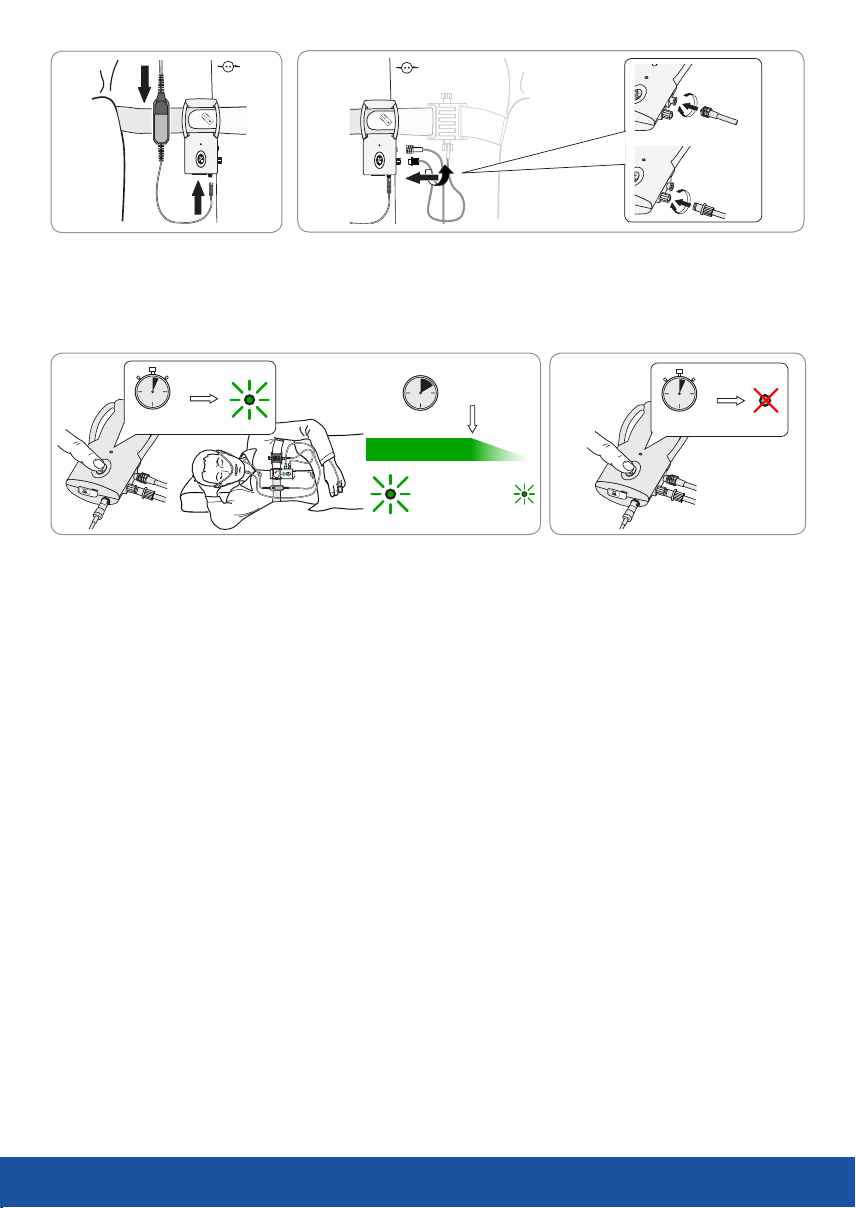
8
9
Attach the clip on the holder to
the belt. Insert the end of the
pulse oximeter cable into the
bottom of the recorder.
Remove and SAVE the protective cap from the nasal pressure cannula
connection. Fit the effort sensor tube and the end of the the nasal
pressure cannula to the connections of the recorder by turning it
clockwise.
Recording
Start
1 2
1..2.. sec
10 min
The lamp will dim
10 minutes after
recording begins.
Start the recording in bed by pressing and holding the START/STOP
button for approximately two seconds, until the small light above the
button turns green. The ApneaLink Plus is recording when the green
lamp is on.
Stop
1..2.. sec
Stop the recording by pressing and
holding the START/STOP button for
approximately two seconds, until
the small light goes out.
Disassembly
After stopping the recording, unscrew the nasal pressure cannula and remove the finger pulse sensor. •
Discard the nasal pressure cannula. •
Unfasten the chest belt with the ApneaLink Plus recorder and connected components. •
Carefully screw the protective cap back on the • nasal pressure cannula connection.
Detach the pulse oximeter from the recorder unit. •
Detach the finger pulse sensor from the pulse oximeter. •
Return or dispose of the finger pulse sensor as instructed by your Health Care Professional. •
Return the ApneaLink Plus together with the belt, oximeter, clip fastener and effort sensor back to •
your Health Care Professional.
Cleaning
Your Health Care Professional is responsible for cleaning the unit. Do not attempt to clean the unit. •
Intended Use
The ApneaLink Plus device is indicated for use by Health Care professionals (HCP) to aid in the diagnosis
of sleep disordered breathing. ApneaLink Plus records the following data: patient respiratory nasal
airflow, snoring, blood oxygen saturation, pulse and respiratory effort during sleep. The device uses these
recordings to produce a report that the HCP can use for diagnosis or for further clinical investigation.
CAUTION: U.S. Federal law restricts this device to sale by or on the order of a physician.
Manufacturer: ResMed Germany Inc Fraunhoferstr. 16 82152 Martinsried Germany Manufacturer for Canada: ResMed Ltd 1 Elizabeth Macarthur Drive Bella Vista
NSW 2153 Australia Distributed by: ResMed Corp 14040 Danielson Street Poway CA 92064-6857 USA ResMed (UK) Ltd 96 Milton Park Abingdon Oxfordshire OX14
4RY UK See www.resmed.com for other ResMed locations worldwide. Patents and designs pending. ApneaLink is a trademark of MAP Medizin-Technologie GmbH
©2009 ResMed Ltd. 228525/1 09 02
Global leaders in sleep and respiratory medicine www.resmed.com
 Loading...