


Wireless IP Camera
EN/DE
Technical Support
For Windows Client & Mac Client, please download the PC software:
https://reolink.com/software-and-manual/
For advanced setup, please download the user manual:
https://reolink.com/software-and-manual/
For more troubleshooting, please go to FAQs on our website:
https://reolink.com/faqs/
For other technical support, please contact us at
support@reolink.com
Quick Start Guide
QG4_B
General Introduction
English 3
Deutsch 17
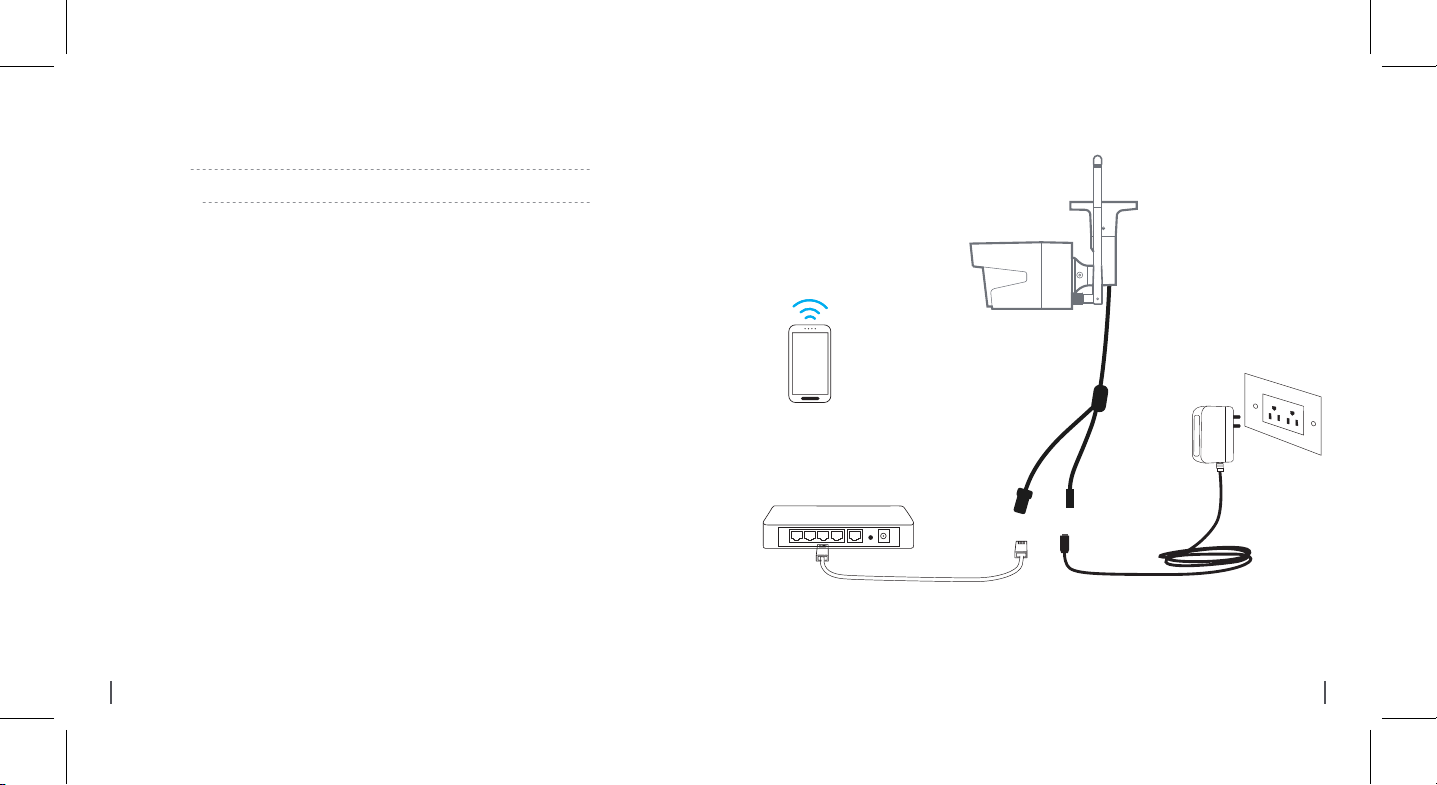
Camera Connection Diagram
Wireless IP Camera
Your Smart
Device
2 English
Router
For initial setup, please connect the camera to your router LAN port with an Ethernet
cable, and then follow the steps below to set up your camera. Make sure that your camera
and your smart devices are in the same network.
Power CableNetwork Cable
Power Adapter
3English

01.
Access the
Install Reolink App
There are two ways to get the Reolink App:
1. Search “Reolink” in App Store (for iOS), or Google Play (for Android), download and
install the app.
2. Scan the QR code below to download and install the app.
Available on the
Camera by
Smartphones
4 English
Add the Device
When in LAN
1
(Local Area Network)
The camera will be automatically added. You need to add the camera either by
When in WAN
2
(Wide Area Network)
scanning the QR code on the camera or
by entering the UID number manually.
5English

1
In LAN
Front Door
Reolink-5G
1. Connect your smartphone to
the WiFi network of your router.
6 English
Front Door
3. Tap screen to sync the time
and create your password.
4. Start live view or go to “Device
Settings” for more configurations.
2. Launch Reolink App. The camera
will automatically display in the
camera list in LAN.
7English
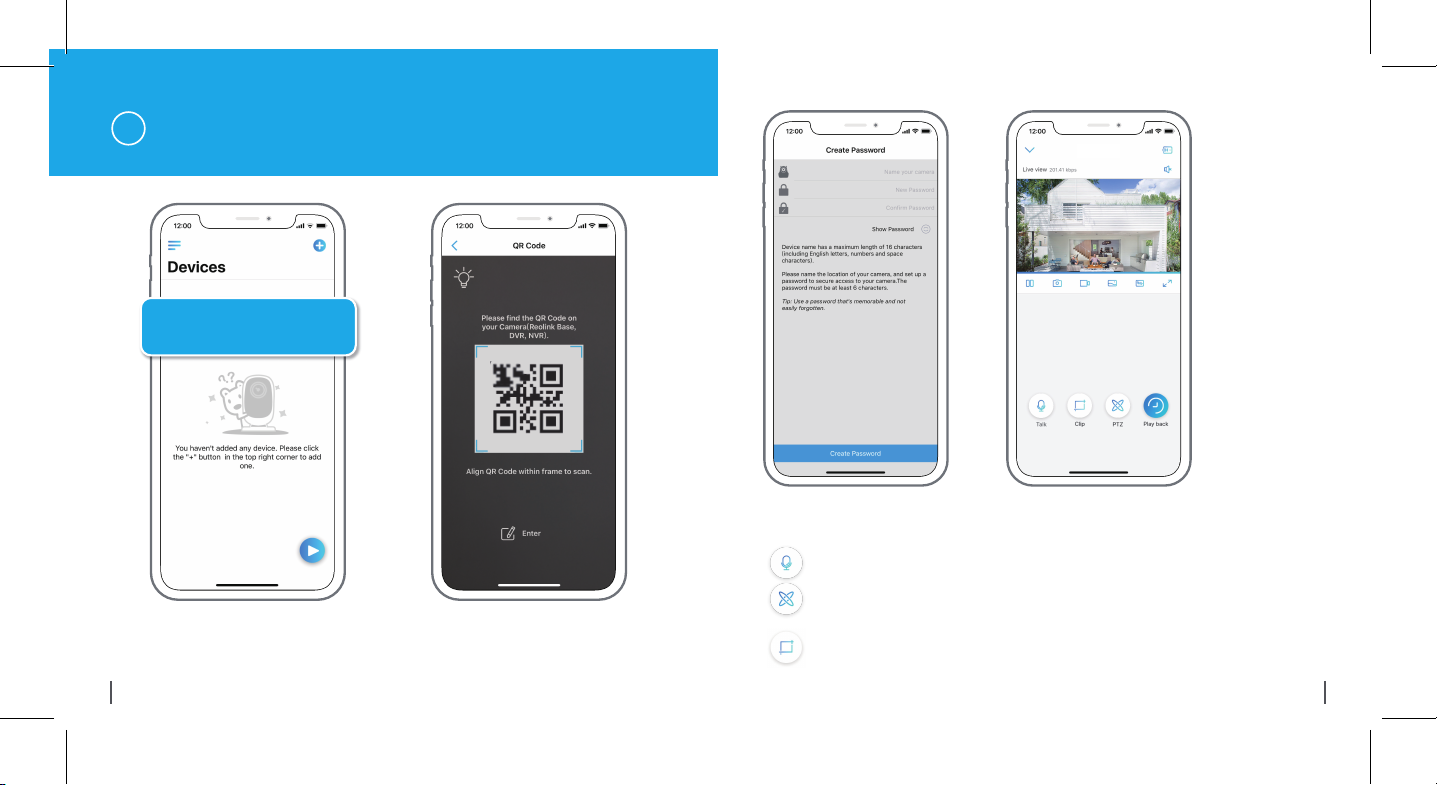
In WAN
2
Add New Device
1. Click “Add New Device” on the app. 2. Scan the QR code on the camera, and
8 English
then tap “Login”. (There is no password at
the factory default status.)
Front Door
3. Name your camera, create a password, and then start live view.
This icon only displays if the camera supports 2-way audio.
This icon only displays if the camera supports pan & tilt (zoom).
This icon only displays if the camera (4MP or above) supports Clip
function, which means you will see more detailed image in the selected
area and get clearer image quality under fluent mode/ substream video.
9English

Wi-Fi Settings
Tap the gear icon ’ ‘ to enter
the Device Setting page, tap 'WiFi'.
1. Choose the Wi-Fi network you
want to join in, enter the password
of the Wi-Fi network, and then click
“OK”.
2. Wi-Fi Test:
a) If the Wi-Fi test succeeds, press
the “Save” button to save the
settings.
b) If the Wi-Fi test fails, please
check your Wi-Fi password and the
network connection, and then try
again.
3. Remove the Ethernet cable and
then you can access the camera via
the wireless connection.
Front Door
Reolink-5G
Reolink-5G
02.
Access the
Camera by
Computer
10 English
11English

Install Reolink Client
Please download the client software from our official website:
https://reolink.com/software-and-manual, and install it.
Alternatively, you can manually add the camera to the client.
Please follow the steps below.
Device list
Front Door
Add Device
Device Basic Infomation
Device Name
Camera1
IP Address
Register Mode
User Name
2
NO. Device Name IP Address Port Mac Addr UID
Camera11
5
admin
9000
192.168.10.10 EC:71:DB:B1:6D:85
Media Port
IP Address
Password
9000
192.168.10.10
******
CancelOKScan Device In LAN
Stae: login success
4
1
Add Device
3
Add the Device
1
In LAN
Launch the Reolink Client software on the PC. By
default, the client software will automatically search
the cameras in your LAN network and display them in
the “Device List” on the right-side menu.
Click the “Start” button, and you can view the live
streaming now.
12 English
Device list
Front Door
State: login success
1. Click “Add Device” on the right-side menu.
2. Click "Scan Device in LAN".
3. Double click on the camera you want to add. The information will be filled in automatically.
4. Input the password for the camera. The default password is blank. If you have created
the password on Reolink App, you need to use the password to log in.
5. Click “OK” to log in.
13English
2
In WAN
Wi-Fi Settings
Click the “Basic Settings” button, and go to Network >> Wi-Fi Settings.
4
2
******
3
5
1. Click “Add Device” on the right-side menu.
2. Choose “UID” as the Register Mode.
3. Type in the UID of your camera.
4. Create a Name for the camera displayed on Reolink client.
5. Click “OK” to log in.
14 English
Device list
1
Add Device
Device list
Front Door
Stae: login success
1
Add Device
Note:
The SD card icon only displays after you’ve inserted the SD card into your camera.
15English

Device Settings Wifi Settings
Wifi Settings
SSID
Password
Wi-Fi Test
4
SSID
Reolink-5G
TP-LINK_5G_F8F4
ASUS 2.4G
Reolink-5G
******
3
Wi-Fi Test
2
Device Settings
1
Scan
Show Password
Wi-Fi Signal
5
OK
Scan succeed!
1. Scan the SSID.
2. Double click the SSID which you choose. Enter the password.
3. Click “Wi-Fi Test” to test the password.
4. Wi-Fi Test
a) If the Wi-Fi test succeeds, please go to step 5.
b) If the Wi-Fi Test fails, please check your Wi-Fi password and the network connection,
and then try again.
5. Click “OK”.
Remove the Ethernet cable and you can access the camera via Wi-Fi on computer now.
16 English
Wireless IP-Kamera
Kurzanleitung
17Deutsch
Verbindungsschema der Kamera
WLAN IP-Kamera
Ihr Smart
Device
Router
Verbinden Sie die Kamera durch ein Ethernet-Kabel mit dem LAN-Port von Ihrem Router
und befolgen Sie danach folgende Schritte, um die Kamera einzurichten. Stellen Sie
sicher, dass sich die Kamera und Ihre Smart Devices mit demselben Router verbinden.
Diese Kurzanleitung gilt für folgende Kameras: Reolink C1, C1 Pro, C2, RLC-410WS,
RLC-411WS, RLC-422W & RLC-423WS.
18 Deutsch
NetzkabelNetzwerkkabel
Netzadapter
01.
Kamerazugriff
via Smartphones
19Deutsch

Reolink App installieren
Es gibt zwei Möglichkeiten, die Reolink App herunterzuladen:
1. Suchen Sie im App Store (für iOS) oder in Google Play (für Android) nach „Reolink“,
führen Sie den Download durch und installieren Sie die App.
2. Scannen Sie den unten abgebildeten QR-Code, um den Download durchzuführen und
die App zu installieren.
Available on the
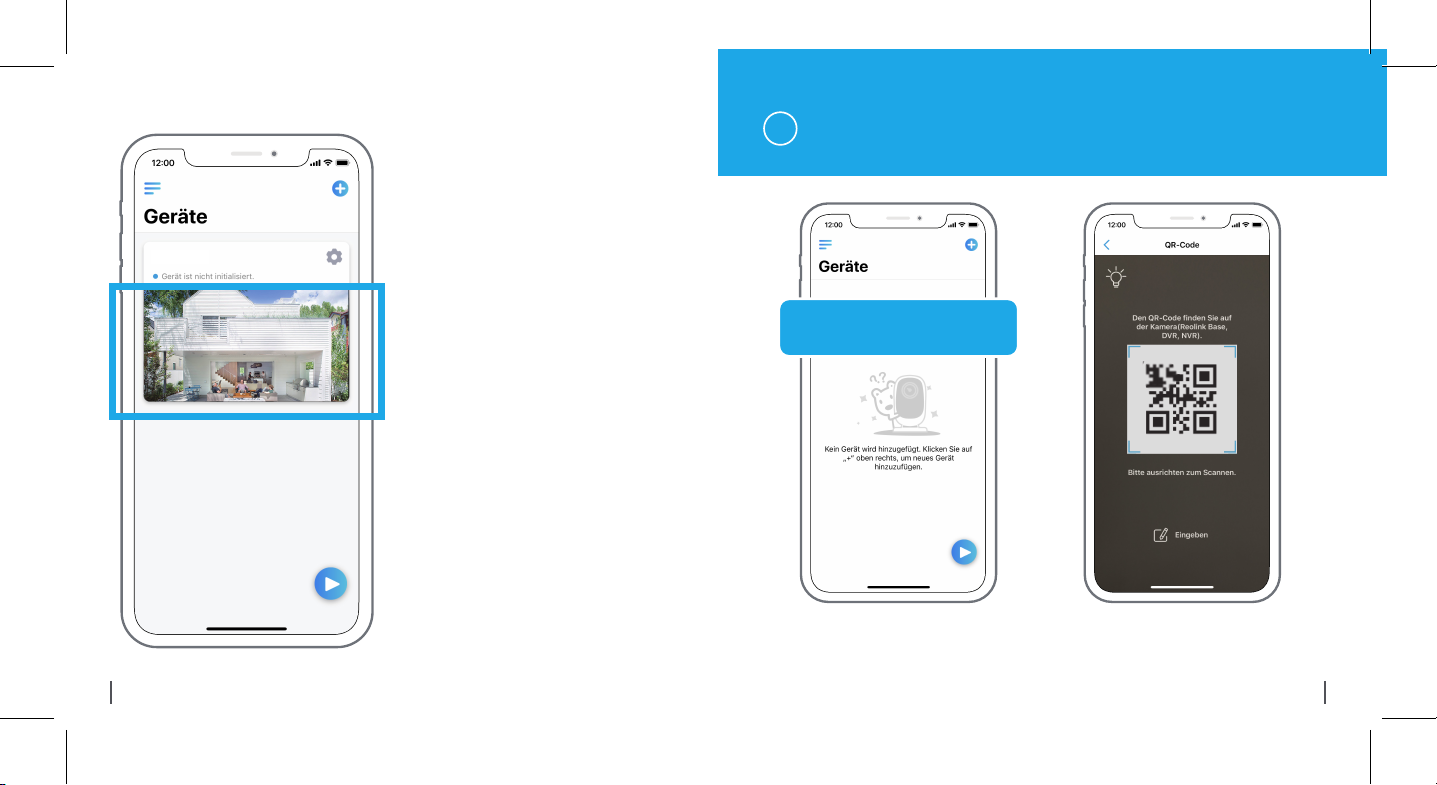
Gerät hinzufügen
1
Im LAN
Reolink-5G
Front Door
Bei einer LAN-Verbindung
1
(Lokales Netzwerk)
Die Kamera wird automatisch hinzugefügt. Sie können den QR-Code scannen oder
20 Deutsch
Bei einer WAN-Verbindung
2
(Wide Area Network)
die UID-Nummer manuell eingeben, um
die Kamera hinzuzufügen.
1. Verbinden Sie Ihr Smartphone
mit dem WLAN Ihres Routers.
2. Starten Sie die Reolink App. Bei
einer LAN-Verbindung wird die
Kamera automatisch in der
Geräteliste angezeigt.
21Deutsch
Front Door
3. Tippen Sie auf den Bildschirm,
um die Zeit zu synchronisieren
und Ihr Passwort zu erstellen.
4. Starten Sie die Live-Ansicht
oder gehen Sie zu
„Geräteeinstellungen“, um weitere
Konfigurationen vorzunehmen.
Im WAN
2
Neues Gerät hinzufügen
22 Deutsch
1. Klicken Sie oben rechts auf „+“. 2. Scannen Sie den QR-Code auf der
Kamera und tippen Sie auf „Einloggen“.
(Bei der Werkseinstellung gibt es kein
Passwort.)
23Deutsch
Front Door
3. Benennen Sie Ihre Kamera und erstellen Sie ein Passwort. Gehen Sie dann zur Live-Ansicht.
Dieses Symbol wird nur angezeigt, wenn die Kamera 2-Wege-Audio unterstützt.
Dieses Symbol wird nur angezeigt, wenn die Kamera Pan & Tilt (Zoom) unterstützt.
Dieses Symbol wird nur angezeigt, wenn die Kamera (4MP oder höhere Version)
Clip-Funktion unterstützt. Das bedeutet, dass Sie detailreicheres Bild im ausgewählten
Bereich sowie höhere Bildqualität im Flüssig-Modus/im Substream-Video erhalten.
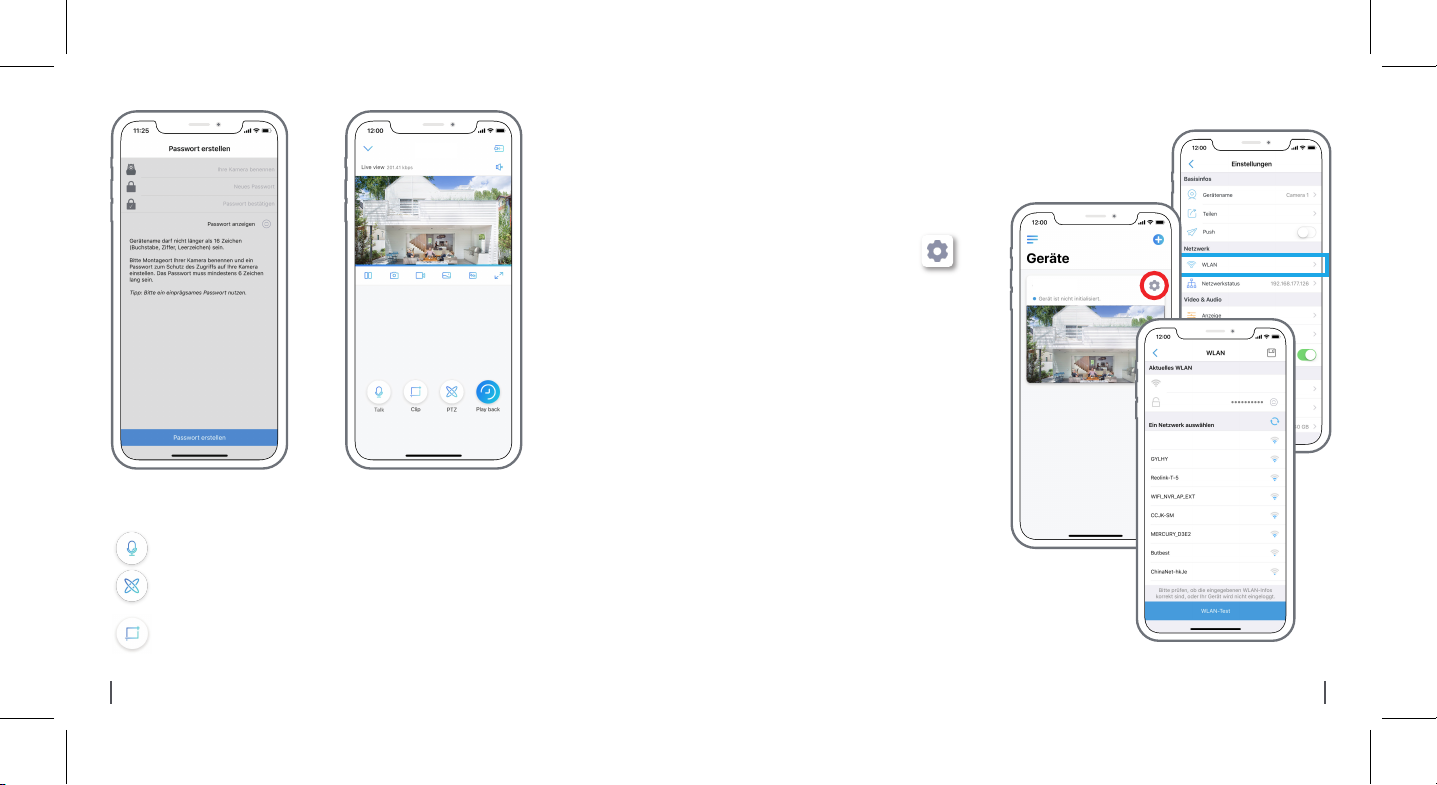
WLANEinstellungen
Tippen Sie oben rechts
auf das Zahnrad-Symbol ,
um zur Seite der Geräteeinstellungen
zu gelangen. Tippen Sie dann auf
das WLAN-Symbol.
1. Wählen Sie eine WLAN-Verbindung
aus, geben Sie das Passwort ein und
klicken Sie dann auf „OK“.
2. WLAN-Test:
a) Wenn der WLAN-Test erfolgreich
ist, drücken Sie auf „Speichern“, um
die Einstellungen zu speichern.
b) Wenn der WLAN-Test fehlschlägt,
überprüfen Sie bitte das
WLAN-Passwort und die
Netzwerkverbindung. Versuchen Sie
es dann erneut.
3. Entfernen Sie das Ethernet-Kabel.
Jetzt können Sie über die
WLAN-Verbindung auf die Kamera
zugreifen.
Front Door
Reolink-5G
Reolink-5G
24 Deutsch
25Deutsch

02.
Kamerazugriff
Reolink Client installieren
Sie können die Client-Software auf der folgenden Website herunterladen:
https://reolink.com/de/software-and-manual/.
06/03/2018 23:48:13 TUE
411-5MP
Gerät hinzufügen
via Computer
26 Deutsch
1
Im LAN
Starten Sie die Reolink Client-Software auf dem PC.
Standardmäßig sucht die Client-Software automatisch
nach den Kameras im LAN-Netz und zeigt sie in der
„Geräteliste“ im Menü auf der rechten Seite an.
Klicken Sie auf „Starten“, um den Livestream zu
starten.
27Deutsch

Alternativ können Sie die Kamera manuell zur Client-Software hinzufügen.
Befolgen Sie dazu bitte die folgenden Schritte:
5
******
2
3
4
2
Im WAN
4
1
2
1
3
5
1. Klicken Sie im Menü auf der rechten Seite auf „Gerät hinzufügen“.
2. Klicken Sie im LAN auf „Gerät scannen“.
3. Fügen Sie die Kamera mit einem Doppelklick hinzu. Die Informationen werden
automatisch eingetragen.
4. Geben Sie das Passwort für die Kamera ein. Standardmäßig ist das Passwortfeld leer.
Wenn Sie bereits ein Passwort in der Reolink App erstellt haben, verwenden Sie dieses bitte.
5. Klicken Sie auf „OK“, um sich einzuloggen.
28 Deutsch
1. Klicken Sie im Menü auf der rechten Seite auf „Gerät hinzufügen“.
2. Wählen Sie „UID“ als Registermodus aus.
3. Geben Sie die UID-Nummer Ihrer Kamera ein.
4. Benennen Sie die im Reolink Client angezeigte Kamera.
5. Klicken Sie auf „OK“, um sich einzuloggen.
29Deutsch

WLAN-Einstellungen
06/03/2018 23:48:13 TUE
411-5MP
Klicken Sie auf „Geräteeinstellungen“, und fahren Sie fort mit „Netzwerk >>WLAN-Einstellung“.
Reolinik-5G
1
Reolinik-5G
3
4
Hinweis:
Das Symbol der SD-Karte wird nur angezeigt, wenn eine SD-Karte in die Kamera
eingesteckt wurde.
30 Deutsch
g
2
5
1. Scannen Sie die SSID.
2. Wählen Sie mit einem Doppelklick die SSID und geben Sie das Passwort ein.
3. Klicken Sie auf „WLAN-Test“, um das Passwort zu testen.
4. WLAN-Test
a) Wenn der WLAN-Test erfolgreich ist, gehen Sie bitte zu Schritt 5.
b) Wenn der WLAN-Test fehlschlägt, überprüfen Sie bitte das WLAN-Passwort und die
Netzwerkverbindung. Versuchen Sie es dann erneut.
5. Klicken Sie auf „OK“.
Entfernen Sie nun das Ethernet-Kabel. Jetzt können Sie auf dem Computer über die
WLAN-Verbindung auf die Kamera zugreifen.
31Deutsch
 Loading...