

Page 1

Operating instructions
Internet Radio RF-IR-PSOCKET1
Item No.
1581726
Page 2

2
Table of contents
Page
1. Introduction .......................................................................................................................................................... 3
2. Explanation of symbols ........................................................................................................................................ 3
3. Intended use ........................................................................................................................................................ 4
4. Delivery content ................................................................................................................................................... 4
5. Safety instructions ...............................................................................................................................................5
6. Features and functions ........................................................................................................................................ 6
7. Components and controls .................................................................................................................................... 7
8. Electrical connection ............................................................................................................................................ 8
9. Using the radio .....................................................................................................................................................8
a) Basic functions ..............................................................................................................................................8
b) Initial setup ....................................................................................................................................................9
c) Menu overview ............................................................................................................................................ 10
d) Internet radio mode .....................................................................................................................................15
e) Media center mode ...................................................................................................................................... 17
f) DLNA playback ............................................................................................................................................18
g) Alarm ........................................................................................................................................................... 19
h) My mediaU ..................................................................................................................................................20
10. Handling .............................................................................................................................................................20
11. Troubleshooting ................................................................................................................................................. 21
12. Maintenance and cleaning .................................................................................................................................22
13. Disposal ............................................................................................................................................................. 22
14. Technical data ....................................................................................................................................................23
15. Declaration of conformity ...................................................................................................................................23
Page 3
3
1. Introduction
Dear Customer,
thank you for purchasing this product.
This product complies with the statutory national and European specications. To maintain this status and to ensure
safe operation, you as the user must observe these operating instructions!
These operating instructions are part of this product. They contain important notes on commissioning and
handling. Also consider this if you pass on the product to any third party. Therefore, retain these operating
instructions for reference!
If there are any technical questions, please contact:
International: www.conrad.com/contact
United Kingdom: www.conrad-electronic.co.uk/contact
2. Explanation of symbols
The symbol with the lightning in the triangle indicates that there is a risk to your health, e.g. due to an
electric shock.
This symbol is used to highlight important information in these operating instructions. Always read this
information carefully.
This symbol indicates special information and advice on how to use the product.
The symbol with the house indicates that the product may only be used in enclosed rooms.
Page 4
4
3. Intended use
This product is designed to play Internet radio stations. You can also use it to stream music over your home network
via UPnP and DLNA. It features a clock with an alarm function.
The radio connects to the Internet via your home Wi-Fi network.
This product is only designed for connection to a 100–240 V/AC wall-mounted mains socket.
This product is intended for indoor use only. Do not use it outdoors. Contact with moisture (e.g. in bathrooms) must
be avoided under all circumstances.
For safety and approval purposes, you must not rebuild and/or modify this product. Using the product for purposes
other than those described above may damage the product. In addition, improper use can cause hazards such as a
short circuit, re or electric shock.
Read the instructions carefully and store them in a safe place. Make this product available to third parties only together
with its operating instructions.
All company and product names are trademarks of their respective owners. All rights reserved.
4. Delivery content
• Internet radio
• Operating instructions
Up-to-date operating instructions
Download the latest operating instructions at www.conrad.com/downloads or scan the QR code on
this page. Follow the instructions on the website.
Page 5

5
5. Safety instructions
Read the operating instructions and safety information carefully. If you do not follow the safety
instructions and information on proper handling in this manual, we will assume no liability for any
resulting personal injury or damage to property. Such cases will invalidate the warranty/guarantee.
• This product is not a toy and must be kept out of the reach of children! Children do not understand the
hazards associated with the incorrect use of electrical devices.
• This device is not intended to be used by people (including children) with reduced physical, sensory or
mental abilities or lack of experience and/or lack of knowledge unless they are supervised by a person
responsible for their safety or have received instructions on how to use the device.
• Do not leave packaging material lying around carelessly, as it may become dangerous playing material
for children.
• Protect the product from extreme temperatures, direct sunlight, strong jolts, high humidity, moisture,
ammable gases, vapours and solvents.
• Do not place the product under any mechanical stress.
• If it is no longer possible to operate the product safely, stop using it and prevent unauthorized use. Safe
operation can no longer be guaranteed if the product:
- is visibly damaged,
- is no longer working properly,
- has been stored for extended periods in poor ambient conditions or
- has been subjected to any serious transport-related stress.
• Always handle the product carefully. Jolts, impacts or a fall even from a low height may damage the
product.
• Pay attention to all additional safety information in the individual sections of these instructions.
• Consult a technician if you are not sure how to use or connect the product.
• Maintenance, modications and repairs must be done by a technician or an authorized repair centre.
• If you have questions which remain unanswered by these operating instructions, contact our technical
support service or other technical personnel.
• The radio must be unplugged from the mains socket to ensure that it is disconnected from the mains.
• Never touch the product when your hands are wet or damp. This may cause a fatal electric shock.
• Do not touch the radio if there are any signs of damage. Switch off the appropriate mains socket (e.g. via
the respective circuit-breaker and the RCD), and then carefully unplug the device from the mains socket.
Never use the product if there are signs of damage.
Page 6
6
• Always read these operating instructions before using, installing, conguring or servicing this product.
• Never place objects containing liquid (e.g. glasses, buckets, vases or plants) on or directly next to the
device. Liquids may seep into the casing and impair the electrical safety of the device. There is also the
risk of a re or a fatal electric shock. Isolate the mains socket (e.g. switch off the circuit breaker and RCD),
and then unplug the device from the mains socket. Discontinue use and take the product to a specialist
repair centre.
• Ensure that the device is adequately ventilated during use. Do not cover ventilation holes with magazines, table cloths, curtains or other objects.
• Do not place open ames (such as burning candles) on or directly next to the device.
• Do not operate the device when it is unattended.
• Only use the product in temperate climates. It is not suitable for use in tropical climates.
6. Features and functions
• Large TFT colour display
• UPnP and DLNA playback
• Built-in clock with two alarms
• Sleep timer
Page 7
7
7. Components and controls
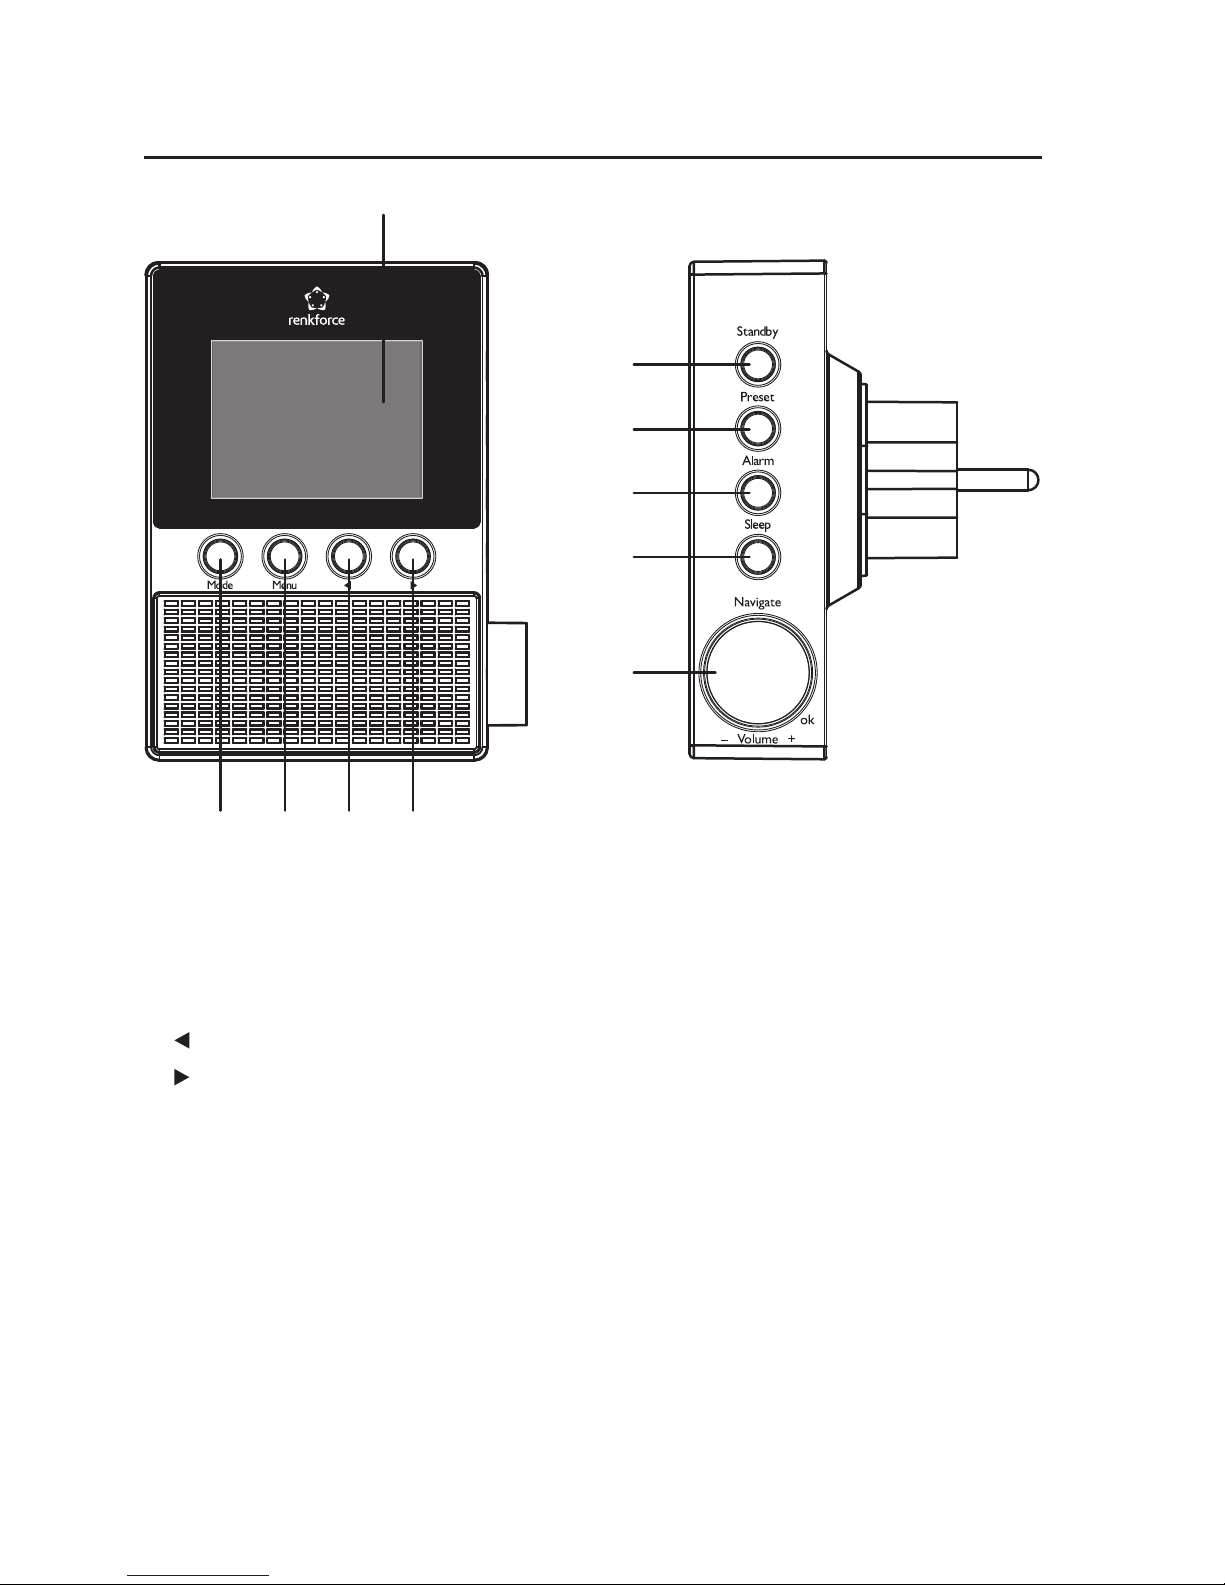
1 Display
2 MODE button
3 MENU button
4 button
5 button
6 STANDBY button
7 PRESET button
8 ALARM button
9 SLEEP button
10 NAVIGATE/VOLUME control
1
2 3 4 5
6
7
8
9
10
Page 8
8
8. Electrical connection
Make sure that the voltage indicated on the product corresponds with your household mains voltage. Never
attempt to operate the device with any other type of voltage.
Exercise caution when handling power adapters and mains connections. Mains voltages can cause fatal
electric shocks.
Plug the device into a wall socket.
9. Using the radio
In this menu, options have been left in English in the German version of the manual, a German explanation
is provided in brackets.
a) Basic functions
Standby mode
• Press the STANDBY button (6) to enable/disable standby mode.
In standby mode, the display (1) shows the time and weather data (when enabled via the menu).
Basic operations
• Use the NAVIGATE/VOLUME control (10) to set the volume, select functions, and change the settings/menu options.
• Press the button (4) to navigate to the previous setting or function.
• Press the button (5) to navigate to the next setting or function.
• Press the NAVIGATE/VOLUME control (10) to conrm a selection or setting.
• Press the MODE button (2) to select the operating mode. The radio switches to the next mode each time you press
the button.
• Press the PRESET button (7) to access the favourites list, save a station or select a saved station.
• Press the MENU button (3) to access the main menu.
• Press the ALARM button (8) to access the alarm settings.
• Press the SLEEP button (9) to activate the sleep timer. The radio will switch off automatically after the preset time
has elapsed. Keep pressing the button until the desired sleep time is shown on the display.
This button takes you straight to the “SLEEP TIMER” options in the “CONFIGURATION” menu.
Page 9

9
b) Initial setup
“WELCOME” will appear on the display when you switch the radio on for the rst time, or when you switch
it on after disconnecting it from your home network. Wait for a few seconds while the radio turns on. The
progress bar indicates the loading status.
The following settings can be changed at any time via the “CONFIGURATION” menu. There are two sub-
menus: “LANGUAGE” and “NETWORK”.
Language settings
• A language menu will be displayed when you turn the radio on for the rst time.
• Use the NAVIGATE/VOLUME control (10) to select the desired language.
• Press the NAVIGATE/VOLUME control (10) to conrm your selection.
Conguring the Wi-Fi connection
• Once you have selected the language, a prompt will appear asking whether you want the radio to check the Wi-Fi
connection each time you turn the radio on.
• Use the (4) or buttons (5) to select YES or NO.
• Press the NAVIGATE/VOLUME control (10) to conrm your selection.
• On the next screen you can set up the Wi-Fi connection. Here, you have the choice between:
“YES” (manual password entry)
“YES (WPS)” (automatic setup with WPS)
“NO” (skip Wi-Fi setup)
• Use the (4) or (5) buttons to select an option.
• Press the NAVIGATE/VOLUME control (10) to conrm your selection.
- Select “NO” if you want to set up the Wi-Fi connection later.
- Select “YES (WPS)” if you want to set up the connection automatically using the WPS feature.
After selecting this option, enable WPS on your router or access point within 120 seconds.
The connection will be established automatically and the radio will switch to the main menu.
Page 10

10
- Select “YES” if you want to congure the Wi-Fi connection manually.
The Internet radio will automatically search for available Wi-Fi networks.
Use the NAVIGATE/VOLUME control (10) to select the desired network.
Press the NAVIGATE/VOLUME control (10) to conrm your selection.
Enter the password for the selected Wi-Fi network.
Turn the NAVIGATE/VOLUME control (10) to select the characters for the password.
Press the button (5) to go to the next character.
Press the button (4) to go to the previous character.
Press the NAVIGATE/VOLUME control (10) to conrm the password.
The radio will connect to the network and revert to the main menu.
c) Menu overview
The following section provides an overview of the different menu options. The active setting is highlighted
in white.
Please note that some menu options may change following future software updates.
“INTERNET RADIO”
Refer to “Internet radio mode” for a detailed description of this mode.
• “MY FAVORITE”
Use this sub-menu to add your favourite stations to the favourites list.
“RADIO STATION/MUSIC”
Use this sub-menu to select a radio station based on a range of criteria.
• “LOCAL RADIO”
This option allows you to search for local radio stations. To congure your location, go to “LOCAL RADIO SETUP”
in the CONFIGURATION menu.
• “HISTORY” (most recent stations)
This menu lists the most recently used stations.
• “SERVICE”
Use this menu option to search for stations using keywords or to enter a station’s web address.
Page 11

11
“MEDIA CENTER”
Refer to “Media center mode” for a detailed description of this mode.
• “UPnP” (Universal Plug and Play)
Use this menu option to access your media server. The server must support UPnP. When you select this option, the
radio will display a list of available servers.
• “MY PLAYLIST”
Displays the tracks in your playlist.
• “CLEAR MY PLAYLIST”
Deletes the tracks in your playlist.
“INFORMATION CENTER”
• “WEATHER INFORMATION”
Displays weather information for different locations across the globe.
You can choose locations based on continent, country and city/town. Weather data is retrieved from the Internet.
• “FINANCIAL INFORMATION”
Displays stock market data (e.g. Dow Jones and DAX).
Stock market data is retrieved from the Internet.
• “SYSTEM INFORMATION”
This menu displays up-to-date information about the system and wireless network.
“CONFIGURATION”
• “TIME DISPLAY”
Use this option to select digital or analogue time.
• “MANAGE MY MediaU”
This menu option allows you to congure your own Internet-based channel list.
Refer to “My mediaU” for details.
Page 12

12
• “NETWORK”
- “WIRELESS NETWORK CONFIGURATION”
Use this menu option to search for wireless access points and connect to a network. Refer to “Initial setup” and
follow the instructions for the “YES” option to connect to the desired network.
- “WIRELESS NETWORK (WPS PBC)”
Use this menu options to enable WPS and connect the radio to your router. Refer to “Initial setup” and follow the
instructions for the “YES (WPS)” option to connect to the router.
- “MANUAL CONFIGURATION”
If you cannot connect to the network automatically, try conguring the network settings manually.
You can choose whether to obtain an IP address automatically (DCHP).
If the SSID is hidden, enter the SSID manually.
You can also switch between saved Wi-Fi networks.
- “CHECK NETWORK WHEN POWER ON”
This sub-menu gives you the option to check the Internet connection when the radio is switched on.
When this feature is enabled, the network conguration menu will be automatically displayed if the radio
does not detect an Internet connection when it is switched on.
• “DATE & TIME”
- “SET DATE & TIME”
Here you can choose whether to set the date and time manually or automatically.
To manually congure the date and time, select the manual option and congure the settings using the
NAVIGATE/VOLUME control (10) and the (4) and (5) buttons.
- “SET TIME FORMAT”
You can choose between 12 or 24-hour format.
- “SET DATE FORMAT”
Choose the desired date format. You can choose from the following options:
“YYYY/MM/DD” (year/month/day)
“DD/MM/YYYY” (day/month/year)
“MM/DD/YYYY” (month/day/year).
- “DAYLIGHT SAVING TIME (DST)”
Enables/disables automatic daylight saving time.
Page 13

13
• “ALARM”
Refer to “Alarm” for detailed instructions on how to congure the alarm settings.
- “ALARM 1 (TURN OFF)”
Alarm 1 settings.
- “ALARM 2 (TURN OFF)”
Alarm 2 settings.
- “NAP ALARM (TURN OFF)”
This feature turns on the alarm after a preset duration (e.g. when you take a midday nap).
- “ALARM VOLUME”
Use this option to set the alarm volume. The volume settings apply to all alarms.
• “TIMER”
Use this menu to set a countdown timer.
Set the countdown time using the (4) and buttons (5), and then press the NAVIGATE/VOLUME control (10)
to conrm your selection.
Press the NAVIGATE/VOLUME control (10) to pause and restart the timer.
An alarm will go off when the preset time has elapsed.
• “LANGUAGE”
Use this option to select the menu language.
• “DIMMER”
- “POWER SAVING”
Use this option to set the display brightness for standby mode.
- “TURN ON”
Use this option to set the power-on display brightness.
• “DISPLAY”
Use this option to congure the display colour settings (colour or monochrome).
• “POWER MANAGEMENT”
Use this option to set the power-off time. The Internet radio will automatically switch to standby mode after the
preset time if no buttons are pressed and/or there is no network connection.
• “SLEEP TIMER”
Use this menu to congure the sleep timer.
The radio will turn off automatically when the preset time has elapsed.
You can choose from the following sleep times: 15, 30, 60, 90, 120, 150 or 180 minutes.
Page 14

14
• “BUFFER”
Use this menu to buffer radio reception for 2,4 or 8 seconds.
The Internet radio will store audio data for a few seconds to prevent interrupted playback.
• “WEATHER”
- “SET LOCATION”
Use this menu to select the city for which you want to view weather data.
Select the desired continent, and then select the country and city.
- “TEMPERATURE UNIT”
Use this option to select the temperature unit. You can choose from “CELCIUS” (°C) and “FAHRENHEIT” (°F).
- “SHOW ON STANDBY”
Choose whether to display weather information when the radio is in standby mode.
When enabled, the display switches between the time and weather information when the radio is in standby
mode.
• “LOCAL RADIO SETUP”
Here you can congure the settings for local radio stations.
The radio can detect your location automatically via your IP address, or you can congure the location manually.
• “PLAYBACK SETUP”
Use this option to select the playback mode.
- “OFF” Disable repeat mode
- “REPEAT ALL” Repeat all tracks
- “REPEAT ONE” Repeat the current track
- “SHUFFLE” Play the tracks in a random order
• “DEVICE”
- “RENAME (AirMusic)
Use this option to rename the radio’s DLNA device name.
Enter the name in the same way as the Wi-Fi password (see “Initial setup”).
- “AIR MUSIC CONTROL APP”
Select this option to display a QR code with a link to the AirMusic Control App. The AirMusic Control App allows
you to stream music from your smartphone via DLNA (the app is not required if your smartphone is DLNA-ready).
• “EQUALISER”
Select this option to congure the equaliser settings.
• “RESUME WHEN POWER ON”
Use this option to congure the default action when the Internet radio is plugged into a mains socket. When set to
“ON”, playback will resume automatically; when set to “OFF”, the main menu will be displayed.
Page 15

15
• “SOFTWARE UPDATE”
This feature is only designed for use by service technicians and for factory conguration.
• “RESET TO DEFAULT”
Use this menu option to reset the Internet radio to the factory settings. Select “YES” to proceed or “NO” to exit.
“LOCAL RADIO”
Refer to “Internet radio mode” for a detailed description of this mode.
• Use this option to select a local radio station. The listed stations are based on the location settings that you cong-
ured in “LOCAL RADIO SETUP” in the “CONFIGURATION” menu.
• This menu option can also be accessed from the “INTERNET RADIO” menu.
“MY mediaU”
This menu is only available when you enable “MANAGE MY mediaU” in the “CONFIGURATION” menu.
Refer to “My mediaU” for more information.
d) Internet radio mode
Enabling Internet radio mode
• To switch to Internet radio mode, scroll to “INTERNET RADIO” using the NAVIGATE/VOLUME control (10) or the
(4) and (5) buttons.
• Press the NAVIGATE/VOLUME control (10) to enable Internet radio mode.
Selecting a radio station
• Use one of the following menu options to select a radio station:
“MY FAVORITE” Select a saved station from your favourites
“RADIO STATION/MUSIC” Select a station based on search criteria
“LOCAL RADIO” Select a local station
“HISTORY” Select a recently used station
You can also access the “LOCAL STATION” menu directly from the main menu. The local stations are
sorted into categories.
Page 16

16
• Example: Use the NAVIGATE/VOLUME control (10) to navigate to “RADIO STATION/MUSIC”, and then press the
NAVIGATE/VOLUME control to conrm your selection.
• A number of subcategories will appear on the display. Use the NAVIGATE/VOLUME control (10) to navigate through
the subcategories, and then press to conrm your selection.
• For example, select “GENRE” > “BLUES” > “BLUES/TOP 10”, and then select the desired station.
• The Internet radio will automatically connect to the selected station.
• Press the button (5) during playback to view additional information (e.g. station name, song etc.).
• Press the button (4) to go back to the previous menu.
• The radio will display the list of stations for the selected category. Press the NAVIGATE/VOLUME control (10) to
select another station.
• If you do not select another station, the display will automatically revert to the current station after a few seconds.
The station will continue playing until you select another station or function.
Adding stations to your favourites
• Adding the current station to your favourites:
- Hold down the PRESET button (7) until the list of favourites is displayed.
- Use the NAVIGATE/VOLUME control (10) to select the desired position in the list.
- Press the dial NAVIGATE/VOLUME control (10) to save the station.
• Adding channels from the list to your favourites
- Select the desired station from the list.
- Hold down the PRESET button (7) until the list of favourites is displayed.
- Use the NAVIGATE/VOLUME control (10) to select the desired position in the list.
- Press the dial NAVIGATE/VOLUME control (10) to save the station.
If the selected position is occupied by another station, the previous station will be automatically deleted
from the list.
Selecting a station from your favourites
• Press the PRESET button (7) to display your favourites list.
• Use the NAVIGATE/VOLUME control (10) to select the desired station.
• Press the dial NAVIGATE/VOLUME control (10) to conrm your selection.
Exiting Internet radio mode
• To exit Internet radio mode, press the MENU button (3) to access the main menu.
• Alternatively, press the MODE button (2) to select another mode.
Page 17

17
e) Media center mode
Media center mode allows you to stream music from a computer on your home network (UPnP playback).
Switching to Media center mode
• To switch to Media center mode, scroll to “MEDIA CENTER” using the NAVIGATE/VOLUME control (10) or the
(4) and (5) buttons.
• Press the control NAVIGATE/VOLUME control (10) to conrm your selection.
UPnP playback
The radio supports UPnP (Universal Plug and Play).
This allows you to stream music over your home network. A compatible device must be connected to your
network to function as the server. This can be a network hard drive with a UPnP server or a standard PC
(e.g. with Windows® 8) that allows access to public folders/media sharing.
• Use the NAVIGATE/VOLUME control (10) to navigate to “UPnP”, and then press to conrm your selection. Alterna-
tively, keep pressing the MODE button (2) until “UPnP” is displayed.
• The Internet radio will automatically search for and list compatible devices connected to your network. If the desired
device is not listed, press the button (4) to go back and load the menu again.
• Select a network device using the NAVIGATE/VOLUME control (10), and then press to conrm your selection.
• The radio will display the server menu. The folders displayed may vary depending on your server. Navigate through
the folders to the desired track, and then press the NAVIGATE/VOLUME control (10) to start playback.
• The selected track will start to play.
• Press the button (5) during playback to display additional information about the track.
• Press the button (4) to go back to the list of tracks.
Page 18

18
Creating a playlist
• To add the current track to your playlist, hold down the NAVIGATE/VOLUME control (10) until a symbol appears
on the display (1).
• The current track will be added to the playlist.
• To add another track to the playlist, select the desired track and hold down the NAVIGATE/VOLUME control (10)
until a symbol appears to the left of the time display.
• The selected track will be added to playlist.
• To access the playlist, go to “MY PLAYLIST” in the media center menu.
• Press the NAVIGATE/VOLUME control (10) to select and play a track from the playlist.
• To delete a track from the playlist, select the desired track and then hold down the NAVIGATE/VOLUME control
(10).
• You will be prompted to select “YES” in order to delete the track.
Deleting the playlist
• To delete the playlist, go to the Media center menu and select “CLEAR MY PLAYLIST” using the NAVIGATE/
VOLUME control (10).
• You will be prompted to select “YES” in order to delete the playlist.
The playlist will be automatically deleted when the Internet radio is disconnected from the power supply.
Exiting Media center mode
• To exit Media center mode, press the MENU button (3). The display will revert to the main menu.
• Alternatively, press the MODE button (2) to select another mode.
f) DLNA playback
• The Internet radio also supports DLNA playback.
• This allows you to stream music from a compatible device connected to the same network.
• DLNA is supported by Windows® Media Player (provided that media sharing is enabled). You will normally be
prompted to enable media sharing when you launch the program for the rst time. You may also need to allow
media sharing in your rewall software.
• To start playback, right click on a track in Media Player, select “Stream to”, and then select the radio’s DLNA device
name (“AirMusic”).
• To change the device name, go to the “CONFIGURATION” menu and select “DEVICE” >> “RENAME (AIRMUSIC)”.
• To stream music from a smartphone that does not support DLNA by default, download the “AirMusic Control App”.
• To download the app, go to the “CONFIGURATION” menu and scan the QR code under “DEVICE” > “AirMusic
CONTROL APP”.
Page 19

19
g) Alarm
Conguring the alarm settings
• Press the ALARM button (8) to access the alarm menu.
• Alternatively, go to the “CONFIGURATION” menu, and then select “ALARM”.
Setting the alarm
The radio has two separate alarms. Each alarm is congured in the same way.
• In the alarm menu, select “ALARM 1 (TURN OFF)” or “ALARM 2 (TURN OFF)”.
• Select “TURN ON” and conrm your selection.
• Select “REPEAT” and congure the repeat settings:
“EVERYDAY”
“ONCE”
Day of the week
Weekdays: The alarm will go off on the selected days.
• Press the button (4) to go back to the previous menu, and then navigate to “TIME: 00:00”.
• Select the option and then set the desired alarm time.
• Select “SOUND MELODY” and set the alarm tone. You can choose from the following options:
“BEEP”
“MELODY”
“INTERNET RADIO”
When you select “Internet radio”, you will be prompted to select a station from your favourites. If the radio
station cannot be accessed when the alarm goes off (e.g. if no Wi-Fi connection is available), the standard
alarm tone will be played after one minute.
• Set the alarm volume to complete the alarm settings.
To set the volume, select “ALARM VOLUME” and adjust the volume to the desired level.
• The alarm settings are now complete and you can exit the settings menu.
“NAP ALARM”
• This feature turns on the alarm after a preset duration (e.g. when you take a midday nap).
• In the alarm menu, select “NAP ALARM (TURN OFF)” and set the sleep duration.
Switching off the alarm
• Press the STANDBY button (6) to silence the alarm.
• Pressing any other button enables the snooze function. The alarm will go off again after ve minutes.
• Press the STANDBY button (6) at any time to disable the snooze function.
• To disable the alarm, go to the “ALARM” menu and change the alarm setting from “ON” to “OFF”.
• Disabling the alarm will not delete the alarm settings.
Page 20

20
h) My mediaU
You can use your computer to create your own list of favourite radio stations. Proceed as follows:
• Go to the “CONFIGURATION” menu, and then select “MANAGE MY mediaU”.
• Change the setting from “DISABLE” to “ENABLE”.
• Exit the settings menu.
• “MY mediaU” should now be displayed in the main menu.
• Open your computer browser and visit “http://www.mediayou.net/web/index.php”.
• Click “JOIN NOW” to create an account.
• Once you have created an account, log in and register your Internet radio.
• You can now create your own favourites list on the website.
• The radio will automatically sync the list that you created online.
• To select a station from the list, go to the “MY mediaU” menu and select the desired station.
10. Handling
• Never plug the device into a mains socket immediately after it has been brought from a cold room into a warm one.
The condensation generated may destroy the product. Before connecting the device to the mains, allow it to reach
room temperature and wait until the condensation has evaporated.
• Unplug the device from the mains when you do not plan to use it for an extended period.
• For safety reasons, always unplug the device from the mains during thunderstorms.
• To ensure sufcient ventilation, do not cover the device. In addition, air circulation must not be impaired by objects
such as magazines, table clothes and curtains.
Page 21

21
11. Troubleshooting
The radio does not connect to your Wi-Fi network.
• Check whether another device (e.g. a computer or tablet) can connect to the Internet over the Wi-Fi network.
• Check whether your router is running a DCHP server and that you have congured the static IP address (including
the subnet mask and standard gateway) correctly.
• Check whether your rewall is blocking the outgoing ports.
• Some access points are congured to deny access to devices whose MAC address is not registered on the access
point’s conguration page. Refer to the instruction manual of your router or access point for details.
The MAC address can be accessed from the following menu:
“INFORMATION CENTER” > “SYSTEM INFORMATION” > “WIRELESS INFO” > “MAC ADDRESS”
• Check that you have entered the correct Wi-Fi password. The password is case-sensitive.
The radio is connected to your network, but it does not play certain radio stations.
• The Internet radio station may be ofine. This may be the case if the radio station is located in a different time zone.
• There are too many users accessing the radio station’s server.
• Some radio stations limit the number of users that can access the server. You will not be able to access the station
when this number is reached.
• The radio station may have stopped broadcasting.
• The radio station URL may no longer be valid. The URLs are updated daily. The station should be available again
one or two days later.
• If the radio station is located in another country, the connection may be slow. Try playing the station on a computer
or other device.
You want to use the UPnP function, but the radio cannot nd your device on the network.
• Check that the radio is connected to your Wi-Fi network. The radio and the server must be connected to the same
network.
• There is an active rewall on your UPnP server that is blocking access to public folders. Refer to your rewall
instructions for more information.
The computer from which you want to play music is listed, but you cannot access any folders.
• If a rewall is running on your computer or server, disable the rewall briey to check whether it is blocking access
to your folders.
The le sharing feature is not available.
• Enable le sharing on your system.
Page 22
22
The radio keeps buffering and playback is intermittent.
• The radio streams Internet radio stations over a broadband connection. If your Internet bandwidth is too low or other
users are downloading large amounts of data, playback may be intermittent.
• Check your Internet connection and try switching to another station.
“Buffering” means that the playback device downloads a certain amount of data before starting playback.
This normally ensures that the audio data is played without interruption.
Any repair work other than that described above must be carried out by an authorized technician.
12. Maintenance and cleaning
Always observe the following safety instructions before cleaning or servicing the radio:
Live components may be exposed when the case is opened or components are removed. The device must
be disconnected from all power supplies before carrying out any servicing or repair work.
Capacitors inside the device may still carry a voltage when they have been disconnected from the power
supply.
Repair work must only be done by qualied technicians who are familiar with the potential hazards and the
relevant regulations.
Never use aggressive detergents, rubbing alcohol or other chemical solutions, as these could damage the
casing or stop the product from functioning properly.
• Always disconnect the product from the power supply before cleaning it.
• Use a dry, lint-free cloth to clean the product.
13. Disposal
Electronic devices are recyclable waste and must not be placed in household waste. Always dispose of the
product according to the relevant statutory regulations.
Page 23

23
14. Technical data
Operating voltage .............................................100–240 V/AC 50/60 Hz
Power consumption ..........................................Max. 3.5 W
Output power ....................................................2 W
Display ..............................................................240 x 320 pixel TFT colour screen
Alarms ..............................................................2 + NAP alarm
Transmission frequency....................................2.4 GHz
Transmission power..........................................Max. 17 dBm
Dimensions .......................................................89 x 82 x 117 mm
Weight ..............................................................230 g
Operating conditions .........................................0 to +40 °C / 10–95% rel. humidity
Storage conditions ............................................-20 to +60 °C / 10–95% rel. humidity
15. Declaration of conformity
Conrad Electronic SE, Klaus-Conrad-Straße 1, D-92240 Hirschau, hereby declares that this product conforms to the
2014/53/EU directive.
Click on the following link to read the full text of the EU declaration of conformity:
www.conrad.com/downloads
Select a language by clicking on a ag symbol, and then enter the product order number in the search box.
The EU Declaration of Conformity is available for download in PDF format.
Page 24

1581726_V1_0817_02_VTP_m_en
This is a publication by Conrad Electronic SE, Klaus-Conrad-Str. 1, D-92240 Hirschau (www.conrad.com).
All rights including translation reserved. Reproduction by any method, e.g. photocopy, microlming, or the capture in
electronic data processing systems require the prior written approval by the editor. Reprinting, also in part, is prohibited.
This publication represent the technical status at the time of printing.
Copyright 2017 by Conrad Electronic SE.
 Loading...