

Page 1

Bedienungsanleitung
GM115-25210 LED-Bar
Best.-Nr. 1233887 Seite 2 - 21
Operating Instructions
GM115-25210 LED-Bar
Item No. 1233887 Page 22 - 41
Notice d´emploi
Barre à DEL GM115-25210
N° de commande 1233887 Page 42 - 61
Gebruiksaanwijzing
GM115-25210 LED-balk
Bestelnr. 1233887 Pagina 62 - 81
Page 2

2
Inhaltsverzeichnis
Seite
1. Einführung ............................................................................................................................................................3
2. Bestimmungsgemäße Verwendung ................................................................................................................
4
3. Symbolerklärung .................................................................................................................................................4
4. Sicherheitshinweise ...........................................................................................................................................5
5. Featurebeschreibung .........................................................................................................................................6
6. Lieferumfang ........................................................................................................................................................7
7. Einzelteile und Bedienelemente .......................................................................................................................
7
8. Montage ...............................................................................................................................................................8
9. DMX-Anschluss ..................................................................................................................................................9
a) Anschluss eines DMX-Controllers ............................................................................................................
9
b) Aufbau einer Master-Slave-Kette
.............................................................................................................10
10. Netzanschluss ....................................................................................................................................................11
11. Bedienung ...........................................................................................................................................................12
a) Einstellung der Betriebsart ........................................................................................................................
12
b) Betrieb mit externem DMX-Controller .....................................................................................................
13
c) Slave-Betrieb ...............................................................................................................................................16
d) Sound-to-Light-Betrieb ...............................................................................................................................17
e) Automatikbetrieb .........................................................................................................................................17
f) Parametereinstellung für Automatik- und Sound-to-Light-Betrieb ....................................................
18
g) Blackout (Standby) ......................................................................................................................................
18
h) Einstellung der Displayausrichtung ..........................................................................................................
18
i) Betrieb mit fester Farbeinstellung (RGB-Betrieb) ..................................................................................
19
12. Handhabung........................................................................................................................................................19
13. Wartung ...............................................................................................................................................................20
14. Behebung von Störungen .................................................................................................................................
20
15. Entsorgung ..........................................................................................................................................................
21
16. Technische Daten ..............................................................................................................................................
21
Page 3
3
1. Einführung
Sehr geehrte Kundin, sehr geehrter Kunde,
wir bedanken uns für den Kauf dieses Produkts.
Dieses Produkt erfüllt die gesetzlichen nationalen und europäischen Anforderungen. Um diesen Zustand
zu erhalten und einen gefahrlosen Betrieb sicherzustellen, müssen Sie als Anwender diese Bedienungs
-
anleitung beachten!
Diese Bedienungsanleitung gehört zu diesem Produkt. Sie enthält wichtige Hinweise zur Inbe-
triebnahme und Handhabung. Achten Sie hierauf, auch wenn Sie dieses Produkt an Dritte weitergeben. Heben Sie deshalb diese Bedienungsanleitung zum Nachlesen auf!
Bei technischen Fragen wenden Sie sich bitte an:
Deutschland: www.conrad.de/kontakt
Österreich: www.conrad.at
www.business.conrad.at
Schweiz: www.conrad.ch
www.biz-conrad.ch
Page 4
4
2. Bestimmungsgemäße Verwendung
Die LED-Bar dient zur Erzeugung von Lichteekten in Dekobeleuchtungen, Lightshow-Anlagen, Partyräumen etc. und wird über den eingebauten Controller oder einen externen DMX-Controller gesteuert.
Dieses Produkt ist nur für den Anschluss an 100-240 V/ 50/60 Hz Wechselspannung und nur für Schutzkon
-
taktsteckdosen zugelassen.
Der DMX-Anschluss darf nur an geeignete DMX-Controller oder an andere DMX-Lichteekte mit DMX-
Anschluss angeschlossen werden.
Eine Verwendung ist nur in geschlossenen Räumen, also nicht im Freien erlaubt. Der Kontakt mit Feuchtig
-
keit, z.B. im Badezimmer u.ä. ist unbedingt zu vermeiden.
Eine andere Verwendung als zuvor beschrieben führt zur Beschädigung dieses Produktes, darüber hinaus
ist dies mit Gefahren, wie z.B. Kurzschluss, Brand, elektrischer Schlag etc. verbunden.
Das gesamte Produkt darf nicht geändert bzw. umgebaut und das Gehäuse nicht geönet werden.
Beachten Sie alle Sicherheitshinweise dieser Bedienungsanleitung!
3. Symbolerklärung
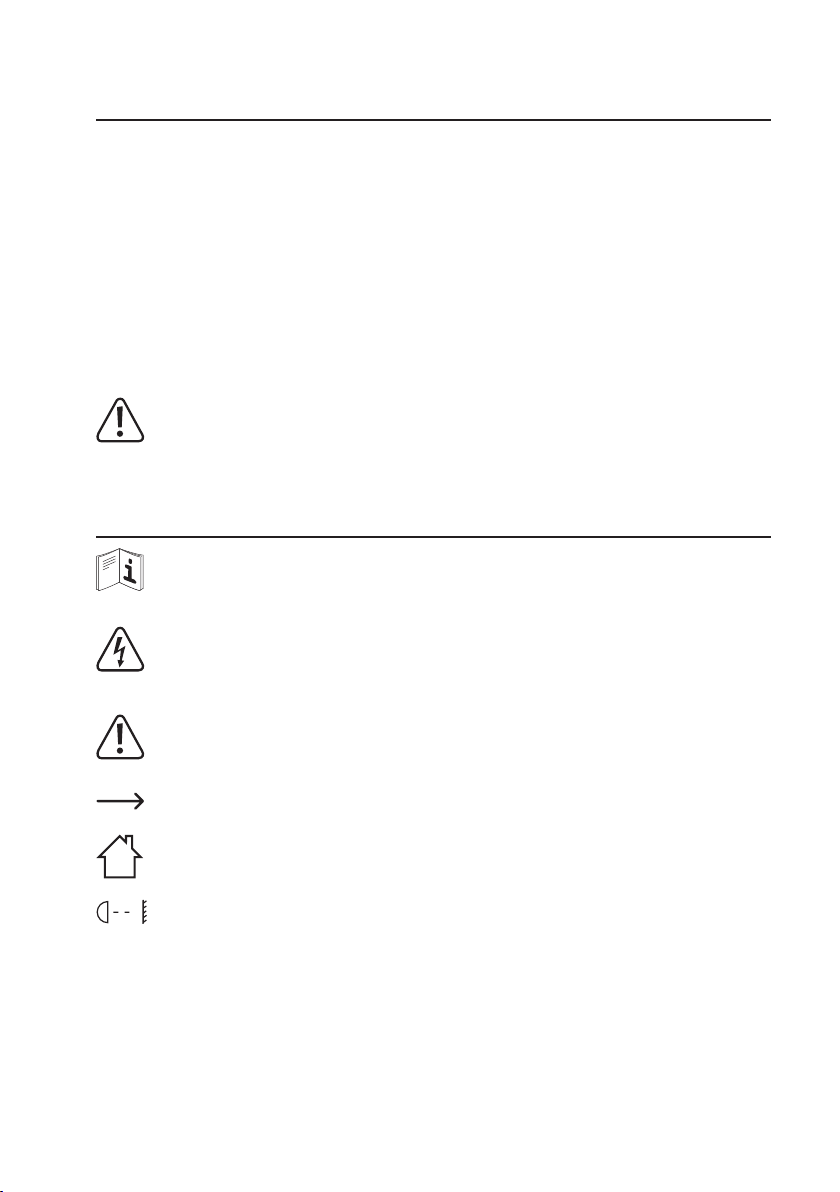
Dieses Zeichen auf dem Gerät weist den Benutzer darauf hin, dass er vor der Inbetriebnahme
des Gerätes diese Bedienungsanleitung lesen und beim Betrieb beachten muss.
Das Symbol mit dem Blitz im Dreieck wird verwendet, wenn Gefahr für Ihre Gesundheit besteht,
z.B. durch elektrischen Schlag. Im Gerät befinden sich keine vom Benutzer zu wartenden Teile.
Önen Sie das Gerät deshalb nie.
Wichtige Hinweise, die unbedingt zu beachten sind, werden in dieser Bedienungsanleitung
durch das Ausrufezeichen gekennzeichnet.
Das Symbol mit dem Pfeil ist zu finden, wenn besondere Tipps und Hinweise zur Bedienung ge-
geben werden.
Dieses Symbol weist darauf hin, dass das Produkt nur in Innenräumen verwendet werden darf.
...m
Dieses Symbol gibt den Mindestabstand zu angestrahlten Flächen an.
Page 5

5
4. Sicherheitshinweise
Bei Schäden, die durch Nichtbeachten dieser Bedienungsanleitung verursacht werden, er-
lischt die Gewährleistung/Garantie. Für Folgeschäden übernehmen wir keine Haftung.
Bei Sach- oder Personenschäden, die durch unsachgemäße Handhabung oder Nichtbeachten
der Sicherheitshinweise verursacht werden, übernehmen wir keine Haftung. In solchen Fällen
erlischt die Gewährleistung/Garantie.
Sehr geehrte Kundin, sehr geehrter Kunde: Die folgenden Sicherheits- und Gefahrenhinweise
dienen nicht nur zum Schutz des Gerätes, sondern auch zum Schutz Ihrer Gesundheit. Lesen Sie
sich bitte die folgenden Punkte aufmerksam durch:
• Aus Sicherheitsgründen ist das eigenmächtige Umbauen und/oder Verändern des Produktes
nicht gestattet.
• Das Gerät ist in Schutzklasse 1 aufgebaut. Als Spannungsquelle darf nur eine ordnungsge
mäße Netzsteckdose (100-240 V/50/60 Hz) des öentlichen Versorgungsnetzes in Schutzkontaktausführung verwendet werden.
• Prüfen Sie das Gerät vor der Inbetriebnahme auf Schäden. Falls solche vorliegen sollten, neh
men Sie es nicht in Betrieb, sondern wenden Sie sich an eine Fachkraft oder unseren Service.
• Alle Personen, die diesen Eektstrahler bedienen, installieren, aufstellen, in Betrieb nehmen
oder warten müssen entsprechend ausgebildet und qualifiziert sein und diese Bedienungsan
-
leitung beachten.
• Die Netzsteckdose, an die das Produkt angeschlossen wird, muss leicht zugänglich sein.
• Verwenden Sie das Produkt nicht in Räumen oder bei widrigen Umgebungsbedingungen, wo
brennbare Gase, Dämpfe oder Stäube vorhanden sind oder vorhanden sein können! Es besteht
Explosionsgefahr!
• LED-Strahlung kann gefährlich sein, wenn der LED-Strahl oder eine Reflexion in das unge
schützte Auge gelangt. Informieren Sie sich deshalb bevor Sie das Gerät in Betrieb nehmen
über die gesetzlichen Bestimmungen und Vorsichtsmaßnahmen für den Betrieb eines derartigen LED-Gerätes.
• Blicken Sie während des Betriebs niemals direkt in die Lichtquelle. Die hellen Lichtblitze kön
nen kurzzeitig zu Sehstörungen führen. Außerdem können bei empfindlichen Menschen unter
Umständen epileptische Anfälle ausgelöst werden. Dies gilt insbesondere für Epileptiker.
• Fassen Sie den Netzstecker niemals mit feuchten oder nassen Händen an. Es besteht die Ge
fahr eines lebensgefährlichen elektrischen Schlages!
• Beachten Sie, dass das Netzkabel nicht gequetscht, geknickt, durch scharfe Kanten beschä
digt oder anders mechanisch belastet wird. Vermeiden Sie eine übermäßige thermische Belastung des Netzkabels durch große Hitze oder große Kälte. Verändern sie das Netzkabel nicht.
Wird dies nicht beachtet, kann das Netzkabel beschädigt werden. Ein beschädigtes Netzkabel
kann einen lebensgefährlichen elektrischen Schlag zur Folge haben.
• Sollte die Netzleitung Beschädigungen aufweisen, so berühren Sie sie nicht. Schalten Sie zu
erst die zugehörige Netzsteckdose stromlos (z.B. über den zugehörigen FI-Schalter und Sicherungsautomaten) und ziehen Sie danach den Netzstecker vorsichtig aus der Netzsteckdose.
Bringen Sie das Gerät zur Instandsetzung in eine Fachwerkstatt. Betreiben Sie das Produkt auf
keinen Fall mit beschädigter Netzleitung.
Page 6
6
• Das Produkt ist kein Spielzeug, es ist nicht für Kinder geeignet. Kinder können die Gefahren, die
im Umgang mit elektrischen Geräten bestehen, nicht einschätzen.
• Setzen Sie das Gerät keinen hohen Temperaturen, Tropf- oder Spritzwasser, starken Vibrati
-
onen, sowie hohen mechanischen Beanspruchungen aus.
• Achten Sie während des Betriebs auf eine ausreichende Belüftung des Gerätes. Decken Sie
das Gehäuse nicht ab.
• Stellen Sie keine oenen Brandquellen wie brennende Kerzen auf oder direkt neben dem Gerät
ab.
• Stellen Sie keine Gefäße mit Flüssigkeiten, z.B. Gläser, Eimer, Vasen oder Pflanzen, in die un
mittelbare Nähe des Produkts. Flüssigkeiten könnten ins Gehäuseinnere gelangen und dabei
die elektrische Sicherheit beeinträchtigen. Außerdem besteht höchste Gefahr eines Brandes
oder eines lebensgefährlichen elektrischen Schlages! Schalten Sie in einem solchen Fall die
zugehörige Netzsteckdose stromlos (z.B. über den zugehörigen FI-Schalter und Sicherungsautomaten) und ziehen Sie danach den Netzstecker aus der Netzsteckdose. Stecken Sie alle
Kabel vom Gerät ab. Das Produkt darf danach nicht mehr betrieben werden, bringen Sie es in
eine Fachwerkstatt.
• Wenden Sie sich an eine Fachkraft, wenn Sie Zweifel über die Arbeitsweise, die Sicherheit
oder den Anschluss des Produktes haben.
• Benutzen Sie das Gerät nur in gemäßigtem Klima, nicht in tropischem Klima.
• Lassen Sie Verpackungsmaterial nicht achtlos liegen. Es könnte für Kinder zu einem gefähr
-
lichen Spielzeug werden.
• Beachten Sie auch die zusätzlichen Sicherheitshinweise in den einzelnen Kapiteln dieser Be
-
dienungsanleitung.
• In gewerblichen Einrichtungen sind die Unfallverhütungsvorschriften des Verbandes der ge
-
werblichen Berufsgenossenschaften für elektrische Anlagen und Betriebsmittel zu beachten.
• Sollten Sie sich über den korrekten Anschluss nicht im Klaren sein oder sollten sich Fragen
ergeben, die nicht im Laufe der Bedienungsanleitung abgeklärt werden, so setzen Sie sich
bitte mit unserer technischen Auskunft oder einem anderen Fachmann in Verbindung.
5. Featurebeschreibung
• Sehr helle LED-Bar mit 252 LEDs
• LED-Display zur einfachen Bedienung
• Stand-Alone-Betrieb, Master-Slave-Betrieb und DMX-Betrieb
• 6 DMX-Betriebsarten mit bis zu 14 Kanälen
• 25 Automatikprogramme
• 12 Sound-to-Light-Programme
• eingebautes Mikrofon für die Sound-to-Light-Steuerung
• stabiles Metallgehäuse
Page 7

7
6. Lieferumfang
• LED-Bar
• Montagewinkel mit Schrauben
• Netzleitung
• Bedienungsanleitung
7. Einzelteile und Bedienelemente
(1) Netzanschluss IN
(2) Anschluss DMX IN
(3) Anschluss DMX OUT
(4) Display
(5) Mikrofon
(6) Netzanschluss OUT
(7) Taste MENU
(8) Taste UP
(9) Taste DOWN
(10) Taste ENTER
AC100-240V 50/60Hz IN DMX IN DMX OUT
MENU
UP DOWN
ENTER
MIC
AC100-240V 50/60Hz OUT
Max. Load: 7 A
10
Page 8
8
8. Montage
Die Montage und die Installation des Gerätes darf nur durch eine Fachkraft erfolgen, die mit
den Gefahren und den einschlägigen Vorschriften hierfür vertraut ist. Die Wartung, Bedienung
und Inbetriebnahme dieses Produktes darf nur durch Personen ausgeführt werden, die entsprechend qualifiziert sind.
Achten Sie bei der Auswahl des Montageortes Ihres Gerätes darauf, dass Erschütterungen,
Vibrationen, Staub, Hitze, Kälte und Feuchtigkeit vermieden werden müssen. Außerdem dürfen
sich keine starken Transformatoren oder Motoren in der Nähe des Gerätes befinden.
Decken Sie das Gerät niemals ab. Achten Sie beim Aufstellen mit anderem Equipment auf
ausreichende Belüftung. Halten Sie einen ausreichenden Abstand zu anderen Geräten und zu
Wänden ein. Stellen Sie den Lichteekt nicht in die direkte Nähe von Wärmequellen. Richten
Sie keine starken Strahler und Lichtquellen auf das Gerät. Dies kann zur Überhitzung führen
(Brandgefahr!).
Bohren oder schrauben Sie zur Befestigung des Gerätes keine zusätzlichen Schrauben in das
Gehäuse. Dadurch können gefährliche Spannungen berührbar werden.
Das Gerät muss außerhalb des Handbereiches von Personen montiert werden.
Beleuchtete Gegenstände müssen mindestens 0,5 m vom Lichtaustritt des Gerätes entfernt sein.
Leicht entflammbare Materialien wie z.B. Dekostoe müssen ebenfalls mindestens 0,5 m vom
Gerät entfernt sein. Es besteht ansonsten Brandgefahr!
Stellen Sie sicher, dass bei der Montage des Produktes das Netzkabel nicht gequetscht oder
durch scharfe Kanten beschädigt wird.
Während Montage- und Servicearbeiten muss der Bereich unterhalb des Montageortes abge
-
sperrt sein.
Die Montagefläche bzw. –vorrichtung muss dermaßen bemessen sein, dass sie mindestens
eine Stunde lang die zehnfache Nutzlast ohne dauernde schädliche Deformierung aushalten
kann.
Das Gerät muss bei erhöhter Montage außerdem unbedingt durch eine zweite, von der eigent
lichen Montagevorrichtung unabhängige Sicherheitsaufhängung gesichert werden. Bei fehlerhafter Hauptaufhängung darf kein Teil der Installation herabfallen können.
Bei der Aufstellung/Montage sind alle diesbezüglich relevanten Vorschriften Ihres Landes zu
beachten.
Abnahme der Installation (bei gewerblicher/öentlicher Verwendung):
Vor der ersten Inbetriebnahme und nach wesentlichen Änderungen daran muss die Installation
(einschließlich des elektrischen Anschlusses) durch einen Sachverständigen geprüft werden.
Einmal jährlich ist eine Prüfung durch einen Sachkundigen erforderlich.
Page 9
9
• Montieren Sie den Lichteekt mit den Montagewinkeln an der Decke, der Wand oder einem geeigneten
Traversensystem. Die Montage darf niemals freischwingend erfolgen. Benutzen Sie hierbei Montagematerial, das für die Befestigungsfläche geeignet ist und die Last des Lichteekts tragen kann.
• Sichern Sie die Montage mit einem geeigneten Sicherheitsfangseil oder einem Fangnetz zusätzlich ab.
Das Sicherheitsfangseil bzw. das Fangnetz muss unabhängig von der Hauptbefestigung den Lichteekt
im Falle eines Fehlers an der Hauptaufhängung halten können.
• Stellen Sie den gewünschten Neigungswinkel ein und ziehen Sie die Flügelschrauben an den Montage
-
winkeln gut fest.
9. DMX-Anschluss
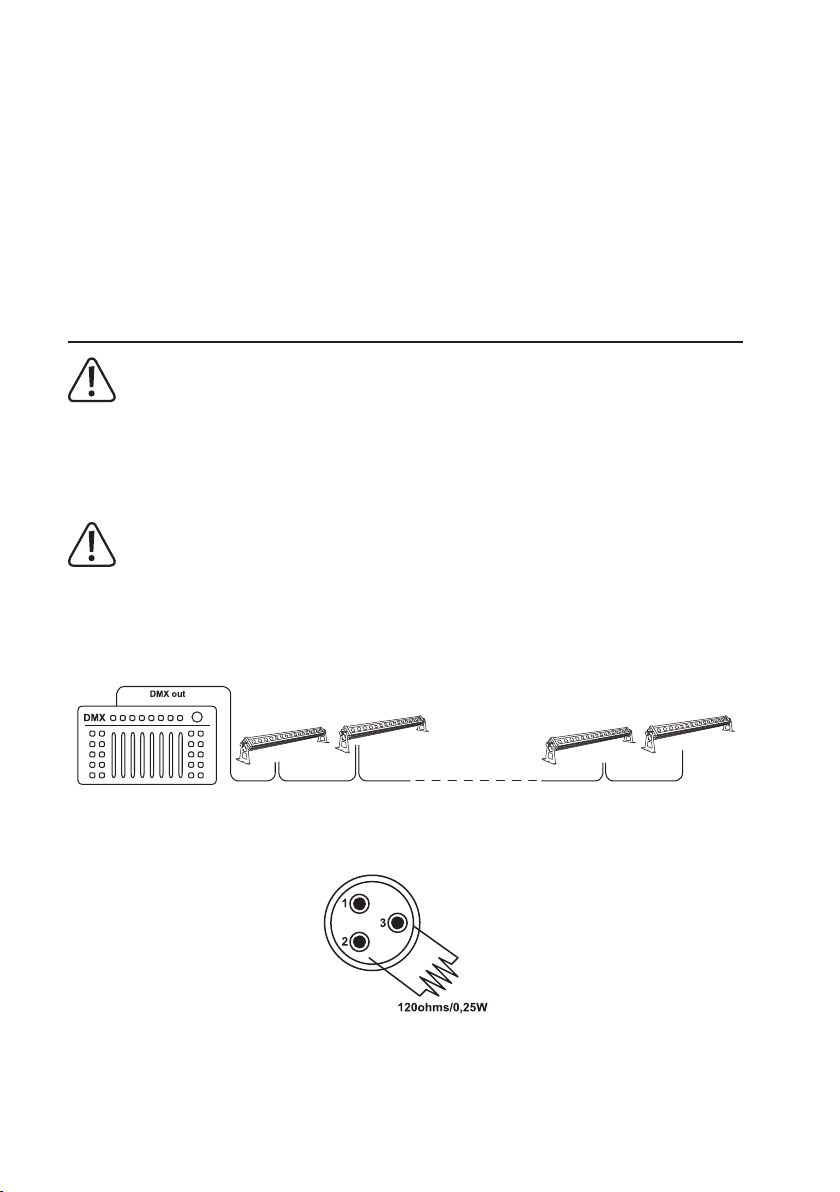
Es können max. 32 Geräte in einer DMX-Kette betrieben werden, da ansonsten der Controller
überlastet wird.
Die maximale Gesamtlänge der DMX-Kette sollte 500 m nicht überschreiten.
Bei der Verwendung von XLR-Mikrofonkabeln kann es zu Störungen bei der DMX-Signalüber
-
tragung kommen. Bitte verwenden Sie in diesem Fall spezielle DMX-Hochfrequenzleitungen.
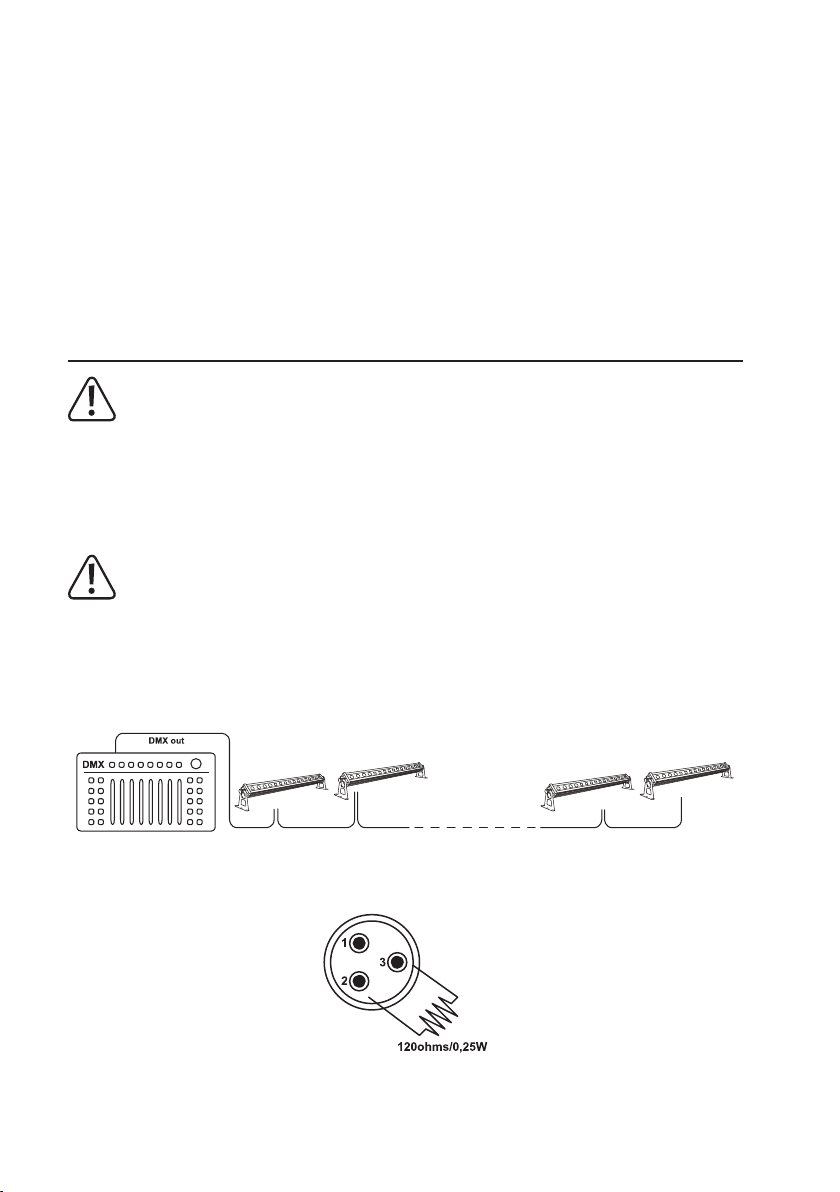
a) Anschluss eines DMX-Controllers
Das Gerät ist ausschließlich zum Anschluss an DMX-Controller mit DMX-512-Protokoll vorge-
sehen.
• Verbinden Sie den Anschluss DMX IN (2) mit dem Ausgang des DMX-Controllers.
• Verwenden Sie hierzu eine geschirmte XLR-Leitung. Der Controller muss je nach DMX-Betriebsart über
bis zu 14 freie Steuerkanäle verfügen.
• Verbinden Sie den Anschluss DMX OUT (3) mit dem DMX-Eingang des nachfolgenden Gerätes.
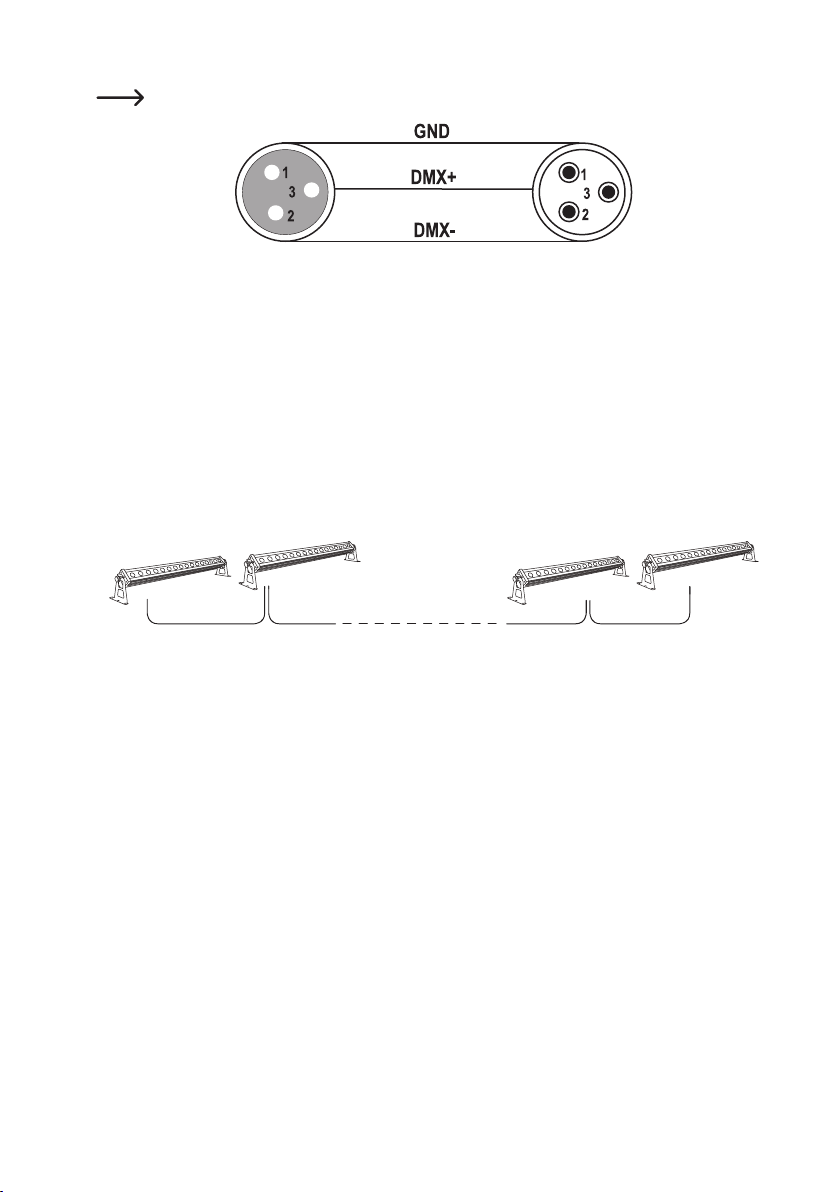
• Sollte der Lichteekt das letzte oder einzige Gerät in der DMX-Kette sein, so stecken Sie in den An
schluss DMX OUT (3) einen Stecker mit einem 120 Ohm/0,25 W-Abschlusswiderstand (zwischen Pin2 und
Pin3) ein.
Page 10

10
Pinbelegung des DMX-Anschlusses: Pin1 = Masse / Pin2 = (-) / Pin3 = (+).
b) Aufbau einer Master-Slave-Kette
Der Lichteekt kann alternativ zum Betrieb an einem DMX-Controller auch als Gerät in einer Master-SlaveKette verwendet werden. Hierbei dient der eingebaute Controller des Master-Gerätes als Steuercontroller
für die angeschlossenen Slave-Geräte.
• Verbinden Sie den Anschluss DMX OUT (3) des Master-Gerätes mit dem Anschluss DMX IN (2) des
ersten Slave-Gerätes.
• Verbinden Sie den Anschluss DMX OUT (3) des ersten Slave-Gerätes mit dem Anschluss DMX IN (2) des
folgenden Slave-Gerätes.
• Verfahren Sie mit allen folgenden Slave-Geräten wie oben beschrieben.
• Stecken Sie in den Anschluss DMX OUT (3) des letzten Slave-Gerätes einen XLR-Stecker mit Abschluss
-
widerstand ein (wie unter „Anschluss eines DMX-Controllers“ beschrieben).
Master Slave Slave Slave
Page 11

11
10. Netzanschluss
Die Netzsteckdose, an die der Lichteekt angeschlossen wird, muss sich in der Nähe des Ge-
rätes befinden und leicht zugänglich sein, damit das Gerät im Fehlerfall schnell und einfach von
der Netzstromversorgung getrennt werden kann.
Lassen Sie die Netzleitung nicht mit anderen Leitungen in Kontakt kommen.
Seien Sie vorsichtig beim Umgang mit Netzleitungen und Netzanschlüssen. Netzspannung kann
lebensgefährliche elektrische Schläge verursachen.
Lassen Sie Kabel nicht frei herumliegen, sondern verlegen Sie sie fachmännisch um Unfallge
-
fahren zu vermeiden.
Achten Sie vor dem Einstecken des Netzsteckers darauf, dass die am Lichteekt angegebene
Gerätespannung mit der verfügbaren Netzspannung übereinstimmt. Sollte die Angabe nicht mit
der zur Verfügung stehenden Netzspannung übereinstimmen, schließen Sie das Gerät nicht an.
Bei einer falschen Versorgungsspannung kann es zu irreparablen Schäden am Gerät und zu
Gefahren für den Benutzer kommen.
Wenn Sie weitere Geräte mit dem Netzanschluss OUT (6) verbinden, achten Sie darauf, die
sen Anschluss nicht zu überlasten. Die Gesamt-Stromaufnahme der Geräte, die mit diesem
Anschluss verbunden werden, darf 7 A nicht überschreiten. Schließen Sie auf keinen Fall Geräte mit hoher Stromaufnahme wie z.B. Verstärker, Nebelmaschinen etc. an den Netzanschluss
OUT (6) an.
• Stecken Sie den Kaltgerätestecker der Netzleitung in den Netzanschluss IN (1) am Gerät.
• Wenn Sie weitere LED-Bars mit Strom versorgen möchten, können Sie diese mit dem Netzanschluss
OUT (6) verbinden.
• Stecken Sie den Netzstecker der Netzleitung in eine Schutzkontaktsteckdose.
• Sobald das Gerät mit dem Netz verbunden ist, nimmt es den Betrieb auf.
Page 12
12
11. Bedienung
a) Einstellung der Betriebsart
Der Lichteekt kann mit dem eingebauten Controller oder mit einem externen DMX-Controller gesteuert
werden. Außerdem kann er im Master-Slave-Betrieb als Master-Gerät mit dem eingebauten Controller
andere angeschlossene Lichteekte synchron steuern oder als Slave-Gerät über den Controller eines anderen Lichteekts gesteuert werden.
Über das Display (4) und die Funktionstasten MENU (7), UP (8), DOWN (9) und ENTER (10) erfolgen die
Einstellungen im Menü.
• Drücken Sie die Taste MENU (7), um ins Hauptmenü zu gelangen.
• Wählen Sie mit den Tasten UP (8) bzw. DOWN (9) die gewünschte Betriebsart aus und bestätigen Sie die
Auswahl mit der Taste ENTER (10).
• Drücken Sie nochmals die Taste ENTER, um zur Auswahl der Optionen zu gelangen.
• Wählen Sie mit den Tasten UP (8) bzw. DOWN (9) die gewünschte Option der Betriebsart aus und bestä
-
tigen Sie die Auswahl mit der Taste ENTER (10).
• Um im Menü eine Ebene zurück zu springen, drücken Sie die Taste MENU (7).
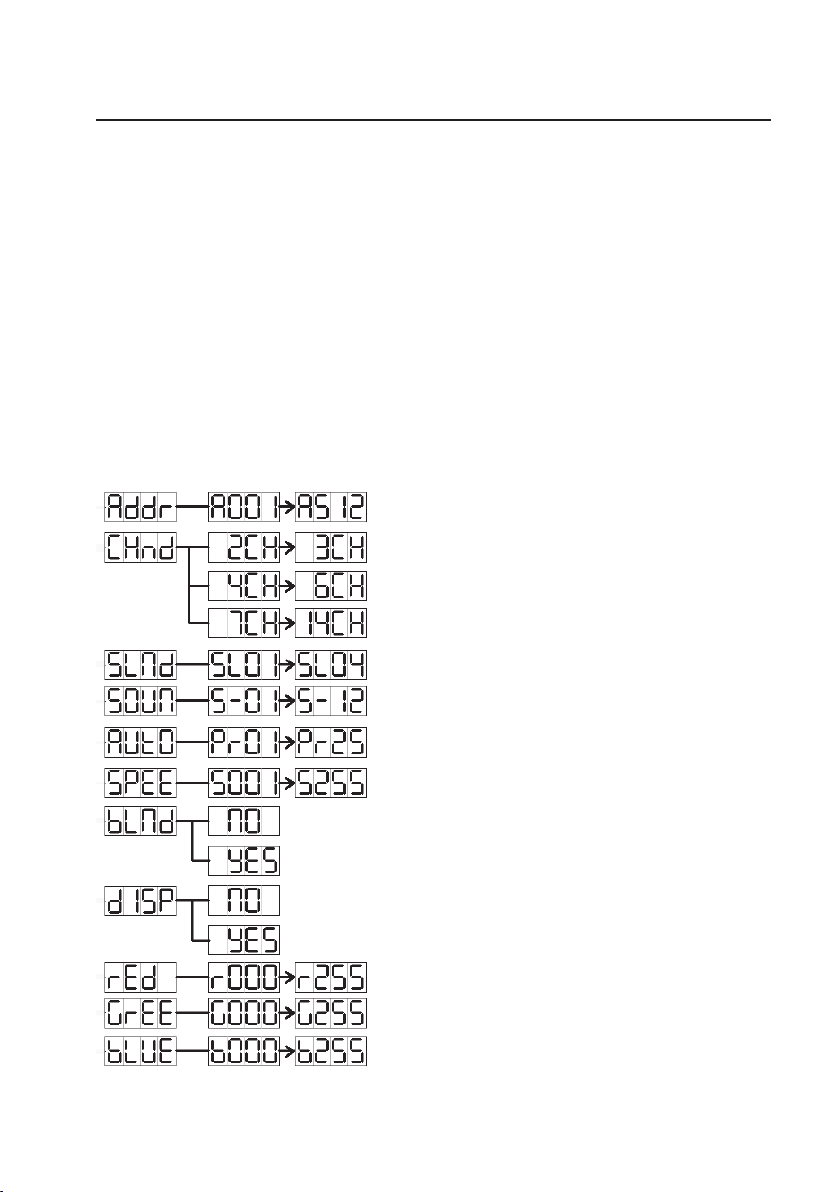
DMX-Startadresse: A001 bis A512
DMX-Betriebsart: 2 / 3 / 4 / 6 / 7 / 14 Kanäle
Slave-Betriebsart: SL01 bis SL04
Sound-to-Light-Betriebsart: S-01 bis S-12
Automatikprogramm: Pr01 bis Pr25
Parametereinstellung für AUtO und SOUn: S001 bis S255
Blackout (Standby): no/yes
Displayausrichtung (180° Drehung): no/yes
Farbeinstellung Dimmer rot: r000 bis r255
Farbeinstellung Dimmer grün: g000 bis g255
Farbeinstellung Dimmer blau: b000 bis b255
Page 13

13
b) Betrieb mit externem DMX-Controller
Jedes DMX-Gerät einer DMX-Kette benötigt eine so genannte DMX-Startadresse, um vom Controller eindeutig angesteuert werden zu können. Diese DMX-Startadresse definiert den ersten DMX-Kanal, auf den
der Lichteekt reagiert. Die weiteren Steuerkanäle folgen auf diesen ersten DMX-Kanal (DMX-Startadres
-
se).
Der Lichteekt benötigt je nach DMX-Betriebsart bis zu 14 DMX-Kanäle.
Einstellung der DMX-Betriebsart (Kanalzahl)
• Drücken Sie, falls erforderlich, die Taste MENU (7), bis sich die Anzeige im Hauptmenü befindet.
• Drücken Sie die Taste UP (8) bzw. DOWN (9) bis Chnd angezeigt wird.
• Drücken Sie zur Bestätigung der Auswahl die Taste ENTER (10).
• Drücken Sie nochmals die Taste ENTER (10), um zur Auswahl der DMX-Betriebsart zu gelangen.
• Die DMX-Betriebsart (xxCh) wird angezeigt (xx definiert die Kanalzahl im DMX-Betrieb).
• Stellen Sie die DMX-Kanalzahl mit der Taste UP (8) bzw. DOWN (9) ein.
• Drücken Sie die Taste MENU (7), bis sich die Anzeige wieder im Hauptmenü befindet.
Einstellung der DMX-Startadresse
• Drücken Sie, falls erforderlich, die Taste MENU (7), bis sich die Anzeige im Hauptmenü befindet.
• Drücken Sie die Taste UP (8) bzw. DOWN (9) bis Addr angezeigt wird.
• Drücken Sie zur Bestätigung der Auswahl die Taste ENTER (10).
• Drücken Sie nochmals die Taste ENTER (10), um zur Auswahl der DMX-Startadresse zu gelangen.
• Die DMX-Startadresse (Axxx) wird angezeigt (xxx definiert die Startadresse).
• Stellen Sie die DMX-Startadresse mit der Taste UP (8) bzw. DOWN (9) ein.
• Drücken Sie zur Bestätigung der Auswahl die Taste ENTER (10).
• Drücken Sie die Taste MENU (7), bis sich die Anzeige wieder im Hauptmenü befindet.
Die folgenden Tabellen geben Aufschluss über die verschiedenen DMX-Betriebsarten und die Auswir
-
kungen der Einstellungen an den einzelnen DMX-Kanälen.
DMX Betriebsart 2Ch (2-Kanal-DMX-Betrieb)
DMX-Kanal DMX-Wert Funktion
1 000-135 Automatik-Lichtprogramm
136-255 Sound-to-Light-Steuerung
2 000-255 Programmgeschwindigkeit bzw. Sound-to-Light-Empfindlichkeit
Page 14
14
DMX Betriebsart 3Ch (3-Kanal-DMX-Betrieb)
DMX-Kanal DMX-Wert Funktion
1 000-255 Helligkeit rot
2 000-255 Helligkeit grün
3 000-255 Helligkeit blau
DMX Betriebsart 4Ch (4-Kanal-DMX-Betrieb)
DMX-Kanal DMX-Wert Funktion
1 000-255 Helligkeit rot
2 000-255 Helligkeit grün
3 000-255 Helligkeit blau
4 000 Licht aus
001-255 Gesamthelligkeit
DMX Betriebsart 6Ch (6-Kanal-DMX-Betrieb)
DMX-Kanal DMX-Wert Funktion
1 000-255 Helligkeit rot (nur bei Kanal 4 > DMX = 0-7)
2 000-255 Helligkeit grün (nur bei Kanal 4 > DMX = 0-7)
3 000-255 Helligkeit blau (nur bei Kanal 4 > DMX = 0-7)
4 000-007 RGB-Betrieb / Helligkeitseinstellung mit Kanal 1-3
008-135 Automatik-Lichtprogramm (wie bei 2ch-Betrieb)
136-255 Sound-to-Light-Steuerung (wie bei 2ch-Betrieb)
5 000-015 kein Strobe-Eekt
016-255 Strobe-Eekt langsam > schnell
6 000-255 Programmgeschwindigkeit bzw. Sound-to-Light-Empfindlichkeit
(wie bei 2ch-Betrieb)
Im RGB-Betrieb (DMX-Kanal 4 auf 000-007 eingestellt) sind nur die Kanäle 1, 2, 3 und 4 aktiv.
Im Automatikbetrieb (DMX-Kanal 4 auf 008-135 eingestellt) ist Kanal 5 zur Regelung des Strobe-
Eekts und Kanal 6 zur Regelung der Programmgeschwindigkeit aktiv.
Im Sound-to-Light-Betrieb (DMX-Kanal 4 auf 136-255 eingestellt) ist Kanal 5 zur Regelung des
Strobe-Eekts und Kanal 6 zur Regelung der Sound-to-Light-Empfindlichkeit aktiv.
Page 15
15
DMX Betriebsart 7Ch (7-Kanal-DMX-Betrieb)
DMX-Kanal DMX-Wert Funktion
1 000-255 Helligkeit rot (nur bei Kanal 4 > DMX = 0-7)
2 000-255 Helligkeit grün (nur bei Kanal 4 > DMX = 0-7)
3 000-255 Helligkeit blau (nur bei Kanal 4 > DMX = 0-7)
4 000-007 RGB-Betrieb / Helligkeitseinstellung mit Kanal 1-3
008-135 Automatik-Lichtprogramm (wie bei 2ch-Betrieb)
136-255 Sound-to-Light-Steuerung (wie bei 2ch-Betrieb)
5 000-015 kein Strobe-Eekt
016-255 Strobe-Eekt langsam > schnell
6 000-255 Programmgeschwindigkeit bzw. Sound-to-Light-Empfindlichkeit
(wie bei 2ch-Betrieb)
7 000 Licht aus (nur bei Kanal 4 > DMX = 0-7)
001-255 Gesamthelligkeit (nur bei Kanal 4 > DMX = 0-7)
Im RGB-Betrieb (DMX-Kanal 4 auf 000-007 eingestellt) sind nur die Kanäle 1, 2, 3, 4 und 7 aktiv.
Im Automatikbetrieb (DMX-Kanal 4 auf 008-135 eingestellt) ist Kanal 5 zur Regelung des Strobe-
Eekts und Kanal 6 zur Regelung der Programmgeschwindigkeit aktiv.
Im Sound-to-Light-Betrieb (DMX-Kanal 4 auf 136-255 eingestellt) ist Kanal 5 zur Regelung des
Strobe-Eekts und Kanal 6 zur Regelung der Sound-to-Light-Empfindlichkeit aktiv.
Page 16

16
DMX Betriebsart 14Ch (14-Kanal-DMX-Betrieb)
In dieser Betriebsart arbeitet die LED-Bar im RGB-Betrieb und ist in 4 Segmente unterteilt, deren Helligkeit
über die Kanäle 1-12 geregelt wird.
DMX-Kanal DMX-Wert Funktion
1 000-255 Segment 1 - Helligkeit rot
2 000-255 Segment 1 - Helligkeit grün
3 000-255 Segment 1 - Helligkeit blau
4 000-255 Segment 2 - Helligkeit rot
5 000-255 Segment 2 - Helligkeit grün
6 000-255 Segment 2 - Helligkeit blau
7 000-255 Segment 3 - Helligkeit rot
8 000-255 Segment 3 - Helligkeit grün
9 000-255 Segment 3 - Helligkeit blau
10 000-255 Segment 4 - Helligkeit rot
11 000-255 Segment 4 - Helligkeit grün
12 000-255 Segment 4 - Helligkeit blau
13 000-015 kein Strobe-Eekt
016-255 Strobe-Eekt langsam > schnell
14 000 Licht aus
001-255 Gesamthelligkeit
c) Slave-Betrieb
• Drücken Sie, falls erforderlich, die Taste MENU (7), bis sich die Anzeige im Hauptmenü befindet.
• Drücken Sie die Taste UP (8) bzw. DOWN (9) bis SLnd angezeigt wird.
• Drücken Sie zur Bestätigung der Auswahl die Taste ENTER (10).
• Drücken Sie nochmals die Taste ENTER (10), um zur Auswahl der Slave-Betriebsart zu gelangen.
• Die Slave-Betriebsart (SLxx) wird angezeigt (xx definiert die Slave-Betriebsart).
• Stellen Sie die Slave-Betriebsart mit der Taste UP (8) bzw. DOWN (9) ein. Es stehen 4 verschiedene Sla
-
ve-Betriebsarten zur Verfügung.
SL01 = Das Slave-Gerät reagiert genauso, wie das Master-Gerät
SL02 = Das Slave-Gerät reagiert um einen Programmschritt verzögert zum Master-Gerät
SL03 = Das Slave-Gerät reagiert um zwei Programmschritte verzögert zum Master-Gerät
SL04 = Das Slave-Gerät reagiert um drei Programmschritte verzögert zum Master-Gerät
• Drücken Sie zur Bestätigung der Auswahl die Taste ENTER (10).
• Drücken Sie die Taste MENU (7), bis sich die Anzeige wieder im Hauptmenü befindet.
Page 17

17
In einer Master-Slave-Kette darf nur ein Gerät als Master-Gerät definiert werden, alle anderen
Geräte müssen als Slave-Geräte definiert sein.
Durch die Möglichkeit, die Slave-Geräte verzögert ansprechen zu lassen, können bis zu 4 Geräte
zu einem neuen Lichteekt zusammengeschlossen werden (z.B. ein Lauflicht, das über alle 4
LED-Bars läuft).
d) Sound-to-Light-Betrieb
• Drücken Sie, falls erforderlich, die Taste MENU (7), bis sich die Anzeige im Hauptmenü befindet.
• Drücken Sie die Taste UP (8) bzw. DOWN (9) bis SOUn angezeigt wird.
• Drücken Sie zur Bestätigung der Auswahl die Taste ENTER (10).
• Drücken Sie nochmals die Taste ENTER (10), um zur Auswahl des Sound-to-Light-Programms zu gelan
-
gen.
• Das Sound-to-Light-Programm (S-xx) wird angezeigt (xx definiert das Sound-to-Light-Programm).
• Stellen Sie das gewünschte Sound-to-Light-Programm mit der Taste UP (8) bzw. DOWN (9) ein. Es stehen
12 verschiedene Programme zur Verfügung.
• Drücken Sie zur Bestätigung der Auswahl die Taste ENTER (10).
• Drücken Sie die Taste MENU (7), bis sich die Anzeige wieder im Hauptmenü befindet.
e) Automatikbetrieb
• Drücken Sie, falls erforderlich, die Taste MENU (7), bis sich die Anzeige im Hauptmenü befindet.
• Drücken Sie die Taste UP (8) bzw. DOWN (9) bis AUtO angezeigt wird.
• Drücken Sie zur Bestätigung der Auswahl die Taste ENTER (10).
• Drücken Sie nochmals die Taste ENTER (10), um zur Auswahl des Automatikprogramms zu gelangen.
• Das Automatikprogramm (Prxx) wird angezeigt (xx definiert das Automatikprogramm).
• Stellen Sie das gewünschte Automatikprogramm mit der Taste UP (8) bzw. DOWN (9) ein. Es stehen 25
verschiedene Programme zur Verfügung.
• Drücken Sie zur Bestätigung der Auswahl die Taste ENTER (10).
• Drücken Sie die Taste MENU (7), bis sich die Anzeige wieder im Hauptmenü befindet.
Page 18

18
f) Parametereinstellung für Automatik- und Sound-to-Light-Betrieb
• Drücken Sie, falls erforderlich, die Taste MENU (7), bis sich die Anzeige im Hauptmenü befindet.
• Drücken Sie die Taste UP (8) bzw. DOWN (9) bis SPEE angezeigt wird.
• Drücken Sie zur Bestätigung der Auswahl die Taste ENTER (10).
• Drücken Sie nochmals die Taste ENTER (10), um zur Geschwindigkeits- bzw. Empfindlichkeitseinstellung
zu gelangen.
• Die Einstellung (Sxxx) wird angezeigt (xxx definiert die Programmgeschwindigkeit für den Automatikbe
-
trieb bzw. Empfindlichkeitseinstellung für den Sound-to-Light-Betrieb).
• Stellen Sie den gewünschten Wert mit der Taste UP (8) bzw. DOWN (9) ein.
• Drücken Sie zur Bestätigung der Auswahl die Taste ENTER (10).
• Drücken Sie die Taste MENU (7), bis sich die Anzeige wieder im Hauptmenü befindet.
g) Blackout (Standby)
• Drücken Sie, falls erforderlich, die Taste MENU (7), bis sich die Anzeige im Hauptmenü befindet.
• Drücken Sie die Taste UP (8) bzw. DOWN (9) bis bLnd angezeigt wird.
• Drücken Sie zur Bestätigung der Auswahl die Taste ENTER (10).
• Drücken Sie nochmals die Taste ENTER (10), um no bzw. yes zu wählen.
• Stellen Sie die gewünschte Betriebsart mit der Taste UP (8) bzw. DOWN (9) ein.
no = Normalbetrieb (Licht ist eingeschaltet)
yes = Standby (Licht ist ausgeschaltet)
• Drücken Sie zur Bestätigung der Auswahl die Taste ENTER (10).
• Drücken Sie die Taste MENU (7), bis sich die Anzeige wieder im Hauptmenü befindet.
h) Einstellung der Displayausrichtung
• Drücken Sie, falls erforderlich, die Taste MENU (7), bis sich die Anzeige im Hauptmenü befindet.
• Drücken Sie die Taste UP (8) bzw. DOWN (9) bis dISP angezeigt wird.
• Drücken Sie zur Bestätigung der Auswahl die Taste ENTER (10).
• Drücken Sie nochmals die Taste ENTER (10), um no bzw. yes zu wählen.
• Stellen Sie die gewünschte Displayausrichtung mit der Taste UP (8) bzw. DOWN (9) ein.
no = Normalbetrieb
yes = Displayanzeige um 180° gedreht
• Drücken Sie zur Bestätigung der Auswahl die Taste ENTER (10).
• Drücken Sie die Taste MENU (7), bis sich die Anzeige wieder im Hauptmenü befindet.
Page 19

19
i) Betrieb mit fester Farbeinstellung (RGB-Betrieb)
• Drücken Sie, falls erforderlich, die Taste MENU (7), bis sich die Anzeige im Hauptmenü befindet.
• Drücken Sie die Taste UP (8) bzw. DOWN (9) bis rEd angezeigt wird.
• Drücken Sie zur Bestätigung der Auswahl die Taste ENTER (10).
• Drücken Sie nochmals die Taste ENTER (10), um zur Einstellung der Helligkeit für rot zu gelangen.
• Der Helligkeitswert für rot (rxxx) wird angezeigt (xxx definiert den Helligkeitswert).
• Stellen Sie den gewünschten Helligkeitswert mit der Taste UP (8) bzw. DOWN (9) ein.
• Drücken Sie zur Bestätigung der Auswahl die Taste ENTER (10).
• Drücken Sie die Taste MENU (7), bis sich die Anzeige wieder im Hauptmenü befindet.
• Verfahren Sie mit der Einstellung der Helligkeitswerte für grün (GrEE) und blau (bLUE) wie oben beschrie
-
ben.
Je nach eingestellten Einzel-Farbintensitäten können die verschiedenen Mischfarben kreiert
werden.
12. Handhabung
• Stecken Sie den Netzstecker niemals gleich dann in eine Netzsteckdose, wenn das Gerät von einem
kalten Raum in einen warmen Raum gebracht wurde. Das dabei entstehende Kondenswasser kann unter
Umständen das Gerät zerstören. Lassen Sie das Gerät uneingesteckt auf Zimmertemperatur kommen.
Warten Sie bis das Kondenswasser verdunstet ist.
• Ziehen Sie Netzstecker nie an der Leitung aus der Steckdose, ziehen Sie sie immer nur an den dafür
vorgesehenen Griflächen aus der Netzsteckdose.
• Ziehen Sie bei Nichtbenutzung den Netzstecker aus der Netzsteckdose.
• Ziehen Sie aus Sicherheitsgründen bei einem Gewitter immer den Netzstecker aus der Netzsteckdose.
• Versehen Sie den Lichtaustritt keinesfalls mit Filterfolien, Masken oder anderen Materialien. Dies kann
zu Hitzeschäden und Brandgefahr führen.
• Das Gerät kann sich während des Betriebs erhitzen. Berühren Sie das Gehäuse nicht während des Be
triebs. Lassen Sie den Lichteekt nach dem Betrieb erst abkühlen, bevor Sie das Gehäuse berühren oder
reinigen.
• Um eine ausreichende Belüftung zu gewährleisten, darf das Gerät auf keinen Fall abgedeckt werden.
Außerdem darf die Luftzirkulation nicht durch Gegenstände wie Zeitschriften, Tischdecken, Vorhänge
o.ä. behindert werden. Halten Sie während des Betriebs einen Bereich von mindestens 0,5 m rund um
das Gerät frei.
Page 20
20
13. Wartung
Überprüfen Sie regelmäßig die technische Sicherheit des Eektstrahlers z.B. auf Beschädigung der Netzleitung und des Gehäuses.
Wenn anzunehmen ist, dass ein gefahrloser Betrieb nicht mehr möglich ist, so ist das Gerät außer Betrieb
zu setzen und gegen unbeabsichtigten Betrieb zu sichern. Netzstecker aus der Steckdose ziehen!
Es ist anzunehmen, dass ein gefahrloser Betrieb nicht mehr möglich ist, wenn:
• das Gerät sichtbare Beschädigungen aufweist
• das Gerät nicht mehr arbeitet
• nach längerer Lagerung unter ungünstigen Verhältnissen, oder
• nach schweren Transportbeanspruchungen
Bevor Sie den Eektstrahler reinigen oder warten beachten Sie unbedingt folgende Sicherheitshinweise:
Beim Önen von Abdeckungen oder Entfernen von Teilen können spannungsführende Teile frei-
gelegt werden.
Vor einer Wartung oder Instandsetzung muss deshalb das Gerät von allen Spannungsquellen
getrennt werden.
Kondensatoren im Gerät können noch geladen sein, selbst wenn es von allen Spannungsquel
-
len getrennt wurde.
Eine Reparatur darf nur durch eine Fachkraft erfolgen, die mit den damit verbundenen Gefahren
bzw. einschlägigen Vorschriften vertraut ist.
Reinigung
Äußerlich sollte der Lichteekt nur mit einem weichen, trockenen Tuch oder Pinsel gereinigt werden.
Verwenden Sie auf keinen Fall aggressive Reinigungsmittel oder chemische Lösungen, da sonst die Ge-
häuseoberflächen beschädigt werden könnten.
14. Behebung von Störungen
Mit der Renkforce LED-Bar haben Sie ein Produkt erworben, welches nach dem Stand der Technik gebaut
wurde und betriebssicher ist. Dennoch kann es zu Problemen oder Störungen kommen. Deshalb möchten
wir Ihnen hier beschreiben, wie Sie mögliche Störungen beheben können:
Beachten Sie unbedingt die Sicherheitshinweise!
Keine Funktion, nachdem das Gerät mit der Stromversorgung verbunden wurde:
• Der Netzstecker steckt nicht richtig in der Steckdose.
• Die Netzleitung steckt nicht richtig im Netzanschluss IN (1) des Gerätes.
• Die Netzsteckdose wird nicht mit Strom versorgt.
Page 21
21
Es erfolgt keine Reaktion auf DMX-Befehle (bei DMX- und Master-Slave-Betrieb):
• Der Blackout-Modus ist aktiv.
• Die DMX-Adresse ist falsch eingestellt.
• Die Verbindung zwischen DMX-Lichtsteuergerät und dem Lichteekt ist unterbrochen.
• Die DMX-Leitung ist zu lang bzw. ist Störungen ausgesetzt. Verwenden Sie eine spezielle DMX-Hochfre
-
quenzleitung. Versuchen Sie, die DMX-Leitung von Störquellen entfernt zu verlegen.
• Die Polarität der DMX-Anschlüsse an DMX-Controller und LED-Bar sind unterschiedlich.
• Probieren Sie falls möglich einen anderen DMX-Controller aus.
Die Musiksteuerung funktioniert nicht:
• Die Musiksteuerung ist nicht aktiviert.
• Im Sound-to-Light-Betrieb dürfen keine DMX-Signale am Anschluss DMX IN (2) anliegen.
• Die Musikwiedergabe ist zu leise eingestellt. Versuchen Sie probeweise eine höhere Lautstärke einzu
-
stellen oder die Empfindlichkeit der Musiksteuerung zu erhöhen.
• Testen Sie die Funktion des Mikrofons (5), indem Sie mit dem Finger leicht auf das Mikrofon (5) tippen. Bei
jedem Impuls sollte die Sound-to-Light-Steuerung reagieren.
15. Entsorgung
Elektronische Geräte sind Wertstoe und dürfen nicht in den Hausmüll!
Entsorgen Sie das Produkt am Ende seiner Lebensdauer gemäß den geltenden gesetzlichen Be
-
stimmungen.
16. Technische Daten
Betriebsspannung.............................................. 100-240 V/50/60 Hz
Leistungsaufnahme ...........................................30 W
Belastbarkeit Netzausgang .............................. 7 A
Betriebsarten ...................................................... DMX / Auto / Master-Slave
LEDs...................................................................... 252 LEDs
DMX-Protokoll .................................................... DMX 512
DMX-Kanäle........................................................ 2 / 3 / 4 / 6 / 7 / 14 (je nach DMX-Betriebsart)
Abmessungen ..................................................... 1020 x 65 x 65 mm (ohne Montagematerial)
Gewicht................................................................ 1,7 kg
Betriebs- und Lagerbedingungen ...................-20 bis +50 °C / 10-90 % rel. Luftfeuchte
Page 22

22
Table of Contents
Page
1. Introduction.........................................................................................................................................................23
2. Intended Use
.......................................................................................................................................................24
3. Symbols ...............................................................................................................................................................24
4. Safety Information .............................................................................................................................................
25
5. Features ...............................................................................................................................................................26
6. Scope of Delivery ...............................................................................................................................................
27
7. Components and Control Elements .................................................................................................................
27
8. Installation...........................................................................................................................................................28
9. DMX Connection ................................................................................................................................................
29
a) Connection of a DMX Controller ...............................................................................................................
29
b) Setting up a Master-Slave Chain ..............................................................................................................
30
10. Mains Connection ..............................................................................................................................................
31
11. Operation .............................................................................................................................................................32
a) Setting the Operating Mode ......................................................................................................................
32
b) Use with an External DMX Controller ......................................................................................................
33
c) Slave mode ...................................................................................................................................................
36
d) Sound-to-Light Mode ..................................................................................................................................
37
e) Automatic Operation ...................................................................................................................................
37
f) Parameter Settings for Automatic and Sound-to-Light Mode .............................................................
38
g) Blackout (Standby) ......................................................................................................................................
38
h) Setting the Display Alignment ...................................................................................................................
38
i) Operating with Fixed Colour Settings (RGB Operation) ........................................................................
39
12. Handling ...............................................................................................................................................................39
13. Maintenance.......................................................................................................................................................40
14. Troubleshooting ..................................................................................................................................................40
15. Disposal ...............................................................................................................................................................
41
16. Technical Data ....................................................................................................................................................
41
Page 23
23
1. Introduction
Dear Customer,
thank you for purchasing this product.
This product complies with the statutory national and European specifications. To maintain this status and
to ensure safe operation, you as the user must observe these operating instructions!
These operating instructions are part of this product. They contain important notes on commis-
sioning and handling. Also consider this if you pass on the product to any third party. Therefore,
retain these operating instructions for reference!
If there are any technical questions, please contact:
International: www.conrad.com/contact
United Kingdom: www.conrad-electronic.co.uk/contact
Page 24
24
2. Intended Use
The LED bar is used to generate light eects in decorative lighting, light show equipment, party rooms, etc.
and is controlled by the built-in controller or an external DMX controller.
This product is only approved for connection to 100-240 V/50/60 Hz alternating current and only for use with
an earthed mains socket.
The DMX connection must only be connected to suitable DMX controllers or other DMX eect lights with
DMX connections.
It is intended for indoor use only. Do not use it outdoors. Contact with moisture, e.g. in bathrooms, must be
avoided under all circumstances.
Any use other than that described above will damage this product and involves the risk of short circuit,
fire, electric shock, etc.
The entire product must not be modified or converted, and the casing must not be opened.
Observe all safety information in these operating instructions!
3. Symbols
This symbol on the device indicates that the user must read these operating instructions before
using the product and observe them during operation.
The symbol with a lightning bolt in a triangle is used where there is a health hazard, e.g. from
electric shock. The device contains no parts that require servicing by the user. Therefore, never
open the device.
The exclamation mark indicates important notes in these operating instructions that must be
strictly observed.
The arrow symbol indicates special advice and operating information.
This symbol indicates that the product must only be used indoors.
...m
This symbol indicates the minimum distance to the illuminated surfaces.
Page 25
25
4. Safety Information
The warranty/guarantee will expire if damage is incurred resulting from non-compliance with
these operating instructions. We do not assume liability for any consequential damage.
Nor do we assume any liability for damage to property or personal injury caused by improper
use or failure to observe the safety instructions. In such cases the warranty/guarantee is voided.
Dear Customer: The following safety information is intended not only for the protection of the
device but also for the protection of your health. Please read the following items carefully:
• For safety reasons, any unauthorized conversions and/or modifications to the product are not
permitted.
• This device is a safety class 1 product. The only permissible voltage source is a properly groun
-
ded mains socket (100-240 V/50/60 Hz) of the public mains.
• Check the device for damage before using it. If the device is damaged, do not operate it and
consult an expert or our service team.
• Anyone operating, installing, setting up, commissioning or servicing this eect spotlight must
be trained and qualified properly and observe these operating instructions.
• The mains socket to which the product is connected must be easily accessible.
• Do not use the product inside of rooms or in bad ambient conditions where flammable gases,
vapours or explosive dust may be or are present! There is a danger of explosion!
• LED radiation may be dangerous if the LED beam or a reflection enters the unprotected eye.
Therefore, familiarise yourself with the statutory regulations and measures of precaution for
the operation of this kind of LED device before using the device.
• Never look straight into the light source during operation. The bright light flashes may tem
porarily impair your eyesight. Apart from this, epileptic fits may be triggered under certain
circumstances in persons sensitive to such lights. This particularly applies to epileptics.
• Never touch the mains plug with wet or damp hands. There is a risk of potentially fatal electric
shock!
• Make sure that the mains cable is not squeezed, bent, damaged by sharp edges or put under
mechanical stress. Avoid excessive thermal stress on the mains cable from extreme heat or
cold. Do not modify the mains cable. Otherwise the mains cable may be damaged. A damaged
mains cable can cause a deadly electric shock.
• Do not touch the mains cable if it is damaged. First, power down the respective mains socket
(e.g. via the respective FI switch and circuit breaker) and then carefully pull the mains plug
from the mains socket. In this case, take the device to a specialist workshop for repair. Never
use the product if the mains cable is damaged.
• This product is not a toy and not suitable for children. Children cannot judge the dangers invol
-
ved when handling electrical devices.
• Do not expose the device to any high temperatures, dripping or splashing water, strong vibra
-
tions or heavy mechanical stress.
Page 26
26
• Make sure the device is suciently ventilated when in operation. Never cover the casing.
• Do not place any open sources of fire, such as burning candles, on or directly next to the de
-
vice.
• Do not place any containers with liquids, e.g. glasses, buckets, vases or plants in the imme
diate proximity of the product. Liquids may get into the housing and impair electrical safety.
This also poses great danger of fire or potentially fatal electric shock! If this is the case, first
power down the respective mains socket (e.g. via the associated FI switch and circuit breaker)
and then pull the mains cable from the socket. Disconnect all cables from the device. Do not
operate the product anymore afterwards, but take it to a specialist workshop.
• Consult an expert if you are unsure as to the function, safety or connection of the product.
• Only operate the device in moderate climates, never in tropical climates.
• Do not leave any packaging material unattended. It may become a dangerous toy for children.
• Also observe the additional safety information in the individual chapters of these operating
instructions.
• In commercial institutions, the accident prevention regulations of the Employer’s Liability Insu
-
rance Association for Electrical Systems and Operating Materials are to be observed.
• If you are not sure of the correct connection or if there are any questions that are not covered
by the operating instructions, do not hesitate to contact our technical support or another spe
-
cialist.
5. Features
• Very bright LED bar with 252 LEDs
• LED display for easy operation
• Stand-alone mode, master-slave mode and DMX mode
• 6 DMX modes with up to 14 channels
• 25 Automatic programmes
• 12 Sound-to-light programmes
• Integrated microphone for sound-to-light control
• Stable metal casing
Page 27

27
6. Scope of Delivery
• LED-bar
• Mounting angle with screws
• Mains cable
• Operating Instructions
7. Components and Control Elements
(1) Mains connection IN
(2) DMX IN connection
(3) DMX OUT connection
(4) Display
(5) Microphone
(6) Mains connection OUT
(7) MENU button
(8) UP button
(9) DOWN button
(10) ENTER button
AC100-240V 50/60Hz IN DMX IN DMX OUT
MENU
UP DOWN
ENTER
MIC
AC100-240V 50/60Hz OUT
Max. Load: 7 A
10
Page 28
28
8. Installation
Assembly and installation of the device must be carried out by a specialist familiar with the
hazards and the relevant regulations. Maintenance, operation and commissioning of this device
must only be carried out by qualified persons.
When choosing a location for your device, make sure to avoid impact, vibration, dust, hot and
cold temperatures and dampness. Furthermore, no powerful transformers or motors must be
used close to the device.
Never cover the device. Ensure sucient ventilation when setting up the device with other
equipment. Maintain a sucient distance to other devices and walls. Never put up the eect
light in direct proximity of heat sources. Do not point any strong spotlights or light sources
towards the device. This may cause overheating (danger of fire!).
Do not drill or screw additional screws into the casing in order to fasten the device. This may
expose dangerous voltage to touch.
The device must be mounted out of normal reach.
Illuminated objects must be at least 0.5 m away from the device‘s light emission source. Easily
flammable materials such as decorative fabrics must also have a distance of at least 0.5 m to the
device. Otherwise, such objects may catch fire!
When mounting the product, make sure that the power cord is neither jammed nor damaged by
sharp edges.
During installation or service work, the area below the place of installation must be cordoned
o.
The installation surface or mounting fixture needs to be designed in a way that it can take 10
times its load capacity for at least 1 hour without permanent damaging deformation.
It is also essential that the device is secured by means of a second safety restraint that is inde
pendent of the actual mounting supports when installing it in an elevated position. No part of
the installation must fall down if the main suspension system fails.
Observe all relevant regulations of your country when mounting/installing the device.
Acceptance test (in case of industrial/public use):
Before first use and after any significant modifications, the installation (including the electrical
connections) must be inspected by an ocial expert.
A yearly inspection by an expert is required.
Page 29
29
• Install the light eect on the ceiling, the wall or a suitable crossbeam with the mounting angles. The
assembly must never swing freely. Use assembly material suitable for the assembly area and for bearing
the eect light load.
• Additionally secure the installation with a suitable safety restraint cable or a safety net. The safety reten
tion rope or the net must be designed to support the eect light in the event of failure of the main support
system independently of the main attachment.
• Set the desired inclination angle and tighten the wing screws to the mounting angles well.
9. DMX Connection
You can operate a maximum of 32 devices in a DMX chain without overloading the controller.
The maximum total length of the DMX chain should not exceed 500 m.
Use of XLR microphone cables may cause interferences in the DMX signal transmission. In this
case, please use special DMX high-frequency cables.
a) Connection of a DMX Controller
Only connect the device to a DMX controller with a DMX-512 protocol.
• Connect the port DMX IN (2) with the output of the DMX controller.
• Use a screened XLR cable for this. The controller must have up to 14 free control channels depending on
DMX mode.
• Connect DMX OUT (3) with the DMX input of the subsequent device.
• If the eect light is the last or the only device in the DMX chain, insert an plug with a 120 ohm/0.25 W
terminating resistor into the DMX OUT (3) socket (between Pin2 and Pin3).
Page 30
30
Pin assignment of the DMX connection: Pin1 = earth / Pin2 = (-) / Pin3 = (+).
b) Setting up a Master-Slave Chain
The eect light can be operated controlled by a DMX controller or in a master-slave chain. In that case, the
integrated controller of the master device controls the connected slave devices.
• Connect the DMX OUT (3) port of the master device to the DMX IN (2) port of the first slave device.
• Connect the DMX OUT (3) port of the first slave device to the DMX IN (2) port of the subsequent slave
device.
• Proceed as described above with all remaining slave devices.
• Plug an XLR plug with a terminating resistor into the DMX OUT (3) port of the last slave device (as descri
-
bed in section „Connection of a DMX Controller“).
Master Slave Slave Slave
Page 31

31
10. Mains Connection
The mains socket to which the eect light is connected must be close to the device and easily
accessible to quickly separate the device from the mains voltage in case of an error.
Do not let the mains cable come into contact with other cables.
Be careful when handling mains cables and mains connections. Mains voltage may cause po
-
tentially fatal electric shock.
Make sure that no cables lie around openly. Install cables professionally to prevent accidents.
Before plugging in the mains plug, ensure that the device voltage indicated at the eect light
corresponds to the available mains voltage. Do not connect the device if the indication does
not correspond to the available mains voltage. Incorrect supply voltage may lead to irreparable
damage to the device and danger to the user.
When connecting additional devices to the mains connection OUT (6), never overload this con
nection. The total power input of the devices connected to this connection must not exceed 7 A.
Never connect devices with a higher current consumption, such as amplifiers, fog devices, etc.,
to the OUT (6) mains connection.
• Connect the mains cable low-voltage plug to the mains connection IN (1) at the device.
• If you want to supply further LED bars with power, you can connect them to the mains connection
OUT (6).
• Plug the mains plug of the mains line into a grounded socket.
• Once the device is connected to the mains socket, it takes up operation.
Page 32

32
11. Operation
a) Setting the Operating Mode
The eect light can be controlled with the integrated controller or with an external DMX controller. Additionally, it can be used as a master device with integrated controller to control other connected eect lights
synchronously in master-slave operation, or as slave device via the controller of another eect light.
The settings are made in the menu via the display (4) and the function buttons MENU (7), UP (8), DOWN (9)
and ENTER (10).
• Push the button MENU (7) to enter the main menu.
• Select the desired operating mode with the buttons UP (8) or DOWN (9) and confirm your selection with
the button ENTER (10).
• Push the ENTER button again to get to the option selection.
• Select the desired operating mode with the buttons UP (8) or DOWN (9) and confirm your selection with
the button ENTER (10).
• To go back one level in the menu, push the button MENU (7).
DMX starting address: A001 to A512
DMX mode: 2 / 3 / 4 / 6 / 7 / 14 channels
Slave mode: SL01 to SL04
Sound-to-Light mode: S-01 to S-12
Automatic mode: Pr01 to Pr25
Parameter settings for AUtO and SOUn: S001 to S255
Blackout (Standby): no/yes
Display alignment (180° rotation): no/yes
Colour settings dimmer red: r000 to r255
Colour settings dimmer green: g000 to g255
Colour settings dimmer blue: b000 to b255
Page 33

33
b) Use with an External DMX Controller
Each DMX device in a DMX chain requires a so-called DMX starting address to be clearly identified by the
controller. This DMX starting address specifies the first DMX channel to which the eect light responds.
The remaining control channels come after this first DMX channel (DMX starting address).
The eect light requires up to 14 DMX channels depending on DMX mode.
Setting the DMX mode (channel number)
• If required, push the button MENU (7) until the display is in the main menu.
• Push the button UP (8) or DOWN (9) until Chnd is displayed.
• Push the ENTER (10) button for confirmation of your selection.
• Push the ENTER (10) button again to get to the DMX mode selection.
• The DMX mode (xxCh) is displayed (xx defines the channel number in DMX mode).
• Set the DMX channel number with the buttons UP (8) or DOWN (9).
• Push the button MENU (7) until the display is in the main menu again.
Setting the DMX starting address
• If required, push the button MENU (7) until the display is in the main menu.
• Push the button UP (8) or DOWN (9) until Addr is displayed.
• Push the ENTER (10) button for confirmation of your selection.
• Push the ENTER (10) button again to get to the DMX starting address selection.
• The DMX starting address (Axxx) is displayed (xxx defines the starting address).
• Set the DMX starting address with the buttons UP (8) or DOWN (9).
• Push the ENTER (10) button for confirmation of your selection.
• Push the button MENU (7) until the display is in the main menu again.
The following tables provide information on the dierent DMX modes and the eects of the settings on the
individual DMX channels.
DMX mode 2Ch (2-channel DMX mode)
DMX channel DMX Value Function
1 000-135 Automatic light programme
136-255 Sound-to-light control
2 000-255 Programme speed or sound-to-light sensitivity
Page 34

34
DMX mode 3Ch (3-channel DMX mode)
DMX channel DMX Value Function
1 000-255 Brightness red
2 000-255 Brightness green
3 000-255 Brightness blue
DMX mode 4Ch (4-channel DMX mode)
DMX channel DMX Value Function
1 000-255 Brightness red
2 000-255 Brightness green
3 000-255 Brightness blue
4 000 Lights o
001-255 Overall brightness
DMX mode 6Ch (6-channel DMX mode)
DMX channel DMX Value Function
1 000-255 Brightness red (only for channel 4 > DMX = 0-7)
2 000-255 Brightness green (only for channel 4 > DMX = 0-7)
3 000-255 Brightness blue (only for channel 4 > DMX = 0-7)
4 000-007 RGB mode / brightness settings with channel 1-3
008-135 Automatic light programme (as in 2ch mode)
136-255 Sound-to-light control (such as 2ch mode)
5 000-015 no strobe eect
016-255 Strobe eect slow > fast
6 000-255 Programme speed or sound-to-light sensitivity
(as in 2ch mode)
In RGB mode (DMX channel 4 set to 000-007), only channels 1, 2, 3 and 4 are active.
In automatic mode (DMX channel 4 set to 008-135), channel 5 is active to control the strobe eect
and channel 6 to control the programme speed.
In sound-to-light mode (DMX channel 4 set to 136-255), channel 5 is active to control the strobe
eect and channel 6 to control the sound-to-light sensitivity.
Page 35

35
DMX mode 7Ch (7-channel DMX mode)
DMX channel DMX Value Function
1 000-255 Brightness red (only for channel 4 > DMX = 0-7)
2 000-255 Brightness green (only for channel 4 > DMX = 0-7)
3 000-255 Brightness blue (only for channel 4 > DMX = 0-7)
4 000-007 RGB mode / brightness settings with channel 1-3
008-135 Automatic light programme (as in 2ch mode)
136-255 Sound-to-light control (such as 2ch mode)
5 000-015 no strobe eect
016-255 Strobe eect slow > fast
6 000-255 Programme speed or sound-to-light sensitivity
(as in 2ch mode)
7 000 Light o (only for channel 4 > DMX = 0-7)
001-255 Overall brightness (only for channel 4 > DMX = 0-7)
In RGB mode (DMX channel 4 set to 000-007), only channels 1, 2, 3, 4 and 7 are active.
In automatic mode (DMX channel 4 set to 008-135), channel 5 is active to control the strobe eect
and channel 6 to control the programme speed.
In sound-to-light mode (DMX channel 4 set to 136-255), channel 5 is active to control the strobe
eect and channel 6 to control the sound-to-light sensitivity.
Page 36

36
DMX mode 14Ch (14-channel DMX mode)
In this mode, the LED bar works in RGB mode and is structured into 4 segments the brightness of which is
controlled via channels 1-12.
DMX channel DMX Value Function
1 000-255 Segment 1 - Brightness red
2 000-255 Segment 1 - Brightness green
3 000-255 Segment 1 - Brightness blue
4 000-255 Segment 2 - Brightness red
5 000-255 Segment 2 - Brightness green
6 000-255 Segment 2 - Brightness blue
7 000-255 Segment 3 - Brightness red
8 000-255 Segment 3 - Brightness green
9 000-255 Segment 3 - Brightness blue
10 000-255 Segment 4 - Brightness red
11 000-255 Segment 4 - Brightness green
12 000-255 Segment 4 - Brightness blue
13 000-015 no strobe eect
016-255 Strobe eect slow > fast
14 000 Lights o
001-255 Overall brightness
c) Slave Mode
• If required, push the button MENU (7) until the display is in the main menu.
• Push the button UP (8) or DOWN (9) until SLnd is displayed.
• Push the ENTER (10) button for confirmation of your selection.
• Push the ENTER (10) button again to get to the slave mode selection.
• The slave mode (SLxx) is displayed (xx defines the slave mode).
• Set the slave mode with the buttons UP (8) or DOWN (9). 4 dierent slave modes are available.
SL01 = The slave device reacts just like the master device
SL02 = The slave device reacts by one programme step delayed against the master device
SL03 = The slave device reacts by two programme steps delayed against the master device
SL04 = The slave device reacts by two programme steps delayed against the master device
• Push the ENTER (10) button for confirmation of your selection.
• Push the button MENU (7) until the display is in the main menu again.
Page 37

37
Only one device in a master-slave-chain must be defined as master device. All other devices
must be defined as slave devices.
The option of having the slave devices trip with a delay permits connection of up to 4 devices into
a new light eect (e.g. a running light that will run across all 4 LED bars).
d) Sound-to-Light Mode
• If required, push the button MENU (7) until the display is in the main menu.
• Push the button UP (8) or DOWN (9) until SOUn is displayed.
• Push the ENTER (10) button for confirmation of your selection.
• Push the ENTER (10) button again to get to the sound-to-light programme selection.
• The sound-to-light-programme (S-xx) is displayed (xx defines the sound-to-light programme).
• Set the desired sound-to-light programme with the buttons UP (8) or DOWN (9). 12 dierent programmes
are available.
• Push the ENTER (10) button for confirmation of your selection.
• Push the button MENU (7) until the display is in the main menu again.
e) Automatic Operation
• If required, push the button MENU (7) until the display is in the main menu.
• Push the button UP (8) or DOWN (9) until AUtO is displayed.
• Push the ENTER (10) button for confirmation of your selection.
• Push the ENTER (10) button again to get to the automatic programme selection.
• The automatic programme (Prxx) is displayed (xx defines the automatic programme).
• Set the desired automatic programme with the buttons UP (8) or DOWN (9). 25 dierent programmes are
available.
• Push the ENTER (10) button for confirmation of your selection.
• Push the button MENU (7) until the display is in the main menu again.
Page 38

38
f) Parameter Settings for Automatic and Sound-to-Light Mode
• If required, push the button MENU (7) until the display is in the main menu.
• Push the button UP (8) or DOWN (9) until SPEE is displayed.
• Push the ENTER (10) button for confirmation of your selection.
• Push the ENTER (10) button again to get to the speed or sensitivity setting.
• The setting (Sxxx) is displayed (xxx defines the programme speed for automatic mode or sensitivity set
-
ting for sound-to-light mode).
• Set the desired value with the buttons UP (8) or DOWN (9).
• Push the ENTER (10) button for confirmation of your selection.
• Push the button MENU (7) until the display is in the main menu again.
g) Blackout (Standby)
• If required, push the button MENU (7) until the display is in the main menu.
• Push the button UP (8) or DOWN (9) until bLnd is displayed.
• Push the ENTER (10) button for confirmation of your selection.
• Push the button ENTER (10) again to select no or yes.
• Set the desired mode with the buttons UP (8) or DOWN (9).
no = regular operation (light is on)
yes = standby (light is o)
• Push the ENTER (10) button for confirmation of your selection.
• Push the button MENU (7) until the display is in the main menu again.
h) Setting the Display Alignment
• If required, push the button MENU (7) until the display is in the main menu.
• Push the button UP (8) or DOWN (9) until diSP is displayed.
• Push the ENTER (10) button for confirmation of your selection.
• Push the button ENTER (10) again to select no or yes.
• Set the desired display alignment with the buttons UP (8) or DOWN (9).
no = regular operation
yes = display turned by 180°
• Push the ENTER (10) button for confirmation of your selection.
• Push the button MENU (7) until the display is in the main menu again.
Page 39

39
i) Operating with Fixed Colour Settings (RGB Operation)
• If required, push the button MENU (7) until the display is in the main menu.
• Push the button UP (8) or DOWN (9) until rEd is displayed.
• Push the ENTER (10) button for confirmation of your selection.
• Push the ENTER (10) button again to get to the brightness setting for red.
• The brightness value for red (rxxx) is displayed (xxx defines the brightness value).
• Set the desired brightness value with the buttons UP (8) or DOWN (9).
• Push the ENTER (10) button for confirmation of your selection.
• Push the button MENU (7) until the display is in the main menu again.
• Proceed with setting of the brightness values for green (GrEE) and blue (bLUE) as described above.
Depending on the individual colour intensities set, dierent mixed colours can be created.
12. Handling
• Never connect the mains plug to a mains socket immediately after the device has been taken from a cold
to a warm environment. The resulting condensation may destroy the device. Allow the device to reach
room temperature before connecting it. Wait until the condensation has evaporated.
• Never pull the mains plug from the mains socket by the cable. Only pull it from the mains socket by the
intended grip areas.
• Always pull it from the socket using the intended grips.
• Disconnect the mains plug from the mains socket during thunderstorms for reasons of safety.
• Never put any filter foils, masks or other materials over the light exit. This may cause heat damage and
danger of fire.
• The device may heat up during operation. Never touch the casing during operation. Let the eect light
cool o after operation before touching or cleaning the casing.
• Do not cover the device to ensure sucient ventilation. Air circulation also must not be impaired by any
objects like magazines, tablecloths, curtains, etc. During operation, keep a minimum distance of 0.5 m
around the device.
Page 40

40
13. Maintenance
Regularly check the technical safety of the eect spotlight, e.g. for damage to the mains cable or the
casing.
If you have reason to believe that the device can no longer be operated safely, disconnect it immediately
and make sure it is not operated unintentionally. Pull the mains plug from the mains socket!
It can be assumed that safe operation is no longer possible if:
• the device is visibly damaged
• the device no longer works
• the device has been stored under unfavourable conditions for an extended period of time or
• after exposure to extraordinary stress caused by transport
Always observe the following safety instructions before cleaning or servicing the eect spotlight:
Live components may be exposed if covers are opened or components are removed.
The device must be disconnected from all power sources before any servicing or repair work is
carried out.
Capacitors inside the device may still carry voltage even though they have been disconnected
from all power sources.
Only qualified experts familiar with the hazards involved and the relevant regulations must per
-
form repairs.
Cleaning
The outside of the eect light should only be cleaned with a soft, dry cloth or brush.
Never use any aggressive cleaning agents or chemical solutions as these may damage the surface of the
casing.
14. Troubleshooting
With this Renkforce LED bar, you purchased a product built to the state of the art and operationally safe.
Nevertheless, problems or errors may occur. Therefore, we would like to describe how to eliminate possible errors here:
Always observe the safety information!
No function after the device has been connected to the power supply:
• The mains plug is not plugged into the socket correctly.
• The mains cable is not connected to the device mains connection IN (1) correctly.
• The mains socket is not supplied with current.
Page 41

41
There is no reaction to DMX commands (at DMX and master-slave mode):
• Blackout mode is active.
• The DMX address is set wrongly.
• The connection between the DMX light controller and the light eect is interrupted.
• The DMX line is too long or subject to interference. Use a special DMX high frequency line. Try placing
the DMX line away from the interference source.
• The polarities of the DMX connections to the DMX controller and LED bar are dierent.
• If possible, try another DMX controller.
The music control does not work:
• Music control is not activated.
• In sound-to-light mode, no DMX signals must be pending at the connection DMX IN (2).
• Music playback volume is too low. Try setting a higher volume or increasing the sensitivity of the music
control.
• Test the function of the microphone (5) by lightly tapping a finger on the microphone (5). The sound to
light control should react to every impulse.
15. Disposal
Electronic devices are recyclable waste and must not be disposed of in the household waste!
Dispose of the product according to the applicable statutory provisions at the end of its service
life.
16. Technical Data
Operating voltage............................................... 100-240 V/50/60 Hz
Power consumption
........................................... 30 W
Capacity of mains output .................................. 7 A
Operating modes ................................................ DMX / auto / master-slave
LEDs...................................................................... 252 LEDs
DMX protocol
...................................................... DMX 512
DMX channels .................................................... 2 / 3 / 4 / 6 / 7 / 14 (depending on DMX mode)
Dimensions.......................................................... 1020 x 65 x 65 mm (without assembly material)
Weight .................................................................. 1,7 kg
Operating and storage conditions
................... -20 to +50 °C / 10-90 % rel. humidity
Page 42

42
Table des matières
Page
1. Introduction.........................................................................................................................................................43
2. Utilisation conforme ..........................................................................................................................................
44
3. Explication des symboles .................................................................................................................................
44
4. Consignes de sécurité
.......................................................................................................................................45
5. Description des fonctions
.................................................................................................................................46
6. Étendue de la livraison ......................................................................................................................................
47
7. Pièces détachées et éléments de commande ..............................................................................................
47
8. Montage ..............................................................................................................................................................48
9. Raccordement DMX ..........................................................................................................................................
49
a) Raccordement d’un contrôleur DMX .......................................................................................................
49
b) Structure d’une chaîne maître-esclave ...................................................................................................
50
10. Raccordement au réseau .................................................................................................................................
51
11. Utilisation .............................................................................................................................................................52
a) Réglage du mode de fonctionnement ......................................................................................................
52
b) Fonctionnement avec un contrôleur DMX externe ...............................................................................
53
c) Mode esclave ...............................................................................................................................................
56
d) Mode Sound-to-Light ..................................................................................................................................
57
e) Mode automatique ......................................................................................................................................
57
f) Configuration des paramètres pour le mode automatique et le mode Sound-to-Light ...................
58
g) Blackout (veille) ...........................................................................................................................................
58
h) Réglage de l’orientation de l’écran ..........................................................................................................
58
i) Mode à réglage de couleur fixe (mode RVB) ..........................................................................................
59
12. Manipulation .......................................................................................................................................................59
13. Entretien ..............................................................................................................................................................60
14. Dépannage ..........................................................................................................................................................60
15. Élimination ...........................................................................................................................................................
61
16. Caractéristiques techniques ............................................................................................................................
61
Page 43

43
1. Introduction
Chère cliente, chere client,
Nous vous remercions pour l’achat de ce produit.
Le produit est conforme aux exigences des directives européennes et nationales en vigueur. Afin de main
tenir le produit en bon état et de garantir un fonctionnement sans danger, l’utilisateur doit impérativement
respecter le présent mode d’emploi !
Le présent mode d’emploi fait partie intégrante de ce produit. Il contient des remarques impor-
tantes à propos de la mise en service et de la manipulation du produit. Observez ces remarques,
même en cas de cession de ce produit à des tiers. Conservez donc le présent mode d’emploi afin
de pouvoir le consulter à tout moment !
Pour toute question technique, veuillez vous adresser à:
France (email): technique@conrad-france.fr
Suisse: www.conrad.ch
www.biz-conrad.ch
Page 44

44
2. Utilisation conforme
La barre à DEL permet de créer des eets lumineux avec les éclairages décoratifs, les équipements de jeux
de lumières, dans les salles de fêtes, etc. et se contrôle à l’aide du contrôleur intégré ou d’un contrôleur
DMX externe.
Ce produit est uniquement homologué pour le fonctionnement sur une tension alternative
100-240 V / 50 / 60 Hz et les prises de courant de sécurité.
Le raccord DMX doit uniquement être relié à un contrôleur DMX approprié ou d’autres projecteurs à eets
lumineux DMX avec raccord DMX.
L’utilisation est uniquement autorisée en intérieur, dans les locaux fermés ; l’utilisation en plein air est interdite. Il convient d’éviter impérativement tout contact avec l’humidité, par ex. dans la salle de bains.
Toute utilisation autre que celle désignée ci-dessus peut endommager le produit et engendrer des dangers
de court-circuit, d’incendie, d’électrocution, etc.
Le produit ne doit pas être transformé ni modifié et le boîtier ne doit pas être ouvert.
Observez toutes les consignes de sécurité dans le présent mode d’emploi !
3. Explication des symboles
Ce symbole sur l’appareil indique à l’utilisateur qu’il doit lire le présent mode d’emploi avant la
mise en service et qu’il doit respecter son contenu pendant l’utilisation.
Le symbole de l’éclair dans le triangle est employé pour signaler un danger pour votre santé, par
ex. un risque d’électrocution. Aucune pièce de l’appareil ne nécessite un entretien de la part de
l’utilisateur. N’ouvrez donc jamais l’appareil.
Dans le présent mode d’emploi, les remarques importantes à impérativement observer sont pré-
cédées d’un point d’exclamation.
Le symbole de la flèche précède les conseils et indications spécifiques à l’utilisation.
Ce symbole signale que le produit a uniquement été conçu pour une utilisation en intérieur.
...m
Ce symbole indique la distance minimale par rapport à toute surface illuminée.
Page 45
45
4. Consignes de sécurité
Tout dommage résultant d’un non-respect du présent mode d’emploi entraîne l’annulation de la
garantie. Nous déclinons toute responsabilité en cas d’éventuels dommages consécutifs.
De même, nous n’assumons aucune responsabilité en cas de dommages matériels ou corporels
résultant d’une utilisation de l’appareil non conforme aux spécifications ou du non-respect des
présentes consignes de sécurité. De tels cas entraînent l’annulation de la garantie ou garantie
légale.
Chère cliente, cher client : les consignes de sécurité et mentions de danger ci-après ne sont pas
uniquement destinées à préserver le bon fonctionnement de l’appareil, mais aussi à préserver
votre santé. Veuillez attentivement lire les points suivants :
• Pour des raisons de sécurité, il est interdit de transformer et / ou modifier le produit de manière
arbitraire.
• La construction de l’appareil correspond à la classe de protection 1. Comme source de tensi
on, employer uniquement une prise de courant de sécurité conforme (100-240 V / 50 / 60 Hz),
raccordée au réseau d’alimentation public.
• Avant la mise en service, assurez-vous que l’appareil n’est pas endommagé. En présence de
dommages, ne mettez pas l’appareil en service et consultez un technicien spécialisé ou notre
service d’assistance technique.
• Toute personne susceptible d’utiliser, de monter, d’installer, de mettre ce projecteur à eets
lumineux en service ou d’en eectuer l’entretien doit être formée et qualifiée en conséquence
et respecter le mode d’emploi.
• La prise de courant à laquelle le produit est raccordé doit facilement être accessible.
• N’utilisez pas le produit dans des locaux ou en présence de conditions ambiantes inappro
priées, contenant ou susceptibles de contenir des gaz, des vapeurs ou des poussières inflammables ! Il y a risque d’explosion !
• Le rayonnement DEL peut être dangereux si le faisceau lumineux DEL ou une réflexion atteint
un œil non protégé. Par conséquent, avant de mettre en marche l’appareil, renseignez-vous
sur les mesures de précaution et les prescriptions légales relatives à l’utilisation d’un appareil
à DEL de ce type.
• Ne regardez jamais directement dans la source lumineuse pendant le fonctionnement. Les
flashs brillants pourraient provoquer des troubles visuels temporaires. En outre, ils pourraient,
le cas échéant, provoquer des attaques d’épilepsie chez les personnes sensibles. Cela vaut en
particulier pour les personnes épileptiques.
• Ne touchez jamais la fiche de secteur avec les mains mouillées ou humides. Il y a danger de
mort par électrocution !
• Veillez à ne pas écraser, plier ou endommager le cordon d’alimentation par des arêtes vives
et à ne pas l’exposer à d’autres sollicitations mécaniques. Évitez les sollicitations thermiques
excessives du cordon d’alimentation liées à une chaleur ou à un refroidissement extrême.
Ne modifiez pas le cordon d’alimentation. Si cette précaution n’est pas prise, le cordon
d’alimentation peut s’en trouver endommagé. Un cordon d’alimentation endommagé peut ent
-
raîner une décharge électrique mortelle.
• Si le cordon d’alimentation est endommagé, ne le touchez pas. Mettez d’abord la prise de
courant correspondante hors tension (par ex. au moyen du disjoncteur diérentiel et des cou
pe-circuits automatiques correspondants) puis retirez avec précaution la fiche de secteur de
la prise de courant. Confiez l’appareil à un atelier spécialisé en vue de sa réparation. N’utilisez
en aucun cas le produit lorsque le cordon d’alimentation est endommagé.
Page 46
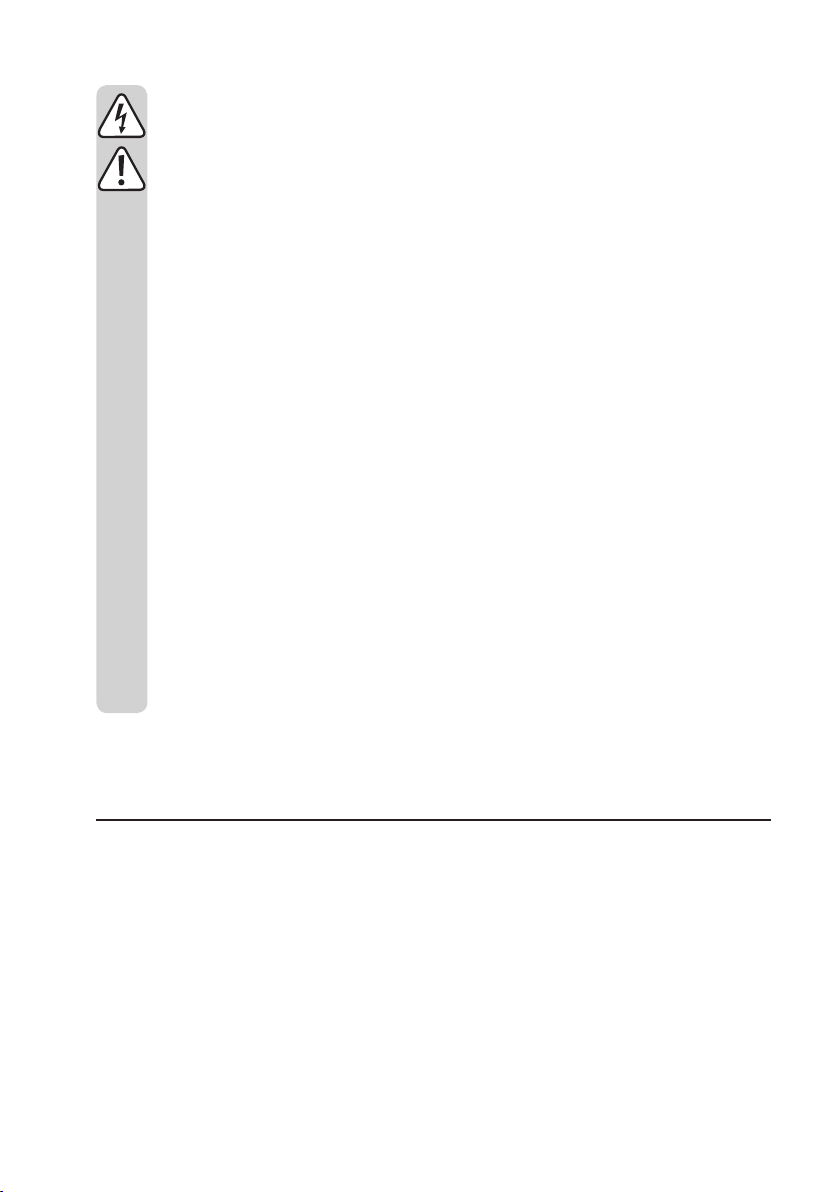
46
• Ce produit n’est pas un jouet, il ne convient pas aux enfants. Les enfants ne sont pas en mesure
d’évaluer les risques liés à la manipulation d’appareils électriques.
• N’exposez pas l’appareil à des températures extrêmes ni à des gouttes ou projections d’eau ni
à de fortes vibrations ou contraintes mécaniques.
• Veillez à une ventilation susante de l’appareil durant l’utilisation. Ne recouvrez jamais le boî
-
tier.
• Ne placez jamais de sources de chaleur susceptibles de provoquer un incendie telles que des
bougies allumées sur ou à proximité de l’appareil.
• Ne placez pas de récipients remplis de liquides, par ex. verre, seau, vase ou plante à proximité
du produit. Les liquides pourraient pénétrer à l’intérieur du boîtier et compromettre la sécurité
électrique. Un tel geste pourrait, en outre, engendrer des dangers importants d’incendie ou
d’électrocution ! En tel cas, mettez d’abord la prise de courant correspondante hors tension
(par ex. au moyen du disjoncteur diérentiel et des coupe-circuits automatiques correspon
dants) puis retirez avec précaution la fiche de secteur de la prise de courant. Débranchez tous
les câbles de l’appareil. Le produit ne doit ensuite plus être remis en service, apportez-le dans
un atelier spécialisé.
• Adressez-vous à un technicien si vous avez des doutes concernant le mode de fonctionne
ment, la sécurité ou le branchement du produit.
• N’utilisez l’appareil que dans les régions avec un climat modéré et non pas dans les régions
avec un climat tropical.
• Ne laissez pas traîner le matériel d’emballage sans surveillance. Il pourrait constituer un jouet
dangereux pour les enfants.
• Observez également les consignes de sécurité supplémentaires fournies dans les diérents
chapitres du présent mode d’emploi.
• Dans les installations industrielles, il convient d’observer les consignes de prévention des ac
cidents relatives aux installations et moyens d’exploitation électriques, édictées par les associations professionnelles.
• En cas de doute quant au raccordement correct de l’appareil ou lorsque vous avez des que
stions sans réponse dans le présent mode d’emploi, contactez notre service d’assistance
technique ou un autre spécialiste.
5. Description des fonctions
• Barre à DEL très lumineuse avec 252 DEL
• Écran à DEL pour une commande facile
• Mode autonome, mode maître-esclave et mode DMX
• 6 modes de fonctionnement DMX avec jusqu’à 14 canaux
• 25 programmes automatiques
• 12 programmes Sound-to-Light
• Microphone intégré pour la commande Sound-to-Light
• Boîtier métallique robuste
Page 47
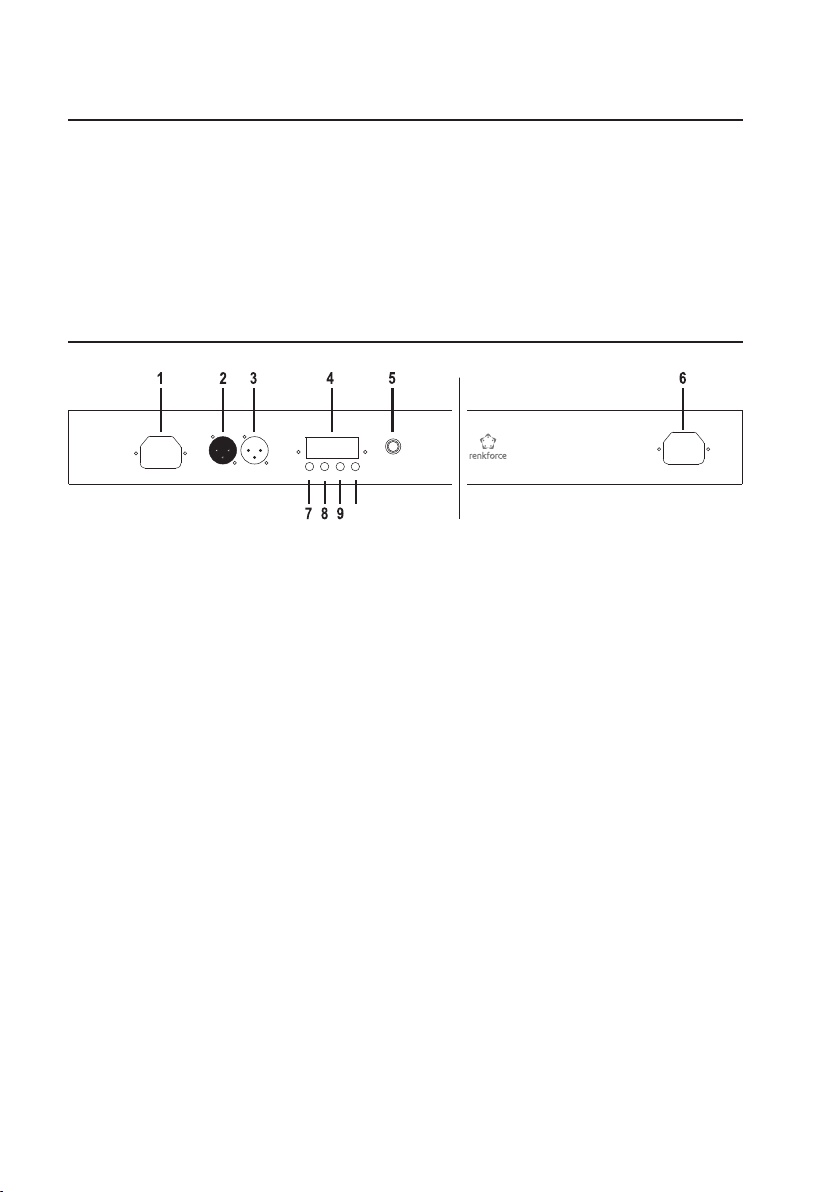
47
6. Étendue de la livraison
• Barre à DEL
• Équerre de montage avec vis
• Cordon d’alimentation
• Mode d’emploi
7. Pièces détachées et éléments de commande
(1) Raccordement au réseau IN
(2) Prise DMX IN
(3) Prise DMX OUT
(4) Écran
(5) Microphone
(6) Raccordement au réseau OUT
(7) Touche MENU
(8) Touche UP
(9) Touche DOWN
(10) Touche ENTER
AC100-240V 50/60Hz IN DMX IN DMX OUT
MENU
UP DOWN
ENTER
MIC
AC100-240V 50/60Hz OUT
Max. Load: 7 A
10
Page 48

48
8. Montage
Le montage et l’installation de l’appareil doivent uniquement être eectués par un technicien
spécialisé connaissant parfaitement les risques potentiels encourus et les prescriptions spécifiques en vigueur. La maintenance, l’utilisation et la mise en service de ce produit ne doivent
être eectuées que par des personnes qualifiées.
Veillez à choisir un emplacement où l’appareil est à l’abri des chocs, des vibrations, de la pous
-
sière, de la chaleur, du froid et de l’humidité. Par ailleurs, aucun transformateur puissant ou
moteur ne doit se trouver à proximité de l’appareil.
Ne recouvrez jamais l’appareil. Lors de l’installation avec d’autres équipements, assurez-vous
que l’aération est susante. Observez une distance susante par rapport aux autres appareils
et aux murs. N’installez pas le projecteur à eets lumineux à proximité directe de sources de
chaleur. Ne dirigez pas de projecteurs puissants ou des sources lumineuses puissantes vers
l’appareil. Cela peut provoquer une surchaue (danger d’incendie !).
Ne percez pas et ne vissez pas de vis supplémentaires dans le boîtier pour fixer l’appareil. Vous
risqueriez d’entrer en contact avec des tensions dangereuses.
L’appareil doit être monté hors de portée de main des personnes.
Les objets illuminés doivent se trouver à une distance minimale de 0,5 m par rapport à la sortie
de lumière de l’appareil. Les matériaux inflammables, comme par ex. les tissus décoratifs, doi-
vent également se trouver à une distance minimale de 0,5 m de l’appareil. Il y a sinon danger
d’incendie !
Lors du montage de l’appareil, assurez-vous que le câble d’alimentation n’est ni coincé, ni en
-
dommagé par des arêtes vives.
Pendant les travaux de montage et de maintenance, assurez-vous que la zone au-dessous du
lieu de montage est condamnée.
La surface ou le dispositif de montage doivent être conçus de manière à pouvoir supporter dix
fois la charge utile sans provoquer une déformation persistante destructive pendant au moins
une heure.
En cas de montage en hauteur, l’appareil doit impérativement être retenu par une deuxième
suspension de sécurité indépendante du dispositif de montage proprement dit. Même si le dis-
positif de suspension principal est défectueux, aucune partie de l’installation ne doit pouvoir
tomber.
Lors de l’installation et du montage, toutes les prescriptions nationales pertinentes relatives à
ce sujet doivent être respectées.
Contrôle de l’installation (en cas d’une utilisation industrielle / publique) :
Avant la première mise en service et après toute modification majeure, l’installation (y compris le
raccordement électrique) doit être contrôlée par un expert.
Un contrôle annuel par un expert est obligatoire.
Page 49

49
• Montez le projecteur à eets lumineux à l’aide des équerres de montage au plafond, au mur ou sur un
système de traverses approprié. Le produit ne doit pas être monté de façon à pouvoir osciller librement.
Pour ce faire, employez du matériel de montage adapté à la surface de montage et pouvant supporter le
poids du projecteur à eets lumineux.
• Durant le montage, sécurisez également l’appareil au moyen d’un câble d’arrêt de sécurité approprié
ou d’un filet d’arrêt. Indépendamment de la fixation principale, le câble ou le filet d’arrêt de sécurité doit
être en mesure de retenir le projecteur à eets lumineux en cas de défaillance aectant la suspension
principale.
• Réglez l’angle d’inclinaison souhaité puis serrez bien les vis à oreilles sur les équerres de montage.
9. Raccordement DMX
Au maximum, 32 appareils peuvent être installés dans une chaîne DMX. Si le nombre d’appareils
est supérieur, il y a surcharge du contrôleur.
La longueur totale maximale de la chaîne DMX ne doit pas être supérieure à 500 m.
En cas d’utilisation de câbles de microphone XLR, ceux-ci peuvent générer des interférences
lors de la transmission des signaux DMX. En tel cas, veuillez utiliser des câbles haute fré-
quence DMX spéciaux.
a) Raccordement d’un contrôleur DMX
L’appareil est uniquement conçu pour être raccordé à un contrôleur DMX avec le protocole
DMX-512.
• Reliez la prise DMX IN (2) à la sortie du contrôleur DMX.
• À cet eet, employez un câble blindé XLR. En fonction du mode de fonctionnement DMX, le contrôleur
doit disposer de jusqu’à 14 canaux de commande libres.
• Raccordez la prise DMX OUT (3) à l’entrée DMX de l’appareil suivant.
• Si le projecteur à eets lumineux doit être le dernier ou le seul appareil dans la chaîne DMX, branchez
une fiche pourvue d’une résistance de terminaison de 120 ohms / 0,25 W (entre les broches 2 et 3) dans
la prise DMX OUT (3).
Page 50

50
Aectation des broches de la prise DMX : Broche 1 = masse / broche 2 = (-) / broche 3 = (+).
b) Structure d’une chaîne maître-esclave
Alternativement, le projecteur à eets lumineux peut être utilisé pour le fonctionnement sur un contrôleur
DMX comme appareil dans une chaîne maître-esclave. Le contrôleur de l’appareil maître intégré sert ici de
contrôleur de commande pour les appareils esclaves raccordés.
• Reliez la prise DMX OUT (3) de l’appareil maître à la prise DMX IN (2) du premier appareil esclave.
• Reliez la prise DMX OUT (3) du premier appareil esclave à la prise DMX IN (2) de l’appareil esclave sui
-
vant.
• Pour tous les appareils esclaves suivants, procédez comme décrit ci-dessus.
• Dans la prise DMX OUT (3) du dernier appareil esclave, branchez une fiche XLR avec résistance de
terminaison (comme décrit dans « Branchement d’un contrôleur DMX »).
Master Slave Slave Slave
Page 51

51
10. Raccordement au réseau
La prise de courant à laquelle le projecteur à eets lumineux est raccordé doit se trouver à
proximité de l’appareil et être facilement accessible afin de pouvoir facilement et rapidement
déconnecter l’appareil de l’alimentation électrique en cas de panne.
Le cordon d’alimentation ne doit pas entrer en contact avec d’autres câbles.
La prudence s’impose lors de la manipulation des câbles d’alimentation et des prises secteur.
La tension du secteur peut provoquer une électrocution mortelle.
Ne laissez pas traîner ou pendre les câbles, posez-les en veillant à exclure tout danger
d’accident.
Avant de brancher la fiche sur la prise secteur, veillez à ce que la tension indiquée sur le pro
jecteur à eets lumineux corresponde à la tension secteur disponible. Le cas contraire, ne
raccordez pas l’appareil. Une tension d’alimentation incorrecte peut provoquer des dommages
irréparables sur l’appareil et engendrer des dangers pour l’utilisateur.
Si vous raccordez d’autres appareils au raccordement au réseau OUT (6), veillez à ne pas
surcharger cette prise. La puissance absorbée totale des appareils raccordés à cette prise ne
doit pas être supérieure à 7 A. Ne branchez jamais d’appareils à puissance absorbée élevée,
comme par ex. des amplificateurs, machines à brouillard, etc., sur le raccordement au réseau
OUT (6).
• Insérez la fiche du cordon d’alimentation dans le raccordement au réseau IN (1) de l’appareil.
• Pour l’alimentation électrique d’autres barres à DEL, vous pouvez raccorder ces dernières au raccorde
-
ment au réseau OUT (6).
• Branchez la fiche du câble d’alimentation dans une prise de courant de sécurité.
• L’appareil s’allume dès que l’appareil est relié à l’alimentation réseau.
Page 52

52
11. Utilisation
a) Réglage du mode de fonctionnement
Le projecteur à eets lumineux peut directement être commandé à l’aide du contrôleur intégré ou à
l’aide d’un contrôleur DMX externe. Par ailleurs, en tant qu’appareil maître avec un contrôleur intégré, il
peut également commander d’autres projecteurs à eets lumineux raccordés ou être commandé en tant
qu’appareil esclave via le contrôleur d’un autre projecteur à eets lumineux.
Les réglages dans le menu s’eectuent via l’écran (4) et les touches de fonction MENU (7), UP (8),
DOWN (9) et ENTER (10).
• Appuyez sur la touche MENU (7) pour acher le menu principal.
• Sélectionnez le mode de fonctionnement souhaité à l’aide des touches UP (8) et DOWN (9) puis validez
la sélection en appuyant sur la touche ENTER (10).
• Appuyez encore une fois sur la touche ENTER pour sélectionner les options.
• Sélectionnez l’option souhaitée du mode de fonctionnement à l’aide des touches UP (8) et DOWN (9) puis
validez la sélection en appuyant sur la touche ENTER (10).
• Pour retourner au niveau précédent du menu, appuyez sur la touche MENU (7).
Adresse de départ DMX : A001 à A512
Mode de fonctionnement DMX : 2 / 3 / 4 / 6 / 7 / 14 canaux
Mode de fonctionnement esclave : SL01 à SL04
Mode de fonctionnement Sound-to-Light : S-01 à S-12
Programme automatique : Pr01 à Pr25
Configuration des paramètres pour AUtO et SOUn : S001
à S255
Blackout (veille) : non / oui
Orientation de l’écran (rotation de 180°) : non / oui
Variateur réglage de la couleur rouge : r000 à r255
Variateur réglage de la couleur vert : g000 à g255
Variateur réglage de la couleur bleu : b000 à b255
Page 53

53
b) Fonctionnement avec un contrôleur DMX externe
Chaque appareil DMX d’une chaîne DMX requiert ce que l’on appelle une adresse DMX de départ afin de
pouvoir clairement être commandé par le contrôleur. Cette adresse de départ DMX définit le premier canal
DMX auquel le projecteur à eets lumineux réagit. Les autres canaux de commande suivent ce premier
canal DMX (adresse de départ DMX).
En fonction du mode de fonctionnement DMX, le projecteur à eets lumineux requiert jusqu’à 14
canaux DMX.
Réglage du mode de fonctionnement DMX (nombre de canaux)
• Le cas échéant, appuyez sur la touche MENU (7) jusqu’à ce que le menu principal s’ache.
• Appuyez sur la touche UP (8) ou DOWN (9) jusqu’à ce que l’indication Chnd s’ache.
• Appuyez sur la touche ENTER (10) pour valider la sélection.
• Appuyez encore une fois sur la touche ENTER (10) pour ouvrir la sélection du mode de fonctionnement
DMX.
• Le mode de fonctionnement DMX (xxCh) s’ache sur l’écran (xx correspond au nombre de canaux en
mode DMX).
• Réglez le nombre de canaux DMX à l’aide des touches UP (8) et DOWN (9).
• Appuyez sur la touche MENU (7) jusqu’à ce que le menu principal s’ache à nouveau.
Réglage de l’adresse de départ DMX
• Le cas échéant, appuyez sur la touche MENU (7) jusqu’à ce que le menu principal s’ache.
• Appuyez sur la touche UP (8) ou DOWN (9) jusqu’à ce que l’indication Addr s’ache.
• Appuyez sur la touche ENTER (10) pour valider la sélection.
• Appuyez encore une fois sur la touche ENTER (10) pour ouvrir la sélection de l’adresse de départ DMX.
• L’adresse de départ DMX (Axxx) s’ache sur l’écran (xxx correspond à l’adresse de départ).
• Réglez l’adresse de départ DMX à l’aide des touches UP (8) et DOWN (9).
• Appuyez sur la touche ENTER (10) pour valider la sélection.
• Appuyez sur la touche MENU (7) jusqu’à ce que le menu principal s’ache à nouveau.
Les tableaux suivants vous renseignent à propos des diérents modes de fonctionnement DMX et les eets
des réglages disponibles pour chacun des canaux DMX.
Mode de fonctionnement DMX 2Ch (mode DMX à 2 canaux)
Canal DMX Valeur DMX Fonction
1 000-135 Programme lumineux automatique
136-255 Commande Sound-to-Light
2 000-255 Vitesse du programme ou sensibilité Sound-to-Light
Page 54

54
Mode de fonctionnement DMX 3Ch (mode DMX à 3 canaux)
Canal DMX Valeur DMX Fonction
1 000-255 Luminosité du rouge
2 000-255 Luminosité du vert
3 000-255 Luminosité du bleu
Mode de fonctionnement DMX 4Ch (mode DMX à 4 canaux)
Canal DMX Valeur DMX Fonction
1 000-255 Luminosité du rouge
2 000-255 Luminosité du vert
3 000-255 Luminosité du bleu
4 000 Lumière éteinte
001-255 Luminosité totale
Mode de fonctionnement DMX 6Ch (mode DMX à 6 canaux)
Canal DMX Valeur DMX Fonction
1 000-255 Luminosité rouge (uniquement avec canal 4 > DMX = 0-7)
2 000-255 Luminosité vert (uniquement avec canal 4 > DMX = 0-7)
3 000-255 Luminosité bleu (uniquement avec canal 4 > DMX = 0-7)
4 000-007 Mode RVB / réglage de la luminosité avec les canaux 1 à 3
008-135 Programme lumineux automatique (comme pour mode 2ch)
136-255 Commande Sound-to-Light (comme pour mode 2ch)
5 000-015 Aucun eet stroboscopique
016-255 Eet stroboscopique lent > rapide
6 000-255 Vitesse du programme ou sensibilité Sound-to-Light
(comme pour mode 2ch)
En mode RVB (canal DMX 4 réglé sur 000-007), seuls les canaux 1, 2, 3 et 4 sont actifs.
En mode automatique (canal DMX 4 réglé sur 008-135), le canal 5 est activé pour la régulation de
l’eet stroboscopique et le canal 6 pour la régulation de la vitesse du programme.
En mode Sound-to-Light (canal DMX 4 réglé sur 136-255), le canal 5 est activé pour la régulation
de l’eet stroboscopique et le canal 6 pour la régulation de la sensibilité Sound-to-Light.
Page 55

55
Mode de fonctionnement DMX 7Ch (mode DMX à 7 canaux)
Canal DMX Valeur DMX Fonction
1 000-255 Luminosité rouge (uniquement avec canal 4 > DMX = 0-7)
2 000-255 Luminosité vert (uniquement avec canal 4 > DMX = 0-7)
3 000-255 Luminosité bleu (uniquement avec canal 4 > DMX = 0-7)
4 000-007 Mode RVB / réglage de la luminosité avec les canaux 1 à 3
008-135 Programme lumineux automatique (comme pour mode 2ch)
136-255 Commande Sound-to-Light (comme pour mode 2ch)
5 000-015 Aucun eet stroboscopique
016-255 Eet stroboscopique lent > rapide
6 000-255 Vitesse du programme ou sensibilité Sound-to-Light
(comme pour mode 2ch)
7 000 Lumière désactivée (uniquement avec canal 4 > DMX = 0-7)
001-255 Luminosité totale (uniquement avec canal 4 > DMX = 0-7)
En mode RVB (canal DMX 4 réglé sur 000-007), seuls les canaux 1, 2, 3, 4 et 7 sont actifs.
En mode automatique (canal DMX 4 réglé sur 008-135), le canal 5 est activé pour la régulation de
l’eet stroboscopique et le canal 6 pour la régulation de la vitesse du programme.
En mode Sound-to-Light (canal DMX 4 réglé sur 136-255), le canal 5 est activé pour la régulation
de l’eet stroboscopique et le canal 6 pour la régulation de la sensibilité Sound-to-Light.
Page 56

56
Mode de fonctionnement DMX 14Ch (mode DMX à 14 canaux)
Avec ce mode de fonctionnement, la barre à DEL fonctionne en mode RVB et est divisée en 4 segments,
dont la luminosité est régulée par les canaux 1 à 12.
Canal DMX Valeur DMX Fonction
1 000-255 Segment 1 - Luminosité rouge
2 000-255 Segment 1 - Luminosité vert
3 000-255 Segment 1 - Luminosité bleu
4 000-255 Segment 2 - Luminosité rouge
5 000-255 Segment 2 - Luminosité vert
6 000-255 Segment 2 - Luminosité bleu
7 000-255 Segment 3 - Luminosité rouge
8 000-255 Segment 3 - Luminosité vert
9 000-255 Segment 3 - Luminosité bleu
10 000-255 Segment 4 - Luminosité rouge
11 000-255 Segment 4 - Luminosité vert
12 000-255 Segment 4 - Luminosité bleu
13 000-015 Aucun eet stroboscopique
016-255 Eet stroboscopique lent > rapide
14 000 Lumière éteinte
001-255 Luminosité totale
c) Mode esclave
• Le cas échéant, appuyez sur la touche MENU (7) jusqu’à ce que le menu principal s’ache.
• Appuyez sur la touche UP (8) ou DOWN (9) jusqu’à ce que l’indication SLnd s’ache.
• Appuyez sur la touche ENTER (10) pour valider la sélection.
• Appuyez encore une fois sur la touche ENTER (10) pour ouvrir la sélection du mode de fonctionnement
esclave.
• Le mode de fonctionnement esclave (SLxx) s’ache sur l’écran (xx correspond au mode de fonctionne
-
ment esclave).
• Réglez le mode de fonctionnement esclave à l’aide des touches UP (8) et DOWN (9). 4 diérents modes
de fonctionnement esclave sont disponibles.
SL01 = L’appareil esclave réagit exactement comme l’appareil maître
SL02 = L’appareil esclave réagit avec un pas de programme de décalage par rapport à l’appareil maître
SL03 = L’appareil esclave réagit avec deux pas de programme de décalage par rapport à l’appareil maî
-
tre
SL04 = L’appareil esclave réagit avec trois pas de programme de décalage par rapport à l’appareil maî
-
tre
• Appuyez sur la touche ENTER (10) pour valider la sélection.
• Appuyez sur la touche MENU (7) jusqu’à ce que le menu principal s’ache à nouveau.
Page 57

57
Dans une chaîne maître-esclave, seul un appareil peut être configuré comme appareil maître,
tous les autres appareils doivent être configurés comme appareils esclaves.
Grâce à la possibilité de réaction décalée des appareils esclaves, il est possible de raccorder
jusqu’à 4 appareils entre eux afin de créer un nouveau projecteur à eets lumineux (par ex. une
lumière défilante qui s’ache sur toutes les 4 barres à DEL).
d) Mode Sound-to-Light
• Le cas échéant, appuyez sur la touche MENU (7) jusqu’à ce que le menu principal s’ache.
• Appuyez sur la touche UP (8) ou DOWN (9) jusqu’à ce que l’indication SOUn s’ache.
• Appuyez sur la touche ENTER (10) pour valider la sélection.
• Appuyez encore une fois sur la touche ENTER (10) pour ouvrir la sélection du programme Sound-toLight.
• Le programme Sound-to-Light (S-xx) s’ache (xx correspond au programme Sound-to-Light).
• Sélectionnez le programme Sound-to-Light souhaité à l’aide des touches UP (8) et DOWN (9). 12 dié
-
rents programmes sont disponibles.
• Appuyez sur la touche ENTER (10) pour valider la sélection.
• Appuyez sur la touche MENU (7) jusqu’à ce que le menu principal s’ache à nouveau.
e) Mode automatique
• Le cas échéant, appuyez sur la touche MENU (7) jusqu’à ce que le menu principal s’ache.
• Appuyez sur la touche UP (8) ou DOWN (9) jusqu’à ce que l’indication AUtO s’ache.
• Appuyez sur la touche ENTER (10) pour valider la sélection.
• Appuyez encore une fois sur la touche ENTER (10) pour ouvrir la sélection du programme automatique.
• Le programme automatique (Prxx) s’ache (xx correspond au programme automatique).
• Sélectionnez le programme automatique souhaité à l’aide des touches UP (8) et DOWN (9). 25 diérents
programmes sont disponibles.
• Appuyez sur la touche ENTER (10) pour valider la sélection.
• Appuyez sur la touche MENU (7) jusqu’à ce que le menu principal s’ache à nouveau.
Page 58

58
f) Configuration des paramètres pour le mode automatique et le mode Sound to-Light
• Le cas échéant, appuyez sur la touche MENU (7) jusqu’à ce que le menu principal s’ache.
• Appuyez sur la touche UP (8) ou DOWN (9) jusqu’à ce que l’indication SPEE s’ache.
• Appuyez sur la touche ENTER (10) pour valider la sélection.
• Appuyez encore une fois sur la touche ENTER (10) pour ouvrir le réglage de la vitesse ou de la sensibili
-
té.
• Le réglage (Sxxx) s’ache (xxx correspond à la vitesse du programme pour le mode automatique ou au
réglage de la sensibilité pour le mode Sound-to-Light).
• Sélectionnez la valeur souhaitée à l’aide des touches UP (8) et DOWN (9).
• Appuyez sur la touche ENTER (10) pour valider la sélection.
• Appuyez sur la touche MENU (7) jusqu’à ce que le menu principal s’ache à nouveau.
g) Blackout (veille)
• Le cas échéant, appuyez sur la touche MENU (7) jusqu’à ce que le menu principal s’ache.
• Appuyez sur la touche UP (8) ou DOWN (9) jusqu’à ce que l’indication bLnd s’ache.
• Appuyez sur la touche ENTER (10) pour valider la sélection.
• Appuyez encore une fois sur la touche ENTER (10) pour sélectionner « no » (non) ou « yes » (oui).
• Réglez le mode de fonctionnement souhaité à l’aide des touches UP (8) et DOWN (9).
no = Fonctionnement normal (la lumière est allumée)
yes = Veille (la lumière est éteinte)
• Appuyez sur la touche ENTER (10) pour valider la sélection.
• Appuyez sur la touche MENU (7) jusqu’à ce que le menu principal s’ache à nouveau.
h) Réglage de l’orientation de l’écran
• Le cas échéant, appuyez sur la touche MENU (7) jusqu’à ce que le menu principal s’ache.
• Appuyez sur la touche UP (8) ou DOWN (9) jusqu’à ce que l’indication dISP s’ache.
• Appuyez sur la touche ENTER (10) pour valider la sélection.
• Appuyez encore une fois sur la touche ENTER (10) pour sélectionner « no » (non) ou « yes » (oui).
• Réglez l’orientation de l’écran souhaitée à l’aide des touches UP (8) et DOWN (9).
no = Fonctionnement normal
yes = Achage sur l’écran tourné de 180°
• Appuyez sur la touche ENTER (10) pour valider la sélection.
• Appuyez sur la touche MENU (7) jusqu’à ce que le menu principal s’ache à nouveau.
Page 59

59
i) Mode à réglage de couleur fixe (mode RVB)
• Le cas échéant, appuyez sur la touche MENU (7) jusqu’à ce que le menu principal s’ache.
• Appuyez sur la touche UP (8) ou DOWN (9) jusqu’à ce que l’indication rEd s’ache.
• Appuyez sur la touche ENTER (10) pour valider la sélection.
• Appuyez encore une fois sur la touche ENTER (10) pour ouvrir le réglage de la luminosité pour le rouge.
• La valeur de luminosité pour le rouge (rxxx) s’achage (xxx correspond à la valeur de luminosité).
• Sélectionnez la valeur de luminosité souhaitée à l’aide des touches UP (8) et DOWN (9).
• Appuyez sur la touche ENTER (10) pour valider la sélection.
• Appuyez sur la touche MENU (7) jusqu’à ce que le menu principal s’ache à nouveau.
• Procédez de la manière susmentionnée pour régler les valeurs de luminosité du vert (GrEE) et du bleu
(bLUE).
En fonction de l’intensité définie pour les diérentes couleurs, il est possible de créer les dié-
rentes teintes mélangées.
12. Manipulation
• N’insérez jamais directement la fiche dans une prise de courant lorsque l’appareil a été transporté d’une
pièce froide dans une pièce chaude. L’eau de condensation qui se forme alors risquerait de détruire
l’appareil. Attendez que l’appareil ait atteint la température ambiante avant de le brancher. Attendez que
l’eau de condensation se soit évaporée.
• Ne tirez jamais sur le câble pour débrancher la fiche de la prise de courant ; retirez toujours la fiche en
la saisissant au niveau des surfaces de préhension prévues à cet eet.
• En cas d’inutilisation, retirez la fiche de la prise de courant.
• Pour des raisons de sécurité, débranchez systématiquement la fiche de la prise de courant par temps
d’orage.
• Ne posez jamais des films filtrants, des masques ou d’autres matériaux sur la sortie de lumière. La
chaleur dégagée risquerait de provoquer des dommages ou un incendie.
• L’appareil peut chauer durant le fonctionnement. Ne touchez pas le boîtier durant le fonctionnement.
Après l’utilisation, laissez refroidir le projecteur à eets lumineux avant de toucher ou de nettoyer le
boîtier.
• Pour assurer une ventilation susante, l’appareil ne doit en aucun cas être couvert. La circulation d’air
ne doit pas être gênée par des objets tels que des journaux, des nappes, des rideaux ou autres. Pendant
le fonctionnement, laissez un espace libre d’au moins 0,5 m tout autour de l’appareil.
Page 60
60
13. Entretien
Contrôlez régulièrement la sécurité technique du projecteur à eets lumineux en vous assurant par ex. de
l’absence de détérioration au niveau du cordon d’alimentation et du boîtier.
Lorsqu’un fonctionnement sans danger de l’appareil n’est plus garanti, il convient de mettre celui-ci hors
service et d’empêcher toute remise en marche accidentelle. Débranchez la fiche de secteur de la prise
de courant !
Une utilisation sans danger n’est plus garantie lorsque :
• l’appareil est visiblement endommagé,
• l’appareil ne fonctionne plus,
• en cas de stockage prolongé dans des conditions défavorables ou
• lorsque l’appareil a été exposé à de sévères contraintes durant le transport
Avant de procéder au nettoyage ou à l’entretien du projecteur à eets lumineux, il est impératif de re
-
specter les consignes de sécurité suivantes :
L’ouverture de caches et le démontage de pièces risquent de mettre à nu des pièces sous tensi-
on.
Avant tout entretien ou réparation, il convient donc de déconnecter l’appareil de toutes les
sources de tension.
Les condensateurs montés dans l’appareil peuvent être encore chargés, même après avoir dé
-
branché l’appareil de toutes les sources de tension.
Les réparations doivent uniquement être eectuées par un technicien qualifié, familiarisé avec
les dangers potentiels encourus et les prescriptions spécifiques en vigueur.
Nettoyage
L’extérieur du projecteur à eets lumineux doit uniquement être nettoyé à l’aide d’un chion doux et sec
ou d’un pinceau.
N’utilisez pas de détergents agressifs ou de solutions chimiques, car ils risqueraient d’endommager les
surfaces du boîtier.
14. Dépannage
Avec la barre à DEL Renkforce, vous avez acquis un produit à la pointe du progrès technique qui ore
une grande sécurité de fonctionnement. Il est toutefois possible que des problèmes ou des pannes surviennent. Vous trouverez ci-après plusieurs procédures vous permettant, le cas échéant, d’eectuer un
dépannage :
Respectez impérativement les consignes de sécurité !
L’appareil ne fonctionne pas après le raccordement à l’alimentation électrique :
• La fiche de secteur n’est pas correctement insérée dans la prise de courant.
• Le cordon d’alimentation n’est pas correctement enfiché dans le raccordement au réseau IN (1) de
l’appareil.
• La prise de courant n’est pas alimentée en courant.
Page 61
61
Le système ne réagit pas aux commandes DMX (en mode DMX et en mode maître-esclave) :
• Le mode Blackout est activé.
• L’adresse DMX configurée est incorrecte.
• La connexion entre le variateur de lumière DMX et le projecteur à eets lumineux est interrompue.
• Le câble DMX est trop long ou défectueux. Utilisez un câble DMX haute fréquence spécial. Essayez de
poser le câble DMX à l’écart des sources d’interférences.
• La polarité des prises DMX sur le contrôleur DMX et la barre à DEL n’est pas identique.
• Dans la mesure du possible, essayez un autre contrôleur DMX.
La commande musicale ne fonctionne pas :
• La commande musicale n’est pas activée.
• En mode Sound-to-Light, aucun signal DMX ne doit être disponible sur la prise DMX IN (2).
• Le volume de lecture de la musique n’est pas assez fort. Essayez d’augmenter le volume ou la sensibilité
de la commande musicale.
• Testez le fonctionnement du microphone (5) en tapotant avec le doigt sur le microphone (5). La comman
-
de Sound-to-Light devrait réagir à chaque impulsion.
15. Élimination
Les appareils électroniques sont des matériaux recyclables et ne doivent pas être éliminés avec
les ordures ménagères !
À la fin de sa durée de vie, éliminez le produit conformément aux dispositions légales en vi
-
gueur.
16. Caractéristiques techniques
Tension de service ............................................. 100-240 V/50/60 Hz
Puissance absorbée .......................................... 30 W
Capacité de charge de la sortie réseau ......... 7 A
Modes de fonctionnement ...............................DMX / Auto / Maître-Esclave
DEL........................................................................ 252 DEL
Protocole DMX ................................................... DMX 512
Canaux DMX ....................................................... 2 / 3 / 4 / 6 / 7 / 14 (en fonction du mode de fonctionnement
DMX)
Dimensions.......................................................... 1020 x 65 x 65 mm (sans matériel de montage)
Poids..................................................................... 1,7 kg
Conditions de service et de stockage ............-20 à +50 °C / 10-90 % d’humidité relative de l’air
Page 62

62
Inhoudsopgave
Pagina
1. Inleiding ...............................................................................................................................................................63
2. Voorgeschreven gebruik ..................................................................................................................................
64
3. Verklaring van symbolen ..................................................................................................................................
64
4. Veiligheidsaanwijzingen ...................................................................................................................................65
5. Eigenschappen ...................................................................................................................................................66
6. Leveringsomvang ...............................................................................................................................................67
7. Onderdelen en bedieningselementen ............................................................................................................
67
8. Montage ..............................................................................................................................................................68
9. DMX-aansluiting ................................................................................................................................................69
a) Aansluiting van een DMX-controller ........................................................................................................
69
b) Opbouw van een master-slave ketting ....................................................................................................
70
10. Netaansluiting ....................................................................................................................................................71
11. Bediening ............................................................................................................................................................72
a) Instelling van de bedrijfsmodus ................................................................................................................
72
b) Gebruik met een externe DMX-controller ...............................................................................................
73
c) Slave-modus .................................................................................................................................................76
d) Sound-to-light modus .................................................................................................................................
77
e) Automatische modus ..................................................................................................................................
77
f) Parameterinstelling voor automatisch- en sound-to-lightgebruik ......................................................
78
g) Blackout (stand-by) .....................................................................................................................................
78
h) Schermafstelling instellen .........................................................................................................................
78
i) Gebruik met vaste kleurinstelling (RGB-bedrijf) .....................................................................................
79
12. Gebruik .................................................................................................................................................................79
13. Onderhoud...........................................................................................................................................................80
14. Verhelpen van storingen ...................................................................................................................................
80
15. Verwijderen .........................................................................................................................................................
81
16. Technische gegevens .......................................................................................................................................
81
Page 63

63
1. Inleiding
Geachte klant,
Hartelijk dank voor de aanschaf van dit product.
Dit product voldoet aan de voorwaarden van de nationale en Europese wetgeving. Volg de instructies van
de gebruiksaanwijzing op om deze status van het apparaat te handhaven en een ongevaarlijke werking te
garanderen!
Deze gebruiksaanwijzing hoort bij dit product. Deze bevat belangrijke instructies voor de inge-
bruikname en bediening. Let hierop, ook wanneer u dit product aan derden doorgeeft. Bewaar
deze handleiding om haar achteraf te raadplegen!
Bij technische vragen kunt u zich wenden tot onze helpdesk.
Voor meer informative kunt u kijken op www.conrad.nl of www.conrad.be
Page 64

64
2. Voorgeschreven gebruik
De LED-balk dient voor het opwekken van lichteecten in decoratieve verlichting, lichtshowinstallaties,
feestzalen, enz. en wordt via de ingebouwde controller of een externe DMX-controller bestuurd.
Dit product is alleen goedgekeurd voor aansluiting op 100-240 V/50/60 Hz-wisselspanning en voor rand
-
geaarde contactdozen.
De DMX-aansluiting mag uitsluitend op geschikte DMX-controllers of andere DMX-lichteecten met DMX-
aansluiting worden aangesloten.
Het product mag uitsluitend in gesloten ruimten worden gebruikt, dus niet in de open lucht. Contact met
vocht, bijv. in de badkamer, moet absoluut worden voorkomen.
Een andere toepassing dan hierboven beschreven, kan leiden tot beschadiging van het product. Daarnaast
bestaat het risico van bijv. kortsluiting, brand of elektrische schokken.
Aan het complete product mag niets worden veranderd resp. omgebouwd en de behuizing mag niet wor
-
den geopend.
Volg alle veiligheidsinstructies in deze gebruiksaanwijzing op!
3. Verklaring van symbolen
Dit teken op het toestel wijst de gebruiker erop, dat hij of zij voor de ingebruikname van het toestel de gebruiksaanwijzing moet lezen en deze bij het gebruik in acht moet nemen.
Het symbool met de bliksem in een driehoek wordt gebruikt als er gevaar bestaat voor uw ge-
zondheid (bv. door elektrische schokken). In het toestel bevinden zich geen onderdelen die door
de gebruiker moeten worden onderhouden. Het toestel mag daarom nooit worden geopend.
Belangrijke aanwijzingen die absoluut in acht moeten worden genomen, zijn in deze gebruik-
saanwijzing met een uitroepteken aangegeven.
Het symbool met de pijl vindt u bij bijzondere tips of aanwijzingen voor de bediening.
Dit symbool wijst erop dat het product alleen in binnenruimtes mag worden gebruikt.
...m
Dit symbool geeft de minimale afstand tot de bestraalde oppervlakken aan.
Page 65
65
4. Veiligheidsaanwijzingen
Bij schade veroorzaakt door het niet opvolgen van de gebruiksaanwijzing, vervalt het recht op
garantie. Voor gevolgschade die hieruit ontstaat, zijn wij niet aansprakelijk.
Voor materiële of persoonlijke schade, die door ondeskundig gebruik of niet inachtname van
de veiligheidsvoorschriften veroorzaakt worden zijn wij niet aansprakelijk. In zulke gevallen
vervalt de garantie.
Geachte klant: De volgende veiligheids- en gevarenvoorschriften hebben niet alleen de bescher
ming van het product, maar ook de bescherming van uw gezondheid tot doel. Lees de volgende
punten zorgvuldig door:
• Om veiligheidsredenen is het eigenmachtig ombouwen en/of veranderen van de hoofdtelefoon
niet toegestaan.
• Het apparaat voldoet aan veiligheidsklasse 1. Als spanningsbron mag alleen een wandcontact
-
doos met randaarde (100-240 V/50/60 Hz) van het openbare stroomnet in veiligheidscontactuit
-
voering worden gebruikt die aan de voorschriften voldoet.
• Controleer het apparaat vóór ingebruikname op schade. Als dit het geval is, mag het toestel
niet in gebruik worden genomen. Neem dan contact op met een vakman of met onze service.
• Alle personen, die de eectlamp bedienen, installeren, opstellen, in bedrijf nemen of onderhou-
den, moeten hiervoor opgeleid en voldoende gekwalificeerd zijn en deze gebruiksaanwijzing
opvolgen.
• De contactdoos waaraan het product wordt aangesloten, moet makkelijk toegankelijk zijn.
• Gebruik het product niet in ruimten of onder ongunstige omstandigheden waarbij brandbare
gassen, dampen of stoen aanwezig zijn of aanwezig kunnen zijn! Er bestaat explosiegevaar!
• LED-straling kan gevaarlijk zijn als de LED-straal of een reflectie onbeschermd in uw ogen
komt. Stelt u zich daarom op de hoogte van de wettelijke bepalingen en voorzorgsmaatregelen
voor het gebruik van een dergelijk LED-apparaat, voordat u het in gebruik neemt.
• Kijk tijdens het gebruik nooit rechtstreeks in de lichtbron. De felle lichtstralen kunnen scha
-
delijk zijn voor het gezichtsvermogen. Bovendien kunnen bij mensen die hier gevoelig voor
zijn onder bepaalde omstandigheden epileptische aanvallen worden veroorzaakt. Dit geldt met
name voor epileptici.
• Raak de stekker nooit met vochtige of natte handen aan. Er bestaat het gevaar voor een le
-
vensgevaarlijke elektrische schok!
• Zorg dat het netsnoer niet wordt afgekneld, geknikt, door scherpe randen wordt beschadigd
of op andere wijze mechanisch wordt belast. Vermijd overmatige thermische belasting van
het netsnoer door te grote hitte of koude. Verander het netsnoer niet. Indien u hier niet op let,
dan kan het netsnoer beschadigd raken. Een beschadigd netsnoer kan een levensgevaarlijke
elektrische schok tot gevolg hebben.
• Als het netsnoer beschadigd is, mag u het niet aanraken. Schakel eerst de betreende wand-
contactdoos stroomloos (bijv. via de bijbehorende veiligheidsschakelaar en dierentieelschakelaar) en trek daarna de netstekker voorzichtig uit de wandcontactdoos. Breng het apparaat
bij storingen of defecten naar een elektrotechnisch bedrijf. Gebruik het product in geen geval
met een beschadigd netsnoer.
Page 66

66
• Houd het product buiten bereik van kinderen; het is geen speelgoed. Kinderen kunnen niet
inschatten welke gevaren aan het gebruik van elektrische apparatuur zijn verbonden.
• Stel het toestel niet bloot aan hoge temperaturen, druip- of spatwater, sterke trillingen of hoge
mechanische belastingen.
• Let tijdens het gebruik op voldoende ventilatie rondom het apparaat. Dek de behuizing niet af.
• Zet geen brandende voorwerpen, zoals kaarsen, op of naast het toestel.
• U mag geen potten met vloeistoen (bv. glazen, emmers, vazen of planten) in de onmiddellijke
buurt van het product plaatsen. Vloeistoen kunnen in de behuizing dringen en daarbij afbreuk
doen aan de elektrische veiligheid. Bovendien bestaat het gevaar van brand of een elektrische
schok; levensgevaarlijk! Schakel in dit geval de bijhorende wandcontactdoos spanningsloos
(bijv. via de bijhorende veiligheids- en dierentieelschakelaars) en trek vervolgens de netstek
ker uit het stopcontact. Maak alle kabels los van het apparaat. Het product mag daarna niet
meer worden gebruikt, breng het naar een onderhoudswerkplaats.
• Raadpleeg een vakman wanneer u vragen heeft over de werkwijze, veiligheid of aansluiting
van het product.
• Gebruik het toestel uitsluitend in een gematigd klimaat; niet in een tropisch klimaat.
• Laat verpakkingsmateriaal niet achteloos slingeren. Dit kan voor kinderen gevaarlijk speelgoed
zijn.
• Neem ook de veiligheidsvoorschriften in de afzonderlijke hoofdstukken van deze gebruiksaan
-
wijzing in acht.
• In industriële omgevingen dienen de Arbovoorschriften ter voorkoming van ongevallen met
betrekking tot elektrische installaties en bedrijfsmiddelen in acht te worden genomen.
• Indien u vragen heeft over de correcte aansluiting of als er problemen zijn waar u in de gebru
iksaanwijzing geen oplossing voor kunt vinden, neemt u dan contact op met onze technische
helpdesk of met een andere elektromonteur.
5. Eigenschappen
• Zeer heldere LED-bar met 252 LED‘s
• LED-scherm voor eenvoudige bediening
• Stand-Alone-modus, Master-Slave-modus en DMX-modus
• 6 DMX bedrijfsmodi met tot 14 kanalen
• 25 automatische programma‘s
• 12 Sound-to-light programma‘s
• ingebouwde microfoon voor de sound-to-light-besturing
• stabiele metalen behuizing
Page 67

67
6. Leveringsomvang
• LED-balk
• Montagebeugel met schroeven
• Netsnoer
• Gebruiksaanwijzing
7. Onderdelen en bedieningselementen
(1) Netaansluiting IN
(2) Aansluiting DMX IN
(3) Aansluiting DMX OUT
(4) Scherm
(5) Microfoon
(6) Netaansluiting OUT
(7) MENU-toets
(8) Toets UP
(9) Toets DOWN
(10) Toets ENTER
AC100-240V 50/60Hz IN DMX IN DMX OUT
MENU
UP DOWN
ENTER
MIC
AC100-240V 50/60Hz OUT
Max. Load: 7 A
10
Page 68

68
8. Montage
De montage en de installatie van het apparaat mogen uitsluitend door een vakman worden
uitgevoerd die vertrouwd is met de gevaren en relevante voorschriften. Het product mag alleen
onderhouden, bediend en in gebruik genomen worden door personen die overeenkomstig gekwalificeerd zijn.
Houd bij de keuze van een montageplaats rekening met het feit dat schokken, trillingen, stof,
koude, hitte en vochtigheid vermeden moeten worden. Er mogen bovendien geen sterke trans
-
formatoren of motoren in de buurt van het apparaat zijn.
U mag het apparaat nooit afdekken. Let bij het opstellen samen met andere apparatuur op
voldoende ventilatiemogelijkheden. Bewaar voldoende afstand tot andere toestellen en muren.
Plaats het lichteect niet in de onmiddellijke omgeving van warmtebronnen. Richt geen sterke
stralers of lichtbronnen op het apparaat. Dit kan leiden tot oververhitting (brandgevaar!).
U mag voor de montage van het product geen bijkomende gaten of schroeven in de behuizing
boren of vastschroeven. Hierdoor kunnen onder spanning staande onderdelen bloot komen te
liggen.
Het toestel moet buiten handbereik van personen worden gemonteerd.
Verlichte voorwerpen moeten minstens 0,5 m van de lichtopening van het toestel verwijderd
zijn. Licht ontvlambare materialen, zoals decoratieve stoen, moeten minstens 0,5 m van het
apparaat verwijderd zijn. Anders bestaat brandgevaar!
Zorg dat bij de montage van het product het netsnoer niet wordt afgekneld of door scherpe
randen wordt beschadigd.
Tijdens montage- en servicewerkzaamheden dient het gebied onder de montageplaats afgeslo
-
ten te zijn.
Het montageoppervlak of -inrichting dienen zo geconstrueerd te zijn, dat deze minstens 1 uur
lang de 10-voudige werkbelasting zonder blijvende schadelijke vervorming kan doorstaan.
Het toestel dient bovendien bij een hoge montage door een tweede veiligheidsophanging te
worden geborgd, die onafhankelijk is van de eigenlijke montage-inrichting. Bij fouten van het
hoofdophangsysteem mogen er geen onderdelen van de installatie naar beneden vallen.
Bij de opstelling/montage moeten alle in dit verband relevante voorschriften in uw land nauw
-
gezet worden aangehouden.
Keuring van de installatie (bij commercieel/openbaar gebruik):
Vóór de eerste ingebruikneming en na ingrijpende wijzigingen dient de installatie (met inbegrip
van de elektrische aansluiting) door een deskundige gecontroleerd te worden.
De installatie moet een keer per jaar door een deskundige gecontroleerd worden.
Page 69

69
• Monteer het lichteect met de montagebeugels aan het plafond, de wand of op een geschikt traversesysteem. Het apparaat mag nooit zonder beugel worden gemonteerd. Gebruik hierbij montagemateriaal
dat geschikt is voor het montage-oppervlak en de belasting van het lichteect kan dragen.
• Beveilig de montage bovendien met een geschikte veiligheidsvangkabel of een vangnet. De veiligheids
vangkabel resp. het vangnet moet onafhankelijk van de hoofdbevestiging, het lichteect in geval van een
fout bij de hoofdophanging kunnen houden.
• Stel de gewenste hellingshoek in en draai de beide vleugelschroeven goed aan de montagebeugels
vast.
9. DMX-aansluiting
Er kunnen max. 32 toestellen in een DMX-ketting worden opgenomen, omdat anders de control-
ler wordt overbelast.
De maximale totale lengte van de DMX-ketting mag 500 m niet overschrijden.
Bij gebruik van XLR-microfoonkabels kan het tot storingen in de DMX-signaaloverdracht ko
-
men. Gebruikt u in dit geval speciale DMX-hoogfrequentieleidingen.
a) Aansluiting van een DMX-controller
Het toestel is uitsluitend bedoeld voor aansluitingen op DMX-controllers met DMX-512-proto-
col.
• Verbind de aansluiting DMX IN (2) met de uitgang van de DMX-controller.
• Gebruik hiervoor een afgeschermde XLR-kabel. De controller moet telkens naargelang de DMX-bedrijfs
-
modus over meer dan 14 vrije stuurkanalen beschikken.
• Verbind de aansluiting DMX OUT (3) met de DMX-ingang van het volgende apparaat.
• Als het lichteect het laatste of het enige apparaat in de DMX-ketting is, dan plaatst u in de aansluiting
DMX OUT (3) een stekker met een 120 Ohm/0,25 W-afsluitweerstand (tussen pen 2 en pen 3).
Page 70

70
Bedrading van de DMX-aansluiting: Pen 1 = massa / Pen 2 = (-) / Pen 3 = (+).
b) Opbouw van een master-slave ketting
Het lichteect kan alternatief voor het bedrijf via een DMX-controller ook worden gebruikt als apparaat
binnen een master-slave ketting. Hierbij dient de ingebouwde controller van het master-apparaat als stuurcontroller voor de aangesloten slave-apparaten.
• Verbind de aansluiting DMX OUT (3) van het master-apparaat met de aansluiting DMX IN (2) van het
eerste slave-apparaat.
• Verbind de aansluiting DMX OUT (3) van het eerste slave-apparaat met de aansluiting DMX IN (2) van het
volgende slave-apparaat.
• Ga met alle volgende slave-apparaten op dezelfde manier tewerk.
• Steek in de aansluiting DMX OUT (3) van het laatste slave-apparaat een XLR-stekker met afsluitweer
-
stand (zoals beschreven onder „Aansluiting van een DMX-controller“).
Master Slave Slave Slave
Page 71

71
10. Aansluiting op het lichtnet
Het stopcontact waarop het lichteect wordt aangesloten, moet zich in de buurt van het ap-
paraat bevinden en makkelijk toegankelijk zijn zodat het apparaat in geval van storingen snel
en zonder gevaren van de netspanning kan worden gescheiden.
Zorg ervoor dat het netsnoer niet met andere kabels in aanraking komt.
Wees voorzichtig bij het omgaan met netsnoeren en netaansluitingen. Netspanning kan levens
-
gevaarlijke elektrische schokken veroorzaken.
Laat kabels niet los liggen. Deze dienen op deskundige wijze gelegd te worden om gevaar voor
ongevallen te voorkomen.
Let voor het verbinden van het netsnoer op dat de aan het lichteect aangesloten apparaats
panning met de aanwezige netspanning overeenstemt. Als de gegevens niet overeenkomen met
de beschikbare netspanning, kunt u het apparaat niet aansluiten. Bij een verkeerd ingestelde
voedingsspanning kan het komen tot onherstelbare schade aan het apparaat en tot gevaar voor
de gebruiker.
Wanneer u meer toestellen met de aansluiting OUT (6) verbindt, moet u erop letten, deze aans
luiting niet te overbelasten. De totale vermogensopname van de apparaten die met deze aansluiting mag worden verbonden, mag 7 A niet overschrijden. Sluit in geen geval apparaten met
een hoge vermogensopname, zoals vb. versterkers, nevelmachines, etc. aan de netaansluiting
OUT (6) aan.
• Verbind de eurostekker van de netsnoer met de netaansluiting IN (1) van het apparaat.
• Als u andere LED-balken van stroom wilt voorzien, kunt u deze met behulp van de netaansluiting OUT (6)
verbinden.
• Steek de netstekker van het netsnoer in een stopcontact met randaarde.
• Zodra het apparaat op de voedingsspanning is aangesloten, begint het te werken.
Page 72

72
11. Bediening
a) Instelling van de bedrijfsmodus
Het lichteect kan met de ingebouwde controller of met een externe DMX-controller worden gestuurd.
Verder kan hij in het Master-Slave-bedrijf als master-apparaat met de ingebouwde controller andere aangesloten lichteecten synchroon sturen of als slave-apparaat via de controller van een ander lichteect
worden aangestuurd.
Via het scherm (4) en de functietoetsen MENU (7), UP (8), DOWN (9) en ENTER (10) vindt de instellingen in
het menu plaats.
• Druk op de toets MENU (7) om naar het hoofdmenu te gaan.
• Kies met behulp van de toetsen UP (8) of DOWN (9) de gewenste bedrijfsmodus en bevestig de keuze met
de toets ENTER (10).
• Druk nogmaals op de toets ENTER om naar de keuze van de opties te gaan.
• Kies met behulp van de toetsen UP (8) of DOWN (9) de gewenste bedrijfsmodusoptie en bevestig de
keuze met de toets ENTER (10).
• Om in het menu een niveau terug te keren, drukt u op de toets MENU (7).
DMX-startadres: A001 tot A512
DMX-bedrijfsmodus: 2 / 3 / 4 / 6 / 7 / 14 kanalen
Slave-bedrijfsmodus: SL01 tot SL04
Sound-to-light-bedrijfsmodus: S-01 tot S-12
Automatisch programma: Pr01 tot Pr25
Parameterinstelling voor AUtO en SOUn: S001 tot S255
Blackout (stand-by): no/yes
Schermafstelling (180° draaiing): no/yes
Kleurinstelling dimmer rood: r000 tot r255
Kleurinstelling dimmer groen: g000 tot g255
Kleurinstelling dimmer blauw: b000 tot b255
Page 73

73
b) Gebruik met een externe DMX-controller
Elk DMX-apparaat in een DMX-ketting heeft een zogenaamd DMX-startadres nodig om eenduidig door de
controller aangestuurd te kunnen worden. Dit DMX-startadres definieert het eerste DMX-kanaal, waarop
het lichteect reageert. De andere stuurkanalen volgen op dit eerste DMX-kanaal (DMX-startadres).
Het lichteect heeft naargelang de DMX-bedrijfsmodus tot 14 DMX-kanalen nodig.
Instelling van de DMX-bedrijfsmodus (kanaalnummer)
• Druk indien nodig op de toets MENU (7) tot het scherm zich in het hoofdmenu bevindt.
• Druk op de toets UP (8) of DOWN (9) tot Chnd wordt weergegeven.
• Druk om de keuze te bevestigen op de toets ENTER (10).
• Druk nogmaals op de toets ENTER (10) om naar de keuze van de DMX-bedrijfsmodus te gaan.
• De DMX-bedrijfsmodus (xxCh) wordt weergegeven (xx definieert het aantal kanalen in DMX-bedrijfsmo
-
dus).
• Stel het aantal DMX-kanalen met de toetsen UP (8) of DOWN (9) in.
• Druk op de toets MENU (7) tot het scherm zich in het hoofdmenu bevindt.
Instelling van de DMX-startadressen
• Druk indien nodig op de toets MENU (7) tot het scherm zich in het hoofdmenu bevindt.
• Druk op de toets UP (8) of DOWN (9) tot Addr wordt weergegeven.
• Druk om de keuze te bevestigen op de toets ENTER (10).
• Druk nogmaals op de toets ENTER (10) om naar de keuze van de DMX-startadressen te gaan.
• Het DMX-startadres (Axxx) wordt weergegeven (xxx definieert het startadres).
• Stel het aantal DMX-startadressen met de toetsen UP (8) of DOWN (9) in.
• Druk om de keuze te bevestigen op de toets ENTER (10).
• Druk op de toets MENU (7) tot het scherm zich in het hoofdmenu bevindt.
De volgende tabellen geven de resultaten van de verschillende DMX-bedrijfsmodi en de resultaten van de
instellingen aan de afzonderlijke DMX-kanalen.
DMX-bedrijfsmodus 2Ch (2-kanaals-DMX-bedrijf)
DMX-kanaal DMX-waarde Functie
1 000-135 Automatisch lichtprogramma
136-255 Sound-to-light sturing
2 000-255 Programmasnelheid of sound-to-light-gevoeligheid
Page 74

74
DMX-bedrijfsmodus 3Ch (3-kanaals-DMX-bedrijf)
DMX-kanaal DMX-waarde Functie
1 000-255 Helderheid rood
2 000-255 Helderheid groen
3 000-255 Helderheid blauw
DMX-bedrijfsmodus 4Ch (4-kanaals-DMX-bedrijf)
DMX-kanaal DMX-waarde Functie
1 000-255 Helderheid rood
2 000-255 Helderheid groen
3 000-255 Helderheid blauw
4 000 Licht uit
001-255 Gehele helderheid
DMX-bedrijfsmodus 6Ch (6-kanaals-DMX-bedrijf)
DMX-kanaal DMX-waarde Functie
1 000-255 Helderheid rood (uitsluitend bij kanaal 4 > DMX = 0-7)
2 000-255 Helderheid groen (uitsluitend bij kanaal 4 > DMX = 0-7)
3 000-255 Helderheid blauw (uitsluitend bij kanaal 4 > DMX = 0-7)
4 000-007 RGB-bedrijf / helderheidsinstelling met kanaal 1-3
008-135 Automatisch lichtprogramma (zoals bij 2ch-bedrijf)
136-255 Sound-to-light-besturing (zoals bij 2ch-bedrijf)
5 000-015 geen strobe-eect
016-255 Strobe-eect langzaam > snel
6 000-255 Programmasnelheid of sound-to-light-gevoeligheid
(zoals bij 2ch-bedrijf)
Bij RGB-bedrijf (DMX-kanaal 4 op 000-007 ingesteld) zijn alleen kanalen 1, 2, 3 en 4 actief.
Bij automatisch bedrijf (DMX-kanaal 4 op 008-135 ingesteld) is kanaal 5 actief voor de regeling
van het strobe-eect en kanaal 6 voor de regeling van de programmasnelheid.
Bij sound-to-light bedrijf (DMX-kanaal 4 op 136-255 ingesteld) is kanaal 5 actief voor de regeling
van het strobe-eect en kanaal 6 voor de regeling van de sound-to-light-gevoeligheid.
Page 75

75
DMX-bedrijfsmodus 7Ch (7-kanaals-DMX-bedrijf)
DMX-kanaal DMX-waarde Functie
1 000-255 Helderheid rood (uitsluitend bij kanaal 4 > DMX = 0-7)
2 000-255 Helderheid groen (uitsluitend bij kanaal 4 > DMX = 0-7)
3 000-255 Helderheid blauw (uitsluitend bij kanaal 4 > DMX = 0-7)
4 000-007 RGB-bedrijf / helderheidsinstelling met kanaal 1-3
008-135 Automatisch lichtprogramma (zoals bij 2ch-bedrijf)
136-255 Sound-to-light-besturing (zoals bij 2ch-bedrijf)
5 000-015 geen strobe-eect
016-255 Strobe-eect langzaam > snel
6 000-255 Programmasnelheid of sound-to-light-gevoeligheid
(zoals bij 2ch-bedrijf)
7 000 Licht uit (uitsluitend bij kanaal > DMX = 0-7)
001-255 Totale helderheid (uitsluitend bij kanaal > DMX = 0-7)
Bij RGB-bedrijf (DMX-kanaal 4 op 000-007 ingesteld) zijn alleen kanalen 1, 2, 3, 4 en 7 actief.
Bij automatisch bedrijf (DMX-kanaal 4 op 008-135 ingesteld) is kanaal 5 actief voor de regeling
van het strobe-eect en kanaal 6 voor de regeling van de programmasnelheid.
Bij sound-to-light bedrijf (DMX-kanaal 4 op 136-255 ingesteld) is kanaal 5 actief voor de regeling
van het strobe-eect en kanaal 6 voor de regeling van de sound-to-light-gevoeligheid.
Page 76

76
DMX-bedrijfsmodus 14Ch (14-kanaals-DMX-bedrijf)
In deze bedrijfsmodus werkt de LED-bar bij RGB-bedrijf en is in 4 segmenten onderverdeeld, waarvan de
helderheid via kanalen 1-12 wordt geregeld.
DMX-kanaal DMX-waarde Functie
1 000-255 Segment 1 - helderheid rood
2 000-255 Segment 1 - helderheid groen
3 000-255 Segment 1 - helderheid blauw
4 000-255 Segment 2 - helderheid rood
5 000-255 Segment 2 - helderheid groen
6 000-255 Segment 2 - helderheid blauw
7 000-255 Segment 3 - helderheid rood
8 000-255 Segment 3 - helderheid groen
9 000-255 Segment 3 - helderheid blauw
10 000-255 Segment 4 - helderheid rood
11 000-255 Segment 4 - helderheid groen
12 000-255 Segment 4 - helderheid blauw
13 000-015 geen strobe-eect
016-255 Strobe-eect langzaam > snel
14 000 Licht uit
001-255 Gehele helderheid
c) Slave-bedrijf
• Druk indien nodig op de toets MENU (7) tot het scherm zich in het hoofdmenu bevindt.
• Druk op de toets UP (8) of DOWN (9) tot SLnd wordt weergegeven.
• Druk om de keuze te bevestigen op de toets ENTER (10).
• Druk nogmaals op de toets ENTER (10) om naar de keuze van de slave-bedrijfsmodus te gaan.
• De slave-bedrijfsmodus (SLxx) wordt weergegeven (xx definieert de slave-bedrijfsmodus).
• Stel de slave-bedrijfsmodus met de toetsen UP (8) of DOWN (9) in. Er zijn 4 verschillende slave-modi
beschikbaar.
SL01 = het slave-apparaat reageert precies als het master-apparaat
SL02 = het slave-apparaat reageert met een vertraging van een programmastap t.o.v. het master-ap
-
paraat
SL03 = het slave-apparaat reageert met een vertraging van twee programmastappen t.o.v. het master-
apparaat
SL04 = het slave-apparaat reageert met een vertraging van drie programmastappen t.o.v. het master-
apparaat
• Druk om de keuze te bevestigen op de toets ENTER (10).
• Druk op de toets MENU (7) tot het scherm zich in het hoofdmenu bevindt.
Page 77

77
In een master-slave-ketting mag slechts één apparaat als master-apparaat worden gedefinieerd,
alle andere apparaten moeten als slave-apparaten worden gedefinieerd.
Door de mogelijkheid om de slave-apparaten vertraagd te laten aanspreken, kunnen tot 4 ap
paraten met een nieuw lichteect worden samengesloten (vb. een looplamp die over alle 4 de
LED-bars loopt).
d) Sound-to-light modus
• Druk indien nodig op de toets MENU (7) tot het scherm zich in het hoofdmenu bevindt.
• Druk op de toets UP (8) of DOWN (9) tot SOUn wordt weergegeven.
• Druk om de keuze te bevestigen op de toets ENTER (10).
• Druk nogmaals op de toets ENTER (10) om naar de keuze van het sound-to-light-programma te gaan.
• Het sound-to-light-programma (S-xx) wordt weergegeven (xx definieert het sound-to-light-programma).
• Stel het gewenste sound-to-light-programma met de toetsen UP (8) of DOWN (9) in. Er zijn 12 verschil
-
lende programma‘s beschikbaar.
• Druk om de keuze te bevestigen op de toets ENTER (10).
• Druk op de toets MENU (7) tot het scherm zich in het hoofdmenu bevindt.
e) Automatische modus
• Druk indien nodig op de toets MENU (7) tot het scherm zich in het hoofdmenu bevindt.
• Druk op de toets UP (8) of DOWN (9) tot AUtO wordt weergegeven.
• Druk om de keuze te bevestigen op de toets ENTER (10).
• Druk nogmaals op de toets ENTER (10) om naar de keuze van het automatisch programma te gaan.
• Het automatisch programma (PRxx) wordt weergegeven (x definieert het automatisch programma).
• Stel het gewenste automatisch programma met de toets UP (8) of DOWN (9) in. Er zijn 25 verschillende
programma‘s beschikbaar.
• Druk om de keuze te bevestigen op de toets ENTER (10).
• Druk op de toets MENU (7) tot het scherm zich in het hoofdmenu bevindt.
Page 78

78
f) Parameterinstelling voor automatisch- en sound-to-lightgebruik
• Druk indien nodig op de toets MENU (7) tot het scherm zich in het hoofdmenu bevindt.
• Druk op de toets UP (8) of DOWN (9) tot SPEE wordt weergegeven.
• Druk om de keuze te bevestigen op de toets ENTER (10).
• Druk nogmaals op de toets ENTER (10) om naar de snelheids- of gevoeligheidsinstelling te gaan.
• De instelling (Sxxx) wordt weergegeven (xxx definieert de programmasnelheid voor de automatische
modus of gevoeligheidsinstelling voor het sound-to-light-bedrijf).
• Stel de gewenste waarde met de toets UP (8) of DOWN (9) in.
• Druk om de keuze te bevestigen op de toets ENTER (10).
• Druk op de toets MENU (7) tot het scherm zich in het hoofdmenu bevindt.
g) Blackout (stand-by)
• Druk indien nodig op de toets MENU (7) tot het scherm zich in het hoofdmenu bevindt.
• Druk op de toets UP (8) of DOWN (9) tot bLnd wordt weergegeven.
• Druk om de keuze te bevestigen op de toets ENTER (10).
• Druk nogmaals op de toets ENTER (10) om no of yes te kiezen.
• Stel de gewenste bedrijfsmodus met de toetsen UP (8) of DOWN (9) in.
no = normaal bedrijf (licht is ingeschakeld)
yes = stand-by (licht is uitgeschakeld)
• Druk om de keuze te bevestigen op de toets ENTER (10).
• Druk op de toets MENU (7) tot het scherm zich in het hoofdmenu bevindt.
h) Schermafstelling instellen
• Druk indien nodig op de toets MENU (7) tot het scherm zich in het hoofdmenu bevindt.
• Druk op de toets UP (8) of DOWN (9) tot dISP wordt weergegeven.
• Druk om de keuze te bevestigen op de toets ENTER (10).
• Druk nogmaals op de toets ENTER (10) om no of yes te kiezen.
• Stel de gewenste schermafstelling met de toetsen UP (8) of DOWN (9) in.
no = normaal bedrijf
yes = schermweergave 180° gedraaid
• Druk om de keuze te bevestigen op de toets ENTER (10).
• Druk op de toets MENU (7) tot het scherm zich in het hoofdmenu bevindt.
Page 79
79
i) Gebruik met vaste kleurinstelling (RGB-bedrijf)
• Druk indien nodig op de toets MENU (7) tot het scherm zich in het hoofdmenu bevindt.
• Druk op de toets UP (8) of DOWN (9) tot rEd wordt weergegeven.
• Druk om de keuze te bevestigen op de toets ENTER (10).
• Druk nogmaals op de toets ENTER (10) om naar de keuze van de helderheid voor rood te gaan.
• De helderheidswaarde voor rood (rxxx) wordt weergegeven (xxx definieert de helderheidswaarde).
• Stel de gewenste helderheidswaarde met de toets UP (8) of DOWN (9) in.
• Druk om de keuze te bevestigen op de toets ENTER (10).
• Druk op de toets MENU (7) tot het scherm zich in het hoofdmenu bevindt.
• Ga met de instelling van de helderheidswaarden voor groen (GrEE) en blauw (bLUE) tewerk zoals hierbo
-
ven beschreven.
Naargelang de ingestelde afzonderlijke kleurintensiteiten kunnen de verschillende mengkleuren
worden gecreëerd.
12. Gebruik
• Steek de netstekker nooit direct in een contactdoos als het toestel van een koude in een warme ruimte
is gebracht. Het condenswater dat wordt gevormd, kan onder bepaalde omstandigheden het toestel
beschadigen. Laat het toestel eerst op kamertemperatuur komen, voordat u de stekker in de contactdoos
steekt. Wacht tot al het condenswater is verdampt.
• Trek nooit aan het netsnoer om de stekker uit de contactdoos te verwijderen, pak altijd de netstekker
beet bij de daarvoor bestemde greepvlakken om deze uit de contactdoos te verwijderen.
• Neem de netstekker uit het stopcontact als u deze niet gebruikt.
• Neem bij onweer de netstekker altijd uit de contactdoos.
• Bedek de lichtuitlaat in geen enkel geval met filterfolies, schermen of andere materialen. Dit kan leiden
tot hitteschade en brandgevaar.
• Het toestel kan tijdens het gebruik verhitten. Raak de behuizing tijdens het gebruik niet aan. Laat het
lichteect na gebruik eerst afkoelen, voor u de behuizing aanraakt of reinigt.
• Om voldoende ventilatie te garanderen, mag het toestel nooit worden afgedekt. Bovendien mag de lucht
circulatie niet worden gehinderd door voorwerpen als tijdschriften, tafelkleden, gordijnen, etc. Houd
tijdens het gebruik een gebied van minimaal 0,5 m rond het toestel vrij.
Page 80

80
13. Onderhoud
Controleer regelmatig de technische veiligheid van de eectstraler, b.v. op beschadiging van de netleiding
en de behuizing.
Wanneer kan worden aangenomen dat een veilig gebruik niet meer mogelijk is, mag het apparaat niet
meer worden gebruikt en moet het worden beveiligd tegen onbedoeld gebruik. Neem de stekker uit de
contactdoos!
U mag ervan uitgaan dat een veilig gebruik niet meer mogelijk is indien:
• het toestel zichtbaar is beschadigd
• het toestel niet meer functioneert
• het toestel gedurende langere tijd onder ongunstige omstandigheden is opgeslagen of
• het toestel tijdens transport te zwaar is belast
Vóórdat u de eectstraler schoonmaakt of onderhoudt, moeten de volgende veiligheidsvoorschriften bes
-
list in acht worden genomen:
Bij het openen van deksels en/of het verwijderen van onderdelen van het toestel kunnen span-
ningvoerende delen vrij komen te liggen.
Daarom moet het toestel voor onderhoud of reparatie worden losgekoppeld van alle spannings
-
bronnen.
Condensatoren in het toestel kunnen nog geladen zijn, zelfs als ze van alle spanningsbronnen
zijn losgekoppeld.
Een reparatie mag uitsluitend plaatsvinden door een technicus die vertrouwd is met de risico‘s
resp. de van toepassing zijnde voorschriften.
Reiniging
De buitenkant van het lichteect mag alleen met een zachte, droge doek of borstel worden gereinigd.
Gebruik in geen geval agressieve schoonmaakmiddelen of chemische oplossingen, omdat deze het op-
pervlak van de behuizing kunnen beschadigen.
14. Verhelpen van storingen
U heeft met de Renkforce LED-bar een product aangeschaft dat volgens de nieuwste stand der techniek
is ontwikkeld en veilig is in het gebruik. Toch kunnen zich problemen of storingen voordoen. Daarom wordt
hieronder beschreven hoe eventuele storingen kunnen worden verholpen:
Neem altijd de veiligheidsinstructies in acht!
Geen functie nadat het apparaat met de stroomtoevoer verbonden werd:
• De netstekker zit niet goed in de contactdoos.
• Het netsnoer zit niet goed in de netaansluiting IN (1) van het apparaat.
• De contactdoos wordt niet van stroom voorzien.
Page 81

81
Er volgt geen reactie op DMX-bevelen (bij DMX- en master-slabe-bedrijf):
• De blackout-modus is actief.
• Het DMX-adres is verkeerd ingesteld.
• De verbinding tussen DMX-lichtstuurapparaat en lichteect is onderbroken.
• De DMX-leiding is te lang of wordt gestoord. Gebruik een speciale DMX-hoogfrequentieleiding. Probeer
om de DMX-leiding van stoorbronnen verder weg te leggen.
• De polariteit van de DMX-aansluitingen aan de DMX-controller en de LED-bar verschillen.
• Probeer indien mogelijk een andere DMX-controller.
De muziekbesturing werkt niet:
• De muziekbesturing is niet geactiveerd.
• Bij sound-to-light-bedrijf mogen geen DMX-signalen aan de aansluiting DMX IN (2) aangesloten zijn.
• De muziekweergave is te stil ingesteld. Probeer als test een hoger volume in te stellen of de gevoeligheid
van de muziekbesturing te verhogen.
• Test de werking van de microfoon (5) door met de vinger licht op de microfoon (5) te tikken. Bij elke impuls
moet de sound-to-light-besturing reageren.
15. Verwijderen
Elektronische apparaten zijn recycleerbare stoen en horen niet bij het huisvuil!
Na afloop van de economisch nuttige levensduur moet het product in overeenstemming met de
van kracht zijnde wettelijke bepalingen voor afvalverwerking worden verwijderd.
16. Technische gegevens
Bedrijfsspanning ................................................ 100-240 V/50/60 Hz
Vermogensopname ............................................ 30 W
Belastbaarheid netuitgang ............................... 7 A
Bedrijfsmodi ........................................................ DMX / Auto / Master/Slave
LED‘s..................................................................... 252 LEDs
DMX-protocol ..................................................... DMX 512
DMX-kanalen ...................................................... 2 / 3 / 4 / 6 / 7 / 14 (naargelang de DMX-bedrijfsmodus)
Afmetingen .......................................................... 1020 x 65 x 65 mm (zonder montagemateriaal)
Gewicht................................................................ 1,7 kg
Bedrijfs- en opslagvoorwaarden
..................... -20 tot +50 °C / 10-90 % rel. luchtvochtigheid
Page 82
Impressum
Dies ist eine Publikation der Conrad Electronic SE, Klaus-Conrad-Str. 1, D-92240 Hirschau (www.conrad.com).
Alle Rechte einschließlich Übersetzung vorbehalten. Reproduktionen jeder Art, z. B. Fotokopie, Mikroverfilmung, oder
die Erfassung in elektronischen Datenverarbeitungsanlagen, bedürfen der schriftlichen Genehmigung des Herausgebers. Nachdruck, auch auszugsweise, verboten. Die Publikation entspricht dem technischen Stand bei Drucklegung.
© Copyright 2014 by Conrad Electronic SE.
Legal notice
This is a publication by Conrad Electronic SE, Klaus-Conrad-Str. 1, D-92240 Hirschau (www.conrad.com).
All rights including translation reserved. Reproduction by any method, e.g. photocopy, microfilming, or the capture in
electronic data processing systems require the prior written approval by the editor. Reprinting, also in part, is prohibited. This publication represent the technical status at the time of printing.
© Copyright 2014 by Conrad Electronic SE.
Information légales
Ceci est une publication de Conrad Electronic SE, Klaus-Conrad-Str. 1, D-92240 Hirschau (www.conrad.com).
Tous droits réservés, y compris de traduction. Toute reproduction, quelle qu‘elle soit (p. ex. photocopie, microfilm,
saisie dans des installations de traitement de données) nécessite une autorisation écrite de l‘éditeur. Il est interdit
de le réimprimer, même par extraits. Cette publication correspond au niveau technique du moment de la mise sous
presse.
© Copyright 2014 par Conrad Electronic SE.
Colofon
Dit is een publicatie van Conrad Electronic SE, Klaus-Conrad-Str. 1, D-92240 Hirschau (www.conrad.com).
Alle rechten, vertaling inbegrepen, voorbehouden. Reproducties van welke aard dan ook, bijvoorbeeld fotokopie,
microverfilming of de registratie in elektronische gegevensverwerkingsapparatuur, vereisen de schriftelijke toestemming van de uitgever. Nadruk, ook van uittreksels, verboden. De publicatie voldoet aan de technische stand bij het in
druk bezorgen.
© Copyright 2014 by Conrad Electronic SE. V2_1214_02
 Loading...