


Bedienungsanleitung
BT-RSD1802K SD-Tuner
Best.-Nr. 374225 Seite 2 - 34
Operating Instructions
BT-RSD1802K SD-Tuner
Item No. 374225 Page 35 - 67
Notice d´emploi
BT-RSD1802K Syntoniseur SD
N° de commande 374225 Page 68 - 100
Gebruiksaanwijzing
BT-RSD1802K SD-Tuner
Bestelnr. 374225 Pagina 101 - 133

2
Inhaltsverzeichnis
Seite
1. Einführung ............................................................................................................................................................3
2. Bestimmungsgemäße Verwendung ................................................................................................................
3. Symbolerklärung .................................................................................................................................................4
4. Sicherheitshinweise ...........................................................................................................................................5
5. Bedienelemente ..................................................................................................................................................6
6. Produktbeschreibung .........................................................................................................................................8
7. Mechanischer Einbau ........................................................................................................................................
a) Einbau in den Radioschacht ......................................................................................................................
b) Ausbau ..........................................................................................................................................................11
c) Freisprechmikrofon .....................................................................................................................................11
8. Elektrischer Anschluss .....................................................................................................................................
a) Anschluss der Antenne ..............................................................................................................................
b) Anschluss der LINE-Ausgänge .................................................................................................................
c) Anschluss AUX IN .......................................................................................................................................
d) Anschluss des Freisprechmikrofons ........................................................................................................
e) Anschluss der Lautsprecher und der Stromversorgung ......................................................................
f) Einlegen / Wechsel der Fernbedienungsbatterie
9. Bedienung ...........................................................................................................................................................16
a) Allgemeine Bedienung ...............................................................................................................................
b) Menü-Einstellungen ....................................................................................................................................18
c) Radiobetrieb .................................................................................................................................................21
d) USB-/Speicherkartenbetrieb .....................................................................................................................24
e) Funktionen der Fernbedienung .................................................................................................................
f) Bluetooth®-Betrieb ......................................................................................................................................28
10. Wartung ...............................................................................................................................................................30
a) Sicherungswechsel ....................................................................................................................................30
b) Reinigung ......................................................................................................................................................30
11. Handhabung........................................................................................................................................................31
12. Behebung von Störungen .................................................................................................................................
13. Technische Daten ..............................................................................................................................................
14. Entsorgung ..........................................................................................................................................................34
15. Konformitätserklärung ......................................................................................................................................34
...................................................................................15
4
9
10
12
12
13
13
13
13
16
27
31
33

1. Einführung
Sehr geehrte Kundin, sehr geehrter Kunde,
wir bedanken uns für den Kauf dieses Produkts.
Dieses Produkt erfüllt die gesetzlichen nationalen und europäischen Anforderungen. Um diesen Zustand
zu erhalten und einen gefahrlosen Betrieb sicherzustellen, müssen Sie als Anwender diese Bedienungs
anleitung beachten!
Diese Bedienungsanleitung gehört zu diesem Produkt. Sie enthält wichtige Hinweise zur Inbe-
triebnahme und Handhabung. Achten Sie hierauf, auch wenn Sie dieses Produkt an Dritte weitergeben. Heben Sie deshalb diese Bedienungsanleitung zum Nachlesen auf!
Bei technischen Fragen wenden Sie sich bitte an:
Deutschland: www.conrad.de/kontakt
Österreich: www.conrad.at
www.business.conrad.at
Schweiz: www.conrad.ch
www.biz-conrad.ch
-
3

4
2. Bestimmungsgemäße Verwendung
Der Renkforce BT-RSD1802K SD-Tuner dient dazu, Radiosender in Fahrzeugen zu empfangen, Audiodaten
von passenden Speichermedien wiederzugeben und die so gewonnenen Audiosignale zu verstärken. Außerdem dient er als Freisprecheinrichtung für Bluetooth®-fahige Mobiltelefone.
Das Gerät muss zur Wiedergabe an Lautsprecher angeschlossen werden.
Dieses Produkt ist nur für den Anschluss an ein 12 V-Gleichspannungsbordnetz mit negativem Pol der Fahr-
zeugbatterie an Karosserie zugelassen. Das Gerät darf nur in Fahrzeugen mit dieser Bordspannungsart
eingebaut und in Betrieb genommen werden.
Durch die Art des Einbaus ist vom Benutzer sicherzustellen, dass das Gerät vor Feuchtigkeit und Nässe
geschützt wird.
Eine andere Verwendung als zuvor beschrieben, führt zur Beschädigung dieses Produktes, darüber hinaus
ist dies mit Gefahren, wie z.B. Kurzschluss, Brand, elektrischer Schlag etc. verbunden.
Das gesamte Produkt darf nicht geändert, bzw. umgebaut und das Gehäuse nicht geönet werden.
Beachten Sie alle Sicherheitshinweise dieser Bedienungsanleitung!
3. Symbolerklärung
Das Symbol mit dem Ausrufezeichen weist den Benutzer darauf hin, dass er vor der Inbetrieb-
nahme des Gerätes diese Bedienungsanleitung lesen und beim Betrieb beachten muss.
Das Symbol mit dem Pfeil steht für spezielle Tipps und Bedienhinweise.

4. Sicherheitshinweise
Bei Schäden, die durch Nichtbeachten dieser Bedienungsanleitung verursacht werden, er-
lischt die Gewährleistung/Garantie. Für Folgeschäden übernehmen wir keine Haftung.
Bei Sach- oder Personenschäden, die durch unsachgemäße Handhabung oder Nichtbeachten
der Sicherheitshinweise verursacht werden, übernehmen wir keine Haftung. In solchen Fällen
erlischt die Gewährleistung/Garantie.
Sehr geehrte Kundin, sehr geehrter Kunde: Die folgenden Sicherheits- und Gefahrenhinweise
dienen nicht nur zum Schutz des Gerätes, sondern auch zum Schutz Ihrer Gesundheit. Lesen Sie
sich bitte die folgenden Punkte aufmerksam durch:
• Aus Sicherheitsgründen ist das eigenmächtige Umbauen und/oder Verändern des Produktes
nicht gestattet.
• Als Spannungsquelle darf nur das 12 V-Gleichspannungsbordnetz (negativer Pol der Batterie
an der Karosserie des Fahrzeugs) verwendet werden. Schließen Sie das Gerät nie an eine
andere Spannungsversorgung an.
• Achten Sie auf eine sachgerechte Inbetriebnahme des Gerätes. Beachten Sie hierbei diese
Bedienungsanleitung.
• Das Produkt ist kein Spielzeug, es ist nicht für Kinder geeignet. Kinder können die Gefahren, die
im Umgang mit elektrischen Geräten bestehen, nicht einschätzen.
• Setzen Sie das Gerät keinen hohen Temperaturen, Tropf- oder Spritzwasser, starken Vibrati
onen, sowie hohen mechanischen Beanspruchungen aus.
• Betreiben Sie das Gerät nicht unbeaufsichtigt.
• Lassen Sie Verpackungsmaterial nicht achtlos liegen. Es könnte für Kinder zu einem gefähr
lichen Spielzeug werden.
• Beachten Sie auch die Sicherheitshinweise und Bedienungsanleitungen der übrigen Geräte,
die an das Gerät angeschlossen werden.
• Sollten Sie sich über den korrekten Anschluss nicht im Klaren sein oder sollten sich Fragen
ergeben, die nicht im Laufe der Bedienungsanleitung abgeklärt werden, so setzen Sie sich
bitte mit unserer technischen Auskunft oder einem anderen Fachmann in Verbindung.
-
-
5
6
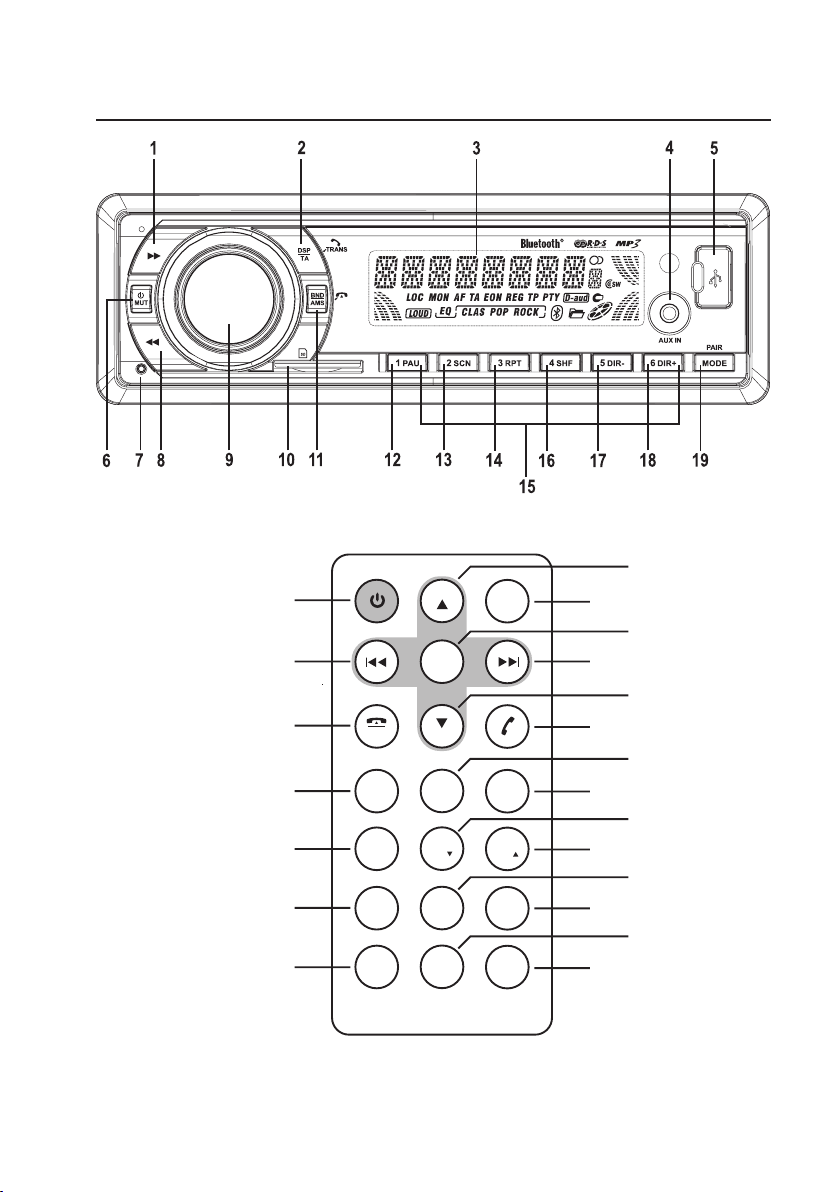
5. Bedienelemente
PWR/MUT
PAIR
MODE
VOL
VOL
LOU
BND
SEL
1
PAU
2
SCN
3
RPT
4
SHF
5
DIR
6
DIR
7
AF
8
EQ
9
PTY
*
0
DISP
#
MON
TA
6
20
12
16
21
28
19
29
25
13
14
17
18
22
26
24
9
1
8
23
27

(1) Taste
(2) Taste DSP / TA /
(3) LC-Display
(4) Anschluss AUX IN
(5) USB-Schnittstelle
(6) Taste
(7) Taste RESET
(8) Taste
(9) Drehregler VOLUME / Taste SELECT
(10) Speicherkartenleser
(11) Taste BND / AMS /
(12) Taste PAU
(13) Taste SCN
(14) Taste RPT
(15) Stationstasten 1-6
(16) Taste SHF
(17) Taste DIR(18) Taste DIR+
(19) Taste MODE / PAIR
(20) Taste
(21) Taste AF / MON / 7
(22) Taste EQ / TA / 8
(23) Taste *
(24) Taste DISP / 0
(25) Taste
(26) Taste PTY / 9
(27) Taste #
(28) Taste VOL+
(29) Taste VOL-
/ MUT
/ BAND / LOU
7

8
6. Produktbeschreibung
Dieses Gerät ist mit folgenden Merkmalen ausgestattet:
• UKW / MW-Radioteil
• USB-Schnittstelle
• MMC- / SD-Kartenlesegerät
• Bluetooth®-Freisprecheinrichtung
• Musikwiedergabe über Bluetooth®-Schnittstelle (A2DP)
• IR-Fernbedienung
• Hohe Ausgangsleistung (4 x 40 W max.)
• Vorverstärkerausgang zum Anschluss eines Leistungsverstärkers
• Front AUX IN zum Anschluss externer Audioquellen
• Elektronische Lautstärke-, Tiefen-, Höhen-, Fader- und Balance-Regelung
• Digitaler Signalprozessor zur Anpassung der Klangcharakteristik an verschiedene Musikrichtungen
• Loudness-Schaltung
• UKW-Tuner mit RDS-Funktion
• Genaues elektronisches Abstimmen der Sender durch PLL-Tuner
• 24 programmierbare Stationsspeicher (18 x UKW, 6 x MW)
• Manueller / Automatischer Sendersuchlauf in beide Suchrichtungen
• Automatische Senderspeicherung
• Alphanumerisches DOT-Matrix-Display
• ID3-Tag-Anzeige bei MP3-Wiedergabe
• Uhrzeiteinstellung über RDS-System
• ISO-Anschlussterminal

7. Mechanischer Einbau
In den meisten Kfz ist vom Hersteller ein Einbauplatz für das Autoradio vorgesehen. Die Wahl des Einbauplatzes erfolgte aus sicherheitstechnischen Gesichtspunkten. Es ist deshalb anzuraten, das Autoradio in
diesen vorgesehenen Bereich einzubauen.
Das Gerät benötigt einen DIN-Einbauausschnitt mit den Abmessungen 182 x 53 mm, diese Einbaumaße sind
genormt und werden üblicherweise von allen Kfz-Herstellern eingehalten.
Sollte kein Einbauausschnitt vorgesehen sein, so informieren Sie sich bitte bei Ihrem Autohändler über den
korrekten Einbauort für das Autoradio.
Wählen Sie den Einbauort sorgfältig aus, damit das Gerät nicht die normale Fahrtätigkeit des
Fahrers beeinflusst oder ihn vom Verkehrsgeschehen ablenkt.
Verwenden Sie nur das mitgelieferte Montagematerial, um eine sichere Installation zu garan
tieren.
Änderungen am Fahrzeug, die durch den Einbau des SD-Tuners oder anderer Komponenten
nötig sind, müssen immer so ausgeführt werden, dass dadurch keine Beeinträchtigung der
Verkehrssicherheit oder der konstruktiven Stabilität des Kfz entstehen. Bei vielen Kfz erlischt
bereits durch das Aussägen eines Blechteils die Betriebserlaubnis.
Da das Gerät im Betrieb Wärme erzeugt, muss der Einbauort hitzeunempfindlich sein.
Vergewissern Sie sich vor der Ausführung von Befestigungsbohrungen, dass hierdurch keine
elektrischen Kabel, Bremsleitungen, der Kraftstotank o.ä. beschädigt werden.
Beachten Sie bei der Verwendung von Werkzeugen zum Einbau Ihrer Auto-HiFi-Komponenten
die Sicherheitshinweise der Werkzeughersteller.
Berücksichtigen Sie beim Einbau Ihrer HiFi-Anlage die Unfallgefahr, die von losgerissenen Ge
räten im Falle eines Unfalls ausgehen kann. Befestigen Sie deshalb jedes Teil sicher und an
einem Platz an dem es nicht zu einer Gefahr für die Insassen werden kann.
Überprüfen Sie vor dem Einbau des Gerätes die Tiefe des vorgesehenen Einbauraumes.
-
-
9
10
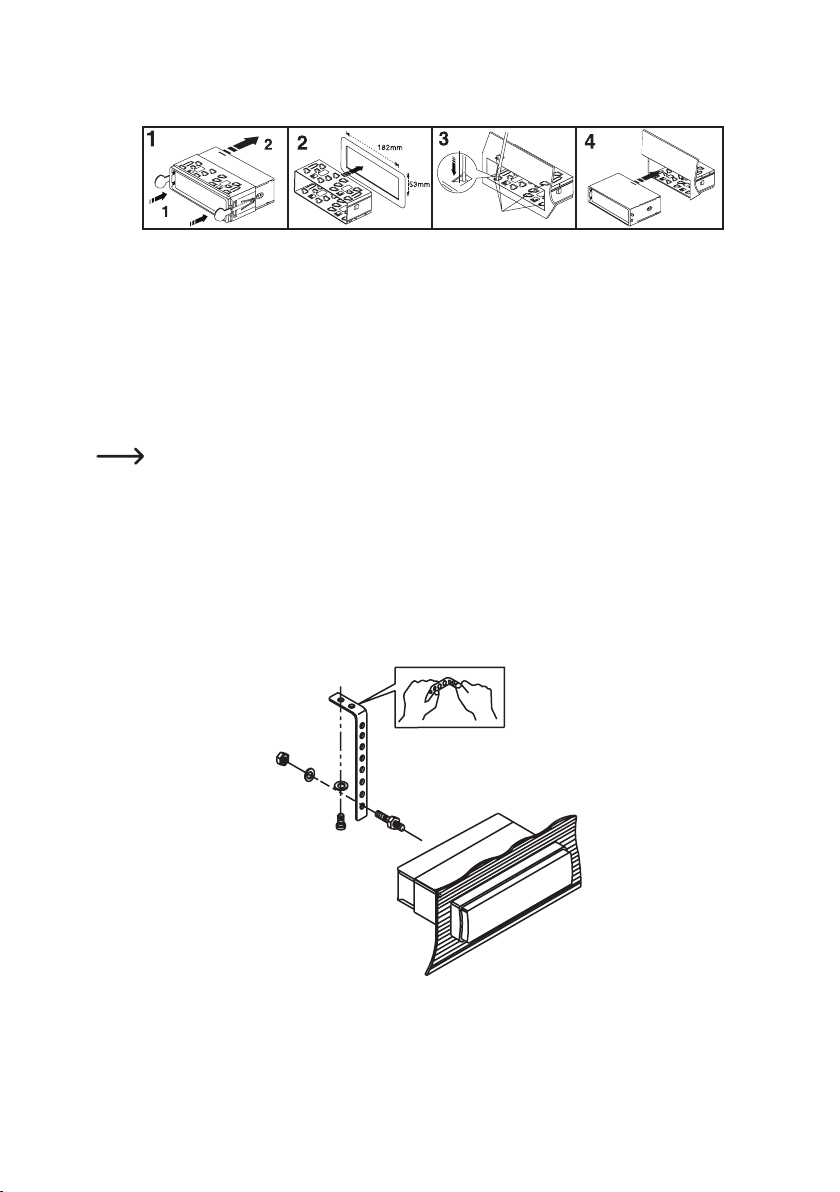
a) Einbau in den Radioschacht
• Entriegeln Sie den Einbaurahmen mit den beiden Entriegelungsschlüsseln (Bild1, Punkt1).
• Ziehen Sie den Einbaurahmen nach hinten vom Gerät ab (Bild1, Punkt2).
• Schieben Sie den Einbaurahmen in den Einbauausschnitt des Fahrzeugs (Bild2).
• Biegen Sie einige der Haltelaschen am Einbaurahmen um, bis der Rahmen sicher in der Einbauönung
fixiert ist (Bild3).
• Nachdem Sie alle elektrischen Verbindungen hergestellt haben (siehe „Elektrischer Anschluss“) schie
ben Sie das Gerät in den Einbaurahmen, bis es sicher einrastet (Bild4).
Bewahren Sie die beiden Entriegelungsschlüssel gut auf. Sie benötigen sie für eine spätere De-
montage des Gerätes.
-
• Sichern Sie das Gerät zusätzlich gegen Erschütterungen mit dem Schraubzapfen an der Geräterücksei
te.
• Bei den meisten Fahrzeugen ist solch eine Sicherung bereits vorgesehen. Falls dies bei Ihrem Fahrzeug
nicht der Fall sein sollte, befestigen Sie das Gerät bitte mit dem beiliegenden Lochblechstreifen.
Gehen Sie bei der Befestigung wie im folgenden Bild gezeigt vor:
-
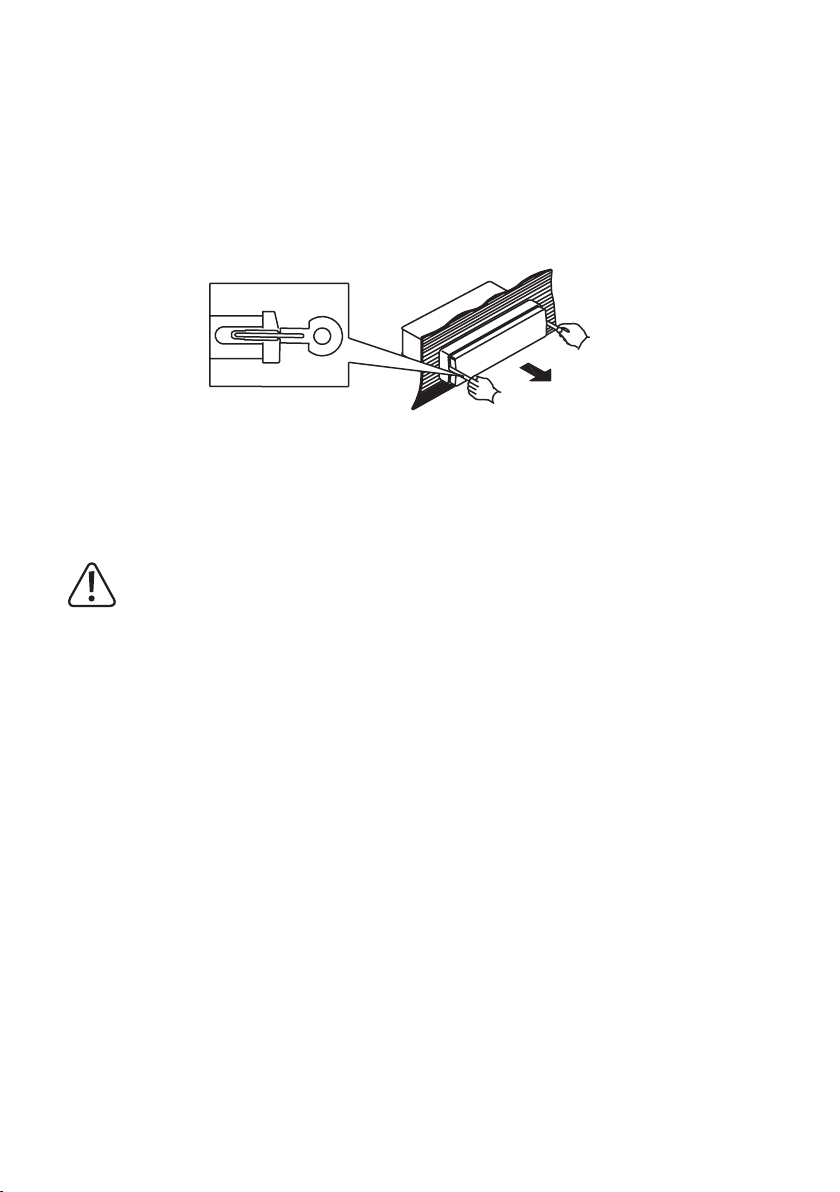
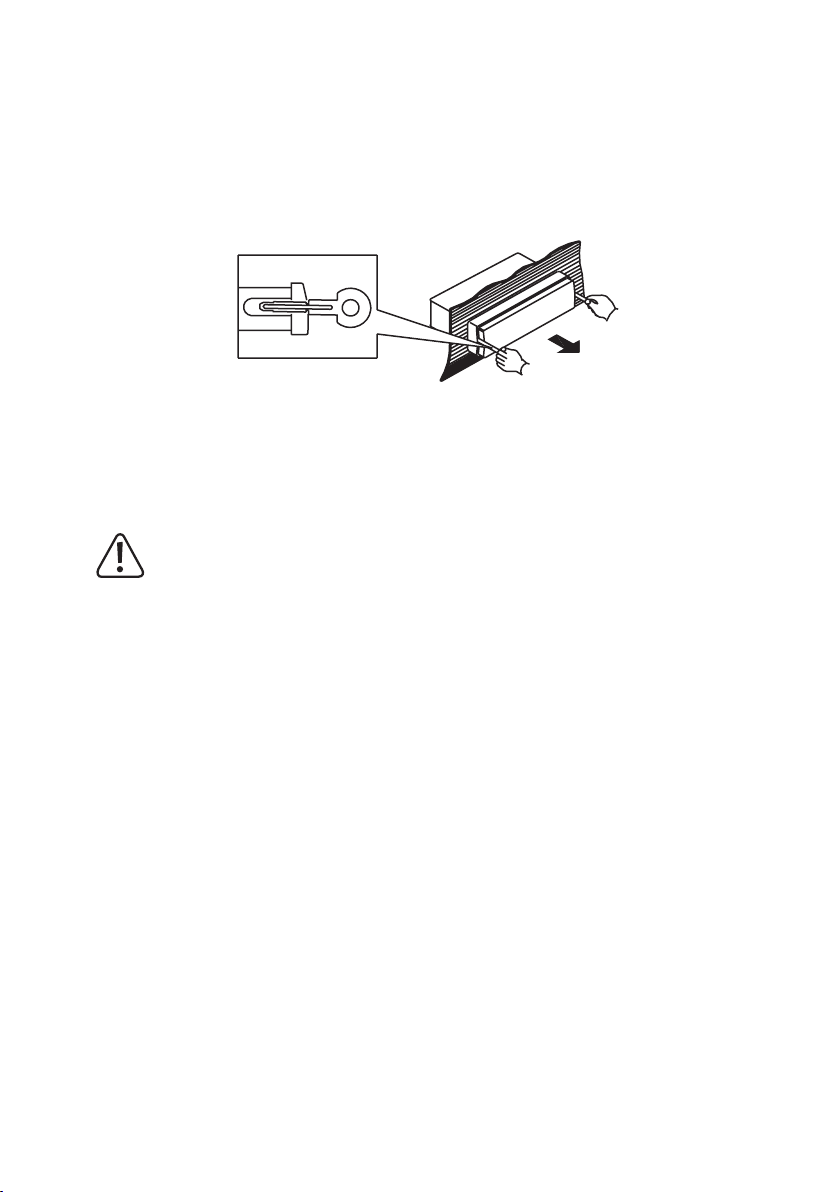
b) Ausbau
• Stecken Sie die beiden Entriegelungsschlüssel in die seitlichen Schlitze im Einbaurahmen, bis das Gerät
entriegelt ist.
• Lösen Sie, falls erforderlich die Befestigungsschraube an der Geräterückseite.
• Ziehen Sie das Autoradio an den Entriegelungsschlüsseln vorsichtig aus dem Einbaurahmen.
• Lösen Sie alle Steckverbindungen an der Geräterückseite.
c) Freisprechmikrofon
Das Mikrofon für die Freisprecheinrichtung kann an der Sonnenblende, der Lenksäulenverkleidung oder an
einer anderen geeigneten Stelle im Fahrzeuginnenraum befestigt werden.
Das Mikrofon und die Anschlussleitung darf sich keinesfalls im Auslösebereich eines Airbags
befinden.
• Befestigen Sie das Freisprechmikrofon mit der Klemme an einer geeigneten Stelle.
• Verlegen Sie die Anschlussleitung bis zum Radioeinbauschacht.
11
12
8. Elektrischer Anschluss
Der elektrische Anschluss sollte nur von einer Fachkraft durchgeführt werden.
Um Kurzschlüsse und daraus resultierende Beschädigungen des Gerätes zu vermeiden, muss
während des Anschlusses der Minuspol (Masse) der Fahrzeugbatterie abgeklemmt werden.
Schließen Sie den Minuspol der Batterie erst wieder an, wenn Sie das Gerät vollständig ange
schlossen und den Anschluss überprüft haben.
Benutzen Sie zum Überprüfen der Spannung an Bordspannungsleitungen nur ein Voltmeter oder
eine Diodenprüflampe, da normale Prüflampen zu hohe Ströme aufnehmen und so die Bordelek
tronik beschädigen können.
Achten Sie bei der Verlegung von Leitungen darauf, dass diese nicht gequetscht werden oder
an scharfen Kanten scheuern, benutzen Sie bei Durchführungspunkten Gummitüllen.
Die Verdrahtung zu den Lautsprechern muss jeweils zweiadrig ausgeführt werden. Isolieren
Sie oene Verbindungsstellen. Achten Sie darauf, dass keine der Leitungen durch scharfe Kanten beschädigt werden kann.
Verwenden Sie nur Lautsprecher mit einer ausreichenden Belastbarkeit (siehe „Technische
Daten“).
Achten Sie darauf, dass alle Lautsprecher richtig gepolt sind - also die Plus- und Minuskenn
zeichen übereinstimmen.
Die Anschlusskabel der Lautsprecher sind im Normalfall codiert: Einige Lautsprecherhersteller
markieren die (+)-Leitung mit einem zusätzlichen Farbstreifen, andere wiederum verwenden
eine gerielte Leitung für den (+)-Pol, für den (-)-Pol hingegen eine glatte Leitung.
Das Gerät wurde für den Betrieb an Lautsprecherimpedanzen von mindestens 4 Ohm entwi
ckelt. Schließen Sie auf keinen Fall Lautsprecher mit einer geringeren Impedanz an.
Bei den meisten Fahrzeugen sind die Leitungen für den elektrischen Anschluss und den An-
schluss der Lautsprecher bereits bis zum vorgesehenen Einbauschacht geführt.
Sollte dies nicht der Fall sein muss darauf geachtet werden, dass die nachträglich eingebauten
Leitungen über die entsprechend vorgesehenen Bordsicherungen (siehe Bedienhandbuch des
Fahrzeugs) abgesichert sind.
-
-
-
-
a) Anschluss der Antenne
• Verbinden Sie den Antennenstecker Ihres Fahrzeugs mit der Antennenbuchse hinten am Gerät (Buchse
neben den Cinch-Anschlüssen).
• Sollte Ihr Fahrzeug mit einem anderen Antennenstecker ausgerüstet sein, verwenden Sie bitte einen
passenden Adapter, der im Fachhandel erhältlich ist.

b) Anschluss der LINE-Ausgänge
Der SD-Tuner verfügt über LINE-Ausgänge für den Anschluss eines Leistungsverstärkers.
Benutzen Sie zum Anschluss der Cinchbuchsen nur hierfür geeignete abgeschirmte Cinchlei-
tungen. Bei Verwendung anderer Kabel können Störungen auftreten.
Halten Sie die Länge der Anschlussleitungen möglichst kurz.
Verlegen Sie die Leitungen nicht in der Nähe anderer Kabel. Sie vermeiden so störende Ein
Um Verzerrungen oder Fehlanpassungen zu vermeiden, die zur Beschädigung des Gerätes
Verbinden Sie die Cinchbuchsen an der Geräterückseite mit den Eingängen des Leistungsverstärkers.
Die weiße Buchse ist der Anschluss für den linken Kanal
streuungen in die Leitungen.
führen können, dürfen an die Cinchanschlüsse nur Geräte mit ebensolchen Cinchanschlüssen
angeschlossen werden. Beachten Sie hierzu auch die Anschlusswerte in den „Technischen
Daten“.
Die rote Buchse ist der Anschluss für den rechten Kanal
c) Anschluss AUX IN
An den Anschluss AUX IN (4) kann ein externes Audiogerät (z.B. tragbarer MP3-Player) angeschlossen
werden, dessen Signal über die Fahrzeuglautsprecher wiedergegeben wird.
Verbinden Sie den Anschluss AUX IN (4) mit dem Audioausgang des externen Gerätes.
d) Anschluss des Freisprechmikrofons
Verbinden Sie den Stecker des Freisprechmikrofons mit der Kupplung der schwarzen Anschlussleitung
hinten am Gerät.
-
e) Anschluss der Lautsprecher und der Stromversorgung
Fahrzeuge, die mit einem ISO-Systemstecker ausgerüstet sind, können bei gleicher Steckerbelegung (bitte
vorher überprüfen!) direkt mit dem ISO Anschlussterminal verbunden werden. Bei abweichender Steckerbelegung erfolgt der Anschluss über einen fahrzeugspezifischen Adapter, den Sie im Handel erhalten.
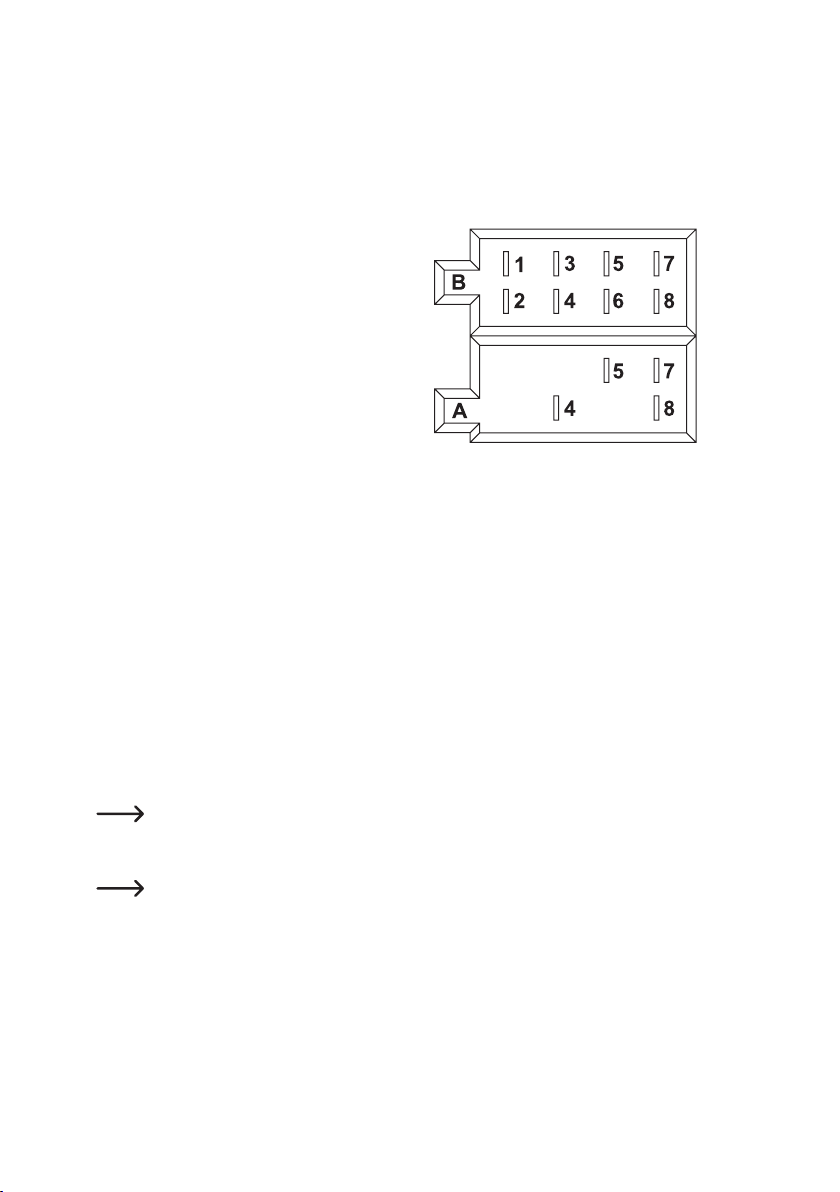
Die Kontaktbelegung der ISO-Anschlussbuchse des SD-Tuners entnehmen Sie bitte den nachfolgenden
Bildern.
Die jeweilige Belegung Ihres Kfz Systemsteckers erfahren Sie bei Ihrem Kfz Händler.
13
14
Systemstecker B (Lautsprecheranschluss)
(1) Lautsprecher rechts hinten (+)
(2) Lautsprecher rechts hinten (-)
(3) Lautsprecher rechts vorne (+)
(4) Lautsprecher rechts vorne (-)
(5) Lautsprecher links vorne (+)
(6) Lautsprecher links vorne (-)
(7) Lautsprecher links hinten (+)
(8) Lautsprecher links hinten (-)
Systemstecker A (Stromversorgung)
(1) nicht belegt
(2) nicht belegt
(3) nicht belegt
(4) Dauerstrom +12V
(5) Antennensteuerausgang
(6) nicht belegt
(7) Zündung +12V
(8) Masse
• Der Anschluss Dauerstrom +12V (4) muss an eine Leitung angeklemmt werden, die auch bei ausgeschalteter Zündung permanent 12V liefert (Klemme 30 des Bordnetzes). Dieser Anschluss dient zur Speiche
rung der Benutzereinstellungen, der Uhrzeit usw.
• Der Antennensteuerausgang (5) liefert bei eingeschaltetem Gerät eine Spannung von +12V. Diese Lei
tung kann für die Stromversorgung einer elektrischen Antenne, sowie als Einschaltspannung für einen
Autoverstärker verwendet werden.
• Der Anschluss Zündung +12V (7) muss mit einer Leitung verbunden werden, die nur bei eingeschalteter
Zündung +12V führt (Klemme 15 des Bordnetzes).
Klemmen Sie diesen Anschluss nicht auf Dauerstrom, da es ansonsten bei längerer Standzeit des
Fahrzeuges zu einer Entleerung der Bordbatterie kommen kann.
• Der Anschluss Masse (8) wird mit der Fahrzeugkarosserie verbunden.
Bedingt durch die immer häufiger verwendete Klebetechnik bzw. durch lackierte Metallteile wird
die elektrische Leitfähigkeit eingeschränkt. Daher ist nicht jedes Metallteil als Massepunkt geeignet.
-
-
f) Einlegen / Wechsel der Fernbedienungsbatterie
Achten Sie beim Einlegen der Batterie auf die richtige Polung.
Lassen Sie Batterien nicht oen herumliegen, es besteht die Gefahr, dass diese von Kindern
oder Haustieren verschluckt werden. Suchen Sie im Falle eines Verschluckens sofort einen
Arzt auf.
Ausgelaufene oder beschädigte Batterien können bei Berührung mit der Haut Verätzungen ver
ursachen. Benutzen Sie deshalb in diesem Fall geeignete Schutzhandschuhe.
Achten Sie darauf, dass die Batterie nicht kurzgeschlossen oder ins Feuer geworfen wird. Sie
darf außerdem nicht aufgeladen werden. Es besteht Explosionsgefahr.
Entfernen Sie die Batterie bei längerer Nichtbenutzung.
-
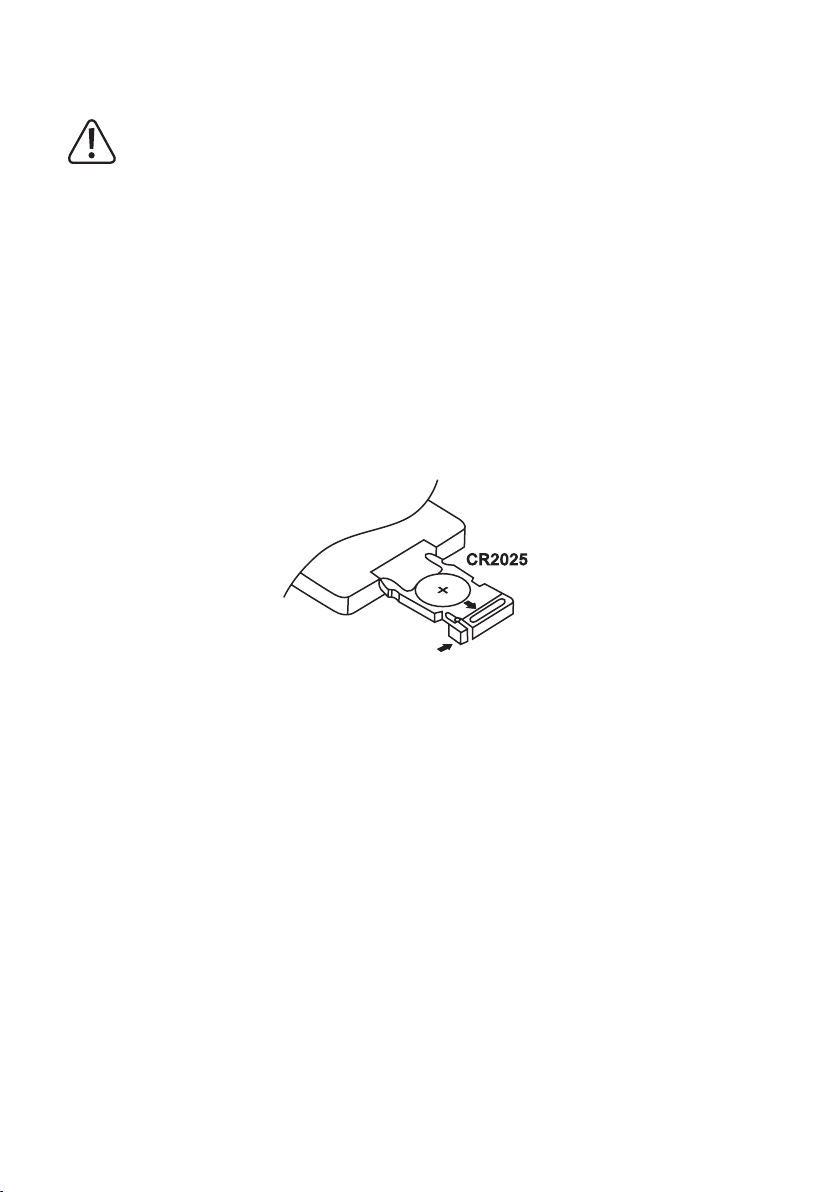
• Entriegeln Sie den Sicherungshebel und ziehen Sie den Batteriehalter an der Rückseite der Fernbedie
nung heraus.
• Legen Sie eine neue 3V-Lithium-Knopfzelle CR2025 polungsrichtig ein. Der positive Pol der Batterie muss
hierbei nach oben gerichtet sein.
• Schließen Sie das Batteriefach wieder. Die Rastnase muss hörbar einrasten.
• Wenn die Fernbedienung nicht mehr richtig funktioniert, ist die Batterie entladen und muss gegen eine
neue Batterie gleichen Typs gewechselt werden.
• Der Batteriewechsel erfolgt analog zu obiger Beschreibung.
• Tauschen Sie hierbei die entladene Batterie gegen eine neue Batterie gleichen Typs.
-
15
16
9. Bedienung
Nehmen Sie das Gerät nur dann in Betrieb, wenn Sie sich mit den Funktionen und mit dieser
Bedienungsanleitung vertraut gemacht haben.
Überprüfen Sie alle Anschlüsse nochmals auf ihre Richtigkeit. Klemmen Sie nach der Überprü
fung den Minuspol der Bordbatterie wieder an.
a) Allgemeine Bedienung
Taste / MUT (6)
Mit dieser Taste wird das Gerät ein- bzw. ausgeschaltet und die Stummschaltung aktiviert.
Kurz drücken bei ausgeschaltetem Gerät > Gerät wird eingeschaltet
Kurz drücken bei eingeschaltetem Gerät > Stummschaltung wird aktiviert bzw. deaktiviert
Lang drücken bei eingeschaltetem Gerät > Gerät wird ausgeschaltet
Zum Einschalten kann auch jede andere Taste des Gerätes gedrückt werden.
Drehregler VOLUME / Taste SELECT (9)
Im Normalbetrieb wird mit dem Drehregler VOLUME die Lautstärke geregelt.
Drücken Sie die Taste SELECT ein- bzw. mehrmals kurz, um die Parameter BAS (Tieftonklangregelung),
TRB (Hochtonklangregelung), BAL (Balanceeinstellung), FAD (Fadereinstellung), LOUD (Loudness-Funkti
on) und DSP (digitaler Signalprozessor) durch Drehen des Drehreglers VOLUME zu verändern.
Loudness-Funktion:
LOUD ON: Die Loudness-Schaltung ist aktiviert.
LOUD OFF: Die Loudness-Schaltung ist abgeschaltet. Der Klang wird nicht beeinflusst.
Das menschliche Ohr nimmt tiefe und hohe Töne bei geringen Lautstärken schlechter wahr.
Durch eine Anhebung dieser Frequenzbereiche bei geringen Lautstärken (Loudness-Korrektur)
wird diesem Eekt entgegengewirkt und die Musikwiedergabe klingt natürlicher.
-
-
DSP-Funktion:
FLAT Signalprozessor eingeschaltet, linearer Frequenzgang
CLASSICS Voreinstellung für klassische Musik
POP M Voreinstellung für Popmusik
ROCK M Voreinstellung für Rockmusik
DSP OFF Signalprozessor ausgeschaltet
LC-Display (3)
Im LC-Display (3) werden alle Informationen, in Abhängigkeit von der gerade wiedergegebenen Audioquel
le (Radioteil, SD-Player usw.) angezeigt.
-

Taste DSP / TA (2)
Mit dieser Taste werden verschiedene Informationen auf dem LC-Display (3) angezeigt. Durch erneutes
Drücken der Taste wird die Anzeige jeweils weitergeschaltet.
Wird die Taste nicht weiter betätigt, schaltet die Anzeige nach kurzer Zeit wieder auf die ursprüngliche
Information um.
Außerdem kann mit dieser Taste die Uhrzeit manuell eingestellt werden.
Umschaltung der Displayinformationen
Bei Empfang eines RDS-Senders:
Radiobetrieb: Stationsname > Uhrzeit > Sendefrequenz > Programmtyp
SD/USB-Betrieb: Trackanzeige > Uhrzeit > ID3-Informationen > Stationsname > Sendefrequenz >
Programmtyp
Bei Empfang eines Nicht-RDS-Senders:
Radiobetrieb: Sendefrequenz > Uhrzeit > PTY NONE
SD/USB-Betrieb: Trackanzeige > Uhrzeit > ID3-Informationen > Sendefrequenz > PTY NONE
Einstellung der Uhrzeit
Drücken Sie die Taste kurz, bis die Uhrzeit im Display angezeigt wird.
Drücken Sie dann die Taste lang, bis die Uhrzeitanzeige blinkt.
Stellen Sie mit der Taste
Taste MODE / PAIR (19)
Mit dieser Taste werden die verschiedenen Audioquellen gewählt.
Drücken Sie die Taste kurz, um auf die jeweils nächste Quelle umzuschalten:
TUNER > USB > SD-MMC > AUX
Wenn eine der Quellen nicht aktiv ist, d.h. es ist kein Medium eingelegt, wird die Quelle bei der
Auswahl übersprungen.
(1) die Minuten und mit der Taste (8) die Stunden ein.
Taste RESET (7)
Diese Taste setzt alle Einstellungen auf die werksseitig vorgegebenen Werte zurück.
Drücken Sie diese Taste mit einem spitzen Gegenstand (z.B. einer Kugelschreiberspitze) in folgenden Fäl
len:
- nach Abschluss der Einbau- und Anschlussarbeiten
- wenn das Gerät nicht mehr auf Tastenbetätigungen reagiert
- wenn im Display undefinierte Zeichen angezeigt werden
17
-

18
b) Menü-Einstellungen
Drehregler VOLUME / Taste SELECT (9)
Um die Menüeinstellungen zu wählen, drücken Sie zuerst länger (>2 Sekunden) die Taste SELECT und
anschließend drücken Sie diese Taste erneut, aber nur kurz, bis die gewünschte Funktion auf dem Display
erscheint.
Die Optionen bei der jeweiligen Einstellung werden durch Drehen des Drehreglers VOLUME ausgewählt.
BEEP ON / OFF
BEEP ON: Jede Tastenbetätigung wird mit einem Signalton quittiert.
BEEP OFF: Der Tastenquittierungston ist deaktiviert.
P-VOL
Stellen Sie hier durch Drehen des Drehreglers VOLUME die Einschaltlautstärke des Gerätes ein.
AREA EUR / USA
AREA EUR: Radio-Frequenzbandeinstellung für Europa
FM 87,5-108 MHz / 50 kHz-Schritte
MW 522-1620 kHz / 9 kHz-Schritte
AREA USA: Radio-Frequenzbandeinstellung für USA
FM 87,5-107,9 MHz / 100 kHz-Schritte
MW 530-1710 kHz / 10 kHz-Schritte
AF ON / OFF
AF ON: AF ist eingeschaltet
AF OFF: AF ist ausgeschaltet
Die Funktion AF aktiviert die automatische Sendernachführung (siehe „Radiobetrieb“).
Im Display erscheint die Anzeige AF. Wird ein schwacher oder kein RDS Sender empfangen, blinkt die
Anzeige. Bei einem gut zu empfangenden Sender erscheint das Symbol ständig.
Nur mit aktivierter AF Funktion (AF ON) kann das Gerät beim Verlassen des Sendegebietes selbstständig
auf einen besseren Sender umschalten.

PTY-Suchlauf
Hier können Sie den gewünschten Sendertyp für die PTY-Suchfunktion festlegen und den Suchlauf star
ten.
Stellen Sie mit dem Drehregler VOLUME (9) die gewünschte Programmart ein und drücken Sie eine der
Tasten
(8) oder (1), um den Suchlauf zu starten.
Nun beginnt der Suchlauf nach einem Sender dieser Programmart. Es stehen folgende Programmarten
zur Verfügung:
NEWS, AFFAIRS, INFO, SPORT, EDUCATE, DRAMA, CULTURE, SCIENCE, VARIED, POP M, ROCK M,
EASY M, LIGHT M, CLASSICS, OTHER M, WEATHER, FINANCE, CHILDREN, SOCIAL, RELIGION, PHONE IN,
TRAVEL, LEISURE, JAZZ M, COUNTRY, NATION M, OLDIES, FOLK M, DOCUMENT, TEST, ALARM
HOUR 12H / 24H
12H: Die Uhrzeit wird im 12h-Format angezeigt.
24H: Die Uhrzeit wird im 24h-Format angezeigt.
PCLK ON / OFF
PCLK ON: Die Uhrzeit wird bei ausgeschaltetem Gerät im Display angezeigt.
PCLK OFF: Die Uhrzeit wird bei ausgeschaltetem Gerät nicht im Display angezeigt.
CON BT / DISCON BT
Mit Hilfe dieser Funktion werden Bluetooth®-Geräte mit dem SD-Tuner gekoppelt bzw. wieder getrennt.
Mehr hierzu finden Sie im Kapitel „Bluetooth®-Betrieb“.
-
TA SEEK / ALARM
TA SEEK: Das Gerät sucht bei Verlust der Verkehrsfunkinformation einen neuen Sender mit
Verkehrsfunk-Kennung.
TA ALARM: Das Gerät gibt einen Warnton ab, wenn die Verkehrsfunk-Kennung nicht mehr
empfangen werden kann.
PI SOUND / MUTE
Reaktion des Gerätes, wenn man in ein Sendegebiet kommt, in dem 2 unterschiedliche Sender mit unter
schiedlicher Programmidentifikation (PI) die gleiche AF (Alternativfrequenz) senden:
PI SOUND: Das Radio schaltet einige Sekunden auf den neuen Sender und dann wieder zurück.
PI MUTE: Der neue Sender wird stummgeschaltet.
19
-

20
RETUNE L / S
RETUNE L: Wenn keine Verkehrsfunk-Kennung mehr empfangen wird, startet der automatische
Suchlauf nach 90 Sekunden.
RETUNE S: Wenn keine Verkehrsfunk-Kennung mehr empfangen wird, startet der automatische
Suchlauf nach 30 Sekunden.
MASK DPI / ALL
Reaktion des Gerätes bei der Sendersuche:
MASK DPI: Alternativfrequenzen mit unterschiedlicher Programminformation (PI) werden nicht
berücksichtigt.
MASK ALL: Alternativfrequenzen mit unterschiedlicher Programminformation (PI) und
Alternativfrequenzen mit hoher Signalstärke, jedoch ohne RDS Information werden
nicht berücksichtigt.
EON TA LO / DX
Reaktion des Gerätes beim Umschalten auf EON-Verkehrsfunkdurchsagen:
EON TA LO: Das Gerät schaltet nur auf EON-Verkehrsfunkdurchsagen um, wenn die Signalstärke
des EON Senders gut ist und keine Störungen zu erwarten sind.
EON TA DX: Das Gerät schaltet immer auf EON-Verkehrsfunkdurchsagen um, die Signalstärke wird
nicht berücksichtigt.
TA VOL
Beim Verkehrsfunkdurchsagen und aktivierter TA-Funktion wird die hier voreingestellte Lautstärke ge
wählt, sofern die eingestellte Lautstärke geringer ist.
Stellen Sie die gewünschte Durchsagelautstärke durch Drehen des Drehreglers VOLUME (9) ein.
-
REG ON / OFF
REG ON: Das Gerät schaltet bei schwächer werdendem Empfang nur auf eine andere Frequenz
mit exakt dem gleichen Programm um.
REG OFF: Das Gerät schaltet bei schwächer werdendem Empfang auch auf einen anderen Sen
der mit der gleichen Regionalkennung um.

c) Radiobetrieb
RDS als Empfangskonzept
Das Kürzel RDS steht für Radio Daten System, d.h. es werden unhörbare, codierte Zusatzinformationen
über den UKW RDS Sender mit ausgestrahlt.
Sie besitzen mit dem BT-RSD1802K einen SD-Tuner, der in der Lage ist diese codierten Daten, die von fast
allen Sendeanstalten mit ausgestrahlt werden auszuwerten.
Folgende wesentlichen Zusatzinformationen werden gesendet:
- Programm Identifikation (PI)
- Verkehrsfunkkennung (TP)
- Verkehrsdurchsagekennung (TA)
- Programm Servicename (PS)
- Alternative Frequenzen (AF)
- Programmtyp (PTY)
- EON-Informationen (EON)
- Uhrzeit (CT)
Programm Identifikation (PI)
Diese Daten helfen dem Empfänger einen Sender eindeutig zu identifizieren. Sie ermöglichen dem Radio
zwischen Gebieten zu unterscheiden in denen das gleiche Programm ausgestrahlt wird. Das Autoradio
schaltet also bei schwächer werdendem Empfang nur auf einen stärkeren Sender um, der die gleiche
Programm Identifikation ausstrahlt.
Verkehrsfunk-Kennung (TP)
Durch dieses Signal erkennt der Empfänger, dass ein Sender mit Verkehrsfunkinformationen empfangen
wird.
Verkehrsdurchsage-Kennung (TA)
Durch dieses Signal kann der Sender eine Verkehrsfunkdurchsage erkennen und gegebenenfalls die lau
fende Wiedergabe einer anderen Quelle unterbrechen.
Programm Servicename (PS)
Diese Information gibt dem Empfänger an, welchen Sender er gerade empfängt. Sie wird direkt im Display
des Autoradios wiedergegeben, z.B. BAYERN 3.
Alternative Frequenzen (AF)
Es wird eine Liste von alternativen Frequenzen mitgesendet, welche dasselbe Programm abstrahlen. Wird
der empfangene Sender zu schwach, so erkennt der Empfänger über das AF-Signal auf welchen Fre
quenzen er nach einem Sender suchen muss, der besser zu empfangen ist.
21
-
-

22
Programmtyp (PTY)
Dieser Code gibt dem Empfänger Informationen über die Art des gesendeten Programms (z.B. Sport, Klas
sik, Nachrichten usw.). Der Hörer kann dadurch gezielt nach einem Programm seiner Wahl suchen.
Außerdem kann ein nationaler Katastrophenalarm auf diese Art verbreitet werden. Den PTY-Service bieten
jedoch nicht alle Sender an.
EON-Informationen (EON)
Viele Senderketten mit verschiedenen Programmen haben nur ein Programm mit Verkehrsfunkdienst. Wer
den EON-Informationen mitgesendet, schaltet ein derart ausgestattetes Gerät bei Verkehrsdurchsagen auf
den Verkehrsfunksender um, obwohl ein anderes Programm der Senderkette gehört wird.
Hört man z.B. BR-Klassik (ohne Verkehrsfunk) schaltet das Gerät bei aktiver TA-Funktion für die Dauer einer
Verkehrsfunkdurchsage auf Bayern 3 (mit Verkehrsfunk) um.
Uhrzeit (CT)
Viele Sender senden die aktuelle Uhrzeit in den RDS-Daten. Empfängt das Gerät dieses Signal stellt es die
eingebaute Uhr automatisch.
Das RDS System bietet also den Vorteil, dass beim Verlassen des Sendegebietes ein Umschalten auf einen
gleichen, besser zu empfangenden Sender automatisch erfolgt. Ein Umschalten erfolgt jedoch nur, wenn
ein besserer Sender mit dem gleichen Programm vorhanden ist.
Kurze empfangsbedingte Signalabschwächungen können auch durch das RDS System nicht eliminiert
werden, da ein ständiges Hin- und Herschalten des Autoradios die Folge wäre. Dies würde vom Hörer als
weitaus störender empfunden, als kurz auftretende Empfangsstörungen.
Ein weiterer Pluspunkt des RDS Systems ist die Anzeige des Sendernamens. Der Sendername eines RDSSenders wird auf dem Autoradiodisplay angezeigt.
-
-

Funktion der einzelnen Tasten
Taste BND / AMS (11)
Durch kurzes Drücken dieser Taste wird der Bandbereich des Radioteils gewählt.
Es stehen 3 UKW-Bereiche und ein MW-Bereich zur Verfügung:
F1 > F2 > F3 > MW
Auf jedem der vier Bandbereiche können 6 Sender auf den Stationstasten 1-6 (15) abgespeichert
werden.
Durch längeres Drücken dieser Taste wird die automatische Senderspeicherung aktiviert. Im Display blinkt
die Anzeige SEARCH.
Hierbei werden alle gut zu empfangenden Sender automatisch auf die Stationstasten 1-6 (15) abgespei
chert.
Nach diesem Vorgang, werden die abgespeicherten Sender jeweils für einige Sekunden wiedergegeben.
(8) und (1)
Tasten
Mit diesen Tasten wird die Empfangsfrequenz geändert, um Sender im Radiobetrieb einzustellen.
Kurzes Drücken einer Taste startet den automatischen Sendersuchlauf (Displayanzeige SEARCH).
Der Suchlauf hält erst beim nächsten, gut zu empfangenden Sender an.
Wird eine Taste länger gedrückt gehalten ist der manuelle Sendersuchlauf aktiviert.
Im Display erscheint MANUAL.
Die Frequenz wird in diesem Modus solange verändert, bis die entsprechende Taste wieder losgelassen
wird. Kurzes Drücken verändert die Frequenz schrittweise.
Werden die Tasten längere Zeit nicht betätigt schaltet das Gerät wieder in den automatischen
Sendersuchlauf um. Im Display erscheint kurz AUTO.
-
Stationstasten 1-6 (15)
Durch einen kurzen Druck auf diese Tasten kann man direkt einen vorher gespeicherten Sender anwählen.
Um einen gerade gehörten Sender abzuspeichern, einfach die gewünschte Taste länger als 1 Sekunde
drücken.
Jeder der drei UKW-Bandbereiche (F1-3) und auch der MW-Empfangsbereich (MW) hat sechs
Stationstasten. Es können also insgesamt 24 Stationstasten belegt werden.
Taste DSP / TA (2)
Drücken Sie diese Taste lang, um die TA-Funktion ein- bzw. auszuschalten.
Wird ein Verkehrsfunksender empfangen, so erscheint im Display die Anzeige TP = Trac Programm.
Bei aktivierter TA-Funktion erscheint zusätzlich das Kürzel TA im Display.
Bei laufender Wiedergabe einer anderen Quelle (z.B. SD-Wiedergabe) wird das Programm für die Dauer
der Verkehrsfunkdurchsage stummgeschaltet.
Wird eine laufende Rundfunksendung sehr leise gehört, erhöht sich die Lautstärke der Verkehrsfunkdurch
sage automatisch.
23
-

24
d) USB-/Speicherkartenbetrieb
Das Gerät ist mit einer USB-Schnittstelle und einem Speicherkartenleser für SD/MMC-Karten ausgerüstet.
MP3-Dateien, die auf diesen Medien abgespeichert sind, können wiedergegeben werden.
Verbinden Sie keinen MP3-Player mit der USB-Schnittstelle, wenn er über Batterien betrieben
wird.
Die Stromversorgung der USB-Schnittstelle kann die eingelegten Batterien laden und somit zu
Überhitzung bzw. auch Explosion der Batterien führen.
USB-Medien bis max. 32 GB und mit einer Stromaufnahme von max. 500 mA können an die USB-
Schnittstelle angeschlossen werden.
An der USB-Schnittstelle können nur USB-Speichermedien betrieben werden. MP3-Player mit
USB-Anschluss schalten beim Einstecken in diesen Anschluss meist in den PC-Modus. In diesem
Modus ist ein Abspielen von Musikdateien nicht möglich. Sie können jedoch jederzeit den Audi
oausgang eines MP3-Players an den Anschluss AUX IN (4) anschließen.
SD/MMC-Karten und SDHC-Karten bis max. 16 GB werden unterstützt.
Die Medien müssen FAT 16 oder FAT 32 formatiert sein.
Aufgrund der sehr großen Vielfalt von Geräten mit USB- und SD/MMC-Kartenschnittstellen und
ihren manchmal sehr herstellerspezifischen Funktionen, kann nicht sichergestellt werden, dass
alle Medien erkannt werden und alle Bedienungsmöglichkeiten in Verbindung mit diesem Gerät
gegeben sind.
Sollte das Speichermedien nicht erkannt werden, ziehen Sie es bitte nochmals heraus und ste
cken es erneut ein.
• Stecken Sie Ihr USB-Speichermedium in die USB-Schnittstelle (5).
• Bei Verwendung einer Speicherkarte stecken Sie diese in den Speicherkartenleser (10).
• Das Gerät schaltet automatisch auf den entsprechenden Eingang um und startet die Wiedergabe.
• Das zuletzt eingesteckte Medium wird automatisch ausgewählt.
-
-
(8) und (1)
Tasten
Diese Tasten dienen zur Auswahl der einzelnen Tracks bzw. zum Suchen eines bestimmten Abschnitts
innerhalb eines Tracks.
Die Pfeile auf den Tasten geben die Suchrichtung (vorwärts bzw. rückwärts) an.
Drücken Sie die Tasten kurz, um zum nächsten bzw. vorherigen Track zu springen.
Drücken Sie die Tasten lang, um innerhalb eines Tracks einen bestimmten Abschnitt zu suchen. Die Wie-
dergabe erfolgt in diesem Fall beschleunigt.
Tasten DIR- (17) und DIR+ (18)
Diese Tasten dienen zur Auswahl der Ordner auf dem Speichermedium.
DIR- (17) wählt den vorangehenden Ordner.
DIR+ (18) wählt den nächsten Ordner.
Ist auf dem Speichermedium keine Ordnerstruktur vorhanden haben diese Tasten keine Funkti-
on.

Taste PAU (12)
Drücken Sie diese Taste, um die Wiedergabe kurzzeitig zu unterbrechen. Bei erneuter Betätigung setzt die
Wiedergabe an der Stelle wieder ein, an der sie vorher unterbrochen wurde.
Taste SCN (13)
Drücken Sie diese Taste kurz um jeden Track für ca. 10 Sekunden anzuspielen (Anzeige S-SCN).
Drücken Sie diese Taste lang, um die Tracks des aktuellen Ordners für ca. 10 Sekunden anzuspielen (An
zeige D-SCN).
Um diese Funktion wieder abzuschalten drücken Sie die Taste SCN (13) erneut.
Die Wiedergabe erfolgt ab dieser Stelle wieder normal.
Taste RPT (14)
Drücken Sie diese Taste kurz, um den aktuell gespielten Titel zu wiederholen (Anzeige S-RPT).
Drücken Sie diese Taste lang, um die Tracks des aktuellen Ordners zu wiederholen (Anzeige D-RPT).
Um diese Funktion wieder abzuschalten, drücken Sie die Taste RPT (14) erneut.
Taste SHF (16)
Drücken Sie diese Taste kurz, um alle Tracks in zufälliger Reihenfolge abzuspielen (Anzeige S-SHF).
Drücken Sie diese Taste lang, um die Tracks des aktuellen Ordners in zufälliger Reihenfolge abzuspielen
(Anzeige D-SHF).
Um diese Funktion wieder abzuschalten drücken, Sie die Taste SHF (16) erneut.
Die Wiedergabe erfolgt ab dieser Stelle wieder in normaler Reihenfolge.
Suchfunktionen bei USB-/Speicherkartenbetrieb
Suche nach Tracknummern
- Drücken Sie die Taste BND / AMS (11) einmal, um die Suche nach Tracknummern zu aktivieren.
- Wählen Sie mit dem Drehregler VOLUME (9) die gewünschte Tracknummer.
- Drücken Sie die Taste SELECT (9).
- Der gewünschte Track wird automatisch abgespielt.
-
25

26
Suche nach Tracknamen
- Drücken Sie die Taste BND / AMS (11) zweimal, um die Suche nach Tracknamen zu aktivieren.
- Der erste Buchstabe der Trackanzeige blinkt.
- Wählen Sie mit dem Drehregler VOLUME (9) den gewünschten Buchstaben.
- Drücken Sie die Taste SELECT (9), der zweite Buchstabe blinkt.
- Wählen Sie auf die beschriebene Weise ggf. weitere Buchstaben.
- Drücken Sie die Taste SELECT (9) lang.
- Alle Tracks und Ordner, die mit den gewählten Buchstaben beginnen werden angezeigt.
- Wählen Sie mit dem Drehregler VOLUME (9) den gewünschten Track oder Ordner.
- Sollte es sich bei dem gewählten Namen um einen Ordnernamen handeln, wird im Display (, ,) ange
zeigt.
- Wählen Sie in diesem Fall mit dem Drehregler VOLUME (9) den Tracknamen innerhalb dieses Ordners
aus.
- Drücken Sie die Taste SELECT (9).
- Der gewünschte Track wird automatisch abgespielt.
Suche über die Ordnerstruktur
- Drücken Sie die Taste BND / AMS (11) dreimal, um die Suche über die Ordnerstruktur zu aktivieren.
- Die erste Verzeichnisstruktur wird angezeigt.
- Wählen Sie mit dem Drehregler VOLUME (9) das gewünschte Verzeichnis.
- Drücken Sie die Taste SELECT (9). Das Verzeichnis ist gewählt und der Name des ersten Tracks bzw. des
nächsten Unterverzeichnisses wird angezeigt.
- Wählen Sie mit dem Drehregler VOLUME (9) den gewünschten Track bzw. das nächste Unterverzeich
nis.
- Verfahren Sie auf die beschriebene Weise weiter, bis der gewünschte Track angezeigt wird.
- Drücken Sie die Taste SELECT (9).
- Der gewünschte Track wird automatisch abgespielt.
-
-
Suche innerhalb des aktuell gewählten Verzeichnisses
- Drücken Sie die Taste BND / AMS (11) viermal, um die Suche innerhalb des aktuellen Verzeichnisses zu
aktivieren.
- Der Name des aktuellen Verzeichnisses wird angezeigt.
- Wählen Sie mit dem Drehregler VOLUME (9) den gewünschten Track bzw. (, ,), um das gewünschte Ver
zeichnis zu wählen.
- Verfahren Sie weiter wie schon unter „Suche über die Ordnerstruktur“ beschrieben.
-

e) Funktionen der Fernbedienung
Fast alle Funktionen des SD-Tuners können auch mit der beiliegenden Fernbedienung gesteuert werden.
Außerdem kann auch die Bedienung der Bluetooth®-Freisprecheinrichtung hierüber bequem und sicher
erfolgen.
Die Tasten mit den gleichen Bezeichnungen wie am Gerät haben auch die gleichen Funktionen.
Zusätzliche Tasten:
VOL+ (28) und VOL- (29)
Regelung der Lautstärke
Tasten 0 bis 9 und Tasten * (23) und # (27)
Eingabe von Telefonnummern in Verbindung mit der Freisprecheinrichtung
/ BND / LOU (20)
Während eines Telefongesprächs > Hörer auflegen
Im Radiobetrieb > Wechsel des Empfangsbereichs
Lange Betätigung > Loudness-Schaltung ein- bzw. ausschalten
AF / MON / 7 (21)
Kurze Betätigung > AF-Funktion ein- bzw. ausschalten
Lange Betätigung > Mono-Stereo-Umschaltung des Radioempfangs
EQ / TA / 8 (22)
Kurze Betätigung > Auswahl der DSP-Funktion (digitaler Klangprozessor)
Lange Betätigung > TA-Funktion ein- bzw. ausschalten
DISP / 0 (24)
Umschaltung der Displayanzeige
(25)
Abnehmen des Hörers in Verbindung mit der Freisprecheinrichtung
PTY / 9 (26)
Aktivierung der PTY-Funktion im Radiobetrieb (Auswahl des Programmtyps erfolgt mit den Tasten
VOL+ (28) und VOL- (29))
27
28
f) Bluetooth®-Betrieb
Um einen optimalen Telefonempfang zu ermöglichen und die elektromagnetische Strahlung im
Fahrzeug so gering wie möglich zu halten, sollte im Mobiltelefonbetrieb immer eine Außenantenne verwendet werden.
Im Bluetooth®-Betrieb kann der SD-Tuner als Freisprechanlage für Mobiltelefone und/oder als Wiederga
begerät für Bluetooth®A2DP-Audio-Streaming genutzt werden. Bevor jedoch eine Übertragung zwischen
Ihrem Mobiltelefon bzw. Bluetooth®-Gerät und dem SD-Tuner möglich ist, müssen beide Geräte miteinander gekoppelt werden. Dieser Vorgang wird „Pairing“ genannt.
Pairing
• Schalten Sie ihr Bluetooth®-Gerät ein und aktivieren Sie hier den Pairing-Modus (siehe hierzu Anleitung
des entsprechenden Geräts). Das Gerät sucht dann nach Bluetooth®-Geräten im Empfangsbereich.
• Drücken Sie die Taste MODE / PAIR (19) lang, bis das Display PAIRING anzeigt.
• Wenn der SD-Tuner gefunden wurde, zeigt Ihr Bluetooth®-Gerät den Namen CarBT an.
• Geben Sie das Passwort 0000 ein, um die beiden Geräte zu koppeln.
• Nach erfolgreichem Pairing-Vorgang zeigt das Display das Bluetooth®-Symbol
• Wenn der Pairing-Vorgang nicht erfolgreich war, versuchen Sie den Vorgang zu wiederholen. Evtl. muss
zuerst das Gerät CarBT in Ihrem Mobiltelefon nochmals gelöscht werden (siehe hierzu Anleitung des
Mobiltelefons).
• Um eine Koppelung aufzuheben bzw. herzustellen können Sie auch im Hauptmenü (siehe „Menüeinstel
lungen“) den Punkt CON BT (koppeln) bzw. DISCON BT (Koppelung aufheben) wählen.
Es kann immer nur ein Bluetooth®-Gerät mit dem SD-Tuner gekoppelt werden. Besteht bereits
eine aktive Bluetooth®-Koppelung, muss diese Verbindung zuerst unterbrochen werden.
Wird der SD-Tuner oder das Bluetooth®-Gerät, mit dem eine aktive Koppelung besteht ausge
schaltet oder aus der Reichweite entfernt, wird die Verbindung unterbrochen. Beim erneuten
Einschalten bzw. wenn das Bluetooth®-Gerät wieder in die Reichweite des SD-Tuners kommt,
wird die Verbindung automatisch wieder aufgebaut. Im Display des SD-Tuners erscheint das
Bluetooth®-Symbol wieder.
Um diesen automatischen Verbindungsaufbau zu ermöglichen muss diese Funktion am
Bluetooth®-Gerät evtl. aktiviert werden (bitte informieren Sie sich hierzu in der Anleitung Ihres
Bluetooth®-Geräts).
an.
-
-
-
Aufbau eines Telefongesprächs mit manueller Nummereingabe
• Drücken Sie die Taste
• Wählen Sie die gewünschte Rufnummer mit den numerischen Tasten 0 bis 9 sowie * (23) und # (27) an der
Fernbedienung.
• Die gewählte Nummer erscheint im Display.
• Drücken Sie die Taste (25) erneut, um zu wählen.
Drücken Sie die Taste / BND / LOU (20) oder die Taste BND / AMS / (11) während der
Rufnummerneingabe kurz, um die zuletzt eingegebene Zier zu löschen.
Drücken Sie die Taste
Rufnummerneingabe lang, um die gesamte Telefonnummer zu löschen.
(25) an der Fernbedienung, um in den Telefon-Modus zu gelangen.
/ BND / LOU (20) oder die Taste BND / AMS / (11) während der
Wahlwiederholung
• Drücken Sie die Taste
• Im Display erscheint LAST NUM.
• Drücken Sie die Taste
Annahme eines eingehenden Telefongesprächs
• Drücken Sie die Taste
• Drücken Sie die Taste
Telefongespräch abzulehnen.
Beenden eines Telefongesprächs
• Drücken Sie die Taste
zu beenden.
Rufübernahme
• Drücken Sie während eines Telefongesprächs die Taste DSP / TA /
Mobiltelefon bzw. an die Freisprecheinrichtung zu übergeben.
Rufnummernanzeige
• Bei einem eingehenden Telefongespräch wird die Rufnummer des Anrufers im Display angezeigt.
Wenn der Anrufer die Rufnummernanzeige unterdrückt hat oder das Mobilfunknetz dieses Fea-
ture nicht unterstützt, funktioniert die Rufnummernanzeige nicht.
Audio-Streaming
Audio-Streaming nennt sich die Übertragung von Audiodaten (Musik) per Bluetooth® an den SD-Tuner.
Wenn Sie ein A2DP-fähiges Bluetooth®-Gerät besitzen, können Sie es wie weiter vorne beschrieben durch
den Pairing-Vorgang mit dem SD-Tuner verbinden und eine Audioübertragung aufbauen.
• Stellen Sie sicher, dass beide Geräte durch Pairing verbunden wurden.
• Starten Sie die Wiedergabe/Audioübertragung an ihrem Bluetooth®-Gerät (siehe entsprechende Bedie
nungsanleitung).
• Drücken Sie die Taste MODE / PAIR (19), bis BT AUDIO im Display angezeigt wird.
• Die Audioübertragung ist nun aktiviert.
• Sie können die Wiedergabe Ihres Bluetooth®-Gerätes nun mit den Tasten
PAU (12) wie gewohnt fernsteuern.
(25) zweimal, um die Wahlwiederholung zu aktivieren.
(25) erneut, um die zuletzt gewählte Rufnummer anzurufen.
(25), um ein eingehendes Telefongespräch anzunehmen.
/ BND / LOU (20) oder die Taste BND / AMS / (11), um ein eingehendes
/ BND / LOU (20) oder die Taste BND / AMS / (11), um ein Telefongespräch
(2) lang, um das Gespräch an das
(8) und (1) und Taste
-
29

30
10. Wartung
Überprüfen Sie regelmäßig die technische Sicherheit des SD-Tuners z.B. auf Beschädigung der Anschlussleitungen und des Gehäuses.
Wenn anzunehmen ist, dass ein gefahrloser Betrieb nicht mehr möglich ist, so ist das Produkt außer Be
trieb zu setzen und gegen unbeabsichtigten Betrieb zu sichern. Bordnetz abklemmen!
Es ist anzunehmen, dass ein gefahrloser Betrieb nicht mehr möglich ist, wenn:
• das Gerät sichtbare Beschädigungen aufweist
• das Gerät nicht mehr arbeitet, oder
• nach schweren mechanischen Beanspruchungen
Bevor Sie den SD-Tuner reinigen oder warten, beachten Sie unbedingt folgende Sicherheitshinweise:
Beim Önen von Abdeckungen oder Entfernen von Teilen können spannungsführende Teile frei-
gelegt werden.
Vor einer Wartung oder Instandsetzung muss deshalb das Gerät von allen Spannungsquellen
getrennt werden.
Kondensatoren im Gerät können noch geladen sein, selbst wenn es von allen Spannungsquel
len getrennt wurde.
Eine Reparatur darf nur durch eine Fachkraft erfolgen, die mit den damit verbundenen Gefahren
bzw. einschlägigen Vorschriften vertraut ist.
a) Sicherungswechsel
Ist ein Sicherungswechsel erforderlich, ist darauf zu achten, dass nur Sicherungen vom angegebenen Typ
und Nennstromstärke (siehe „Technische Daten“) als Ersatz Verwendung finden.
-
-
Ein Flicken von Sicherungen oder das Überbrücken des Sicherungshalters ist unzulässig.
• Nach erfolgter Trennung von der Stromversorgung (ISO-Anschluss-Stecker abklemmen!) ziehen Sie vorsichtig die Sicherung aus dem Sicherungshalter neben dem ISO-Anschluss heraus.
• Ersetzen Sie sie mit einer Sicherung gleichen Typs.
• Erst danach den SD-Tuner wieder mit dem Bordnetz verbinden und in Betrieb nehmen.
• Sollte die Sicherung erneut auslösen, bringen Sie das Gerät zur Reparatur in eine Fachwerkstatt.
b) Reinigung
Äußerlich sollte das Gerät nur mit einem weichen, trockenen Tuch oder Pinsel gereinigt werden.
Verwenden Sie auf keinen Fall aggressive Reinigungsmittel oder chemische Lösungen, da sonst die Ober
fläche des Gehäuses beschädigt werden könnte.
-

11. Handhabung
• Eine zu hohe Lautstärke im Kfz-Innenraum hat zur Folge, dass akustische Warnsignale nicht mehr wahrgenommen werden können. Dadurch werden Sie und andere Verkehrsteilnehmer gefährdet. Achten Sie
deshalb auf eine angepasste Lautstärke.
• Unachtsamkeit im Straßenverkehr kann zu schwerwiegenden Unfällen führen. Eine Bedienung der HiFiAnlage darf deshalb immer nur dann erfolgen, wenn es die Verkehrssituation erlaubt und Sie durch die
Bedienung der Anlage nicht vom Verkehrsgeschehen abgelenkt werden.
• Musik sollte nicht über einen längeren Zeitraum mit übermäßiger Lautstärke gehört werden. Hierdurch
kann das Gehör geschädigt werden.
12. Behebung von Störungen
Mit dem Renkforce BT-RSD1802K SD-Tuner haben Sie ein Produkt erworben, welches nach dem Stand der
Technik gebaut wurde und betriebssicher ist.
Dennoch kann es zu Problemen oder Störungen kommen.
Deshalb möchten wir Ihnen hier beschreiben, wie Sie mögliche Störungen beheben können:
Beachten Sie unbedingt die Sicherheitshinweise!
Keine Wiedergabe, Display und Beleuchtung leuchten nicht:
• Kfz-Sicherung defekt. In der Betriebsanleitung ihres Fahrzeugs die entsprechende Sicherung suchen
und überprüfen.
• Gerätesicherung defekt. Gerät ausbauen und die Sicherung überprüfen.
• Plusleitung/Masseleitung gelöst. Gerät ausbauen und den Anschluss der Leitungen überprüfen.
Wiedergabe nur über einen Lautsprecher:
• Balanceregelung verstellt. Balanceregelung wie beschrieben einstellen.
• Lautsprecheranschluss hat sich gelöst. Gerät und/oder Lautsprecher ausbauen und Anschlüsse über
prüfen.
Wiedergabe nur über die vorderen oder hinteren Lautsprecher:
• Faderregelung verstellt. Faderregelung einstellen.
• Lautsprecheranschluss hat sich gelöst. Gerät und/oder Lautsprecher ausbauen und Anschlüsse über
prüfen.
31
-
-

32
Bei Radiobetrieb kaum Sender zu empfangen:
• Antenne nicht ganz herausgezogen. Antenne auf volle Länge ausziehen.
• Antennenanschluss hat sich aus dem Gerät gelöst. Gerät ausbauen und Anschluss überprüfen.
• Antenne defekt. Anschluss, Erdung sowie Antenne überprüfen.
Störungen bei Radio- und USB- / Speicherkartenbetrieb:
• Störungen gelangen über die Plusleitung in das Gerät. Zusatzentstördrossel in die Plusleitung einbau
en.
• Fahrzeug evtl. zusätzlich mit Entstörkerzensteckern, Verteilerfinger usw. entstören.
• Schlechte Masseverbindung. Masseanschluss überprüfen, evtl. anderen Massepunkt verwenden.
Beim Drücken der Stationstasten ertönt nur Rauschen:
• Kein Sender programmiert. Wie beschrieben Sender programmieren.
Das Gerät reagiert nicht mehr auf Tastenbefehle oder zeigt wirre Zeichen im Display an:
• Setzen Sie das Gerät mit der Taste RESET (7) zurück.
Die Bluetooth®-Audioübertragung funktioniert nicht:
• Das angeschlossene Gerät unterstützt die Bluetooth®A2DP-Audioübertragung nicht.
• Das Gerät ist nicht mit dem SD-Tuner verbunden. Führen Sie den Pairing-Vorgang aus.
Die Übertragungsqualität im Freisprechbetrieb ist schlecht:
• Der Abstand zwischen Mikrofon und den Fahrzeuglautsprechern ist zu gering.
• Das Mikrofon befindet sich im Luftstrom von Schiebedach, oenem Fenster, Lüftung o.ä.
• Der Abstand zwischen Sprecher und Mikrofon ist zu groß.
-
Andere Reparaturen als zuvor beschrieben sind ausschließlich durch einen autorisierten Fach-
mann durchzuführen.

13. Technische Daten
Allgemein
Betriebsspannung...................................... 12 V/DC
Stromaufnahme .......................................... 15 A max. / 7 mA standby
Sicherung .................................................... Kfz-Flachsicherung 15 A
Batterie Fernbedienung ............................ 3V-Lithium-Knopfzelle CR2025
Ausgangsleistung ......................................4 x 40 W (max.)
Lautsprecherimpedanz .............................4 - 8 Ohm
Schnittstellen .............................................. Bluetooth®, USB und SD/MMC-Card
Einbauschacht ............................................ 1 DIN (182 x 53 mm)
Einbautiefe ..................................................115 mm
Masse ..........................................................600 g
Tuner
Empfangsbereich (Europa) ....................... UKW 87,5 - 108,0 MHz / MW 522 - 1620 kHz
Empfangsbereich (USA)
Frequenzschritt (Europa) ..........................UKW 50 kHz / MW 9 kHz
Frequenzschritt (USA) ............................... UKW 100 kHz / MW 10 kHz
Empfindlichkeit ........................................... UKW 10 dbµ / MW 32 dBµ
Zwischenfrequenz .....................................UKW 10,7 MHz / MW 450 kHz
Stereo-Trennung UKW ..............................>25 dB
............................ UKW 87,5 - 107,9 MHz / MW 530 - 1710 kHz
USB-/Speicherkartenbetrieb
Frequenzgang ............................................. 20 - 20000 Hz
Rauschabstand........................................... >60 dB
Kanaltrennung ............................................ >50 dB
Abspielbare Dateiformate ........................
Abspielbare Medien .................................. SD/MMC, SDHC max. 16 GB / USB max. 32 GB
Strombelastbarkeit USB-Ausgang .......... max. 500 mA
MP3
33

14. Entsorgung
Elektronische Geräte sind Wertstoe und dürfen nicht in den Hausmüll!
Entsorgen Sie das Produkt am Ende seiner Lebensdauer gemäß den geltenden gesetzlichen Be
stimmungen.
Entnehmen Sie evtl. eingelegte Batterien und entsorgen Sie diese getrennt vom Produkt.
Entsorgung von gebrauchten Batterien/Akkus
Sie als Endverbraucher sind gesetzlich (Batterieverordnung) zur Rückgabe aller gebrauchten
Batterien und Akkus verpflichtet; eine Entsorgung über den Hausmüll ist untersagt.
Schadstohaltige Batterien/Akkus sind mit dem nebenstehenden Symbol gekennzeichnet, das
auf das Verbot der Entsorgung über den Hausmüll hinweist. Die Bezeichnungen für das aus
schlaggebende Schwermetall sind: Cd = Cadmium, Hg = Quecksilber, Pb = Blei. Ihre verbrauchten
Batterien/Akkus können Sie unentgeltlich bei den Sammelstellen Ihrer Gemeinde oder überall
dort abgeben, wo Batterien/Akkus verkauft werden.
15. Konformitätserklärung
Hiermit erklärt der Hersteller, dass sich dieses Produkt in Übereinstimmung mit den grundlegenden Anforderungen und den anderen relevanten Vorschriften der Richtlinie 1999/5/EG befindet.
Die Konformitätserklärung zu diesem Produkt finden Sie unter www.conrad.com.
-
-
34

Table of Contents
Page
1. Introduction.........................................................................................................................................................36
2. Intended Use
3. Symbols ...............................................................................................................................................................37
4. Safety Information .............................................................................................................................................
5. Control Elements ................................................................................................................................................
6. Product Description
7. Mechanical Installation ....................................................................................................................................
a) Installation in the Radio Slot ......................................................................................................................
b) Removal .........................................................................................................................................................44
c) Hands-Free Microphone ............................................................................................................................
8. Electric Connection ...........................................................................................................................................
a) Connecting the Aerial .................................................................................................................................
b) Connecting the LINE Outputs ....................................................................................................................
c) AUX IN Connection .....................................................................................................................................
d) Hands-Free Microphone Connection .......................................................................................................
e) Connection of the Speakers and the Power Supply ..............................................................................
f) Inserting / Replacing the Remote Control Battery .................................................................................
9. Operation .............................................................................................................................................................49
a) General Operation .......................................................................................................................................
b) Menu Settings ..............................................................................................................................................
c) Radio Mode ..................................................................................................................................................
d) USB/Memory Card Operation ....................................................................................................................
e) Remote Control Functions ..........................................................................................................................
f) Bluetooth®-Operation ..................................................................................................................................61
10. Maintenance.......................................................................................................................................................63
a) Fuse Replacement .......................................................................................................................................
b) Cleaning ........................................................................................................................................................63
11. Handling ...............................................................................................................................................................64
12. Troubleshooting ..................................................................................................................................................64
13. Technical Data ....................................................................................................................................................
14. Disposal ...............................................................................................................................................................67
15. Declaration of Conformity
.......................................................................................................................................................37
...........................................................................................................................................41
.................................................................................................................................67
(
38
39
42
43
44
45
45
46
46
46
46
48
49
51
54
57
60
63
66
35

36
1. Introduction
Dear Customer,
thank you for purchasing this product.
This product complies with the statutory national and European specifications. To maintain this status and
to ensure safe operation, you as the user must observe these operating instructions!
These operating instructions are part of this product. They contain important notes on commis-
sioning and handling. Also consider this if you pass on the product to any third party. Therefore,
retain these operating instructions for reference!
If there are any technical questions, please contact:
International: www.conrad.com/contact
United Kingdom: www.conrad-electronic.co.uk/contact

2. Intended Use
With the Renkforce BT-RSD-1802K SD tuner you can receive radio programmes in vehicles and play back
audio data from suitable media and amplify the audio signals received in this manner. It also serves as
hands-free system for Bluetooth®-capable mobile phones.
The device must be connected to speaker.
This device is only approved for connection to 12 V direct current on-board networks with the negative pole
of the battery to the car body. The device must only be installed and operated in vehicles with this kind of
on-board voltage.
The user must make sure that the way the product is installed protects the product from humidity and
wetness.
Any use other than that described above can damage the product and may involve additional risks such as
short circuit, fire, electric shock, etc.
No part of the device must be modified or converted, and the casing must not be opened.
Observe all safety information in these operating instructions!
3. Symbols
The exclamation mark symbol indicates that the user must read these operating instructions
before commissioning of the device, and observe them during operation.
The “Hand” symbol indicates special advice and operating information.
37

38
4. Safety Information
The warranty/guarantee will expire if damage is incurred resulting from non-compliance with
these operating instructions. We do not assume liability for any consequential damage.
Nor do we assume any liability for damage to property or personal injury caused by improper
use or failure to observe the safety instructions. In such cases the warranty/guarantee is voided.
Dear Customer: The following safety information is intended not only for the protection of the
device but also for the protection of your health. Please read the following items carefully:
• For safety reasons, any unauthorized conversions and/or modifications to the product are not
permitted.
• The device must only be used with the 12 V DC vehicle power supply (with the negative termi
nal of the battery connected to the body of the vehicle). Never connect the device to a dierent
power supply.
• Ensure proper commissioning of the device. Observe the operating instructions for it.
• This product is not a toy and not suitable for children. Children cannot judge the dangers invol
ved when handling electrical devices.
• Do not expose the device to any high temperatures, dripping or splashing water, strong vibra
tions or heavy mechanical stress.
• Never operate the device unattended.
• Do not leave any packing material unattended. It may become a dangerous toy for children.
• Also observe the safety and operating instructions of any other devices that are connected to
the device.
• If you are not sure about the correct connection or if there are any questions that are not co
vered by the operating instructions, do not hesitate to contact our technical support or another
specialist.
-
-
-
-

5. Control Elements
PWR/MUT
PAIR
MODE
VOL
VOL
LOU
BND
SEL
1
PAU
2
SCN
3
RPT
4
SHF
5
DIR
6
DIR
7
AF
8
EQ
9
PTY
*
0
DISP
#
MON
TA
6
20
12
16
21
28
19
29
25
13
14
17
18
22
26
24
9
1
8
23
27
39

40
(1) 66 button
(2) DSP / TA /
(3) LC display
(4) AUX IN Connection
(5) USB interface
(6) / MUT button
(7) RESET button
(8) 44 button
(9) VOLUME rotary control / SELECT button
(10) Memory card reader
(11) BND / AMS /
(12) PAU button
(13) SCN button
(14) RPT button
(15) Station buttons 1-6
(16) SHF button
(17) DIR- button
(18) DIR+ button
(19) MODE / PAIR button
(20) / BAND / LOU button
(21) AF / MON / 7 button
(22) EQ / TA / 8 button
(23) * button
(24) DISP / 0 button
(25) Button
(26) PTY button / 9
(27) # button
(28) VOL+ button
(29) VOL- button
button
button

6. Product Description
This device is equipped with the following characteristics:
• FM / AM radio unit
• USB interface
• MMC / SD card slot
• Bluetooth® hands-free system
• Music playback via Bluetooth® interface (A2DP)
• IR remote control
• High output (4 x 40W max.)
• Preamp output for the connection of a power amplifier
• Front AUX IN for connecting external audio sources
• Electronic volume, bass, treble, fader and balance control
• Digital signal processor for the adaptation of the sound characteristics to various music styles
• Loudness correction
• FM radio unit with RDS-function
• Exact electronic tuning of the stations with a PLL-tuner
• 24 programmable station memory slots (18 x FM, 6 x AM)
• Manual / automatic station scan in both directions
• Automatic station storage
• Alphanumerical DOT-matrix display
• ID3-day display for MP3-playback
• Time setting by means of the RDS system
• ISO terminal
41

42
7. Mechanical Installation
In most vehicles the producers plan an installation cut-out for the car radio. The choice of the location
depends on safety aspects. Therefore we recommend that you actually install the radio in this place.
The SD tuner requires a DIN installation cut-out with the dimensions 182 x 53 mm; these dimensions are
standardized and usually the vehicle manufacturers comply with them.
Should there be no slot, please ask your car dealer about the correct place of installation for your car
radio.
Please select the place of installation carefully so that the SD tuner neither influences the
driver’s activity nor distracts him from the trac.
Only use the supplied installation material to guarantee a safe installation.
Any changes in the vehicle that become necessary for the installation of the SD tuner or other
components must be carried out in such a way that neither trac security nor the stability of the
car are aected. With many cars, the type approval will lapse if you merely saw out a section of
the sheet metal.
Since the SD tuner creates heat during operation, the place of installation must be heat-resi
stant.
Before drilling the attachment holes, make sure that no electric cables, brake lines, the fuel
tank or similar are damaged.
When using tools to install your car hi-fi components, observe the manufacturer’s safety infor
mation.
When installing the car hi-fi system, take into consideration the risk of accident which can
arise from devices being torn away in the case of an accident. Therefore, you should secure
every component in a place where it cannot be dangerous to passengers.
Before you install the system, check the depth of the installation recess.
-
-

a) Installation in the Radio Slot
• Unlock the installation frame with the two unlocking keys (figure 1, item 1).
• Remove the installation frame towards the back of the system (figure 1, item 2).
• Insert the frame into the respective cut-out in the vehicle (figure 2).
• Bend down some clips in the installation frame until the frame is securely fastened in the recess (figure
3).
• When you have made all the electrical contacts (see “Electric Connection”) insert the SD tuner into the
frame until it locks in (figure 4).
Keep the two unlocking keys. You will need them for a later removal of the SD tuner.
• Protect your SD tuner from vibrations with the bolt at the back of the unit.
• In most vehicles, such a safety fastening is provided for. If this is not the case in your car, fasten the SD
tuner with the enclosed punched metal strip.
For the fastening, proceed as shown in the following figure:
43
44
b) Removal
• Insert the two unlocking keys into the lateral slots in the installation frame until the device unlocks.
• Loosen the fastening screw at the back of the device if required.
• Carefully pull out the radio with the unlocking keys from the installation frame.
• Remove all plug connections at the back of the unit.
c) Hands-Free Microphone
The microphone for the hands-free system can be attached to the sunblind, the steering column cover or
any other suitable position inside the vehicle.
The microphone and connection line must never be in the airbag trigger area.
• Attach the hands-free microphone in a suitable position with the clamp.
• Place the connection line to the radio installation slot.

8. Electric Connection
The electric connection should be made by a specialist.
To avoid short circuits and resulting damage to the SD tuner, the negative pole (earth) of the
vehicle battery must be disconnected during connection.
Only connect the negative pole of the battery when you have completely connected the system
and checked the connections.
You should only use a voltmeter or a diode test lamp for checking the voltage on the on-board
cables as normal test lamps consume excessive currents and can thus damage the electronic
system of the car.
When laying the cables, make sure that they are not squeezed or scoured on sharp edges. Use
rubber grommets for the feed-though points.
Connection to the speakers must be two-wire each. Insulate any open connection points. Make
sure that the cables are not damaged by sharp edges.
Only use speakers with sucient load capacity (see “Technical Data”).
Observe that all speakers have the correct polarity - that is, that plus and minus marks match.
The connecting cables of the loudspeakers are usually coded: Some speaker manufacturers
indicate the (+) wire by means of an additional colour stripe, others use a corrugated cable for
the (+) terminal and a smooth one for the (-) terminal.
The system was designed for the operation at speaker impedances of at least 4 Ohm. Never
connect speakers with a lower impedance.
In most vehicles the cables for the electric connection and the connection of the speakers have
been laid directly to the slot.
If this is not the case, please make sure that any cables placed later are secured by the respec
tive on-board fuses (see vehicle operation manual).
-
a) Connecting the Aerial
• Connect the aerial plug of your vehicle with the aerial socket at the back of the radio (socket next to the
cinch terminals).
• If your vehicle has a dierent aerial plug, please use a suitable adapter, available in specialist shops.
45

46
b) Connecting the LINE Outputs
The SD tuner has LINE outputs for connecting a power amplifier.
For the connection of the cinch sockets only use the shielded cinch wires. Use of any other
cables may cause interferences.
Keep the distance of the cables as short as possible.
Do not place the cables near other cables to avoid interferences in the cables.
To avoid distortions or mismatching that could damage the device, cinch connector must only
Connect the cinch sockets at the rear of the casing to the power amplifier inputs.
The white socket is a terminal for the left channel
be connected to devices with the suitable cinch terminals. For this, observe also the connection
information in the section “Technical Data”.
The red socket is a terminal for the right channel
c) AUX IN Connection
You can connect an external audio device (e.g. portable MP3 player) to the port AUX IN (4) whose signal is
played back via the vehicle speakers.
Connect the port AUX IN (4) with the audio output of the external device.
d) Hands-Free Microphone Connection
Connect the plug of the hands-free microphone to the coupling of the black connection line at the back of
the device.
e) Connection of the Speakers and the Power Supply
Vehicles equipped with an ISO plug can be connected directly to the ISO connection terminal if the plug
assignment is the same (please check beforehand!). If the plug assignment diers, use a vehicle-specific
adapter from a vendor for connection.
Please refer to the following figures for the contact assignment of the ISO connection socket of the SD
tuner.
Please ask your car dealer for the respective assignment of your vehicle system plug.

System connector B (speaker connection)
(1) Speaker rear right (+)
(2) Speaker rear right (-)
(3) Speaker front right (+)
(4) Speaker front right (-)
(5) Speaker front left (+)
(6) Speaker front left (-)
(7) Speaker rear left (+)
(8) Speaker rear left (-)
System plug A (power supply)
(1) (Not assigned)
(2) (Not assigned)
(3) (Not assigned)
(4) Continuous current +12V
(5) Aerial control output
(6) (Not assigned)
(7) Ignition +12V
(8) Ground
• The constant current terminal +12V (4) must be connected to a cable that also supplies 12V permanently
when the ignition is o (terminal 30 of the on-board network). This terminal serves to save the user set
tings, time, etc.
• The aerial control output (5) supplies a voltage of +12V when the device is switched on. This cable can
be used for the power supply of an electrical aerial and for the voltage for switching on a car amplifier.
• The ignition terminal +12V (7) must be connected to a cable that is only live with +12V when the ignition
is on (terminal 15 of the on-board networks).
Do not connect this terminal to continuous current, otherwise the on-board battery could be
discharged when the vehicle is parked for an extended period of time.
• Connect the ground connection (8) with the vehicle body.
Adhesive techniques which become ever more common and painted metal parts impair the elec-
tric conductivity. Therefore, not every metal part is a suitable earthing point.
47
-

48
f) Inserting / Replacing the Remote Control Battery
Observe correct polarity when inserting the battery.
Do not leave any batteries lying around openly. There is a risk of batteries being swallowed by
children or pets. If swallowed, consult a doctor immediately.
Leaking or damaged batteries may cause alkali burns if they come in contact with the skin.
Therefore, use suitable protective gloves.
Do not short-circuit the battery and do not throw it into fire. It also must not be recharged. Dan
ger of explosion.
Remove the battery when the device is not in use for extended periods of time.
• Unlock the safety lever und remove the battery holder on the back of the remote control.
• Insert a new 3V lithium button cell battery CR2025 in the correct polarity. The positive pole of the battery
must point up.
• Close the battery compartment again. The latching tab must latch audibly.
• If the remote control no longer functions properly, the battery is discharged and must be replaced with a
new one of the same type.
• Battery change takes place as described above.
• Replace the discharged battery with a new battery of the same type.
-

9. Operation
Only take the device into operation after familiarising yourself with its functions and these
operating instructions.
Check all the connections again. When you have done so, reconnect the negative pole of the car
a) General Operation
Button / MUT (6)
This button switches the radio on and o and activates muting.
Push briefly with the device switched o > device is switched on
Push briefly with the device switched on > muting is switched on or o
Keep pushed with the device switched on > device is switched o
VOLUME rotary control / SELECT button (9)
In standard operation, the VOLUME control is for setting the volume.
Push the SELECT button (2) once or several times to change the parameters BAS (bass control),
TRB (treble control), BAL (balance control) and FAD (fader control), LOUD (loudness function) and DSP
(digital signal processor) by turning the VOLUME control.
Loudness function:
LOUD ON: The loudness function is active.
LOUD OFF: The loudness function is inactive. The sound is not influenced.
battery.
To switch the SD tuner on, you can also push any other button on the device.
At low volumes the human ear does not perceive very low and very high sounds well. An incre-
ase of the frequency range for low volume (loudness correction) counteracts this eect and the
music replay sounds more natural.
DSP function:
FLAT Signal processor on, linear frequency response
CLASSICS Pre-settings for classical music
POP M Pre-setting for pop music
ROCK M Pre-setting for rock music
DSP OFF Signal processor o
LC Display (3)
The LC-display (3) shows all the information, depending on the audio source that is being played (radio,
SD-player etc.).
49

50
DSP / TA button (2)
With this button various information can be displayed on the LC display (3). Press the button once more to
move to the next display.
When the button is not activated anymore, the display returns to the original information after a little whi
le.
The button can also be used to set the time manually.
Switching the display information
When an RDS station is being received:
Radio operation: Station name > Time > Program type
SD/USB operation: Track display > Time > ID3 Information > Station name > Transmission frequency >
Program type
When receiving a non-RDS station:
Radio operation: Transmission frequency > Time > PTY NONE
SD/USB operation: Track display > Time > ID3 Information > Transmission frequency > PTY NONE
Setting the Time
Push the button briefly until the time is displayed.
Then hold the button pushed until the time display flashes.
Use the button
MODE / PAIR button (19)
With this you can select various audio sources.
Briefly push this button to switch to the next source:
TUNER > USB > SD-MMC > AUX
66 (1) to set the minutes and the button 44 (8) to set the hours.
When one of the sources is not active, i.e. no medium inserted, this source will be skipped in the
selection.
-
RESET button (7)
This button resets all settings to factory settings.
Push this button with a pointy object (e.g. a ball point pen tip) in the following cases:
- when you have completed the installation and connection
- when the SD tuner does not react to the operation of buttons anymore
- when the display shows undefined characters

b) Menu Settings
VOLUME rotary control / SELECT button (9)
To select the menu settings, please push the SELECT button a little longer (>2 seconds) and then push this
button once more, but only very briefly, until the desired function appears on the display.
Choose the options for the respective settings by turning the VOLUME control.
BEEP ON / OFF
BEEP ON: Every activation of a button is confirmed by a signal sound.
BEEP OFF: The sound confirmation function is deactivated.
P-VOL
Set the activation volume of the device here by turning the VOLUME dial.
AREA EUR / USA
AREA EUR: Radio frequency band setting for Europe
FM 87.5-108 MHz / 50 kHz steps
AM 522-1620 kHz / 9 kHz-steps
AREA USA: Radio frequency band setting for USA
FM 87.5-107,9 MHz / 100 kHz steps
AM 530-1710 kHz / 10 kHz-steps
AF ON / OFF
AF ON: AF is switched on
AF OFF: AF is switched o
The AF function activates automatic station tracking (see “Radio Operation”).
“AF” will be displayed. If the reception of an RDS transmitter station gets weaker or the radio does not
receive and RDS station at all, the display flashes. When a station can be received well, the symbol is
displayed continuously.
When you leave a transmission area, the radio can only switch to a better station when the AF function is
activated (AF ON).
51

52
PTY search
This is where you can specify the desired station type for the PTY search and start searching.
Use the rotary control VOLUME (9) to set the desired programme type and push one of the buttons
44 (8) or 66 (1) to start searching.
Now search for a station with this programme type starts. The following programme modes are available:
NEWS, AFFAIRS, INFO, SPORT, EDUCATE, DRAMA, CULTURE, SCIENCE, VARIED, POP M, ROCK M,
EASY M, LIGHT M, CLASSICS, OTHER M, WEATHER, FINANCE, CHILDREN, SOCIAL, RELIGION, PHONE IN,
TRAVEL, LEISURE, JAZZ M, COUNTRY, NATION M, OLDIES, FOLK M, DOCUMENT, TEST, ALARM
HOUR 12H / 24H
12H: The time is displayed in 12h format.
24H: The time is displayed in 24h format.
PCLK ON / OFF
PCLK ON: The time is displayed when the device is o.
PCLK OFF: The time is not displayed when the device is o.
CON BT / DISCON BT
This function connects and disconnects Bluetooth® devices to and from the SD tuner. For more information
on this, see chapter “Bluetooth® operation”:
TA SEEK / ALARM
TA SEEK: When the radio has lost the trac information, it will seek a new station with Trac
Announcement coding.
TA ALARM: When the radio cannot receive the TA code anymore, there will be an alarm signal.
PI SOUND / MUTE
Device reaction when a transmission area is reached where 2 dierent stations with dierent programme
identification are transmitting the same AF (alternative frequency):
PI SOUND: The radio switches to the new station for a few seconds and then back.
PI MUTE: The new station is muted.

RETUNE L / S
RETUNE L: When the radio does not receive trac announcements any more, the auto-scan starts
90 seconds later.
RETUNE S: When the radio does not receive trac announcements any more, the auto-scan starts
30 seconds later.
MASK DPI / ALL
Device reaction during channel search:
MASK DPI: Alternative frequencies with dierent programme information (PI) are not considered.
MASK ALL: Alternative frequencies with dierent programme information (PI) and alternative
frequencies with a high signal strength but without RDS information are not considered.
EON TA LO / DX
Device reaction when switching to EON trac announcements:
EON TA LO: The device only switches to EON trac announcements when the EON transmitter
signal strength is good and no interferences are to be expected.
EON TA DX: The device always switches to EON trac announcements; signal strength is not
considered.
TA VOL
In case of trac reports and activated TA function, the pre-set volume is selected where the volume set
is lower.
Set the desired volume by turning the VOLUME rotary control (9).
REG ON / OFF
REG ON: The device only switches to a dierent frequency with exactly the same program if the
reception grows weaker.
REG OFF: When the reception grows weaker, the device switches to another transmitter with the
same regional identification.
53

54
c) Radio Mode
Receiving concept RDS
The abbreviation RDS stands for Radio Data System, i.e. inaudible, additional information codes are trans
mitted by the FM RDS station.
With the BT-RSD-1802K, you have a SD tuner that is able to evaluate these coded data that are transmitted
by most of the radio stations.
The following important data is transmitted:
- Program Identification (PI)
- Trac Program (TP)
- Trac Announcement (TA)
- Program Service (PS)
- Alternative Frequencies (AF)
- Program Type (PTY)
- EON Information (enhanced other networks)
- Clock time (CT)
Program Identification (PI)
This information helps the receiver to identify a station. It enables the radio to dierentiate between areas
where the same programme is transmitted. The car radio only switches to a stronger station when the
reception grows weaker if the stronger station transmits the same programme identification.
Trac Programme (TP)
This signal enables the receiver to detect that a station with a trac programme is being received.
-
Trac Announcement (TA)
With this signal the receiver can detect a trac announcement and interrupt the current playback of a
dierent audio source.
Program Service (PS)
This information tells the receiver which station it is receiving. It is directly played back in the display of
the car radio, e.g. BAYERN 3.
Alternative Frequencies (AF)
A list of alternative frequencies that send the same programme is transmitted. If the transmitter station
currently received becomes too weak, the receiver detects from the AF signal on which frequencies it must
search for a better station.

Program Type (PTY)
This code gives the receiver information on the type of the transmitted programme (e.g. sports, classic,
news etc.). The listener can select his favourite programme more directly.
A national disaster alarm can also be sent this way. However, not all the radio stations oer the PTY ser
vice.
EON Information (EON)
Many radio station chains with various programmes only have one programme with trac information.
If EON information is transmitted, a radio equipped with an EON function switches to the Trac Announ
cement station whenever such announcements are made, even if a dierent programme of this chain is
being played.
If you listen to BR Klassik (no trac announcement) and the TA function is activated, the radio will switch
to Bayern 3 (with trac announcements) for the time of a trac announcement.
Clock time (CT)
Many stations transmit the current time in the RDS data. If a radio receives this signal, it sets the in-built
clock automatically.
Therefore, when you leave the transmission area, the RDS system has the advantage that it switches to
a similar transmitter station that can be better received. However, it only changes when it finds a better
station with the same programme.
Short signal attenuations due to the reception cannot be eliminated by the RDS system either, since this
would mean that the car radios permanently switches back and forth. The listener would feel much more
disturbed by this than by short-term reception problems.
Another advantage of the RDS system is that the station name is displayed. The station name of an RDS
station is displayed in the car radio.
-
-
55

56
Button functions
BND / AMS button (11)
Briefly push this button to select the band range of the radio unit.
There are 3 FM areas and one AM area available:
F1 > F2 > F3 > AM
On each of the four band ranges, 6 stations can be stored on the station buttons 1-6 (15).
Keep this button pushed to activate automatic station search. SEARCH flashes in the display.
All stations that can be received well are automatically stored for the station buttons 1-6 (15).
After this procedure, the stored stations are played for a few seconds.
44 (8) and 66 (1) buttons
With these buttons the receiving frequency can be changed to adjust stations in radio operation.
Briefly pushing a button starts the automatic station search (display shows SEARCH).
The auto-scan only stops at the next station that can be received well.
By pushing a button longer, you activate manual station scan.
The display shows MANUAL.
In this mode, the frequency is changed until you release the corresponding button again. Brief pushes of
this button changes the frequency step by step.
If buttons are not pushed for an extended period of time, the devices switches back to automatic
station search. The display shows AUTO.
Station buttons 1-6 (15)
If you briefly push these buttons, you can select a station you have pre-set.
If you want to store a station you are listening to, simply push the desired button for more than 1 second.
Every one of the three FM ranges (F1-3) and the AM reception range (MW) has six station but-
tons. Therefore you can assign 24 station buttons.
DSP / TA button (2)
Keep this button pushed to switch the TA function on or o.
When you receive a trac programme station, the display shows TP (trac programme).
When you keep the TA button pushed, TA appears in the display as well.
If a dierent source is being played (e.g. SD playback), the programme is set to mute during the trac
announcement.
If you listen to a current radio programme at very low volume, volume will automatically turn up for the
trac report.

d) USB/Memory Card Operation
The SD tuner is equipped with a USB interface and a memory card reader for SD/MMC cards.
MP3 files stored on these media can be played.
Do not connect any MP3-player to the USB interface if it is battery-operated.
The USB interface power supply may load the inserted batteries and cause overheating or ex
plosion of a battery.
USB media up to 32 GB and a power intake of up to max. 500 mA can be connected to the USB
interface.
Only USB storage media can be operated at the USB socket. MP3 players with a USB port usually
switch into PC mode when this port is connected. In this mode, music files cannot be played.
However, you may connect the audio output of your MP3 player to the AUX IN (4).
Supports SD/MMC-cards and SDHC-cards up to 16 GB.
The media must be formatted in FAT 16 or FAT 32.
Due to the great variety of systems with USB and SD/MMC card interfaces and their dierent
functions that are sometimes producer-specific, we cannot guarantee that all media will be re
cognized and that all the operational functions are available in this SD tuner.
If the storage medium is not recognised, remove it and insert it again.
• Connect your USB storage medium with the USB port (5).
• If you use a memory card, insert it into the memory card reader (10).
• The player switches to the respective input automatically and starts playback.
• The last inserted medium is selected automatically.
44 (8) and 66 (1) buttons
With these buttons you can select individual tracks or search for a specific section within one track.
The arrows on the buttons indicate the search direction (forward or back).
Only push the buttons briefly to jump to the next or previous track.
Push the buttons longer to search a certain section within one track. Playback is accelerated in this case.
-
-
DIR- (17) and DIR+ (18) buttons
These buttons serve to select the folders on the storage medium.
DIR- (17) selects the previous folder.
DIR+ (18) selects the next folder.
If no folder structure is present on the storage medium, these buttons have no function.
57

58
PAU button (12)
Push this button to interrupt the playback briefly.
When you confirm the button again, playback will begin at the point where it was interrupted.
SCN button (13)
Push this button briefly to play each track approx. for 10 seconds (display S-SCN).
Keep this button pushed to play the tracks of the current folder for approx. 10 seconds each
(display D-SCN).
To de-activate this function again, push the button SCN (13) again.
Playback will be normal from this point onward.
RPT button (14)
Push this button briefly to repeat the currently played track (display S-RPT).
Keep this button pushed to repeat all tracks of the current folder (display D-RPT).
To de-activate this function, push the button RPT (14) again.
SHF button (16)
Push this button briefly to play all tracks at random order (display S-SHF).
Keep this button pressed to play the tracks of the current folder in random order (display D-SHF).
To deactivate this function again, push the button SHF (16) again.
Playback continues in normal order from here.
Search function for USB/memory card operation
Searching for track numbers
- Push the BND / AMS (11) button once to activate track number search.
- Select the desired track number with the rotary control VOLUME (9).
- Press the SELECT button (9).
- The selected track is played automatically.

Searching for track names
- Push the BND / AMS (11) button twice to activate track name search.
- The first digit of the track display flashes.
- Select the desired letter with the rotary control VOLUME (9).
- Press the SELECT button (9), the second character flashes.
- Select the other letters the same way if applicable.
- Keep the SELECT button (9) pushed.
- All tracks and folders starting with the selected letter/s are displayed.
- Select the desired track or folder with the rotary control VOLUME (9).
- If the selected name is a folder name, the display shows (, ,).
- In this case, select the track name within this folder with the rotary control VOLUME (9).
- Press the SELECT button (9).
- The selected track is played automatically.
Search via the folder structure
- Press the BND / AMS (11) button three times to activate search via the folder structure.
- The first directory structure is displayed.
- Select the desired folder with the rotary control VOLUME (9).
- Press the SELECT button (9). The file is selected and the name of the first track or the next sub-file is
displayed.
- Select the desired track or the next sub-file with the VOLUME control (9).
- Continue in the same way until the desired track is displayed.
- Press the SELECT button (9).
- The selected track is played automatically.
Search within the currently selected directory
- Press the BND / AMS (11) button four times to activate search via the current directory.
- The name of the current directory is displayed.
- Use the rotary control VOLUME (9) to select the desired track or (, ,) for the desired directory.
- Proceed as already described in “Search via the folder structure”.
59

60
e) Remote Control Functions
Almost all of the functions of the SD tuner can also be activated by use of the remote control included in
the delivery contents. In addition, the operation of the Bluetooth® speakerphone can also be controlled this
way in a comfortable and safe manner.
The buttons have the same label as the ones on the unit itself do.
Additional keys:
VOL+ (28) and VOL- (29)
Volume control
Buttons 0 to 9 and buttons * (23) and # (27)
Input of phone numbers in connection with the hands-free system
/ BND / LOU (20)
During a phone call > hanging up the phone
During radio operation > switching the reception band
Long operation > The loudness circuit is switched on and o
AF / MON / 7 (21)
Short operation > AF function is switched on and o
Long operation > Mono stereo switching of the radio reception
EQ / TA / 8 (22)
Short operation > Selection of the DSP function (digital sound processor)
Long operation > The TA function is switched on and o
DISP / 0 (24)
Switching the display information
(25)
Accepting a call in connection with the hands-free system
PTY / 9 (26)
Activating the PTY function in radio operation (programme type selection with the buttons VOL+ (28) and
VOL- (29))

f) Bluetooth®-Operation
To permit best phone reception and keep electromagnetic irradiation in the vehicle as low as
possible, always use an outside aerial in mobile phone operation.
In Bluetooth® operation, the SD tuner can be used as hands-free system for mobile phones and/or as
playback device for Bluetooth®A2DP audio streaming. Before transmission between your mobile phone or
Bluetooth® device and the SD tuner is possible, however, both devices must be coupled. This process is
called “Pairing”.
Pairing
• Switch your Bluetooth® device on and activate the pairing mode here (see instructions of the correspon
ding device). The device scans for Bluetooth® devices in the reception range.
• Press the button MODE / PAIR (19) until the display shows PAIRING.
• When the SD tuner was found, your Bluetooth® device shows the name CarBT.
• Enter the password 0000 to couple the two devices.
• After successful pairing, the display (5) indicates the Bluetooth® symbol
• If pairing was not successful, try repeating the process. The CarBT device may have to be deleted in your
mobile phone first (see mobile phone instructions).
• To remove or create a connection, you may also select the item CON BT (connect) or DISCON BT (dis
connect) in the main menu (see “Menu Settings”).
Only one Bluetooth® device at a time can be coupled with the SD tuner. If there is an active
Bluetooth® connection already, this connection must be interrupted first.
If the SD tuner or Bluetooth® device with which there is an active connection is switched o or
removed from the range, the connection is interrupted. When switching on again or when the
Bluetooth® device returns into the SD tuner range again, the connection is automatically re-esta
blished. The SD tuner display shows the Bluetooth® icon again.
To permit this automatic establishment of connection, this function may have to be activated at
the Bluetooth® device (read about this in your Bluetooth® device’s instructions).
.
-
-
-
Initiating a call with manual number input
• Push the
• Dial the desired number with the number keys 0 to 9, * (23) and # (27) at the remote control.
• The dialled number appears in the display.
• Push the
Push the button
button (25) at the remote control to enter the phone mode.
button (25) again to dial.
Push the button / BND / LOU (20) or BND / AMS / (11) briefly while entering the number
to delete the last digit entered.
/ BND / LOU (20) or BND / AMS / (11) for a longer time while entering the
number to delete the entire number.
61

62
Redial
• Press the
• LAST NUM appears in the display.
• Push the
Accepting an incoming phone call
• Press the
• Push the button
Ending a phone call
• Push the button
Call handover
• During a phone call, push the button DSP / TA /
phone or the hands-free system.
Caller ID display
• For an incoming phone call, the caller ID is shown in the display.
Audio streaming
Audio streaming is the transmission of audio data (music) by Bluetooth® to the SD tuner.
If you have am A2DP-capable Bluetooth®-device, you may connect it to the SD tuner by pairing as descri
bed above and establish an audio transmission.
• Ensure that the two devices are connected by pairing.
• Start playback/auto transmission at your Bluetooth® device (see corresponding operating instructions).
• Push the button MODE / PAIR (19) until BT AUDIO is shown in the display.
• The audio transmission is now active.
• You may now remote-control playback of your Bluetooth® device with the buttons
and button PAU (12) as usual.
button (25) twice to recall the last number.
button (25) again to call the last number dialled again.
button (25) to accept an incoming phone call.
/ BND / LOU (20) or BND / AMS / (11) to reject an incoming call.
/ BND / LOU (20) or BND / AMS / (11) to terminate a call.
(2) for a longer time to hand over the call to the mobile
If the caller suppresses his caller ID or the mobile phone network does not support this feature,
the caller ID cannot be displayed.
44 (8) and 66 (1)
-

10. Maintenance
Regularly check the technical safety of the SD tuner, e.g. for damage of the cables or the casing.
If it can be assumed that safe operation is no longer possible, the device must be turned o and precau
tions are to be taken to ensure that it is not used unintentionally. Disconnect the car power system!
It can be assumed that safe operation is no longer possible if:
• the device is visibly damaged
• if the device does not function for some reason, or
• following considerable stress during transportation
-
Before cleaning the SD tuner or performing maintenance, the following safety information must be obser
ved:
Live components may be exposed if covers are opened or components are removed.
The device must be disconnected from all power sources before any servicing or repair work is
carried out.
Capacitors inside the device may still carry voltage even though they have been disconnected
from all power sources.
Only qualified experts familiar with the hazards involved and the relevant regulations must per
form repairs.
a) Fuse Replacement
If it becomes necessary to replace a fuse, make sure that only fuses of the prescribed type and nominal
current are used (see “Technical Data”).
Never repair fuses or bridge the fuse holder.
• When the power supply has been disconnected (disconnect ISO plug!) carefully remove the fuse from
the fuse holder next to the ISO plug.
• Replace it with a fuse of the same type.
• Only then can you reconnect the SD tuner to the electric on-board system and turn it on.
• Should the fuse trigger again, have the SD tuner repaired in a specialised workshop.
b) Cleaning
Clean the exterior of the device with a soft, dry cloth or brush only.
Never use any aggressive cleaning agents or chemical solutions that may damage the surface of the ca
sing.
-
-
-
63

64
11. Handling
• If the volume inside your car is too high, you will not hear any acoustic warning signals. This constitutes
a danger to yourself and other road users. Therefore, make sure the volume is at a suitable level.
• Inattentiveness on the road may cause serious accidents. Operation of the hi-fi system may therefore
only take place if the trac situation permits and you are not unduly distracted by operating the sy
stem.
• Do not listen to excessively loud music over an extended period of time. This may damage your hearing.
12. Troubleshooting
The Renkforce BT-RSD1802K SD tuner you have purchased is equipped with state-of-the-art technology
and is safe to operate.
Nevertheless, problems or errors may occur.
Therefore, we would like to describe how to eliminate possible errors here:
Always observe the safety information!
No playback, no display, and the lights are out:
• Car fuse defective. Look up the respective fuse in the operation manual of your car. Check the fuse.
• The fuse of the SD tuner is defective. Remove the SD tuner and check the fuse.
• The positive line/earth line is loose. Remove the SD tuner and check the connections of the cables.
-
Playback only through one speaker:
• The balance control is wrongly adjusted. Adjust the balance control as described.
• The speaker connection has come loose. Remove the SD tuner and/or speakers and check the connec
tions.
Playback only through the front or rear speakers:
• The fader control is not adjusted correctly. Adjust the fader control.
• The speaker connection has come loose. Remove the SD tuner and/or speakers and check the connections.
-

In radio operation hardly any stations can be received:
• The aerial is not pulled out completely. Pull out the aerial to its full length.
• The aerial connection has come loose. Remove the SD tuner and check the connection.
• The aerial is defective. Check the connection, earthing and the aerial itself.
Interferences in radio and USB / memory card operation:
• Interferences reach the SD tuner via the positive line. Install an additional interference suppression coil
into the positive line.
• If necessary, also equip the vehicle with spark-plug suppressor sockets, distributor arms, etc. to suppress interferences.
• Bad ground connection. Check ground connection, use other grounding point if required.
When you press a station button, you only hear hissing:
• No station has been programmed. Program the stations as described above.
The device no longer responds to button commands or displays weird characters:
• Reset the device with the RESET (7) button.
The Bluetooth® audio transmission does not work:
• The connected device does not support the Bluetooth®A2DP audio transmission.
• The device is not connected to the SD tuner. Perform pairing.
The transmission quality in hands-free operation is bad:
• The distance between microphone and vehicle speakers is too low.
• The microphone is located in the air stream of sliding roof, open window, ventilation, etc.
• The distance between speaker and microphone is too large.
Repairs other than those described above must only be carried out by an authorised specialist.
65

66
13. Technical Data
General Information
Operating voltage
Power input ......................................................... 15 A max. / 7 mA standby
Fuse ...................................................................... vehicle flat fuse 15 A
Battery remote control ...................................... 3V-Lithium button cell CR2025
Output performance ..........................................4 x 40 W (max.)
Speaker impedance
Interfaces ............................................................ Bluetooth®, USB and SD/MMC-Card
Installation shaft
Mounting depth .................................................. 115 mm
Weight .................................................................. 600 g
Radio
Reception range (Europe)
Reception range (USA) .....................................FM 87.5 - 107,9 MHz / AM 530 - 1710 kHz
Frequency step (Europe)................................... FM 50 kHz / AM 9 kHz
Frequency step (USA) .......................................FM 100 kHz / AM 10 kHz
Sensitivity ............................................................ FM 10 dbµ / AM 32 dBµ
Intermediate frequency ....................................FM 10,7 MHz / AM 450 kHz
Stereo separation FM
............................................... 12 V/DC
........................................... 4 - 8 Ohm
................................................. 1 DIN (182 x 53 mm)
................................. FM 87.5 - 108.0 MHz / AM 522 - 1620 kHz
........................................ >25 dB
USB/Memory Card Operation
Frequency response .......................................... 20 - 20000 Hz
Signal-to-noise ratio .......................................... >60 dB
Channel separation
Playable file formats ..........................................
Admissible Media ..............................................SD/MMC, SDHC max. 16 GB / USB max. 32 GB
USB output current carrying capacity ...........max. 500 mA
............................................ >50 dB
MP3

14. Disposal
Electronic devices are recyclable waste and must not be disposed of in the household waste!
Dispose of the product according to the applicable statutory provisions at the end of its service
life.
Remove any inserted batteries and dispose of them separately from the product.
Disposal of Used Batteries/Rechargeable Batteries
You as the end user are required by law (Battery Ordinance) to return all used batteries and
rechargeable batteries. Disposing of them in the household waste is prohibited.
Batteries/rechargeable batteries that contain any hazardous substances are labelled with the
adjacent icon to indicate that disposal in domestic waste is forbidden. The descriptions for the
respective heavy metal are: Cd = cadmium, Hg = mercury, Pb = lead. You may return your used
batteries/rechargeable batteries free of charge to collection points in your municipality and any
where where batteries/rechargeable batteries are sold.
15. Declaration of Conformity
The manufacturer hereby declares that this product complies with the essential requirements and regulations and all other relevant provisions of the 1999/5/EC directive.
The declaration of conformity for this product is available at www.conrad.com.
-
67

68
Table des matières
Page
1. Introduction.........................................................................................................................................................69
2. Utilisation conforme ..........................................................................................................................................
3. Explication des symboles .................................................................................................................................
4. Consignes de sécurité
5. Éléments de commande
6. Description du produit
7. Montage mécanique .........................................................................................................................................
a) Montage dans la baie radio .......................................................................................................................
b) Démontage ...................................................................................................................................................77
c) Microphone mains-libres ...........................................................................................................................
8. Raccordement électrique .................................................................................................................................
a) Branchement d’une antenne .....................................................................................................................
b) Branchement des sorties LINE .................................................................................................................
c) Prise AUX IN .................................................................................................................................................
d) Branchement du microphone mains-libres ............................................................................................
e) Branchement des haut-parleurs et de l’alimentation électrique ........................................................
f) Insertion / remplacement de la pile de la télécommande ....................................................................
9. Utilisation .............................................................................................................................................................82
a) Utilisation générale .....................................................................................................................................
b) Configuration du menu ...............................................................................................................................
c) Mode radio ...................................................................................................................................................
d) Mode USB / carte mémoire .......................................................................................................................
e) Fonctions de la télécommande .................................................................................................................
f) Mode Bluetooth® .........................................................................................................................................
10. Entretien ..............................................................................................................................................................96
a) Remplacement des fusibles .......................................................................................................................
b) Nettoyage .....................................................................................................................................................96
11. Manipulation .......................................................................................................................................................97
12. Dépannage ..........................................................................................................................................................97
13. Caractéristiques techniques ............................................................................................................................
14. Élimination ..........................................................................................................................................................100
15. Déclaration de conformité
.......................................................................................................................................71
....................................................................................................................................72
.......................................................................................................................................74
...............................................................................................................................100
#
70
70
75
76
77
78
78
79
79
79
79
81
82
84
87
90
93
94
96
99

1. Introduction
Chère cliente, cher client,
Nous vous remercions pour l’achat de ce produit.
Le produit est conforme aux exigences des directives européennes et nationales en vigueur. Afin de main
tenir le produit en bon état et de garantir un fonctionnement sans danger, l’utilisateur doit impérativement
respecter le présent mode d’emploi !
Le présent mode d’emploi fait partie intégrante de ce produit. Il contient des remarques impor-
tantes à propos de la mise en service et de la manipulation du produit. Observez ces remarques,
même en cas de cession de ce produit à des tiers. Conservez donc le présent mode d’emploi afin
de pouvoir le consulter à tout moment !
Pour toute question technique, veuillez vous adresser à:
France (email): technique@conrad-france.fr
Suisse: www.conrad.ch
www.biz-conrad.ch
-
69

70
2. Utilisation conforme
Le syntoniseur SD Renkforce BT-RSD1802K est conçu pour la réception de stations radio dans les véhicules, la lecture de données audio à partir de supports de données compatibles et l’amplification des
signaux audio ainsi reproduits. L’appareil sert, en outre, de kit mains-libres pour les téléphones portables
compatibles avec Bluetooth®.
Pour la lecture, l’appareil doit être raccordé à des haut-parleurs.
Ce produit est exclusivement homologué pour le raccordement à un réseau de bord à tension continue
12 V avec pôle négatif de la batterie du véhicule sur la carrosserie. L’appareil ne doit être monté et mis en
service que dans les véhicules utilisant ce type de tension de bord.
Lors du montage, l’utilisateur doit veiller à ce que l’appareil ne prenne ni l’humidité ni l’eau.
Toute utilisation autre que celle stipulée ci-dessus provoque l’endommagement du présent produit ainsi
que des risques de courts-circuits, d’incendie, d’électrocution, etc.
Il est interdit de modifier ou transformer l’ensemble du produit ou d’ouvrir le boîtier.
Observez toutes les consignes de sécurité du présent mode d’emploi !
3. Explication des symboles
Le symbole du point d’exclamation indique à l’utilisateur qu’il doit lire ce mode d’emploi avant la
mise en service de l’appareil et qu’il doit le respecter pendant le fonctionnement.
Le symbole de la « main » précède les conseils et consignes d’utilisation particuliers.

4. Consignes de sécurité
Tout dommage résultant d’un non-respect du présent mode d’emploi annule la garantie ou ga-
rantie légale. Nous déclinons toute responsabilité en cas d’éventuels dommages consécutifs.
Nous déclinons toute responsabilité pour les dommages matériels ou corporels qui résul
tent d’une manipulation de l’appareil non conforme aux spécifications ou du non-respect des
présentes consignes de sécurité. De tels cas entraînent l’annulation de la garantie ou garantie
légale.
Chère cliente, cher client : les consignes de sécurité et mentions de danger ci-après ne sont pas
uniquement destinées à préserver le bon fonctionnement de l’appareil, mais aussi à préserver
votre santé. Veuillez attentivement lire les points suivants :
• Pour des raisons de sécurité, il est interdit de transformer et / ou modifier le produit de manière
arbitraire.
• Uniquement utiliser le réseau de bord à tension continue 12 V (pôle négatif de la batterie sur
la carrosserie du véhicule) comme source de tension. Ne branchez jamais l’appareil sur une
autre alimentation électrique.
• Veillez à ce que la mise en service de l’appareil soit eectuée dans les règles de l’art. Observez
alors le contenu du présent mode d’emploi.
• Ce produit n’est pas un jouet, il ne convient pas pour les enfants. Les enfants ne sont pas en
mesure d’évaluer les risques liés à la manipulation d’appareils électriques.
• N’exposez pas l’appareil à des températures extrêmes ni à des gouttes ou projections d’eau, ni
à de fortes vibrations ou contraintes mécaniques.
• Ne laissez pas l’appareil en marche sans surveillance.
• Ne laissez pas traîner le matériel d’emballage sans surveillance. Il pourrait constituer un jouet
dangereux pour les enfants.
• Observez également les consignes de sécurité et les modes d’emploi des autres appareils
raccordés à l’appareil.
• En cas de doute quant au raccordement correct de l’appareil ou lorsque vous avez des que
stions sans réponse dans le présent mode d’emploi, contactez notre service d’assistance
technique ou un autre spécialiste.
-
-
71

72
5. Éléments de commande
PWR/MUT
PAIR
MODE
VOL
VOL
LOU
BND
SEL
1
PAU
2
SCN
3
RPT
4
SHF
5
DIR
6
DIR
7
AF
8
EQ
9
PTY
*
0
DISP
#
MON
TA
6
20
12
16
21
28
19
29
25
13
14
17
18
22
26
24
9
1
8
23
27

(1) Touche 66
(2) Touche DSP / TA /
(3) Écran à cristaux liquides
(4) Prise AUX IN
(5) Port USB
(6) Touche
(7) Touche RESET
(8) Touche
(9) Bouton rotatif VOLUME / touche SELECT
(10) Lecteur de cartes mémoire
(11) Touche BND / AMS /
(12) Touche PAU
(13) Touche SCN
(14) Touche RPT
(15) Touches 1 à 6 des stations
(16) Touche SHF
(17) Touche DIR(18) Touche DIR+
(19) Touche MODE / PAIR
(20) Touche
(21) Touche AF / MON / 7
(22) Touche EQ / TA / 8
(23) Touche *
(24) Touche DISP / 0
(25) Touche
(26) Touche PTY / 9
(27) Touche #
(28) Touche VOL+
(29) Touche VOL-
/ MUT
44
/ BAND / LOU
73

74
6. Description du produit
Cet appareil ore les caractéristiques suivantes :
• Radio FM / AM
• Port USB
• Lecteur de cartes MMC / SD
• Kit mains-libres Bluetooth®
• Restitution de la musique via l’interface Bluetooth® (A2DP)
• Télécommande infrarouge
• Puissance de sortie élevée (max. 4 x 40 W)
• Sortie de préamplificateur pour le raccordement d’un amplificateur de sortie
• Prise AUX IN en façade pour le raccordement de sources audio externes
• Réglage électronique du volume, des basses, des aigus, du fader et de la balance
• Processeur de signaux numériques pour l’adaptation de la caractéristique sonore aux diérents styles
de musique
• Circuit Loudness
• Syntoniseur FM avec fonction RDS
• Syntonisation électronique précise des stations au moyen d’un syntoniseur PLL
• 24 stations radio programmables (18 stations FM, 6 stations AM)
• Recherche manuelle / automatique des stations dans les deux sens de recherche
• Mémorisation automatique des stations
• Écran alphanumérique DOT-Matrix
• Achage des métadonnées ID3 durant la lecture MP3
• Réglage de l’heure via le système RDS
• Terminal de connexion ISO

7. Montage mécanique
Les constructeurs prévoient un emplacement pour le montage de l’autoradio dans la plupart des véhicules.
L’emplacement de montage est défini en tenant compte des aspects de sécurité. Pour cette raison, il est
conseillé de monter l’autoradio à l’emplacement prévu à cet eet.
L’appareil doit être installé dans une baie de montage DIN aux dimensions 182 x 53 mm. Ces dimensions de
montage sont normalisées et sont généralement respectées par tous les constructeurs automobiles.
Si aucune baie de montage n’est prévue, veuillez consulter votre concessionnaire automobile qui vous
indiquera l’emplacement prévu pour le montage de l’autoradio.
Choisissez soigneusement l’emplacement pour le montage en veillant à ce que l’appareil ne
gêne pas le conducteur au volant et ne détourne pas son attention de la circulation.
Utilisez uniquement le matériel de montage fourni afin de garantir une installation sûre.
Les modifications indispensables sur le véhicule pour le montage du syntoniseur SD ou d’autres
Comme l’appareil produit de la chaleur pendant son fonctionnement, l’emplacement prévu pour
Avant de percer des trous de fixation, assurez-vous qu’aucun câble électrique, conduite de
Observez les consignes de sécurité des fabricants des outils utilisés pour le montage de vos
Lors du montage de votre chaîne hi-fi, tenez compte des risques de blessure qui peuvent émaner
composants doivent toujours être eectuées de manière à ne pas compromettre la sécurité
routière ni la stabilité de la construction du véhicule. Pour de nombreux véhicules, la découpe
d’une tôle à l’aide d’une scie sut pour perdre l’autorisation d’exploitation.
le montage doit être résistant à la chaleur.
frein, réservoir d’essence ou objets similaires ne soient endommagés.
composants HIFI automobiles.
d’appareils susceptibles de se détacher en cas d’accident. Pour cette raison, fixez bien toutes
les pièces à un emplacement ne présentant aucun danger pour les passagers.
Avant le montage de l’appareil, contrôlez la profondeur de la baie de montage.
75

76
a) Montage dans la baie radio
• Déverrouillez le cadre de montage à l’aide des deux clés de déblocage (figure 1, point 2).
• Retirez le cadre de montage en le tirant vers l’arrière (figure 1, point 2).
• Introduisez le cadre de montage dans la baie de montage du véhicule (figure 2).
• Pliez quelques-uns des colliers de fixation du cadre de montage jusqu’à ce que le cadre soit correcte
ment fixé dans la baie de montage (figure 3).
• Après avoir raccordé tous les câbles électriques (voir « Raccordement électrique »), glissez l’appareil
dans le cadre de montage jusqu’à ce qu’il s’y enclenche correctement (figure 4).
Conservez les deux clés de déblocage à portée de main. Le cas échéant, vous en aurez besoin
pour démonter l’appareil.
-
• Fixez en plus l’appareil à l’aide de la vis sans tête au dos de l’appareil afin le protéger contre les vibra
tions.
• Une telle protection est déjà prévue dans la plupart des véhicules. Le cas contraire, fixez l’appareil à
l’aide de la bande de tôle perforée fourni.
Pour la fixation, procédez de la manière indiquée sur la figure suivante :
-

b) Démontage
• Enfoncez les deux clés de déblocage dans les fentes latérales du cadre de montage jusqu’à ce que
l’appareil soit déverrouillé.
• Le cas échéant, desserrez la vis de fixation au dos de l’appareil.
• Retirez avec précaution l’autoradio du cadre de montage en le tenant par les clés de déblocage.
• Débranchez tous raccords enfichables au dos de l’appareil.
c) Microphone mains-libres
Le microphone pour le kit mains-libres peut être fixé au pare-soleil, à l’habillage de la colonne de direction
ou à un autre emplacement approprié dans l’habitacle du véhicule.
Il est interdit d’installer le microphone et le câble de raccordement dans la zone de déclenche-
ment de l’airbag.
• Fixez le microphone mains-libres à l’aide de la pince à un emplacement approprié.
• Posez le câble de raccordement jusqu’à la baie radio.
77

78
8. Raccordement électrique
Le raccordement électrique est réservé aux techniciens qualifiés.
Afin d’éviter les courts-circuits et les endommagements qui pourraient en découler, le pôle
négatif (masse) de la batterie du véhicule doit être déconnecté pendant le raccordement.
Rebranchez le pôle négatif de la batterie uniquement après avoir entièrement raccordé
l’appareil et contrôlé le raccordement.
Pour vérifier la tension sur les câbles de tension de bord, utilisez uniquement un voltmètre ou
une lampe témoin à diode car les lampes témoin normales absorbent des courants trop élevés
et peuvent ainsi endommager l’électronique de bord.
Durant le raccordement des câbles, veillez à ne pas les écraser ou les endommager au niveau
des arêtes vives. Utilisez des passe-fils en caoutchouc.
Veillez à utiliser des câbles bifilaires pour le raccordement des haut-parleurs. Isolez les points
de raccordement nus. Veillez à ce que les câbles ne soient pas endommagés au niveau des
arêtes vives.
Utilisez uniquement des haut-parleurs avec une capacité de charge susante (voir « Caractéri
stiques techniques »).
Respectez la polarité des haut-parleurs ; les repères plus et moins doivent coïncider.
Les câbles de raccordement des haut-parleurs sont habituellement codés : certains fabricants
de haut-parleurs marquent le câble (+) avec une bande colorée supplémentaire, d’autres utili-
sent un câble cannelé pour le pôle (+) et un câble lisse pour le pôle (-).
L’appareil a été conçu pour une l’utilisation de haut-parleurs avec une impédance minimale de
4 ohms. Ne branchez jamais des haut-parleurs avec une impédance inférieure.
Dans la plupart des véhicules, les câbles disponibles pour le raccordement électrique et la con-
nexion des haut-parleurs sont déjà posés jusqu’à la baie de montage prévue.
Le cas contraire, veiller à ce que les câbles posés par la suite soient protégés par les fusibles de
bord prévus à cet eet (voir manuel d’utilisation du véhicule).
-
a) Branchement de l’antenne
• Raccordez le connecteur de l’antenne de votre véhicule à la prise de l’antenne à l’arrière de l’appareil
(prise à côté des raccords Cinch).
• Si votre véhicule est équipé d’une autre fiche d’antenne, utilisez un adaptateur compatible disponible
dans le commerce spécialisé.

b) Raccordement des sorties LINE
Le syntoniseur SD est équipé de sorties LINE pour le raccordement d’un amplificateur de sortie.
N’utilisez que des câbles RCA blindés appropriés pour le raccordement aux prises RCA.
L’utilisation d’autres câbles pourrait provoquer des perturbations.
Veillez à utiliser des câbles de raccordement aussi courts que possible.
Ne posez pas les câbles à proximité d’autres câbles. Cela permet d’éviter un parasitage dans
Afin d’éviter les distorsions et asymétries qui risqueraient d’endommager l’appareil, branchez
Raccordez les prises RCA au dos de l’appareil aux entrées de l’amplificateur de sortie.
La prise blanche est prévue pour le raccordement du canal de gauche
les câbles.
uniquement les appareils équipés de prises RCA identiques sur les prises RCA. À ce propos,
observez également les puissances connectées indiquées dans les « Caractéristiques tech-
niques ».
La prise rouge est prévue pour le raccordement du canal de droite
c) Prise AUX IN
Un appareil audio externe (par ex. un lecteur MP3 portatif) dont le signal est transmis par les haut-parleurs
du véhicule peut être raccordé à la prise AUX IN (4).
Raccordez la prise AUX IN (4) à la sortie audio de l’appareil externe.
d) Raccordement du microphone à haut-parleur
Raccordez la fiche du microphone mains-libres à la prise du câble de raccordement noir au dos de
l’appareil.
e) Raccordement des haut-parleurs et de l’alimentation électrique
Lorsque l’aectation des connecteurs modulaires est identique (à contrôler au préalable !), les véhicules
équipés de connecteurs DIN peuvent directement être raccordés au terminal de connexion DIN. En cas
d’aectation diérente des connecteurs, eectuez le raccordement à l’aide d’un adaptateur spécifique au
véhicule disponible dans le commerce.
L’aectation des contacts de la prise femelle de raccordement du syntoniseur SD est indiquée sur les
figures suivantes.
Pour connaître l’aectation du connecteur modulaire de votre véhicule, adressez-vous à votre concessi
onnaire automobile.
79
-

80
Connecteur modulaire B (raccordement des haut-parleurs)
(1) Haut-parleur arrière droit (+)
(2) Haut-parleur arrière droit (-)
(3) Haut-parleur avant droit (+)
(4) Haut-parleur avant droit (-)
(5) Haut-parleur avant gauche (+)
(6) Haut-parleur avant gauche (-)
(7) Haut-parleur arrière gauche (+)
(8) Haut-parleur arrière gauche (-)
Connecteur modulaire A (alimentation électrique)
(1) Non aecté
(2) Non aecté
(3) Non aecté
(4) Courant continu +12V
(5) Sortie de commande l’antenne
(6) Non aecté
(7) Allumage +12V
(8) Masse
• La prise Courant permanent +12V (4) doit être raccordée à un câble qui fournit en permanence un courant 12V, même lorsque le contact est coupé (borne 30 du réseau de bord). Cette prise permet de mémo
riser les réglages de l’utilisateur, l’heure, etc.
• La sortie de commande de l’antenne (5) fournit une tension +12V lorsque l’appareil est sous tension. Cet
te ligne peut être est utilisée pour l’alimentation électrique d’une antenne électrique ou comme tension
de démarrage pour un amplificateur de voiture.
• La prise Allumage +12V (7) doit uniquement être raccordée à une ligne sous tension +12V lorsque le
contact est allumé (borne 15 du réseau de bord).
Ne branchez pas cette prise sur le courant continu. Cela pourrait décharger la batterie de bord
en cas d’immobilisation prolongée du véhicule.
• La prise Masse (8) doit être raccordée à la carrosserie du véhicule.
La technique de collage de plus en plus utilisée et les composants métalliques vernis ont pour
eet de limiter la conductivité électrique. Toutes les pièces en métal ne conviennent donc pas
comme terre.
-
-

f) Insertion / remplacement de la pile de la télécommande
Respecter la polarité lors de la mise en place de la pile.
Ne laissez pas les piles à la portée de tous, les enfants ou les animaux domestiques risquerai
ent de les avaler. En cas d’ingestion, consultez immédiatement un médecin.
Les piles corrodées ou endommagées peuvent au toucher causer des brûlures sur la peau.
Portez donc des gants de protection appropriés.
Faites attention de ne pas court-circuiter la pile, ni de la jeter dans le feu. Ne pas la recharger.
Il y a danger d’explosion.
Retirez la pile en cas d’une inutilisation prolongée de l’appareil.
• Déverrouillez le cran de sécurité et retirez le support de pile au dos de la télécommande
• Insérez une pile bouton au lithium 3 V CR2025 neuve en respectant la polarité. Le pôle positif de la pile
doit alors pointer vers le haut.
• Refermez le logement des piles. L’ergot doit s’enclencher de manière audible.
• Si la télécommande ne fonctionne plus correctement, cela signifie que la pile est déchargée et qu’elle
doit être remplacée par une pile neuve du même type.
• Le remplacement de la pile s’eectue en procédant de la manière décrite plus haut.
• Remplacez ici la pile vide par une pile neuve du même type.
-
81

82
9. Utilisation
Avant de mettre l’appareil en service, vous devez impérativement vous familiariser avec ses
fonctions et le présent mode d’emploi.
Contrôlez encore une fois si tous les raccordements ont correctement été eectués. Après ce
contrôle, reconnectez le pôle négatif de la batterie de bord.
a) Utilisation générale
Touche / MUT (6)
Cette touche permet d’allumer ou d’éteindre l’appareil et d’activer la fonction Muet.
Pression brève lorsque l’appareil est éteint > L’appareil s’allume
Pression brève lorsque l’appareil est allumé > La fonction Muet est activée ou désactivée
Pression prolongée lorsque l’appareil est allumé > L’appareil s’éteint
Pour mettre en marche l’appareil, il sut d’appuyer sur une touche quelconque.
Bouton rotatif VOLUME / touche SELECT (9)
Durant le fonctionnement normal, le bouton rotatif VOLUME permet de régler le volume.
Une ou plusieurs pressions brèves sur la touche SELECT permettent de modifier les paramètres BAS (rég
lage des graves), TRB (réglage des aigus), BAL (réglage de la balance), FAD (réglage du fader), LOUD
(fonction Loudness) et DSP (processeur numérique de signaux) en tournant le bouton rotatif VOLUME.
Fonction Loudness :
LOUD ON : le circuit Loudness est activé.
LOUD OFF : le circuit Loudness est désactivé. Le son n’est pas modulé.
À bas volume, la perception des sons aigus et graves par l’ouïe humaine est plus mauvaise. Grâce
à un renforcement de ces portées de fréquences au cas où le volume serait faible (correction
Loudness), il est possible de parer à cet eet et d’obtenir une restitution audio plus naturelle.
-
Fonction DSP :
FLAT Processeur de signaux activé, courbe de réponse linéaire
CLASSICS Préréglage pour la musique classique
POP M Préréglage pour la musique pop
ROCK M Préréglage pour la musique rock
DSP OFF Processeur de signaux désactivé
Écran à cristaux liquides (3)
Toutes les informations sont achées sur l’écran à cristaux liquides (3) en fonction de la source audio
actuellement restituée (radio, lecteur SD, etc.).

Touche DSP / TA (2)
Une pression sur cette touche permet d’acher diérentes informations sur l’écran LCD (3). Chaque pres
sion sur cette touche permet de passer à l’achage suivant.
Lorsque la touche n’est plus actionnée pendant un court instant, l’écran ache à nouveau les informations
initialement achées.
Cette touche permet également de définir l’heure manuellement.
Commutation des informations sur l’écran
Durant la réception d’une station RDS :
Mode radio : Nom de la station > Heure > Fréquence d’émission > Type de programme
Mode SD / USB : Achage de la piste > Heure > Infos métadonnées ID3 > Nom de la station > Fréquence
d’émission > Type de programme
Durant la réception d’une station sans RDS :
Mode radio : Fréquence émise > Heure > PTY NONE
Mode SD / USB : Achage de la piste > Heure > Infos métadonnées ID3 > Fréquence émise > PTY NONE
Réglage de l’heure
Appuyez brièvement sur la touche jusqu’à ce que l’heure s’ache sur l’écran.
Maintenez ensuite la touche enfoncée jusqu’à ce que l’heure commence à clignote.
Réglez les minutes à l’aide de la touche
Touche MODE / PAIR (19)
Cette touche permet de sélectionner les diérentes sources audio.
Appuyez brièvement sur la touche pour sélectionner la source suivante :
TUNER > USB > SD-MMC > AUX
Si l’une des sources n’est pas active, c.-à-d. lorsqu’aucun support n’est inséré, elle n’est pas
disponible pour la sélection.
66 (1), puis les heures à l’aide de la touche 44 (8).
-
Touche RESET (7)
Cette touche permet de rétablir la configuration d’origine pour tous les réglages.
Appuyez sur cette touche à l’aide d’un objet pointu (par ex. la pointe d’un style à bille) dans les cas sui
vants :
- à la fin des travaux d’installation et de raccordement,
- si l’appareil ne réagit plus aux pressions sur les touches,
- lorsque l’écran n’ache que des caractères incompréhensibles
83
-

84
b) Configuration du menu
Bouton rotatif VOLUME / touche SELECT (9)
Pour ouvrir la configuration du menu, maintenez d’abord la touche SELECT enfoncée (pendant plus de
2 secondes), puis appuyez à nouveau sur cette touche, cette fois brièvement, jusqu’à ce que la fonction
souhaitée s’ache sur l’écran.
Les options du réglage correspondant se sélectionnent en tournant le bouton rotatif VOLUME.
BEEP ON / OFF
BEEP ON : chaque pression sur une touche est confirmée par un signal sonore.
BEEP OFF : le signal sonore confirmant la pression sur une touche est désactivé.
P-VOL
Réglez ici le volume lors de la mise en marche de l’appareil en tournant le bouton rotatif VOLUME.
AREA EUR / USA
AREA EUR : sélection de la bande de fréquence pour les stations européennes
FM 87,5-108 MHz / par pas de 50 kHz
FM 522-1620 kHz / par pas de 9 kHz
AREA USA : sélection de la bande de fréquence radio pour les stations américaines
FM 87,5-107,9 MHz / par pas de 100 kHz
FM 530-1710 kHz / par pas de 10 kHz
AF ON / OFF
AF ON : AF est activé
AF OFF : AF est désactivé
La fonction AF active l’ajustement automatique des stations (voir « Mode radio »).
L’indication AF s’ache sur l’écran. L’achage clignote lorsque la radio capte une station RDS faible ou
ne capte aucune station RDS. Le symbole reste aché en permanence lorsque la qualité de réception de
la station est bonne.
La fonction AF (AF ON) doit être activée afin que l’appareil puisse sélectionner automatiquement une mei
lleure station en cas de sortie de la zone de réception.
-

Recherche automatique PTY
Vous pouvez ici définir le type de station pour la fonction de recherche PTY puis lancer la recherche.
Sélectionnez le type de programme souhaité à l’aide du bouton rotatif VOLUME (9) puis appuyez sur la
44 (8) ou 66 (1) pour lancer la recherche.
touche
L’autoradio recherche une station qui correspond à ce type de programme. Les types de programme sui
vants sont disponibles :
NEWS, AFFAIRS, INFO, SPORT, EDUCATE, DRAMA, CULTURE, SCIENCE, VARIED, POP M, ROCK M,
EASY M, LIGHT M, CLASSICS, OTHER M, WEATHER, FINANCE, CHILDREN, SOCIAL, RELIGION, PHONE IN,
TRAVEL, LEISURE, JAZZ M, COUNTRY, NATION M, OLDIES, FOLK M, DOCUMENT, TEST, ALARM
HOUR 12H / 24H
12H : L’heure est achée au format 12 heures.
24H : L’heure est achée au format 24 heures.
PCLK ON / OFF
PCLK ON : L’heure est achée sur l’écran lorsque l’appareil est éteint.
PCLK OFF : L’heure n’est pas achée sur l’écran lorsque l’appareil est éteint.
CON BT / DISCON BT
Cette fonction permet de connecter ou de déconnecter les périphériques Bluetooth® et le syntoniseur SD.
Pour de plus amples informations, voir chapitre « Fonctionnement Bluetooth® ».
TA SEEK / ALARM
TA SEEK : en cas de perte des informations radio routières, l’appareil recherche une nouvelle
station avec un signal pour les annonces routières.
TA ALARM : l’appareil émet un signal d’avertissement lorsque le signal des annonces routières ne
peut plus être reçu.
-
PI SOUND / MUTE
Comportement de l’appareil en cas d’entrée dans une zone d’émission dans laquelle 2 diérents stations
avec diérentes identifications de programme (PI) émettent la même AF (fréquence alternative) :
PI SOUND : la radio commute pendant quelques secondes sur la nouvelle station puis revient à la
station précédente.
PI MUTE : la fonction Muet est activée pour la nouvelle station.
85

86
RETUNE L / S
RETUNE L : en l’absence de signal pour les annonces routières, la recherche automatique est
lancée au bout de 90 secondes.
RETUNE S : en l’absence de signal pour les annonces routières, la recherche automatique est
lancée au bout de 30 secondes.
MASK DPI / ALL
Comportement de l’appareil durant la recherche des stations :
MASK DPI : les fréquences alternatives avec diérentes informations de programme (PI) ne sont
pas prises en compte.
MASK ALL : les fréquences alternatives avec des informations de programme (PI) et les fréquences
alternatives diérentes dont le signal est plus puissant, mais sans informations RDS, ne
sont pas prises en compte.
EON TA LO / DX
Réaction de l’appareil en cas d’activation des annonces routières EON :
EON TA LO : l’appareil restitue uniquement les annonces routières lorsque la puissance du signal de
la station EON est bonne et que des perturbations sont improbables.
EON TA DX : l’appareil restitue toujours les annonces routières, la puissance du signal n’est pas
prise en compte.
TA VOL
Lors de la réception de l’annonce routière et l’activation de la fonction TA, le volume préréglé est sélecti
onné si le volume réglé est plus faible.
Réglez le volume d’annonce souhaité en tournant le bouton de réglage VOLUME (9).
-
REG ON / OFF
REG ON : si la qualité de la réception diminue, l’appareil passe à une autre station proposant
exactement le même programme.
REG OFF : si la qualité de la réception diminue, l’appareil passe également à une autre station
avec le même identifiant régional.

c) Mode radio
Le concept de réception RDS
Le sigle RDS signifie Radio Data System (système de données radio). Cela signifie que des informations
supplémentaires inaudibles codées sont émises par la station RDS FM.
Votre syntoniseur SD BT-RSD1802K est capable d’exploiter ces données codées qui sont diusées par la
quasi-totalité des stations radio.
Les informations supplémentaires suivantes sont diusées :
- Identification du programme (PI)
- Identifiant des annonces routières (TP)
- Identifiant d’annonces routières (TA)
- Nom de service du programme (PS)
- Fréquences alternatives (AF)
- Type de programme (PTY)
- Informations EON (EON)
- Heure (CT)
Identification du programme (PI)
Ces informations permettent au récepteur d’identifier une station de façon univoque. Elles permettent à la
radio de discerner les zones dans lesquelles le même programme est émis. Dès qu’il capte des signaux
faibles, l’autoradio s’accorde sur une station plus forte diusant la même identification du programme.
Identifiant des annonces routières (TP)
Grâce à ce signal, le récepteur détecte que la station écoutée diuse des annonces routières.
Identifiant d’annonces routières (TA)
Ce signal indique la diusion d’une annonce routière et permet, le cas échéant, d’interrompre la lecture en
cours à partir d’une autre source.
Nom de service du programme (PS)
Cette information indique au récepteur le nom de la station qu’il capte. Le nom est directement aché sur
l’écran de l’autoradio, par ex. RTL.
Fréquences alternatives (AF)
Une liste avec les fréquences alternatives diusant pour le même programme est transmise. Si la station
reçue devient trop faible, le récepteur détecte, à l’aide du signal AF, les fréquences sur lesquelles il doit
chercher une station dont la réception est meilleure.
87

88
Type de programme (PTY)
Ce code fournit au récepteur les informations concernant le type du programme en cours de réception
(par ex. sport, musique classique, actualités, etc.). Cela permet à l’auditeur de rechercher, de manière
ciblée, le programme de son choix.
Il est ainsi également possible de diuser une alarme en cas de catastrophe nationale. Le service PTY n’est
cependant pas proposé par toutes les stations.
Informations EON (EON)
De nombreux groupes de stations aux programmes variés n’émettent des annonces routières que sur une
seule station. Si une station diuse des informations EON, l’appareil doté d’un tel système passe à la station
de radioguidage dès que les annonces routières sont diusées, même lorsque durant l’écoute d’un autre
programme de la chaîne.
Par ex. en cas d’écoute de RTL (sans annonces routières) et que la fonction TA est activée, l’appareil passe
à RTL 2 (avec annonces routières) pour la durée des annonces routières.
Horloge (CT)
De nombreuses stations diusent l’heure actuelle avec les informations RDS. Lors de la réception de ce
signal, l’appareil règle automatiquement l’heure de l’horloge intégrée.
Le système RDS ore donc l’avantage de pouvoir passer automatiquement à une station identique et
dont la réception est meilleure dès que vous quittez la zone de diusion. Cependant, le changement ne
s’eectuera que si une station plus puissante avec le même programme est disponible.
Le système RDS ne peut pas éliminer les brèves dégradations du signal liées à la réception, la consé
quence étant un changement permanent de fréquences de l’autoradio. L’auditeur trouverait cela largement
plus gênant que de brèves perturbations de la réception.
Un autre avantage du système RDS est l’achage du nom de la station. Le nom d’une station RDS est
aché sur l’écran de l’autoradio.
-

Fonctions des diérentes touches
Touche BND / AMS (11)
Une pression brève sur cette touche permet de sélectionner la gamme de fréquences de la radio.
Vous avez le choix entre 3 bandes FM et une bande AM :
F1 > F2 > F3 > MW
6 stations peuvent être mémorisées sur les touches des stations 1 à 6 (15) de chacune des quatre
bandes passantes.
Une pression prolongée sur cette touche permet d’activer la mémorisation automatique des stations. Le
message SEARCH clignote sur l’écran.
Cette fonction permet de mémoriser automatiquement toutes les stations avec une bonne réception sur les
touches des stations 1 à 6 (15).
Une fois la procédure terminée, les stations mémorisées sont restituées pendant quelques secondes.
Touches 44 (8) et 66 (1)
Ces touches permettent de changer la fréquence de réception pour le réglage des stations en mode ra
dio.
Une pression brève sur une touche lance automatiquement la recherche des stations (achage SEARCH
sur l’écran).
La recherche ne s’arrête qu’à la prochaine station avec une bonne réception.
Si vous maintenez la touche enfoncée, la recherche manuelle des stations est activée.
L’indication MANUAL s’ache sur l’écran.
Dans ce mode, la fréquence change jusqu’à ce que vous relâchiez la touche correspondante. Une brève
pression permet de changer progressivement la fréquence.
Si vous n’appuyez sur aucune touche pendant un certain temps, l’appareil active à nouveau la
recherche automatique des stations. L’indication AUTO s’ache brièvement sur l’écran.
-
Touches des stations 1 à 6 (15)
Une pression brève sur ces touches permet de directement sélectionner une station préalablement mé
morisée.
Pour mémoriser une station en cours d’écoute, il sut d’appuyer sur la touche souhaitée pendant plus
d’une seconde.
Chacune des trois gammes de fréquences FM (F1-3) ainsi que la gamme AM (MW) proposent six
touches pour la mémorisation des stations. Au total, il est donc possible de mémoriser 24 stations.
Touche DSP / TA (2)
Une pression prolongée sur cette touche permet d’activer ou de désactiver la fonction TA.
Lors de la réception d’une station avec des annonces routières, le sigle « TP » (= Trac Programm) est
aché sur l’écran.
Lorsque la fonction TA est activée, le sigle TA s’ache également sur l’écran.
Lors de la restitution d’une autre source (par ex. lecture SD), la fonction Muet est activée pour la station en
cours d’écoute pendant la réception de l’annonce routière.
Si vous êtes en train d’écouter une émission à volume très bas, l’autoradio augmente automatiquement le
volume de l’annonce routière.
89
-

90
d) Mode USB / carte mémoire
L’appareil est équipé d’un port USB et d’un lecteur de cartes mémoire pour cartes SD / MMC.
Il est ainsi possible de lire les fichiers MP3 enregistrés sur ces supports de données.
Ne connectez pas de lecteur MP3 fonctionnant sur piles sur le port USB.
L’alimentation électrique du port USB pourrait charger les piles insérées et provoquer ainsi une
surchaue, voire une explosion de la pile.
Vous pouvez connecter les supports USB avec une capacité maximale de 32 Go et dont la con-
sommation électrique ne dépasse 500 mA sur le port USB.
Les supports de données USB peuvent uniquement être utilisés sur le port USB. En général, les
lecteurs MP3 munis d’une fiche USB basculent en mode PC dès qu’ils sont insérés. Ce mode ne
permet pas de lire les fichiers musicaux. Vous pouvez cependant toujours connecter la sortie
audio d’un lecteur MP3 sur la prise AUX IN (4).
Les cartes SD / MMC et SDHC avec une capacité maximale de 16 Go sont prises en charge.
Les supports doivent être formatés FAT 16 ou FAT 32.
En raison du très grand nombre d’appareils munis de ports USB et d’interfaces carte mémoire
et de leurs fonctions parfois très spécifiques aux fabricants, il n’est pas possible de garantir que
tous les supports soient reconnus et que toutes les fonctionnalités de l’appareil soient eective
ment prises en charge.
Si le support de données n’est pas reconnu, débranchez-le puis rebranchez-le.
• Branchez votre support de données USB sur le port USB (5).
• En cas d’utilisation d’une carte mémoire, introduisez-la dans le lecteur de cartes mémoire (10).
• L’appareil commute automatiquement sur l’entrée correspondante et lance la lecture.
• Le dernier support branché est automatiquement sélectionné.
-
Touches 44 (8) et 66 (1)
Ces touches permettent de sélectionner les diérentes pistes ou de rechercher un passage précis d’une
piste.
Les flèches sur les touches indiquent le sens de recherche (vers l’avant ou vers l’arrière).
Appuyez brièvement sur ces touches pour passer au titre suivant ou au titre précédent.
Maintenez les touches enfoncées pour rechercher un passage précis de ce titre. Dans ce cas, la lecture
s’eectue de manière plus rapide.
Touches DIR- (17) et DIR+ (18)
Ces touches permettent de sélectionner un dossier sur le support de données.
La touche DIR- (17) permet de sélectionner le dossier précédent.
La touche DIR+ (18) permet de sélectionner le dossier suivant.
Si le support de données ne contient pas de dossiers, ces touches n’ont pas de fonction.

Touche PAU (12)
Appuyez sur cette touche pour interrompre brièvement la lecture.
Une nouvelle pression sur cette touche permet de reprendre la lecture au point où elle a précédemment
été interrompue.
Touche SCN (13)
Appuyez brièvement sur cette touche pour écouter les 10 premières secondes de chaque piste (achage
S-SCN).
Maintenez cette touche enfoncée pour écouter les 10 premières secondes de chaque piste du dossier en
cours de lecture (achage D-SCN).
Pour désactiver cette fonction, appuyez encore une fois sur la touche SCN (13).
La lecture se poursuit normalement à partir de cet emplacement.
Touche RPT (14)
Appuyez brièvement sur cette touche pour répéter le titre en cours de lecture (achage S-RPT).
Maintenez cette touche enfoncée pour répéter toutes les pistes du dossier actuel (achage D-RPT).
Pour désactiver cette fonction, appuyez encore une fois sur la touche RPT (14).
Touche SHF (16)
Appuyez brièvement sur cette touche pour activer la lecture aléatoire des pistes (achage S-SHF).
Une pression prolongée sur cette touche permet d’activer la lecture aléatoire des pistes du dossier actuel
(achage D-SHF).
Pour désactiver cette fonction, appuyez encore une fois sur la touche SHF (16).
La lecture s’eectue de nouveau dans l’ordre normal à partir de cet emplacement.
Fonctions de recherche en mode USB / carte mémoire
Recherche de numéros de pistes
- Appuyez une fois sur la touche BND / AMS (11) pour activer la recherche des numéros de pistes.
- Sélectionnez le numéro de la piste correspondante en tournant le bouton rotatif VOLUME (9).
- Appuyez sur la touche SELECT (9).
- La lecture de la piste correspondante démarre automatiquement.
91

92
Recherche de noms de pistes
- Appuyez deux fois sur la touche BND / AMS (11) pour activer la recherche des noms des pistes.
- La première lettre de l’achage des pistes clignote.
- Sélectionnez la lettre correspondante en tournant le bouton rotatif VOLUME (9).
- Appuyez sur la touche SELECT (9), la seconde lettre se met à clignoter.
- Le cas échéant, répétez cette procédure pour toutes les autres lettres.
- Maintenez la touche SELECT (9) enfoncée.
- Toutes les pistes et dossiers qui commencent par la ou les lettres sélectionnées s’achent sur l’écran.
- Sélectionnez la piste ou le dossier correspondant en tournant le bouton rotatif VOLUME (9).
- Si le nom sélectionné est le nom d’un dossier, l’indication (, ,) s’ache sur l’écran.
- En tel cas, sélectionnez le nom de la piste dans le dossier en tournant le bouton rotatif VOLUME (9).
- Appuyez sur la touche SELECT (9).
- La lecture de la piste correspondante démarre automatiquement.
Recherche via l’arborescence des dossiers
- Appuyez trois fois sur la touche BND / AMS (11) pour activer la recherche via l’arborescence des dos
siers.
- La structure du dossier principal s’ache.
- Sélectionnez le dossier correspondant en tournant le bouton rotatif VOLUME (9).
- Appuyez sur la touche SELECT (9). Le dossier sélectionné et le nom du premier titre ou du sous-dossier
suivant s’achent sur l’écran.
- Sélectionnez la piste souhaitée ou le sous-dossier suivant en tournant le bouton rotatif VOLUME (9).
- Procédez de la manière décrite jusqu’à ce que la piste correspondante s’ache sur l’écran.
- Appuyez sur la touche SELECT (9).
- La lecture de la piste correspondante démarre automatiquement.
-
Recherche dans le dossier actuellement sélectionné
- Appuyez quatre fois sur la touche BND / AMS (11) pour activer la recherche dans le dossier actuellement
sélectionné.
- Le nom du dossier actuel s’ache sur l’écran.
- Sélectionnez la piste souhaitée ou (, ,) pour sélectionner le dossier correspondant en tournant le bouton
rotatif VOLUME (9).
- Procédez ensuite de la manière décrite plus haut pour la « Recherche via l’arborescence des dos
siers ».
-

e) Fonctions de la télécommande
Vous pouvez également contrôler presque toutes les fonctions du tuner SD avec la télécommande fournie.
En outre, la télécommande vous permet de contrôler le kit mains-libres Bluetooth® confortablement et en
toute sécurité.
Les touches marquées de la même façon que sur l‘appareil ont également les mêmes fonctions.
Touches supplémentaires :
VOL+ (28) et VOL- (29)
Réglage du volume
Touches 0 à 9 et touches * (23) et # (27)
Saisie de numéros de téléphone en liaison avec le kit mains-libres
/ BND / LOU (20)
Durant un appel téléphonique > Raccrocher le combiné
Durant l’écoute de la radio > Changement de la gamme de fréquences
Pression longue > Activation ou désactivation du circuit Loudness
AF / MON / 7 (21)
Pression brève > Activation ou désactivation de la fonction AF
Pression longue > Commutation mono / stéréo de la réception radio
EQ / TA / 8 (22)
Pression brève > Sélection de la fonction DSP (processeur sonore numérique)
Pression longue > Activation ou désactivation de la fonction TA
DISP / 0 (24)
Commutation de l’achage sur l’écran
(25)
Décrocher le combiné en liaison avec le kit mains-libres
PTY / 9 (26)
Activation de la fonction PTY en mode radio (la sélection du type de programme s’eectue à l’aide des
touches VOL+ (28) et VOL- (29))
93

94
f) Mode Bluetooth®
Afin de garantir une réception optimale sur le téléphone et de minimiser le rayonnement élec-
tromagnétique à l’intérieur du véhicule, il est recommandé d’utiliser une antenne extérieure
lorsque le mode Téléphone portable est activé.
En mode Bluetooth®, le syntoniseur SD peut être utilisé comme poste mains-libres pour les téléphones
portables et / ou comme lecteur audio streaming (lecture audio en transit) A2DP sur Bluetooth®. Avant
de pouvoir eectuer une transmission entre votre téléphone portable ou votre périphérique Bluetooth® et
le syntoniseur SD, les deux périphériques doivent être appairés. Cette opération s’appelle « Appairage »
(Pairing).
Appairage
• Allumez votre périphérique Bluetooth® et activez le mode Appairage (voir à ce sujet le manuel du pé
riphérique correspondant). L’appareil recherche ensuite les périphériques Bluetooth® dans la zone de
réception.
• Appuyez sur la touche MODE / PAIR (19) jusqu’à ce que PAIRING s’ache sur l’écran.
• Une fois le syntoniseur SD trouvé, votre périphérique Bluetooth® ache le nom CarBT.
• Saisissez le mot de passe 0000 pour accoupler les deux périphériques.
• Si l’appairage réussit, le symbole Bluetooth®
• En cas d’échec de l’appairage, répétez la procédure. Le cas échéant, vous devez d’abord eacer le pé
riphérique CarBT de votre téléphone portable (à ce sujet, voir le mode d’emploi du téléphone portable).
• Pour annuler ou établir un appairage, vous pouvez également sélectionner la rubrique CON BT (appairer)
ou DISCON BT (annuler l’appairage) dans le menu principal (voir « Configuration du menu »).
Le syntoniseur SD ne peut être accouplé qu’avec un seul périphérique Bluetooth® à la fois.
Lorsqu’un appairage Bluetooth® est déjà actif, vous devez d’abord interrompre cette connexion.
La connexion est interrompue dès que le syntoniseur SD ou le périphérique Bluetooth® connecté
est éteint ou quitte la zone de réception. Dès que le périphérique Bluetooth® est remis sous ten
sion ou entre dans la zone de réception du syntoniseur SD, la connexion est automatiquement
rétablie. Le symbole Bluetooth® s’ache à nouveau sur l’écran du syntoniseur SD.
Pour que la connexion puisse automatiquement être établie, cette fonction doit, le cas échéant,
être activée sur le périphérique Bluetooth® (à cet eet, veuillez consulter le manuel du périphé
rique Bluetooth®).
s’ache sur l’écran.
-
-
-
-
Appel téléphonique avec composition manuelle du numéro
• Appuyez sur la touche
• Composez le numéro souhaité à l’aide des touches numériques 0 à 9 ainsi que * (23) et # (27) sur la télé
commande.
• Le numéro composé s’ache sur l’écran.
• Appuyez encore une fois sur la touche (25) pour appeler le numéro composé.
Appuyez brièvement sur la touche / BND / LOU (20) ou sur la touche BND / AMS / (11)
durant la composition du numéro pour eacer le dernier chire saisi.
Maintenez la touche
composition du numéro pour eacer le numéro complet.
(25) sur la télécommande pour activer le mode téléphone.
/ BND / LOU (20) ou la touche BND / AMS / (11) enfoncée durant la
-

Rappel du dernier numéro
• Appuyez deux fois sur la touche
• LAST NUM s’ache sur l’écran.
• Appuyez encore une fois sur la touche
Acceptation d’un appel entrant
• Appuyez sur la touche
• Appuyez sur la touche
entrant.
Fin d’un appel
• Appuyez sur la touche
appel.
Transfert de l’appel
• Pendant un appel, appuyez sur la touche DSP / TA /
ou au kit mains-libres.
Achage du numéro
• En cas de réception d’un appel, le numéro du correspondant est aché sur l’écran.
Si le numéro du correspondant est masqué ou que le réseau de téléphonie mobile n’est pas
compatible avec cette fonction, le numéro n’est pas aché.
Streaming audio
Par streaming audio, on entend la transmission des données audio (musique) via Bluetooth®, par ex. vers
un syntoniseur SD.
Si vous disposez d’un appareil Bluetooth® compatible A2DP, vous pouvez le connecter par couplage comme
décrit ci-dessus avec le syntoniseur SD et établir une transmission audio.
• Assurez-vous que les deux périphériques soient correctement appairés.
• Démarrez la lecture / transmission audio vers votre périphérique Bluetooth® (voir mode d’emploi corre
spondant).
• Appuyez sur la touche MODE / PAIR (19) jusqu’à ce que BT AUDIO s’ache sur l’écran.
• La transmission audio est maintenant activée.
• Vous pouvez maintenant, comme d’habitude, commander à distance la lecture de votre périphérique
Bluetooth® à l’aide des touches
(25) pour accepter un appel entrant.
(25) pour activer le rappel du dernier numéro.
(25) pour rappeler le dernier numéro composé.
/ BND / LOU (20) ou sur la touche BND / AMS / (11) pour refuser un appel
/ BND / LOU (20) ou sur la touche BND / AMS / (11) pour terminer un
(2) pour transférer l’appel au téléphone portable
44 (8) et 66 (1) et de la touche PAU (12).
-
95

96
10. Entretien
Contrôlez régulièrement la sécurité technique du syntoniseur SD, assurez-vous notamment régulièrement
que les câbles de raccordement et le boîtier ne soient pas endommagés.
S’il est probable qu’une utilisation sans danger n’est plus possible, le produit doit être mis hors service puis
sécurisé afin d’éviter toute utilisation accidentelle. Débranchez le réseau de bord !
Une utilisation sans danger n’est plus garantie lorsque :
• l’appareil est visiblement endommagé,
• l’appareil ne fonctionne plus ou
• suite à de fortes sollicitations mécaniques
Avant de procéder au nettoyage ou à l’entretien du syntoniseur SD, observez impérativement les consi
gnes de sécurité suivantes :
L’ouverture de caches et le démontage de pièces risquent de mettre à nu des pièces sous tensi-
on.
Avant tout entretien ou remise en état, l’appareil doit donc être débranché de toute source de
tension.
Les condensateurs montés dans l’appareil peuvent être encore chargés, même après avoir dé
branché l’appareil de toutes les sources de tension.
Les réparations doivent uniquement être eectuées par un technicien qualifié, familiarisé avec
les dangers potentiels encourus et les prescriptions spécifiques en vigueur.
a) Remplacement du fusible
Si un remplacement des fusibles s’avère nécessaire, veillez à n’utiliser que des fusibles de rechange du
type et au courant nominal spécifiés (voir « Caractéristiques techniques »).
Il est interdit de réparer les fusibles usagés ou de ponter le porte-fusible.
• Débranchez l’appareil de l’alimentation électrique (débrancher le connecteur ISO !) puis retirez avec
précaution le fusible du porte-fusible à côté du connecteur ISO.
• Remplacez le fusible par un fusible du même type.
• Rebranchez seulement ensuite le syntoniseur SD sur le réseau de bord puis remettez-le en service.
• Si le fusible se déclenche à nouveau, confiez l’appareil à un atelier spécialisé.
b) Nettoyage
L’extérieur de l’appareil doit uniquement être nettoyé à l’aide d’un chion doux et sec ou à l’aide d’un
pinceau.
N’utilisez en aucun cas des détergents agressifs ou des solutions chimiques ; ils risqueraient d’endommager
la surface du boîtier.
-
-

11. Manipulation
• Un volume sonore trop élevé à l’intérieur du véhicule peut gêner la perception des avertissements acoustiques. Cela représente un danger pour vous ainsi que pour les autres usagers de la route. Veillez donc
à un réglage approprié du volume.
• L’inattention sur la route peut provoquer de graves accidents. Veuillez donc procéder à la commande de
la chaîne HIFI uniquement lorsque la circulation le permet. Ne vous laissez pas distraire par son manie
ment et restez attentif à la circulation.
• Il est déconseillé d’écouter de la musique de manière prolongée à un volume sonore excessif. Cela peut
occasionner des troubles auditifs.
12. Dépannage
Avec le syntoniseur SD Renkforce BT-RSD1802K, vous avez acheté un produit construit selon les derniers
progrès de la technique et fonctionnant de manière sûre.
Il est toutefois possible que des problèmes ou des dysfonctionnements surviennent.
Vous trouverez ci-après plusieurs procédures vous permettant, le cas échéant, d’eectuer un dépanna
ge :
Observez impérativement les consignes de sécurité !
La lecture ne fonctionne pas, l’achage et l’éclairage ne s’allument pas :
• Fusible du véhicule défectueux. À l’aide du mode d’emploi de votre véhicule, recherchez l’emplacement
du fusible correspondant puis contrôlez-le.
• Fusible de l’appareil défectueux. Démontez l’appareil et contrôlez le fusible.
• Câble plus ou câble de masse desserré. Démontez l’appareil et contrôlez la connexion des câbles.
-
-
Restitution par un seul haut-parleur :
• Balance déréglée. Ajustez la balance comme décrit ci-dessus.
• Le câble du haut-parleur s’est détaché. Démontez l’appareil et / ou le haut-parleur et contrôlez les con
nexions.
Restitution uniquement par les haut-parleurs à l’avant ou à l’arrière :
• Fader déréglé. Ajustez le fader.
• Le câble du haut-parleur s’est détaché. Démontez l’appareil et / ou le haut-parleur et contrôlez les con
nexions.
97
-
-

98
Réception de peu de stations en mode radio :
• L’antenne n’est pas complètement déployée. Déployez complètement l’antenne.
• La prise de l’antenne s’est détachée de l’appareil. Démontez l’appareil et contrôlez la connexion.
• Antenne défectueuse. Contrôlez le branchement, la mise à la terre et l’antenne.
Perturbations en mode radio et en mode USB / carte mémoire :
• Les perturbations entrent dans l’appareil par le câble plus. Montez un élément d’antiparasitage sur le
câble plus.
• Le cas échéant, déparasiter le véhicule à l’aide de capuchons antiparasite, de doigts de distributeur
d’allumage supplémentaires, etc.
• Mauvaise connexion à la masse. Contrôler le raccord de masse. Le cas échéant, utiliser un autre point.
En cas de pression sur les touches des stations, seuls des grésillements sont audibles :
• Aucune station n’est programmée. Programmez les stations de la manière décrite.
L’appareil ne réagit plus correctement aux pressions sur les touches, des caractères incompréhensibles
s’achent sur l’écran :
• Réinitialisez l’appareil à l’aide de la touche RESET (7).
La transmission audio via Bluetooth® ne fonctionne pas :
• Le périphérique connecté n’est pas compatible avec la transmission audio A2DP via Bluetooth®.
• L’appareil n’est pas connecté au syntoniseur SD. Exécutez la procédure de couplage.
La qualité de la transmission est mauvaise en mode mains-libres :
• La distance entre le microphone et les haut-parleurs du véhicule est trop faible.
• Le microphone se trouve dans le courant d’air du toit coulissant, d’une vitre ouverte, de l’aération, etc.
• La distance entre le conducteur et le microphone est trop grande.
Les réparations autres que celles précédemment décrites sont réservées aux techniciens qua-
lifiés et agréés.

13. Caractéristiques techniques
Généralités
Tension de service ..................................................... 12 V / CC
Consommation de courant .......................................15 A max. / 7 mA en veille
Fusible fusible automobile plat 15 A
Pile de la télécommande ..........................................pile bouton 3 V au lithium CR2025
Puissance de sortie ................................................... 4 x 40 W (max.)
Impédance des haut-parleurs .................................4 à 8 ohms
Interfaces .................................................................... Bluetooth®, USB et carte SD / MMC
Baie de montage ........................................................ 1 DIN (182 x 53 mm)
Profondeur de montage ............................................ 115 mm
Poids 600 g
Syntoniseur
Gamme des fréquences (Europe)
Gamme des fréquences (USA) ................................FM 87,5 - 107,9 MHz / AM 530 - 1710 kHz
Pas de fréquence (Europe)....................................... FM 50 kHz / AM 9 kHz
Pas de fréquence (USA) ...........................................FM 100 kHz / AM 10 kHz
Sensibilité .................................................................... FM 10 dBµ / AM 32 dBµ
Fréquence intermédiaire ..........................................FM 10,7 MHz / AM 450 kHz
Séparation stéréo FM
................................................ >25 dB
............................ FM 87,5 - 108,0 MHz / AM 522 - 1620 kHz
Mode USB / carte mémoire
Courbe de réponse ....................................................20 à 20 000 Hz
Rapport signal / bruit ................................................. >60 dB
Séparation des canaux ............................................. >50 dB
Formats compatibles .................................................
Supports compatibles ...............................................SD / MMC, SDHC max. 16 Go / USB max. 32 Go
Intensité maximale admissible (port USB) ............ max. 500 mA
MP3
99

14. Élimination
Les appareils électroniques sont des matériaux recyclables et ne doivent pas être éliminés avec
les ordures ménagères !
À la fin de sa durée de vie, éliminez le produit conformément aux dispositions légales en vi
gueur.
Le cas échéant, retirez d’abord les piles insérées et éliminez-les séparément.
Élimination des piles et batteries usagées
Le consommateur final est légalement tenu (ordonnance relative à l’élimination des piles
usagées) de rapporter toutes les piles et batteries, il est interdit de les jeter dans les ordures
ménagères.
Les piles et batteries qui contiennent des substances toxiques sont caractérisées par les sym
boles ci-contre qui indiquent l’interdiction de les jeter dans les ordures ménagères. Les désignations pour le métal lourd prépondérant sont : Cd = cadmium, Hg = mercure, Pb = plomb. Vous
pouvez rapporter gratuitement vos piles et batteries usagées dans les centres de récupération
de votre commune, dans nos succursales ou dans tous les points de vente de piles et de batte
ries.
15. Déclaration de conformité
Par la présente, le fabricant déclare que ce produit est conforme aux exigences fondamentales ainsi
qu’aux autres consignes pertinentes de la directive 1999/5/CE.
La déclaration de conformité de ce produit est disponible sur le site www.conrad.com.
-
-
-
100
 Loading...