


100%
RecyclingPapier.
Chlorfrei
gebleicht.
Impressum
Diese Bedienungsanleitung ist eine Publikation der Conrad Electronic SE, Klaus-Conrad-Str. 1,
D-92240 Hirschau.
Alle Rechte einschließlich Übersetzung vorbehalten. Reproduktionen jeder Art, z. B. Fotokopie,
Mikroverfilmung, oder die Erfassung in elektronischen Datenverarbeitungsanlagen, bedürfen der schriftlichen Genehmigung des Herausgebers.
Nachdruck, auch auszugsweise, verboten.
Diese Bedienungsanleitung entspricht dem technischen Stand bei Drucklegung.
Änderung in Technik und Ausstattung vorbehalten.
© Copyright 2008 by Conrad Electronic SE. Printed in Germany.
Version 08/08
CD-Tuner
100%
recycling
paper.
Bleached
without
chlorine.
100%
papier
recyclé.
Blanchi
sans
chlore.
100%
Recycling
Papier.
Chloorvrij
gebleekt.
Imprint
These operating instructions are published by Conrad Electronic SE, Klaus-Conrad-Str. 1,
D-92240 Hirschau/Germany.
No reproduction (including translation) is permitted in whole or part e.g. photocopy, microfilming or
storage in electronic data processing equipment, without the express written consent of the publisher.
The operating instructions reflect the current technical specifications at time of print.We reserve the right
to change the technical or physical specifications.
© Copyright 2008 by Conrad Electronic SE. Printed in Germany.
Note de l´éditeur
Cette notice est une publication de la société Conrad Electronic SE, Klaus-Conrad-Str. 1,
D-92240 Hirschau/Allemagne.
Tous droits réservés, y compris traduction. Toute reproduction, quel que soit le type, par exemple
photocopies, microfilms ou saisie dans des traitements de texte electronique est soumise à une
autorisation préalable écrite de l‘éditeur.
Impression, même partielle, interdite.
Cette notice est conforme à la règlementation en vigueur lors de l´impression.
Données techniques et conditionnement soumis à modifications sans aucun préalable.
© Copyright 2008 par Conrad Electronic SE. Imprimé en Allemagne.
Impressum
Deze gebruiksaanwijzing is een publicatie van Conrad Electronic Benelux B. V.
Alle rechten, inclusief de vertaling, voorbehouden. Reproducties van welke aard dan ook, fotokopie,
microfilm of opslag in een geautomatiseerd gegevensbestand, alleen met schriftelijke toestemming van
de uitgever.
Nadruk, ook in uittreksel, verboden.
Deze gebruiksaanwijzing voldoet aan de technische eisen bij het ter perse gaan.
Wijzigingen in techniek en uitrusting voorbehouden.
© Copyright 2008 by Conrad Electronic Benelux B. V. Printed in Germany.
CD-7516
Bedienungsanleitung
Seite 2-35
CD-Tuner
CD-7516
Operating Instructions
Page 36-69
Syntoniseur CD
CD-7516
Notice d´Emploi
Page 70-103
CD-Tuner
CD-7516
Gebruiksaanwijzing
Pagina 104-137
Best.-Nr. / ItemNo. /
N° de commande / Bestnr.:
37 22 16

Inhaltsverzeichnis
Einführung ............................................................................................................................................................... 3
Bedienelemente ...................................................................................................................................................... 4
Bestimmungsgemäße Verwendung ...................................................................................................................... 6
Produktbeschreibung ............................................................................................................................................. 7
Symbolerklärung ..................................................................................................................................................... 7
Sicherheitshinweise ................................................................................................................................................ 8
Mechanischer Einbau ............................................................................................................................................. 9
Einbaulage ...................................................................................................................................................... 9
Abnehmen und Anbringen des Frontbedienteils ........................................................................................ 10
Einbau in den Radioschacht ........................................................................................................................ 11
Ausbau .......................................................................................................................................................... 12
Elektrischer Anschluss ......................................................................................................................................... 13
Anschluss der Lautsprecher und der Stromversorgung ............................................................................. 14
Anschluss der Antenne ................................................................................................................................ 15
Anschluss eines USB-Speichergerätes ....................................................................................................... 15
Anschluss der LINE-Ausgänge .................................................................................................................... 16
Bedienungsanleitung
Deutsch
Seite
Bedienung ............................................................................................................................................................. 17
Allgemeine Bedienung ................................................................................................................................. 17
Einstellungen ................................................................................................................................................ 19
Radiobetrieb .................................................................................................................................................. 20
CD-Betrieb..................................................................................................................................................... 26
AUX-Betrieb .................................................................................................................................................. 29
USB-/Speicherkartenbetrieb ........................................................................................................................ 29
Reset ............................................................................................................................................................. 30
Wartung ............................................................................................................................................................... 31
Handhabung ......................................................................................................................................................... 32
Entsorgung ............................................................................................................................................................ 32
Behebung von Störungen .................................................................................................................................... 32
Technische Daten ................................................................................................................................................. 34
2

Einführung
Sehr geehrte Kundin, sehr geehrter Kunde,
wir bedanken uns für den Kauf dieses Produkts.
Dieses Produkt erfüllt die gesetzlichen nationalen und europäischen Anforderungen. Um diesen Zustand
zu erhalten und einen gefahrlosen Betrieb sicherzustellen, müssen Sie als Anwender diese Bedienungsanleitung beachten!
Diese Bedienungsanleitung gehört zu diesem Produkt. Sie enthält wichtige Hinweise zur Inbetriebnahme und
Handhabung. Achten Sie hierauf, auch wenn Sie dieses Produkt an Dritte weitergeben. Heben Sie deshalb diese
Bedienungsanleitung zum Nachlesen auf!
Alle enthaltenen Firmennamen und Produktbezeichnungen sind Warenzeichen der jeweiligen Inhaber. Alle
Rechte vorbehalten.
Tel. 0 180/5 31 21 11
Fax 0 180/5 31 21 10
e-mail: Bitte verwenden Sie für Ihre Anfrage unser Formular im Internet.
www.conrad.de unter der Rubrik Kontakt
www.conrad.at bzw. www.business.conrad.at
Tel. 0848/80 12 88
Fax 0848/80 12 89
e-mail: support@conrad.ch
Mo. – Fr. 8.00 bis 12.00 Uhr, 13.00 bis 17.00 Uhr
3
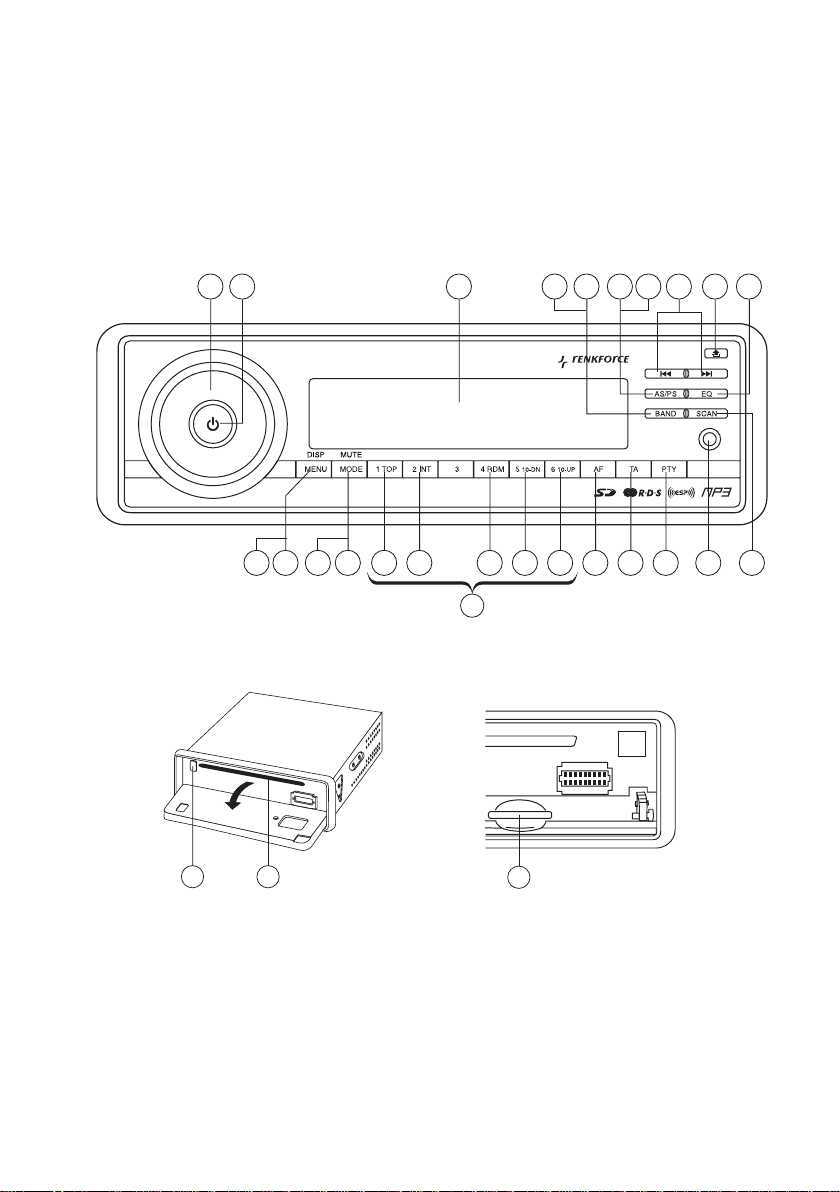
Bedienelemente
2 9148 20 22 24 25 26 5 6 7 27 13
16 1112 23 151021 1713
CD/MP3/WMA/CD-R/CD-RW PLAYER 4x40WATTS
4
(1-6)
Bedienungsanleitung
Deutsch
19 18
28
4

(1) Taste POWER
(2) Taste MENU
(3) Drehregler VOLUME
(4) Stationstasten 1-6
(5) Taste AF (ALTERNATIVE FREQUENCY)
(6) Taste TA (TRAFFIC ANNOUNCEMENT)
(7) Taste PTY (PROGRAM TYPE)
(8) Taste DISP (DISPLAY)
(9) Taste MODE
(10) Taste BAND (PLAY/PAUSE)
(11) Tasten UP/DOWN
(12) Taste AS/PS (AUTO SEEK/PROGRAM SEEK)
(13) Taste SCAN
(14) Taste MUTE
(15) Taste EQ
(16) LC-Display
(17) Taste RELEASE
(18) CD-Schlitz
(19) Taste EJECT
(20) Taste TOP
(21) Taste PLAY/PAUSE
(22) Taste INT (INTRO)
(23) Taste REPEAT
(24) Taste RDM (RANDOM)
(25) Taste 10-DN (nur bei MP3-Wiedergabe)
(26) Taste 10-UP (nur bei MP3-Wiedergabe)
(27) Anschluss AUX
(28) Speicherkartenleser
5

Bestimmungsgemäße Verwendung
Der Renkforce CD-7516 CD-Tuner dient dazu, Radiosender in Fahrzeugen zu empfangen, Audio-CDs und
Audiodaten von passenden Speichermedien wiederzugeben und die so gewonnenen Audiosignale zu verstärken.
Das Gerät muss zur Wiedergabe an Lautsprecher angeschlossen werden.
Dieses Produkt ist nur für den Anschluss an ein 12 V-Gleichspannungsbordnetz mit negativem Pol der Fahrzeugbatterie an Karosserie zugelassen. Das Gerät darf nur in Fahrzeugen mit dieser Bordspannungsart eingebaut und
in Betrieb genommen werden.
Durch die Art des Einbaus ist vom Benutzer sicherzustellen, dass das Gerät vor Feuchtigkeit und Nässe geschützt
wird.
Eine andere Verwendung als zuvor beschrieben, führt zur Beschädigung dieses Produktes, darüber hinaus ist dies
mit Gefahren, wie z.B. Kurzschluss, Brand, elektrischer Schlag etc. verbunden.
Das gesamte Produkt darf nicht geändert, bzw. umgebaut und das Gehäuse nicht geöffnet werden.
Beachten Sie alle Sicherheitshinweise dieser Bedienungsanleitung!
Bedienungsanleitung
Deutsch
6

Produktbeschreibung
Dieses Gerät ist mit einem abnehmbaren Frontbedienteil, FM-Stereo-Radioteil, einer USB-Schnittstelle, einem
MMC/SD-Kartenlesegerät und einem CD/CD-R/CD-RW/MP3/WMA-Spieler mit den folgenden Merkmalen ausgestattet:
• Hohe Ausgangsleistung (4 x 40W max.)
• Vorverstärkerausgang zum Anschluss eines Leistungsverstärkers
• AUX-Eingang an der Frontseite zur Einspeisung externer Audioquellen
• Elektronische Lautstärke-, Tiefen- Höhen-, Fader- und Balance-Regelung
• Digitaler Signalprozessor zur Anpassung der Klangcharakteristik an verschiedene Musikrichtungen
• Loudness-Schaltung
• FM-Tuner mit RDS-Funktion
• Genaues elektronisches Abstimmen der Sender durch PLL-Tuner
• 18 programmierbare Stationsspeicher
• Manueller/Automatischer Sendersuchlauf in beide Suchrichtungen
• Automatische Senderspeicherung/Programmspeichersuchlauf
• Blau beleuchtetes LC-Display
• ID3-Tag-Anzeige bei MP3-Wiedergabe
• ISO-Anschlussterminal
Symbolerklärung
Das Symbol mit dem Ausrufezeichen weist den Benutzer darauf hin, dass er vor der Inbetriebnahme
des Gerätes diese Bedienungsanleitung lesen und beim Betrieb beachten muss.
Das „Hand“-Symbol steht für spezielle Tipps und Bedienhinweise.
7

Sicherheitshinweise
Bei Schäden, die durch Nichtbeachtung dieser Bedienungsanleitung verursacht werden,
erlischt die Gewährleistung/Garantie. Für Folgeschäden übernehmen wir keine Haftung!
Bei Sach- oder Personenschäden, die durch unsachgemäße Handhabung oder Nichtbeachten
der Sicherheitshinweise verursacht werden, übernehmen wir keine Haftung. In solchen Fällen
erlischt die Gewährleistung/Garantie!
• Aus Sicherheits- und Zulassungsgründen ist das eigenmächtige Umbauen und/oder Verändern des
Produktes nicht gestattet.
• Als Spannungsquelle darf nur das 12 V-Gleichspannungsbordnetz (negativer Pol der Batterie an
der Karosserie des Fahrzeugs) verwendet werden. Schließen Sie das Gerät nie an eine andere
Spannungsversorgung an.
• Achten Sie auf eine sachgerechte Inbetriebnahme des Gerätes. Beachten Sie hierbei diese
Bedienungsanleitung.
• Bei geöffnetem Gerät oder überbrückter Sicherheitsschaltung kann unsichtbare Laserstrahlung
austreten. Wenn andere als die hier in der Anleitung angegebenen Bedienungseinrichtungen
benutzt oder andere Verfahrensweisen ausgeführt werden, kann dies zu gefährlicher
Strahlungsexposition führen.
• Das Produkt ist kein Spielzeug, es ist nicht für Kinder geeignet. Kinder können die Gefahren, die im
Umgang mit elektrischen Geräten bestehen, nicht einschätzen.
• Setzen Sie das Gerät keinen hohen Temperaturen, Tropf- oder Spritzwasser, starken Vibrationen,
sowie hohen mechanischen Beanspruchungen aus.
• Betreiben Sie das Gerät nicht unbeaufsichtigt.
• Lassen Sie Verpackungsmaterial nicht achtlos liegen. Es könnte für Kinder zu einem gefährlichen
Spielzeug werden.
• Beachten Sie auch die Sicherheitshinweise und Bedienungsanleitungen der übrigen Geräte, die an
das Gerät angeschlossen werden.
• Sollten Sie sich über den korrekten Anschluss nicht im Klaren sein oder sollten sich Fragen ergeben,
die nicht im Laufe der Bedienungsanleitung abgeklärt werden, so setzen Sie sich bitte mit unserer
technischen Auskunft oder einem anderen Fachmann in Verbindung.
Bedienungsanleitung
Deutsch
8

Mechanischer Einbau
In den meisten Kfz ist vom Hersteller ein Einbauplatz für das Autoradio vorgesehen. Die Wahl des Einbauplatzes
erfolgte aus sicherheitstechnischen Gesichtspunkten. Es ist deshalb anzuraten, das Autoradio in diesen vorgesehenen Bereich einzubauen.
Das Gerät benötigt einen DIN-Einbauausschnitt mit den Abmessungen 182x53mm, diese Einbaumaße sind
genormt und werden üblicherweise von allen Kfz-Herstellern eingehalten.
Sollte kein Einbauausschnitt vorgesehen sein, so informieren Sie sich bitte bei Ihrem Autohändler über den korrekten
Einbauort für das Autoradio.
Wählen Sie den Einbauort sorgfältig aus, damit das Gerät nicht die normale Fahrtätigkeit des
Fahrers beeinflusst oder ihn vom Verkehrsgeschehen ablenkt.
Verwenden Sie nur das mitgelieferte Montagematerial, um eine sichere Installation zu garantieren.
Änderungen am Fahrzeug, die durch den Einbau des CD-Tuners oder anderer Komponenten
nötig sind, müssen immer so ausgeführt werden, dass dadurch keine Beeinträchtigung der
Verkehrssicherheit oder der konstruktiven Stabilität des Kfz entstehen. Bei vielen Kfz erlischt
bereits durch das Aussägen eines Blechteils die Betriebserlaubnis.
Da das Gerät im Betrieb Wärme erzeugt, muss der Einbauort hitzeunempfindlich sein.
Vergewissern Sie sich vor der Ausführung von Befestigungsbohrungen, dass hierdurch keine
elektrischen Kabel, Bremsleitungen, der Kraftstofftank o.ä. beschädigt werden.
Beachten Sie bei der Verwendung von Werkzeugen zum Einbau Ihrer Auto-HiFi-Komponenten
die Sicherheitshinweise der Werkzeughersteller.
Berücksichtigen Sie beim Einbau Ihrer HiFi-Anlage die Unfallgefahr, die von losgerissenen
Geräten im Falle eines Unfalls ausgehen kann. Befestigen Sie deshalb jedes Teil sicher und an
einem Platz an dem es nicht zu einer Gefahr für die Insassen werden kann.
Überprüfen Sie vor dem Einbau des Gerätes die Tiefe des vorgesehenen Einbauraumes.
Einbaulage
Der Einbauwinkel gegenüber der Horizontalen muss kleiner als 30° sein. Ein zu stark geneigtes Gerät kann zu
Problemen beim Abspielen von CDs führen.
9
Bedienungsanleitung
Deutsch
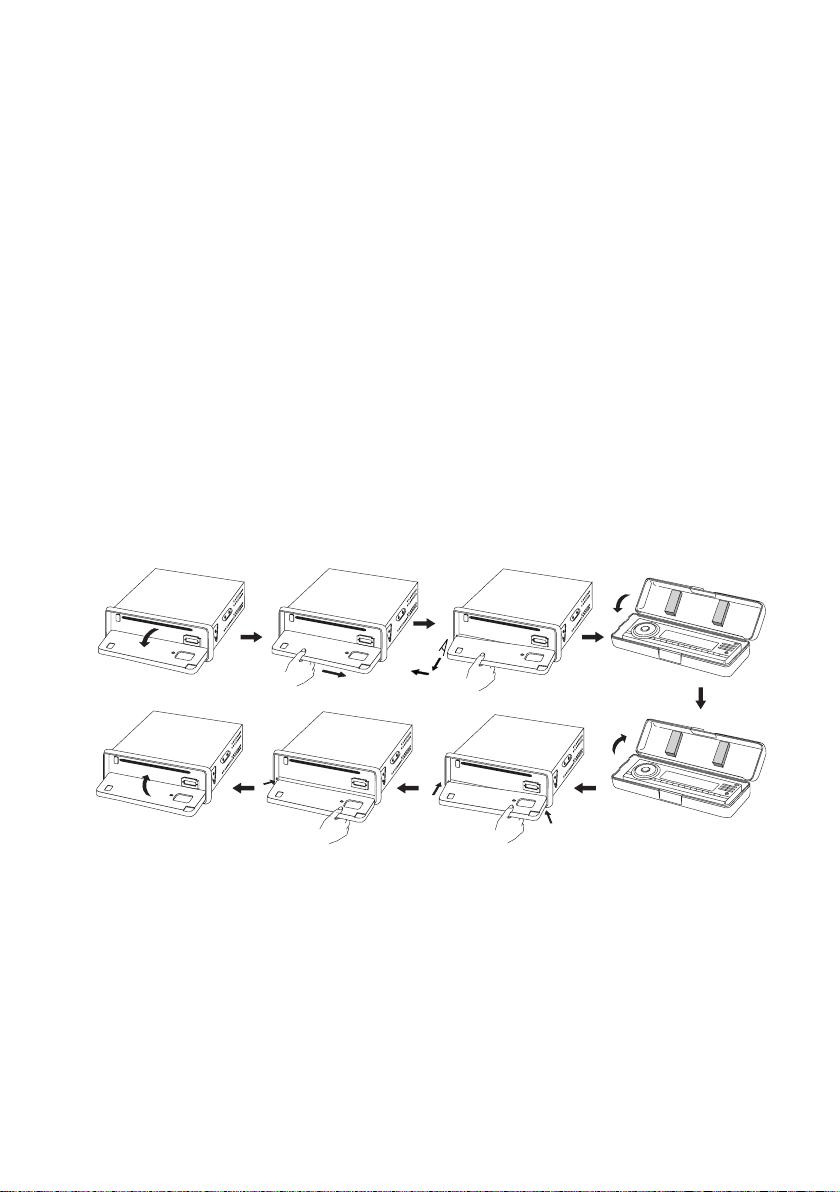
Abnehmen und Anbringen des Frontbedienteils
Zur Vorbeugung vor Diebstahl kann das Frontbedienteil des Gerätes abgenommen werden.
• Bevor Sie das Frontbedienteil abnehmen, drücken Sie die Taste PWR (1), um das Gerät auszuschalten.
• Drücken Sie die Taste RELEASE (17) und klappen Sie das Bedienteil auf.
• Drücken Sie das Bedienteil nach rechts und rasten Sie es auf der linken Seite aus der Halterung aus.
• Nehmen Sie das Bedienteil ab und legen Sie es in die mitgelieferte Schutzhülle.
• Zum Anbringen des Bedienteils setzen Sie die rechte Seite wie in der unteren Abbildung gezeigt in die Halterung
ein (Schritt 1) und drücken Sie es nach rechts.
• Rasten Sie dann die linke Seite des Bedienteils in die Halterung ein (Schritt 2).
• Klappen Sie das Bedienteil wieder nach oben, bis es einrastet.
• Üben Sie keinen Druck auf das Display oder die Bedienungstasten aus.
10
2
1
Vergewissern Sie sich, dass Sie das Frontbedienteil richtig herum auf das Gerät aufsetzen.
Drücken Sie das Frontbedienteil nicht zu stark gegen das Gerät, wenn Sie es aufsetzen. Es kann
einfach angebracht werden, indem Sie es leicht gegen das Gerät drücken.
Wenn Sie das Frontbedienteil mitnehmen, legen Sie es in die mitgelieferte Schutzhülle.
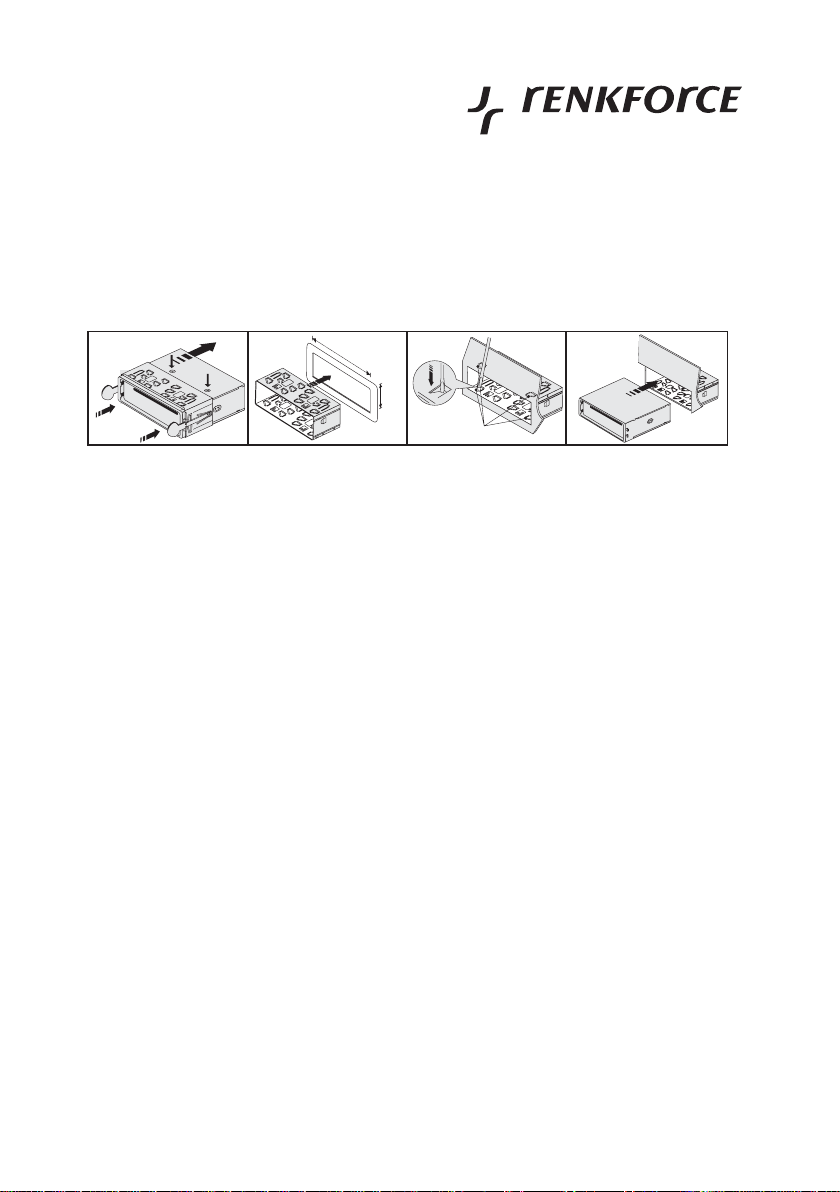
Einbau in den Radioschacht
• Nehmen Sie das Frontbedienteil ab.
• Lösen Sie vorsichtig den Kunststoffrahmen an der Gerätefront, indem Sie ihn leicht nach außen biegen und vom
Gerät abziehen.
53mm
3
4
1
1
2
• Entfernen Sie die beiden Sicherungsschrauben des CD-Laufwerks (Bild1, Punkt1).
• Entriegeln Sie den Einbaurahmen mit den beiden Entriegelungsschlüsseln (Bild1, Punkt2).
• Ziehen Sie den Einbaurahmen nach hinten vom Gerät ab (Bild1, Punkt3).
• Schieben Sie den Einbaurahmen in den Einbauausschnitt des Fahrzeugs (Bild2).
• Biegen Sie einige der Haltelaschen am Einbaurahmen um, bis der Rahmen sicher in der Einbauöffnung fixiert
ist (Bild3).
• Nachdem Sie alle elektrischen Verbindungen hergestellt haben (siehe „Elektrischer Anschluss“) schieben Sie
das Gerät in den Einbaurahmen, bis es sicher einrastet (Bild4).
• Stecken Sie die Rahmenblende des Frontbedienteils wieder auf das Gerät auf.
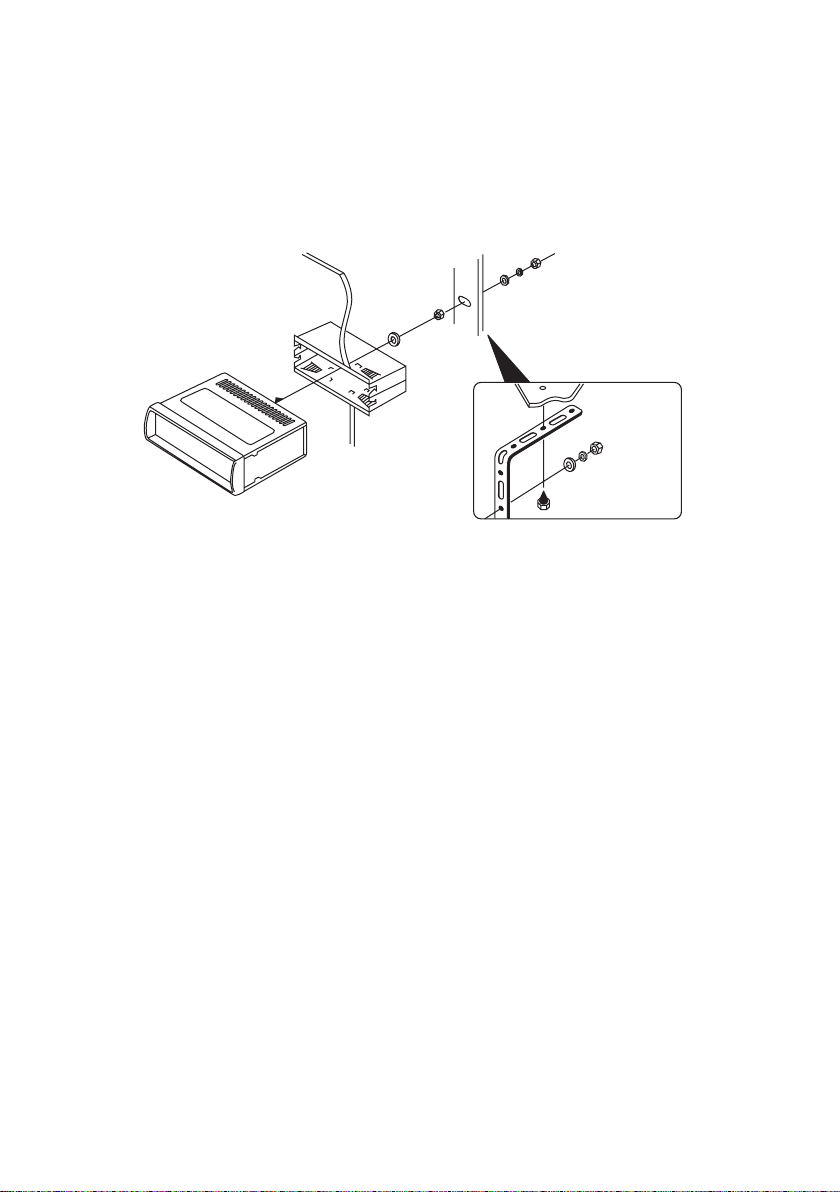
Sichern Sie das Gerät zusätzlich gegen Erschütterungen mit dem Schraubzapfen an der Geräterückseite.
Bei den meisten Fahrzeuge ist solch eine Sicherung bereits vorgesehen. Falls dies bei Ihrem Fahrzeug nicht der Fall
sein sollte, befestigen Sie das Gerät bitte mit einem Lochblechstreifen o.ä.
Bewahren Sie die beiden Entriegelungsschlüssel gut auf. Sie benötigen sie für eine spätere Demontage des Gerätes.
2
3
182mm
11
Bedienungsanleitung
Deutsch
Gehen Sie bei der Befestigung wie im folgenden Bild gezeigt vor:
Ausbau
• Nehmen Sie das Frontbedienteil ab.
• Lösen Sie vorsichtig den Kunststoffrahmen an der Gerätefront, indem Sie ihn leicht nach außen biegen und vom
Gerät abziehen.
• Stecken Sie die beiden Entriegelungsschlüssel in die seitlichen Schlitze zwischen Gerät und Einbaurahmen, bis
das Gerät entriegelt ist.
• Lösen Sie die Befestigungsschraube an der Geräterückseite.
• Ziehen Sie das Autoradio an den Entriegelungsschlüsseln vorsichtig aus dem Einbaurahmen.
• Lösen Sie sämtliche elektrische Verbindungen.
12

Elektrischer Anschluss
Der elektrische Anschluss sollte nur von einer Fachkraft durchgeführt werden.
Um Kurzschlüsse und daraus resultierende Beschädigungen des Gerätes zu vermeiden, muss
während des Anschlusses der Minuspol (Masse) der Fahrzeugbatterie abgeklemmt werden.
Schließen Sie den Minuspol der Batterie erst wieder an, wenn Sie das Gerät vollständig
angeschlossen und den Anschluss überprüft haben.
Benutzen Sie zum Überprüfen der Spannung an Bordspannungsleitungen nur ein Voltmeter
oder eine Diodenprüflampe, da normale Prüflampen zu hohe Ströme aufnehmen und so die
Bordelektronik beschädigen können.
Achten Sie bei der Verlegung von Leitungen darauf, dass diese nicht gequetscht werden oder
an scharfen Kanten scheuern, benutzen Sie bei Durchführungspunkten Gummitüllen.
Die Verdrahtung zu den Lautsprechern muss jeweils zweiadrig ausgeführt werden. Isolieren
Sie offene Verbindungsstellen. Achten Sie darauf, dass keine der Leitungen durch scharfe
Kanten beschädigt werden kann.
Verwenden Sie nur Lautsprecher mit einer ausreichenden Belastbarkeit (siehe „Technische
Daten“).
Achten Sie darauf, dass alle Lautsprecher richtig gepolt sind - also die Plus- und Minuskennzeichen übereinstimmen.
Die Anschlusskabel der Lautsprecher sind im Normalfall codiert: Einige Lautsprecherhersteller markieren die (+)-Leitung mit einem zusätzlichen Farbstreifen, andere wiederum verwenden eine geriffelte Leitung für den (+)-Pol, für den (-)-Pol hingegen eine glatte Leitung.
Das Gerät wurde für den Betrieb an Lautsprecherimpedanzen von mindestens 4 Ohm entwikkelt. Schließen Sie auf keinen Fall Lautsprecher mit einer geringeren Impedanz an.
Bei den meisten Fahrzeugen sind die Leitungen für den elektrischen Anschluss und den Anschluss der
Lautsprecher bereits bis zum vorgesehenen Einbauschacht geführt.
Sollte dies nicht der Fall sein muss darauf geachtet werden, dass die nachträglich eingebauten
Leitungen über die entsprechend vorgesehenen Bordsicherungen (siehe Bedienhandbuch des Fahrzeugs) abgesichert sind.
13
Bedienungsanleitung
Deutsch
Anschluss der Lautsprecher und der Stromversorgung
Der CD-Tuner verfügt über einen ISO-Systemstecker.
Fahrzeuge, die mit einem solchen Systemstecker ausgerüstet sind, können bei gleicher Steckerbelegung
(bitte vorher überprüfen!) direkt mit dem Gerät verbunden werden. Bei abweichender Steckerbelegung
erfolgt der Anschluss über einen Adapter.
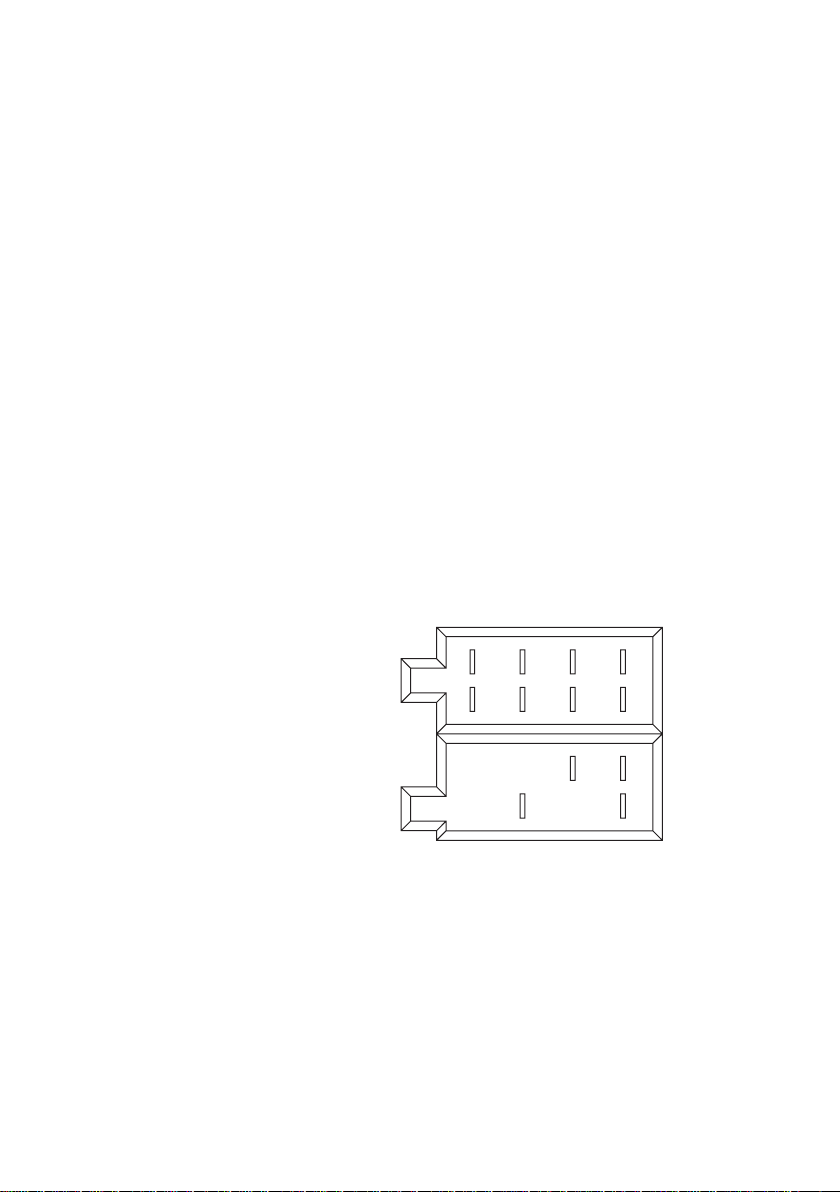
Die Kontaktbelegung der Anschlussbuchse des CD-Tuners entnehmen Sie bitte den nachfolgenden
Bildern.
Die jeweilige Belegung Ihres Kfz Systemsteckers erfahren Sie bei Ihrem Kfz Händler.
Systemstecker B (Lautsprecheranschluss)
(1) Lautsprecher rechts hinten (+)
(2) Lautsprecher rechts hinten (-)
(3) Lautsprecher rechts vorne (+)
(4) Lautsprecher rechts vorne (-)
(5) Lautsprecher links vorne (+)
(6) Lautsprecher links vorne (-)
(7) Lautsprecher links hinten (+)
(8) Lautsprecher links hinten (-)
Systemstecker A (Stromversorgung)
(1) nicht belegt
(2) nicht belegt
(3) nicht belegt
(4) Dauerstrom +12V
(5) Antennensteuerausgang
(6) nicht belegt
(7) Zündung +12V
(8) Masse
B
A
357
1
2468
57
48
14

• Der Anschluss Dauerstrom +12V (4) muss an eine Leitung angeklemmt werden, die auch bei ausgeschalteter
Zündung permanent 12V liefert (Klemme 30 des Bordnetzes). Dieser Anschluss dient zur Speicherung der
Benutzeinstellungen, der Uhrzeit usw.
• Der Antennensteuerausgang (5) liefert bei eingeschaltetem Gerät eine Spannung von +12V. Diese Leitung kann
für die Stromversorgung einer elektrischen Antenne, sowie als Einschaltspannung für einen Autoverstärker
verwendet werden.
• Der Anschluss Zündung +12V (7) muss mit einer Leitung verbunden werden, die nur bei eingeschalteter
Zündung +12V führt (Klemme 15 des Bordnetzes).
Klemmen Sie diesen Anschluss nicht auf Dauerstrom, da es ansonsten bei längerer Standzeit des Fahrzeuges
zu einer Entleerung der Bordbatterie kommen kann.
• Der Anschluss Masse (8) wird mit der Fahrzeugkarosserie verbunden.
Bedingt durch die immer häufiger verwendete Klebetechnik bzw. durch lackierte Metallteile wird die
elektrische Leitfähigkeit eingeschränkt. Daher ist nicht jedes Metallteil als Massepunkt geeignet.
Anschluss der Antenne
• Verbinden Sie den Antennenstecker Ihres Fahrzeugs mit der Antennenbuchse hinten am Gerät (Buchse neben
den LINE-Anschlüssen).
• Sollte Ihr Fahrzeug mit einem anderen Antennenstecker ausgerüstet sein, verwenden Sie bitte einen passenden
Adapter, der im Fachhandel erhältlich ist.
Anschluss eines USB-Speichergerätes
• Stecken Sie das USB-Speichergerät (USB-Stick, MP3-Player) in die USB-Leitung hinten am Gerät.
• Sollte die USB-Leitung zu kurz sein, um sie an einen zugänglichen Ort (z.B. Handschuhfach) zu verlegen kann
hier eine handelsübliche USB-Verlängerungsleitung verwendet werden.
15

Bedienungsanleitung
Deutsch
Anschluss der LINE-Ausgänge
Der CD-Tuner verfügt über einen LINE-Ausgang für den Anschluss eines Leistungsverstärkers.
Benutzen Sie zum Anschluss der Cinchbuchsen nur hierfür geeignete abgeschirmte
Cinchleitungen. Bei Verwendung anderer Kabel können Störungen auftreten.
Halten Sie die Länge der Anschlussleitungen möglichst kurz.
Verlegen Sie die Leitungen nicht in der Nähe anderer Kabel. Sie vermeiden so störende
Einstreuungen in die Leitungen.
Um Verzerrungen oder Fehlanpassungen zu vermeiden, die zur Beschädigung des Gerätes
führen können, dürfen an die Cinchanschlüsse nur Geräte mit ebensolchen Cinchanschlüssen
angeschlossen werden. Beachten Sie hierzu auch die Anschlusswerte in den „Technischen
Daten“.
• Verbinden Sie die Buchsen LINE OUT mit den Eingängen eines Leitungsverstärkers.
16
Die rote Buchse ist der Anschluss für den rechten Kanal
Die weiße Buchse ist der Anschluss für den linken Kanal

Bedienung
Nehmen Sie das Gerät nur dann in Betrieb, wenn Sie sich mit den Funktionen und mit dieser
Bedienungsanleitung vertraut gemacht haben.
Überprüfen Sie alle Anschlüsse nochmals auf ihre Richtigkeit. Klemmen Sie nach der Überprüfung den Minuspol der Bordbatterie wieder an.
Allgemeine Bedienung
Ein-/Ausschalten
• Drücken Sie die Taste POWER (1) um das Gerät einzuschalten.
• Zum Ausschalten halten Sie die Taste bitte länger gedrückt, bis das Gerät abschaltet.
Zum Einschalten kann auch jede andere Taste gedrückt werden.
Lautstärkeregelung
• Drehen Sie den Drehregler VOLUME (3), um die Lautstärke einzustellen.
• Drehen im Uhrzeigersinn erhöht die Lautstärke, Drehen gegen den Uhrzeigersinn verringert sie.
Stummschaltung
Die Taste MUTE (14) aktiviert die Stummschaltung.
• Drücken Sie die Taste lang, wenn Sie die aktuelle Wiedergabe kurzzeitig unterbrechen wollen, um sich z.B. bei
Passanten nach dem Weg zu erkundigen.
• Um die Stummschaltung wieder zu deaktivieren drücken Sie die Taste MUTE (14) erneut lang.
Uhrzeitanzeige
• Drücken Sie die Taste DISP (8), um die Uhrzeit anzuzeigen. Die Anzeige kehrt nach kurzer Zeit wieder zur
vorherigen Anzeige zurück.
17

Bedienungsanleitung
Deutsch
Auswahl der Wiedergabequelle
• Drücken Sie die Taste MODE (9) wiederholt, um die einzelnen Wiedergabequellen anzuwählen.
• Die Auswahl erfolgt in folgender Reihenfolge: Radio > CD > USB > SD/MMC > AUX
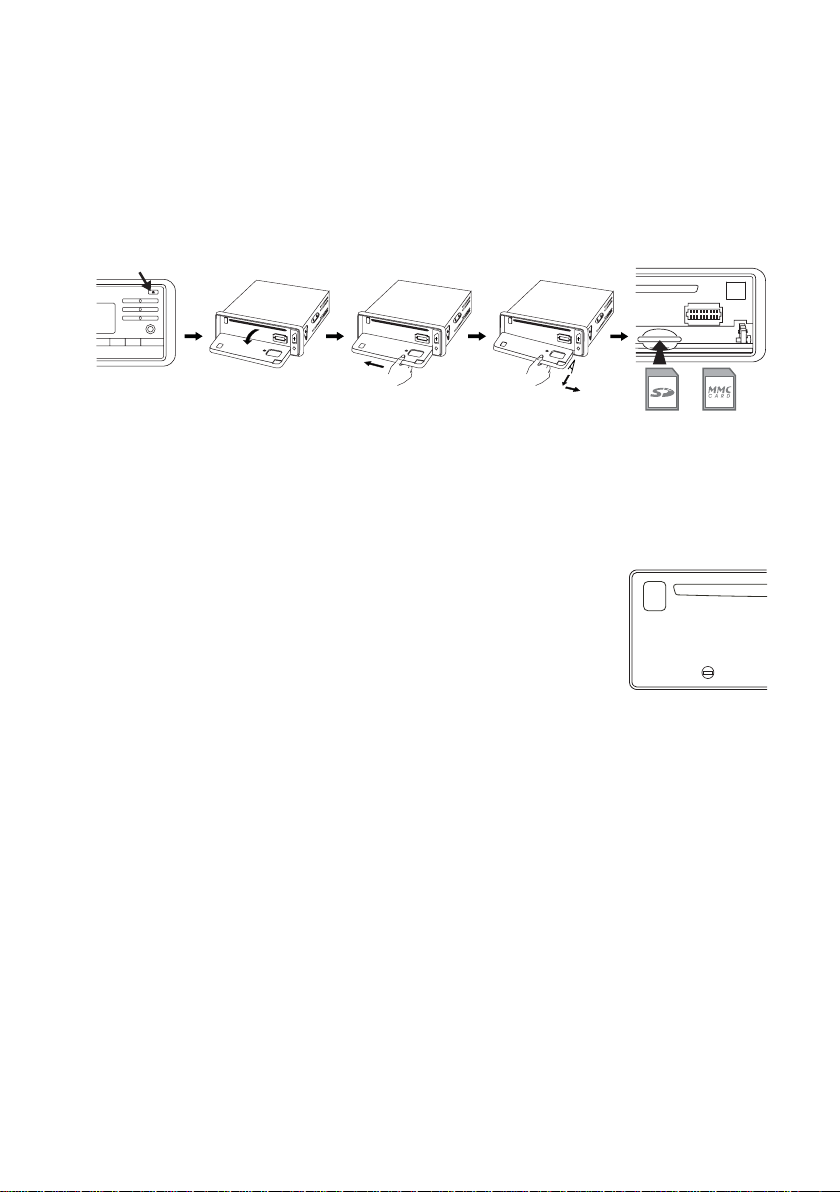
Einlegen einer CD
• Drücken Sie die Taste RELEASE (17), um die Frontblende zu öffnen. Schieben Sie eine CD in den CD-Schlitz
Wenn keine CD, kein USB-Speicher oder keine SD/MMC-Karte eingelegt/eingesteckt ist, werden die
betreffenden Quellen bei der Auswahl übersprungen.
(18) ein.
Die CD muss immer mit der beschrifteten Seite nach oben eingeschoben werden.
Auswerfen einer CD
• Drücken Sie die Taste RELEASE (17), um die Frontblende zu öffnen.
• Drücken Sie die Taste EJECT (19), die CD wird ausgeworfen.
• Schließen Sie die Frontblende wieder, indem Sie sie hochklappen.
Einstellung des Equalizers
• Drücken Sie die Taste EQ (15). Diese Taste ruft direkt das Menü AUDIO /EQUALIZER auf. Die Auswahl erfolgt
durch Drehen des Drehreglers VOLUME (3) und Bestätigung mit der Taste MENU (2).
EQ OFF = Der Equalizer ist ausgeschaltet
POP = Die Klangcharakteristik ist für Popmusik angepasst
ROCK = Die Klangcharakteristik ist für Rockmusik angepasst
CLASSIC = Die Klangcharakteristik ist für klassische Musik angepasst
FLAT = Der Equalizer ist eingeschaltet, es findet jedoch keine Klanganpassung statt
• Nach einigen Sekunden schaltet das Display wieder auf die vorherige Anzeige zurück.
18

Einstellungen
Uhrzeit
• Drücken Sie die Taste MENU (2) länger (ca. 2s).
• Drehen Sie den Drehregler VOLUME (3) bis CLOCK angezeigt wird.
• Drücken Sie die Taste MENU (2) erneut, aber nur kurz.
• Die Uhrzeit wird angezeigt und die Stundenanzeige blinkt.
• Stellen Sie mit dem Drehregler VOLUME (3) die Stunden ein.
• Drücken Sie die Taste MENU (2) kurz.
• Die Minutenanzeige blinkt.
• Stellen Sie mit dem Drehregler VOLUME (3) die Minuten ein.
• Drücken Sie die Taste MENU (2) kurz. Die Einstellung wird gespeichert.
• Drücken Sie die Taste DOWN (11), um das Einstellmenü zu verlassen.
Klang
• Drücken Sie die Taste MENU (2) länger (ca. 2s).
• Drehen Sie den Drehregler VOLUME (3) bis AUDIO angezeigt wird.
• Drücken Sie die Taste MENU (2) erneut, aber nur kurz.
• Die folgenden Menüpunkte können nun wie bereits beschrieben mit der Taste MENU (2) ausgewählt und mit
dem Drehregler VOLUME (3) eingestellt werden.
BASS zur Einstellung der Tieftonwiedergabe
TREBLE zur Einstellung der Hochtonwiedergabe
FADER zur Einstellung des Lautstärkeverhältnisses zwischen vorderen und hinteren Lautsprechern
BALANCE zur Einstellung des Lautstärkeverhältnisses zwischen rechten und linken Lautsprechern
EQUALIZER zur Auswahl einer Klangvoreinstellung
LOUDNESS zur Anhebung der hohen und tiefen Töne bei leiserer Musikwiedergabe
BEEP zur Aktivierung/Deaktivierung des Tastenquittierungstons
• Um im Menü um eine Ebene zurück zu springen, drücken Sie die Taste DOWN (11).
19

Bedienungsanleitung
Deutsch
Display
• Drücken Sie die Taste MENU (2) länger (ca. 2s).
• Drehen Sie den Drehregler VOLUME (3) bis DISPLAY angezeigt wird.
• Drücken Sie die Taste MENU (2) erneut, aber nur kurz.
• Die folgenden Menüpunkte können nun wie bereits beschrieben mit der Taste MENU (2) ausgewählt und mit
dem Drehregler VOLUME (3) eingestellt werden.
CONTRAST zur Einstellung des Displaykontrasts.
VIEW zur Einstellung der Displaydarstellung (positiv/negativ).
• Um im Menü um eine Ebene zurück zu springen, drücken Sie die Taste DOWN (11).
Radiobetrieb
RDS als Empfangskonzept
Das Kürzel RDS steht für Radio Daten System, d.h. es werden unhörbare, codierte Zusatzinformationen über den
UKW RDS Sender mit ausgestrahlt.
Sie besitzen mit dem CD-7516 einen CD-Tuner, der in der Lage ist diese codierten Daten, die von fast allen
Sendeanstalten mit ausgestrahlt werden auszuwerten.
Folgende wesentlichen Zusatzinformationen werden gesendet:
- Programm Identifikation (PI)
- Verkehrsfunkkennung (TP)
- Verkehrsdurchsagekennung (TA)
- Programm Servicename (PS)
- Alternative Frequenzen (AF)
- Programmtyp (PTY)
- EON-Informationen (EON)
- Uhrzeit (CT)
20

Programm Identifikation (PI)
Diese Daten helfen dem Empfänger einen Sender eindeutig zu identifizieren. Sie ermöglichen dem Radio zwischen
Gebieten zu unterscheiden in denen das gleiche Programm ausgestrahlt wird. Das Autoradio schaltet also bei
schwächer werdendem Empfang nur auf einen stärkeren Sender um, der die gleiche Programm Identifikation
ausstrahlt.
Verkehrsfunk-Kennung (TP)
Durch dieses Signal erkennt der Empfänger, dass ein Sender mit Verkehrsfunkinformationen empfangen wird.
Verkehrsdurchsage-Kennung (TA)
Durch dieses Signal kann der Sender eine Verkehrsfunkdurchsage erkennen und gegebenenfalls die laufende
Wiedergabe einer anderen Quelle unterbrechen.
Programm Servicename (PS)
Diese Information gibt dem Empfänger an, welchen Sender er gerade empfängt. Sie wird direkt im Display des
Autoradios wiedergegeben, z.B. BAYERN 3.
Alternative Frequenzen (AF)
Es wird eine Liste von alternativen Frequenzen mitgesendet, welche dasselbe Programm abstrahlen. Wird der
empfangene Sender zu schwach, so erkennt der Empfänger über das AF-Signal auf welchen Frequenzen er nach
einem Sender der besser zu empfangen ist, suchen muss.
Programmtyp (PTY)
Dieser Code gibt dem Empfänger Informationen über die Art des gesendeten Programms (z.B. Sport, Klassik,
Nachrichten usw.). Der Hörer kann dadurch gezielt nach einem Programm seiner Wahl suchen.
Außerdem kann ein nationaler Katastrophenalarm auf diese Art verbreitet werden. Den PTY-Service bieten jedoch
nicht alle Sender an.
EON-Informationen
Viele Senderketten mit verschiedenen Programmen haben nur ein Programm mit Verkehrsfunkdienst. Werden
EON-Informationen mitgesendet, schaltet ein derart ausgestattetes Gerät bei Verkehrsdurchsagen auf den
Verkehrsfunksender um, obwohl ein anderes Programm der Senderkette gehört wird.
Hört man z.B. Bayern 4 (ohne Verkehrsfunk) schaltet das Gerät bei aktiver TA-Taste für die Dauer einer
Verkehrsfunkdurchsage auf Bayern 3 (mit Verkehrsfunk) um.
21

Bedienungsanleitung
Deutsch
Uhrzeit (CT)
Viele Sender senden die aktuelle Uhrzeit in den RDS-Daten. Empfängt das Gerät dieses Signal stellt es die
eingebaute Uhr automatisch.
Das RDS System bietet also den Vorteil, dass beim Verlassen des Sendegebietes ein Umschalten auf einen
gleichen, besser zu empfangenden Sender automatisch erfolgt. Ein Umschalten erfolgt jedoch nur, wenn ein
besserer Sender mit dem gleichen Programm vorhanden ist.
Kurze empfangsbedingte Signalabschwächungen können auch durch das RDS System nicht eliminiert werden, da
ein ständiges Hin und Herschalten des Autoradios die Folge wäre. Dies würde vom Hörer als weitaus störender
empfunden, als kurz auftretende Empfangsstörungen.
Ein weiterer Pluspunkt des RDS Systems ist die Anzeige des Sendernamens. Der Sendername eines RDS-Senders
wird auf dem Autoradiodisplay angezeigt.
Einstellung der Optionen
• Drücken Sie die Taste MENU (2) länger (ca. 2s).
• Drehen Sie den Drehregler VOLUME (3) bis TUNER angezeigt wird.
• Drücken Sie die Taste MENU (2) erneut, aber nur kurz.
• Die folgenden Menüpunkte können nun wie bereits beschrieben mit der Taste MENU (2) ausgewählt und mit
dem Drehregler VOLUME (3) eingestellt werden.
• Um im Menü um eine Ebene zurück zu springen, drücken Sie die Taste DOWN (11).
SEARCH
AUTO SEARCH startet einen automatischen Suchlauf und belegt die Stationstasten (4) automatisch mit gefundenen Sendern.
PROGRAM TYPE startet einen Suchlauf nach Sendern, die die vorher auszuwählende PTY-Kennung haben.
STEREO-MONO
STEREO = Stereoempfang im Radiobetrieb
MONO = Monoempfang im Radiobetrieb
Bei schwachen Sendern führt die Umschaltung auf Mono-Empfang zu verminderten Störgeräuschen.
22

TUNER SENSIBILITY
LOCAL = Der Sendersuchlauf stoppt nur bei starken Sendern.
DISTANT = Der Sendersuchlauf stoppt auch bei schwächeren Sendern.
RDS OPTIONS
AF MODE
AF OFF = Der Tuner sucht nicht automatisch nach einer besser zu empfangende Frequenz des Senders.
AF ON = Der Tuner sucht automatisch nach einer besser zu empfangende Frequenz des Senders.
TRAFFIC ALERT
TA OFF = Der Verkehrsfunk ist ausgeschaltet.
TA SEEK = Das Gerät sucht bei Verlust der Verkehrsfunkinformation einen neuen Sender mit Verkehrsfunk-Kennung.
TA ALARM = Das Gerät gibt einen Warnton ab, wenn die Verkehrsfunk-Kennung nicht mehr empfangen
werden kann.
REGION
REGION OFF = Der Tuner schaltet auch auf Sender mit anderer Programmidentifikation (Regionalkennung)
um.
REGION ON = Der Tuner schaltet nur auf Sender mit gleicher Programmidentifikation (Regionalkennung) um.
MASK
DIFFERENCE PI = Automatische Umschaltung auf die bestempfangbare Frequenz der gewählten Senderkette
nur wenn hier auch RDS-Signale gesendet werden.
ALL PI = Automatische Umschaltung auf die bestempfangbare Frequenz der gewählten Senderkette, auch
wenn hier keine RDS-Signale gesendet werden.
RETUNE
SHORT TIME = Wenn keine Verkehrsfunk-Kennung mehr empfangen wird, startet der automatische Suchlauf
nach kurzer Zeit.
LONG TIME = Wenn keine Verkehrsfunk-Kennung mehr empfangen wird, startet der automatische Suchlauf
nach längerer Zeit.
23

Bedienungsanleitung
Deutsch
Funktion der einzelnen Tasten
Taste BAND (10)
• Drücken Sie diese Taste, um den Bandbereich FM1, FM2 oder FM3 einzustellen. In jedem Bandbereich stehen
6 Stationstasten (4) zum Abspeichern von Sendern zur Verfügung.
Tasten UP/DOWN (11)
Mit diesen Tasten wird die Empfangsfrequenz geändert, um Sender im Radiobetrieb einzustellen.
• Drücken Sie eine dieser Tasten kurz, um den automatischen Sendersuchlauf in die jeweilige Richtung zu starten.
Der Suchlauf hält erst beim nächsten, gut zu empfangenden Sender an.
• Drücken Sie eine dieser Tasten länger, um den manuellen Sendersuchlauf zu aktivieren. Der Suchlauf stoppt
sobald die Taste losgelassen wird.
Nach kurzer Zeit ohne Knopfdruck schaltet der Tuner wieder zurück zum automatischen Suchlauf.
Stationstasten 1-6 (4)
• Drücken Sie kurz auf eine dieser Tasten, um einen vorher dort gespeicherten Sender direkt anzuwählen.
• Drücken Sie länger auf eine dieser Tasten, um einen gerade gehörten Sender dort abzuspeichern.
Taste AF (5)
Diese Taste ruft direkt das Menü RDS OPTIONS/AF MODE auf. Die Auswahl erfolgt durch Drehen des Drehreglers
VOLUME (3) und Bestätigung mit der Taste MENU (2).
• AF OFF = Der Tuner sucht nicht automatisch nach einer besser zu empfangende Frequenz des Senders.
• AF ON = Der Tuner sucht automatisch nach einer besser zu empfangende Frequenz des Senders.
• Nach einigen Sekunden schaltet das Display wieder auf die vorherige Anzeige zurück.
Jeder der drei FM-Bandbereiche (FM1-3) hat sechs Stationstasten. Es können also insgesamt 18
Stationstasten belegt werden
24

Taste TA (6)
Diese Taste ruft direkt das Menü RDS OPTIONS/TRAFFIC ALERT auf. Die Auswahl erfolgt durch Drehen des
Drehreglers VOLUME (3) und Bestätigung mit der Taste MENU (2).
• TA OFF = Der Verkehrsfunk ist ausgeschaltet
• TA SEEK = Das Gerät sucht bei Verlust der Verkehrsfunkinformation einen neuen Sender mit VerkehrsfunkKennung
• TA ALARM = Das Gerät gibt einen Warnton ab, wenn die Verkehrsfunk-Kennung nicht mehr empfangen werden
kann.
Bei aktivierter TA-Funktion (TA SEEK oder TA ALARM) können nur noch Sender mit Verkehrsfunk-Kennung
empfangen werden. Bei laufender Wiedergabe einer anderen Quelle (z.B. CD-Wiedergabe) wird das Programm für
die Dauer der Verkehrsfunkdurchsage stummgeschaltet. Wird eine laufende Rundfunksendung sehr leise gehört,
erhöht sich die Lautstärke der Verkehrsfunkdurchsage automatisch auf einen gut verständlichen Pegel. Nach
Beendigung der Durchsage stellt sich die vorher eingestellte Lautstärke wieder ein.
Taste PTY (7)
Diese Taste ruft direkt das Menü SEARCH/PROGRAM TYPE auf. Die Auswahl erfolgt durch Drehen des Drehreglers
VOLUME (3) und Bestätigung mit der Taste MENU (2).
• Wählen Sie einen Programmtyp aus und drücken Sie die Taste MENU (2). Der Suchlauf nach einem Sender, der
die vorher ausgewählte PTY-Kennung hat wird gestartet.
• Wird kein Sender mit der entsprechenden PTY-Kennung gefunden gibt das Gerät drei Warntöne ab.
Taste AS/PS (12)
• Wird diese Taste kurz gedrückt, werden die auf den Stationstasten 1-6 (4) abgespeicherten Sender für jeweils
5 Sekunden abgerufen. Um diesen Vorgang zu stoppen, drücken Sie die Taste erneut.
• Wird die Taste länger gedrückt gehalten, werden alle gut zu empfangenden Sender automatisch auf die
Stationstasten 1-6 (4) abgespeichert.
• Nach diesem Vorgang, werden die abgespeicherten Sender wie oben beschrieben für 5 Sekunden abgerufen.
Taste SCAN (13)
• Diese Taste startet den Sendersuchlauf.
• Wenn ein Sender gefunden wurde, wird dieser für einige Sekunden angespielt und dann erneut der Sendersuchlauf
gestartet.
• Drücken Sie die Taste nochmals, um den Suchlauf wieder zu stoppen und den gerade wiedergegebenen Sender
dauerhaft zu hören.
25

Bedienungsanleitung
Deutsch
CD-Betrieb
Allgemeine Bedienung
Tasten UP/DOWN (11)
Diese Tasten dienen zur Auswahl der einzelnen Tracks einer CD bzw. zum Suchen eines bestimmten Abschnitts
innerhalb eines CD-Tracks.
Die Pfeile auf den Tasten geben die Suchrichtung (aufwärts bzw. abwärts) an.
• Drücken Sie die Tasten kurz, um zum nächsten bzw. vorherigen Track zu springen.
• Drücken Sie die Tasten lang, um innerhalb eines Tracks einen bestimmten Abschnitt zu suchen.
Taste BAND (PLAY/PAUSE) (10)
• Drücken Sie diese Taste, um die CD-Wiedergabe kurzzeitig zu unterbrechen.
• Bei erneuter Betätigung setzt die Wiedergabe an der Stelle wieder ein, an der sie vorher unterbrochen wurde.
Taste TOP (20)
• Drücken Sie diese Taste, um zum ersten Titel einer CD zu springen.
Taste INT (INTRO) (22)
• Drücken Sie diese Taste um jeden Titel der CD für 10 Sekunden anzuspielen. Im Display erscheint INT.
• Um diese Funktion wieder abzuschalten drücken Sie die Taste erneut. Die Wiedergabe erfolgt ab dieser Stelle
wieder normal.
Taste RDM (RANDOM) (24)
• Drücken Sie diese Taste, um die Zufallswiedergabe zu aktivieren. Die Titel werden in zufälliger Reihenfolge
abgespielt.
• Um diese Funktion wieder abzuschalten drücken Sie die Taste erneut. Die Wiedergabe erfolgt ab dieser Stelle
wieder normal.
26

Tasten 10-DN (25) und 10-UP (26)
• Drücken Sie diese Tasten, um schnell 10 Titel weiter- bzw. zurückzuspringen. Sie funktionieren wie die Tasten
UP/DOWN (11), jedoch werden immer 10 Titel übersprungen.
Diese Tasten sind nur im MP3-Betrieb aktiv.
Taste AS/PS (12)
• Drücken Sie diese Taste, um den aktuell gespielten Titel zu wiederholen.
• Um diese Funktion wieder abzuschalten drücken Sie die Taste erneut. Die Wiedergabe erfolgt ab dieser Stelle
wieder normal.
Suchfunktionen bei MP3-Betrieb
Es gibt 3 verschiedene Suchfunktionen in dieser Betriebsart: Suche nach Titelnummer, Suche nach Anfangsbuchstaben und Suche in der Verzeichnisstruktur.
Suche nach Titelnummer
• Drücken Sie die Taste MENU (2) länger (ca. 2s).
• Drehen Sie den Drehregler VOLUME (3) bis CD/FLASH angezeigt wird.
• Drücken Sie die Taste MENU (2) erneut, aber nur kurz.
• Wählen Sie SEARCH aus und drücken Sie die Taste MENU (2) nochmals.
• Wählen Sie TRACK aus und drücken Sie die Taste MENU (2) nochmals.
• Drehen Sie den Drehregler VOLUME (3), um die erste Ziffer auszuwählen und bestätigen Sie mit der Taste
MENU (2).
• Wiederholen Sie diese Auswahl, bis alle Ziffern eingegeben sind.
• Der gewünschte Titel wird automatisch abgespielt.
Die Titelnummer muss immer dreistellig eingegeben werden. Um z.B. eine zweistellige Titelnummer
einzugeben stellen Sie der Titelnummer eine 0 voran.
27

Bedienungsanleitung
Deutsch
Suche nach Anfangsbuchstaben
• Drücken Sie die Taste MENU (2) länger (ca. 2s).
• Drehen Sie den Drehregler VOLUME (3) bis CD/FLASH angezeigt wird.
• Drücken Sie die Taste MENU (2) erneut, aber nur kurz.
• Wählen Sie SEARCH aus und drücken Sie die Taste MENU (2) nochmals.
• Wählen Sie CHARACTER aus und drücken Sie die Taste MENU (2) nochmals.
• Drehen Sie den Drehregler VOLUME (3), um den Anfangsbuchstaben auszuwählen und bestätigen Sie mit der
Taste MENU (2).
• Im Display werden alle Titel mit dem gewählten Anfangsbuchstaben angezeigt.
• Drehen Sie den Drehregler VOLUME (3), um den gesuchten Titel auszuwählen und bestätigen Sie mit der Taste
MENU (2).
• Der gewünschte Titel wird automatisch abgespielt.
Suche in der Verzeichnisstruktur
• Drücken Sie die Taste MENU (2) länger (ca. 2s).
• Drehen Sie den Drehregler VOLUME (3) bis CD/FLASH angezeigt wird.
• Drücken Sie die Taste MENU (2) erneut, aber nur kurz.
• Wählen Sie SEARCH aus und drücken Sie die Taste MENU (2) nochmals.
• Wählen Sie FILE & FOLDER aus und drücken Sie die Taste MENU (2) nochmals.
• Drehen Sie den Drehregler VOLUME (3), um den gesuchten Titel auszuwählen und bestätigen Sie mit der Taste
MENU (2).
• Der gewünschte Titel wird automatisch abgespielt.
28

Abspielen von Multisession Disks
Selbstgebrannte CDs können in mehreren Sessions (mehrfache Brennvorgänge hintereinander) aufgenommen
werden. Hier kann eingestellt werden, ob bei solchen CDs immer nur die erste Session oder alle Sessions
wiedergegeben werden.
• Drücken Sie die Taste MENU (2) länger (ca. 2s).
• Drehen Sie den Drehregler VOLUME (3) bis CD/FLASH angezeigt wird.
• Drücken Sie die Taste MENU (2) erneut, aber nur kurz.
• Wählen Sie MULTI-SESSION aus und drücken Sie die Taste MENU (2) nochmals.
• Wählen Sie ONE-SESSION bzw. MULTI-SESSION aus und drücken Sie die Taste MENU (2) zur Bestätigung.
ONE-SESSION: Bei Multisession CDs wird nur die erste Session wiedergegeben.
MULTI-SESSION: Multisession CDs werden komplett wiedergegeben.
• Um im Menü um eine Ebene zurück zu springen, drücken Sie die Taste DOWN (11).
AUX-Betrieb
An den Anschluss AUX (27) können Audioausgänge von externen Wiedergabegeräten (z.B. MP3-Player) angeschlossen werden.
• Verbinden Sie den Audioausgang des externen Gerätes mit dem Anschluss AUX (27).
• Wählen Sie den Eingang AUX mit der Taste MODE (9) an und starten Sie die Wiedergabe am externen Gerät.
USB-/Speicherkartenbetrieb
Das Gerät ist mit einer USB-Schnittstelle und einem Speicherkartenleser für SD/MMC-Karten ausgerüstet.
MP3-Dateien, die auf diesen Medien abgespeichert sind, können wiedergegeben werden.
• Stecken Sie Ihren USB-Speicherstick oder den USB-Anschluss Ihres MP3-Players an das USB-Kabel an der
Aufgrund der sehr großen Vielfalt von Geräten mit USB- und SD/MMC-Kartenschnittstellen und ihren
manchmal sehr herstellerspezifischen Funktionen, kann nicht sichergestellt werden, dass alle Medien
erkannt werden und alle Bedienungsmöglichkeiten in Verbindung mit diesem Gerät gegeben sind.
USB-Festplatten können nicht an dieses Gerät angeschlossen werden.
Geräterückseite an.
29
Bedienungsanleitung
Deutsch
• Bei Verwendung einer Speicherkarte stecken Sie diese in den Speicherkartenleser (28). Hierzu muss vorher, wie
im Bild gezeigt die Frontblende abgenommen werden.
• Der entsprechende Eingang wird mit der Taste MODE (9) ausgewählt.
• Die Bedienung ist mit der Bedienung bei der CD-Wiedergabe identisch.
Reset
Diese Taste setzt alle Einstellungen auf die werksseitig vorgegebenen Werte zurück.
Drücken Sie diese Taste in folgenden Fällen:
- nach Abschluss der Einbau- und Anschlussarbeiten
- wenn das Gerät nicht mehr auf Tastenbetätigungen reagiert
- wenn im Display undefinierte Zeichen angezeigt werden
RESET
30

Wartung
Überprüfen Sie regelmäßig die technische Sicherheit des CD-Tuners z.B. auf Beschädigung der Anschlussleitungen
und des Gehäuses.
Wenn anzunehmen ist, dass ein gefahrloser Betrieb nicht mehr möglich ist, so ist das Produkt außer Betrieb zu
setzen und gegen unbeabsichtigten Betrieb zu sichern. Bordnetz abklemmen!
Es ist anzunehmen, dass ein gefahrloser Betrieb nicht mehr möglich ist, wenn:
• das Gerät sichtbare Beschädigungen aufweist
• das Gerät nicht mehr arbeitet, oder
• nach schweren mechanischen Beanspruchungen
Bevor Sie den CD-Tuner reinigen oder warten, beachten Sie unbedingt folgende Sicherheitshinweise:
Beim Öffnen von Abdeckungen oder Entfernen von Teilen können spannungsführende Teile
freigelegt werden.
Vor einer Wartung oder Instandsetzung muss deshalb das Gerät von allen Spannungsquellen
getrennt werden.
Kondensatoren im Gerät können noch geladen sein, selbst wenn es von allen Spannungsquellen getrennt wurde.
Eine Reparatur darf nur durch eine Fachkraft erfolgen, die mit den damit verbundenen Gefahren
bzw. einschlägigen Vorschriften vertraut ist.
Ist ein Sicherungswechsel erforderlich, ist darauf zu achten, dass nur Sicherungen vom angegebenen Typ und
Nennstromstärke (siehe „Technische Daten“) als Ersatz Verwendung finden.
Ein Flicken von Sicherungen oder ein Überbrücken des Sicherungshalters ist unzulässig.
• Nach erfolgter Trennung von der Stromversorgung (ISO-Anschluss-Stecker abklemmen!) ziehen Sie vorsichtig
die Sicherung aus dem Sicherungshalter neben dem ISO-Anschluss heraus.
• Ersetzen Sie sie mit einer Sicherung gleichen Typs.
• Erst danach den CD-Tuner wieder mit dem Bordnetz verbinden und in Betrieb nehmen.
• Sollte die Sicherung erneut auslösen, bringen Sie das Gerät zur Reparatur in eine Fachwerkstatt.
Das Gerät ist ansonsten wartungsfrei. Äußerlich sollte es nur mit einem weichen, trockenen Tuch oder Pinsel
gereinigt werden.
Verwenden Sie auf keinen Fall aggressive Reinigungsmittel oder chemische Lösungen, da sonst die Oberfläche des
Gehäuses beschädigt werden könnte.
31

Handhabung
• Eine zu hohe Lautstärke im Kfz-Innenraum hat zur Folge, dass akustische Warnsignale nicht mehr wahrgenommen werden können. Dadurch werden Sie und andere Verkehrsteilnehmer gefährdet. Achten Sie deshalb auf
eine angepasste Lautstärke.
• Unachtsamkeit im Straßenverkehr kann zu schwerwiegenden Unfällen führen. Eine Bedienung der HiFi-Anlage
darf deshalb immer nur dann erfolgen, wenn es die Verkehrssituation erlaubt und Sie durch die Bedienung der
Anlage nicht vom Verkehrsgeschehen abgelenkt werden.
• Musik sollte nicht über einen längeren Zeitraum mit übermäßiger Lautstärke gehört werden. Hierdurch kann das
Gehör geschädigt werden.
Bedienungsanleitung
Deutsch
Entsorgung
Entsorgen Sie das Produkt am Ende seiner Lebensdauer gemäß den geltenden gesetzlichen
Bestimmungen.
Behebung von Störungen
Mit dem Renkforce CD-7516 CD-Tuner haben Sie ein Produkt erworben, welches nach dem Stand der Technik
gebaut wurde und betriebssicher ist.
Dennoch kann es zu Problemen oder Störungen kommen.
Deshalb möchten wir Ihnen hier beschreiben, wie Sie mögliche Störungen beheben können:
Beachten Sie unbedingt die Sicherheitshinweise!
Keine Wiedergabe, Display und Beleuchtung leuchten nicht:
• Autosicherung defekt. In der Betriebsanleitung ihres Wagens die entsprechende Sicherung suchen und
überprüfen.
• Gerätesicherung defekt. Gerät ausbauen und die Sicherung überprüfen
• Plusleitung/Masseleitung gelöst. Gerät ausbauen und den Anschluss der Leitungen überprüfen.
32

Wiedergabe nur über einen Lautsprecher:
• Balanceregelung verstellt. Balanceregelung wie beschrieben einstellen.
• Lautsprecheranschluss hat sich gelöst. Gerät und/oder Lautsprecher ausbauen und Anschlüsse überprüfen.
Wiedergabe nur über die vorderen oder hinteren Lautsprecher:
• Faderregelung verstellt. Faderregelung einstellen.
• Lautsprecheranschluss hat sich gelöst. Gerät und/oder Lautsprecher ausbauen und Anschlüsse überprüfen.
Bei Radiobetrieb kaum Sender zu empfangen:
• Antenne nicht ganz herausgezogen. Antenne auf volle Länge ausziehen.
• Antennenanschluss hat sich aus dem Gerät gelöst. Gerät ausbauen und Anschluss überprüfen.
• Antenne defekt. Anschluss, Erdung sowie Antenne überprüfen.
Störungen bei Radio- und CD-Wiedergabe:
• Störungen gelangen über die Plusleitung in das Gerät. Zusatzentstördrossel in die Plusleitung einbauen. Auto
evtl. zusätzlich mit Entstörkerzensteckern, Verteilerfinger usw. entstören.
Beim Drücken der Stationstasten ertönt nur Rauschen:
• Kein Sender programmiert. Wie beschrieben Sender programmieren.
Nach jedem Ausschalten des Gerätes geht die Senderspeicherung verloren:
• Dauerplusanschluss nicht angeschlossen bzw. Leitung hat sich gelöst. Dauerplusleitung entsprechend der
Anleitung anschließen bzw. überprüfen, ob die Leitung richtig angeschlossen ist. Sicherung überprüfen.
Andere Reparaturen als zuvor beschrieben sind ausschließlich durch einen autorisierten
Fachmann durchzuführen.
33

Technische Daten
Allgemein
Betriebsspannung............................................... 12V= (10,8-15,6V=)
Sicherung ............................................................ Kfz-Flachsicherung 10A
Ausgangsleistung ............................................... 4 x 40W (max.)
Lautsprecherimpedanz .......................................4 oder 8 Ohm
Schnittstellen ....................................................... USB und SD/MMC-Card
Abmessungen ..................................................... 187 x 57 x 195mm
Masse .................................................................. 1,5kg
FM-Tuner
Empfangsbereich ................................................FM 87,5-108,0MHz
Frequenzschritt ................................................... 50kHz
Empfindlichkeit .................................................... 2,8μV
Zwischenfrequenz .............................................. 10,7MHz
Stereo-Trennung ................................................ 30dB
Rauschabstand ................................................... 50dB
Bedienungsanleitung
Deutsch
CD-Player
Frequenzgang ..................................................... 20-20.000Hz
Rauschabstand ................................................... >60dB
Kanaltrennung .................................................... >50dB (1kHz)
Abspielbare Medien ............................................ CD/CD-R/CD-RW/MP3/WMA
LINE-Ausgang
Ausgangsspannung ............................................5V max.
Ausgangsimpedanz ............................................ 10kOhm
34

35

Table of Contents
Introduction ........................................................................................................................................................... 37
Controls ............................................................................................................................................................... 38
Intended Use ......................................................................................................................................................... 40
Product Description .............................................................................................................................................. 41
Symbols ............................................................................................................................................................... 41
Safety Instructions ................................................................................................................................................ 42
Mechanical Installation ......................................................................................................................................... 43
Installation Position ....................................................................................................................................... 43
Removing and Replacing the Front Control Panel ..................................................................................... 44
Installation in the Radio Recess .................................................................................................................. 45
Removal ........................................................................................................................................................ 46
Electrical Connection ............................................................................................................................................ 47
Connecting the Speakers and the Power Supply ....................................................................................... 48
Connecting the Aerial ................................................................................................................................... 49
Connection to a USB Port ............................................................................................................................ 49
Connecting the LINE Outlets ....................................................................................................................... 50
Operating Instructions
English
Page
Operation .............................................................................................................................................................. 51
General Operation ........................................................................................................................................ 51
Settings.......................................................................................................................................................... 53
Radio Mode ................................................................................................................................................... 54
CD Mode ....................................................................................................................................................... 60
AUX Mode ..................................................................................................................................................... 63
USB/Memory Card Mode ............................................................................................................................. 63
Reset ............................................................................................................................................................. 64
Maintenance ......................................................................................................................................................... 65
Handling ............................................................................................................................................................... 66
Disposal ............................................................................................................................................................... 66
Troubleshooting .................................................................................................................................................... 66
Technical Data ...................................................................................................................................................... 68
36

Introduction
Dear Customer,
Thank you for purchasing this product.
This product complies with the national and European legal requirements. We kindly request the user to
follow the operating instructions, to preserve this condition and to ensure safe operation!
These operating instructions relate to this product. They contain important information concerning commissioning
and handling. Please bear this in mind when passing on the product to a third party. Keep these operating instructions
for future reference!
All company names and product names are trademarks of the respective owner. All rights reserved.
Fon. +49 9604 / 40 88 80
Fax +49 9604/40 88 48
e-mail: tkb@conrad.de
Mon to Thurs 8.00am to 4.30pm
Fri 8.00am to 2.00pm
37

Controls
Operating Instructions
English
16 1112 23 151021 1713
CD/MP3/WMA/CD-R/CD-RW PLAYER 4x40WATTS
2 9148 20 22 24 25 26 5 6 7 27 13
4
(1-6)
38
19 18
28

(1) POWER button
(2) MENU button
(3) VOLUME dial
(4) Station buttons 1-6
(5) AF (ALTERNATIVE FREQUENCY) button
(6) TA (TRAFFIC ANNOUNCEMENT) button
(7) PTY (PROGRAMME TYPE) button
(8) DISP (DISPLAY) button
(9) MODE button
(10) BAND (PLAY/PAUSE) button
(11) UP/DOWN button
(12) A/PS (AUTO SEEK/PROGRAM SEEK) button
(13) SCAN button
(14) MUTE button
(15) EQ button
(16) LC display
(17) RELEASE button
(18) CD slot
(19) EJECT button
(20) TOP button
(21) PLAY/PAUSE button
(22) INT (INTRO) button
(23) REPEAT button
(24) RDM (RANDOM) button
(25) 10-DN button (only for MP3 replay)
(26) 10-UP button (only for MP3 replay)
(27) AUX connection
(28) Memory card reader
39

Intended Use
With the Renkforce CD-7516 CD Tuner you can receive radio programmes in vehicles, play audio CDs and audio
data from suitable media and amplify the audio signals.
The CD Tuner must be connected to speakers.
This product is only approved for connection to a 12 V direct current on-board power supply with the negative pole
of the battery connected to the car body. The product may only be installed and operated in vehicles with this kind
of on-board electrical system.
The user must make sure that the way the product is installed protects the product from humidity and wetness.
Any use other than the one described above damages the product. Moreover, this involves dangers such as shortcircuit, fire, electric shock, etc.
No part of the product may be modified or rebuilt and the housing must not be opened.
Observe all the safety instructions in these operating instructions!
Operating Instructions
English
40

Product Description
This product is equipped with a removable front control panel, an FM stereo radio unit, a USB interface, an MMC/
SD card reader and a CD/CD-R/CD-RW/MP3/WMA-player with the following features:
• High output (4 x 40 W max.)
• Preamp output for connecting a power amplifier
• Front side AUX input for inputting external audio sources
• Electronic volume, bass, treble, fader and balance control
• Digital signal processor for the adaptation of the sound characteristics to various music styles
• Loudness correction
• FM-tuner with RDS-function
• Exact electronic tuning of the stations with a PLL-tuner
• 18 programmable station memories
• Manual/automatic station scan in both directions
• Automatic station storage/programme memory search
• Blue-light Illuminated LC display
• ID3-day display for MP3-replay
• ISO terminal
Symbols
The exclamation mark symbol on the device indicates that the user should read and observe these
operating instructions prior to and whilst using the product.
The “hand” symbol points out special tips and operating instructions.
41

Safety Instructions
The warranty/guarantee is rendered void in cases of damage resulting from failure to comply
with these operating instructions. We do not accept any liability for consequential damages!
We do not accept any liability for personal injury or damage to property caused by incorrect
handling of the device or failure to observe the safety instructions. In such cases the warranty/
guarantee is rendered void!
• The unauthorized conversion and/or modification of the product is not permitted for safety and
approval reasons.
• The device may only be used with the 12 V DC vehicle power supply (with the negative terminal of
the battery connected to the body of the vehicle). Never connect the device to a different power
supply.
• The device must be set up correctly. Please also follow these operating instructions.
• When the product is opened or the safety circuit is disabled, invisible laser radiation may be emitted.
Caution - if you use the product in a different manner or use any controls other than those specified
in this manual, you may expose yourself to hazardous radiation.
• The device is not a toy and has no place in the hands of children. Children cannot judge the dangers
involved, when dealing with electrical devices.
• Do not expose the device to high temperatures, dripping or splashing water, strong vibration or
heavy mechanical loads.
• Do not operate the light when it is unattended.
• Do not leave packaging material unattended. It can be dangerous to children who play with it.
• Comply with the safety and operating instructions of any other appliances that are connected to the
device.
• If you are not sure about the correct connection or if questions arise which are not covered by the
operating instructions, please do not hesitate to contact our technical support or another specialist.
Operating Instructions
English
42

Mechanical Installation
In most vehicles the manufacturers have included an installation slot for the car radio. The choice of the location of
the slot is made with safety aspects in mind. Therefore we recommend that you actually install the radio in this place.
The device requires a DIN installation slot with the dimensions 182x53mm; these dimensions are standardized and
usually the vehicle manufacturers keep to them.
Should there be no slot, please ask your car dealer about the correct place to install your car radio.
Please select the place of installation carefully so that the CD tuner doesn’t influence the
driver’s activity and does not distract the driver from the traffic.
Only use the supplied installation material to guarantee safe installation.
Any changes to the vehicle that become necessary for the installation of the CD tuner or other
components, must be carried out in such a way that neither the traffic security nor the stability
of the car are affected. With many cars, the vehicle warrant of fitness will lapse if you saw out
a section of the sheet metal.
As the CD tuner creates heat during operation, the place of installation must be heat-resistant.
Make sure before drilling the attachment holes that no electric cables, brake lines, the fuel tank
or similar are damaged.
When using tools to install your car hi-fi components, observe the manufacturer’s safety
instructions.
When installing the car hi-fi system, take into consideration the risk of damage which may be
caused from devices being torn away in the case of an accident. Therefore, you should secure
every component in a place where it cannot be dangerous to passengers.
Before you install the system, check the depth of the installation slot.
Installation Position
The angle of installation must deviate less than 30° from horizontal. A CD tuner that is too far inclined may cause
problems when playing CDs.
43

Operating Instructions
English
Removing and Replacing the Front Control Panel
The front control panel can be removed to prevent theft.
• Before you remove the front control panel, press the PWR button (1) to turn the product off.
• Press the RELEASE button (17) and fold out the front control panel.
• Press the front control panel to the right and unclip it from the bracket on the left hand side.
• Remove the front control panel and put it into the supplied protective cover.
• To replace the front control panel place the right hand side in the bracket as shown in the figure below (step 1)
and press it to the right.
• Clip the left side of the front control panel into the bracket (step 2).
• Fold the front control panel back upwards until it clicks into place.
• Do not exert any pressure on the display or the buttons in doing so.
44
2
1
Make sure to insert the front control panel in the correct way.
Do not exert too much pressure on the front control panel against the unit. You can easily put it back
in place by pressing lightly on the device.
When you take the front control panel with you, please put it into the supplied protective cover.

Installation in the Radio Recess
• Remove the front control panel.
• Carefully remove the plastic frame in the front of the system, by bending it slightly to the outside and pulling it off
the unit.
53mm
3
4
1
1
2
• Remove the two CD drive securing screws (fig. 1, no. 1).
• Unlock the installation frame with the two unlocking keys (fig. 1, no. 2).
• Remove the installation frame off the back of the system (fig. 1, no. 3).
• Insert the frame into the stereo slot in the vehicle (fig. 2).
• Bend down a few of the clips on the installation frame until the frame is securely fastened in the recess.
• Once you have secured all the electrical contacts (see “Electric Connection”) insert the device into the frame until
it securely locks into place (fig. 4).
• Replace the frame cover of the front control panel.
Keep the two unlocking keys somewhere safe. You will need them for a later removal of the device.
2
3
182mm
Protect your CD tuner against vibrations with the bolt at the back of the unit.
In most vehicles, such a safety fastening is provided for. If this is not the case in your car, fasten the CD tuner with
a hole-punched metal strip or similar.
45

Operating Instructions
English
Proceed as per the following figure to fasten the device.
Removal
• Remove the front control panel.
• Carefully remove the plastic frame in the front of the system, by bending it slightly to the outside and pulling it off
the unit.
• Insert the two unlocking keys into the lateral slots between the CD tuner and the installation frame, until the CD
tuner unlocks.
• Remove the fastening screw at the back of the unit.
• Carefully pull out the radio with the unlocking keys from the installation frame.
• Loosen all electrical connections.
46

Electrical Connection
The electric connection should be carried out by a specialist.
To avoid short-circuits and resulting damage to the CD tuner, the negative pole (ground) of the
vehicle battery must be disconnected during connection.
Only connect the negative pole of the battery, when you have completely connected the system
and checked the connections.
You should only use a voltmeter or a diode test lamp for checking the voltage on the on-board
cables as normal test lamps consume excessive current and can thus damage the electronic
system of the car.
When laying the cables, make sure that they are not jammed or damaged by sharp edges. Use
rubber spouts for the lead-though points.
The cabling to the speakers must be a two-lead cable. Insulate the bare wires at the connecting
terminals. Make sure that there are no sharp edges which could damage the cables.
Only use speakers which have a sufficiently high loading capacity (see „Technical Data“)..
Make sure that all speakers have the correct polarity, i.e. the plus and minus signs must match.
The connecting cables for the speakers are usually coded: Some speaker manufacturers
indicate the (+) wire by means of an additional colour stripe, others use a corrugated cable for
the (+) terminal and a smooth one for the (-) terminal.
The system was designed for the operation at speaker impedances of at least 4 Ohm. Never
connect speakers with a lower impedance.
In most vehicles the cables for the electric connection and the connection of the speakers have been
laid directly to the radio recess.
If this is not the case, please make sure that any cables laid later are secured by the respective on-board
fuses (see vehicle operation manual).
47

Operating Instructions
English
Connecting the Speakers and the Power Supply
The CD tuner has an ISO system plug.
Vehicles equipped with such a system plug can be connected directly to the system if the plug assignment is the same
(please check beforehand!). If the assignment differs, please connect the CD tuner via an adapter.
Please refer to the following figures for the contact assignment of the CD tuner socket.
Please ask you car dealer for the respective assignment of your vehicle system plug.
System connector B (speaker connection)
(1) Speaker rear right (+)
(2) Speaker rear right (-)
(3) Speaker front right (+)
(4) Speaker front right (-)
(5) Speaker front left (+)
(6) Speaker front left (-)
(7) Speaker rear left (+)
(8) Speaker rear left (-)
System plug A (power supply)
(1) not assigned
(2) not assigned
(3) not assigned
(4) DC +12V
(5) Aerial control output
(6) not assigned
(7) Ignition +12V
(8) Earth
B
A
357
1
2468
57
48
48

• The +12V DC terminal (4) must be connected to a cable that also supplies 12V permanently when the ignition
is off (terminal 30 in the on-board wiring). This terminal saves the user settings, time, etc.
• The aerial control output (5) supplies a voltage of +12V when the device is switched on. This cable can be used
for the power supply of an electric aerial, and for the voltage for powering a vehicle amplifier.
• The +12V ignition terminal (7) must be connected to a cable that is only live with +12V when the ignition is on
(terminal 15 in the on-board wiring).
Do not connect this terminal to continuous power supply, otherwise the car battery could be discharged when the
vehicle is parked for a longer period of time.
• Connect the earth connection (8) with the vehicle body.
Adhesive techniques which are ever more common and painted metal parts impair the electric
conductivity. Therefore not every metal part is a suitable earthing point.
Connecting the Aerial
• Connect the aerial plug of your vehicle with the aerial socket at the back of the radio (socket next to the LINE
terminals).
• If your vehicle has a different aerial plug, please use a suitable adapter, available in specialist shops.
Connection to a USB Port
• Insert your USB storage device (USB stick, MP3 player) into the USB interface at the back of the device.
• If the USB lead is too short to be laid at an accessible location (e.g. glove box) a normal commercially available
USB extension cable.
49

Connecting the LINE Outlets
The CD tuner has one LINE outlet for connecting power amplifiers.
Only use suitable shielded cinch wires for connecting the cinch sockets. The use of other
cables might cause interference.
Keep the length of the connecting cables as short as possible.
Do not place the cables near other cables. This helps to avoid interference in the cables.
To avoid distortions or mismatching that could damage the unit, the cinch connector must only
be connected to devices with the suitable cinch terminals. Observe also the connection data
in the section „Technical Data“.
• Connect the sockets LINE OUT with the inputs of a power amplifier.
Operating Instructions
English
The red socket is the terminal for the right channel
The white socket is the terminal for the left channel
50

Operation
Do not turn the CD tuner on before you have read and understood these operating instructions.
Check all the connections again to ensure that they are correct. When you have done so,
reconnect the negative pole of the car battery.
General Operation
Switching on/off
• Press the POWER (1) button to switch on the device!
• To switch the device off, hold down the corresponding button a little bit longer until the device is switched off.
To switch the CD tuner on, you can also press any other button.
Volume control
• Turn the VOLUME dial (3), to set the volume.
• Turning clockwise increases the volume, turning anti-clockwise reduces it.
Mute switch
The MUTE button (14) activates the mute function.
• Press and hold the button for a brief period, if you want to interrupt the current playback for a short time, for
example if you want to ask someone for the way.
• To de-activate the mute function, press and hold the MUTE button (14) again briefly.
Time display
• Press the DISP (8) button to display the time. The display returns to its original content again automatically after
a short time.
51

Selecting the playback source
• Press the MODE key (9) in order to select the individual playback sources.
• Selection is made in the following sequence: Radio > CD > USB > SD/MMC > AUX
Operating Instructions
English
If no CD, USB memory or SD/MMC card is inserted, these sources are skipped during selection.
Inserting a CD
• Press the RELEASE button (18) to open the front screen. Slip a CD into the CD slot (18).
Always insert the CD with the printed side on top.
Ejecting a CD
• Press the RELEASE button (17) to open the front screen.
• Press the EJECT button (19) to stop the playback of the CD.
• Close the front screen by folding it back upwards.
Setting the equalizer
• Press the EQ button (15). This button calls up the AUDIO /EQUALIZER menu. Selection is carried out by turning
the VOLUME dial (3) and confirmation with the MENU button (2).
EQ OFF = the equalizer is switched off
POP = the sound characteristics are adapted to pop music.
ROCK = the sound characteristics are adapted to rock music.
CLASSIC = the sound characteristics are adapted to classical music.
FLAT = the equalizer is active, but there is no sound adaptation.
• The display returns to its original content again automatically after a few seconds.
52

Settings
Time
• Press and hold the MENU button (2) for approx. 2 seconds.
• Turn the VOLUME dial (3), until CLOCK is displayed.
• Briefly press the MENU button (2) again.
• The time is shown and the hour display blinks.
• Set the hours with the VOLUME dial (3).
• Briefly press the MENU button (2).
• The minute display blinks.
• Set the minutes with the VOLUME dial (3).
• Briefly press the MENU button (2). The setting is stored.
• Press DOWN (11) to exit the menu again.
Sound
• Press and hold the MENU button (2) for approx. 2 seconds.
• Turn the VOLUME dial (3), until AUDIO is displayed.
• Briefly press the MENU button (2) again.
• The following menu items can be selected with the MENU button (2) and set with the VOLUME dial (3) as
previously described.
BASS for setting the bass sound
TREBLE for setting the higher tone sound
FADER for setting the speaker volume balance between front and back speakers
BALANCE for setting the speaker volume balance between right and left speakers
EQUALIZER for selecting a sound presetting
LOUDNESS to increase the high and low tones when listening to quiet music.
BEEP for activating/deactivating the button confirmation sound
• To jump back one level in the menu, press the DOWN (11) button.
53

Operating Instructions
English
Display
• Press and hold the MENU button (2) for approx. 2 seconds.
• Turn the VOLUME dial (3), until DISPLAY is displayed.
• Briefly press the MENU button (2) again.
• The following menu items can be selected with the MENU button (2) and set with the VOLUME dial (3) as
previously described.
CONTRAST for setting the display contrast.
VIEW for setting the display view (positive/negative).
• To jump back one level in the menu, press the DOWN (11) button.
Radio Mode
RDS as a receiving concept
The abbreviation RDS stands for Radio Data System, i.e. inaudible, additional information codes are transmitted by
the FM RDS station.
Your CD 7516 is a CD tuner that is able to evaluate this coded data which is transmitted by most of the radio stations.
The following important data is transmitted:
- Programme Identification (PI)
- Traffic Programme (TP)
- Traffic Announcement (TA)
- Programme Service (PS)
- Alternative Frequencies (AF)
- Programme Type (PTY)
- EON Information (enhanced other networks)
- Clock time (CT)
54

Programme Identification (PI)
This data helps the receiver to identify a station. It enables the radio to differentiate between areas where the same
programme is transmitted. The car radio only switches to a stronger station when the reception gets weaker, if the
stronger station transmits the same programme identification
Traffic Programme (TP)
This signal enables the receiver to detect that a station with a traffic programme is being received.
Traffic Announcement (TA)
With this signal the receiver can detect a traffic announcement and interrupt the current playback of a different audio
source.
Programme Service (PS)
This information tells the receiver which station it is receiving. It is directly replayed in the display of the car radio, e.g.
BAYERN 3.
Alternative Frequencies (AF)
A list of alternative frequencies that send the same programme is transmitted. If the transmitter station currently
received becomes too weak, the receiver detects from the AF signal on which frequencies it must search for a better
transmitter.
Program Type (PTY)
This code gives the receiver information about the type of the transmitted programme (e.g. sports, classic, news etc).
The listener can select his favourite programme in a targeted manner.
A national disaster alarm can also be broadcast this way. However, not all the radio stations offer the PTY service.
EON Information
Many chains of radio stations with various programmes only have one programme with traffic information. If EON
information is transmitted, a radio equipped with an EON function switches to the Traffic Announcement station
whenever such announcements are made, even if a different programme of this chain is being played.
If you listen to Bayern 4 for example (no traffic announcement) and the TA button is activated, the radio will switch
to Bayern 3 (with traffic announcements) for the duration of the traffic announcement.
55

Operating Instructions
English
Clock time (CT)
Many stations transmit the current time in the RDS data. If a radio receives this signal, it sets the in-built clock
automatically.
Therefore, when you leave the transmission area, the RDS system has the advantage that it switches to a similar
transmitter station that can be better received. However, it only changes when it finds a better transmitter station with
the same programme.
Short signal variations due to reception cannot be eliminated by the RDS system either, since this would mean that
the car radio would repeatedly switch back and forth. The listener would be much more disturbed by this than by shortterm reception problems.
Another advantage of the RDS system is that the station name is displayed. The station name of an RDS station is
displayed in the car radio display.
Adjusting the options
• Press and hold the MENU button (2) for approx. 2 seconds.
• Turn the VOLUME dial (3), until TUNER is displayed.
• Briefly press the MENU button (2) again.
• The following menu items can be selected with the MENU button (2) and set with the VOLUME dial (3) as
previously described.
• To jump back one level in the menu, press the DOWN (11) button.
SEARCH
AUTO SEARCH starts an automatic search and saves the found stations to the station buttons (4).
PROGRAM TYPE starts an automatic search for stations which have the PTY code which must be preselected.
STEREO-MONO
STEREO = stereo reception in radio mode
MONO = mono reception in radio mode
When transmitter stations are weak switching to mono reduces interference.
56

TUNER SENSIBILITY
LOCAL = the auto-scan only stops at strong stations.
LOCAL = the auto-scan also stops at weaker stations.
RDS OPTIONS
AF MODE
AF OFF = the tuner does not automatically search for a more receivable frequency of the same station.
AF ON = the tuner automatically searches for a more receivable frequency of the same station.
TRAFFIC ALERT
TA OFF = the traffic alert is switched off.
TA SEEK = if the radio has lost the traffic information, it will seek a new station with Traffic Announcement
coding.
TA ALARM = when the radio cannot receive the TA code any more, there will be an alarm signal.
REGION
REGION OFF = the tuner also switches to stations with other programme codes (regional recognition).
REGION ON = the tuner only switches to stations with the same programme codes (regional recognition).
MASK
DIFFERENCE PI = the radio only switches to the best frequency of the selected chain of radio stations
automatically if the RDS signals are being sent there too.
ALL PI = the radio switches to the best frequency of the selected chain of radio stations, even if no RDS
signals are being sent there.
RETUNE
SHORT TIME = when the radio does not receive traffic announcements any more, the auto-scan starts
shortly afterwards.
LONG TIME = when the radio does not receive traffic announcements any more, the auto-scan starts after
a longer period of time.
57

Operating Instructions
English
Function of the individual buttons
BAND button (10)
• Press this button to set the band to FM1, FM2 or FM3. In each band there are 6 station buttons (4) available to
save stations.
UP/DOWN buttons (11)
These buttons change the receiving frequency to adjust to stations in radio operation.
• Press one of these buttons briefly to start the automatic scan for stations in the corresponding directions. The
auto-scan only stops at the next station that can be received well.
• Press one of these buttons for longer in order to activate manual station scan. The search will stop as soon as
the button is released.
After a short period of time without the button being pressed, the tuner reverts back to automatic scan.
Station buttons 1-6 (4)
• Press one of these buttons briefly in order to directly select the station previously saved to the button.
• Press one of these buttons for longer in order to save the currently heard station to that button.
AF button (5)
This button calls up the RDS OPTIONS/AF MODE menu. Selection is carried out by turning the VOLUME dial (3)
and confirmation with the MENU button (2).
• AF OFF = the tuner does not automatically search for a more receivable frequency of the same station.
• AF ON = the tuner automatically searches for a more receivable frequency of the same station.
• The display returns to its original content again automatically after a few seconds.
Every one of the three FM ranges (FM1-3) has six station buttons. Therefore you can assign 18 station
buttons.
58

TA button (6)
This button calls up the RDS OPTIONS/TRAFFIC ALERT menu. Selection is carried out by turning the VOLUME dial
(3) and confirmation with the MENU button (2).
• TA OFF = the traffic alert is switched off.
• TA SEEK = if the radio has lost the traffic information, it will seek a new station with Traffic Announcement coding.
• TA ALARM = when the radio cannot receive the TA code any more, there will be an alarm signal.
When a TA function is activated (TA SEEK or TA ALARM) only stations with traffic information identification can be
received. If a different audio source is being played (a CD for instance), the programme is set to mute during the traffic
announcement. When you are listening to a radio programme at a very low volume, the volume is automatically
increased to an easily audible level during the traffic announcement. When the traffic announcement is over, the
volume you were hearing before is restored.
PTY button (7)
This button calls up the SEARCH/PROGRAM TYPE menu. Selection is carried out by turning the VOLUME dial (3)
and confirmation with the MENU button (2).
• Select a programme type and briefly press the MENU button (2). The automatic search is started for a station
which has the preselected PTY code.
• If no station is found with the corresponding PTY identification, the device emits 3 warning sounds.
AS/PS button (12)
• If you press this button shortly, the stations stored on the station buttons 1-6 (4) are played for 5 seconds each.
To stop the auto-scan, press the button again.
• If you hold the button down, all the stations that can be received well are stored on the station buttons 1-6 (4).
• After this procedure, the stored stations are played for 5 seconds each, as described above.
(13) SCAN Key
• This button starts the auto-scan.
• If a station has been found, it is played for 5 seconds and then the auto-scan is continued.
• Press the button again to stop the auto-scan to listen to the currently played station.
59

Operating Instructions
English
CD Mode
General Operation
UP/DOWN buttons (11)
With these buttons you can select individual tracks of a CD or search for a certain section within one CD track.
The arrows on the buttons indicate the search direction (up or down).
• Only press the buttons shortly to jump to the next or previous track.
• Press the buttons longer to search through a certain section within one track.
BAND (PLAY/PAUSE) button (10)
• Press this button to interrupt the CD replay shortly.
• When you press the button again, playback will begin at the point where it was interrupted.
TOP button (20)
• Press this button to jump to the first track of a CD.
INT (INTRO) button
• Press this button to play each track in the CD for 10 seconds. INT appears on the display.
• To de-activate this function, press the button again. Playback will be normal from this point onward.
RDM (RANDOM) button (24)
• Press this key for random playback. The tracks will be played in a random order.
• To de-activate this function, press the button again. Playback will be normal from this point onward.
60

10-DN (25) and 10-UP buttons (26)
• Press these buttons to jump up and down by 10 tracks quickly. It functions like the button UP/DOWN (11), but
skips 10 tracks every time.
These buttons are only active in MP3 mode.
AS/PS button (12)
• Press this button to repeat the track that is being played.
• To de-activate this function, press the button again. Playback will be normal from this point onward.
Search function in MP3 mode
There are 3 different types of scan function in this mode of operation: Search for track number, search for first letter
and search amongst folders.
Search for track number
• Press and hold the MENU button (2) for approx. 2 seconds.
• Turn the VOLUME dial (3), until CD/FLASH is displayed.
• Briefly press the MENU button (2) again.
• Select SEARCH and press the MENU button (2) again.
• Select TRACK and press the MENU button (2) again.
• Turn the VOLUME dial (3), to select the first number and confirm with the MENU button (2).
• Repeat the selection until all numbers are entered.
• The selected track is played automatically.
The title number must always be three numbers long. I.e. to enter a 2 digit number, enter a 0 before
the track number.
61

Operating Instructions
English
Search for first letters
• Press and hold the MENU button (2) for approx. 2 seconds.
• Turn the VOLUME dial (3), until CD/FLASH is displayed.
• Briefly press the MENU button (2) again.
• Select SEARCH and press the MENU button (2) again.
• Select CHARACTER and press the MENU button (2) again.
• Turn the VOLUME dial (3), to select the first letter and confirm with the MENU button (2).
• The display shows all the tracks corresponding to the selected first letter.
• Turn the VOLUME dial (3), to select the title and confirm with the MENU button (2).
• The selected track is played automatically.
Search within folders
• Press and hold the MENU button (2) for approx. 2 seconds.
• Turn the VOLUME dial (3), until CD/FLASH is displayed.
• Briefly press the MENU button (2) again.
• Select SEARCH and press the MENU button (2) again.
• Select FILE & FOLDER and press the MENU button (2) again.
• Turn the VOLUME dial (3), to select the title and confirm with the MENU button (2).
• The selected track is played automatically.
62

Playing multisession disks
CDs you burn yourself can be recorded in several sessions (several successive burning processes). Here you can
make the setting whether only the first session or all sessions are played when using such CDs.
• Press and hold the MENU button (2) for approx. 2 seconds.
• Turn the VOLUME dial (3), until CD/FLASH is displayed.
• Briefly press the MENU button (2) again.
• Select MULTI-SESSION and press the MENU button (2) again.
• Select ONE-SESSION or MULTI-SESSION and press the MENU button (2) again.
ONE-SESSION: Only the first session of multisession CDs is played.
MULTI-SESSION: Multisession CDs are played completely.
• To jump back one level in the menu, press the DOWN (11) button.
AUX Mode
The AUX connector (27) allows audio outputs to external playback devices (e.g. MP3 players) to be connected.
• Connect the output from the external device with the AUX input (27).
• Select the AUX input with the MODE button (9) and start playback on the external device.
USB/Memory Card Mode
The CD tuner is equipped with a USB interface and a memory card reader for SD/MMC cards,
MP3 files stored on these media can be played.
• Insert your USB stick or the USB connector of your MP3 player into the USB cable on the back of the device.
Due to the great variety of systems with USB and SD/MMC card interfaces and their different functions
that are sometimes producer-specific, we cannot guarantee that all media will be recognized and that
all the operational functions are available in this CD tuner.
USB hard-drives cannot be connected to this device.
63

Operating Instructions
English
• If you use a memory card, insert it into the memory card reader (28). The front screen needs to be removed
beforehand as shown in the figure.
• The corresponding input is selected with the MODE button (9).
• The operation is the same as for CD playback.
Reset
This button resets all the settings to the original settings that were made in the factory.
Press this button in the following cases:
- when you have completed the installation and connection
- when the CD tuner does not react when you press buttons any more
- when the display shows undefined characters.
RESET
64

Maintenance
Regularly check the technical safety of the CD tuner, e.g. for damage of the cables or the housing.
If it can be assumed that safe operation is no longer possible, the device must be turned off and precautions are to
be taken to ensure that it is not used unintentionally. Disconnect the car power system!
It can be assumed that safe operation is no longer possible if:
• the device is visibly damaged,
• if the appliance does not function for some reason, or
• following considerable mechanical stress.
Before cleaning the CD tuner or performing maintenance, the following safety instructions must be observed:
Live components may be exposed if the cover is opened or if components are removed.
Prior to start of maintenance or repair works, the device must be disconnected from all voltage
sources.
Capacitors inside the device may still carry voltage even though they have been disconnected
from all voltage sources.
Repairs may only be carried out by qualified personnel who are familiar with the hazards
involved and the relevant regulations.
If it is necessary to replace a fuse, make sure that only fuses of the prescribed type and nominal current are used
(see “Technical Data”).
Do not repair fuses or bridge the fuse holders.
• When the power supply has been disconnected (disconnect ISO plug!) carefully remove the fuse from the fuse
holder next to the ISO plug.
• Replace it with a fuse of the same type.
• Only then can you re-connect the CD tuner to the electric on-board system.
• Should the fuse blow again, have the CD tuner repaired in a specialised workshop.
Otherwise, the device does not need servicing. The outside should only be cleaned with a soft, dry cloth or a brush.
Never use caustic cleaning agents or chemical solutions as the surface of the housing could be damaged.
65

Handling
• If the volume inside your car is too high, you will not hear acoustic warning signals. This constitutes a danger to
yourself and other road users. Therefore, make sure the volume is at a suitable level.
• Lack of attention on the road can lead to serious accidents. Operation of the hi-fi system may therefore only take
place if the traffic situation permits and you are not unduly distracted by operating the system.
• Do not listen to excessively loud music for long periods of time. This could damage your hearing.
Operating Instructions
English
Disposal
Dispose of the unserviceable product according to the relevant statutory regulations.
T roubleshooting
The Renkforce CD-7516 CD tuner you have purchased is equipped with state-of-the-art technology and is safe to
operate.
Nevertheless, problems or faults may occur.
Therefore, we would like to describe here how to eliminate possible faults:
Observe the safety instructions at all times!
No playback, no display, and the lights do not glow:
• The vehicle fuse is defect. Look up the respective fuse in the operation manual of your car. Check the fuse.
• The fuse of the CD tuner is defective. Remove the CD tuner and check the fuse.
• The positive line/ground line is loose. Remove the CD tuner and check the connections of the cables.
66

Playback only through one speaker:
• The balance control is wrongly adjusted. Adjust the balance control as described.
• The speaker connection has come loose. Remove the CD tuner and/or speakers and check the connections.
Playback only through the front or rear speakers:
• The fader control is wrongly adjusted. Adjust the fader control.
• The speaker connection has come loose. Remove the CD tuner and/or speakers and check the connections.
In radio operation hardly any stations can be received:
• The aerial is not completely extended. Pull out the aerial to its full length.
• The aerial connection has come loose. Remove the CD tuner and check the connection.
• The aerial is defective. Check the connection, grounding and the aerial itself.
Problems during radio and CD playback:
• Interference reaches the CD tuner via the positive lead. Install an additional interference suppression coil into
the positive lead. If necessary also equip the vehicle with spark-plug suppressor sockets, distributor arms etc.
to suppress interferences.
When you press a station button, you only hear hissing:
• No station has been programmed. Program the stations as described above.
Every time you switch off the CD tuner, the station programming is lost:
• The continuous positive line is not connected, or has come loose. Connect or check the continuous positive line
as explained in the instructions or check whether the cable is correctly connected. Check the fuse.
Repairs other than those described above should only be performed by an authorised
specialist.
67

Technical Data
General Information
Operating voltage ............................................... 12V= (10.8-15.6V=)
Fuse..................................................................... Vehicle flat fuse 10A
Output power ...................................................... 4 x 40W (max.)
Speaker impedance: .......................................... 4 or 8 Ohm
Interfaces............................................................. USB and SD/MMC card
Dimensions ......................................................... 187 x 57 x 195mm
Weight ................................................................. 1.5kg
FM tuner
Reception range: ................................................ FM 87.5-108.0MHz
Frequency step ................................................... 50kHz
Sensitivity ............................................................ 2.8μV
Intermediate frequency....................................... 10.7MHz
Stereo separation ............................................... 30dB
Signal-to-noise ratio ........................................... 50dB
Operating Instructions
English
CD player
Frequency response ........................................... 20-20,000Hz
Signal-to-noise ratio ........................................... >60dB
Channel separation ............................................ >50dB (1kHz)
Admissible Media................................................ CD/CD-R/CD-RW/MP3/WMA
LINE output
Output voltage .................................................... 5V max.
Output impedance .............................................. 10 kOhm
68

69

Table des matières
Introduction ........................................................................................................................................................... 71
Eléments de commande ...................................................................................................................................... 72
Utilisation conforme .............................................................................................................................................. 74
Description du produit .......................................................................................................................................... 75
Explication des symboles ..................................................................................................................................... 75
Consignes de sécurité .......................................................................................................................................... 76
Montage mécanique ............................................................................................................................................. 77
Position de montage ..................................................................................................................................... 77
Démontage et montage de la façade .......................................................................................................... 78
Installation dans la baie radio ...................................................................................................................... 79
Démontage .................................................................................................................................................... 80
Raccordement électrique ..................................................................................................................................... 81
Connexion des haut-parleurs et de l’alimentation en courant ................................................................... 82
Branchement de l’antenne ........................................................................................................................... 83
Branchement d’un support d’enregistrement USB ..................................................................................... 83
Connexion des sorties LINE......................................................................................................................... 84
Mode d´emploi
français
Page
Utilisation............................................................................................................................................................... 85
Mise en service générale ............................................................................................................................. 85
Réglages ....................................................................................................................................................... 87
Mode radio .................................................................................................................................................... 88
Mode CD ....................................................................................................................................................... 94
Mode AUX ..................................................................................................................................................... 97
Mode USB/carte mémoire ............................................................................................................................ 97
Reset ............................................................................................................................................................. 98
Maintenance ......................................................................................................................................................... 99
Manipulation........................................................................................................................................................ 100
Élimination........................................................................................................................................................... 100
Dépannage ......................................................................................................................................................... 100
Caractéristiques techniques ............................................................................................................................... 102
70

Introduction
Chère cliente, cher client,
Nous vous remercions de l'achat du présent produit.
Ce produit répond aux exigences légales nationales et européennes. Afin de maintenir l’appareil en bon état
et d’en assurer l’exploitation sans risques, l’utilisateur doit absolument tenir compte de ce mode d’emploi !
Le présent mode d'emploi fait partie intégrante du produit. Il contient des consignes importantes pour la mise en
service et la manipulation du produit. Tenez en compte, notamment lorsque vous transmettez le produit à un tiers.
Conservez le présent mode d'emploi afin de pouvoir le consulter à tout moment !
Tous les noms de société et toutes les désignations de produit sont des marques déposées de leurs
propriétaires respectifs. Tous droits réservés.
Tél. 0892 897 777
Fax 0892 896 002
e-mail : support@conrad.fr
Du lundi au vendredi de 8h00 à 18h00
le samedi de 8h00 à 12h00
Tél. 0848/80 12 88
Fax 0848/80 12 89
e-mail : support@conrad.ch
Du lundi au vendredi de 8h00 à 12h00 et de 13h00 à 17h00
71

Éléments de commande
CD/MP3/WMA/CD-R/CD-RW PLAYER 4x40WATTS
2 9148 20 22 24 25 26 5 6 7 27 13
Mode d´emploi
français
16 1112 23 151021 1713
4
(1-6)
72
19 18
28

(1) Touche POWER
(2) Touche MENU
(3) Bouton de réglage VOLUME
(4) Touches de recherche des stations 1-6
(5) Touche AF (ALTERNATIVE FREQUENCY)
(6) Touche TA (TRAFFIC ANNOUNCEMENT)
(7) Touche PTY (PROGRAM TYPE)
(8) Touche DISP (DISPLAY)
(9) Touche MODE
(10) Touche BAND (PLAY/PAUSE)
(11) Touches UP/DOWN
(12) Touche AS/PS (AUTO SEEK/PROGRAM SEEK)
(13) Touche SCAN
(14) Touche MUTE
(15) Touche EQ
(16) Ecran à cristaux liquides (LCD)
(17) Touche RELEASE
(18) Fente CD
(19) Touche EJECT
(20) Touche TOP
(21) Touche PLAY/PAUSE
(22) Touche INT (INTRO)
(23) Touche REPEAT
(24) Touche RDM (RANDOM)
(25) Touche 10-DN (seulement pendant la lecture de MP3)
(26) Touche 10-UP (seulement pendant la lecture de MP3)
(27) Branchement AUX
(28) Lecteur de cartes mémoire
73

Utilisation conforme
Le syntoniseur CD 7516 Renkforce est prévu pour l’emploi dans des voitures et sert à la réception des stations de
radio et à la lecture de CDs audio et des données audio de supports d •information adaptables et ainsi à
l’amplification des signaux audio reproduits.
Pour la reproduction l’appareil doit être branché à des haut-parleurs.
Ce produit n’est homologué que pour être branché sur un réseau de bord de tension continue de 12 V avec le pôle
négatif de la batterie du véhicule à la carrosserie. L’appareil ne doit être monté et mis en service que dans les
véhicules utilisant cette tension de bord.
Lors du montage, l’utilisateur doit s’assurer que l’appareil est protégé contre l’humidité.
Toute utilisation autre que celle stipulée ci-dessus provoque l’endommagement du présent produit, ainsi que des
risques de courts-circuits, d’incendie, de décharge électrique etc.
Il est interdit de modifier, de transformer l’ensemble du produit ou d´ouvrir le boîtier.
Respectez toutes les consignes de sécurité du présent mode d’emploi !
Mode d´emploi
français
74

Description du produit
Cet appareil est équipé d’une façade détachable, d’une radio FM stéréo, d’un port USB, d’un lecteur de cartes MMC/
SD et d’un lecteur CD/CD-R/CD-RW/MP3/WMA muni des caractéristiques suivantes :
• Forte puissance de sortie (4 x 40W max.),
• Sortie de préamplificateur pour la connexion d’un amplificateur,
• Entrée AUX sur la face avant pour l’alimentation de sources audio externes
• Réglage électronique du volume, des basses, des aiguës, du fader et équilibrage des voies
• Processeur analogique numérique pour l’adaptation de la caractéristique sonore aux différents types de musique
• Réglage de niveau
• Syntoniseur FM avec fonction RDS,
• Syntonisation électronique exacte des stations au moyen d’un syntoniseur PLL
• 18 stations radio programmables,
• Recherche manuelle/automatique de la fréquence optimale dans les deux sens de recherche
• Mémorisation automatique des fréquences/recherche des mémoires de programme
• Écran à cristaux liquides rétroéclairé en bleu
• Affichage ID3 Tag lors de la lecture de MP3
• Connecteur ISO.
Explication des symboles
Le symbole du point d’exclamation indique à l’utilisateur qu’il doit lire ce mode d’emploi avant la mise
en service de l’appareil et qu’il doit le respecter pendant le fonctionnement.
Le symbole de la „main“ précède des conseils et consignes d´utilisation particuliers.
75

Consignes de sécurité
Tout dommage résultant d’un non-respect du présent mode d’emploi a pour effet d’annuler la
garantie. Nous déclinons toute responsabilité pour d’éventuels dommages consécutifs !
De même, le constructeur n’assume aucune responsabilité en cas de dommages matériels ou
corporels résultant d’une utilisation non conforme de l’appareil ou du non-respect des
présentes consignes de sécurité. De tels cas entraîne l’annulation de la garantie.
• Pour des raisons de sécurité et d’homologation, il est interdit de modifier ou de transformer ce produit
de son propre chef !
• Seul le réseau de bord alimenté par une tension continue de 12 V (pôle négatif de la batterie sur la
carrosserie du véhicule) peut être utilisé comme source de tension. Ne branchez jamais l’appareil
sur une autre alimentation en courant.
• Veillez à ce que la mise en service de l’appareil soit effectué dans les règles de l’art. Tenez compte
à cet effet des indications contenues dans le présent mode d’emploi.
• Il y a risque d’un rayonnement laser invisible quand l’appareil est ouvert ou quand un circuit de
sécurité est court-circuité. Des maniements ou procédures autres que ceux décrits dans ce mode
d’emploi peuvent avoir pour conséquence une émission de rayons dangereuse.
• Ce produit n’est pas un jouet, maintenez-le hors de la portée des enfants. Les enfants ne sont pas
en mesure d’évaluer les risques résultant de la manipulation des appareils électriques.
• N’exposez l’appareil ni à des températures extrêmes ni à des gouttes ou projections d’eau ni à de
fortes vibrations ni à de fortes contraintes mécaniques.
• Ne laissez pas l’appareil en marche sans surveillance.
• Ne laissez pas traîner négligemment le matériel d’emballage. Il pourrait constituer un jouet
dangereux pour les enfants.
• Respectez également les consignes de sécurité et les instructions de service des autres appareils
raccordés à ce produit.
• En cas de doute sur le branchement correct de l’appareil ou si vous aviez des questions auxquelles
le mode d’emploi n’aurait pu répondre, prenez contact avec notre service technique ou demandez
l’avis d’un autre spécialiste.
Mode d´emploi
français
76

Montage mécanique
Un lieu de montage pour l’autoradio a été prévu par le fabricant dans la plupart des véhicules. Le lieu du montage
a été choisi du point de vue de la sécurité. Pour cette raison, il est conseillé de monter la radio du véhicule à l´endroit
prévu à cet effet.
l’appareil nécessite une ouverture d’emplacement DIN présentant les dimension 182 x 53 mm; ces dimensions de
montage sont standardisées et normalement respectées par tous les fabricants de voitures.
Si aucune ouverture d’emplacement n’est prévue, veuillez consulter votre concessionnaire automobile qui vous
indiquera l´endroit correct du montage de la radio.
Choisissez soigneusement l’emplacement du montage en veillant à ce que l’appareil ne gêne
pas le conducteur au volant ou ne détourne pas son attention de la route.
N’utilisez que le matériel de montage contenu dans l’emballage afin de garantir une installation
sûre.
Des modifications sur le véhicule nécessitées par le montage du syntoniseur CD ou d’autres
composants doivent toujours être effectuées de manière à ne pas compromettre la sécurité
routière ou la stabilité de construction du véhicule. Pour de nombreux véhicules, la découpe
d’une tôle à l’aide d’une scie suffit pour perdre l’autorisation de l’exploitation.
Comme l’appareil produit de la chaleur pendant son fonctionnement, le lieu de montage doit
être insensible à la chaleur
Avant de percer des trous de fixation, assurez-vous qu’aucun câble électrique, conduite du
frein, réservoir d’essence ou objet similaire ne sont pas endommagés.
Observez les consignes de sécurité des fabricants des outils utilisés pour le montage de vos
composants HiFi pour voiture.
Lors du montage de votre chaîne hi-fi, tenez compte des risques de blessure qui peuvent
émaner d’appareils susceptibles de se détacher lors d’un accident. Pour cette raison, fixez bien
toutes les pièces à un endroit qui ne présente aucun danger pour les passagers.
Avant le montage de l’appareil, contrôlez la profondeur du logement prévu.
Position de montage
L’angle d’installation par rapport à l’horizontale doit être inférieur à 30°. Une inclinaison exagérée de l’appareil peut
provoquer des problèmes lors de la lecture de CDs.
77

Mode d´emploi
français
Démontage et montage de la façade
La façade peut être enlevée de façon à éviter que l’appareil puisse être volé.
• Avant d’enlever la façade, appuyez sur la touche PWR (1) pour mettre l’appareil hors service.
• Appuyez sur la touche RELEASE (17) et rabattez l’unité de commande.
• Poussez l’unité de commande vers la droite et faites-la décliqueter au côté gauche de son support.
• Retirez l’unité de commande et rangez-la dans l´étui fourni.
• Pour remettre l’unité de commande, insérez la partie droite dans le support comme indiqué dans la figure
inférieure (étape 1) et poussez-la vers la droite.
• Faites encliqueter alors la partie gauche de l’unité de commande dans le support (étape 2).
• Rabattez l’unité de commande vers le haut jusqu’à ce qu’elle s’encliquette.
• Faites attention à n’exercer aucune pression sur l’affichage ou sur les touches de commande.
78
2
1
Assurez-vous que la façade est dans la bonne position lorsque vous la replacez sur l’appareil.
N´appuyez pas trop fort la façade contre l’appareil quand vous la mettez en place. Il suffit d’appuyer
légèrement sur l’appareil pour le monter.
Si vous emportez la façade, rangez-la dans l´étui fourni.

Installation dans la baie radio
• Enlevez la façade.
• Dégagez avec précaution le cadre en plastique de la façade de l’appareil en le pliant légèrement vers l’extérieur
et retirez-le.
53mm
3
4
1
1
2
• Dévissez les deux vis de retenue du lecteur de CD (figure 1, point 1).
• Déverrouillez le cadre encastrable à l’aide des deux clés de déblocage (figure 1, point 2).
• Enlevez le cadre encastrable en le retirant vers l’arrière (figure 1, point 3).
• Introduisez le cadre encastrable dans l’ouverture d’emplacement du véhicule (figure 2).
• Courbez quelques-uns des colliers de fixation situés sur le cadre encastrable jusqu’à ce que le cadre soit fixé
dans l’ouverture d’emplacement (figure 3).
• Après avoir effectué tous les câblages électriques (voir „Branchement électrique“), introduisez l’appareil dans le
cadre encastrable jusqu’à ce qu’il s´enclenche (figure 4).
• Remettez le cache de la façade sur l’appareil.
Fixez en plus l’appareil à l’aide de la vis sans tête située au dos de l’appareil pour le protéger contre les chocs.
Une telle fixation est déjà prévue dans la plupart des véhicules. Si tel n´est pas le cas, veuillez fixer l’appareil à l’aide
d’un ruban en tôle perforée ou objet similaire.
Gardez bien les deux clés de déblocage. Vous en aurez besoin lors d’un démontage ultérieur de
l’appareil.
2
3
182mm
79

Mode d´emploi
français
Pour la fixation, procédez comme illustré dans la figure suivante :
Démontage
• Enlevez la façade.
• Dégagez avec précaution le cadre en plastique de la façade de l’appareil en le pliant légèrement vers l’extérieur
et retirez-le.
• Enfoncez les deux clés de déblocage dans les fentes latérales entre l´appareil et le cadre encastrable jusqu’à
ce que l’appareil soit déverrouillé.
• Dévissez la vis de retenue située au dos de l’appareil.
• Retirez avec précaution l’autoradio du cadre encastrable en le tenant par les clés de déblocage.
• Déconnectez tous les liaisons électriques.
80

Raccordement électrique
Le raccordement électrique ne doit être effectué que par du personnel qualifié.
Afin d’éviter les courts-circuits et les endommagements qui en découlent, le pôle négatif
(masse) de la batterie du véhicule doit être déconnecté pendant le raccordement.
Rebranchez le pôle négatif de la batterie uniquement lorsque vous avez entièrement raccordé
l’appareil et vérifié le branchement.
Pour vérifier la tension sur les câbles de tension de bord, utilisez uniquement un voltmètre ou
une lampe étalon à diodes car les lampes étalon normales absorbent des courants trop élevés
et peuvent ainsi endommager l’électronique de bord.
En raccordant les câbles, veillez à ce qu’ils ne soient pas écrasés ou endommagés par des
arêtes vives. Utilisez des passe-fils en caoutchouc.
Veillez à utiliser des câbles bifilaires lorsque vous faites la connexion aux haut-parleurs. Isolez
des points de raccordement ouverts. Veillez à ce que les câbles ne soient pas endommagés par
des arêtes vives.
N’utilisez que des haut-parleurs disposant d’une capacité de charge suffisante (voir les
„Caractéristiques techniques“).
Veillez à ce que tous les haut-parleurs aient la bonne polarité, c’est-à-dire que marque positive
et négative soient correspondantes.
Les câbles de raccordement des haut-parleurs sont généralement codés: Certains fabricants
de haut-parleurs marquent le câble (+) par une bande colorée supplémentaire, d’autres utilisent
un câble cannelé pour le pôle positif et un câble lisse pour le pôle negatif.
L’appareil a été conçu pour une mise en service avec des impédances de haut-parleur d’au
moins 4 ohms. Ne branchez jamais des haut-parleurs ayant une impédance inférieure.
Dans la plupart des voitures, les câbles disponibles pour le branchement électrique et pour la
connexion des haut-parleurs sont déjà tracés jusqu’à la baie prévue à cet effet.
Si tel n´est pas le cas, il faut veiller à ce que les câbles installés plus tard soient protégés par les fusibles
de bord prévus à cet effet (voir manuel du véhicule).
81

Mode d´emploi
français
Connexion des haut-parleurs et de l’alimentation en courant
Le syntoniseur CD est muni d’un connecteur ISO.
Il est possible de brancher les véhicules munis d’un tel connecteur directement sur l’appareil si l’affectation des
connecteurs est identique (veuillez vérifier d’abord!) Si l’affectation des connecteurs ne correspond pas, le
branchement s’effectue par un adaptateur.
Pour procéder à l’affectation des contacts du connecteur du syntoniseur CD, voir les figures suivantes.
Pour connaître l’affectation de votre connecteur de véhicule, informez-vous auprès de votre marchand d’automobile.
Connecteur B (Connexion haut-parleur)
(1) Haut-parleur arrière droit (+)
(2) Haut-parleur arrière droit (-)
(3) Haut-parleur avant droit (+)
(4) Haut-parleur avant droit (-)
(5) Haut-parleur avant gauche (+)
(6) Haut-parleur avant gauche (-)
(7) Haut-parleur arrière gauche (+)
(8) Haut-parleur arrière gauche (-)
Connecteur A (Alimentation en courant)
(1) non affecté
(2) non affecté
(3) non affecté
(4) Courant continu +12V
(5) Sortie de commande d’antenne
(6) non affecté
(7) Allumage +12V
(8) Masse
B
A
357
1
2468
57
48
82

• La prise courant continu +12V (4) doit être raccordée à un câble qui fournit en permanence un courant de 12V,
également allumage éteint (borne 30 du réseau de bord). Cette connexion sert à mémoriser les réglages
utilisateur, l´heure etc.
• La sortie de commande d’antenne (5) fournit une tension de +12V lorsque l’appareil est allumé. Il est possible
d’utiliser cette ligne pour l’alimentation en courant d’une antenne électrique ou comme tension de seuil pour un
amplificateur de voiture.
• La connexion allumage +12V (7) doit être raccordée à une ligne qui n’est sous tension de +12V que si le contact
est allumé (borne 15 du réseau de bord).
Ne branchez pas cette connexion sur le courant continu, car cela peut décharger la batterie de bord en cas
d´immobilisation prolongée du véhicule.
• La connexion masse (8) est raccordée à la carrosserie du véhicule.
La technologie de collage de plus en plus utilisée et les composants métalliques vernis ont pour effet
de limiter la conductivité électrique. Pour cette raison, toutes les pièces en métal ne sont pas idéales
pour servir de masse.
Branchement de l’antenne
• Branchez le connecteur d’antenne de votre véhicule au connecteur d’antenne à l’arrière de l’appareil (connecteur
à côté des connexions LINE).
• Si votre véhicule est muni d’un autre connecteur d’antenne, veuillez utiliser un adaptateur approprié que l’on
trouve dans le commerce.
Branchement d’un support d’enregistrement USB
• Enfoncez le support d’enregistrement USB (clé USB, lecteur MP3) dans la connexion USB sur la face arrière de
l’appareil.
• Si le câble USB devait être trop court pour la poser à un endroit accessible (tel que la boîte à gants) vous pouvez
utiliser une rallonge pour câble USB usuelle.
83

Connexion des sorties LINE
Le syntoniseur CD dispose d’une sortie LINE pour la connexion d’un amplificateur.
Pour la connexion des douilles cinch, n’utilisez que des câbles cinch blindés adaptés à cet
effet. L’emploi d’autres câbles pourrait provoquer des perturbations.
Veillez à utiliser des câbles de raccordement le plus courts possibles.
Ne posez pas les câbles à proximité d’autres câbles. Ainsi vous évitez des perturbations dans
les lignes.
Pour éviter des distorsions ou des asymétries qui peuvent entraîner l’endommagement de
l’appareil, branchez les connexions cinch exclusivement à des appareils munis de connexions
cinch pareilles. Observez également les valeurs de connexion indiquées dans les
« Caractéristiques techniques ».
• Connectez les douilles LINE OUT aux entrées d’un amplificateur.
Mode d´emploi
français
84
La douille rouge est la connexion pour le canal droit
La douille blanche est la connexion pour le canal gauche

Utilisation
Avant de mettre l’appareil en service, vous devriez vous familiariser avec ses fonctions et avec
ce mode d’emploi.
Vérifiez encore une fois si toutes les connexions ont été effectuées de manière correcte. Une
fois le test terminé, reconnectez le pôle négatif de la batterie de bord.
Mise en service générale
Marche/Arrêt
• Appuyez sur la touche POWER (1) pour mettre l’appareil en marche.
• Pour la mise à l’arrêt, veuillez maintenir la touche enfoncée jusqu’à ce que l’appareil s’éteigne.
Pour la mise en service il suffit d’appuyer sur n’importe quelle touche.
Réglage du volume sonore
• Tournez le bouton de réglage VOLUME (3) pour régler le volume.
• Monter le volume en tournant le bouton dans le sens des aiguilles d´une montre, baisser le volume en tournant
le bouton dans le sens inverse des aiguilles d´une montre.
Eteindre le son
La touche MUTE (14) active le mode silencieux.
• Appuyez longuement sur cette touche si vous voulez brièvement interrompre la lecture actuelle, par exemple
pour demander le chemin à des passants.
• Appuyez à nouveau longuement sur la touche MUTE (14) pour désactiver le mode silencieux.
Affichage de l’heure
• Appuyez sur la touche DISP (8) pour afficher l’heure. L’écran repasse après un court instant à l’affichage
précédent.
85

Mode d´emploi
français
Sélection de la source de lecture
• Appuyez à plusieurs reprises sur la touche MODE (9) pour sélectionner les différentes sources de lecture.
• La sélection se fait dans l’ordre suivant : Radio > CD > USB > SD/MMC > AUX
Insertion d’un CD
• Appuyez sur la touche RELEASE (17) pour ouvrir la façade. Faites glisser un CD dans la fente CD (18).
Si aucun CD, aucune mémoire USB ni aucune carte SD/MMC sont insérés, les sources correspondantes
sont omises lors de la sélection.
Veillez à toujours insérer le CD avec la face inscrite en haut.
Ejecter un CD
• Appuyez sur la touche RELEASE (17) pour ouvrir la façade.
• Appuyez sur la touche EJECT (19) et le CD sera éjecté.
• Refermez la façade en la rabattant de nouveau.
Réglage de l’égaliseur
• Appuyez sur la touche EQ (15). Cette touche vous permet d’appeler directement le menu AUDIO /EQUALIZER.
La sélection se fait en tournant le bouton de réglage rotatif VOLUME (3), la validation par la touche MENU (2).
EQ OFF = L’égaliseur est éteint
POP = La caractéristique sonore est adaptée à la musique pop
ROCK = La caractéristique sonore est adaptée à la musique rock
CLASSIC = La caractéristique sonore est adaptée à la musique classique
FLAT = L’égaliseur est allumé mais l’adaptation sonore ne s’effectue pas
• Après quelques secondes, l’écran repasse à l’affichage précédent.
86

Réglages
Heure
• Appuyez longuement sur la touche MENU (2) (pendant env. 2s).
• Tournez le bouton de réglage VOLUME (3) jusqu’à ce que CLOCK soit affiché.
• Appuyez de nouveau, mais seulement courtement sur la touche MENU (2).
• L’heure est affichée et l’affichage des heures clignote.
• Réglez les heures avec le bouton de réglage rotatif VOLUME (3).
• Appuyez brièvement sur la touche MENU (2).
• L’affichage des minutes clignote.
• Réglez les minutes avec le bouton de réglage rotatif VOLUME (3).
• Appuyez brièvement sur la touche MENU (2). Le réglage est mémorisé.
• Appuyez sur la touche DOWN (11) pour quitter le mode de réglage.
Son
• Appuyez longuement sur la touche MENU (2) (pendant env. 2s).
• Tournez le bouton de réglage VOLUME (3) jusqu’à ce que AUDIO soit affiché.
• Appuyez de nouveau, mais seulement courtement sur la touche MENU (2).
• Maintenant, les points de menu suivants peuvent être sélectionnés comme déjà décrit par la touche MENU (2)
et réglés à l’aide du bouton de réglage rotatif VOLUME (3).
BASS destiné au réglage de la reproduction des graves
TREBLE destiné au réglage de la reproduction des aiguës
FADER destiné au réglage du rapport de volume entre les haut-parleurs avant et arrière
BALANCE destiné au réglage du rapport de volume entre les haut-parleurs droit et gauche
EQUALIZER destiné à la sélection d’un préréglage de son
LOUDNESS destiné au renforcement des aiguës et des graves lors d’une lecture à faible volume
BEEP destiné à l’activation/la désactivation de la tonalité de validation des touches
• Appuyez sur la touche DOWN (11) pour sauter un niveau en arrière dans le menu.
87

Mode d´emploi
français
Ecran
• Appuyez longuement sur la touche MENU (2) (pendant env. 2s).
• Tournez le bouton de réglage VOLUME (3) jusqu’à ce que DISPLAY soit affiché.
• Appuyez de nouveau, mais seulement courtement sur la touche MENU (2).
• Maintenant, les points de menu suivants peuvent être sélectionnés comme déjà décrit par la touche MENU (2)
et réglés à l’aide du bouton de réglage rotatif VOLUME (3).
CONTRAST destiné au réglage du contraste de l’écran.
VIEW destiné au réglage de l’affichage (positif/négatif).
• Appuyez sur la touche DOWN (11) pour sauter un niveau en arrière dans le menu.
Mode radio
La technologie de réception RDS
Le sigle RDS signifie système de données radio, c’est-à-dire que des informations supplémentaires imperceptibles
et codées sont émises par l’émetteur UKW RDS
Votre syntoniseur CD-7516 est capable d’exploiter ces données codées qui sont émises par presque toutes les
stations radio.
Les informations supplémentaires suivantes de base sont transmises :
- identification du programme (PI),
- code de système de radioguidage (TP)
- code d’annonces routières (TA),
- nom m du programme (PS),
- fréquences alternatives (AF),
- type de programme (PTY),
- informations EON (EON),
- heure d’horloge (CT),
88

Identification du programme (PI)
Ces données aident le récepteur à identifier une station de façon univoque. Elles permettent à la radio de discerner
les zones dans lesquelles est émis le programme identique. Dès qu’elle capte des signaux faibles, l’autoradio
s’accorde sur une station plus forte diffusant la même identification du programme.
Code de programmes de radioguidage (TP)
Le récepteur détecte par le biais de ce signal la réception d’une station diffusant des informations routières.
Spécification d’annonces routières (TA)
Ce signal indique la diffusion d’une annonce routière et permet, le cas échéant, d’interrompre la lecture actuelle d’une
autre source.
Nom du programme (PS)
Cette information indique au récepteur la station qu’il est en train de capter. Elle est directement affichée sur l’écran
de l’autoradio, par ex. ADO FM.
Fréquences alternatives (AF)
Transmission d’une liste contenant des fréquences alternatives émettant le même programme. Si la station recue
devient trop faible, le récepteur détecte à l’aide du signal AF les fréquences sur lesquelles il doit chercher une station
dont la réception est meilleure.
Type de programme (PTY)
Ce code donne au récepteur des informations concernant le type du programme en cours de réception (par ex. sport,
musique classique, journal parlé etc.) Ceci permet à l’auditeur de rechercher de façon ciblée le programme de son
choix.
Il offre, en outre, la possibilité de diffuser de cette manière une alarme en cas de catastrophe nationale. Le service
PTY n’est cependant pas proposé par toutes les stations.
Informations EON
De nombreuses chaînes aux divers programmes ne disposent que d’un seul programme de radioguidage. Si des
stations diffusent des informations EON, l’appareil doté d’un tel système passe à la station de radioguidage dès que
les annonces routières sont diffusées, même lorsque l´on écoute un autre programme de la chaîne.
Si l’on écoute par ex. RTL (sans programme de radioguidage), et que la touche TA est activée, l’appareil passe à
RTL 2 (avec programme de radioguidage) pour la durée des annonces routières.
89

Mode d´emploi
français
Horloge (CT)
Plusieurs stations transmettent l’heure actuelle sous la forme de données RDS. A la réception de ce signal, l’appareil
règle automatiquement l’heure de l’horloge intégrée.
Le système RDS offre donc l’avantage de pouvoir passer automatiquement à une station identique et dont la
réception est meilleure dès que vous quittez l´aire de diffusion. Cependant, de passage ne s’effectuera que si une
station plus puissante avec le même programme est disponible.
Le système RDS ne peut pas éliminer les brèves dégradations du signal liées à la réception, la conséquence étant
une commutation permanente de l’autoradio. L´auditeur le trouverait largement plus gênant que de brèves
perturbations de la réception.
Un autre avantage du système RDS est l’affichage du nom du programme. Le nom d’une station RDS est affiché
sur l’écran de l’autoradio.
Réglage des options
• Appuyez longuement sur la touche MENU (2) (pendant env. 2s).
• Tournez le bouton de réglage VOLUME (3) jusqu’à ce que TUNER soit affiché.
• Appuyez de nouveau, mais seulement courtement sur la touche MENU (2).
• Maintenant, les points de menu suivants peuvent être sélectionnés comme déjà décrit par la touche MENU (2)
et réglés à l’aide du bouton de réglage rotatif VOLUME (3).
• Appuyez sur la touche DOWN (11) pour sauter un niveau en arrière dans le menu.
SEARCH
AUTO SEARCH lance une recherche automatique et sauvegarde les stations trouvés sur les touches de recherche
des stations (4).
PROGRAM TYPE lance une recherche des stations ayant la spécification PTY à sélectionner préalablement.
STEREO-MONO
STEREO = Réception stéréo en mode radio
MONO = Réception mono en mode radio
La commutation en mode monophonique peut réduire les parasites des stations faibles.
90

TUNER SENSIBILITY
LOCAL = La recherche automatiquement ne s’arrête que lors de la détection de stations fortes.
DISTANT = La recherche automatique s’arrête également lors de la détection de stations de faible puissance.
RDS OPTIONS
AF MODE
AF OFF = Le syntoniseur ne recherche pas automatiquement une fréquence mieux reçue de la station.
AF ON = Le syntoniseur recherche automatiquement une fréquence mieux reçue de la station.
TRAFFIC ALERT
TA OFF = Le radioguidage est éteint.
TA SEEK = En cas de perte des informations routières, l’appareil recherche une nouvelle station avec
spécification de l’annonce trafic.
TA ALARM = L’appareil émet un signal sonore lorsque la spécification de l’annonce trafic ne peut plus être
reçue.
REGION
REGION OFF = Le syntoniseur passe également à d’autres stations ayant une autre identification de
programme (spécification régionale).
REGION OFF = Le syntoniseur passe seulement à des stations de la même identification de programme
(spécification régionale).
MASK
DIFFERENCE PI = Passage automatique à la fréquence captant le mieux la chaîne sélectionnée,
uniquement lorsque des signaux RDS sont également transmis.
ALL PI = Passage automatique à la fréquence captant le mieux la chaîne sélectionnée, même si aucun
signal RDS est transmis.
RETUNE
SHORT TIME = Quand la radio ne capte plus de spécification trafic, la recherche automatique démarre
après peu.
LONG TIME = Quand la radio ne capte plus de spécification trafic, la recherche automatique démarre après
une période prolongée.
91

Mode d´emploi
français
Fonction des touches individuelles
Touche BAND (10)
• Appuyez sur cette touche pour régler la band epassante FM1, FM2 ou FM3. Pour chaque bande passante, 6
touches de recherche des stations (4) permettent de sauvegarder des stations.
Touches UP/DOWN (11)
Ces touches permettent de modifier la fréquence de réception pour régler les stations en mode radio.
• Appuyez courtement sur l’une de ces touches pour lancer la recherche automatique dans le sens correspondant.
La recherche ne s’arrête que lors de la détection de la prochaine station convenable.
• Appuyez longuement sur l’une de ces touches pour activer la recherche manuelle. La recherche s’arrête dès que
la touche est lâchée.
Touches de recherche des stations 1-6 (4)
• Appuyez brièvement sur l’une de ces touches pour sélectionner directement une station préalablement
• Appuyez longuement sur l’une de ces touches pour y sauvegarder la station actuellement reçue.
Touche AF (5)
Cette touche permet d’appeler directement le menu RDS OPTIONS/AF MODE. La sélection se fait en tournant le
bouton de réglage rotatif VOLUME (3), la validation par la touche MENU (2).
• AF OFF = Le syntoniseur ne recherche pas automatiquement une fréquence mieux reçue de la station.
• AF ON = Le syntoniseur recherche automatiquement une fréquence mieux reçue de la station.
• Après quelques secondes, l’écran repasse à l’affichage précédent.
Après un court instant sans actionnement de la touche, le syntoniseur repasse à la recherche
automatique.
sauvegardée sur cette touche.
Chacune des trois gammes FM (FM1-3) possède trois touches de recherche de stations. Il est donc
possible d’affecter 18 touches de recherche de stations au total.
92

Touche TA (6)
Cette touche permet d’appeler directement le menu RDS OPTIONS/TRAFFIC ALERT. La sélection se fait en
tournant le bouton de réglage rotatif VOLUME (3), la validation par la touche MENU (2).
• TA OFF = Le radioguidage est éteint
• TA SEEK = En cas de perte des informations routières, l’appareil recherche une nouvelle station avec
spécification de l’annonce trafic
• TA ALARM = L’appareil émet un signal sonore lorsque la spécification de l’annonce trafic ne peut plus être reçue.
Lorsque la fonction TA (TA SEEK ou TA ALARM) est activée, seulement des stations avec spécification trafic
peuvent être reçues. Lors de la lecture d’une autre source (par ex. d’une CD) le programme est mis en mode
silencieux pendant la réception de l’annonce routière. Si l’on est en train d’écouter une émission à un niveau très
bas, le volume de l’annonce routière est automatiquement augmenté pour arriver à un niveau bien audible. Une fois
l’annonce terminée, le volume réglé auparavant est rétabli.
Touche PTY (7)
Cette touche vous permet d’appeler directement le menu SEARCH/PROGRAM TYPE. La sélection se fait en
tournant le bouton de réglage rotatif VOLUME (3), la validation par la touche MENU (2).
• Sélectionnez un type de programme et appuyez sur la touche MENU (2). La recherche d’une station ayant la
spécification PTY préalablement sélectionnée est lancée.
• Si aucune station d’une spécification PTY correspondante n’est trouvée, l’appareil émet trois signaux sonores.
Touche AS/PS (12)
• En appuyant brièvement sur cette touche vous appelez pendant 5 secondes chacune des stations mémorisées
sur les touches de recherche des stations 1-6 (4). En appuyant de nouveau sur cette touche vous arrêtez ce
processus.
• Si vous maintenez la touche enfoncée plus longtemps, toutes les stations présentant une bonne réception sont
automatiquement mémorisées sur les touches de recherche des stations 1-6 (4).
• Une fois la procédure terminée, vous appelez les stations enregistrées pendant 5 secondes comme décrit cidessus.
Touche SCAN (13)
• Cette touche lance la recherche des stations.
• Si une station a été trouvée, celle-ci est lue pendant quelques secondes. Ensuite, une nouvelle recherche est
lancée.
• Appuyez de nouveau sur cette touche pour arrêter la recherche et écouter durablement la station qui vient d’être
transmise.
93

Mode d´emploi
français
Mode CD
Mise en service générale
Touches UP/DOWN (11)
Ces touches servent à sélectionner les différents titres d’un CD et à rechercher un certain passage dans un titre de
CD.
Les flèches sur les touches indiquent le sens de recherche (vers le haut et vers le bas).
• Appuyez brièvement sur ces touches pour passer au titre suivant ou précédent.
• Maintenez les touches appuyées longuement afin de rechercher, à l’intérieur d’un titre, une section déterminée.
Touche BAND (PLAY/PAUSE) (10)
• Appuyez sur cette touche pour interrompre brièvement la lecture du CD.
• En réappuyant sur la touche, la lecture est reprise au point où elle a été précédemment interrompue.
Touche TOP (20)
• Appuyez sur cette touche pour sauter à la première piste d’un CD.
Touche INT (INTRO) (22)
• Appuyez sur cette touche pour lire les 10 premières secondes de toutes les pistes du CD. INT apparaît sur l’écran.
• Appuyez de nouveau sur la touche pour désactiver cette fonction. La lecture s’effectue de nouveau normalement
à partir de cet endroit.
Touche RDM (RANDOM) (24)
• Appuyez sur cette touche pour activer la lecture aléatoire. Les pistes sont lues dans un ordre aléatoire.
• Appuyez de nouveau sur la touche pour désactiver cette fonction. La lecture s’effectue de nouveau normalement
à partir de cet endroit.
94

Touches 10-DN (25) et 10-UP (26)
• Appuyez sur ces touches pour sauter rapidement 10 pistes en avant ou en arrière. Leur fonction est identique
à celle des touches UP/DOWN (11) ; cependant, elles permettent de sauter 10 pistes en une fois.
Ces touches ne sont activées qu’en mode MP3.
Touche AS/PS (12)
• Pour répéter la piste qui vient d’être lue, appuyez sur cette touche.
• Appuyez de nouveau sur la touche pour désactiver cette fonction. La lecture s’effectue de nouveau normalement
à partir de cet endroit.
Fonctions de recherche en mode MP3
Il existe 3 différentes fonctions de recherche dans ce mode de service : la recherche du numéro de la piste, la
recherche de l’initiale et la recherche dans l’arborescence du répertoire.
Recherche du numéro de la piste
• Appuyez longuement sur la touche MENU (2) (pendant env. 2s).
• Tournez le bouton de réglage VOLUME (3) jusqu’à ce que CD/FLASH soit affiché.
• Appuyez de nouveau, mais seulement courtement sur la touche MENU (2).
• Sélectionnez SEARCH et appuyez de nouveau sur la touche MENU (2).
• Sélectionnez TRACK et appuyez de nouveau sur la touche MENU (2).
• Tournez le bouton de réglage rotatif VOLUME (3) pour sélectionner le premier chiffre et validez par la touche
MENU (2).
• Répetez cette procédure jusqu’à ce que tous les chiffres sont entrés.
• La piste souhaitée est lu automatiquement.
Le numéro de la piste doit toujours être entré sous forme de trois chiffres. Pour entrer par ex. une piste
d’un numéro à deux chiffres, ajoutez un 0 au début du numéro de la piste.
95

Mode d´emploi
français
Recherche de l’initiale
• Appuyez longuement sur la touche MENU (2) (pendant env. 2s).
• Tournez le bouton de réglage VOLUME (3) jusqu’à ce que CD/FLASH soit affiché.
• Appuyez de nouveau, mais seulement courtement sur la touche MENU (2).
• Sélectionnez SEARCH et appuyez de nouveau sur la touche MENU (2).
• Sélectionnez CHARACTER et appuyez de nouveau sur la touche MENU (2).
• Tournez le bouton de réglage rotatif VOLUME (3) pour sélectionner l’initiale et validez par la touche MENU (2).
• L’écran affiche toutes les pistes qui commencent par l’initiale sélectionnée.
• Tournez le bouton de réglage rotatif VOLUME (3) pour sélectionner la piste recherchée et validez par la touche
MENU (2).
• La piste souhaitée est lu automatiquement.
Recherche dans l’arborescence du répertoire
• Appuyez longuement sur la touche MENU (2) (pendant env. 2s).
• Tournez le bouton de réglage VOLUME (3) jusqu’à ce que CD/FLASH soit affiché.
• Appuyez de nouveau, mais seulement courtement sur la touche MENU (2).
• Sélectionnez SEARCH et appuyez de nouveau sur la touche MENU (2).
• Sélectionnez FILE & FOLDER et appuyez de nouveau sur la touche MENU (2).
• Tournez le bouton de réglage rotatif VOLUME (3) pour sélectionner la piste recherchée et validez par la touche
MENU (2).
• La piste souhaitée est lu automatiquement.
96

Lecture de discs multisession
Les CD gravés peuvent être enregistrés en plusieurs sessions (gravures multiples consécutives). Vous pouvez régler
ici si pour ce type de CD seulement la première session ou si toutes les sessions doivent être lues.
• Appuyez longuement sur la touche MENU (2) (pendant env. 2s).
• Tournez le bouton de réglage VOLUME (3) jusqu’à ce que CD/FLASH soit affiché.
• Appuyez de nouveau, mais seulement courtement sur la touche MENU (2).
• Sélectionnez MULTI-SESSION et appuyez de nouveau sur la touche MENU (2).
• Sélectionnez ONE-SESSION ou MULTI-SESSION et appuyez pour valider sur la touche MENU (2).
ONE-SESSION : Lors des CD multisession, ce n’est que la première session qui est lue.
MULTI-SESSION : Les CD multisession sont lus intégralement.
• Appuyez sur la touche DOWN (11) pour sauter un niveau en arrière dans le menu.
Mode AUX
Le branchement AUX (27) permet de connecter des sorties audio de lecteurs externes (par ex. lecteurs MP3) .
• Reliez la sortie audio de l’appareil externe au branchement AUX (27).
• Sélectionnez l’entrée AUX par la touche MODE (9) et lancez la lecture sur l’appareil externe.
Mode USB/carte mémoire
L’appareil est doté d’un port USB et d’un lecteur de carte mémoire pour cartes SD/MMC.
Il est possible de lire des fichiers MP3 stockés sur ces média.
• Connectez votre clé mémoire USB ou le port USB de votre lecteur MP3 au câble USB sur la face arrière de
En raison des innombrables appareils différents munis de ports USB et d’interfaces carte mémoire et
de leurs fonctions parfois très spécifiques aux fabricants, il n’est pas possible de garantir que tous les
supports soient reconnus et toutes les possibilités d’utilisation quant à cet appareil soient proposées.
Il n’est pas possible de raccorder des disques durs USB à cet appareil.
l’appareil.
97

Mode d´emploi
français
• Si vous utilisez une carte mémoire, introduisez-la dans le lecteur de carte mémoire (28). A cet effet vou devez
retirer la façade avant, comme indiqué à l’image.
• L’entrée correspondante est sélectionnée par la touche MODE (9).
• L’utilisation est identique à celle appliquée lors de la lecture de disques.
Reset
Cette touche remet tous les réglages aux réglages d’usine.
Actionnez cette touche dans les cas suivants:
- après avoir terminé l’installation et la connexion,
- lorsque l’appareil ne réagit plus aux commandes des touches,
- lorsque l’écran n’affiche que des caractères incompréhensibles,
RESET
98

Maintenance
Vérifiez régulièrement la sécurité technique du syntoniseur de CD, assurez-vous entre autres régulièrement que le
câble de raccordement et le boîtier ne sont pas endommagés.
S’il est probable qu’une utilisation sans danger n’est plus possible, l’appareil doit être mis hors service et protégé
contre toute utilisation involontaire. Débranchez le réseau de bord !
Le fonctionnement sans risque n’est plus assuré lorsque :
• l’appareil est visiblement endommagé,
• l’appareil ne fonctionne plus ou
• suite à de fortes sollicitations mécaniques.
Avant de procéder au nettoyage ou à l’entretien du syntoniseur CD, tenez impérativement compte des consignes
de sécurité suivantes :
L’ouverture de boîtiers et le démontage de pièces risquent de mettre à nu des pièces sous
tension.
Avant tout entretien ou remise en état, il faut donc déconnecter l´appareil de toute source de
tension.
Les condensateurs montés dans l’appareil peuvent être encore chargés même après avoir
déconnecté l’appareil de toutes les sources de tension.
Les réparations doivent uniquement être effectuées par un technicien qualifié familiarisé avec
les dangers potentiels encourus, respectivement les prescriptions spécifiques en vigueur.
Si le remplacement des fusibles s’avère nécessaire, veillez à n’utiliser que des fusibles du type et au courant nominal
spécifiés (voir « Caractéristiques techniques ») à titre de rechange.
Il est interdit de réparer les fusibles usés ou de ponter le porte-fusible.
• Séparez l’appareil de l’alimentation en courant (débrancher le connecteur ISO!) et retirez avec précaution le
fusible du support de fusible se trouvant à côté du connecteur ISO.
• Remplacez-le par un fusible du même type.
• Rebrancher seulement ensuite le syntoniseur CD au réseau de bord et le remettre en service.
• Si le fusible déclenchait à nouveau, apportez l’appareil dans un atelier spécialisé.
Sinon, l’appareil ne nécessite aucun entretien. Pour le nettoyage extérieur, utilisez uniquement un chiffon sec et doux
ou un pinceau.
N’utilisez en aucun cas des nettoyants agressifs ou des solutions chimiques car ils pourraient endommager la surface
du boîtier.
99

Manipulation
• Un volume sonore trop élevé dans l’habitacle du véhicule peut altérer la perception audible des signaux
acoustiques d’avertissement. Cela représente un danger pour vous et pour les autres usagers de la route. Veillez
donc à un réglage approprié du volume.
• L’inattention sur la route peut provoquer de graves accidents. Veuillez donc procéder à la commande de la chaîne
hi-fi uniquement lorsque la circulation le permet. Ne vous laissez pas distraire par son maniement et restez
attentif à la circulation.
• Il est déconseillé d’écouter de la musique de manière prolongée à un volume sonore excessif. Cela peut
occasionner des troubles auditifs.
Mode d´emploi
français
Élimination
Jetez l’appareil devenu inutilisable suivant les lois en vigueur.
Dépannage
Avec le syntoniseur CD-7516 Renkforce, vous avez fait l’acquisition d’un produit construit d’après les derniers
progrès de la technique et fonctionnant de manière fiable.
Il est toutefois possible que des problèmes ou des pannes surviennent.
Vous trouverez ci-après plusieurs procédures vous permettant, le cas échéant, d’effectuer le dépannage :
Respectez impérativement les consignes de sécurité !
La lecture ne fonctionne pas, l’affichage et l’éclairage ne s’allument pas :
• Fusible du véhicule défectueux. Cherchez dans le mode d’emploi de votre voiture le fusible correspondant et
vérifiez-le.
• Fusible de l’appareil défectueux. Démontez l’appareil et contrôlez le fusible
• Ligne positive/câble de court-circuit desserré. Démontez l’appareil et contrôlez la connexion des câbles
d’alimentation.
100
 Loading...