

Page 1

Quick-start guide
A-5646-8500
RTS radio tool setter
1
2
English (EN)
Deutsch (DE)
Español (ES)
Français (FR)
Italiano (IT)
日本語 (JA)
Polski (PL)
Česky (CS)
Русский (RU)
中文(繁體)(ZH-TW)
中文 (简体) (ZH)
한국어 (KO)
Page 2

EN
DE
ES
FR
IT
日本語
Renishaw printed book part no: H-5646-8502-02-A
Issued: 08.2014
Publications for this product are available in electronic format on the mini-CD in the pocket
inside the back cover. To view these, insert the CD into the CD drive of your PC, select your
language, then select a publication. Files can also be printed if required. For more information,
see www.renishaw.com/rts.
Veröffentlichungen zu diesem Produkt stehen in elektronischem Format auf der Mini-CD zur
Verfügung, die sich auf der hinteren Umschlagseite befindet. Zur Ansicht schieben Sie die CD
in das CD-Laufwerk Ihres PC und wählen Sie das gewünschte Dokument in Ihrer Sprache aus.
Dateien können bei Bedarf auch ausgedruckt werden. Weitere Informationen finden Sie unter
www.renishaw.de/rts.
Hay disponible documentación sobre este producto en formato electrónico en el mini-CD de la
bolsa de la contraportada. Para verlo inserte el CD en el lector de CDs de su PC, seleccione el
idioma y a continuación la documentación. Si lo desea puede imprimir los archivos. Para más
información, visite www.renishaw.es/rts.
Des publications sur ce produit sont disponibles en format électronique sur le mini CD dans la
pochette de la couverture arrière. Pour les voir, insérez le CD dans le lecteur CD de votre PC,
sélectionnez votre langue, puis sélectionnez une publication. Les fichiers peuvent être imprimer si
nécessaire. Pour plus d’informations voir www.renishaw.fr/rts.
La documentazione relativa a questo prodotto è disponibile in formato elettronico nel mini-CD
contenuto nell’apposita tasca della retrocopertina. Per visualizzare i file, inserire il CD nel drive del
Vostro PC, selezionare la lingua e qundi selezionare un documento. I file possono essere anche
stampati, se necessario. Per maggiori informazioni, visitare il sito www.renishaw.it/rts.
本製品の説明書は、裏表紙内側ポケットに入っている CD 内の電子データでも御利用いただけます。
これをご覧いただくには、PC の CD ドライブに CD を挿入し、言語を選択した後、説明書を選択しま
す。ファイルは必要に応じて印刷もできます。詳細については、 www.renishaw.jp/rtsをご覧下さい。
Page 3

PL
CS
RU
中文
(繁體)
中文
(简体)
한국어
Publikacje dla tego produktu są również dostępne w formie elektronicznej na minidysku CD w
kieszeni wewnątrz przewodnika. Aby je przeglądać, należy włożyć dysk do napędu CD komputera
PC, wybrać żądany język, a następnie wybrać publikację. Pliki mogą być też wydrukowane w razie
potrzeby. Aby uzyskać więcej informacji, odwiedź witrynę www.renishaw.pl/rts.
Publikace pro tento výrobek jsou k dispozici v elektronickém formátu na mini disku CD-ROM,
který naleznete v kapse na zadním přebalu originálního šestijazyčného návodu. Chcete-li si je
prohlédnout, vložte disk CD do jednotky CD vašeho počítače, zvolte jazyk, a nakonec si vyberte
publikaci. Soubory lze v případě potřeby také vytisknout. Více informací najdete na adrese
www.renishaw.cz/rts.
В кармане на задней стороне обложки прилагается мини-CD, содержащий публикации
по данному изделию в электронном формате. Для просмотра этих материалов следует
вставить CD в дисковод компьютера, выбрать язык, а затем выбрать нужный документ. При
необходимости файлы могут быть распечатаны. Более подробная информация приведена
на сайте www.renishaw.ru/rts.
本指南封底內頁紙袋中備有一袖珍型光碟,內有本產品說明書之電子文件檔。若欲瀏覽,請將光碟
插入電腦光碟機中,選取所需語言,再選擇欲瀏覽項目即可。如有需要亦可列印檔案。若需更多詳
細資料,請造訪網站 www.renishaw.com.tw/rts。
本产品也提供电子版手册,请见封三所附的光盘。要查看这些文档,请将光盘插入电脑的
光驱中,选择语言,然后选择一个文档。如果需要,也可打印文档。详细信息,请参阅
www.renishaw.com.cn/rts。
이 제품 관련 문서는 안내서 뒷 표지 안쪽에 있는 CD에 전자 문서 형식으로 포함되어
있습니다. 이 문서를 보려면 PC의 CD 드라이브에 CD를 넣고 언어를 선택한 후 원하는 문서를
선택하십시오. 필요하면 파일을 인쇄할 수 있습니다. 자세한 내용은 www.renishaw.co.kr/rts
을 참조하십시오.
Page 4

Radio approvals
Radio equipment – Canadian warning statements
English
Under Industry Canada regulations, this radio
transmitter may only operate using an antenna of
a type and maximum (or lesser) gain approved for
the transmitter by Industry Canada.
To reduce potential radio interference to other
users, the antenna type and its gain should be so
chosen that the equivalent isotropically radiated
power (e.i.r.p.) is not more than that necessary for
successful communication.
This device complies with Industry Canada
licence-exempt RSS standard(s). Operation is
subject to the following two conditions: (1) this
device may not cause interference, and (2) this
device must accept any interference, including
interference that may cause undesired operation
of the device.
Français
Conformément à la réglementation d’Industrie
Canada, le présent émetteur radio peut
fonctionner avec une antenne d’un type et d’un
gain maximal (ou inférieur) approuvé pour
l’émetteur par Industrie Canada.
Dans le but de réduire les risques de brouillage
radioélectrique à l’intention des autres
utilisateurs, il faut choisir le type d’antenne et
son gain de sorte que la puissance isotrope
rayonnée équivalente (p.i.r.e.) ne dépasse pas
l’intensité nécessaire à l’établissement d’une
communication satisfaisante.
Le présent appareil est conforme aux CNR
d’Industrie Canada applicables aux appareils
radio exempts de licence. L’exploitation est
autorisée aux deux conditions suivantes : (1)
l’appareil ne doit pas produire de brouillage,
et (2) l’utilisateur de l’appareil doit accepter
tout brouillage radioélectrique subi, même si le
brouillage est susceptible d’en compromettre le
fonctionnement.
Page 5
Radio approvals
Argentina: CNC ID: C-13042
Brazil: 1762-13-2812
South Africa: TA-2013/1221
TA-2013/1221
APPROVED
South Korea: KCC-CRM-R1P-RTS
“Este equipamento opera em caráter secundário,
Taiwan: CCAB13LP3030T2
isto é, não tem direito a proteção contra interferência
prejudicial, mesmo de estações do mesmo tipo, e não
pode causar interferência a sistemas operando em
caráter primário.”
Canada: IC: 3928A-RTS
China: CMIIT ID: 2012DJ3541
Europe: CE
Japan: 205-120126
Singapore: Reg. No: N2288-12
Complies with
IDA Standards
DA104328
USA: FCC ID: KQGRTS
Australia Iceland India Indonesia Israel Liechtenstein Malaysia Montenegro New Zealand
Norway Russia Switzerland The Philippines Turkey Vietnam
Page 6

EC declaration of conformity
FCC Information to the user (USA only)
47 CFR Section 15.19
C
Renishaw plc hereby declares that the RTS is in
compliance with the essential requirements and
other relevant provisions of Directive 1999/5/EC.
Contact Renishaw plc or visit
www.renishaw.com/rts for the full EC declaration
of conformity.
This device complies with part 15 of the FCC
Rules. Operation is subject to the following two
conditions:
1. This device may not cause harmful
interference.
2. This device must accept any interference
received, including interference that may
cause undesired operation.
47 CFR Section 15.21
The user is cautioned that any changes or
modifications not expressly approved by
Renishaw plc or authorised representative
could void the user’s authority to operate the
equipment.
Page 7

1
English (EN)
Deutsch (DE)
Español (ES)
Français (FR)
Italiano (IT)
日本語 (JA)
1-1
Page 8

Safety Sicherheitshinweise
The RTS has a glass window. Handle with care if broken to avoid
injury.
In all applications involving the use of machine tools, eye
protection is recommended.
Battery safety
The RTS may be supplied or used with non-rechargeable alkaline
or lithium thionyl chloride batteries.
• Do not attempt to recharge the batteries.
• Please dispose of waste batteries in accordance with your local
environmental and safety laws.
• Replace the batteries only with the specified type.
• Ensure that all batteries are inserted with the correct polarity.
• Do not store batteries in direct sunlight.
• Do not heat or dispose of batteries in a fire.
• Do not short-circuit or force discharge the batteries.
• Do not disassemble, pierce, deform or apply excessive
pressure to the batteries.
• Do not swallow the batteries.
• Keep the batteries out of the reach of children.
• Do not get batteries wet.
• If a battery is damaged, handle it with care to avoid contact with
electrolyte.
Lithium batteries are classified as dangerous goods and strict
controls apply to their shipment by air. To reduce the risk of
shipment delays, if you need to return the RTS to Renishaw for
any reason, do not return any batteries.
Equipment operation
If this equipment is used in a manner not specified by the
manufacturer, the protection provided by the equipment may be
impaired.
1-2
Der RTS hat ein Glasfenster. Bei Bruch mit Vorsicht handhaben,
um Verletzungen zu vermeiden.
Beim Arbeiten mit Werkzeugmaschinen wird ein Augenschutz
empfohlen.
Sicherheitshinweise (Batterie)
RTS wird eventuell mit nicht-wiederaufladbaren Alkaline-Batterien
oder Lithium-Thionylchlorid-Batterien geliefert bzw. verwendet.
• Versuchen Sie nicht, diese Batterien wieder aufzuladen.
• Bitte entsorgen Sie Altbatterien sachgemäß in Übereinstimmung mit den örtlichen Vorschriften.
• Ersetzen Sie Batterien nur mit dem angegebenen Typ.
• Stellen Sie sicher, dass die Batterien polrichtig eingesetzt
werden.
• Setzen Sie Batterien nicht direkter Sonnenstrahlung aus.
• Werfen Sie keine Batterien ins Feuer.
• Batterien nicht kurzschließen oder überladen.
• Öffnen Sie die Batterie nicht, setzen Sie Batterien keiner
mechanischen Belastung aus.
• Batterien nicht verschlucken.
• Batterien für Kinder unzugänglich aufbewahren.
• Halten Sie die Batterie trocken.
• Beschädigte Batterien mit Vorsicht handhaben, um Kontakt mit
Elektrolyt zu vermeiden.
Lithium-Batterien sind als Gefahrgut eingestuft und deren Versand
per Luftfracht unterliegt strengen Kontrollen. Damit bei einem
Rückversand RTS an Renishaw keine Verzögerungen entstehen,
sollten die Batterien vorher entfernt werden.
Betrieb des Geräts
Wird das Gerät für einen nicht vom Hersteller spezifizierten Zweck
benutzt, kann dies zu einer Beeinträchtigung des vom Gerät
bereit gestellten Schutzes führen.
Page 9

Seguridad Sécurité
La sonda RTS tiene una ventana de cristal. Si se rompe, manéjela
con cuidado para evitar lesiones.
Se recomienda usar gafas de protección en todas las aplicaciones
que implican el uso de Máquinas-Herramienta.
Seguridad de las baterías
La sonda RTS puede suministrarse o utilizarse con pilas no
recargables alcalinas o de litio-cloruro de tionilo.
• No intente recargar estas baterías.
• Para desechar las baterías agotadas, siga la normativa legal
de seguridad y medio ambiente de su zona.
• Utilice únicamente baterías de repuesto del tipo especificado.
• Compruebe que las baterías se han colocado con la polaridad
correcta.
• No las almacene bajo la luz directa del sol.
• No las someta a fuentes de calor ni las arroje al fuego.
• Evite los cortocircuitos y no intente descargarlas.
• No las abra, perfore, deforme ni aplique una presión excesiva.
• No ingerir las baterías.
• Manténgalas fuera del alcance de los niños.
• Guárdelas en sitio seco.
• Si una batería está dañada, manéjela con cuidado para evitar
el contacto con el electrolito.
Las baterías de litio están clasificadas como materiales peligrosos
y son sometidas a estrictos controles en el transporte aéreo.
Para reducir la posibilidad de retrasos en el transporte, retire las
baterías antes de enviar el RTS a Renishaw por cualquier motivo.
Funcionamiento del equipo
Si no se cumplen las indicaciones especificadas por el fabricante
para la utilización del equipo, la protección del equipo puede
resultar inutilizada.
Le RTS a une vitre. En cas de rupture, manipuler avec soin pour
éviter les blessures.
Le port de lunettes de protection est recommandé pour toute
application sur machine-outil.
Consignes de sécurité pour les piles
Le RTS peut être fourni ou utilisé avec des piles non
rechargeables alcalines ou au chlorure de lithium thionyle.
• N’essayez pas de recharger ces piles.
• Éliminez-les conformément aux lois locales en vigueur sur
l’environnement et la sécurité.
• Remplacer uniquement par le type spécifié.
• Toutes les piles doivent être introduites suivant la polarité
correcte.
• Ne pas stocker les piles en plein soleil.
• Ne pas chauffer les piles et ne pas les jeter au feu.
• Ne pas court-circuiter pour forcer le déchargement.
• Ne pas démonter, percer ou déformer les piles. Ne pas leur
appliquer de pression excessive.
• Ne pas avaler les piles.
• Tenir les piles hors de portée des enfants.
• Ne pas laisser les piles à l’humidité.
• Si une pile est endommagée, manipulez-la avec soin pour
éviter tout contact avec l’électrolyte.
Les piles au lithium étant classées comme des articles dangereux,
elles sont soumises à des contrôles stricts pour leur transport
aérien. Si vous devez renvoyer un RTS à Renishaw pour quelque
raison que ce soit, ne renvoyez pas les piles, vous réduirez ainsi
les risques de retards d’expédition.
Fonctionnement de l’équipement
Toute utilisation de cet équipement d’une manière non spécifiée
par le constructeur peut compromettre la protection dont est
pourvu cet équipement.
1-3
Page 10

Sicurezza
安全について
L’RTS dispone di una finestra di vetro. In caso di rottura fare
attenzione per evitare lesioni personali.
Si raccomanda di indossare occhiali di protezione in applicazioni
che comportano l’utilizzo di macchine utensili.
Sicurezza relative alle batterie
RTS può includere batterie alcaline non ricaricabili oppure batterie
al litio cloruro di tionile.
• Queste batterie non possono essere ricaricate.
• Le batterie devono essere smaltite in conformità alle leggi
ambientali e di sicurezza del paese di residenza.
• Sostituire solo con batterie del tipo specificato.
• Controllare che tutte le batterie siano inserite con la polarità
corretta.
• Non esporre le batterie alla luce diretta del sole.
• Non esporre le batteria al calore e non smaltirle gettandole fra
le fiamme.
• Evitare cortocircuiti e non forzare il loro esaurimento.
• Non smontare le batterie, evitare di applicare pressioni
eccessive, di forarle o deformarle.
• Non ingoiare le batterie.
• Tenere le batterie lontano dalla portata dei bambini.
• Evitare che le batterie si bagnino.
• Se una batteria fosse danneggiata, maneggiarla con cura per
evitare il contatto con la sostanza elettrolita.
Le batterie al litio sono classificate come materiali pericolosi e per
il loro trasporto via aerea sono previsti controlli severi. Per ridurre il
rischio di ritardi, quando si restituisce a Renishaw un RTS, evitare
di includere le batterie.
Funzionamento dell’apparecchiatura
Il grado di protezione normalmente fornito da dispositivi potrebbe
essere reso meno efficace in caso di utilizzo dei dispositivi non
conforme a quanto specificato dal produttore.
1-4
RTS には、ガラスウィンドウがあります。万が一、割れた場合には、怪
我をしないよう注意してお取り扱い下さい。
工作機械を使用する全てのアプリケーションにおいて、保護眼鏡の
着用を推奨します。
バッテリー の 安全 性
RTS には単三型アルカリ電池(充電不可)または塩化チオニル・リ
チウム電池を使用します。電池は付属品として添付される場合もあ
ります 。
• これらの電池には充電しないで下さい 。
• 使用済みの電池は、各自治体の環境・安全の法令に従って処分
して下さい。
• 電池を交換する際は、必ず指定されたタイプの電池のみを使用
して下さい。
• 電池は全て、正しい電極の向きに挿入されていることを確認し
て下さい。
• 直射日光があたる場所に電池を保管しないで下さい。
• 加熱したり焼却処分しないで下さい。
• 電池をショート(短絡)させたり、故意に放電させたりしないで下
さい。
• 分解したり、過大な圧力を加えたり、穴を開けたり、変形させたり
しないで下さい。
• 電池を飲み込まないで下さい。
• 子供の手の届かないところに保管して下さい。
• 濡らさないで 下さい。
• 電池に損傷がある場合は、電解液に触れないように十分注意して
お取り扱い下さい。
リチウム電池は危険物に分類されており、空輸の場合は厳格な取り
締まりが適用されます。輸送における遅延の可能性を軽減させるた
め、なんらかの理由で製品をレニショーに返却される際は、電池を取
り出してからお送りいただくようお願いいたします。
製品の使用について
本製品をメーカが指定する方法以外で使用した場合、本製品の保護
性能・機能が低下することがあります。
Page 11
RTS
RTS
*A-5646-8503-02*
*A-5646-8503-02*
RTS radio tool setter installation guide
RTS Installationshandbuch
Guía de instalación de RTS
Manuel d’installation du RTS
RTS - Guida all’installazione
RTSイン ストレ ー ションガ イド
1-5
Page 12
Batteries
Batterien
Baterías
Piles
Batterie
バッテリー
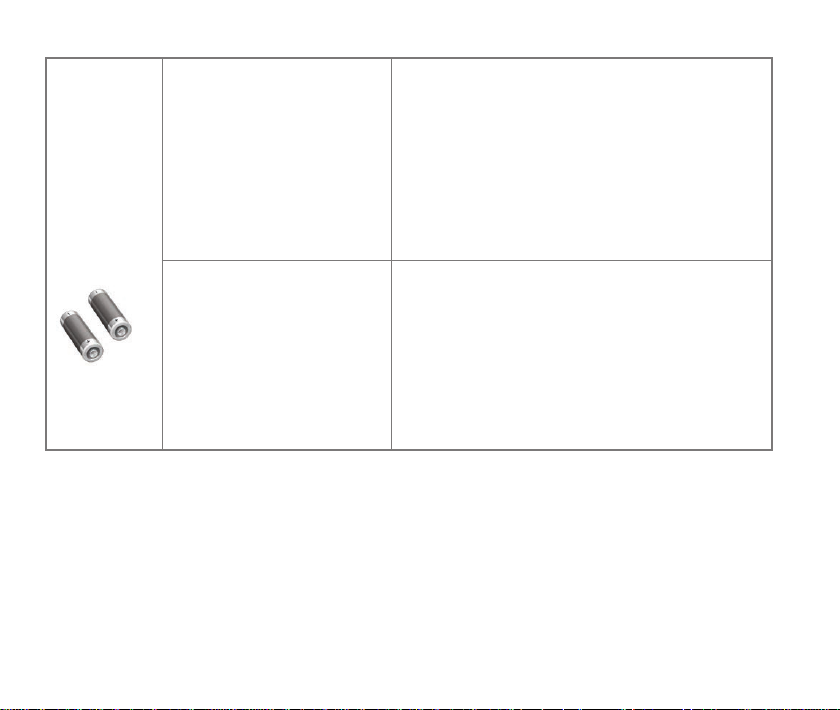
AA alkaline × 2
AA Alkaline × 2
2 × Alcalinas de tamaño AA
2 piles AA alcaline
Alcaline AA × 2
AA(単三型)アルカリ電池 × 2本
AA Lithium thionyl chloride × 2
AA Lithium-Thionylchlorid × 2
2 × Litio-cloruro de tionilo de tamaño AA
2 piles AA chlorure de lithium thionyle
Litio Cloruro di Tionile AA × 2
AAサイズ(単三型)塩化チオニル・リチウム電池 × 2本
Minamoto:
Saft:
Tadiran:
4
NOTE: Maximum battery life is achieved when lithium thionyl chloride batteries are used.
HINWEIS: Mit Lithium-Thionylchlorid Batterien erzielen Sie die maximale Batterielebensdauer.
NOTA: La máxima vida de batería se alcanza con el uso de baterías de Litio-cloruro de tionilo.
REMARQUE : L’autonomie sera optimale avec des piles au chlorure de lithium thionyle.
NOTA: La durata massima della batteria si ottiene con l’utilizzo di batterie al Litio Cloruro di Tionile.
注 意:塩化チオニル・リチウム電池をローパワーモードで使用すれば、最長の電池寿命を得ることができます。
Tekcell:
Xeno:
ER14505, ER14505H
LS 14500, LS14500C
SL360/S, SL-760/S,
SL860/S
TL-5903/S, TLH-5903/S
SS-AA11
XL-060F
4
1-6
Page 13
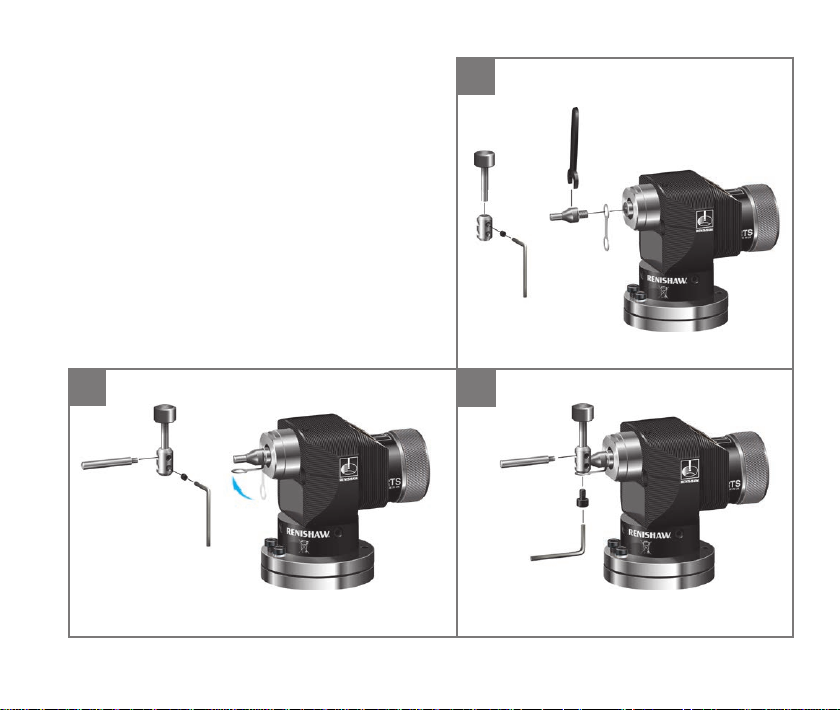
Fitting the stylus and captive link
Montage des Tastereinsatzes und
Sicherungsbandes
Ajuste del palpador y del prisionero
Montage du stylet et de l’attache de
retenue
Installazione dello stilo e del raccordo
スタイラスとキャプティブリンクの 取り付 け
1
1,1 Nm
(0.81 lbf.ft)
2,6 Nm
(1.92 lbf.ft)
2
1,1 Nm
(0.81 lbf.ft)
3
2,6 Nm
(1.92 lbf.ft)
1-7
Page 14
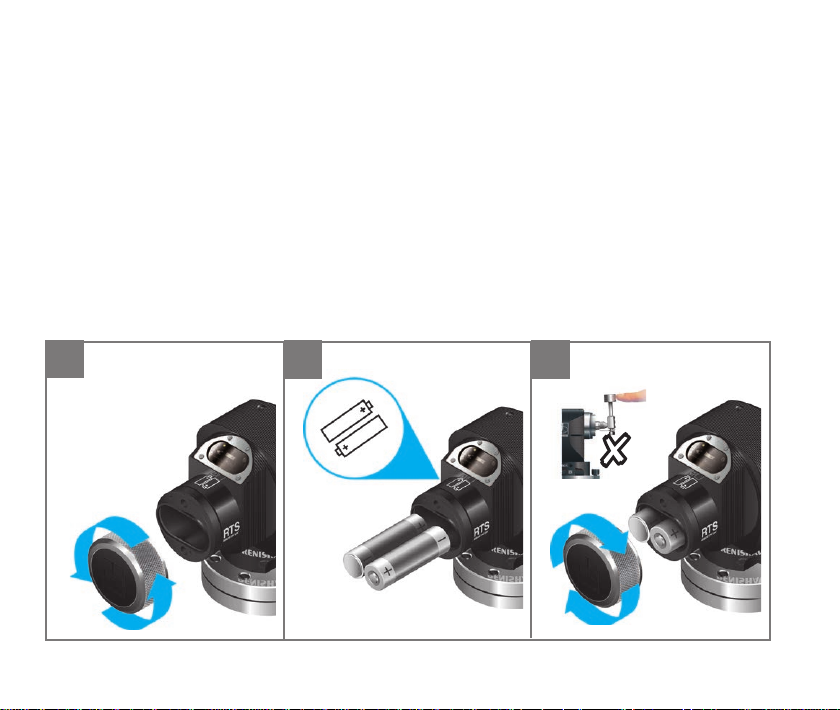
Installing the batteries
Batterien einsetzen
Colocación de las baterías
Installation des piles
Installazione delle batterie
バッテリーの 取り付 け
1
1-8
2 3
8
Page 15
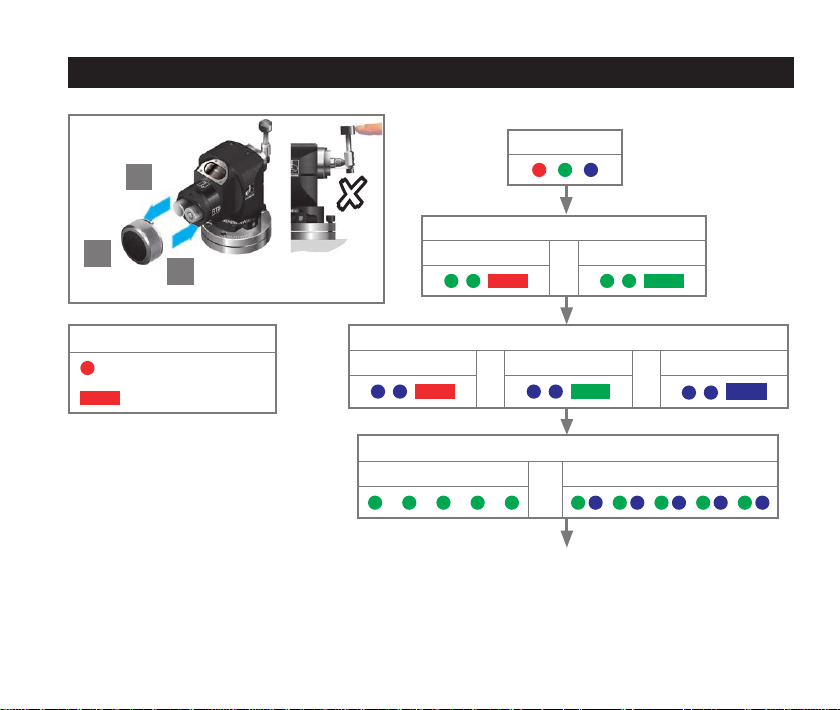
2
> 5 s
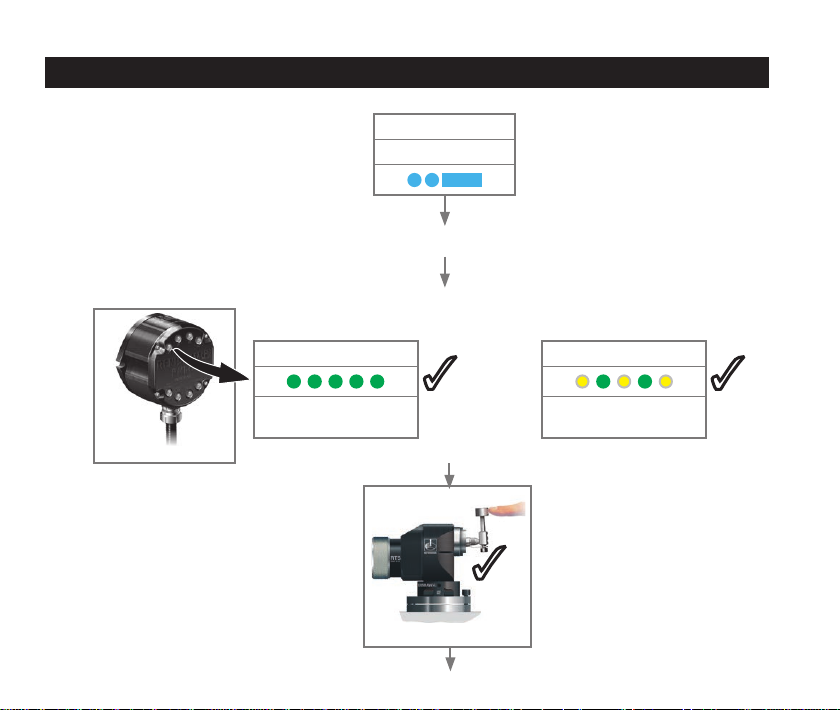
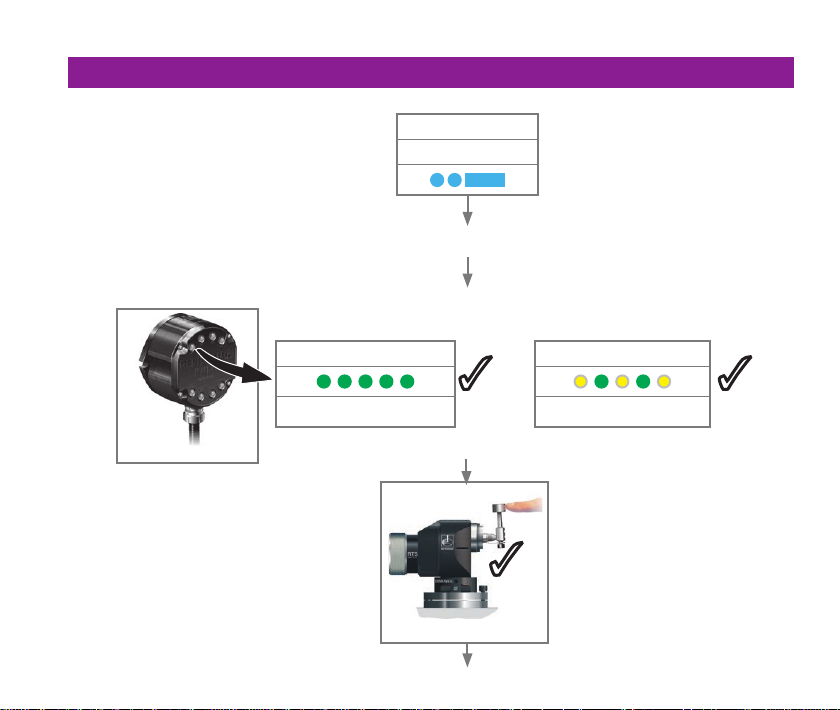
Reviewing the probe settings
LED check
1
8
Enhanced trigger filter setting
Off
3
or
On
Key to the symbols
LED short flash
LED long flash
Hibernation mode setting
30 s
Battery good
or
Battery status
Probe in standby mode
or
5 s
or
Battery low
Off
1-9
Page 16
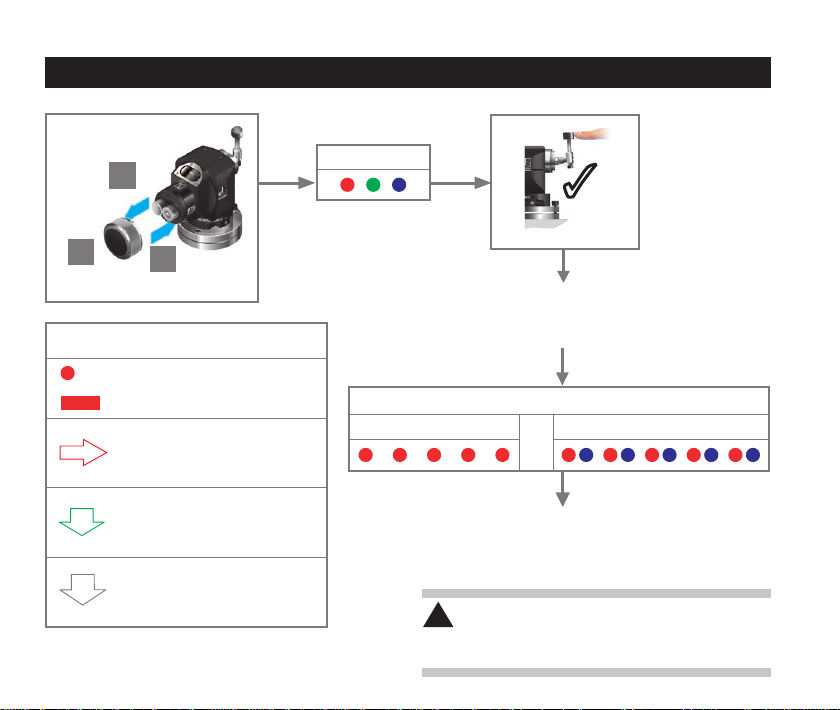
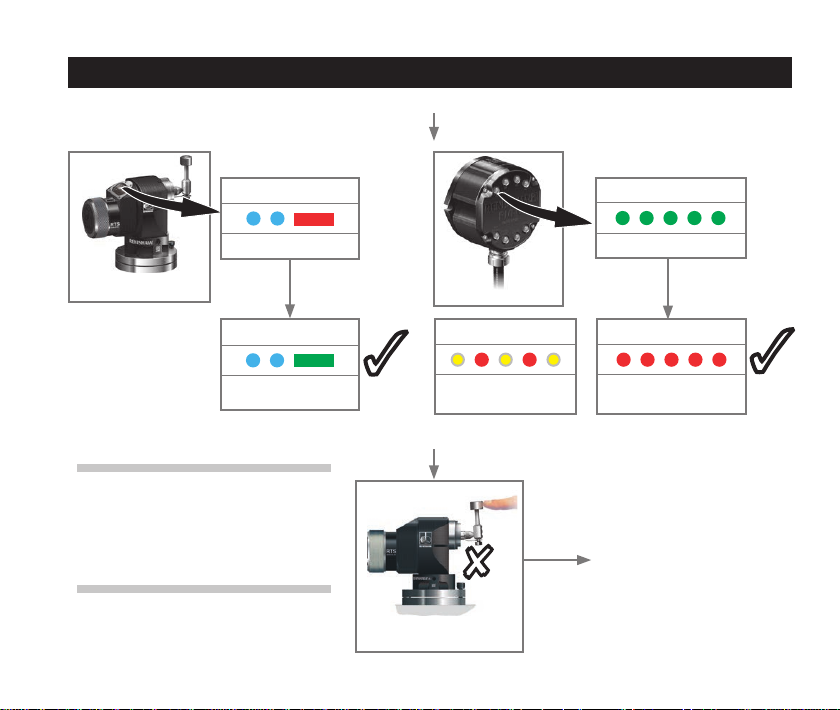
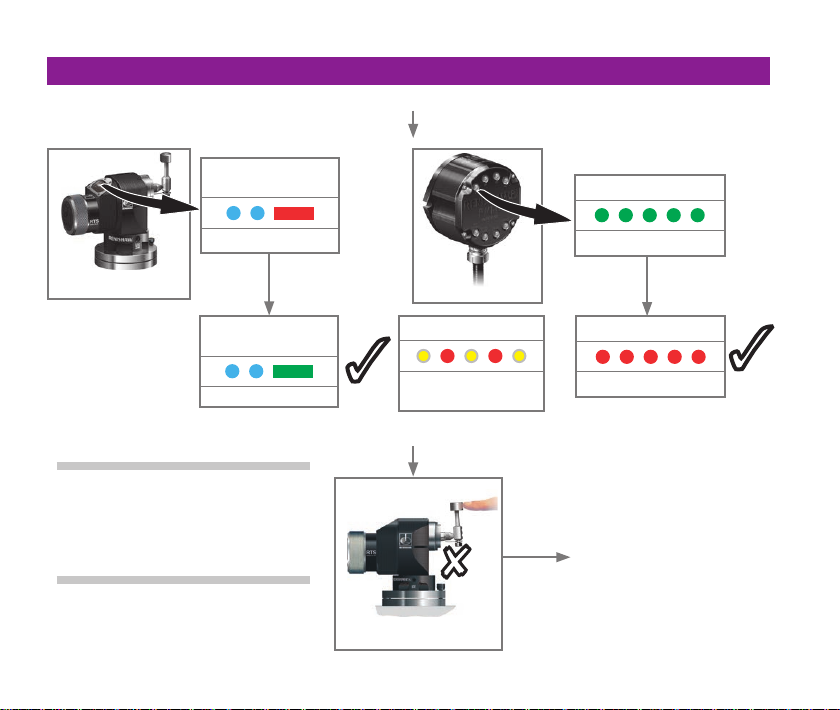
Placing the probe in configuration mode
LED check
1
3
> 5 s
1-10
2
3
Key to the symbols
LED short flash
LED long flash
Deflect the stylus for less than
4 seconds to move to the next
menu option.
Deflect the stylus for more than
4 seconds to move to the next
menu.
To exit, leave the stylus
untouched for more than
20 seconds.
Deflect the stylus and hold deflected until
battery status has been displayed at the
end of the review sequence.
Battery status
Battery good
To change the enhanced trigger filter setting
CAUTION: Do not remove the batteries whilst in
!
the configuration mode. Leave the stylus untouched for
more than 20 seconds to exit.
or
go to the next page
Battery low
Page 17
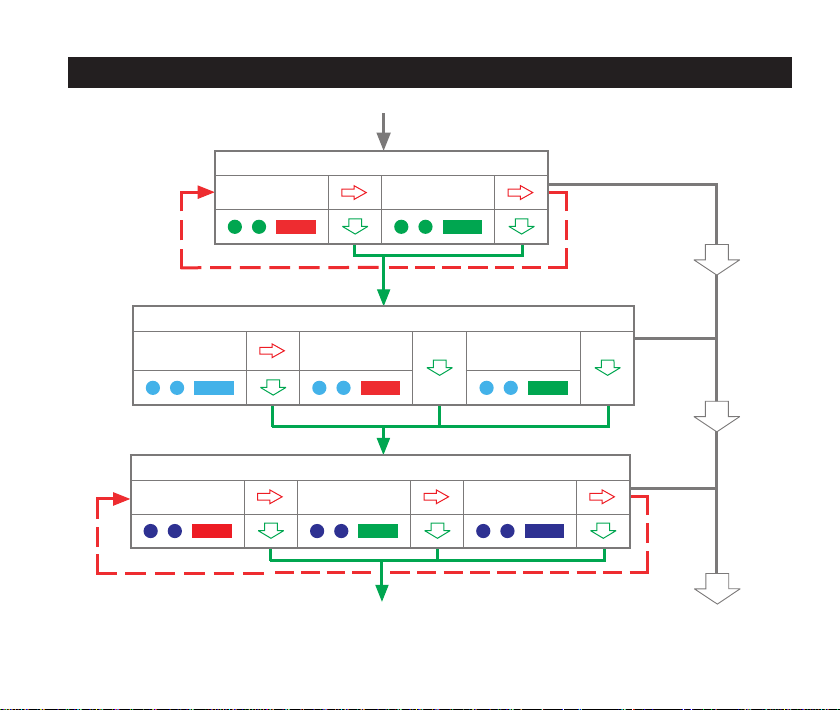
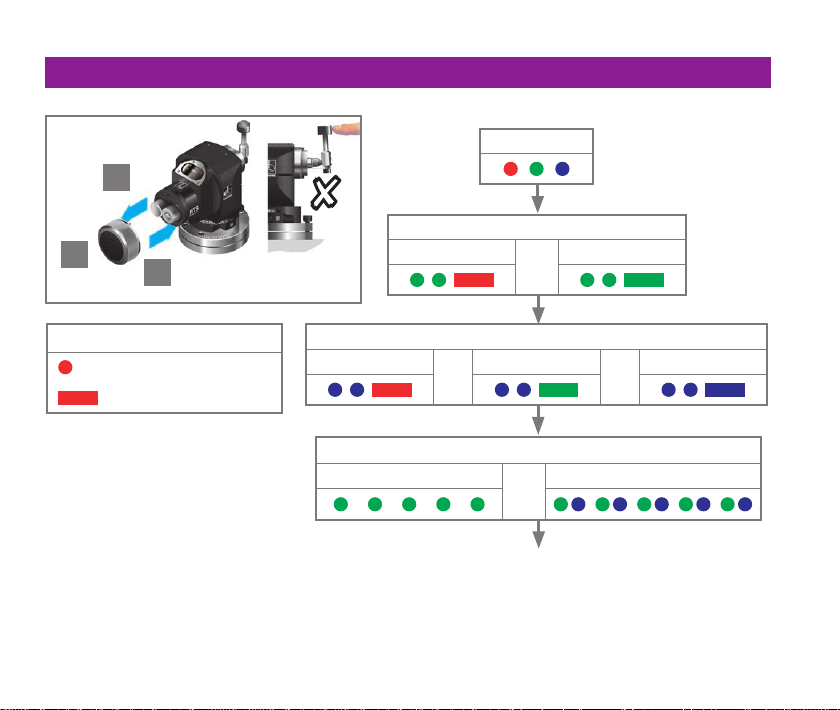
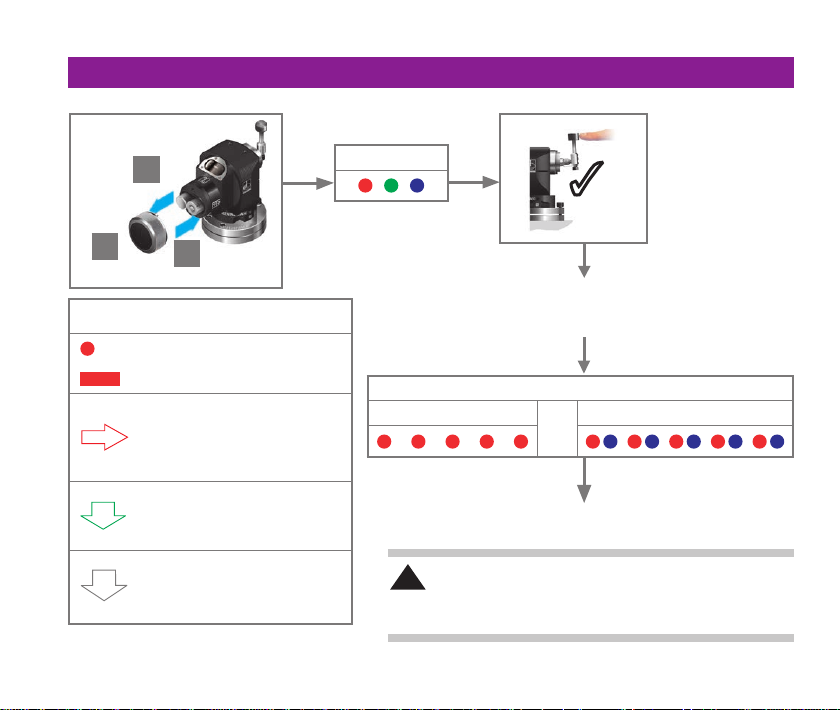
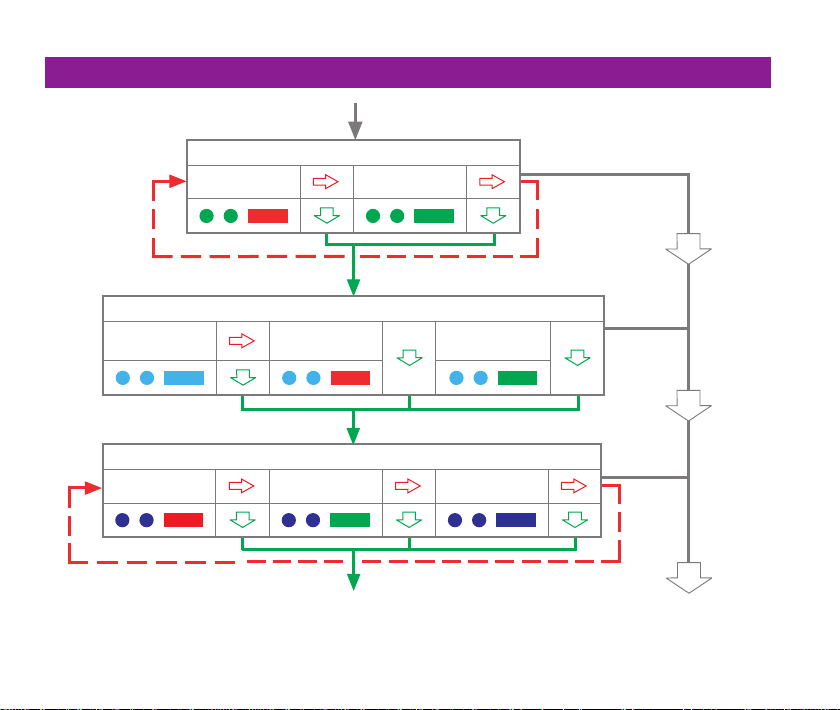
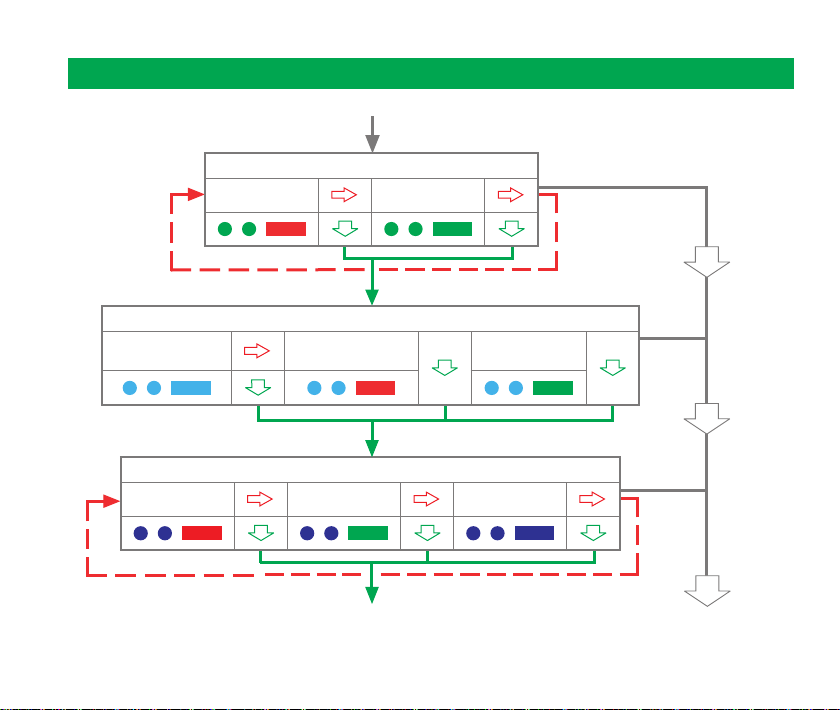
Changing the probe settings
Enhanced trigger filter setting
Off
Acquisition mode (time out only in acquisition successful)
Acquisition mode
off
30 s
Acquisition mode
on
Hibernation mode setting
5 s Off
On
Acquisition
successful
Return to
“Enhanced trigger filter”
New settings complete
1-11
Page 18
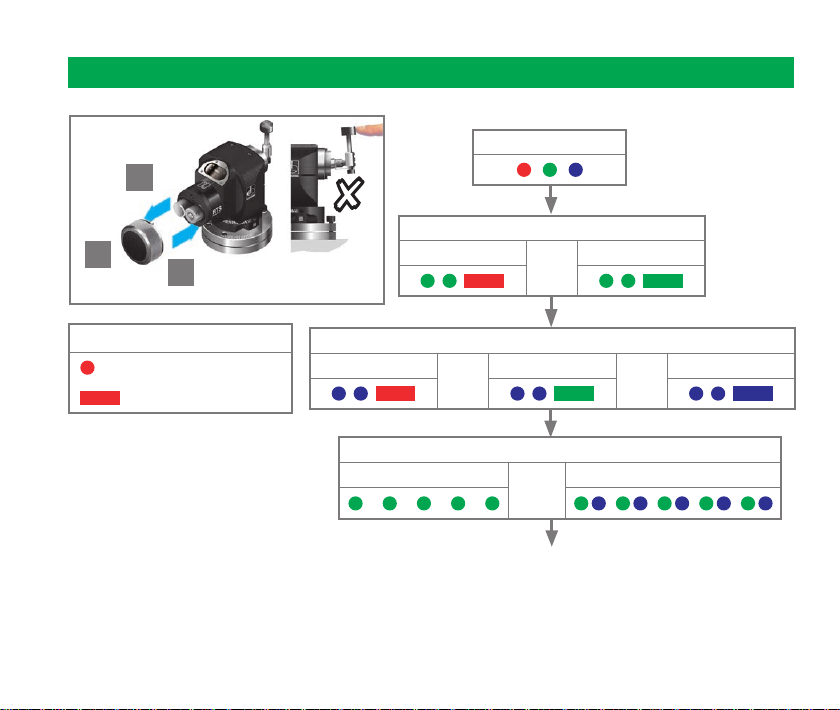
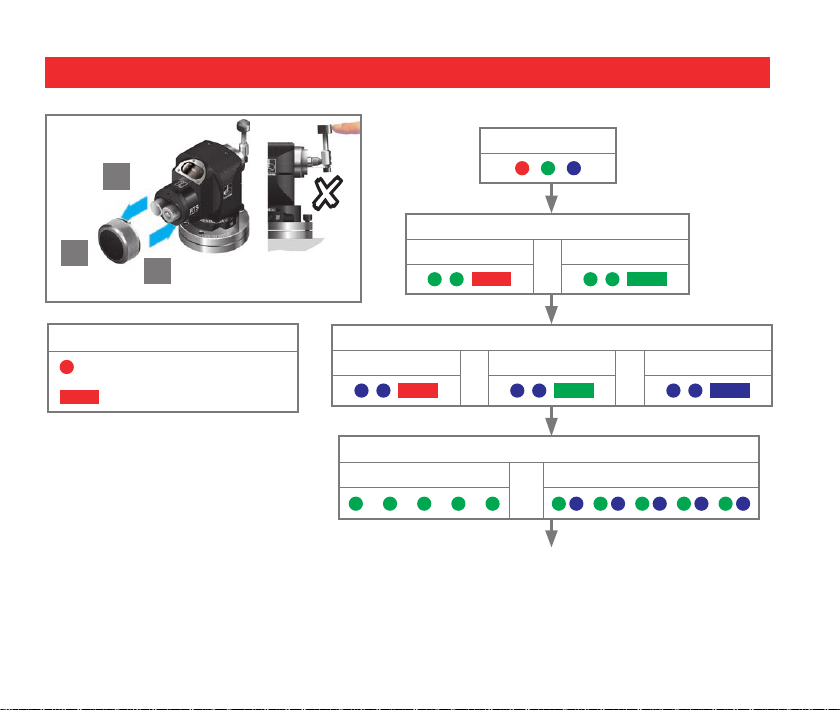
RTS – RMI-Q partnership
Acquisition mode
Acquisition mode off
Switch on the RMI-Q
1-12
SYSTEM STATUS LED
RMI-Q in acquisition mode
with empty probe location
3
< 4 s
3
SYSTEM STATUS LED
or
RMI-Q in acquisition mode
with full probe location
Deflect the stylus to select
“Acquisition mode on”. Ensure
this is done within 60 seconds
of the RMI-Q system status
LED flashing green.
3
Page 19
RTS – RMI-Q partnership
PROBE STATUS LED
Acquisition pending
PROBE STATUS LED
Acquisition mode
completed successfully
Displayed for 20 seconds.
Note: Please refer to the RMI-Q
installation guide (Renishaw part no.
H-5687-8504) when partnering up to
four RTS’/RMPs.
3
SYSTEM STATUS LED
New partner RTS
acquired
Displayed for 5 seconds.
8
> 20 s
SYSTEM STATUS LED
Acquisition pending
SYSTEM STATUS LED
or
RTS cleared from
location
The probe is in standby and
the system is ready for use.
3
1-13
Page 20
2
> 5 s
Messtastereinstellungen anzeigen
LED-Test
1
8
Einstellen erweiter ter Triggerfilter
Aus
3
oder
Ein
Zeichenerklärung
1-14
Kurzes Blinken der LED
Langes Blinken der LED
Einstellung “Winterschlaf-Modus“
30 s
Batterie gut
oder
Ladezustand der Batterien
Messtaster im Bereitschaftsmodus
oder
5 s
oder
Batterie schwach
Aus
Page 21
Einstellen des Messtasters auf den Programmiermodus
1
2
> 5 s
3
Zeichenerklärung
Kurzes Blinken der LED
Langes Blinken der LED
Den Tastereinsatz für weniger
als 4 Sekunden lang auslenken,
um zur nächsten Menüoption zu
gelangen.
Den Tastereinsatz länger als
4 Sekunden auslenken, um in
das nächste Menü zu gelangen.
Zum Beenden, den Tastereinsatz mindestens 20 Sekunden
nicht auslenken.
LED-Test
Den Tastereinsatz ununterbrochen
auslenken, bis der Batteriestatus am
Ende des Prüfablaufs angezeigt wurde.
Ladezustand der Batterien
Batterie gut
Das Ändern der Einstellung des erweiterten Triggerfilters
ACHTUNG: Entfernen Sie die Batterien nicht
!
während des Programmiermodus. Zum Beenden, den
Tastereinsatz mindestens 20 Sekunden nicht auslenken.
finden Sie auf der nächsten Seite
oder
3
Batterie schwach
1-15
Page 22
Ändern der Messtastereinstellungen
Einstellen erweiter ter Triggerfilte
Aus
Paarungsmodus
Paarungsmodus
Aus
30 s
Paarungsmodus
Ein
Einstellung “Winterschlaf-Modus“
5 s Aus
Ein
Paarung ist efolgt
1-16
Zurück zu
„Einstellen erweiterter Triggerfilter“
Die neuen Einstellungen
sind nun komplett
Page 23
Paarung RTS/RMI-Q
Paarungsmodus
Paarungsmodus Aus
RMI-Q einschalten
SYSTEM-STATUS-LED
RMI-Q frei zur Paarung
< 4 s
3
oder
3
SYSTEM-STATUS-LED
RMI-Q Paarung belegt
Lenken Sie den Tastereinsatz
aus, um „Paarungsmodus
Ein“ zu wählen. Dies muss
innerhalb 60 Sekunden
erfolgen, wenn die RMI-Q
LEDs grün blinken.
3
1-17
Page 24
MESSTASTER-
STATUS-LED
Im Paarungsmodus
Paarung RTS/RMI-Q
SYSTEM-STATUS-LED
Im Paarungsmodus
MESSTASTER-
STATUS-LED
Paarung ist erfolgt
Wird für 20 Sekunden angezeigt.
Hinweis: Siehe Paarung RMI-Q im
Installationshandbuch H-5687-8511
wenn bis zu vier Funkmesstaster
gepaart werden.
1-18
SYSTEM-STATUS-LED
3
Neue Paarung mit RTS
erfolgt
Wird für 5 Sekunden angezeigt.
8
> 20 s
SYSTEM-STATUS-LED
oder
RTS Paarung wieder frei
Der Messtaster befindet sich
nun im Stand-by-Modus und
das System ist einsatzbereit.
3
Page 25
2
> 5 s
Revisión de la configuración de la sonda
Comprobación de LED
1
8
Ajuste del filtro del disparador mejorado
Apagado
3
o bien
Encendido
Clave de los símbolos
Parpadeo corto del LED
Parpadeo largo del LED
Ajuste del modo de hibernación
30 s
Batería en buen estado
o bien
Sonda en modo de espera
5 s
Estado de la batería
o bien
o bien
Batería con carga baja
Apagado
1-19
Page 26

Poner la sonda en modo de configuración
Comprobación de LED
1
3
2
> 5 s
Clave de los símbolos
Parpadeo corto del LED
Parpadeo largo del LED
Flexione el palpador menos
de 4 segundos para pasar a la
siguiente opción del menú.
Flexione el palpador más de
4 segundos para pasar al
siguiente menú.
Para salir, deje el palpador
sin tocar durante más de 20
segundos.
1-20
3
Flexione el palpador hasta que se
muestre el estado de la batería al final
de la secuencia de revisión.
Estado de la batería
Batería en buen estado
!
el modo configuración. Para salir, deje el palpador sin tocar
durante más de 20 segundos.
Para cambiar el ajuste del filtro del disparador mejorado
PRECAUCIÓN: No retire las baterías mientras esté en
o bien
vaya a la página siguiente
Batería con carga baja
Page 27
Cambio de la configuración de la sonda
Ajuste del filtro del disparador mejorado
Apagado
Modo de adquisición (se desactivará sólo cuando se haya conseguido la adquisición)
Modo de adquisición
desactivado
30 s
Modo de adquisición
activado
Ajuste del modo de hibernación
5 s Apagado
Encendido
Adquisición
correcta
Volver
“Para cambiar el ajuste del filtro del disparador mejorado”
Nuevos ajustes completos
1-21
Page 28

Asociación RTS – RMI-Q
Modo de adquisición
Modo de adquisición
desactivado
Encienda el RMI-Q
1-22
LED DE ESTADO DEL
SISTEMA
RMI-Q en modo adquisición
sin ninguna sonda adquirida
3
< 4 s
LED DE ESTADO DEL
o bien
RMI-Q en modo adquisición
con todas las posiciones ya
3
SISTEMA
adquiridas
Flexione el palpador para
seleccionar “Modo de adquisición
activado”. Asegúrese de que esto se
realiza en menos de 60 segundos
desde que el LED de estado de
sistema del RMI-Q parpadea en
verde.
3
Page 29

Asociación RTS – RMI-Q
LED DE ESTADO DE
LA SONDA
Adquisición pendiente
LED DE ESTADO DE
LA SONDA
Modo de adquisición
completado
satisfactoriamente
Se visualiza durante 20 segundos.
Nota: Consulte la guía de instalación
del RMI-Q (H-5687-8507) para realizar la
adquisición con hasta cuatro sondas RTS/
RMP.
LED DE ESTADO DE
SISTEMA
Nueva sincronización
con RTS adquirida
Se visualiza durante 5 segundos.
8
> 20 s
LED DE ESTADO DE
SISTEMA
Adquisición pendiente
LED DE ESTADO DE
o bien
La sonda se coloca en
espera y sistema está listo
para usar.
SISTEMA
RTS eliminada de la
adquisición
33
1-23
Page 30
2
> 5 s
Vérification des réglages du palpeur
Contrôle des LED
1
8
Réglage du filtre de déclenchement avancé
Desactivé
3
ou
Activé
Légende des symboles
Clignotement court de diode
Clignotement long de diode
1-24
Réglage Mode Hibernation
30 s
Piles bonnes
ou
Palpeur en mode veille
5 s
État des piles
ou
ou
Piles faibles
Desactivé
Page 31

Mettre le palpeur en mode configuration
1
2
> 5 s
Légende des symboles
3
Clignotement court de diode
Clignotement long de diode
Défléchir le stylet pendant
moins de 4 secondes pour
passer à l’option suivante du
menu.
Défléchir le stylet pendant plus
de 4 secondes pour passer au
menu suivant.
Pour quitter, ne pas toucher
au stylet pendant plus de
20 secondes.
Contrôle des LED
Défléchir le stylet et le maintenir défléchi
jusqu’à la fin de l’affichage d’état de pile,
à l’issue de la séquence de contrôle.
Piles bonnes
passer à la page suivante
Pour changer le réglage du Filtre de déclenchement avancé
ATTENTION : Ne pas enlever les piles pendant le
!
mode configuration. Pour quitter, ne pas toucher au
stylet pendant plus de 20 secondes.
3
3
État des piles
ou
Piles faibles
1-25
Page 32

Modification des réglages du palpeur
Réglage du filtre de déclenchement avancé
Desactivé
Mode Acquisition (arrêt après délai si acquisition réussie)
Mode Acquisition
désactivé
30 s
Mode Acquisition
activé
Réglage Mode Hibernation
5 s Desactivé
Activé
Acquisition
réussie
1-26
Retour à
“Réglage du filtre de déclenchement avancé”
Nouveaux réglages
terminés
Page 33

Partenariat RTS – RMI-Q
Mode Acquisition
Mode Acquisition
désactivé
Démarrer la RMI-Q
LED ETAT SYSTEME
RMI-Q en mode acquisition
avec emplacement de
palpeur vide
3
ou
< 4 s
LED ETAT SYSTEME
RMI-Q en mode acquisition
avec emplacement de
palpeur rempli
Défléchir le stylet pour
sélectionner « Mode Acquisition
3
activé ». Assurez-vous que ceci
est fait dans les 60 secondes de
clignotement en vert des LED état
système.
3
1-27
Page 34

LED D’ETAT
PALPEUR
Acquisition en cours
LED D’ETAT
PALPEUR
Mode d’acquisition
achevé avec succès
Remarque : Se référer au guide
d’installation du RMI-Q (H-5687-8505) pour
le partenariat jusqu’à quatre RTS/RMP.
Partenariat RTS – RMI-Q
LED ETAT SYSTEME
3
Nouveau partenaire
RTS acquis
Affiché pendant 5 secondes.Affiché pendant 20 secondes.
8
> 20 s
LED ETAT SYSTEME
Acquisition en cours
LED ETAT SYSTEME
ou
RTS supprimé de
l’emplacement
Le palpeur est en attente
et le système est prêt à
l’emploi.
3
1-28
Page 35

2
> 5 s
Controllo delle impostazioni della sonda
Controllo LED
1
8
Impostazione del filtro di trigger avanzato
Disattivato
3
oppure
Attivato
Legenda dei simboli
Breve lampeggiamento del LED
Lungo lampeggiamento del LED
Impostazione modalità di ibernazione
30 s
Batteria carica
oppure
Sonda in modalità standby
5 s
Stato della batteria
oppure
oppure
Batteria scarica
Disattivata
1-29
Page 36

Come entrare nella modalità di configurazione della sonda
> 5 s
1-30
1
2
3
Legenda dei simboli
Breve lampeggiamento del LED
Lungo lampeggiamento del LED
Per passare all’opzione di menu
successiva, deflettere lo stilo per
meno di 4 secondi.
Per passare al menu successivo,
deflettere lo stilo per più di
4 secondi.
Per uscire, non toccare lo stilo
per almeno 20 secondi.
Controllo LED
Mantenere lo stilo deflesso finché, alla fine
della sequenza delle impostazioni, non
viene visualizzato lo stato della batteria.
Batteria carica
Per modificare l’impostazione del filtro di trigger avanzato
andare alla pagina successiva
ATTENZIONE: Non rimuovere le batterie
!
durante la modalità di configurazione. Per
uscire, non toccare lo stilo per almeno 20 secondi.
3
Stato della batteria
oppure
Batteria scarica
Page 37

Modifica delle impostazioni della sonda
Impostazione del filtro di trigger avanzato
Disattivato
Modalità di acquisizione (salta se acquisizione già eseguita)
Modalità di
acquisizione
disattivata
30 s
Modalità di
acquisizione
attivata
Impostazione modalità di ibernazione
5 s Disattivata
Attivato
Acquisizione già
eseguita
Tornare a
Per modificare l’impostazione del filtro di trigger avanzato
La selezione delle nuove
impostazioni è completata
1-31
Page 38

Associazione RTS – RMI-Q
Modalità di acquisizione
Modalità di acquisizione
disattivata
Accendere l’unità RMI-Q
1-32
LED DI STATO DEL
SISTEMA
RMI-Q in modalità di
acquisizione su un canale
sonda libero
LED DI STATO DEL
oppure
3 3
3
< 4 s
SISTEMA
RMI-Q in modalità di
acquisizione su un canale
sonda occupato
Deflettere lo stilo per selezionare
“Modalità di acquisizione attivata”.
Assicurarsi che questa operazione
venga effettuata entro 60 secondi
da quando il LED di stato del
sistema del ricevitore RMI-Q inizia
a lampeggiare verde.
Page 39

LED DI STATO
SONDA
In attesa di
acquisizione
Associazione RTS – RMI-Q
LED DI STATO DEL
SISTEMA
In attesa di acquisizione
LED DI STATO
SONDA
Acquisizione
completata
correttamente
Visualizzato per 20 secondi.
Nota: Vedere la guida d’installazione
del ricevitore RMI-Q (H-5687-8506) per
la procedura di acquisizione di sonde
multiple RMPs.
LED DI STATO DEL
SISTEMA
3
Acquisita nuova RTS
Visualizzato per 5 secondi.
> 20 s
8
LED DI STATO DEL
oppure
RTS cancellato
La sonda è in standby e la
sistema è pronto all’uso.
SISTEMA
3
1-33
Page 40

2
> 5 秒
現在のプローブ設定の確認
LED チェック
1
8
エンハンスドトリガーフィルター設 定
3
OFF
または
ON
1-34
記号の意味
LED が短く点灯
LED が長く点灯
省エネモード設定
30 秒
バッテリー 良 好
または
プローブのスタンバイモード
5 秒
バッテリー ステ ータス
または
または
ロー バッテリー
OFF
Page 41

プローブの設定モードの開始
1
2
> 5 秒
3
記号の意味
LED が短く点灯
LED が長く点灯
次のメニュー内選択肢に移るに
は、4 秒 未満 スタイラスをトリガ ー
させます。
次のメニューに移るには、4 秒以上
スタイラスをトリガーさせます。
終了するには、20秒以上スタイラス
を放 置します。
LED チェック
確認シーケンスの最後にバッテリー
ステータスが表 示されるまで、スタイ
ラスをトリガーさせ続けます。
バッテリー ステ ータス
バッテリー 良 好
注意: プローブがプログラミングモードに入って
!
いる場合は、電池を抜かないで下さい。
終了する には、20秒以上スタイラスを放置します。
エンハンスドトリガーフィルター設定メニュー
次のページをご覧ください。
または
3
ロー バッテリー
1-35
Page 42

プローブ設定の変更
エンハンスドトリガーフィルター設 定
OFF
マッチング モード (マッチング成功時のみタイムアウトになります)
マッチング モード
OFF
30 秒
マッチングモード
ON
省エネモード設定
5 秒
ON
マッチング 成 功
OFF
1-36
「エンハンスドトリガーフィルター設 定メニュー」に戻る
新しい設定の完了
Page 43

RTS と RMI-Q の マッチング
マッチング モード
マッチング モード OFF
RMI-Qの電源をONにします
システムステータスLED
RMI-Qがマッチング待機中、
かつ当該プローブナンバーの
マッチングデータが空の状態
システムステータスLED
または
3 3
< 4 秒
RMI-Qがマッチング待機中、
かつ当該プローブナンバーの
マッチングデータが既に登録
されている状態
スタ イラス をトリガ ーして 、「 マ
ッチング モード ON」を 選 択 し ま
す。この操作をRMI-Qのシステ
3
ムステータスLEDが緑に点滅し
始めてから60秒以内に実行し
て下さい。
1-37
Page 44

RTS と RMI-Q の マッチング
プローブステータス LED
マッチング待機中
プローブステータス LED
マッチング成功
20秒間表示します。
注 意: RTS/RMP とのマッチングについて
はRMI-Qイン ストレー ションガ イド
(H-5687-8509)を参照下さい。
1-38
3
システムステータスLED
新しい RTSとのマッチ
ングが確立
5秒間表示します。
8
> 20 秒
システムステータスLED
マッチング待機中
システムステータスLED
または
プローブがスタンバイ状態になり、
システムが使用可能状態になります。
当該プローブナンバー
からRTSの マッチング
データを消去
3
Page 45

Mounting the probe on the
machine table
Installation du palpeur sur la table de
la machine
Montage des Messtasters auf
dem Maschinentisch
Montaje de la sonda en la mesa
de la máquina
1
V
Montaggio della sonda sulla tavola
della macchina
機械のテーブルへのプローブの取り付け
V
M10/M12 bolt and T nut – supplied by
user.
M10/M12 Schraube und T-Nutstein (nicht
im Lieferumfang enthalten).
Tornillo M10/M12 y tuerca T, a cargo del
usuario.
Boulon M10/M12 et écrou en T – fourni
par l’utilisateur.
Vite M10/M12 e tassello a T – a carico
dell’utente.
M10/M12 ボルトと T ナット – お客様にてご
用意下さい。
1-39
Page 46

2
1,1 Nm
(0.81 lbf.ft)
× 4
3
1,1 Nm
(0.81 lbf.ft)
× 2
1-40
Page 47

Stylus adjustment
Réglage du stylet
Tastereinsatzeinstellung
Ajuste del palpador
1
1,1 Nm
(0.81 lbf.ft)
× 2
Regolazione stilo
スタイラス の芯 だし調整
1-41
Page 48

1
2
Adjust
Ausrichten
Ajustar
Régler
Registrare
調整
Adjust and lock
2
Ausrichten und Festziehen
Ajustar y bloquear
Régler et bloquer
Registrare e bloccare
調整と固 定
1-42
1
2
5,1 Nm
(3.76 lbf.ft)
Page 49

Square stylus only
Stylet carré seulement
Nur für Tastplatte
Solo palpador cuadrado
3
1,1 Nm
(0.81 lbf.ft)
Solo stilo cubico
スクエアスタイラスのみ該 当
1-43
Page 50

4
Slacken
Lösen
Aflojar
Desserrer
Svitare
緩めます
1-44
Page 51

5
Adjust
Ausrichten
Ajustar
Régler
Registrare
調整
1,1 Nm
(0.81 lbf.ft)
× 2
1-45
Page 52

6
1,1 Nm
(0.81 lbf.ft)
Tighten
Anziehen
Amarre
Serrer
Serrare
締めます
× 4
1-46
Page 53

Cleaning
Clean the window to maintain signal range.
Reinigung
Reinigen Sie die Glasscheibe, um
eine möglichst uneingeschränkte
Signalübertragung zu sichern.
Limpieza
Limpie la ventana para mantener la
intensidad de la señal.
Nettoyage
Nettoyez la vitre pour maintenir la portée
du signal.
Pulizia
Pulire la finestra per mantenere la portata
del segnale.
クリー ニング
信号の伝達性能を維持するために、
ウィンド ウ をクリー ニン グしてくだ さい 。
1-47
Page 54

RMI-Q visual diagnostics
LOW BATTERY/START LED
OFF
PROBE STATUS LED
Battery is okay
and no M-code
start/stop in
progress
Battery low
M-code start/
stop in progress
Battery is low
and M-code
start/stop in
progress
Overload error
Probe triggered
Probe seated
Overload error
1-48
P1, P2, P3, P4 SYSTEM STATUS LEDs
OFF
Probe number empty
Probe number full, in standby
Probe number full, operating
Probe number full, 0.5 s
compatibility error
Selection error
Acquisition/clearing pending,
full
Acquisition pending, empty
Acquisition complete, probe
full
Clearing complete, probe
empty
Key to the symbols
SIGNAL LED
Off
ERROR LED
OFF
Continuously on
Flashing
No probes
operating
Good
communications
Poor
communications
Overload error
No error
Error
Overload error
Page 55

BATTERIE SCHWACH /
START-LED
AUS (OFF)
MESSTASTER-STATUS-LED
Batterien sind
OK und kein
M-Befehl (Start/
Stopp) steht an
Batterie
schwach
M-Befehl (Start/
Stopp) steht an
Batterien sind
schwach und
M-Befehl (Start/
Stopp) steht an
Überspannungsfehler
Messtaster
ausgelenkt
Messtaster in
Ruhestellung
Überspannungsfehler
RMI-Q Anzeigediagnostik
P1, P2, P3, P4 SYSTEMSTATUS LEDs
AUS (OFF)
Tasterplatz frei
Tasterplatz belegt, Taster nicht
aktiv
Tasterplatz belegt, Taster im
Betrieb
Tasterplatz belegt, Fehler.
RMI-Q Auf 0,5s Einschaltzeit
gesetzt, muss aber auf 1s
gesetzt werden
Auswahlfehler
Paarungsmodus Ein,
Tasterplatz belegt
Paarungmodus Ein, Tasterplatz
frei
Paarung erfolgreich, Tasterplatz
belegt
Tasterpaarung gelöscht,
Tasterplatz frei
AUS (OFF)
AUS (OFF)
Zeichenerklärung
Permanent An
Blinken
SIGNAL-LED
Kein Messtaster in
betrieb
Optimale
Signalübertragung
Schlechte
Signalübertragung
Überspannungsfehler
FEHLER-LED
Kein Fehler
Fehler
Überspannungsfehler
1-49
Page 56

LED DE BATERÍA BAJA/INICIO
APAGADO
Batería en
buen estado
sin código M de
inicio o parada
en curso
Batería con
carga baja
Código M de
inicio o parada
en curso
Batería baja y
código M de
inicio o parada
en curso
Error de
sobrecarga
Diagnóstico visual del RMI-Q
LEDS DE ESTADO DE SISTEMA P1, P2, P3, P4
APAGADO
Número de sondas vacío
Número de sondas lleno, en
espera
Número de sondas lleno, en
funcionamiento
Número de sondas lleno,
0,5 segundos de error de
compatibilidad
Error de selección
Adquisición/borrado pendiente,
lleno
Adquisición pendiente, vacía
Adquisición completada,
sondas completas
Borrado completado, sondas
vacías
Clave de los símbolos
LED DE SEÑAL
APAGADO
Permanente
Destellando
No hay sondas en
funcionamiento
Buena señal de
recepción
Mala señal de
recepción
Error de
sobrecarga
LED DE ESTADO DE LA SONDA
Sonda disparada
Sonda en reposo
Error de
sobrecarga
1-50
APAGADO
LED DE ERROR
Sin error
Error
Error de
sobrecarga
Page 57

Diagnostics visuels de RMI-Q
LED DE PILES FAIBLES/
DÉMARRAGE
DÉSACTIVÉ
LED D’ETAT PALPEUR
Piles bonnes et
pas de code M
de départ/arrêt
en cours
Piles faibles
Code M de
départ/arrêt en
cours
Piles faibles
et code M de
départ/arrêt en
cours
Erreur de
dépassement
Capteur déclenché
Palpeur au repos
Erreur de
dépassement
LEDs ETAT SYSTEME P1, P2, P3, P4
DÉSACTIVÉ
Numéro palpeur vide
Numéro palpeur complet, en
attente
Numéro palpeur complet, en
opération
Numéro palpeur complet,
erreur de compatibilté 0,5 s
Erreur sélection
Acquisition/suppression en
cours complet
Acquisition en cours vide
Acquisition terminée, palpeur
complet
Supression terminée, palpeur
vide
Légende des symboles
LED DE SIGNAL
DÉSACTIVÉ
LED D’ERREUR
DÉSACTIVÉ
Allumé en continu
Clignotant
Pas de palpeur en
opération
Communication
correcte
Communication
faible
Erreur de
dépassement
Aucune erreur
Erreur
Erreur de
dépassement
1-51
Page 58

Diagnostica visiva dell’unità RMI-Q
LED DI BATTERIA SCARICA /
ACCENSIONE
SPENTO
La batteria è
carica e non
è in corso
l’accensione/
spegnimento a
codice M
Batteria scarica
È in corso
l’accensione/
spegnimento a
codice M
È in corso
l’accensione/
spegnimento
a codice M e
batteria scarica
Sovraccarico
LED STATO SONDA
Sonda deflessa
Sonda a riposo
Sovraccarico
1-52
LED DI STATO DEL SISTEMA P1, P2, P3, P4
SPENTO
Canale sonda libero
Canale sonda occupato, in
standby
Canale sonda occupato,
operativo
Canale sonda occupato, errore
di compatibilità 0,5 s
Errore di selezione
Acquisizione/cancellazione su
canale occupato
Acquisizione su canale libero
Acquisizione completata, canale
sonda impostato
Cancellazione completata,
canale sonda libero
Legenda dei simboli
LED DI SEGNALE
SPENTO
LED DI ERRORE
SPENTO
Acceso costante
Lampeggiante
Nessuna sonda in
funzione
Buona
comunicazione
Scarsa
comunicazione
Sovraccarico
Nessun errore
Errore
Sovraccarico
Page 59

RMI-Qの診断用LEDの機能
ロー バッテリー / スタート LED
OFF
プローブステータス LED
バッテリー 電圧 が
良好で、M コード
スタ ート/ ストップ
信号送信なし
ロー バッテリー
M コードスター
ト/ストップ信号
送信中
ロー バッテリー
状態で、M コード
スタ ート/ ストップ
信号送信中
出力回路
過負荷状態
プローブ が
トリガー状態
プローブ が
シート状 態
出力回路
過負荷状態
P1,P2,P3,P4システムステータス表示LED
OFF
当該プローブナンバーに登録無し
当該プローブナンバーに登録有
り、待機状態
当該プローブナンバーに登録有
り、稼働状態
当該プローブナンバーに登録有
り、0.5秒 起動モードエラー
プローブ 選択エラー
マッチング/マッチング消去待機
中、登録プローブデータあり
マッチング待機中、登録プローブ
デー タなし
マッチング完了、プローブデ ータ
登録済み
マッチングデータ消去 完了、プロー
ブデータ登録無し
OFF
OFF
記号の意味
シグナル LED
稼働中プローブ無し
信号状態良好
信号状態不十分
出力回路過負荷
状態
エラー LED
異常なし
エラー
出力回路過負荷
状態
継続点灯
点滅
1-53
Page 60

2
Polski (PL)
Česky (CS)
Русский (RU)
中文(繁體)(ZH-TW)
中文(简体)(ZH)
한국어 (KO)
2-1
Page 61

BezpečnostBezpieczeństwo
RTS posiada szklane okienko. W razie rozbicia szybki należy
zachować ostrożność, aby uniknąć obrażeń.
Podczas obsługi obrabiarek zaleca się używanie ochrony na oczy.
Bezpieczeństwo baterii
Sonda RTS może być dostarczana lub używana z bateriami
alkaicznymi lub zawierającymi chlorek tionylo-litowy,
nieprzeznaczonymi do ładowania.
• Nie należy próbować naładować tych baterii.
• Zużyte baterie należy utylizować zgodnie z lokalnymi
przepisami dotyczącymi środowiska oraz bezpieczeństwa.
• Należy wymienić tylko na określony typ baterii.
• Należy upewnić się, że wszystkie baterie są poprawnie
włożone.
• Nie przechowywać w bezpośrednim słońcu czy deszczu.
• Nie rozgrzewać czy likwidować baterii w ogniu.
• Nie doprowadzać do zwarcia lub celowo rozładowywać baterii.
• Nie demontować, przekłuwać, deformować czy nakładać
nadmiernej siły na baterie.
• Nie połykać baterii.
• Baterie należy przechowywać poza zasięgiem dzieci.
• Nie zmoczyć baterii.
• W razie uszkodzenia baterii należy zachować ostrożność i
unikać kontaktu z elektrolitem.
Baterie litowe są klasyfikowane, jako przedmioty niebezpieczne
i do ich transportu drogą powietrzną zastosowanie mają surowe
kontrole. Aby obniżyć ryzyko opóźnienia dostawy, jeżeli z
jakiegokolwiek powodu musisz zwrócić RTS do Renishaw, nie
zwracaj baterii.
Działanie urządzenia
Jeżeli urządzenie to jest użytkowane w sposób inny niż określił to
producent, zabezpieczenie zapewniane przez to urządzenie może
być osłabione.
2-2
RTS má skleněné okénko. Pokud je rozbité, zacházejte s ním
opatrně, abyste zabránili poranění.
U všech aplikací zahrnujících použití obráběcích strojů je
doporučeno používat ochranu zraku.
Bezpečnost baterie
Sonda RTS může být dodána nebo použita s nedobíjecími
alkalickými nebo lithium-thionyl-chloridovými bateriemi.
• Tyto baterie nedobíjejte.
• Nepoužitelné baterie zlikvidujte v souladu s místními zákony na
ochranu životního prostředí a zákony pro zajištění bezpečnosti.
• Jako náhradu použijte jen určený typ.
• Všechny baterie musejí být instalovány při zachování správné
polarity.
• Neskladujte na přímém slunečním světle.
• Baterie nezahřívejte a neodhazujte do ohně.
• Nezkratujte a nuceně nevybíjejte.
• Baterie nerozebírejte, nevyvíjejte na ně nadměrný tlak,
neprorážejte a nedeformujte.
• Baterie nepolykejte.
• Baterie uchovávejte mimo dosah dětí.
• Baterie nesmějí navlhnout.
• S poškozenou baterií zacházejte opatrně, abyste nepřišli do
styku s elektrolytem.
Lithiové baterie jsou klasifikovány jako nebezpečné zboží a na
jejich leteckou přepravu se vztahují přísné kontroly. Pokud z
jakéhokoli důvodu potřebujete vrátit RTS společnosti Renishaw,
pro snížení rizika zpoždění dodávky nevracejte baterie.
Provoz zařízení
Používá-li se toto zařízení způsobem, který není výrobcem
specifikován, může dojít ke snížení ochrany zajištěné zařízením.
Page 62

Общая техника безопасности
安全性é
Прибор RTS оснащен стеклянным окошком. Если стекло разбито,
обращаться с осторожностью во избежание порезов.
При выполнении любых работ на станках рекомендуется
использовать средства защиты глаз.
Техника безопасности при работе с аккумуляторами
Датчик RTS может поставляться или использоваться с
щелочными или литиевыми тионил-хлоридными батареями,
не допускающими перезарядку.
• Нельзя перезаряжать батареи.
• Утилизируйте разряженные батареи в соответствии с
требованиями местного законодательства по безопасности
и защите окружающей среды.
• Для замены используйте только батареи указанного типа.
• Необходимо вставлять все аккумуляторы с соблюдением
полярности.
• Не храните под прямыми солнечными лучами.
• Нельзя нагревать аккумуляторы или бросать их в огонь.
• Не допускайте короткого замыкания или ускоренной разрядки.
• Запрещается разбирать батареи, прилагать к ним чрезмерное
давление, пробивать в них отверстия или деформировать их.
• Нельзя допускать попадания батарей в пищеварительный тракт.
• Следует хранить батареи в местах, недоступных для детей.
• Нельзя допускать попадания влаги на батареи.
• С поврежденной батареей обращайтесь осторожно,
избегая контакта с электролитом.
Литиевые батареи классифицируются как опасный груз; при их
перевозке по воздуху действуют строгие правила. Для снижения
риска, связанного с задержками при доставке, в случае возврата
по каким-либо причинам RTS в компанию Renishaw не следует
(вместе с ним) отправлять батареи.
Работа оборудования
В случае если имеет место эксплуатация оборудования в
режиме, не указанном производителем, эффективность защиты,
предусматриваемой на оборудовании, может быть нарушена.
RTS 配有一個玻璃視窗。如果玻璃破裂,請小心處理以避免造成
割傷。
應用此機械工具時,建議做好眼部防護措施。
電池安全性
RTS 可能隨附或使用非充電式鹼性電池或鋰電池。
• 請勿嘗試給這些電池重新充電。
• 請依據當地環境安全法規棄置廢電池。
• 務必更換規格相符的電池類型。
• 確保所有電池按正確的極性插入。
• 請勿置於陽光可直接照射處。
• 請勿將電池加熱或投入火中處置。
• 請勿使電池短路或強制放電。
• 請勿對電池進行拆解、穿刺、變形或施加過度壓力。
• 請勿吞食電池。
• 請將電池置放於孩童無法接觸到的地方。
• 請勿讓電池受潮。
• 電池受損時,請小心處理,避免接觸電解液。
鋰電池被定義為危險貨物,並且透過空運運輸有嚴格的控制。
為避免延遲運送的情況發生,若因任何因素需要將(產品)退還給
Renishaw 時,請勿退還電池。
設備作業
如果未按照製造商規定的方法使用此設備,則設備本身提供的保護
將會大幅減弱。
2-3
Page 63

安全须知
안전
RTS有一个玻璃窗口。如果玻璃破碎,请务必小心以免受伤。
在所有涉及使用机床的应用中,建议采取保护眼睛的措施。
电池安全性
RTS可能随附或使用非充电型碱性电池或锂亚硫酰氯电池。
• 不要尝试给电池充电。
• 请按照当地的环境和安全法规处置用过的电池。
• 请按照指定的类型更换电池。
• 确保所有安装的电池正负极方向正确。
• 请勿存放在阳光直射的地方。
• 请勿将电池加热或弃入火中处置。
• 请勿使电池短路或强制放电。
• 请勿对电池进行拆解、穿透、施加过度压力、或使其变形。
• 请勿吞咽电池。
• 请将电池放在儿童无法接触的地方。
• 请勿使电池受潮。
• 如果电池损坏,请小心处理,不要触碰到电解液。
锂电池被定义为危险品,空运有严格的控制。为了减少运输延期的
风险,无论出于何种原因,若您需要将产品返回雷尼绍,请勿包含
任何电池。
设备操作
如果设备使用方式与制造商要求的方式不符,设备提供的保护功能
可能会减弱。
2-4
RTS에는 유리창이 있습니다. 유리가 파손되어 부상을 입지
않도록 주의하십시오.
공작 기계를 사용하는 모든 분야에서 눈을 보호하는 것이
안전합니다.
배터리 안전
RTS은 1회용 알카라인 또는 리튬 염화 티오닐 배터리가 함께
제공되거나 사용될 수 있습니다.
• 배터리를 재충천하지 마십시오.
• 다 쓴 배터리는 지역 환경 및 안전 법률에 따라
폐기하십시오.
• 정해진 유형으로만 교체합니다.
• 배터리가 양극과 음극에 올바르게 맞춰 삽입되었는지
확인합니다.
• 직사 광선을 피해 보관하십시오.
• 배터리를 불에 가열하거나 폐기하지 마십시오.
• 단락시키거나 강제로 방전하지 마십시오.
• 배터리를 임의로 분리, 무리한 압력을 가하여 변형시키지
마십시오.
• 배터리를 삼키지 마십시오.
• 아동이 배터리에 접근하지 않도록 하십시오.
• 배터리를 물에 젖지 않도록 하십시오.
• 배터리가 손상된 경우 전해액이 묻지 않도록 조심해서
취급하십시오.
리튬 배터리는 위험물로 분류되며 항공 운송 시 엄격하게
관리됩니다. 어떠한 이유로든 Renishaw로 (제품)을
(를) 반환해야 할 때 선적 지연을 줄이기 위해 배터리를
제거하십시오.
장비 작동
제조업체에서 지정하지 않은 방법으로 이 장비를 사용하면
장비가 제공하는 보호 기능이 제대로 작동하지 않을 수
있습니다.
Page 64

RTS
*A-5646-8503-02*
RTS - Instrukcja instalacji
Instalační příručka RTS
Инструкция по установке RTS
RTS 安裝指南
RTS安装指南
RTS 설치 안내서
RTS
*A-5646-8503-02*
2-5
Page 65

Baterie
Baterie
Элементы итания
電池
电池
배터리
Baterie alkaliczne AA × 2
2 × alkalická AA
AA щелочные, 2 шт
AA 鹼性電池 × 2
AA 碱性电池 × 2
AA표준 알카라인 건전지× 2
Baterie AA zawierające chlorek tionylo-litowy × 2
2 × lithio-thionylchloridové AA
AA литий-тионилхлорид, 2 шт
AA 鋰電池× 2
AA锂亚硫酰氯电池 × 2
AA리튬 염화티오닐 × 2
Minamoto:
Saft:
Tadiran:
4
UWAGA: Maksymalny okres pracy uzyskuje się stosując baterie na bazie chlorku tionylo-litowego.
POZNÁMKA: Použitím lithio-thionylchloridových baterií dosáhnete maximální životnosti.
ПРИМЕЧАНИЕ: максимальный срок службы батарей достигается при использовании литий-
тионилхлоридных элементов питания.
備註:若使用鋰電池,可達到電池最長之使用壽命。
注:锂亚硫酰氯电池的使用寿命最长,可降低电池更换频率。
주석: 다른 종류의 배터리 보다 리튬 염화티오닐 배터리가 배터리 사용 수명이 가장 오래 갑니다.
Tekcell:
Xeno:
ER14505, ER14505H
LS 14500, LS14500C
SL360/S, SL-760/S,
SL860/S
TL-5903/S, TLH-5903/S
SS-AA11
XL-060F
2-6
4
Page 66

Mocowanie trzpienia pomiarowego i
łącznika zabezpieczającego
Montáž doteku a střižného kolíku
Установка щупа и невыпадающего
соединения
安裝測針和防脫拉環
装配测针和柔性连接片
1
2,6 Nm
스타일러스 및 캡티브 링크 장착
2
1,1 Nm
1,1 Nm
3
2,6 Nm
2-7
Page 67

Instalowanie baterii
Instalace baterií
Установка батарей
安裝電池
安装电池
배터리 설치
1
2-8
2 3
8
Page 68

2
> 5 s
Sprawdzanie ustawień sondy
Kontrola diody LED
1
8
Ustawienie filtru układu przystosowania wyzwalania
Wyłączony
3
lub
Włączony
Opis symboli
Krótki błysk diody LED
Długi błysk diody LED
Ustawienia trybu hibernacji
30 s
Prawidłowy stan naładowania baterii
lub
Sonda w stanie gotowości
5 s
Stan baterii
lub
Niski poziom naładowania baterii
lub
Wyłączony
2-9
Page 69

Wprowadzenie sondy do trybu konfiguracji
> 5 s
2-10
1
2
3
Opis symboli
Krótki błysk diody LED
Długi błysk diody LED
Odchylić trzpień pomiarowy na
czas krótszy niż 4 sekundy w celu
przejścia do następnej opcji menu.
Odchylić trzpień pomiarowy na
czas dłuższy niż 4 sekundy w celu
przejścia do następnego menu.
W celu zakończenia pozostawić
trzpień pomiarowy przez czas
dłuższy niż 20 sekund, nie
dotykając go.
Kontrola diody LED
Odchylić trzpień pomiarowy i przytrzymać go w
stanie odchylonym dopóki nie zostanie wyświetlony
stan baterii na końcu sekwencji przeglądania.
Prawidłowy stan
naładowania baterii
Aby zmienić ustawienia filtru układu przystosowania wyzwalania
OSTRZEŻENIE: Nie wyjmować baterii podczas pracy sondy
!
w trybie konfiguracyjnym. W celu zakończenia pozostawić
trzpień pomiarowy przez czas dłuższy niż 20 sekund, nie dotykając go.
należy przejść na następną stronę
3
Stan baterii
lub
Niski poziom
naładowania baterii
Page 70

Zmiana ustawień sondy
Ustawienie filtru układu przystosowania wyzwalania
Wyłączony
Włączony
(wyłączenie automatyczne jeśli tryb wyszukiwania włączony)
Wyłączenie trybu
wyszukiwania
30 s
Tryb wyszukiwania
Włączenie trybu
wyszukiwania
Ustawienia trybu hibernacji
5 s Wyłączony
Wyszukiwanie
Powrót do
Zmiana ustawienia filtru układu przystosowania wyzwalania
wykonane
Wprowadzanie nowych
ustawień zostało zakończone
2-11
Page 71

Współpraca RTS - RMI-Q
Tryb wyszukiwania
Wyłączenie trybu
wyszukiwania
Włączyć zespół RMI-Q
2-12
DIODA STANU SYSTEMU
RMI-Q w trybie
wyszukiwania z kanałem
wolnym
DIODA STANU SYSTEMU
lub
3 3
< 4 s
RMI-Q w trybie
wyszukiwania z kanałem
obsadzonym
Odchylić trzpień pomiarowy,
aby wybrać „Włączenie trybu
wyszukiwania”. Należy zadbać,
aby tę czynność wykonać w ciągu
3
60 sekund od chwili, kiedy dioda
stanu systemu RMI-Q zacznie
migotać zielonym światłem.
Page 72

Współpraca RTS - RMI-Q
DIODA STANU SONDY
Wyszukiwanie trwa
DIODA STANU SONDY
Tryb wyszukiwania
zakończony pomyślnie
Wyświetlane przez 20 s.
Uwaga: Przy łączeniu do czterech
sond RTS/RMP prosimy zapoznać się
zinstrukcją instalacji sondy RMI-Q
(H-5687-8504).
3
Wyświetlane przez 5 s.
> 20 s
DIODA STANU
SYSTEMU
Zostało wyszukane
nowe współpracujące
urządzenie RTS
8
DIODA STANU
SYSTEMU
Wyszukiwanie trwa
DIODA STANU
lub
SYSTEMU
Sonda RTS usunięta
Sonda w stanie gotowości i
system gotowy do użytkowania.
3
2-13
Page 73

2
> 5 s
Kontrola nastavení sondy
Kontrola LED dio
1
8
Nastavení zdokonaleného spínacího filtru
Vypnuto
3
nebo
Zapnuto
2-14
Klíč k symbolům
Krátké bliknutí LED diody
Delší bliknutí LED diody
Nastavení režimu spánku
30 s
Baterie nabité
nebo
Sonda v pohotovostním režimu
5 s
Stav baterií
nebo
nebo
Nízký stav baterií
Vypnuto
Page 74

Uvedení sondy do konfiguračním režimu
1
2
> 5 s
3
Klíč k symbolům
Krátké bliknutí LED diody
Delší bliknutí LED diody
Vychylte dotek na méně než
4 sekundy přejdete na další
možnost nabídky.
Vychylte dotek na více než
4 sekundy přejdete do další
nabídky.
Pro ukončení se nedotýkejte
doteku minimálně 20 sekund.
Kontrola LED diod
Vychylte dotek a přidržte ho vychýlený,
dokud se nezobrazí stav baterií na konci
přehledové sekvence.
Baterie nabité
UPOZORNĚNÍ: V režimu konfigurace nevydělávejte
!
baterie. Pro ukončení se nedotýkejte doteku minimálně
20 sekund.
Změna nastavení filtru zpoždění spínání
viz přejděte na další stranu
Stav baterií
nebo
3
Nízký stav baterií
2-15
Page 75

Změna nastavení sondy
Nastavení zdokonaleného spínacího filtru
Vypnuto
Režim párování (čas vyprší pouze po úspěšném párování)
Režim párování
vypnut
30 s
Režim párování
zapnut
Nastavení režimu spánku
5 s Vypnuto
Zapnuto
Úspěšně
spárováno
2-16
Návrat k
Změna nastavení filtru zpoždění spínání
Nové nastavení dokončeno
Page 76

Spárování RTS - RMI-Q
Režim párování
Režim párování vypnut
Zapněte RMI-Q
LED SYSTÉM STATUS
RMI-Q v režimu párování -
ID sondy neobsazeno
LED SYSTÉM STATUS
nebo
3 3
< 4 s
RMI-Q v režimu párování -
ID sondy obsazeno
Vychylte dotek, chcete-li vybrat
“Režim párování zapnut”.
Toto musí být provedeno do
3
60 sekund, během kterých
RMI-Q system status LED
bliká zeleně.
2-17
Page 77

Spárování RTS - RMI-Q
LED DIODA STAVU
SONDY
Párování probíhá
LED DIODA STAVU
SONDY
Párování proběhlo
úspěšně
Zobrazeno po dobu 20 sekund.
Poznámka: Při párování sondy RTS/
RMP nahlédněte prosím do instalační
příručky (H-5687-8504).
2-18
LED SYSTÉM STATUS
3
Nové spárování se
sondou RTS
Zobrazeno po dobu 5 sekund.
8
> 20 s
LED SYSTÉM STATUS
Párování probíhá
LED SYSTÉM STATUS
nebo
Sonda je v pohotovostním režimu a
systém je připraven k použití.
Identifikace RTS
vymazána
3
Page 78

1
2
> 5 секунд
Проверка настроек датчика
Проверка индикатора
8
Настройка фильтра оптимизации срабатывания
выключен
3
или
включен
Условные обозначения
Короткие вспышки индикатора
Длинные вспышки индикатора
Установка режима пассивного ожидания
30 секунд
Батарейки в норме
Датчик в режиме ожидания
5 секунд
или
Состояние батарей
или
или
Батарейки разряжены
выключен
2-19
Page 79

Перевод датчика в режим настройки
1
2
> 5 секунд.
Условные обозначения
3
Короткие вспышки индикатора
Длинные вспышки индикатора
Отклоните щуп на время
менее 4 секунд для перехода
к следующему пункту меню.
Отклоните щуп на время
более 4 секунд для перехода
к следующему меню.
Для выхода не касайтесь
щупа более 20 секунд.
2-20
Проверка индикатора
или
3
Батарейки разряжены
Отклонив щуп, удерживайте его в таком положении
вплоть до высвечивания последовательности,
отображающей уровень заряда батарей.
Состояние батарей
Батарейки в норме
Для изменения настройки фильтра оптимизации срабатывания
ПРЕДОСТЕРЕЖЕНИЕ: не удаляйте батарейки во время
!
нахождения датчика в режиме настройки. Pro ukončení se
nedotýkejte doteku minimálně 20 sekund.
см. на следующей странице
Page 80

Смена настроек датчика
Настройка фильтра оптимизации срабатывания
включен выключен
включен
(временная задержка возможна только если обнаружение успешно завершено)
Режим oбнаружения
выключен
Установка режима пассивного ожидания
30 секунд
Режим обнаружения
Режим обнаружения
включен
5 секунд выключен
Возврат к пункту
Для изменения настройки фильтра оптимизации срабатывания
Обнаружение успешно
завершено
Настройка завершена
2-21
Page 81

Согласование устройств RTS-RMI-Q
Режим обнаружения
Режим oбнаружения
выключен
Включить RMI-Q
2-22
Индикатор состояния
системы
RMI-Q в режиме
обнаружения с
незаданным текущим
датчиком
Продолжение на следующей странице
3
< 4 секунд
или
Индикатор состояния
системы
RMI-Q в режиме
обнаружения с уже
заданным текущим
датчиком
Отклоните щуп для перехода
в «Режим обнаружения
включен». Убедитесь, что это
3
сделано в течении 60 секунд
пока индикатор состояния
системы на RMI-Q моргает
зеленым.
3
Page 82

Согласование устройств RTS-RMI-Q
ИНДИКАТОР
PROBE STATUS
(СОСТОЯНИЕ
ДАТЧИКА)
Обнаружение в
процессе
ИНДИКАТОР
PROBE STATUS
(СОСТОЯНИЕ
ДАТЧИКА)
Режим обнаружения
успешно завершен
Индикация в течении
20 секунд.
Примечание: смотри инструкцию
по установке RMI-Q (артикул
H-5687-8512) при сопряжении с
датчиками типа RTS или RMP
(до 4-х датчиков).
Индикатор состояния
системы
3
Индикация в течении 5 секунд.
Обнаружен новый
датчик RTS
8
> 20 секунд
Индикатор состояния
системы
Обнаружение в
процессе
Индикатор состояния
или
системы
Текущий датчик RTS
сброшен
Датчик находится в режиме
ожидания; система готова
к работе.
3
2-23
Page 83

2
> 5 秒
檢視測頭設定
LED 檢查
1
8
增強型觸發信號過濾設定
關閉
3
或
開啟
指示燈的符號定義
LED 短閃爍
LED 短閃爍
2-24
休眠模式設定
30 秒
電池電量良好
或
5 秒
電池狀態
或
測頭處於待命模式
或
電池電量過低
關閉
Page 84

進入測頭配置模式
2
> 5 秒
1
3
指示燈的符號定義
LED 短閃爍
LED 長閃爍
偏壓測針小於 4 秒,可移動至
選單內的下一選項。
偏壓測針大於 4 秒,可移動至
下一選單。
要退出,請保持不偏壓測針
20 秒以上。
LED 檢查
偏壓測針並保持不動,直到檢視步驟完成並出現電
電池電量良好
要更改增強型觸發信號過濾設定,
小心: 在配置模式下請勿取下電池。要退出,請保持不
!
偏壓測針 20 秒以上。
3
池狀態為止。
電池狀態
或
請轉至下一頁。
電池電量過低
2-25
Page 85

更改測頭設定
增強型觸發信號過濾設定
關閉
擷取模式 (僅有在擷取成功時才會計時關閉)
擷取模式關閉
30 秒
擷取模式開啟
休眠模式設定
5 秒
開啟
擷取成功
關閉
2-26
返回到‘更改增強型觸發信號過濾設定
’
新設定完成
Page 86

RTS – RMI-Q 配對
擷取模式
擷取模式關閉
開啟 RMI-Q
系統狀態指示燈
RMI-Q 在擷取模式下,無測
頭佔用。
系統狀態指示燈
或
3 3
< 4 秒
RMI-Q 在擷取模式下,有測
頭佔用。
偏壓測針即可選擇「擷取模式開
啟」。確認此操作必須在 RMI-Q
3
系統狀態指示燈閃爍綠燈的 60 秒
內完成。
2-27
Page 87

RTS – RMI-Q 配對
測頭狀態 LED 指示燈
測頭狀態 LED 指示燈
擷取模式順利完成
持續顯示 20 秒
註: 準備與多至四個 RTS/RMP
進行配對時,請參閱 RMI 安裝指南
(H-5687-8504)。
2-28
擷取等待中
3
新配對的 RTS 已獲得
持續顯示 5 秒
> 20 秒
系統狀態指示燈
8
系統狀態指示燈
擷取等待中
系統狀態指示燈
或
RTS 已離開位置
測頭處於待命狀態,系統可以
開始工作。
3
Page 88

2
> 5秒
检查测头设定
LED检查
1
8
增强型触发滤波器设定
关
3
或
开
指示灯定义
LED短闪烁
LED长闪烁
休眠模式设定
30秒
电池电压正常
或
5秒
电池状态
或
测头处于待机模式
或
电池电压低
关
2-29
Page 89

测头置于配置模式
LED检查
1
3
> 5秒
2-30
2
3
指示灯定义
LED短闪烁
LED长闪烁
触发测针小于4秒,移至下一
菜单选项。
触发测针大于4秒,移至下一
级菜单。
要退出,请保持不接触测针
20秒以上。
使测针保持触发状态,直到检查步骤结束
时显示电池状态为止。
电池状态
电池电压正常
要更改增强型触发滤波器设定,
小心:在配置模式下请勿取下电池。要退出,
!
请保持不接触测针20秒以上。
或
请转至下一页
电池电压低
Page 90

更改测头设定
增强型触发滤波器设定
关
配对模式(仅在配对成功时执行延时关闭)
配对模式关闭 配对模式开启 配对成功
休眠模式设定
30秒
5秒
开
关
返回“增强型触发滤波器”
新设定完成
2-31
Page 91

RTS - RMI-Q配对
配对模式
配对模式关闭
接通RMI-Q
2-32
系统状态LED指示灯
RMI-Q处于配对模式,
此位置无测头
系统状态LED指示灯
或
3 3
< 4秒
RMI-Q处于配对模式,
此位置有测头
触发测针,选择“配对模式开启”。
确保此步骤在RMI-Q系统状态LED
3
指示灯绿灯闪烁60秒之内完成。
Page 92

RTS - RMI-Q配对
测头状态LED指示灯
等待配对
测头状态LED指示灯
配对成功
显示持续20秒。
注:对4个RTS/RMP进行配对时,
请参阅RMI-Q安装指南
(H-5687-8514)。
3
系统状态LED指示灯
> 20秒
RTS获得新配对
显示持续5秒。
8
系统状态LED指示灯
等待配对
系统状态LED指示灯
或
RTS从此位置清除
测头处于待机状态,
系统准备就绪可以使用。
3
2-33
Page 93

2
> 5초
프로브 설정 검토
LED 점검
1
8
개선된 트리거 필터 설정
끄기
3
또는
켜기
2-34
기호 설명
LED가 짧게 깜박임
LED가 길게 깜박임
절전 모드 설정
30초
배터리 양호
또는
5초
배터리 상태
또는
프로브 대기 모드
또는
배터리 용량 부족
끄기
Page 94

구성 모드에서 프로브 LED 순서
2
> 5초
1
3
기호 설명
LED가 짧게 깜박임
LED가 길게 깜박임
다음 메뉴 옵션으로
이동하기 위해 4초 미만 동안
스타일러스를 구부리십시오
다음 메뉴로 이동하기 위해
4초 이상 스타일러스를
구부리십시오
종료하려면 스타일러스를 20초
이상 가만히 놓아 두십시오.
LED 점검
스타일러스를 편향시키고 검토 절차가 끝나면서 배터리 상태가
표시될 때까지 스타일러스가 편향된 상태를 유지합니다
배터리 양호
향상된 트리거 필터 설정을 변경하려면,
다음 페이지로 이동하십시오.
경고: 설정모드인 중에는 배터리를
!
제거하지마십시오.종료하려면 스타일러스를
20초 이상 가만히 놓아 두십시오.
배터리 상태
또는
3
배터리 용량 부족
2-35
Page 95

프로브 설정 변경
향상된 트리거 필터 설정을 변경하려면
OFF
설정 모드 (설정완료 시 시간종료만)
설정 모드 끄기
30초
설정 모드 켜기 설정 모드 완료
절전 모드 설정
5초 OFF
ON
2-36
‘향상된 트리거 필터 설정을 변경하려면’
으로 돌아가기
새로운 설정 완료
Page 96

RTS - RMI-Q 파트너쉽
설정 모드
설정 모드 끄기
RMI-Q 스위치 켜기
상태 표시 LED
프로브가 설치 안된 상태에서
RMI-Q 설정모드
상태 표시 LED
또는
3 3
< 4초
프로브가 모두설치 된 상태
에서 RMI-Q 설정모드
“설정 모드 켜기” 선택을 위해
스타일러스를 구부립니다. RMI-Q
3
의 녹색 LED의 깜빡임이 60초
이내에 종료됨을 확인합니다.
2-37
Page 97

RTS - RMI-Q 파트너쉽
프로브 상태 LED
설정 진행중
프로브 상태 LED
설정 완료
20초동안 표시된다.
주: 4가지 RTS/RMPs과 연결 시
RMI-Q 설치 안내서(H-5687-8504)를
참조하십시오.
2-38
3
상태 표시 LED
새로운 파트너 RTS
설정됨
5초동안 표시 된다.
8
> 20초
상태 표시 LED
설정 진행중
상태 표시 LED
또는
RTS범위에서 벗어남
프로브가 대기 중이며
시스템을 사용할 준비가 된
상태입니다.
3
Page 98

Montowanie sondy na stole obrabiarki
將測頭固定在機器工作臺上
Montáž sondy na stůl stroje
Монтаж датчика на столе станка
1
V
将测头固定在机床工作台上
기계 테이블에 프로브 장착
V
Śruba M10/M12 i nakrętka teowa –
dostarcza użytkownik
Šroub M10/M12 a T-matice – dodá uživatel
Болт M10/M12 и T-образная гайка не
входят в комплект поставки
M10/M12 螺栓和T型槽螺帽 — 使用者自備
M10/M12螺栓和T形拉块 — 用户自备
M10/M12 볼트 및 T 너트 - 사용자가
준비해야 함
2-39
Page 99

2
1,1 Nm
× 4
3
1,1 Nm
× 2
2-40
Page 100

Ustawienie trzpienia
pomiarowego
Nastavení doteku
Выставление щупа
1
1,1 Nm
x 2
測針調整
测针调整
스타일리 조정
2-41
 Loading...