

Renishaw RENGAGE RMP400 Quick Start Manual
Quick-start guide
H-6570-8500-01-A
RMP400
English (EN)
Deutsch (DE)
Español (ES)
Français (FR)
Italiano (IT)
日本語 (JA)
Polski (PL)
Česky (CS)
Русский (RU)
中文(繁體)(ZH-TW)
中文 (简体) (ZH)
한국어 (KO)
1
2

Issued: 11.2018
EN
Publications for this product are available by visiting www.renishaw.com/rmp400 .
DE
Weitere Informationen zu diesem Produkt sind unter folgendem Link
www.renishaw.de/rmp400 abrufbar.
ES
Las publicaciones para este producto están disponibles a través de
www.renishaw.es/rmp400 .
FR
Les documentations pour ce produit sont disponibles en visitant le site
www.renishaw.fr/rmp400 .
IT
La documentazione per questo prodotto è disponibile visitando il sito
www.renishaw.it/rmp400 .
日本語
本製品に関する資料は、www.renishaw.jp/rmp400 からダウンロードいただけます
PL
Publikacje dotyczące tego produktu są dostępne w witrynie www.renishaw.pl/rmp400 .
CS
Dokumentaci k produktu najdete na www.renishaw.cz/rmp400 .
RU
Документация по данному изделию доступна на сайте
www.renishaw.ru/rmp400 .
中文
(繁體)
請訪問雷尼紹網站以獲得此產品的的相關文件檔案: www.renishaw.com.tw/rmp400 。
中文
(简体)
请访问雷尼绍网站以获得此产品的相关文档:www.renishaw.com.cn/rmp400 。
한국어
이 제품의 관련 자료는 www.renishaw.co.kr/rmp400에서 확인 가능 합니다.
1
2


1-1
English (EN)
Deutsch (DE)
Español (ES)
Français (FR)
Italiano (IT)
日本語 (JA)
1

1-2
1-3
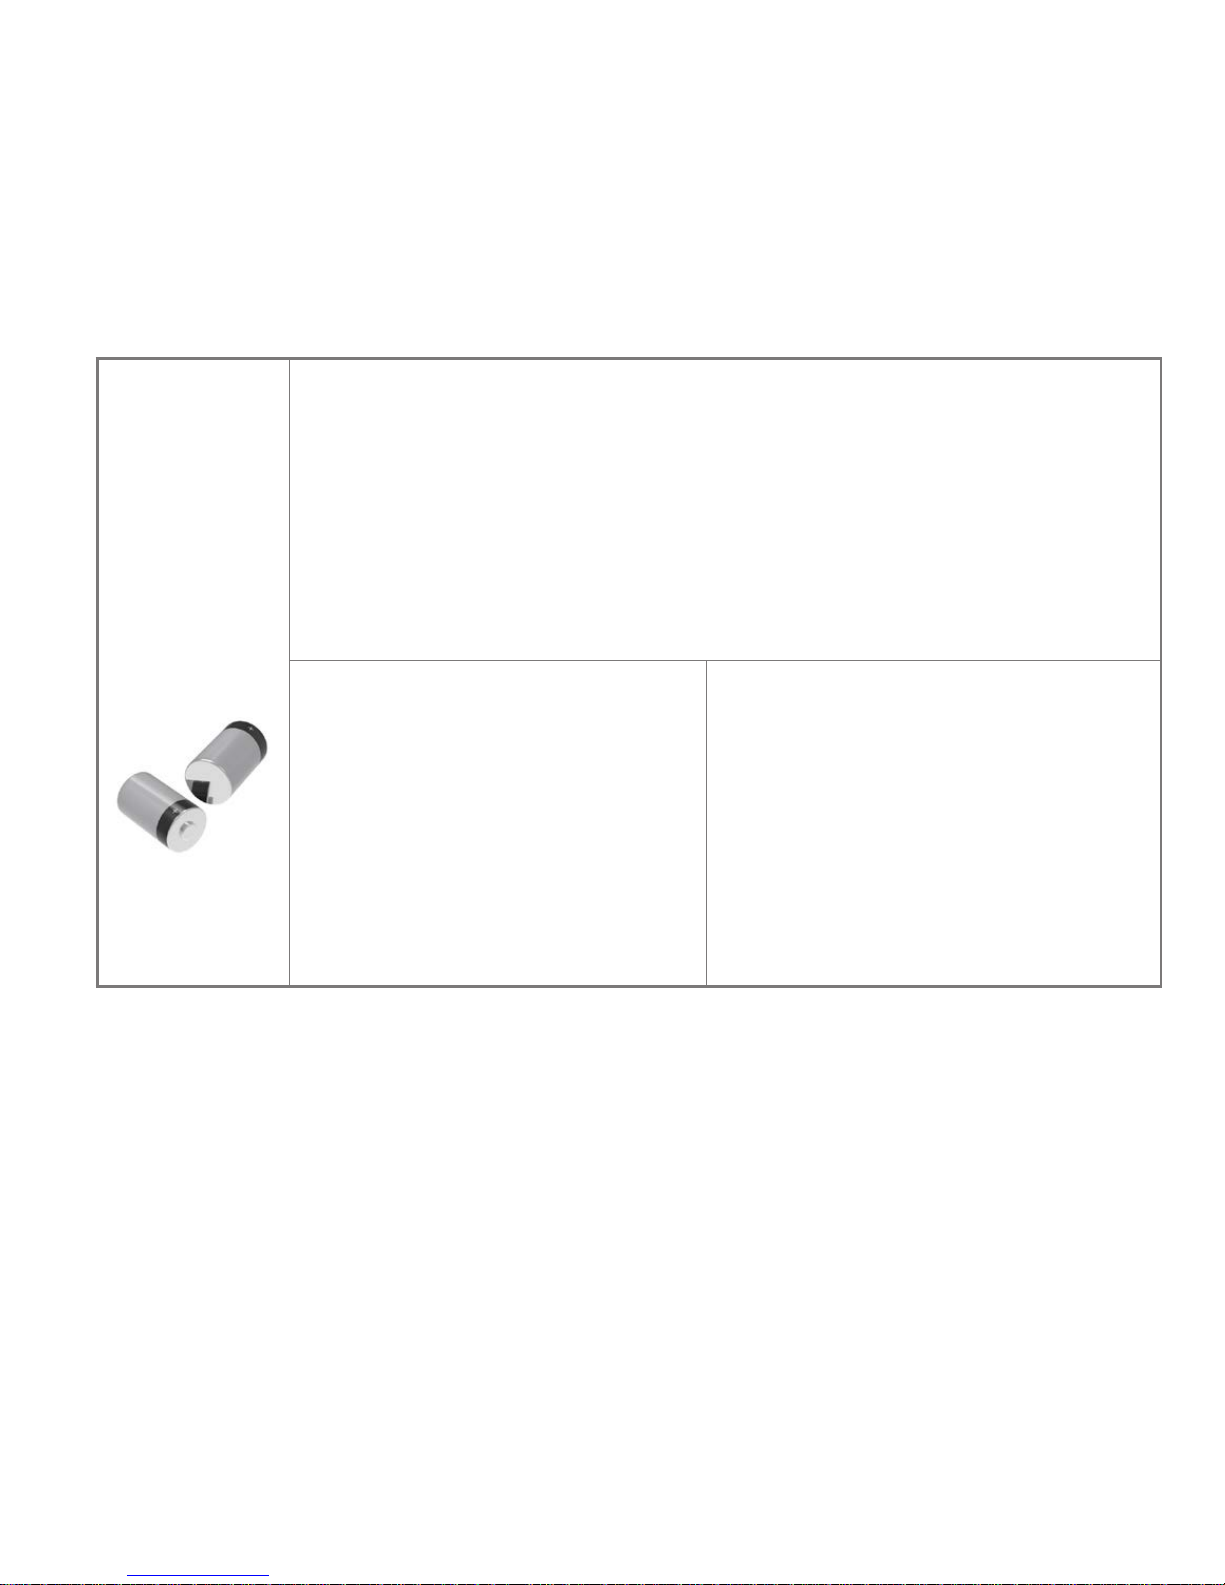
Batteries
Batterien
Baterías
Piles
Batterie
電池
½ AA (3.6 V) lithium-thionyl chloride × 2
½ AA (3,6 V) Lithium-Thionylchlorid × 2
2 × Litio-cloruro de tionilo de tamaño ½ AA (3,6 V)
2 piles ½ AA lithium-chlorure de thionyle (3,6 V)
Litio cloruro di tionile ½ AA (3,6 V) × 2
½AA サイズの塩化チオニル・リチウム電池 (3.6 V) × 2 本
Ecocel
Saft
Tadiran
Xeno
EB 1426
LS 14250
SL-750
XL-050F
Dubilier
Maxell
Sanyo
Tadiran
Varta
SB-AA02
ER3S
CR 14250 SE
SL-350, SL-550,
TL-4902, TL-5902,
TL-2150, TL-5101
CR ½ AA
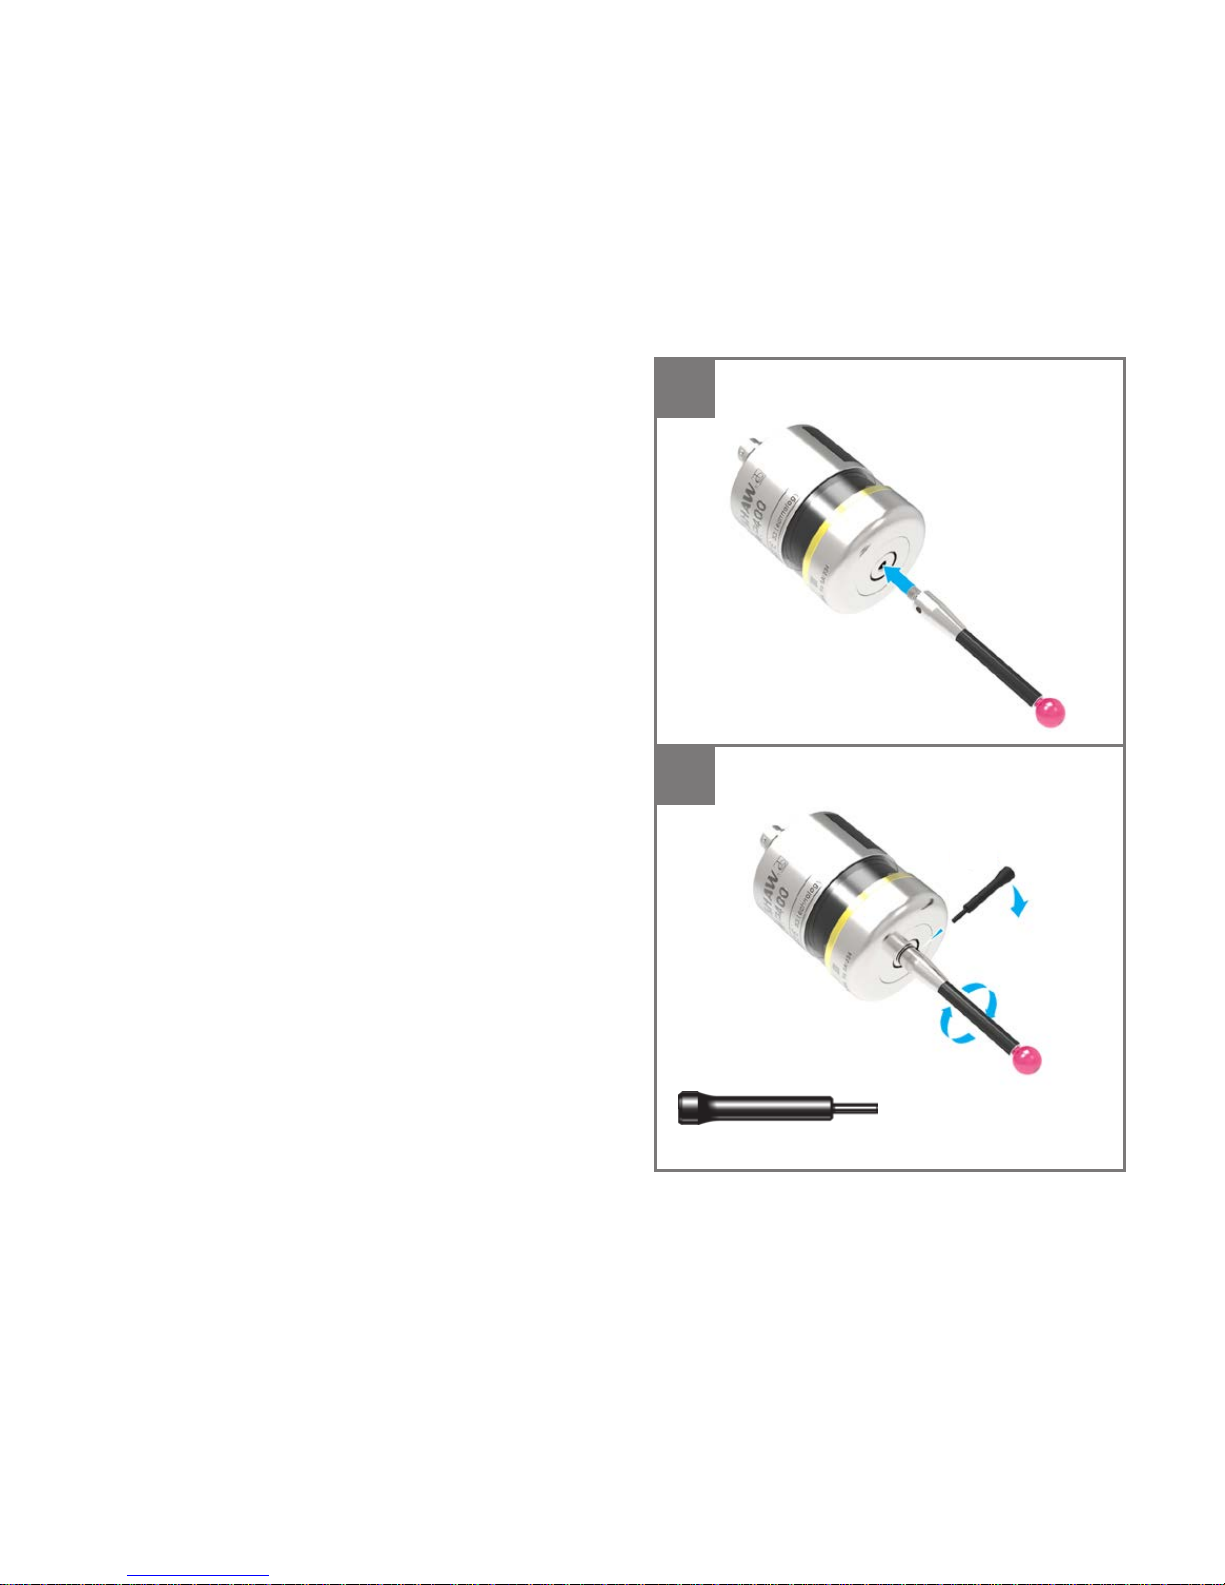
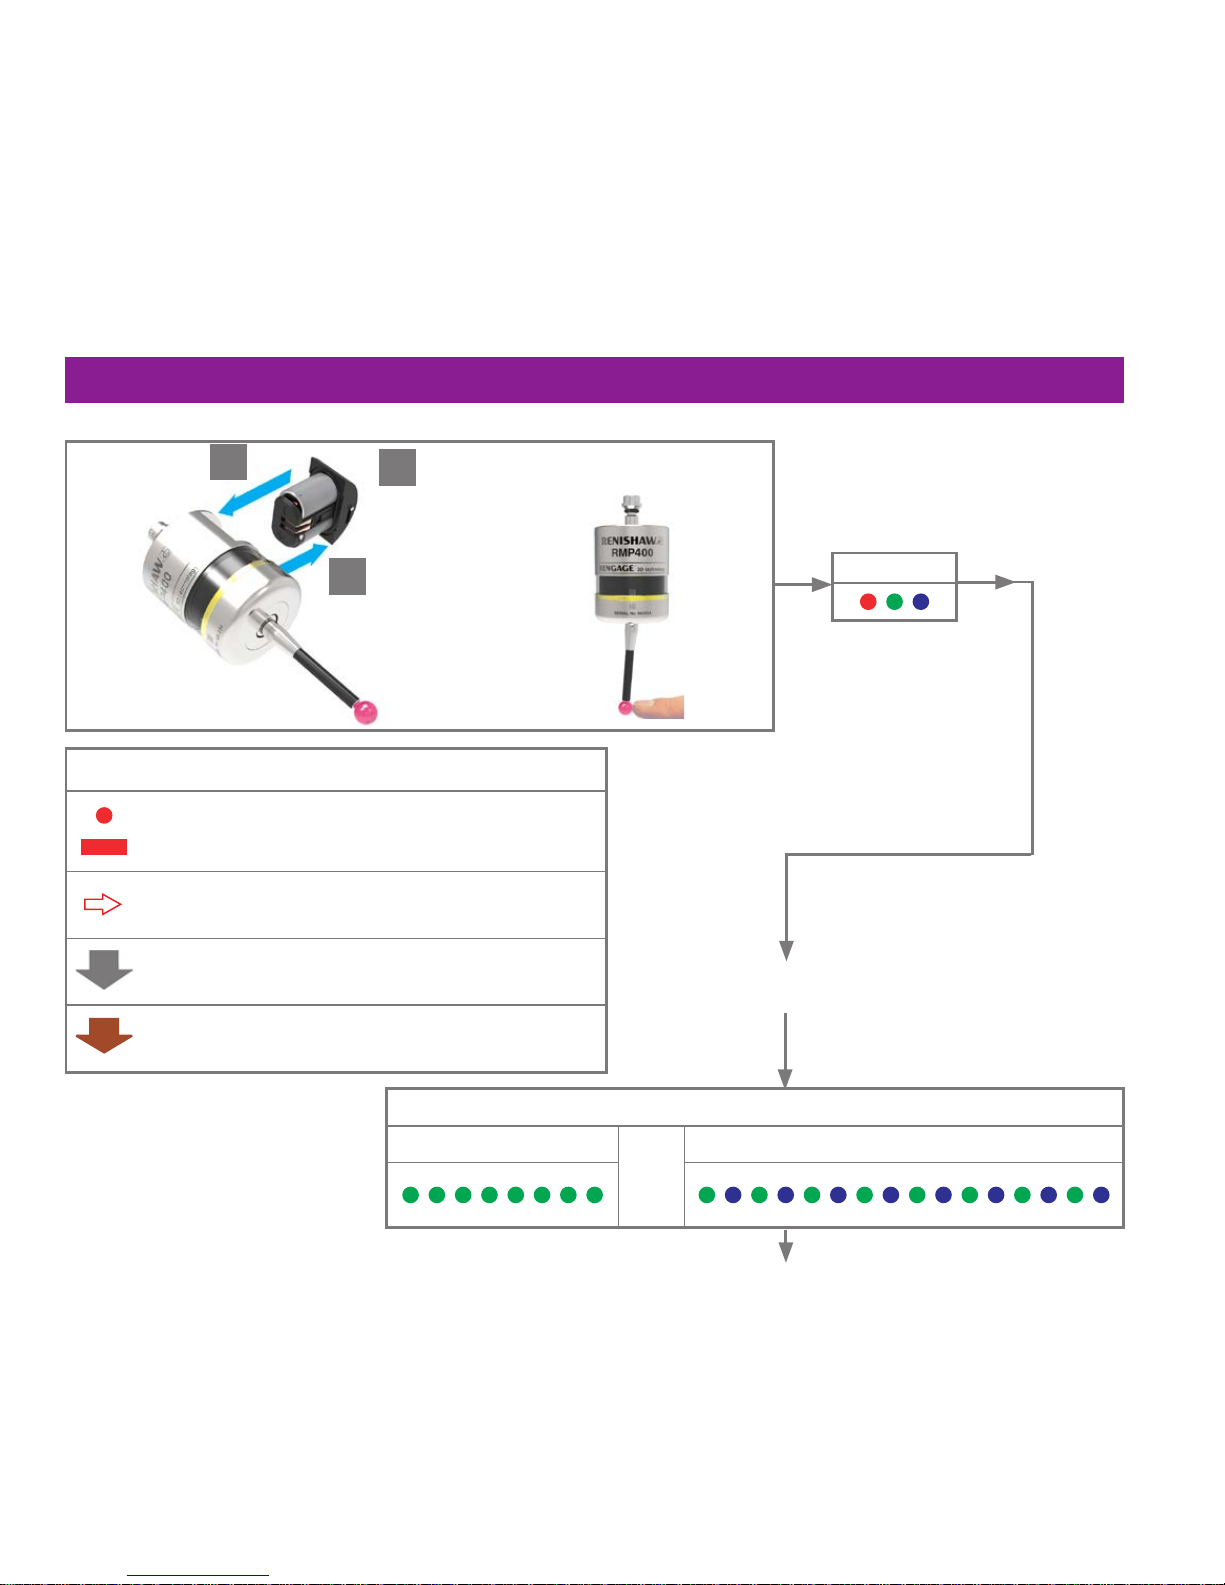
1-4
Fitting the stylus
Montage des Tastereinsatzes
Colocación del palpador
Montage du stylet
Installazione dello stilo
スタイラスの取付け
2
1
M-5000-3707
1,8Nm – 2,2Nm
(1.3lbf.ft – 1.6lbf.ft)
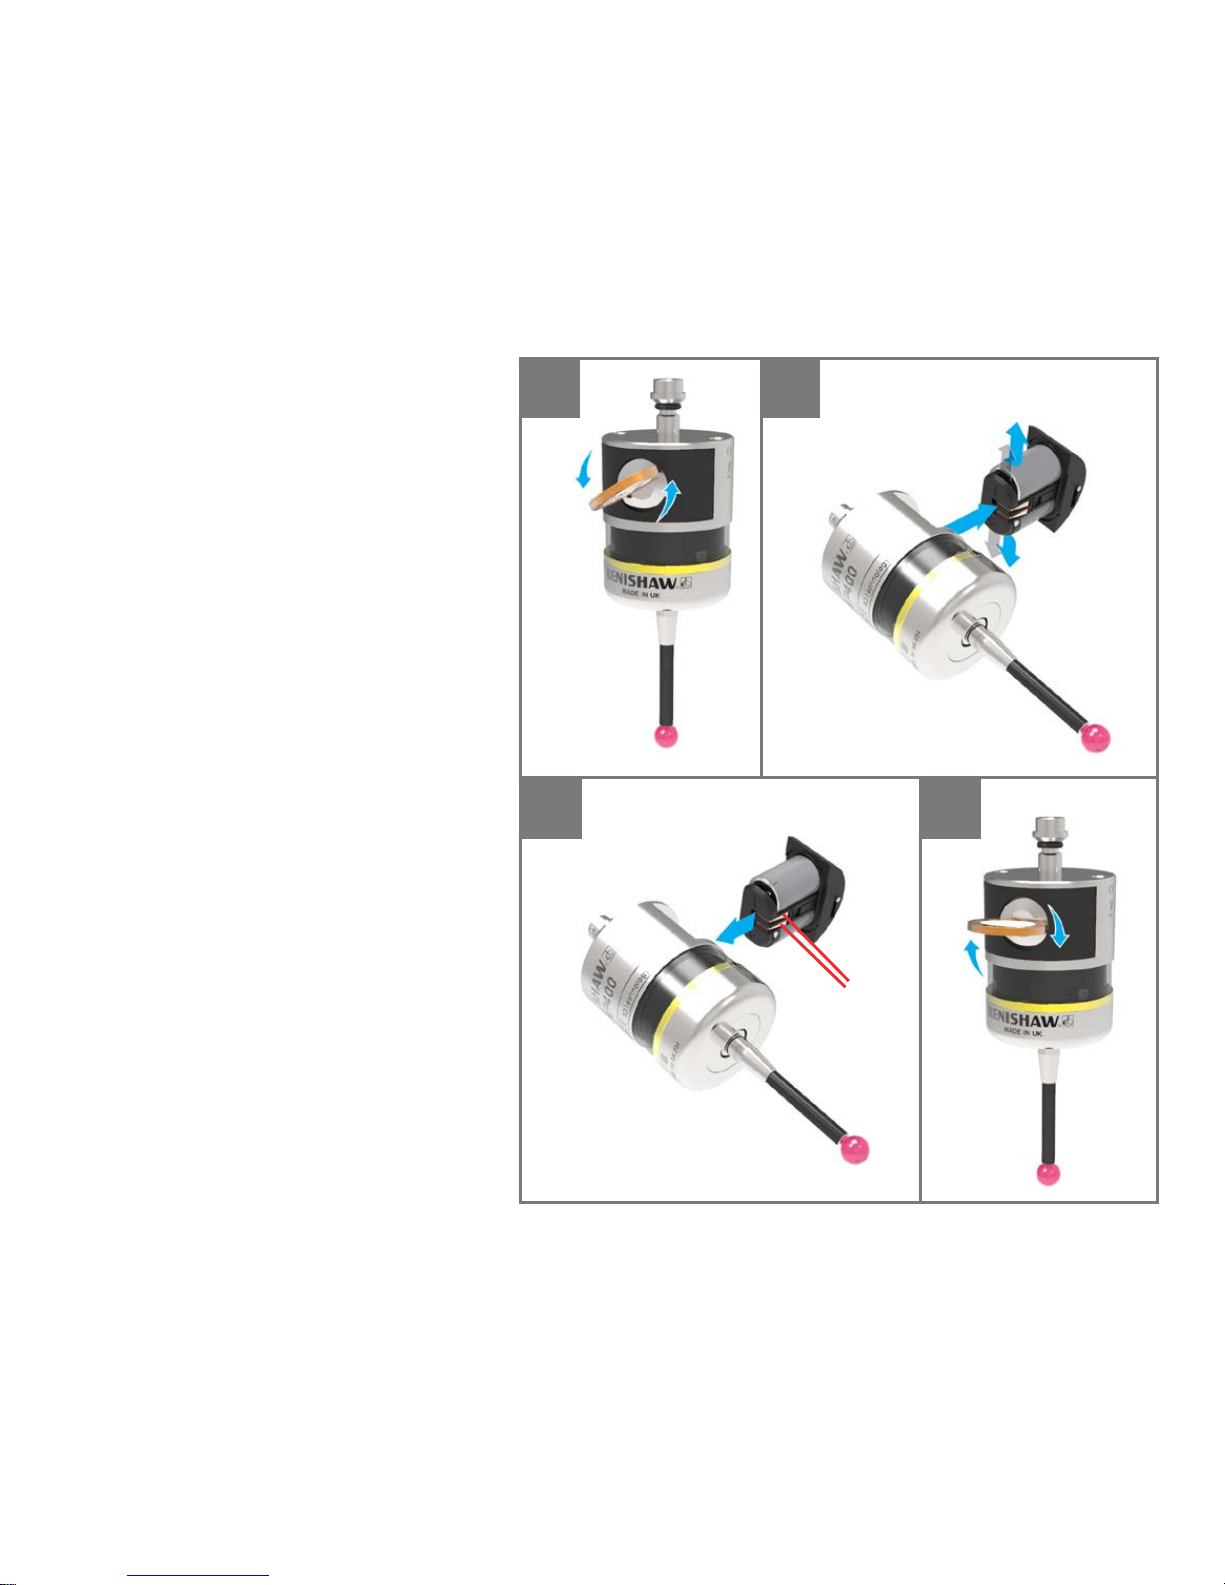
1-5
¬
3
4
1
2
Attention
Please remove the battery isolation device
from the battery compartment before use.
¬ Take care not to short the battery contacts.
Achtung
Bitte vor Gebrauch die Batterie-Isolierung
aus dem Batteriefach entfernen.
¬ Die Batteriekontakte dürfen nicht
kurzgeschlossen werden.
Atención
Por favor, retire el dispositivo de aislamiento
de las baterías del compartimento de las
mismas antes del uso.
¬ Tenga cuidado para no hacer cortocircuito
en los contactos de la batería.
Attention
Merci d’enlever le dispositif d’isolement de
la pile du compartiment de la pile avant
utilisation.
¬ Prenez soin de ne pas mettre les piles en
court circuit.
Attenzione
Rimuovere la protezione di isolamento dal
vano batteria prima dell’uso.
¬ Fare attenzione a non cortocircuitare i
contatti della batteria.
注意
ご使用になる前に、電池ケース内から電池保護
材を取り除いてください。
¬ 電池の接点を短絡させないように気をつけ
てくだ さい 。

1-6
EN
Conguring the probe
The following sections describe the process of reviewing and conguring the probe settings. The
Trigger Logic™ app simplies this process with clear, interactive instructions and informative
videos. The app can also be used with radio probes for probe acquisition.
DE
Kongurieren des Messtasters
In den folgenden Abschnitten werden die Prüfung und Konguration der Messtastereinstellungen
beschrieben. Die Trigger Logic™ App vereinfacht den Vorgang mit deutlichen, interaktiven
Anweisungen und informativen Videos. Die App eignet sich auch für Funkmesstaster zur
Messtasterpaarung.
ES
Conguración de la sonda
Las siguientes secciones describen el proceso de revisión y conguración de los ajustes de
la sonda. La aplicación Trigger Logic™ simplica este proceso con instrucciones claras e
interactivas, así como vídeos informativos. La aplicación también se puede utilizar con sondas de
radio para su conguración.

1-7
FR
Conguration du palpeur
Les chapitres qui suivent décrivent le processus de programmation et de conguration
des paramètres de palpage. L’application Trigger Logic™ simplie le processus au travers
d’instructions claires et interactives et avec des vidéos d’information. L’application peut également
être utilisée avec des palpeurs radio à des ns d’acquisition.
IT
Congurazione della sonda
Le seguenti sezioni descrivono il processo di revisione e congurazione delle impostazioni della
sonda. L’applicazione Trigger Logic™ semplica questo processo con istruzioni chiare, interattive
e video esplicativi. L’applicazione può essere utilizzata anche per eseguire la procedura di
acquisizione dei sistemi radio.
日本語
プローブの設定
以降のセクションにて、プローブ設定の確認方法および設定方法について説明します。明瞭で対話型
の指示とわかりやすいビデオを使用した Trigger Logic™ アプリを使えば、本工程を簡よりシンプルな
ものにできます。 アプリは、無線式プローブのマッチングにも使用できます。
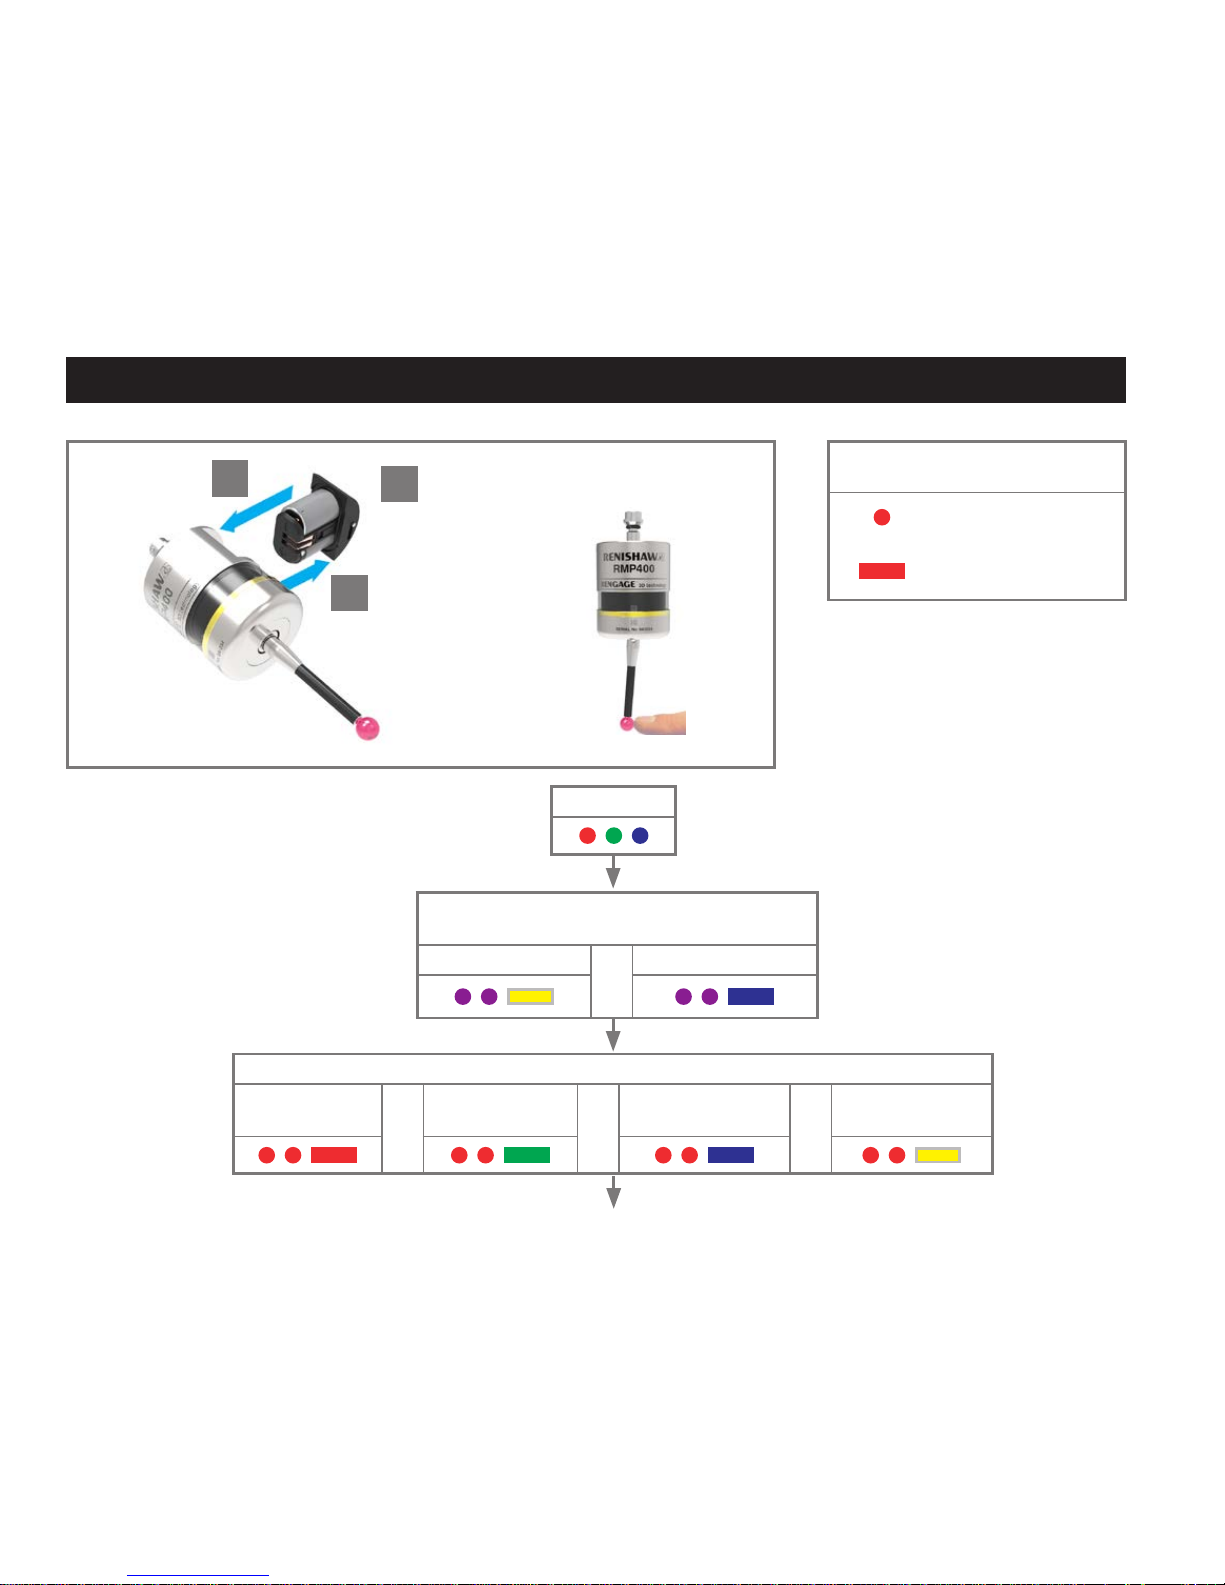
1-8
1
> 5 s
2
3
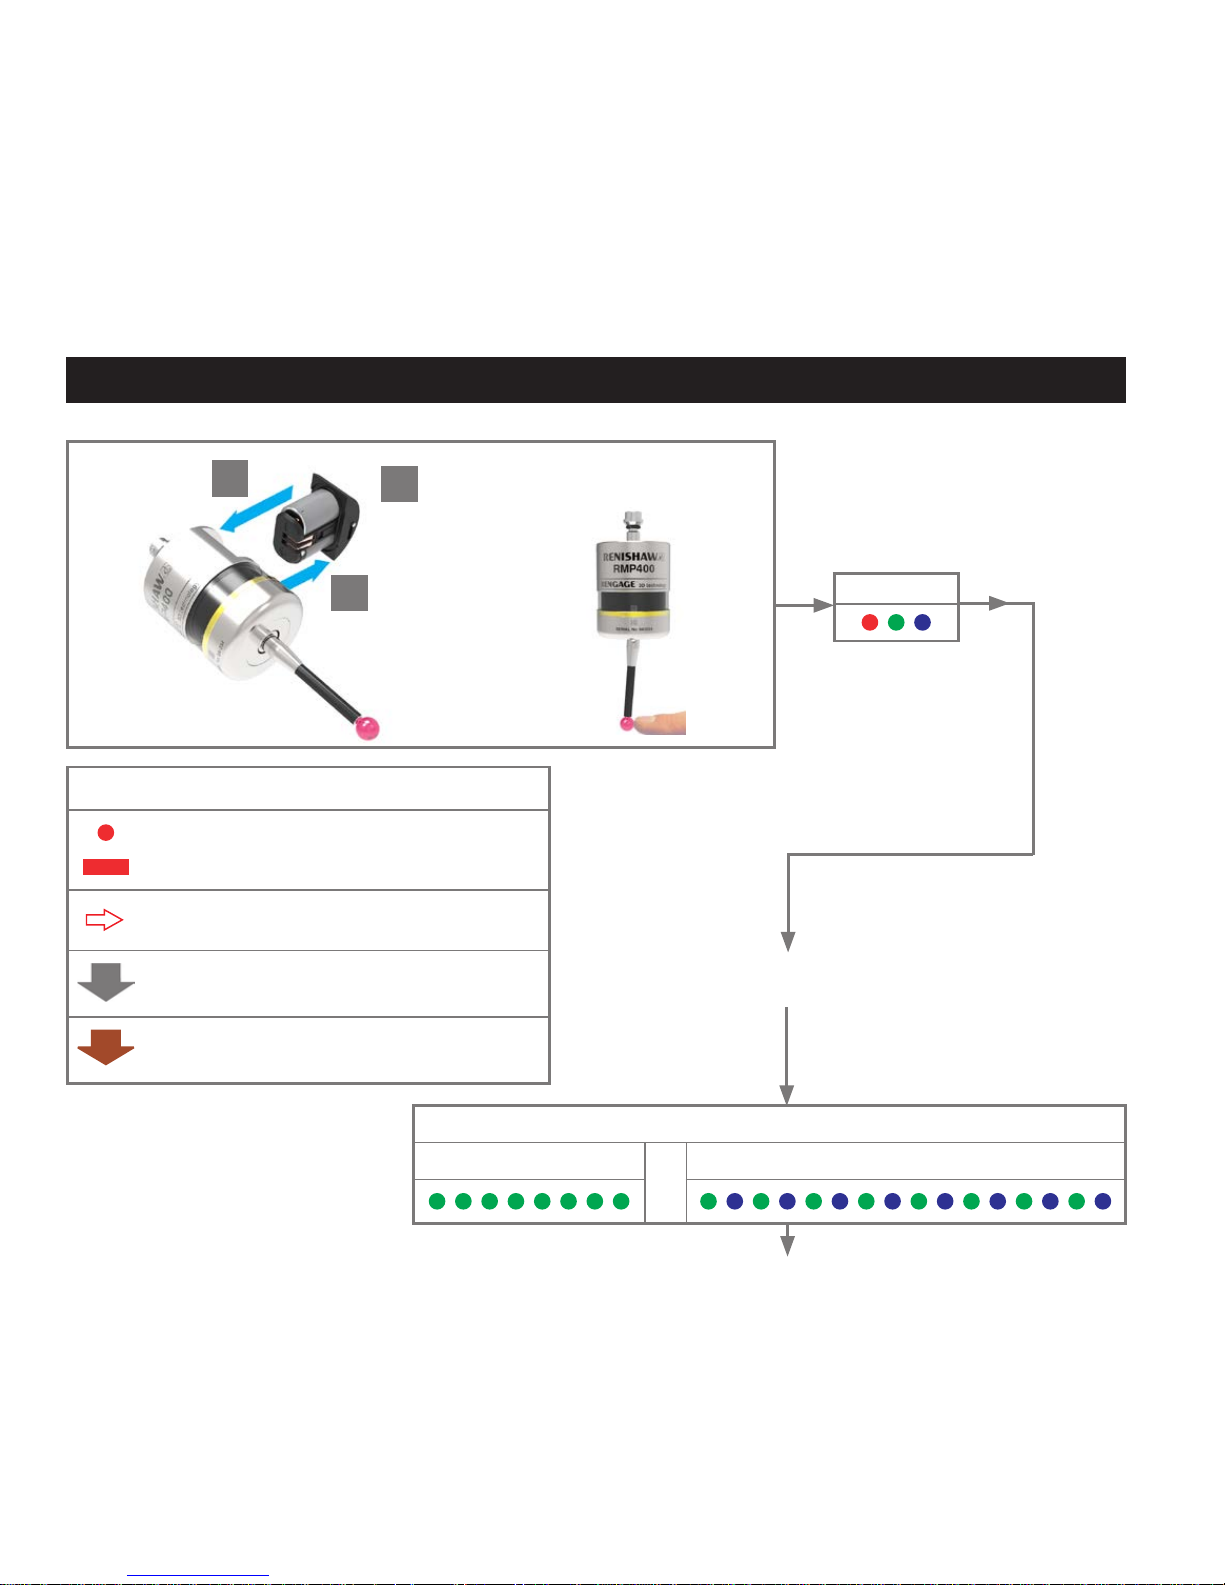
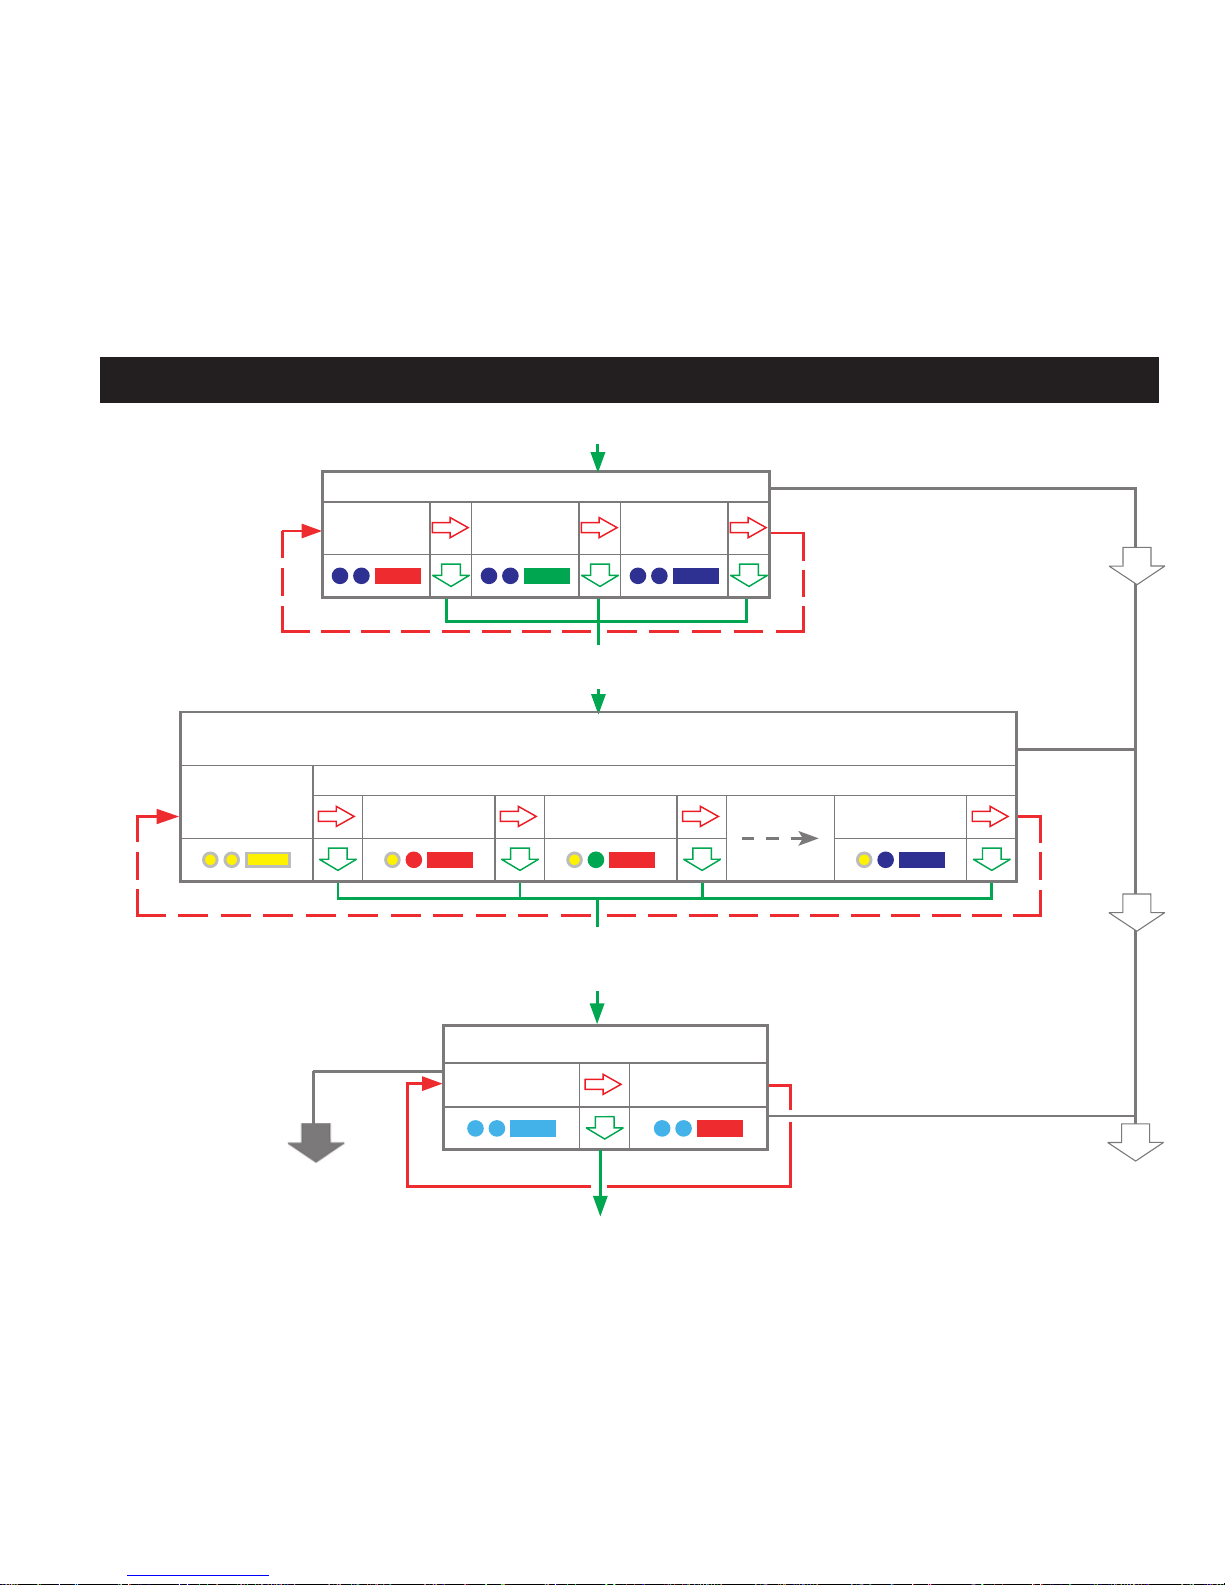
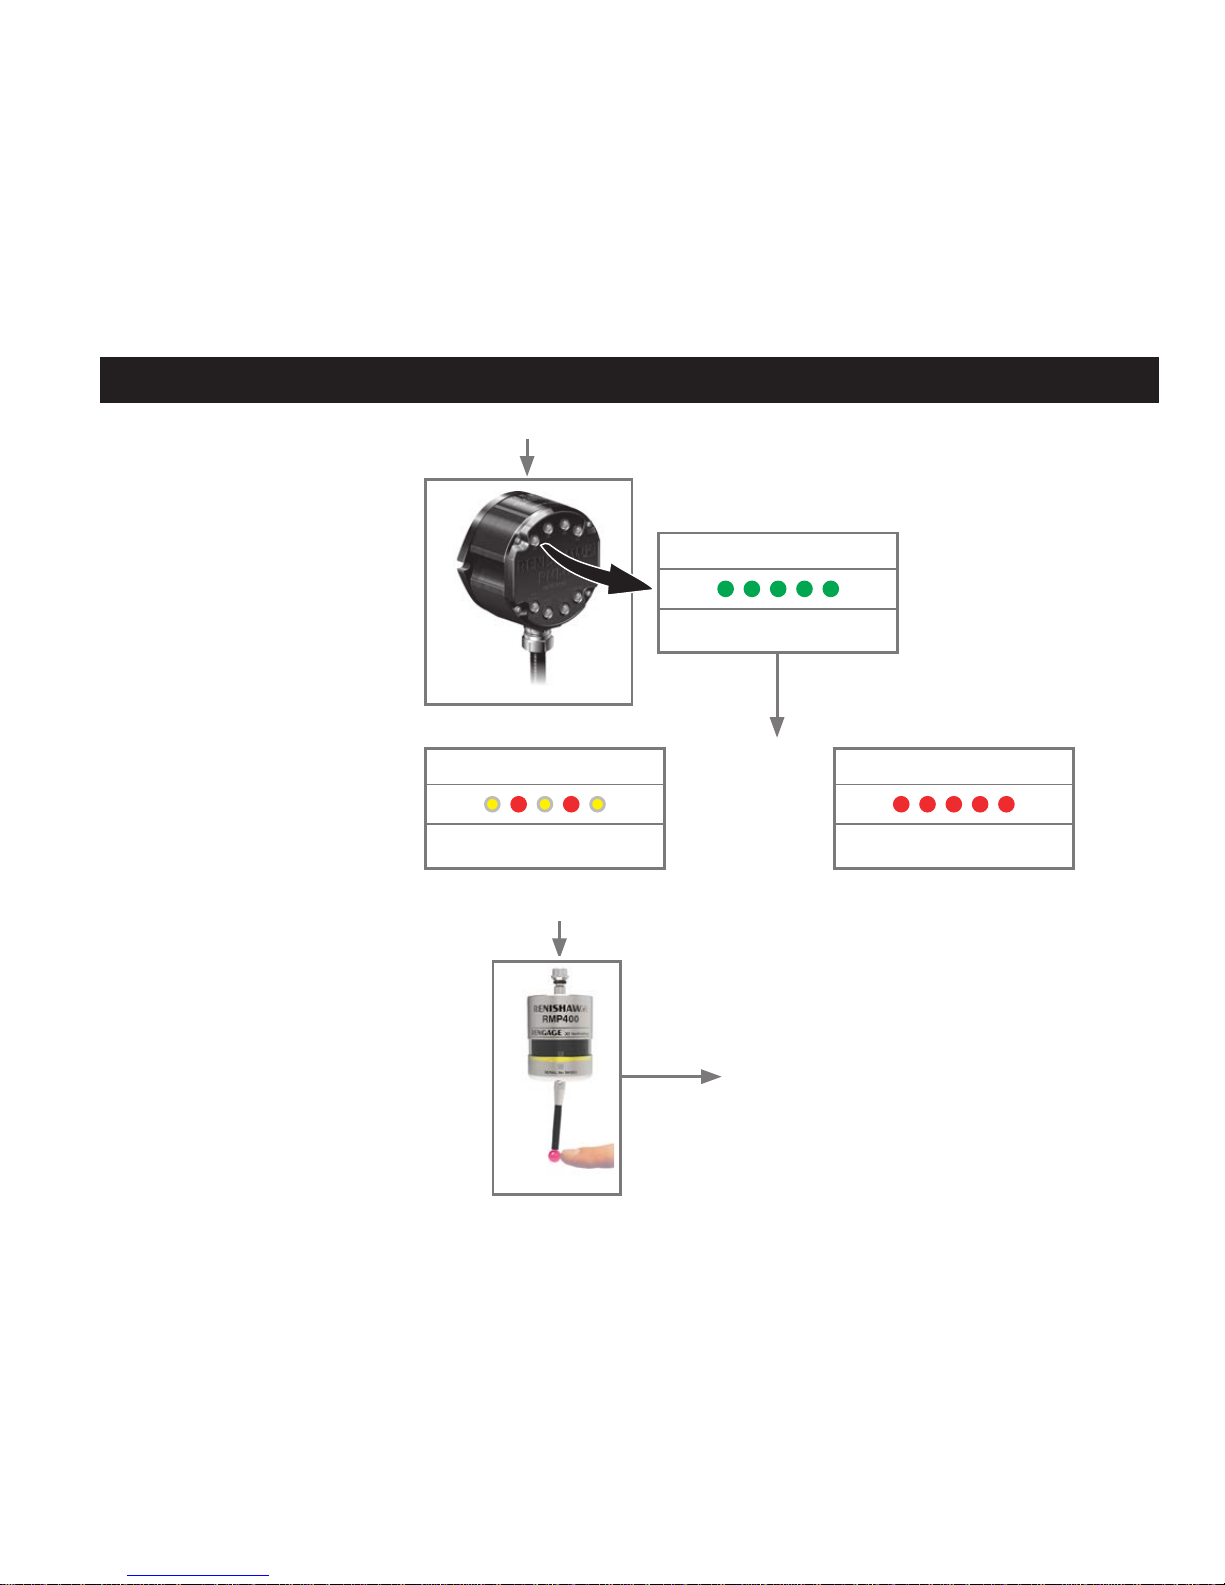
Reviewing the probe settings
Key to the symbols
LED short ash
LED long ash
Switch-off method
Radio off or
Spin off
or
Short timeout
12 s
or
Medium timeout
33 s
or
Long timeout
134 s
LED check
Switch-on method
(omitted if “Multiple probe mode” was selected)
Radio on
or
Spin on
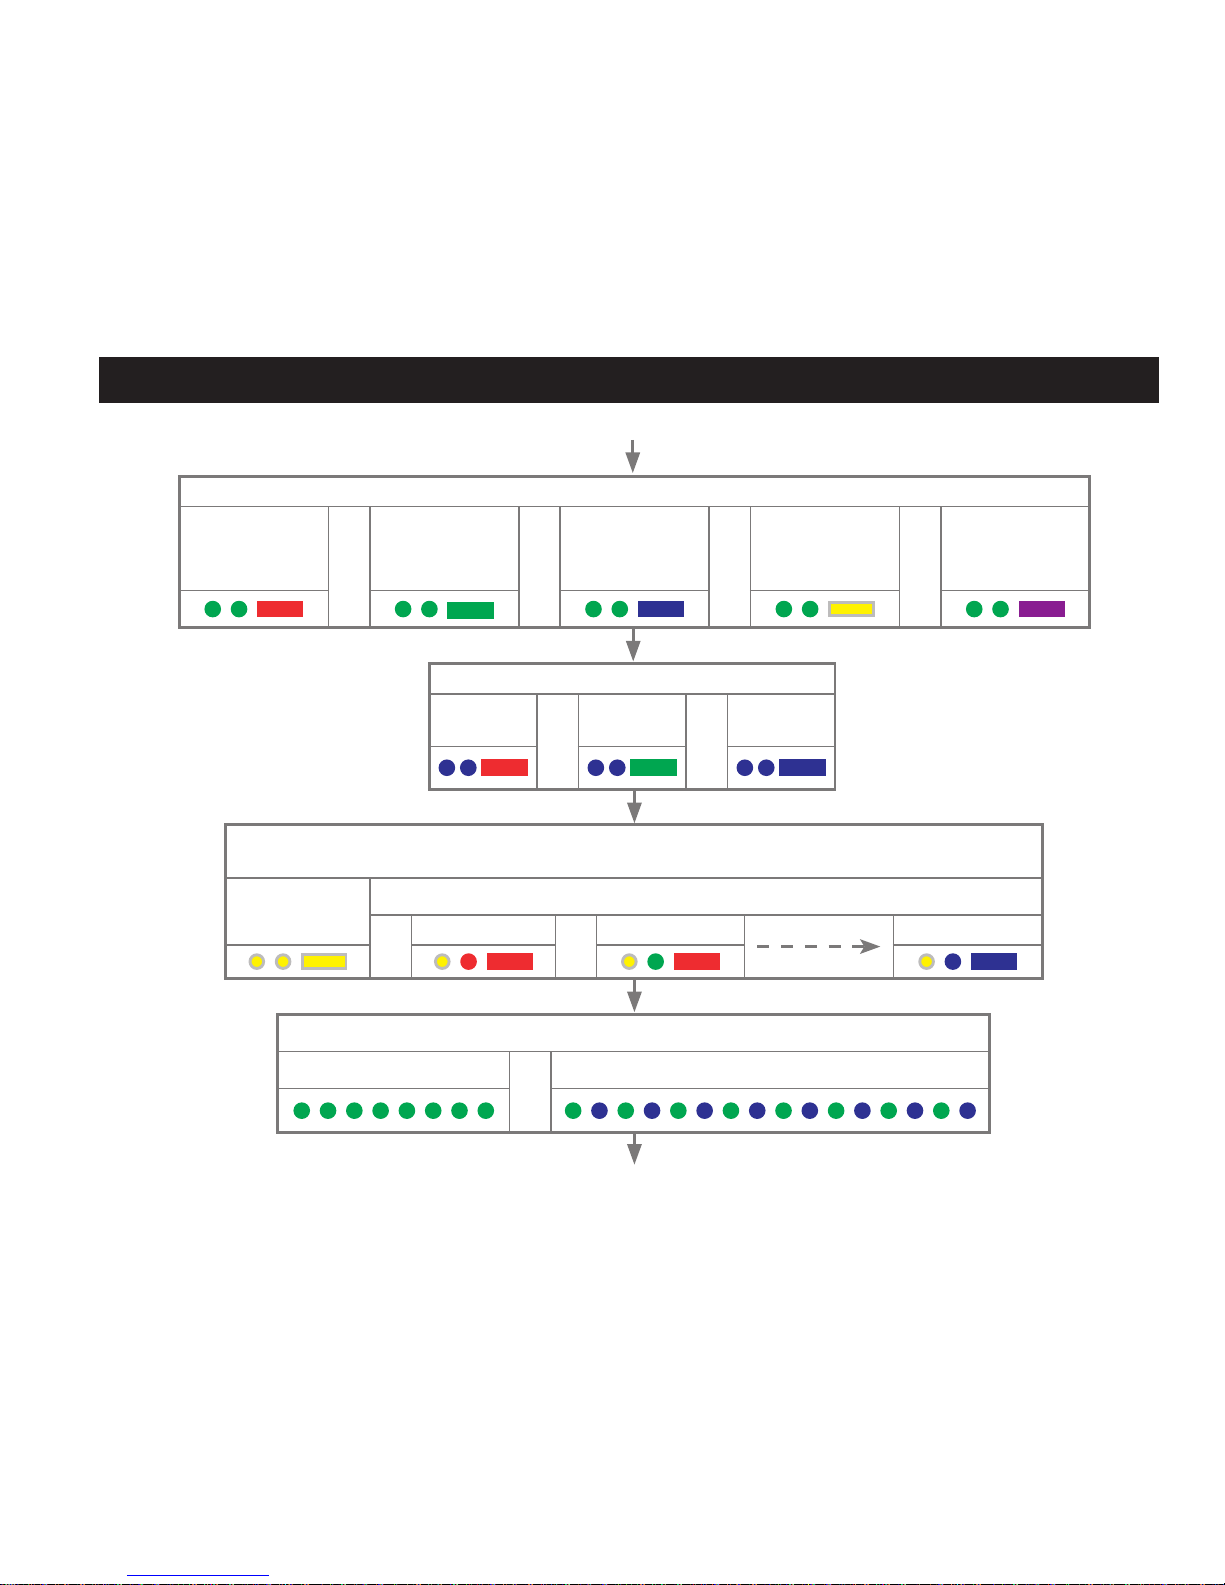
1-9
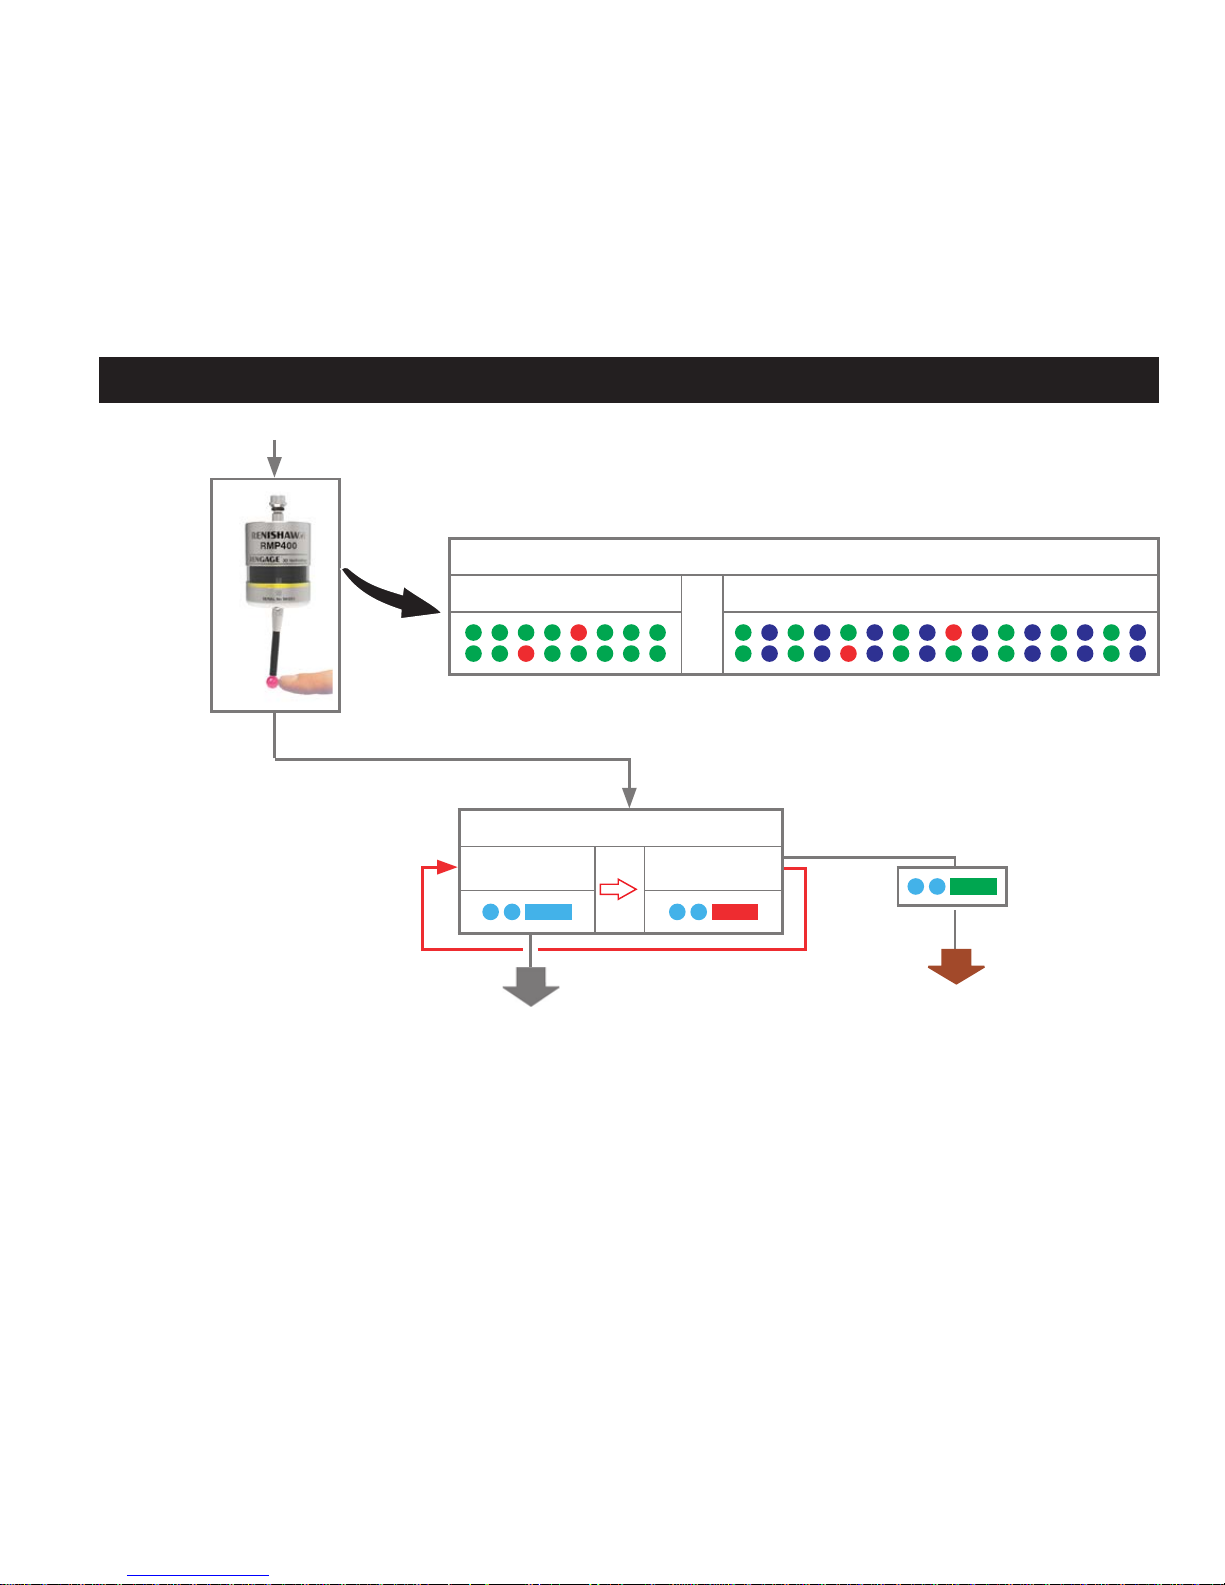
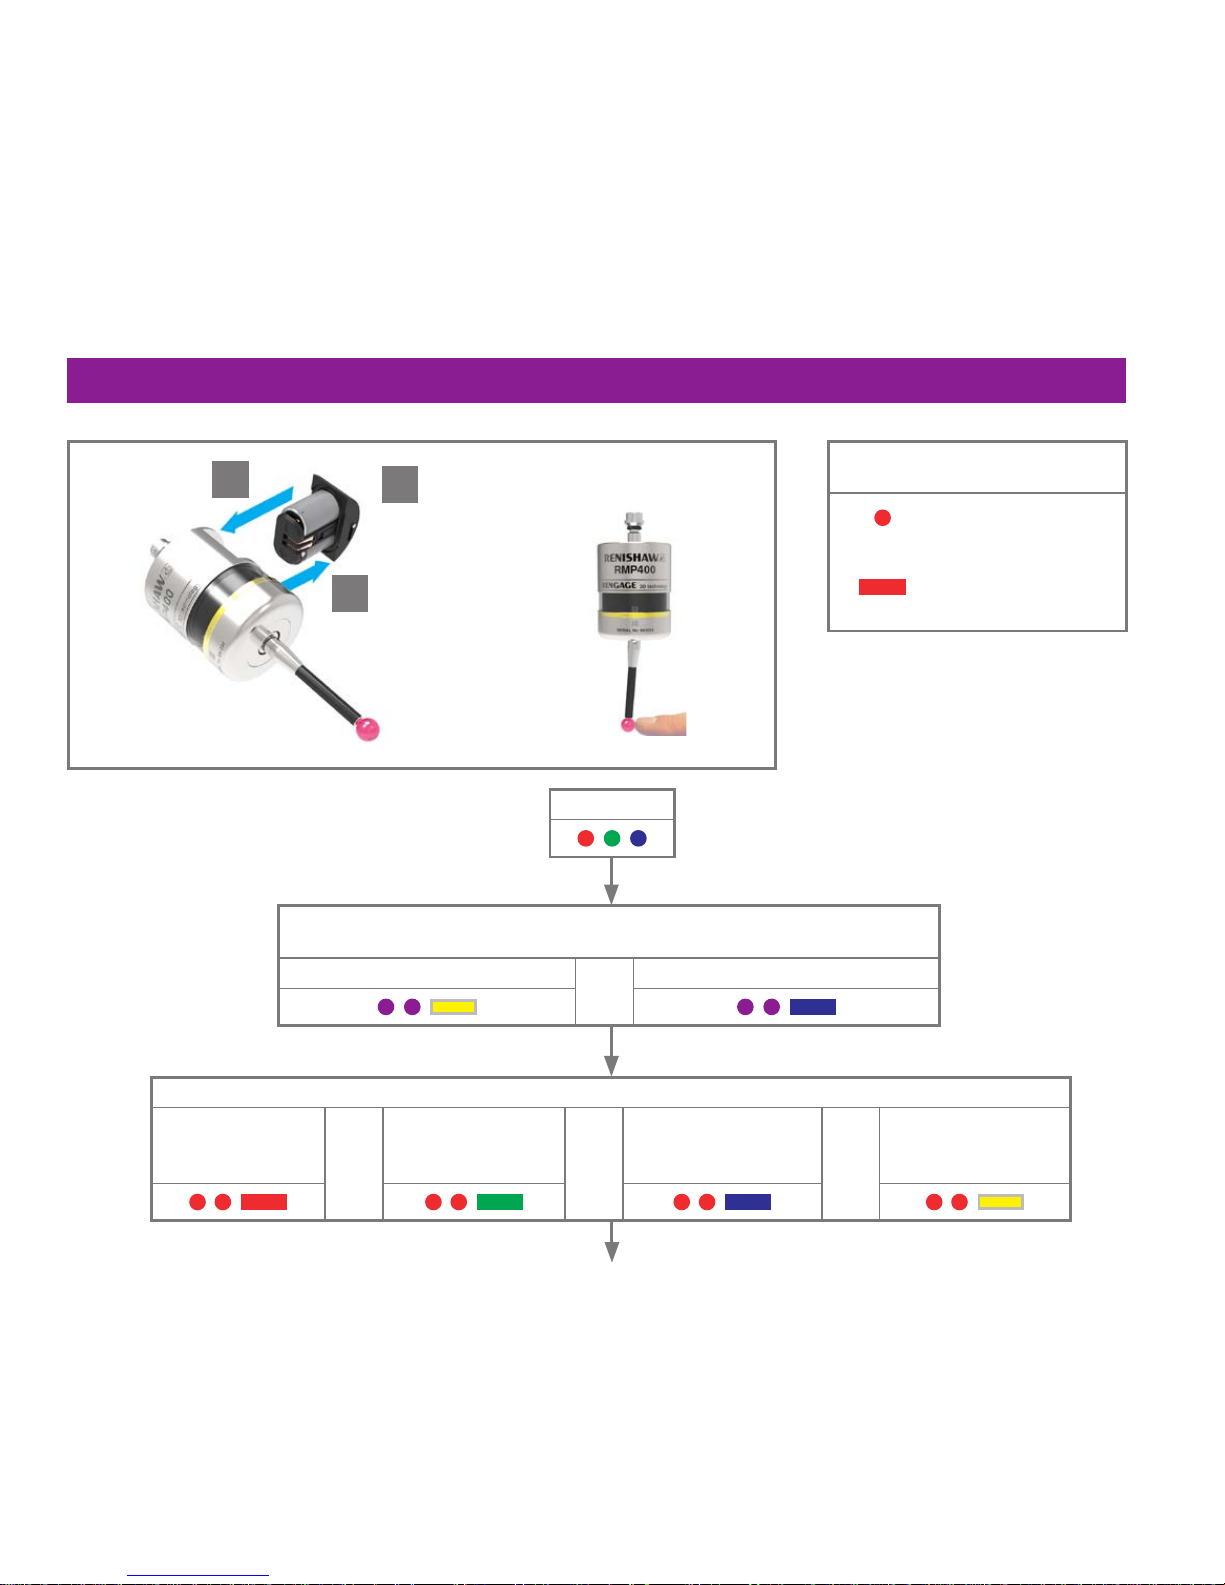
Reviewing the probe settings
Enhanced trigger lter setting and auto-reset facility
Auto reset off
Trigger lter on
8 ms
or
Auto reset off
Trigger lter on
16 ms
or
Auto reset on
Trigger lter on
8 ms
or
Auto reset on
Trigger lter on
16 ms
or
Auto reset off
Trigger lter off
Probe in standby mode (after 5 seconds)
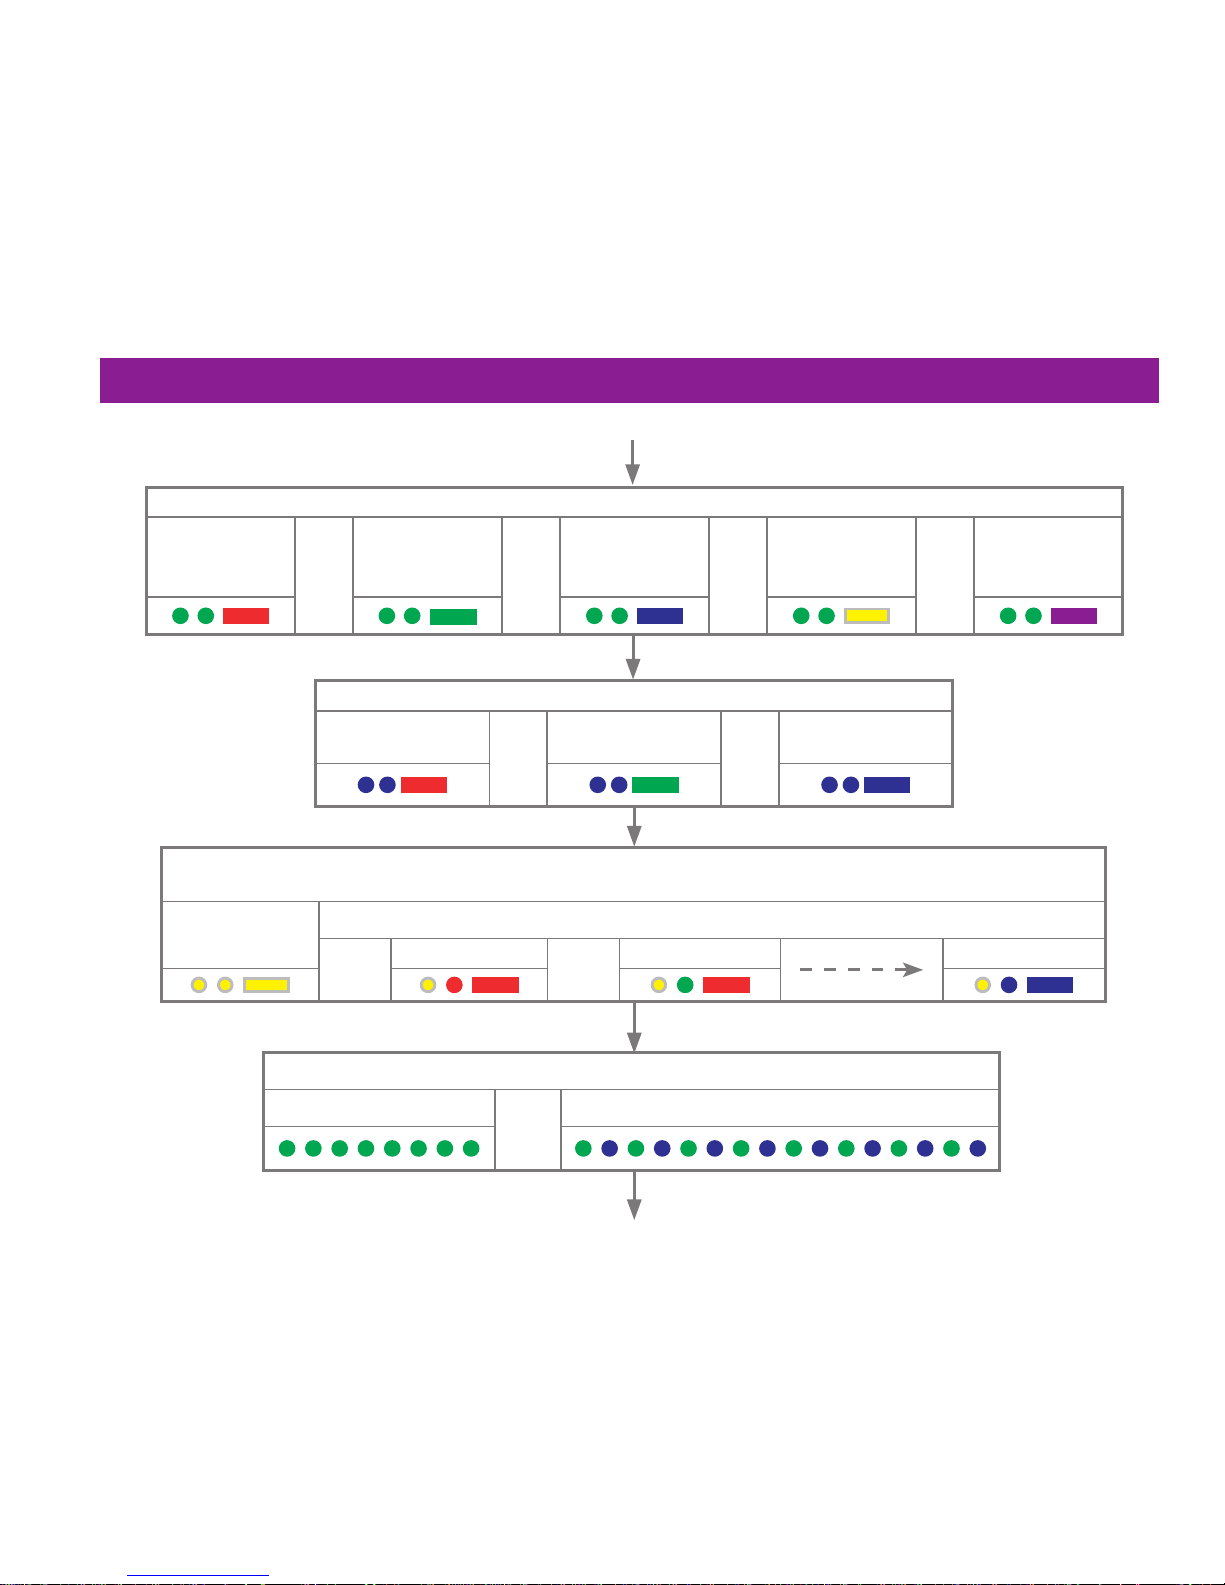
Hibernation mode setting (only for “radio on”)
On
30 s
or
On
5 s
or
Off
Multiple probe mode (omitted for “radio on”)
(see “Multiple probe mode settings” to view all 16 choices)
Mode off
Mode on
or
Machine 1
or
Machine 2 Machine 16
Battery status
Battery good
or
Battery low
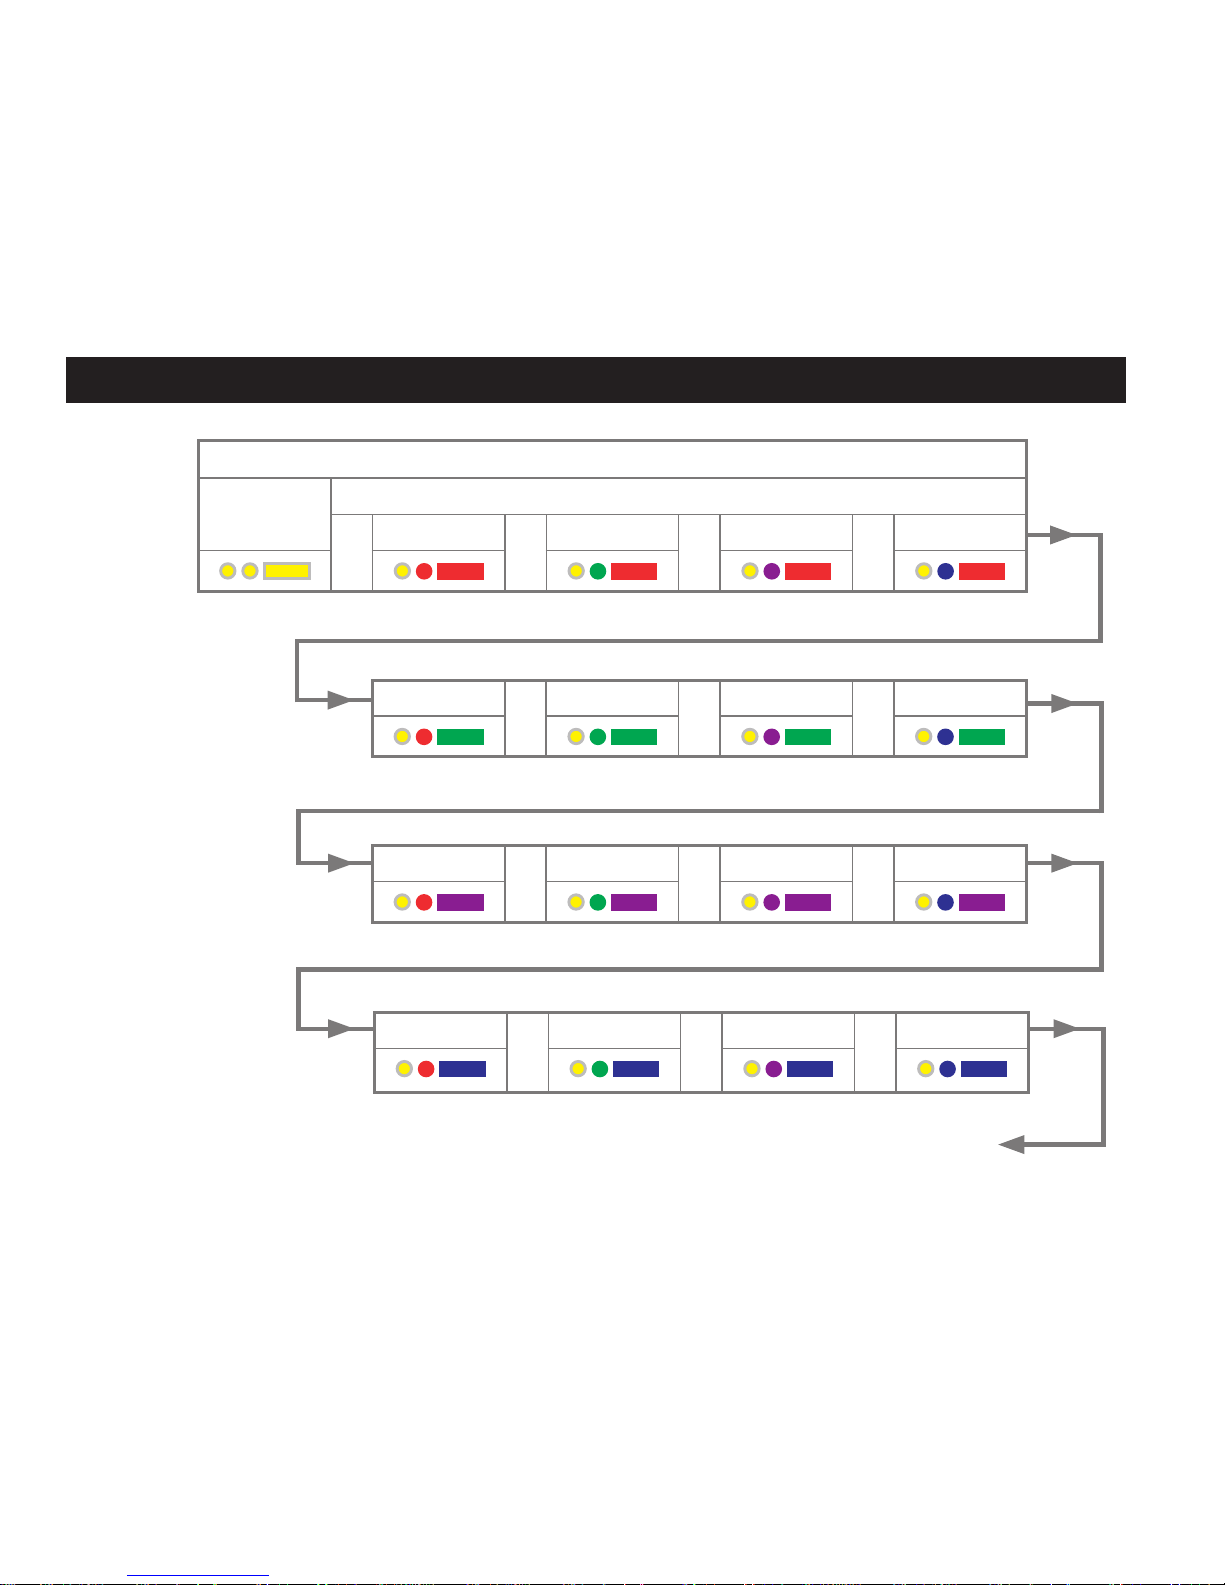
1-10
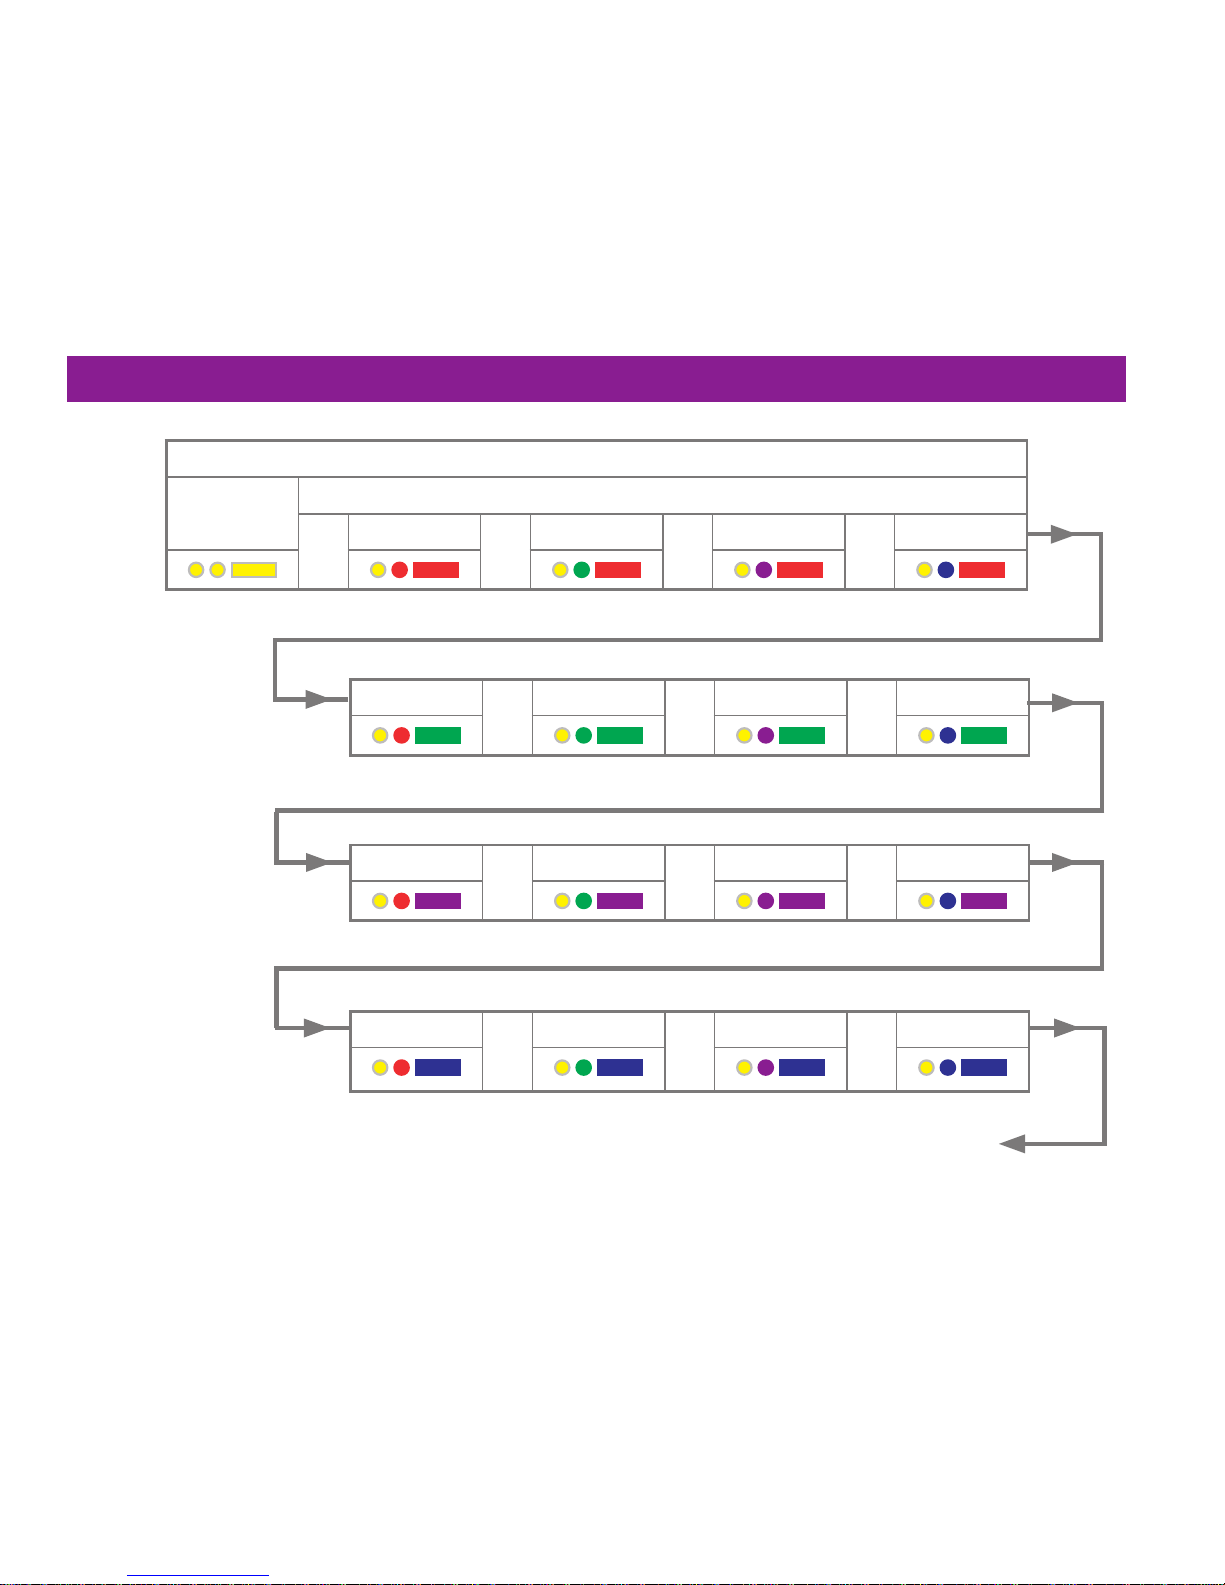
Multiple probe mode settings
Machine 13
or
Machine 14
or
Machine 15
or
Machine 16
Machine 9
or
Machine 10
or
Machine 11
or
Machine 12
Machine 5
or
Machine 6
or
Machine 7
or
Machine 8
Multiple probe mode
Mode off Mode on
or
Machine 1
or
Machine 2
or
Machine 3
or
Machine 4
Return to
“Mode off”

1-11
This page is intentionally left blank.
1-12
1
> 5 s
2
3
Key to the symbols
LED short ash
LED long ash
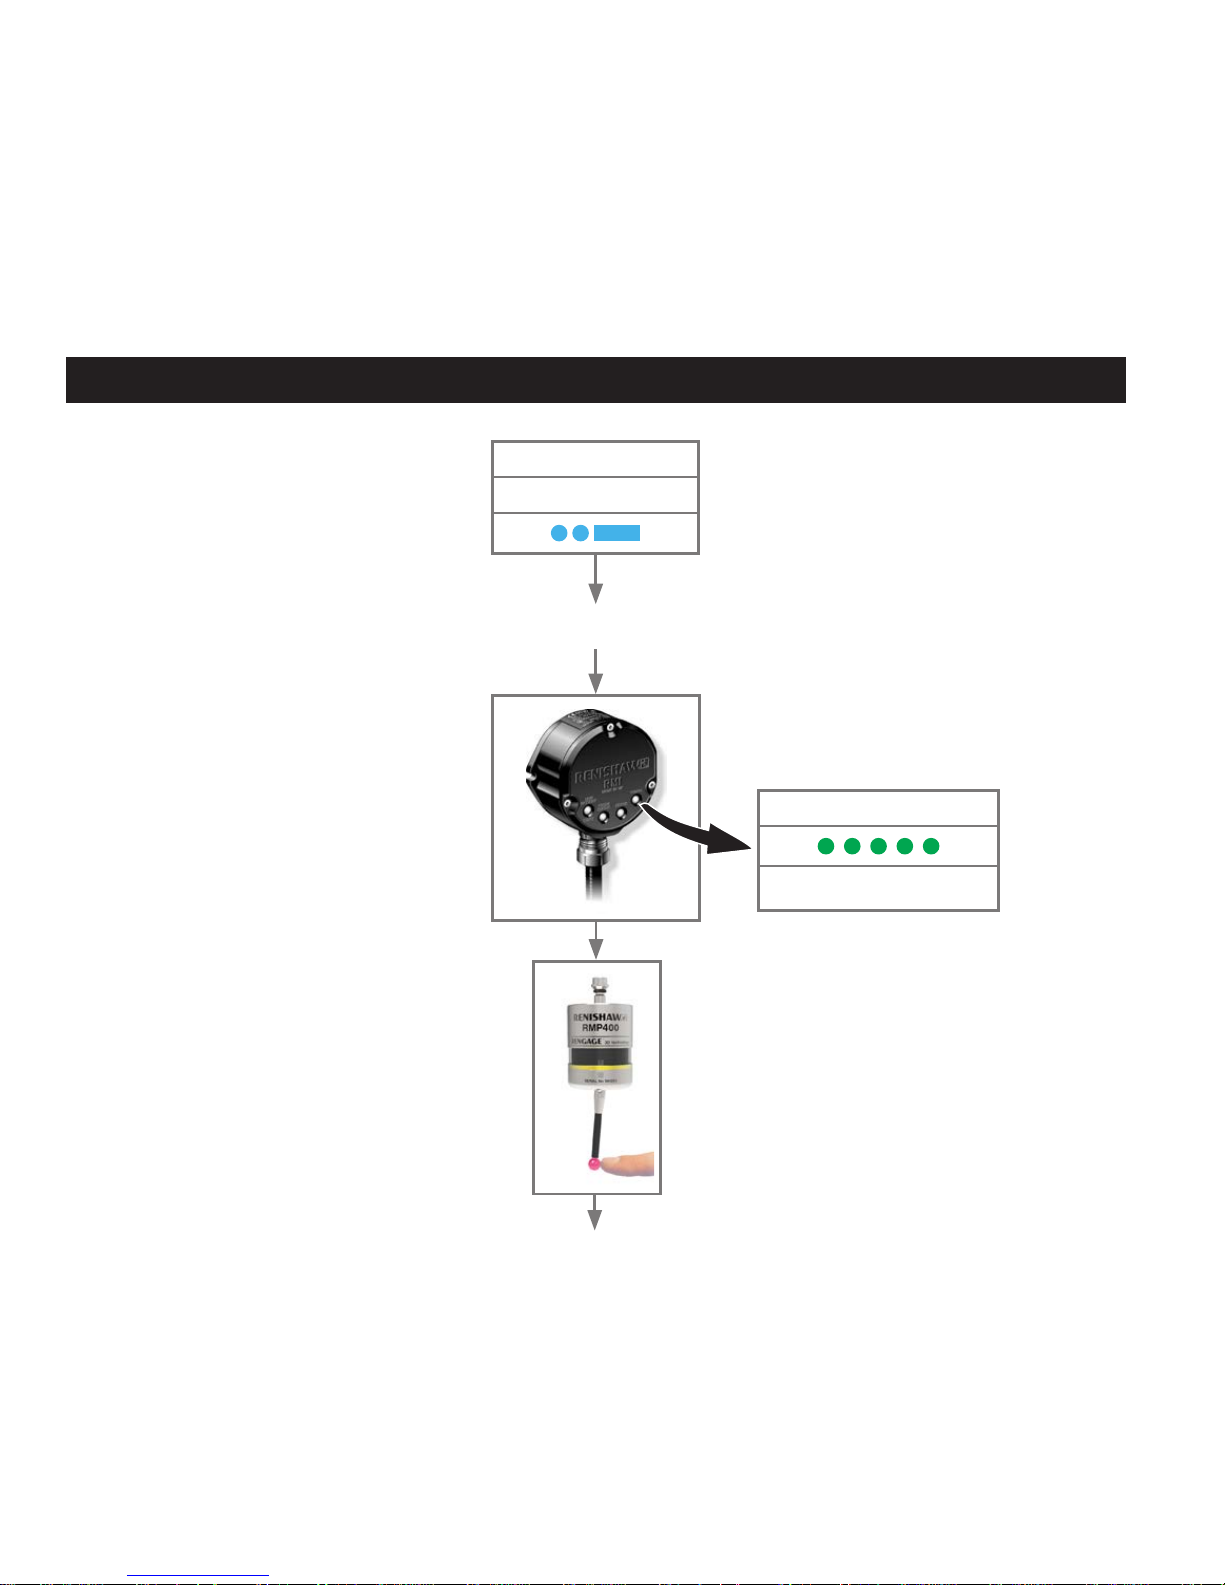
Deect the stylus for less than 4 seconds to
move to the next menu option.
To exit, leave the stylus untouched for more than
120seconds.
Acquisition successful. Probe is now in standby.
All probe settings will be shown, ending with
“Battery status” being displayed.
Probe partnering function
LED check
Battery status
Battery good
or
Battery low
1-13
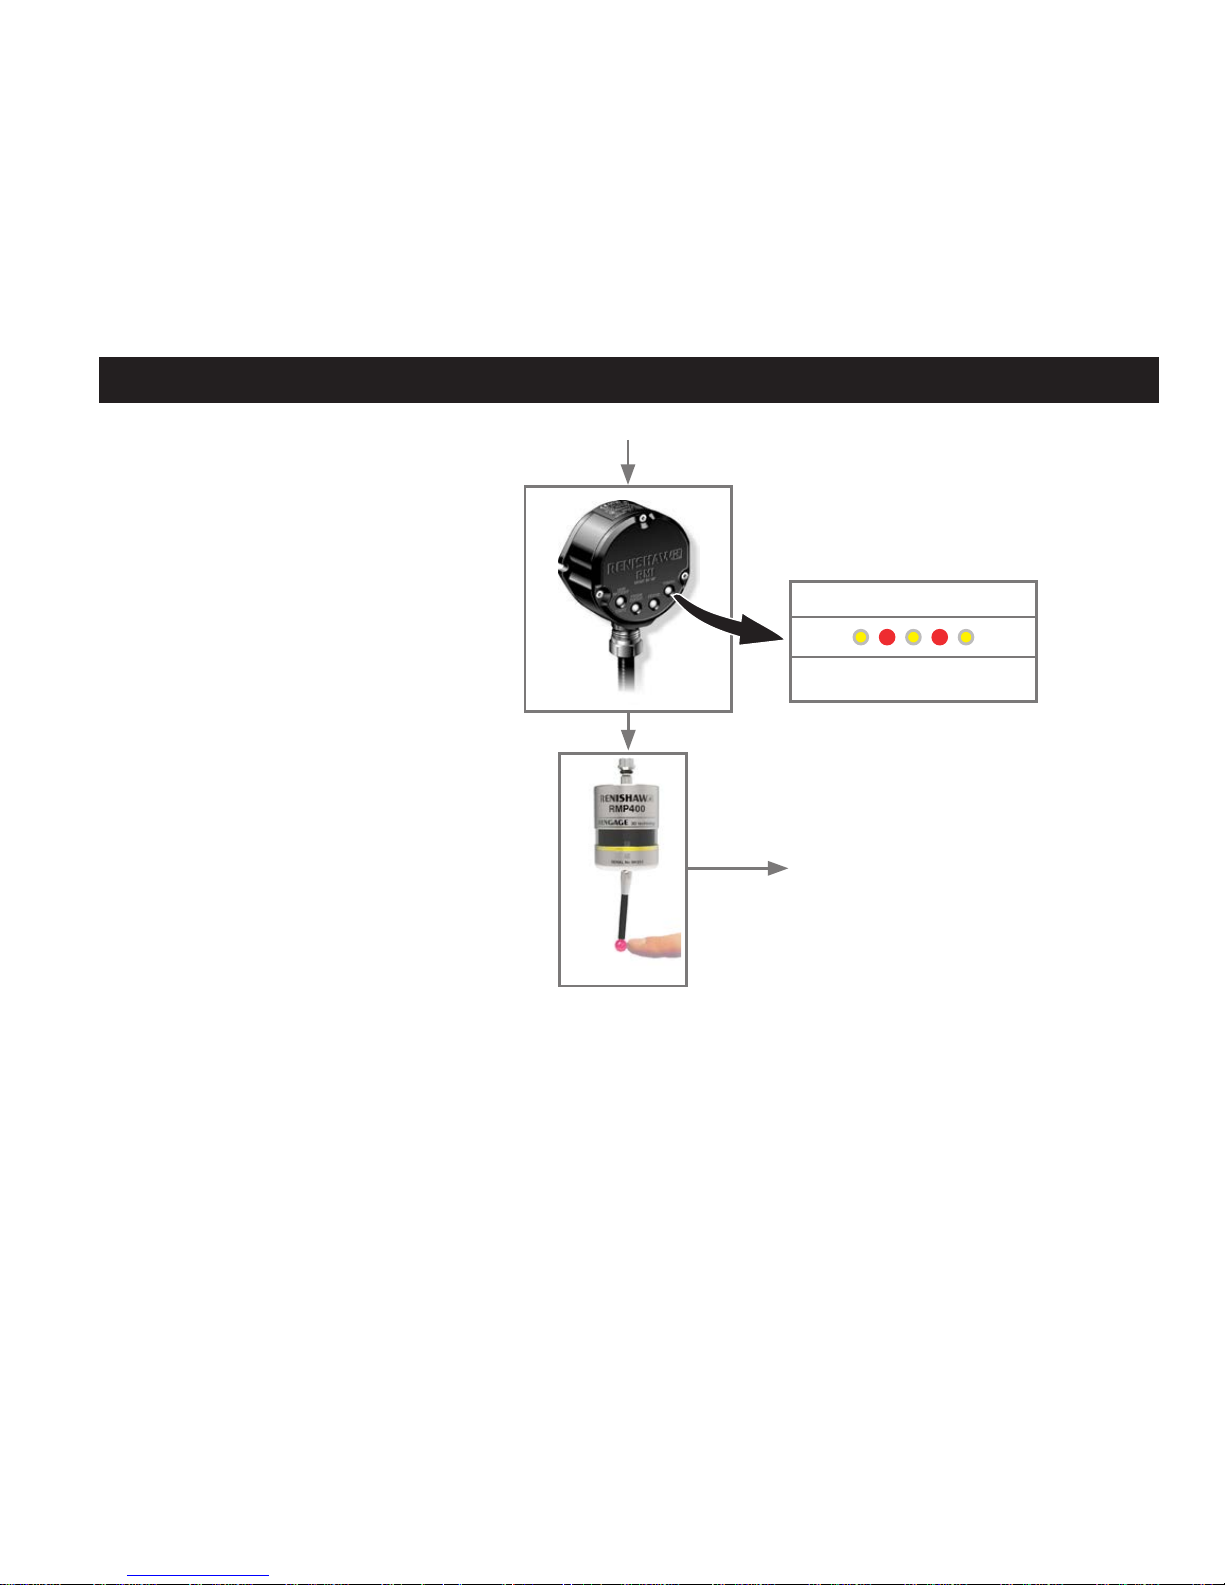
Whilst the “Battery status” is being displayed, deect and release the
stylus to enter “Acquisition mode off”. Probe status will flash red to
acknowledge this.
Acquisition mode
Acquisition
mode off
Acquisition
mode on
20 seconds
probe in standby
120 seconds
probe in standby
At this point turn on either the RMI or RMI-Q.
If partnering is unsuccessful “Acquisition mode off” will be displayed
again after 8 seconds.
Deflect the stylus for less than 4 seconds to select “Acquisition mode
on” again.
After 8
seconds
Acquisition
successful
Probe partnering function
Battery status
Battery good
or
Battery low

1-14
This page is intentionally left blank.
1-15
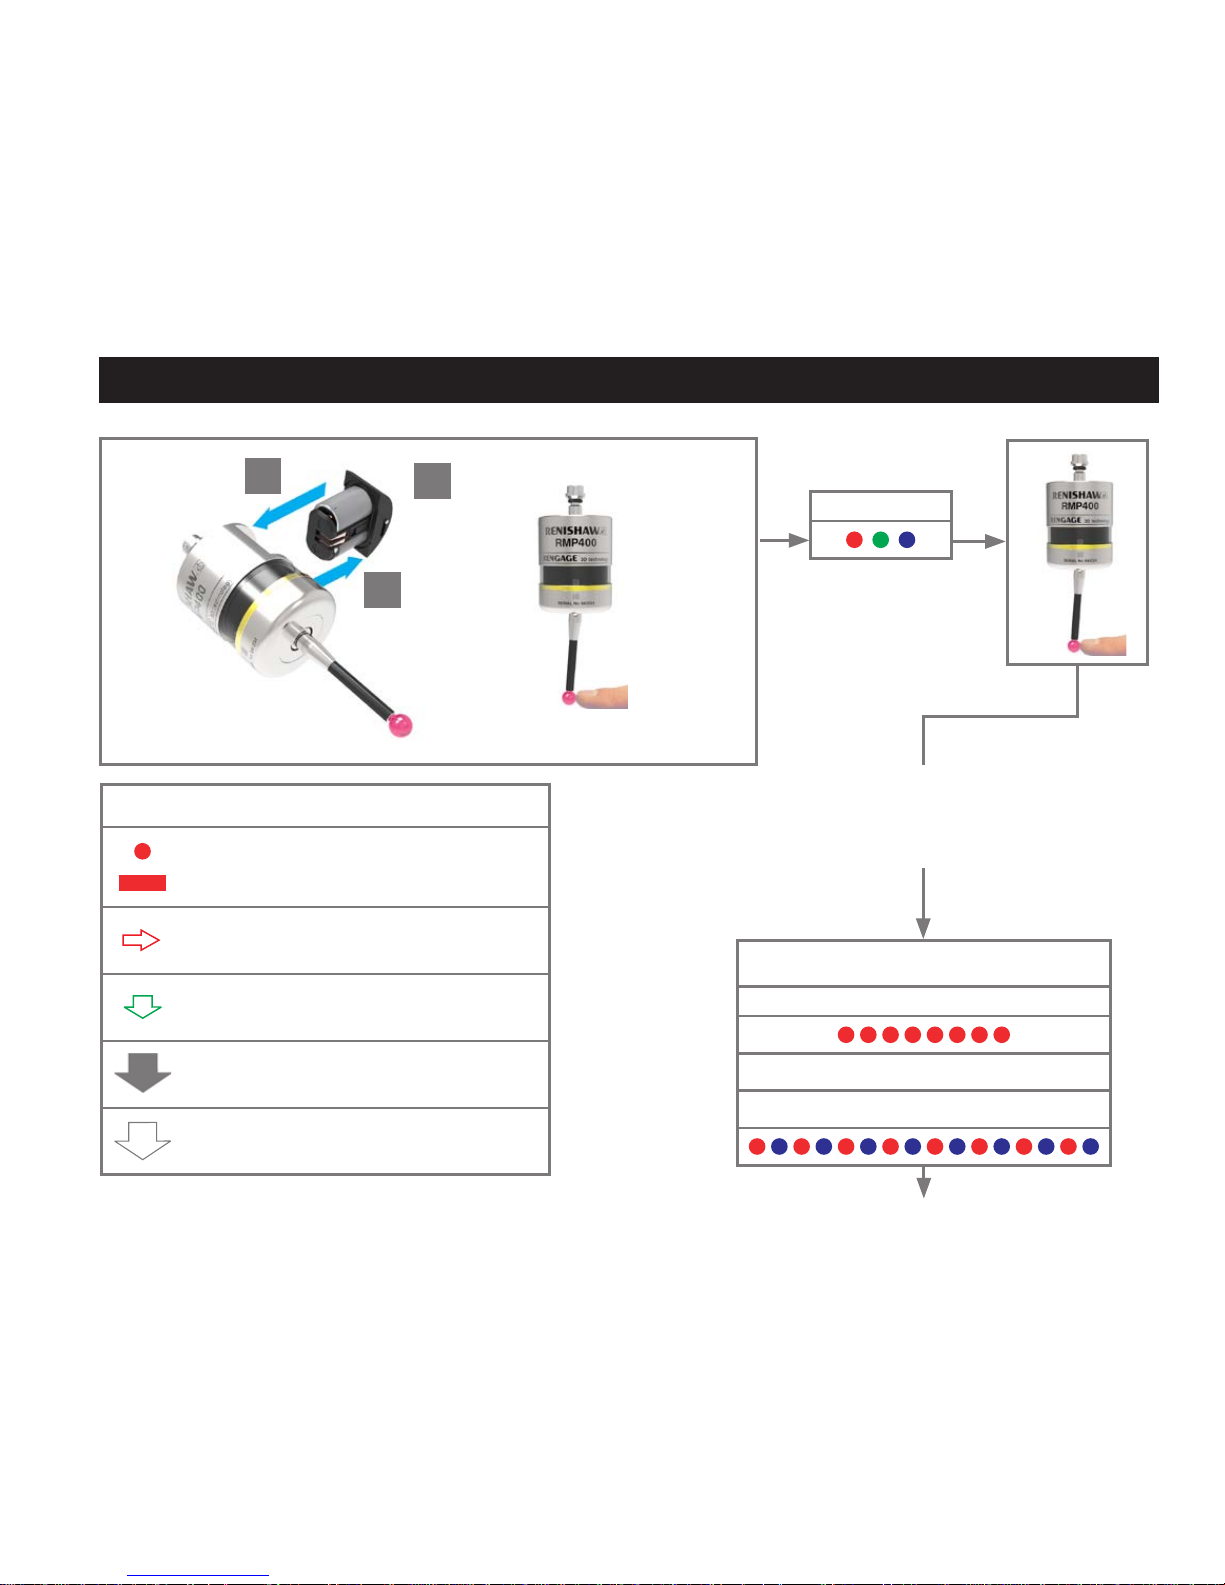
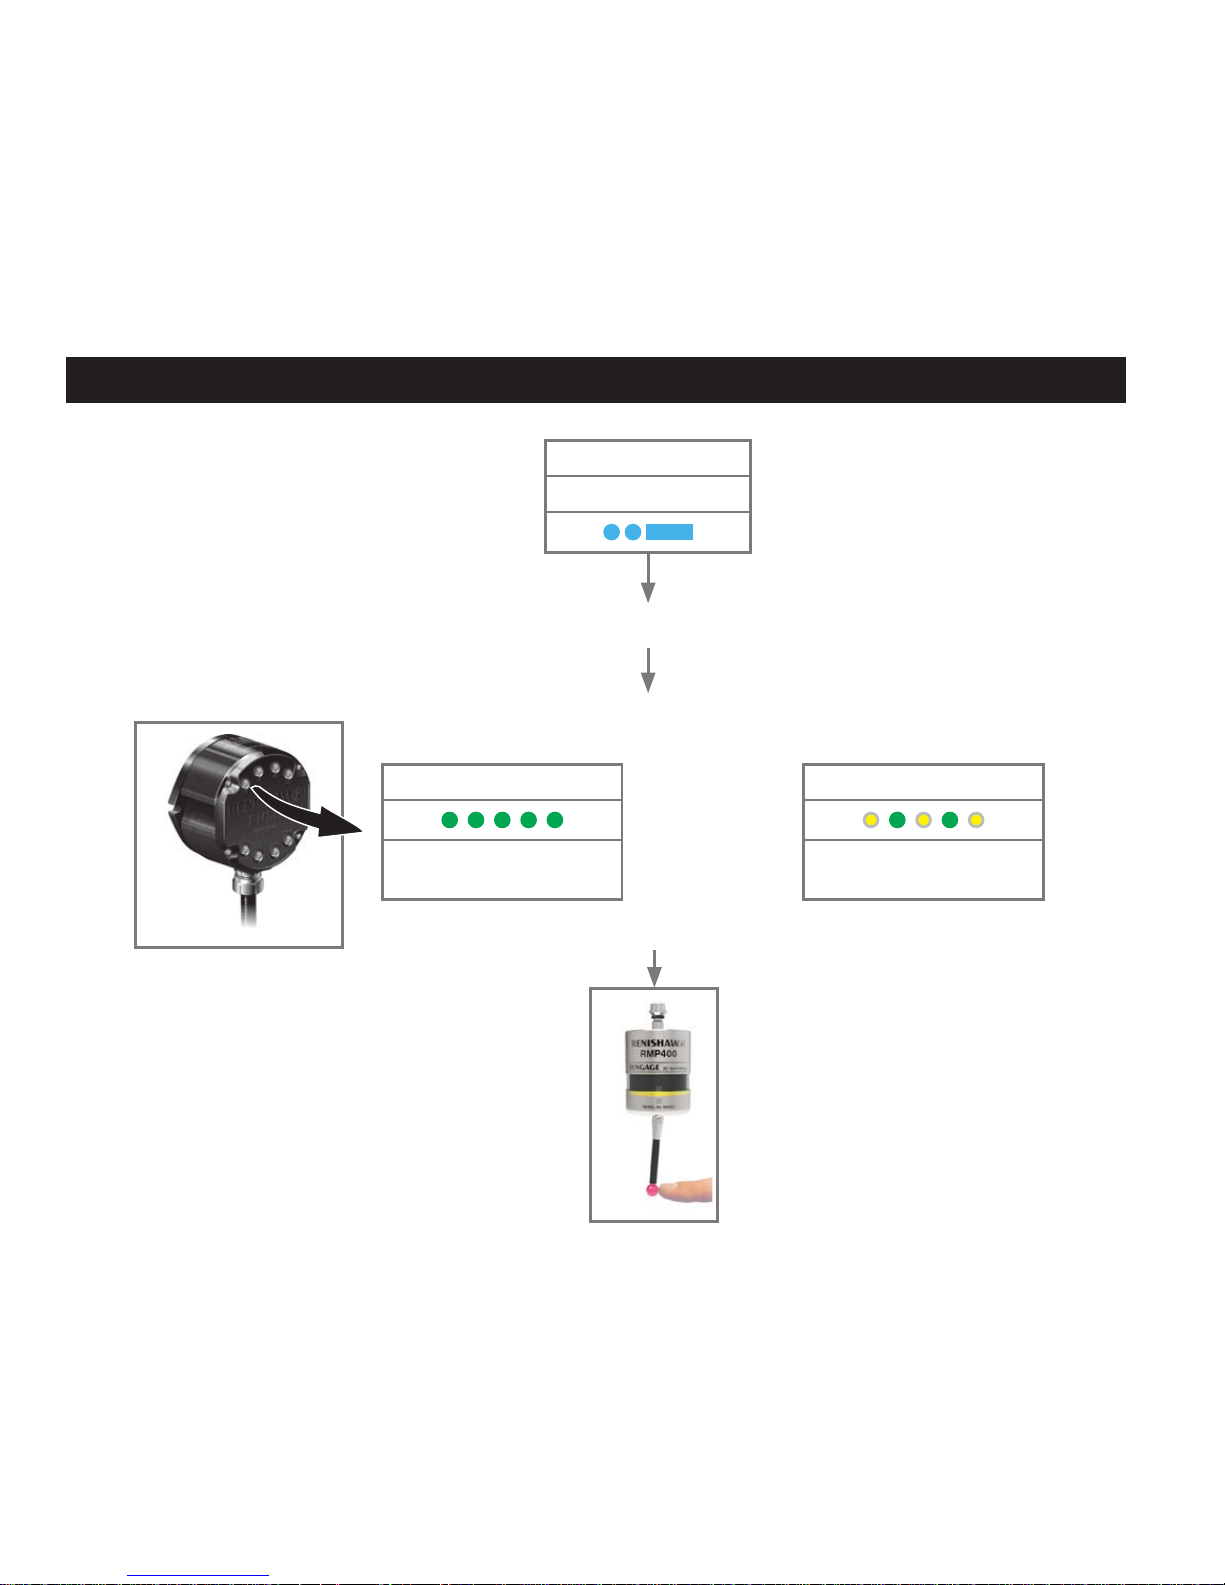
To acquire the probe and/or change the
probe settings, go to the next page.
Key to the symbols
LED short ash
LED long ash
Deect the stylus for less than 4 seconds
to move to the next menu option.
Deect the stylus for more than 4 seconds
to move to the next menu.
To exit, leave the stylus untouched for
more than 120 seconds.
To exit, leave the stylus untouched for
more than 20 seconds.
Battery status
Battery good
or
Battery low
Deect the stylus and hold it deected
until after the battery status has been
displayed at the end of the review
sequence.
CAUTION: Do not remove the batteries whilst in conguration
mode. To exit, leave the stylus untouched for more than 20
seconds.
LED check
1
> 5 s
2
3
Placing the probe in conguration mode
1-16
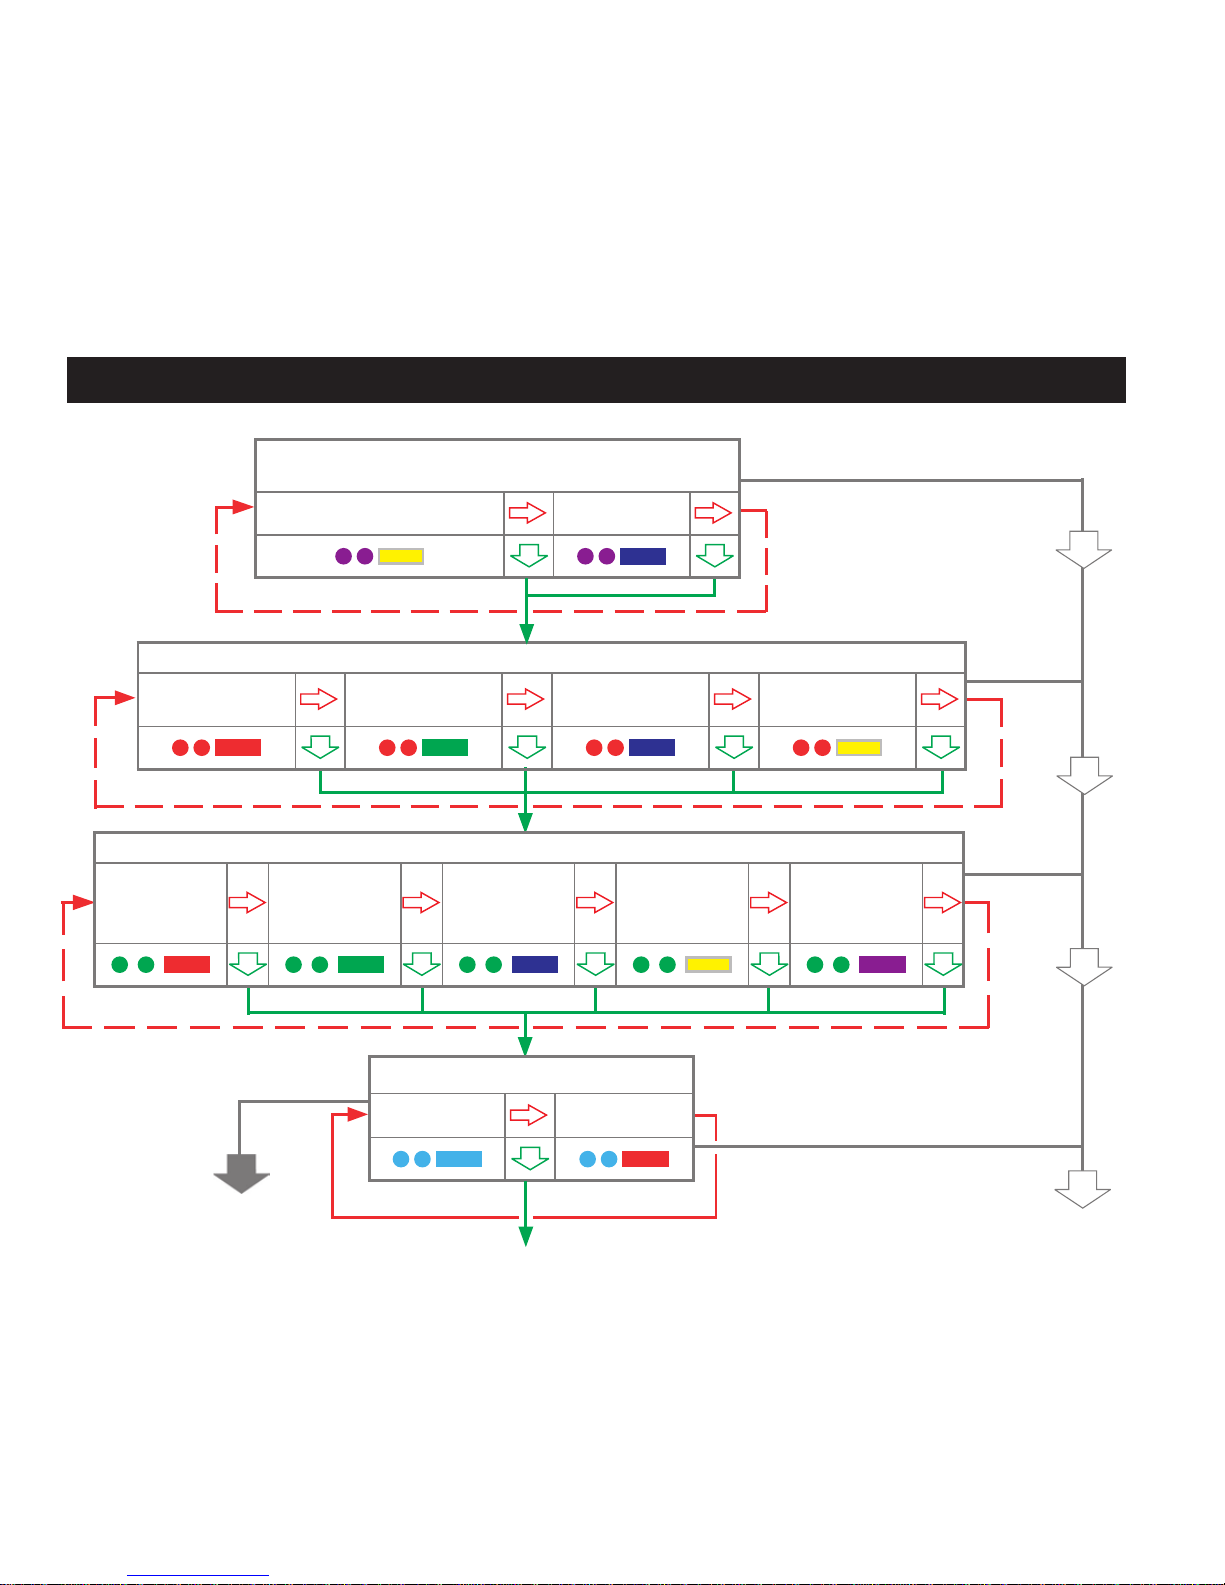
Changing the probe settings
New settings
complete
Switch-off method
Radio off or
Spin off
Short timeout
12 s
Medium timeout
33 s
Long timeout
134 s
Switch-on method
(omitted if “Multiple probe mode” was selected)
Radio on
Spin on
Enhanced trigger lter setting and auto-reset facility
Auto reset off
Trigger lter
on 8 ms
Auto reset off
Trigger lter
on 16 ms
Auto reset on
Trigger lter
on 8 ms
Auto reset on
Trigger lter
on 16 ms
Auto reset off
Trigger lter
off
Acquisition mode
Acquisition
mode off
Acquisition
mode on
120 seconds,
probe in standby
After 8 seconds
Acquisition successful,
20 seconds probe in standby
1-17
Changing the probe settings
Hibernation mode setting (only for “radio on”)
On
30 s
On
5 s
Off
Return to the beginning of the Trigger Logic menu
Multiple probe mode (omitted for “radio on”)
(see “Multiple probe mode settings” to view all 16 choices)
Mode off
Mode on
Machine 1 Machine 2
Machine 16
Stop triggering here, unless “Multiple probe mode” is required, in which
case deect the stylus for more than 4 seconds.
Acquisition mode
Acquisition
mode off
Acquisition
mode on
120 seconds,
probe in standby
After 8 seconds
Acquisition successful,
20 seconds probe in standby
NOTE: After the
RMI or RMI-Q has
been acquired, the
RMP400 will only show
“Acquisition mode
off”.
If no changes are made in “Multiple probe mode”, then deflecting the stylus for more than 4 seconds will return the
probe settings to beginning of the Trigger Logic menu. If “Multiple probe mode” is selected, proceed to “Acquisition
mode” to repartner one probe with the RMI or RMI-Q.
New settings
complete,
probe in standby
1-18
RMP400 – RMI partnership
Switch on the RMI
Acquisition mode
Acquisition mode off
Deflect the stylus to select
“Acquisition mode on”. Ensure
this is done within 8 seconds of the
RMI signal LED flashing green.
SIGNAL LED
RMI in acquisition mode
1-19
RMP400 – RMI partnership
NOTE: Please refer to the RMI
installation guide (Renishaw part no.
H-4113-8554) when partnering the
RMP400.
SIGNAL LED
New partner RMP acquired
The probe is in standby and the
system is ready for use.
> 20 s
1-20
SYSTEM STATUS LED
RMI-Q in acquisition mode
with empty probe location
or
SYSTEM STATUS LED
RMI-Q in acquisition mode
with full probe location
RMP400 – RMI-Q partnership
Switch on the RMI-Q
Acquisition mode
Acquisition mode off
Deflect the stylus to select
“Acquisition mode on”. Ensure
this is done within 60 seconds
of the RMI-Q system status LED
flashing green.
1-21
RMP400 – RMI-Q partnership
The probe is in standby and the
system is ready for use.
NOTE: Please refer to the RMI-Q
installation guide (Renishaw part no.
H-5687-8504) when partnering up to
four RMPs.
SYSTEM STATUS LED
Acquisition pending
Displayed for 5 seconds
> 20 s
SYSTEM STATUS LED
New partner RMP acquired
SYSTEM STATUS LED
RMP cleared from location
or
1-22
1
2
3
Messtastereinstellungen anzeigen
Zeichenerklärung
Kurzes Blinken der
LED
Langes Blinken
der LED
Ausschaltmethode
Ausschalten durch
Funksignal oder
Drehen
oder
Kurze Ausschaltzeit
12 s
oder
Mittlere Ausschaltzeit
33 s
oder
Lange Ausschaltzeit
134 s
LED-Test
Einschaltmethode
(nicht möglich bei Auswahl des „Modus zur Verwendung mehrerer Messtaster“)
Einschalten durch ein Funksignal
oder
Einschalten durch Drehen
> 5 s
1-23
Messtastereinstellungen anzeigen
Einstellen erweiterter Triggerlter und Auto-Reset-Funktion
Auto-Reset Aus
Triggerlter Ein
8 ms
oder
Auto-Reset Aus
Triggerlter Ein
16 ms
oder
Auto-Reset Ein
Triggerlter Ein
8 ms
oder
Auto-Reset Ein
Triggerlter Ein
16 ms
oder
Auto-Reset Aus
Triggerlter
Aus
Messtaster im Bereitschaftsmodus (nach 5 Sekunden)
Einstellung „Energiesparmodus“ (nur für „Einschalten durch Funksignal“)
Ein
30 s
oder
Ein
5 s
oder
Aus
Modus zur Verwendung mehrerer Messtaster (nicht für „Einschalten durch Funksignal“)
(siehe „Einstellungen - Modus zur Verwendung mehrerer Messtaster“ für die 16 möglichen Maschinen-Farbcodes)
Modus Aus
Modus Ein
oder
Maschine 1
oder
Maschine 2 Maschine 16
Ladezustand der Batterien
Batterien gut
oder
Batterien schwach
1-24
Einstellungen - Modus zur Verwendung mehrerer Messtaster
Maschine 13
oder
Maschine 14
oder
Maschine 15
oder
Maschine 16
Maschine 9
oder
Maschine 10
oder
Maschine 11
oder
Maschine 12
Maschine 5
oder
Maschine 6
oder
Maschine 7
oder
Maschine 8
Modus zur Verwendung mehrerer Messtaster
Modus Aus Modus Ein
oder
Maschine 1
oder
Maschine 2
oder
Maschine 3
oder
Maschine 4
Zurück zu
„Modus Aus“

1-25
Leere Seite
1-26
1
2
3
Messtaster-Paarungsfunktionen
LED-Test
Ladezustand der Batterien
Batterien gut
oder
Batterien schwach
> 5 s
Alle Messtastereinstellung werden angezeigt,
zuletzt der „Ladezustand der Batterien“.
Zeichenerklärung
Kurzes Blinken der LED
Langes Blinken der LED
Den Tastereinsatz kürzer als 4 Sekunden auslenken,
um zur nächsten Menüoption zu gelangen.
Zum Beenden den Tastereinsatz mindestens 120
Sekunden nicht auslenken.
Paarung erfolgreich. Tasterplatz bendet sich nun im
Stand-by-Modus.
 Loading...