

Page 1

MEDIA-NAV Evolution
Quick guide
Page 2
1
WELCOME TO THE WORLD OF MEDIA NAV Evolution.
Congratulations on your choice.
So that you can get the most from your integrated multimedia screen device, we recommend that you read this document to learn about the main functions and settings available on your multimedia system.
Translated from French. Copying or translation, in part or in full, is forbidden unless prior written permission has been obtained from the car manufacturer.
This document does not replace the driver’s handbook.
Please read the driver’s handbook for more detailed information on the features mentioned in the “References” guide for your multimedia system.
The “References” guide covers all the functions (standard and optional) available; their presence in the Média Nav Evolution navigation system depends on the
version, the options selected and the marketing country. Depending on the make and model of your telephone, some functions may be partially or completely
incompatible with your vehicle’s multimedia system.
For more details, please consult an Authorised Dealer.
Page 3

First use
3
Enter a destination
6
Guidance
9
Listen to the radio
10
Multimedia
12
Bluetooth® device connection
14
Making and receiving a call
16
Driving-Eco²/4x4 info
18
System settings
19
Updating the system
21
Page 4
3
A
A
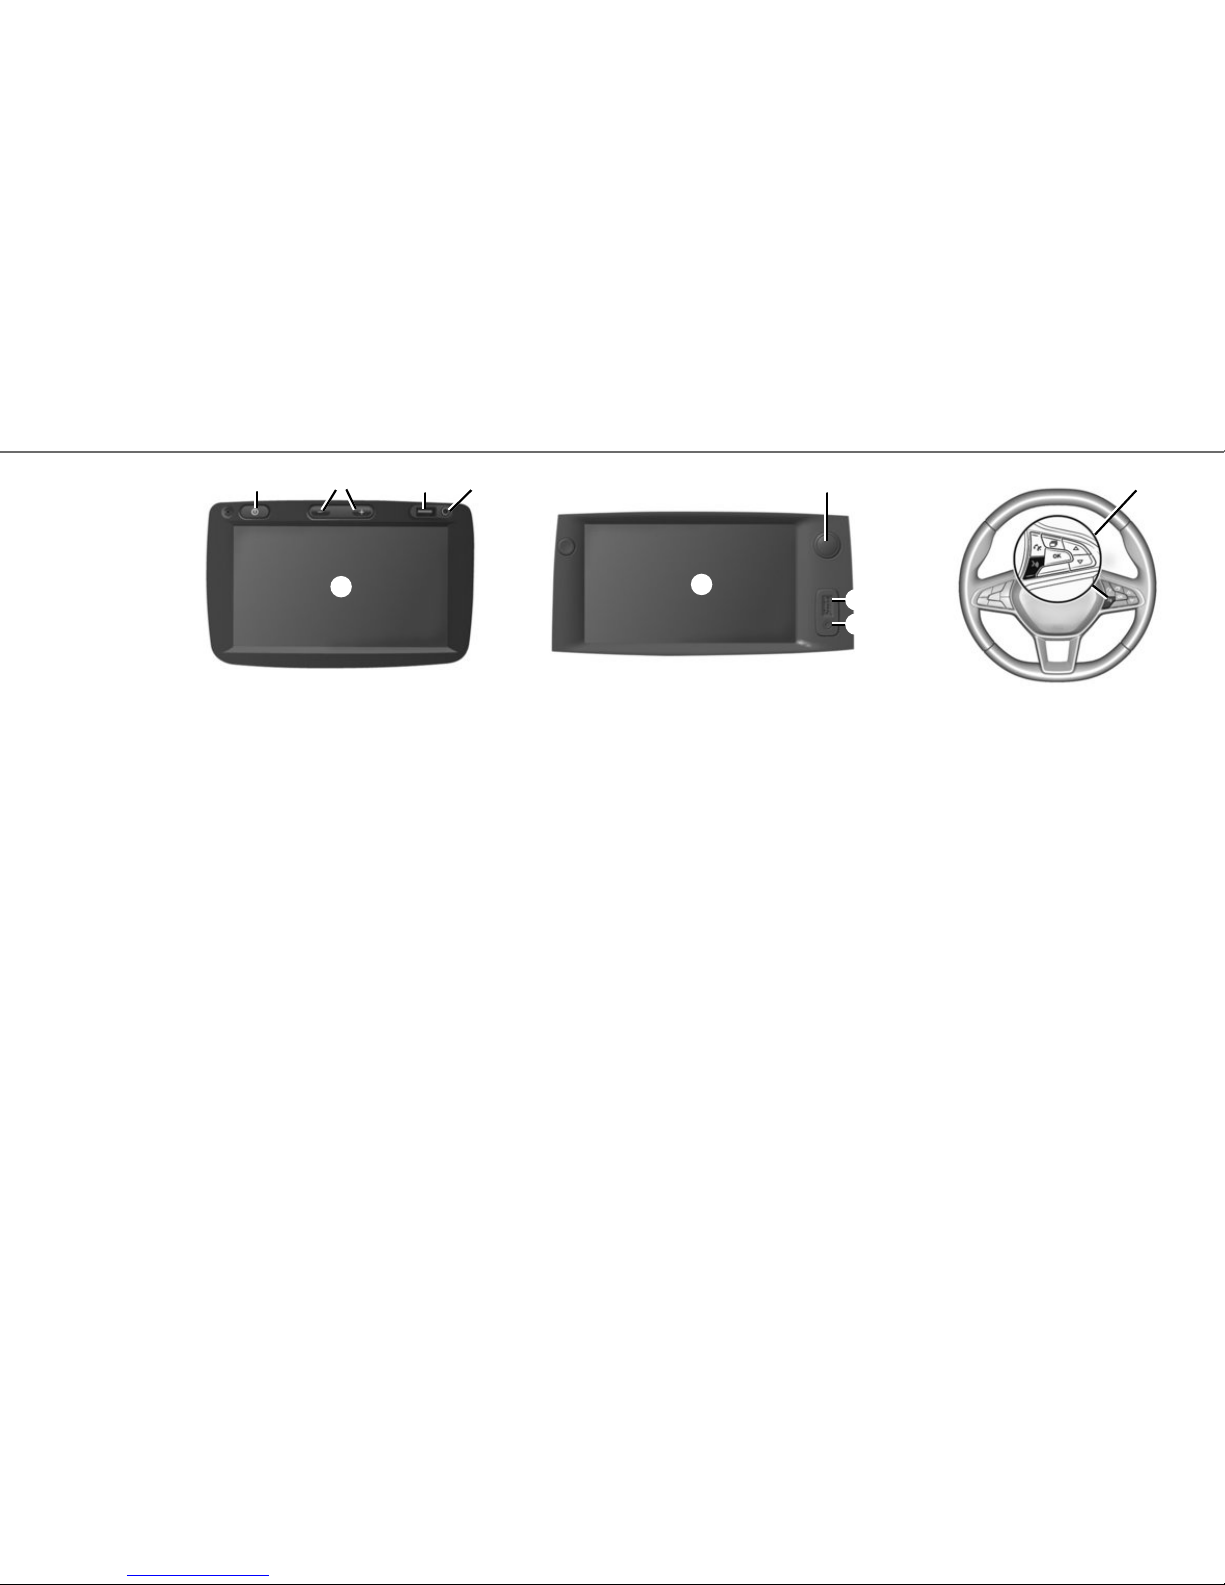
Switching on
The multimedia system switches on automatically
when the ignition is started. For other cases, press
the 1 or 5 button on your system. With the ignition off, the system will operate for 20 minutes.
Press again on 1 or 5 to activate your system for
20 minutes.
Switching off
The system switches off automatically when the
vehicle’s ignition is switched off.
MULTIMEDIA SCREEN
Touch the multimedia system display touchscreen A using your finger to select a menu or
button.
Auxiliary function
You have a USB connection 3 and an analogue auxiliary input 4 on the control panel enabling connection to an external audio device (inside your vehicle, depending on your equipment level).
Standby screen
With the ignition on, press the 1 or 5 button on
your system to put the system on standby. The
clock and the exterior temperature are displayed
on the screen.
Note: in standby mode, the radio and guidance
system do not operate.
Volume
To modify the volume of the sources and the voice
navigation instructions (during an instruction),
turn 5 or press one of the buttons 2.
Voice recognition
The 6 button on the steering wheel (on the system
front panel, depending on equipment level) enables
you to use the voice recognition on your telephone
when it is connected to the system. For more information, see the multimedia system user manual.
2
FIRST USE (1/3)
1
3 4 5
3
4
6
Page 5
4
12
7 8
11
Radio Media
Phone
Driving eco² Nav Settings
Dark
FIRST USE (2/3)
9 10
Set Time
13 14
15
Player List Presets
Options
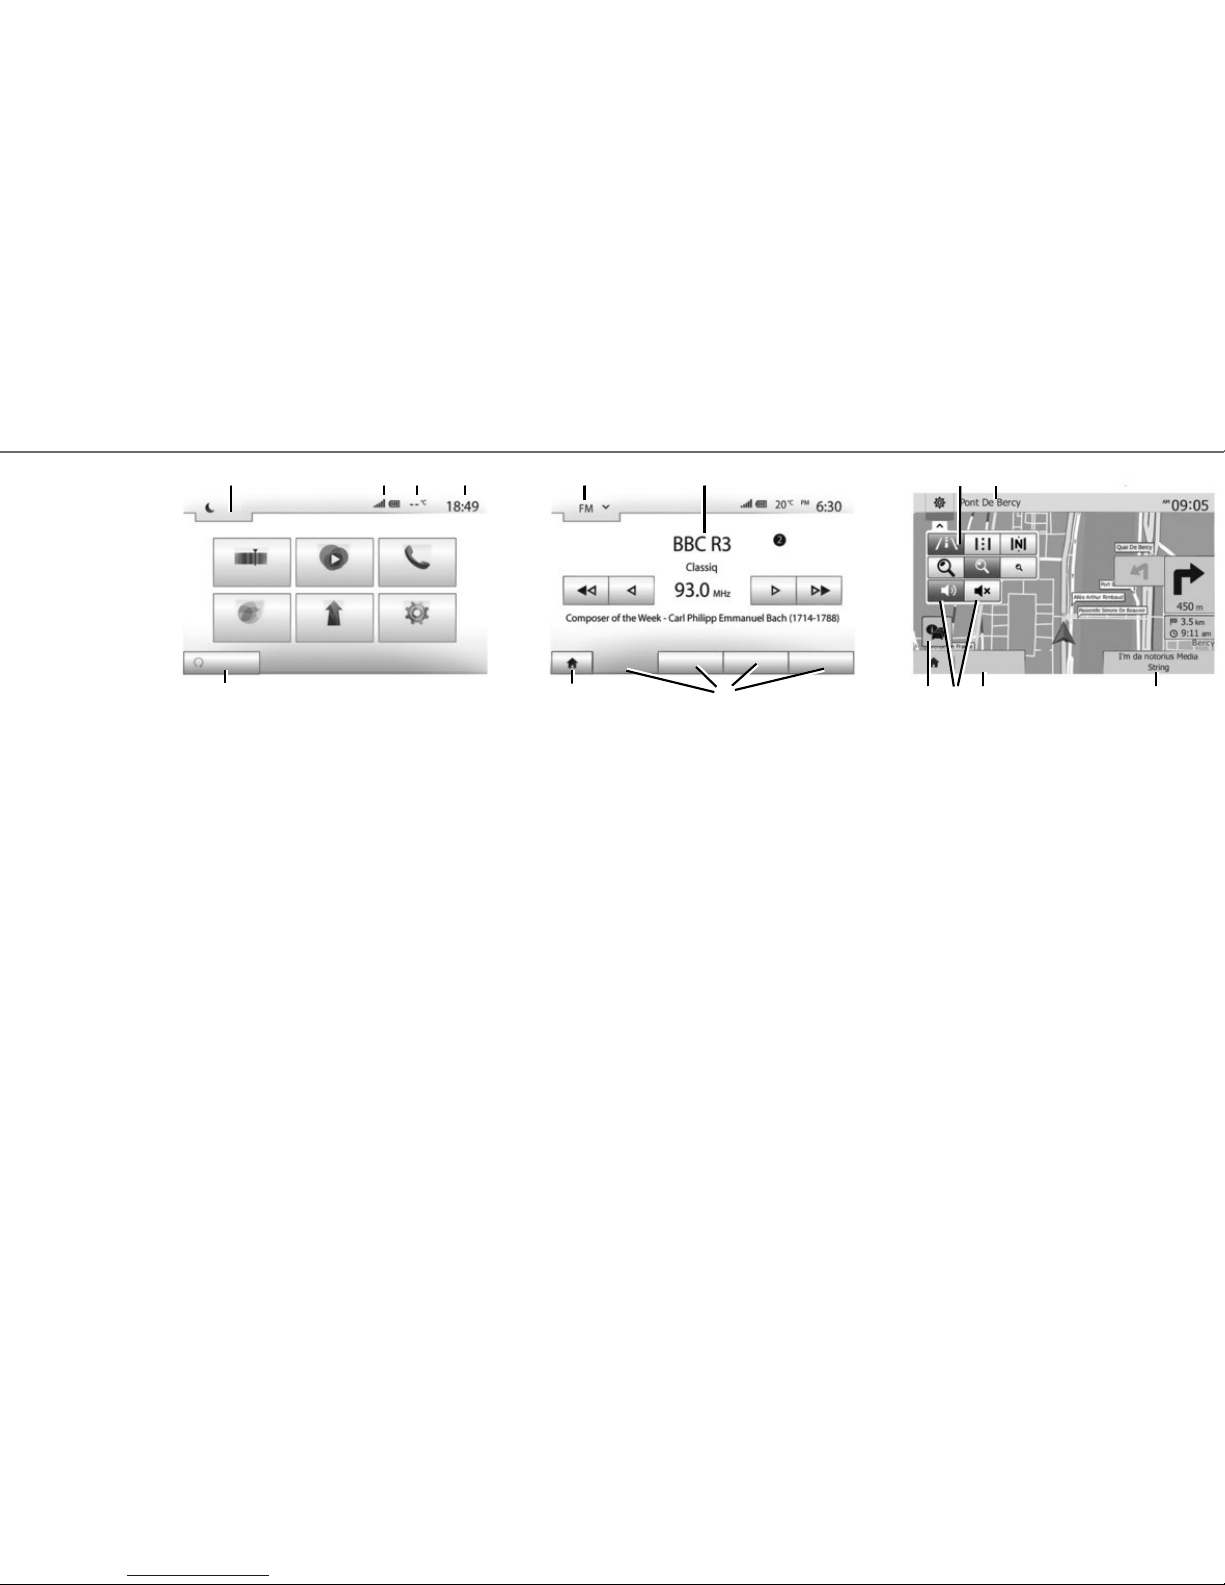
13 Mode selection area:
– displays the selected mode;
– when the mode selection area is touched, a
drop-down menu will appear.
14 Table of contents area:
– shows the contents of a menu item and
related information.
15 Menu area:
– display subordinate menu of mode;
– shows current menu as highlighted.
16 Home or return to navigation area.
Menu screen
7 Mode standby and clock display
8 Telephone information area.
9 Exterior temperature.
10 Time area.
11 Area for selecting programmed engine start-up
12 Menus area.
16
Navigation screen
17 Map mode (2D /3D and 2D North).
18 Name of the next street to take on your route.
19 Access the current media (USB, AUX, AM, FM,
DAB, iPod®, and Bluetooth®)
20 Options for route and map setting.
21 Voice guidance On/Off.
22 Traffic information (TMC).
Destination
18
192022 21
17
Page 6
5
Steering column controls
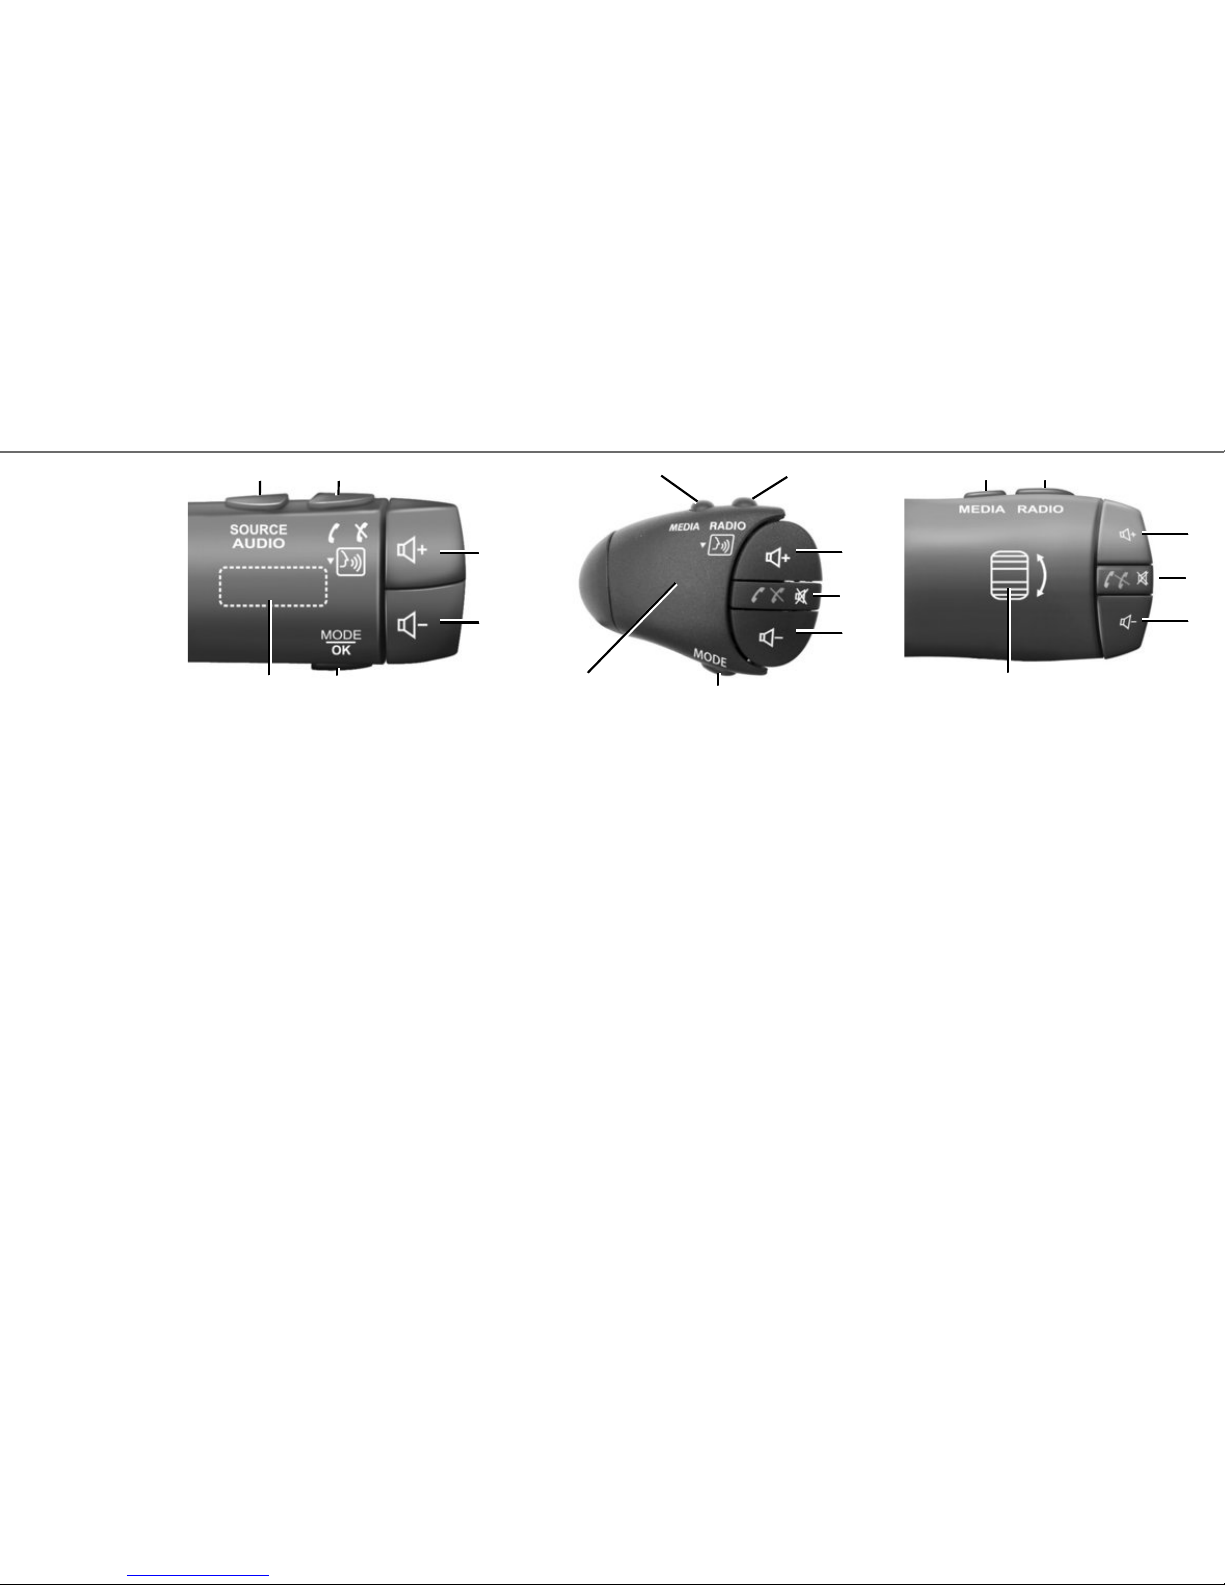
23 Choose audio source (FM / AM / DAB / USB /
iPod® / Bluetooth® / AUX).
24 Tap: access the “Phone” menu.
Press and hold: activate/deactivate your telephone’s voice recognition function.
When receiving a call:
– short press: answer the call;
– long press: reject the call.
Brief press during a call: end call.
25, 26 Adjust the volume.
25+26 Mute/unmute the sound;
FIRST USE (3/3)
27 Change the playback mode of the radio stations
or the media (USB / iPod®) currently in use.
28 Rear dial:
– radio: change radio mode (preset/list/fre-
quency);
– media: previous/next track.
29 Change media (CD / USB / AUX).
30 Tap: change radio mode (FM /AM /DAB).
Press and hold: activate/deactivate your telephone’s voice recognition function.
23 24
25
26
27
29 30
31
32
33
27
28
28
31
32
33
34
29 30
31, 33 Adjust the volume.
32 Listening to an audio source: mute/unmute.
When receiving a call:
– short press: answer the call;
– long press: reject the call.
Brief press during a call: end call.
34 Rear dial:
– radio: change radio mode (preset/list/fre-
quency);
– media: previous/next track.
Short press: confirm an action.
Page 7
6
– select a destination on the map from “Find on
map”;
– select a latitude and longitude from “Coordinate”.
ENTERING A NEW “ADDRESS”
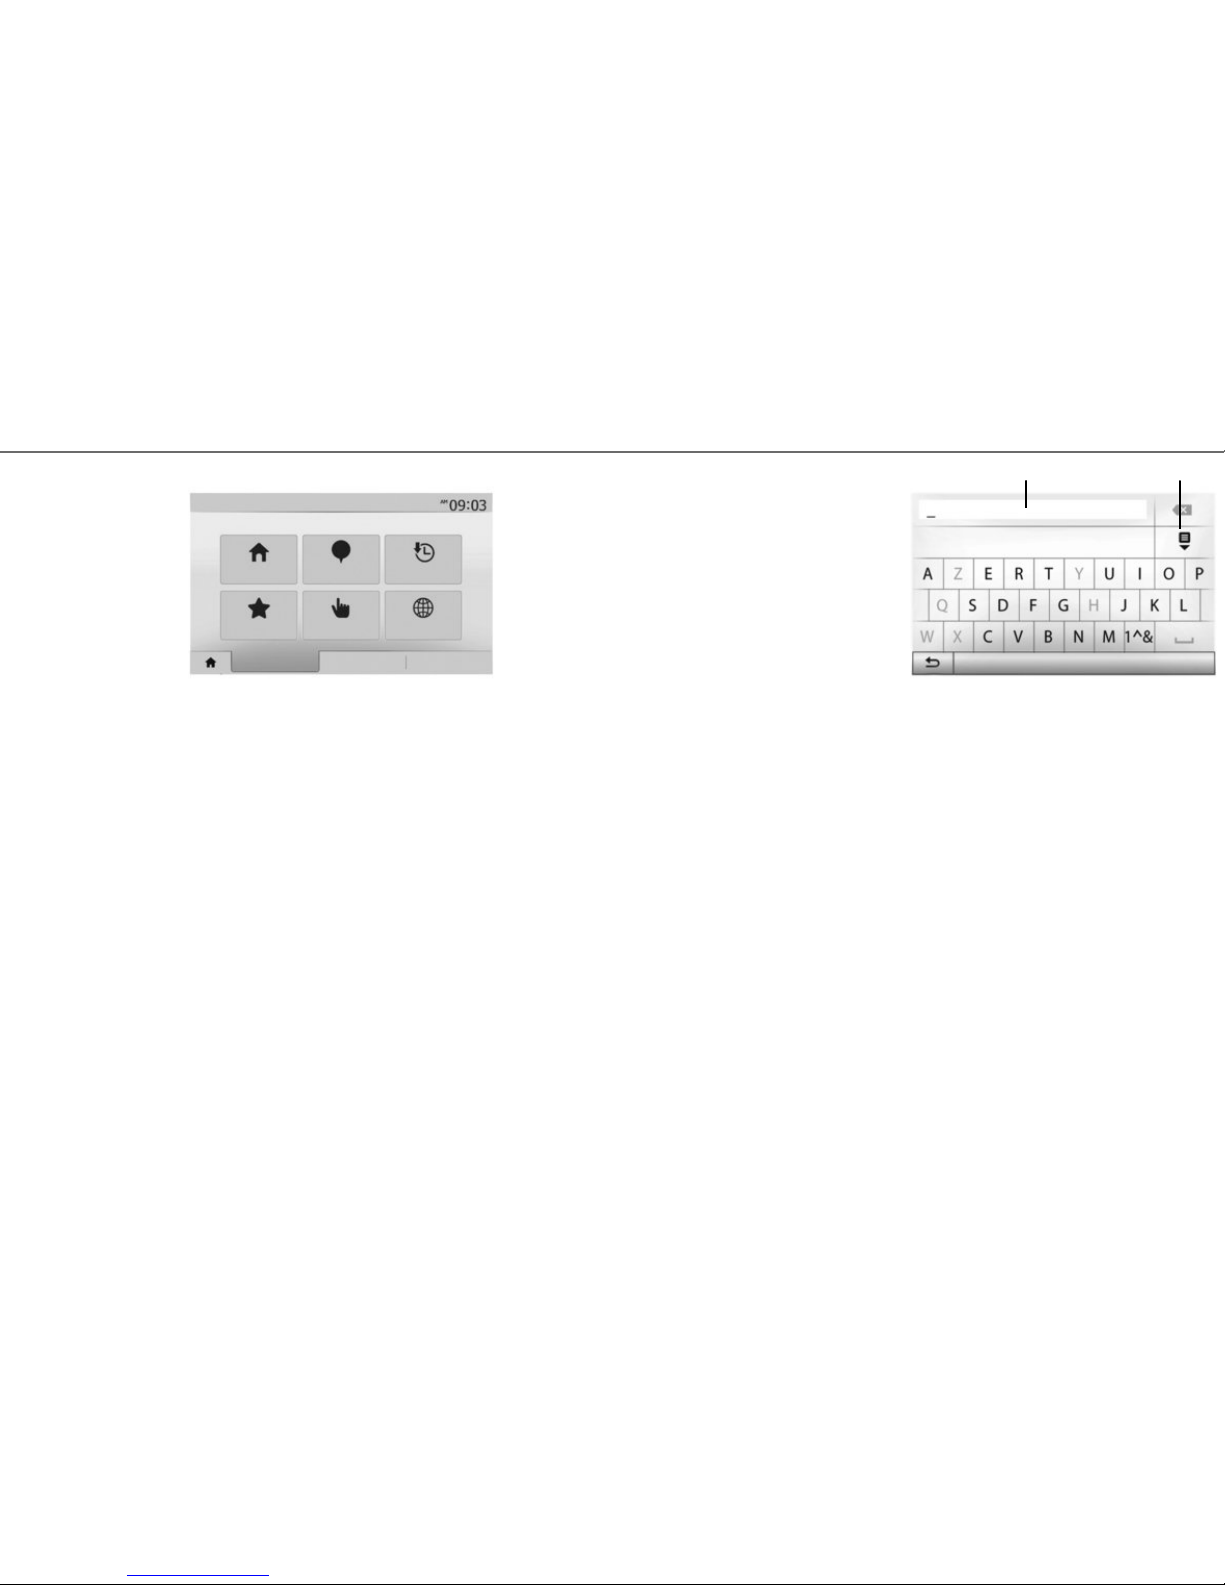
This item allows you to enter all or part of the address: country, city, street and house number.
Note: only addresses known on the digital map are
authorised.
When using this for the first time, you must select
your country. Then use the touchpad to enter the
name of the destination town or city. The system
suggests a city name in the area 1. If the suggestion is incorrect, access the full list corresponding to your search by pressing the 2 button. The
system displays a list.
For more information, see the multimedia system
user manual.
ENTERING A DESTINATION (1/3)
Menu “Destination”
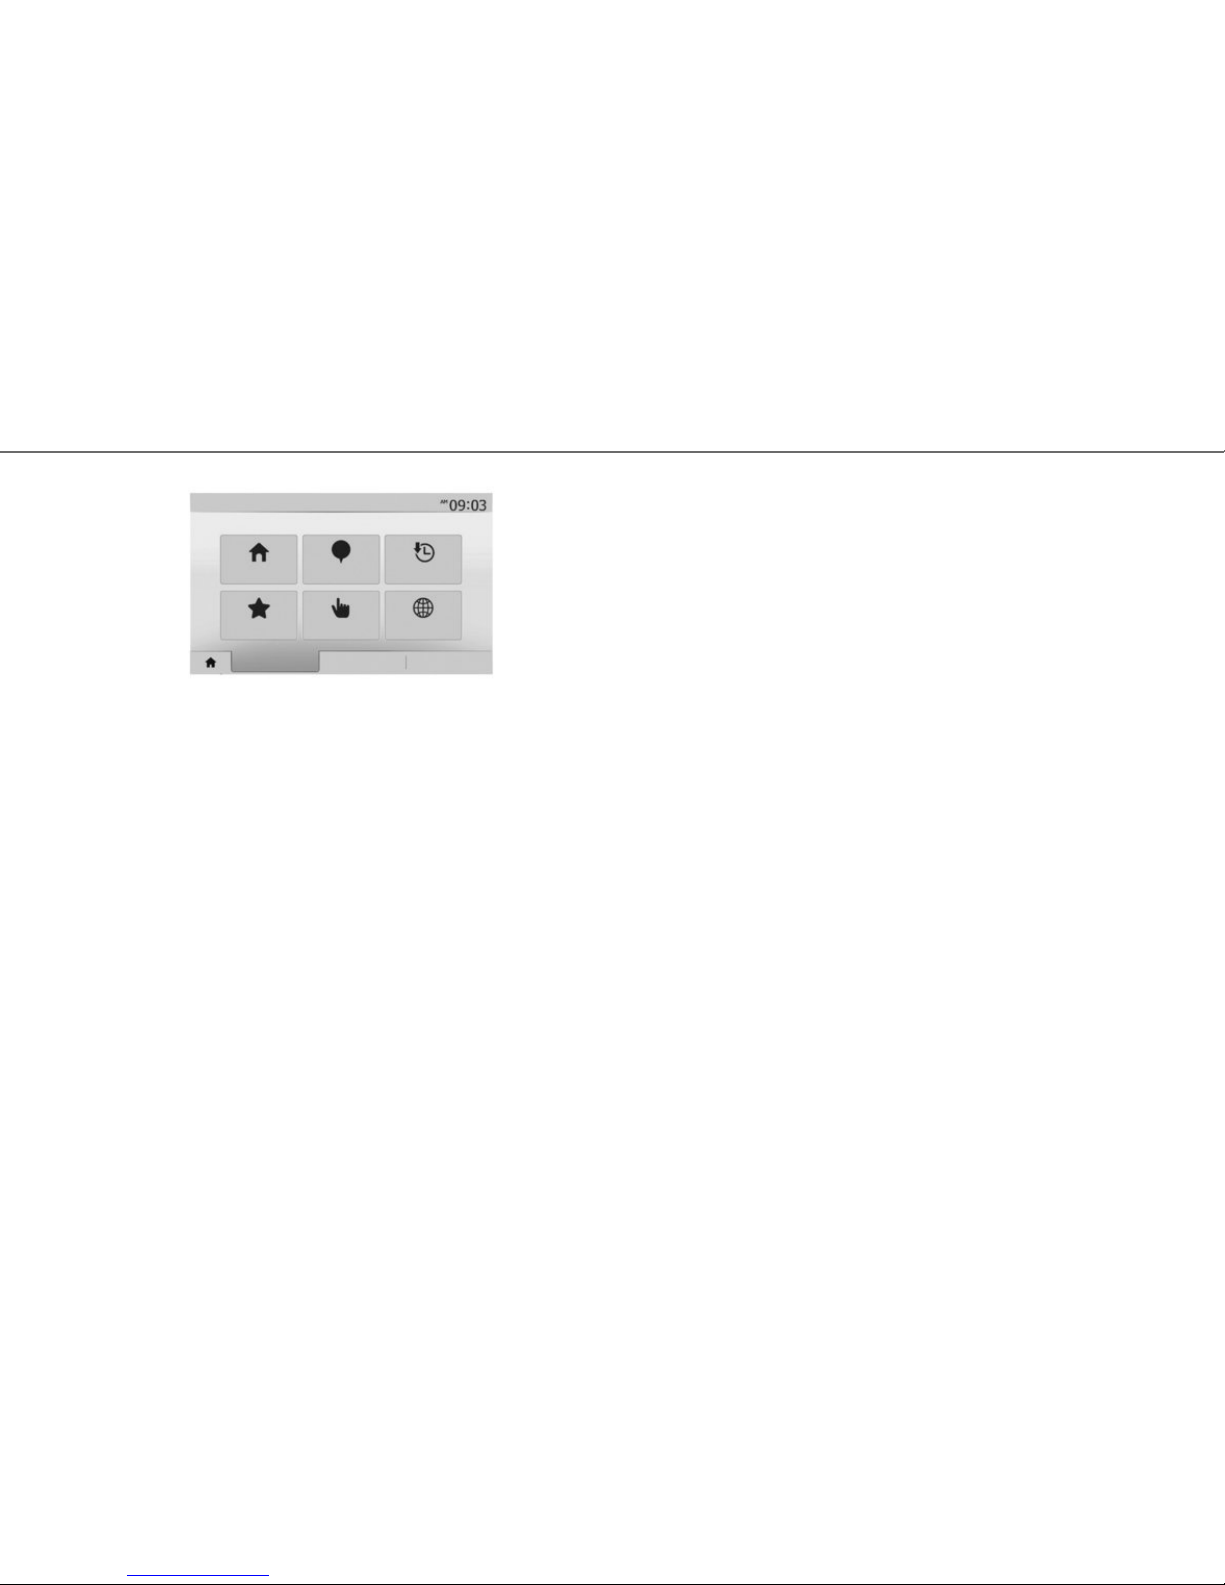
Press the home button to access the “Nav” menu,
then on the “Destination” tab at the bottom of the
screen.
To enter a destination:
– enter an address from “Address”;
– select an address from “Points of interest”;
– select a recent destination from the locations in
“History”;
– select a previously saved address from
“Favourites”;
– select the town or city;
– follow the same procedure for the “Street”,
“Intersecting street” and “Street number”
screens, if necessary.
When entering the address, the system will highlight certain letters to help with entering the information.
Note: “Intersecting street” and “Street number”
can be activated after selecting “Street”.
Note: the system stores previously entered addresses in its memory. Once you have entered a
destination by address, that address will be displayed when the device is next used.
1
2
Address Points of interest History
Favourites Find on map Coordinate
Destination Itinerary Options
Options
Navigation
Page 8
7
ENTERING A DESTINATION (2/3)
“POINTS OF INTEREST”
A place of interest is a service, an establishment
or a tourist destination. The locations are classified
into different categories – restaurants, museums,
car parks, etc.
You can search for a point of interest by:
– category:
– name of the point of interest;
– finding a point of interest on the map.
“FAVOURITES”
The Favourites menu lists favourite destinations,
such as your place of work, home, school etc.
You can include a new destination on your favourites list when you program a route to this destination for the first time (refer to the information on
“Confirming a destination”).
– select the Home button, “Nav”, then the
“Destination” tab;
– choose “Favourites”;
– select the required destination in the list of
stored addresses.
Address Points of interest History
Favourites
Find on map Coordinate
Destination Itinerary Options
Navigation
“HISTORY”
This item enables you to select a destination from
the list of addresses last used. This information is
stored automatically once guidance starts.
From the main menu select “Nav”, the “Destination”
tab, then the “History” menu.
From the list of stored destinations, select an address then confirm this address as the destination.
Page 9
8
ENTERING A DESTINATION (3/3)
“FIND ON MAP”
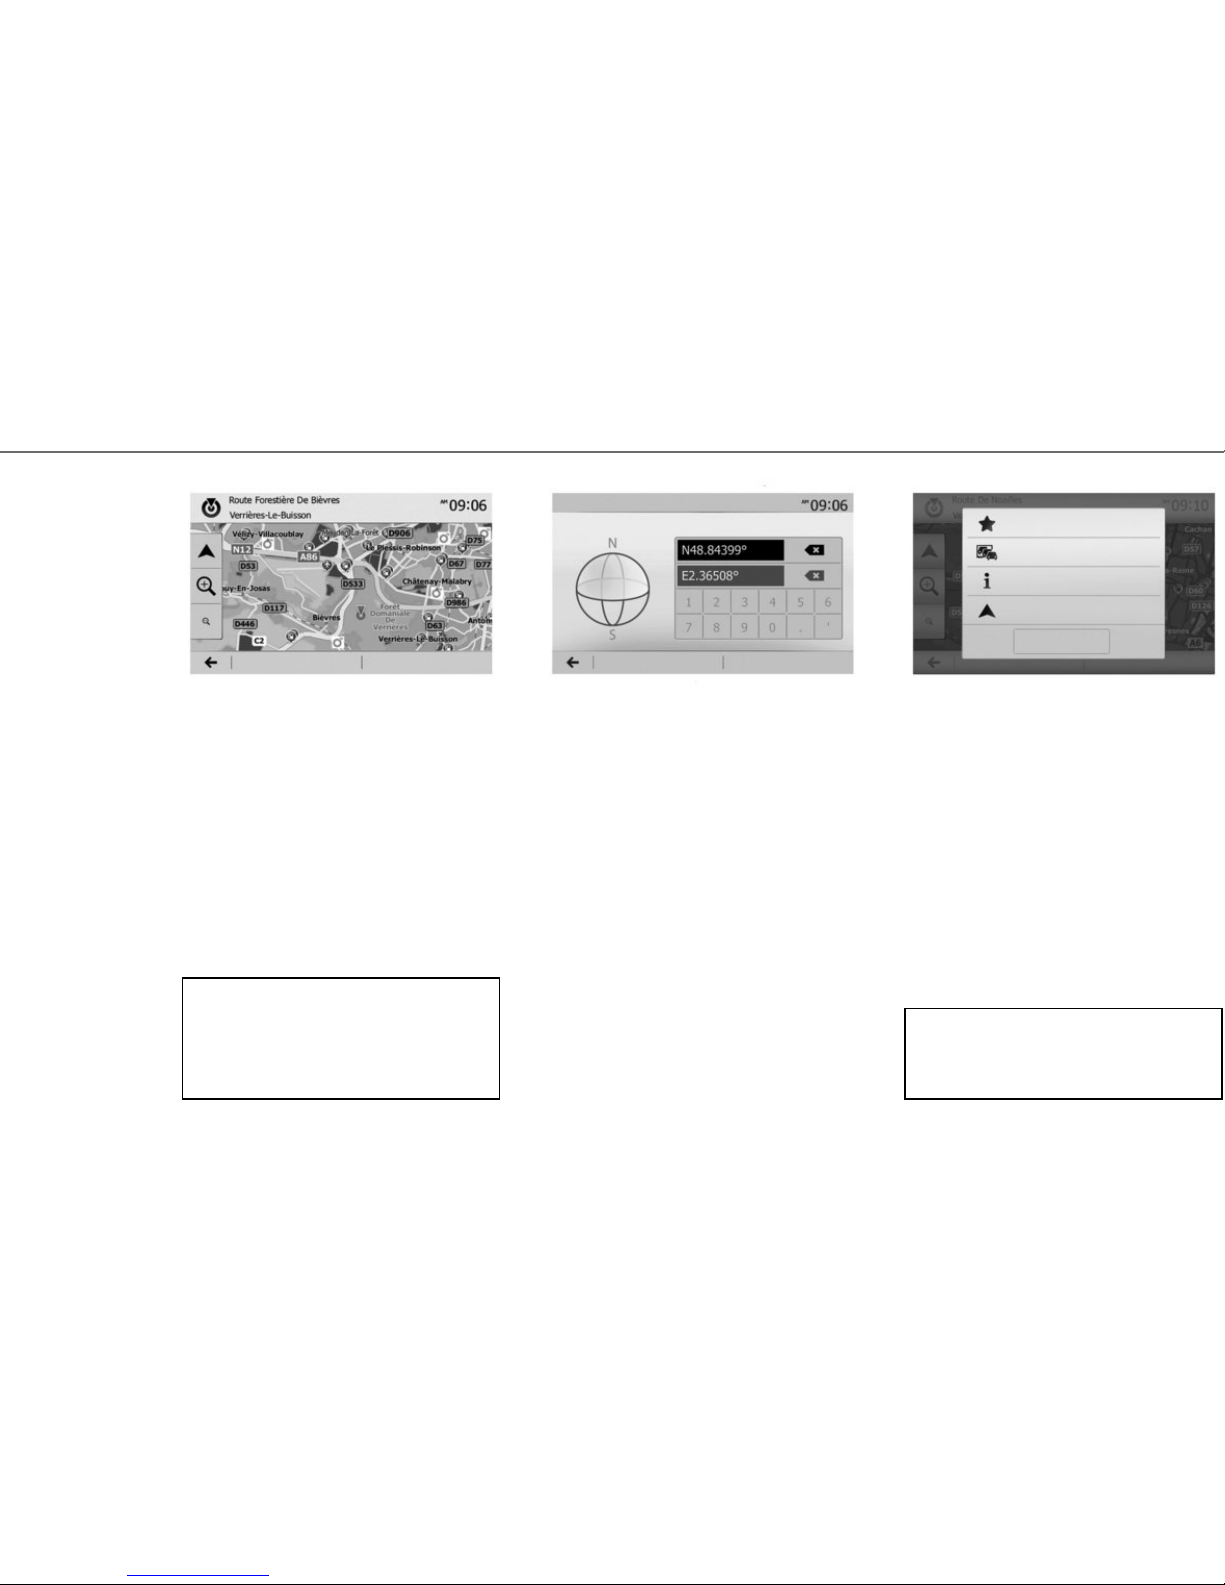
This function allows you to define a destination
from the map. From the navigation screen, move
around the map to position the cursor on your destination, then press “OK” to confirm: the system
calculates the route.
“COORDINATE”
This function allows you to define a destination
using latitude and longitude values.
– “Options”, then “Back to car” enables you to pin-
point your vehicle’s current location;
– “OK” activates guidance.
Confirming the
destination
When the calculation is complete, the system
offers you several options:
– “Options”, then “Add to favourites” enables you
to add destination addresses to your favourites;
– “Options” then “Current traffic” obtains informa-
tion on traffic incidents flagged on your route, or
in your immediate vicinity;
– “Options”, then “News” allows you to consult the
address, latitude, longitude and phone number
(phone number is only activated after selecting
a point of interest known to the system);
Options
OK Options OK
Add to favourites
Current traffic
News
Close
Coordinate
Options OK
If the coordinates or map location entered do not
match an accessible location (street or path), the
system will create an error message.
Back to car
If an active route exists, you can select the destination as a new route or stage.
Page 10
9
GUIDANCE
Cancel the route
From the main menu you can interrupt an ongoing
route itinerary. Select the “Home” button, “Nav”,
then “Destination”, “Itinerary” from the tabs at the
bottom of the screen, then “Cancel Route” and
confirm.
Configuring a route
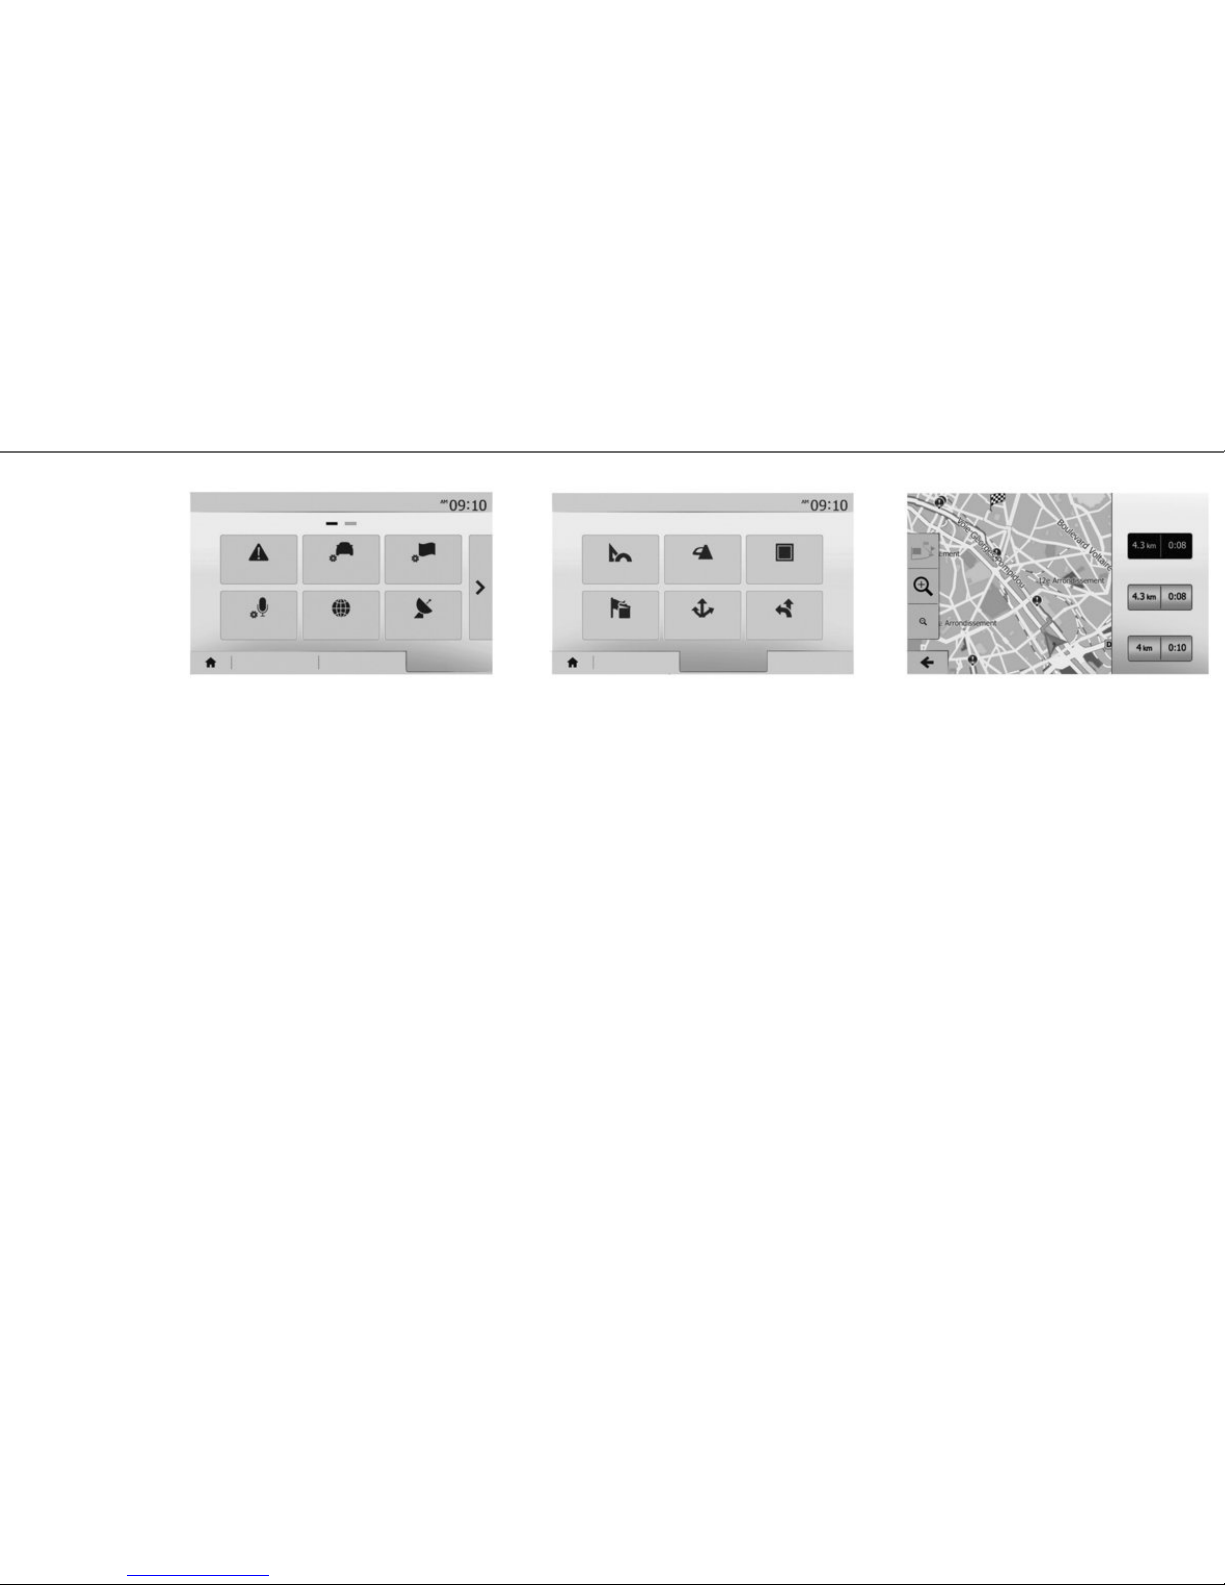
“Route settings”, accessible from the “Options”
menu, allows you to select the type of route to take
during navigation.
Route information
This function allows you to view your route before
guidance begins. Select the Home button, “Nav”,
then “Destination”, “Itinerary” after entering a destination.
There are six types of settings:
– “Edit route”;
– “Avoidances”;
– “Overview”;
– “Cancel Route”;
– “Alternative routes”;
– “Itinerary”.
Alternative routes
This section, accessible from the “Options” menu,
can be used to modify the planning method with
three possible route choices.
– “Fast”;
– “Economical”;
– “Short”.
Note: The choice of route configuration, according to the selected road type, can greatly affect the
proposed route.
Destination Itinerary Options
Navigation
Destination Itinerary Options
Navigation
Warnings
Route settings Map settings
Language Setting Coordinate format
GPS
Edit route
Avoidances Overview
Cancel Route Alternative routes Itinerary
Alternative routes
Fast
Economical
Short
Page 11
10
LIST
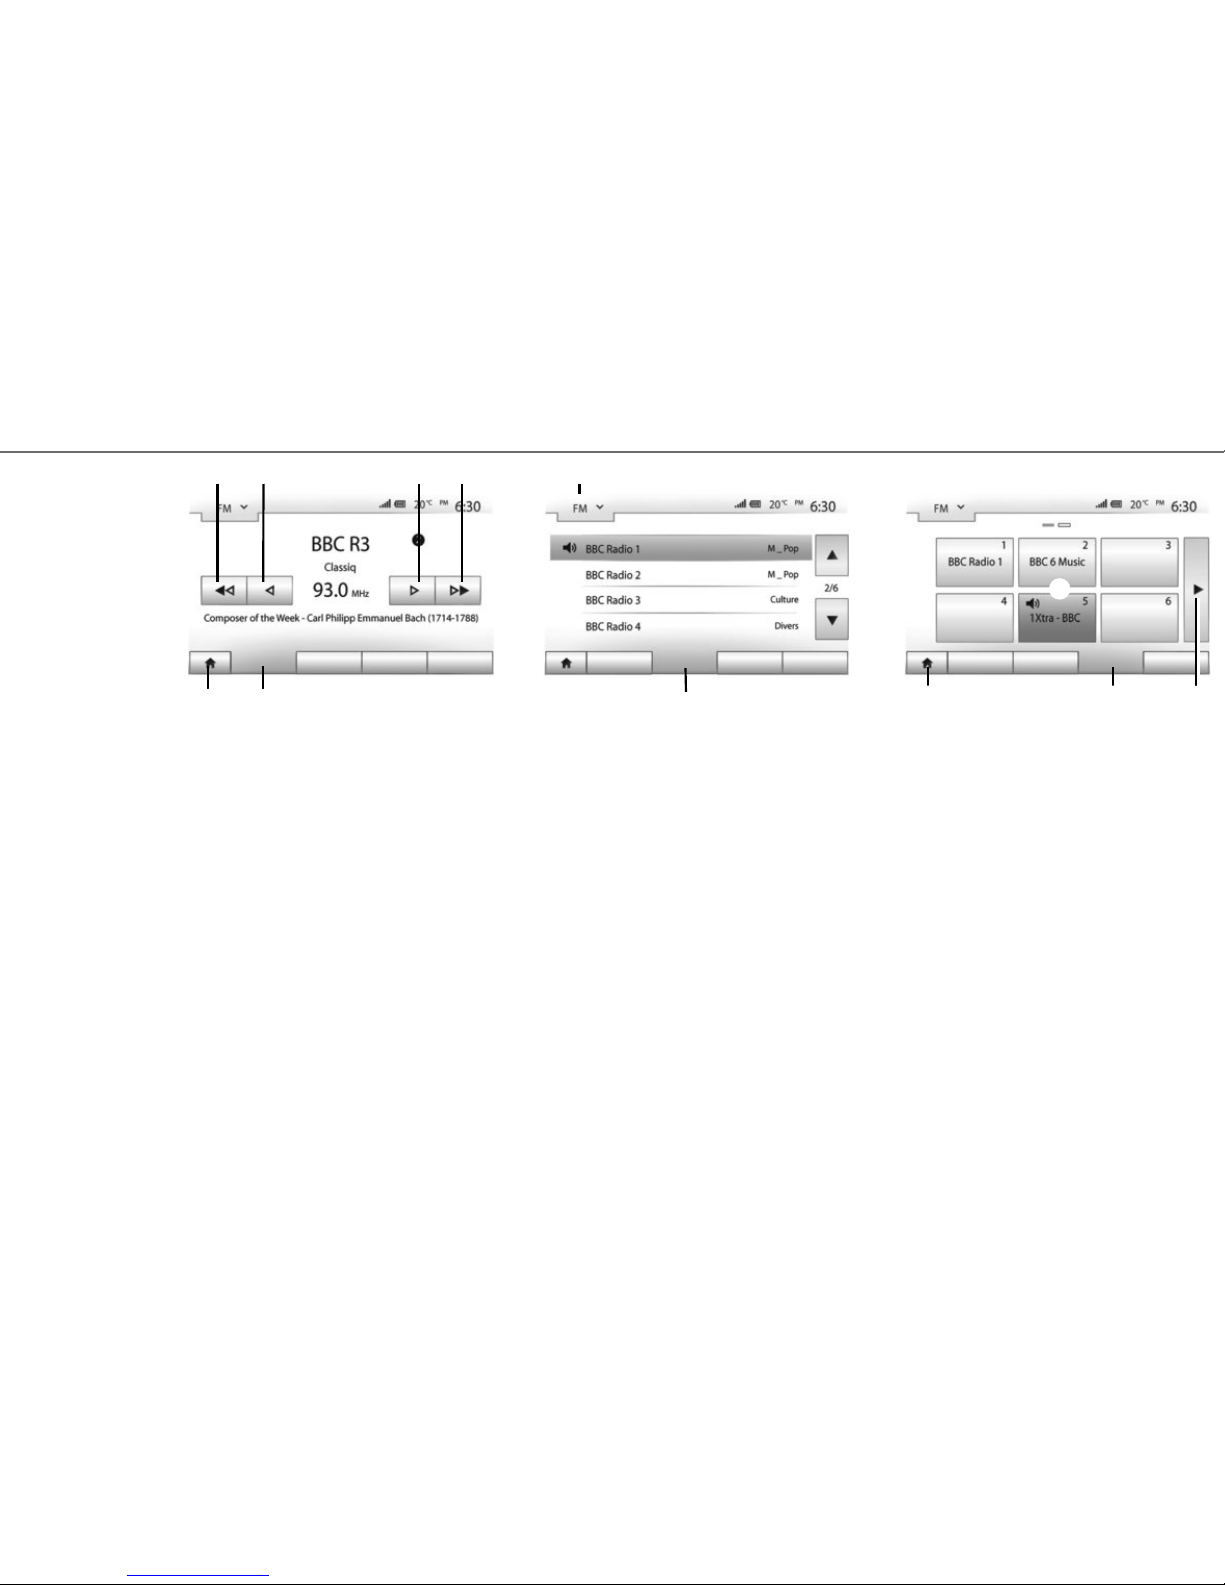
To access the full list of stations, press the “List”
button 8, then select “FM” or “DAB”.
To update the list of FM, AM or DAB stations, press
"Options”, then in the “Update List” section, press
“Start”. Depending on the radio mode 7 selected,
the “FM”, “AM” or “DAB” list is automatically updated.
For more information, see the multimedia system
user manual.
9
8
Main List
Presets
Options
Main List Presets
Options
7
6 10
SAVED STATIONS
To access the list of saved radio stations, press
“Presets” 9, then select the station you want.
SAVING A STATION
While listening to the radio, press “Presets” then
press and hold one of the buttons in the A area
until the sound signal is emitted. You can store up
to twelve stations per band. To access the other
stored stations, press the 10 arrow.
Note: to return to the navigation screen, press the
“Home” button 6, then “Nav”.
To access the radio menu, press the Home
button 6, then “Radio”. Select the desired radio
mode (“AM”, “FM” or “DAB”) by pressing 7.
“AM” and “FM”
FREQUENCIES
To search for a station, select the “Main” button 5.
Two search options are available:
– manual search by pressing buttons 2 or 3;
– automatic search by pressing buttons 1 or 4.
LISTENING TO THE RADIO (1/2)
5
1 2 3 4
Main List Presets Options
6
A
Page 12
11
LISTENING TO THE RADIO (2/2)
“DAB" (terrestrial digital
radio)
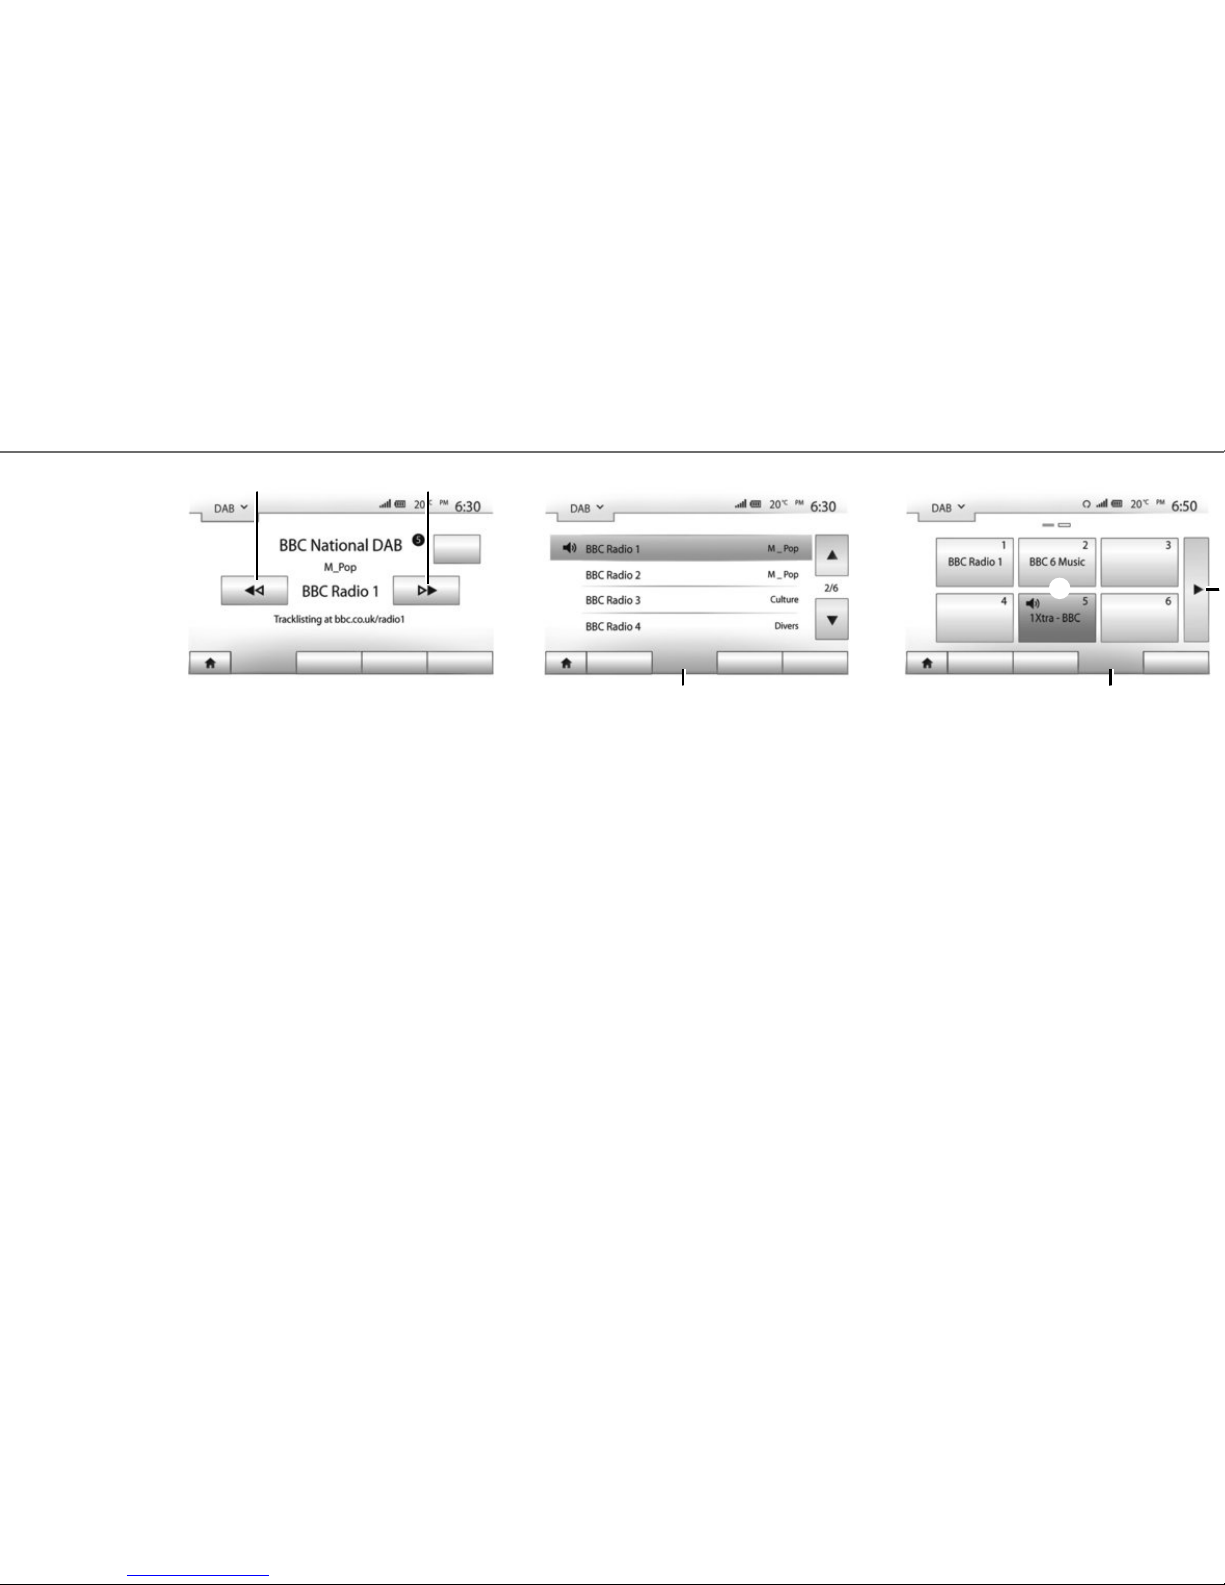
Digital radio offers a greater choice of radio stations, better listening quality and additional information.
FREQUENCIES
This mode lets you listen to the available radios. Go
from one channel to another by pressing 11 or 12.
LIST
To access the full list of stations, press button
“List” 13, then select the desired station.
To update the list of local stations, press “Options”,
then in the “Update List” section, press “Start”.
SAVED STATIONS
To access the list of saved radio stations, press
“Presets” 15, then select the station you want.
SAVING A STATION
While listening to the radio, press “Presets” then
press and hold one of the buttons in the B area
until the sound signal is emitted. You can store up
to twelve stations per band. To access the other
stored stations, press the 14 arrow.
11 12
Options
Main List
Presets
Options
Main List
Presets
13 15
14
Options
Main List
Presets
B
Page 13
12
USE
The iPod® and devices with integrated iPod® can
play music.
“REPEAT”
This function allows you to repeat one song or all
songs.
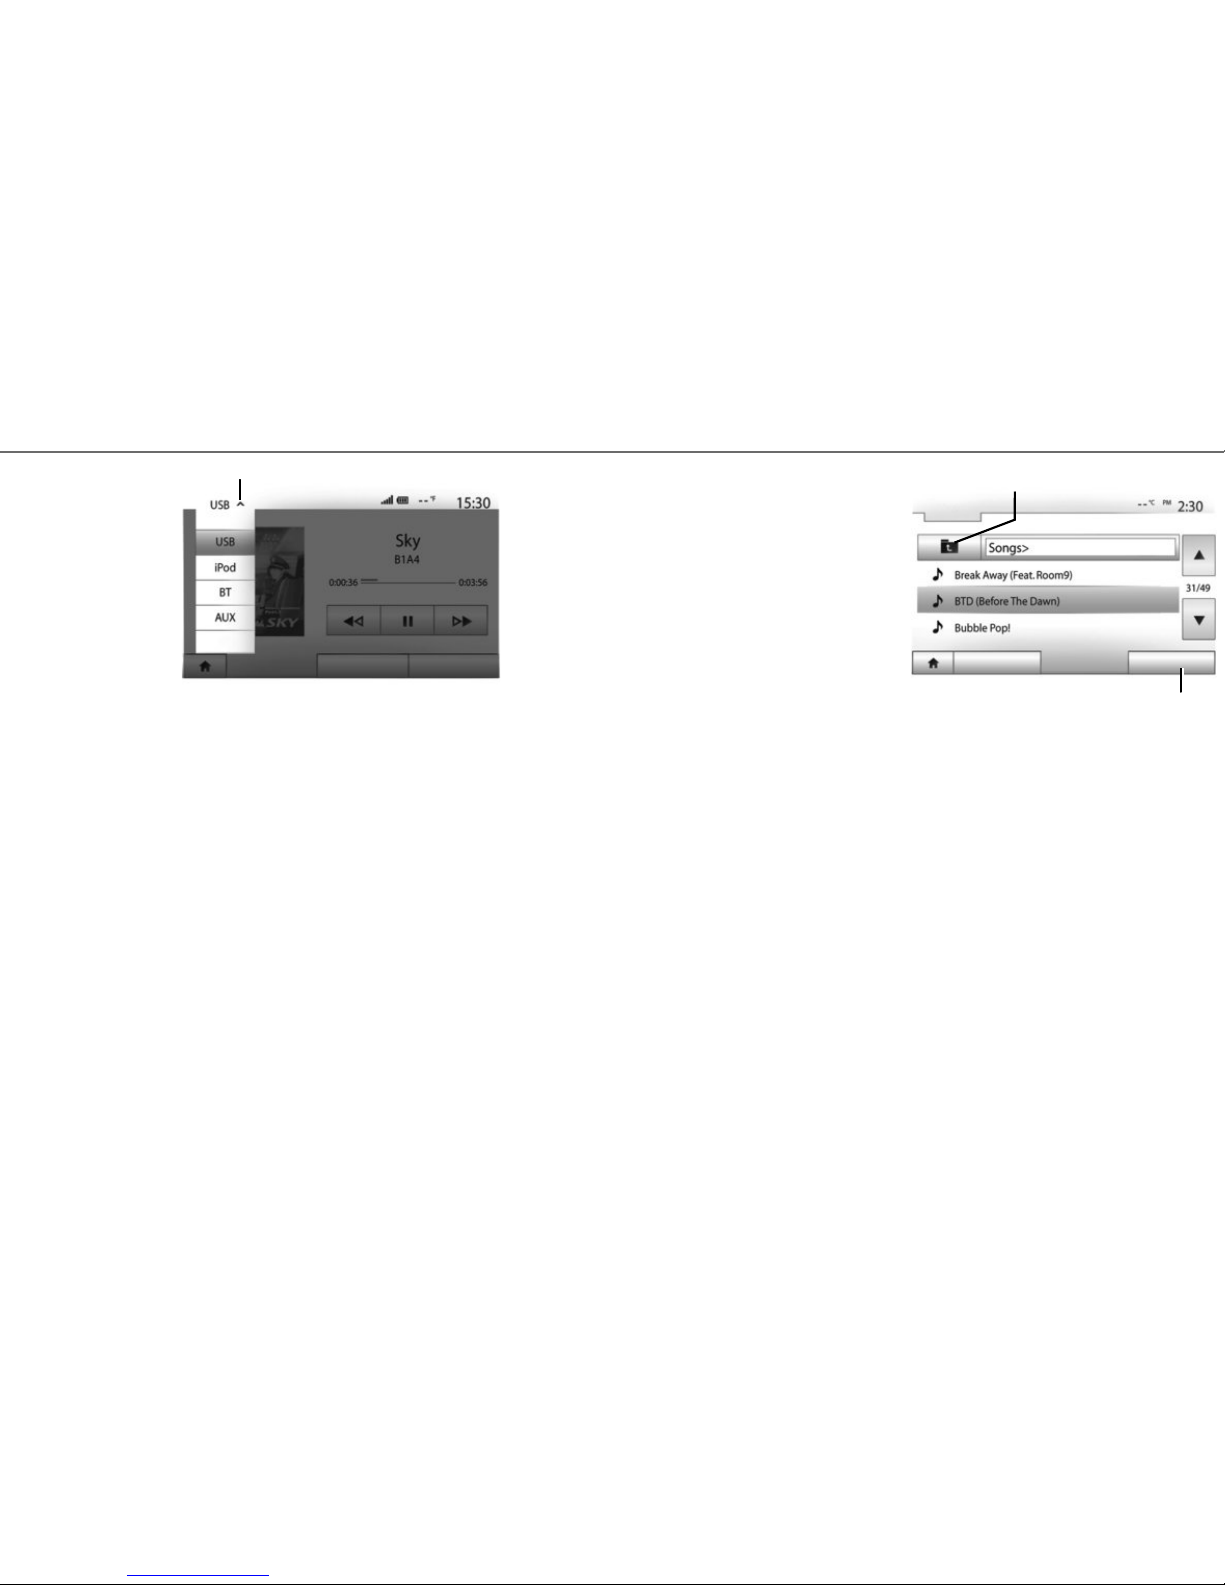
Press “Options” 3 then choose “Track”, “Folder”
or “All”.
To go up a level in the folder structure, press 2.
To deactivate the function, press the “Options”
button 3 then choose “Off”.
Your vehicle is fitted with a multimedia system.
Select “Media” on the main menu.
Several input sources are available by pressing 1:
– “USB": USB memory sticks, MP3 player, phone
etc. ;
– “iPod®": devices with integrated iPod® ;
– “BT”: Bluetooth® devices;
– “AUX”: analogue audio input (3.5 mm jack) ;
– “Video”: USB flash drive (MP4 file).
The USB key used must be formatted to FAT32
format and have maximum capacity 32 GB.
Auxiliary input: USB,
Bluetooth®
CONNECTION: USB
Connect the socket of your portable audio player to
the USB input on the unit. Once the USB socket of
the digital portable audio player is connected, the
“USB” menu is displayed.
CHARGING WITH THE USB PORT
You can charge the battery or keep the battery’s
charge while it is in use.
Note: some devices do not recharge or maintain
battery charge level when they are connected to the
USB port on the multimedia system.
Note: it is best to use a USB connection for easier
music searches.
CONNECTION: IPOD®
Connect the socket of your iPod® to the USB input
on the unit. Once the USB socket of your iPod® is
connected, the “iPod” menu is displayed.
MULTIMEDIA (1/2)
1
Main
Video
List
Options
Main
List Options
2
AUX
3
Page 14
13
Analogue auxiliary input
(AUX)
CONNECTION
Insert the jack from the player into the system’s
auxiliary input.
USE
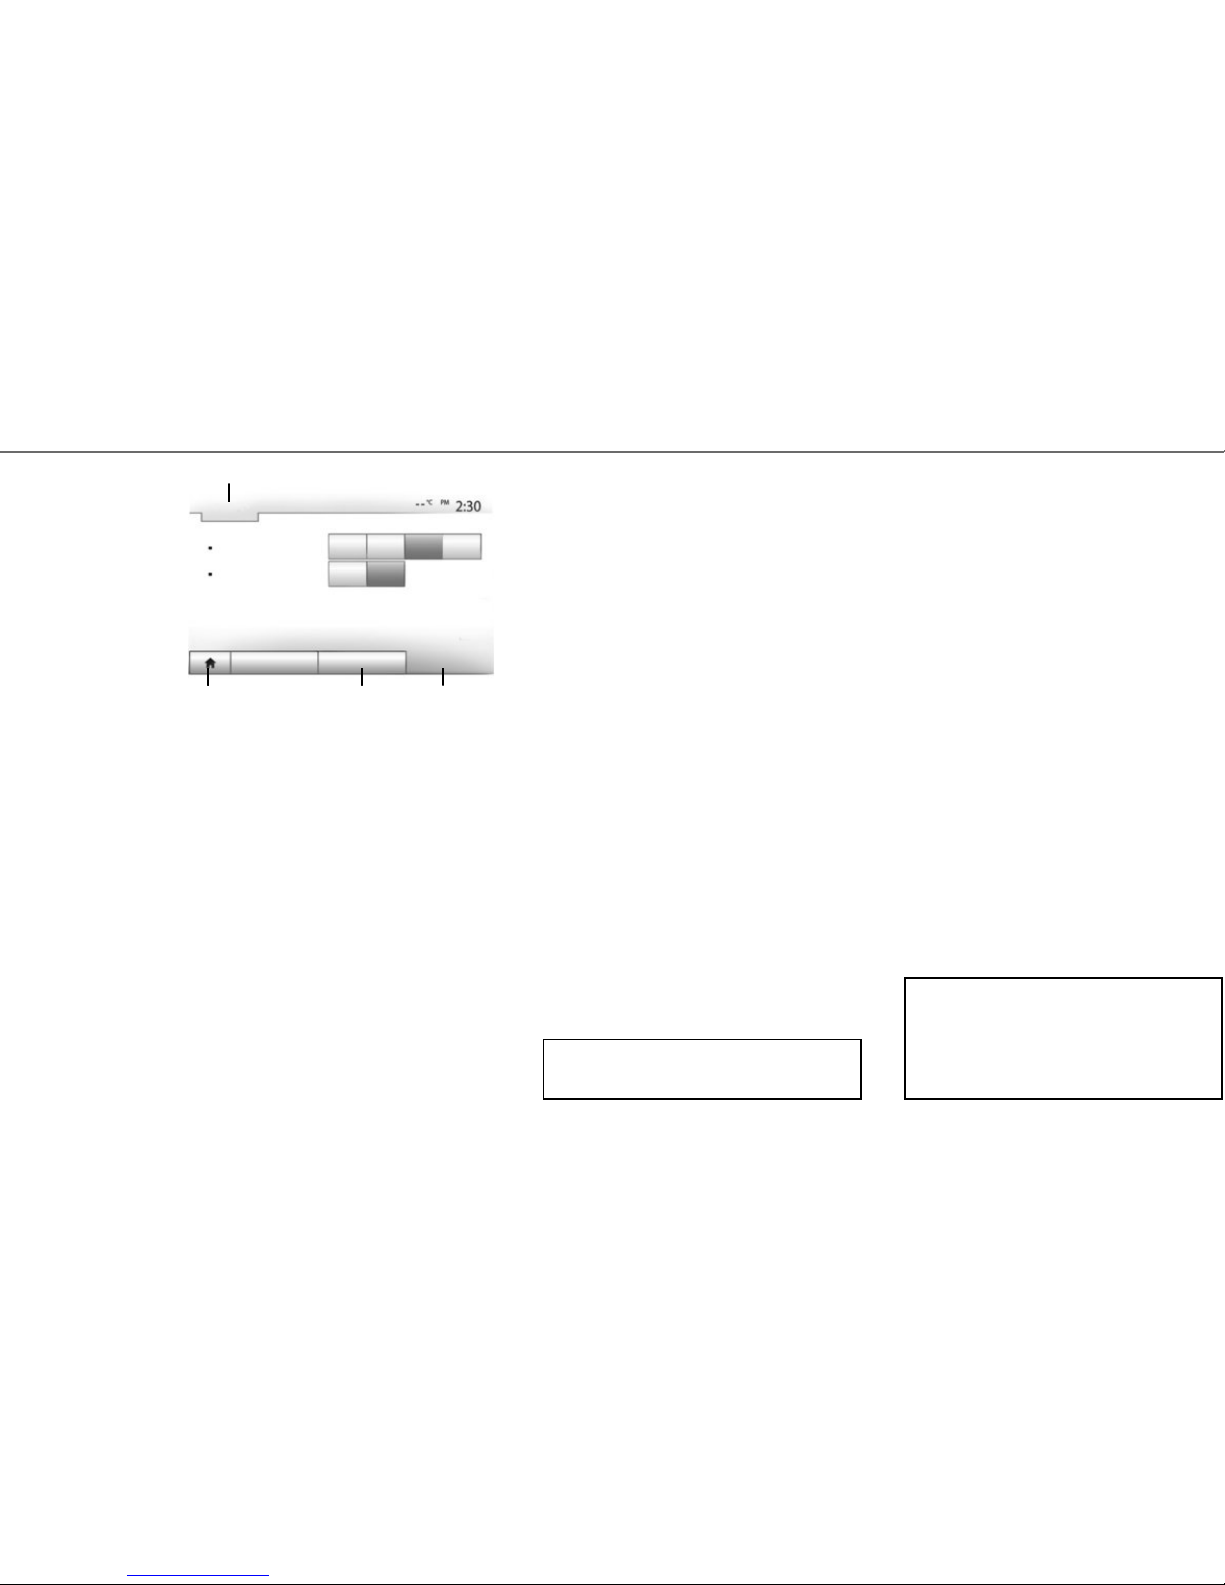
Select “AUX” from the drop-down list 1, then
choose the desired track on your music player.
Do not operate the controls of your external audio
device while driving.
No information regarding the audio (song name,
artist, etc.) will be displayed on the multimedia
screen.
Note: To return to the home screen, press
the 5 button.
MULTIMEDIA (2/2)
3
“SHUFFLE”
This function allows you to play all songs randomly.
Press “Options” 3 then select “On” to activate or
“OK” to deactivate.
CONNECTION: BLUETOOTH®
See the “Connecting Bluetooth® devices” section
in this manual.
The sound quality of the analogue (AUX) or digital (USB, Bluetooth®) inputs may vary according to the file type.
Video playback is only possible when the vehicle
is stationary.
AUX
Main
List Options
Repeat
Shuffle
Off
Off On
Track Folder
All
USE
To display the list of available input sources,
press 1.
To select an audio track within a folder, press
“List” 4.
By default, albums are listed in alphabetical order.
Video
Select “Video” to view the videos available on your
USB flash drive.
When playing a video, you can:
– view the video in fullscreen ;
– adjust the screen brightness ;
– fast forward ;
– restart the video from the beginning ;
– pause.
Note: some video formats may not be compatible
with the system.
5
1
4
Page 15
14
Note: the pairing time varies based on the make
and model of your telephone.
If your telephone is not visible by the multimedia
system when searching for Bluetooth® devices,
please consult your telephone user manual.
If pairing fails, redo the operation.
Note: on some phones, the system may ask you to
confirm the automatic transfer of the phonebook to
the multimedia system during pairing.
CONNECTING BLUETOOTH® DEVICES (1/2)
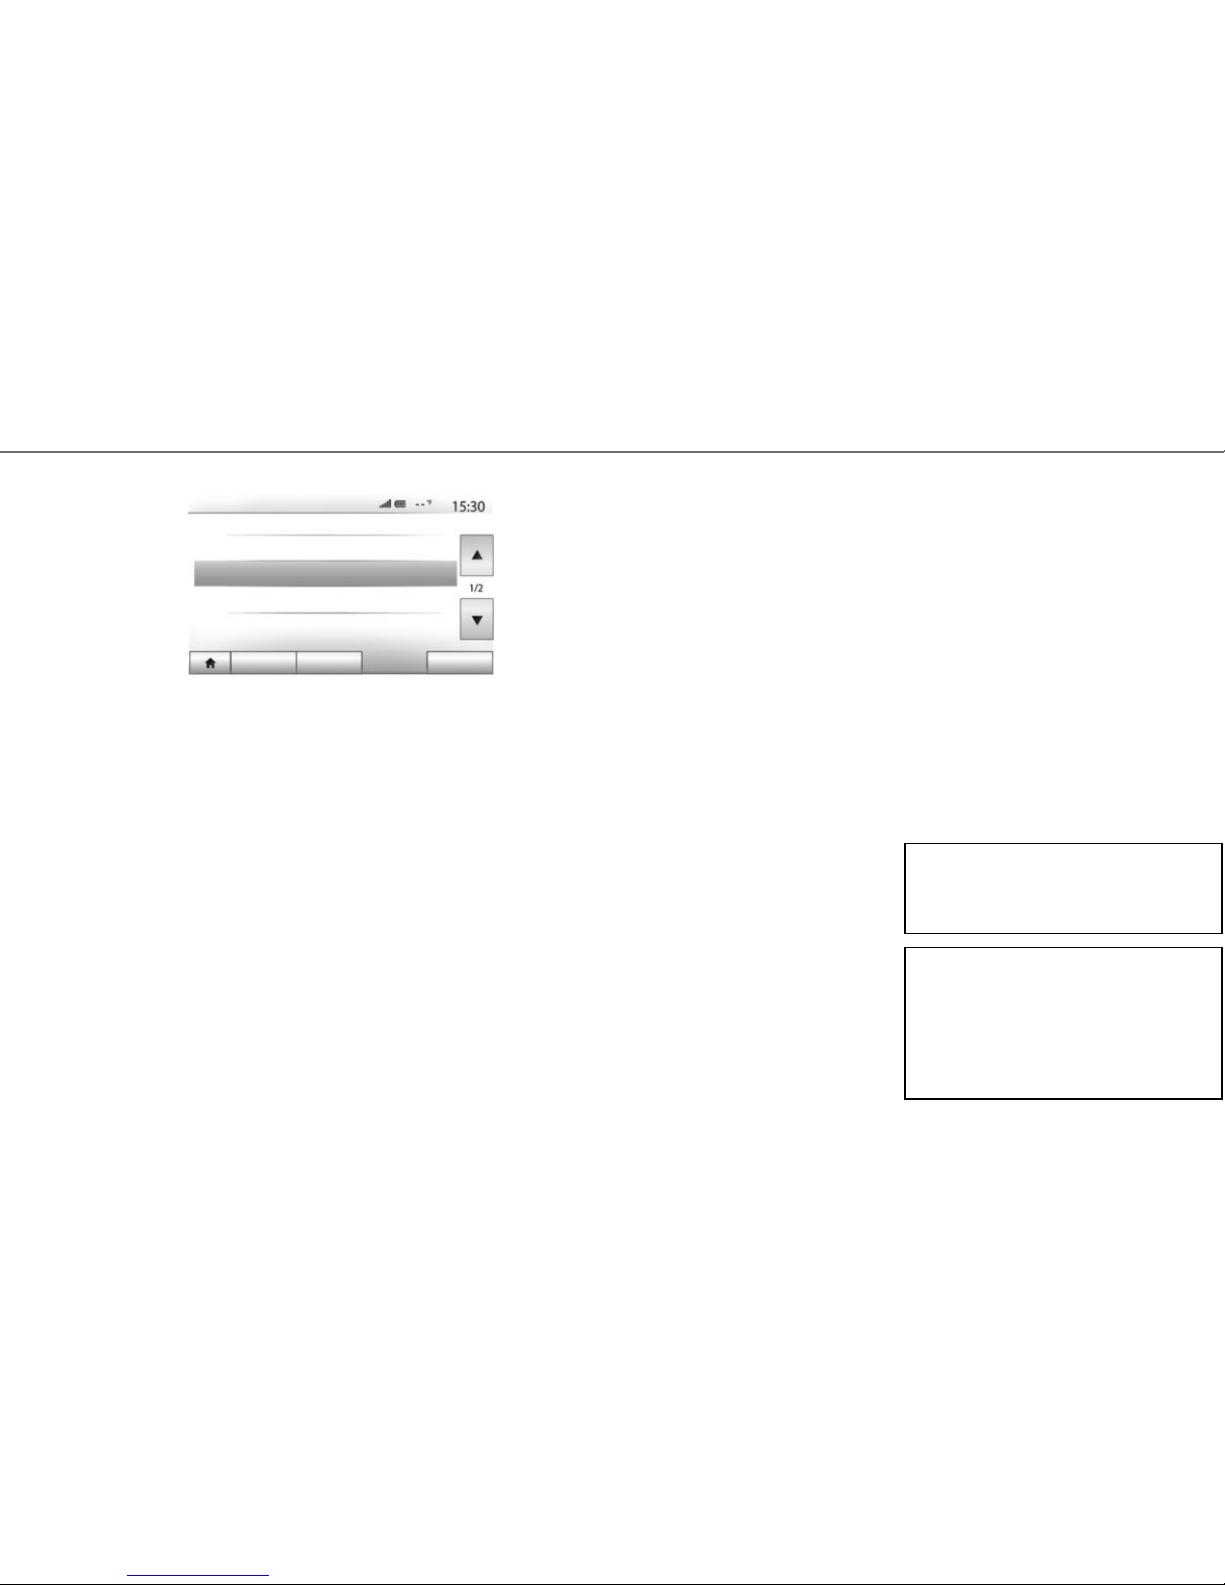
View Bluetooth device list
From the multimedia system:
– Activate your phone’s Bluetooth® connection;
– Press “Settings” > “Connectivity” > “Search for
Bluetooth device” (check that your telephone is
activated and visible on the Bluetooth® link);
– Select your phone from the list of devices found
by the multimedia system;
– A message is displayed on your phone screen.
Depending on the phone, press “Twin”, “Pair” or
“Connect” to authorise the pairing.
– Depending on the phone, enter the code dis-
played on the multimedia system screen on your
telephone keypad;
– A second message appears on your phone screen
offering to automatically pair with the multimedia
system for future uses. Accept this authorisation
to avoid the need to redo all these steps.
Your smartphone is now paired to your multimedia system.
Search for Bluetooth device
External device authorization
Change passkey
Audio
Display
Connectivity
System
Bluetooth Settings
Depending on the make and model of your telephone, the hands-free functions may be partially
or fully incompatible with your vehicle’s multimedia system.
Depending on the country: for more information please see the www.renault-multimedia.
com site.
Pairing a Bluetooth®
phone
PAIRING A BLUETOOTH® TELEPHONE FROM THE
MULTIMEDIA SYSTEM
In order to use your hands-free system, you must
pair your Bluetooth® telephone to the vehicle on
its first use. The multimedia system and your telephone must be switched on and you should check
that your telephone's Bluetooth® is activated, visible and identifiable by other devices (please refer
to your telephone manual for further information).
Page 16
15
CONNECTING BLUETOOTH® DEVICES (2/2)
Note: the pairing time varies based on the make
and model of your telephone. If pairing fails, redo
the operation.
Removing a Bluetooth®
telephone pairing
From the main menu, press “Settings”,
“Connectivity”, then “View Bluetooth device list”.
Press the “Recycle Bin” icon by the phone to delete
and confirm your choice by pressing “OK”.
CHANGING A CONNECTED PHONE
The system can store up to five Bluetooth® telephones.
You can connect/disconnect any of these telephones at any time. From the main menu, press
“Settings”, “Connectivity” then “View Bluetooth
device list”.
Select the telephone to be connected or disconnected, then confirm by pressing «OK».
CONNECTION FAILURE
If connection fails, check that:
– your telephone is switched on;
– your phone is configured to accept the multime-
dia system’s automatic connection request;
– your phone battery is not flat;
– your telephone has previously been paired with
the hands-free system;
– the Bluetooth® function on your phone and on
the multimedia system is activated.
Note: using your hands-free system for prolonged
periods of time will discharge your phone’s battery
more quickly.
PAIRING A BLUETOOTH® TELEPHONE TO THE
MULTIMEDIA SYSTEM FROM THE PHONE
– Activate the Bluetooth® connection of your tele-
phone and the multimedia system;
– on the multimedia system, from the main menu,
press “Settings” > “Connectivity” > “External
device authorization”. The multimedia system is
now visible to other Bluetooth® devices;
– a message appears on the screen displaying a
password and the time left during which the multimedia system remains visible;
– from your phone, display a list of available
Bluetooth® devices;
– select the multimedia system «Media Nav
Evolution" from the list of available devices, and,
depending on the telephone, enter the password
displayed on the multimedia system screen on
your telephone keypad.
A message appears on your telephone screen notifying you that it is now paired with the multimedia system.
When switching on the multimedia system,
the last paired telephone will be automatically
connected to the system.
Page 17
16
MAKING AND RECEIVING A CALL (1/2)
Making a call from the
phonebook
MAKING A CALL
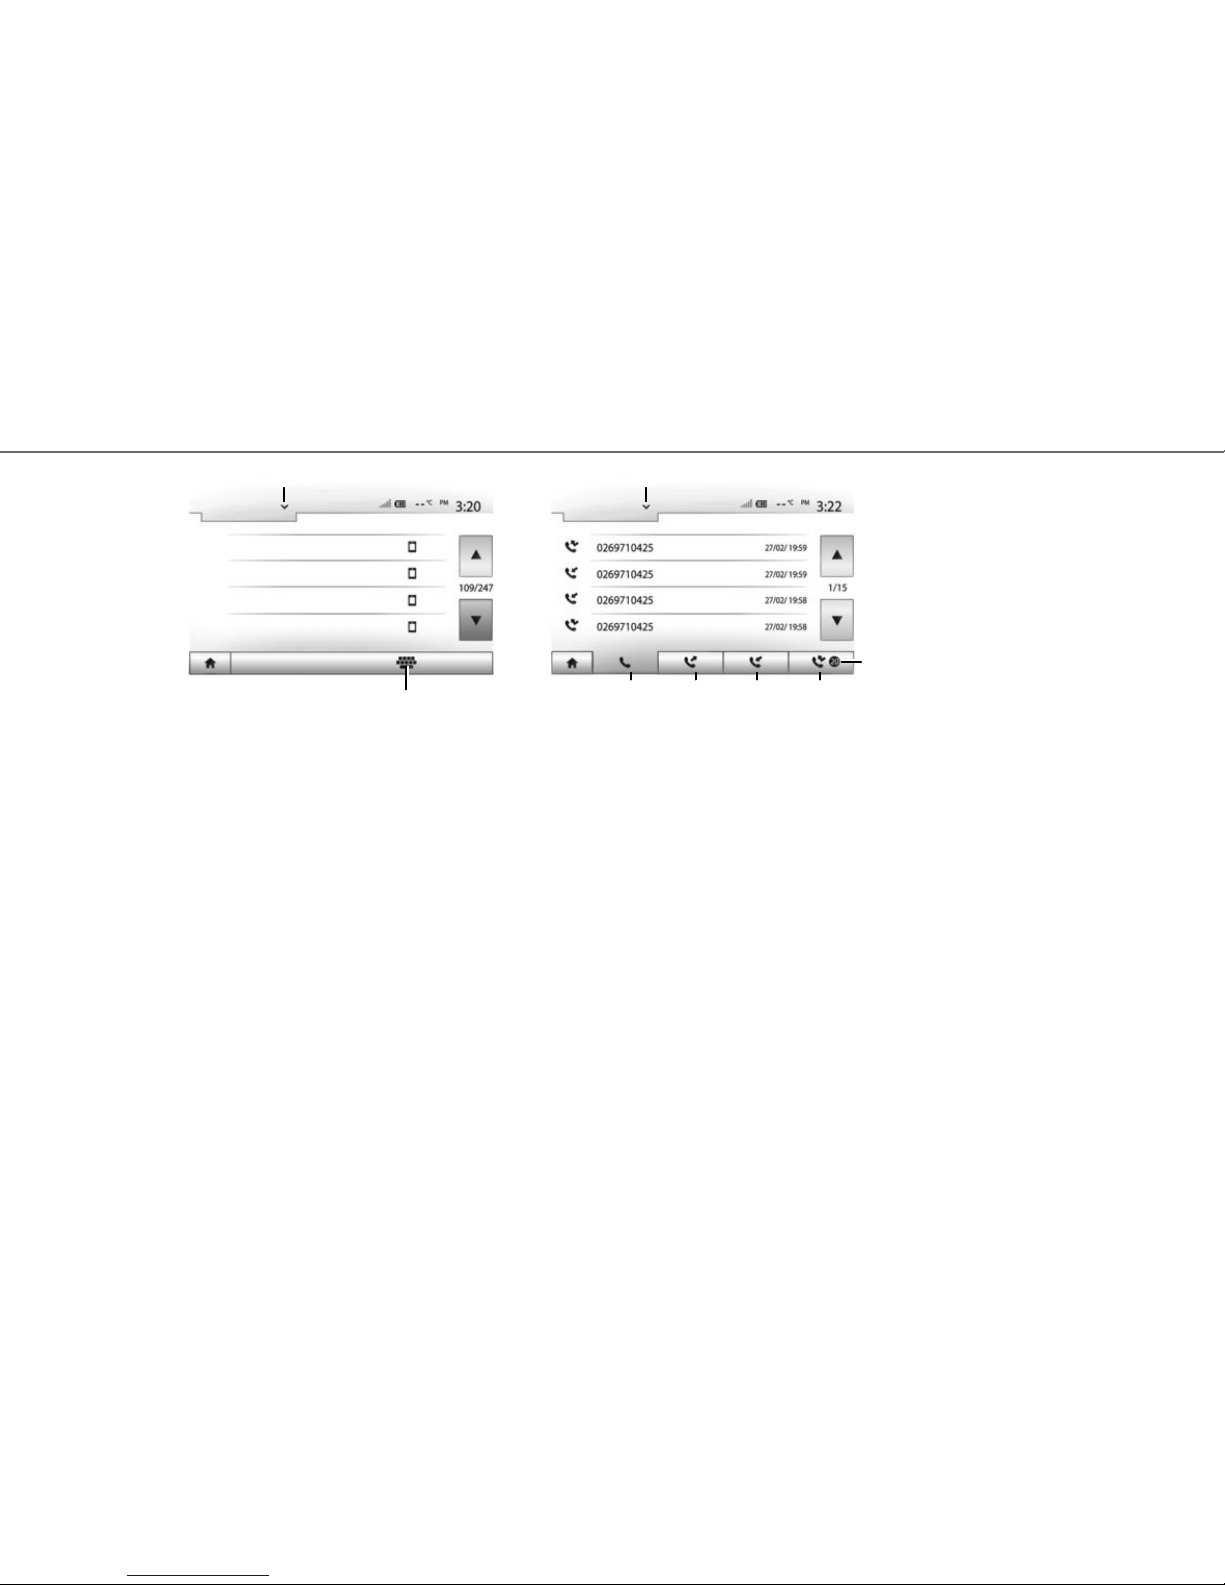
With the telephone connected to the system, from
the main menu press “Phone device”, then “Phone
Book”, in the drop-down menu 1.
Select the contact (or the suitable number of the
contact has more than one). The call is made automatically by pressing the contact’s number.
Note: you can make a call from the multimedia
system using the voice recognition function on
your telephone. For more information, see the multimedia system user manual.
Making a call from the
call history
From the main menu, press “Phone device”, then
“Calling Lists” from the drop-down menu 1.
From the four contact lists, select:
3 Number of missed calls;
4 List of missed calls;
5 List of incoming calls;
6 List of outgoing calls;
7 All calls made, received and missed.
For each list, the contacts are listed from the most
recent to the oldest. Press the contact you wish to
call to start the call.
11
4567
Phone Book
Search by Name
Calling Lists
All
SEARCHING FOR A CONTACT
You can find a contact by pressing 2 from the
“Phone Book” menu then entering the contact’s
last or first name using the keypad.
Press the drop-down menu 1 to scroll through the
list, then select one of the following:
– “Dial”;
– “Phone Book”;
– “Calling Lists”.
Adam Smith
Vincent Casse
Hugo Car Repair
Dr. Brown
2
3
Page 18
17
During a call
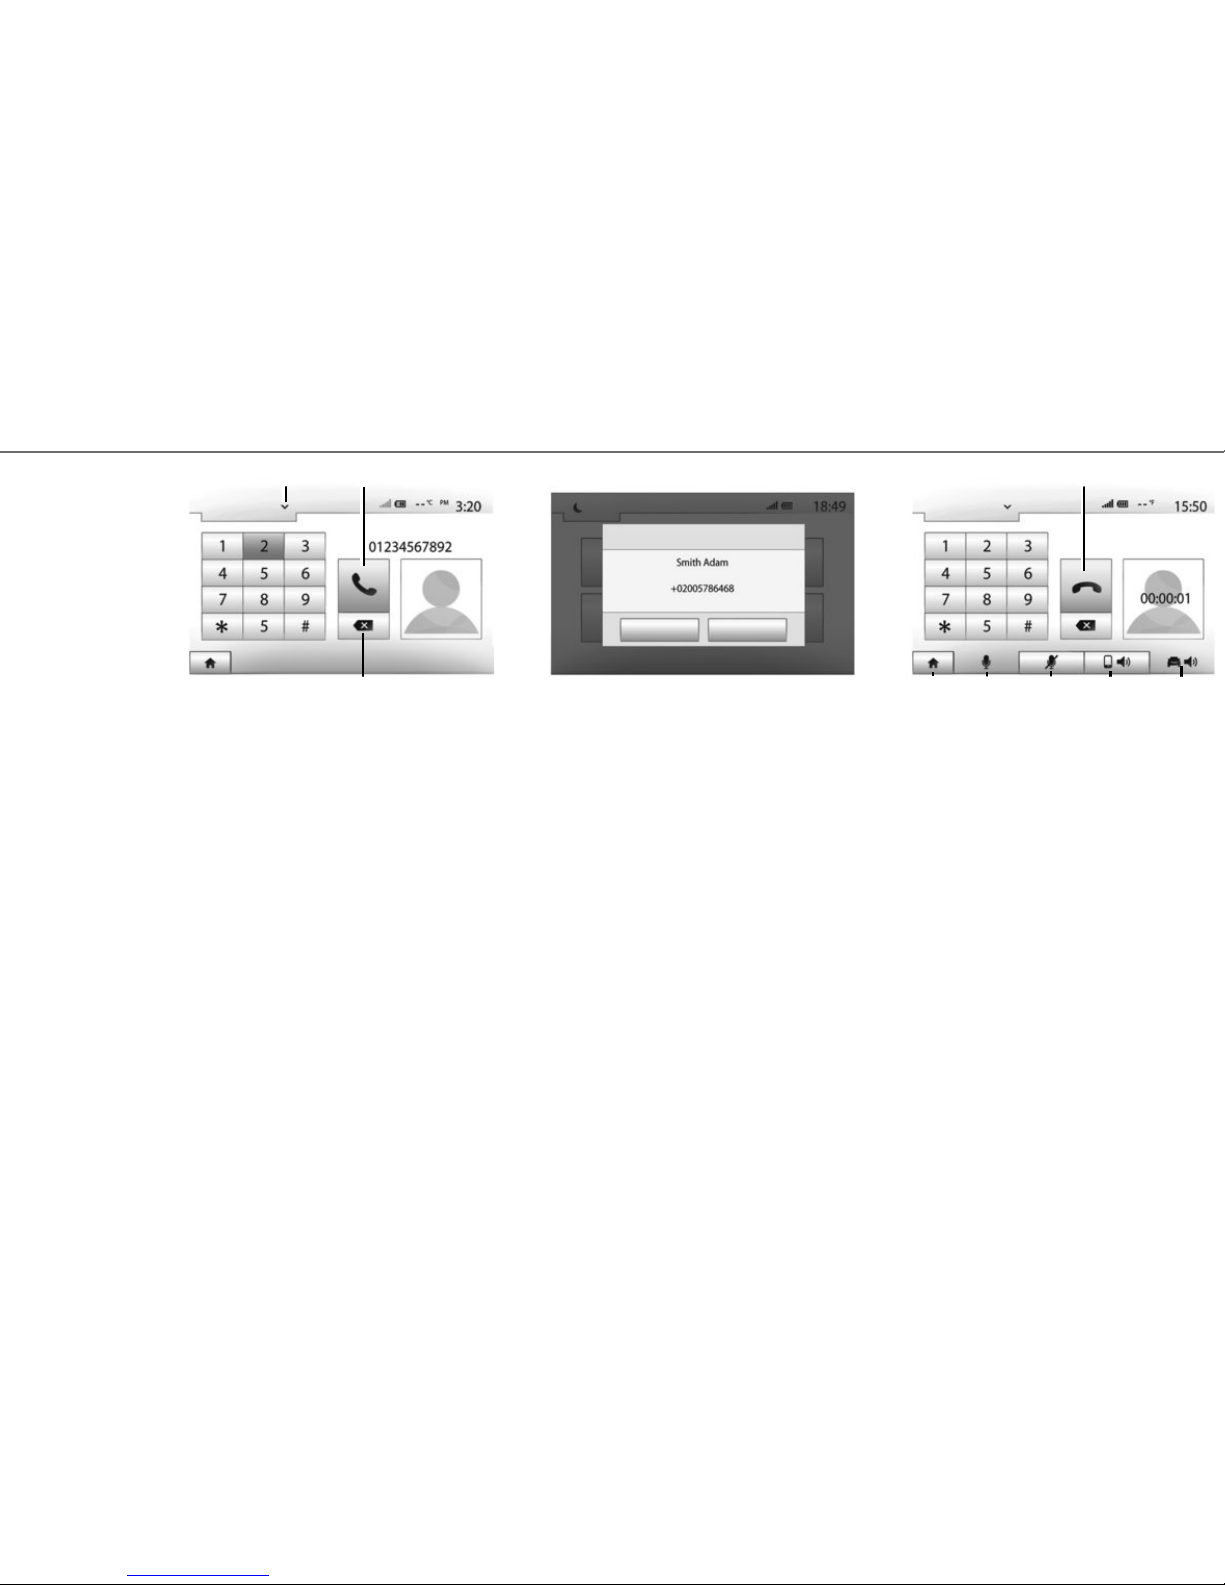
During a call you can:
– hang up by pressing 10;
– hear sound through the phone speaker by press-
ing 12 (private mode);
– hear sound through the vehicle speaker by press-
ing 11 (hands-free mode);
– switch the microphone off by pressing 13;
– switch the microphone on by pressing 14;
– return to the home screen or previous screen
(e.g. navigation) by pressing 15.
Receiving a call
In the event of an incoming call, a message is displayed with the following information:
– the name of the contact (if the number is present
in the phonebook list);
– caller’s number;
– “Unknown Number” (if the number cannot be
viewed).
Note: You can answer or reject an incoming call
using the steering column control.
MAKING AND RECEIVING A CALL (2/2)
1112
1314
Incoming call
Accept Reject
Dial
Entering a number
From the main menu, press “Phone device”, then
“Dial” from the drop-down menu 1.
Press the numbered buttons to dial the number,
then press 8 to place the call.
To correct a number, press 9 briefly. Press and hold
the button 9 to delete all of the entered number.
9
Dial
1
8
10
15
Page 19
18
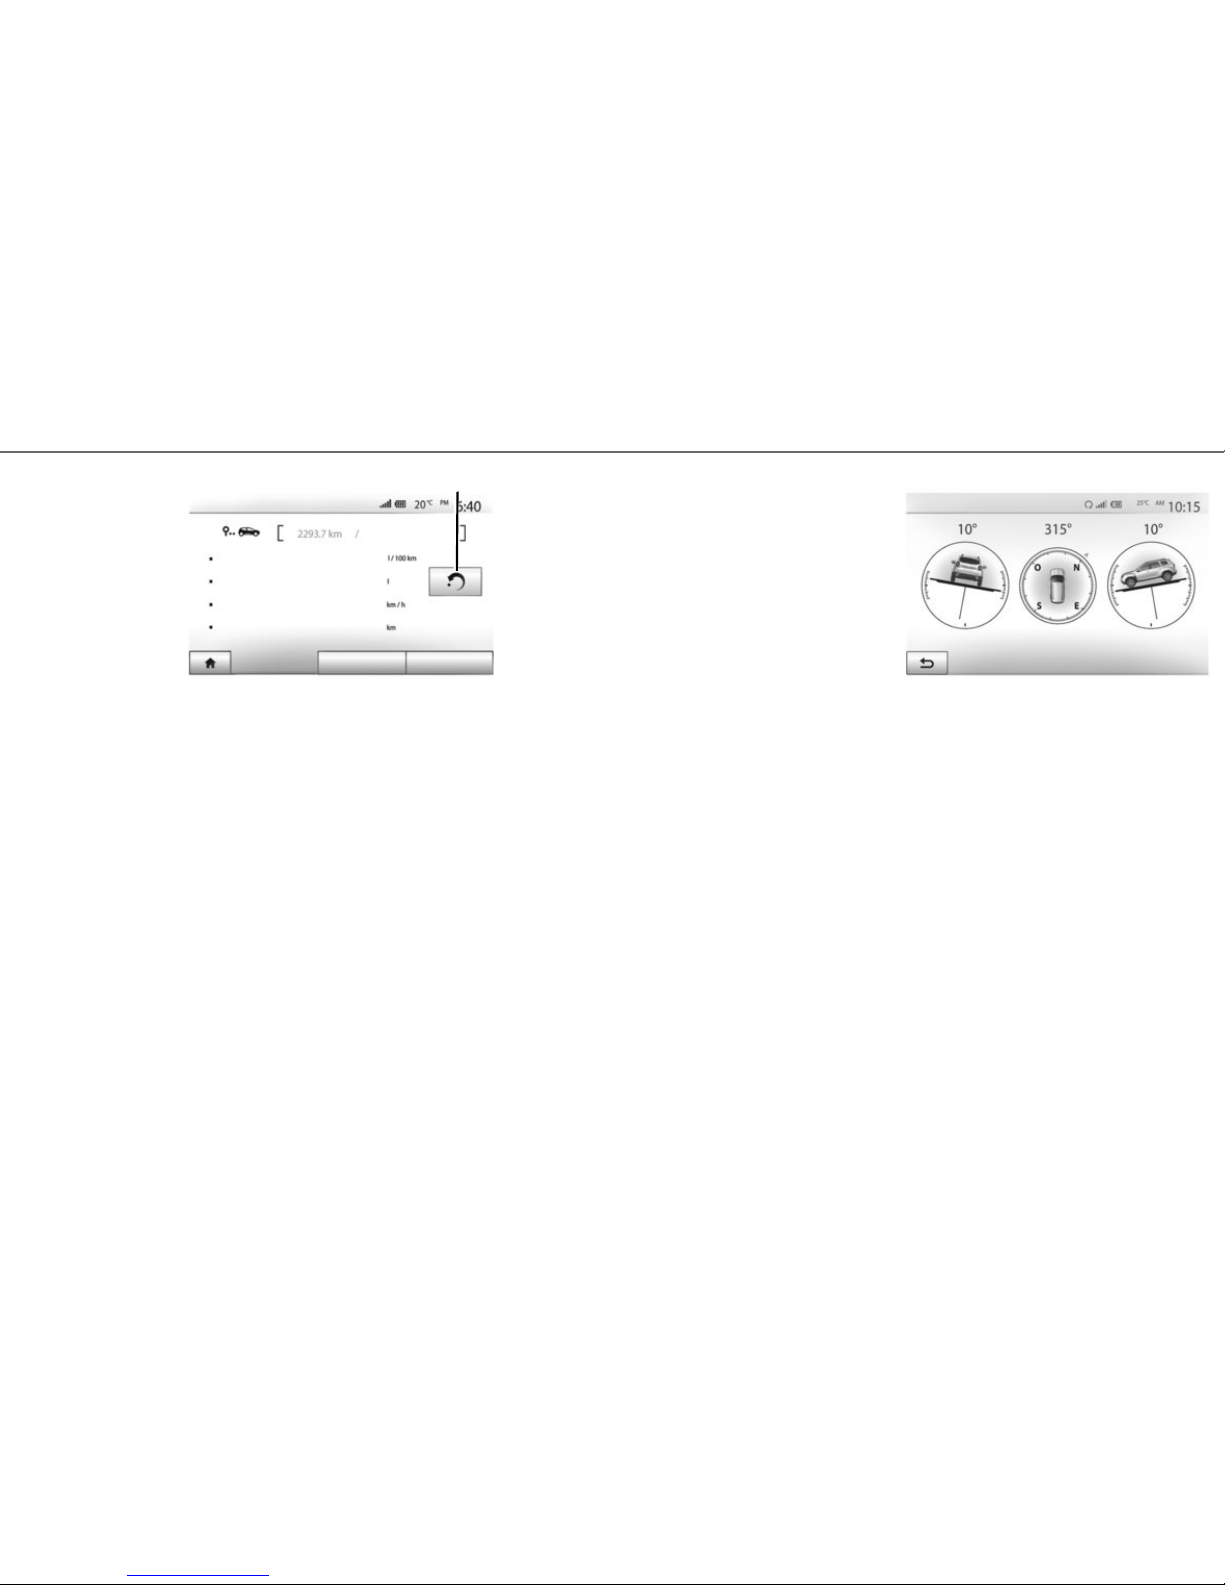
DRIVING ECO²/ANDROIDAUTO-CARPLAY/4X4 INFO
4X4 INFO
If the system is equipped with this feature, “4x4
info” can be used to obtain the following information in real time:
– Wheel camber (drive) in degrees;
– Course, using a compass;
– Horizontal angle (pitch) in degrees.
1
Trip report Eco scoring Eco coaching
Average consumption
Total consumption
Average speed
Dist. without consumption
Driving eco2
“ECO SCORING”
This menu gives you an overall mark out of 100.
The higher the score, the better your eco-driving
performance.
– Average acceleration performance;
– Average gear change performance;
– Average braking anticipation performance.
“ECO COACHING”
This menu assesses your driving style and gives
you the best possible advice to optimise your fuel
consumption.
ANDROID AUTO/
CARPLAY
Android Auto and Carplay can be used with certain
applications on your telephone, accessible from
your multimedia system screen. For more information, see the multimedia system user manual.
Driving eco²
Depending on your equipment level, the menus can
be used to monitor your fuel consumption. From
the main screen select “Driving eco²” to access the
following information:
“Trip report”, “Eco scoring”, “Eco coaching”.
Note: You can reset the data by pressing 1.
“TRIP REPORT”
You can view the data recorded for your last journey: “Average consumption”, “Average speed”,
“Dist. without consumption”.
4x4 info
Page 20
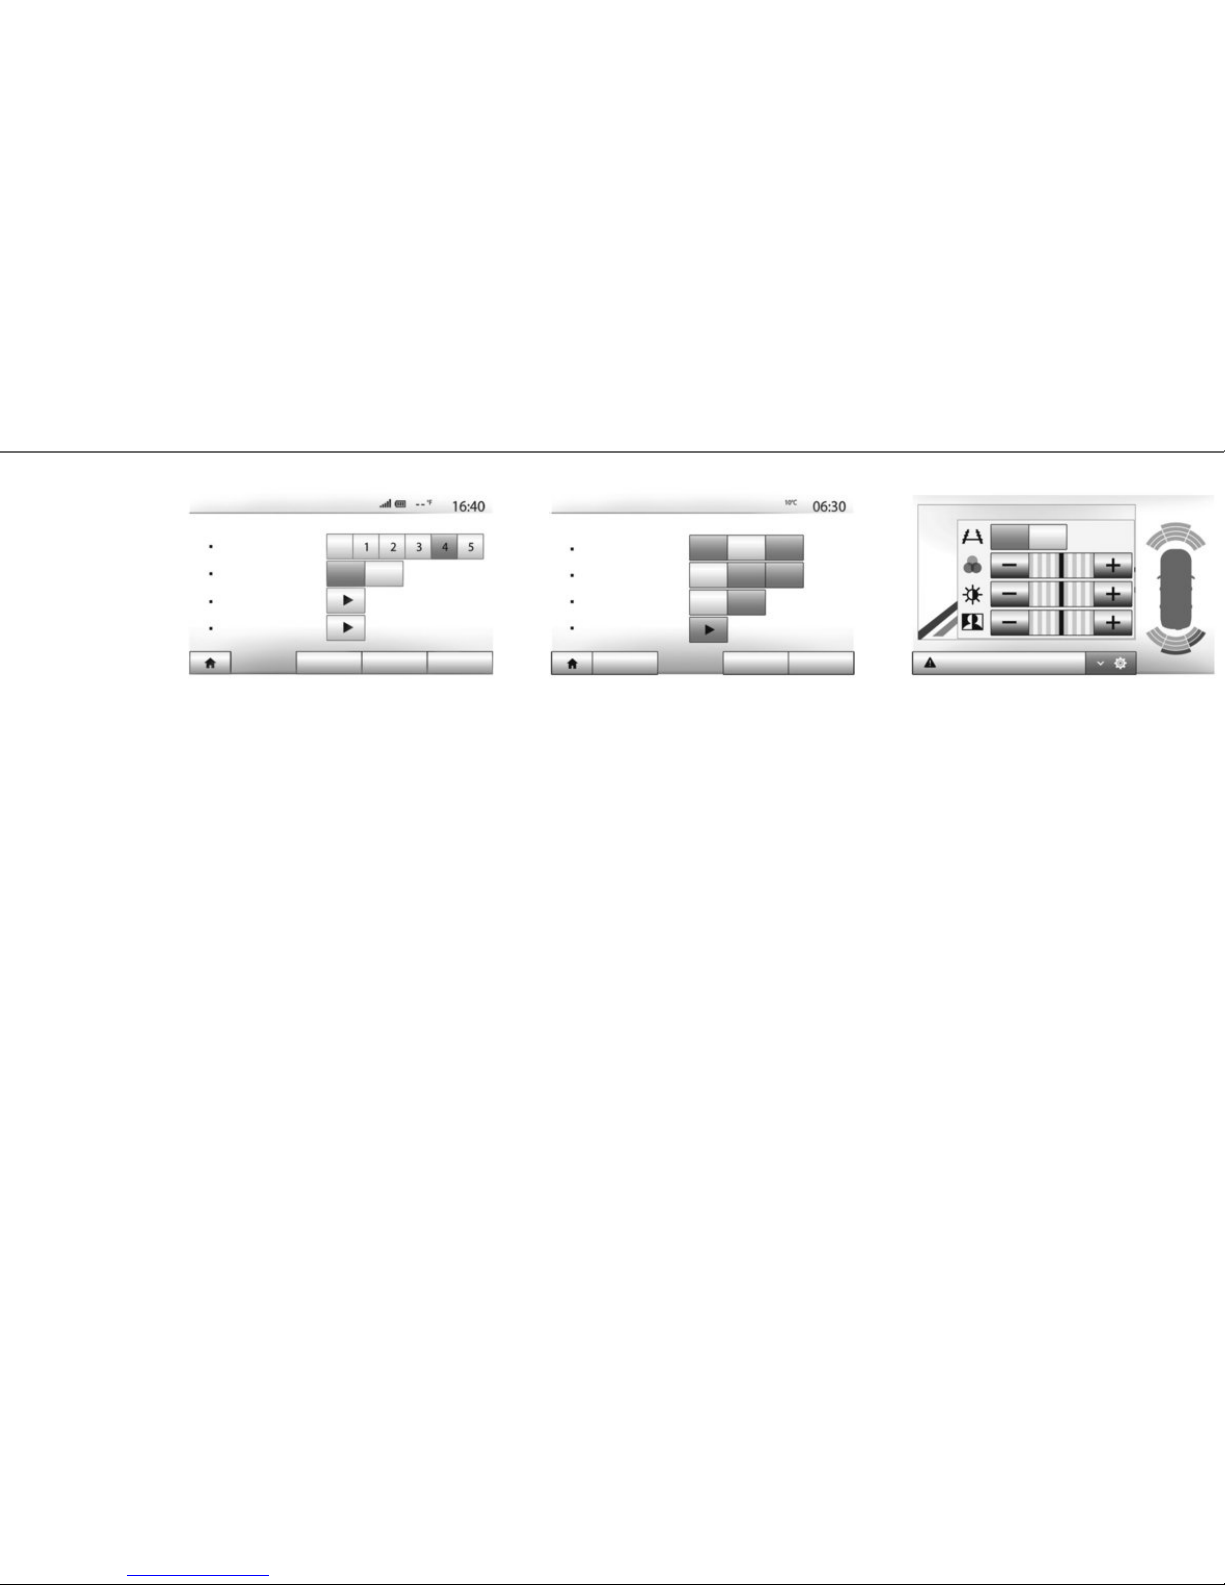
19
– “Sound” can be used to set the audio volume for
each sound independently (Audio, TA, Navigation,
Phone device and Ring).
DISPLAY SETTINGS
This menu lets you go to the following settings:
– “Brightness” adjusts the brightness of the screen
between “Low”, “Mid” and “High”;
– “Map Mode” can be used to improve map visibil-
ity by setting the display mode to “Day”, “Night”
or “Auto” to change to “Day”/”Night” mode auto-
matically according to the headlight status;
Accessing the settings
From the main menu, press “Settings” to access
the following settings: “Audio”, “Display”,
“Connectivity” and “System”.
AUDIO SETTINGS
This menu lets you go to the following settings:
– “Vol/Speed” can be used to automatically adjust
the volume based on the vehicle speed;
– “Loudness” can be used to activate the sound
equaliser;
– “BAL/FAD” can be used to set the left/right and
front/rear sound balance as well as the bass,
medium and treble;
SYSTEM SETTINGS (1/2)
– “AC Info” can be used to activate or deactivate
the display of air conditioning details when the
settings are modified;
– “Background” selects between a dark or light
display mode;
– “Parking assistance” can be used to activate or
deactivate the rear view camera (or multi-view
camera, depending on equipment) and to access
the obstacle detection settings.
BLUETOOTH® CONFIGURATION
Please refer to the “Bluetooth® device connection”
section.
Audio
Display Connectivity
System
Loudness
BAL/FAD
Audio Settings Display Settings
Brightness
Map Mode
Low
Mid
High
Auto
Day Night
Audio
Display
Connectivity
System
Vol/Speed
Background
Dark Light
Off
On
Sound
Off
Parking assistance
Off On
Look in all directions
Page 21
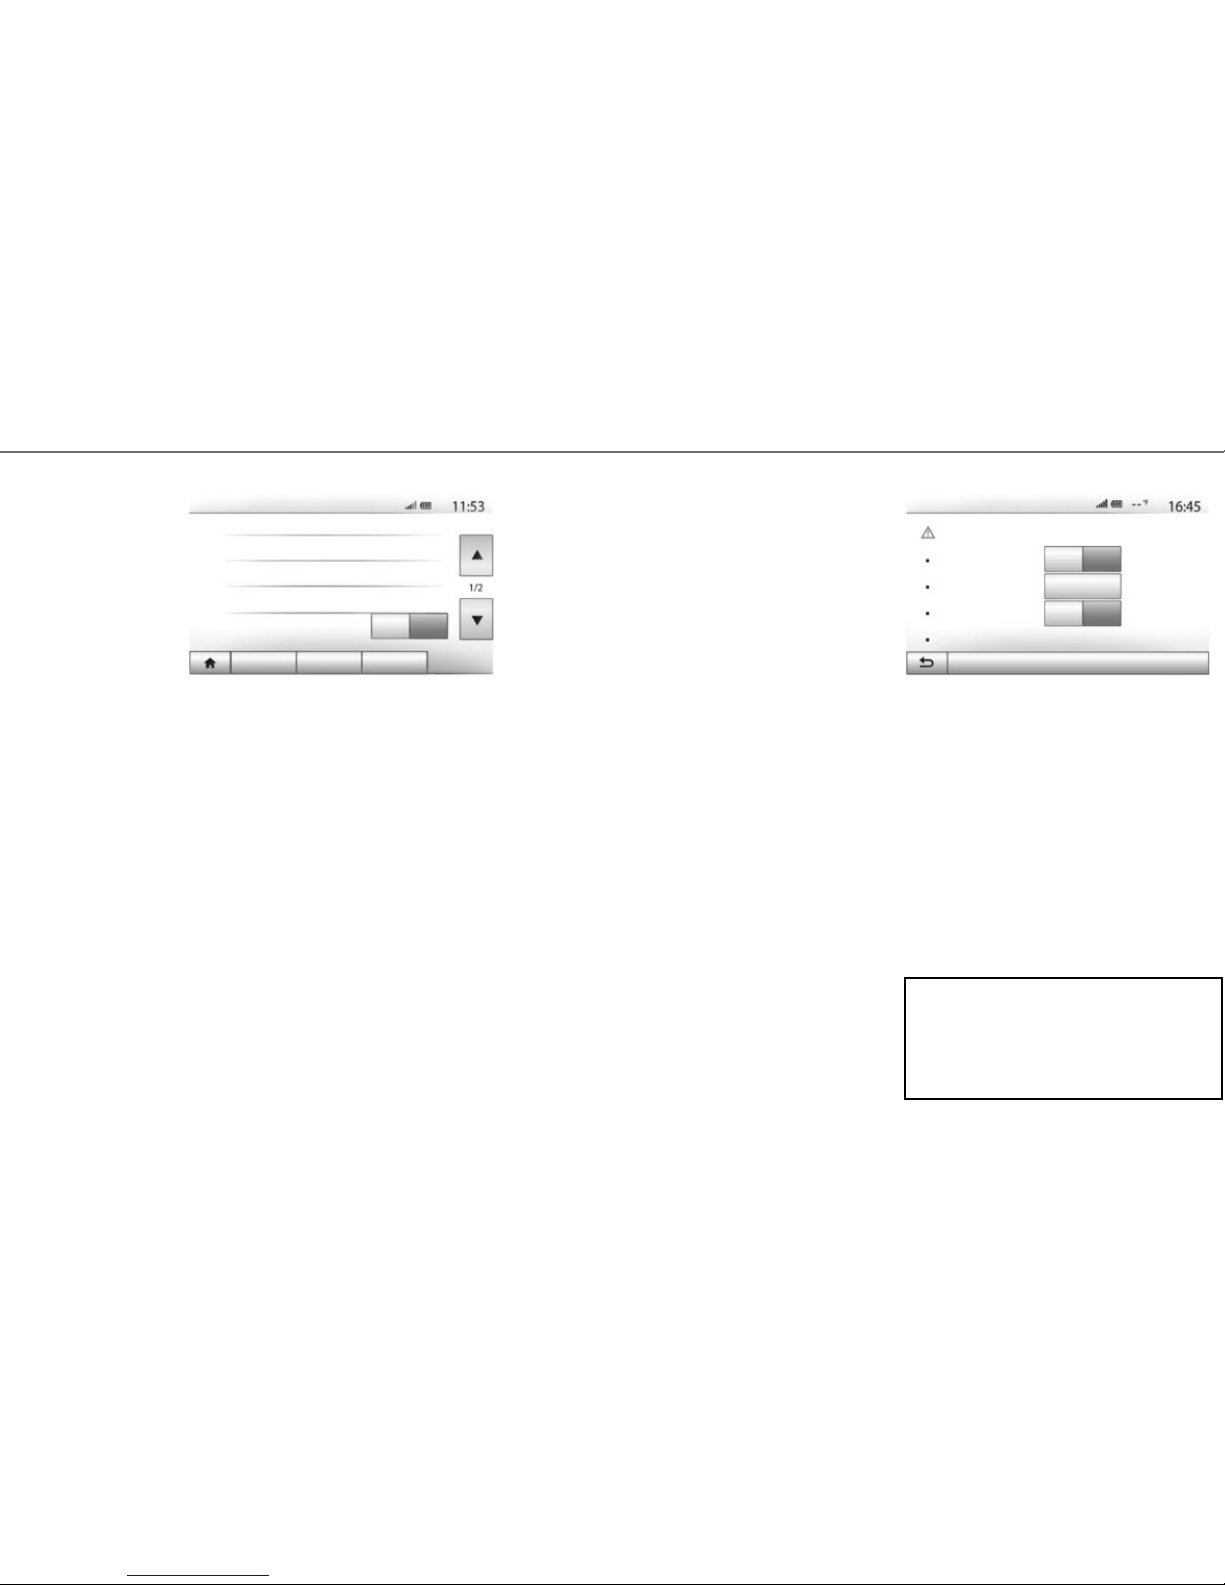
20
SYSTEM SETTINGS (2/2)
Audio
Display Connectivity
System
Language
Clock/Units
System Settings
Factory Settings
Navigation
SYSTEM SETTINGS
This menu lets you go to the following settings:
– “Language” can be used to change the system
language from “Navigation”, “Destination”,
“Options”. To change the system voice, refer to
the “Guidance” section in the multimedia system
user manual;
– “Clock/Units” can be used to change the time
setting to manual or automatic mode, choose the
“12H” or “24H” display format, or to modify the
measurement units (distance, Temperature). To
change the time manually, press “Clock/Units”,
then select “Time Setting”.
Off On
Remote Engine Start
Warning: Never park your vehicle in an enclosed room
Automatic Start
Car Ready for
Wake up every 2 hours
Car will be ready in 0 hours & 0 minutes
OK
Off
Off
On
On
Change
Remote engine start-up
If the vehicle is equipped with this function, it can
be used to set the engine to start remotely in order
to heat or ventilate the passenger compartment up
to 24 hours before using the vehicle.
To use the remote engine start-up, see the section “Remote engine start-up” of the Driver’s
Handbook.
Note: The time is set automatically by the GPS. You
will need the maps for the country in which you are
currently located to get the local time.
– “Factory Settings” can be used to reinitialise vari-
ous settings (“All”, “Phone device”, “Navigation”
or “Audio-Media-Radio/System”);
– “Navigation” can be used to activate/deactivate
the system navigation,
– “System Version” enables you to check the
system version.
Security code
Your multimedia system is protected by a security code. This is used to electronically lock the
multimedia system when the power is cut (battery
disconnected, system disconnected, fuse blown,
etc.). To operate the multimedia system, you must
enter the secret four-digit code supplied by the approved dealer.
For more information, see the multimedia system
user manual.
Page 22
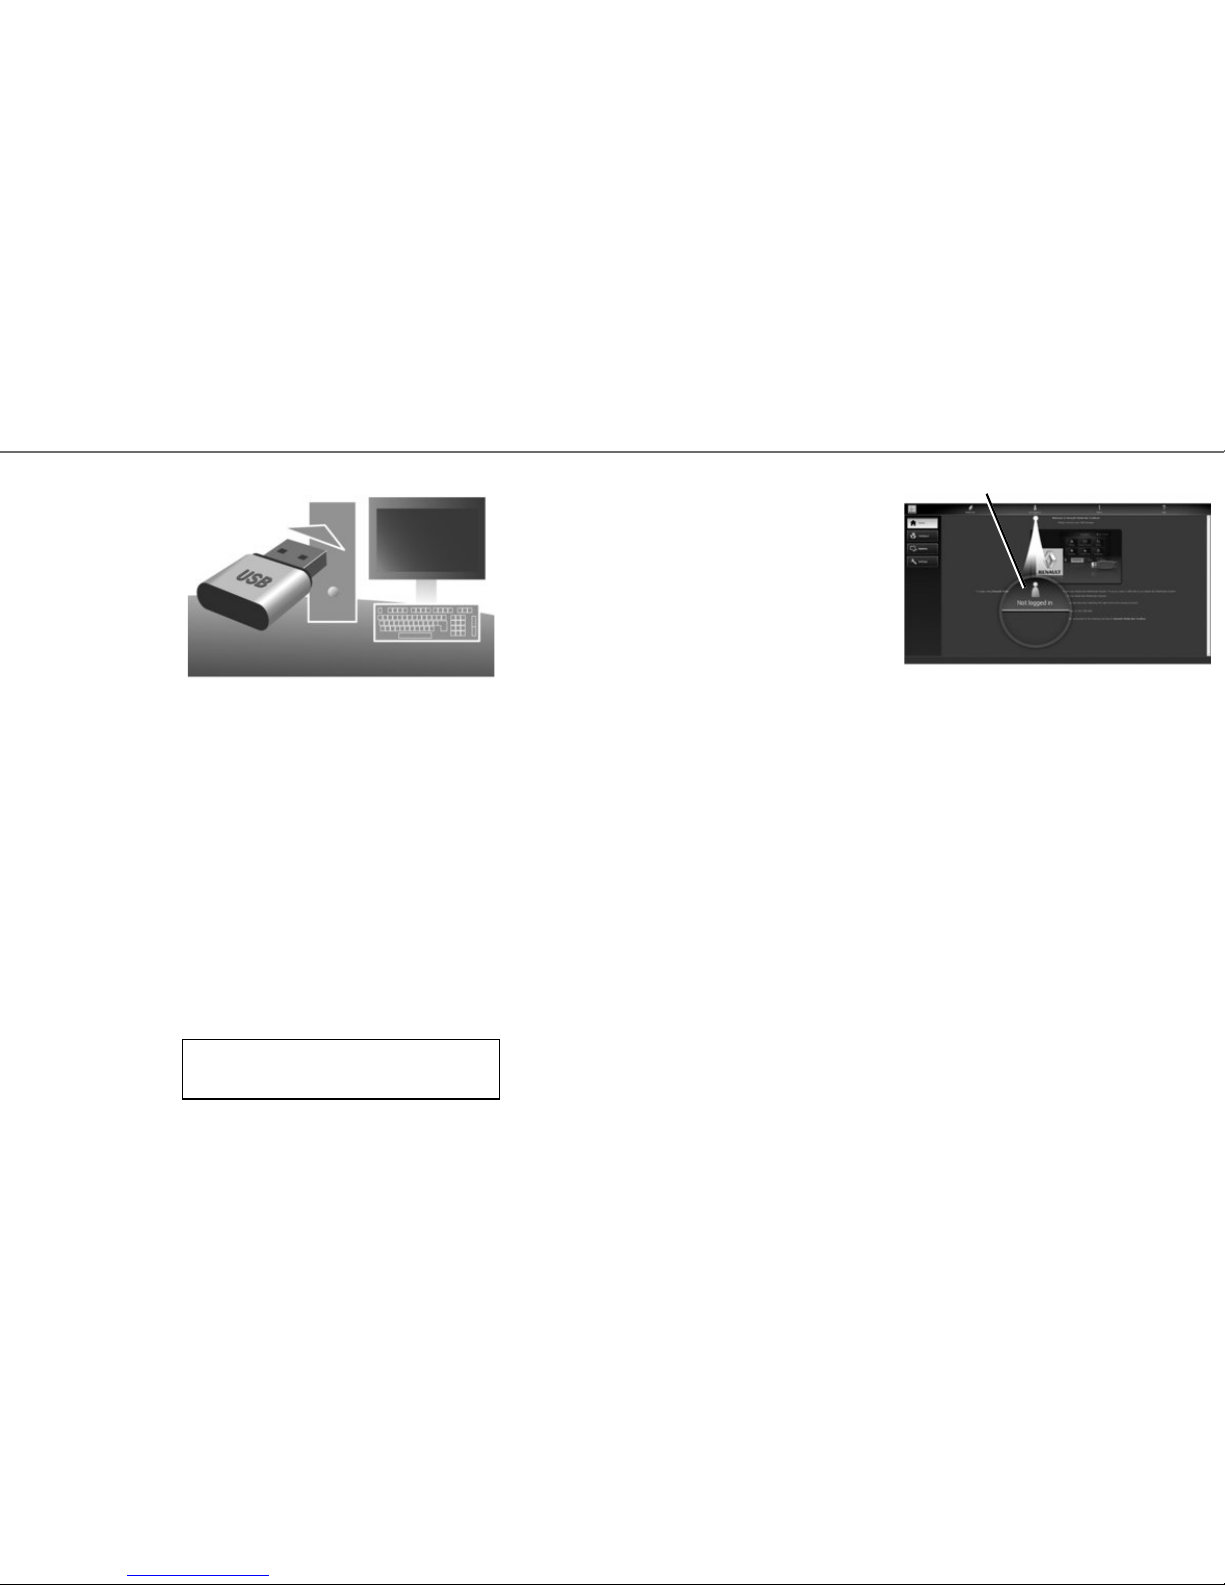
21
UPDATING THE SYSTEM (1/2)
Updates (especially of maps) are published regularly. In some cases, it is possible that roads alter
and that the mapping is not yet up to date.
Note: we recommend installing Naviextras Toolbox
software on your computer and updating your
system regularly.
Using a formatted USB key, a computer and an
Internet connection, you can:
– update your map content;
– update the system;
– purchase new maps;
– update your places of interest.
To do this, you must first install the software on
your computer.
Installing the software
Install the Naviextras Toolbox application on your
computer. The application can be downloaded from
the manufacturer's website: Naviextras.com.
Launch the software installation and follow the onscreen instructions.
Creating an account
From the Naviextras Toolbox application, press
the 1 icon “Not logged in” in the toolbar at the top
of the page or press the “Connection” button on
the main screen of the Toolbox.
If you are not registered on the Naviextras.com
website, you can do this easily from the Toolbox
by clicking on the “Register” button on the connection page.
LATEST MAP GUARANTEE
Once your new vehicle has been delivered, you will
have a maximum of 90 days in which to update the
map for free. Once this time has elapsed, you will
need to pay for updates.
The screens shown in the reference guide are
not contractual.
1
Page 23
22
– start up the Naviextras Toolbox application on
your computer.
The system name will appear at the top of the application window.
Your system is saved on your user profile.
DOWNLOADING UPDATES TO THE USB KEY
– From the application, click on the “Update”
menu. A table of updates will be displayed on the
screen. You can select or de-select the updates
you want to install in the multimedia system;
– click on “Install”.
The updates are downloaded to your USB key.
Please wait until a message is displayed notifying
you that the download is complete.
DOWNLOADING UPDATES TO THE VEHICLE
With the engine running:
– insert the USB key in the USB connector of the
system.
When the system is turned on it automatically
identifies the updates available on the USB key,
then it recommends that you update the system
or cards and displays the message: “Update”.
– Press “Update” to start the update.
Do not touch your system or remove the USB key
while the update is running. Once the update is
complete, the system will restart.
In some cases, it is possible that roads alter and
that the mapping is not yet up to date.
For more information, see the multimedia system
user manual.
Note: Downloading and installing a system update
is only possible if there is a newer version available.
UPDATING THE SYSTEM (2/2)
In certain countries it is illegal to download and
activate the warning areas and this may lead to
prosecution.
Updating the system
SAVING THE SYSTEM ON A USB KEY
To update your navigation system, you should first
download the most up-to-date system onto a USB
key (not supplied).
Note: the USB key used must be formatted to
FAT32 format and have a minimum capacity of 4GB
and a maximum capacity of 32GB.
– insert the USB key into the system slot;
– select the home button, then “Nav” > “Options”
> “Map Update” on the second page > “Options”
> “Update”.
A copy of your system is downloaded to the USB
key.
SAVING THE SYSTEM ON YOUR COMPUTER
– Connect the USB key to your computer (while
connected to the internet);
Page 24

RP 1335-1 – 25 91 039 22R
à259103922Rñêíä
04
(
www.renault-multimedia.com
)
 Loading...