Remo+ Remobell S Quick Start Guide

Quick Start Guide
www.remoplus.co

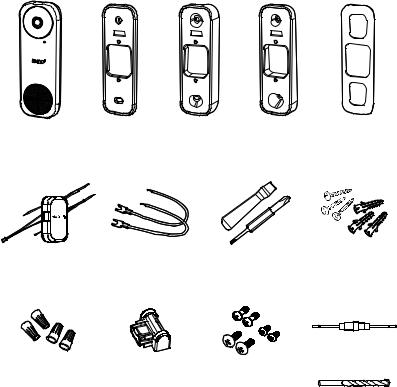
WHAT’S IN THE BOX
REMOBELL® S |
WALL |
15° ANGLE |
5° WEDGE |
MOUNT |
|
MOUNT |
MOUNT |
MOUNT |
FOAM |
POWER KIT |
EXTENSION |
SCREWDRIVER |
MOUNTING |
WITH WIRE HARNESS |
WIRES |
|
SCREWS AND |
|
|
|
ANCHORS |
|
|
|
SAFETY FUSE |
WIRE NUTS |
BUBBLE |
POWER TERMINAL SCREWS |
|
|
LEVEL |
DOORBELL SCREWS |
|
|
|
SECURITY SCREWS |
|
* For brick or stucco surfaces, you’ll need a drill. |
DRILL BIT |
||
1

MEET REMOBELL® S
FACEPLATE |
|
BODY* |
|
BACK |
|||
1 |
LED Indicator |
4 |
Camera lens |
9 |
Power terminal |
||
2 |
Bell button |
5 |
IR LED |
10 |
Speaker |
||
3 |
Security screw holes |
6 |
Mic |
|
|
|
|
7Reset button
8Mounting holes
*Remove the protective lm before use
2

BEFORE YOU BEGIN
Check your doorbell voltage and chime.
RemoBell® S only works with a voltage of 16-24VAC.
Go to your breaker box and turn o the power to your doorbell.
WARNING: If you are not sure how to turn o the power to your doorbell from your breaker box, please consult a licensed electrician.
•If you have a mechanical chime, start POWER KIT INSTALLATION.
•If you have an electronic chime, please refer to its manual for instructions.
•If you do not have chime, skip POWER KIT INSTALLATION and follow OPTION B on page 8.
3

POWER KIT INSTALLATION
1.Insert one end of the Wire Harness into the Power Kit.
3.Take a picture of the wiring for reference during installation.
2.Remove the cover of your mechanical chime.
4.Loosen the screws and remove the wires. Then straighten the exposed end of the wires.
4

5. Connect the to the
"FRONT"
exposed end
Harness chime wire Wire Nut, and
tightly. Repeat remaining wires.
7.Place your Power Kit so that it doesn't interfere with moving parts or mu e the chime. You can use the adhesive backing to hold it in place. Put the chime cover back on.
5
 Loading...