

Page 1

100822_REM_IFU_WDF4815_UK.indd 1 14.10.10 20:57
LADY SHAVER
BATTERY OPERATED
Page 2
T
a
s
h
P
k
1
2
3
4
5
6
7
8
9
4.
9.
8.
2.
1.
6.
3.
7.
5.
100822_REM_IFU_WDF4815_UK.indd 2 14.10.10 20:57
Page 3
ENGLISH
1
Thank you for choosing Remington®. Our products
are designed to meet the highest
standard of quality, functionality and design. We
hope you enjoy using your new Remington
®
product.
Please read the instructions for use carefully and
keep them in a safe place for future reference.
CAUTION
Use this appliance only for its intended use as
described in this manual.
Do not use this product if it is not working
correctly, if it has been dropped
or damaged, or dropped into water.
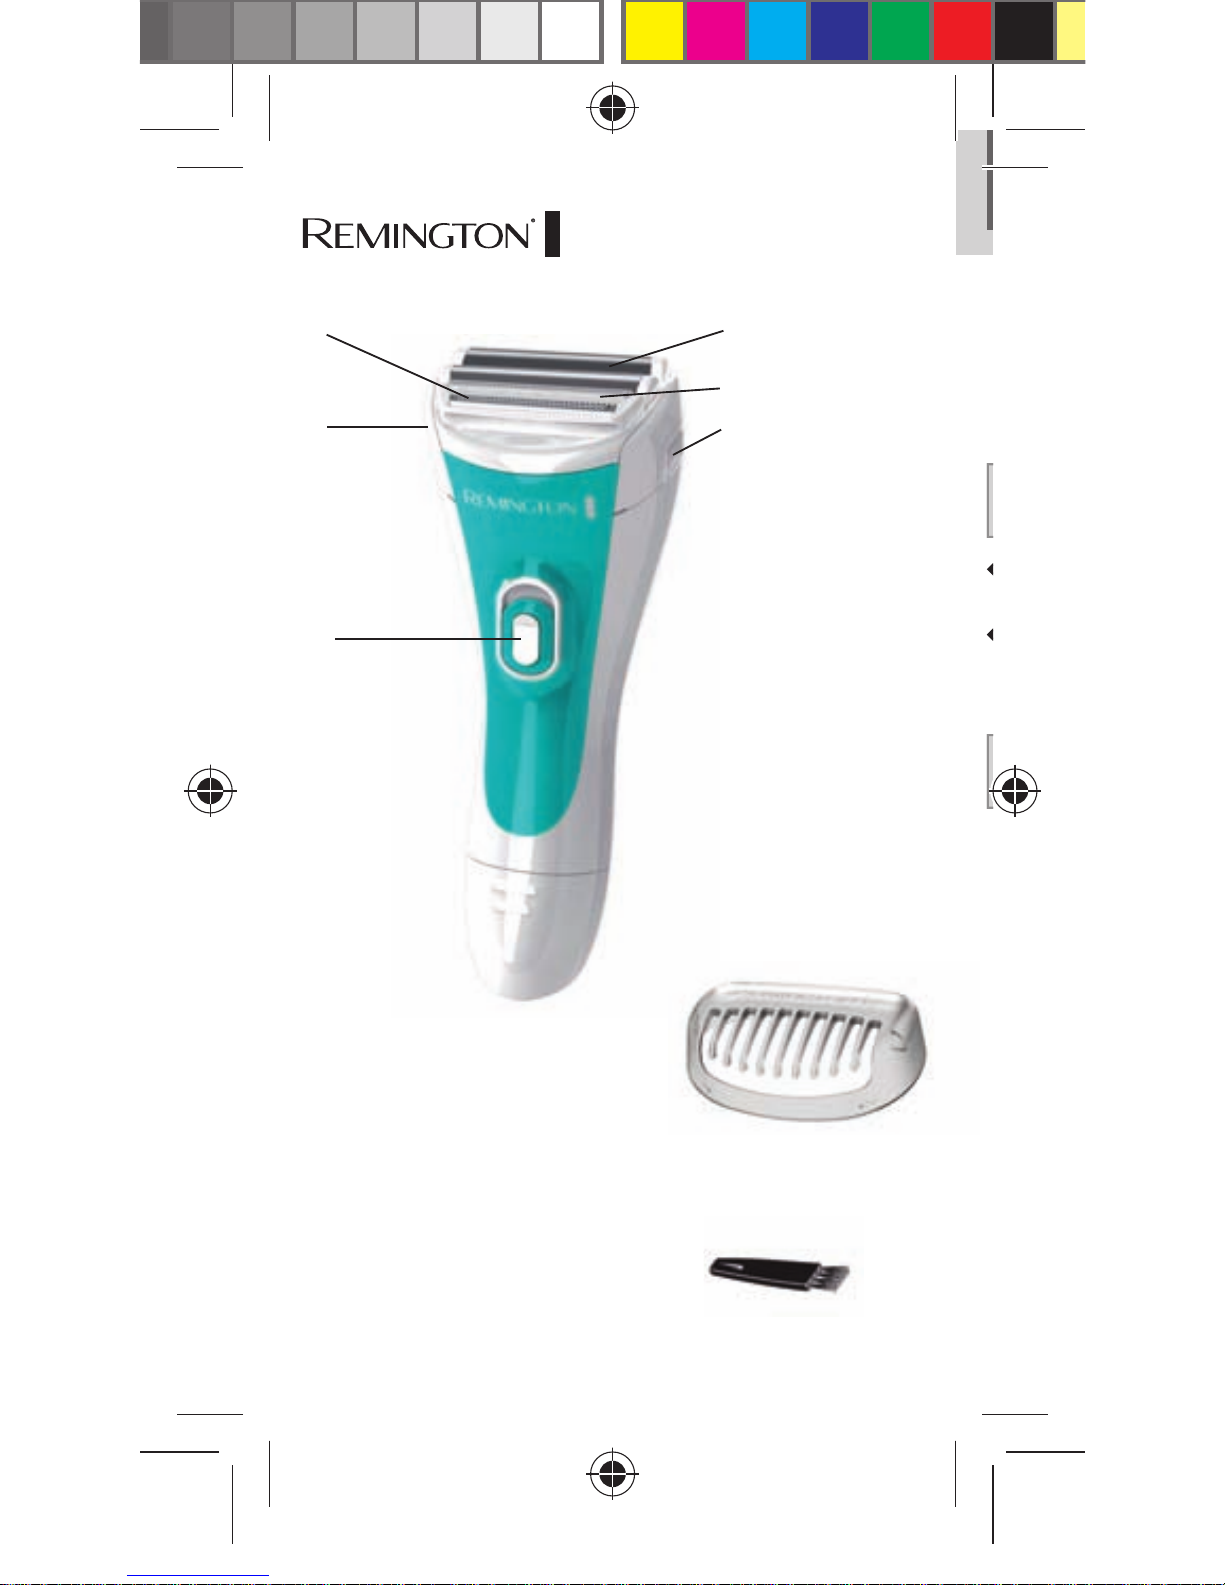
DESCRIPTION
1. Head assembly
2. Head release button
3. On/Off button
4. 2 hypoallergenic fl exing shaver foils
5. Bikini trimmer comb guard
6. Flexible trimmer
7. Battery compartment
8. Massage strip
9. Cleaning brush
2 year guarantee
100822_REM_IFU_WDF4815_UK.indd GB_1 14.10.10 20:57
Page 4

2
ENGLISH
GETTING READY
Be patient when first using your lady shaver, as with
any new product, it may take a little while to familiarise
yourself with the product. Take the time to acquaint
yourself with your shaver, as we are confident you will
receive years of enjoyable use and complete satisfaction.
INSERTING BATTERIES
Your shaver requires 2 ‘AAA’ alkaline batteries (fi rst
set included). We recommend that you use VARTA
®
batteries.
Make sure the product is turned off.
Rotate the battery compartment cap approximately 1/4
turn anti-clockwise then pull off.
Insert 2 “AAA” alkaline battery, so that the (+) and (-)
marks on the battery face the same mark in the battery
compartment.
Place cap back on unit using the alignment marks and
rotate clockwise until the cap snaps into place.
NOTE: Your shaver will not work if the batteries
are inserted incorrectly.
NOTE: Remove batteries if the unit is not in use
for long periods.
I
s
r
100822_REM_IFU_WDF4815_UK.indd GB_2 14.10.10 20:57
Page 5

ENGLISH
3
HOW TO USE
Your lady shaver is suitable for legs, underarms and
the bikini area. It can be used dry or in the shower.
FOR REGULAR SHAVING
Remove protective cap before shaving.
Turn the lady shaver on.
Hold the lady shaver at a right angle to your skin and
move the shaver against the direction of the hair
growth.
After shaving, turn shaver off.
Note: Before dry shaving, make sure that the area is
clean, dry and free from creams or oils
FOR LONGER HAIRS
If you have not shaved for a while, use the trimmer before
shaving. This will help you achieve a more effective shaving
result.
Hold the shaver with the trimmer facing your leg and
slightly tilted towards you (approximately at a 45º
angle).
Move the trimmer slowly against the direction of the
hair growth.
100822_REM_IFU_WDF4815_UK.indd GB3 14.10.10 20:57
Page 6

4
ENGLISH
TRIMMING AND SHAPING
Attach the bikini trimmer attachment.
Hold the shaver at a right angle to your skin and press
down gently.
Edge and shape the areas as desired.
FOR BEST SHAVING PERFORMANCE
We recommend that you use your new shaver daily for
two or three weeks to allow time to fi nd the optimum
shaving methods for your particular type of hair growth
patterns.
CAUTION
If your skin is easily irritated by shaving, or you suffer
from skin allergies, you should test a section of your
arm or leg before using the shaver.
CARE FOR YOUR SHAVER
To ensure long lasting performance of your shaver, clean
the head assembly regularly. The easiest and the most hygienic way to clean the shaver is by rinsing the shaving head
after use with warm water. Always keep the protective cap
on the shaving head when the shaver is not in use.
AFTER EACH USE
Ensure the shaver is turned off.
Press the side release button to slip open the head
assembly.
Blow any loose debris from the foil.
T
y
r
n
S
100822_REM_IFU_WDF4815_UK.indd GB4 14.10.10 20:57
Page 7

ENGLISH
5
Brush or rinse the accumulated hair from the main
body of the shaver, head assembly and cutter assembly.
Leave the head assembly open to let the shaver dry
completely.
NOTE:
The lady shaver is suitable for use in the bath or
shower.
Do not rinse with water hotter than 70ºC.
Do not completely submerge the lady shaver in
water.
Ensure that the lady shaver is turned off and when
cleaning.
Do not clean the shaving foils with the brush.
At regular intervals, put a drop of sewing machine oil
onto the foils and cutter heads.
REPLACING YOUR FOILS AND CUTTERS
To ensure the continued highest quality performance from
your shaver, we recommend that the foil and cutter are
replaced every 6 months. These can be obtained from our
nearest Remington
®
Service Centre.
Signs that your foils and cutters need replacing:
Irritation: As foils get worn, you may experience skin
irritation.
Pulling: As the cutters wear, your shaver may not feel as
close and you may feel the cutter pulling your hair.
Wear through: You may notice that the cutters have
worn through the foils.
100822_REM_IFU_WDF4815_UK.indd GB5 14.10.10 20:57
Page 8

6
ENGLISH
TO REPLACE THE FOIL
Ensure the lady shaver is switched off.
Gently push the small plastic area at either end of the
foil. The foil should then easily detach from the head
assembly.
To reassemble, slide the foils into foil brackets and click
into position.
Close the head assembly.
CAUTION
Only hold the plastic to prevent damage to the foil.
Do not press on the foil when replacing.
TO REPLACE THE CUTTERS
Ensure the shaver is switched off and open the head
assembly (as above).
To remove cutter, grasp cutter between thumb and
forefi nger and pull upward.
To reassemble cutter, place cutter onto oscillator tip.
Gently push down clicking into position.
IMPORTANT SAFETY INSTRUCTIONS
WARNING – TO REDUCE THE RISK OF BURNS,
ELECTROCUTION, FIRE,
OR INJURY TO PERSONS:
An appliance should never be left unattended when
plugged in to a power outlet, except when charging.
Make sure the product and battery compartment do
not get wet.
Do not use the product with a damaged cord. A
replacement can be obtained via the Remington
®
Service Centre.
T
p
D
100822_REM_IFU_WDF4815_UK.indd GB6 14.10.10 20:57
Page 9

ENGLISH
7
Store the product at a temperature between 15°C
and 35°C.
Only use the parts supplied with this appliance. Use
of non Remington
®
parts with this product may give
rise to a hazardous condition.
This product is batteries operated only.
Keep this product out of reach of children. The use
of this appliance by persons with reduced physical,
sensory or mental capabilities or lack of experience
and knowledge can give cause to hazards. Persons
responsible for their safety should give explicit
instructions or supervise the use of the appliance.
Always turn off when cleaning or when being used
under running water.
PROTECT THE ENVIRONMENT
The product uses alkaline batteries. Do not dispose this
product in household waste at the end of its useful life.
Disposal can take place at an appropriate collection sites.
CAUTION: Do not put in fi re or mutilate your battery
packs as they may burst or release toxic materials.
For further information on recycling see
www.remington-europe.com
100822_REM_IFU_WDF4815_UK.indd GB7 14.10.10 20:57
Page 10

8
ENGLISH
SERVICE & WARRANTY
This product has been checked and is free of defects. We
warrant this product against any defects that are due to
faulty material or workmanship for a 2 year period from
the original date of consumer purchase.
If the product should become defective within the
warranty period, we will repair any such defect or elect
to replace the product or any part of it without charge
provided there is proof of purchase. This does not mean an
extension of the warranty period.
In the case of a warranty simply call the
REMINGTON
®
Service Centre in your region.
This warranty is offered over and above your normal
statutory rights.
The warranty shall apply in all countries in which our
product was sold via an authorised dealer.
This warranty does not include shaving heads / foils and
cutters which are consumable parts. Also not covered
is damage to the product by accident or misuse, abuse,
alteration to the product or use inconsistent with the
technical and/or safety instructions required. This warranty
shall not apply if the product has been dismantled or
repaired by a person not authorised by us.
HE
U
R
W
T
T
w
100822_REM_IFU_WDF4815_UK.indd GB8 14.10.10 20:57
Page 11

HE
REMINGTON® SERVICE HOTLINES
United Kingdom
+44 0800 212 438 (free call)
Rayovac Europe Ltd,
Watermans House, Kingsbury Crescent,
The Causeway, Staines, Middlesex,
TW18 3BA, UNITED KINGDOM
www.remington.co.uk
100822_REM_IFU_WDF4815_UK.indd GB9 14.10.10 20:57
Page 12

All technical modifications reserved. 10/10 TSC 10.0822
10/UK/WDF4815 Version 10/10 Part No.
Remington
®
is a Registered Trademark of Spectrum
Brands, Inc., or one of its subsidiaries.
VARTA Consumer Batteries GmbH & Co. KGaA
Alfred-Krupp-Str. 9
73479 Ellwangen
Germany
www.remington-europe.com
© 2010 SBI
Model no. WDF481 5
100822_REM_IFU_WDF4815_UK.indd GB10 14.10.10 20:57
T22-30445
 Loading...