

ELECTRIC CHAIN SAW
OWNER’S MANUAL
®
®
®
MODELS
LNT-2: 076728J, 100089-06, & 099178H
EL-1, EL-1 Fast Sharp
EL-7: 075762J, 098031J, 099039J, 100015,
100089-01, 100089-04, 100089-05, & 100089-07
EL-7 Fast Sharp: 076702J
Pole Saw: 104316-01
Pole Saw Assembly: 104317
IMPORTANT: Read and understand this manual before assembling or
operating this chain saw. Improper use of saw can cause severe
injury. Keep this manual for future reference.
®

®
ELECTRIC CHAIN SAW
SAFETY
WARNINGS
Make certain you read and understand all
pages 2 and 3. Improper use of
this chain saw can cause severe
injury or death from fire, electrical shock, body contact with
moving chain, or falling wood.
BEFORE OPERATING SAW
1. Read and understand this owner’s
manual before operating chain saw.
2. Watch what you are doing. Use common sense. Do not operate saw when
you are tired.
3. Use chain saw for cutting wood only.
Do not use chain saw for purpose not
intended. Do not use for cutting plastic, masonry, etc.
4. Only well-instructed adults should operate chain saw. Never allow children
to operate chain saw.
5. Use only electrical voltage noted on
model plate of chain saw.
6. Use only extension cords marked for
outdoor use. See page 8 for extension
cord requirements.
7. Do not operate chain saw
• while under the influence of alcohol,
medication, or drugs
• in rain or in damp or wet areas
• where highly flammable liquids or
gases are present
• if saw is damaged, adjusted wrong,
or not fully and securely assembled
• if trigger does not turn saw on and off.
Chain must stop moving when you
release trigger. Have faulty switch
replaced by authorized service center.
• while in a hurry
• while in tree or on a ladder unless
trained to do so
8. Wear snug-fitting clothes when operating chain saw. Do not wear loose
clothing or jewelry . They can get caught
in moving saw chain.
Safety Warnings
on
9. Wear the following safety gear when
operating chain saw.
• heavy-duty gloves (wear rubber
gloves when working outdoors)
• steel-toed safety footwear with non-
skid soles
• eye protection such as safety glasses,
goggles, or face screen
• safety hard hat
• ear mufflers or ear plugs
• hair covering to contain long hair
• face or dust mask (if working in dusty
areas)
10. Before cutting, always provide the
following:
• clear work area
• secure footing
• planned retreat path from falling tree
11. Inspect tree before cutting down. Make
sure there are no dead limbs or branches
that may fall on you.
12. To reduce the risk of electric shock, this
saw has a polarized plug (one blade is
wider than the other). This plug will fit
in a polarized outlet only one way. If
the plug does not fit fully in the outlet
of your extension cord, reverse the
plug. If it still does not fit, a polarized
extension cord will be necessary. Do
not change the plug in any way.
WHILE OPERATING SAW
1. Stay alert. Use common sense while
operating chain saw.
2. Keep work area clean. Cluttered areas
invite injuries.
3. Be aware of extension cord while operating chain saw . Be careful not to trip
over cord. Keep cord away from chain
and operator at all times.
4. Keep children, animals, and bystanders away from chain saw and extension
cord. Only chain saw user should be in
work area.
5. Do not cut down a tree unless you are
trained or have expert help.
6. If two or more persons perform bucking and felling operations at the same
time, provide plenty of distance between
operations. Provide distance of at least
twice the height of tree being felled.
7. Secure wood you are cutting by using
clamps or chocks.
8. Grip chain saw firmly with both hands.
Never operate chain saw with one hand.
Never use hand guard as handle.
9. Keep finger off trigger until ready to
make cut.
10. Before starting chain saw, make sure
chain is not touching anything.
11. To guard against electrical shock, avoid
body contact with grounded objects
such as pipes, fences, and metal posts.
12. Keep all parts of body away from chain
when saw is running.
13. Do not force chain saw while cutting.
Apply light pressure. It will do the job
better and safer at the rate for which it
was intended.
14. Cut small brush and saplings with extreme care. Slender material may catch
in chain and be whipped toward you.
This could also pull you off balance.
15. When cutting limb or tree trunk that is
under tension, use extreme caution. Be
alert for wood springing back. When
wood tension is released, limb could
spring back and strike operator causing severe injury or death.
16. Carry chain saw from one place to another
• with saw stopped and unplugged
• by holding front handle (never use
hand guard as handle)
• with finger off trigger
• with guide bar and chain to rear
2
097017
OWNER’S MANUAL
SAFETY
WARNINGS
KICKBACK
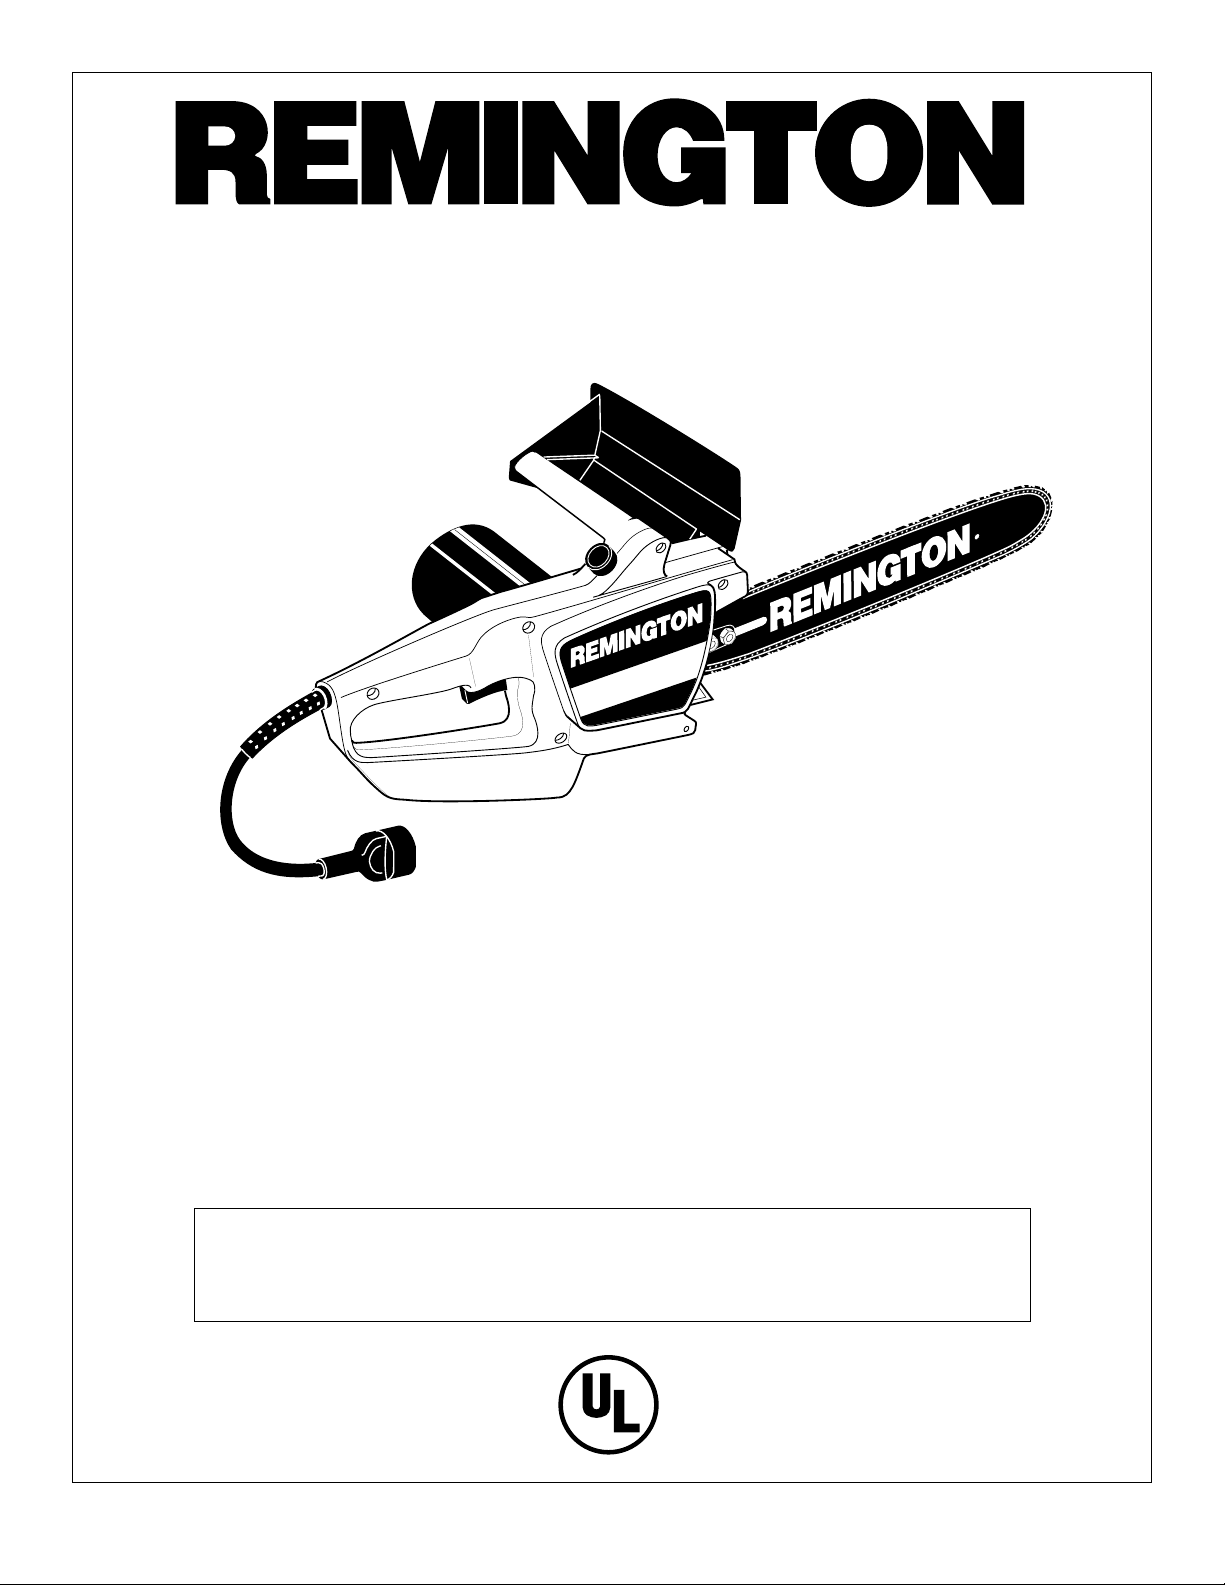
WARNING: Kickback may occur when the nose or tip of the
guide bar touches an object, or
when the wood closes in and
pinches the saw chain in the cut.
Tip contact in some cases may
cause a lightning fast reverse reaction, kicking the guide bar up
and back towards the operator.
Pinching the saw chain along the
top of the guide bar may push the
guide bar rapidly back towards
the operator. Either of these reactions may cause you to lose
control of the saw which could
result in serious injury to user.
Kickback Safety Devices On
This Saw
This saw has a low-kickback chain and
reduced kickback guide bar. Both items
reduce the chance of kickback. Kickback
can still occur with this saw.
Properly install front hand guard. This item
can reduce injuries from kickback. Follow
assembly instructions on page 6. Do not
remove front hand guard. Do not replace
front hand guard with substitute.
The following steps will reduce the risk of
kickback.
• Use both hands to grip saw while saw is
running. Use firm grip. Thumbs and
fingers must wrap around saw handles.
• Keep all safety items in place on saw.
Make sure they work properly.
• Do not overreach or cut above shoulder
height.
• Keep solid footing and balance at all
times
• Stand slightly to left side of saw. This
keeps your body from being in direct line
with chain.
• Do not let guide bar nose touch anything
when chain is moving (see Figure 1).
Direction
90°
Quadrant
Figure 1 - Kickback Hazard Example: Do
Not Let Nose of Guide Bar Touch Object
While Chain is Moving
• Never try cutting through two logs at
same time. Only cut one log at a time.
• Do not bury guide bar nose or try plunge
cut (boring into wood using guide bar
nose).
• Watch for shifting of wood or other
forces that may pinch chain.
• Use extreme caution when re-entering a
previous cut.
• Use low-kickback chain and guide bar
supplied with this chain saw. Only replace these parts with chains and guide
bars listed in this manual.
• Never use dull or loose chain. Keep chain
sharp with proper tension.
• Do not hand sharpen chain on automatic
chain sharpening (Fast Sharp) models.
Do Not Let
Guide Bar
Touch Here
Saw Maintenance and Kickback
Safety
Follow maintenance instructions in this
manual. Proper cleaning of saw and chain
and guide bar maintenance can reduce
chances of kickback. Inspect and maintain
saw after each use. This will increase the
service life of your saw.
proper sharpening, risk of kickback can
increase with each sharpening.
Note:
Even with
MAINTENANCE AND
STORAGE OF CHAIN SAW
1. Unplug chain saw from power source
• when not in use
• before moving from one place to another
• before servicing
• before changing accessories or attachments, such as saw chain and
guard
2. Inspect chain saw before and after each
use. Check saw closely if guard or other
part has been damaged. Check for any
damage that may affect operator safety
or operation of saw. Check for alignment or binding of moving parts. Check
for broken or damaged parts. Do not
use chain saw if damage affects safety
or operation. Have damage repaired by
authorized service center.
3. Maintain chain saw with care.
• Never expose saw to rain.
• Keep chain sharp, clean, and lubri-
cated for better and safer performance.
• Follow steps outlined in this manual
to sharpen chain.
• Keep handles dry, clean, and free of
oil and grease.
• Keep all screws and nuts tight.
• Inspect power cord often. If dam-
aged, have repaired by authorized
service center.
• Never carry chain saw by power
cord.
• Never yank power cord to unplug it.
• Keep power cord from heat, oil, and
sharp edges.
• Inspect extension cords often and
replace if damaged.
4. When servicing, use only identical replacement parts.
5. When not in use, always store chain saw
• in a high or locked place, out of
children’s reach
• in a dry place
• in a carrying case or with scabbard
over guide bar
Keep this manual for reference. It is your
guide to safe and proper operation of this
chain saw.
097017
3

®
ELECTRIC CHAIN SAW
CHAIN SAW NAMES
AND TERMS
Bucking Process of cutting a felled tree or
log into lengths.
Felling Process of cutting down a tree.
Felling Cut Final cut when felling a tree.
Make this cut on opposite side of tree from
notching cut.
Front Handle Located at front of saw body.
Front Hand Guard Shield between front
handle and guide bar. Protects left hand
while using saw.
Guide Bar Metal bar that extends from saw
body. The guide bar supports and guides chain.
Guide Bar Nose Tip or end of guide bar.
Kickback Quick backward and upward
motion of guide bar. Kickback may occur
when tip of guide bar touches an object
while chain is moving. The guide bar will
kick up and back towards operator.
Limbing Process of cutting limb(s) from a
felled tree.
Low-Kickback Chain Chain that reduces chance of kickback as required by
ANSI B175.1.
Normal Cutting Position Stance used
while making bucking and felling cuts.
Notching Cut Notch cut in tree that directs fall of tree.
Oiler Control System for oiling guide bar
and chain.
Power Head Chain saw without chain and
guide bar. Also known as saw body.
Pushback (Kickback, Pinch) Rapid
pushback of chain saw. Pushback may occur if chain along top of guide bar is pinched,
caught, or contacts a foreign object.
Rear Handle Handle located at rear of saw
body.
Reduced Kickback Guide Bar Guide
bar that reduces chance of kickback.
Replacement Chain Chain that complies with ANSI B175.1 when used with a
specific saw. It may not meet ANSI requirements when used with other saws.
Saw Chain (Chain) Loop of chain having
cutting teeth for cutting wood. The motor
drives chain. The guide bar supports chain.
Spiked Bumper (Spike) Pointed teeth at
front of saw body beside guide bar. Keep
spiked bumper in contact with wood when
felling or bucking. It helps maintain position of saw while cutting.
Sprocket Toothed wheel that drives chain.
Switch Device that completes or interrupts
electrical circuit to motor of saw.
Switch Linkage This device connects
switch to trigger. It moves switch when you
squeeze trigger.
Switch Lockout Device that reduces
accidental starting of saw.
Trigger Device that turns saw on and off.
Squeezing trigger turns saw on.
Releasing trigger turns saw off.
Trimming (Pruning) Process of cutting
limb(s) from a living tree.
Undercut An upward cut from underside
of log or limb. This is done while in normal
cutting position and cutting with top of
guide bar.
4
097017
OWNER’S MANUAL
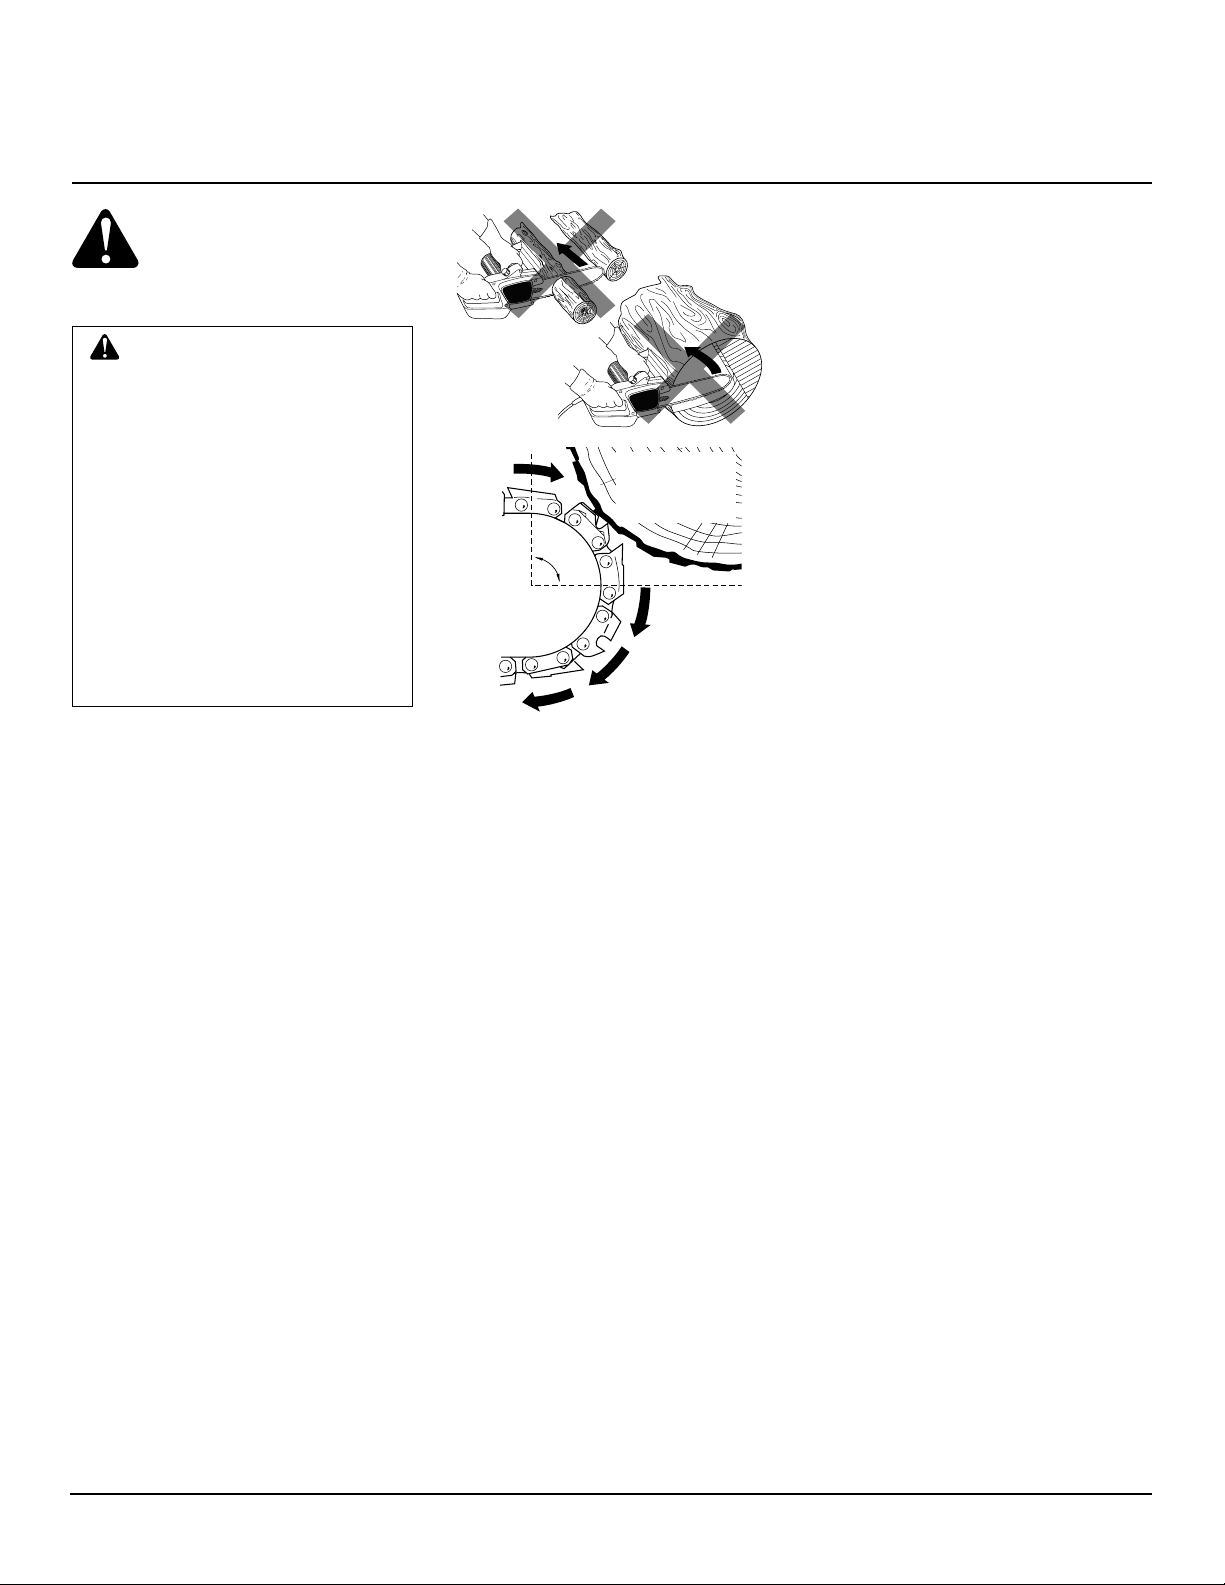
PRODUCT
IDENTIFICATION
Rear
Handle
Rear Hand
Guard
Power Cord
Front Hand
Guard
Saw
Chain
Spike
Oil Level Sight Hole
(located on saw body,
hidden by front handle)
Guide Bar
Nose
Guide Bar
Scabbard
UNPACKING
1. Remove all items from carton.
2. Check all items for any shipping damage. If you find any damage or if any
parts are missing, promptly inform
dealer where you bought chain saw.
Front Handle
Motor
Housing
Figure 2 - Electric Chain Saw
Switch
Lockout
Oil Cap
Trigger
097017
5
®
ELECTRIC CHAIN SAW
ASSEMBLY
Note:
Some models are pre assembled. As-
sembly is not needed on these models.
See Saw Chain Tension Adjustment, page 7.
WARNING: Cutting edges on
chain are sharp. Use protective
gloves when handling chain.
IMPORTANT: Do not clamp chain
saw in vise during assembly.
The plastic hardware bag should include:
• two guide bar bolts
• two guide bar nuts
• one Phillips-head tapping screw
• automatic chain sharpener (Fast Sharp
models only)
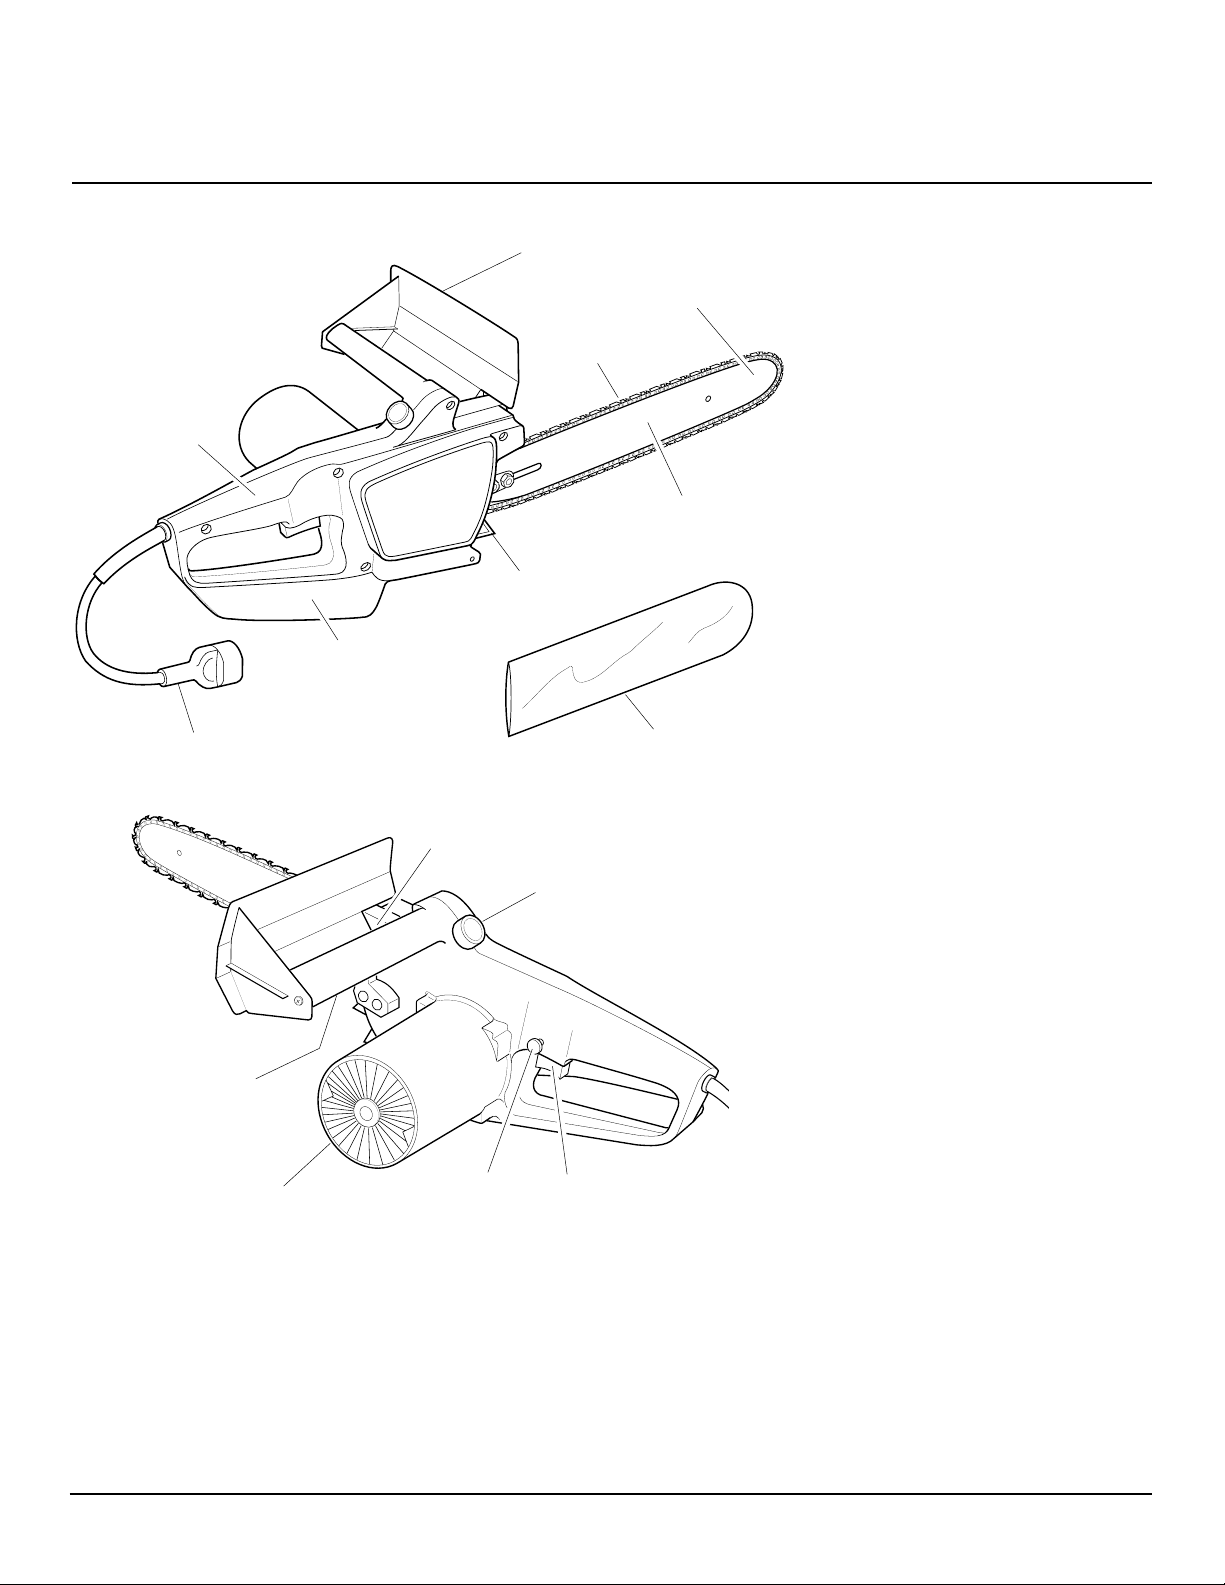
1. Lay chain out flat.
2. Install front hand guard onto saw body.
Do this by pressing two mounting standouts on hand guard into hex-shaped
holes in saw body (see Figure 3).
3 Insert tapping screw through hand
guard and into saw handle. Tighten
screw firmly.
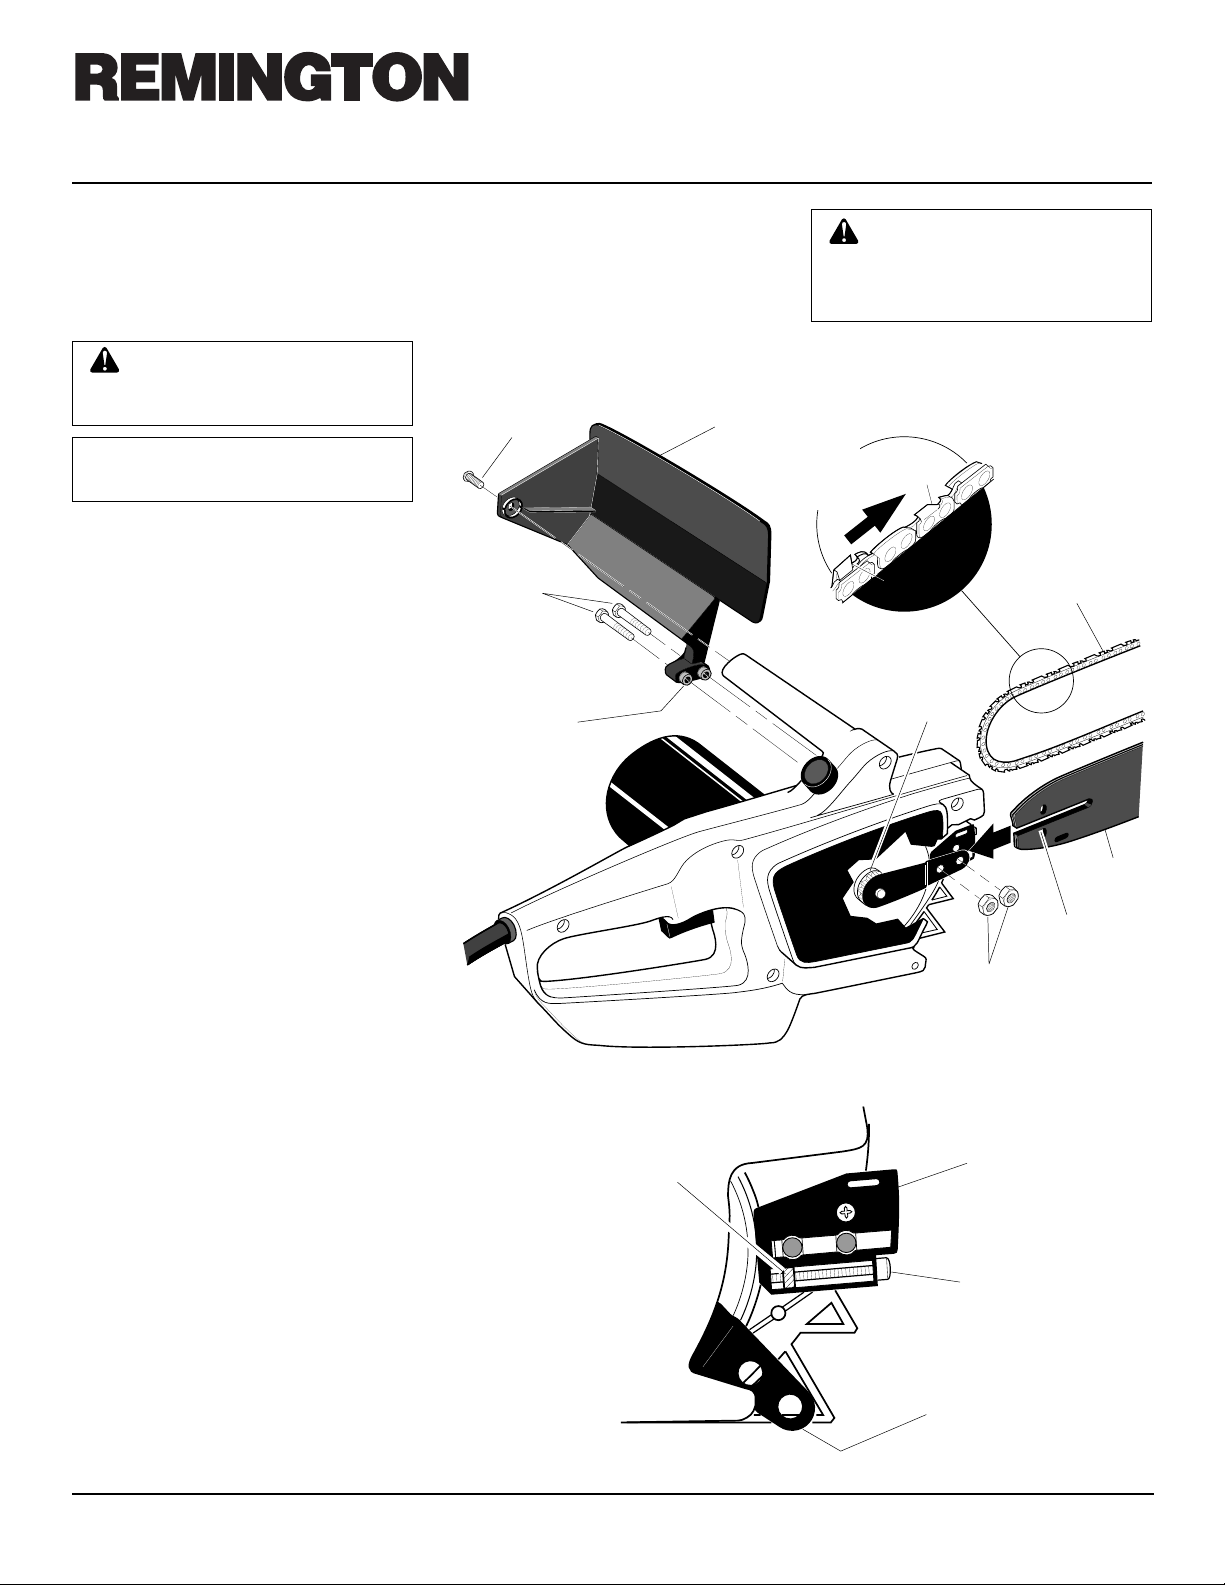
4. Turn adjusting screw counterclockwise
(see Figure 4). Continue to turn adjusting screw until adjusting block is to rear
of adjusting plate.
5. Install guide bar onto saw body. Place
rear of guide bar between adjusting
plate and sprocket support.
IMPORTANT:
justing block into oval adjusting hole
on guide bar.
6. Line up holes on sprocket support with
center slot on guide bar and holes in
saw body.
7. Insert guide bar bolts through front
hand guard, saw body, center slot of
guide bar, and sprocket support. Attach
guide bar nuts to guide bar bolts.
IMPORTANT:
finger tight only. Make sure adjusting block is in oval adjusting hole on
guide bar.
Make sure to insert ad-
T ighten guide bar nuts
8. Place chain around drive sprocket, then
along top groove of guide bar and
around guide bar nose.
Note:
Make
sure cutting edges of chain are facing
the right direction. Position chain so
CAUTION: Do not place chain
on saw backwards. If chain is
backwards, saw will vibrate badly
and will not cut.
cutting edges on top of guide bar face
guide bar nose (see Figure 3).
9. Adjust saw chain tension. Follow steps
under Saw Chain Tension Adjustment,
page 7.
Tapping
Screw
Guide Bar
Bolts
Mounting
Stand-Outs
Figure 3 - Assembling Guide Bar, Chain, and Hand Guard
Adjusting
Block
Front Hand
Guard
Towards
Guide
Bar Nose
Cutting
Edge
Cutting
Edge
Drive
Sprocket
Saw
Chain
Guide
Bar
Adjusting
Hole
Guide Bar
Nuts
Adjusting
Plate
Adjusting
Screw
Sprocket
Support
Figure 4 - Part Locations For Assembling Guide Bar
6
097017

OWNER’S MANUAL
ASSEMBLY
Continued
INSTALLING AUTOMATIC
CHAIN SHARPENER
(Fast Sharp Models Only)
1. Screw automatic chain sharpener into
threaded hole.
2. Continue turning automatic chain
sharpener until you hear five (5) clicks.
Automatic
Chain
Sharpener
PUSH
SHARPEN
TO
Figure 5 - Automatic Chain Sharpener
(Fast Sharp Models Only)
SAW CHAIN
TENSION
ADJUSTMENT
WARNING: Unplug chain saw
from power source before adjusting saw chain tension.
WARNING: Cutting edges on
chain are sharp. Use protective
gloves when handling chain.
WARNING: Maintain proper
chain tension always. A loose
chain will increase the risk of
kickback. A loose chain may jump
out of guide bar groove. This may
injure operator and damage
chain. A loose chain will cause
chain, guide bar, and sprocket to
wear rapidly.
Note:
For pre assembled models, the saw
chain tension is properly set at factory. A
new chain will stretch. Check new chain
after first few minutes of operation. Allow
chain to cool down. Follow steps below to
readjust saw chain tension.
1. Before adjusting chain, make sure guide
bar nuts are only finger tight (see Figure
3, page 6). Also make sure adjusting
block is in oval adjusting hole on guide
bar (see Figures 3 and 4, page 6).
2. Turn adjusting screw clockwise until
all slack is out of chain (see Figure 6).
Note:
There should be no gap between
side links of chain and bottom of guide
bar (see Figure 7).
3. W earing protective gloves, move chain
around guide bar. Chain should move
freely. If chain does not move freely,
loosen chain by turning adjusting screw
counterclockwise.
4. After chain tension is correct, tighten
guide bar nuts firmly. If not, guide bar
will move and loosen chain tension.
This will increase the risk of kickback.
This can also damage saw.
chain will stretch. Check new chain
after first few minutes of operation.
Allow chain to cool down. Readjust
chain tension.
Note:
A new
Figure 6 - Turning Adjusting Screw
Guide Bar
Nuts
Guide Bar
Guide Bar
Correct
Gap
Incorrect
Tension
Figure 7 - Saw Chain Adjustment
Tension
FILLING OIL TANK
1. Remove oil cap.
2. Fill oil tank with SAE #30 motor oil.
Note:
For temperatures below 30°F , use
SAE #10 oil. For temperatures above
75°F, use SAE #40 oil.
3. Replace oil cap at once. Tighten oil cap
firmly for good seal. This will avoid oil
seepage from tank.
4. Wipe off excess oil.
Note:
It is normal for oil to seep when saw
is not in use. Empty oil tank after each use to
prevent seepage.
097017
7

®
ELECTRIC CHAIN SAW
OPERATING CHAIN
SAW
WARNING: Read and understand this owner’s manual before
operating this saw. Make certain
you read and understand all
Warnings
use of this chain saw can cause
severe injury or death from fire,
electrical shock, or body contact
with moving chain, or falling wood.
, pages 2 and 3. Improper
EXTENSION CORDS
Use proper extension cords with this saw.
Use only extension cords marked for outdoor use. The cord must be marked with
suffix W or W-A following the cord type
designation.
Use proper sized cord with this saw. Cord
must be heavy enough to carry current
needed. An undersized cord will cause voltage drop at saw. Saw will lose power and
overheat. Follow cord size requirements
listed below.
Keep cord away from cutting area. Make
sure cord does not catch on branches or logs
during cutting. Inspect cords often. Replace
damaged cords.
The extension cord may come undone from
the power cord during use. To avoid this,
make a knot with the two cords as shown in
Figure 8 below.
Example:
Cord AWG Cord
Length Size
25 feet 16
50 feet 16
100 feet 14
150 feet 12
SJTW-A or SJTW.
Safety
OILING CHAIN
Always check oil level before using saw. To
oil chain, press oil cap. Do not attempt to
operate the oiler while cutting with the saw.
Oil will feed onto guide bar and chain. Press
oil cap at least once before each cut. Check oil
level often by looking at oil sight level hole.
Oil sight level hole is on left side of saw,
between front handle and front hand guard.
Figure 9 - Pressing Oil Cap to Oil Chain
CUTTING WITH THE CHAIN
SAW
1. Connect saw to extension cord. Connect extension cord to power supply.
2. Make sure section of log to be cut is
not laying on ground. This will keep
chain from touching ground as it cuts
through log. Touching ground with
moving chain will dull chain.
3. Use both hands to grip saw. Always use
left hand to grip front handle and right
hand to grip rear handle. Use firm grip.
Thumbs and fingers must wrap around
saw handles (see Figure 10).
4. Make sure your footing is firm. Keep
feet apart. Divide your weight evenly
on both feet.
5. When ready to make a cut, press in
switch lockout with right thumb and
squeeze trigger (see Figure 10). This
will turn saw on. Releasing trigger will
turn saw off. Make sure saw is running
at full speed before starting a cut.
Switch
Lockout
Trigger
Figure 10 - Switch Lockout and Trigger
Location
6. When starting a cut, place moving
chain against wood. Hold saw firmly
in place to avoid possible bouncing or
skating (sideways movement) of saw.
7. Guide saw using light pressure. Do not
force saw. The motor will overload and
can burn out. It will do the job better and
safer at the rate for which it was intended.
8. Remove saw from a cut with saw running at full speed. Stop saw by releasing trigger. Make sure chain has
stopped before setting saw down.
9. Practice until you can maintain a steady,
even cutting rate.
Extension
Cord
Figure 8 - Tying Extension Cord and
Power Cord in Knot
Chain Saw
Power Cord
8
097017

OWNER’S MANUAL
OPERATING CHAIN
SAW
Continued
FELLING A TREE
(Cutting Down a Tree)
WARNING:
• Avoid kickback. Kickback can
result in severe injury or death.
See
Kickback
risk of kickback.
• Do not fell a tree without ample
skill or expert help.
• Keep children, animals, and
bystanders away from area
when felling a tree.
• If two or more persons perform
bucking and felling operations
WARNING: When felling a
tree, be aware of your surroundings. Do not endanger any person, strike utility lines, or cause
property damage. If tree strikes
utility lines, contact utility company at once.
Felling is the process of cutting down a tree.
Make sure your footing is firm. Keep feet
apart. Divide your weight evenly on both
feet. Follow directions below to fell a tree.
Before Felling a Tree
1. Before felling, inspect tree. Make sure
there are no dead limbs or branches that
may fall on you. Study natural lean of
tree, location of larger branches, and
wind direction. This will help you judge
which way tree will fall.
2. Clear work area around tree.
3. Plan and clear a retreat path before felling. Make retreat path opposite to
planned direction of fall of tree and at
45° angle (see Figure 11).
4. Remove dirt, stones, loose bark, nails,
staples, and wire from tree where you
will make felling cuts.
5. Stay on uphill side when felling tree.
Tree could roll or slide downhill after
falling.
, page 3 to avoid
Retreat
Path
Direction
of Fall
45°
Retreat
Path
Figure 11 - Retreat Path From Tree
Tree
Felling Procedure
A) Felling Notch
A properly placed felling notch will determine direction tree will fall. Place felling
notch on side of tree in direction you want
tree to fall (see Figure 12). Follow directions below to create a felling notch.
1. Make lower notch cut as close to
ground as possible. Hold saw so guide
bar is horizontal. Cut 1/3 the diameter
of tree trunk (see Figure 12).
ways make this horizontal lower notch
cut first. If you make this cut second,
tree can pinch chain or guide bar.
2. Start upper notch cut the same distance
above first cut as first cut is deep.
Example:
inches deep, start upper notch cut eight
inches above it. Cut downward at 45°
angle. The upper notch cut should meet
end of lower notch cut (see Figure 12).
3. Remove tree trunk wedge created by
notching cuts.
If lower notch cut is eight
Note:
Al-
B) Felling Cut
1. Make felling cut two inches higher than
lower notch cut and on opposite side
of tree (see Figure 12). Keep felling cut
parallel to lower notch cut.
2. Cut towards notch.
WARNING: Do not cut all the
way through tree. Leave about
two inches of tree diameter uncut directly behind felling notch
(see Figure 12). This uncut portion acts as a hinge. The hinge
helps keep tree from twisting and
falling in wrong direction.
Direction
of Fall
3rd Cut Felling Cut
2
Inches
2"
Figure 12 - Felling A Tree
3. As felling cut nears hinge, tree should
begin to fall.
wedges into felling cut to control direction of fall. If tree settles back and
pinches chain, drive wedges into felling cut to remove saw . Only use wedges
made of wood, plastic, or aluminum.
Never use wedge made of steel. This
could cause kickback and damage to
chain.
4. When tree begins to fall, quickly
• remove saw from felling cut
• release trigger to turn saw off
• put saw down
• exit area using retreat path
WARNING: Be alert for falling
overhead limbs. Watch your footing while exiting area.
Hinge
Note:
If needed, drive
2nd Cut Upper
Notch Cut
1st Cut Lower
Notch Cut
097017
Continued
9

®
ELECTRIC CHAIN SAW
OPERATING CHAIN
SAW
Continued
LIMBING A TREE
WARNING: Avoid kickback.
Kickback can result in severe injury or death. See Kickback, page
3 to avoid risk of kickback.
WARNING: When cutting limb
that is under tension, use extreme
caution. Be alert for wood springing back. When wood tension is
released, limb could spring back
and strike operator causing severe injury or death.
Limbing is removing branches from a fallen
tree. Make sure your footing is firm. Keep
feet apart. Divide your weight evenly on
both feet. Do not remove larger limbs under
tree that support log off ground. Remove
each limb with one cut (see Figure 13).
Clear cut limbs from work area often. This
will help maintain a safe work area.
Make sure you start your cut where limb
will not pinch saw during cutting. To avoid
pinching, start cut on freely hanging limbs
from above limb. Start cut on limbs under
tension from under limb. If pinch occurs,
turn saw off, lift limb, and remove saw.
BUCKING A LOG
WARNING: Avoid kickback.
Kickback can result in severe injury or death. See Kickback, page
3 to avoid risk of kickback.
WARNING:
• If on slope, make sure log will
not roll down hill. Secure log
by using wooden stakes. Drive
wooden stakes into ground on
downhill side of log. Stand on
uphill side of log while cutting.
Log may roll after cutting.
• Never try cutting through two
logs at same time. This could
increase the risk of kickback.
• While cutting log, never hold
log with your hand, leg, or foot.
• While cutting log, never allow
another person to hold log.
• Turn off and unplug saw be-
fore moving from one place to
another.
Bucking a log is cutting a log into sections.
Make sure your footing is firm. Keep feet
apart. Divide your weight evenly on both feet.
When possible, raise log or section off ground.
Do this by using limbs, logs, chocks, etc.
When cutting through log, maintain control
by reducing cutting pressure near end of cut.
Do not relax your grip on chain saw handles.
Do not let moving chain touch ground.
Ground will dull moving chain. After cutting through log, release trigger to turn saw
off before moving saw.
Follow directions below to buck a log.
Entire Length Of Log On
Ground
Cut log from top (see Figure 14).
Figure 14 - Bucking Log With Entire
Length On Ground
Log Supported On One End
1. Make first cut on underside of log (see
Figure 15). Use top of guide bar to
make this cut. Cut 1/3 through diameter of log. This cut will keep section
from splintering when cut.
2. Make second cut directly above first
cut. Cut down to meet first cut. This
cut will keep log from pinching guide
bar and chain.
2nd Cut
Figure 13 - Limbing A Tree
10
1st Cut
Figure 15 - Bucking Log When Log Is
Supported On One End
097017

OWNER’S MANUAL
OPERATING CHAIN
SAW
Continued
Log Supported On Both Ends
1. Make first cut from above log (see Figure 16). Cut 1/3 through diameter of
log. This cut will keep section from
splintering when cut.
2. Make second cut on underside of log,
directly under first cut. Use top of guide
bar to make this cut. Cut up to meet
first cut. This will keep log from pinching guide bar and chain.
1st Cut
2nd Cut
Figure 16 - Bucking Log When Log Is
Supported On Both Ends
TRIMMING A TREE (Pruning)
WARNING: Avoid kickback.
Kickback can result in severe injury or death. See Kickback, page
3 to avoid risk of kickback.
WARNING: Do not operate
chain saw while
• in a tree
• on a ladder or any other un-
stable surface
• in any awkward position
You may lose control of saw causing severe injury.
WARNING: Do not cut limbs
higher than your shoulders.
CAUTION: Seek professional
help if facing conditions beyond
your ability.
Trimming a tree is the process of cutting
limbs from a living tree. Make sure your
footing is firm. Keep feet apart. Divide your
weight evenly on both feet. Follow directions below to trim a tree.
1. Make first cut six inches from tree trunk
on underside of limb. Use top of guide
bar to make this cut. Cut 1/3 through
diameter of limb (see Figure 17).
2. Move two to four inches farther out on
limb. Make second cut from above limb.
Continue cut until you cut limb off.
3. Make third cut as close to tree trunk as
possible on underside of limb stub. Use
top of guide bar to make this cut. Cut
1/3 through diameter of stub.
4. Make fourth cut directly above third
cut. Cut down to meet third cut. This
will remove limb stub.
2nd Cut -
4th Cut Final Stub
Cut
3rd Cut - Stub Undercut
(to avoid splintering)
Figure 17 - Cutting A Limb
Pruning Cut
(to avoid pinching)
6"
2" to 4"
1st Cut Pruning Undercut
(to avoid splintering)
097017
11

®
ELECTRIC CHAIN SAW
CLEANING AND
MAINTENANCE
NOTICE: Below are instructions
for servicing your chain saw. Any
servicing not mentioned below
should be done by an authorized
service center.
CLEANING SAW BODY
WARNING: Unplug chain saw
from power source before servicing. Severe injury or death could
occur from electrical shock or
body contact with moving chain.
WARNING: Cutting edges on
chain are sharp. Use protective
gloves when handling chain.
WARNING: When cleaning
saw body,
• do not submerge saw in any
liquids
• do not use products that con-
tain ammonia, chlorine, or
abrasives
• do not use chlorinated clean-
ing solvents, carbon tetrachloride, kerosene, or gasoline
Keep saw body clean. Use a soft cloth dampened with a mild soap and water mixture.
Wipe saw body to clean.
CARE OF GUIDE BAR
Uneven bar wear causes most guide bar
problems. Incorrect sharpening of chain
cutter and depth gauge settings often cause
this. When bar wears unevenly, it widens
guide bar groove (see Figure 18). This causes
chain clatter and rivet popping. Saw will not
cut straight. Replace guide bar if this occurs.
Inspect guide bar before sharpening chain.
A worn or damaged guide bar is unsafe. A
worn or damaged guide bar will damage
chain. It will also make cutting harder.
Guide Bar
Groove
Guide Bar
Normal Guide
Bar
Figure 18 - Guide Bar Cross Section Showing Uneven Bar Wear
Guide Bar
With Uneven
Wear
Normal Guide Bar Maintenance
1. Remove guide bar from chain saw.
2. Remove sawdust from guide bar
groove periodically. Use putty knife or
wire.
3. Clean oil slots after each day of use.
4. Remove burrs from sides of guide bar.
Use flat file to make side edges square.
Replace guide bar when
• bar is bent or cracked
• inside groove of bar is badly worn
Note:
When replacing guide bar, see Re-
placement Parts and Accessories, on back
cover, for proper bar.
Burr
Flat File
Guide Bar
Cleaning Groove With
Putty Knife
12
Oil Slot
Figure 19 - Guide Bar Maintenance
097017

OWNER’S MANUAL
CLEANING AND
MAINTENANCE
Continued
SHARPENING SAW CHAIN
(Non-Fast Sharp Model)
WARNING: Unplug chain saw
from power source before servicing. Severe injury or death could
occur from electrical shock or
body contact with moving chain.
WARNING: Cutting edges on
chain are sharp. Use protective
gloves when handling chain.
Keep chain sharp. Your saw will cut faster
and more safely. A dull chain will cause
undue sprocket, guide bar, chain, and motor
wear. If you must force chain into wood and
cutting creates only sawdust with few large
chips, chain is dull.
Sharpening Cutters
Use file guide for 30° filing.
1. Adjust chain for proper tension (see Saw
Chain T ension Adjustment, page 7).
2. Clamp guide bar in vise to hold saw
steady.
Note:
Do not clamp chain.
3. Press 5/32" round file (attached to file
guide) into groove between top plate
and depth gauge on chain. File guide
should rest on both top plate and depth
gauge (see Figures 20 and 21).
File at midpoint of guide bar.
30° Guide
Mark
Note:
Filing
Direction
File
Guide
FILE HOLDER
5/32"
Round File
4. Hold file guide level. Make sure 30°
mark on file guide is parallel to center
of guide bar (see Figure 20). This will
insure that you file cutters at 30° angle.
5. File from inside towards outside of cutter until sharp. Only file in this one direction (see Figure 20).
Note:
T wo or three
strokes with file should sharpen cutter.
6. After each cutter if sharpened, move
chain forward to sharpen next cutter.
File all cutters on one side of chain.
7. Move to other side of chain and repeat
process.
Items Needed to Sharpen Chain
Purchase these items from your local dealer,
hardware store, or chain saw supplies outlet.
• 5/32" round file
• Depth gauge tool
• File guide
• Vise
• Medium sized flat file
Note:
This illustration
shows file guide
placement and filing
direction for sharpening cutters on left side
of chain.
Figure 20 - File and File Guide Placement On Chain
Groove
Depth Gauge
(left side of chain)
Groove
Top Plate
(left side of chain)
Left Side of
Chain
Right Side of
Chain
Depth Gauge
(right side
of chain)
Top Plate
(right side of chain)
097017
Figure 21 - Chain Part Locations
Continued
13

®
ELECTRIC CHAIN SAW
CLEANING AND
MAINTENANCE
Continued
Filing Cutter Depth Gauges
The cutter depth gauge clearance is reduced
as cutters are sharpened. After every second
or third sharpening, reset cutter depth gauges.
1. Place depth gauge tool (.025") firmly
across top of two cutters. Make sure
depth gauge enters slot in depth gauge
tool (see Figure 22).
2. Use medium flat file. File depth gauge
level with depth gauge tool.
3. Remove depth gauge tool. With flat file,
round off front corner of cutter depth
gauge (see Figure 23).
After several hand filings, have authorized
service center or sharpening service machine
sharpen chain. This will insure even filing.
Flat File
Depth Gauge
Depth
Gauge
Tool
Depth
Gauge
Slot
Figure 22 - Depth Gauge Tool On Chain
SHARPENING SAW CHAIN
(Fast Sharp Model)
WARNING: Unplug chain saw
from power source before servicing. Severe injury or death could
occur from electrical shock or
body contact with moving chain.
WARNING: Cutting edges on
chain are sharp. Use protective
gloves when handling chain.
WARNING: Do not handsharpen this Fast Sharp chain.
Hand-sharpening chain will increase risk of kickback.
Keep chain sharp. Your saw will cut faster
and more safely. A dull chain will cause
undue sprocket, guide bar, chain, and motor
wear. If you must force chain into wood and
cutting creates only sawdust with few large
chips, chain is dull.
Follow the steps below to sharpen Fast
Sharp chain. The automatic chain sharpener
sharpens cutter, lowers cutter depth gauge,
and adjusts guard drive link.
1. Adjust saw chain for proper tension
(see Saw Chain Tension Adjustment,
page 7).
2. Clean out excess sawdust and wood
chips from drive sprocket area.
3. Turn sharpener knob counterclockwise
until clicking stops (see Figure 24).
4. Turn sharpener knob clockwise until
you hear five distinct clicks.
5. Place saw on clean, flat surface.
6. Connect saw to power supply.
7. Hold saw, with both hands in normal
cutting position.
8. Press in switch lockout with right
thumb and squeeze trigger.
9. Gently push on sharpener knob. Saw
must be running for chain to sharpen.
Note:
Sparks appearing shows sharpener is working (see Figure 25). If no
sparks appear, continue to adjust sharpener one click at a time. After each
click, press sharpener knob until light
flow of sparks appears.
After several sharpenings, you must turn
sharpener knob more to bring stone into
position.
Figure 25 - Sharpening Fast Sharp Chain
REPLACING SAW CHAIN
Replace chain when cutters are too worn to
sharpen or when chain breaks. Only use
replacement chain noted in this manual.
Always include new drive sprocket when
replacing chain. This will maintain proper
driving of chain.
drive sprocket, see Replacement Parts and
Accessories, on back cover.
Note:
For proper chain and
Front Corner
.025"
Figure 23 - Round Off Front Corner Of
Depth Gauge
PUSH
SHARPEN
TO
Sharpener
Knob
Figure 24 - Turning Sharpener Knob
14
097017

OWNER’S MANUAL
TROUBLESHOOTING
OBSERVED FAULT
Saw runs, but does not cut.
Saw does not cut unless heavily forced.
Cutting produces only sawdust with few
large chips.
Saw runs slow. Saw stalls easily.
Motor of saw does not run when you squeeze
trigger.
Motor of saw runs, but chain does not move.
Chain does not get oil.
WARNING: Unplug chain saw from power source before servicing.
Severe injury or death could occur from electrical shock or body contact
with moving chain.
POSSIBLE CAUSE
Chain assembled backwards on guide bar
Chain is dull
Low power supply voltage
1. Switch lockout not pressed in to release
trigger
2. Extension cord connections loose
3. Open line fuse or circuit breaker
4. Bad motor brushes
5. Open wiring circuit on saw
Gear train failure
1. Clogged oil slot in guide bar
2. Oil is too thick
REMEDY
See Assembly, page 6
See Sharpening Saw Chain, page 13 (nonFast Sharp model) or page 14 (Fast Sharp
model)
Extension cord wire size too small. See
Extension Cords, page 8
1. Press in switch lockout before squeezing trigger
2. Check cord connections
3. Check line fuse or circuit breaker
4. See authorized service center
5. See authorized service center
See authorized service center
1. Remove guide bar and clean oil slot
2. Use correct weight of oil. See Filling Oil
T ank, page 7
Chain comes off guide bar.
Saw smokes.
Saw leaks oil.
STORAGE
If storing saw for more than 30 days, follow
steps below.
1. Drain oil tank.
2. Remove and clean guide bar and chain.
Clean guide bar and chain by soaking
in petroleum based solvent or mild soap
and water mixture.
3. Dry guide bar and chain.
4. Place chain in container filled with oil.
This will prevent rust.
5. Wipe a thin coating of oil over surface
of guide bar.
1. Chain is loose
2. Guide bar and chain not assembled right
Saw damaged. Do not use saw.
Oil cap is not secure.
6. Wipe off outside of saw body. Do this
with soft cloth dampened with a mild
soap and water mixture.
7. Store chain saw
• in a high or locked place, out of
children’s reach
• in a dry place
• in a carrying case or with scabbard
over guide bar
TECHNICAL
SERVICE
You may have further questions about assembling, operating, or maintaining this saw.
If so, contact DESA International’s Technical Service Department at 1-800-323-5190.
1. Tighten chain. See Saw Chain Tension
Adjustment, page 7
2. See Assembly, page 6
See authorized service center
Tighten oil cap. Note: Empty oil tank when
not in use.
SERVICE
PUBLICA TIONS
You can buy a service manual from address
listed on back page of this manual. Send a check
for $5.00 payable to DESA International.
You can receive an illustrated parts list free
of charge. Send a self-addressed stamped
envelope to address on back page of this
manual.
When writing, include model number and
serial number of saw. You will find these
numbers on saw motor housing decal.
097017
15

®
ELECTRIC CHAIN SAW
PARTS CENTRALS
Ray's Portable Heater Service
3191 Myers Road
Camino, CA 95709
916-644-7716
Baltimore Electronics
1348 Dixwell Avenue
Hamden, CT 06514
203-248-7553
1-800-397-7553
Eckley’s Small Engine
31617 Spruce Drive
Eustis, FL 32726
352-357-6764
Parts Company of America
1657 Shermer Road
Northbrook, Ill 60062
708-498-5900
1-800-323-0620
Portable Heater Parts
342 North County Road 400 East
Valparaiso, IN 46383
219-462-7441
1-800-362-6951
FBD
1349 Adams Street
Bowling Green, KY 42103-3414
502-846-1199
1-800-654-8534
Lyons & Lyons Sales Co. Inc.
Glen Arm Road
Glen Arm, MD 21057
301-665-6500
1-800-333-5966
Master Parts Distributors
1184 Wilson NW
Grand Rapids, MI 49544
1-616-791-0505
1-800-446-1446
Four Flags Power Products
1115 Stateline Road
Niles, MI 49120
616-684-2697
1-800-268-4983
Hance Distributors Inc.
12795 16th Avenue North
Plymouth, MN 55441
612-559-2299
Automotive Equipment Service
3117 Holmes
Kansas City, MO 64109
816-531-9144
1-800-843-3546
Sun Appliance Service Center
1687 Central Avenue
Albany, NY 12205
518-869-9591
Forrest Lytle and Sons Inc.
740 West Galbraith Road
Cincinnati, OH 45231
513-521-1464
Bortz Chain Saw Shop
Road #2, Box 64A
Oley, PA 19547
610-987-6452
21st Century
2950 Fretz Valley Road
Perkasie, PA 18944
215-795-0400
1-800-325-4828
LaPortes' Parts & Service
2444 N 5th Street
Hartsville, SC 29550
803-332-0191
Webbs Appliance Center
1519 Church Street
Nashville, TN 37203
615-329-4079
1-800-899-4079
Industrial Hardware
4109 Bainbridge Blvd.
Chesapeake, VA 23324
757-543-2232
1-800-788-0008
Mills Lawn and Garden
4750 B. Baxter Road, Unit B
Virginia Beach, VA 23462
757-490-7001
Tuco Industrial Products
5223 180th Street SW
Suite 4A-1
Lynnwood, WA 98037
425-743-9533
1-800-735-1268
ALABAMA (AL)
A & O General Repair Service
1470 Opelika Road
Auburn, AL 36830
334-821-7022
Southern Power Tool
3956 Government Blvd.
Mobile, AL 36693
334-666-3623
ARIZONA (AZ)
Best Brothers Lawnmower Repair
5549 W. Glendale Avenue
Glendale, AZ 85301
602-939-9170
D & L Small Engines, Inc.
10023 North 19th Ave.
Phoenix, AZ 85021
602-861-1978
Power Tool Service Center
660 East 19th Street
Tucson, AZ 85719
520-884-8974
CALIFORNIA (CA)
Ray's Portable Heater Service
3191 Meyers Road
Camino, CA 95709
916-644-7716
California Electric Service
1170 G. Burnett Avenue
Concord, CA 94520
510-827-1011
California Electric Service
612 South Shoppers Lane
Covina, CA 91723
818-915-4935
California Electric Company
1208 East Ash Avenue
Fullerton, CA 92631
714-870-0900
J & N Garden Equipment
4460 W. Imperial Hwy.
Inglewood, CA 90304
310-671-0079
California Electric Company
11284 Los Alamitos Blvd.
Los Alamitos, CA 90720
310-596-7895
California Electric Service
23725 Via Fabricante, Unit B
Mission Viejo, CA 92691
714-586-9440
AUTHORIZED SERVICE CENTERS
California Electric Service
1139 East 12th Street
Oakland, CA 94606
510-834-1050
California Electric Service
2594 East Colorado Blvd.
Pasadena, CA 91107
818-792-3194
California Electric Service
1717 Bell Street
Sacramento, CA 95814
916-443-5711
California Electric Service
3430 El Cajon Blvd.
San Diego, CA 92104
619-283-6488
California Electric Service
1090 Bryant Street
San Francisco, CA 94103
415-431-8494
California Electric Service
783 The Alamada
San Jose, CA 95126
408-295-0475
Lawnmower & Saw
3115 S. Main Street
Santa Ana, CA 92707
714-540-5307
Rincon Valley Yard & Garden
4972 Sonoma Hwy
Santa Rosa, CA 95409
707-593-4124
California Electric Service
41715 Enterprise Circle North
Suite 101
Temecula, CA 92590
909-695-5445
California Electric Service
14753 Oxnard Street
Van Nuys, CA 91411
818-997-8855
California Electric Service
2314 South Westwood Blvd.
W. Los Angeles, CA 90064
310-475-2532
PBI
3160 Industrial Drive
Yuba City, CA 95993
916-671-1871
COLORADO (CO)
McGuckin Power Equipment Center
2845 Valmont Road
Boulder, CO 80302
303-443-9317
Ace Mower and Small Engines
4718 Chromium Drive
Colorado Spring, CO 80918
719-593-0862
Bartell Tool Service
1448 W. Cedar Avenue
Denver, CO 80223
303-777-5463
Metrogas Equipment Company
790 West 64th Ave.
Denver, CO 80221
303-428-3036
Winfrey's Repair
317 8th Street
Greeley, CO 80631
970-353-9576
AAA Electric Company, Inc.
24 South Main Street
Longmont, CO 80501
330-776-6031
Dales Electric Motor Repair
932 Coffman Street
Longmont, CO 80501
303-651-6907
CONNECTICUT (CT)
Baltimore Electronics
1348 Dixwell Avenue
Hamden, CT 06514
203-248-7553
1-800-397-7553
Utility Electric Service
53 Main Street
Hartford, CT 06106
860-246-7271
Goodies Sales and Service
133 Hamilton Street
New Haven, CT 06515
203-865-1470
Appliance Servicenter of Stamford
15 Cedar Heights Road
Stamford, CT 06905
203-322-7656
FLORIDA (FL)
Cricket Shop
3012 39th Avenue West
Bradenton, FL 34205
941-755-7758
Eckley's Small Engine
31617 Spruce Drive
Eustis, FL 32736
352-357-6764
Al's Small Engine, Inc.
2620 Blanding Blvd.
Middleburg, FL 32068
904-282-5416
S TEK Power Tools
2605 South Orange Avenue
Orlando, FL 32806
407-851-5642
Lindle & Sons Electric Motor Repair
7016 Hwy. 22
Panama City, FL 32401
850-871-1722
Eustis and Sons, Inc.
7035 66th Street North
Pinellas Park, FL 34665
813-544-1486
Mulvaney's Inc.
2148 W. Tennessee Street
Tallahassee, FL 32304
904-576-5578
A-1 Tool Rental, Inc.
2509 South State Road 7
West Hollywood, FL 33023
305-961-9250
GEORGIA (GA)
Hamilton Hardware
5300 Veterans Pkwy.
Columbus, GA 31904
706-322-6545
Cowan Ace Hardware
1264 Green Street
Conyers, GA 30207
770-483-8818
Douglasville Ace Hardware
6530 Church Street
Douglasville, GA 30133
770-942-7044
S & P Rental & Supply Co.
259 Clayton Street
Lawrenceville, GA 30245
770-963-0392
Tifton Electric Motors
1265 US Hwy. 82E
Tifton, GA 31794
912-382-4040
IDAHO (ID)
Rossiter Electric
1501 S. Capitol Ave.
Idaho Falls, ID 83403
208-529-3665
Steam Store Rocky Mountain, Inc.
155 North Gate Mile
Idaho Falls, ID 83401
208-522-0609
Steam Store of Magic Valley, Inc.
156 4th Avenue South
Twin Falls, ID 83301
208-734-3694
J & J Enterprises
1704 Addison Avenue East
Twin Falls, ID 83301
208-733-2001
ILLINOIS (IL)
Cherry Valley Small Engine Repair
702 East State Street
Cherry Valley, IL 61016
815-332-5636
Chainsaw Central
11 E. Main Street
Chicago Heights, IL 60411
708-756-2280
Lange Electric
912 E. Fayette
Effingham, IL 62401
217-347-7626
H & R Pump Company, Inc.
2111 E. Washington Street
Joliet, IL 60434
815-726-2950
Mathis-Kelley Construction
1046 W. Jefferson Street
Morton, IL 61550
309-266-9733
Ambraw Power Equipment
310 E. Decatur Street
Newton, IL 62448
618-783-2821
16
097017

OWNER’S MANUAL
INDIANA (IN)
Hutchens Sales and Service
R.R. #5, Box 550
Bloomfield, IN 47424
812-876-1891
Nichols Ice & Oil
2018 Park Road
Connersville, IN 47331
317-825-3741
B & W Repair Service
213 N. Main Street
Dale, IN 47523
812-937-2576
Reggie's Small Engine Spec.
3011 Lower Huntington Road
Ft. Wayne, IN 46809
219-747-6212
Eastside Electric
928 East Lincoln
Goshen, IN 46526
219-533-3823
Mills Electric
4828 Calumet Ave.
Hammond, IN 46327
219-931-3114
Tyrie Mower Repair
110 South 16th Street
Lafayette, IN 47905
317-742-7886
Kabelin True Value Hardware
512 Andrew Avenue
Laporte, IN 46350
219-362-7917
Krep's Small Engine Repair
3301 East County Road 350 North
Muncie, IN 47303
317-282-5139
Lear Lawn & Garden
2204 N. Wolfe Street
Muncie, IN 47303
317-282-6273
Li'l Engine Sales & Service, Inc.
1428 Vincennes Street
New Albany, IN 47150
812-944-1377
Ertel & Sons Portable Welding
109 E. Main Street
Swayzee, IN 46986
317-922-4611
Portable Heater Parts
342 North County Road, 400 East
Valparaiso, IN 46383
219-462-7441
D W Handy's
2112 S. 15th Street
Vincennes, IN 47591
812-886-0172
IOWA (IA)
Brown's
408 South Fifth Street
Abel, IA 50003
515-993-3053
Beal's Motor Rewinding
600 West Beach
Cherokee, IA 51012
712-225-6173
Blink Electric Motors
Rear 116 N. 1st Ave.
Marshalltown, IA 50158
515-752-3036
Fry Company
Box 96 Thatcher Ave.
Millerton, IA 50165
515-897-3235
Moreland Repair
2145 Jericho Road
Peosta, IA 52068
319-583-3669
Northeast Iowa Motor Service
24665-150th Street
Sumner, IA 50674
319-578-5883
Black Hawk Rental
324 West 15th Street
Waterloo, IA 50702
319-234-4421
KANSAS (KS)
Abilene Rent-All & Sales
1701 West 1st Street
Abilene, KS 67410
913-263-7668
NAAB Electric, Inc.
2013 W. Jones
Garden City, KS 67846
316-276-8101
Morris Electric Repair
2423 5th Street
Great Bend, KS 67530
316-792-2919
McPherson Rental Center
911 West First Street
McPherson, KS 67460
316-241-3333
Town and Country
2008 Princeton
Ottawa, KS 66067
913-242-3133
KENTUCKY (KY)
Hart's Motor Service
1747 Woodlawn Road
Bardstown, KY 40004
502-348-3270
E-Z Rent It Inc.
1428 U.S. 31-W By-Pass
Bowling Green, KY 42101
502-782-9462
Roman's Repair Shop
601 College Street
Bowling Green, KY 42101
502-746-0857
Hopkinsville Electric Motor
704 W. 15th Street
Hopkinsville, KY 42240
502-886-7585
Maury's Fluorescent Appliance
1521 Bardstown Road
Louisville, KY 40205
502-456-1671
Rental World, Inc.
9509 Dixie Hwy.
Louisville, KY 40272
502-935-8853
All States Industrial Repair
728 E. Center Street
Madisonville, KY 42431
502-821-6555
Bluegrass Plumbing and Heating
121 South First Street
Richmond, KY 40475
606-623-2390
LOUISIANA (LA)
Welch Sales & Service
13348 W. Main
La Rose, LA 70373
504-693-3351
Triangle Bicycle and Lawnmower
5433 Crowder Road
New Orleans, LA 70127
504-241-3239
MAINE (ME)
Richard's Electric Motor
259 Main Street
Caribou, ME 04736
207-498-8950
Roger's Electric Motor Shop
823-West Main Street
Madawaska, ME 04756
207-728-4253
Rent-N-Save
28 Allen Avenue
Portland, ME 04103
207-797-2223
L.A. Pickard Sales & Service
383 Lewiston Road
Topsham, ME 04086
207-725-2874
MARYLAND (MD)
Center Supply Company
6802 Industrial Drive #208
Beltsville, MD 20705
301-595-0860
Lehmans Hardware, Inc.
5921 Belair Road
Baltimore, MD 21206
410-483-5888
Norris Taylor Contractors, Inc.
8480 Ocean Gateway
Easton, MD 21601
410-822-2050
Southern States Frederick Coop
500 E. South Street
Frederick, MD 21705
301-663-6165
Lyons and Lyons Sales Co., Inc.
Glen Arm Road
Glen Arm, MD 21057
410-665-6500
Chesapeake Rent All
210 N. Stokes Street
Havre De Grace, MD 21078
410-939-1720
Tracy's Appliance Company
520 Soleman's Island Road
P. Frederick, MD 20678
301-855-1818
MASSACHUSETTS (MA)
Holander Electric, Inc.
36 Walton Street
Attleboro, MA 02703
508-226-1060
Ormond's Inc.
115R Dean Ave.
Franklin, MA 02038
508-528-2013
Beacon Lumber/Beacon Rental
513 Church Street
New Bedford, MA 02745
508-995-1766
Grafton Power Equipment
North Grafton Shopping Center
9 Williams Road
North Grafton, MA 01536
508-839-6366
Mott's Tool Repair Service
92 Rayber Road
Orleans, MA 02653
508-240-0764
Utility Electric Service #2
810 Main Street
Springfield, MA 01105
413-781-1635
Franconia Fuel Company, Inc.
379 Main Street
Wareham, MA 02571
508-295-0039
MICHIGAN (MI)
R & A Service
12900 Haggerty Road
Belleville, MI 48111
313-697-1144
Thompson's Rental Resale Repair
11973 New Lothrop Road
Byron, MI 48418
810-266-4969
Renter Center, Inc.
24948 Gratiot
East Pointe, MI 48021
810-772-8111
Master Service Center
7876 Division
Grand Rapids, MI 49504
616-455-3117
Wolf Creek Farm Supply
8011 Wolf Creek Road
Herron, MI 49744
517-727-2391
Chicago Drive Rentals, Inc.
11298 Chicago Drive
Holland, MI 49424
616-396-9575
Fowler's Farm City Sales
2876 West Washington Road
Ithaca, MI 48847
517-875-3976
Superior Industrial Sales & Service
116 N. State Street
Jackson, MI 49201
517-784-0539
Norm's Electric Motor Repair
414 Walbridge
Kalamazoo, MI 49001
616-382-5054
A & J Rentals
550 S. 11th Street
Niles, MI 49120
616-684-3200
Four Flags Power Products
1115 Stateline Road
Niles, MI 49120
616-684-2697
Bob's Service Shop
2537 W. Drahner Road
Oxford, MI 48371
810-628-2601
Don's Small Engine Repair
630 S. Mill Street
Plymouth, MI 48170
313-451-5656
Bid's Service, Inc.
11276 E. Ten Mile
Warren, MI 48089
810-759-3040
MINNESOTA (MN)
Patrick's Sales & Service
415 - 8th Ave. NE
Brainerd, MN 56401
218-829-5356
Perry's Electrical Rebuilders
24630 Hale Avenue
Forest Lake, MN 55025
612-464-8054
Hance Distributor, Inc.
12795 16th Avenue North
Plymouth, MN 55441
612-559-2299
Hance Sales and Service
11212 Wayzata Blvd.
Minnetonka, MN 52343
612-545-8467
Andy's Small Engine Repair
209 9th Avenue, NE
Rochester, MN 55906
507-280-0373
Reed's Sales & Service
1260 Payne Ave.
St. Paul, MN 55101
612-774-9515
MISSISSIPPI (MS)
Handy Man Rentals
1904 Shiloh Road
Corinth, MS 38834
601-287-2460
MISSOURI (MO)
Stewarts Enterprises
7631 NW Salebarn Road
Cameron, MO 64429
816-632-6578
Northwest Power Sales
RD #2, Box 200
Maryville, MO 64468
816-582-5080
Buchheit, Inc.
Route 7, Box 239
Perryville, MO 63775
573-547-1010
MONTANA (MT)
Tom's Service Repair
1111-6th Avenue North
Billings, MT 59103
406-259-6179
Mosch Electric Motors, Inc.
2513 - 17th St. NE
Black Eagle, MT 59414
406-453-2481
Sun Rental Center
1301 - 3rd St. NW
Great Falls, MT 59404
406-761-6688
NEBRASKA (NE)
Hatten's Electric Service
130 S. Hastings, Box 843
Hastings, NE 68901
402-463-4596
Lincoln Tool Service Center
3535 North 40th Street
Lincoln, NE 68404
402-464-1157
Flohr Electric Motor
4356 South 90th Street
Omaha, NE 68127
402-331-6863
MSE Parts Unlimited
4935 South 136th Street
Omaha, NE 68137
402-895-0806
Ted's Mower Sales and Service, Inc.
5155 Q. Street
Omaha, NE 68117
402-731-7058
LaVern Hass Repair
1204 - 1st Road
Wisner, NE 68791
402-529-6846
NEVADA (NV)
Fallon Saw & Tool
300 N. Marine St.
Fallon, NV 89406
702-423-1888
One Stop Shop
1408 Industrial Way #3
Gardnerville, NV 89410
702-782-7004
NEW HAMPSHIRE (NH)
Taylor Rental Center
223 Wincherster Street
Keene, NH 03431
603-352-0539
Kingston Enterprises
85 North Road
Kingston, NH 03848
603-642-3506
Hammar Industrial Supply
175 Amherst Street
Nashua, NH 03061
603-822-5161
Exeter Rent All
State Rt 27, Box 68A
Raymond, NH 03077
603-895-6583
097017
17

®
ELECTRIC CHAIN SAW
NEW JERSEY (NJ)
Complete Saw Service
336 River Road
Garfield, NJ 07026
201-478-7838
Nemeth's Mower Service
55 - 4th Ave.
Haskell, NJ 07420
201-835-0080
Air & Electric Tool Service, Inc.
215 North 8th Street
Kenilworth, NJ 07033
908-272-5567
Associated Industries
Rd 38, Box 2486
Mt. Holley, NJ 08060
609-267-8417
Woodchuck's Lawnmower
and Appliance
220 Whitehorse Pike
Magnolia, NJ 08049
609-783-1111
Myron Tepper/Tep's Power
Equipment
1007 N. High Street
Millville, NJ 08332
609-825-8294
Capitol Service & Equipment
551 New Market Road
Piscataway, NJ 08855
908-968-5577
Handyman's Tool Shop
508 State Hwy. #10
Randolph, NJ 07869
201-361-1581
Sam's Repair Shop
137 W. Bennett Ave.
Wildwood, NJ 03077
603-895-6583
NEW MEXICO (NM)
K & S Service Center
7521 Menaul N.E.
Albuquerque, NM 87110
505-884-6262
NEW YORK (NY)
Sun Appliance Service Center
1687 Central Avenue
Albany, NY 12205
518-869-9591
Valley Mower Service
2857 Ellis Creek Road
Barton, NY 13734
607-589-4825
White Tool Supply Inc.
3047 Atlantic Avenue
Brooklyn, NY 11208
718-227-8844
Shields Brothers of Buffalo
1410 Main Street
Buffalo, NY 14209
716-883-3860
Lehman's Farm & Home Supply
Route 26
Denmark, NY 13631
315-493-1151
John’s Engine Repair
10482 Sisson Hwy.
Eden, NY 14057
716-337-3719
M & S Repair Shop
303 Hilltop Drive
Elma, NY 14059
716-652-0311
Crossbay Appliance Service
158-34 Crossbay Blvd.
Howard Beach, NY 11414
718-843-4422
Belco Equipment Company
3801 - 29th Street
Long Island City, NY 11101
718-361-1122
Para-Deys Tools
708 Victor Road
Macedon, NY 14502
315-986-2520
Advanced Power Equipment
101 Fairgrounds Drive
Manlius, NY 13104
315-682-4010
P & C
12 East Street
Nunda, NY 14517
716-468-5050
Otega Repair
Rd #2, Ostdawa Ave.
Otego, NY 13825
607-988-7859
Owego Agway Coop
38 West Avenue
Owego, NY 13827
607-687-2039
Jack-n-Heater Service
185 Beartown Road
Painted Post, NY 14870
607-962-1239
Larmon Small Engine
16353 Co. Rt. 91
Pierrepont Manor, NY 13674
315-465-6671
R & D Mower & Snowblower
Sales and Service
1630 Empire Blvd.
Webster, NY 14580
716-671-9409
Bedford Appliance, Inc.
1173 Yonkers Ave.
Yonkers, NY 10704
914-237-7575
NORTH CAROLINA (NC)
Ray's Lawn Mower & Machine
1414 Landis Avenue
Charlotte, NC 28205
704-377-1112
Martin Equipment Company
4209-B US 70 E.
Goldsboro, NC 27534
919-778-5996
Hickory Home & Garden Center
336 HWY 321 NW
Hickory, NC 28601
704-327-3719
Bowden Electric Motor Service
1681 S. Wesleyan Blvd.
Rocky Mount, NC 27803
919-446-4203
Small Engine Performance Ctr.
312 Eldred
Valdese, NC 28690
704-879-9652
NORTH DAKOTA (ND)
Fix-It Shop
316 - 21st St. East
Dickinson, ND 58601
701-225-0766
Ted's Saw Service
412 South 4th Street
Grand Forks, ND 58201
701-775-7343
Craig's Small Engine Repair
508 East 2nd Street
Williston, ND 58801
701-774-0798
OHIO (OH)
Carter Electrical Repair
3448 Lunar Rd. NE
Carrollton, OH 44615
330-627-4061
Northwest Mower Sales and Service
6086 Cheviot Road
Cincinnati, OH 45247
513-385-2400
Forrest Lytle & Sons
740 W. Galbraith Road
Cincinnati, OH 45231
513-521-1464
Anytool Precision Sharpening Repair
21150 Lorain Road
Cleveland, OH 44126
216-356-1920
North East Mower Service
412 East 156th Street
Cleveland, OH 44110
216-531-8197
Pecnik's Lawnmower Service
732 East 163rd Street
Cleveland, OH 44110
216-531-8480
Lefeld Welding & Steel Supply
512 N. Second Street
Coldwater, OH 45828
419-678-2397
Dayton Hardware & Supply
16-32 N. Irwin Street
Dayton, OH 45404
513-258-3721
1-800-762-3426 Ohio only
Ken's Repair
3246 S. Sectionline
Delaware, OH 43015
614-369-4798
Lavon Dietsch Repair
07145 Scott Rd. Rt #2
Edgerton, OH 43517
419-298-2948
Anytool & Outdoor Power Equip.
21150 Lorain Road
Fairview Park, OH 44126
216-356-1920
LaGrange True Value
300 E. Main Street
LaGrange, OH 44050
216-355-4222
Deep Run Mower Service
58781 Heil Addn. Deep Run
Martins Ferry, OH 43935
614-859-6131
Worcester Sales and Service
34200 Lorian Road
N. Ridgeville, OH 44039
216-327-2196
Staker Sales & Service
1424 Ninth Street
Portsmouth, OH 45662
614-353-6965
Leonard Hardware
145 North 15th Street
Sebring, OH 44672
330-938-6329
Sparks Sales & Service
5184 Fletcher Chapel Road
Springfield, OH 45502
513-323-5925
Eckert Bros.
244 Factory Street
Sugarcreek, OH 44681
216-852-2611
Larry's Mini Engines
4732 US Route 20 West
Wakeman, OH 44889
216-839-2508
OKLAHOMA (OK)
B.M.I. Inc.
13102 East 1st Street
Broken Arrow, OK 74012
918-252-0011
H. L. Moss
1714 E. 15th Street
Tulsa, OK 74104
918-744-1305
Kay Electric Motors Inc.
810 48th Street
Woodward, OK 73801
405-256-3254
OREGON (OR)
Turner’s Lawnmower and Saw
728 SE Robin Way
Gresham, OR 97080
503-665-5441
Pendleton Grain Growers
200 S. 1st Street
P.O. Box 1248
Hermiston, OR 97801
541-567-5591
Mattix Appliance Parts Company
501 N. Main
Phoenix, OR 97535
541-535-6263
Oregon Appliance
2137 East Burnside Street
Portland, OR 97214
503-235-6681
PENNSYLVANIA (PA)
Albright's Hardware
2119 Wabert Ave.
Allentown, PA 18104
610-433-3831
General Rental & Sales Center
Old Rt 1 & 41
Avondale, PA 19311
610-268-2825
Bud's Tractor and Mower Sevice
21 Bock Lane
Baden, PA 15005
412-869-7142
Copper Creek
Rd. #1, Locust Valley
Barnesville, PA 18214
717-467-2792
Passmore Service Center
1108 Rt. 100
Betchelsville, PA 19505
610-367-9084
Engine Doctors
20 Russell Blvd.
Bradford, PA 16701
814-362-3091
Pro-Fix
Rear 681 Main Street
Edwardsville, PA 18704
717-288-0476
Carson's Hardware
637-43 Main Street
Hellertown, PA 18055
610-838-7741
Eaton Enterprises
240 Main Street
Imperial, PA 15126
412-695-0702
Valray Nurseries Inc.
R.D. #8, Box 362
Kittanning, PA 16201
412-548-1579
Petrosky's Hardware & Supply Co.
602 Alexandria Street
Latrobe, PA 15650
412-537-3541
Reddi-Rentals
948 S. Woodbourne Rd.
Levittown, PA 19057
215-943-4800
Raymond, M. Nolt
290 S. Shirk Road
New Holland, PA 17557
717-354-0198
Bortz Chainsaw Shop
45 Bortz Road
Oley, PA 19547
610-987-6452
Snyder Electric Company
1500 Chateau Street
Pittsburgh, PA 15233
412-231-3100
Stamm's Mower Repair
Rd. 5, Pine Lane Box 150
Selinsgrove, PA 17870
717-743-7651
SOUTH CAROLINA (SC)
Hall's Small Motor Repair
225 Heathwood Drive
Aiken, SC 29803
803-649-6313
Todd's Electric Motor Repair
110 Laurel Street
Conway, SC 29526
803-248-2444
LaPortes Parts & Service
2444 N. 5th Street
Hartsville, SC 29550
803-332-0191
Turner Repair Service
3 E. Belvue Road
Taylors, SC 29687
864-244-1746
TENNESSEE (TN)
Cole's Small Equipment Center
247-A Vance Tank Road
Bristol, TN 37620
615-968-1175
Vista Small Engine
1510 Vista Lane
Clarksville, TN 37043
615-552-6953
Master Repair Service
305 Elmore Road
Crossville, TN 38555
615-484-2061
The Speciality Shop
2300 East Magnolia Avenue
Knoxville, TN 37917
423-523-6894
Authorized Equipment Service
812 Polk Avenue
Memphis, TN 38126
901-774-0850
Webb's Appliance Service Center
1519 Church Street
Nashville, TN 37203
615-329-4079
TEXAS (TX)
Industrial Distributing Co.
9411 Neils Thompson Dr.
Austin, TX 78759
512-837-4122
Bud's LP Gas & Supply
225 Grand
Channelview, TX 77330
713-457-2456
Corpus Christi Power Tool & Rpr.
3701 Agnes
Corpus Christi, TX 78405
512-883-1117
Freel Enterprise
118 Elston
Dallas, TX 75232
214-376-9913
Hawn Equipment Rental
7777 Hawn Freeway
Dallas, TX 75217
214-398-8121
Dyer Cycle
4501 Dyer Street
El Paso, TX 79930
915-566-6022
Ray DeSpain's Inc.
P.O. Box 184, Loop 494 North
New Caney, TX 77357
713-689-2121
Service Department
18
097017

OWNER’S MANUAL
UTAH (UT)
Roosevelt Service Center
133 South 300 East, Box 1546
Roosevelt, UT 84066
801-722-2708
Longs Engine Service
7536 Stone Road
Salt Lake, UT 84121
801-943-5135
Appliance Service Center
210 E. 600 South
Salt Lake City, UT 84111
801-328-9703
VERMONT (VT)
Brown and Roberts
182 Main Street
Brattleboro, VT 05301
802-257-4566
VIRGINIA (VA)
Industrial Hardware
4109 Bainbridge Blvd.
Chesapeake, VA 23324
804-543-2232
Warren E. Smith Shops
564 Reading Rd. Ext.
300 Madestic Drive
Christiansburg, VA 24073
540-382-5501
Mills Repair Service
4750 B. Baxter Road, Unit B
Virginia Beach, VA 23462
757-490-7001
American Power Equip. Ctr.
6502 Horsepen Road
Richmond, VA 23230
804-285-4838
Stafford Equipment Sales & Service
21055 Jefferson Davis Hwy.
Stafford, VA 22554
540-720-1710
Outdoor Power Equipment
800 White Marsh Road
Suffolk, VA 23434
804-925-4933
REPLACEMENT
PARTS AND
ACCESSORIES
WARNING: Use only replacement parts and accessories described in this manual. Use of
other parts or accessories could
damage saw or injure operator.
WASHINGTON (WA)
Action Small Appliance Service
1500 145th Place SE
Bellevue, WA 98005
206-455-3578
TUCO Industrial Products
5227 180th SW, Suite 4A-1
Lynnwood, WA 98046
206-743-9533
Action Small Appliance
2125 Second Avenue
Seattle, WA 98121
206-448-2020
A to Z Rentals
10903 E. Sprague
Spokane, WA 99206
509-924-2000
Lifficks Electric Shop
8239 S. Park Avenue
Tacoma, WA 98408
206-474-7403
WEST VIRGINIA (WV)
Beckley Mower Service
3695 Robert C. Byrd Drive
Beckley, WV 25802
304-253-5748
Town and Country Supply
4117 First Avenue
Nitro, WV 25143
304-755-3520
WISCONSIN (WI)
Smith Petroleum Ltd.
217 N. Walworth
Darien, WI 53314
414-724-3206
Ken's Economy Sales
8887 Highway A
Marshfield, WI 54449
715-676-2143
Moore's Repair Service
W287 & N2108 Stuart Drive
Pewaukee, WI 53072
414-691-2814
Morisse Power Center
200 N. Chicago Avenue
S. Milwaukee, WI 53172
414-762-6444
Purchase these accessories and parts from
your nearest dealer or service center. If they
can not supply these accessories or parts,
either contact your nearest Parts Central or
DESA International for referral information. Parts centrals are listed in this manual.
DESA International
P.O. Box 90004
Bowling Green, KY 42102-9004
1-800-972-7879
Parts Department
LNT-2
Part Number Description
097566-01S Guide bar, 8"
091369S Chain, 8"
097567-01S Guide bar, 10"
091371S Chain, 10"
097568-02S Guide bar, 12"
091373S Chain, 12"
075752 Drive sprocket
099178H, 100089-06, 100089-07 &
EL-1
Part Number Description
097570-01S Guide bar, 14"
091374S Chain, 14"
075752 Drive sprocket
* Includes automatic chain sharpener.
097017
EL-1/EL-7 Fast Sharp
Part Number Description
097570-01S Guide bar, 14"
091367S* Chain, 14"
076695 Drive sprocket
EL-7, 098031J, 099039J, 100089-01,
100089-04, 100089-05
Part Number Description
097572-03S Guide bar, 16"
091375S Chain, 16"
075752 Drive sprocket
POLE SAW, 104316-01
POLE SAW ASSEMBLY, 104317
Part Number Description
104302-01S Guidebar, 8"
104301S Chain, 8"
075752 Drive Sprocket
19
EL-7 - 100015
Part Number Description
101623-01 Guide bar, 15"
101619-01 Chain, 15"
075752 Drive sprocket
General
Part Number Description
079963-02 Plastic scabbard, 8" & 10"
079963-04 Plastic scabbard,
12", 14", & 16"
079088-01 Hand Guard
077155 Adjusting Plate Assy.

REPAIR SERVICE
Note:
Only use original replacement parts.
This will protect your warranty coverage for
parts replaced under warranty.
Each authorized service center is independently owned and operated. For additional
Warranty Service
If saw requires warranty service, return it to
nearest authorized service center. You must
show proof of purchase. If faulty materials
or workmanship caused damage, we will
repair or replace saw without charge.
Non-Warranty Service
If saw requires service, return it to nearest
authorized service center. Repairs will be
billed to you at regular repair list prices.
Note:
Normal wear, misuse, abuse, neglect,
or accidental damage is not covered under
warranty.
service center or warranty information, call
1-800-323-5190.
Model ______________
Serial No. ______________
Date Purchased ______________
ELECTRIC CHAIN SAW LIMITED WARRANTY
Always specify model and serial numbers when writing the factory.
We reserve the right to amend these specifications at any time without notice. The only warranty applicable is our standard written warranty. We
make no other warranty, expressed or implied.
DESA International warrants this electric chain saw and any parts thereof, to be free from defects in material and workmanship for one year from
the date of first purchase from an authorized dealer, provided that the product has been properly maintained and operated in accordance with all
applicable instructions. The bill of sales or proof of purchase must be presented at the time a claim is made under this warranty.
This warranty is extended only to the original retail purchaser. This warranty covers only the parts and labor required to restore this chain saw
to its proper operating condition. Warranty parts must be obtained through factory authorized dealers and service centers for this product. These
dealers and service centers will provide original factory replacement parts. Failure to use original factory replacement parts voids this warranty.
This warranty does not cover commercial, industrial, or rental usage, nor does it apply to parts that are not in original condition because of normal
wear and tear, or parts that fail or become damaged as a result of misuse, accident, lack of proper maintenance, tampering, or alteration. Travel,
handling, transportation, and incidental costs associated with warranty repairs are not reimbursable under this warranty and are the responsibility
of the owner.
To the full extent allowed by the law of the jurisdiction that governs the sale of the product, this express warranty excludes any and all other
expressed warranties and limits the duration of any and all implied warranties, including warranties of merchantability and fitness for a particular
purpose to one year form the date of first purchase, and DESA International’s liability is hereby limited to the purchase price of the product and
DESA International shall not be liable for any other damages whatsoever including indirect, incidental, or consequential damages.
Some states do not allow limitation of how long an implied warranty lasts or an exclusion or limitation of incidental or consequential damages,
so the above limitation of damages may not apply to you.
This warranty provides the original purchaser with specific rights. For information regarding those rights, please consult the applicable state laws.
INTERNATIONAL
2701 Industrial Drive
P.O. Box 90004
Bowling Green, KY 42102-9004
097017 01
NOT A UPC
097017-01
REV. X
5/98
 Loading...