

REMEHA Avanta Plus Mounting Manual
Flue / Air inlet connection
ø 60 / 100 mm
DHW outlet (cold)
ø 15 mm
gas connection
ø 22 mm
condensate drain connection
3/4" (standard overflow pipe size)
DHW outlet (hot)
ø 15 mm
Flow connection
ø 22 mm
return connection
ø 22 mm
158 mm
pipe safety valve
ø 15 mm
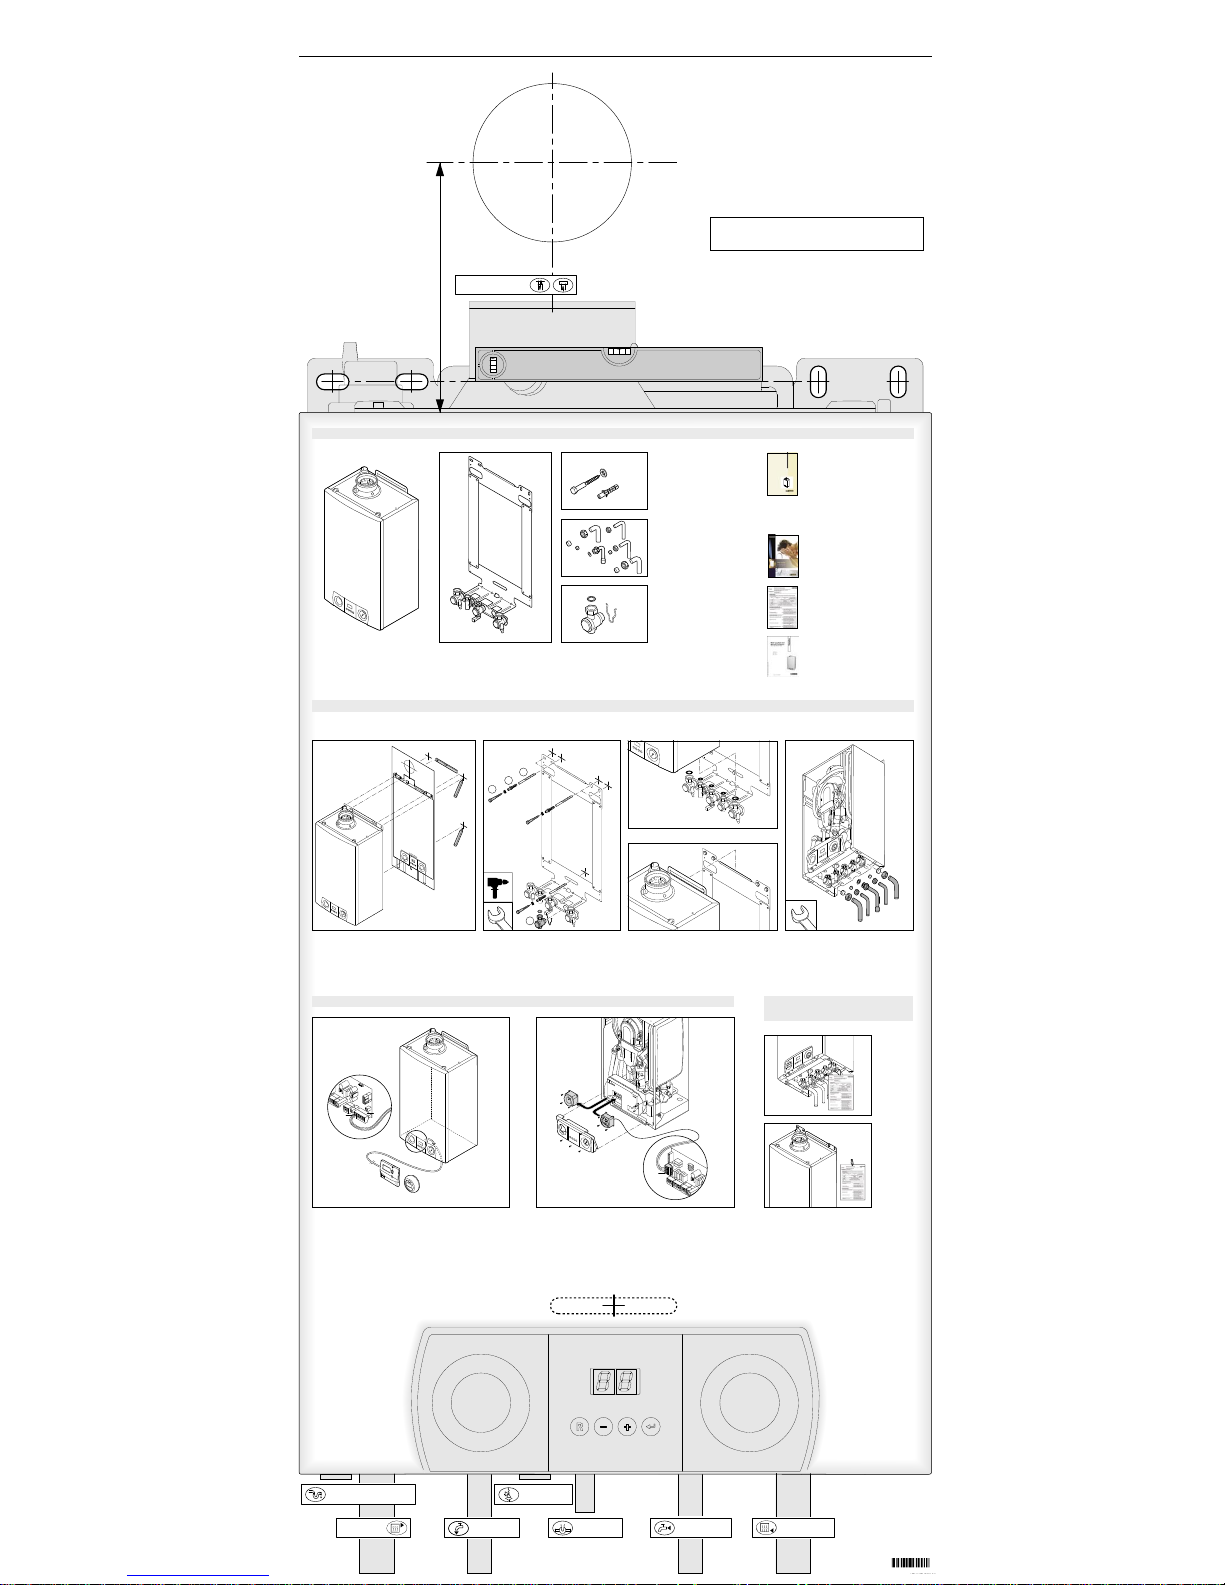
1 Check box contents. Ensure that all components are included. Report incomplete delivery to Broag.
Copper tails
3x
3x
3x
Instructieservice
AvantaPlus
2x
1x
ø10 mm
ø10 mm
ø8 mm
1
2
3
4
X9
8
7
X2
Mounting frame
(including isolation valve set and
washers)
Avanta Plus
(including pressure gauge and safety
valve)
Installation and service
manual
This document contains useful
and important information for the
correct installation, operation and
maintenance. Keep the Installation
and service manual in a safe
place together with the other boiler
documents.
Nylon plugs and screws for
fixing mounting frame
Users guide
Reed the instructions carefully and
keep the document in a safe place.
Short users guide
Boiler Log Book and warranty
card.
See that the Boiler Logbook has been
completed by the engineer at each
service and keep it in a safe place.
DHW inlet
(cold) valve set
2 Mounting Avanta Plus
Connecting OpenTherm room controls
(e.g. the Remeha Celcia 15 or 20):
Mount the control in a reference room (usually the living room).
Connect the two-wire interface cables to connectors 7 and 8 of the X9
terminal strip. When using the Celcia 20 it is possible to add the outside
sensor to provide weather compensation with room adjustment.
Connect the outside sensor to connectors 1 and 2 of the X9 terminal strip.
2. Drill the (Ø 10 mm) holes; Fit the (Ø 10 mm)
plugs; Fit (Ø 8 mm) screws into the plugs;
Check the mounting plate is level and tighten the
screws; Fit the DHW inlet (cold) valve set to the
mounting plate.
3. Fit fibre Washers on HTG Valves.
Suspend the boiler on mounting plate.
3 Connecting external controls
1. Using the template determine and mark the position
of the three mounting holes, making sure the plate is
absolutely level.
4. Connect the valves to the boiler
remembering to fit fibre washers supplied.
Connect the supplied copper tails to the
isolating valves.
Connecting the (optional) two channel time clock.
• Live 230 V supply for the time clock - connect to connectors 1 (N) and
2 (L) on X2 terminal strip.
• For HTG - connect the 230 V output from time clock to connector 5 and
remove exist link between connectors 1 and 4 of the X2 terminal strip.
• For DHW - connect the 230 V output from time clock to connector 3
remove exist link between connectors 3 and 4 of the X2 terminal strip.
4 Hang up the
Short users guide
Hang this card underneath or close to the boiler.
Based on the guidelines and the required installation space, determine where to mount the Remeha Avanta Plus. In determining the boiler position, consider carefully the flue outlet position and any pluming consequences.
Read the Installation and service manual for more details and regulations for mounting the Avanta Plus.
MOUNTING AVANTA PLUS
Please read the instructions given on this template
before installing the Avanta Plus.
WITH STANDARD MOUNTINGFRAME
59751-1005
DHW outlet (cold)
ø 15 mm
gas connection
ø 22 mm
condensate drain connection
3/4" (standard overflow pipe size)
DHW outlet (hot)
ø 15 mm
Flow connection
ø 22 mm
return connection
ø 22 mm
158 mm
pipe safety valve
ø 15 mm
Flue / Air inlet connection
ø 60 / 100 mm
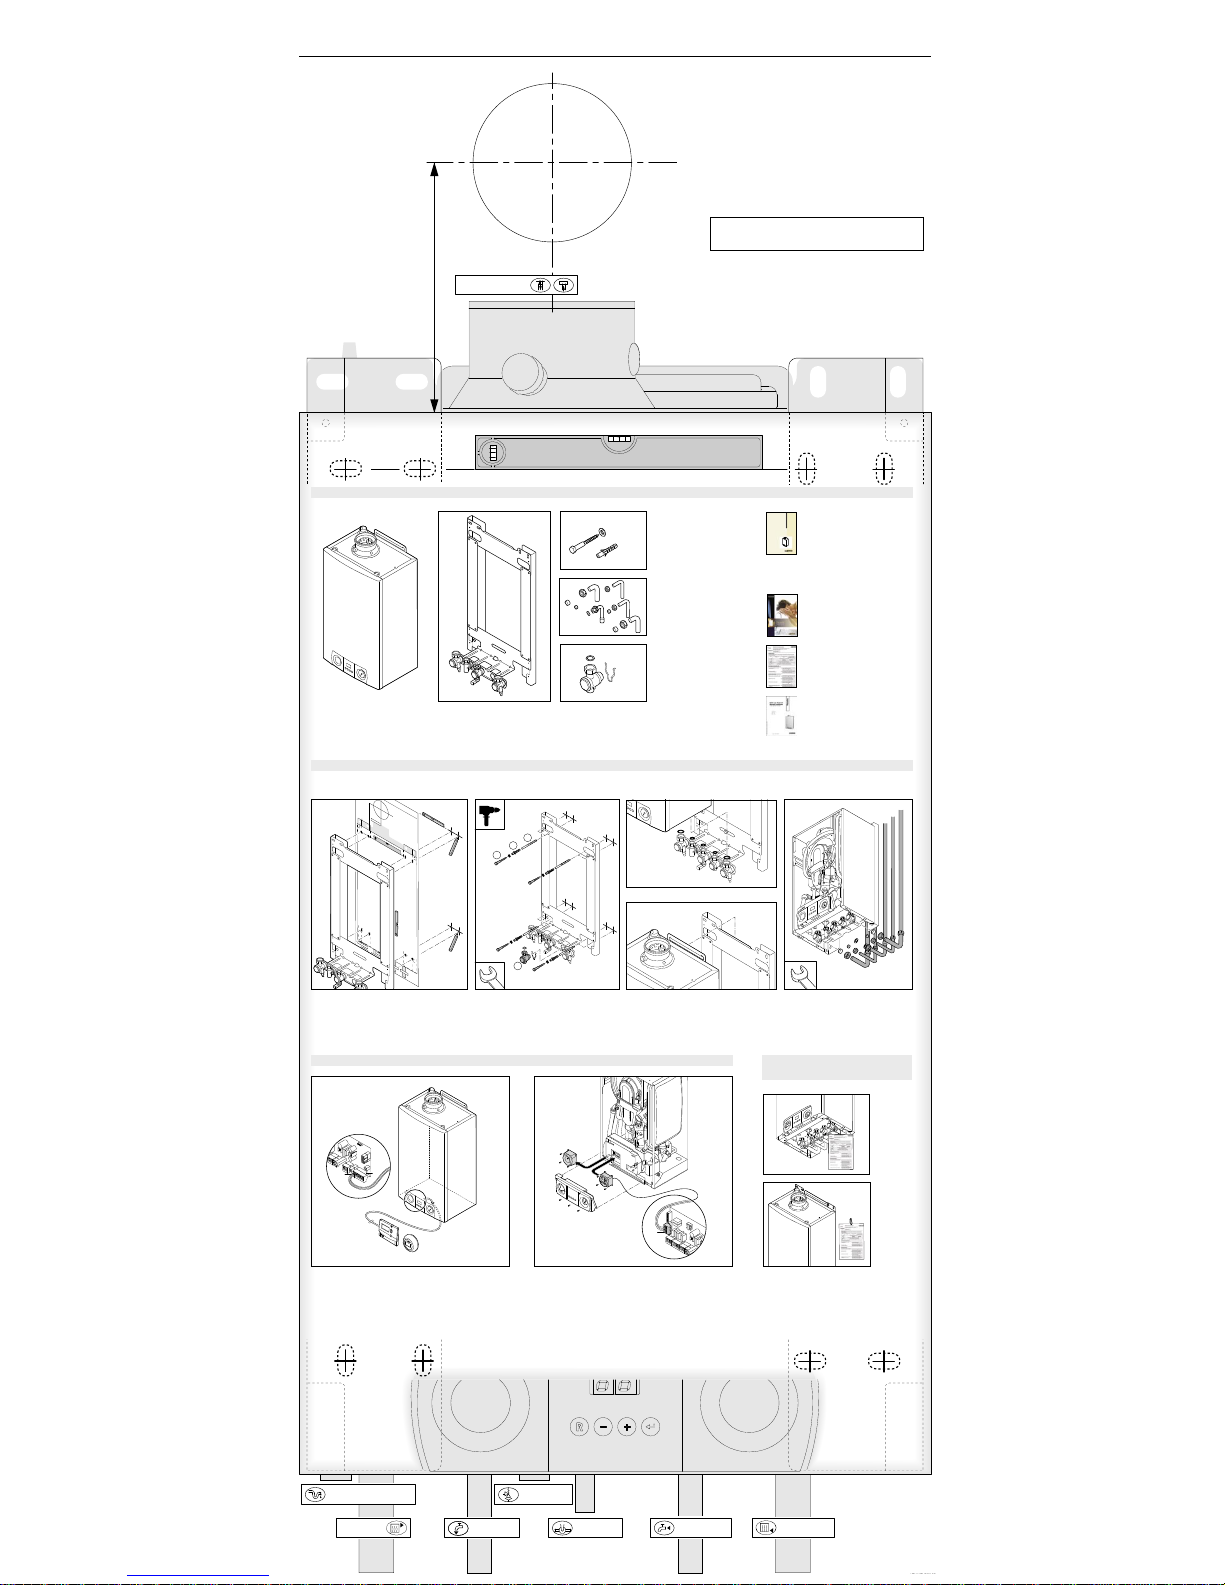
1 Check box contents. Ensure that all components are included. Report incomplete delivery to Broag.
Copper tails
4x
4x
4x
Instructieservice
AvantaPlus
P
l
e
a
s
e
f
i
r
s
t
r
e
a
d
t
h
e
i
n
s
t
r
u
c
t
i
o
n
s
g
i
v
e
n
o
n
t
h
i
s
t
e
m
p
l
a
t
e
b
e
f
o
r
e
i
n
s
t
a
l
l
i
n
g
t
h
e
A
v
a
n
t
a
P
l
u
s
M
O
U
N
T
I
N
G
A
V
A
N
T
A
P
L
U
S
W
I
T
H
O
P
T
I
O
N
A
L
S
T
A
N
D
O
F
F
F
R
A
M
E
1
5
8
m
m
L
T
A
L
W
7
H
0
0
0
1
0
2
a
4
ø10 mm
ø10 mm
ø8 mm
1
2
3
X9
8
7
X2
Mounting frame + Stand off frame
(including isolation valve set and washers)
Avanta Plus
(including pressure gauge and safety
valve)
Installation and service
manual
This document contains useful
and important information for the
correct installation, operation and
maintenance. Keep the Installation
and service manual in a safe
place together with the other boiler
documents.
Nylon plugs and screws for
fixing mounting frame
Users guide
Reed the instructions carefully and
keep the document in a safe place.
Short users guide
Boiler Log Book and warranty
card.
See that the Boiler Logbook has been
completed by the engineer at each
service and keep it in a safe place.
DHW inlet
(cold) valve set
2 Mounting Avanta Plus
Connecting OpenTherm room controls
(e.g. the Remeha Celcia 15 or 20):
Mount the control in a reference room (usually the living room).
Connect the two-wire interface cables to connectors 7 and 8 of the X9
terminal strip. When using the Celcia 20 it is possible to add the outside
sensor to provide weather compensation with room adjustment.
Connect the outside sensor to connectors 1 and 2 of the X9 terminal strip.
2. Drill the (Ø 10 mm) holes; Fit the (Ø 10 mm)
plugs; Fit (Ø 8 mm) screws into the plugs;
Check the stand off frame is level and tighten the
screws; Fit the DHW inlet (cold) valve set to the
mounting plate.
3. Fit fibre Washers on HTG Valves.
Suspend the boiler on mounting plate.
3 Connecting external controls
1. Using the template determine and mark the position
of the four mounting holes, making sure the plate is
absolutely level.
4. Connect the valves to the boiler
remembering to fit fibre washers supplied.
Connect the supplied copper tails to the
isolating valves.
* shown pipework is optional
Connecting the (optional) two channel time clock.
• Live 230 V supply for the time clock - connect to connectors 1 (N) and
2 (L) on X2 terminal strip.
• For HTG - connect the 230 V output from time clock to connector 5 and
remove exist link between connectors 1 and 4 of the X2 terminal strip.
• For DHW - connect the 230 V output from time clock to connector 3
remove exist link between connectors 3 and 4 of the X2 terminal strip.
4 Hang up the
Short users guide
Hang this card underneath or close to the boiler.
Based on the guidelines and the required installation space, determine where to mount the Remeha Avanta Plus. In determining the boiler position, consider carefully the flue outlet position and any pluming consequences.
Read the Installation and service manual for more details and regulations for mounting the Avanta Plus.
MOUNTING AVANTA PLUS
Please read the instructions given on this template
before installing the Avanta Plus.
WITH OPTIONAL STAND OFF FRAME
 Loading...