

Page 1

SPIN!
DIGITAL VINYL SYSTEM
WARNUNG!
Um Feuer oder einen elektrischen Schock zu vermeiden,
setzen Sie dieses Gerät nicht Wasser oder Flüssigkeiten aus!
Öffnen Sie niemals das Gehäuse!
WARNING!
To prevent fire or avoid an electric shock do not expose the
device to water or fluids! Never open the housing!
ATTENTION !
Afin d'éviter un incendie ou une décharge
électrique, veillez à tenir cet appareil à l'écart des liquides et
de l'humidité ! N´ouvrez jamais le boîtier !
Für weiteren Gebrauch aufbewahren!
Keep information for further reference!
Gardez ces instructions pour des utilisations ultérieurs !
www.reloop-spin.com
DEUTSCH
Seite 02-47
ENGLISH
page 48-93
FRANÇAIS
page 94-139
Bedienungsanleitung
ACHTUNG!
Lesen Sie sich vor der ersten Inbetriebnahme zur eigenen Sicherheit
diese Bedienungsanleitung sorgfältig durch! Alle Personen, die mit der
Aufstellung, Inbetriebnahme, Bedienung, Wartung und Instandhaltung
dieses Gerätes zu tun haben, müssen entsprechend qualifiziert sein und
diese Betriebsanleitung genau beachten. Dieses Produkt erfüllt die
Anforderungen der geltenden europäischen und nationalen Richtlinien,
die Konformität wurde nachgewiesen, die entsprechenden Erklärungen
und Unterlagen sind beim Hersteller hinterlegt.
Operation Manual
CAUTION!
For your own safety, please read this operation manual carefully before
initial operation! All persons involved in the installation, setting-up,
operation, maintenance and service of this device must be
appropriately qualified and observe this operation manual in detail. This
product complies with the requirements of the applicable European and
national regulations. Conformity has been proven. The respective
statements and documents are deposited at the manufacturer.
Mode d'emploi
ATTENTION !
Pour votre propre sécurité, veuillez lire attentivement ce mode d'emploi
avant la première utilisation ! Toutes les personnes chargées de
l'installation, de la mise en service, de l'utilisation, de l'entretien et la
maintenance de cet appareil doivent posséder les qualifications
nécessaires et respecter les instructions de ce mode d'emploi. Ce
produit est conforme aux directives européennes et nationales, la
conformité a été certifiée et les déclarations et documents sont en
possession du fabricant.
Page 2

2
INDEX
1 . . .Anschluss & Softwareinstallation . . . . . . . . . . . . . . . . . . . . . . . . S. 6
1.1 . . . .Anschluss . . . . . . . . . . . . . . . . . . . . . . . . . . . . . . . . . . . . . . . . . . . . . . . . . .S. 6
1.2 . . . .Softwareinstallation . . . . . . . . . . . . . . . . . . . . . . . . . . . . . . . . . . . . . . . . . .S. 9
1.3 . . . .Easy Setup . . . . . . . . . . . . . . . . . . . . . . . . . . . . . . . . . . . . . . . . . . . . . . . . .S. 11
1.4 . . . .Erste Software-Schritte . . . . . . . . . . . . . . . . . . . . . . . . . . . . . . . . . . . . . . .S. 14
2 . . .Softwareübersicht . . . . . . . . . . . . . . . . . . . . . . . . . . . . . . . . . . . . .S. 15
2.1 . . . .Shortcut: New Spin! Library . . . . . . . . . . . . . . . . . . . . . . . . . . . . . . . . . . . . . . . . . .S. 16
2.2 . . . .Shortcut: Open Spin! Library . . . . . . . . . . . . . . . . . . . . . . . . . . . . . . . . . . . . . . . . .S. 16
2.3 . . . .Shortcut: Auto Search . . . . . . . . . . . . . . . . . . . . . . . . . . . . . . . . . . . . . . . . . . . . . . .S. 16
2.4 . . . .Shortcut: Save Spin! Library . . . . . . . . . . . . . . . . . . . . . . . . . . . . . . . . . . . . . . . . .S. 16
2.5 . . . .Shortcut: Stop Spin! List . . . . . . . . . . . . . . . . . . . . . . . . . . . . . . . . . . . . . . . . . . . . .S. 16
2.6 . . . .Shortcut: Play Spin! List . . . . . . . . . . . . . . . . . . . . . . . . . . . . . . . . . . . . . . . . . . . . .S. 16
2.7 . . . .Shortcut: Loop Spin! List . . . . . . . . . . . . . . . . . . . . . . . . . . . . . . . . . . . . . . . . . . . .S. 16
2.8 . . . .Shortcut: Shuffle Spin! List . . . . . . . . . . . . . . . . . . . . . . . . . . . . . . . . . . . . . . . . . .S. 16
2.9 . . . .Shortcut: Previous . . . . . . . . . . . . . . . . . . . . . . . . . . . . . . . . . . . . . . . . . . . . . . . . . .S. 16
2.10 . . . .Shortcut: Next . . . . . . . . . . . . . . . . . . . . . . . . . . . . . . . . . . . . . . . . . . . . . . . . . . . . . .S. 16
2.11 . . . .Shortcut: Music Explorer / Audio Input . . . . . . . . . . . . . . . . . . . . . . . . . . . . . . . .S. 16
2.12 . . . .Shortcut: Spin! Library . . . . . . . . . . . . . . . . . . . . . . . . . . . . . . . . . . . . . . . . . . . . . .S. 16
2.13 . . . .Shortcut: Spin! List . . . . . . . . . . . . . . . . . . . . . . . . . . . . . . . . . . . . . . . . . . . . . . . . .S. 16
2.14 . . . .Shortcut: Category View . . . . . . . . . . . . . . . . . . . . . . . . . . . . . . . . . . . . . . . . . . . . .S.16
2.15 . . . .Shortcut: X-Fader Match View . . . . . . . . . . . . . . . . . . . . . . . . . . . . . . . . . . . . . . . .S. 16
2.16 . . . .Shortcut: Master / Rec Vol . . . . . . . . . . . . . . . . . . . . . . . . . . . . . . . . . . . . . . . . . . .S. 16
2.17 . . . .Shortcut: Beat Match View . . . . . . . . . . . . . . . . . . . . . . . . . . . . . . . . . . . . . . . . . . .S. 16
2.18 . . . .Shortcut: Options . . . . . . . . . . . . . . . . . . . . . . . . . . . . . . . . . . . . . . . . . . . . . . . . . . .S. 16
2.19 . . . .Shortcut: Save Mode . . . . . . . . . . . . . . . . . . . . . . . . . . . . . . . . . . . . . . . . . . . . . . . .S. 16
2.20 . . . .Beatmatch View . . . . . . . . . . . . . . . . . . . . . . . . . . . . . . . . . . . . . . . . . . . . . . . . . . . .S. 17
2.21 . . . .Complete View . . . . . . . . . . . . . . . . . . . . . . . . . . . . . . . . . . . . . . . . . . . . . . . . . . . . .S. 17
2.22 . . . .Needle View . . . . . . . . . . . . . . . . . . . . . . . . . . . . . . . . . . . . . . . . . . . . . . . . . . . . . . .S. 17
2.23 . . . .Master . . . . . . . . . . . . . . . . . . . . . . . . . . . . . . . . . . . . . . . . . . . . . . . . . . . . . . . . . . . .S. 17
2.24 . . . .Track öffnen / laden . . . . . . . . . . . . . . . . . . . . . . . . . . . . . . . . . . . . . . . . . . . . . . . .S. 18
2.25 . . . .Bypass . . . . . . . . . . . . . . . . . . . . . . . . . . . . . . . . . . . . . . . . . . . . . . . . . . . . . . . . . . . .S. 18
2.26 . . . .Label-Monitor . . . . . . . . . . . . . . . . . . . . . . . . . . . . . . . . . . . . . . . . . . . . . . . . . . . . . .S. 18
2.27 . . . .Gain . . . . . . . . . . . . . . . . . . . . . . . . . . . . . . . . . . . . . . . . . . . . . . . . . . . . . . . . . . . . . . .S. 18
2.28 . . . .Pitch Mode . . . . . . . . . . . . . . . . . . . . . . . . . . . . . . . . . . . . . . . . . . . . . . . . . . . . . . . .S. 19
2.29 . . . .Pitchfader . . . . . . . . . . . . . . . . . . . . . . . . . . . . . . . . . . . . . . . . . . . . . . . . . . . . . . . . .S. 19
2.30 . . . .Vinyl-Timecode Aktivierung . . . . . . . . . . . . . . . . . . . . . . . . . . . . . . . . . . . . . . . . . .S. 20
2.31 . . . .Spin! Mode . . . . . . . . . . . . . . . . . . . . . . . . . . . . . . . . . . . . . . . . . . . . . . . . . . . . . . . . .S. 20
2.32 . . . .Play/Pause . . . . . . . . . . . . . . . . . . . . . . . . . . . . . . . . . . . . . . . . . . . . . . . . . . . . . . . . .S. 20
2.33 . . . .Cue . . . . . . . . . . . . . . . . . . . . . . . . . . . . . . . . . . . . . . . . . . . . . . . . . . . . . . . . . . . . . . .S. 21
2.34 . . . .Vor- und Rückwärtslauftaste . . . . . . . . . . . . . . . . . . . . . . . . . . . . . . . . . . . . . . . . .S. 21
2.35 . . . .Skip . . . . . . . . . . . . . . . . . . . . . . . . . . . . . . . . . . . . . . . . . . . . . . . . . . . . . . . . . . . . . . .S. 21
2.36 . . . .Schnellsuchlauftasten . . . . . . . . . . . . . . . . . . . . . . . . . . . . . . . . . . . . . . . . . . . . . . .S. 21
2.37 . . . .Pitch Bend . . . . . . . . . . . . . . . . . . . . . . . . . . . . . . . . . . . . . . . . . . . . . . . . . . . . . . . . .S. 21
2.38 . . . .Spin! Library . . . . . . . . . . . . . . . . . . . . . . . . . . . . . . . . . . . . . . . . . . . . . . . . . . . . . . .S. 22
2.39 . . . .Delay FX . . . . . . . . . . . . . . . . . . . . . . . . . . . . . . . . . . . . . . . . . . . . . . . . . . . . . . . . . . .S. 24
2.40 . . . .Filter FX . . . . . . . . . . . . . . . . . . . . . . . . . . . . . . . . . . . . . . . . . . . . . . . . . . . . . . . . . . .S. 24
2.41 . . . .Flanger FX . . . . . . . . . . . . . . . . . . . . . . . . . . . . . . . . . . . . . . . . . . . . . . . . . . . . . . . . .S. 24
2.42 . . . .Beat Loop / Auto Loop . . . . . . . . . . . . . . . . . . . . . . . . . . . . . . . . . . . . . . . . . . . . . .S.24
2.43/44 . . . .Manuelle Loop-Funktion . . . . . . . . . . . . . . . . . . . . . . . . . . . . . . . . . . . . . . . . . . . . .S. 24
2.45 . . . .Crossfader . . . . . . . . . . . . . . . . . . . . . . . . . . . . . . . . . . . . . . . . . . . . . . . . . . . . . . . . .S. 25
2.46 . . . .Beat Match . . . . . . . . . . . . . . . . . . . . . . . . . . . . . . . . . . . . . . . . . . . . . . . . . . . . . . . .S. 25
2.47 . . . .Cue Points . . . . . . . . . . . . . . . . . . . . . . . . . . . . . . . . . . . . . . . . . . . . . . . . . . . . . . . . .S. 25
2.48 . . . .Info View . . . . . . . . . . . . . . . . . . . . . . . . . . . . . . . . . . . . . . . . . . . . . . . . . . . . . . . . . .S. 26
2.49 . . . .Category View . . . . . . . . . . . . . . . . . . . . . . . . . . . . . . . . . . . . . . . . . . . . . . . . . . . . .S. 26
2.50 . . . .Music Explorer / Audio Input . . . . . . . . . . . . . . . . . . . . . . . . . . . . . . . . . . . . . . . . .S. 27
2.51 . . . .Mic Rec / Mic Spin! . . . . . . . . . . . . . . . . . . . . . . . . . . . . . . . . . . . . . . . . . . . . . . . . .S. 27
2.52 . . . .Monitor . . . . . . . . . . . . . . . . . . . . . . . . . . . . . . . . . . . . . . . . . . . . . . . . . . . . . . . . . . . .S. 28
3 . . .Menüführung . . . . . . . . . . . . . . . . . . . . . . . . . . . . . . . . . . . . . . . . .S. 28
3.1 . . . .File . . . . . . . . . . . . . . . . . . . . . . . . . . . . . . . . . . . . . . . . . . . . . . . . . . . . . . . .S. 28
3.1.1 . . . .Options . . . . . . . . . . . . . . . . . . . . . . . . . . . . . . . . . . . . . . . . . . . . . . . . . . . . . . . . . . . .S. 28
3.1.2 . . . .Quit Spinning . . . . . . . . . . . . . . . . . . . . . . . . . . . . . . . . . . . . . . . . . . . . . . . . . . . . . .S. 28
3.2 . . . .Spin! Library . . . . . . . . . . . . . . . . . . . . . . . . . . . . . . . . . . . . . . . . . . . . . . . .S. 28
3.2.1 . . . .New . . . . . . . . . . . . . . . . . . . . . . . . . . . . . . . . . . . . . . . . . . . . . . . . . . . . . . . . . . . . . . .S. 28
3.2.2 . . . .Open . . . . . . . . . . . . . . . . . . . . . . . . . . . . . . . . . . . . . . . . . . . . . . . . . . . . . . . . . . . . . .S. 28
3.2.3 . . . .Save . . . . . . . . . . . . . . . . . . . . . . . . . . . . . . . . . . . . . . . . . . . . . . . . . . . . . . . . . . . . . .S. 28
3.2.4 . . . .Save as... . . . . . . . . . . . . . . . . . . . . . . . . . . . . . . . . . . . . . . . . . . . . . . . . . . . . . . . . . .S. 28
3.2.5 . . . . .Import . . . . . . . . . . . . . . . . . . . . . . . . . . . . . . . . . . . . . . . . . . . . . . . . . . . . . . . . . . . .S. 28
3.2.6 . . . .Export . . . . . . . . . . . . . . . . . . . . . . . . . . . . . . . . . . . . . . . . . . . . . . . . . . . . . . . . . . . . .S. 28
3.2.7 . . . .Automatic Search . . . . . . . . . . . . . . . . . . . . . . . . . . . . . . . . . . . . . . . . . . . . . . . . . .S. 28
3.2.8 . . . .Add Track . . . . . . . . . . . . . . . . . . . . . . . . . . . . . . . . . . . . . . . . . . . . . . . . . . . . . . . . . .S. 28
3.2.9 . . . .Select All . . . . . . . . . . . . . . . . . . . . . . . . . . . . . . . . . . . . . . . . . . . . . . . . . . . . . . . . . .S. 28
3.2.9.1 . . . .Delete . . . . . . . . . . . . . . . . . . . . . . . . . . . . . . . . . . . . . . . . . . . . . . . . . . . . . . . . . . . . .S. 29
Page 3

3
INDEX
3.3 . . . .Track . . . . . . . . . . . . . . . . . . . . . . . . . . . . . . . . . . . . . . . . . . . . . . . . . . . . . .S. 29
3.3.1 . . . .Track Preferences . . . . . . . . . . . . . . . . . . . . . . . . . . . . . . . . . . . . . . . . . . . . . . . . . .S. 29
3.3.2 . . . .Save ID3 TAG . . . . . . . . . . . . . . . . . . . . . . . . . . . . . . . . . . . . . . . . . . . . . . . . . . . . . .S. 29
3.3.3 . . . .Analyze BPM manually . . . . . . . . . . . . . . . . . . . . . . . . . . . . . . . . . . . . . . . . . . . . . .S. 29
3.3.4 . . . .Analyze BPM automatic . . . . . . . . . . . . . . . . . . . . . . . . . . . . . . . . . . . . . . . . . . . . .S. 29
3.3.5 . . . .Delete Tracks permanently . . . . . . . . . . . . . . . . . . . . . . . . . . . . . . . . . . . . . . . . . .S. 29
3.4 . . . .Spin! List . . . . . . . . . . . . . . . . . . . . . . . . . . . . . . . . . . . . . . . . . . . . . . . . . . .S. 29
3.4.1 . . . .Play Spin! List . . . . . . . . . . . . . . . . . . . . . . . . . . . . . . . . . . . . . . . . . . . . . . . . . . . . . .S. 29
3.4.2 . . . .Stop Spin! List . . . . . . . . . . . . . . . . . . . . . . . . . . . . . . . . . . . . . . . . . . . . . . . . . . . . . .S. 29
3.4.3 . . . .Add to Spin! List . . . . . . . . . . . . . . . . . . . . . . . . . . . . . . . . . . . . . . . . . . . . . . . . . . . .S. 29
3.4.4 . . . .Safe Mode . . . . . . . . . . . . . . . . . . . . . . . . . . . . . . . . . . . . . . . . . . . . . . . . . . . . . . . . .S. 29
3.5 . . . .Spin! Workspace . . . . . . . . . . . . . . . . . . . . . . . . . . . . . . . . . . . . . . . . . . . . .S. 30
3.5.1 . . . .Workspace arrangeable . . . . . . . . . . . . . . . . . . . . . . . . . . . . . . . . . . . . . . . . . . . . .S. 30
3.5.2 . . . .Full Screen View . . . . . . . . . . . . . . . . . . . . . . . . . . . . . . . . . . . . . . . . . . . . . . . . . . . .S. 30
3.5.3 . . . .Menu Bar View . . . . . . . . . . . . . . . . . . . . . . . . . . . . . . . . . . . . . . . . . . . . . . . . . . . . .S. 30
3.5.4 . . . .Shortcut View . . . . . . . . . . . . . . . . . . . . . . . . . . . . . . . . . . . . . . . . . . . . . . . . . . . . . .S. 30
3.5.5 . . . .Info View . . . . . . . . . . . . . . . . . . . . . . . . . . . . . . . . . . . . . . . . . . . . . . . . . . . . . . . . . .S. 30
3.5.6 . . . .Preview . . . . . . . . . . . . . . . . . . . . . . . . . . . . . . . . . . . . . . . . . . . . . . . . . . . . . . . . . . .S. 30
3.5.7 . . . .Spin! Library View . . . . . . . . . . . . . . . . . . . . . . . . . . . . . . . . . . . . . . . . . . . . . . . . . .S. 30
3.5.8 . . . .Spin! List View . . . . . . . . . . . . . . . . . . . . . . . . . . . . . . . . . . . . . . . . . . . . . . . . . . . . .S. 30
3.5.9 . . . .Category View . . . . . . . . . . . . . . . . . . . . . . . . . . . . . . . . . . . . . . . . . . . . . . . . . . . . .S. 30
3.5.9.1 . . . .Music Explorer / Audio Input View . . . . . . . . . . . . . . . . . . . . . . . . . . . . . . . . . . . .S. 30
3.5.9.2 . . . .X-Fader Match View . . . . . . . . . . . . . . . . . . . . . . . . . . . . . . . . . . . . . . . . . . . . . . . . .S. 30
3.5.9.3 . . . .Master/Rec Vol. View . . . . . . . . . . . . . . . . . . . . . . . . . . . . . . . . . . . . . . . . . . . . . . . .S. 30
3.5.9.4 . . . .Beatmatch View . . . . . . . . . . . . . . . . . . . . . . . . . . . . . . . . . . . . . . . . . . . . . . . . . . . .S. 30
3.6 . . . .Help . . . . . . . . . . . . . . . . . . . . . . . . . . . . . . . . . . . . . . . . . . . . . . . . . . . . . . .S. 30
3.6.1 . . . .Easy Setup . . . . . . . . . . . . . . . . . . . . . . . . . . . . . . . . . . . . . . . . . . . . . . . . . . . . . . . . .S. 30
3.6.2 . . . .Manual . . . . . . . . . . . . . . . . . . . . . . . . . . . . . . . . . . . . . . . . . . . . . . . . . . . . . . . . . . . .S. 30
3.6.3 . . . .www.reloop-spin.com . . . . . . . . . . . . . . . . . . . . . . . . . . . . . . . . . . . . . . . . . . . . . . . .S. 30
3.6.4 . . . .Configuration Log . . . . . . . . . . . . . . . . . . . . . . . . . . . . . . . . . . . . . . . . . . . . . . . . . .S. 30
3.6.5 . . . .About Spin! . . . . . . . . . . . . . . . . . . . . . . . . . . . . . . . . . . . . . . . . . . . . . . . . . . . . . . . .S. 30
4. . . .Einstellungen . . . . . . . . . . . . . . . . . . . . . . . . . . . . . . . . . . . . . . . . .S. 31
4.1 . . . .Options . . . . . . . . . . . . . . . . . . . . . . . . . . . . . . . . . . . . . . . . . . . . . . . . . . . .S. 31
4.1.1 . . . .System . . . . . . . . . . . . . . . . . . . . . . . . . . . . . . . . . . . . . . . . . . . . . . . . . . . . . . . . . . . .S. 31
4.1.2 . . . .BPM and Tools . . . . . . . . . . . . . . . . . . . . . . . . . . . . . . . . . . . . . . . . . . . . . . . . . . . . .S. 32
4.1.3 . . . .Audio Devices . . . . . . . . . . . . . . . . . . . . . . . . . . . . . . . . . . . . . . . . . . . . . . . . . . . . . .S. 33
4.1.4 . . . .Timecode . . . . . . . . . . . . . . . . . . . . . . . . . . . . . . . . . . . . . . . . . . . . . . . . . . . . . . . . . .S. 34
4.1.5 . . . .Workspace . . . . . . . . . . . . . . . . . . . . . . . . . . . . . . . . . . . . . . . . . . . . . . . . . . . . . . . . .S. 36
4.1.6 . . . .Shortcuts . . . . . . . . . . . . . . . . . . . . . . . . . . . . . . . . . . . . . . . . . . . . . . . . . . . . . . . . . .S. 37
4.1.7 . . . .MIDI Controller . . . . . . . . . . . . . . . . . . . . . . . . . . . . . . . . . . . . . . . . . . . . . . . . . . . . .S. 38
4.2 . . . .Auto Search . . . . . . . . . . . . . . . . . . . . . . . . . . . . . . . . . . . . . . . . . . . . . . . . .S. 39
4.3 . . . .Track Preferences . . . . . . . . . . . . . . . . . . . . . . . . . . . . . . . . . . . . . . . . . . . .S. 40
4.3.1 . . . .Infos . . . . . . . . . . . . . . . . . . . . . . . . . . . . . . . . . . . . . . . . . . . . . . . . . . . . . . . . . . . . . .S. 40
4.3.2 . . . .File . . . . . . . . . . . . . . . . . . . . . . . . . . . . . . . . . . . . . . . . . . . . . . . . . . . . . . . . . . . . . . .S. 40
4.3.3 . . . .Track Settings . . . . . . . . . . . . . . . . . . . . . . . . . . . . . . . . . . . . . . . . . . . . . . . . . . . . . .S. 41
4.3.4 . . . .Volume . . . . . . . . . . . . . . . . . . . . . . . . . . . . . . . . . . . . . . . . . . . . . . . . . . . . . . . . . . . .S. 41
4.3.5 . . . .Lyrics . . . . . . . . . . . . . . . . . . . . . . . . . . . . . . . . . . . . . . . . . . . . . . . . . . . . . . . . . . . . .S. 42
4.3.6 . . . .Cover . . . . . . . . . . . . . . . . . . . . . . . . . . . . . . . . . . . . . . . . . . . . . . . . . . . . . . . . . . . . .S. 42
4.3.7 . . . .Equalization . . . . . . . . . . . . . . . . . . . . . . . . . . . . . . . . . . . . . . . . . . . . . . . . . . . . . . . .S. 43
4.3.8 . . . .Cue Points . . . . . . . . . . . . . . . . . . . . . . . . . . . . . . . . . . . . . . . . . . . . . . . . . . . . . . . . .S. 43
4.3.9 . . . .Loop . . . . . . . . . . . . . . . . . . . . . . . . . . . . . . . . . . . . . . . . . . . . . . . . . . . . . . . . . . . . . .S. 44
5. . . .FAQ . . . . . . . . . . . . . . . . . . . . . . . . . . . . . . . . . . . . . . . . . . . . . . . . .S. 44
5.1 . . . .Braucht man spezielle Nadeln für die Plattenspieler? . . . . . . . . . . . . . . . . . . .S. 44
5.2 . . . .Kann man die Timecode-Vinyls einzeln nachkaufen? . . . . . . . . . . . . . . . . . . . .S. 44
5.3 . . . .Warum erkennt der Computer das Interface nicht? . . . . . . . . . . . . . . . . . . . . .S. 44
5.4 . . . .Wieso kommt von einem Plattenspieler kein Timecodesignal an? . . . . . . . . .S. 45
5.5 . . . .Warum ist nur ein Pfeifen zu hören? . . . . . . . . . . . . . . . . . . . . . . . . . . . . . . . . . .S. 45
5.6 . . . .Kann man auch normale Vinyls abspielen? . . . . . . . . . . . . . . . . . . . . . . . . . . . .S. 45
5.7 . . . .Wieso läuft der Track rückwärts? . . . . . . . . . . . . . . . . . . . . . . . . . . . . . . . . . . . . .S. 45
5.8 . . . .Ist es möglich statt mit 33 RPM mit 45 RPM aufzulegen? . . . . . . . . . . . . . . . .S. 45
5.9 . . . .Warum werden beide Tracks auf dem gleichen Kanal abgespielt? . . . . . . . . .S. 46
5.9.1 . . . .Warum kommt kein Signal? . . . . . . . . . . . . . . . . . . . . . . . . . . . . . . . . . . . . . . . . . .S. 46
5.9.2 . . . .Kann das Interface auch als Soundkarte verwendet werden? . . . . . . . . . . . . .S. 46
5.9.3 . . . .Was ist mit einer Shure M44-7 zu beachten? . . . . . . . . . . . . . . . . . . . . . . . . . . .S. 46
5.9.4 . . . .Wieso sind hin und wieder Sprünge in der Musik zu hören? . . . . . . . . . . . . . .S. 46
5.9.5 . . . .Warum schwankt die Geschwindigkeit / der Pitch beim Abspielen? . . . . . . .S. 46
5.9.6 . . . .Gibt es eine Automix / Partymix-Funktion? . . . . . . . . . . . . . . . . . . . . . . . . . . . .S. 46
5.9.7 . . . .Wie optimiere ich meinen Computer für Spin! ? . . . . . . . . . . . . . . . . . . . . . . . .S. 47
5.9.8 . . . . .Was kann man machen, wenn ein Brummen oder Surren bei
. . . . .Verwendung eines Laptops zu hören ist? . . . . . . . . . . . . . . . . . . . . . . . . . . . . . .S. 47
6. . . .Schnelltasten Übersicht . . . . . . . . . . . . . . . . . . . . . . . . . . . . . . . .S. 47
Page 4

4
DEUTSCH
Wir gratulieren Ihnen zum Kauf des Reloop Spin! Systems. Vielen Dank, dass
Sie unserer Diskjockey-Technologie Ihr Vertrauen schenken. Vor
Inbetriebnahme bitten wir Sie, alle Anweisungen sorgfältig zu studieren und
zu befolgen.
Nehmen Sie das Reloop Spin! Interface aus der Verpackung. Bitte überprüfen Sie
vor der ersten Inbetriebnahme, ob kein offensichtlicher Transportschaden
vorliegt. Sollten Sie Schäden am Stromkabel oder am Gehäuse entdecken,
nehmen Sie das Gerät nicht in Betrieb und setzen Sie sich bitte mit Ihrem
Fachhändler in Verbindung.
SICHERHEITSHINWEISE
ACHTUNG! Seien Sie besonders vorsichtig beim Umgang mit der
Netzspannung 240 V. Bei dieser Spannung können Sie einen
lebensgefährlichen elektrischen Schlag erhalten! Bei Schäden, die durch
Nichtbeachtung dieser Bedienungsanleitung verursacht werden, erlischt
jeder Gewährleistungsanspruch. Bei Sach- oder Personenschäden, die durch
unsachgemäße Handhabung oder Nichtbeachtung der Sicherheitshinweise
verursacht werden, übernimmt der Hersteller keine Haftung.
- Dieses Gerät hat das Werk in einwandfreiem Zustand verlassen. Um diesen
Zustand zu erhalten und einen gefahrlosen Betrieb sicherzustellen, muss der
Anwender unbedingt die Sicherheitshinweise und die Warnvermerke
beachten, die in dieser Gebrauchsanleitung enthalten sind.
- Aus Sicherheits- und Zulassungsgründen (CE) ist das eigenmächtige
Umbauen und/oder Verändern des Gerätes nicht gestattet. Beachten Sie
bitte, dass Schäden, die durch manuelle Veränderungen an diesem Gerät
verursacht werden, nicht unter den Gewährleistungsanspruch fallen.
- Im Geräteinnern befinden sich keine zu wartenden Teile, ausgenommen die
von außen austauschbaren Verschleißteile. Die Wartung darf nur von
fachkundigem Personal durchgeführt werden, ansonsten verfällt die
Gewährleistung!
- Die Sicherung darf nur gegen Sicherungen des gleichen Typs, der gleichen
Auslösecharakteristik und Nennstromstärke ausgetauscht werden.
- Stellen Sie sicher, dass die Stromversorgung erst nach dem Aufbau des
Gerätes erfolgt. Den Netzstecker immer als letztes einstecken. Vergewissern
Sie sich, dass der Netzschalter auf "OFF" steht, wenn Sie das Gerät ans Netz
anschließen.
- Benutzen Sie nur vorschriftsmäßige Kabel. Achten Sie darauf, dass alle
Stecker und Buchsen fest angeschraubt und richtig angeschlossen sind. Bei
Fragen wenden Sie sich bitte an Ihren Händler.
- Stellen Sie sicher, das beim Aufstellen des Produktes das Netzkabel nicht
gequetscht oder durch scharfe Kanten beschädigt wird.
- Lassen Sie das Netzkabel nicht mit anderen Kabeln in Kontakt kommen!
Seien Sie vorsichtig beim Umgang mit Netzkabeln und -anschlüssen. Fassen
Sie diese Teile nie mit nassen Händen an!
- Stecken Sie das Stromkabel nur in geeignete Schukosteckdosen ein. Als
Spannungsquelle darf dabei nur eine ordnungsgemäße Netzsteckdose des
öffentlichen Versorgungsnetzes verwendet werden.
- Trennen Sie das Gerät bei Nichtbenutzung und vor jeder Reinigung vom
Netz! Fassen Sie dazu den Netzstecker an der Grifffläche an und ziehen Sie
niemals an der Netzleitung!
- Stellen Sie das Gerät auf einer horizontalen und stabilen, schwer
entflammbaren Unterlage auf.
- Vermeiden Sie Erschütterungen und jegliche Gewaltanwendung bei der
Installation oder Inbetriebnahme des Gerätes.
- Achten Sie bei der Wahl des Installationsortes darauf, dass das Gerät nicht
zu großer Hitze, Feuchtigkeit und Staub ausgesetzt wird. Vergewissern Sie
sich, dass keine Kabel frei herumliegen. Sie gefährden Ihre und die Sicherheit
Dritter!
BEDIENUNGSANLEITUNG
DEUTSCH
Page 5

- Stellen Sie keine Flüssigkeitsbehälter, die leicht umfallen können, auf dem
Gerät oder in dessen Nähe ab. Falls doch einmal Flüssigkeit in das
Geräteinnere gelangen sollte, sofort den Netzstecker ziehen. Lassen Sie das
Gerät von einem qualifizierten Servicetechniker prüfen, bevor es erneut
genutzt wird. Beschädigungen, die durch Flüssigkeiten im Gerät
hervorgerufen wurden, sind von der Gewährleistung ausgeschlossen.
- Betreiben Sie das Gerät nicht in extrem heißen (über 35° C) oder extrem
kalten (unter 5° C) Umgebungen. Halten Sie das Gerät von direktem
Sonnenlicht und von Wärmequellen wie Heizkörpern, Öfen, usw. (auch beim
Transport in geschlossenen Wagen) fern. Verdecken Sie niemals vorhandene
Lüfter oder Lüftungsschlitze. Sorgen Sie immer für eine ausreichende
Ventilation.
- Das Gerät darf nicht in Betrieb genommen werden, wenn es von einem kalten
Raum in einen warmen Raum gebracht wurde. Das dabei entstehende
Kondenswasser kann unter Umständen Ihr Gerät zerstören. Lassen Sie das
Gerät solange uneingeschaltet, bis es Zimmertemperatur erreicht hat!
- Regler und Schalter sollten niemals mit Sprühreinigungsmitteln und
Schmiermitteln behandelt werden. Dieses Gerät sollte nur mit einem
feuchten Tuch gereinigt werden, verwenden Sie niemals Lösungsmittel oder
Waschbenzin zum Reinigen.
- Bei Umzügen sollte das Gerät im ursprünglichen Versandkarton
transportiert werden.
- Zu Beginn müssen die Überblendregler und Lautstärkeregler Ihres
Verstärkers auf Minimum eingestellt und die Lautsprecherschalter in "OFF"Position geschaltet sein. Vor dem Lauterstellen 8 bis 10 Sekunden warten,
um den durch Einschwingung erzeugten Schroteffekt zu vermeiden, welcher
zu Lautsprecher- und Frequenzweichenschäden führen könnte.
- Geräte, die an Netzspannung betrieben werden, gehören nicht in
Kinderhände. Lassen Sie deshalb in Anwesenheit von Kindern besondere
Vorsicht walten.
- In gewerblichen Einrichtungen sind die Unfallverhütungsvorschriften des
Verbandes der gewerblichen Berufsgenossenschaft zu beachten.
- In Schulen, Ausbildungseinrichtungen, Hobby- oder Selbsthilfewerkstätten
ist das Betreiben des Gerätes durch geschultes Personal verantwortlich zu
überwachen.
- Heben Sie diese Bedienungsanleitung für spätere Fragen und Probleme gut
auf.
BESTIMMUNGSGEMÄßE VERWENDUNG
- Bei diesem Gerät handelt es sich um ein digitales Timecode System, mit dem
sich Software über die beigelegten Timecode Vinyl Platten bzw. CDs steuern
lässt. Das Interface wird dabei mit einem USB Kabel am Computer
angeschlossen.
- Dieses Produkt ist für den Anschluss an 240 V, 50 Hz Wechselspannung
zugelassen und wurde ausschließlich zur Verwendung in Innenräumen
konzipiert.
- Wird das Gerät anders verwendet als in dieser Bedienungsanleitung
beschrieben, kann dies zu Schäden am Produkt führen und der
Gewährleistungsanspruch erlischt. Außerdem ist jede andere Verwendung
mit Gefahren wie z.B. Kurzschluss, Brand, elektrischem Schlag, etc.
verbunden.
- Die vom Hersteller festgelegte Seriennummer darf niemals entfernt werden,
da ansonsten der Gewährleistungsanspruch erlischt.
DEUTSCH
5
Page 6

WARTUNG
- Überprüfen Sie regelmäßig die technische Sicherheit des Gerätes auf
Beschädigungen des Netzkabels oder des Gehäuses, sowie auf die
Abnutzung von Verschleißteilen wie Dreh- und Schiebereglern.
- Wenn anzunehmen ist, dass ein gefahrloser Betrieb nicht mehr möglich ist,
so ist das Gerät außer Betrieb zu setzten und gegen unbeabsichtigten
Betrieb zu sichern. Netzstecker aus der Steckdose ziehen!
- Es ist anzunehmen, dass ein gefahrloser Betrieb nicht mehr möglich ist,
wenn das Gerät sichtbare Beschädigungen aufweist, das Gerät nicht mehr
funktioniert, nach längerer Lagerung unter ungünstigen Verhältnissen oder
nach schweren Transportbeanspruchungen.
Dieses Handbuch, Video-Tutorials, Tipps & Tricks und weitere Downloads
können Sie unter folgender Webseite finden:
www.reloop-spin.de
MINDESTE SYSTEMANFORDERUNGEN:
PC:
• aktueller Prozessor (empfohlen wird mindestens Pentium III, 1GHz)
• Windows 2000, XP, NT, Vista Betriebssystem
• freier USB-Port
• min. 512 MB RAM
1. Anschluss & Softwareinstallation
1.1 Anschluss
6
DEUTSCH
8
2
54
6
1 37
Page 7

a) Verbinden Sie die Ausgänge Ihres Plattenspielers oder CD-Players mit den
entsprechenden Eingängen (1 oder 2) vom Reloop SPIN! Interface -1-.
Gegebenenfalls erden Sie Ihre Plattenspieler an der GND Erdungsschraube -3-.
b) Verbinden Sie die Line-Ausgänge des Reloop SPIN! Interfaces mit den Line
Eingängen Ihres Mixers. -2-
c) Verbinden Sie das Reloop SPIN! Interface mit Ihrem Computer über einen
freien USB-Anschluss. Nun sollten folgende Meldungen, im Beispiel XP, auf
Ihrem Monitor erscheinen:
Neue hardware gefunden –
Reloop Spin! Interface
Neue Hardware gefunden –
USB Audiogerät
Neue Hardware gefunden –
Die Hardware wurde installiert und kann jetzt verwendet werden.
HINWEIS!
Die Installation Ihres Spin!-Interfaces erfolgt unter Windows XP & Vista
nach dem Plug 'N' Play-Prinzip ohne spezielle Treiber.
d) Nachdem Ihr Spin!-Interface vom System erkannt und installiert wurde,
sollten Sie die Lautstärke in den Windows Audioeinstellungen maximieren.
Beispiel XP:
Start > Systemsteuerung > Sounds und Audiogeräte > Reiter „Audio“
7
DEUTSCH
Page 8

Drücken Sie die Schaltfläche „Lautstärke“ unter dem Punkt „Sound Wiedergabe“
und „Sound Aufnahme“. Für best mögliche Ergebnisse maximieren Sie alle
Regler.
Die Option „Soundaufnahme“
unterscheidet sich für ein Vinyl- oder
CD-Setup.
1) Vinyl Einstellungen
Drücken Sie die Schaltfläche
„Soundaufnahme“ und maximieren Sie den Regler.
2) CDJ Einstellungen
Drücken Sie die Schaltfläche
„Soundaufnahme“ und minimieren Sie den Regler.
Sie können danach die Systemsteuerung schließen.
e) Weitere Funktionen bzw. Anschlüsse Ihres Spin!-Interfaces:
USB-LED -4-:
Leuchtet wenn das Interface vom Computer erkannt wird und aktiv ist.
HINWEIS!
Das Interface wird per USB mit Strom versorgt. Es ist also kein
Stromanschluss nötig.
Kopfhörer -5 / 6-:
Hier können Sie einen Kopfhörer anschließen (3,5 mm Klinke) um das
Master-Ausgangssignal direkt am Interface vorzuhören -5-. Mit dem MonitorRegler -6- können Sie die Lautstärke einstellen.
HINWEIS!
Sie können diesen Ausgang auch als Record-Anschluss nutzen, um
beispielsweise ein Set aufzunehmen.
Mikrofon -7 / 8-:
Am Anschluss -7- können Sie ein Mikrofon (6,3 mm Klinke)
anschließen. Die Lautstärke können Sie mit dem Regler -8- einstellen.
ACHTUNG!
Der Mikrofon-Eingang ist mit dem Stereo-Ausgang gekoppelt, d.h. Sie
können entweder ein Mikrofon benutzen oder das Ausgangssignal von
Kanal 1. Achten Sie darauf, dass während der normalen TimecodeBenutzung von Spin! kein Mikrofon angeschlossen wird, ansonsten ist
der Kanal blockiert.
8
DEUTSCH
1) 2)
Page 9

1.2 Softwareinstallation
Nachdem Sie das Hardware-Setup vorgenommen haben, kommen wir nun zur
Softwareinstallation. Legen Sie dazu die SPIN! Installations-CD in das CD-ROM
Laufwerk Ihres Computers. Sollte das Setup nicht automatisch starten, führen
Sie bitte die Datei „Install.exe“ manuell aus.
Wählen Sie die Installations-Sprache aus und bestätigen mit „OK“.
Lesen und akzeptieren Sie danach die Lizenzvereinbarungen.
9
DEUTSCH
Out1 HPOut2
USB
In1Mic In2
CD 1 Turntable 1 Mixer Turntable 2
CH1
CH2
CD or TurntableCD or Turntable
CD 2
Page 10

Nun müssen Sie Ihren Namen, ggf. Firma, E-Mail Adresse (notwendig) und die
Seriennummer eingeben. Die Seriennummer finden Sie auf der Rückseite der
Spin! Installations-CD-Hülle. Bestätigen Sie Ihre Eingabe mit „weiter“.
Wählen Sie dann das Installationsverzeichnis in der Ihre Spin! Software installiert
werden soll, oder verwenden Sie das Standardverzeichnis (empfohlen). Bitte
bestätigen Sie mit „weiter“.
Nach erfolgreicher Installation schließen Sie das Setup wieder mit „Finish“.
HINWEIS!
Überprüfen Sie regelmäßig www.reloop-spin.de auf neue Updates.
ACHTUNG VISTA USER!
Falls Sie das Programm aufgrund der Fehlermeldung “The Serial Number is
not correct” öffnen können, so müssen Sie die Benutzerkontensteuerung
deaktivieren.
> Systemsteuerung > Sicherheitscenter > Benutzerkontensteuerung >
deaktivieren
Alternativ starten Sie die Software durch Rechtsklick auf das Spin!-Icon mit
der Option “Als Administrator ausführen”.
10
DEUTSCH
Page 11

1.3 Easy Setup
Beim ersten Start von Reloop Spin! startet das Easy Setup automatisch.
HINWEIS!
Das Easy Setup kann auch manuell unter dem Menüpunkt >Help>Easy Setup!
Ausgeführt werden.
1. Resolution/Auflösung
Im ersten Schritt wählen Sie Ihre Bildschirmauflösung aus.
2. Kalibrierung Eingang 1
Nun muss die Kalibrierung vorgenommen werden. Wählen Sie dazu das
entsprechende Abspielmedium aus. Gehen Sie in den Wiedergabemodus und
drücken Sie „Weiter“.
11
DEUTSCH
Page 12

3. Kalibirierungsergebnis für Eingang 1
Nach erfolgreicher Kalibrierung sollte die Meldung „Spin! has been calibrated
successfully“ erscheinen.
HINWEIS!
Sollte die Meldung „Spin! has not been installed properly“ erscheinen,
überprüfen Sie Ihre Anschlüsse oder wechseln Sie die Nadeln an Ihrem
Plattenspieler aus.
4. Kalibirierung Eingang 2
Nehmen Sie die gleichen Einstellungen für Ihr zweites Abspielgerät vor.
12
DEUTSCH
Page 13

5. Kalibrierungsergebnis Eingang 2
Auch hier sollte eine erfolgreiche Kalibrierungs-Meldung erscheinen.
HINWEIS!
Die Kalibrierung ist nur für Plattenspieler notwendig. Beim Anschluss von
CD-Playern wird dieser Punkt übersprungen.
6. Bei erfolgreichem Setup werden Ihre Einstellungen bestätigt.
Beenden Sie das Schnellsetup durch Betätigen der „Fertig stellen“-Taste.
HINWEIS!
Im abschließenden Installations-Schritt haben Sie noch drei Möglichkeiten
um Spin! zu optimieren. Nähere Informationen dazu finden Sie im Kapitel 4.1
„Optionen“.
13
DEUTSCH
Page 14

1.4 Erste Software-Schritte
Folgend werden die ersten Schritte, die Sie vornehmen müssen, erklärt um mit
der Spin! Software arbeiten zu können.
HINWEIS!
Die Anleitung erreichen Sie auch aus dem Menü
> Help > Manual.
a) Musik importieren
Importieren Sie zunächst Ihre Musik in die Spin! Library. Gehen Sie dafür im
Menü auf den Punkt
> Spin! Library > Auto Search.
Hier können Sie entweder einzelne Ordner oder Laufwerke automatisch nach
Musik durchsuchen lassen. Bestätigen Sie Ihre Auswahl mit „OK“.
b) Track laden
Nachdem Sie Ihre Musik importiert haben, können Sie einzelne Tracks in die
Player 1 und 2 laden. Dazu stehen Ihnen drei Möglichkeiten zur Verfügung:
• Via Maus
Ziehen Sie per Drag & Drop den Titel in den Player.
• Via Trax Select
Auf der B-Seite der Spin! Timecode Vinyl Platte ist der letzte Rillenabschnitt
für die Auswahl der Titel konzipiert worden. Setzen Sie die Nadel in diesen
Abschnitt um durch die Spin! Library zu navigieren. Halten Sie die Platte am
gewünschten Track an und setzen die Nadel an den Anfang der Platte zurück
um den gewünschten Track in den Player zu laden.
• Via Tastatur
Navigieren Sie in der Spin! Library mit den hoch/runter-Pfeiltasten zum
gewünschten Track und drücken Sie die Enter-Taste um diesen Track zu
laden. Der aktive Player wird mit der Tab-Taste angewählt.
c) Timecode Modus aktivieren
Aktivieren Sie den Timecode Modus durch die Taste „Vinyl“, rechts unter dem
Label-Monitor.
Jetzt können Sie mit dem Auflegen beginnen.
14
DEUTSCH
Page 15

2. SOFTWAREÜBERSICHT:
15
DEUTSCH
12345678910111213141516171819 20 23 51
45
46
48
44
42b
47
40
39
49
21
52
43 42a
41
38 50
22
24
25
27
28
26
29
30
31
32
33
34
36
35
37
Page 16

1. Shortcut: New Spin! Library
Bitte entnehmen Sie Informationen hierzu dem Kapitel 3.2.1.
2. Shortcut: Open Spin! Library
Bitte entnehmen Sie Informationen hierzu dem Kapitel 3.2.2.
3. Shortcut: Auto Search
Bitte entnehmen Sie Informationen hierzu dem Kapitel 3.2.7.
4. Shortcut: Save Spin! Library
Bitte entnehmen Sie Informationen hierzu dem Kapitel 3.2.3.
5. Shortcut: Stop Spin! List
Bitte entnehmen Sie Informationen hierzu dem Kapitel 3.4.2.
6. Shortcut: Play Spin! List
Bitte entnehmen Sie Informationen hierzu dem Kapitel 3.4.1.
7. Shortcut: Loop Spin! List
Hiermit wird die Spin! Playlist in einer Endlosschleife wiederholt.
8. Shortcut: Shuffle Spin! List
Hiermit wird eine zufällige Wiedergabe der Spin! List erzeugt.
9. Shortcut: Previous
Hiermit wird der vorherige Track aus der Spin! List in den Player geladen.
10. Shortcut: Next
Hiermit wird der nächste Track aus der Spin! List in den Player geladen.
11. Shortcut: Music Explorer / Audio Input
Bitte entnehmen Sie Informationen hierzu dem Kapitel 3.5.9.1.
12. Shortcut: Spin! Library
Bitte entnehmen Sie Informationen hierzu dem Kapitel 3.5.7.
13. Shortcut: Spin! List
Bitte entnehmen Sie Informationen hierzu dem Kapitel 3.5.8.
14. Shortcut: Category View
Bitte entnehmen Sie Informationen hierzu dem Kapitel 3.5.9.
15. Shortcut: X-Fader Match View
Bitte entnehmen Sie Informationen hierzu dem Kapitel 3.5.9.2.
16. Shortcut: Master/Rec. Volume
Bitte entnehmen Sie Informationen hierzu dem Kapitel 3.5.9.3.
17. Shortcut: Beat Match View
Bitte entnehmen Sie Informationen hierzu dem Kapitel 3.5.9.4.
18. Shortcut: Options
Bitte entnehmen Sie Informationen hierzu dem Kapitel 3.1.2.
19. Safe Mode
Bitte entnehmen Sie Informationen hierzu dem Kapitel 3.4.4.
16
DEUTSCH
Page 17

20. Beatmatch View
Die Beat Match-Ansicht zeigt Ihnen die Peaks beider Tracks - die beiden
Ansichten stehen sich dabei gegenüber. Hier kann schnell erkannt werden, ob
beispielsweise die Bassdrums oder Snares übereinander laufen. So können Sie
schnell und einfach, sofern beide Tracks vom Tempo angeglichen wurden, die
Stücke synchronisieren. Dabei wird der linke Player 1 in grün dargestellt und der
rechte Player 2 in grau.
21. Complete View
In der Complete View Übersicht sehen Sie den gesamten Wellenverlauf eines
Tracks. Hier können Sie beispielsweise sehr gut den Spannungsbogen eines
Tracks erkennen und auf einen Blick sehen, wo Intros und Breaks einsetzen. Der
bereits abgelaufene Teil eines Tracks wird dabei grün dargestellt, der noch
verbleibende Teil ist grau dargestellt.
22. Needle View
Die Needle View ist eine vergrößerte Ansicht der Wellenformdarstellung. So
können Sie beispielsweise einzelne Bass-Kicks gut erkennen.
Sie können den Zoom-Bereich von 2 bis 16 Beats einstellen. Klicken Sie dazu mit
der rechten Maus-Taste in die Needle View und wählen im Untermenü den
entsprechenden Wert aus.
Ferner können Sie auswählen ob die linke, rechte, Stereo oder beide Kanäle
gemischte Wellenform angezeigt werden sollen. Wählen Sie die entsprechende
Option mit Rechtsklick in der Needle View aus.
Sie haben zwei Varianten der Needle View Darstellung:
• Waveform Scrolling
Die Wellenform bewegt sich. Ein vertikaler Strich in der Mitte repräsentiert
die Nadel.
• Tick Scrolling
Die Wellenform bleibt stehen. Der Strich (entspricht der Position der Nadel)
bewegt sich.
HINWEIS!
Diese Option ist Systemresourcen-sparender.
Wählen Sie die entsprechende Option mit Rechtsklick in der Needle View aus.
23. Master
Hier stellen Sie die Hauptlautstärke für Player 1 bzw. Player 2 ein.
17
DEUTSCH
Page 18

24. Track öffnen/laden
Hiermit können Sie eine einzelne Datei in den Player laden.
25. Bypass-Funktion
Ist die Bypass-Funktion aktiviert, so wird das Eingangssignal vom Spin! Interface
direkt durch die Software geschleift. So können Sie eine normale Vinyl Platte
abspielen. Deaktivieren Sie die Bypass-Funktion für den normalen TimecodeGebrauch. Die Schnelltasten dafür sind „N“ (Player 1) bzw. „M“ (Player 2).
26. Label-Monitor
Der Label Monitor ist eine Art virtuelle Platte, die sich entsprechend der
Timecode-Platte mitbewegt. Jede Bewegung, die Sie mit der Platte ausführen,
wird synchron zum Label Monitor übertragen. Für Beat Juggling können Sie den
Label Monitor beispielsweise gut als virtuellen Marker benutzen.
27. Gain Regler
Der Gain-Regler ist, ähnlich wie beim Mischpult, die Endverstärkung eines
Kanalzuges. Hiermit können Sie Tracks unterschiedlicher Aufnahmelautstärken
einander angleichen ohne die Master-Lautstärke zu erhöhen.
HINWEIS!
Unter > File > Options > Reiter „BPM And Tools!“ > Abschnitt „Auto BPM“
können Sie die Auto Gain-Funktion aktivieren. Somit werden die Gain-Werte
der Tracks, ohne manuelles Zutun, automatisch angeglichen.
18
DEUTSCH
Page 19

28. Pitch Mode
Sie haben die Möglichkeit mit dem Pitch Fader -29- drei verschiedene Pitch-Modi
einzustellen. Sie verändern den Modus, indem Sie mit der Maus auf die
Schaltfläche -28- drücken oder via der Schnelltaste „A“ (Player 1) bzw. „K“
(Player2).
a) Speed Mode
Im eingestellten Speed-Mode können Sie ganz regulär, wie bei einem
Plattenspieler, die Pitch-Geschwindigkeit einstellen. Im eingestellten Pitchbereich wird der aktuelle Wert auch in der Info View -48- an der Stelle -7dargestellt.
b) Master Tempo Mode (MT)
Ist der Master Tempo-Modus aktiviert, so können Sie mit dem Pitch-Fader 29- im Bereich +/- 6% das Tempo verändern, ohne dass die Tonhöhe dadurch
beeinflusst wird. Das bedeutet, dass die Tonhöhe bei verändertem Tempo
gehalten wird.
HINWEIS!
Der Master Tempo-Modus funktioniert nur im Advanced- und Battle-Modus
(siehe Punkt 31).
c) Key Mode
Der Key-Modus stellt den Gegensatz zum Master Tempo-Modus dar. Hier wird
die Tonhöhe, unabhängig vom eingestellten Tempo, variiert.
HINWEIS!
Der Key-Modus funktioniert nur im Advanced- und Battle-Modus.
29. Pitchfader
Der Pitchfader stellt einen herkömmlichen Pitchfader eines Plattenspielers bzw.
CD-Players dar. Im Timecode Vinyl Modus -30- bewegt sich der Fader synchron
zu den am Plattenspieler ausgeführten Bewegungen.
Dieser ist abhängig vom eingestellten Pitch-Modus (siehe Punkt 28). Im
deaktivierten Timecode Modus kann der Pitchfader auch mit der Maus bewegt
werden.
19
DEUTSCH
Page 20

30. Vinyl Timecode-Aktivierung
Mit dieser Taste aktivieren Sie den Timecode-Modus, d.h. die Steuerung per
Timecode-Vinyl und Timecode-CD sind möglich. Ist diese Taste deaktiviert,
können Sie die Software nur per Maus kontrollieren.
31. Spin! Mode-Taste
Durch Betätigen dieser Taste können Sie zwischen den Abspiel-Modi Spin! Mode,
Classic Spin!, Advanced Spin!, Battle Spin! wählen. Die Schnelltasten sind „A“
(Player 1) bzw. „K“ (Player 2).
a) Classic Spin!
Die Audio-Dateien werden wie bei einer normalen Platte, von Anfang bis zum
Ende abgespielt (Needle Drop). Klassisches Mixen und Scratchen ist möglich,
jedoch ohne Loop-, Cue-Punkt-, und Effekt-Optionen.
b) Advanced Spin!
In diesem Modus ist „Needle Drop“ ebenfalls möglich. Dieser ist aber
proportional zur Vinyl-Länge. Will man also beispielsweise in die Mitte eines
Liedes springen, dann muss man die Nadel in die Mitte der Timecode-Platte
platzieren. Klassisches Mixen und Scratchen ist unter Hinzunahme von
Loops, Cue-Punkten und Effekten möglich.
c) Battle Spin!
In diesem Modus ist kein Needle Drop möglich. Das bedeutet, dass der Track
immer weiter läuft, egal wo sich die Nadel auf dem Timecode-Vinyl befindet.
Dieser Modus ist sehr gut zum Scratchen geeignet, selbst wenn die Nadel
springen sollte. Battlemixen unter Hinzunahme von Loops, Cue-Punkten und
Effekten ist hier möglich.
HINWEIS!
Dieser Modus ist nur für die Vinylkontrolle gedacht.
32. Play/Pause-Taste
Durch Betätigen dieser Taste starten Sie den zuvor ausgewählten Track. Diese
Funktion steht Ihnen nur im PC-Kontroll-Modus zur Verfügung. Die Schnelltaste
ist die Space Bar-Taste, je nach aktiviertem Player (TAB-Taste).
20
DEUTSCH
Page 21

33. Cue-Taste
Durch Betätigen dieser Tasten gelangen Sie in den Cue-Modus. Um einen CuePunkt zu setzen haben Sie zwei Möglichkeiten.
a) Cue-Pause
Im Wiedergabe-Modus drücken Sie die Play/Pause-Taste -32- um in den
Pause-Modus zu gelangen. Drücken Sie nun die Cue-Taste um den Cue-Punkt
zu setzen.
b) Loop In
Während der Wiedergabe oder im Pause-Modus können Sie die Loop In-Taste
betätigen um einen Cue-Punkt zu setzen. Die Schnelltasten dazu sind „F1“
(Player 1) bzw. „F9“ (Player 2).
34. Vor- und Rückwärtslauftaste
Mit der Vor- und Rückwärtstaste bestimmen Sie die Abspielrichtung des Tracks
(forward oder reverse). Im Timecode-Modus zeigt diese Taste die Laufrichtung
der Platte an.
35. Skip-Tasten
Drücken Sie diese Tasten, um den vorherigen bzw. nachfolgenden Track aus Ihrer
SPIN! Library zu laden.
36. Schnellsuchlauftasten
Mit diesen Tasten ist es möglich innerhalb eines Tracks schnell vor- oder
rückwärts zu spulen. Im Timecode-Modus ist diese Funktion deaktiviert.
37. Pitch Bend-Tasten
Aktivieren Sie die Geschwindigkeits-Feinregelung mit der Pitch Bend-Taste. Mit
den Pitch Bend-Tasten können Sie durch Gedrückthalten die Geschwindigkeit
temporär erhöhen bzw. vermindern. Lassen Sie die Taste los, so kehrt der Player
zur mit dem Pitch-Fader eingestellten Geschwindigkeit zurück. Durch Drehen des
Jog-Wheels im PC-Kontroll Modus ist diese Funktion ebenfalls ausführbar (siehe
Jog SPIN! Mode). Im Timecode-Modus ist diese Funktion deaktiviert.
21
DEUTSCH
Page 22

38. SPIN! Library
In diesem Browser finden Sie alle wichtigen Informationen zu den Tracks Ihrer
SPIN! Library. Um einen Track direkt aus der Library auszuwählen, klicken Sie
diesen an und bewegen ihn per Drag & Drop auf den gewünschten Player.
Alternativ können Sie auch direkt über die Time Code-Platte die Track-SelectFunktion auswählen (siehe Kapitel 1.4, Punkt b).
Per Schnelltaste „V“ aktivieren Sie die Spin! Library um mit den Pfeil
hoch/runter-tasten in dieser zu navigieren. Durch Drücken der Enter-Taste
können Sie den Track in den aktiven Player laden. Mit der TAB-Taste kann man
zwischen Player 1 und Player 2 hin- und herwechseln.
1. Search Filter
In diesem Feld haben Sie die Möglichkeit Stichwort-artig nach einem Track zu
suchen. Je genauer die Einagbe, desto genauer wird die angezeigte Auswahl.
2. Exact Match
Ist diese Option aktiviert, werden nur exakte, mit dem Suchwort
übereinstimmende Ergebnisse angezeigt.
3. Selection Filter
Hier können Selektionsfilter nach denen gesucht werden soll definiert
werden. Zur Auswahl stehen:
• All
Bei diesem Filter werden alle Kategorien bei der Suche beachtet.
• File
Ist dieser Filter aktiviert, so werden bei der Suche nur Dateinamen
beachtet.
• Title
Ist dieser Filter ausgewählt, so werden bei der Suche nur Titelnamen
beachtet.
• Artist
Ist dieser Filter ausgewählt, so werden bei der Suche nur
Interpretennamen beachtet.
• Album
Ist dieser Filter ausgewählt, so werden bei der Suche nur Album-Namen
beachtet.
• Genre
Ist dieser Filter ausgewählt, so werden bei der Suche nur Genre-Namen
beachtet.
• Remix
Ist dieser Filter ausgewählt, so wird bei der Suche nur nach Remixen
gefiltert.
•Year
Ist dieser Filter ausgewählt, so werden bei der Suche nur Jahreszahlen
beachtet.
• BPM
Ist dieser Filter ausgewählt, so wird bei der Suche nur nach
Geschwindigkeiten gefiltert.
• Directory
Ist dieser Filter ausgewählt, so werden bei der Suche nur Ordner-Namen
beachtet.
22
DEUTSCH
2 3
1
4
Page 23

4. Categories
In dieser Ansicht werden alle Informationen zum Track, wie Titel, Name oder
BPM angezeigt. Sie können die Kategorien selber definieren, indem Sie mit
Rechtsklick auf die Kategorie-Leiste drücken (Columns Properties).
Zur Auswahl stehen:
• Title
• Artist
• Album
• Genre
• BPM
• Duration
• Last Played
• Remix
• Rating
• Comments
•Year
• Track
• File
• Directory
• File Name
• File Extension
• Date Created
• Label
• Producer
•Key
• Counter
HINWEIS!
Sie können sämtliche Informationen zum Track seber editieren, indem
Sie mit der Maus ins jeweilige Kategoriefeld doppelklicken. Falls Sie
möchten, dass diese Attribute (ID3 TAG) permanent zum Track
gespeichert werden, so klicken Sie im Menü beim jeweiligen Track auf:
> Track > Save ID3 TAG Attributes
Mit Rechtsklick in die Spin! Library View können Sie ein Untermenü aufrufen,
welches folgende Optionen beinhaltet:
• Add Track (siehe 3.2.8)
• Auto Search (siehe 3.2.7)
• Track Preferences (siehe 3.3.1)
• Analyse BPM manually (siehe 3.3.3)
• Analyse BPM automatic (siehe 3.3.4)
• Select All
Hiermit werden alle Tracks der aktuell geladenen Spin! Library markiert.
• Delete
Hiermit werden die markierten Titel aus der Spin! Library entfernt.
• Add to Spin! List
Die markierten Tracks werden der Spin! List hinzugefügt.
• Group
Hiermit können Sie die markierten Tracks einer selbst erstellten
Gruppe/Playlist zuweisen bzw. löschen. Näheres dazu finden Sie unter
Punkt 49.
• List View
Hiermit können Sie Ihre Spin! Library auf den Anzeige-Modus List View
stellen. In der List View wird nur der Titel angezeigt. Somit können mehr
Titel auf einmal in der Liste angezeigt werden, ohne scrollen zu müssen.
• Detail View (voreingestellt)
In dieser Ansicht werden alle eingeblendeten kategorien zum Track
angezeigt.
• Column Properties
Hier können Sie, wie zuvor beschrieben, einzelne Kategorien ein- bzw.
ausblenden.
23
DEUTSCH
Page 24

39. Delay-Effekt
Drücken Sie zuerst die Effektaktivierungstaste -39- über dem Delay-Drehregler.
Der Delay-Effekt ist nun aktiviert. Durch Drehen des Delay-Drehreglers können
Sie die Intensität des Delay-Effektes einstellen. Drücken Sie erneut die
Effekaktivierungstaste, um den Effekt wieder zu deaktivieren.
40. Filter-Effekt
Drücken Sie zuerst die Effektaktivierungstaste -40- über dem Filter-Drehregler.
Der Filter-Effekt ist nun aktiviert. Durch Drehen des Filter-Drehreglers können
Sie die Intensität des Filter-Effektes einstellen. Drücken Sie erneut die
Effekaktivierungstaste, um den Effekt wieder zu deaktivieren.
41. Flanger-Effekt
Drücken Sie zuerst die Effektaktivierungstaste -41- über dem Flanger-Drehregler.
Der Flanger-Effekt ist nun aktiviert. Durch Drehen des Flanger-Drehreglers
können Sie die Intensität des Flanger-Effektes einstellen. Drücken Sie erneut die
Effekaktivierungstaste, um den Effekt wieder zu deaktivieren.
42. Beat Loop/Auto Loop-Funktion
Ihre Reloop Spin! Software besitzt eine intelligente Beat Loop-Funktion. Mit
dieser können Sie mit einem Knopfdruck automatisch, abhängig vom
eingestellten Takt, Beat-genaue Loops erstellen. Es ist somit nicht mehr nötig die
In- und Out-Punkte manuell zu setzen.
Wählen Sie den gewünschten Takt mit den Beat Loop Takt-Tasten -42 b- aus
(1/2 – 16 Takte). Aktivieren Sie den Beat Loop mit der Beat Loop-Taste -42 a-;
diese blinkt im Beat Loop-Modus. Verlassen Sie den Beat Loop mit der
Play/Pause-Taste -32-.
Verwendung mit der Tastatur:
• Drücken Sie im Wiedergabe-Modus „F4“ (Player 1) bzw. „F12“ (Player 2) um
in den Beat Loop-Modus überzugehen.
• Mit den Tasten „F5“/“F6“ (Player 1) bzw. „F7“/“F8“ (Player 2) können Sie den
Loop verlängern bzw. verkürzen.
• Drücken Sie die Space Bar um den Auto Loop zu verlassen (den aktiven
Player mit der TAB-Taste auswählen).
43/44. Manuelle Loop-Funktion
• Um einen Loop manuell zu setzen, drücken Sie die Loop In-Taste -44- zum
gewünschten Anfangspunkt und die Loop Out-taste -44- zum gewünschten
Endpunkt.
• Durch erneutes Drücken verlassen Sie den Loop.
• Durch Drücken der Reloop-Taste -43- kehren Sie zum zuletzt gesetzten Loop
zurück.
24
DEUTSCH
Funktion Player 1 Player 2
Loop In F1 F8
Loop Out F2 F10
Reloop F3 F11
Page 25

45. Crossfader
Der Crossfader -45- ist lediglich für den PC-Kontroll-Modus gedacht. Im
regulären Timecode Modus (externes Mischpult) werden Sie diesen nicht
benötigen. Hiermit kann von Kanal 1 zu Kanal 2 übergeblendet werden.
HINWEIS!
Im Timecode-Modus sollte dieser in der Mitte stehen.
46. Beat Match-Funktion
Die Beat Match-Funktion ist eine praktische Hilfe um schnell per Knopfdruck die
Tempi zweier verschiedener Tracks anzugleichen. So kann entweder der linke
dem rechten Player angeglichen werden, oder der rechte dem linken Player.
47. Cue-Punkte
Sie haben die Möglichkeit bis zu 6 Cue-Punkte pro Track zu setzen. Diese werden
automatisch dauerhaft gespeichert bis sie wieder überspielt werden.
• Um einen Cue-Punkt mit der Maus zu setzen, drücken Sie im entsprechenden
Moment die rechte Maustaste
• Um einen Cue-Punkt abzurufen reicht ein Klick mit der linken Maustaste
• Ist ein Cue-Punkt gespeichert, erkennt man dies an der dicken grünen
Markierung der entsprechenden Cue-Taste
• Setzen Sie den Cue-Punkt einmalig für Player 1 mit den Nummern 1 – 5 (nur
5 Cue-Punkte pro Player) und für Player 2 mit den Tasten 6 – 0.
• Erneutes Drücken der entsprechenden Nummern ruft den Cue-Punkt auf
(Hot Cue)
25
DEUTSCH
Beatmatch Schnelltaste
Player 1 Y
Player 2 X
Page 26

48. Info-View
1. Title
Hier wird der Titel des aktuellen Tracks angezeigt. Mit Rechtsklick darauf
können Sie wählen, ob nur Titel, nur Artist oder Artist und Titel angezeigt
werden sollen.
2. Elapsed
Hier wird die verstrichene Zeit des Tracks angezeigt
(Minuten/Sekunden/Frames).
3. Remain
Hier wird die noch verbleibende Zeit eines Tracks angezeigt (Minuten /
Sekunden / Frames).
4. BPM
Hier wird der aktuelle BPM-Wert angezeigt.
5. Repeat-Funktion
Hier können Sie die Track-Wiederholung ein- bzw. ausstellen. Bei
eingestellter Repeat-Funktion wird der geladene Titel automatisch
wiederholt.
6. Out Port
Hier wird angezeigt welchem Ausgangskanal des Interfaces der Player
zugewiesen ist. Bei einer korrekten Einstellung sollte beim linken Player „01“
und beim rechten Player „02“ stehen. Durch Anklicken können Sie den Port
verändern.
7. Pitch
Hier wird der aktuelle Pitch-Wert angezeigt.
49. Category View
Die Category View ist eine Art Schnellauswahl-Filter für die Spin! Library. In
dieser können Sie beispielsweise nach Alphabet, Jahr oder BPM-Geschwindigkeit
die Spin! Library View anzeigen lassen.
Unter dem Punkt „Groups“ können Sie eigene Playlists bzw. Sortierungen
vornehmen. Um eine neue Gruppe zu erstellen, drücken Sie mit Rechtsklick in
der Category View auf den Punkt „Add Group“. Sie werden nun aufgefordert,
einen Namen einzugeben – bestätigen Sie diesen mit der Enter-Taste.
26
DEUTSCH
1
2
3
4
5
7
6
Page 27

50. Music Explorer/Audio Input
Der Music Explorer ist, wie Sie es vom Windows Explorer kennen, ein DateiBrowser in Baumansicht. Hier können Sie nach Dateien in Ihrem Arbeitsplatz
oder Ihrer Netzwerkumgebung suchen. Zusätzlich ist hier auch das Spin!
Interface unter dem Punkt „Audio Input“ zu finden. Die einzelnen Eingänge sind
dort aufgelistet. Per Drag & Drop können auch einzelne Eingänge für eine
einfache Zuweisung auf die Player gezogen werden.
HINWEIS!
Per Voreinstellung sind die Eingänge bereits richtig gesetzt. Nur für eine
Mikrofonaufnahme muss der Eingang „0: Reloop Spin!-Interface 1“ einem
Player zugewiesen werden.
51. Mic Rec-Funktion
Mit der integrierten Mic Rec-Funktion (Mic Spin!) können Sie ein MikrofonSample aufnehmen, welches später beispielsweise gescratcht werden kann.
Gehen Sie dazu wie folgt vor:
• Sample Aufnahme
– Ziehen Sie den Eingang „0: Reloop Spin!-Interface 1“ unter Audio Input
(Music Explorer) per Drag & Drop in einen der Player.
– Stellen Sie den Pegel mit dem Mic Lautstärkeregler ein.
– Drücken Sie auf die Rec-Taste.
– Ein Speichern Dialog öffnet sich; geben Sie hier Namen und Ort an, wohin
das Sample gespeichert werden soll.
– Nachdem Sie auf „speichern“ gedrückt haben fängt die Aufnahme an;
beenden Sie die Aufnahme durch erneutes Drücken der Rec-Taste.
• Mic Spin! Funktion (Sample abspielen bzw. scratchen)
- Ziehen Sie nun einen gewünschten Track aus der Spin! Library oder das
aufgenommene Mic-Sample aus dem Music Explorer per Drag & Drop in den
Player, um es mit der Platte zu manipulieren.
HINWEIS!
Der Mic-Eingang ist mit dem Input 1 gekoppelt. Sobald Sie das Mikrofon
anschließen ist der Phono/Line-Eingang 1 deaktiviert. Falls Sie also während
einer Mixing-Session ein Sample aufnehmen wollen, achten Sie darauf, dass
der Player 2 gerade läuft. Ziehen Sie unbedingt nach der Aufnahme das
Mikrofon wieder ab, um den Player 1 wieder per Platte steuern zu können.
27
DEUTSCH
Page 28

52. Monitor Funktion
Mit der Software Monitor-Funktion können Sie einen Track vorhören. Diese
Funktion ist jedoch bei Verwendung eines externen Mischpultes nicht nötig, da
Sie in der Regel über dessen Cue-Funktion vorhören.
3. RELOOP SPIN! MENÜFÜHRUNG:
In diesem Abschnitt werden alle Menüpunkte Schritt für Schritt erklärt.
3.1 Menüpunkt File:
3.1.1 Options:
Hierüber gelangen Sie in das Menü Optionen in dem Sie diverse Einstellungen
vornehmen können. Nähere Informationen hierzu erhalten Sie im Kapitel 4.1 in
dieser Anleitung.
3.1.2. Quit Spinning:
Hiermit beenden Sie die Reloop Spin! Software
3.2. Menüpunkt Spin! Library:
Mit der Reloop Spin! Library verwalten Sie Ihre Audiodateien. Auf Wunsch
können Sie auch diverse Libraryen anlegen und abspeichern. Sie können Ihre
Musik in die Spin! Library importieren um eine zentrale Sammelstelle Ihrer
Dateien zu erhalten. Es ist möglich, Libraryen zu editieren, exportieren oder
neue Listen zu importieren (z.B. iTunes Playlisten).
3.2.1 New:
Hiermit wird eine neue, leere Library erstellt, die Sie nach Bedarf mit AudioDateien füllen können.
3.2.2 Open:
Hiermit öffnen Sie eine vorhandene Library.
3.2.3 Save:
Hiermit können Sie Ihre Library abspeichern.
3.2.4 Save as...:
Hiermit speichern Sie die aktuelle Library unter anderem Namen, ohne die
vorherige Library zu überschreiben.
3.2.5 Import:
Hiermit können Sie Dateien importieren. [ iTunes (*.xml) / m3u Files (*.m3u)]
3.2.6 Export:
Hiermit können Sie Dateien exportieren. [m3u Files (*.m3u)]
3.2.7 Automatic Search:
Zum Massenimport von Musik-Dateien können Sie mit dieser Funktion
komfortabel Ihre Festplatte oder gegebenenfalls gezielt einzelne Ordner
durchsuchen.
3.2.8 Add Track:
Hiermit können einzelne Tracks zur Library hinzugefügt werden.
3.2.9 Select All:
Hiermit wählen Sie alle Tracks aus der Library aus.
28
DEUTSCH
Page 29

3.2.9.1 Delete:
Hiermit können Dateien aus der aktuell geladenen Library entfernt werden, ohne
diese jedoch von der Festplatte zu löschen.
3.3 Track Menü:
3.3.1 Track Preferences:
Hier können Sie Track-spezifische Einstellungen vornehmen.
3.3.2 Save ID3 TAG Attributes:
Falls Sie ID3 TAG-Attribute ändern, können Sie diese abspeichern.
3.3.3 Analyze BPM manually:
Mit diesem Tool können Sie die BPM (Beats Per Minute) manuell ermitteln. Dies
können Sie entweder durch Klicken der Space-Schaltfläche mit der Maus erzielen
oder mit Hilfe der Leerzeichen-Taste. Je länger Sie im Takt die entsprechende
Taste drücken, desto genauer wird der Wert ermittelt.
3.3.4 Analyze BPM automatically:
Durch diese Funktion wird der BPM-Wert automatisch ermittelt. Beats sind für
die Software nicht zählbar, wenn keine kontinuierliche Rhythmusstruktur
vorhanden ist oder sich die Beats zu schwach vom Rest des Tracks abheben, um
als Rhythmuselement identifiziert zu werden. Beats im 4/4 Takt sind ideal für die
Reloop Spin! Software.
HINWEIS!
Sie können auch mehrere Tracks automatisch analysieren lassen. Wird ein
Track zum ersten Mal in den Player geladen, so wird automatisch die BPMZahl ermittelt und dauerhaft abgespeichert.
3.3.5 Delete tracks permanently:
Mit dieser Funktion können Sie einen Track löschen.
ACHTUNG!
Der Track wird in diesem Fall dauerhaft von Ihrer Festplatte gelöscht und
nicht nur aus der Library entfernt.
3.4 Spin! List Menü:
Die Spin! List ist eine Art „Party“-Playlist. Die darin enthaltenen Tracks werden
im Falle einer Wiedergabe abwechselnd von den Playern 1 und 2 abgespielt und
automatisch übergeblendet. Diese Funktion bietet sich optimal an, wenn Sie
ohne DJ die Software im Stand Alone-Modus betreiben wollen.
3.4.1 Play Spin! List:
Hiermit starten Sie die Wiedergabe der Spin! Playlist.
3.4.2 Stop Spin! List:
Hiermit können Sie die Wiedergabe der Spin! Playlist anhalten.
3.4.3 Add to Spin! List:
Hiermit fügen Sie den aktuell gwählten Track in der Library der Spin! List hinzu.
HINWEIS!
Sie können auch per Drag & Drop Tracks zur Spin! List hinzufügen.
3.4.4 Safe Mode:
Ist der Safe Mode aktiviert, kann kein neuer Track in den laufenden Player
geladen werden. Dies verhindert ein ungewolltes Laden neuer Musik im
laufenden Betrieb.
29
DEUTSCH
Page 30

3.5 Menü Spin! Workspace:
In diesem Menü können Sie einzelne Elemente ein- und ausblenden, um die
Ansicht individuell gestalten zu können.
3.5.1 Workspace Arrangeable:
Ist dies aktiviert, können einzelne Fensterelemente neu arrangiert und
geschlossen werden.
3.5.2 Full Screen View:
Aktiviert die Vollbildansicht. Alternativ kann dies durch die Tastenkombination
ALT+S durchgeführt werden.
3.5.3 Menü Bar View:
Blendet die Menüleiste ein/aus.
3.5.4 Shortcut View:
Blendet die Schnellzugriffansicht ein/aus.
3.5.5 Info View:
Blendet die Infoleistenansicht ein/aus.
3.5.6 Preview
Blendet die Previewleiste ein/aus.
3.5.7 Spin! Library View:
Blendet die Spin! Library ein/aus.
3.5.8 Spin! List View:
Blendet die Spin! List ein/aus.
3.5.9 Category View:
Blendet die Kategorieansicht ein/aus.
3.5.9.1 Music Explorer / Audio Input:
Blendet die Music Explorer / Audio Eingänge-Ansicht ein/aus.
3.5.9.2 X-fader Match View:
Blendet die X-Fader Match-Ansicht ein/aus.
3.5.9.3 Master/REC-Volume:
Blendet die Master/REC Lautstärkeansicht ein/aus.
3.5.9.4 Beatmatch View:
Blendet die Beatmatch-Ansicht ein/aus.
3.6 Help Menü:
3.6.1 Easy Setup:
Hierüber können Sie das Schnell-Setup aufrufen.
3.6.2 Manual:
Hiermit können Sie das Handbuch als PDF-Datei aufrufen.
3.6.3 www.reloop-spin.com
Hiermit rufen Sie die Internetseite www.reloop-spin.com auf. Besuchen Sie diese
Seite in regelmäßigen Abständen um aktuelle Downloads oder Infos zu erhalten.
3.6.4 Configuration Log:
Hiermit wird eine aktuelle Systemkonfigurationsübersicht als Textdatei erstellt.
Diese wird zur eventuellen Problemsuche benötigt.
3.6.5 About Spin!:
Hier wird die aktuelle Spin!-Version angezeigt.
30
DEUTSCH
Page 31

4. EINSTELLUNGEN
4.1 Options
Sie erreichen das Options-Menü unter
> File > Options.
4.1.1 System
1. Load last Track
Ist diese Option aktiviert, wird bei einem Software-Start der zuletzt gespielte
Track und Spin! Library geladen.
2. Record Play
Ist diese Funktion aktiviert, werden alle gespielten Tracks mit Angabe von
Datum und Uhrzeit in einer Liste gespeichert. Durch Drücken auf die
Schaltfläche „View List“ können Sie diese einsehen.
3. TAGs
Hier können Sie auswählen welche Version der ID3 TAGs angezeigt werden
soll. Es sollte hier nur eine Option gewählt werden.
4. Play List Directory
Hier können Sie den Pfad wählen wohin die Spin! List gespeichert/geladen
werden soll.
5. Waveform Directory
Hier können Sie den Pfad angeben, in dem die Waveform PeaksInformationen gespeichert werden sollen.
6. Software Multi Open
Ist diese Funktion aktiviert, so kann Reloop Spin! mehrmals geöffnet werden
(nicht empfehlenswert / ASIO-abhängig).
7. Sound before Graphic Priority
Ist diese Option aktiviert, so wird die Systemleistung vorrangig der
Musikleistung als der Grafikleistung zugeordnet. Dies ist bei älteren oder
leistungsschwächeren Rechneren von Vorteil (wenn es beispielsweise zu
Aussetzern kommt).
31
DEUTSCH
1
2
3
6
7
10
4
5
8
9
11
Page 32

8. Load Track to RAM
Hier können Sie einstellen wie schnell der Track in den RAM Speicher
geladen werden soll. (langsam / normal / schnell).
9. Load Track in RAM/Min.
Hier können Sie in Minuten die maximale Tracklänge angeben, die in den
RAM-Speicher geladen werden soll.
10. Easy Keyboard Search
Ist diese Funktion aktiviert so kann man in der Library und dem Music
Explorer per Buchstabeneingabe navigieren.
11. Tone Pitch
Hier können Sie den prozentualen Bereich einstellen, in dem die Tonhöhe
gepitcht werden soll (siehe auch Kapitel 2, Punkt 28).
4.1.2 BPM and Tools
1. BPM Range
Hier können Sie die BPM-Spanne, in der die Software kalkulieren soll,
einstellen. Je kleiner die Differenz, desto schneller und präziser kann Spin!
die BPM ermitteln. Die Voreinstellung liegt zwischen 78 – 150 BPM.
Empfohlene Einstellungen:
• All-Round 78 – 150 BPM
• Hip Hop 80 – 120 BPM
• House/Techno 110 – 150 BPM
2. Show Pitch Value
Aktiviert die Pitch-Anzeige (voreingestellt und empfohlen).
3. BPM and Waveform
Ist diese Option aktiviert, kalkuliert Spin! die BPM und Wellenform beim
Laden eines Tracks (voreingestellt und empfohlen).
32
DEUTSCH
1
2
3
4
5
6
7
8
9 10
Page 33

4. Auto Gain
Ist diese Funktion aktiviert, werden die Gain-Werte bei Tracks
unterschiedlicher Lautstärke angepasst. Somit ist ein manuelles Angleichen
mit dem Gain-Regler -27- nicht mehr nötig.
5. BPM Match
Aktiviert die Auto Match-Funktion bei neu geladenen Tracks.
HINWEIS!
Mit der Beat Match-Taste -46- können Sie auch jede Seite miteinander
synchronisieren.
6. Auto Cue
Hiermit können Sie die Auto Cue-Funktion ein- und ausschalten.
7. First Cue Point Search
Hiermit können Sie den Zeitrahmen in Sekunden setzen, bis wann der erste
Cue-Punkt gesucht werden soll.
8. dB Sensitivity
Hier können Sie die Empfindlichkeit in Dezibel einstellen, ab dessen
Schwellenwert der Cue-Punkt gesetzt wird.
9. Fading Time
Hier können Sie die Überblendungszeit für die Auto Mix-Funktion der Spin!
List einstellen.
10. End of Track Warning
Hier können Sie die Zeit in Sekunden einstellen, ab wann optisch über das
Ende eines Tracks gewarnt werden soll.
4.1.3 Audio Devices
1. Output Device
Hier wird das Reloop Spin! Interface ausgewählt und sollte dort angezeigt
werden.
33
DEUTSCH
1
2
3
Page 34

2. Out Ports
Hier wird die Anzahl der Ausgänge definiert. Es sollte eine „2“ eingestellt
werden.
3. Setup
Hier können die einzelnen Ausgänge für die linke und rechte Seite eingestellt
werden. Auch kann mit der Schaltfläche „Control Panel“ im ASIO-Setup die
Buffer-Größe eingestellt werden.
HINWEIS!
Sämtliche Audio Devices-Einstellungen sind mit dem Easy Setup
automatisch vorgenommen worden, so dass Sie hier keine
Veränderungen vornehmen müssen.
4.1.4 Timecode
In diesem detailierten Timecode-Menü können einzelne Einstellungen für
Player 1 und Player 2 vorgenommen werden. Diese sind bei erfolgreichem Easy
Setup allerdings nicht nötig. Sie sollten also nur zur Problembehebung und
Optimierung die erweiterten Einstellungen vornehmen.
1. Timecode from
Hier können Sie die Timecode-Quelle, also Vinyl oder CD, einstellen.
2. Spin! Mode
Hier kann der Spin! Mode eingestellt werden (siehe Kapitel 2, Punkt 31).
3. Audio Device
Hier sollte der ASIO-Treiber eingestellt sein.
4. Audio Source
Hier werden die entsprechenden Anschlüsse des Spin! Interfaces
zugewiesen.
Voreingestellt sind:
• Player 1: 0: Reloop Spin!-Interface 1 – Reloop Spin!-Interface 2
• Player 2: 2: Reloop Spin!-Interface 3 – Reloop Spin!-Interface 4
34
DEUTSCH
1
2
3
4
5
6
7
8
9
10
11
12
13
15
18 17 14 16
Page 35

5. Timecode Quality
Hier wird prozentual die Signalqualität des Timecodes angezeigt.
Schwankungen oder eine zu geringe Prozentzahl könnten eine verschmutzte
oder verschlissene Nadel als Ursache haben. Idealerweise sollte der Wert
zwischen 90 – 100% liegen.
6. Adjust Gain
Hier kann der Dezibel-Wert des Input-Signals für die linke und rechte Seite
eingestellt werden. Die virtuelle LED-Kette dient dabei als
Aussteuerungsanzeige. Diesen Wert sollten Sie nur bei einer
Problembehebung manuell ändern. Im Easy Setup-Verfahren wird der
optimale Gain-Wert automatisch für Sie konfiguriert.
7. Direct Phono Input
Hier kann definiert werden ob ein Plattenspieler direkt am Rechner
angeschlossen wurde. In Verwendung mit dem Spin! Interface (Line Output)
muss hier „No“ stehen.
8. 45 RPM
Hier kann eingestellt werden, ob die Timecode-Platte mit 45 RPM (Rounds
Per Minute = Umdrehungen pro Minute) abgespielt werden soll.
Voreingestellt und üblich sind 33 RPM.
9. Left/Right Inverse
Bei bestimmten Nadeln oder Kalibrierungsproblemen kann es sein, dass die
linke und rechte Seite vertauscht sind. Dies können Sie in der Software mit
dieser Option beheben.
10. Phase Inverse
Hiermit können Sie die Phase umkehren.
11. Timecode Start Delay
Hier kann der Startpunkt der Timecode-Platte definiert werden. Da
üblicherweise das erste Drittel einer Timecode-Platte zuerst verschlissen ist,
kann man den Startpunkt an eine gewünschte Position versetzen. Setzen Sie
dazu die Nadel an die gewünschte Startposition und drücken die Schaltfläche
„Save Position“. Der Wert wird in Millisekunden angegeben.
12. Noise Level/Noise Filter
Diese beiden Werte sind nur zur Problembehebung bzw. Optimierung
gedacht. Beim Easy Setup sind diese Werte bereits vorkonfiguriert.
• Noise Filter:
Bei Masseproblemen o.ä. können Sie den Noise Filter erhöhen um das
Eingangssignal zu verbessern, beispielsweise auf 150. Je höher das
Rauschen, desto höher sollte die Frequenz angehoben werden.
ACHTUNG!
Die Timecode-Präzision könnte bei zu hoch eingestelltem Noise
Filter abnehmen.
• Noise Level:
Hier können Sie den Rauschpegel in Dezibel einstellen. Für eine bessere
Empfindlichkeit sollten Sie den Wert erhöhen. Voreingestellt sind 40 dB.
13. Kalibrierungs-Display
Hier wird das Timecode-Signal optisch dargestellt. Idealerweise sollte das
Signal wie eine Sinuskurve dargestellt werden.
Bei einem verzerrten Signal (Rechteckwelle) sollten Sie entweder die Nadel
überprüfen oder die oben genannten Einstellungen anpassen.
35
DEUTSCH
Page 36

14. Circle Diagram
Alternativ kann das Kalibirierungs-Display auch als Kreisdiagramm angezeigt
werden. Aktivieren Sie dazu diese Schaltfläche.
15. Calibrate-Taste
Betätigen Sie diese Taste, um den jeweiligen Player mit den voreingestellten
Optionen automatisch zu kalibrieren.
16. 1 Turntable Mode
Falls Sie nur einen Plattenspieler einsetzen, sollten Sie diesen Modus
aktivieren, um beide Player zu kontrollieren. Achten Sie darauf, dass unter
Audio Source (siehe Punkt 4) der gleiche Interface-Eingang gewählt ist.
TIPP!
Den aktuellen Player können Sie mit der TAB-Taste umschalten.
17. More Options
Aktivieren Sie diese Schaltfläche, um die erweiterten Optionen einzublenden
(Noise Level/Noise Filter und 1 Turntable Mode).
18. Apply
Drücken Sie diese Schaltfläche, um die Einstellungen zu übernehmen.
Drücken Sie abschließend auf „OK“, um das Menü zu verlassen.
4.1.5 Workspace
1. Resolution Selection
Hier werden die vorhandenen Auflösungen aufgelistet. Wählen Sie hier die
entsprechende Auflösung für Ihren Bildschirm.
2. Apply
Übernehmen Sie die Einstellungen mit dem Apply-Button.
36
DEUTSCH
1
2
Page 37

4.1.6 Shortcuts
1. Shortcut Setting File
Hier können Sie das Schnelltasten-Layout für Ihre Tastatur auswählen.
Zur Auswahl stehen:
• Spin_keyboardQWERTZ
(Deutschland, Österreich, Schweiz, Ungarn)
• Spin_keyboardQWERTY
(Amerika, England, Niederlande, Italien, Skandinavien, Polen,
Spanien, Portugal)
• Spin_keyboardAZERTY
(Frankreich, Belgien)
2. Layout Preview
Hier wird die Tastaturbelegung in einer Vorschau dargestellt.
37
DEUTSCH
1
2
Page 38

4.1.7 MIDI Controller
1. Activate MIDI
Hiermit aktivieren Sie die MIDI-Steuerung für Spin!
2. MIDI Device
Hier werden kompatible MIDI-Controller aufgelistet, z.B. Reloop Digital
Jockey (www.digital-jockey.dj).
3. MIDI Setup File
Hier werden die vorkonfigurierten MIDI-Konfigurations-Dateien aufgelistet.
4. Omni Mode
Ist diese Option aktiviert, empfängt Spin! auf allen MIDI-Kanälen.
HINWEIS!
Bitte überprüfen Sie regelmäßig Spin! auf Updates unter
www.reloop-spin.de um beispielsweise neue MIDI-Mappings
herunterzuladen.
38
DEUTSCH
1
2
3
4
Page 39
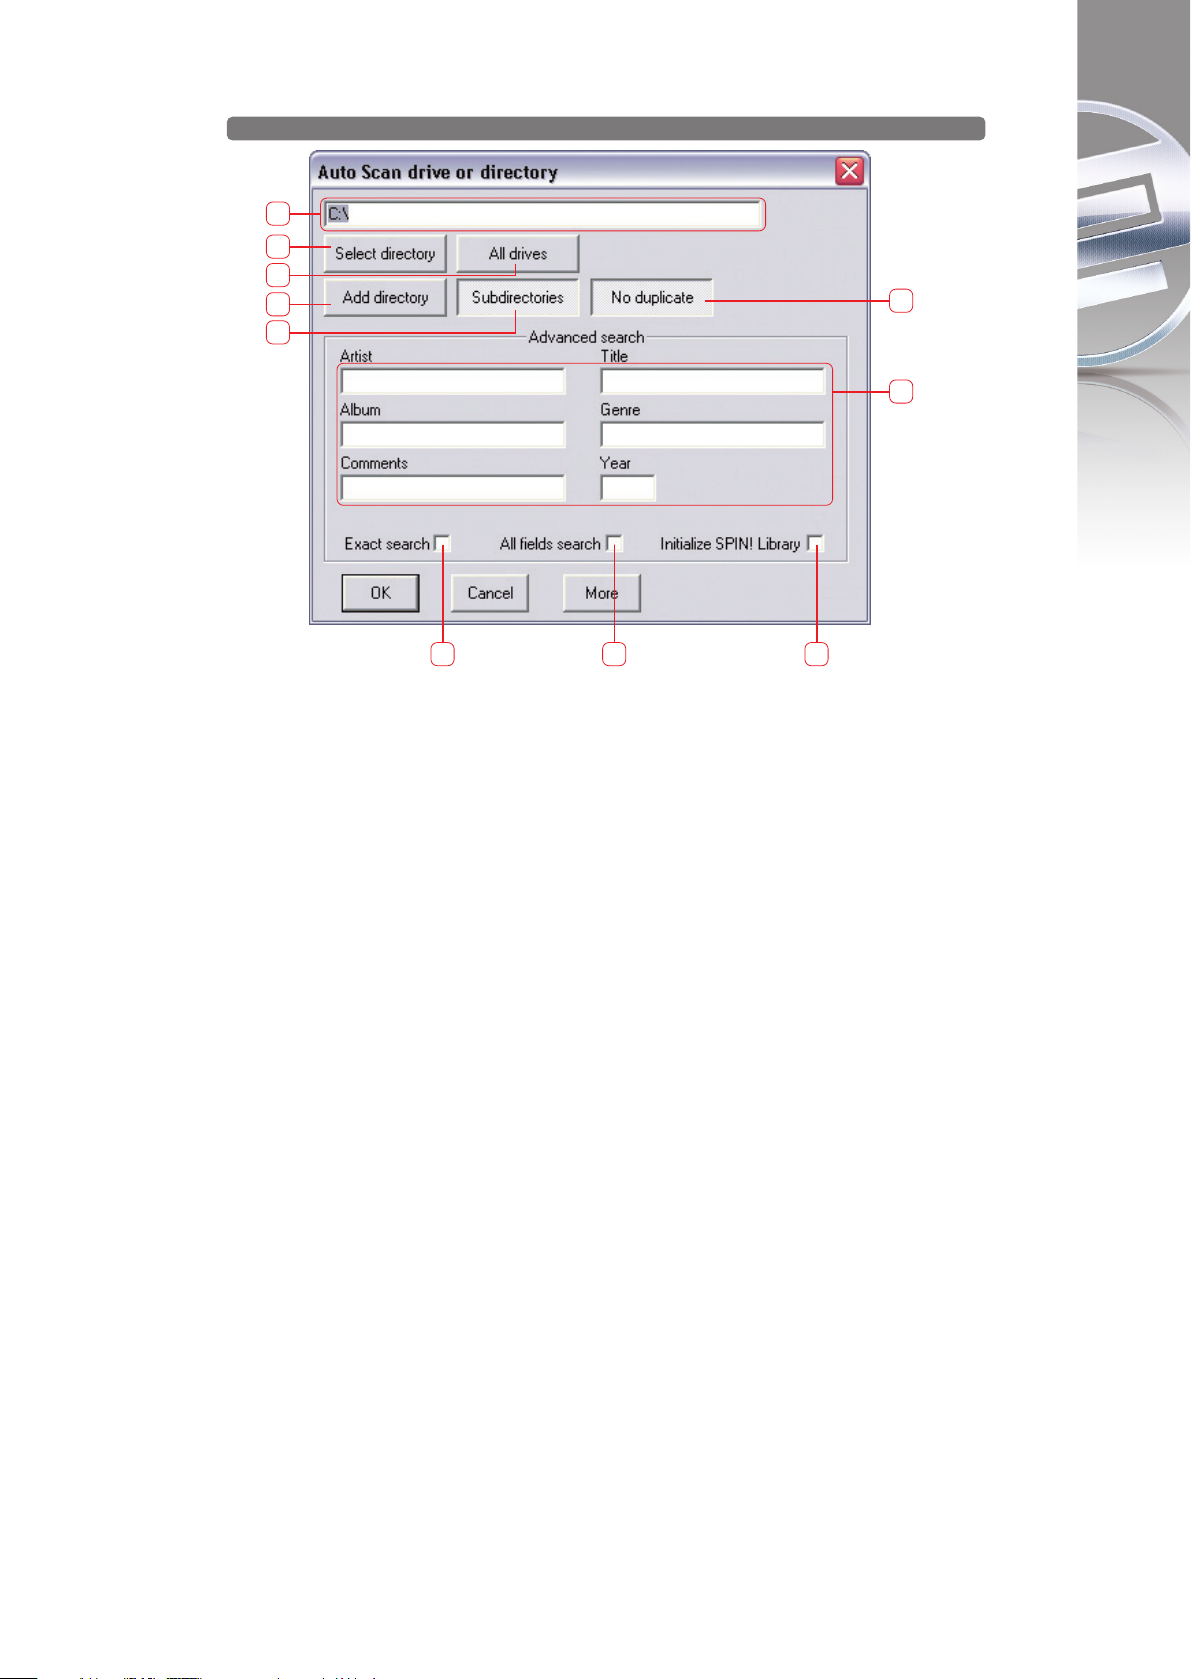
4.2 Auto Search
Mit der Auto Search-Funktion können Sie ganz einfach Musikdateien auf
Ihrer Festplatte lokalisieren und Ihrer Spin! Library hinzufügen lassen.
1. Pfad
Hier wird der aktuell ausgewählte Pfad angezeigt.
2. Select Directory
Hiermit können Sie einzelne Ordner auswählen.
3. Add Directory
Ist diese Option aktiviert, wird ein Ordner hinzugefügt.
4. All Drives
Wählen Sie diese Option um automatisch alle Laufwerke Ihrer
Arbeitsumgebung auszuwählen und nach Tracks zu durchsuchen.
5. Subdirecories
Ist diese Option ausgewählt, werden Unterordner bei der Suche ebenfalls
eingeschlossen.
6. No Duplicate
Ist diese Option aktiviert, werden bei erneuter Suche im gleichen Ordner die
bereits hinzugefügten Tracks nicht erneut der Spin! Library hinzugefügt.
7. Advanced Search
Hier können Kategorien wie Artist, Title oder Genre bei der Suche gefiltert
werden.
8. Exact Search
Ist diese Option aktiviert, werden nur exakt übereinstimmende Ergebnisse
hinzugefügt.
9. All Fields Search
Ist diese Option aktiviert, wird in allen Kategoriefeldern gesucht.
10. Initialize Spin! Library
Wird diese Option aktiviert, so wird die Spin! Library initialisiert.
39
DEUTSCH
1
2
4
3
5
6
7
8 9 10
Page 40

4.3 Track Preferences
In den Track Preferences können Sie diese Einstellungen und Daten eines Tracks
aktivieren. Sie erreichen die Track Preferences entweder unter dem Menüpunkt:
> Track > Track Preferences
oder auch durch Rechtsklick auf den Track selber in der Spin! Library.
4.3.1 Infos
Hier können Sie diverse Informationen, wie z.B. Titel, Interpret oder Label,
einsehen und editieren. Es können auch zusätzlich Kommentare zum Track
gespeichert werden.
4.3.2 File
Hier werden Informationen zum Speicherort und zur Audio-Qualität angezeigt.
40
DEUTSCH
Page 41

4.3.3 Track Settings
Hier können Sie diverse Einstellungen, wie Start- und Endpunkt, Loops oder
Tempo einsehen und editieren.
4.3.4 Volume
Hier können Sie Gain, Pan oder Fade In/Out auf Wunsch für den Track
voreinstellen.
41
DEUTSCH
Page 42
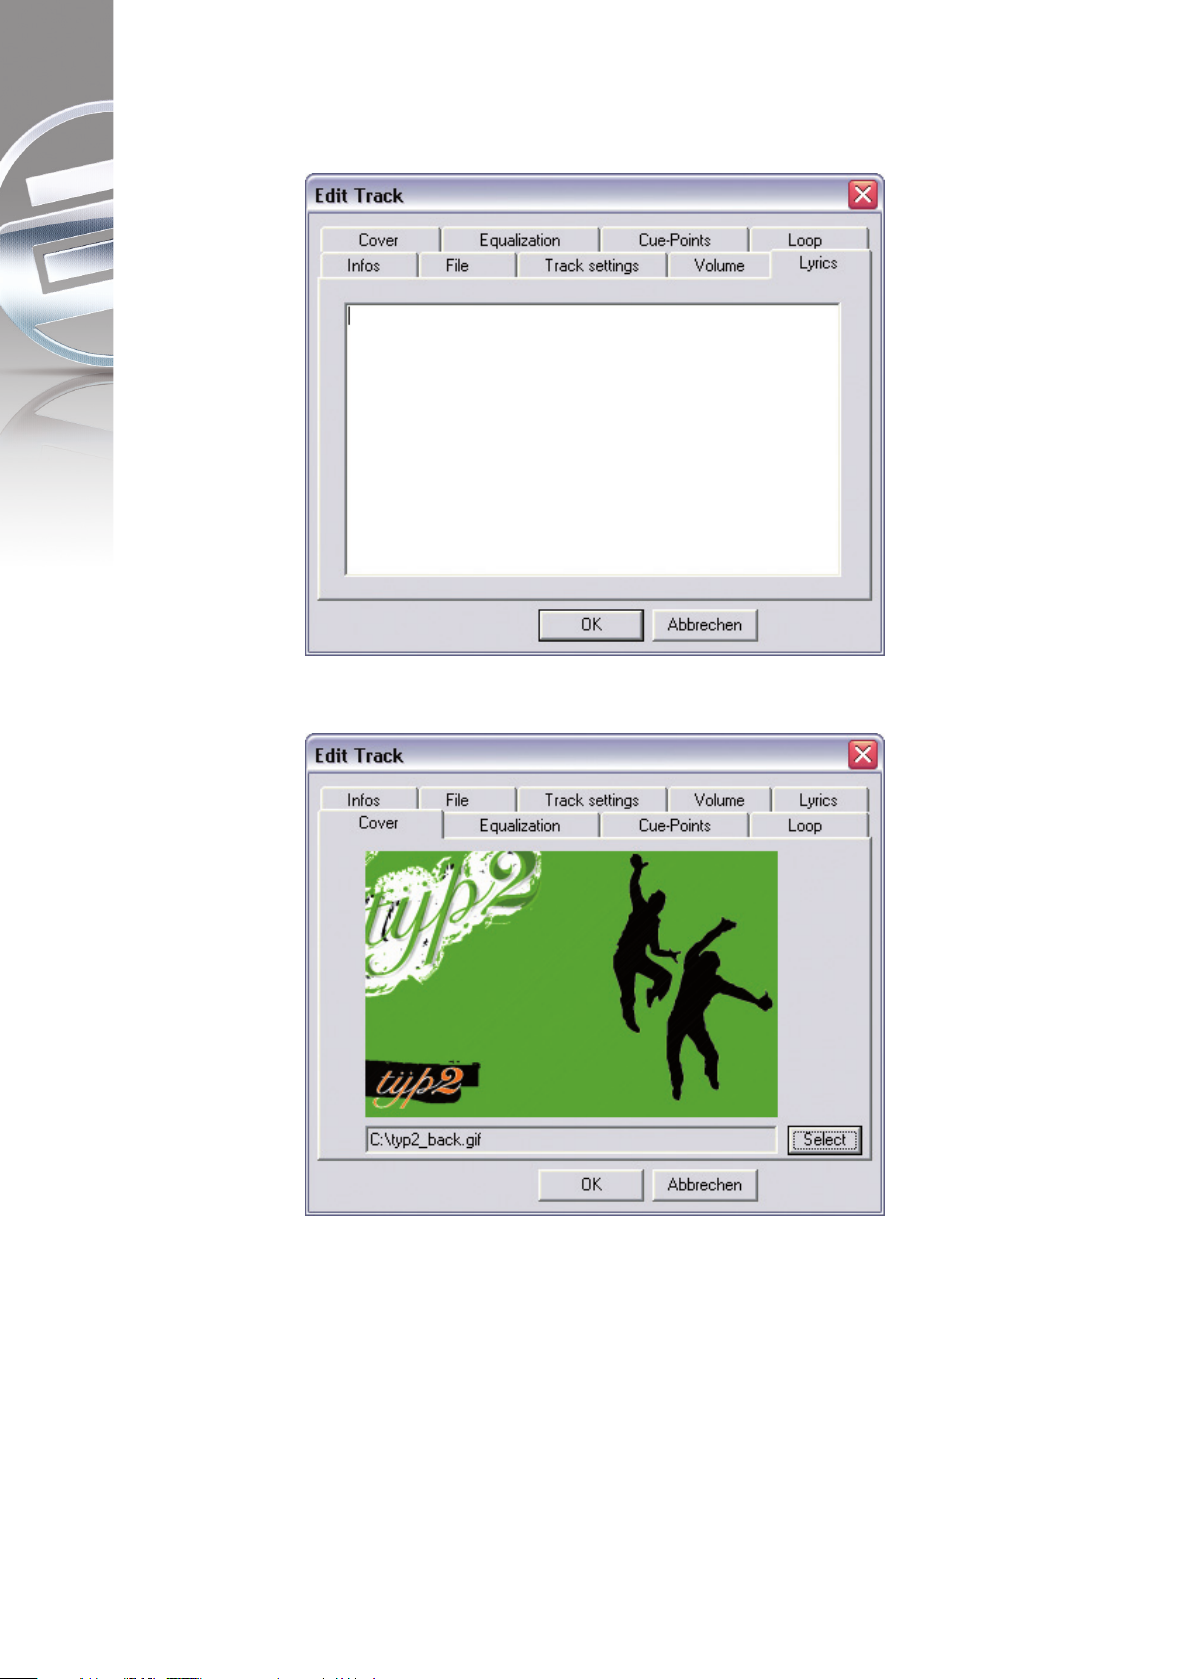
4.3.5 Lyrics
Hier können gegebenenfalls Songtexte eingetragen und eingesehen werden.
4.3.6 Cover
Hier kann ein Cover Artwork zum Track geladen und angezeigt werden.
42
DEUTSCH
Page 43

4.3.7 Equalization
Hier können Sie EQ-Einstellungen vornehmen.
4.3.8 Cue Points
Hier können gegebenenfalls bis zu 10 Cue-Punkte vordefiniert werden.
43
DEUTSCH
Page 44

4.3.9 Loop
Hier können gegebenenfalls bis zu 10 Loops vordefiniert werden.
5. FAQ
5.1 Braucht man spezielle Nadeln für die Plattenspieler, um Spin! benutzen
zu können?
Nein. Prinzipiell wird Spin! mit jeder Nadel funktionieren. Allerdings sollten ein
paar Dinge sichergestellt sein, um einen reibungslosen Ablauf zu erreichen:
Die Nadel darf nicht abgenutzt sein und sie sollte nicht verdreckt sein. Sofern es
sich um ein Headshell-System handelt, sollte sie richtig justiert sein. Außerdem
sollte sie eine möglichst hohe Ausgangsspannung haben, um ein „reines“
Timecodesignal an die Software zu schicken. Aus diesem Grund ist Spin!
ebenfalls im Bundle mit den ORTOFON DIGITRACKS erhältlich. Durch die Ortofon
„Concorde“-Bauart entfällt das Justieren der Nadel unter einer Headshell - die
sehr hohe Ausgangspannung von 8mV garantiert ein „kräftiges“, wenig
störungsanfälliges Timecodesignal.
5.2 Kann man die Timecodevinyls auch einzeln nachkaufen?
Natürlich. Timecodevinyls verschleißen schneller als normale Vinyls, da sie
während des Auflegens nicht gewechselt werden. Abgesehen von der normalen
Abnutzung und den Kratzern, die sich daraus ergeben, setzen Staub, Fett, Nikotin
und der ein oder andere Spritzer Vodka-Martini den Platten ganz schön zu. Aus
diesem Grund gibt es im Fachhandel Ersatzvinyls in den Farben Schwarz,
Mattweiß und Giftgrün.
5.3 Warum erkennt der Computer das Spin!-Interface nicht?
Das kann verschiedene computerbezogene Gründe haben. Als erstes empfehlen
wir sämtliche anderen USB-Geräte vom Computer abzuziehen, um Konflikte (z.B.
mit anderen Soundkarten) auszuschließen.
Des weiteren ist es nach Möglichkeit zu vermeiden, das Interface über einen Hub
mit dem Rechner zu verbinden. Muss unbedingt ein USB-Verlängerungskabel
benutzt werden, so gilt die Regel „so lange wie nötig, so kurz wie möglich“.
44
DEUTSCH
Page 45

5.4 Wieso kommt von einem Plattenspieler kein Timecodesignal an?
Ein Plattenspieler kann problemlos MP3s abspielen, nur der Zweite will partout
nicht funktionieren, weil Spin! meldet, dass es kein Timecodesignal gefunden
hat?
Es gibt zwei Möglichkeiten: Ein Mikrofon ist in das Interface gesteckt und Player
1 funktioniert nicht mehr. In diesem Fall reicht es, das Mic vom Interface
abzuziehen, alles sollte wieder normal funktionieren (das Mic ist mit Input 1
gekoppelt).
Ist kein Mic eingesteckt? Hier eine zweite Möglichkeit, den Fehler zu suchen:
Wenn unter „Options / Timecode“ nur EINE oder KEINE Wellenform dargestellt
wird, liegt ein Problem mit der Verkabelung zwischen Nadel und Interface vor.
Damit Spin! funktionieren kann, MÜSSEN eine rote und eine weiße Sinuswelle
dargestellt werden (nur der Klarheit halber: das sind ZWEI Wellen PRO
FENSTER)!
Als Erstes sollten beide Nadeln untereinander ausgetauscht werden, um zu
überprüfen, ob das Problem weiterhin besteht. Wenn das Problem zusammen
mit der Nadel zum anderen Plattenspieler wandert, dann ist die Nadel entweder
kaputt oder die Kontakte sind verdreckt. Um sie zu reinigen benutzt man ein
Wattestäbchen und etwas Reinigungsalkohol, das gleiche sollte auch mit den
Kontakten im Tonarm geschehen. Bitte KEIN Kontaktspray in den Tonarm
sprühen! Man kann überprüfen, ob wieder ein Stereosignal anliegt indem man
eine normale Platte abgespielt und mit dem Pan-Regler am Mischpult sicherstellt
das Links und Rechts etwas zu hören ist.
Sollten beide Nadeln auf z.B. dem rechten Turntable tadellos funktionieren, aber
beim Linken nicht - obwohl die Kontakte im Tonarm gründlich gereinigt wurden dann besteht noch die Möglichkeit, dass die Kabel an deinem Plattenspieler
defekt sind. Diese sollten dann ausgetauscht werden. Sollten die Kabel fest
installiert sein, so sollte in dem Fall der Händler oder eine qualifizierte Werkstatt
um Hilfe gebeten werden.
5.5 Warum ist nur ein Pfeifen zu hören?
„Vinyl Bypass“ (rechts über dem Label Monitor) ist aktiviert. Diese Funktion
ermöglicht es, normale Schallplatten abzuspielen, das Audiosignal der Platte
wird durchgeschleift. Da der Timecode essentiell aus einem Pfeifen besteht, kann
man dieses nun hören. Einfach den Bypass deaktivieren und die Kontrollvinyls
steuern wieder die digitalen Tracks.
5.6 Kann man auch normale Vinyls abspielen?
Ja. Der „Bypass“-Schalter, der sich in den Playern rechts über dem Label Monitor
(das drehende Ding in der Mitte) befindet, muss aktiviert werden. Das Signal der
Platte wird nun durchgeschliffen und ist hörbar. Die Hotkeys dafür sind „N“ für
den linken und „M“ für den rechten Player.
5.7 Wieso läuft der Track rückwärts?
Der Plattenspieler ist evtl. falsch am Interface angeschlossen, d.h. rechter und
linker Kanal sind vertauscht. Die Kabel sollten andersrum ans Interface
angeschlossen werden und alles läuft wieder vorwärts. Sollte aus irgend einem
Grund die Verkabelung schlecht zu erreichen sein, dann kann man unter „File ->
Options -> Timecode“ ein Häkchen in die Box bei „Left/ Right Inverse“ setzen, das
hat den gleichen Effekt wie das Umstöpseln der Kabel. Trotzdem ist es
empfehlenswerter, die Verkabelung richtig herum angeschlossen zu haben.
5.8 Ist es möglich statt mit 33 RPM mit 45 RPM aufzulegen?
Ja. unter „File -> Options -> Timecode“ das Häkchen im Kasten „45 RPM“
aktivieren und Spin! neu kalibrieren (dabei darauf achten, dass der Pitchfader am
Plattenspieler bei 0% steht).
45
DEUTSCH
Page 46

5.9 Warum werden beide Tracks auf dem gleichen Kanal abgespielt?
Beide Player haben den gleichen OUT PORT zugewiesen. Im Info Screen auf die
Ziffer hinter „Out Port“ klicken um die Zuweisung zu ändern. Typischerweise
wird der linke Kanal auf Port 1 und der rechte Kanal auf Port 2 gestellt werden.
5.9.1 Warum kommt kein Signal?
Es gibt mehrere Möglichkeiten warum nichts zu hören ist. Es zahlt sich aus, diese
Liste der Reihe nach durchzugehen, um dem Fehler auf die Spur zu kommen:
• Ist das Mischpult/ der Verstärker angeschaltet? Sind die Gainregler und
Linefader sowie der Masterregler aufgedreht? Ist der korrekte Eingang
gewählt (Phono statt Line)?
• Ist die Vinylkontrolle aktiviert (Schalter „Vinyl“ unter dem Label Monitor
muss grün sein)?
• Ist Spin! für die Steuerung mit Vinyl eingerichtet?
• Stimmt die Verkabelung?
• Wird das Timecodesignal erkannt?
• Ist ein Mikrofon eingesteckt? Micro abziehen, es blockiert Input 1.
• Ist im Info Screen der richtige Out Port eingestellt? Linker Player: Out Port 1,
rechter Player: Out Port 2.
5.9.2 Kann das Interface auch als Soundkarte verwendet werden?
Das Spin!-Interface kann auch als Soundkarte mit zwei Stereo-Eingängen und
zwei Stereo-Ausgängen fungieren. Desweiteren hat das Interface einen
Mikrofoneingang mit regelbarem Eingangspegel. Ist ein Mic eingesteckt, so
funktioniert es anstelle von Stereoinput 1.
5.9.3 Was ist mit einer Shure M44-7 zu beachten?
Diese Nadeln benötigen eine Phaseninversion. Unter „File -> Options ->
Timecode“ das Häkchen bei „Phase Inverse“ setzen.
5.9.4 Wieso sind hin und wieder Sprünge in der Musik zu hören?
Die Ursache hierfür ist eine langsame Festplatte. Eine Lösung ist unter „Options
-> System“ die Einstellung „Load Tracks to RAM“ auf „rapid“ zu setzen.
Desweiteren empfiehlt es sich, dafür zu sorgen, dass die Festplatte, auf der sich
die Tracks befinden, defragmentiert ist, um die Lesezugriffe zu beschleunigen.
5.9.5 Warum schwankt die Geschwindigkeit / der Pitch beim Abspielen?
Dafür kann es verschiedene Gründe geben:
• Spin! ist nicht kalibriert
• Die Nadel ist verstaubt / dreckig
• Das Auflagegewicht der Nadel ist zu hoch
• Die Nadel ist verschlissen
• Das Timecodevinyl ist verschlissen (Kratzer, cue burn) oder verschmutzt
5.9.6 Gibt es eine Automix / Partymix-Funktion?
Ja. Einfach ein paar Tracks in die Spin! List (nicht die Spin! Library) laden und mit
mit einem Rechtsklick „Play Spin! List“ auswählen. Die Tracks in der Spin! List
werden nun von beiden Playern abwechselnd gespielt.
46
DEUTSCH
Page 47
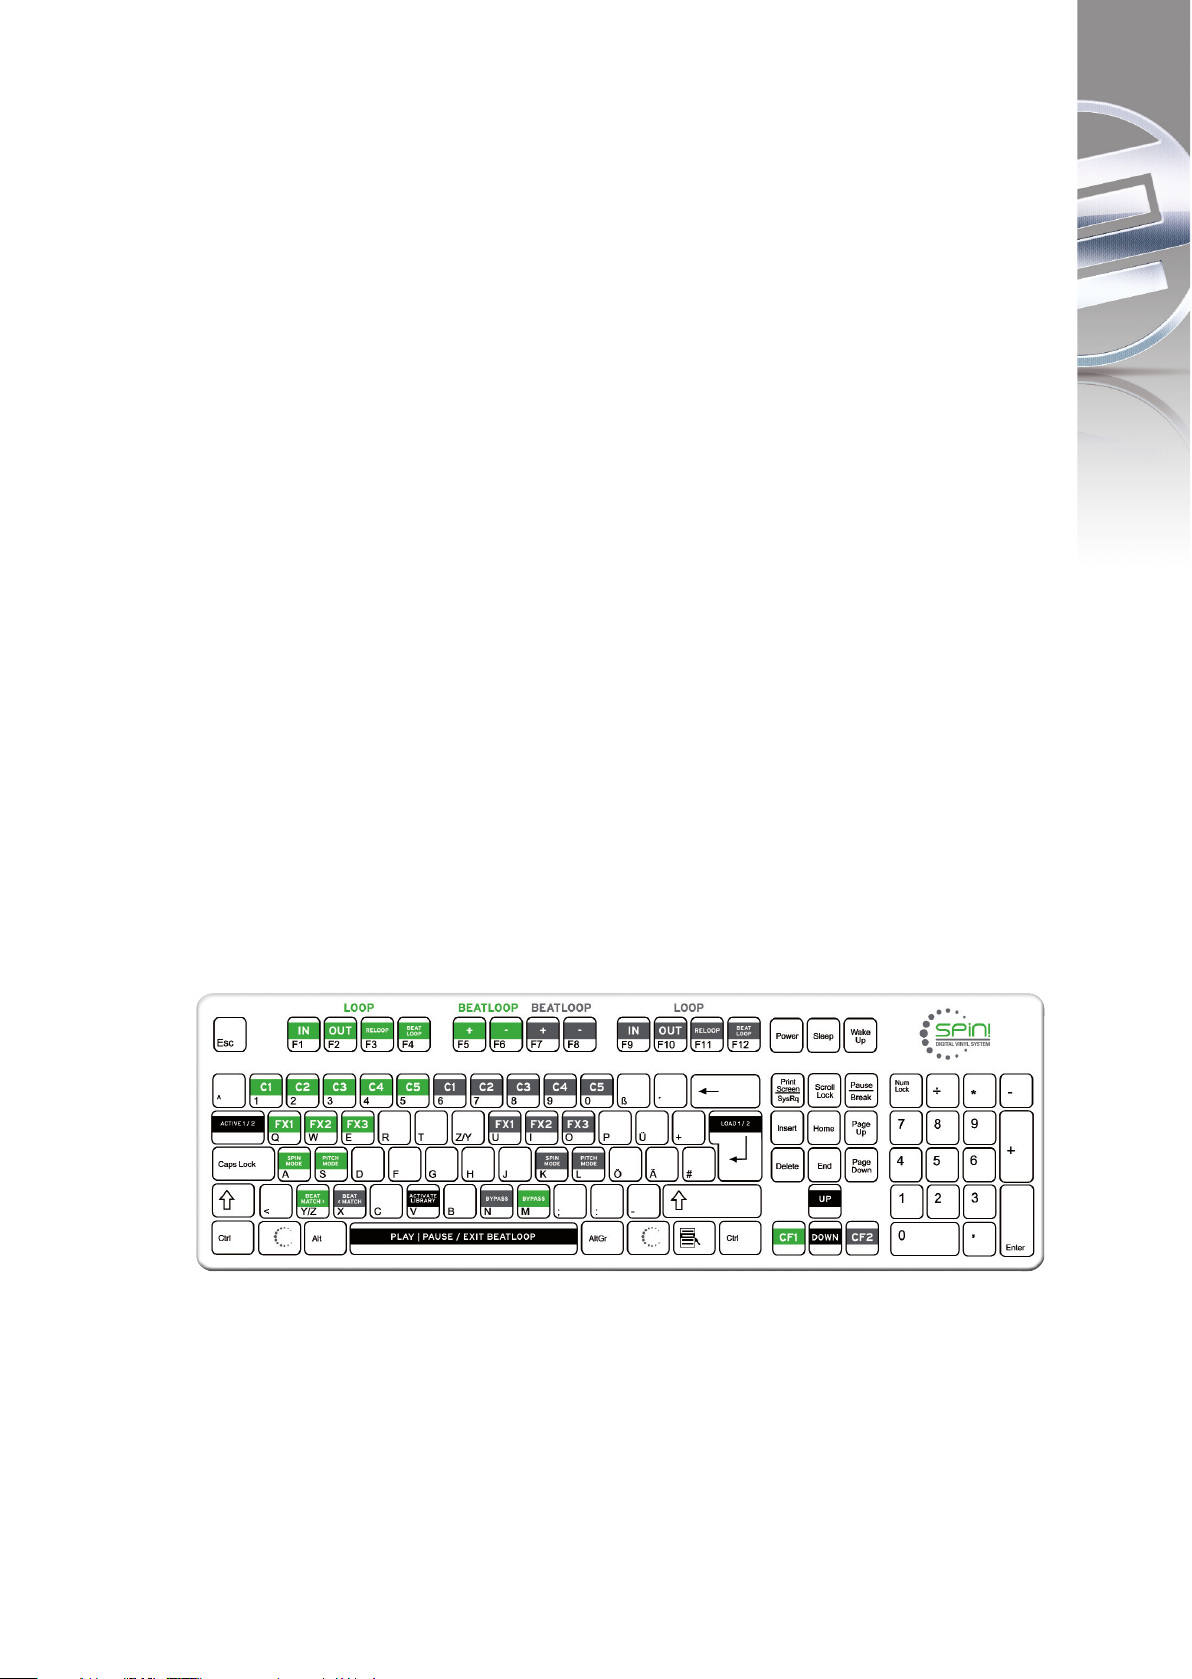
5.9.7 Wie optimiere ich meinen Computer für Spin! ?
Ein gut und stabil laufender Computer ist eine wichtige Voraussetzung, um mit
Spin! zuverlässig arbeiten zu können. Es gibt ein paar Kniffe den Rechner zu
optimieren:
• In der Systemsteuerung unter „System -> Erweitert“ die Einstellungen zur
Systemleistung öffnen
Hier die Einstellung „Für optimale Leistung anpassen“ wählen
• Energiesparmodi und andere Hintergrundprogramme (Virenscanner,
Netzwerkmonitor, etc.) abschalten
• Netzwerkverbindungen und LAN / WLAN deaktivieren
• In der Systemsteuerung unter „System -> Erweitert“ die Einstellungen zur
Systemleistung öffnen. Hier unter „Erweitert“ die Priorität für
Prozessorleistung auf „Hintergrunddienste“ stellen
• Die Festplatten defragmentieren
• Keine anderen Programme parallel zu Spin! laufen lassen
• Um die Performance zu steigern, kann unter „File -> Options“ ein Häkchen in
die Box „Sound before Graphic priority“ gesetzt werden
5.9.8 Was kann man machen, wenn ein Brummen oder Surren bei
Verwendung eines Laptops zu hören ist?
Versuchen Sie das netzteil vom Laptop abzuziehen. Sollte jetzt kein Brummen
mehr zu hören sein, so ist dies ein Erdungs- bzw. Massenschleife-Problem. Sie
können versuchen das Problem durch folgende Maßnahmen zu beheben:
• Verwenden Sie ein Netzteiladapter ohne Erdung.
• Versuchen Sie all Ihre Geräte an nur einen Stromkreis anzuschließen.
• Versuchen Sie Netzkabel und Cinch-Kabel getrennt zu verlegen, so dass sie
sich nicht berühren.
• Überprüfen Sie ob Ihr Plattenspieler korrekt geerdet wurde.
• Schalten Sie einen Anti-Brumm-Filter dazwischen.
6. SCHNELLTASTEN ÜBERSICHT
47
DEUTSCH
Page 48

48
INDEX
1 . . .Conection & Software Installation . . . . . . . . . . . . . . . . . . . . . . . . P. 52
1.1 . . . .Connection . . . . . . . . . . . . . . . . . . . . . . . . . . . . . . . . . . . . . . . . . . . . . . . . . .P. 52
1.2 . . . .Software Installation . . . . . . . . . . . . . . . . . . . . . . . . . . . . . . . . . . . . . . . . .P. 55
1.3 . . . .Easy Setup . . . . . . . . . . . . . . . . . . . . . . . . . . . . . . . . . . . . . . . . . . . . . . . . . .P. 57
1.4 . . . .First Software Steps . . . . . . . . . . . . . . . . . . . . . . . . . . . . . . . . . . . . . . . . . .P. 60
2 . . .Software General Survey . . . . . . . . . . . . . . . . . . . . . . . . . . . . . . . .P. 61
2.1 . . . .Shortcut: New Spin! Library . . . . . . . . . . . . . . . . . . . . . . . . . . . . . . . . . . . . . . . . . .P. 62
2.2 . . . .Shortcut: Open Spin! Library . . . . . . . . . . . . . . . . . . . . . . . . . . . . . . . . . . . . . . . . .P. 62
2.3 . . . .Shortcut: Auto Search . . . . . . . . . . . . . . . . . . . . . . . . . . . . . . . . . . . . . . . . . . . . . . .P. 62
2.4 . . . .Shortcut: Save Spin! Library . . . . . . . . . . . . . . . . . . . . . . . . . . . . . . . . . . . . . . . . .P. 62
2.5 . . . .Shortcut: Stop Spin! List . . . . . . . . . . . . . . . . . . . . . . . . . . . . . . . . . . . . . . . . . . . . .P. 6 2
2.6 . . . .Shortcut: Play Spin! List . . . . . . . . . . . . . . . . . . . . . . . . . . . . . . . . . . . . . . . . . . . . .P. 6 2
2.7 . . . .Shortcut: Loop Spin! List . . . . . . . . . . . . . . . . . . . . . . . . . . . . . . . . . . . . . . . . . . . .P. 62
2.8 . . . .Shortcut: Shuffle Spin! List . . . . . . . . . . . . . . . . . . . . . . . . . . . . . . . . . . . . . . . . . .P. 62
2.9 . . . .Shortcut: Previous . . . . . . . . . . . . . . . . . . . . . . . . . . . . . . . . . . . . . . . . . . . . . . . . . .P. 62
2.10 . . . .Shortcut: Next . . . . . . . . . . . . . . . . . . . . . . . . . . . . . . . . . . . . . . . . . . . . . . . . . . . . . .P. 62
2.11 . . . .Shortcut: Music Explorer / Audio Input . . . . . . . . . . . . . . . . . . . . . . . . . . . . . . . .P. 62
2.12 . . . .Shortcut: Spin! Library . . . . . . . . . . . . . . . . . . . . . . . . . . . . . . . . . . . . . . . . . . . . . .P. 62
2.13 . . . .Shortcut: Spin! List . . . . . . . . . . . . . . . . . . . . . . . . . . . . . . . . . . . . . . . . . . . . . . . . .P. 62
2.14 . . . .Shortcut: Category View . . . . . . . . . . . . . . . . . . . . . . . . . . . . . . . . . . . . . . . . . . . . .P.62
2.15 . . . .Shortcut: X-Fader Match View . . . . . . . . . . . . . . . . . . . . . . . . . . . . . . . . . . . . . . . .P. 62
2.16 . . . .Shortcut: Master / Rec Vol . . . . . . . . . . . . . . . . . . . . . . . . . . . . . . . . . . . . . . . . . . .P. 62
2.17 . . . .Shortcut: Beat Match View . . . . . . . . . . . . . . . . . . . . . . . . . . . . . . . . . . . . . . . . . . .P. 62
2.18 . . . .Shortcut: Options . . . . . . . . . . . . . . . . . . . . . . . . . . . . . . . . . . . . . . . . . . . . . . . . . . .P. 62
2.19 . . . .Shortcut: Save Mode . . . . . . . . . . . . . . . . . . . . . . . . . . . . . . . . . . . . . . . . . . . . . . . .P. 62
2.20 . . . .Beatmatch View . . . . . . . . . . . . . . . . . . . . . . . . . . . . . . . . . . . . . . . . . . . . . . . . . . . .P. 63
2.21 . . . .Complete View . . . . . . . . . . . . . . . . . . . . . . . . . . . . . . . . . . . . . . . . . . . . . . . . . . . . .P. 63
2.22 . . . .Needle View . . . . . . . . . . . . . . . . . . . . . . . . . . . . . . . . . . . . . . . . . . . . . . . . . . . . . . . .P. 63
2.23 . . . .Master . . . . . . . . . . . . . . . . . . . . . . . . . . . . . . . . . . . . . . . . . . . . . . . . . . . . . . . . . . . . .P. 63
2.24 . . . .Load Track . . . . . . . . . . . . . . . . . . . . . . . . . . . . . . . . . . . . . . . . . . . . . . . . . . . . . . . . .P. 64
2.25 . . . .Bypass . . . . . . . . . . . . . . . . . . . . . . . . . . . . . . . . . . . . . . . . . . . . . . . . . . . . . . . . . . . .P. 64
2.26 . . . .Label-Monitor . . . . . . . . . . . . . . . . . . . . . . . . . . . . . . . . . . . . . . . . . . . . . . . . . . . . . .P. 64
2.27 . . . .Gain . . . . . . . . . . . . . . . . . . . . . . . . . . . . . . . . . . . . . . . . . . . . . . . . . . . . . . . . . . . . . . .P. 64
2.28 . . . .Pitch Mode . . . . . . . . . . . . . . . . . . . . . . . . . . . . . . . . . . . . . . . . . . . . . . . . . . . . . . . . .P. 65
2.29 . . . .Pitchfader . . . . . . . . . . . . . . . . . . . . . . . . . . . . . . . . . . . . . . . . . . . . . . . . . . . . . . . . .P. 65
2.30 . . . .Vinyl Timecode Activation . . . . . . . . . . . . . . . . . . . . . . . . . . . . . . . . . . . . . . . . . . .P. 66
2.31 . . . .Spin! Mode . . . . . . . . . . . . . . . . . . . . . . . . . . . . . . . . . . . . . . . . . . . . . . . . . . . . . . . . .P. 66
2.32 . . . .Play/Pause . . . . . . . . . . . . . . . . . . . . . . . . . . . . . . . . . . . . . . . . . . . . . . . . . . . . . . . . .P. 66
2.33 . . . .Cue . . . . . . . . . . . . . . . . . . . . . . . . . . . . . . . . . . . . . . . . . . . . . . . . . . . . . . . . . . . . . . .P. 67
2.34 . . . .Skip Buttons . . . . . . . . . . . . . . . . . . . . . . . . . . . . . . . . . . . . . . . . . . . . . . . . . . . . . . .P. 67
2.35 . . . .Skip . . . . . . . . . . . . . . . . . . . . . . . . . . . . . . . . . . . . . . . . . . . . . . . . . . . . . . . . . . . . . . .P. 67
2.36 . . . .Fast Search Buttons . . . . . . . . . . . . . . . . . . . . . . . . . . . . . . . . . . . . . . . . . . . . . . . . .P. 67
2.37 . . . .Pitch Bend . . . . . . . . . . . . . . . . . . . . . . . . . . . . . . . . . . . . . . . . . . . . . . . . . . . . . . . . .P. 67
2.38 . . . .Spin! Library . . . . . . . . . . . . . . . . . . . . . . . . . . . . . . . . . . . . . . . . . . . . . . . . . . . . . . .P. 68
2.39 . . . .Delay FX . . . . . . . . . . . . . . . . . . . . . . . . . . . . . . . . . . . . . . . . . . . . . . . . . . . . . . . . . . .P. 70
2.40 . . . .Filter FX . . . . . . . . . . . . . . . . . . . . . . . . . . . . . . . . . . . . . . . . . . . . . . . . . . . . . . . . . . .P. 70
2.41 . . . .Flanger FX . . . . . . . . . . . . . . . . . . . . . . . . . . . . . . . . . . . . . . . . . . . . . . . . . . . . . . . . .P. 70
2.42 . . . .Beat Loop / Auto Loop . . . . . . . . . . . . . . . . . . . . . . . . . . . . . . . . . . . . . . . . . . . . . .P.70
2.43/44 . . . .Manual Loop Function . . . . . . . . . . . . . . . . . . . . . . . . . . . . . . . . . . . . . . . . . . . . . . .P. 70
2.45 . . . .Crossfader . . . . . . . . . . . . . . . . . . . . . . . . . . . . . . . . . . . . . . . . . . . . . . . . . . . . . . . . .P. 71
2.46 . . . .Beat Match . . . . . . . . . . . . . . . . . . . . . . . . . . . . . . . . . . . . . . . . . . . . . . . . . . . . . . . . .P. 71
2.47 . . . .Cue Points . . . . . . . . . . . . . . . . . . . . . . . . . . . . . . . . . . . . . . . . . . . . . . . . . . . . . . . . .P. 71
2.48 . . . .Info View . . . . . . . . . . . . . . . . . . . . . . . . . . . . . . . . . . . . . . . . . . . . . . . . . . . . . . . . . .P. 72
2.49 . . . .Category View . . . . . . . . . . . . . . . . . . . . . . . . . . . . . . . . . . . . . . . . . . . . . . . . . . . . . .P. 72
2.50 . . . .Music Explorer / Audio Input . . . . . . . . . . . . . . . . . . . . . . . . . . . . . . . . . . . . . . . . .P. 73
2.51 . . . .Mic Rec / Mic Spin! . . . . . . . . . . . . . . . . . . . . . . . . . . . . . . . . . . . . . . . . . . . . . . . . . .P. 73
2.52 . . . .Monitor . . . . . . . . . . . . . . . . . . . . . . . . . . . . . . . . . . . . . . . . . . . . . . . . . . . . . . . . . . . .P. 74
3 . . .Menu Navigation . . . . . . . . . . . . . . . . . . . . . . . . . . . . . . . . . . . . . . .P. 74
3.1 . . . .File . . . . . . . . . . . . . . . . . . . . . . . . . . . . . . . . . . . . . . . . . . . . . . . . . . . . . . . .P. 74
3.1.1 . . . .Options . . . . . . . . . . . . . . . . . . . . . . . . . . . . . . . . . . . . . . . . . . . . . . . . . . . . . . . . . . . .P. 74
3.1.2 . . . .Quit Spinning . . . . . . . . . . . . . . . . . . . . . . . . . . . . . . . . . . . . . . . . . . . . . . . . . . . . . . .P. 74
3.2 . . . .Spin! Library . . . . . . . . . . . . . . . . . . . . . . . . . . . . . . . . . . . . . . . . . . . . . . . .P. 74
3.2.1 . . . .New . . . . . . . . . . . . . . . . . . . . . . . . . . . . . . . . . . . . . . . . . . . . . . . . . . . . . . . . . . . . . . .P. 74
3.2.2 . . . .Open . . . . . . . . . . . . . . . . . . . . . . . . . . . . . . . . . . . . . . . . . . . . . . . . . . . . . . . . . . . . . .P. 74
3.2.3 . . . .Save . . . . . . . . . . . . . . . . . . . . . . . . . . . . . . . . . . . . . . . . . . . . . . . . . . . . . . . . . . . . . .P. 74
3.2.4 . . . .Save aP... . . . . . . . . . . . . . . . . . . . . . . . . . . . . . . . . . . . . . . . . . . . . . . . . . . . . . . . . . .P. 74
3.2.5 . . . . .Import . . . . . . . . . . . . . . . . . . . . . . . . . . . . . . . . . . . . . . . . . . . . . . . . . . . . . . . . . . . . .P. 74
3.2.6 . . . .Export . . . . . . . . . . . . . . . . . . . . . . . . . . . . . . . . . . . . . . . . . . . . . . . . . . . . . . . . . . . . .P. 74
3.2.7 . . . .Automatic Search . . . . . . . . . . . . . . . . . . . . . . . . . . . . . . . . . . . . . . . . . . . . . . . . . . .P. 74
3.2.8 . . . .Add Track . . . . . . . . . . . . . . . . . . . . . . . . . . . . . . . . . . . . . . . . . . . . . . . . . . . . . . . . . .P. 74
3.2.9 . . . .Select All . . . . . . . . . . . . . . . . . . . . . . . . . . . . . . . . . . . . . . . . . . . . . . . . . . . . . . . . . .P. 74
3.2.9.1 . . . .Delete . . . . . . . . . . . . . . . . . . . . . . . . . . . . . . . . . . . . . . . . . . . . . . . . . . . . . . . . . . . . .P. 75
Page 49

49
INDEX
3.3 . . . .Track . . . . . . . . . . . . . . . . . . . . . . . . . . . . . . . . . . . . . . . . . . . . . . . . . . . . . . .P. 75
3.3.1 . . . .Track Preferences . . . . . . . . . . . . . . . . . . . . . . . . . . . . . . . . . . . . . . . . . . . . . . . . . . .P. 75
3.3.2 . . . .Save ID3 TAG . . . . . . . . . . . . . . . . . . . . . . . . . . . . . . . . . . . . . . . . . . . . . . . . . . . . . . .P. 75
3.3.3 . . . .Analyze BPM manually . . . . . . . . . . . . . . . . . . . . . . . . . . . . . . . . . . . . . . . . . . . . . .P. 75
3.3.4 . . . .Analyze BPM automatic . . . . . . . . . . . . . . . . . . . . . . . . . . . . . . . . . . . . . . . . . . . . .P. 75
3.3.5 . . . .Delete Tracks permanently . . . . . . . . . . . . . . . . . . . . . . . . . . . . . . . . . . . . . . . . . . .P. 75
3.4 . . . .Spin! List . . . . . . . . . . . . . . . . . . . . . . . . . . . . . . . . . . . . . . . . . . . . . . . . . . .P. 75
3.4.1 . . . .Play Spin! List . . . . . . . . . . . . . . . . . . . . . . . . . . . . . . . . . . . . . . . . . . . . . . . . . . . . . .P. 75
3.4.2 . . . .Stop Spin! List . . . . . . . . . . . . . . . . . . . . . . . . . . . . . . . . . . . . . . . . . . . . . . . . . . . . . .P. 75
3.4.3 . . . .Add to Spin! List . . . . . . . . . . . . . . . . . . . . . . . . . . . . . . . . . . . . . . . . . . . . . . . . . . . .P. 75
3.4.4 . . . .Safe Mode . . . . . . . . . . . . . . . . . . . . . . . . . . . . . . . . . . . . . . . . . . . . . . . . . . . . . . . . .P. 75
3.5 . . . .Spin! Workspace . . . . . . . . . . . . . . . . . . . . . . . . . . . . . . . . . . . . . . . . . . . . .P. 76
3.5.1 . . . .Workspace arrangeable . . . . . . . . . . . . . . . . . . . . . . . . . . . . . . . . . . . . . . . . . . . . . .P. 76
3.5.2 . . . .Full Screen View . . . . . . . . . . . . . . . . . . . . . . . . . . . . . . . . . . . . . . . . . . . . . . . . . . . .P. 76
3.5.3 . . . .Menu Bar View . . . . . . . . . . . . . . . . . . . . . . . . . . . . . . . . . . . . . . . . . . . . . . . . . . . . .P. 76
3.5.4 . . . .Shortcut View . . . . . . . . . . . . . . . . . . . . . . . . . . . . . . . . . . . . . . . . . . . . . . . . . . . . . .P. 76
3.5.5 . . . .Info View . . . . . . . . . . . . . . . . . . . . . . . . . . . . . . . . . . . . . . . . . . . . . . . . . . . . . . . . . .P. 76
3.5.6 . . . .Preview . . . . . . . . . . . . . . . . . . . . . . . . . . . . . . . . . . . . . . . . . . . . . . . . . . . . . . . . . . . .P. 76
3.5.7 . . . .Spin! Library View . . . . . . . . . . . . . . . . . . . . . . . . . . . . . . . . . . . . . . . . . . . . . . . . . .P. 76
3.5.8 . . . .Spin! List View . . . . . . . . . . . . . . . . . . . . . . . . . . . . . . . . . . . . . . . . . . . . . . . . . . . . .P. 76
3.5.9 . . . .Category View . . . . . . . . . . . . . . . . . . . . . . . . . . . . . . . . . . . . . . . . . . . . . . . . . . . . . .P. 76
3.5.9.1 . . . .Music Explorer / Audio Input View . . . . . . . . . . . . . . . . . . . . . . . . . . . . . . . . . . . .P. 76
3.5.9.2 . . . .X-Fader Match View . . . . . . . . . . . . . . . . . . . . . . . . . . . . . . . . . . . . . . . . . . . . . . . . .P. 76
3.5.9.3 . . . .Master/Rec Vol. View . . . . . . . . . . . . . . . . . . . . . . . . . . . . . . . . . . . . . . . . . . . . . . . .P. 76
3.5.9.4 . . . .Beatmatch View . . . . . . . . . . . . . . . . . . . . . . . . . . . . . . . . . . . . . . . . . . . . . . . . . . . .P. 76
3.6 . . . .Help . . . . . . . . . . . . . . . . . . . . . . . . . . . . . . . . . . . . . . . . . . . . . . . . . . . . . . .P. 76
3.6.1 . . . .Easy Setup . . . . . . . . . . . . . . . . . . . . . . . . . . . . . . . . . . . . . . . . . . . . . . . . . . . . . . . . .P. 76
3.6.2 . . . .Manual . . . . . . . . . . . . . . . . . . . . . . . . . . . . . . . . . . . . . . . . . . . . . . . . . . . . . . . . . . . .P. 76
3.6.3 . . . .www.reloop-spin.com . . . . . . . . . . . . . . . . . . . . . . . . . . . . . . . . . . . . . . . . . . . . . . . .P. 76
3.6.4 . . . .Configuration Log . . . . . . . . . . . . . . . . . . . . . . . . . . . . . . . . . . . . . . . . . . . . . . . . . . .P. 76
3.6.5 . . . .About Spin! . . . . . . . . . . . . . . . . . . . . . . . . . . . . . . . . . . . . . . . . . . . . . . . . . . . . . . . .P. 76
4. . . .Adjustments . . . . . . . . . . . . . . . . . . . . . . . . . . . . . . . . . . . . . . . . . .P. 77
4.1 . . . .Options . . . . . . . . . . . . . . . . . . . . . . . . . . . . . . . . . . . . . . . . . . . . . . . . . . . . .P. 77
4.1.1 . . . .System . . . . . . . . . . . . . . . . . . . . . . . . . . . . . . . . . . . . . . . . . . . . . . . . . . . . . . . . . . . .P. 77
4.1.2 . . . .BPM and Tools . . . . . . . . . . . . . . . . . . . . . . . . . . . . . . . . . . . . . . . . . . . . . . . . . . . . .P. 78
4.1.3 . . . .Audio Devices . . . . . . . . . . . . . . . . . . . . . . . . . . . . . . . . . . . . . . . . . . . . . . . . . . . . . .P. 79
4.1.4 . . . .Timecode . . . . . . . . . . . . . . . . . . . . . . . . . . . . . . . . . . . . . . . . . . . . . . . . . . . . . . . . . .P. 80
4.1.5 . . . .Workspace . . . . . . . . . . . . . . . . . . . . . . . . . . . . . . . . . . . . . . . . . . . . . . . . . . . . . . . . .P. 82
4.1.6 . . . .Shortcuts . . . . . . . . . . . . . . . . . . . . . . . . . . . . . . . . . . . . . . . . . . . . . . . . . . . . . . . . . .P. 83
4.1.7 . . . .MIDI Controller . . . . . . . . . . . . . . . . . . . . . . . . . . . . . . . . . . . . . . . . . . . . . . . . . . . . .P. 84
4.2 . . . .Auto Search . . . . . . . . . . . . . . . . . . . . . . . . . . . . . . . . . . . . . . . . . . . . . . . . .P. 85
4.3 . . . .Track Preferences . . . . . . . . . . . . . . . . . . . . . . . . . . . . . . . . . . . . . . . . . . . .P. 86
4.3.1 . . . .Infos . . . . . . . . . . . . . . . . . . . . . . . . . . . . . . . . . . . . . . . . . . . . . . . . . . . . . . . . . . . . . .P. 86
4.3.2 . . . .File . . . . . . . . . . . . . . . . . . . . . . . . . . . . . . . . . . . . . . . . . . . . . . . . . . . . . . . . . . . . . . . .P. 86
4.3.3 . . . .Track Settings . . . . . . . . . . . . . . . . . . . . . . . . . . . . . . . . . . . . . . . . . . . . . . . . . . . . . .P. 87
4.3.4 . . . .Volume . . . . . . . . . . . . . . . . . . . . . . . . . . . . . . . . . . . . . . . . . . . . . . . . . . . . . . . . . . . .P. 87
4.3.5 . . . .Lyrics . . . . . . . . . . . . . . . . . . . . . . . . . . . . . . . . . . . . . . . . . . . . . . . . . . . . . . . . . . . . .P. 88
4.3.6 . . . .Cover . . . . . . . . . . . . . . . . . . . . . . . . . . . . . . . . . . . . . . . . . . . . . . . . . . . . . . . . . . . . .P. 88
4.3.7 . . . .Equalization . . . . . . . . . . . . . . . . . . . . . . . . . . . . . . . . . . . . . . . . . . . . . . . . . . . . . . . .P. 89
4.3.8 . . . .Cue Points . . . . . . . . . . . . . . . . . . . . . . . . . . . . . . . . . . . . . . . . . . . . . . . . . . . . . . . . .P. 89
4.3.9 . . . .Loop . . . . . . . . . . . . . . . . . . . . . . . . . . . . . . . . . . . . . . . . . . . . . . . . . . . . . . . . . . . . . .P. 90
5. . . .FAQ . . . . . . . . . . . . . . . . . . . . . . . . . . . . . . . . . . . . . . . . . . . . . . . . .P. 90
5.1 . . . .Do I need a special stylus in order to use Spin! ? . . . . . . . . . . . . . . . . . . . . . . .P. 90
5.2 . . . .Can I buy the timecode vinyl records separately? . . . . . . . . . . . . . . . . . . . . . . .P. 90
5.3 . . . .Why won’t my computer recorgnize the Spin! interface? . . . . . . . . . . . . . . . . .P. 90
5.4 . . . .Why is there no timecode signal? . . . . . . . . . . . . . . . . . . . . . . . . . . . . . . . . . . . . .P. 91
5.5 . . . .Why do I only hear a high-pitched tone? . . . . . . . . . . . . . . . . . . . . . . . . . . . . . . .P. 91
5.6 . . . .Can I play my regular records when I’am using Spin! ? . . . . . . . . . . . . . . . . . .P. 91
5.7 . . . .Why is the music playing backwards? . . . . . . . . . . . . . . . . . . . . . . . . . . . . . . . . .P. 91
5.8 . . . .Can I play my records at 45 RPM instead of 33 RPM? . . . . . . . . . . . . . . . . . . .P. 91
5.9 . . . .Why are both tracks being played on the same channel? . . . . . . . . . . . . . . . .P. 92
5.9.1 . . . .Why is there no signal? . . . . . . . . . . . . . . . . . . . . . . . . . . . . . . . . . . . . . . . . . . . . . .P. 92
5.9.2 . . . .Can I use the Interface as a sound card? . . . . . . . . . . . . . . . . . . . . . . . . . . . . . .P. 92
5.9.3 . . . .What do I have to observe if I use a Shure M44-7? . . . . . . . . . . . . . . . . . . . . . .P. 92
5.9.4 . . . .Why is the music skipping a beat now and then? . . . . . . . . . . . . . . . . . . . . . . .P. 92
5.9.5 . . . .Why does the speed/the pitch of my tracks fluctuate? . . . . . . . . . . . . . . . . . .P. 92
5.9.6 . . . .Is there an auto mix / party mix function? . . . . . . . . . . . . . . . . . . . . . . . . . . . . .P. 92
5.9.7 . . . .How can I optimize the performance of Spin! ? . . . . . . . . . . . . . . . . . . . . . . . . .P. 93
5.9.8 . . . . .What can I do when I hear humming or buzzing when using a laptop? . . . . .P. 93
6. . . .Hot Key Overview . . . . . . . . . . . . . . . . . . . . . . . . . . . . . . . . . . . . . .P. 93
Page 50

50
ENGLISH
Congratulations on purchasing your Reloop Spin! system. Thank you for
placing your trust in our disc jockey technology. Before operating this
equipment we ask you to carefully study and observe all instructions.
Please remove the Spin! interface from its packaging. Check before initial
operation to make sure that the device has not been visibly damaged during
transport. If you detect any damage to the power cable or the casing, do not
operate the device. Contact your specialised dealer.
SAFETY INSTRUCTIONS
CAUTION!
Please exercise particular caution when handling 240 V power voltage. This
voltage rating may lead to a critical electrical shock! Any damage caused by
the non-observance of this operation manual excludes any warranty claims.
The manufacturer is not liable for any damage to property or for personal
injury caused by improper handling or non-observance of the safety
instructions.
- This device left the factory in perfect condition. To maintain this condition
and to ensure a risk-free operation the user must observe the safety
instructions and warnings contained in this operation manual.
- For reasons of safety and certification (CE) the unauthorised conversion
and/or modification of the device is prohibited. Please note that in the event
of damage caused by the manual modification to this device any warranty
claims are excluded.
- The inside of the device does not contain any parts which require
maintenance, with the exception of wear parts that can be exchanged from
the outside. Qualified staff must carry out maintenance, otherwise the
warranty does not apply!
- The Fuse must exclusively be exchanged against fuses of the same class,
with the same trigger features and nominal current rating.
- Ensure that the power will only be supplied after the device has been fully
set up. Always plug in the mains plug last. Ensure that the mains switch is in
the “OFF” position when connecting the device to power.
- Only use cables that comply with regulations. Observe that all jacks and
bushes are tightened and correctly hooked up. Refer to your dealer if you
have any questions.
- Ensure that when setting up the product the mains cable is not squashed or
damaged by sharp edges.
- Prevent the mains cable from coming into contact with other cables! Exercise
great care when handling mains cables and connections. Never touch these
parts with wet hands!
- Connect the power cable exclusively to appropriate shock-proof outlets. The
only supply point to be used is a supply outlet in accordance with
specifications of the public supply network.
- Disconnect the device from the supply outlet when not in use and before
cleaning! Be sure to hold the mains plug by the body. Never pull the mains
cord!
- Position the device on a horizontal and stable low-flame base.
- Avoid any concussions or violent impact when installing or operating the
device.
- When selecting the location of installation make sure that the device is not
exposed to excessive heat, humidity, and dust. Be sure that no cables lie
around openly. You will endanger your own safety and that of others!
- Do not rest any containers filled with liquid that could easily spill onto the
device or in its immediate vicinity. If, however, fluids should access the inside
of the device, immediately disconnect the mains plug. Have the device
checked by a qualified service technician before re-use. Damage caused by
fluids inside the device is excluded from the warranty.
OPERATION MANUAL
ENGLISH
Page 51

- Do not operate the device under extremely hot (in excess of 35° C) or
extremely cold (below 5° C) conditions. Keep the device away from direct
exposure to the sun and heat sources such as radiators, ovens, etc. (even
during transport in a closed vehicle). Never cover the cooling fan or vents.
Always ensure sufficient ventilation.
- The device must not be operated after being taken from a cold environment
into a warm environment. The condensation caused hereby may destroy
your device. Do not switch on or operate the device until it has reached
ambient temperature!
- Controls and switches should never be treated with spray-on cleaning agents
and lubricants. This device should only be cleaned with a damp cloth. Never
use solvents or cleaning fluids with a petroleum base for cleaning.
- When relocating, the device should be transported in its original packaging.
- When starting operation, the crossfaders and volume controls of your
amplifier must be set to minimum level. Bring the loudspeaker switches into
the “OFF” position. Wait between 8 to 10 seconds before increasing the
volume to avoid shot noise created by transient effect, which could cause
damage to loudspeakers and the diplexer.
- Devices supplied by voltage should not be left in the hands of children.
Please exercise particular care when in the presence of children.
- At commercial facilities the regulations for the prevention of accidents as
stipulated by the organization of professional associations must be
observed.
- At schools, training facilities, hobby and self-help workshops the operation of
the device must be monitored with responsibility by trained staff.
- Keep this operation manual in a safe place for later reference in the event of
questions or problems.
APPLICATION IN ACCORDANCE WITH REGULATIONS
- This device is a professional digital timecode system that can control
software via the included timecode vinyl records and CDs respectively. The
device should be connected via USB cable to a computer.
- This product is authorised for connection to 240 V, 50 Hz AC and is designed
exclusively for indoor application.
- If the device is used for any other purposes than those described in the
operation manual, damage can be caused to the product, leading to
exclusion of warranty rights. Moreover, any other application that does not
comply with the specified purpose harbours risks such as short circuit, fire,
electrical shock, etc.
- The serial number determined by the manufacturer must never be removed
to uphold the warranty rights.
ENGLISH
51
Page 52

MAINTENANCE
- Check the technical safety of the device regularly for damage to the mains
line or the casing, as well as for wearout of wear parts such as rotary and
sliding switches.
- If it is to be assumed that a safe operation is no longer feasible then the
device must be disconnected and secured against accidental use. Always
disconnect the mains plug from the outlet!
- It must be assumed that a safe operation is no longer feasible if the device
bears visible defects, if the device no longer functions, following longer
storage under unfavourable conditions or after major transport stress.
This manual, video tutorials, tips and tricks and additional downloads can be
found on:
www.reloop-spin.com
MINIMUM SYSTEM REQUIREMENTS:
PC:
• current processor (Pentium III, 1 GHz recommended)
• Windows 2000, XP, NT, Vista operating system
• free USB port
• 512 MB RAM minimum
1. Connection & Software Installation
1.1 Connection
52
ENGLISH
8
2
54
6
1 37
Page 53

a) Connect your turntable's or CD player's outputs to the corresponding inputs
(1 or 2) of the Reloop Spin! interface -1-. If required connect your turntables
to the GND grounding screw -3-.
b) Connect the line outputs of the Reloop Spin! interface to the line inputs of
your mixer -2-.
c) Connect the Reloop Spin! Interface to your computer via a free USB port.
Now the following messages should appear on your monitor (example for
XP):
New hardware found –
Reloop Spin! Interface
New hardware found –
USB audio device
New hardware found –
Your new hardware is installed and ready to use.
NOTE!
The installation of your Spin! interface under Windows XP & Vista is carried
out Plug 'N' Play without the need for special drivers.
d) After the system has recognized and installed your Spin! interface you
should maximise the volume in the Windows audio settings.
Example Windows XP:
start > control panel > sounds and audio devices > rider „audio“
53
ENGLISH
Page 54

Click on „Volume“ under the item „Sound Playback“ and maximise all faders.
The option „Sound Recording“ for a
vinyl record or CD setup differ.
1) Vinyl settings
Click on the „Sound Recording“
button and maximise the fader.
2) CDJ settings
Click on the „Sound Recording“
button and minimise the fader.
Afterwards you can close the control panel.
e) Additional functions and connections of your Spin! interface:
USB LED -4-:
Shines when the interface has been recognized by the computer and is
active.
NOTE!
The interface is supplied with power via USB. A connection to mains is
not necessary.
Headphones -5 / 6-:
Here you can connect headphones (3,5 mm jack) in order to be able to
monitor the master output signal directly from the interface -5-. Via the
monitor knob -6- you can adjust the volume.
NOTE!
You can also use this output as recording connection in order to record
a set for example.
Microphone -7 / 8-:
You can connect a microphone to this jack (6,3 mm jack). The volume can be
adjusted with the knob -8-.
ATTENTION!
The microphone input is linked to the stereo output. This means you can
either use a microphone or the channel 1 signal. Make sure that no
microphone is connected during normal Spin! timecode use as the
channel would be blocked.
54
ENGLISH
1) 2)
Page 55

1.2. Software Installation
After having carried out the hardware setup now you can continue with the
software installation. To do so please insert the Spin! installation CD in the CD
ROM drive of your computer. If the setup does not start automatically please
carry out the file „Install.exe“ manually.
Choose the installation language and confirm with „OK“.
Read and accept the licensing agreement.
55
ENGLISH
Out1 HPOut2
USB
In1Mic In2
CD 1 Turntable 1 Mixer Turntable 2
CH1
CH2
CD or TurntableCD or Turntable
CD 2
Page 56

Now you have to enter your name, company if required, e-mail address (required)
and the serial number. You can find the serial number on the back side of the
Spin! installation CD-cover. Confirm the entries with „Next“.
Now choose the installation directory where you would like to install your Spin!
software or use the standard directory (recommended). Please confirm with
„Next“.
After successful installation close the setup with „Finish“.
NOTE!
Log regularly onto www.reloop-spin.com for latest updates.
ATTENTION VISTA USERS!
If the program does not start because of the error “the serial number is not
correct”, please deactivate the user account control.
> Control Panel > Security Center > User Account Control > Deactivate
Alternatively open the software by clicking the right mouse button on the
Spin! Icon and choose the option “execute as administrator”.
56
ENGLISH
Page 57

1.3 Easy Setup
When starting Reloop Spin! for the first time the easy setup will start
automatically.
NOTE!
You can also carry out the setup manually under the menu item > Help >
Easy setup!
1. Resolution
In this first step please choose the screen resolution.
2. Calibration input 1
Now you have to carry out the calibration. Choose the according playback
medium. Switch to play mode and click „Next“.
57
ENGLISH
Page 58
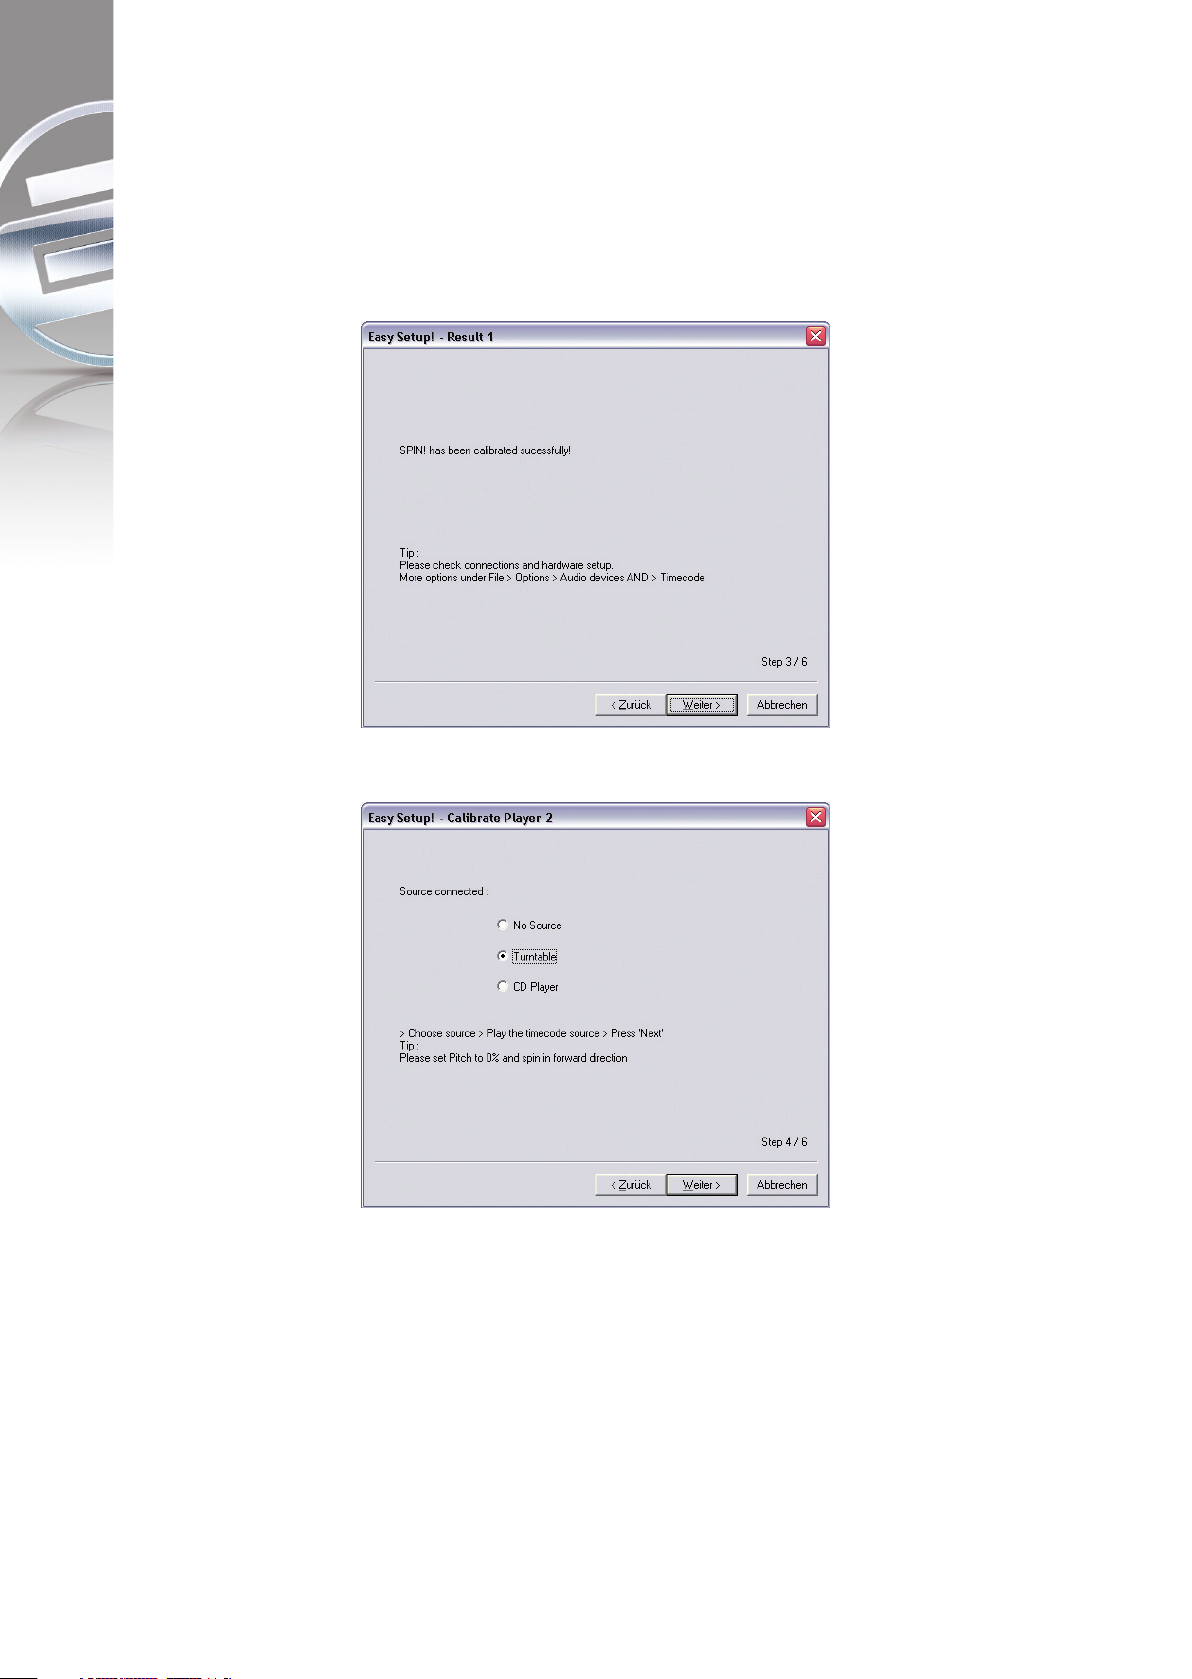
3. Calibration result for channel 1
After the successful calibration the message „Spin! has been calibrated
successfully“ should appear.
NOTE!
If the message „Spin! has not been installed properly“ should appear please
check your connections or change your turntables’ needles.
4. Calibration input 2
Carry out the same adjustments for your second playback device.
58
ENGLISH
Page 59
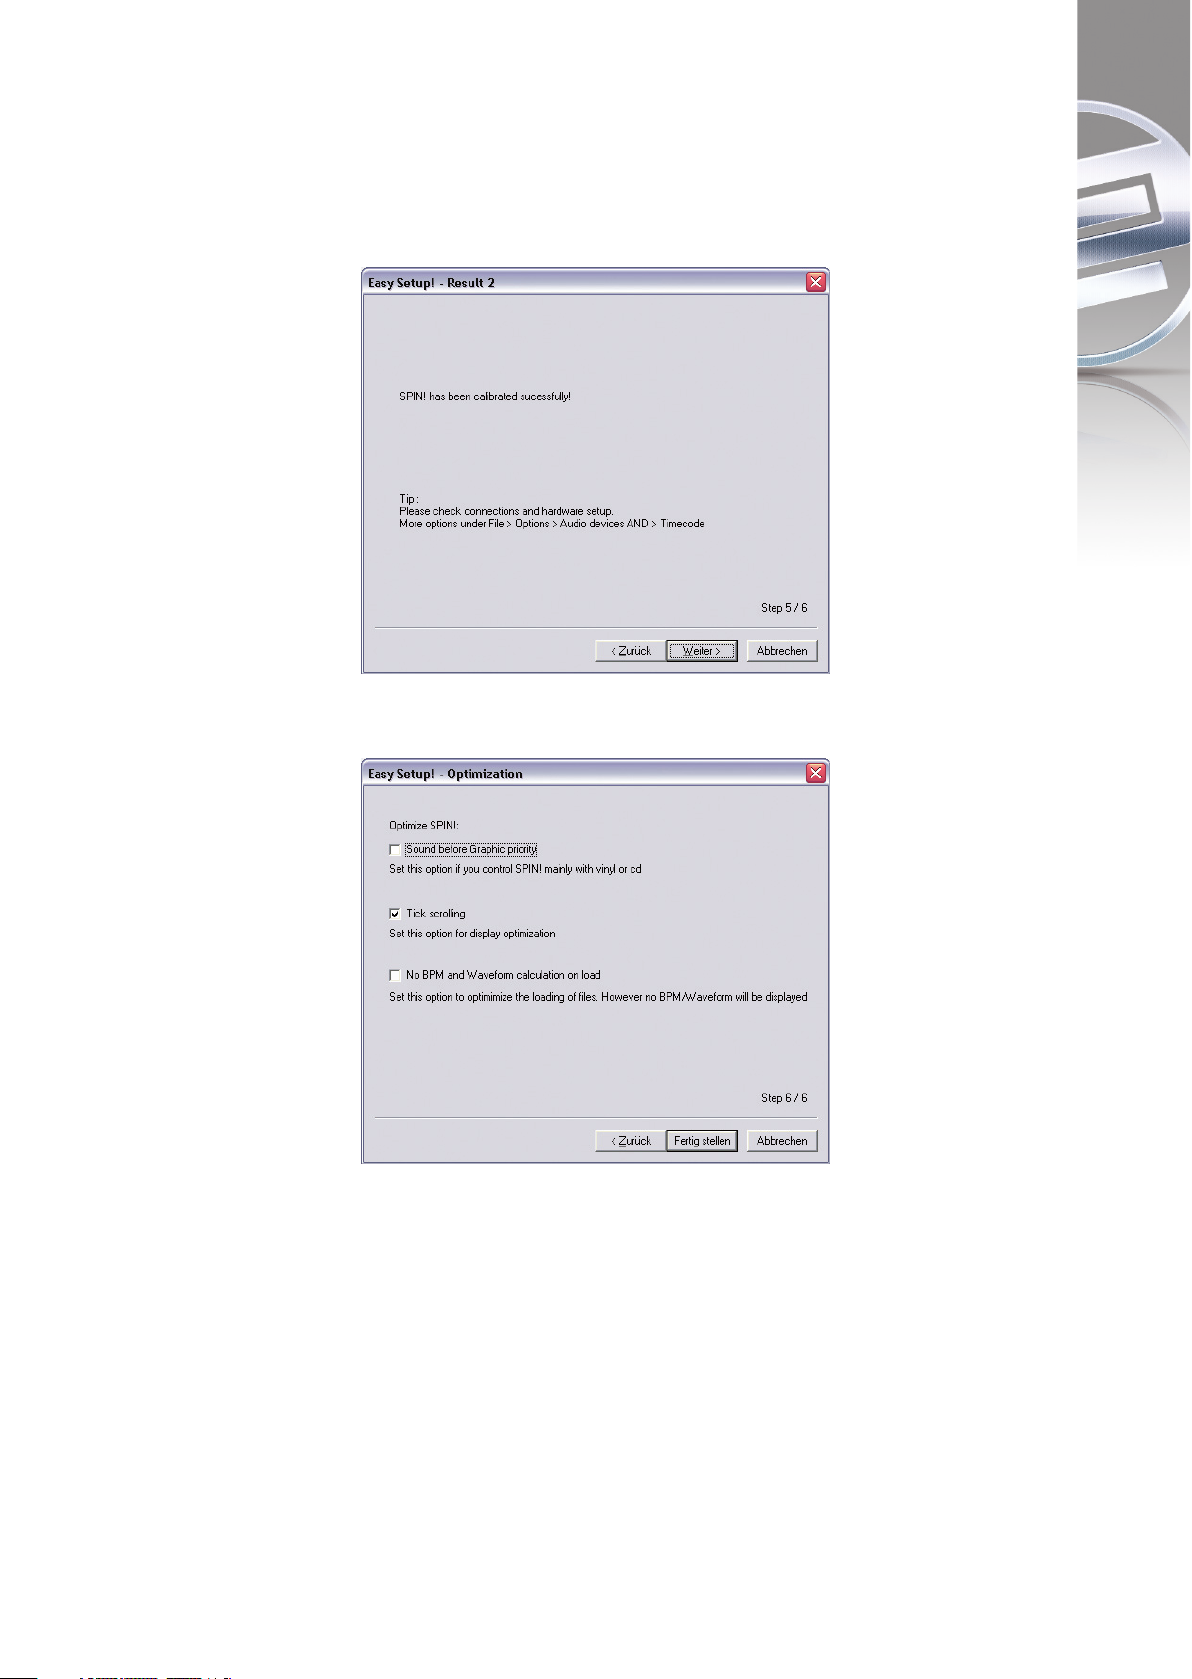
5. Calibration result input 2
A successful calibration result should appear here as well.
NOTE!
The calibration is only necessary for turntables. If CD players have been
connected this step will be skipped.
6. If the setup has been successful your entries will be confirmed.
Close the easy setup by clicking „Finish“.
NOTE!
In order to optimise Spin! there are three possibilities in the last installation
step. Additional information can be found in chapter 4.1 „Options“.
59
ENGLISH
Page 60

1.4 First software steps
Following, the first necessary steps in order to be able to work with the Spin!
software will be explained.
NOTE!
The manual can be found following the menu > Help > Manual
a) Importing music
First import all your music to the Spin! library. To do so go to the menu item
> Spin! library > Auto search.
It is possible to either search single files or directories automatically for music.
Confirm your choice with „OK“.
b) Loading tracks
After having imported all your music you can load single tracks into player 1 and
2. There are three possibilities to do so:
• Via mouse
Use the drag & drop function in order to load tracks.
• Via Trax select
On the Spin! timecode record's B-side the last groove has been conceived for
searching tracks. Drop the needle on this groove in order to browse the Spin!
library. Stop the record at the desired track and put the needle back to the
beginning of the record in order to load the desired track.
• Via keyboard
Activate the Spin! library via the hot key „V“. Browse the Spin! library with
the up/down cursors to the desired track and push the enter key in order to
load this track. The active player can be selected via the TAB key.
c) Activating the timecode mode
Activate the timecode mode via the „Vinyl“ button, right below the label monitor.
Now you can start mixing!
60
ENGLISH
Page 61

2. SOFTWARE GENERAL SURVEY
61
ENGLISH
12345678910111213141516171819 20 23 51
45
46
48
44
42b
47
40
39
49
21
52
43 42a
41
38 50
22
24
25
27
28
26
29
30
31
32
33
34
36
35
37
Page 62

1. Shortcut: New Spin! Library
Please see chapter 3.2.1 for further information.
2. Shortcut: Open Spin! Library
Please see chapter 3.2.2 for further information.
3. Shortcut: Auto Search
Please see chapter 3.2.7 for further information.
4. Shortcut: Save Spin! Library
Please see chapter 3.2.1 for further information.
5. Shortcut: Stop Spin! List
Please see chapter 3.4.2 for further information.
6. Shortcut: Play Spin! List
Please see chapter 3.4.1 for further information.
7. Shortcut: Loop Spin! List
The Spin! list will be repeated in an endless loop.
8. Shortcut: Shuffle Spin! List
A random playback of the Spin! list will be started.
9. Shortcut: Previous
Load the previous track from the Spin! list to your player.
10. Shortcut: Next
Load the next track from the Spin! list to your player.
11. Shortcut: Music Explorer / Audio Input
Please see chapter 3.5.9.1 for further information.
12. Shortcut: Spin! Library
Please see chapter 3.5.7 for further information.
13. Shortcut: Spin! List
Please see chapter 3.5.8 for further information.
14. Shortcut: Category View
Please see chapter 3.5.9 for further information.
15. Shortcut: X-Fader Match View
Please see chapter 3.5.9.2 for further information.
16. Shortcut: Master/Rec. Volume
Please see chapter 3.5.9.3 for further information.
17. Shortcut: Beat Match View
Please see chapter 3.5.9.4 for further information.
18. Shortcut: Options
Please see chapter 3.1.2 for further information.
19. Safe Mode
Please see chapter 3.4.4 for further information.
62
ENGLISH
Page 63

20. Beatmatch View
The beatmatch view shows you the peaks of both tracks – the two displays are
arranged vis-à-vis. It is possible to quickly recognize whether bass drums and
snares are running simultaneously. This way, if the two tracks have been
matched regarding the pitch, it is possible to easily and quickly synchronise two
tracks. The left player 1 is displayed green and the right player 2 is displayed grey.
21. Complete View
In the complete view you can see the complete waveform of a track. The
dramatic arch of a track can be recognized well and at the blink of an eye you
can also see where the intros and breaks are. The elapsed part of a track is
displayed green and the remaining part of a track is displayed grey.
22. Needle View
The needle view is a zoomed view of the waveform display. This way it is easy to
recognize bass kicks for example.
The zoom range can be adjusted from 2 – 16 beats. To do so click the right mouse
button in needle view and select the according value from the submenu.
Furthermore you can choose whether the left, right, stereo or both channels
mixed should be shown in the waveform. Select the according option with a right
mouse click in needle view.
There are two types for the needle view display:
• Waveform Scrolling
The waveform moves. A vertical line in the middle represents the needle.
• Tick Scrolling
The waveform remains still. The line (corresponds to the needle's position)
moves.
NOTE!
This option is system resources saving.
Select the corresponding option with a right mouse click in needle view.
23. Master
Adjust the master volume for player 1 and player 2.
63
ENGLISH
Page 64

24. Load Track
With this function it is possible to load single files to the player.
25. Bypass function
If the bypass function has been activated the input signal of the Spin! interface
will be directly routed through the software. This way it is possible to play a
normal record. Deactivate the bypass function for timecode use. The hot keys
are “N” (player 1) and “M” (player 2).
26. Label Monitor
The label monitor is a kind of virtual record that moves along according to the
timecode record. Each movement that is made with the record will be carried out
synchronously to the label monitor. The label monitor is a helpful marker for beat
juggling.
27. Gain Knob
The gain knob is, similar to a mixer, the final amplification of a channel. Tracks of
a different recording volume level can be adjusted to one another without
increasing the master volume.
NOTE!
Under > File > Options > Rider „BPM and Tools!“ > item “Auto BPM” you can
activate the auto gain function. This way the gain values of the tracks will
be adjusted automatically without any further need for manual adjustment.
64
ENGLISH
Page 65

28. Pitch Mode
You have the possibility to select three different pitch modes via the pitch fader
-29-. You can change the mode by clicking the -28- button or via the hot keys “A”
(player1) and “K” (player 2).
a) Speed Mode
If speed mode has been selected you can adjust the pitch like with a normal
turntable. Within the adjusted pitch range the current value is also shown in
the info view -48-, position -7-.
b) Master Tempo Mode (MT)
If the master tempo mode has been activated it is possible to change the
pitch via the pitch fader -29- ranging from -/+6% without influencing the
tone pitch. This means that the tone pitch remains the same when changing
the pitch.
NOTE!
The master tempo mode is only available for advanced and battle mode (see
point 31).
c) Key Mode
The key mode is the opposite of the master tempo mode. Here the tone pitch
is varied independent from the adjusted pitch.
NOTE!
The key mode is only available for advanced and battle mode.
29. Pitch fader
The pitch fader represents a conventional pitch fader of a turntable or CD player.
When in timecode vinyl mode -30- the fader moves synchronously to the
adjustments made with the turntable.
This depends on the adjusted pitch mode (see point 28). In deactivated timecode
mode the pitch fader can also be moved via the mouse.
65
ENGLISH
Page 66

30. Vinyl Timecode Activation
Via this button you can activate the timecode mode, which means that an
operation via timecode records and CDs becomes possible. If this button is
deactivated it is only possible to control the software via the mosue.
31. Spin! Mode button
By using this button you can choose between the playback modes Spin! Mode,
Classic Spin!, Advanced Spin! and Battle Spin!. The hot keys are “A” (player 1) and
“K” (player 2).
a) Classic Spin!
The audio files will be played from beginning to end, just like a normal record
(needle drop). Classic mixing and scratching is possible but without the loop,
cue points and effects options.
b) Advanced Spin!
In this mode needle dropping is also possible. But it is commensurate to the
vinyl record's length. So if you would like to jump to the middle of a song, you
have to place the needle in the middle of the record. Classic mixing and
scratching is possible, loops, cue points and effects are available.
c) Battle Spin!
No needle drop is available here. This means that the track will always
continue no matter where the needle is palced on the record. This mode is
appropriate for scratching even if the needle should skip. Battle mixing is
possible, loops, cue points and effects are available.
NOTE!
This mode is only for vinyl control.
32. Play/Pause button
By pushing this button you will start the previously selected track. This function
is only available in PC controll mode. The hot key is the space bar, depending on
the activated player (TAB button).
66
ENGLISH
Page 67
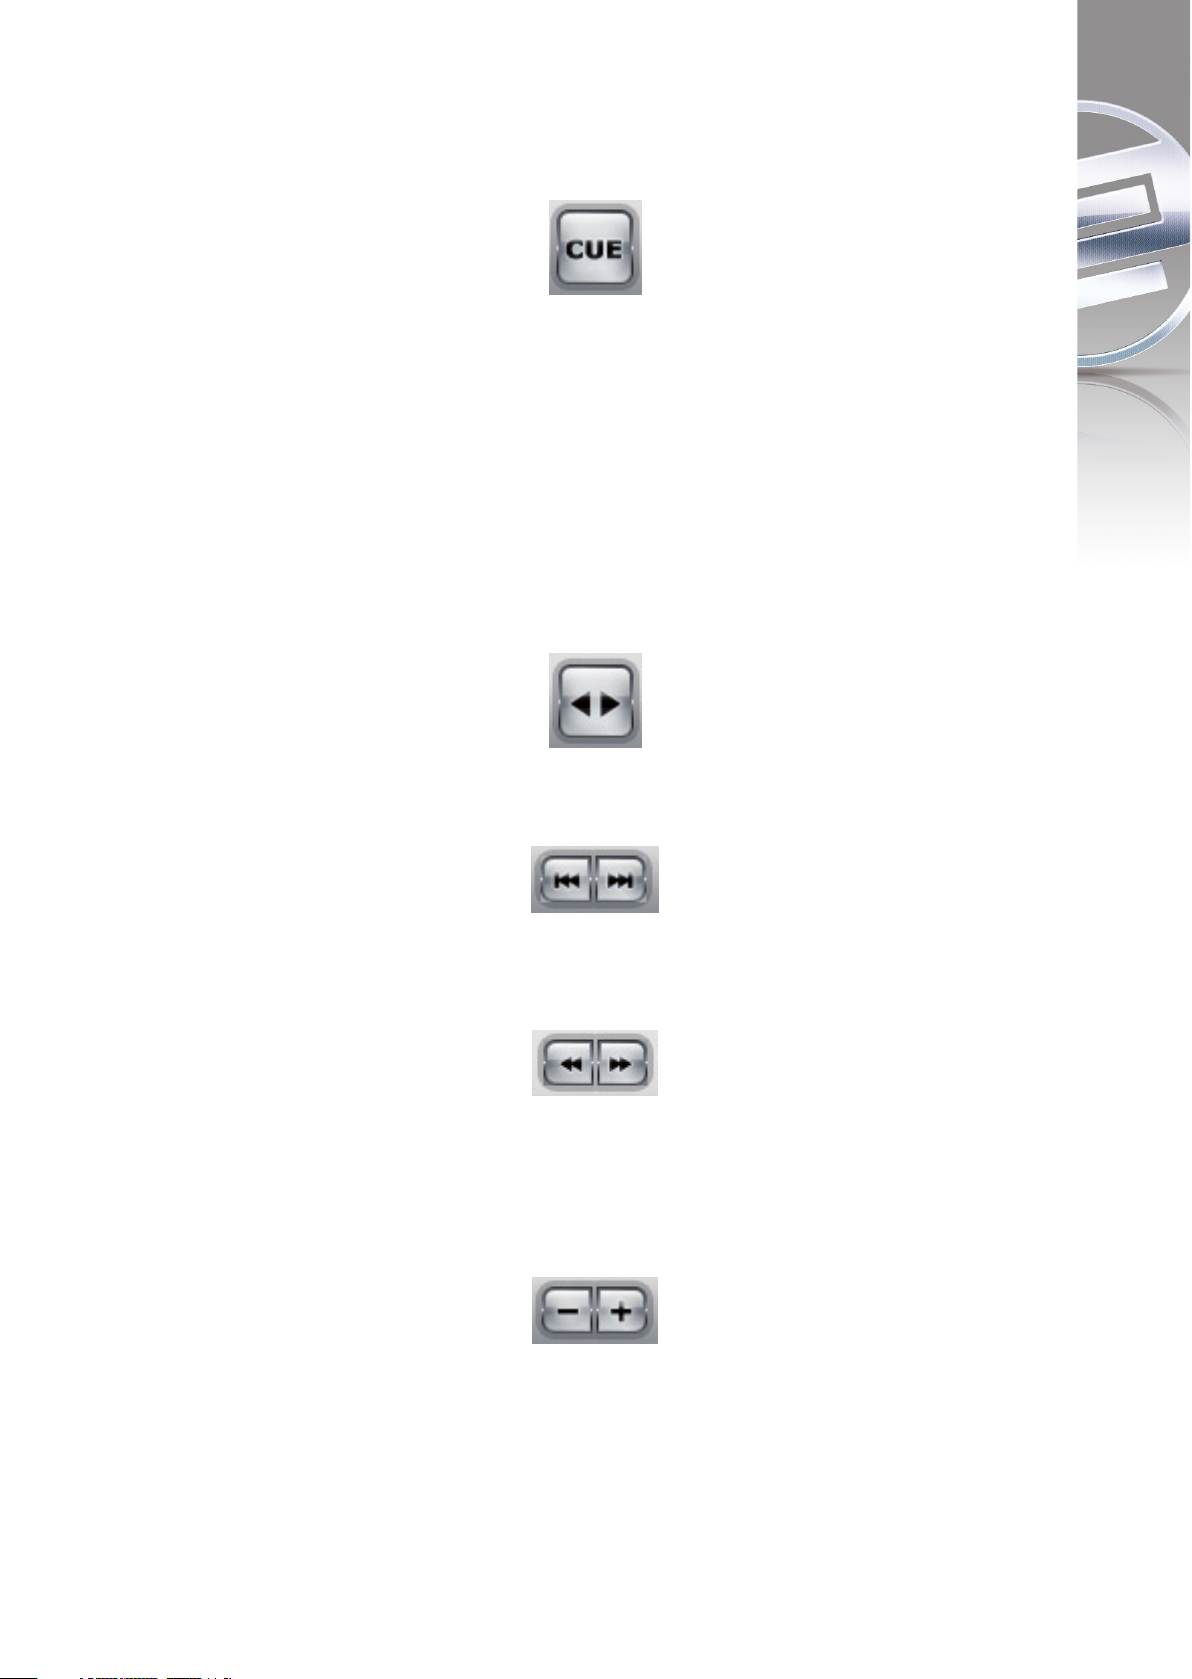
33. Cue button
By using this button you will change to cue mode. There are two possibilities in
order to set a cue point.
a) Cue pause
In playback mode push the play/pause button -32- in order to change to
pause mode. Now push the cue button in order to set a cue point.
b) Loop in
During playback or in pause mode you can push the loop in button in order
to set a cue point. The hot keys are “F1” (player 1) and “F9” (player 2).
34. Forward and reverse button
Via this button you can determine the playback direction of the track (forward or
reverse). In timecode mode this button shows the direction of the record.
35. Skip buttons
Push these buttons in order to load the previous or next track from your Spin!
library.
36. Fast Search buttons
Via these buttons it is possible to fast search within a track. In timecode mode
this function is deactivated.
37. Pitch Bend buttons
Activate the pitch vernier adjustment via the pitch bend button. By pushing and
holding the pitch bend buttons you can temporarily increase or decrease the
pitch. Release the button and the player will return to the pitch that has
previously been set via the pitch fader. By turning the jog wheels in PC control
mode this function is also available. In timecode mode this function is
deactivated.
67
ENGLISH
Page 68

38. Spin! Library
In this browser you will find all necessary information regarding the tracks of
your Spin! library. In order to directly select a track from the library click on the
corresponding track and move it via drag & drop to the desired player.
Alternatively you can also choose the track select function via the timecode
record (see chapter 1.4, item b).
Via the hot key “V” you can activate the Spin! library in order to navigate the
library via the up/down cursor buttons. By pushing the enter button you can
assign the track to the active player. Via the TAB button you can select between
player 1 and player 2.
1. Search Filter
In this field it is possible to search for a track by entering some letters. The more
precise the input the more precise the result will be.
2. Exact Match
If this option is activated only exact results corresponding to the entry will be
shown.
3. Selection Filter
Here you can define selection filters that should be searched for.
The following possibilities are at your disposal:
• All
Via this filter all categories will be observed while searching.
• File
If this filter is active only file names will be considered while searching.
• Title
If this filter is active only title names will be considered while searching.
• Artist
If this filter is active only artist names will be considered while searching.
• Album
If this filter is active only album names will be considered while searching.
• Genre
If this filter is active only genres will be considered while searching.
• Remix
If this filter is active only remix names will be considered while searching.
•Year
If this filter is active only years will be considered while searching.
• BPM
If this filter is active only BPM values will be considered while searching.
• Directory
If this filter is active only directory names will be considered while searching.
68
ENGLISH
2 3
1
4
Page 69

4. Categories
In this view all information regarding a track, like title, name or BPM is displayed.
You can define the categories on your own by clicking the right mouse button in
the category bar (columns properties).
The following items are at your disposal:
• Title
• Artist
• Album
• Genre
• BPM
• Duration
• Last Played
• Remix
• Rating
• Comments
•Year
• Track
• File
• Directory
• File Name
• File Extension
• Date Created
• Label
• Producer
•Key
• Counter
NOTE!
You can edit every bit of information regarding the track on your own by
double clicking the mouse in the corresponding category field. If you wish
to save these attributes (ID3 TAG) permantely for a track, go to the menu
and click on the corresponding track > Track > Save ID3 TAG attributes
Via a right mouse click in the Spin! library you can access a submenu that
includes the following options:
• Add Track (see 3.2.8)
• Auto Search (see 3.2.7)
• Track Preferences (see 3.3.1)
• Analyse BPM manually (see 3.3.3)
• Analyse BPM automatic (see 3.3.4)
• Select All
All tracks of the current Spin! library will be marked.
• Delete
Delete all marked tracks from the Spin! library.
• Add to Spin! list
The marked tracks will be added to the Spin! list.
• Group
Via this function you can assign or delete marked tracks of a previously
created group/playlist. For further information please alo see item 49.
• List View
Via this function you can change your Spin! library to the display mode „List
View“. In the list view only the title is displayed. This way various tracks can
be displayed in this list without the need for scrolling.
• Detail View (default)
All shown categories regarding a track are displayed in this view.
• Column Properties
As already explained, here you can fade in and out single categories.
69
ENGLISH
Page 70

39. Delay effect
First push the effect activation button -39- above the delay turning knob. Now
the delay effect is activated. By turning the delay turning knob you can adjust
the delay effect's intensity. Push the effect activation button again in order to
deactivate the effect.
40. Filter effect
First push the effect activation button -39- above the filter turning knob. Now the
filter effect is activated. By turning the filter turning knob you can adjust the
filter effect's intensity. Push the effect activation button again in order to
deactivate the effect.
41. Flanger effect
First push the effect activation button -39- above the flanger turning knob. Now
the flanger effect is activated. By turning the flanger turning knob you can adjust
the flanger effect's intensity. Push the effect activation button again in order to
deactivate the effect.
42. Beat Loop / Auto Loop function
Your Reloop Spin! software disposes of an intelligent beat loop function. With
this tool it is possible to create beat matching loops with the push of a button,
depending on the selected bar. This way it is not necessary to set the in and out
points manually. Select the desired bar via the beat loop bar buttons -42 b(1/2 – 16 bars). Activate the beat loop via the beat loop button -42 a- (when in
beat loop mode this will flash). Deactivate the beat loop via the play/pause
button -32-.
Operation via keyboard:
• When in playback mode push “F4” (player 1) or “F12” (player 2) in order to
activate the beat loop mode
• Via the keys “F5”/”F6” (player 1) and “F7”/”F8” (player 2) you can prolong
or shorten the loop respectively
• Push the space bar in order to quit the auto loop (select the active player via
the TAB button)
43/44. Manual Loop function
• In order to set a loop manually push the loop in button -44- at the desired
starting point and the loop out button -44- at the desired ending point.
• By pushing this button again you will quit the loop
• By pushin the reloop button -43- you will return to the last set loop
70
ENGLISH
Function Player 1 Player 2
Loop In F1 F8
Loop Out F2 F10
Reloop F3 F11
Page 71

45. Crossfader
The crossfader -45- is just intended for the PC control mode. When in regular
timecode mode (external mixer) you will not need the crossfader. Via the fader
you can crossfade from channel 1 to 2 and vice versa.
NOTE!
When in timecode mode the crossfader should be in the middle position.
46. Beat Match function
The beat match function is a handy helping tool in order to match the pitch of two
different tracks with the push of a button. You can either match the right player
with the left player or you can match the left player with the right player .
47. Cue points
It is possible to set up to 6 cue points per track. They will be permanentely saved
automatically until they are replaced by new ones.
• In order to set a cue point via mouse push the right mouse button at the
desired time.
• In order to call up a cue point a click of the left mouse button suffices.
• If a cue point has been saved you will see a thick green mark on the
corresponding cue button.
• Set the cue point for player 1 via the numbers 1 – 5 (only 5 cue points per
player) and for player two via the numbers 6 – 0.
• If you push the according number again the cue point will be called up (hot
cue).
71
ENGLISH
Beat Match Shortcut
Player 1 Z
Player 2 X
Page 72
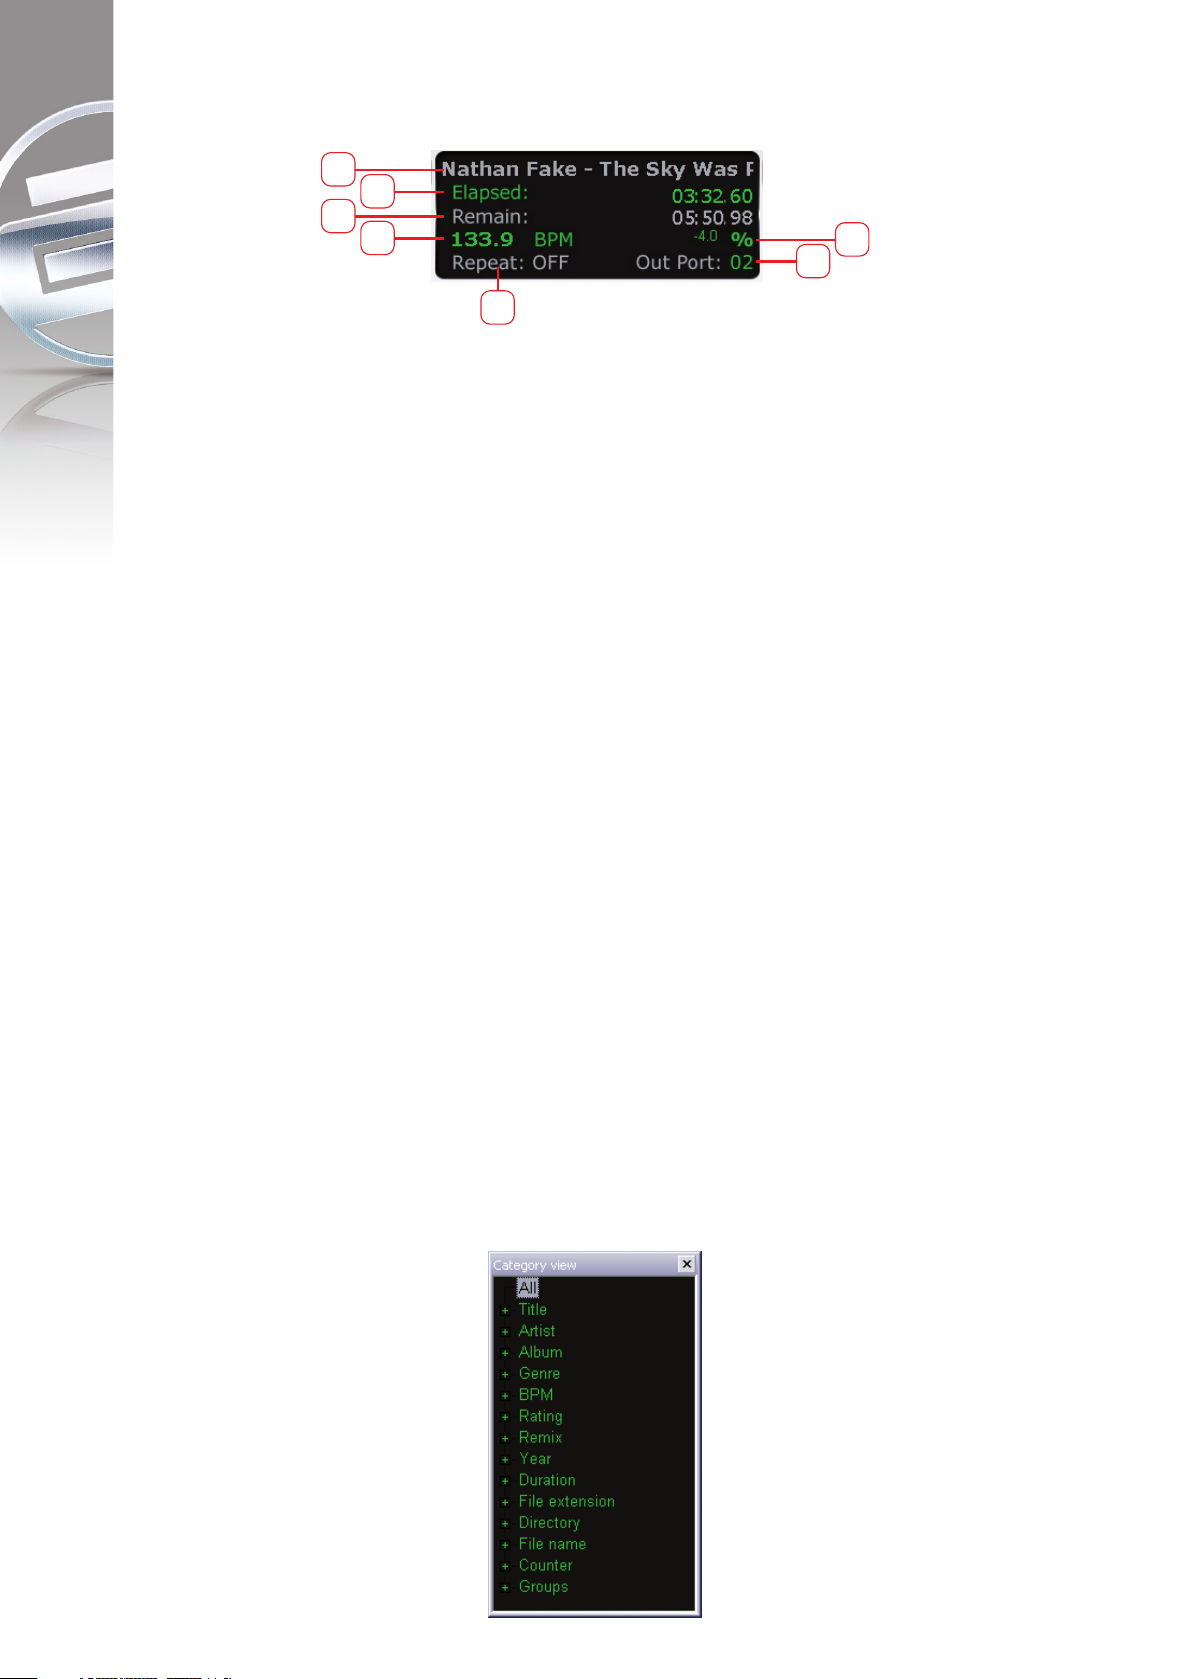
48. Info View
1. Title
The title of the current track is displayed here. With a click of the right mouse
button you can select whether only the title, only the artist or both should be
displayed.
2. Elapsed
The elapsed time of the current track is shown here
(minutes/seconds/frames).
3. Remain
The remaining time of the current track is displayed here
(minutes/seconds/frames).
4. BPM
The current BPM value is shown here.
5. Repeat function
Here you can (de)activate the track repeat function. If the repeat function is
activated the loaded title will automatically be repeated.
6. Out port
Here you can see which output signal of the interface is assigned to the
player. If set up correctly “01” should be displayed on the left player and “02”
on the right player. You can change the port by clicking on it.
7. Pitch
Here the current pitch value is displayed.
49. Category View
The category view is a kind of fast search filter for the Spin! library. You can
choose whether the Spin! library view should be displayed alphabetically, sorted
according to years or BPM values for example.
Under the point “groups” you can carry out playlists or sortings. In order to
create a new group push the right mouse button in category view on the “Add
Group” item. Now you will be asked to enter a name – confirm by pushing the
enter button.
72
ENGLISH
1
2
3
4
5
7
6
Page 73

50. Music Explorer/Audio Input
The music explorer is a file browser in tree view just as you know it from the
Windows explorer. Here you can search for files in your work centre or your
network environment. Furhtermore here you can also find the Spin! interface
under the item “Audio Input”. Each input is listed there. Via drag & drop it is
possible to drag single inputs onto the player for an easy assignment.
NOTE!
Due to the pre-settings your inputs have already been set correctly. Only for
a recording via microphone it is necessary to assign the input “0: Reloop
Spin!-Interface 1” to a player.
51. Mic Rec function
Due to the integrated mic rec function (Mic Spin!) you can record a sample via
microphone that can later be used for scratching for example.
Follow these steps:
• Sample recording
– Under Audio Input (music explorer) assign the input “0: Reloop Spin!-
Interface 1” via drag & drop to one of the players
– Adjust the volume level via the mic volume knob
– Push the Rec button
– A save dialogue will appear; enter name and place where the sample should
be stored
– After pushing “save” the recording will start; stop the recording by pushing
the rec button once more
• Mic Spin! function (playing and scratching a sample)
– Via drag & drop assign a desired track from the Spin! library or the recorded
sample to a player in order to manipulate it via record
NOTE!
The mic input is linked to the input 1. As soon as you connect a microphone
the phono/line input 1 will be deactivated. So if you wish to record a sample
during a mixing session make sure that player 2 is currently playing.
Disconnect the microphone after recording in order to be able again to
control player 1 via record.
73
ENGLISH
Page 74

52. Monitor function
Via the software monitor function you can monitor a track. This function is
unnecessary when using an external mixer as you would monitor a track via the
mixer's cue function.
3. MENU NAVIGATION
In this chapter all menu items will be described step by step.
3.1 Menu item file:
3.1.1 Options:
In this option menu you can carry out a variety of adjustments. Further
information regarding this matter can be found in the chapter “Options” in this
manual.
3.1.2 Quit Spinning
Here you can quit the Reloop Spin! software.
3.2 Menu item Spin! library
With the Reloop Spin! library you can manage your audio files. If desired it is
possible to create and store various libraries. You can import music to the Spin!
library in order to obtain a central collecting station of your files. It is possible to
edit and export new libraries and you can also import libraries (for example
iTunes playlists).
3.2.1 New
Here you can create a new, empty library that can be filled with audio files as
required.
3.2.2 Open
Opens an existing library.
3.2.3 Save
Saves your library.
3.2.4 Save as
Saves your library under a different name without deleting the previous one.
3.2.5 Import
Imports files [ iTunes (*.xml) / m3u Files (*.m3u)]
3.2.6 Export
Exports files [m3u Files (*.m3u)]
3.2.7 Automatic search
In order to import a bulk of audio files you can comfortably browse your hard
disc or if required single directories via this function.
3.2.8 Add track
With this function you can add single tracks to your library.
3.2.9 Select all
With this function you can select all tracks from a library.
74
ENGLISH
Page 75

3.2.9.1 Delete
With this function it is possible to delete files from your current library without
deleting them from your hard disc.
3.3 Track menu
3.3.1 Track preferences
You can carry out track-specific adjustments here.
3.3.2 Save ID3 TAG attributes
If you want to change ID3 TAG attributes you can save these.
3.3.3 Analyse BPM manually
Via this tool you can manually determine the BPM value. This can be achieved by
either clicking on the space button with the mouse or by pushing the space bar.
The longer you push the according button to the beat the more precise the
calculated value will be.
3.3.4 Analyse BPM automatically
Via this function the BPM value will be calculated automatically although beats
can not be recognized by the software if the beat does not stand out enough
from the rest of the track in order to be identified as rhythm element. 4/4 beats
are ideal for the Reloop Spin! software.
NOTE!
Several tracks can be analysed automatically. If a track is loaded to a player
for the first time the BPM value will automatically be determined and saved
permanently.
3.3.5 Delete tracks permanently
Via this function it is possible to delete tracks permanently.
ATTENTION!
In this case the track will be deleted permanently from your hard disc and
not only from the library.
3.4 Spin! list menu
The Spin! list is a kind of “party” playlist. The featured tracks will be played and
crossed over alternately from player 1 and player 2. This function is ideal if you
want to operate the software in stand-alone mode without a DJ.
3.4.1 Play Spin! list
Starts the playback of a Spin! list.
3.4.2 Stop Spin! list
Stops the playback of a Spin! list.
3.4.3 Add to Spin! list
Adds the currently selected track to the Spin! list.
NOTE!
You can also add tracks to the Spin! list via drag & drop.
3.4.4 Safe mode
If the safe mode is active it is not possible to load a track to the currently active
player. This prevents unwanted loading of new music when using a player.
75
ENGLISH
Page 76

3.5 Menu Spin! workspace
In this menu you can fade in and out single elements in order to individually
arrange the view.
3.5.1 Workspace arrangeable
If this is activated it is possible to rearrange and close single window elements.
3.5.2 Full Screen view
Activates the full screen view. Alternatively this can be carried out via the key
combination ALT+S.
3.5.3 Menu Bar view
Fades the menu bar in and out.
3.5.4 Shortcut view
Fades the shortcut view in and out.
3.5.5 Info view
Fades the info view in and out.
3.5.6 Preview
Fades the preview bar in and out.
3.5.7 Spin! library view
Fades the Spin! library in and out.
3.5.8 Spin! list view
Fades the Spin! list in and out.
3.5.9 Category view
Fades the category view in and out.
3.5.9.1 Music Explorer/Audio Input
Fades the music explorer / audio input view in and out.
3.5.9.2 X-fader match view
Fades the X-fader match view in and out.
3.5.9.3 Master/Rec volume
Fades the master/rec volume view in and out.
3.5.9.4 Beatmatch view
Fades the beatmatch view in and out.
3.6 Help menu
3.6.1 Easy setup
Via this you can call up the easy setup.
3.6.2 Manual
Via this you can call up the manual as PDF file.
3.6.3 www.reloop-spin.com
Via this you can visit the web site reloop-spin.com. Visit this site frequently in
order to obtain current downloads or information.
3.6.4 Configuration log
Via this a current system-configuration overview will be created as text file. This
could be required when trying to solve possible problems.
3.6.5 About Spin!
Here the current Spin! version is displayed.
76
ENGLISH
Page 77
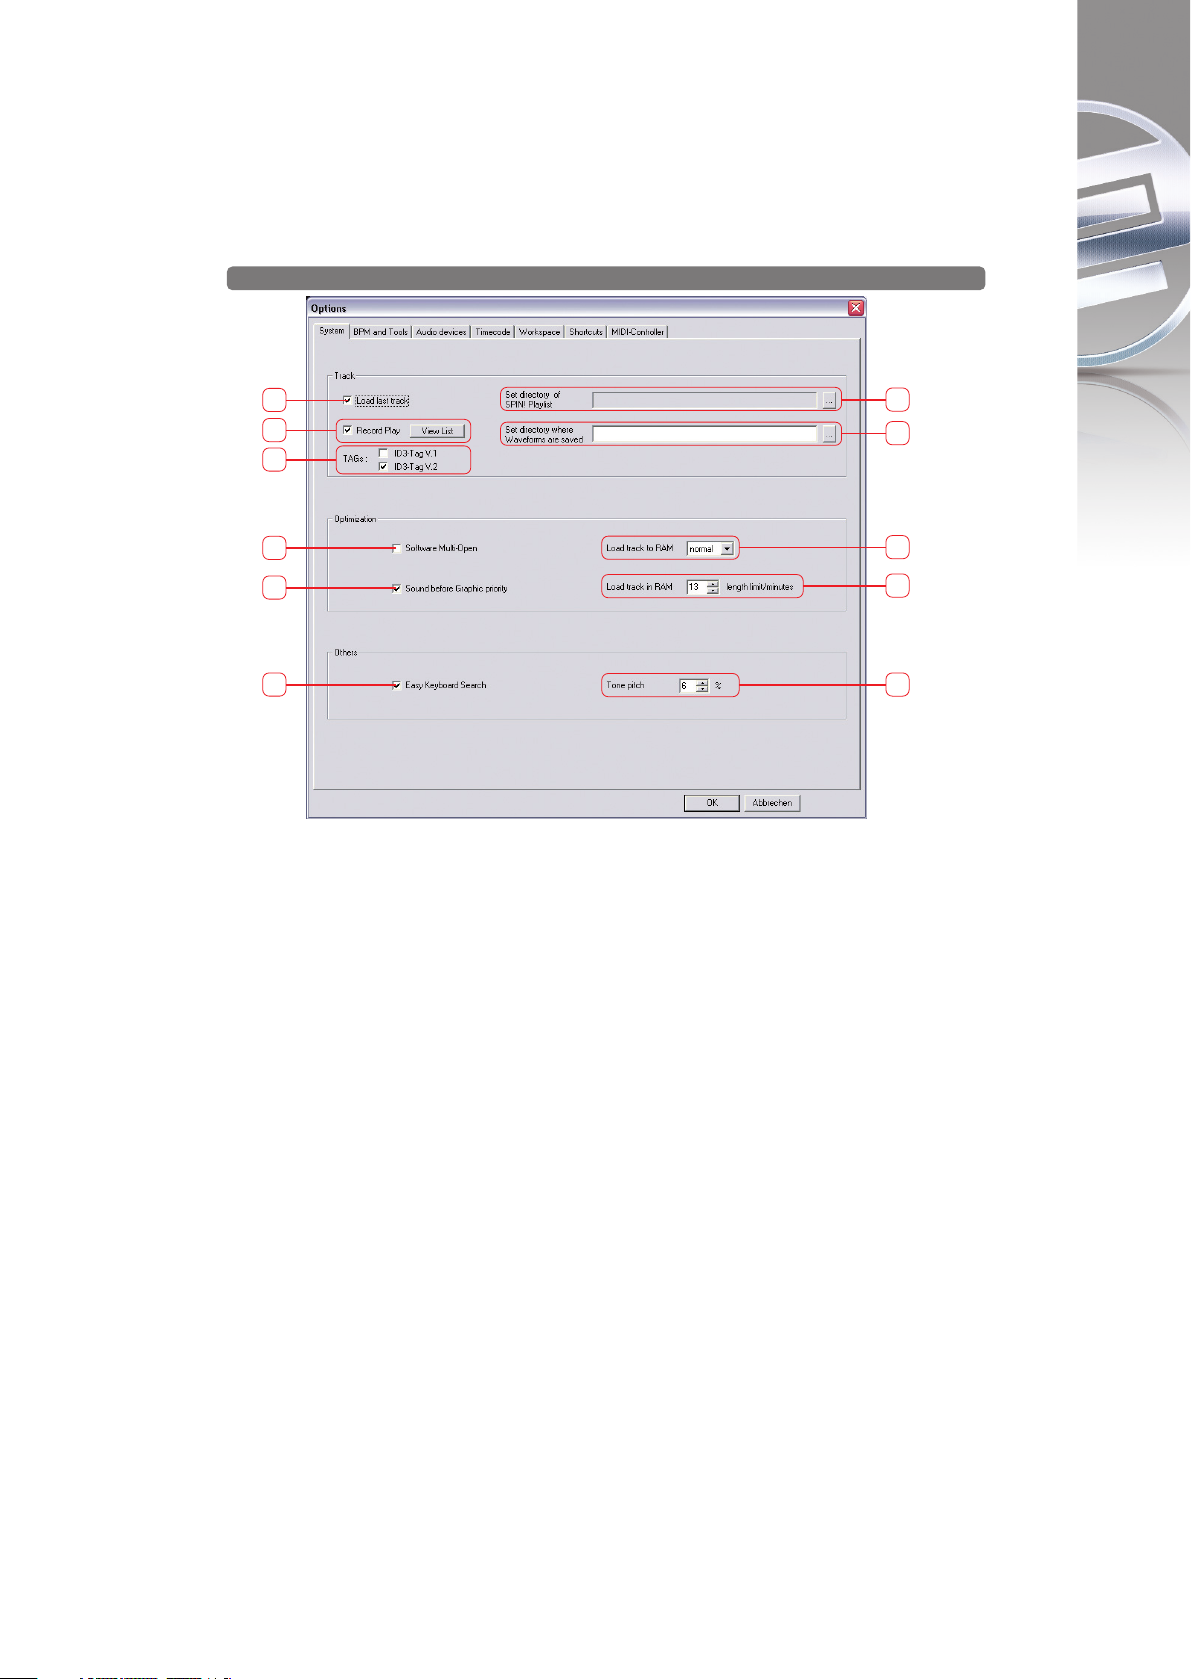
4. ADJUSTMENTS
4.1 Options
You can reach the options menu under
> File > Options.
4.1.1 System
1. Load last track
If this option is activated the last played track and Spin! library will be loaded
when starting the software.
2. Record play
If this function is activated all played tracks will be saved in a list with date and
time. By pushing the “View List” button you can call up this list.
3. TAGs
Here you can select which ID3 TAG version should be displayed. Only one optoin
should be selected here.
4. Play list directory
Here you can determine the path where the Spin! list should be saved/loaded.
5. Waveform directory
Here you can determine the path where the waveform peaks should be saved.
6. Software multi open
If this function is activated Reloop Spin! can be opened several times at once
(not recommended/depends on ASIO).
7. Sound before graphic priority
If this function is activated the sound performance will be assigned before
graphics. This is an advantage when using older or inefficient computers (when
experiencing dropouts for example).
77
ENGLISH
1
2
3
6
7
10
4
5
8
9
11
Page 78

8. Load track to RAM
Here you can determine how fast the track should be loaded to RAM
(slow/normal/fast).
9. Load track in RAM/min.
Here you can determine the maximum track length in minutes that should be
loaded to RAM.
10. Easy keyboard search
If this function is activated you can browse tracks in the Spin! library and music
explorer by simply typing in a letter.
11. Tone pitch
Here you can adjust the percentage that the tone pitch should be played in (also
see cahpter 2, item 28).
4.1.2 BPM and tools
1. BPM range
Here you can adjust the BPM range that the software should use to calculate.
The smaller the difference the faster and more precise the Spin! software can
calculate. By default the range is 78 – 150 BPM.
Recommended settings:
• All-Round 78 – 150 BPM
• Hip Hop 80 – 120 BPM
• House/Techno 110 – 150 BPM
2. Show pitch value
Activates the pitch display (default setting and recommended).
3. BPM and waveform
If this option is activated Spin! determines the BPM and waveforms when loading
a track.
78
ENGLISH
1
2
3
4
5
6
7
8
9 10
Page 79

4. Auto gain
If this function is activated the gain values of tracks with a different volume level
will be matched. This way a manual matching via the gain knob -29- is no longer
necessary.
5. BPM match
Activates the auto match function when loading new tracks.
NOTE!
Via the beat match button -46- you can also match each side with the other.
6. Auto cue
Via this you can turn the auto cue function on/off.
7. First cue point search
Via this you can determine the time frame in seconds for the first cue point
search.
8. dB sensitivity
Here you can adjust the sensitivity in decibel and corresponding threshold level
that should be used for setting a cue point.
9. Fading time
Here you can adjust the crossfading time for the auto mix function of the Spin!
list.
10. End of track warning
Here you can adjust the optical end of track warning-time in seconds.
4.1.3 Audio devices
1. Output device
Here you select the Reloop Spin! interface and it should be displayed here.
79
ENGLISH
1
2
3
Page 80

2. Out ports
Here you can determine the number of outputs. A “2” should be entered here.
3. Setup
Here you can adjust the single outputs for the left and right side. Furthermore
you can adjust the buffer size via the button “Control Panel” in the ASIO setup.
NOTE!
All audio device settings have been automatically adjusted in the easy
setup; this way you do not have to carry out any changes here.
4.1.4 Timecode
In this detailed timecode menu several adjustments for player 1 and player 2 can
be carried out although they are not necessary if the easy setup was successful.
You should carry out advanced settings for optimazation and solving problems
only.
1. Timecode from
Here you can set the timecode source, vinyl or CD.
2. Spin! mode
Here you can select the Spin! mode (see chapter 2, item 31).
3. Audio device
Here the ASIO driver should be selected.
4. Audio source
Here you can assign the corresponding connections of your Spin! interface.
The default settings are:
Player 1: 0: Reloop Spin!-Interface 1 – Reloop Spin!-Interface 2
Player 2: 2: Reloop Spin!-Interface 3 – Reloop Spin!-Interface 4
80
ENGLISH
1
2
3
4
5
6
7
8
9
10
11
12
13
15
18 17 14 16
Page 81

5. Timecode quality
Here the timecode's signal quality is displayed in percentages. Fluctuations or a
percentage that is too low could be caused by dirty or worn out needles. Ideally
the value should be between 90 – 100%.
6. Adjust gain
Here the decibel value of the input signal for the left and right side can be
adjusted. The virutal LED chain serves as modulation display. This value should
only be changed manually when trying to solve a problem. In the easy setup the
ideal gain value will be configured automatically for you.
7. Direct phono input
Here you can define whether a turntable has been directly connected to the
computer. When using the Spin! interface (line output) a “No” must be displayed
here.
8. 45 RPM
Here you can determine whether the timecode records should be played at 45
RPM (Rounds Per Minute). Default setting and usual is 33 RPM.
9. Left/right inverse
When using certain needles or when having calibrating problems it could be that
the left and right side have been mixed up. For the software sector this can be
re-adjusted via this option.
10. Phase inverse
Via this function you can invert the phase. Some cartridges, for example the
Shure M44-7 or certain CD players need this phase inversion in order to run
without any problems.
11. Timecode start delay
Here you can determine the starting point of your timecode record. As usually
the first third of the record is likely to be worn out first it is possible to offset the
starting point to a desired position. To do so place the needle on the desired
starting point and push “Save Position”. The value is displayed in milliseconds.
12. Noise Level/Noise Filter
These two values are only intended for optimisation and for solving problems.
Due to easy setup these values have already been configured.
• Noise Filter:
When experiencing grounding problems or something similar you can
increase the noise filter to 150 for example in order to improve the input
signal. The louder the noise the higher the frequency should be raised.
ATTENTION!
The timecode's precision could decrease if the noise filter is set too high.
• Noise Level:
Here you can adjust the noise level in decibel. For a better sensitivity the
value should be increased. Default setting is 40 dB.
13. Calibration Display
Here the timecode signal is displayed optically. Ideally the signal should look like
a sinus curve.
If the signal is distorted (square wave) you should check your needles or adjust
the settings as described above.
81
ENGLISH
Page 82

14. Circle Diagram
Alternatively the calibration display can be shown as a circle diagram. To do so
activate this button.
15. Calibrate Test
Push this button in order to calibrate the respective player automatically with
the pre-set options.
16. 1 Turntable Mode
If you wish to use only one turntable you should activate this mode in order to
control both players. Make sure that the same interface input is selected under
“Audio Source” (see item 4).
TIP!
You can choose between the players via the TAB button.
17. More Options
Activate this button in order to fade in the advanced options (noise level / noise
filter and 1 turntable mode)
18. Apply
Push this button in order to apply the adjustments. Then push “OK” in order to
quit the menu.
4.1.5 Workspace
1. Resolution Selection
The available resolutions are listed here. Select the according resolution for your
monitor.
2. Apply
Adopt the settings via the apply button.
82
ENGLISH
1
2
Page 83

4.1.6 Shortcuts
1. Shortcut Setting File
Here you can select the hot key layout for your keyboard.
The following options are at your disposal:
• Spin_keyboardQWERTZ
(Germany, Austria, Switzerland, Hungary)
• Spin_keyboardQWERTY
(America, England, Netherlands, Italy, Scandinavia, Poland, Spain, Portugal)
• Spin_keyboardAZERTY
(France, Belgium)
2. Layout Preview
Here the keyboard layout is displayed in a preview.
83
ENGLISH
1
2
Page 84

4.1.7 MIDI Controller
1. Activate MIDI
Via this you can activate the MIDI operation for Spin!
2. MIDI Device
Here you can find a list of compatible MIDI controllers, for example Reloop Digital
Jockey (www.digital-jockey.dj).
3. MIDI Setup File
The pre-configured MIDI configuration files are listed here.
4. Omni Mode
If this option is activated Spin! will receive on all channels.
HINWEIS!
Please check regularly for Spin! updates under www.reloop-spin.com in order
to download new MIDI mappings for example.
84
ENGLISH
1
2
3
4
Page 85

4.2 Auto Search
Via the auto search function you can easily locate music files on your hard disc
and add them to the Spin! library.
1. Path
The currently selected path is shown here.
2. Select Directory
Via this function you can select single files.
3. Add Directory
If this option is activated a directory will be added.
4. All Drives
Select this option in order to select all drives from your work space and search
for tracks.
5. Subdirectories
If this option has been selected subdirectories will also be considered when
searching.
6. No Duplicate
If this option is activated the already added tracks will not be added again to the
Spin! library when searching in the same directory for a second time.
7. Advanced Search
Categories such as artist, title or genre can be filtered here while searching.
8. Exact Search
If this option is activated only exact matches will be added.
9. All Fields Search
If this option is activated all category fields will be searched.
10. Initialize Spin! Library
If this option is activated the Spin! library will be initialized.
85
ENGLISH
1
2
4
3
5
6
7
8 9 10
Page 86

4.3 Track Preferences
In the track preferences you can activate these settings and data of a track. You
can reach the track preferences under the menu item:
> Track > Track Preferences
or by clicking the right mouse button on the track in the Spin! library.
4.3.1 Information
Here you can see and edit various information like title, artist or label for
example. Additionally it is possible to save comments to a track.
4.3.2 File
Here you can see information regarding saving location and audio quality.
86
ENGLISH
Page 87

4.3.3 Track Settings
Here you can see and edit settings such as starting and ending points, loops or
pitch.
4.3.4 Volume
If desired you can preset gain, pan or fade in/out for a track.
87
ENGLISH
Page 88

4.3.5 Lyrics
If desired you can enter and see song lyrics here.
4.3.6 Cover
Here you can upload and see cover artwork for a track.
88
ENGLISH
Page 89

4.3.7 Equalization
Here you can adjust the EQ settings.
4.3.8 Cue Points
Here you can pre-define up to 10 cue points if required.
89
ENGLISH
Page 90

4.3.9 Loop
Here you can pre-define up to 10 loops if required.
5. FAQ
5.1 Do I need a special stylus in order to use Spin!?
No. Spin! will work with every needle. Still, some things should be considered to
guarantee a smooth performance:
Your needle should neither be worn out nor be dirty/dusty. If you use a
headshell-mounted system please be sure that it is aligned properly.
Also its output voltage should be as high as possible to ensure a „clean“
timecode stream. This is why we bundled the Ortofon Digitrack System with
Spin!: due to its „Concorde“-design you dont have to make any adjustments and
its very high output (8mV) makes sure that the timecode stream is always nice
and clean.
5.2 Can I buy the timecode vinyl records separately?
Yes, of course. Timecode vinyl records wear out quicker than normal vinyl
because you don't change them after every song. Besides the normal wear and
tear your records get while being used, oil or grease will degrade the quality of
your timecode vinyl. Because of that your dealer has spare records. They come
in black, white and atomic green.
5.3 Why won't my computer recognize the Spin! interface?
There may be several reasons. We would recommend to unplug all your USB
devices to eliminate conflicts with USB soundcards for example.
Also we advise you not to use a hub to connect Spin! to your computer. If
possible, always make a direct connection.
90
ENGLISH
Page 91

5.4 Why is there no timecode signal?
If Spin! can not detect a timecode signal during installation please make sure you
do not have a microphone plugged to the interface (the mic input disables
input 1).
If your turntables are connected to the interface and there is no mic plugged in
and Spin! can not read a timecode signal then proceed as follows:
Go to „Options/ Timecode“ and check if any waveforms are displayed. If there is
only one waveform displayed then there is a faulty connection between your
needle and the interface. In order for Spin! to work it needs to read TWO
waveforms. Just to clarify: that means TWO waveforms PER PLAYER, shown in
red and white.
First, swap your needles. If the problem migrates along with your needle to the
second turntable then your needle is either dirty/ broken or the contacts are
dirty. Use a q-tip and some cleaning alcohol to clean both the contacts on the
cartridge and in the tonearm. Please do NOT spray contact spray or anything
else into the tonearm!
You can check whether you get a stereo signal out of your turntable by playing
a normal record and using the panorama knob on your mixer.
If both needles work on one of the turntables but not on the second turntable
then you probably have a bad RCA cord. Please replace it. If the audio cords are
permanently attached to your turntable then contact your specialized dealer /
technician and ask for help.
5.5 Why do I only hear a high-pitched tone?
You're listening to the timecode stream because you activated „Vinyl Bypass“,
located right above the Label Monitor. „Vinyl Bypass“ allows you to play your
normal records. In your case, you're playing the timecode vinyl. Deactivate „Vinyl
Bypass“ and the control vinyl will play your digital music.
5.6 Can I play my regular records when I am using Spin!?
Absolutely. Activate „Vinyl Bypass“ (right above the Label Monitor). The signal
coming from your records is now made audible. Use the following hotkeys: „N“
will toggle Bypass for the left player, „M“ for the right.
5.7 Why is the music playing backwards?
Your turntable is playing normally yet your music is playing backwards? Your
turntable may be hooked up incorrectly.
Your cables are mixed up- the left and right channels of your turntable are
reversed. Simply swap them and everything should be back to normal.
If for some reason you can't swap the cables then go to „File-> Options->
Timecode“ and check the box next to „Left/Right Inverse“. Basically this has the
same effect as swapping your cables would have, however, it is always a better
to have your equipment connected correctly.
5.8 Can I play my records at 45 RPM instead of 33 RPM?
Yes. Go to „File -> Options -> Timecode“ and check the box next to „45 RPM“.
Now re-calibrate Spin! (make sure that the turntable's pitch fader is set to „0“).
91
ENGLISH
Page 92

5.9 Why are both tracks being played on the same channel?
Both players are routed to the same OUT PORT. In the Info Screen, click on the
number after „Out Port“ to change the routing. Typically you will want to route
the left channel to Port 1 and the right one to Port 2.
5.9.1 Why is there no signal?
There are several possibilities, please check the following:
• Is your mixer/amp turned on? Are gain, line and master controls turned up?
• Did you choose the correct input on your mixer (phono instead of line)?
• Is vinyl control activated? (Button „Vinyl“ below the Label monitor has to be
green)
• Is Spin! correctly configured?
• Have all the cords been plugged correctly?
• Does Spin! recognize the timecode?
• Is a microphone plugged in? Unplug the mic, it blocks Input 1.
• Is the correct Out Port set? Left Player: Out Port 1, right player: Out Port 2.
5.9.2 Can I use the interface as a sound card?
You can use the Spin! interface as a mobile USB sound card with two stereo
inputs and two stereo outputs. Also it features a microphone input with
adjustable gain. If you use the mic input it will work instead of stereo input 1.
5.9.3 What do I have to observe if I use a Shure M44-7?
This cartridge will need a phase inversion. Go to „File -> Options -> Timecode“
and tick the box next to „Phase Inverse“.
5.9.4 Why is the music skipping a beat now and then?
The cause may be a hard disc that is too slow. One solution is to set the setting
“Load Tracks to RAM” to “rapid” under “options>system”. Furthermore it is
recommended to defragment the hard disc where the tracks are stored in order
to optimize the reading abilities.
5.9.5 Why does the speed / the pitch of my tracks fluctuate?
There are several reasons for this:
• Spin! is not calibrated
• the neddle is dirty/ dusty
• there is too much weight on the needle
• the needle is worn out
• the timecode vinyl is worn out (scratches, cue burn) or dirty
5.9.6 Is there an auto mix/party mix function?
Yes. Add some tracks to the Spin! list (NOT the Spin! library) and select „play
Spin! list“ by right-clicking into the list. The tracks will be played alternately
between both players.
92
ENGLISH
Page 93

5.9.7 How can I optimize the performance of Spin!?
A computer with decent performance and stability is important in order to have
Spin! running reliably. Here are some tricks:
• Open the settings for your system performance in your control panel under
„System>Advanced“. Here select the setting „adjust for ideal setting“.
• Deactivate any LAN / WLAN and network devices.
• Deactivate virus scanners and power managment software.
• In Windows, go to „System Properties ->Advanced -> Performance Options“
and tick „Background services“ in your Windows settings
• Defragment your hard disc
• Don't have other programs running in parallel with Spin!.
• In Spin!, go to „File -> Options“ and tick „Sound before graphic priority“
5.9.8 What can I do if I hear humming or buzzing when using a laptop?
Try to disconnect the mains adapter from your laptop. If the humming is no
longer audible this is a grounding problem. You can try to solve the problem via
the following procedures:
• Try to use a mains adapter without grounding.
• Try to connect all your devices to only one circuit.
• Try to place the mains and RCA cords separately.
• Check if your turntable is grounded correctly.
• Try to connect an anti-buzzing filter.
6. HOT KEY OVERVIEW
93
ENGLISH
Page 94

94
INDEX
1 . . .Branchements & Installation du Logiciel . . . . . . . . . . . . . . . . . . S. 98
1.1 . . . .Branchements . . . . . . . . . . . . . . . . . . . . . . . . . . . . . . . . . . . . . . . . . . . . . . .S. 98
1.2 . . . .Installation du Logiciel . . . . . . . . . . . . . . . . . . . . . . . . . . . . . . . . . . . . . . . .S. 101
1.3 . . . .Easy Setup . . . . . . . . . . . . . . . . . . . . . . . . . . . . . . . . . . . . . . . . . . . . . . . . .S. 103
1.4 . . . .Premiers pas avec le logiciel . . . . . . . . . . . . . . . . . . . . . . . . . . . . . . . . . . .S. 106
2 . . .Vue d'ensemble du logiciel . . . . . . . . . . . . . . . . . . . . . . . . . . . . . .S. 107
2.1 . . . .Shortcut: New Spin! Library . . . . . . . . . . . . . . . . . . . . . . . . . . . . . . . . . . . . . . . . . .S. 108
2.2 . . . .Shortcut: Open Spin! Library . . . . . . . . . . . . . . . . . . . . . . . . . . . . . . . . . . . . . . . . .S. 108
2.3 . . . .Shortcut: Auto Search . . . . . . . . . . . . . . . . . . . . . . . . . . . . . . . . . . . . . . . . . . . . . . .S. 108
2.4 . . . .Shortcut: Save Spin! Library . . . . . . . . . . . . . . . . . . . . . . . . . . . . . . . . . . . . . . . . .S. 108
2.5 . . . .Shortcut: Stop Spin! List . . . . . . . . . . . . . . . . . . . . . . . . . . . . . . . . . . . . . . . . . . . . .S. 108
2.6 . . . .Shortcut: Play Spin! List . . . . . . . . . . . . . . . . . . . . . . . . . . . . . . . . . . . . . . . . . . . . .S. 108
2.7 . . . .Shortcut: Loop Spin! List . . . . . . . . . . . . . . . . . . . . . . . . . . . . . . . . . . . . . . . . . . . .S. 108
2.8 . . . .Shortcut: Shuffle Spin! List . . . . . . . . . . . . . . . . . . . . . . . . . . . . . . . . . . . . . . . . . .S. 108
2.9 . . . .Shortcut: Previous . . . . . . . . . . . . . . . . . . . . . . . . . . . . . . . . . . . . . . . . . . . . . . . . . .S. 108
2.10 . . . .Shortcut: Next . . . . . . . . . . . . . . . . . . . . . . . . . . . . . . . . . . . . . . . . . . . . . . . . . . . . . .S. 108
2.11 . . . .Shortcut: Music Explorer / Audio Input . . . . . . . . . . . . . . . . . . . . . . . . . . . . . . . .S. 108
2.12 . . . .Shortcut: Spin! Library . . . . . . . . . . . . . . . . . . . . . . . . . . . . . . . . . . . . . . . . . . . . . .S. 108
2.13 . . . .Shortcut: Spin! List . . . . . . . . . . . . . . . . . . . . . . . . . . . . . . . . . . . . . . . . . . . . . . . . .S. 108
2.14 . . . .Shortcut: Category View . . . . . . . . . . . . . . . . . . . . . . . . . . . . . . . . . . . . . . . . . . . . .S. 108
2.15 . . . .Shortcut: X-Fader Match View . . . . . . . . . . . . . . . . . . . . . . . . . . . . . . . . . . . . . . . .S. 108
2.16 . . . .Shortcut: Master / Rec Vol . . . . . . . . . . . . . . . . . . . . . . . . . . . . . . . . . . . . . . . . . . .S. 108
2.17 . . . .Shortcut: Beat Match View . . . . . . . . . . . . . . . . . . . . . . . . . . . . . . . . . . . . . . . . . . .S. 108
2.18 . . . .Shortcut: Options . . . . . . . . . . . . . . . . . . . . . . . . . . . . . . . . . . . . . . . . . . . . . . . . . . .S. 108
2.19 . . . .Shortcut: Save Mode . . . . . . . . . . . . . . . . . . . . . . . . . . . . . . . . . . . . . . . . . . . . . . . .S. 108
2.20 . . . .Beatmatch View . . . . . . . . . . . . . . . . . . . . . . . . . . . . . . . . . . . . . . . . . . . . . . . . . . . .S. 109
2.21 . . . .Complete View . . . . . . . . . . . . . . . . . . . . . . . . . . . . . . . . . . . . . . . . . . . . . . . . . . . . .S. 109
2.22 . . . .Needle View . . . . . . . . . . . . . . . . . . . . . . . . . . . . . . . . . . . . . . . . . . . . . . . . . . . . . . .S. 109
2.23 . . . .Master . . . . . . . . . . . . . . . . . . . . . . . . . . . . . . . . . . . . . . . . . . . . . . . . . . . . . . . . . . . .S. 109
2.24 . . . .Ouvrir/charger une piste . . . . . . . . . . . . . . . . . . . . . . . . . . . . . . . . . . . . . . . . . . . . .S. 110
2.25 . . . .Bypass . . . . . . . . . . . . . . . . . . . . . . . . . . . . . . . . . . . . . . . . . . . . . . . . . . . . . . . . . . . .S. 110
2.26 . . . .Label-Monitor . . . . . . . . . . . . . . . . . . . . . . . . . . . . . . . . . . . . . . . . . . . . . . . . . . . . . .S. 110
2.27 . . . .Gain . . . . . . . . . . . . . . . . . . . . . . . . . . . . . . . . . . . . . . . . . . . . . . . . . . . . . . . . . . . . . . .S. 110
2.28 . . . .Pitch Mode . . . . . . . . . . . . . . . . . . . . . . . . . . . . . . . . . . . . . . . . . . . . . . . . . . . . . . . .S. 111
2.29 . . . .Pitchfader . . . . . . . . . . . . . . . . . . . . . . . . . . . . . . . . . . . . . . . . . . . . . . . . . . . . . . . . .S. 111
2.30 . . . .Activation de Vinyl Timecode . . . . . . . . . . . . . . . . . . . . . . . . . . . . . . . . . . . . . . . .S. 112
2.31 . . . .Spin! Mode . . . . . . . . . . . . . . . . . . . . . . . . . . . . . . . . . . . . . . . . . . . . . . . . . . . . . . . . .S. 112
2.32 . . . .Play/Pause . . . . . . . . . . . . . . . . . . . . . . . . . . . . . . . . . . . . . . . . . . . . . . . . . . . . . . . . .S. 112
2.33 . . . .Cue . . . . . . . . . . . . . . . . . . . . . . . . . . . . . . . . . . . . . . . . . . . . . . . . . . . . . . . . . . . . . . .S. 113
2.34 . . . .Touche marche avant/arrière . . . . . . . . . . . . . . . . . . . . . . . . . . . . . . . . . . . . . . . .S. 113
2.35 . . . .Skip . . . . . . . . . . . . . . . . . . . . . . . . . . . . . . . . . . . . . . . . . . . . . . . . . . . . . . . . . . . . . . .S. 113
2.36 . . . .Touches de recherche rapide . . . . . . . . . . . . . . . . . . . . . . . . . . . . . . . . . . . . . . . . .S. 113
2.37 . . . .Pitch Bend . . . . . . . . . . . . . . . . . . . . . . . . . . . . . . . . . . . . . . . . . . . . . . . . . . . . . . . . .S. 113
2.38 . . . .Spin! Library . . . . . . . . . . . . . . . . . . . . . . . . . . . . . . . . . . . . . . . . . . . . . . . . . . . . . . .S. 114
2.39 . . . .Delay FX . . . . . . . . . . . . . . . . . . . . . . . . . . . . . . . . . . . . . . . . . . . . . . . . . . . . . . . . . . .S. 116
2.40 . . . .Filter FX . . . . . . . . . . . . . . . . . . . . . . . . . . . . . . . . . . . . . . . . . . . . . . . . . . . . . . . . . . .S. 116
2.41 . . . .Flanger FX . . . . . . . . . . . . . . . . . . . . . . . . . . . . . . . . . . . . . . . . . . . . . . . . . . . . . . . . .S. 116
2.42 . . . .Beat Loop / Auto Loop . . . . . . . . . . . . . . . . . . . . . . . . . . . . . . . . . . . . . . . . . . . . . .S. 116
2.43/44 . . . .Fonction Loop manuelle . . . . . . . . . . . . . . . . . . . . . . . . . . . . . . . . . . . . . . . . . . . . .S. 116
2.45 . . . .Crossfader . . . . . . . . . . . . . . . . . . . . . . . . . . . . . . . . . . . . . . . . . . . . . . . . . . . . . . . . .S. 117
2.46 . . . .Beat Match . . . . . . . . . . . . . . . . . . . . . . . . . . . . . . . . . . . . . . . . . . . . . . . . . . . . . . . .S. 117
2.47 . . . .Cue Points . . . . . . . . . . . . . . . . . . . . . . . . . . . . . . . . . . . . . . . . . . . . . . . . . . . . . . . . .S. 117
2.48 . . . .Info View . . . . . . . . . . . . . . . . . . . . . . . . . . . . . . . . . . . . . . . . . . . . . . . . . . . . . . . . . .S. 118
2.49 . . . .Category View . . . . . . . . . . . . . . . . . . . . . . . . . . . . . . . . . . . . . . . . . . . . . . . . . . . . .S. 118
2.50 . . . .Music Explorer / Audio Input . . . . . . . . . . . . . . . . . . . . . . . . . . . . . . . . . . . . . . . . .S. 119
2.51 . . . .Mic Rec / Mic Spin! . . . . . . . . . . . . . . . . . . . . . . . . . . . . . . . . . . . . . . . . . . . . . . . . .S. 119
2.52 . . . .Monitor . . . . . . . . . . . . . . . . . . . . . . . . . . . . . . . . . . . . . . . . . . . . . . . . . . . . . . . . . . . .S. 120
3 . . .Guidage des menus . . . . . . . . . . . . . . . . . . . . . . . . . . . . . . . . . . . .S. 120
3.1 . . . .File . . . . . . . . . . . . . . . . . . . . . . . . . . . . . . . . . . . . . . . . . . . . . . . . . . . . . . . .S. 120
3.1.1 . . . .Options . . . . . . . . . . . . . . . . . . . . . . . . . . . . . . . . . . . . . . . . . . . . . . . . . . . . . . . . . . . .S. 120
3.1.2 . . . .Quit Spinning . . . . . . . . . . . . . . . . . . . . . . . . . . . . . . . . . . . . . . . . . . . . . . . . . . . . . .S. 120
3.2 . . . .Spin! Library . . . . . . . . . . . . . . . . . . . . . . . . . . . . . . . . . . . . . . . . . . . . . . . .S. 120
3.2.1 . . . .New . . . . . . . . . . . . . . . . . . . . . . . . . . . . . . . . . . . . . . . . . . . . . . . . . . . . . . . . . . . . . . .S. 120
3.2.2 . . . .Open . . . . . . . . . . . . . . . . . . . . . . . . . . . . . . . . . . . . . . . . . . . . . . . . . . . . . . . . . . . . . .S. 120
3.2.3 . . . .Save . . . . . . . . . . . . . . . . . . . . . . . . . . . . . . . . . . . . . . . . . . . . . . . . . . . . . . . . . . . . . .S. 120
3.2.4 . . . .Save as... . . . . . . . . . . . . . . . . . . . . . . . . . . . . . . . . . . . . . . . . . . . . . . . . . . . . . . . . . .S. 120
3.2.5 . . . . .Import . . . . . . . . . . . . . . . . . . . . . . . . . . . . . . . . . . . . . . . . . . . . . . . . . . . . . . . . . . . .S. 120
3.2.6 . . . .Export . . . . . . . . . . . . . . . . . . . . . . . . . . . . . . . . . . . . . . . . . . . . . . . . . . . . . . . . . . . . .S. 120
3.2.7 . . . .Automatic Search . . . . . . . . . . . . . . . . . . . . . . . . . . . . . . . . . . . . . . . . . . . . . . . . . .S. 120
3.2.8 . . . .Add Track . . . . . . . . . . . . . . . . . . . . . . . . . . . . . . . . . . . . . . . . . . . . . . . . . . . . . . . . . .S. 120
3.2.9 . . . .Select All . . . . . . . . . . . . . . . . . . . . . . . . . . . . . . . . . . . . . . . . . . . . . . . . . . . . . . . . . .S. 120
3.2.9.1 . . . .Delete . . . . . . . . . . . . . . . . . . . . . . . . . . . . . . . . . . . . . . . . . . . . . . . . . . . . . . . . . . . . .S. 121
Page 95

95
INDEX
3.3 . . . .Track . . . . . . . . . . . . . . . . . . . . . . . . . . . . . . . . . . . . . . . . . . . . . . . . . . . . . .S. 121
3.3.1 . . . .Track Preferences . . . . . . . . . . . . . . . . . . . . . . . . . . . . . . . . . . . . . . . . . . . . . . . . . .S. 121
3.3.2 . . . .Save ID3 TAG . . . . . . . . . . . . . . . . . . . . . . . . . . . . . . . . . . . . . . . . . . . . . . . . . . . . . .S. 121
3.3.3 . . . .Analyze BPM manually . . . . . . . . . . . . . . . . . . . . . . . . . . . . . . . . . . . . . . . . . . . . . .S. 121
3.3.4 . . . .Analyze BPM automatic . . . . . . . . . . . . . . . . . . . . . . . . . . . . . . . . . . . . . . . . . . . . .S. 121
3.3.5 . . . .Delete Tracks permanently . . . . . . . . . . . . . . . . . . . . . . . . . . . . . . . . . . . . . . . . . .S. 121
3.4 . . . .Spin! List . . . . . . . . . . . . . . . . . . . . . . . . . . . . . . . . . . . . . . . . . . . . . . . . . . .S. 121
3.4.1 . . . .Play Spin! List . . . . . . . . . . . . . . . . . . . . . . . . . . . . . . . . . . . . . . . . . . . . . . . . . . . . . .S. 121
3.4.2 . . . .Stop Spin! List . . . . . . . . . . . . . . . . . . . . . . . . . . . . . . . . . . . . . . . . . . . . . . . . . . . . . .S. 121
3.4.3 . . . .Add to Spin! List . . . . . . . . . . . . . . . . . . . . . . . . . . . . . . . . . . . . . . . . . . . . . . . . . . . .S. 121
3.4.4 . . . .Safe Mode . . . . . . . . . . . . . . . . . . . . . . . . . . . . . . . . . . . . . . . . . . . . . . . . . . . . . . . . .S. 121
3.5 . . . .Spin! Workspace . . . . . . . . . . . . . . . . . . . . . . . . . . . . . . . . . . . . . . . . . . . . .S. 122
3.5.1 . . . .Workspace arrangeable . . . . . . . . . . . . . . . . . . . . . . . . . . . . . . . . . . . . . . . . . . . . .S. 122
3.5.2 . . . .Full Screen View . . . . . . . . . . . . . . . . . . . . . . . . . . . . . . . . . . . . . . . . . . . . . . . . . . . .S. 122
3.5.3 . . . .Menu Bar View . . . . . . . . . . . . . . . . . . . . . . . . . . . . . . . . . . . . . . . . . . . . . . . . . . . . .S. 122
3.5.4 . . . .Shortcut View . . . . . . . . . . . . . . . . . . . . . . . . . . . . . . . . . . . . . . . . . . . . . . . . . . . . . .S. 122
3.5.5 . . . .Info View . . . . . . . . . . . . . . . . . . . . . . . . . . . . . . . . . . . . . . . . . . . . . . . . . . . . . . . . . .S. 122
3.5.6 . . . .Preview . . . . . . . . . . . . . . . . . . . . . . . . . . . . . . . . . . . . . . . . . . . . . . . . . . . . . . . . . . .S. 122
3.5.7 . . . .Spin! Library View . . . . . . . . . . . . . . . . . . . . . . . . . . . . . . . . . . . . . . . . . . . . . . . . . .S. 122
3.5.8 . . . .Spin! List View . . . . . . . . . . . . . . . . . . . . . . . . . . . . . . . . . . . . . . . . . . . . . . . . . . . . .S. 122
3.5.9 . . . .Category View . . . . . . . . . . . . . . . . . . . . . . . . . . . . . . . . . . . . . . . . . . . . . . . . . . . . .S. 122
3.5.9.1 . . . .Music Explorer / Audio Input View . . . . . . . . . . . . . . . . . . . . . . . . . . . . . . . . . . . .S. 122
3.5.9.2 . . . .X-Fader Match View . . . . . . . . . . . . . . . . . . . . . . . . . . . . . . . . . . . . . . . . . . . . . . . . .S. 122
3.5.9.3 . . . .Master/Rec Vol. View . . . . . . . . . . . . . . . . . . . . . . . . . . . . . . . . . . . . . . . . . . . . . . . .S. 122
3.5.9.4 . . . .Beatmatch View . . . . . . . . . . . . . . . . . . . . . . . . . . . . . . . . . . . . . . . . . . . . . . . . . . . .S. 122
3.6 . . . .Help . . . . . . . . . . . . . . . . . . . . . . . . . . . . . . . . . . . . . . . . . . . . . . . . . . . . . . .S. 122
3.6.1 . . . .Easy Setup . . . . . . . . . . . . . . . . . . . . . . . . . . . . . . . . . . . . . . . . . . . . . . . . . . . . . . . . .S. 122
3.6.2 . . . .Manual . . . . . . . . . . . . . . . . . . . . . . . . . . . . . . . . . . . . . . . . . . . . . . . . . . . . . . . . . . . .S. 122
3.6.3 . . . .www.reloop-spin.com . . . . . . . . . . . . . . . . . . . . . . . . . . . . . . . . . . . . . . . . . . . . . . . .S. 122
3.6.4 . . . .Configuration Log . . . . . . . . . . . . . . . . . . . . . . . . . . . . . . . . . . . . . . . . . . . . . . . . . .S. 122
3.6.5 . . . .About Spin! . . . . . . . . . . . . . . . . . . . . . . . . . . . . . . . . . . . . . . . . . . . . . . . . . . . . . . . .S. 122
4. . . .Réglages . . . . . . . . . . . . . . . . . . . . . . . . . . . . . . . . . . . . . . . . . . . . .S. 123
4.1 . . . .Options . . . . . . . . . . . . . . . . . . . . . . . . . . . . . . . . . . . . . . . . . . . . . . . . . . . .S. 123
4.1.1 . . . .System . . . . . . . . . . . . . . . . . . . . . . . . . . . . . . . . . . . . . . . . . . . . . . . . . . . . . . . . . . . .S. 123
4.1.2 . . . .BPM and Tools . . . . . . . . . . . . . . . . . . . . . . . . . . . . . . . . . . . . . . . . . . . . . . . . . . . . .S. 124
4.1.3 . . . .Audio Devices . . . . . . . . . . . . . . . . . . . . . . . . . . . . . . . . . . . . . . . . . . . . . . . . . . . . . .S. 125
4.1.4 . . . .Timecode . . . . . . . . . . . . . . . . . . . . . . . . . . . . . . . . . . . . . . . . . . . . . . . . . . . . . . . . . .S. 126
4.1.5 . . . .Workspace . . . . . . . . . . . . . . . . . . . . . . . . . . . . . . . . . . . . . . . . . . . . . . . . . . . . . . . . .S. 128
4.1.6 . . . .Shortcuts . . . . . . . . . . . . . . . . . . . . . . . . . . . . . . . . . . . . . . . . . . . . . . . . . . . . . . . . . .S. 129
4.1.7 . . . .MIDI Controller . . . . . . . . . . . . . . . . . . . . . . . . . . . . . . . . . . . . . . . . . . . . . . . . . . . . .S. 130
4.2 . . . .Auto Search . . . . . . . . . . . . . . . . . . . . . . . . . . . . . . . . . . . . . . . . . . . . . . . . .S. 131
4.3 . . . .Track Preferences . . . . . . . . . . . . . . . . . . . . . . . . . . . . . . . . . . . . . . . . . . . .S. 132
4.3.1 . . . .Infos . . . . . . . . . . . . . . . . . . . . . . . . . . . . . . . . . . . . . . . . . . . . . . . . . . . . . . . . . . . . . .S. 132
4.3.2 . . . .File . . . . . . . . . . . . . . . . . . . . . . . . . . . . . . . . . . . . . . . . . . . . . . . . . . . . . . . . . . . . . . .S. 132
4.3.3 . . . .Track Settings . . . . . . . . . . . . . . . . . . . . . . . . . . . . . . . . . . . . . . . . . . . . . . . . . . . . . .S. 133
4.3.4 . . . .Volume . . . . . . . . . . . . . . . . . . . . . . . . . . . . . . . . . . . . . . . . . . . . . . . . . . . . . . . . . . . .S. 133
4.3.5 . . . .Lyrics . . . . . . . . . . . . . . . . . . . . . . . . . . . . . . . . . . . . . . . . . . . . . . . . . . . . . . . . . . . . .S. 134
4.3.6 . . . .Cover . . . . . . . . . . . . . . . . . . . . . . . . . . . . . . . . . . . . . . . . . . . . . . . . . . . . . . . . . . . . .S. 134
4.3.7 . . . .Equalization . . . . . . . . . . . . . . . . . . . . . . . . . . . . . . . . . . . . . . . . . . . . . . . . . . . . . . . .S. 135
4.3.8 . . . .Cue Points . . . . . . . . . . . . . . . . . . . . . . . . . . . . . . . . . . . . . . . . . . . . . . . . . . . . . . . . .S. 135
4.3.9 . . . .Loop . . . . . . . . . . . . . . . . . . . . . . . . . . . . . . . . . . . . . . . . . . . . . . . . . . . . . . . . . . . . . .S. 136
5. . . .FAQ . . . . . . . . . . . . . . . . . . . . . . . . . . . . . . . . . . . . . . . . . . . . . . . . .S. 136
5.1 . . . .Faut-il monter une aiguille spéciale sur la platine vinyle pour pouvoir utiliser Spin! ? . . .S. 136
5.2 . . . .Peut on aussi acheter les disques Timecode séparément ? . . . . . . . . . . . . . .S. 136
5.3 . . . .L'ordinateur ne détecte pas l'interface Spin!... . . . . . . . . . . . . . . . . . . . . . . . . . .S. 136
5.4 . . . .Une platine vinyle n'envoie pas de signal Timecode ? . . . . . . . . . . . . . . . . . . .S. 137
5.5 . . . .D'où vient ce sifflement ? . . . . . . . . . . . . . . . . . . . . . . . . . . . . . . . . . . . . . . . . . . .S. 137
5.6 . . . .Peut-on aussi lire des vinyles normaux ? . . . . . . . . . . . . . . . . . . . . . . . . . . . . . .S. 137
5.7 . . . .Pourquoi la piste est lue à l'envers ? . . . . . . . . . . . . . . . . . . . . . . . . . . . . . . . . . .S. 137
5.8 . . . .Puis-je lire en 45t au lieu de 33t ? . . . . . . . . . . . . . . . . . . . . . . . . . . . . . . . . . . . .S. 137
5.9 . . . .Pourquoi les deux pistes sont lues sur le même canal ? . . . . . . . . . . . . . . . . .S. 138
5.9.1 . . . .Suis-je sourd ? . . . . . . . . . . . . . . . . . . . . . . . . . . . . . . . . . . . . . . . . . . . . . . . . . . . . .S. 138
5.9.2 . . . .Puis-je aussi utiliser l'interface en tant que carte son ? . . . . . . . . . . . . . . . . .S. 138
5.9.3 . . . .Que faut-il respecter avec une Shure M44-7 ? . . . . . . . . . . . . . . . . . . . . . . . . . .S. 138
5.9.4 . . . .Comment se fait-il que les pistes sautent parfois ? . . . . . . . . . . . . . . . . . . . . . .S. 138
5.9.5 . . . .Pourquoi la vitesse/le Pitch varie lors de la lecture ? . . . . . . . . . . . . . . . . . . . .S. 138
5.9.6 . . . .L'interface possède une fonction Automix / Partymix ? . . . . . . . . . . . . . . . . .S. 138
5.9.7 . . . .Comment optimiser mon ordinateur pour Spin! ? . . . . . . . . . . . . . . . . . . . . . . .S. 139
5.9.8 . . . . .Que faire en cas de ronflement ou vrombissement lorsque
. . . . .j'utilise un ordinateur portable ? . . . . . . . . . . . . . . . . . . . . . . . . . . . . . . . . . . . . .S. 139
6. . . .Désignation au clavier rapide . . . . . . . . . . . . . . . . . . . . . . . . . . . .S. 139
Page 96

96
FRANÇAIS
Nous vous félicitons d’avoir choisi le systeme Reloop Spin!, preuve de la
confiance que vous accordez à notre technologie pour Disc Jockey. Avant la
mise en service, nous vous prions de lire attentivement ce mode d’emploi et
de respecter les instructions pendant l’utilisation.
Retirez le Reloop Spin! de son emballage. Avant la première mise en service,
vérifiez le bon état de l’appareil. Si le boîtier ou le câble sont endommagés,
n’utilisez pas l’appareil et contactez votre revendeur.
CONSIGNES DE SÉCURITÉ
ATTENTION !
Soyez particulièrement vigilant lors des branchements avec la tension
secteur 230 V. Une décharge électrique à cette tension peut être mortelle !
La garantie exclu tous les dégâts dus au non-respect des instructions de ce
mode d’emploi. Le fabricant décline toute responsabilité pour les dégâts
matériels et personnels dus à un usage incorrect ou au non-respect des
consignes de sécurité.
- Cet appareil a quitté l’usine de fabrication en parfait état. Afin de conserver
cet état et assurer la sécurité de fonctionnement, l’utilisateur doit
absolument respecter les consignes de sécurité et les avertissements
indiqués dans ce mode d’emploi.
- Pour des raisons de sécurité et de certification (CE), il est interdit de
transformer ou modifier cet appareil. Tous les dégâts dus à une modification
de cet appareil ne sont pas couverts par la garantie.
- Le boîtier ne contient aucune pièce nécessitant un entretien, à l’exception de
pièces d’usure pouvant être remplacées de l’extérieur. La maintenance doit
exclusivement être effectuée par du personnel qualifié afin de conserver les
droits de garantie !
- Les fusibles -57- doivent uniquement être remplacés par des fusibles de
même type, dotés de caractéristiques de déclenchement et d’un ampérage
identique.
- Veillez à n’effectuer le raccordement secteur qu’une fois l’installation
terminée. Branchez toujours la fiche secteur en dernier. Vérifiez que
l’interrupteur principal soit sur "OFF" avant de brancher l’appareil.
- Utilisez uniquement des câbles conformes. Veillez à ce que toutes les fiches
et douilles soient bien vissées et correctement connectées. Si vous avez des
questions, contactez votre revendeur.
- Veillez à ne pas coincer ou endommager le cordon d’alimentation par des
arêtes tranchantes lorsque vous installez l’appareil.
- Prenez garde à ce que le cordon électrique n'entre pas en contact avec
d'autres câbles et soyez prudent lorsque vous manipulez des lignes ou des
prises électriques. Ne touchez jamais ces éléments avec des mains humides!
- Insérez uniquement le cordon d’alimentation dans des prises électriques de
sécurité. La source de tension utilisée doit uniquement être une prise
électrique en ordre du réseau d’alimentation publique.
- Débranchez l’appareil lorsque vous ne l’utilisez pas ou pour le nettoyer ! Pour
débrancher l’appareil, tirez toujours sur la prise, jamais sur le câble !
- Placez l’appareil sur une surface plane, stable et difficilement inflammable.
En cas de larsen, éloignez les enceintes de l’appareil.
- Évitez tous les chocs et l’emploi de la force lors de l’installation et l’utilisation
de l’appareil.
- Installez l’appareil dans un endroit à l’abri de la chaleur, de l’humidité et de
la poussière. Ne laissez pas traîner les câbles pour votre sécurité personnelle
et celle de tiers !
- Ne placez jamais des récipients de liquides susceptibles de se renverser sur
l’appareil ou à proximité directe. En cas d’infiltration de liquides dans le
boîtier, retirez immédiatement la fiche électrique. Faites contrôler l’appareil
par un technicien qualifié avant de le réutiliser. La garantie exclu tous les
dégâts dus aux infiltrations de liquides.
MODE D’EMPLOI
FRANÇAIS
Page 97

- N’utilisez pas l’appareil dans un environnement extrêmement chaud (plus de
35°C) ou froid (sous 5° C). N’exposez pas l’appareil directement aux rayons
solaires ou à des sources de chaleur telles que radiateurs, fours, etc.
(également valable lors du transport). Veillez à ne pas obstruer les
ventilateurs ou les fentes de ventilation. Assurez toujours une ventilation
convenable.
- N’utilisez pas l’appareil lorsqu’il est amené d’une pièce froide dans une pièce
chaude. L’eau de condensation peut détruire votre appareil. Laissez l’appareil
hors tension jusqu’à ce qu’il ait atteint la température ambiante !
- Ne nettoyez jamais les touches et curseurs avec des produits aérosols ou
gras. Utilisez uniquement un chiffon légèrement humide, jamais de solvants
ou d’essence.
- Utilisez l’emballage original pour transporter l’appareil.
- Réglez d’abord les curseurs de réglage et de volume de votre ampli au
minimum et les interrupteurs des enceintes sur "OFF". Attendez 8 à 20
secondes avant d’augmenter le volume afin d’éviter l’effet de Schottky,
susceptible d’endommager les enceintes et le diviseur de fréquence.
- Les appareils électriques ne sont pas des jouets. Soyez particulièrement
vigilants en présence d’enfants.
- Les directives de prévention des accidents de l’association des fédérations
professionnelles doivent être respectées dans les établissements
commerciaux.
- Dans les écoles, instituts de formation, ateliers de loisirs etc. l’utilisation de
l’appareil doit être effectuée sous la surveillance de personnel qualifié.
- Conservez ce mode d’emploi pour le consulter en cas de questions ou de
problèmes.
UTILISATION CONFORME
- Cet appareil est une interface Timecode numérique permettant de contrôler
le logiciel par les disques Timecode vinyles ou compacts fournis. L'interface
doit pour cela être connectée à l'ordinateur par un câble USB.
- Ce produit est certifié pour le branchement sur secteur 230 V, 50 Hz tension
alternative et est exclusivement conçu pour être utilisé en local fermé.
- Toute utilisation non conforme peut endommager le produit et annuler les
droits de garantie. En outre, toute utilisation autre que celle décrite dans ce
mode d’emploi peut être source de courts-circuits, incendies, décharge
électrique, etc.
- Le numéro de série attribué par le fabricant ne doit jamais être effacé sous
peine d’annuler les droits de garantie.
FRANÇAIS
97
Page 98

ENTRETIEN
- Contrôlez régulièrement le bon état de l’appareil (boîtier, cordon) et l’usure
éventuelle des molettes et curseurs.
- Si vous supposez que l’appareil ne peut plus être utilisé en toute sécurité,
mettez l’appareil hors-service et assurez-le contre toute réutilisation
involontaire. Débranchez la fiche électrique de la prise de courant !
- La sécurité d’emploi est susceptible d’être affectée lorsque l’appareil est
visiblement endommagé, ne fonctionne plus correctement, après un
stockage prolongé dans des conditions défavorable ou après une forte
sollicitation de transport.
Ce manuel, les vidéos de démonstration, conseils & astuces ainsi que
d'autres téléchargements sont disponibles sur le site ci-dessous :
www.reloop-spin.com
CONFIGURATION MINIMUM :
PC :
• processeur récent (minimum recommandé : Pentium III, 1GHz)
• système d'exploitation Windows 2000, XP, NT, Vista
• port USB libre
• RAM min. 512 MO
1. Branchements & installation du logiciel
1.1 Branchements
98
FRANÇAIS
8
2
54
6
1 37
Page 99

a) Raccorder les sorties de votre platine vinyle ou lecteur de disques compacts
avec les entrées respectives (1 ou 2) du Reloop Spin! Interface -1-. Le cas
échéant, relier votre platine vinyle à la vis de mise à la terre GND -3-.
b) Raccorder les sorties Line de l'interface Reloop Spin! avec les entrées Line
de votre console de mixage. -2-
c) Raccorder l'interface Reloop Spin! avec l'ordinateur par un port USB libre.
Les messages ci-dessous (exemple XP) doivent à présent s'afficher sur votre
écran :
Nouveau périphérique détecté –
Reloop Spin! Interface
Nouveau périphérique détecté –
périphérique audio USB
Nouveau périphérique détecté –
Le périphérique a été installé et peut être utilisé.
NOTE
L'installation de votre interface Spin! avec Windows XP & Vista est de type
Plug 'N' Play et ne requiert aucun pilote spécial.
d) Après la détection et l'installation de votre interface Spin! par le système, il
faut régler le volume au maximum dans les préférences audio Windows.
Exemple pour XP :
Démarrage > Panneau de configuration > Sons et périphériques audio> onglet
“Audio”
99
FRANÇAIS
Page 100

Appuyer sur la touche „Volume“ sous l'option „Lecture du son“ et
„Enregistrement du son“. Régler tous les curseurs au maximum pour un résultat
optimal.
L'option 'enregistrement sonore' est
différente pour un vinyl et CD
d'installation.
1) Vinyl Paramètres
Appuyez sur le bouton
'enregistrement sonore' et
maximiser le curseur.
2) CDJ Paramètres
Appuyez sur le bouton
'enregistrement sonore' et
minimiser le curseur.
Quitter ensuite le Panneau de configuration.
e) Autres fonctions et branchements de votre interface Spin! :
DEL USB -4- :
s'allume lorsque l'interface est détectée par l'ordinateur et activée.
NOTE
L'alimentation électrique de l'interface est assurée via USB. Elle ne requiert
donc aucun branchement sur le secteur.
Casque -5 / 6- :
permet de brancher un casque (3,5 mm jack) pour pré écouter le signal de
sortie Master directement sur l'interface -5-. Le régleur Monitor -6- permet
d'ajuster le volume.
NOTE
Vous pouvez aussi utiliser cette sortie comme connexion Record, par
exemple pour enregistrer une session.
Microphone -7 / 8- :
Le connecteur -7- permet de brancher un microphone (6,3 mm jack). Vous
pouvez régler le volume au moyen du régleur -8-.
ATTENTION !
L'entrée microphone est couplée à la sortie stéréo, vous pouvez donc
utiliser soit un microphone, soit le signal de sortie du canal 1. Veiller à ne
pas brancher un microphone pendant l'utilisation Timecode normale de
Spin!, autrement, le canal est bloqué.
100
FRANÇAIS
1) 2)
 Loading...