

Page 1
STEAMBOY 200CU
FLOOR STE AMER
NETTOYEU R À VAPEUR
LIMPIA DOR A VAPOR
INSTRUCTION MANUAL
GUIDE D’UTILISATION
MANUAL DE INSTRUCCIONES
Page 2

Page 3

ENGLISH 04
FRANÇAIS 15
ESPAÑOL 26
Page 4

STEAMBOY 200CU
FLOOR STEAMER
INSTRUCTION MANUAL
ENGLISH
4
Page 5

RELIABLE. RIGHT THERE WITH YOU.
At Reliable, we do what we love, and take pride in doing it right.
You want what’s best for the people, places and things that matter
in your life – from where you live to what you wear. So do we. From
the start, we approach every product with a craftsman’s attention
to detail and passion for making it right. Quality, functionality,
design and customer service play an equally important part in
delivering what’s right for you. Imagine cleaning your floors
and carpets with the purity of water! Plug it in, turn it on, and in
seconds the 200CU will change the way you clean.
For your safety and to fully enjoy the advantages of this product,
please take a few minutes to read all the important safeguards
and care instructions. Keep this manual handy and review the
product warranty for your reference.
5
Page 6

IMPORTANT SAFETY REQUIREMENTS
When using an electric appliance, basic precautions should always be followed,
including the following:
READ ALL INSTRUCTIONS BEFORE USING THIS STEAMER
WARNING: Danger of scalding
TO REDUCE THE RISK OF FIRE, ELECTRIC SHOCK, OR INJURY:
• This product is designed for domestic use only.
• Do not use outdoors.
• Do not leave the Steamboy 200CU unattended while turned on. Unplug the
electrical cord when not in use and before servicing.
• Do not allow to be used as a toy. Close attention is necessary when used
near children, pets or plants.
• The Steamboy 200CU is not intended for use by young children or infirm
persons without supervision.
• Young children should be supervised to ensure that they do not play with
the Steamboy 200CU.
• Never direct steam towards people, animals or plants, or equipment containing
electrical components.
• Do not immerse the Steamboy 200CU into water or other liquids.
• Do not use with damaged cord or plug. If the Steamboy 200CU is not working
as it should, has been dropped, damaged, left outdoors, or immersed into
water, contact the distributor before continuing use. If the power supply cord is
damaged, it must be replaced by the manufacturer.
• Do not pull or carry by cord, use cord as a handle, close a door on the cord, or pull
cord around sharp edges or corners. Keep cord away from heated surfaces.
• Do not use extension cords or outlets with inadequate current carrying capacity.
• Unplug after use. Do not unplug by pulling on cord. To unplug, grasp the
plug, not the cord.
• Do not handle plug or any part of the Steamboy 200CU with wet hands or operate
without shoes.
• Do not insert any objects into openings. Do not use with any opening blocked.
• Do not use without microfiber pad in place unless using just the floor brush.
• Do not use on stairs.
• Store your Steamboy 200CU indoors in a cool, dry area.
• Keep your work area well lighted.
• Never put cleaning detergents into the Steamboy 200CU. This will make the
operation unsafe and damage the unit.
• Use only as described in this manual. Use only manufacturer’s
recommended accessories.
6
Page 7
SAVE THESE INSTRUCTIONS IN A SAFE
PLACE FOR FUTURE REFERENCE
PARTS
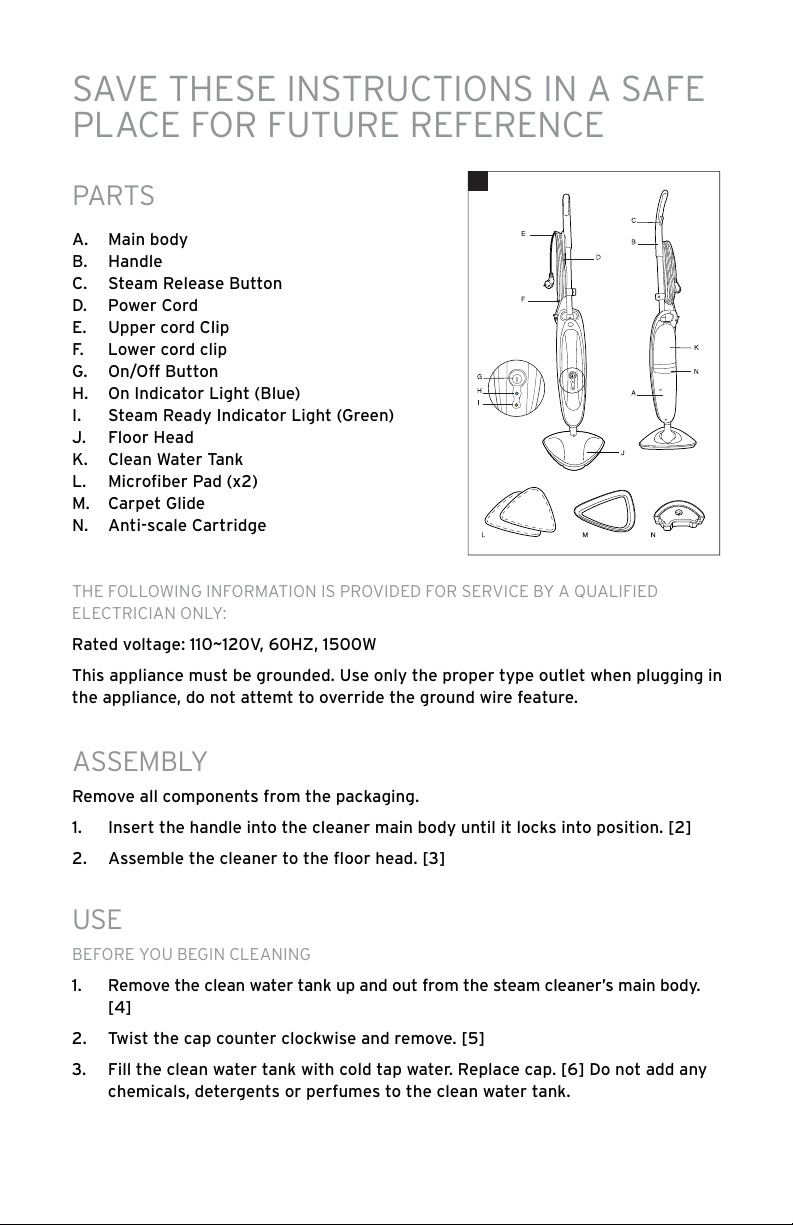
A. Main body
B. Handle
C. Steam Release Button
D. Power Cord
E. Upper cord Clip
F. Lower cord clip
G. On/Off Button
H. On Indicator Light (Blue)
I. Steam Ready Indicator Light (Green)
J. Floor Head
K. Clean Water Tank
L. Microfiber Pad (x2)
M. Carpet Glide
N. Anti-scale Cartridge
THE FOLLOwINg INFORmATION IS PROVIdEd FOR SERVICE by A qUALIFIEd
ELECTRICIAN ONLy:
Rated voltage: 110~120V, 60HZ, 1500W
This appliance must be grounded. Use only the proper type outlet when plugging in
the appliance, do not attemt to override the ground wire feature.
AS SEm b Ly
Remove all components from the packaging.
1. Insert the handle into the cleaner main body until it locks into position. [2]
2. Assemble the cleaner to the floor head. [3]
USE
bEFORE yOU bEgIN CLEANINg
1. Remove the clean water tank up and out from the steam cleaner’s main body.
[4]
2. Twist the cap counter clockwise and remove. [5]
3. Fill the clean water tank with cold tap water. Replace cap. [6] Do not add any
chemicals, detergents or perfumes to the clean water tank.
1
7
Page 8

4.
Install the full
water tank to the cleaner ensuring the hard water filter is
in place.
5. Attach a microfiber pad to the base of the floor head. [7]
IMPORTANT: Always unplug the cleaner when adding water or changing a
textile pad.
NOTE: Wash the textile pad prior to use to remove any lint.
2
6
10
14
3
7
11
4
8
12
5
5
9
9
13
13
STEAM CLEANING HARD FLOORS
NOTE: Always sweep or vacuum the floor prior to use to remove any loose
dirt or debris.
IMPORTANT: Do not use the cleaner without a microfiber pad attached to the
floor head.
NOTE: Do not use the carpet glide when cleaning hard floors.
1. Plug the steam cleaner into the main power. The blue ON light will illuminate.
8
Page 9

2. After a few seconds the green Steam Ready light will illuminate indicating the
cleaner is ready for use.
3. Recline the cleaner by placing a foot on the floor head and lowering the main
body towards the floor. [8]
4.
To produce steam press the Steam Release Button. [9]
5. Move the cleaner slowly backwards and forwards paying particular attention to
high traffic areas. [11]
REFRESHING CARPETS
NOTE: Always sweep or vacuum the floor prior to use to remove any loose dirt
or debris.
IMPORTANT: Do not use the cleaner without a microfiber pad attached to the
floor head.
1. Attach the carpet glide to the floor head. [10]
2. Plug the steam cleaner into the main power. The blue ON light will illuminate
3. After a few seconds the green Steam Ready light will illuminate indicating the
cleaner is ready for use.
4. Recline the cleaner by placing a foot on the floor head and lowering the main
body towards the floor. [8]
5. To produce steam press the steam release button. [9]
6. Move the cleaner slowly backwards and forwards paying particular attention to
high traffic areas. [11]
MAINTENANCE
IMPORTANT: always ensure the cleaner has fully cooled down before performing
any maintenance tasks.
EMPTY THE WATER TANK
1. Unplug the cleaner from the main power and ensure the unit has cooled.
2. Remove the clean water tank for the main body of the cleaner. [4]
3. Twist the cap anti-clockwise and remove. [5]
4. Empty any excess water from the tank. [12] Replace the cap and return to
the cleaner.
REMOVING AND CLEANING THE MICRO FIBER PAD
1. Unplug the cleaner from the main power and ensure the unit has cooled.
9
Page 10

2.
If necessary remove the carpet glide, then peel the textile pad from the floor
base. [13]
3. Wash the textile pad in a washing machine with a mild detergent at max
temperature 40°c.
IMPORTANT: Do not use bleach or fabric softener when washing the textile pad.
REPLACING THE ANTI-SCALE CARTRIDGE
The cleaner is fitted with a hard water filter. If you live in an area of hard water the
filter will discolour over time. Depending on the water hardness and frequency of
use the filter should be changed every 6 months.
1. Unplug the cleaner from the main power and ensure the unit has cooled.
2. Remove the clean water tank for the main body of the cleaner. [4]
3. Lift the hard water filter out of the cleaner. [14] Replace with new filter.
4. Reassemble the clean water tank to your cleaner.
NOTE: The condition of the filter will affect the cleaner performance.
CLEANING FAQS
When is steam ready?
In approximately 30 seconds.
Can I use steam on all floor surfaces?
On all hard floors like marble, ceramic, stone, linoleum, sealed hardwood floors
and parquet. Always test on a small patch to be certain.
Does steam emit automatically?
No, to produce steam you should press the steam release button under the handle.
Can I use it vertically?
No, the Steamboy 200CU can be used only on horizontal floor surfaces.
Can I put detergents or other chemicals inside the tank?
No, it will damage the product.
What if where I live the water is very hard?
You can use distilled water or you will have to change the anti-scale cartridge
more often.
When is it time to change the anti-scale cartridge?
It depends on the water hardness. Normally 6 months. You will notice that the
colour of yellow resin inside the anti-scale cartridge becomes a bit dull.
Is the microfiber pad washable?
Yes, it can be washed by hand or in the washing machine with a mild detergent at
max temperature 40°C. Do not use bleach or fabric softener.
10
Page 11
TROUBLESHOOTING
CAUTION: Prior to troubleshooting isolate the unit by removing the cord
from the power socket.
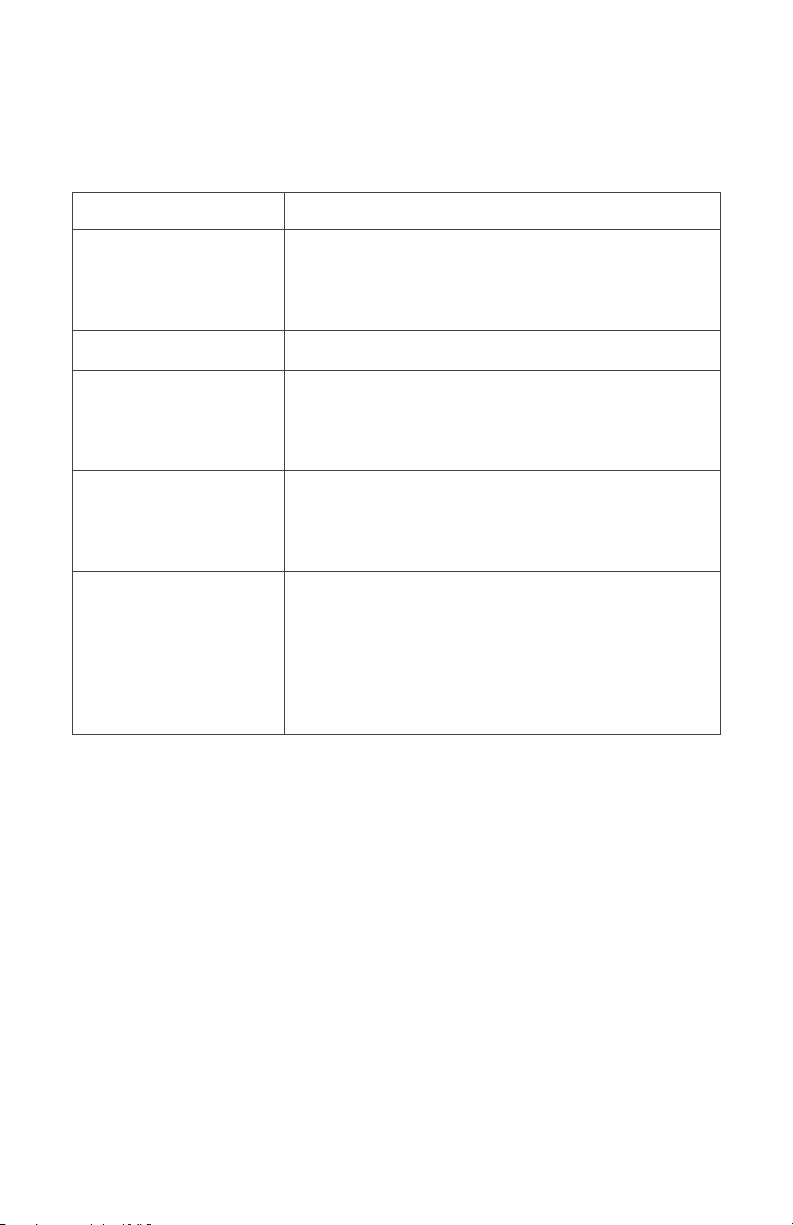
PROBLEM
LED is not on
No steam
Pale residue left on the floor
(caused by leaving the floor
steamer in the same position
for too long)
Too much water on the floor
No steam comes out
REMEDY
1. Ensure Steamer power cord is correctly plugged into
power outlet.
2. Ensure circuit breaker is operational.
3. Try operating the steamer from another power outlet.
1. Ensure the water tank has correct level of water.
1. Can be removed with household white vinegar
or a decalcifying product.
2. Alternatively reheat the area for one minute and residue
should be removed. CAUTION: DO NOT OVERHEAT AREA.
1. Hold steam switch for no longer than 5 seconds at a time.
Release the switch for a few seconds and then you can repeat
(the heating element needs time to heat up again to properly
convert the water into steam.
1. Have you pressed the steam release button correctly?
2. The Steamboy 200CU is not yet ready to operate. Hold the
steam release button down for approx. 30 seconds until you
no longer hear any pumping noises and the device begins to
emit steam.
3. The water tank is empty. Fill it up.
11
Page 12
RELIABLE PRODUCTS WARRANTY
Reliable Corporation (“Reliable”) warrants to original purchaser of its products that
every product sold by Reliable (a “Reliable Product”) is free from defects in material and
workmanship for a period of one year from the date of purchase if properly used and
maintained. Subject to the conditions and limitations set forth below, Reliable will either
repair or replace any part of a Reliable Product that proves defective by reason of improper
workmanship or materials. If the defective Reliable Product is no longer available and
cannot be repaired effectively or replaced with an identical model, Reliable shall replace
the defective Reliable Product with a current Reliable Product of equal or greater value.
Repaired parts or replacement products will be provided by Reliable on an exchange basis,
and will be either new or refurbished to be functionally equivalent to new. If Reliable is
unable to repair or replace a Reliable Product, it will refund the current value of that Reliable
Product at the time the warranty claim is made.
This limited warranty does not cover any damage to a Reliable Product that results from
improper installation, accident, abuse, misuse, natural disaster, insufficient or excessive
electrical supply, abnormal mechanical or envsteamermental conditions, wear and tear
resulting from normal use of the product, or any unauthorized disassembly, repair, or
modification. This limited warranty does not extend to any indirect, consequential or
incidental damages that may be suffered by a user or from the use of a Reliable Product,
including without limitation, any liability for third party claims for damage, and is limited
to the amount paid by the original purchaser Reliable Product with respect to which this
limited warranty protection applies. This limited warranty does not apply with respect to
products that have been altered or which are missing serial numbers or for products not
purchased directly from Reliable or a dealer authorized by us to sell Reliable Products.
This limited warranty is the only warranty that applies to any Reliable Product, supersedes
any and all terms that may be contained in any other document or purchase order and may
not be altered or amended except expressly in writing by Reliable.
To obtain a repair or replacement under the terms of this warranty, please contact our
customer service group at 1-800-268-1649 or at support@reliablecorporation.com.
You will be required to submit an original receipt via fax or e-mail. The receipt must reflect
that you are the original purchaser, the product was bought directly from
us or from an authorized Reliable dealer and that the warranty claim is being made within
the warranty period. You will be issued a return authorization number (RA#) and asked to
ship the defective product together with proof of purchase and RA#, prepaid insured to the
following address:
Reliable Corporation, 5-100 Wingold Avenue, Toronto, ON M6B 4K7. Freight collect
shipments will be refused. The risk of loss or damage in transit will be borne by
the customer. Once Reliable receives the defective product, it will initiate the repair or
replacement process.
If you have any questions regarding this warranty, you may write to:
Reliable Corporation
100 Wingold Avenue, Unit 5
Toronto, Ontario
Canada M6B 4K7
www.reliablecorporation.com
12
Page 13

131415
Page 14

Page 15

STEAMBOY 200CU
NETTOYEUR À VAPEUR
MANUEL D’INSTRUCTIONS
FRANÇAIS
Page 16

RELIABLE. PROCHE DE VOUS.
Chez Reliable, nous faisons ce que nous aimons et sommes
fiers de bien le faire. Vous voulez ce qu’il y a de mieux pour
les personnes, les lieux et les choses importantes de votre vie
- depuis l’endroit où vous vivez jusqu’aux vêtements que vous
portez. Nous aussi. Depuis le début, nous approchons chaque
produit avec une attention aux détails artisanale et la passion
de le fabriquer. La qualité, la fonctionnalité, la conception et le
service à la clientèle jouent des rôles également importants dans
notre mission de vous fournir ce qui vous correspond. Imaginez
nettoyer vos sols et vos tapis avec la pureté de l’eau ! Branchez
le, allumez-le, et en l’espace de quelques secondes, le 200 CU
changera votre manière de nettoyer. Pour votre sécurité et pour
profiter pleinement des avantages de ce produit, veuillez prendre
quelques minutes pour lire toutes les importantes mises en garde
et les directives d’entretien. Gardez ce manuel et la garantie du
produit à portée de main pour vous y référer ultérieurement.
16
Page 17

IMPORTANTES MESURES DE SÉCURITÉ
Les précautions de base suivantes doivent toujours être respectées lorsque vous
utilisez un appareil électrique :
LIRE TOUTES LES INSTRUCTIONS AVANT D’UTILISER CE NETTOYEUR À VAPEUR
MISE EN GARDE : Danger de brûlure
POUR DIMINUER TOUT RISQUE DE FEU, DÉCHARGE ÉLECTRIQUE OU DE BLESSURE :
• Ce produit a été conçu seulement pour un usage ménager.
• Ne pas utiliser à l’extérieur de la maison.
• Ne pas laisser la vadrouille en marche et sans surveillance. Débranchez le cordon d’alimentation lorsque l’appareil n’est pas utilisé ou avant tout entretien.
• Ne pas l’utiliser comme jouet. Porter une attention particulière lorsqu’il y a
des enfants, des animaux ou des plantes à proximité.
• L’appareil n’est pas conçu pour être utilisé par les jeunes enfants ou des
personnes handicapées sans surveillance.
• Les jeunes enfants devraient toujours être supervisés afin de s’assurer qu’ils
ne jouent pas avec l’appareil.
• Ne diriger jamais la vapeur vers les personnes, les animaux ou les plantes,
ou vers les équipements qui contiennent des composants électriques.
• Ne plongez pas la vadrouille dans l’eau ou dans d’autres liquides.
• Ne l’utilisez pas avec un cordon électrique ou une prise endommagés. Si la
vadrouille ne fonctionne pas correctement, si elle est tombée, a été endommagée, laissée à l’extérieur ou si elle est tombée dans l’eau, contactez le
distributeur avant de continuer à l’utiliser. Si le cordon d’alimentation est
endommagé, il doit être remplacé par le fabricant.
• Ne pas tirer ou transporter par le cordon, l’utiliser pour manipuler, fermer une
porte dessus ou le tirer sur des extrémités ou des coins pointus. Garder le
cordon éloigné des surfaces chaudes.
• N’utilisez pas de rallonges ou de prises de courant ayant une capacité de
charge en courant inadéquate.
• Débrancher après l’avoir utilisée. Ne pas débrancher en tirant sur le cordon.
Tirer sur la prise et non la corde pour débrancher.
• Ne pas manipuler la fiche ou le nettoyeur à vapeur avec des mains humides ou
en ne portant pas de souliers.
• Ne pas mettre aucun objet dans les ouvertures. Ne l’utilisez pas si l’une des
ouvertures est bloquée.
• N’employez pas sans protection de microfiber en place à moins qu’employant
juste la brosse de plancher.
• Ne pas utiliser dans les escaliers.
17
Page 18

• Ranger votre vadrouille à l’intérieur dans un endroit sec et frais.
• Garder votre surface de travail bien éclairée.
• Ne jamais mettre des détergents nettoyants dans la Vadrouille. Ceci rendra le
fonctionnement non sécuritaire et endommagera l’appareil.
• Utiliser seulement comme décrit dans ce manuel. Utiliser seulement les
accessoires recommandés par le fabricant.
CONSERVER CES INSTRUCTIONS
CARACTÉRISTIQUES PRINCIPALES DE STEAMBOY
CARACTÉRISTIQUES/PIÈCES
A. Corps principal du nettoyeur
B. Poignée
C. Bouton de libération de la vapeur
D. Cordon d’alimentation
E. Bride supérieure du cordon
F. Bride inférieure du cordon
G. Bouton de mise en marche
H. Indicateur lumineux allumé (Bleu)
I. Témoin lumineux de vapeur prête (Vert)
J. Tête pour sol
K. Réservoir d’eau propre
L. Tampon en microfibre (x2)
M. Patin pour tapis
N. Cartouche antitartre
L’INFORMATION SUIVANTE EST FOURNIE POUR LE SERVICE DONNÉ UNIQUEMENT
PAR UN ÉLECTRICIEN QUALIFIÉ :
Tension : 110~120V, 60HZ, 1500W
Cet appareil doit être mis à la terre. Utilisez seulement la prise de type approprié au
moment de brancher l’appareil, ne pas attemt pour remplacer la fonctionnalité de fil
de terre.
1
ASSEMBLAGE
Le balai électrique est conçu pour balayer les résidus secs, la poussière et les
Retirez tous les éléments de l’emballage.
18
Page 19

1. Insérez la poignée dans le corps principal du nettoyeur à vapeur jusqu’à ce
qu’elle se verrouille en position. [2]
2. Assemblez le nettoyeur à vapeur équipé de la brosse à la tête. [3]
UTILISATION
Avant que vous ne commenciez le nettoyage.
1. Retirez le réservoir d’eau propre en le tirant hors du corps principal du nettoyeur à vapeur. [4]
2. Tournez le bouchon dans le sens contraire aux aiguilles d’une montre et
retirez-le. [5]
3. Remplissez le réservoir d’eau propre avec de l’eau froide du robinet. Remettez
le bouchon. [6] N’ajoutez aucun produit chimique, détergent ou parfum dans le
réservoir d’eau propre.
4. Remettez en place le réservoir d’eau propre sur le nettoyeur à vapeur en vous
assurant que le filtre pour eau calcaire est en place.
5. Fixez le tampon textile à la base de la tête. [7]
IMPORTANT : Débranchez toujours le nettoyeur à vapeur lorsque vous ajoutez de
l’eau ou changez un tampon textile.
REMARQUE : Lavez le tampon textile avant de l’utiliser pour retirer toute peluche.
NETTOYAGE À LA VAPEUR DES SOLS DURS
REMARQUE : Balayez ou aspirez toujours le sol avant l’utilisation afin d’éliminer
toute saleté ou débris de la surface.
IMPORTANT : N’utilisez pas le nettoyeur à vapeur sans tampon textile fixé
à la tête.
REMARQUE : N’utilisez pas le patin pour tapis lors du nettoyage de sols durs.
1. Connectez le nettoyeur à vapeur à l’alimentation principale. Le témoin bleu ON
(En marche) s’allumera.
2. Après quelques secondes, le témoin lumineux vert de vapeur prête s’allumera,
indiquant que le nettoyeur à vapeur est prêt à l’emploi.
3. Inclinez le nettoyeur à vapeur en plaçant un pied sous la tête et en abaissant le
corps principal vers le sol. [8]
4. Pour produire de la vapeur, appuyez sur la gâchette à vapeur. [9]
5. Déplacez le nettoyeur à vapeur lentement d’arrière en avant en faisant particulièrement attention dans les zones à forte circulation. [11]
19
Page 20

2
3
4
5
6
10
14
7
11
8
12
9
13
RAFRAÎCHIR LES TAPIS
REMARQUE : Balayez ou aspirez toujours le sol avant l’utilisation afin d’éliminer
toute saleté ou débris de la surface.
IMPORTANT : N’utilisez pas le nettoyeur à vapeur sans tampon textile fixé à la tête.
1. Fixez le patin pour tapis à la tête. [10]
2. Connectez le nettoyeur à vapeur à l’alimentation principale. Le témoin bleu
ON (En marche) s’allumera.
3. Après quelques secondes, le témoin lumineux vert de vapeur prête s’allumera,
indiquant que le nettoyeur à vapeur est prêt à l’emploi.
4. Inclinez le nettoyeur à vapeur en plaçant un pied sous la tête et en abaissant
le corps principal vers le sol. [8]
5. Pour produire de la vapeur, appuyez sur la gâchette à vapeur. [9]
20
Page 21

6. Déplacez le nettoyeur à vapeur lentement d’arrière en avant en faisant particulièrement attention dans les zones à forte circulation. [11]
ENTRETIEN
IMPORTANT : assurez-vous toujours que le nettoyeur à vapeur ait complètement
refroidi avant d’effectuer des travaux d’entretien.
VIDEZ LE RÉSERVOIR D’EAU
1. Débranchez le nettoyeur à vapeur de l’alimentation principale et assurez-vous
que l’unité ait refroidi.
2. Retirez le réservoir d’eau propre du corps principal du nettoyeur à vapeur. [4]
3. Tournez le bouchon dans le sens contraire aux aiguilles d’une montre et
retirez-le. [5]
4. Videz tout excès d’eau du réservoir. [12] Remettez en place le bouchon et
retournez le nettoyeur à vapeur
RETIRER ET NETTOYER LE TAMPON EN MICROFIBRE
1. Débranchez le nettoyeur à vapeur de l’alimentation principale et assurez-vous
que l’unité ait refroidi.
2. Si nécessaire, retirez le patin pour tapis, puis décollez le tampon textile de la
base. [13]
3. Lavez le tampon textile dans une machine à laver avec un détergent doux à
une température max. de 40°C.
IMPORTANT : N’utilisez pas d’eau de Javel ou d’adoucissement pour le linge lors du
lavage du tampon textile.
REMPLACER LA CARTOUCHE ANTITARTRE
1. Débranchez le nettoyeur à vapeur de l’alimentation principale et assurez-vous
que l’unité ait refroidi.
2. Retirez le réservoir d’eau propre du corps principal du nettoyeur à vapeur. [4]
3. Soulevez le filtre pour eau calcaire pour le retirer du nettoyeur à vapeur. [14]
Remplacez-le par un filtre neuf.
4. Réassemblez le réservoir d’eau propre sur votre nettoyeur à vapeur.
REMARQUE : L’état du filtre affectera les performances du nettoyeur à vapeur.
21
Page 22

FAQ SUR LE NETTOYAGE
Quand Steamjet est-il prêt ?
Approximativement en 30 secondes.
Puis-je utiliser le jet de vapeur sur toutes les surfaces de plancher ?
Sur tous les sols durs tels que le marbre, la céramique, la pierre, le linoleum, les
planchers en bois dur vitrifiés et le parquet.
Steamjet émet-il automatiquement de la vapeur ?
Non, pour produire de la vapeur, vous devez appuyer sur le bouton de libération de
vapeur/d’aspiration sous la poignée.
Puis-je l’utiliser verticalement ?
Non, Steamjet peut uniquement être utilisés sur des surfaces au sol horizontales.
Puis-je mettre des détergents ou d’autres produits chimiques dans le réservoir ?
Non, vous endommageriez le produit.
Qu’en est-il si dans la ville où je vis, l’eau est très calcaire ?
Vous pouvez utiliser de l’eau filtrée ou vous devrez changer la cassette filtre plus
souvent.
Quand faut-il changer la cassette filtre ? Comment le remarque-t-on ?
Cela dépend de la dureté de l’eau. Normalement tous les 6 mois. Vous noterez que
la couleur de la résine jaune à l’intérieur de la cassette filtre devient un peu terne.
La vadrouille est-elle lavable ?
Oui, elle peut être lavée à la main ou dans une machine à laver avec un détergent doux à une température max. de 40°C. N’utilisez pas d’eau de Javel ou
d’adoucissant pour le linge.
22
Page 23

DÉPANNAGE
ATTENTION : Avant du dépannage, isolez l’appareil en débranchant le cordon de la
prise d’alimentation.
PROBLÈME
Voyant DEL n’est pas affiché
Pas de vapeur
Présence d’un résidu pale
dans le plancher (Provoqué
en laissant la vadrouille à
vapeur dans la même position trop longtemps)
Trop d’eau dans le plancher
Aucune vapeur ne sort
SOLUTION
1. Assurez-vous que le cordon d’alimentation soit correctement branché dans la prise électrique.
2. Assurez-vous que le disjoncteur soit en fonctionnement.
3. Essayer de faire fonctionner la vadrouille dans une autre
prise électrique.
1. Assurez-vous que le réservoir d’eau ait le niveau approprié
d’eau.
1. Peut être enlevé à l’aide d’un peu de vinaigre blanc ménager
ou un produit décalcifiant.
2. En alternance, réchauffez l’endroit pendant une minute et le
résidu devrait être enlevé.
ATTENTION : Ne pas surchauffer l’endroit.
1. Tenez l’interrupteur de vapeur pour pas plus que 5 secondes à la fois. Relâchez l’interrupteur pendant quelques
secondes et ensuite vous pouvez alors répéter (l’élément de
chauffage à besoin de temps pour réchauffer et convertir
correctement l’eau en vapeur).
1. Avez-vous bien appuyé sur le bouton d’émission de vapeur ?
2. La vadrouille à vapeur 200CU n’est pas encore prête.
Maintenez le bouton d’émission de vapeur appuyé environ
30 secondes jusqu’à ne plus entendre les bruits de pompe
et que l’appareil commence à émettre de la vapeur.
3. Le réservoir à eau est vide. Remplissez-le.
23
Page 24

GARANTIE DES PRODUITS RELIABLE
Reliable Corporation (« Reliable ») garantit à l'acheteur original de ce produit que chaque
produit vendu par Reliable (un « Produit Reliable ») est exempt de tout défaut de pièce et
de main d'œuvre pour une période d'un an à compter de la date d'achat, s'il est utilisé et
entretenu correctement. Soumis aux conditions et limitations établies ci-après, Reliable
réparera ou remplacera toute pièce d'un produit Reliable qui s'avère défectueuse en raison
d'un défaut de fabrication ou de main d'œuvre. Si le Produit Reliable défectueux n'est plus
disponible et ne peut pas être réparé efficacement ou remplacé par un modèle identique,
Reliable remplacera le Produit Reliable défectueux par un Produit Reliable actuel de
valeur équivalente ou supérieure. Les pièces réparées ou les produits remplacés seront
fournis par Reliable sur la base d'un échange, et seront ou neufs ou remis à neuf pour être
fonctionnellement équivalents aux neufs. Si Reliable n'est pas en mesure de réparer ou de
remplacer le Produit Reliable, elle remboursera la valeur actuelle du Produit Reliable au
moment où la réclamation de garantie est réalisée.
Cette garantie limitée ne couvre aucun dommage subi par un Produit Reliable résultant
d'une installation incorrecte, d'un accident, d'un abus, d'une mauvaise utilisation,
d'une catastrophe naturelle, d'une alimentation électrique insuffisante ou excessive, de
conditions mécaniques ou environnementales anormales, de l'usure et de la détérioration
résultant de l'usure normale du produit, ou de tout démontage, réparation ou modification
non autorisé(e). Cette garantie limitée ne s'étend à aucun dommage indirect ou direct dont
peut être victime un utilisateur ou suite à l'utilisation d'un Produit Reliable, y compris mais
sans s'y limiter, toute responsabilité pour des réclamations de tiers pour des dégâts, et se
limite au montant payé par l'acheteur original du Produit Reliable auquel cette protection
de garantie limitée s'applique. Cette garantie limitée ne s'applique pas aux produits qui ont
été modifiés ou dont les numéros de séries sont manquants, ou aux produits non achetés
directement auprès de Reliable ou d'un revendeur agréé pour la vente de Produits Reliable.
Cette garantie limitée est l'unique garantie qui s'applique à tout Produit Reliable, elle
remplace toutes conditions qui peuvent être contenues dans un autre document ou bon de
commande et ne peut être transformée ou modifiée, sauf dérogation expressément écrite
de Reliable.
Pour obtenir une réparation ou un remplacement en vertu des conditions de cette garantie,
veuillez contacter notre service à la clientèle au 1-800-268-1649 ou par courriel à
support@reliablecorporation.com.
Il vous sera demandé d'envoyer le reçu original par télécopie ou courriel. Le reçu doit
prouver que vous êtes l'acheteur original, que le produit a été acheté directement chez
nous ou chez un revendeur agréé par Reliable et que la réclamation de garantie est
effectuée pendant la période de garantie. Un numéro d'autorisation de retour (Nº AR) vous
sera fourni et il vous sera demandé d'expédier le produit défectueux accompagné de la
preuve d'achat et du Nº AR, les frais d'assurances étant prépayés à l'adresse suivante :
Reliable Corporation, 5-100 Wingold Avenue, Toronto, ON M6B 4K7. Les expéditions avec
fret payable à destination seront refusées. Le risque de perte ou d'endommagement lors du
transport sera assumé par le client. Une fois que Reliable aura reçu le produit défectueux,
elle initiera la réparation ou le remplacement.
Si vous avez des questions concernant la présente garantie, vous pouvez écrire à :
Reliable Corporation
100 Wingold Avenue, Unit 5
Toronto, Ontario
Canada M6B 4K7
www.reliablecorporation.com
24
Page 25

25
Page 26

STEAMBOY 200CU
LIMPIADOR A VAPOR
MANUAL DE INSTRUCCIONES
ESPAÑOL
26
Page 27

RELIABLE. JUNTO A USTED.
En Reliable, hacemos lo que nos encanta hacer y nos
enorgullecemos de hacerlo bien. Quiere lo mejor para las
personas, los lugares y las cosas que importan en la vida:
desde dónde vive a la ropa que viste. Nosotros también. Desde
el inicio, abordamos cada producto con la atención al detalle
de un artesano y la pasión por hacerlo bien. La calidad, la
funcionalidad, el diseño y el servicio al consumidor son igual de
importantes para ofrecerle algo adecuado para usted. Imagínese
limpiando sus pisos y alfombras con la pureza del agua ! Sólo
debe conectarlo y encenderlo, y en cuestión de segundos el
200CU cambiará tu manera de hacer limpieza.
Por su seguridad y para disfrutar al máximo las ventajas de este
producto, tómese unos minutos para leer todas las precauciones
importantes e instrucciones de cuidado. Conserve este manual a
mano y lea la garantía del producto para su referencia.
27
Page 28

NOTICIA IMPORTANTE PARA
SU SEGURIDAD
Cuando use cualquier maquina eléctrica siempre debe seguir las instrucciones
de precaución y seguridad, incluyendo lo siguiente:
LEA TODAS LAS INSTRUCCIONES ANTES DE UTILIZAR ESTA LIMPIADOR A VAPOR.
ADVERTENCIA: puede quemarse la piel
PARA REDUCIR EL RIESGO DE INCENDIOS, ELECTROCHOQUE O DE LESIONES:
• Este producto se ha diseñado solo para el uso domestico.
• No lo utilice al aire libre.
• No deje la Steamboy 200CU sin atender cuando este encendida. Desconecte el
cordón eléctrico cuando la maquina no este en uso y antes de hacerle cualquier
mantenimiento.
• No permita que se utilice esta maquina como un juguete. Preste mucha
atención cuando se utiliza la maquina cerca de los niños, las mascotas
o las plantas. Los niños y las personas invalidas no deben usar esta maquina sin
supervisión.
• Los niños pequeños deben ser supervisados para asegurar que no jueguen con
la Steamboy 200CU.
• Nunca levante la maquina con vapor hacia las personas, animales o plantas,
o a ningún equipo que contenga componentes eléctricos.
• Nunca introduzca el limpia pisos de vapor al agua o a ningún otro liquido.
• No utilice la maquina si el cordón o el enchufe están dañados. Si el limpia pisos
de vapor no esta funcionando como debe ser, o si se ha caído, roto, o se ha
dejado afuera al aire libre, o sumergido bajo el agua, contacte al distribuidor
antes de volverlo a usar. Si el cordón esta dañado, tiene que ser remplazado
por el fabricante.
• No jale la maquina por el cordón, no utilice el cordón como una manija, no
cierre ninguna puerta cuando el cordón este en el camino, y no jale el cordón
alrededor de los filos o las esquinas. Mantenga el cordón lejos de las
superficies calientes.
• No use cordones de extensión o toma corrientes con capacidad de
corriente inadecuada.
• Desconectar de la corriente después de usar. Nunca hale el cordón eléctrico del
toma corriente. Para desenchufarlo, agarre el enchufe y no el cordón.
• Nunca agarre el enchufe o el limpia pisos cuando tenga las manos mojadas
y nunca opere la maquina cuando este descalzo.
• Nunca introduzca ningún objeto dentro de las ranuras. Nunca utilice la
maquina si cualquier abertura esta bloqueada.
28
Page 29

• No use sin microfibra pad en lugar a menos que se utilice el cepillo para
el suelo.
• No utilice la maquina en las escaleras.
• Guarde su limpiador de pisos dentro, en un lugar fresco y seco.
• Use buena luz cuando este trabajando con el limpia pisos.
• Nunca introduzca ningún detergente de limpiar al limpiador de pisos de vapor.
Eso hace que la operación sea insegura y también dañara el equipo.
• Use la maquina solo tal como esta estipulado en este manual. Solo utilice los
accesorios recomendados por el fabricante.
GUARDE ESTAS INSTGRUCCIONES EN UN
LUGAR SEGURO COMO REFERENCIA EN
EL FUTURO
1
FUNCIONES/PIEZAS
A Cuerpo principal de la limpiadora
B. Mango
C. Botón de liberación de vapor
D. Cable de alimentación
E. Clip superior para cable
F. Clip inferior para cable
G. Botón de encendido y apagado
H. Luz indicadora de encendido (azul)
I. Luz indicadora de vapor (verde)
J. Cabeza para pisos
K. Depósito de agua limpia
L. Almohadilla de microfibra (x2)
M. Deslizante para alfombras
N. Sistema antisarro
LA INFORMACIÓN SIGUIENTE SE PROPORCIONA PARA EL MANTENIMIENTO
DE LA MAQUINA SOLO POR UN ELECTRICISTA CALIFICADO:
Voltaje clasificado: 110~120V, 60HZ, 1500W
Este aparato debe estar conectado a tierra. Utilice únicamente la fuente de tipo
adecuado al enchufar el aparato, no attemt para anular la función de conductor
de tierra.
29
Page 30

MONTAJE
Retire todos los componentes del embalaje.
1. Inserte el mango en el cuerpo principal de la limpiadora hasta que se trabe en
su lugar. [2]
2. Arme la limpiadora con el cepillo para pisos en la cabeza para pisos. [3]
USO
ANTES DE COMENZAR A LIMPIAR
1. Retire del cuerpo principal de la limpiadora el depósito de agua limpia hacia
arriba y afuera. [4]
2. Gire la tapa en el sentido contrario al de las agujas del reloj y retire. [5]
3. Llene el depósito de agua limpia con agua fría del grifo. Coloque la tapa nuevamente. [6] No agregue químicos, detergentes ni perfumes al depósito de
agua limpia.
4. Coloque nuevamente el depósito de agua limpia en la limpiadora y verifique el
filtro de agua dura.
5. Adjunte una almohadilla de tela a la base de la cabeza para pisos. [7]
IMPORTANTE: Siempre desenchufe la limpiadora cuando agregue agua o cambie una
almohadilla de tela.
NOTA: Antes de usarla, lave la almohadilla de tela a fin de eliminar la pelusa.
Limpieza a vapor de pisos duros
NOTA: Antes de usarla, siempre barra o aspire el piso para eliminar la
suciedad suelta.
IMPORTANTE: No utilice la limpiadora sin una almohadilla de tela adjunta a la cabeza
para pisos.
NOTA: No utilice el deslizante para alfombras cuando limpie pisos duros.
1. Enchufe la limpiadora a vapor al tomacorriente principal. Se iluminará la luz
de encendido azul.
2. Después de unos segundos, se iluminará la luz indicadora de vapor (verde)
para señalar que la limpiadora está lista.
3. Recline la limpiadora: presione con el pie la cabeza para pisos y baje el cuerpo
principal hacia el piso. [8]
4. Para producir vapor, presione el botón de vapor. [9]
5. Mueva la limpiadora lentamente hacia atrás y hacia adelante y preste atención a las áreas de mucho tránsito. [11]
30
Page 31

2
3
4
5
6
10
14
7
11
8
12
9
13
LIMPIEZA DE ALFOMBRAS
NOTA: Antes de usarla, siempre barra o aspire el piso para eliminar la suciedad
suelta.
IMPORTANTE: No utilice la limpiadora sin una almohadilla de tela adjunta a la cabeza
para pisos.
1. Coloque el deslizante para alfombras en la cabeza para pisos. [10]
2. Enchufe la limpiadora a vapor al tomacorriente principal. Se iluminará la luz
de encendido azul.
3. Después de unos segundos, se iluminará la luz indicadora de vapor (verde)
para señalar que la limpiadora está lista.
4. Recline la limpiadora: presione con el pie la cabeza para pisos y baje el cuerpo
principal hacia el piso. [8]
5. Para producir vapor, presione el botón de vapor. [9]
31
Page 32

6. Mueva la limpiadora lentamente hacia atrás y hacia adelante y preste atención a las áreas de mucho tránsito. [11]
MANTENIMIENTO
IMPORTANTE: verifique siempre que la limpiadora se haya enfriado por completo
antes de proceder con las tareas de mantenimiento.
VACIADO DEL DEPÓSITO DE AGUA.
1. Desenchufe la limpiadora del tomacorriente principal y verifique que se haya
enfriado.
2. Retire el depósito de agua limpia del cuerpo principal de la limpiadora. [4]
3. Gire la tapa en el sentido contrario al de las agujas del reloj y retire. [5]
4. Vacíe cualquier exceso de agua del depósito. [12] Vuelva a colocar la tapa y
lleve el depósito de agua limpia de regreso a la limpiadora.
EXTRACCIÓN Y LIMPIEZA DE LA ALMOHADILLA DE MICROFIBRA
1. Desenchufe la limpiadora del tomacorriente principal y verifique que se
haya enfriado.
2. Si fuera necesario, retire el deslizante para alfombras, y luego saque la almohadilla de tela de la base. [13]
3. Lave la almohadilla de tela en una lavadora con detergente suave a una temperatura máxima de 40 °C.
IMPORTANTE: No utilice lejía ni suavizante de ropa cuando lave la almohadilla.
CAMBIO DEL SISTEMA ANTISARRO
La limpiadora trae un filtro de agua dura. Si vive en una zona de agua dura, el filtro
se decolorará con el paso del tiempo. Según la dureza del agua y la frecuencia en el
uso del filtro, debería cambiarse cada 6 meses.
1. Desenchufe la limpiadora del tomacorriente principal y verifique que se haya
enfriado.
2. Retire el depósito de agua limpia del cuerpo principal de la limpiadora. [4]
3. Saque el filtro de agua dura de la limpiadora. [14] Coloque el filtro nuevo.
4. Arme nuevamente el depósito de agua limpia en la limpiadora.
NOTA: El estado del filtro afectará el rendimiento de la limpiadora.
32
Page 33

PREGUNTAS FRECUENTES SOBRE
LIMPIEZA
¿Cuándo está listo el chorro de vapor?
En unos 30 segundos.
¿Puedo usar el chorro de vapor en todos los pisos?
En todos los pisos duros, por ejemplo, mármol, cerámica, piedra, linóleo, parquet y
pisos de madera dura sellada.
¿El chorro de vapor emite vapor de manera automática?
No, para producir vapor presione el botón de vapor/barrido ubicado debajo del
mango.
¿Lo puedo usar en sentido vertical?
No, el chorro de vapor solo puede usarse sobre superficies horizontales del piso.
¿Puedo colocar detergentes u otros químicos en el interior del depósito?
No, dañaría el producto.
¿Qué ocurre si en la ciudad en la que vivo el agua es muy dura?
Puede usar agua filtrada o cambiar el filtro con mayor frecuencia.
¿Cuándo es el momento de cambiar el filtro? ¿Cómo me doy cuenta?
Depende de la dureza del agua. Generalmente 6 meses. Notará que la resina amarilla del filtro ha perdido el color.
¿Es lavable el trapeador?
Sí, puede lavarse a mano o en la lavadora con un detergente suave a una temperatura máxima de 40 °C. No utilice lejía ni suavizante de ropa.
33
Page 34

GUIA DE QUE HACER CUANDO EXISTE UN
PROBLEMA
PRECAUCION: Antes de hacer cualquier revision del problema, quitar el cordon de
la corriente.
PROBLEMA
No se enciende el piloto DEL
No sale vapor
La maquina deja residuos de
color claro en el piso
Sale demasiado agua al piso
No sale vapor
SOLUCION
1. Asegurar que el cordón eléctrico este correctamente
conectado al toma corriente.
2. Asegurar que el interruptor del circuito este funcionando.
3. Trate de prender el limpiador utilizando otro toma corriente.
1. Asegurar que el tanque de agua tiene la cantidad de
agua correcta.
1. Se pueden quitar los residuos con vinagre blanco o con un
producto descalcificador.
2. De otra forma, puede calentar el lugar por un minuto y se
podrá quitar el residuo.
PRECAUCION: NO SOBRECALENTAR EL ÁREA.
1. No apriete el interruptor de vapor por mas de 5 segundos
a la vez.
Suelte el botón por unos segundos y podrá repetir la
operasion (el elemento de calefacción necesita tiempo para
poderse recalentar y poder convertir el agua en
vapor correctamente).
1. ¿Presionó de forma correcta el botón de liberación de vapor?
2. La Steamboy 200CU no está preparada para funcionar.
Mantenga presionado el botón para liberación de vapor
durante aproximadamente 30 segundos, hasta que ya no
escuche ningún ruido y el aparato comience a sacar vapor.
3. El tanque de agua está vacío. Llénelo.
34
Page 35

GARANTÍA DE LOS PRODUCTOS RELIABLE
Reliable Corporation (“Reliable”) garantiza al comprador original de sus productos que todas
las unidades vendidas por Reliable (un “Producto Reliable”) se encuentran libres de defectos
de material y de mano de obra durante el período de un año a partir de la fecha de compra,
si son utilizadas correctamente y han recibido el mantenimiento adecuado. En virtud de las
condiciones y limitaciones establecidas a continuación, Reliable reparará o reemplazará
la pieza de un Producto Reliable que demuestre estar defectuosa a causa de material o
fabricación inadecuadas. Si el Producto Reliable defectuoso deja de estar disponible y no se
lo puede reparar en forma eficaz ni reemplazar por un modelo idéntico, Reliable cambiará el
Producto Reliable defectuoso por un Producto Reliable vigente de igual o mayor valor. Reliable
proporcionará piezas reparadas o de repuesto a cambio de las piezas originales, y serán piezas
nuevas o reacondicionadas para convertirse en productos funcionalmente equivalentes a piezas
nuevas. Si Reliable no puede reparar ni reemplazar un Producto Reliable, reembolsará el valor
del Producto Reliable que esté vigente al momento de reclamar la garantía.
Esta garantía limitada no cubre los daños que sufra un Producto Reliable como resultado de una
instalación inadecuada, accidente, abuso, uso incorrecto, desastre natural, suministro de energía
eléctrica insuficiente o excesivo, condiciones mecánicas o ambientales anormales, desgaste
provocado por el uso normal del producto, o cualquier desarme, reparación o modificación no
autorizada. Esta garantía limitada no se extiende a ningún daño indirecto, resultante o accidental
que el usuario pueda sufrir o que pueda causar el uso de un Producto Reliable, incluyendo,
entre otros, la responsabilidad ante los reclamos presentados por terceros; y se limita al monto
pagado por el comprador original del Producto Reliable respecto del cual tiene aplicación
esta protección de garantía limitada. Esta garantía limitada no es válida para productos que
hayan sido modificados o que no tengan número de serie, o para productos que no hayan sido
comprados directamente a Reliable o mediante un vendedor certificado que cuente con nuestra
autorización para vender Productos Reliable.
Esta garantía limitada es la única que se aplica a todos los Productos Reliable, reemplaza todos
los términos que puedan estar contenidos en cualquier otro documento u orden de compra, y no
puede ser alterada ni modificada excepto que Reliable así lo haya autorizado expresamente por
escrito.
Para obtener una reparación o cambio según los términos de esta garantía,
comuníquese con nuestro grupo de atención al cliente al 1-800-268-1649 o escriba a
support@reliablecorporation.com.
Usted deberá presentar, por fax o correo electrónico, el comprobante original. Este comprobante
debe demostrar que usted es el comprador original, que el producto fue adquirido directamente
en nuestras oficinas o a un vendedor de Reliable autorizado y que el reclamo de la garantía se
realiza dentro del período correspondiente. Usted recibirá un número de autorización (RA#) y
deberá enviar el producto defectuoso, junto con el comprobante de compra, el RA# y seguros
pagados por adelantado, a la siguiente dirección:
Reliable Corporation, 5-100 Wingold Avenue, Toronto, ON M6B 4K7. Los costos de envío por
cobrar serán rechazados. El riesgo de sufrir una pérdida o daño en tránsito será asumido por el
cliente. Una vez que Reliable reciba el producto defectuoso, la compañía iniciará el proceso de
reparación o reemplazo.
Si tiene preguntas sobre esta garantía, puede escribir a la siguiente dirección:
Reliable Corporation
100 Wingold Avenue, Unit 5
Toronto, Ontario
Canada M6B 4K7
www.reliablecorporation.com
35
Page 36

Page 37

Page 38

“We are very fortunate
to have team members
who have been with us for
over a generation.”
Rober t Kahn, CEO
1 800 268 1649
www.reliablecorporation.com
 Loading...