

Page 1

North American Version
REMOTE CONTROL
INSTALLATION & OPERATING
INSTRUCTIONS
918-290e 09/17/07
© Copyright 2007, FPI Fireplace Products International Ltd. All rights reserved.
Page 2

The FireGenie
TM
Remote Control is tested safe when installed in accordance with this installation
manual. It is your responsibility to read all instructions before starting installation and to follow
these instructions carefully during installation.
TM
The FireGenie
Remote Control is carefully engineered and MUST be installed only as specifi ed. If
you modify it or any of its components, you may possibly cause a fi re hazard.
The FireGenie
TM
Remote Control MUST be installed by a qualifi ed installer.
FCC Requirements
Warning: Changes or modifi cations to this unit not expressly approved by the party responsible
for compliance could void the user’s authority to operate the equipment. This equipment has been
tested and found to comply with the limits for a Class B digital device, pursuant to Part 15 to the
FCC Rules. These limits are designed to provide reasonable protection against harmful interference
in a residential installation. This equipment generates, uses, and can radiate radio frequency energy
and, if not installed and used in accordance with the instructions, may cause harmful interference to
radio communications. However, there is no guarantee that interference will not occur in a particular
installation. If this equipment does cause harmful interference to radio or television reception, which
can be determined by turning the equipment off and on, the user is encouraged to try to correct the
interference by one or more of the following measures:
- Reorient or relocate the receiver antenna.
- Increase the separation between the equipment and receiver.
- Connect the equipment into an outlet on a circuit different from that to which the receiver is
connected.
- Consult the dealer or an experienced radio TV technician for help.
Canadian Equipment Requirements
This digital apparatus does not exceed the (class A/class B)* limits for radio noise emissions from
digital apparatus set out in the Radio Interference Regulations of the Canadian Department of
Communications.
This device complies with RSS-210 of Industry and Science Canada. Operation is subject to the
following two conditions; (1) this device may not cause interference, and (2) this device must accept
any interference, including interference that may cause undesired operation of the device.
All wiring should be done by a qualifi ed electrician and shall be in compliance with local codes and
with the National Electric Code ANSI/NFPA No. 70-current (In the United States), or with the CSA
C22.1 Canadian Electric Code (in Canada).
Page 3

TABLE OF CONTENTS
Matching Remote Control & Receiver ID Code ................................................................... 4
Remote Control Keypad ....................................................................................................... 5
Remote Control Screen Display (LCD) ................................................................................ 6
Remote Control - Basic Functions ........................................................................................ 6
Switching the Remote ON and OFF ................................................................................ 6
Setting Time & Day ........................................................................................................ 7
Receiver Operation ............................................................................................................... 7
Manual Mode ....................................................................................................................... 8
Auto Mode ............................................................................................................................ 8
Program Mode ...................................................................................................................... 9
Setting the Program Mode .................................................................................................... 10
Installing the Receiver .......................................................................................................... 15
Installing to a Wall Mount ............................................................................................... 15
Installing to a Fireplace .................................................................................................... 16
Troubleshooting .................................................................................................................... 18
Battery Replacement ........................................................................................................ 18
Special Conditions in Program Mode .............................................................................. 19
Displaying Temperature in Celsius or Fahrenheit ........................................................... 19
IMPORTANT
* The battery light (BAT. LOW) on the Receiver will NOT turn on when the
Receiver is set to “ON” or “OFF”.
* When the Receiver is set to “REMOTE” the battery light will fl ash (1 blink
per second). Battery power is suffi cient.
* If the battery light (BAT. LOW) starts to fl ash rapidly (3 blinks per second),
this is an indication that the battery power is low and they should be
replaced.
* The Remote Control only responds to a Remote Control with a matching
ID Code. See page 4 for details.
Page 4

MATCHING REMOTE CONTROL & RECEIVER ID CODE
The Remote Control handset has a set of unique ID codes that is pre-programmed into its memory. This
set of ID codes helps to differentiate one Remote Control handset from another so that only the control
box with a matching ID code will respond to the appropriate Remot Control handset.
To ensure the Remote Control is matched to the Receiver correctly, please follow the steps below;
1. Ensure that the pilot is lit and the pilot control knob is in the ON position at the appliance.
2. Ensure both the Remote Control and the Receiver box are switched OFF.
3. Install the 2 x AAA alkaline batteries into the Remote Control.
4. Install the 4 x AA alkaline batteries into the Remote Receiver.
5. Switch the Receiver box to the REMOTE position.
6. Press and hold the PROG and PRESET buttons simultaneously on the remote control for up
to 20 seconds. During this time, the remote will display “LC” while it is transmitting codes to
the receiver. Once it has successfully transmitted, the burner will come on. If it does not work
the fi rst time wait for 1 minute and repeat steps 1 - 5.
7. Release both the PROG and PRESET buttons. The remote control will revert back to normal,
but the burner will still be on.
8. Press the ON/OFF button on the remote 2 times to turnn the burner off.
9. The remote control is now programmed to the receiver and the appliance can now be operated
with it.
The control box will only learn the Remote ID codes during the fi rst 30 seconds after power is applied and will ignore this special command from the Remote Control after the fi rst 30 seconds.
NOTE: This must only be performed by a qualifi ed installer.
IMPORTANT NOTE
When there is no signal from the Remote Control to the Receiver
either when the battery is low or the remote is out of range, the unit
will automatically shut down in 4 hours +/- 48 minutes.
FPI FireGenieTM Remote Control Manual4
Page 5
The FireGenieTM is a custom designed Remote Control system with the following features:
* Thermostatic Control;
* An Automatic & Manual Mode for controlling unit ON and OFF;
* A Program Mode for programming 2 time periods per day for all days of the week.
A Quick Reference Sticker is available to be placed on the back of your Remote Control Handset.
Place the sticker close to the very top of the remote, away from the battery opening and wall
mounting bracket.
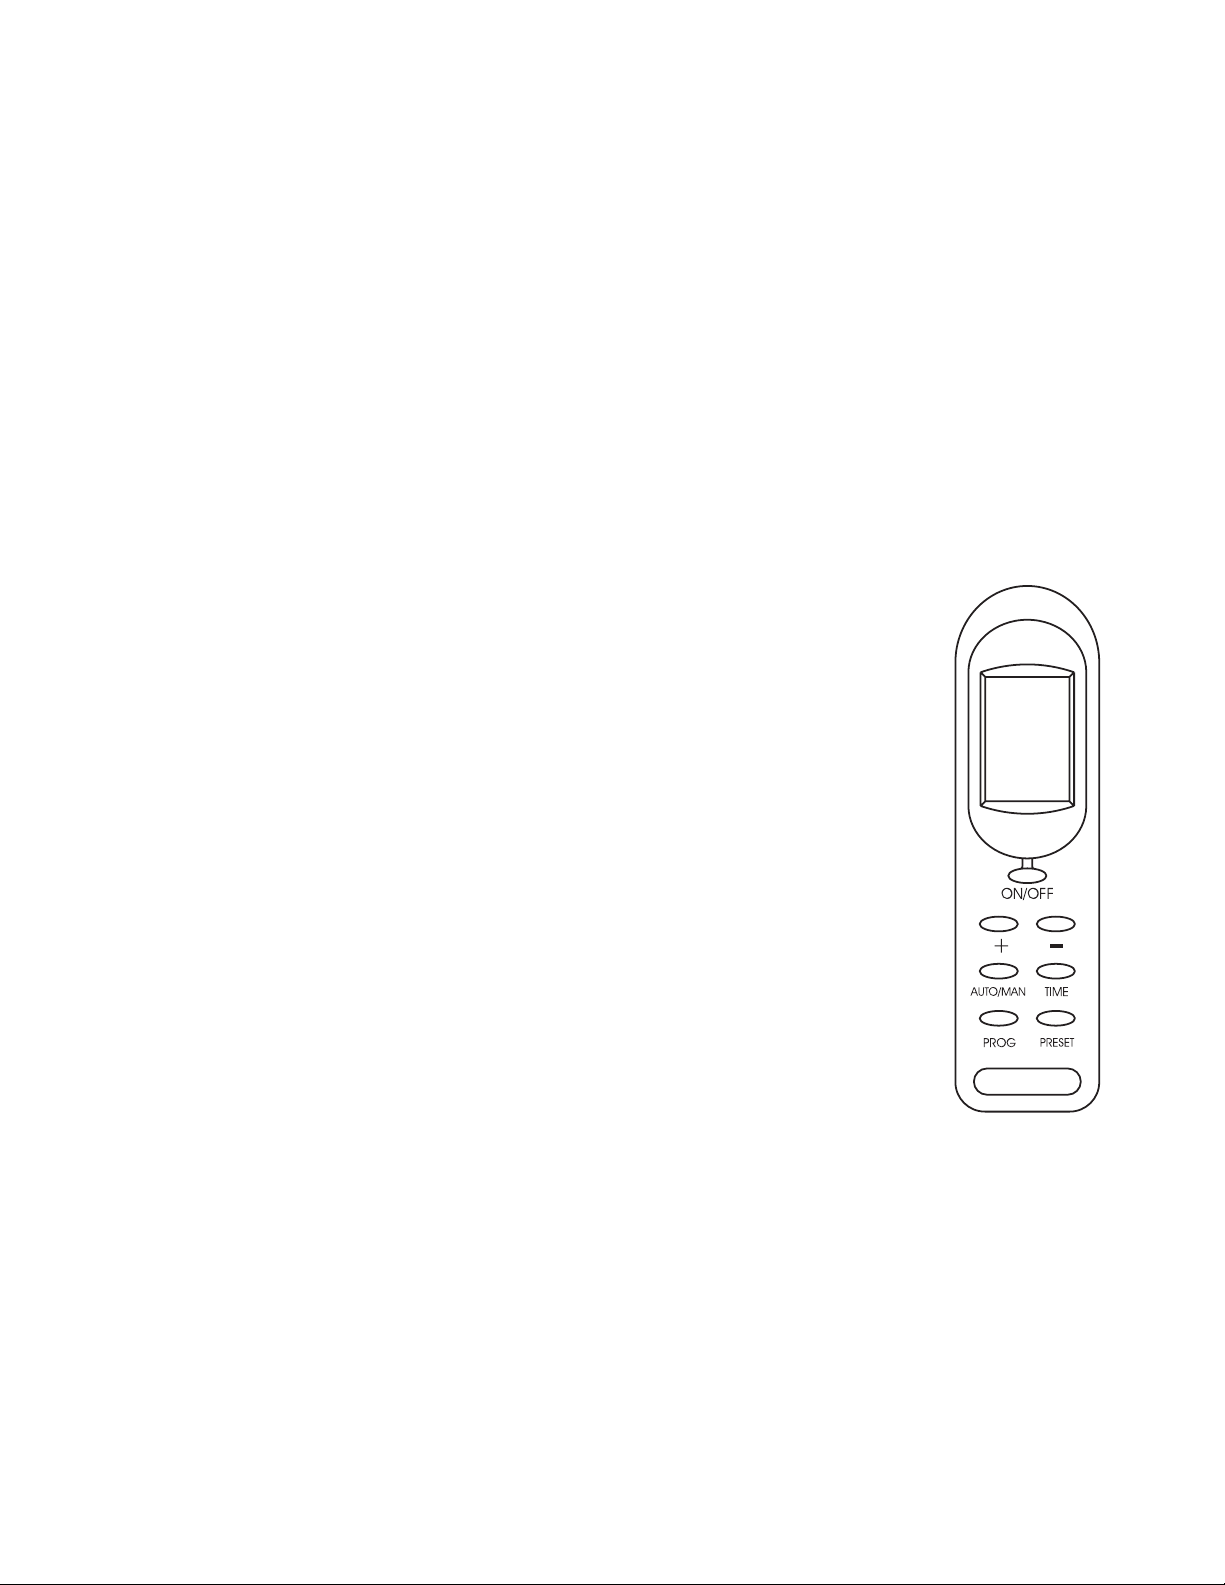
REMOTE CONTROL KEYPAD
There are 7 push buttons on the Remote Control:
(1) ON/OFF Button: Switches the Remote ON or OFF;
(2) “+” Button: This is the INCREMENT or HOUR button;
(3) “-” Button: This is the DECREMENT or MINUTE button;
(4) AUTO/MAN Button: Toggles between Manual, Auto and Program mode;
(5) TIME Button: Initiates the setting of the Time and Day;
(6) PROG Button: Initiates the programming for Auto mode;
(7) PRESET Button: Restores factory set programs;
Remote Control
FPI FireGenieTM Remote Control Manual 5
Page 6
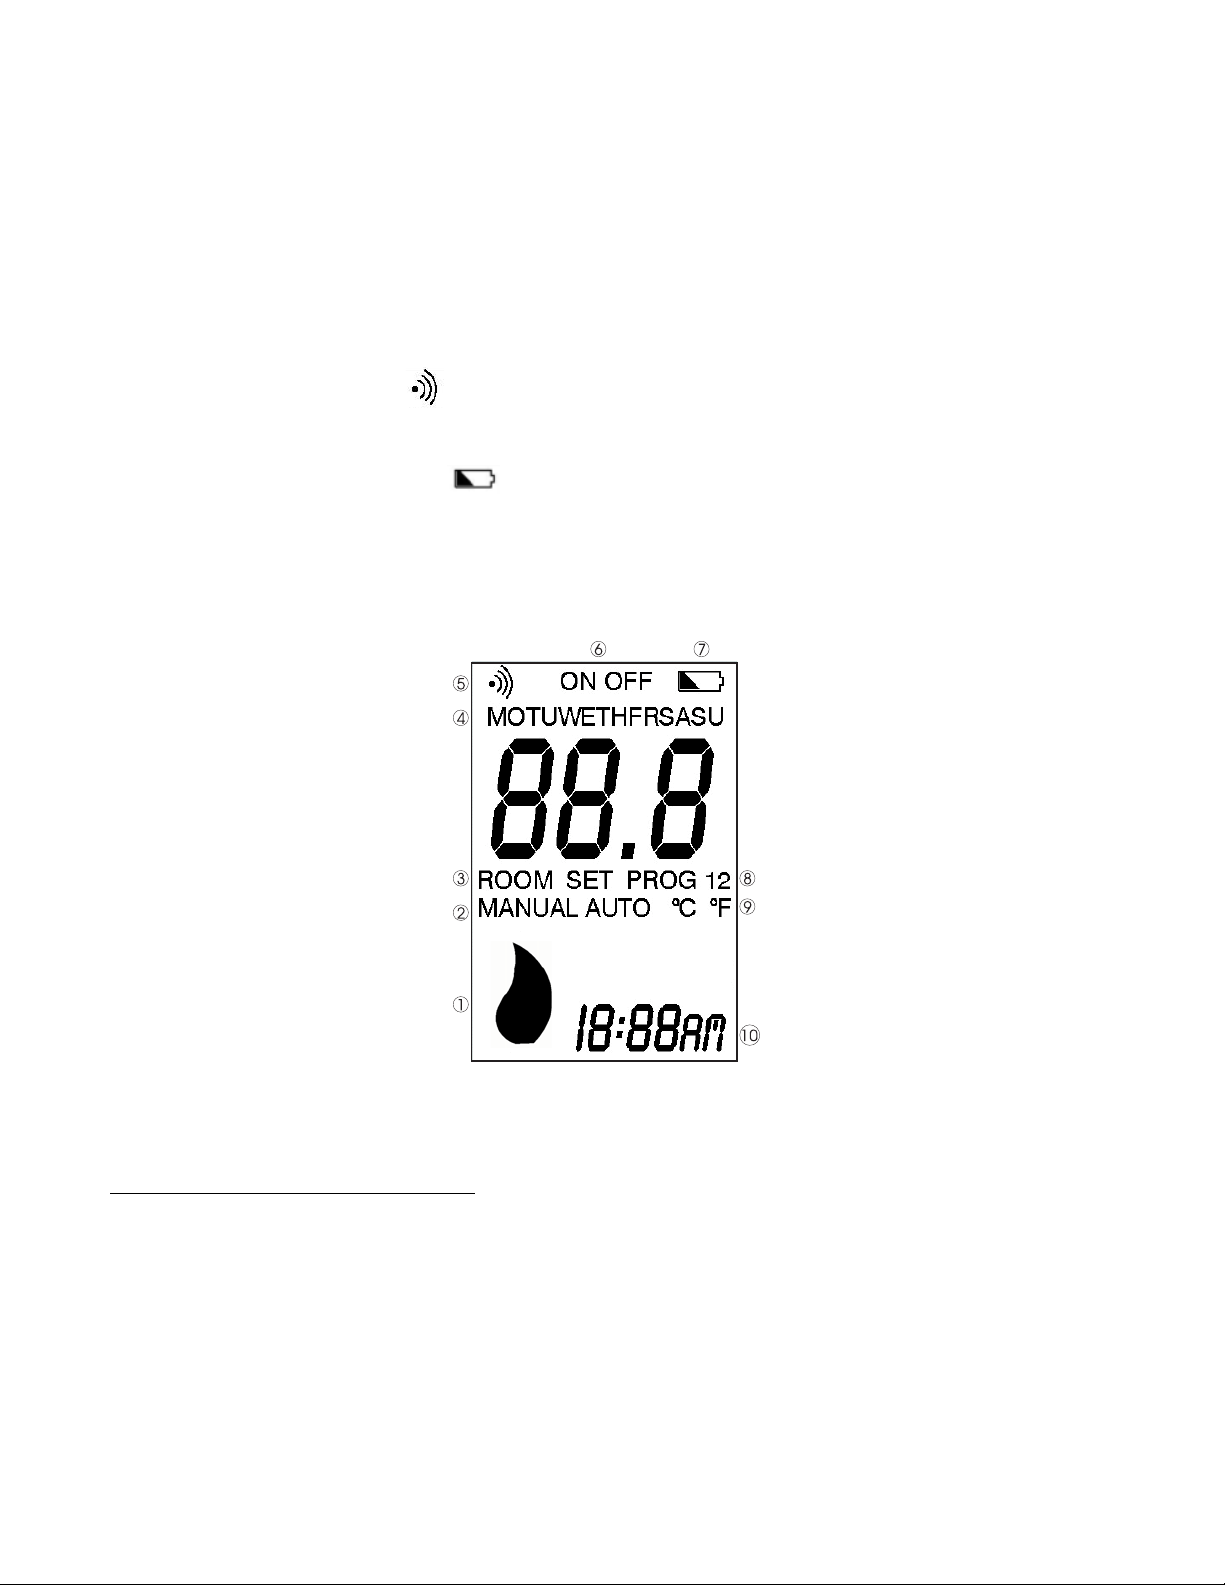
REMOTE CONTROL SCREEN DISPLAY (LCD)
The LCD provides the following display features:
1. Flame Indication;
2. Manual & Auto Mode Indication - “MANUAL” / “AUTO”;
3. “ROOM” or “SET” Temperature Indicator;
4. Day of Week;
5. Transmit Indicator “
6. System Status Indicator “ON” or “OFF”;
7. Battery Low Indicator “
8. Programmed Mode Indication “PROG 1” / “PROG 2”;
9. Temperature Display in “ºC” or “ºF”;
10. Time of Day with AM, PM;
” ;
“
REMOTE CONTROL — BASIC FUNCTIONS
Switching the Remote ON & OFF
The On/Off button is used to switch the Remote Control ON or OFF.
If the Remote Control is switched OFF, pressing and releasing the On/Off button will switch ON the
Remote Control. Once switched ON, the Remote Control will continue with its last selected operating
mode, for example, Manual, Auto or Program mode. When the Remote Control is OFF, the LCD display
continues to show the current day, time and room temperature.
FPI FireGenieTM Remote Control Manual6
Page 7
Setting Time & Day
Note: The Remote Control Keypad must be “ON” in order to set the Time & Day.
Time
Press and hold the “TIME” button for 2 seconds and then use the “+” button to set the hour and
use the “-” button to set the minute.
Day
Press the “TIME” button again and use the “+” or “-” button to set the day.
Press the “TIME” button once more to record the setting.
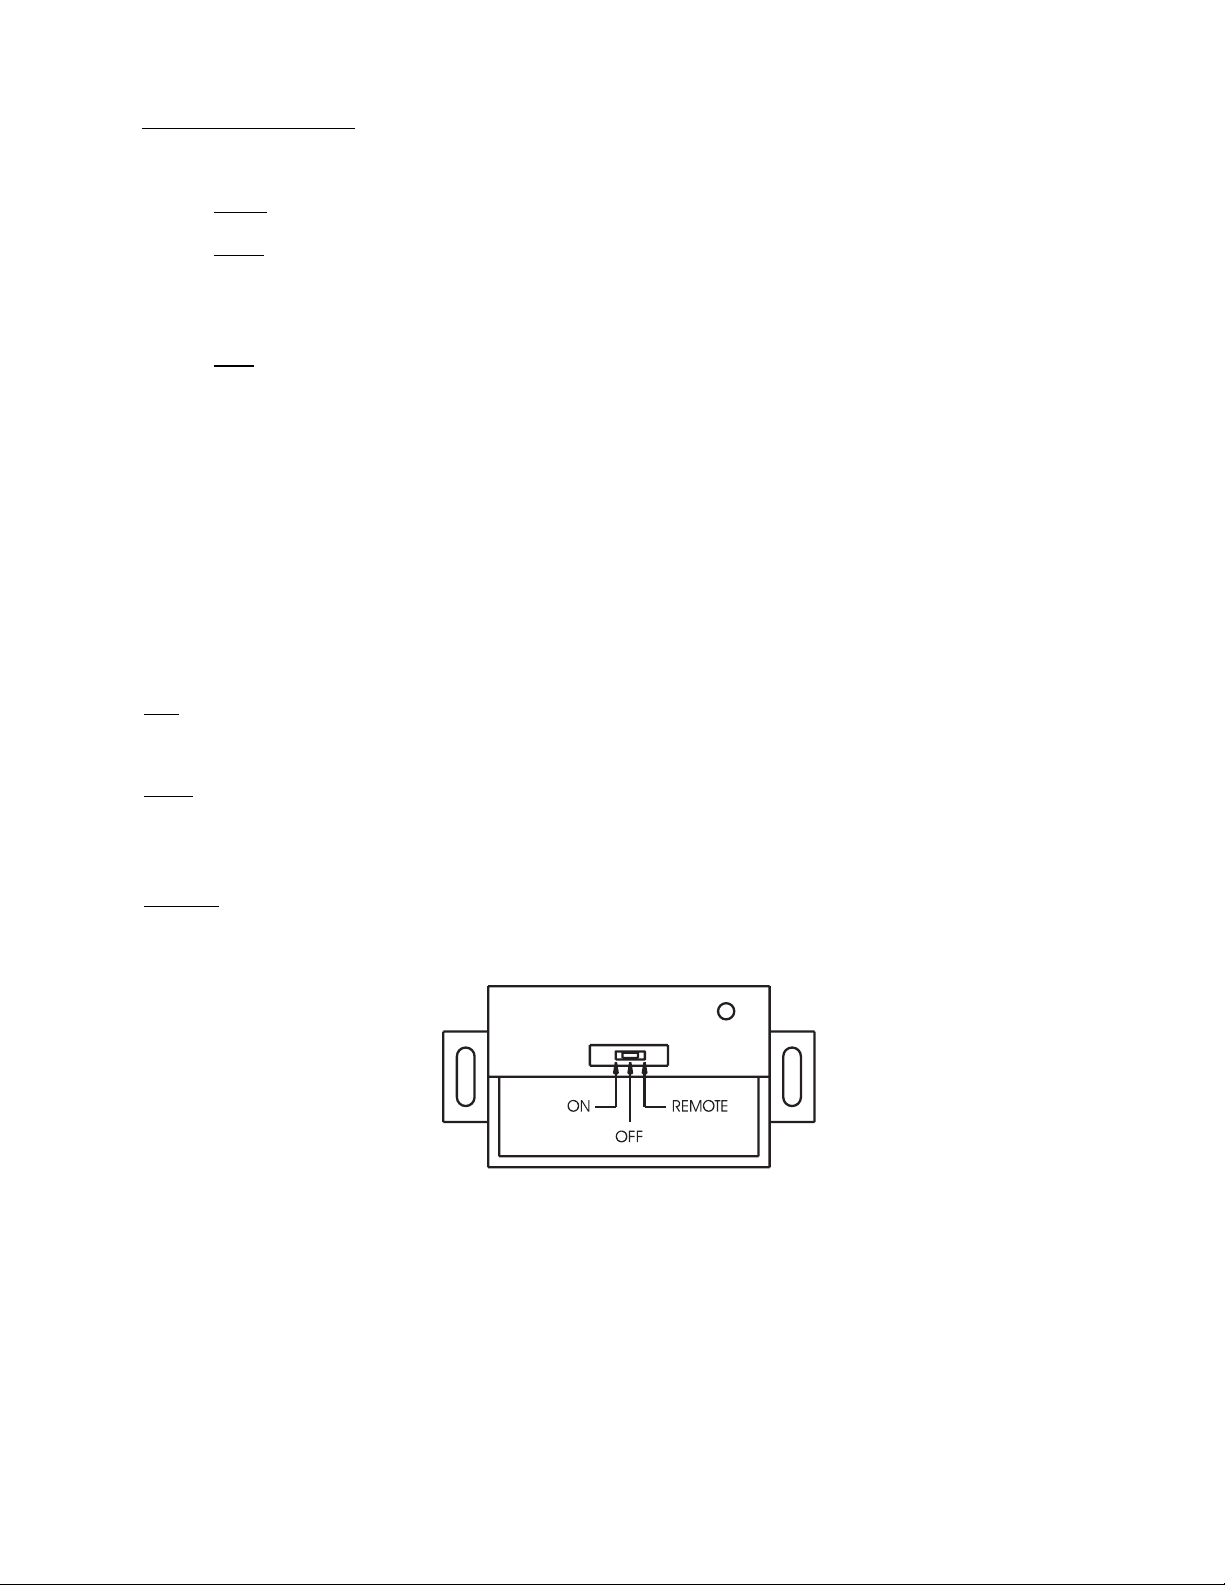
RECEIVER OPERATION
The Remote Receiver has 3 operating modes, namely ON, OFF and Remote. The operating mode is
selected by means of a slide switch on the front panel of the Receiver.
ON: When “ON” Mode is selected, the fl ame will turn ON.
OFF: When “OFF” Mode is selected, the fl ame will turn OFF. However, the unit can be turned ON
or OFF with the standard ON/OFF switch.
Remote: When Remote Mode is selected, the Receiver will turn the fl ame ON or OFF depending on
the setting of the Remote Control.
Receiver
FPI FireGenieTM Remote Control Manual 7
Page 8
MANUAL MODE
p
p
Note: Ensure the Remote Control has been turned ON in order to operate in this mode.
Manual mode can be selected by pressing and releasing the AUTO/MAN button until the symbol
“MANUAL” is shown on the LCD.
In Manual mode, the Flame can be turned on and off using the Remote Control via the ON/OFF button.
AUTO MODE
There is a 3-minute delay built into the Remote Control. This delay will affect the “AUTO” and “PROG”
modes only. Which means the unit may not respond to specifi c instructions instantly when in either of
these 2 modes.
Note: Ensure the Remote Control has been turned “ON” in order to operate in this mode.
In Auto Mode the Remote Control operates as a thermostat to turn the fi re on and off depending on what
temperature setting it has been programmed to.
Auto mode can be selected by pressing and releasing the AUTO/MAN button until the symbol “AUTO”
is shown on the LCD.
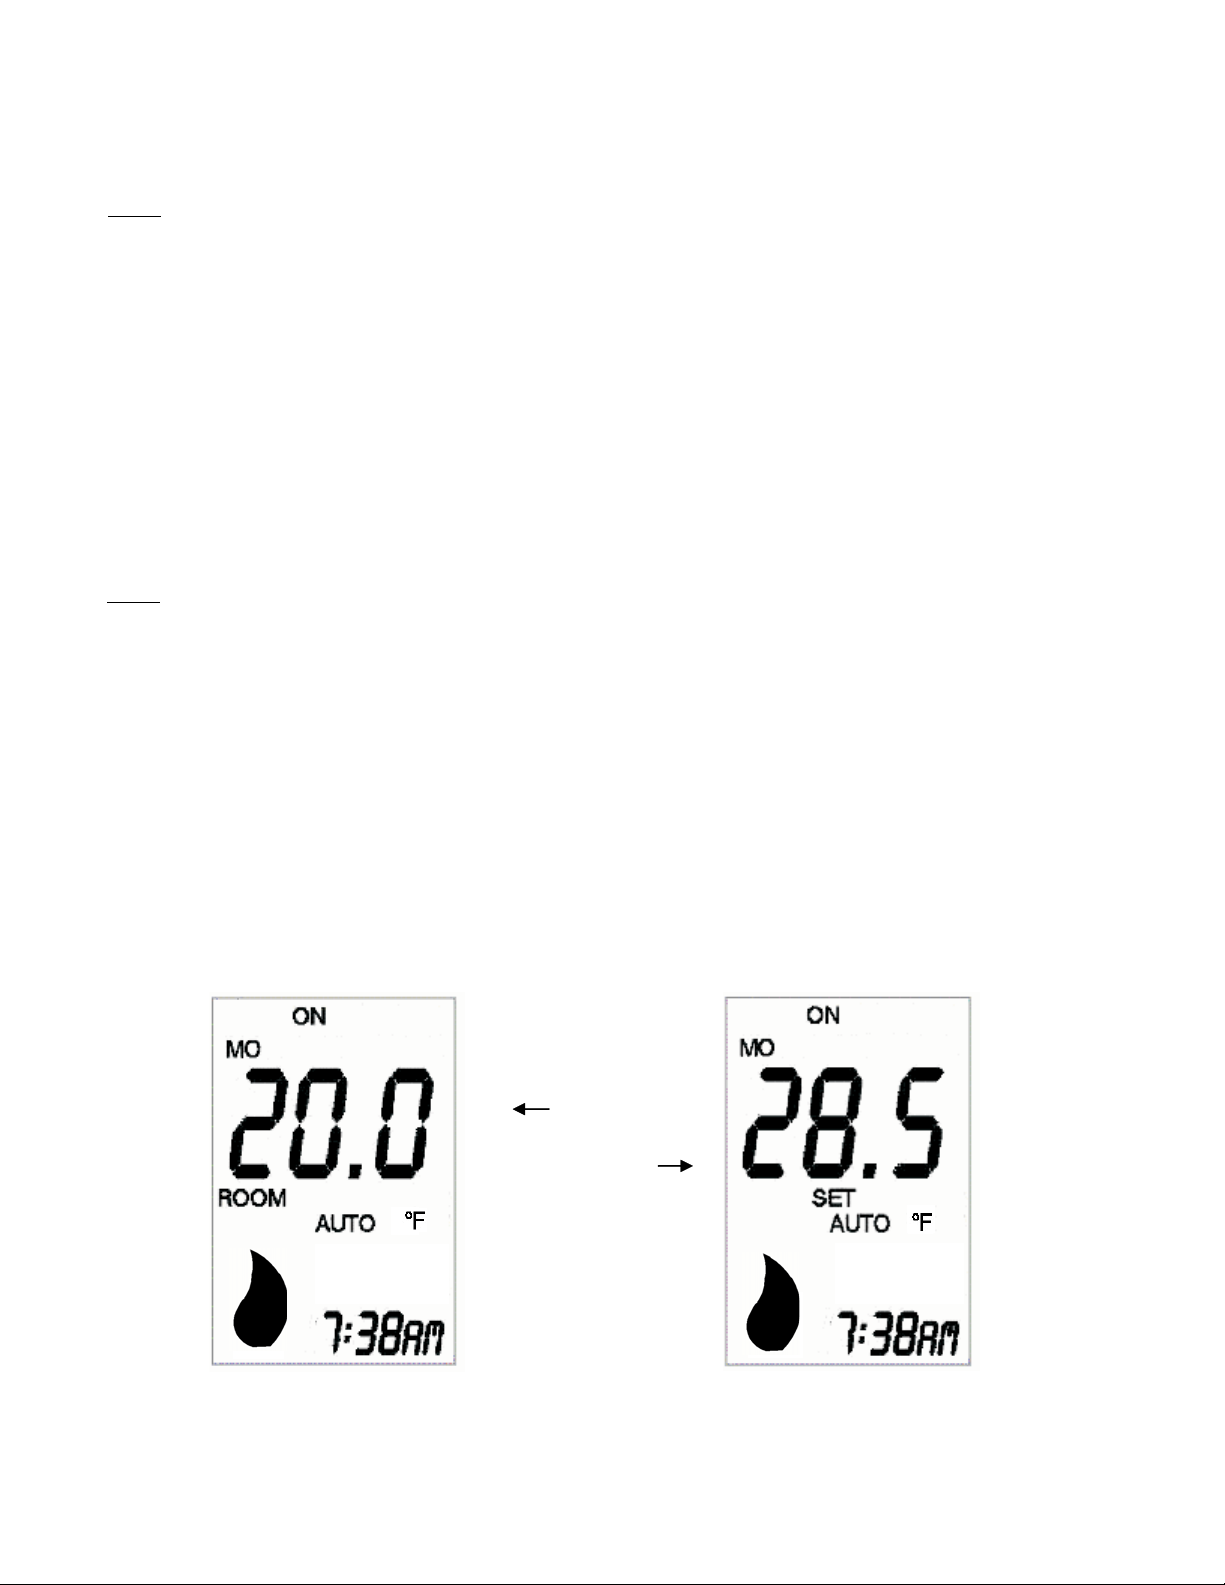
In Auto mode, when either the “+” or “-” button is pressed, the Set Temperature will be displayed on the
LCD instead of the Room Temperature. The Set Temperature will remain displayed on the LCD for 5
seconds after the button is released and then the display will revert to show the Room Temperature. The
Set Temperature can be adjusted while it is displayed using the “+” and “-” buttons.
The LCD will show the following when either the “+” or “-” button is pressed:
Room
Tem
Set
Tem
erature
erature
Auto Mode normal
display
When “+” or “-”
button is pressed
FPI FireGenieTM Remote Control Manual8
Page 9

ADVANCED FUNCTION - PROGRAM MODE
Note: Ensure the Remote Control has been turned ON in order to operate in this mode.
Program mode is selected by pressing and releasing the AUTO/MAN button until the symbol
“PROG” is shown on the LCD. The Remote Control will operate according to the settings in the 2
Time Periods programmed by the user. Refer to Setting the Program Mode for details.
The Remote Control has been pre-programmed with the following default factory program:
Time Period On-Time Off -Time Set Temperature (°F)
1 – Mon. – Fri. 6:00 am 8:00 am 71.5
1 – Sat. – Sun. 7:00 am 10:00 am 71.5
2 – Mon. – Fri. 5:00 pm 10:00 pm 71.5
2 – Sat. – Sun. 4:00 pm 11:00 pm 71.5
By pressing and holding the PRESET button for 10 seconds or longer, the Remote Control’s programs
will be reset to the above default factory set program.
Pressing and releasing the PROG button successively will allow the user to review the programmed
times for each day of the week.
To exit this mode wait approximately 20 seconds after the last button is released or press the ON/OFF
button twice to return to the last operating mode.
If the Time Periods have not been programmed in the Remote Control, the display will show the
following:
Programs have not been set.
FPI FireGenieTM Remote Control Manual 9
Page 10

SETTING THE PROGRAM MODE
The user can program two On-Times and two Off-Times as well as the Temperature settings for each
day of the week. The PROG button is used to initiate the programming mode. The “+” and “-” buttons
are used to adjust the time and temperature settings.
Note: The Remote Control must be “ON” in order to set the Programs.
To change or re-program your Remote Control, confi rm that the Remote Control is in program mode.
“PROG” will be displayed on the LCD. Hold the “PROG” button down for 2 seconds, you will see
“PROG” and the Time both fl ash. Continue through the set-up instructions.
Follow the steps below to set the programs:
1) Programming the On-Time of Time Period 1
Press and hold the PROG button for 2 seconds or more to initiate the Programming mode.
The symbol “PROG 1” will fl ash to indicate the Remote is in Programming mode.
The On-Time for Time Period 1 will also fl ash. The “+” and “-” buttons can be used to adjust
this time setting.
The LCD will show the current setting in Time Period 1 for Monday:
Programming of Time Period 1
Programming of Time Zone 1
Time Period 1 On-Time
Time Zone 1 On-Time
FPI FireGenieTM Remote Control Manual10
Page 11

2) Programming the Off -Time of Time Period 1
Press and release the PROG button again to program the Off-Time for Time Period 1. Use the
“+” and “-” buttons to adjust this time setting.
The LCD will show the following:
Programming of Time Period 1
Programming of Time Zone 1
Time Period 1 Off -Time
Time Zone 1 Off-Time
3)
Programming the Set Temperature of Time Period 1
Press and release the PROG button again to program the Set Temperature. Use the “+” and “-”
buttons to adjust the temperature setting.
Time Period 1 Set Temperature
Time Zone 1 Set Temperature
Programming of Time Period 1
Programming of Time Zone 1
FPI FireGenieTM Remote Control Manual 11
Page 12

4) Programming the On-Time of Time Period 2
Press and release the PROG button again to program the On-Time of Time Period 2. Use the
“+” and “-” buttons to adjust this time setting.
The LCD will show the following:
Programming of Time Period 2
Programming of Time Zone 2
Time Period 2 On-Time
Time Zone 2 On-Time
5)
Programming the Off -Time of Time Period 2
Press and release the PROG button again to program the Off-Time of Time Period 2. Use the
“+” and “-” buttons to adjust this time setting.
The LCD will show the following:
Programming of Time Period 2
Programming of Time Zone 2
Time Period 2 Off -Time
Time Zone 2 Off-Time
FPI FireGenieTM Remote Control Manual12
Page 13

6) Programming the Set Temperature of Time Period 2
Press and release the PROG button one more time to program the Set Temperature of Time
Period 2. Use the “+” and “-” buttons to adjust the temperature setting.
See step 7b) immediately if you would like to copy the set program over to other days of the
week.
Time Period 2 Set Temperature
Time Zone 2 Set Temperature
Programming of Time Period 2
Programming of Time Zone 2
7a) Programming the Rest of the Week
Repeat steps 2 to 6 until all 7 days have been programmed.
7b) Alternatively, Copy Programs Over to the Other Days
While the Set Temperature of Time Period 2 is still fl ashing, pressing and holding the PROG
button for 2 seconds or longer will initiate the copying process.
Time Period 2 Set Temperature
is fl ashing.
FPI FireGenieTM Remote Control Manual 13
Page 14

The “Day”, “Set Temperature” and “Prog 2” will all begin to fl ash simultaneuosly, indicating that
Copy Mode has been activated.
Pressing and releasing the “+” button will select the Day(s) of which the program is to copy to.
Pressing and releasing the “-” button will confi rm the copying process in which the original
program will copy across to the selected day(s).
The next day of the week fl ashes.
2
Once the programs have been copied over to the other days of the week, the Remote Control
will automatically return to normal Program mode after the last button is released, after
approximately 20 seconds.
8) Exiting Program Mode
1) The Remote Control will automatically exit the Program mode 20 seconds after the last
button is released or
2) By pressing the ON/OFF button twice, the Remote Control will return to the last
operating mode.
There are 2 ways to exit Program Mode;
FPI FireGenieTM Remote Control Manual14
Page 15

INSTALLING THE RECEIVER
1. Make sure the slide switch on the
Receiver is at the “OFF” position.
2. Connect the output cable of the
Receiver to the valve.
Refer to the unit instruction manual
for wiring details.
Installing the Receiver to a Wall Mount
a. Secure the Receiver to the wall receptacle box.
b. Use the screws provided to secure the face plate to the Receiver.
Installation of
the Receiver to a
Junction Box
FPI FireGenieTM Remote Control Manual 15
Page 16

Installing the Receiver to a Fireplace
1) Remove Control Switch from Remote Receiver
by pulling out gently.
Control
Switch
Remote
Receiver
2) Remove spring loaded Battery Pack by pushing
in and then pulling out.
Battery
Pack
4) Place Heat Shield over Receiver. Be careful not
to crimp wires under edge of Shield.
Heat
Shield
Receiver
5) Secure Heat Shield onto Receiver with 2 x #10 x
1/2” screws. Ensure the bottom of the Heat Shield
is fl ush with the Receiver as shown in the diagram
below.
3) Remove Receiver from Bracket and discard
bracket. (This Bracket is no longer required after
this step.)
Bracket Receiver
NOTE: After this step, installation of the E21 differs
from the rest of the units. Please follow steps specifi ed
for the E21.
6) Re-install Battery Pack and Control Switch by
reversing steps 2 and 1 only.
FPI FireGenieTM Remote Control Manual16
Page 17

Continuation For E21 Installation Only
4) Remove Bottom Glass Trim.
5) Place Remote Receiver under fi rebox.
Firebox
Remote
Receiver
6) Place Heat Shield over Receiver.
Heat
Shield
7) Secure Heat Shield with 2 screws as shown
below.
8) Ensure wires do not touch base of fi rebox.
9) Re-install Bottom Glass Trim.
Remote
Receiver
FPI FireGenieTM Remote Control Manual 17
Page 18

TROUBLESHOOTING
If the Remote Control does not turn on:
• Check to see that the Receiver is in the “Remote” position.
• Ensure the batteries are correctly installed in the Receiver.
• Check the batteries for replacement.
When batteries are replaced, only the current time and day will need to be reset. The set program times
are not affected.
Battery Replacement
The Remote Control takes 2 x AAA alkaline batteries.
To replace simply remove the Cover from the back of the Remote Control, take out the old
batteries and replace with new ones.
The Receiver takes 4 x AA alkaline batteries.
To replace, simply remove the Spring Loaded Battery pack from the Receiver by pushing in
and then pulling out. Then remove the Cover from the top of the Receiver, take out the old
batteries and replace with new ones.
IMPORTANT NOTE
When there is no signal from the Remote Control to the Receiver
either when the battery is low or the remote is out of range, the unit
will automatically shut down in 4 hours +/- 48 minutes.
FPI FireGenieTM Remote Control Manual18
Page 19

Special Conditions in Program Mode
o If the On-Time of a Time Period matches the Off-Time of the same Time Period, the Time
Period is disabled.
o If the Off-Time of the First Time Period crosses over to the On-Time of the second Time
Period, the Off-Time of the fi rst Time Period will have precedent, for example, if Time Period
1 is programmed to end at 2:00 pm whereas Time Period 2 is programmed to commence at
1:00 pm, the following will occur:
Time Period 1
On-Time Off-Time
8:00 am 2:00 pm
1:00 pm 4:00 pm
On-Time Off-Time
Time Period 2
Operates in Time Period 1 Setting Operates in Time Period 2 Setting
Displaying Temperature in Celsius or Fahrenheit
The default setting of the Remote Control is to display the temperature in Fahrenheit.
However, the Remote Control can be changed to display temperature in Celsius by the following
steps:
1. Ensure the Remote Control is switched off by using the On/Off button.
2. Press and hold the “-” button.
3. While the “-” button is held down, press and release the “+” button, this will toggle the
temperature display between °C and °F.
This setting is stored in memory hence the Remote Control will continue to display the
temperature in Celsius even if the battery is replaced.
FPI FireGenieTM Remote Control Manual 19
Page 20

NOTES:
FPI FireGenieTM Remote Control Manual20
Page 21

NOTES:
FPI FireGenieTM Remote Control Manual 21
Page 22

NOTES:
FPI FireGenieTM Remote Control Manual22
Page 23

FPI FireGenieTM Remote Control Manual 23
Page 24

IMPORTANT!
The transmitter and receiver in this box must be
coded together before proceeding to program the
remote to function.
Please follow the instructions under “Matching
Remote Control and Receiver ID Code” on page 4
in the enclosed manual, and follow the coding
instructions carefully. Failure to code these together will
result in malfunction of the remote control device.
FireGenieTM is a trademark of FPI Fireplace Products International Ltd. Printed in Canada
FPI FireGenieTM Remote Control Manual24
 Loading...