

Page 1

Contents
Introduction.........................................................................................1
Installation...........................................................................................2
In Use.................................................................................................3
Front Panel Switches......................................................................4-5
Front Panel Display............................................................................6
Use of the Tuner..............................................................................7-8
Back Panel.........................................................................................9
Aerial Information.............................................................................10
The optional Remote Control...........................................................11
Additional Functions........................................................................12
Tuning..............................................................................................13
Programming the Pre-sets...............................................................14
Using the Pre-sets...........................................................................15
Use of the Radio in North America..................................................16
Troubleshooting................................................................................17
Reception Problems.........................................................................18
Specifications...................................................................................19
Radio Mk3 Manual v3-3.qxd 14/06/2004 09:49 Page 1
Page 2

1
Introduction
Your Rega Radio 3 has been designed as a high quality source, able
to reproduce a broadcast easily and effectively at a competitive price.
The Radio 3 has been built to Rega's usual discriminating standards
of reliability and quality to ensure many years of musical enjoyment
with improved AM function.
A tuner's function is to oscillate along with the tiny electromagnetic
vibrations that are a radio signal. The ability of a tuner to oscillate at
a stable, predetermined frequency matching that of the signal - is
directly related to its quality.
In addition to meeting this requirement, the Radio 3 allows fine-tuning
between the normal incremental steps. To fully appreciate the quality
of the Rega Radio 3 however, it's only necessary to switch on, sit
back and enjoy the music.
Radio Mk3 Manual v3-3.qxd 14/06/2004 09:49 Page 2
Page 3
2
Installation
The Radio 3 will work well on most surfaces, such as a shelf or
table, provided there is sufficient air around it to prevent
overheating.
For maximum performance place unit as far away as possible from
fridges, cookers, fluorescent lights etc.
Never stack Hi-fi equipment directly on top of one another.
Radio Mk3 Manual v3-3.qxd 14/06/2004 09:49 Page 3
Page 4
3
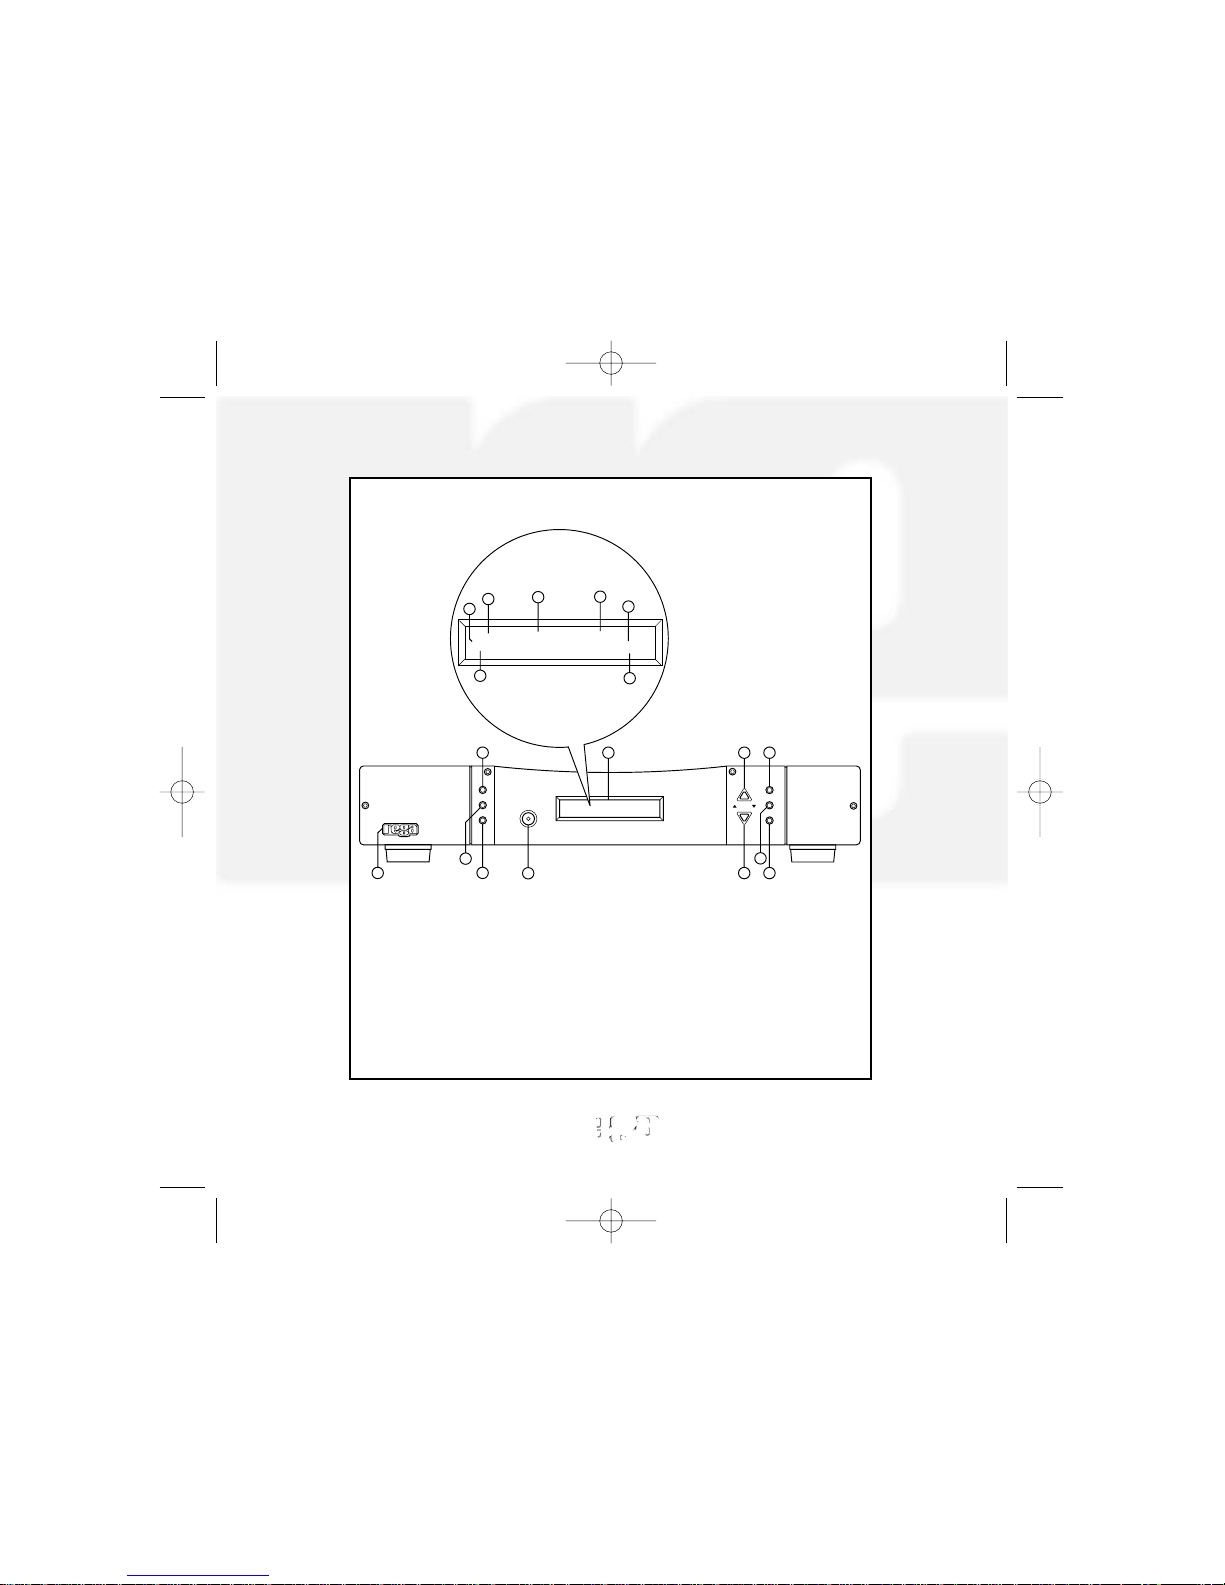
Radio
Preset
Prog
Am/Fm
St./Mono
Pre
Man
Auto
888888 88
STEREO
kHz - MHz
MEMORY
MW
FM/AM
1
2
9
8
34
10
7
c
g
11
56
f
e
d
a
b
888888 88
STEREO
kHz - MHz
MEMORY
MW
FM/AM
a) Memory indicator
b) MW indicator
c) FM/AM indicator
d) Frequency
e) Station Preset Number
f) Stereo indicator
g) kHz/MHz indicator
1) Preset
2) Auto
3) Manual
4) Preset Down / Auto / Manual Tune
5) Preset Up / Auto / Manual Tune
6) Display
7) Power Switch and LED
8) Stereo / Mono Toggle
9) Am / Fm Toggle
10) Program
11) Infra Red Remote Sensor
In Use
Radio Mk3 Manual v3-3.qxd 14/06/2004 09:49 Page 4
Page 5

4
Front Panel Switches
1) Pre-set - Selects Pre-set station mode. The switch will light to
indicate the Pre-set mode is activated.
2) Auto - Selects Auto tune mode, this will enable automatic scan
through the band searching for strong stations available in your
area. The switch will light to indicate the Auto mode is activated.
3) Manual - Selects Manual tune mode, this will step through the
FM and AM bands in steps of 25KHz & 9/10KHz respectively. The
switch will light to indicate the manual mode is activated.
4) Down - Move, scan or step down in Pre-set, Auto or Manual
tuning modes respectively.
5) UP - Move, scan or step up in Pre-set, Auto or Manual tuning
modes respectively.
6) Display - see front panel display on Page 6.
7) Power on/off - This turns the tuner on or off. When the tuner is
off, the microprocessor will stay active. If in the event of a processor
hang-up or crash, the processor can be reset. This is done by
turning the tuner off at the front panel, removing the mains plug from
the back panel and then plugging it in again after a few seconds.
This will not affect any stored data in the memory.
Radio Mk3 Manual v3-3.qxd 14/06/2004 09:49 Page 5
Page 6

5
8) Mono - Places the tuner into Mono mode, the switch will light to
indicate the Mono mode is activated. This will cause the STEREO
logo on the display to go out if you are receiving a stereo signal.
This can improve the audibility of certain programmes by reducing
mush and background noise.
9) AM/FM - Switches between the wavebands. The FM logo will light
on the display to show the tuner is in FM mode, whereas the MW
and AM logo will light to show the tuner is in AM/MW (Medium
Wave) mode.
10) Program - Places the tuner in Program mode, this is used in
conjunction with the Up/Down and Mode switches. When active the
MEMORY logo in the display will be lit.
Radio Mk3 Manual v3-3.qxd 14/06/2004 09:49 Page 6
Page 7

6
Front Panel Display
The display will indicate the following data.
a) Memory - This shows the tuner is in the pre-set station or
Memory Pre-set programming mode.
b) MW & AM - This shows the tuner is in AM mode.
c) FM - This shows the tuner is in FM mode.
d) First six digits - Shows the tuned frequency.
Note - the last digit is not displayed for reasons of clarity, for
example, 100.025 will be displayed as 100.02.
e) Last two digits - Shows the pre-set location number.
f) Stereo - This shows the radio is receiving Stereo broadcast.
g) kHz - This shows the unit of frequency for AM/MW broadcasts.
The kHz logo also performs as a 'tuned' indicator, and will light when
a strong station is tuned in.
g) MHz - This shows the unit of frequency for FM broadcasts. The
MHz logo also performs as a 'tuned' indicator, and will light when a
strong station is tuned in.
Radio Mk3 Manual v3-3.qxd 14/06/2004 09:50 Page 7
Page 8

7
Use of the Tuner
Manual Tune
Select the required waveband, either AM/FM, then press the manual
button. The button will then light up, if you then press the UP or
DOWN buttons you will step through the frequency band selected.
The MHz or kHz logo lighting indicates a tuned station. Stereo logo
will also light if the station is broadcasting in 'stereo'.
Auto Tune
Select the required waveband, either AM/FM, then press the auto
button. The button will then light up, if you then press the UP or
DOWN buttons you will search through the frequency band selected
until the radio fines a strong signal. You can stop the search by
pressing the button again. The radio will tune to stations that
broadcast in stereo and mono. If the radio will not tune in to your
desired station, you will need to use the manual-tuning mode.
Programming the Pre-sets
Use either Auto or Manual to tune to the desired frequency / station.
Press the program button and the memory logo will light on the
display, showing that you are in the programming mode. You must
then choose a pre-set number to store the frequency / station in, this
is done using the UP or DOWN buttons. Once you have chosen the
pre-set number, press the program button once more to store the
frequency / station into that pre-set.
Radio Mk3 Manual v3-3.qxd 14/06/2004 09:50 Page 8
Page 9

8
Note: The pre-set programming will not be lost if the unit is turned
off but you will need to re-select the preset number when turned
back on.
Pre-set Stations
Firstly decide which band you require, either FM or AM/MW, then
press the pre-set button. The button will then light and the memory
logo is displayed, you should also notice that the output level drops
to stop any loud pops, crackles or noise damaging your system
when tuning.
By pressing the UP or DOWN buttons you will move through the
pre-sets until the desired station is reached. The last two digits in the
display show the pre-set number. Now that you have located your
station, press the Pre-set button again to activate it. The Radio will
then return to either Auto or Manual mode and increase the output
level to normal.
If the frequency indicators do not light, then the signal being
received is not strong enough, and you will hear 'white noise'.
Radio Mk3 Manual v3-3.qxd 14/06/2004 09:50 Page 9
Page 10

9
Back Panel
1) FM aerial socket
2) Earth socket
3) AM aerial socket
4) Left channel coaxial input (white)
5) Right channel coaxial input (red)
6) IEC Power input
1
2 3
4 5
6
EARTH
AM
Right Channel
Left Channel
Rega Research Limited, England
Power In
FM
Radio Mk3 Manual v3-3.qxd 14/06/2004 09:50 Page 10
Page 11

10
Aerial Information
The Radio 3 needs to be connected to an aerial to work. The FM
aerial socket (No.1 on 'Back Panel' page 9) is designed to accept a
75Ω coaxial cable. If a 300Ω twin lead wire is used to connect an
aerial, use a 300-75Ω adapter.
The very best results from the Radio 3 will be obtained when using
a multi-element aerial mounted externally.
An aerial will also be needed for AM reception. This should consist
of a simple single wire of 4 meters long, connected to the tuner's AM
socket (No.3 on 'Back Panel' page 9) and if possible laid horizontally
along its length. Try to avoid metal shelving and experiment for the
best reception.
Distant AM reception can be improved* by using a 'long-wire' aerial,
mounted externally, parallel to the ground. This should be a single
wire, up to 30 meters long.
Further improvements may be made by connecting the earth socket
(No.2 on 'Back Panel' page 9) on the Radio, to earth, via a copper
plated rod driven into the ground. A substitute electrical earth, such
as a cold water pipe may also prove effective.
*Please Note: If you are close to a broadcasting aerial, the
reception of local AM stations may actually be worsened by this
method.
Radio Mk3 Manual v3-3.qxd 14/06/2004 09:50 Page 11
Page 12

11
The optional Remote Control
AM/FM
Preset
Tuner
Preset Last
Auto Tune Down
Manual Tune Down
Preset Next
Auto Tune Up
Manual Tune U
p
A
M/FM Toggle
Tuner Input Selector
AM/FM - toggles between the AM and FM bands of the Radio.
Pre-set - Use these two buttons to select a desired pre-set stored in
the Radio memory. When these buttons are pressed the output level
Radio Mk3 Manual v3-3.qxd 14/06/2004 09:50 Page 12
Page 13

12
will drop to stop any pops, crackles or noise damaging your system.
It will return back to normal after the buttons have not been pressed
for 2 seconds.
Additional Functions
(Remote Option Only)
Having purchased your SOLAR remote, it is possible to control your
radio from the comfort of your armchair.
The solar allows you to switch between wavebands (AM/FM) and
the pre-sets stored on your radio. However, the Radio 3 has to be in
auto or manual mode for the remote control to work.
If you are also using a complete Rega setup (remote controllable),
the solar allows you to adjust the volume and input selection as well
as the CD functions too.
Radio Mk3 Manual v3-3.qxd 14/06/2004 09:50 Page 13
Page 14

13
Tuning
Automatic
Using up or down buttons,
press once to activate auto
tune. The Radio will
automatically lock onto a strong
station. Press again to carry on
searching.
Manual
Using up or down buttons,
select desired frequency directly
in steps of 25kHz. A strong signal
will be indicated by the MHz on
FM or kHz on AM/MW lighting in
the display.
NO
YES
Is the signal clear?
YES
Repeat tuning
procedure to
fine tune, or find
another station.
Select the Man(ual)
or Auto(matic) button.
NO
Tuning
finished
Do you want to add this
station to the memory?
Please turn over
to the next page...
Radio Mk3 Manual v3-3.qxd 14/06/2004 09:50 Page 14
Page 15

14
Programming the Pre-sets
NO
Select desired
station or frequency.
Select pre-set location using
Up or Down buttons.
Press Prog(ram)
button.
Finished?
Press Prog(ram) button
again to store station or
frequency into memory.
End
YES
Radio Mk3 Manual v3-3.qxd 14/06/2004 09:50 Page 15
Page 16

15
Using the Pre-sets
Select Pre(-set) button.
Use Up or Down
buttons to select the desired
preset.
Press Pre(-set) button again
to enter the selected station.
Radio Mk3 Manual v3-3.qxd 14/06/2004 09:50 Page 16
Page 17

16
Connect mains lead
and switch tuner on.
Remove mains lead from the
socket on the back panel.
Plug in the mains lead
into the socket on the
back (whilst holding down
the program button)
The tuner is now in
‘9/10kHz Step Change
Mode’. Press the
AM/FM button to toggle
between 10/9kHz
Press the Mono button to
store the frequency step and
return to normal operation mode.
Press Prog(ram) button
and hold down.
Use of the Radio in North America
In North America and Canada AM/MW the broadcast frequency
steps are in 10KHz increments instead of 9KHz as found in Europe.
To change from 9KHz to 10KHz, follow this procedure.
Radio Mk3 Manual v3-3.qxd 14/06/2004 09:50 Page 17
Page 18

17
NO
YES
YES
YES
NO
NO
YES
NO
Troubleshooting
(No sound from speakers)
Is the mains supply
connected and
switched on?
Are the phono
plugs and connecting
cables intact?
Has the fuse in the
plug blown?
Contact your Rega dealer
Plug in
and switch on
Is the mains
socket live?
Rotate the plugs or
replace the leads
Replace the fuse
Check by plugging
in another appliance
Radio Mk3 Manual v3-3.qxd 14/06/2004 09:50 Page 18
Page 19

18
Reception Problems
Contact your Rega dealer
NO
YES
YES
YES
YES
Interference on AM/FM
reception?
Computer and/or
peripherals in
the vicinity?
Move them
Interference or
distortion on FM
reception?
Experiment with
aerial orientation
and positioning
Interference on
AM/FM reception?
(Buzzing or whistles)
Fluorescent lights,
electric motors or
appliances in the vicinity?
Loud humming or
buzzing on one or both
channels?
Move them
(if possible)
Check plugs are
fully inserted
NO
NO
NO
Radio Mk3 Manual v3-3.qxd 14/06/2004 09:50 Page 19
Page 20

19
Specifications
FM section
Input Sensitivity.
Limiting..................................................................................................................................2.8uV
30 dB Quieting..........................................................................................................................4uV
THD Mono..................................................................................................................1KHz 0.08%
6KHz 0.3%
THD Stereo..................................................................................................................1KHz 0.1%
6KHz 0.25%
Signal to Noise Ratio Bandwidth...........................................................................30Hz to 15KHz
Mono 81dB
Stereo 74dB
Frequency Response.............................................................................. 30Hz to 15KHz +/-0.5dB
Stereo Separation 1K 53dB
6K 50dB
10K 39dB
AM Section
Sensitivity...............................................................................................................................10mv
Signal to Noise.......................................................................................................................45dB
THD........................................................................................................................................0.5%
NEC Custom System Remote Control
Radio Mk3 Manual v3-3.qxd 14/06/2004 09:51 Page 20
 Loading...