

Page 1

Planet
CD Player
owners manual
Planet manual.qxd 28/05/2002 10:26 Page 1
Page 2
WARNING
To prevent fire or shock hazard, do not expose the unit to rain or
moisture.
To avoid electrical shock, do not separate the top and bottom case
halves. Refer the servicing to qualified Rega dealers only.
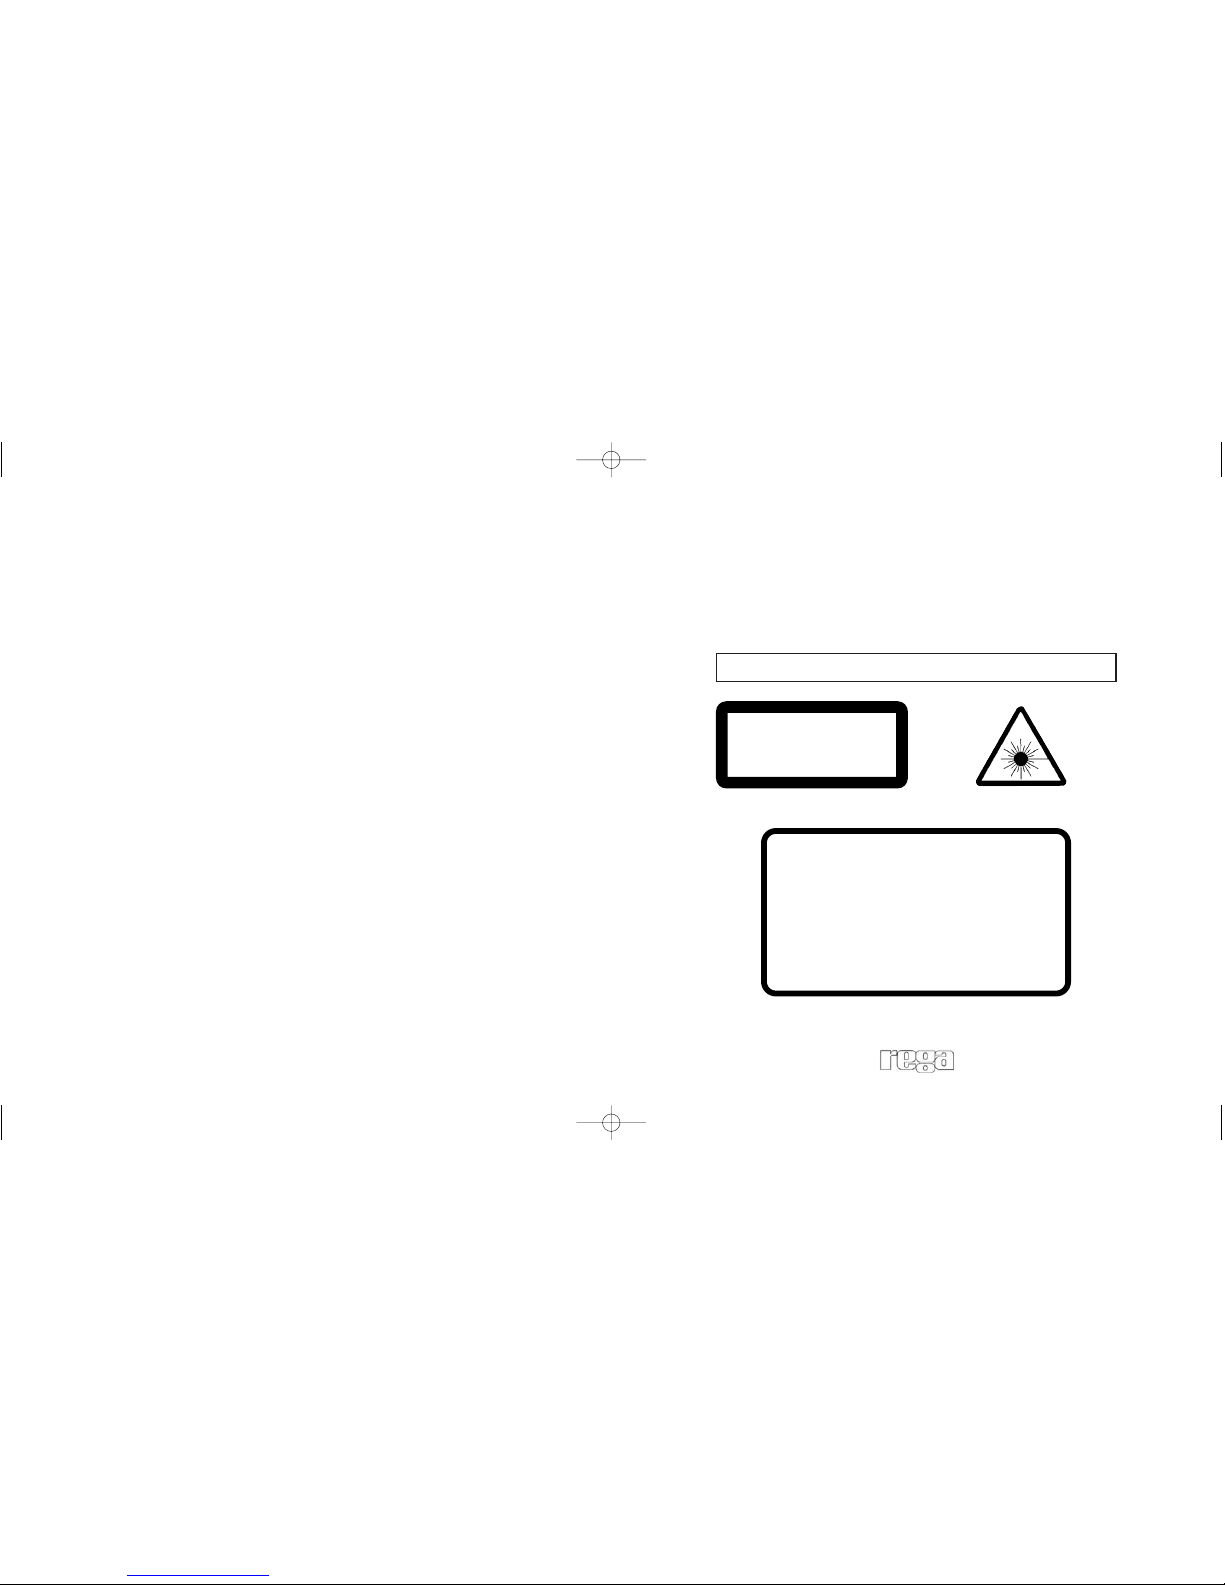
The laser component in this product is capable of emitting radiation exceeding the
limit for Class 1.
CLASS 1
LASER PRODUCT
This appliance is classified as a CLASS 1 LASER product.
This label is located inside the unit.
CAUTION - INVISIBLE LASER RADIATION WHEN OPEN AND INTERLOCKS DEFEATED. AVOID
EXPOSURE TO BEAM.
VORSICHT! - UNSICHTBARE LASERSTRAHLUNG TRITT AUS. WENN DECKEL GEÖFFNET UND
WENN SICHERHEITSVERRIEGELUNG ÜBERBRUCKT IST. NICHT DEM STRAHL
AUSSETZEN!
VARNING - OSYNLIG LASERSTRÅLNING NÅR DENNA DEL ÅR URKOPPLAD. STRÅLEN ÅR FARLIG.
ADVARSEL - USYNLIG LASERSTRÅLING VED ÅBNING NÅR
SIKKERHEDSAFBRYDERE ER UDE AF FUNKTION. UNDGÅ UDSÆTTELSE FOR
STRÅLING.
ATTENTION - RAYONNEMENT LASER ET ELECTROMAGNETIQUE DANGEREUX SI OUVERT AVEC
L'ENCLENCHEMENT DE SECURITE ANNULE.
VARO! - AVATTAESSA JA SUOJALUKITUS OHITETTAESSA OLET ALTTINA NÄKYMÄTTÖMÄLLE
LASERSÄTEILYLLE. ÄLÄ KATSO SÄTEESEEN.
ADVARSEL - USYNLIG LASERSTRÄLING NÄR DEKSEL ÄPNES OG SIKKERHEDSLÄS BRYTES.
UNNGÄ EKSPONERING FOR STRÄLEN.
Planet manual.qxd 28/05/2002 10:26 Page 2
Page 3
Introduction
Your Rega Planet has been designed to be effective, easy to use and
above all - to be more musical than any other CD player. We have
omitted all the useless gimmicks and genuinely concentrated the
manufacturing costs on high quality component parts, and employed
a unique design direction, both necessary to reproduce a musical
sound quality from a digital source of information.
For example: A complex sub-chassis suspension is normally
necessary to isolate the transport. However, they are detrimental to
the sound quality and degrade in time, causing malfunction. Rega
have designed a VCS* foot system which minimises footfall shock,
and therefore eradicates the need for a suspension, while maximising
sound quality by reducing error correction.
Rega’s design skill and the use of extremely high quality components
ensure that your Planet will perform at its optimum.
The tips we give here may help to give you maximum musical
enjoyment and ease of use for many years.
*VCS - Viscous Coupled System
Contents
Introduction.................................................................2
Design Innovation..............................................................3
Installation................................................................4
Interconnects..................................................................4
Output Connections............................................................5
In Use................................................................................6-9
Additional CD Functions.................................................10-17
The handling of CD’s............................................................18
Care of the Player.................................................................19
Troubleshooting..................................................20-22
Specifications...........................................................23
Owners Log...........................................................................24
2
Mission Statement
Rega’s philosophy is to make high quality products at sensible prices, as a means
of reproducing music as faithfully as possible. Rega is committed to the design
and development of new and existing products, both in hi-fi and other areas, that
will perpetuate Rega’s values of quality and value for money.
Planet manual.qxd 28/05/2002 10:26 Page 4
Page 4

Design Innovation
Rega were the last major specialist hi-fi manufacturer to make a CD
player. We have used this time to observe the development of this
medium. Whilst it has become the dominant format, we are still
unimpressed with the majority of products available on the market.
This has encouraged us to develop our own product that comes from
our own philosophies concerning sound quality, reliability and value
for money.
The Planet CD player has a unique sound that harmonises with the
rest of our products and is in contrast to the tonal qualities of most
players.
A top loading design was chosen for several reasons. Firstly,
complex motorised tray mechanisms are vulnerable to wear and
therefore a cause of unreliability. Secondly, the use of our underslung
transport location allows service engineers immediate access to the
next most unreliable part of any CD player (the laser diode
assembly).
Through extensive research we have found that traditional
suspensions in CD players actually encourage error correction, so we
have designed a foot suspension system to absorb the vibrations of
the surroundings without adding resonances to a spinning disc.
Installation
Ensure the operating voltage of the Planet (stated on the rear) is the
same as that of your local power supply.
The Planet will work well on most surfaces, such as a shelf or a table,
stand, or wall bracket.
The Planet should be placed to allow adequate access to the lid and
aperture. If access is limited there is a danger of scratching the CD
when sliding it over the hub.
NOTE: The foot suspension has been designed to absorb the
shock of normal footfalls, but can be made to skip if exposed to
more extreme impacts. If this could be a problem then the player
should be further isolated by a wall bracket or other method.
Interconnects
An interconnect is included with your Planet CD player, which
provides entirely satisfactory performance. Audiophiles may wish to
upgrade to a more exotic interconnect at a later stage, such as
Rega's Couple.
3 4
Planet manual.qxd 28/05/2002 10:26 Page 6
Page 5
Output Connections
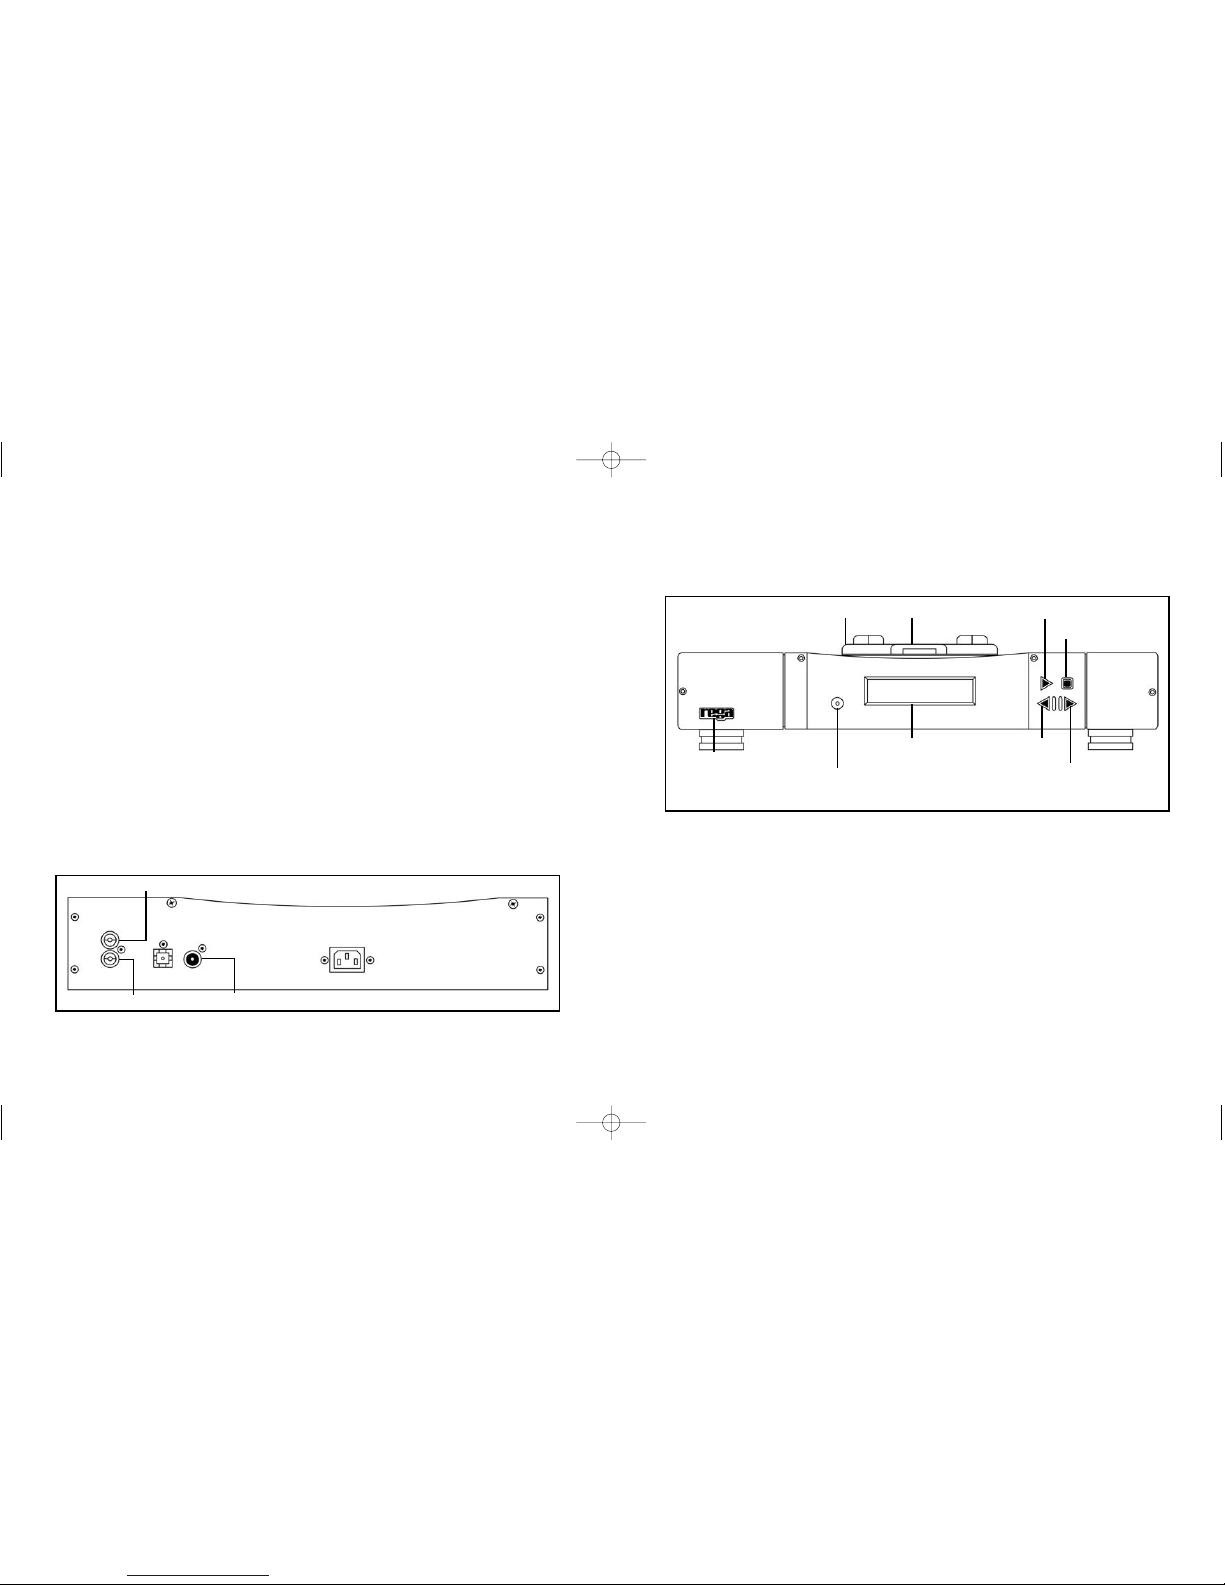
All the outputs are made via RCA (Phono) type connectors. The
sockets on the REGA products are clearly marked red, white and
black.
Line Out: For output to an audio amplifier.
Right: always the lower row and marked in RED.
Left: always the upper row and marked in WHITE.
CAUTION: SOME AMPLIFIERS AND INTERCONNECTS HAVE BLACK COLOUR
CODING FOR THE LEFT CHANNEL.
Digital Out: for output to digital components such as D.A converter,
digital processor, DAT, or MD, and marked in BLACK.
IMPORTANT: ALWAYS TURN OFF THE PLAYER WHEN CHANGING LEADS.
Rear Panel Connections
Powering up
Press the power switch on the front panel, the power indication LED
on the power switch will illuminate.
If there is a disc in the player the number of tracks and the total
running time is briefly displayed, before returning to 0.
If there is no disc in the player, “NO DISC” is displayed.
In Use
RIGHT CHANNEL
OPTICAL
OUT
IEC
LINE OUT
White
Red
Black
Power switch and
power indicator
Lid
Display
Track previous
Track next
Play/Pause
Stop
Finger Lift
Remote
sensor
5 6
LEFT CHANNEL
DIGITAL
OUT
Planet
Planet manual.qxd 28/05/2002 10:26 Page 8
Page 6
Loading a disc
1. Use the finger lift to open the lid.
2. Holding the disc at opposite sides, place onto the hub in
the CD tray.
3. Close the lid - the puck will clamp the disc onto the hub. If
the player is on, the disc will be read. If the player is off,
the disc will be read on power up.
4. To remove the disc: Press STOP if in play mode. When the
disc has stopped playing, lift the lid and remove the disc.
Play/Pause
Press the PLAY button with a disc loaded and the disc will start
playing from track 1.
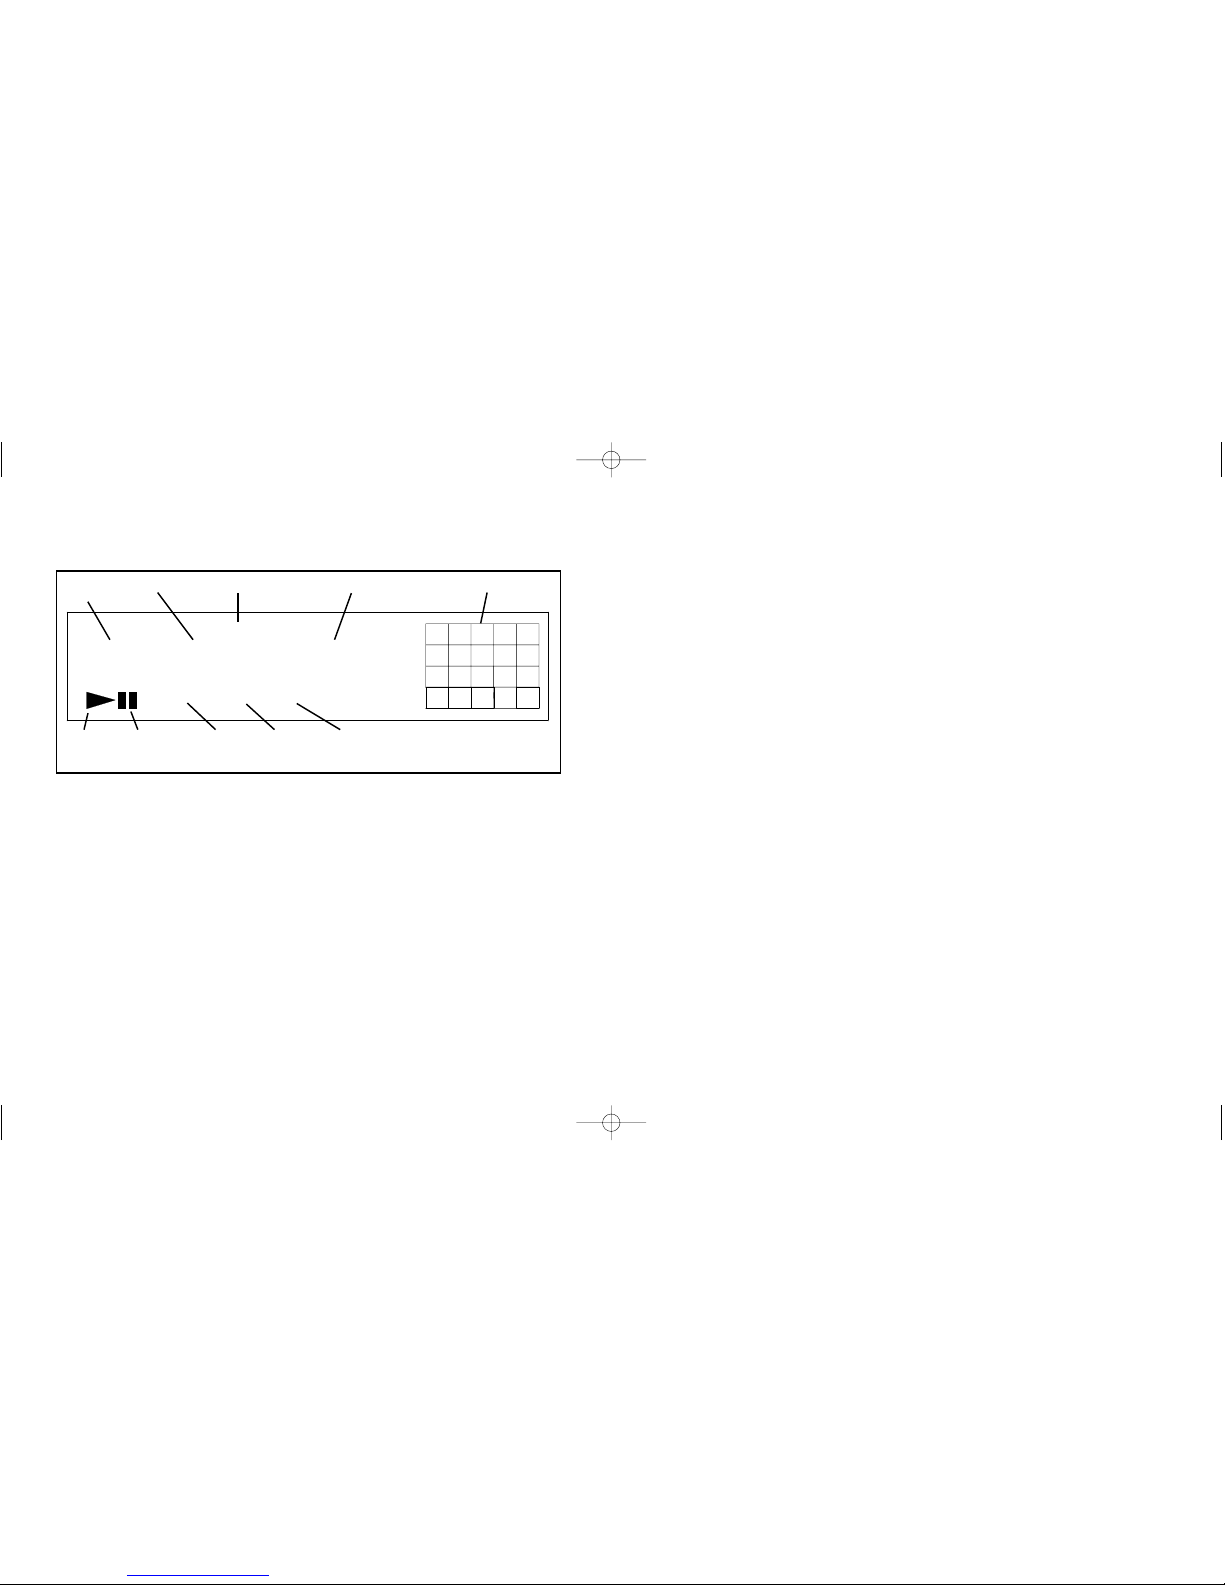
The display will show the play symbol, track number, index number,
and the playing time.
Pressing again toggles between play and pause*. In pause mode the
pause symbol will be displayed.
*Optional Remote Control has separate play and pause buttons.
Stop
Press the STOP button to stop playing the disc. The display will
return to track 0.
1234
6785910
TRACK INDEX SECMINDISC
000000000.000
11 1312
14 15
1816
17
20
19
SHUFFLE PROGRAM REPEAT 1
STEP
Play
Symbol
Pause
Symbol
Shuffle
Mode
Program
Mode
Repeat
Mode
Track
Number
Index
TimeStep Music Calendar
7 8
19
888888888.888
Planet manual.qxd 28/05/2002 10:26 Page 10
Page 7
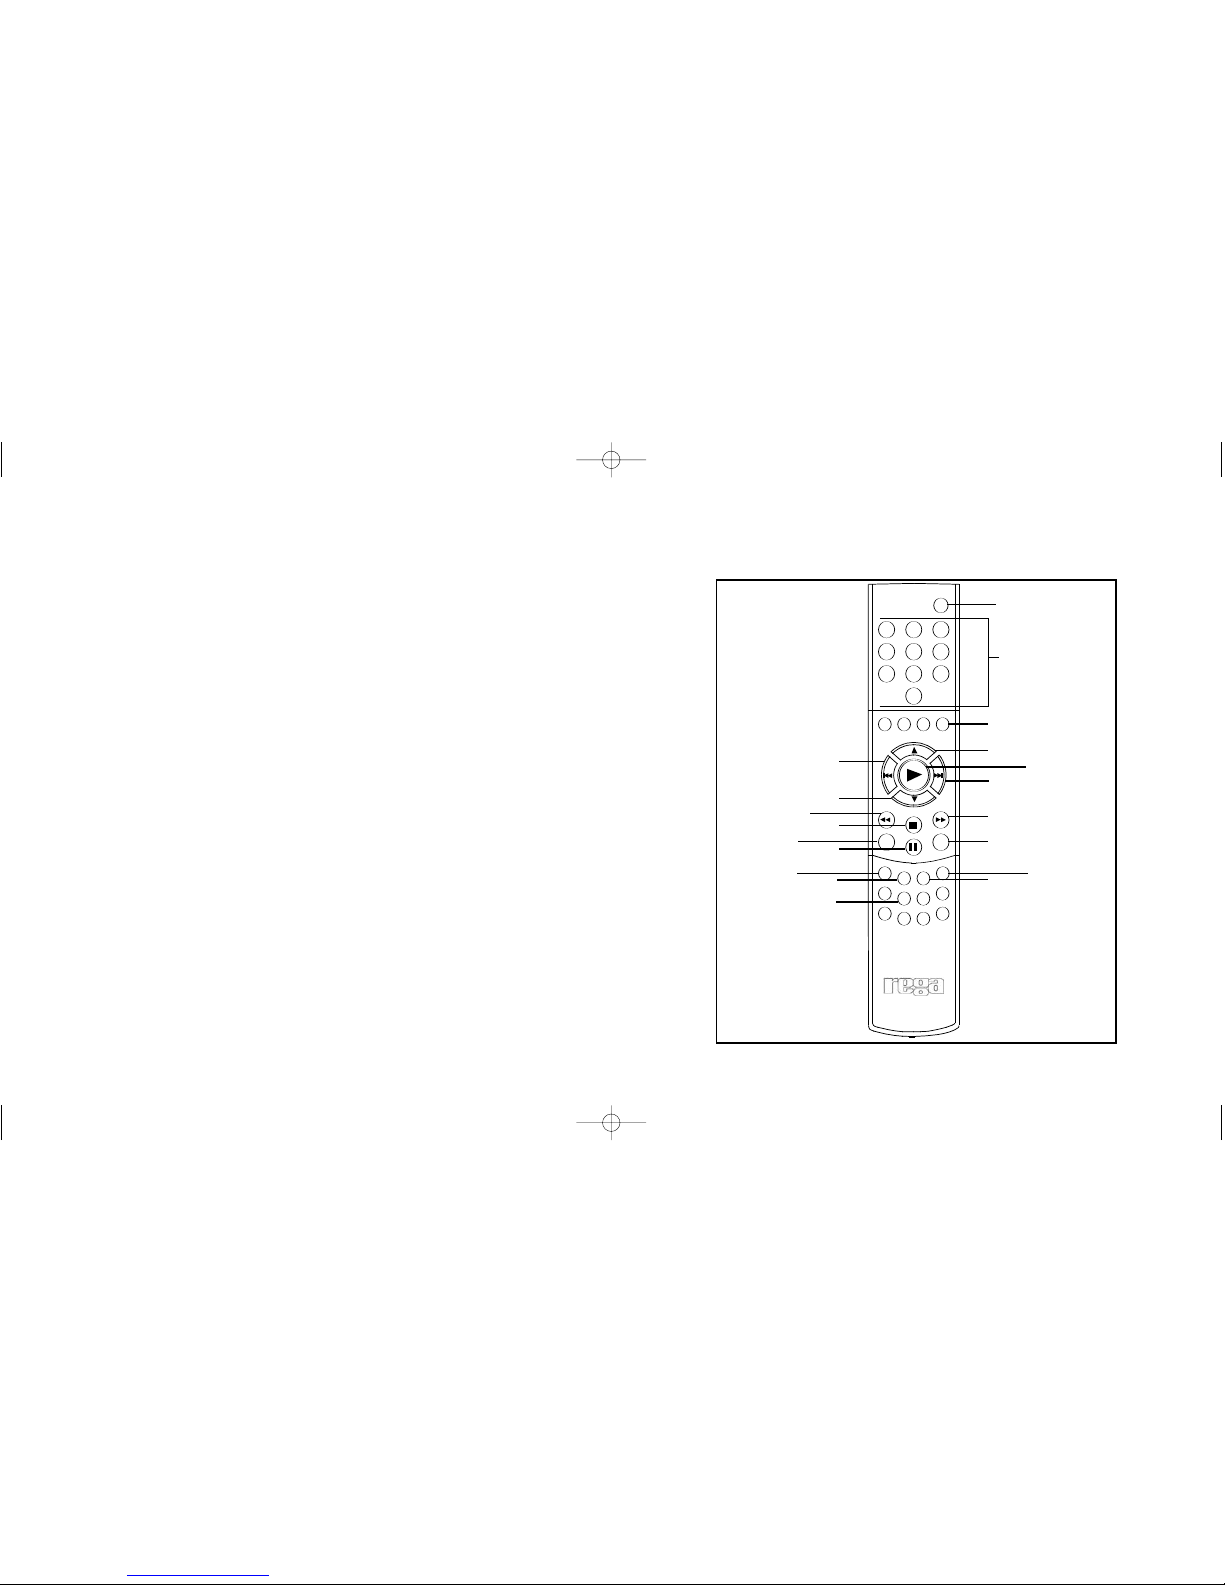
Track Previous
When pressed while the disc is playing, the current track will start
again from the beginning.
Pressing again in quick succession will take you to the start of the
previous track.
Track Next
Pressing once while the disc is playing, the next track will start from
the beginning. Pressing again takes you to the beginning of the next
track after that, etc.......
If the TRACK buttons are pressed in pause and stop modes, a
specific track can be selected, and when the PLAY button is pressed
the selected track will start from the beginning. In the case of stop
mode, if PLAY is not pressed within 16 seconds of track selection, the
display will return to track 0.
>10 (for tracks above 9)
Numeric Keypad
Track previous
Volume (down)
Track next
Play
Volume (up)
>10
123
45
6
7
89
0
Display
CD Display
Stop
Pause
Program
Check
Clear
Time
Repeat
Search forwards
Search backwards
CD input
Shuffle
Repeat
Prog
Check
Clear
Time
CD
Shuffle
10
Additional CD Functions
(Remote Option Only)
9
Solar
Planet manual.qxd 28/05/2002 10:26 Page 12
Page 8
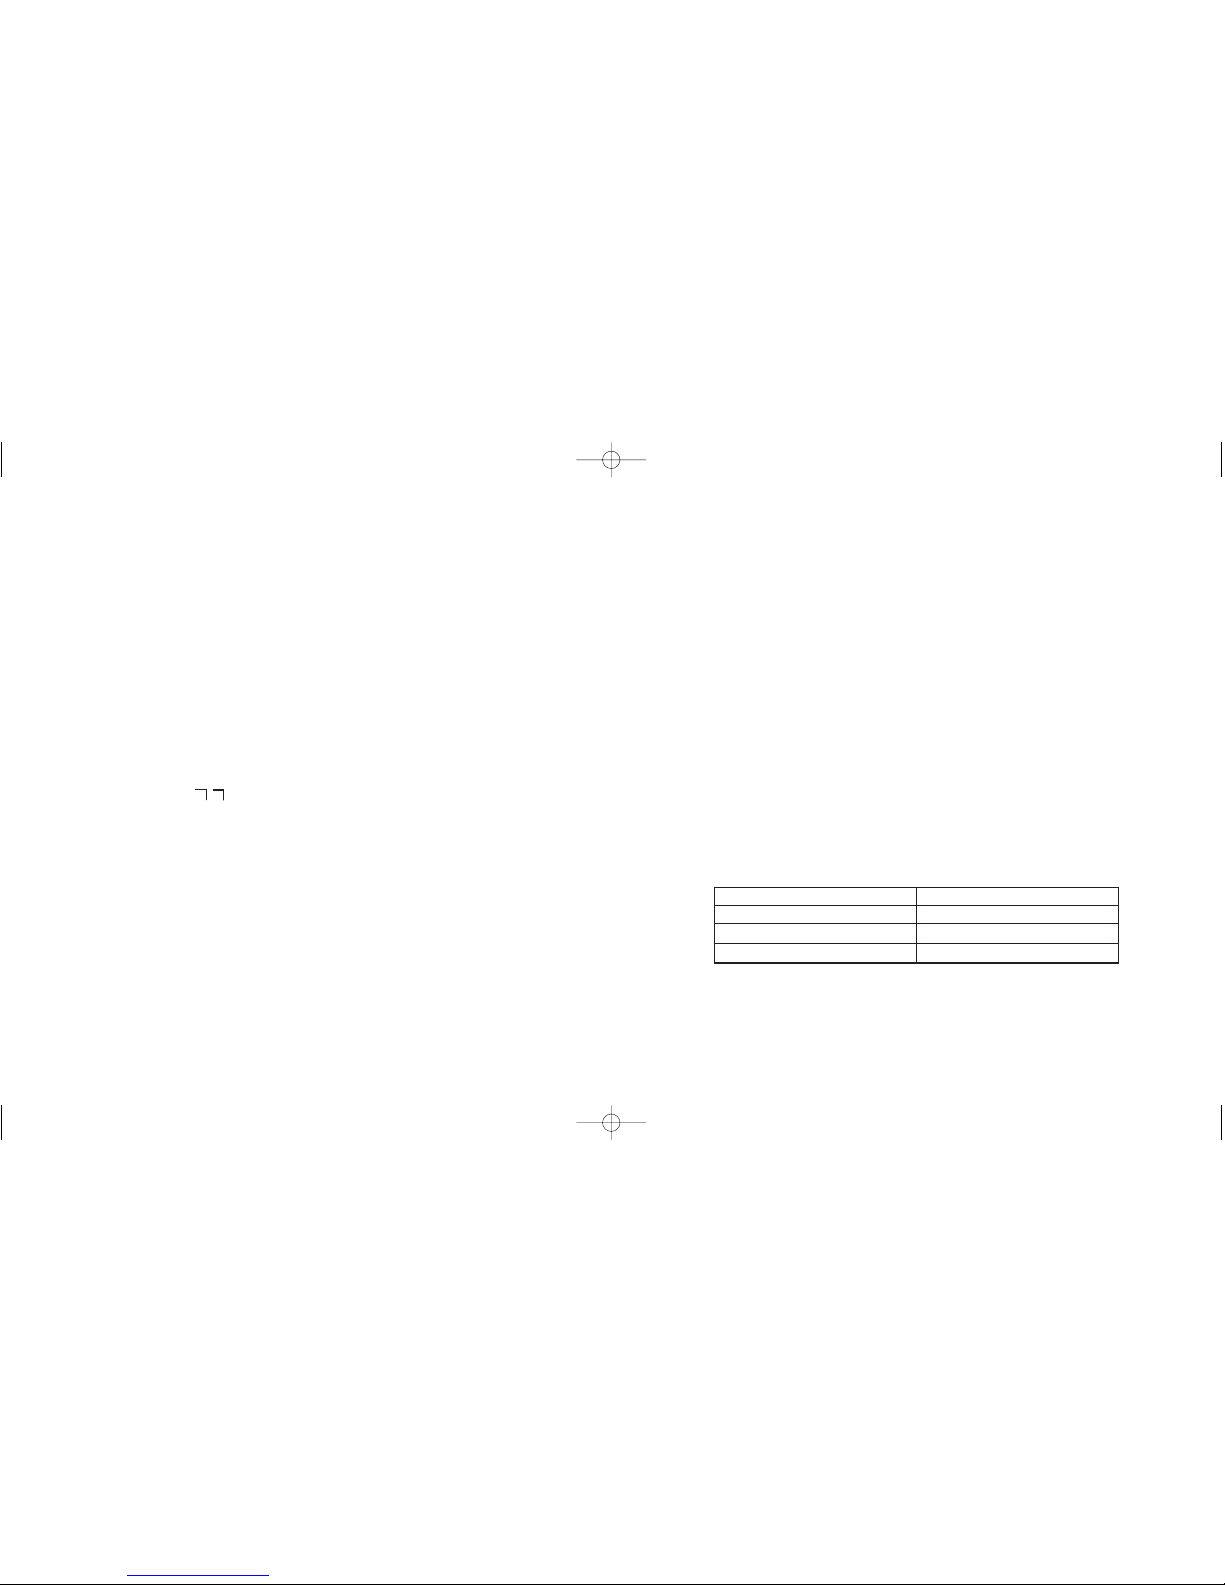
When the disc is played in...
Continuous Play
Shuffle Play
Program play (see page 16)
The Planet repeats...
All the tracks
All the tracks in random order
The same program
Shuffle
To play tracks in a random order press SHUFFLE then press PLAY.
To play tracks in a random order whilst in play mode, press the
SHUFFLE button once. “SHUFFLE” will read on the display and the
tracks will be played in a sequence generated by the player.
To cancel shuffle play, press the SHUFFLE button again.
”CONTINUE” will be displayed and Play will continue in the discs
original sequence.
Repeat
To repeat the whole disc, press the REPEAT button once. The
display will read “REPEAT”. To repeat the current track, press the
REPEAT button until the display reads “REPEAT 1”. To cancel,
press the REPEAT button until “REPEAT OFF” appears on the
display.
Play, pause, stop, track previous, and track next
The PLAY and PAUSE buttons on the Remote Control are the same
as PLAY/PAUSE on the front panel except they have been
separated.
Stop, track previous, and track next work in the same way as on the
front panel of the player. (See pages 8 & 9.)
Search Back, Search Forward.
Pressing the SEARCH BACK / SEARCH FORWARD buttons in play
mode, plays the disc at high speed at reduced volume, allowing you
to find a specific position in a track.
In pause mode, the track is scanned at a higher speed without
playing music.
Note: if the lead out (end) of the disc is reached during Search
Forward mode, will appear on the display. To resume play, press
SEARCH BACK or PREVIOUS TRACK.
Numeric Keys.
You can start from the beginning of a desired track by pressing the
corresponding NUMERIC KEY. If the track number is greater than 9,
press >10 before selecting your track.
11 12
Planet manual.qxd 28/05/2002 10:26 Page 14
Page 9
Display
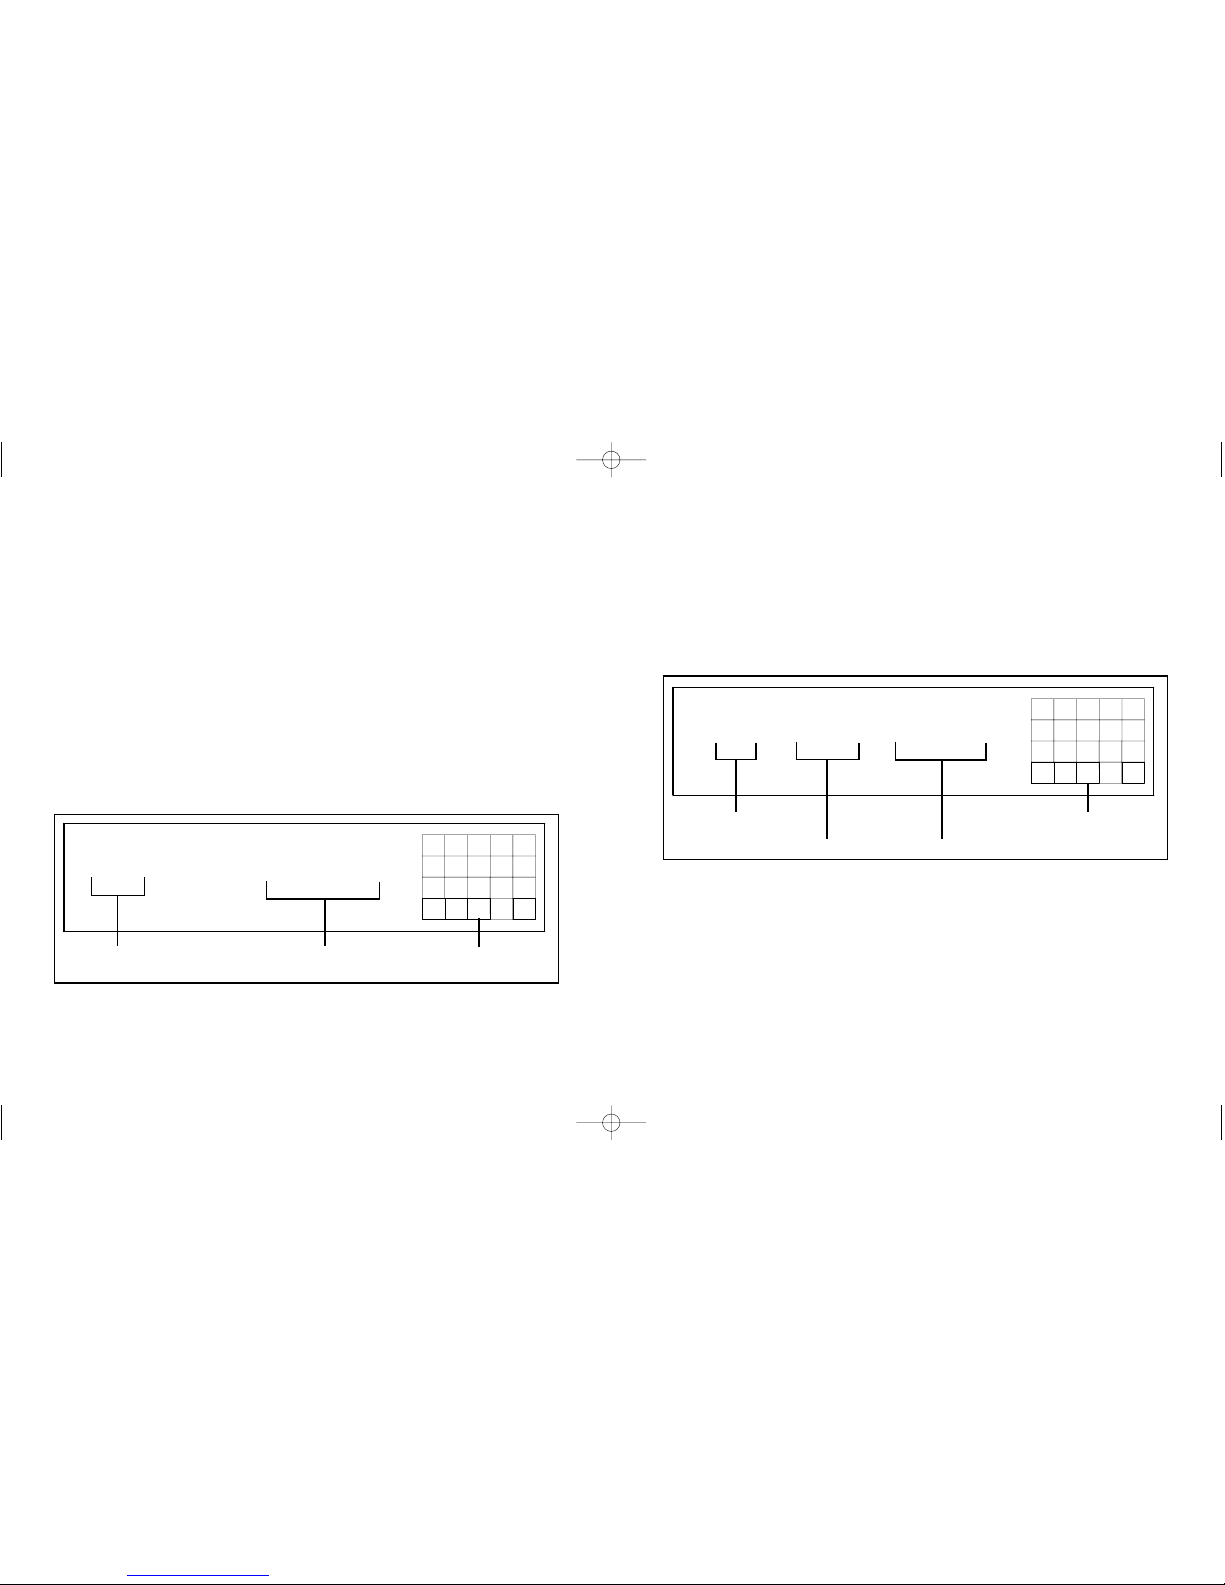
Checking the total number and playing time of the tracks
Press TIME before you start playing.
The display shows the total number of tracks, total playing time, and
music calendar.
While in Shuffle Play mode (“SHUFFLE” appears in the display; see
page 12), a one-second access time blank is added between each
track. This increase is automatically added to the total playing time in
the display.
Display information while playing a disk.
While Playing a disc, the display shows the current track number,
index number, playing time, and the music calendar.
The track numbers in the music calendar disappear after they are
played.
Turning off the display
Each time you press DISPLAY on the remote while playing a disc, the
display turns off and on alternately.
In the “display off” mode, if any button on either the player or remote
are pressed, the display will be switched on for about 3 seconds to
allow you to verify your command.
1234
6785910
10
TRACK INDEX SECMIN
45.28
1.56
1
1
Current track
number
Index number Playing time
Music calendar
1234
6785910
10
TRACK INDEX SECMIN
45.28
Total playing time
Total number
of tracks
Music calendar
13 14
Planet manual.qxd 28/05/2002 10:26 Page 16
Page 10
1234
6785910
10
TRACK INDEX SECMIN
45.28
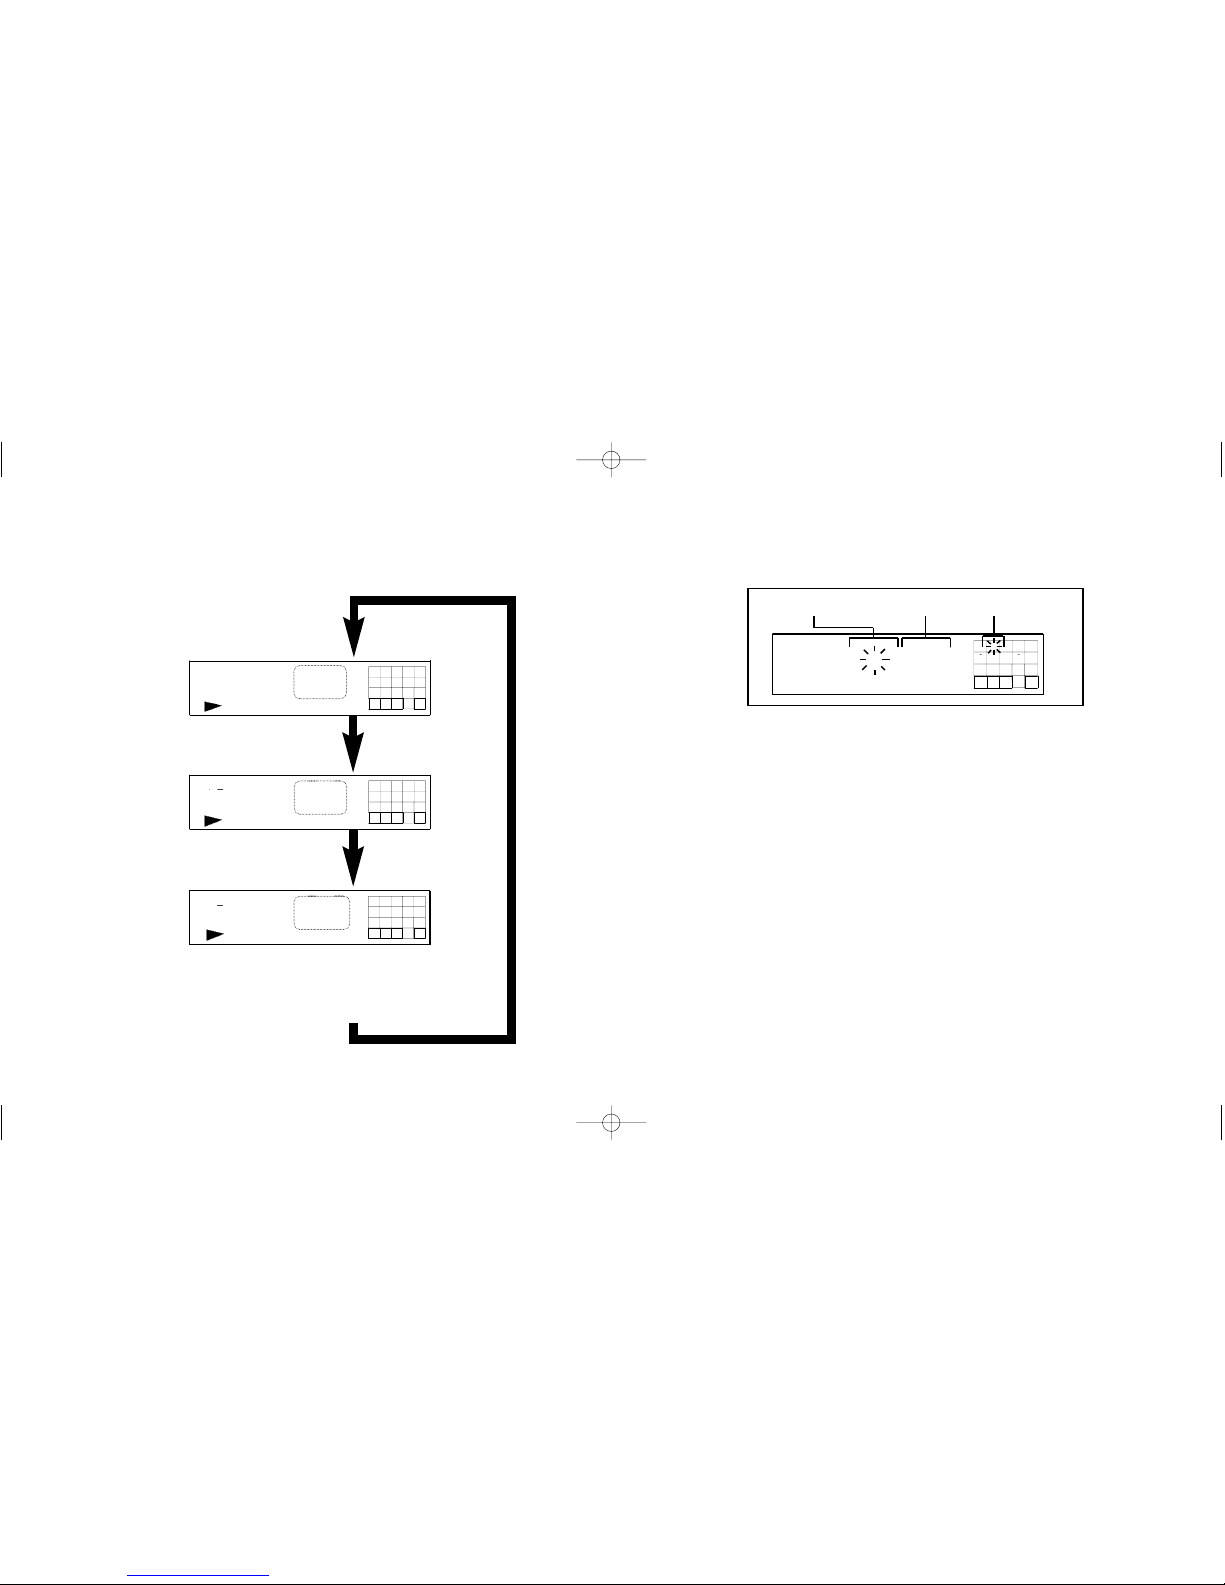
Checking the remaining time
Each time you press TIME while playing a disc, the display
changes as shown in the chart below.
1234
6785910
10
TRACK INDEX SECMIN
45.28
1234
6785910
10
TRACK INDEX SECMIN
45.28
If the remaining time exceeds 100 minutes in Program Play mode
or when the disc has more than 24 tracks, “--.--” appears instead
of the remaining time.
Playing time of the
current track
Remaining time on
the current track
Remaining time on
the disc
If the track number exceeds 24 “--.--”
appears instead of the remaining time.
Press
Press
1 1
1.56
MIN
SEC
1.57
MIN
SEC
1
51.37
MIN
SEC
Creating a program
The program function allows you to play up to 24 tracks from a disc
in any order you specify.
1) Press PROGRAM to create your new program list. ”PROGRAM”
will appear on the display.
2) Enter up to 24 tracks, one after the other, in the order you want
them to play. Use the
>10 button for tracks above 9.
1234
6785910
10
TRACK INDEX SECMIN
45.28
2
3.18
STEP
1
Track number
being programmed
Total playing time
Playing order
PROGRAM
1615
Planet manual.qxd 28/05/2002 10:26 Page 18
Page 11

The handling of CD’s
To keep the CD clean, handle by its edge only. Do not touch the
surface; natural oils from skin can stop the laser from reading the disc
accurately.
Do not expose the disc to bright sunlight, or leave near hot places
such as electrical equipment or in a parked car. Excess heat can
cause the disc to warp.
Do not use any cleaning fluids or anti-static sprays on the disc, they
can damage the disc and the player.
Store the disc in its case when not in use to prevent it from becoming
scratched
.
17 18
Creating a Program (continued)
3) If you make a mistake, pressing CLEAR will erase the last track
you entered. Keep pressing CLEAR to erase more than one track
from the play list. Hold down CLEAR for 3 seconds if you want to
delete the whole program list. To continue programming, enter the
tracks you want from where you left off.
4) Press PLAY on the remote. Your selected tracks will now play.
5) Pressing PROGRAM again will display “CONTINUE” and you will
be back to normal play mode. Pressing PROGRAM once more will
return the programmed tracks.
6) To create a new program list, press STOP. Clear the previous
program list, then to re-program, repeat from step 2.
Planet manual.qxd 28/05/2002 10:26 Page 20
Page 12
Care of the Player
Do not touch the lens or electronic parts inside the player, it is a very
sensitive optical device and is easily damaged.
Also if dirt gets on the lens, the player may not work.
Do not attempt to clean the lens or lubricate in any way. Fluids and
abrasive materials could easily damage the lens. Your REGA dealer
will be trained in cleaning this component, but provided you take care
with your player, it should not need any servicing.
Do not leave the lid open, as dust will get into the player and onto the
lens.
Do not drop objects into the player. If any objects fall into the player,
switch off and disconnect from the mains supply immediately, and
contact your REGA dealer. Do not open the case or stick implements
into it to retrieve the item.
If you are not going to use the player for a long time, we recommend
that you switch it off, as it is not disconnected from the mains even if
the player itself has been turned off.
Always pull the plug itself when disconnecting from the wall socket,
never the cord.
WARNING
Misuse of the player could invalidate your Rega warranty.
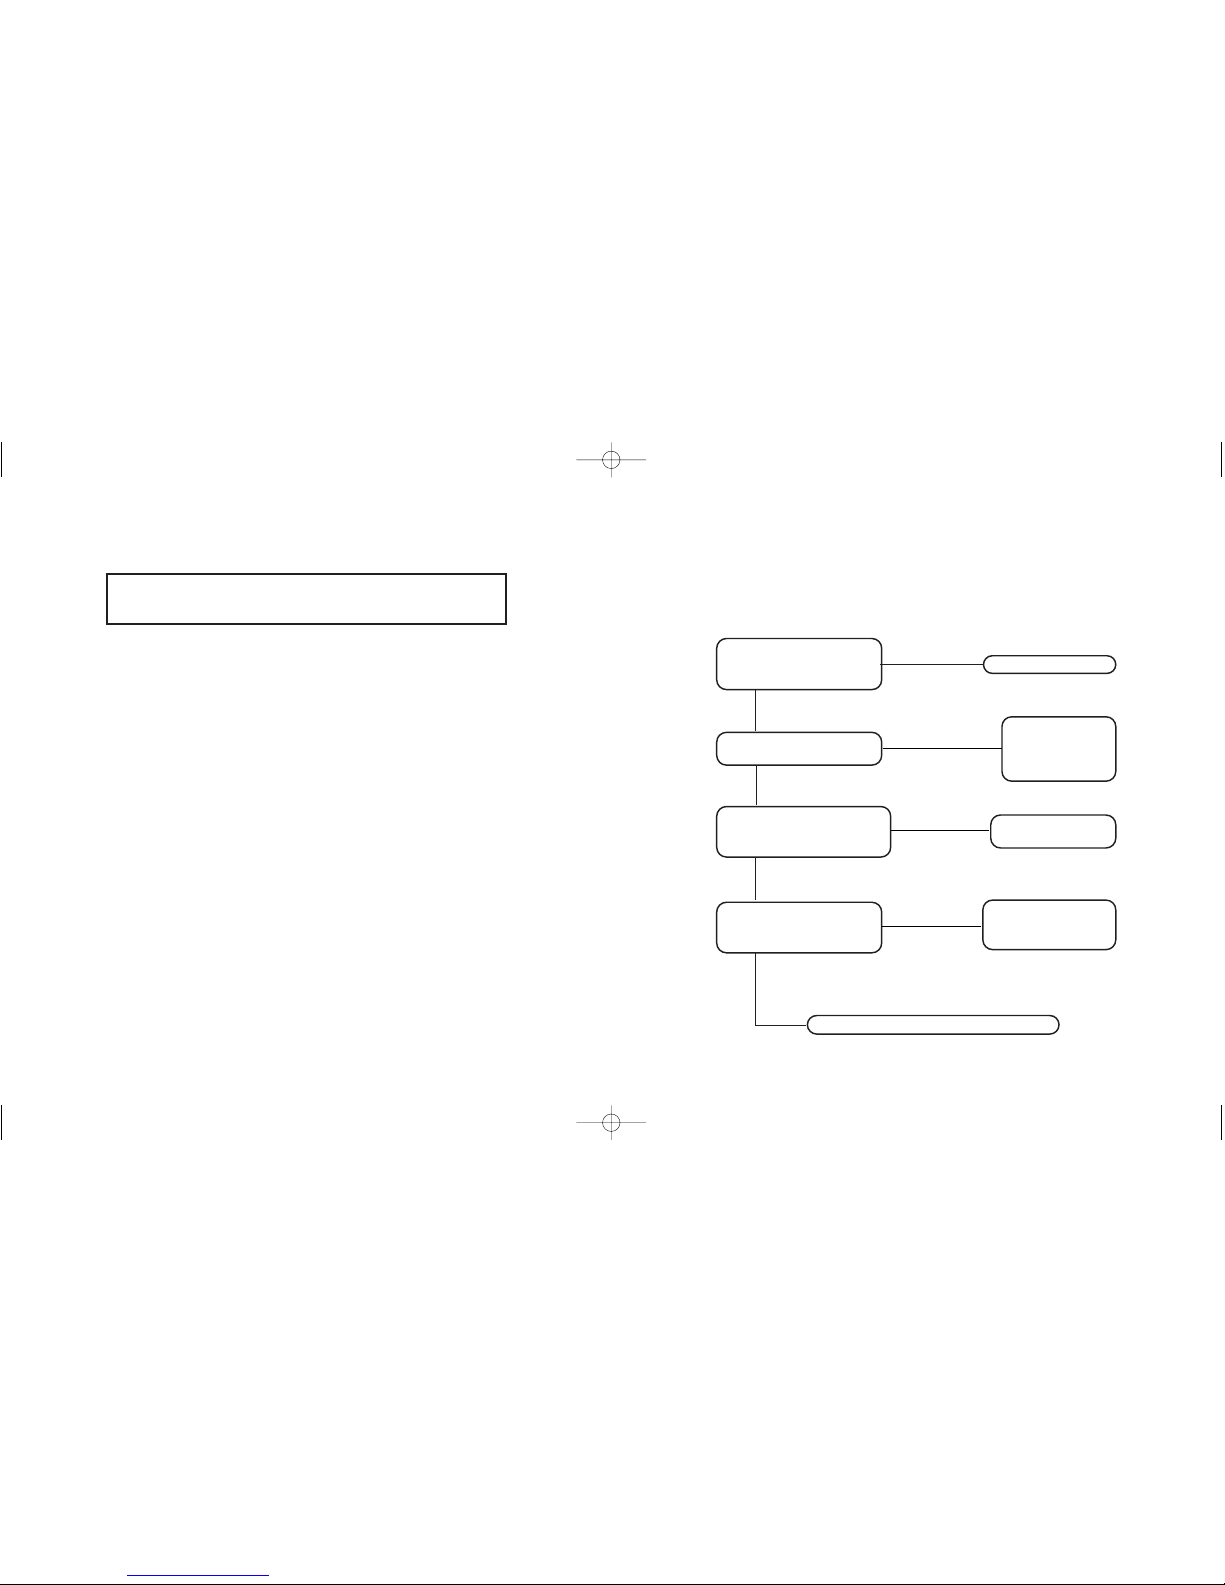
Troubleshooting
(No power, power switch LED does not light up)
Is the mains supply
connected and the socket
switched on?
Is the front panel on/off
switch fully depressed?
Has the fuse in the mains
plug blown? (Plug in another
appliance to check)
Is the mains socket
live? (Plug in another
appliance to check)
Contact your Rega dealer
Correct the fault
Correct the
fault (Contact your
Rega Dealer if it
appears faulty)
Replace fuse in
plug
Check household
fuses or contact an
electrician!
NO
NO
NO
NO
YES
YES
YES
YES
19 20
Planet manual.qxd 28/05/2002 10:26 Page 22
Page 13
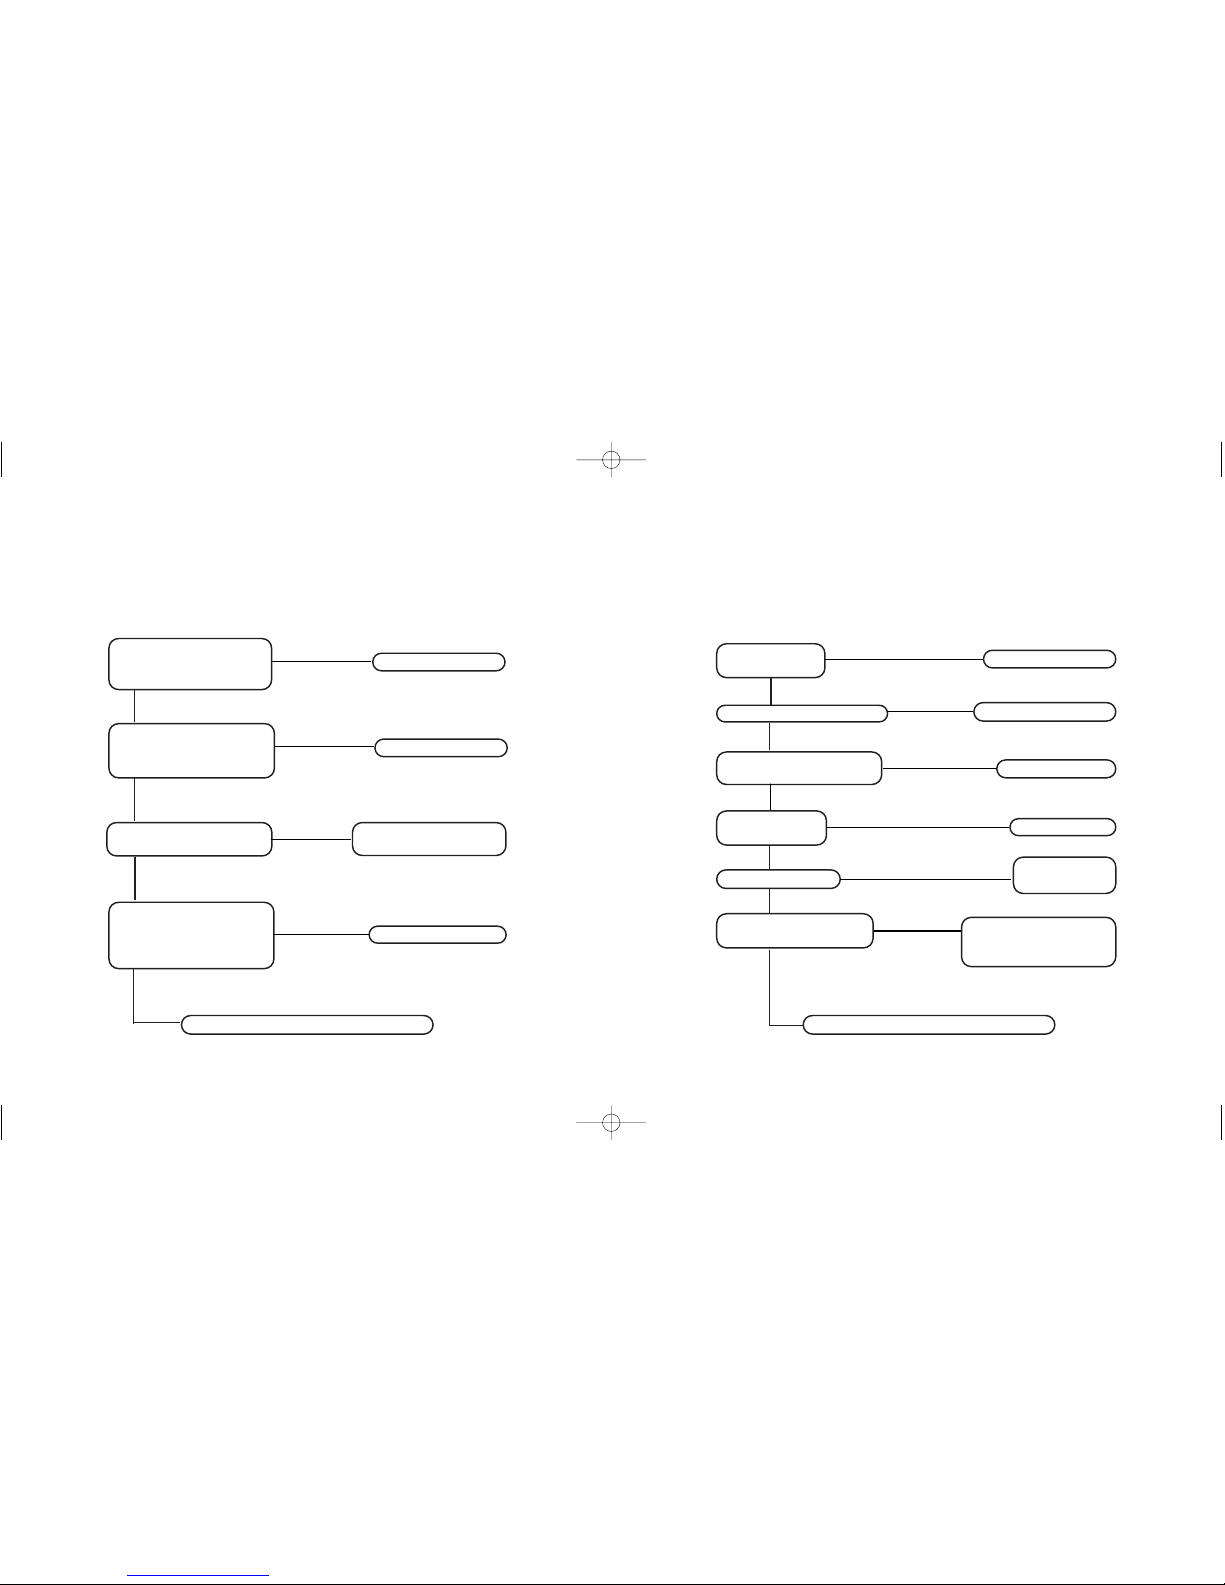
Troubleshooting
(Power on, no output)
Are the output
connections connected
correctly?
Are the amplifier
connections correct and
the correct input selected?
Is there a fault in the
amp/speaker chain?
If you are using the
digital output, is the DAC
switched on and correctly
setup?
Contact your Rega dealer
Correct the fault
Swap components to
determine the fault
Correct the fault
NO
NO
NO
NO
YES
YES
YES
YES
Correct the fault
Troubleshooting
(Power on, power switch LED and display on,
but CD does not play)
Is there a disc
in the player?
Is the disc label side up?
After selecting a track
have you pressed play?
Is the player in
pause mode?
Contact your Rega dealer
Load a disc
Turn the disc over
Press play
Press play
NO
NO
NO
NO
YES
YES
YES
Is the CD clean?
YES
Clean the CD
(see page 17)
Has moisture
condensed on the lens?
YES
Leave player turned
on for about an hour with
no disc in.
NO
NO
YES
21 22
Planet manual.qxd 28/05/2002 10:26 Page 24
Page 14

Laser
Wavelength
Line Output Maximum Level
Digital Output Maximum Level
Digital Sampling Frequency
Mains Voltage
Power Consumption
Dimensions
Required Space for operation
Semiconductor laser
780nm
2V (load impedance minimum 10kΩ)
0.5V (load impedance 75Ω)
44.1kHz
230V (minimum 190V maximum 250V)
115V (minimum 95V maximum 125V)
10W
435Wx100Hx270D
435Wx180Hx315D
Specifications Owners Log
(1)
Owner.......................................................................................
Date..........................................................................................
Where Purchased.....................................................................
..................................................................................................
(2)
Owner.......................................................................................
Date..........................................................................................
Where Purchased.....................................................................
..................................................................................................
(3)
Owner.......................................................................................
Date..........................................................................................
Where Purchased.....................................................................
..................................................................................................
23 24
Planet manual.qxd 28/05/2002 10:26 Page 26
 Loading...