

PST USB
Cassette Tape Converter
INSTRUCTION MANUAL
BEFORE OPERATING THIS PRODUCT PLEASE READ,
THESE INSTRUCTIONS AND RETAIN FOR FUTURE REFERENCE
1
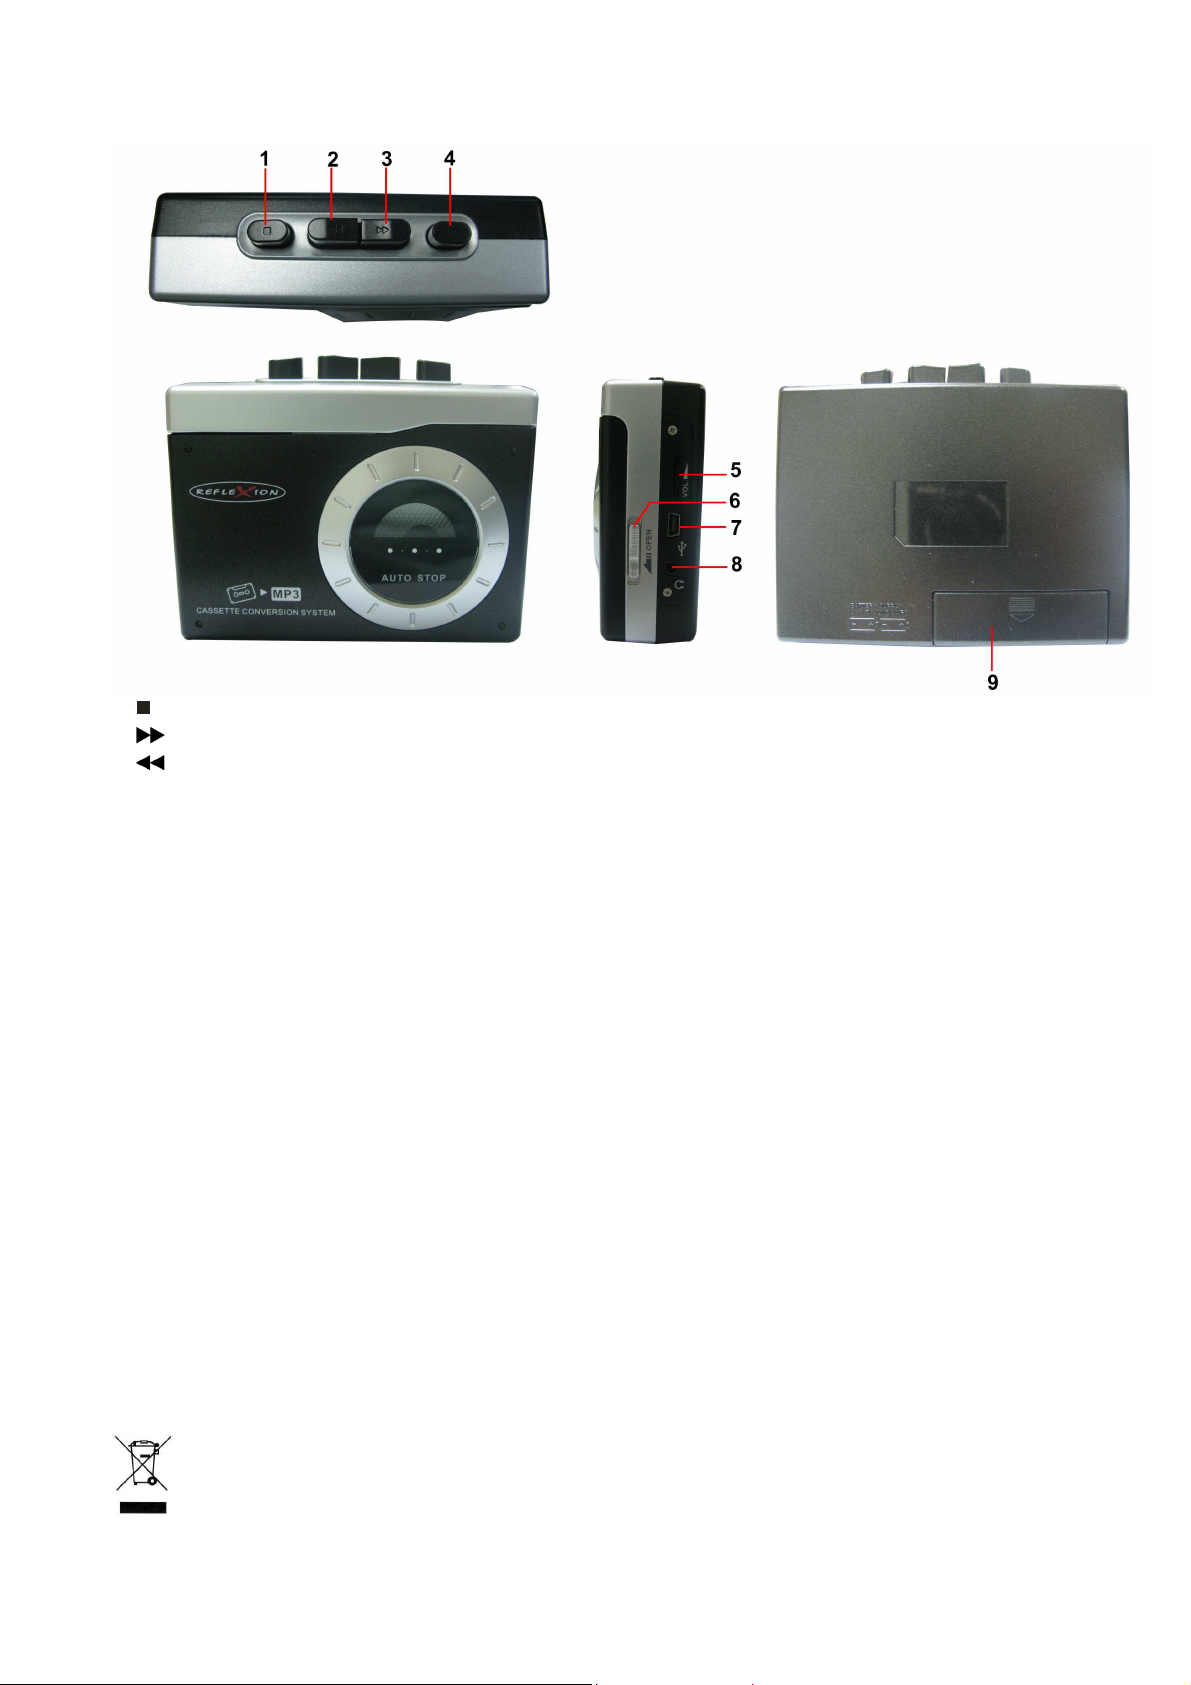
LOCATION OF CONTROLS
1. STOPbutton
2. F.FWDbutton
3. REWINDbutton
4. PLAYbutton
5. Volume control
6. Open button (Cassette Door)
7. USB port (to computer)
8. Headphone jack
9. Battery Door (AA x 2)
CONTENT
•
Main Unit with earphones
•
USB cable
•
Software CDR
Remove the unit carefully from the box & retain the packaging for future use.
PLAYBACK
•
Press Eject button to open the cassette door.
•
Place the cassette tape into Deck, with the side to be played facing the window.
•
Close cassette door and Press Play button to start playback.
•
Playback stops when the tape reaches the end.
•
Press Stop button if you want to stop playback before the end of the tape.
PLAY CONTROLS
•
PLAY : to start cassette playback.
•
REWIND : to fast rewind the cassette.
•
F.FWD : to fast forward the cassette.
•
STOP : to stop cassette playback.
HEADPHONE JACK
Be sure that your headphones have a 3.5mm stereo plug with an impedance of 8-32 Ohms.
The crossed out “Wheelie bin” is intended to show that this appliance must not be placed with ordinary
household waste.
Wh e n this appli a n c e has reac h e d the end o f i ts useful l i fe, it m u s t be dispose d o f in
ac c o r dance wit h l ocal by- l aw s. Consul t o ur local w a s te dispo s a l authorit y (WEEE Di r e ctive).
EN -1
2

Audacity and USB Connection
Installing the Audacity Software
Install the Audacity software in your Computer, the disc is
matches with the USB turntable.
-
Insert the Audacity disc into the CD drive of your
-
Click on My Computer on the desktop.
-
Double-click CD drive to view the contents of the
-
Double-click Audacity Set Up to install the Audacity
computer.
Audacity disc.
software according to the instruction.
Audacity Preferences
Install the USB Driver
-
Make sure the Audacity disc is still in your CD drive.
-
Using the included USB cable to connect the turntable
to your computer.
-
Follow screen instruction to install the USB driver.
Running the Software
1.
Double-click the Audacity software showing red and
orange “balls” wearing blue headphone, and come into
the following interface;
2. Using the attribute controls button at the top of the
screen, go to beginning, Play, Record, Pause, Stop
and go to end. Use the File, Edit, View, Project,
Generate, Effect and Analyze menus to Save, Export,
and edit the music.
3. Select preferences at the bottom of the menu which will
open up Audacity Preferences. You can set the Audio
I/O,Quality,File Formats, Spectrograms, Directories,
Interface, Keyboard and Mouse in the Audacity
preference Interface.
4. Adjust output and input volume.
Output volume Input volume
5. Select the record button ( ) to record the disc, the left
and right tracks will show on the interface;
If do not have the fluctuant wave on the interface when
recording, please adjust the line in volume as follows:
(i) Click the “start” in the left corner of the computer, Select
“Programs” , “Accessories”, “Entertainment” , “Sound
Recorder” and come into the sound record interface.
EN-2
3

Audio properties Interface
(ii) Sound Recorder Interface
(iii) Select Edit and click “Audio Properties” in the bottom
of the menu to come into “Audio Properties” interface;
(iv) Select sound recording volume and come
into“Recording Control” interface;
Adjust the line in volume to most or middle, the fluctuant
wave will show on the interface when recording.
6. Click the ( ) button to skip to start;
7. Click the ( ) button to skip to end;
8. Click the ( ) button to play;
9. Click the ( ) button to pause the record play;
10. Click the ( ) button to stop the Record.
6 8 5 9 10 7
11. Export the Music Files for WAV,MP3,Ogg Format.
-
Once you finished the record, you should save your
music to the computer.
-
Click File menu and move down to Export as WAV
format,MP3 format or Ogg format.
-
Click anyone format to save the music, and you will
ask for the file name of the music recorded.
- Note:
Audacity does not export MP3 files directly,
you should download the LAME MP3 encoder, which
named lame_enc.dll.
EN-3
4
 Loading...