

Page 1
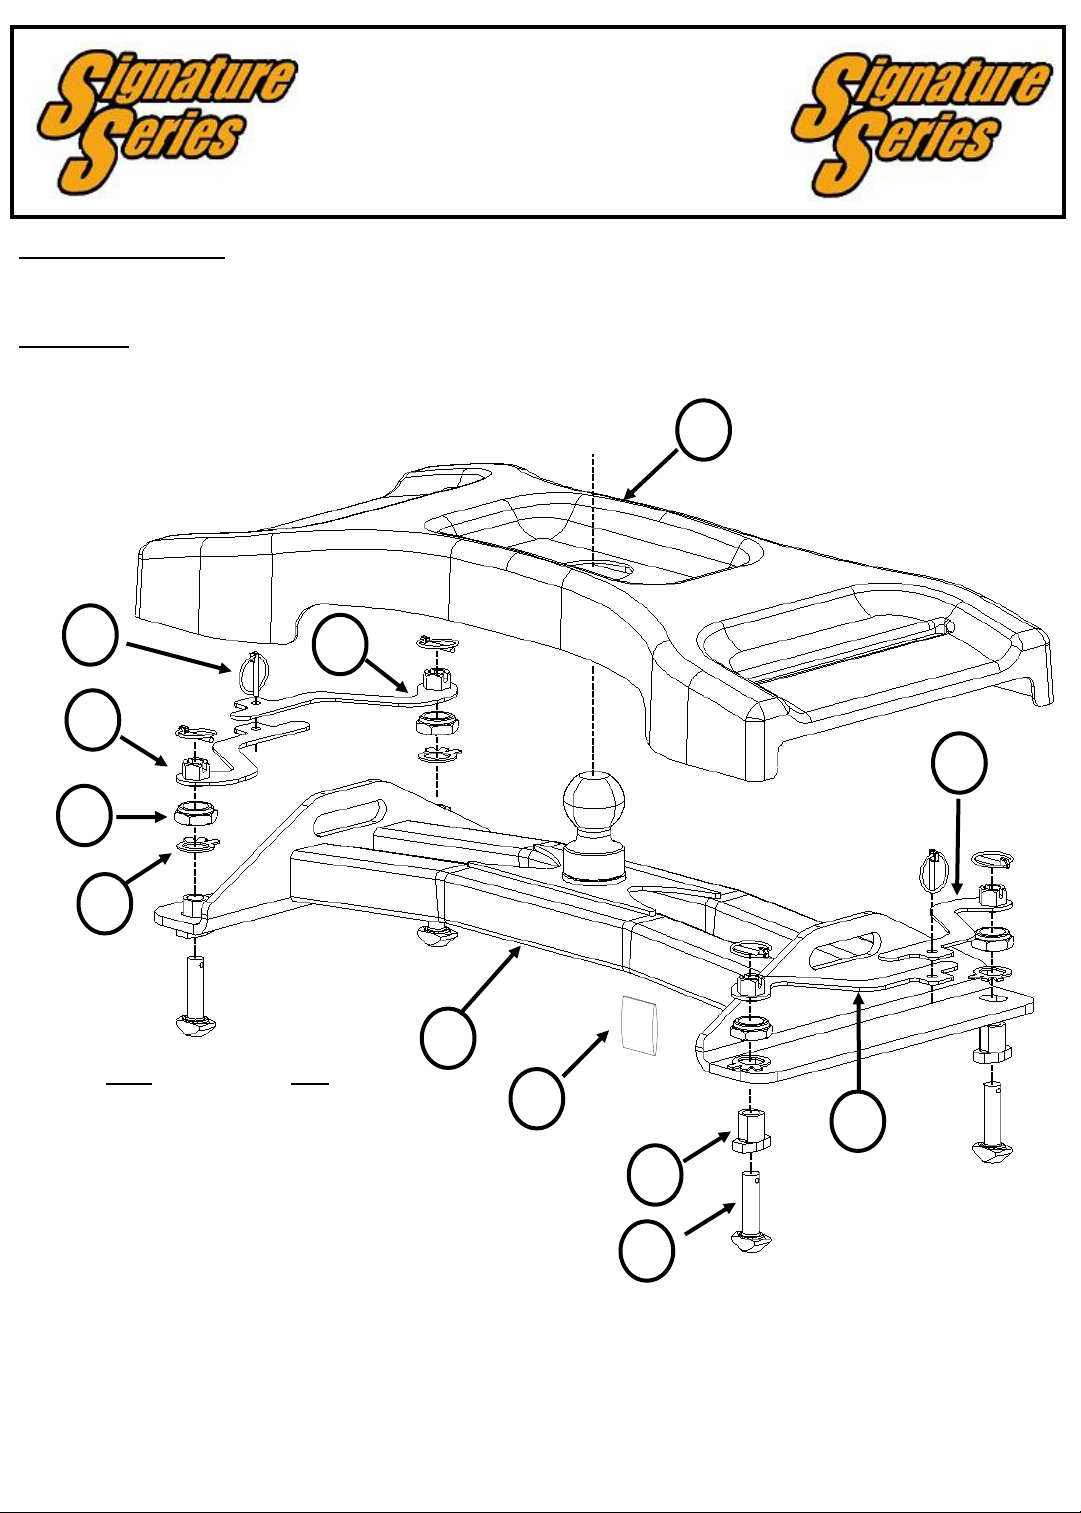
ASSEMBLY INSTRUCTIONS
PART QTY.
1. BASE ASSEMBLY 1
2. PLASTIC COVER 1
3. HANDLE "A" 2
4. HANDLE "B" 2
5. 1" JAM NUT 4
6. TAB WASHER 4
7. 3/16" LINCH PIN 6
8. ANCHOR BUSHING 4
9. ANCHOR TEE PIN 4
10. PRIMER 1
Signature Series
Gooseneck
2
5
7
3
4
3
6
1
10
4
8
30845IN – 31OCT12D PCN18116 ©2005, 2012 CEQUENT PERFORMANCE PRODUCTS, INC. Litho in USA 1
For Kits 30845, 40845 & 50845
For Installation Assistance or Technical Help, Call 1-800-758-0869
9
Fig. 1
Page 2
WARNING:
Failure to follow all of these instructions may result in death or serious injury!
INDEX
1. GUIDELINES FOR MATCHING TOW VEHICLE AND TRAILER P. 2-4
2. ASSEMBLY INSTRUCTIONS P. 5–10
3. OPERATING INSTRUCTIONS P. 11
4. BEFORE TOWING INSTRUCTIONS & MAINTENANCE P 12
5. IMPORTANT INFORMATION P. 13
4. CEQUENT PERFORMANCE PRODUCTS SEVEN YEAR LIMITED WARRANTY P. 14
GUIDELINES FOR MATCHING HITCH TRUCK AND TRAILER
WARNING:
Failure to check and follow tow ratings could result in tow vehicle
damage or truck and trailer separation while hauling.
Trailer and its contents together must not exceed truck, hitch and/or trailer tow
ratings.
Towing vehicle must have a manufacturer’s rated towing capacity equal to or
greater than the gross trailer weight (dry weight of the trailer plus payload of the
trailer). (See Fig. 2)
Gross weight of trailer must not exceed 25,000 pounds.
Pin weight must not exceed 6,250 pounds.
1. Check Tow Ratings:
(See Fig. 3). If in doubt have pin weight measured by qualified facility.
Fig. 2
Vehicle Tow Rating:_______________________.
Signature Series Hitch Rating:_______ __.
Gross Trailer Weight (Fig. 2):______________.
*Trailer weight should be the lowest of these recorded ratings for safe towing conditions.
2. Cequent Performance Products hitches are designed for use with recreational gooseneck trailers only. Hitch applications
other than recreational gooseneck trailers must be approved in writing by Cequent Performance Products’ Engineering
Department.
3. Use only a SAE 2-inch kingpin with your Signature Series Gooseneck Hitch.
4. Approximately 15%-25% of trailer weight should be on hitch (Pin Weight). See Fig. 3.
FACTORY TRAILER + FULL WATER
TANKS + CARGO, ETC.
= GROSS TRAILER WEIGHT
Fig. 3
15-25%
GROSS TRAILER
WEIGHT
(PIN WEIGHT)
30845IN – 31OCT12D PCN18116 ©2005, 2012 CEQUENT PERFORMANCE PRODUCTS, INC. Litho in USA 2
For Kits 30845, 40845 & 50845
75-85%
GROSS TRAILER
WEIGHT
Page 3
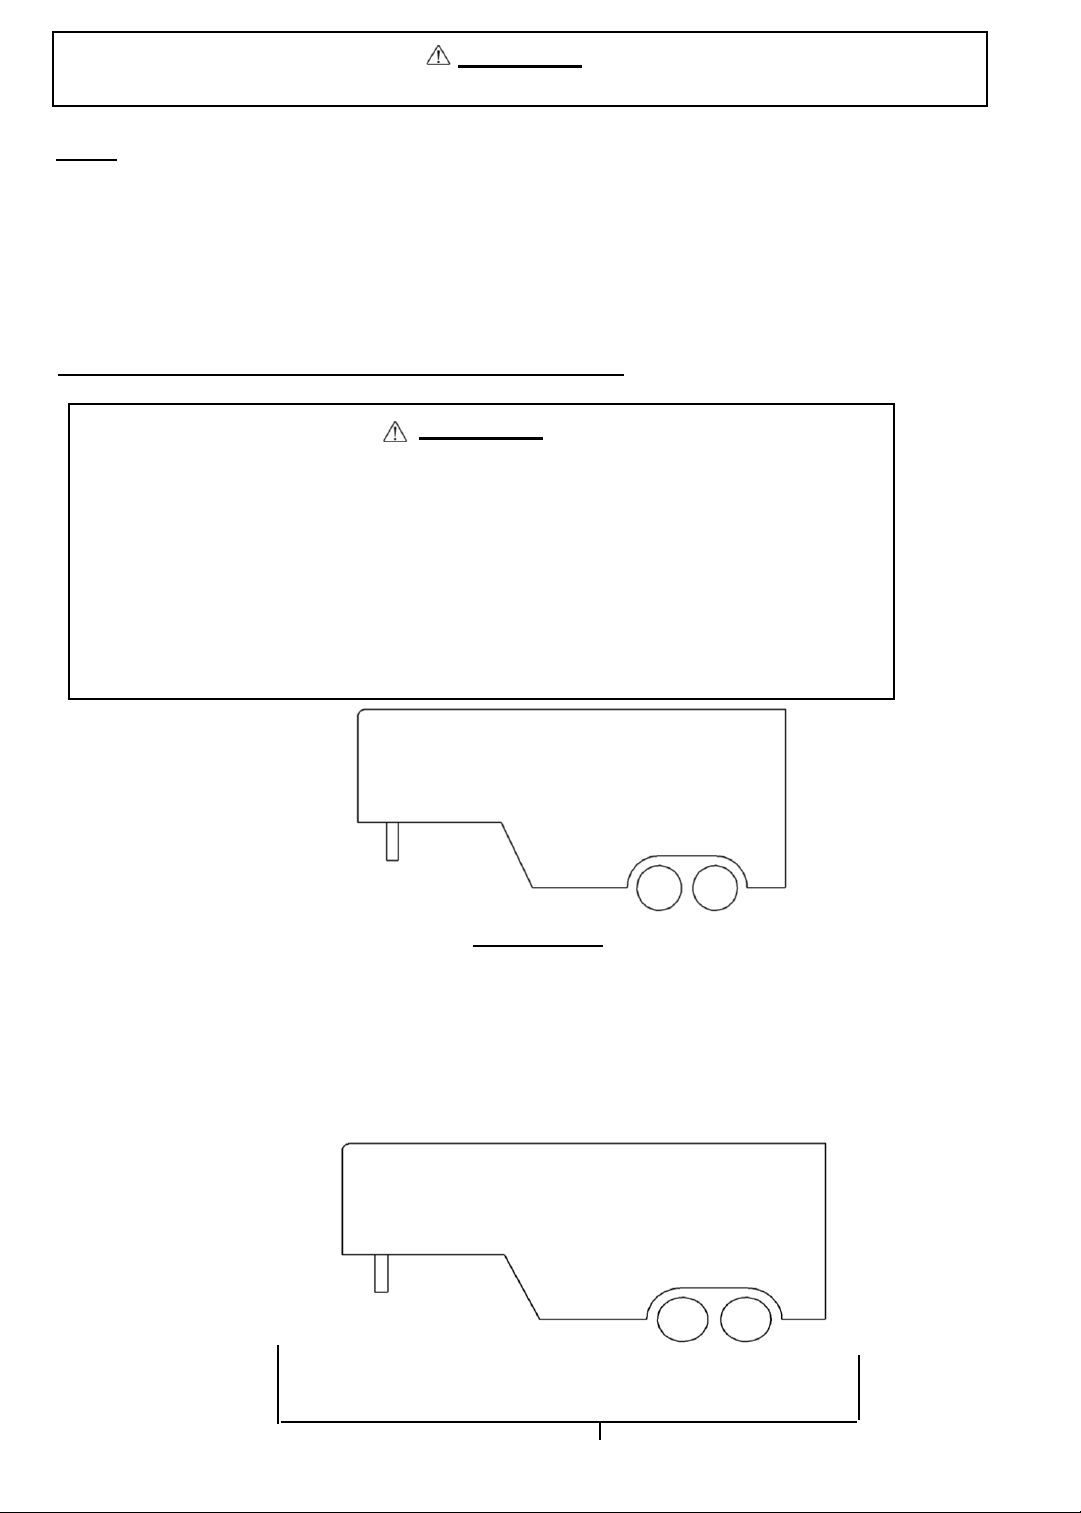
5. Trucks come in many different configurations. Cequent Performance Products’ hitches are designed for use in light
trucks such as the Ford F-Series, the Chevy Silverado and the Dodge Ram. Cequent Performance Products
recommends the use of long bed (8ft) light trucks for the best combination in truck - trailer turning clearance.
Fig. 4
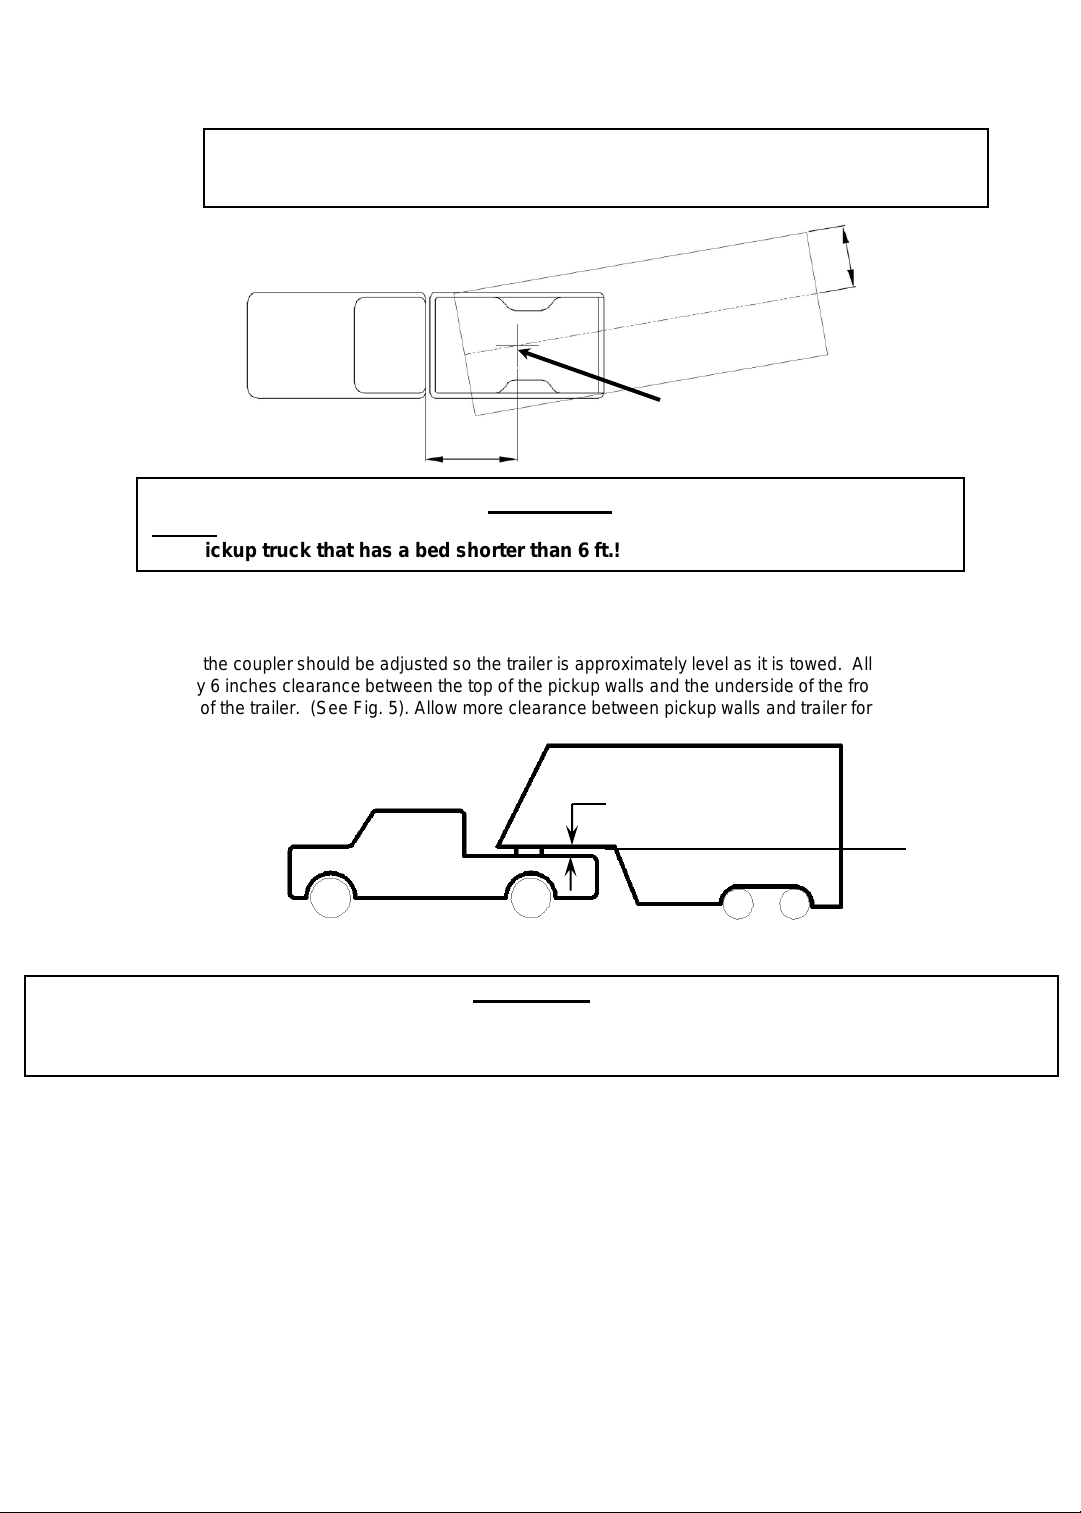
6. The height of the coupler should be adjusted so the trailer is approximately level as it is towed. Allow
approximately 6 inches clearance between the top of the pickup walls and the underside of the front of the trailer for
pitch and roll of the trailer. (See Fig. 5). Allow more clearance between pickup walls and trailer for off road use.
The measurements above are guidelines. If your measurements are close to these numbers re-check
clearances. If vehicle and/or trailer has any added bed vicinity accessories (i.e. fairings, air dams, ground effects,
bed rails, etc.). Additional dimensioning and clearance checks have to be made.
Do Not install this Signature Series Gooseneck Hitch on or attempt to tow with a short
bed pickup truck that has a bed shorter than 6 ft.!
Fig. 5
Rule of thumb: The distance from the back of the truck cab to the center of the rear truck
axle (“X” in Fig. 4), should be approximately 4 inches greater than one-half
the trailer width (“Y” in Fig.4)
Y
RV Trailer
Truck
Gooseneck Hitch Ball
X
WARNING:
Approximately 6 Inches
Level Trailer
CAUTION:
30845IN – 31OCT12D PCN18116 ©2005, 2012 CEQUENT PERFORMANCE PRODUCTS, INC. Litho in USA 3
For Kits 30845, 40845 & 50845
Page 4
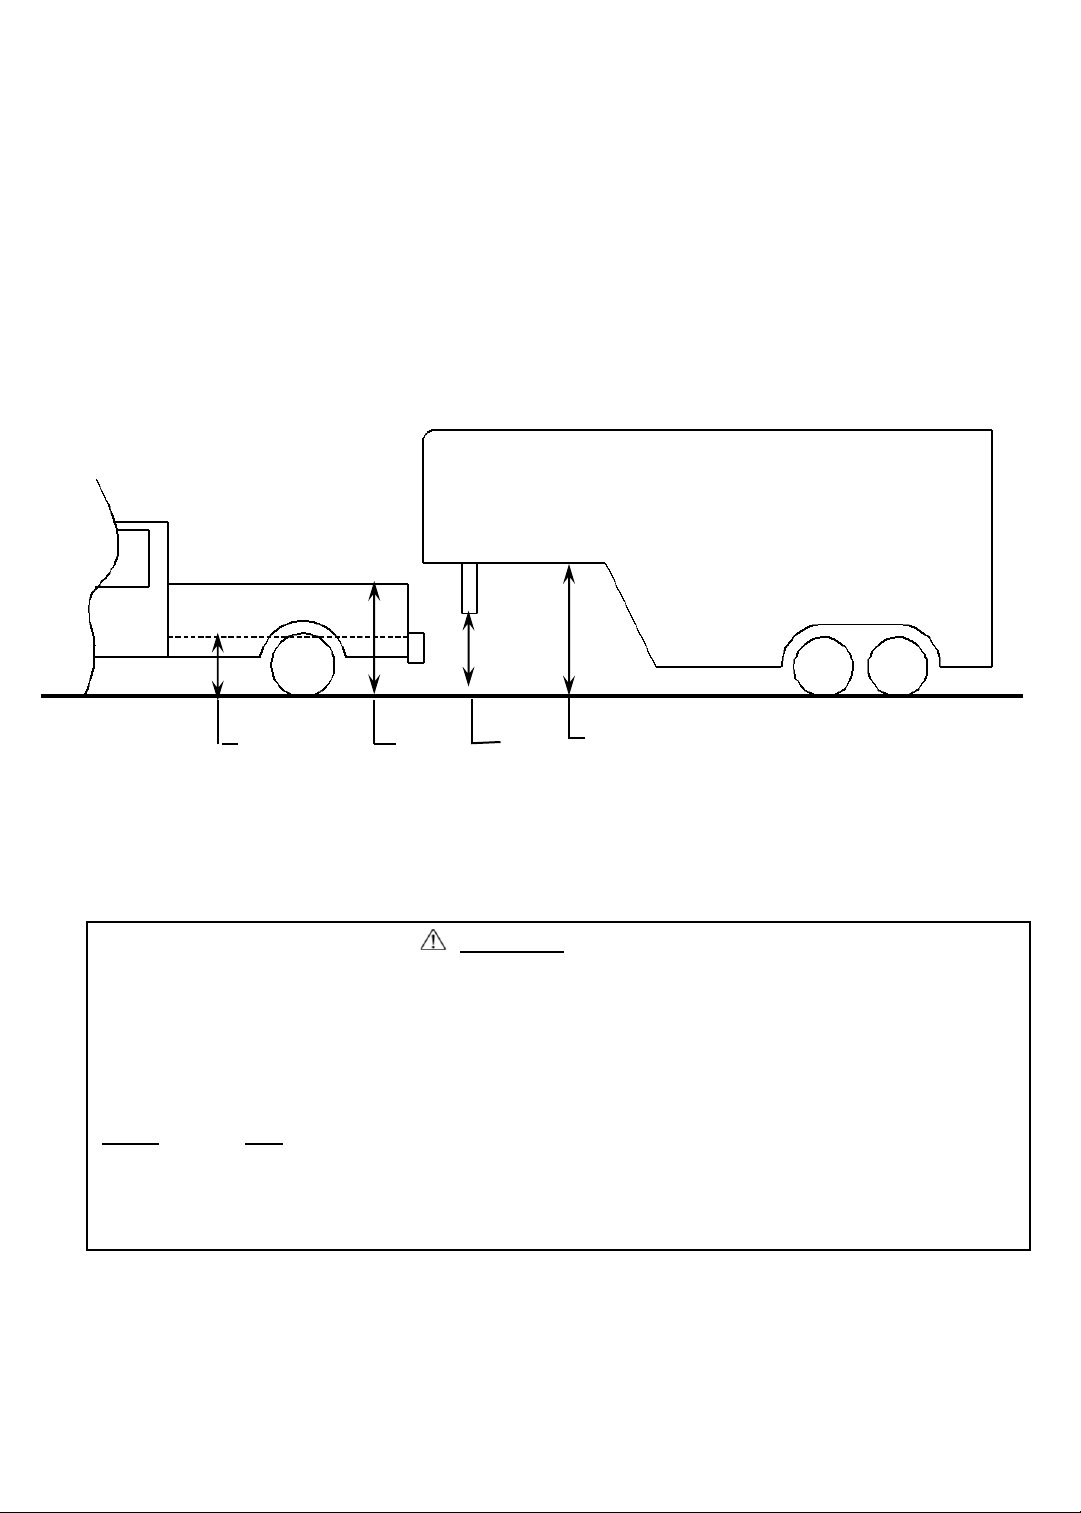
7. Hitch height determination:
With trailer leveled and on level ground measure from the ground to the coupler, Dimension “A” in Fig. 7.
Secondly, measure from the height of the inside of the truck bed to the ground, Dimension “B” in Fig. 7.
Dimensions “C” and “D” in Fig. 7 can be used to determine the amount of clearance over the side rails, as
mentioned in instruction #6 (Additional clearance may be needed for off road maneuvering and/or steep
inclines while turning).
Hitch Height = A – B + 2”
The 2” value is an estimate of suspension compression due to king pin weight of the trailer. This
compression could range between 1”-5” depending on the truck being used and the trailer being towed.
D – C + 2” > 6” as noted in instruction #6.
B
C
A
D
*MEASURED WITH TRAILER LEVEL,
ON LEVEL GROUND
FIG. 7
WARNING:
Connection for trailer wiring must be located at the side of the truck bed between the driver’s
seat and the rear wheel to prevent operators from working between the truck and trailer.
Avoid putting any part of your body under the trailer or between the truck and trailer.
Unexpected or accidental movement of the truck or the trailer can cause serious injury or death
If you must place any part of your body under the trailer or between the truck and trailer you
MUST perform ALL of the following steps:
Check that the truck transmission is in park
Check that the emergency brake is on
Block in front of and behind all trailer tires
Check that the trailer landing gear are resting on firm ground
30845IN – 31OCT12D PCN18116 ©2005, 2012 CEQUENT PERFORMANCE PRODUCTS, INC. Litho in USA 4
For Kits 30845, 40845 & 50845
Page 5
Signature Series GOOSENECK ASSEMBLY
TOOLS
Safety Glasses Chisel
Impact Wrench Hammer
1-1/2” Box or End Wrenches or socket White Lithium Grease
1. Check all the boxes for all the components
listed in Figure 1 and become familiar with
component terminology.
2. Lube all 4 Anchor Bushing with white
lithium grease. Do this by spraying or
manually applying the grease to the inside
of the Anchor Bushing. See Figure 8.
Lube Locations
White Lithium Grease
Fig. 8
Anchor Bushing
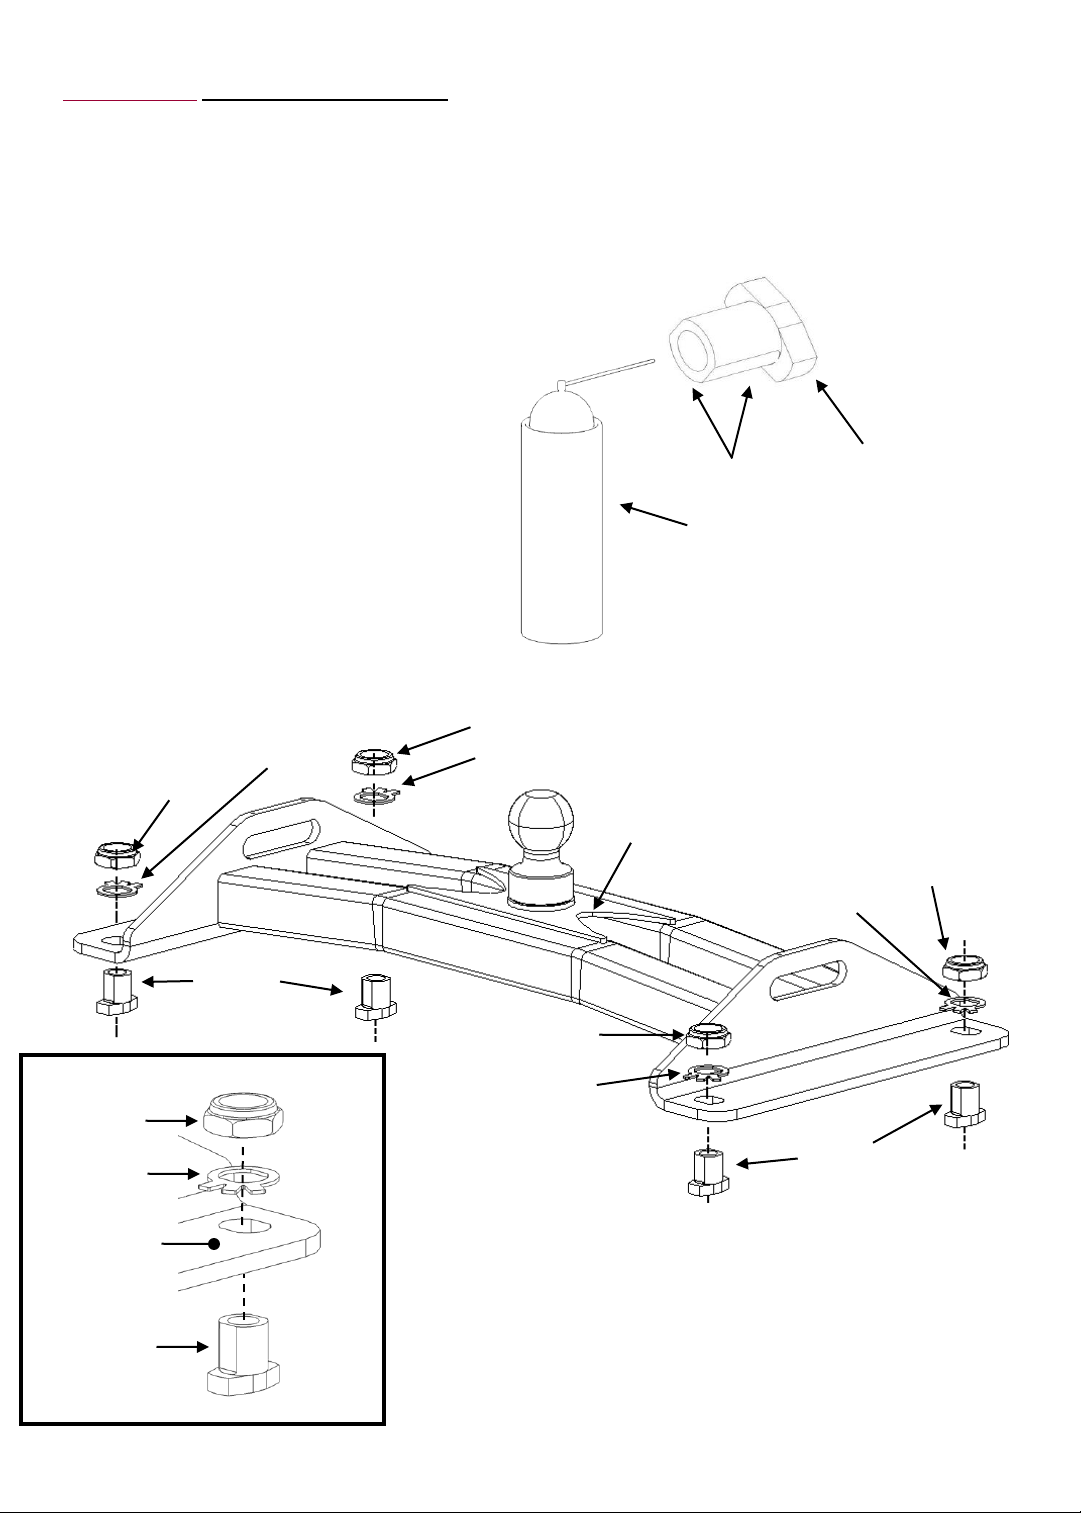
3. Loosely assemble the four anchor bushings to the base of the Signature Series Gooseneck Hitch using the 1” jam nuts
and tab washers.
See Figure 9.
Tab Washer
1” Jam Nut
Tab Washer
1” Jam Nut
Signature Series Gooseneck Hitch
1” Jam Nut
Tab Washer
Anchor
Bushing
1” Jam Nut
Tab Washer
1” Jam Nut
Anchor
Tab Washer
Base of
Fig. 9
Bushing
Gooseneck
Hitch
Anchor
Bushing
30845IN – 31OCT12D PCN18116 ©2005, 2012 CEQUENT PERFORMANCE PRODUCTS, INC. Litho in USA 5
For Kits 30845, 40845 & 50845
Page 6

4. Place the Signature Series Gooseneck Hitch into the mounting pucks previously installed in the truck (See
Signature Series Mounting Kit Instructions). See Figure 10.
Signature Series Gooseneck Hitch
Truck Bed
Mounting Puck
Mounting Pucks
Fig. 10
5 . Once the Signature Series Gooseneck Hitch is installed onto the mounting pucks, snug tight (no vertical play in anchor
bushing assembly) all four 1” jam nuts using a 1-1/2” box end wrench or impact wrench as it sits in the pucks in the
bed of the truck. Finish tightening each jam nut by turning the nut 1/4 turn more to achieve the required torque. See
Figure 11.
Signature Series Gooseneck Hitch
1” Jam Nuts
With Tab Washers
6 . Bend one tab (one that best aligns with flats of nut) on tab washer up against flat of jam nut on each of four anchor
attachments. This is to ensure that the nuts do not loosen over time. See Figure 12. Use a chisel and hammer to
bend tabs.
(between Signature Series Gooseneck Hitch & Truck Bed)
Bend up any one
tab that aligns with
a flat side of the nut
Mounting Pucks
Tab Washer
1” Jam Nuts With Tab Washers
Truck Bed
Fig. 11
1” Jam Nut
Fig. 12
30845IN – 31OCT12D PCN18116 ©2005, 2012 CEQUENT PERFORMANCE PRODUCTS, INC. Litho in USA 6
For Kits 30845, 40845 & 50845
Page 7

7. Remove the Signature Series Gooseneck Hitch from the truck bed and prepare for installing the Anchor Tee Pins,
Anchor Handles and the 3/16” linch pins. Install the Anchor Tee Pin by inserting it up through the Anchor bushing
and threading it into the the Anchor Handle. See Figure 13A. Each side of the Signature Series Gooseneck Hitch gets
one of each anchor handle (Anchor Handle “A” & Anchor Handle “B”). See Figure 13B for correct handle orientation.
The Anchor Tee Pin should be threaded as far as it can go into the Anchor Handle. The hole in the Anchor Tee Pin
will probably not line up with the slot in the Anchor Handle nut at this point and should be turned back slowly until
they are inline. Once aligned, rotate the Anchor Tee Pin 540 degrees (1 ½ times) counter clockwise until the hole
and slot re-align. See Figures 13C, 13D, 13E. The 3/16” linch pin can now be inserted into the hole.
Linch Pin
Anchor Handle
1” Jam Nut
Tab Washer
Anchor Bushing
Anchor Tee Pin
Fig. 13A
Anchor
Tee Pin
Anchor Handle “B” Shown
Hole in Anchor Tee Pin
Slot in Anchor Handle nut
Anchor Handle nut
Anchor Handle
1” Jam Nut
Tab Washer
Fig. 13B
The pin will snug up at an undetermined
angle
Fig. 13C
30845IN – 31OCT12D PCN18116 ©2005, 2012 CEQUENT PERFORMANCE PRODUCTS, INC. Litho in USA 7
For Kits 30845, 40845 & 50845
Loosen Tee Pin back to first parallel with
bushing position (less than ½ rotation)
Fig. 13D
Loosen Tee Pin 1 ½ additional
complete rotation for suggested
adjustment.
Fig. 13E
Page 8

8. When properly installed, all the Anchor Handles should be parallel to the Signature Series Gooseneck Hitch when
locked. The Anchor Handles are Unlocked when rotated 90 degrees (perpendicular to the Signature Series
Gooseneck Hitch). See Figure 14.
WARNING:
Failure to properly install handles could result in tow vehicle damage.
Anchor Handle “B”
Unlocked Position
Anchor Handle “A”
Unlocked Position
Fig. 14
Top of Hitch Shown
Anchor Handle “A”
Locked Position
Anchor Handle “B”
Locked Position
Lynch Pin through
holes in Anchor Handles
See sketch below
Anchor Handle “B”
Anchor Handle “A”
WARNING:
To prevent serious damage to
truck and/or persons both Lynch
Pins Must be installed through
the holes in the Anchor Handles
for the hitch to be properly
locked.
Install Lynch Pin through
holes in Anchor Handles to lock
30845IN – 31OCT12D PCN18116 ©2005, 2012 CEQUENT PERFORMANCE PRODUCTS, INC. Litho in USA 8
For Kits 30845, 40845 & 50845
Page 9

9. Rotate the Anchor Handles into the unlocked position (see Figure 14) and install the Signature Series
Gooseneck Hitch into the mounting pucks.
10. Rotate the anchor handles into the locked position and install the linch pins into the anchor handles. See
Figure 14.
If handles do not rotate into the locked position be sure there are not any obstructions in the mounting
pucks and that the Signature Series Gooseneck Hitch’s anchor bushings line up and fit into the mounting
pucks.
If the anchor bushings do not line up with the mounting pucks, it may be necessary to uninstall the hitch
and repeat steps 4 – 6.
If the anchor bushings do line up with the mounting pucks and the handles still do not rotate into the
locked position, it may be necessary to loosen up the anchor tee pins. Remove Signature Series Gooseneck
Hitch from truck bed, remove appropriate linch pin and rotate the anchor tee pin another ½ turn counter
clockwise. Do this until all 4 anchor handles rotate into the locked position. See Figure 14.
If the handles rotate into the locked position and have excessive vertical movement, it may be necessary
to tighten up the anchor tee pins. Remove Signature Series Gooseneck Hitch from truck bed, remove
appropriate linch pin and rotate the anchor tee pin another ½ turn clockwise. Do this until all 4 anchor
handles rotate into the locked position. See Figure 14.
11. The Signature Series Gooseneck Hitch is now secure and unable to be lifted out of the truck unless the
handles are unpinned and rotated to the unlocked position.
12. Remove the linch pins and rotate the handles to the unlocked position. Remove the Signature Series
Gooseneck Hitch from the truck.
13. Follow instructions on primer container and apply to hitch in designated area. See Figure 15.
Apply primer to this area
Apply primer to this area
Fig. 15
30845IN – 31OCT12D PCN18116 ©2005, 2012 CEQUENT PERFORMANCE PRODUCTS, INC. Litho in USA 9
For Kits 30845, 40845 & 50845
Page 10

14. Remove backing from double sided tape and install plastic on Signature Series Gooseneck Hitch. See Figure 16.
Let tape set for 45 minutes before usage.
Plastic Cover
Signature Series Gooseneck Hitch
Press down in center area
Fig. 16
30845IN – 31OCT12D PCN18116 ©2005, 2012 CEQUENT PERFORMANCE PRODUCTS, INC. Litho in USA 10
For Kits 30845, 40845 & 50845
Page 11

Signature Series Gooseneck Installation:
1. Remove puck plugs from all (4) of the pucks in the truck bed (Figure 17) and store for use when hitch is removed.
2. Set Signature Series Gooseneck hitch onto the pucks, and rotate handles into unlocked position(approximately
perpendicular with Signature Series Gooseneck Hitch Figure 14) until hitch drops into pucks on all (4) corners. See Figure
18.
3. Rotate (4) anchor handles into the locked position(anchor handles parallel with gooseneck). Figure 14.
4. Place lynch pins / locks through the anchor handle holes on each side to anchor hitch into pucks. Figure 14.
Signature Series Gooseneck Removal:
1. Remove lynch pin / lock from the anchor handle holes on each side of the Signature Series Gooseneck hitch. Figure 14.
Store lynch pins.
2. Rotate (4) handles into unlocked position(perpendicular with Signature Series Gooseneck Hitch). Figure 14. Lift each side
of hitch out of pucks separately, handles may have to be jiggled slightly to align anchors with puck holes to remove.
See Figure 18.
3. Store hitch in dry place where dirt and debris will not get into anchor assemblies.
4. Press puck plugs (packed with mounting kit) into all (4) of the pucks in the truck bed to keep debris out of pucks.
Figure 17.
Truck Bed
Puck Plug
Puck
Fig. 17
Fig. 18
30845IN – 31OCT12D PCN18116 ©2005, 2012 CEQUENT PERFORMANCE PRODUCTS, INC. Litho in USA 11
For Kits 30845, 40845 & 50845
Page 12

AFTER SYSTEM INSTALLATION AND BEFORE TOWING:
Connect trailer to the tow vehicle following coupler manufacturer’s operating instructions.
The coupler must be adjusted to provide about 6” of clearance between the bottom of the trailer nose and the top
of the pickup bed sides.
Slowly back the trailer to a jackknifed position to the tow vehicle while checking to see there is adequate
clearance between the gooseneck trailer and the rear of the vehicle. Also check to see there is adequate
clearance between the forward corners of the gooseneck trailer and the cab of the truck. Slowly jackknife the
truck and trailer in the opposite direction and check the clearances to the end of the truck and the cab.
Signature Series GOOSENECK MAINTENANCE
-Keep assembly free of dirt and debris.
-Lubricate hitch ball monthly or as needed with heavy grease.
-Check equipment before towing for worn or damaged parts.
REPLACE WORN OR DAMAGED PARTS IMMEDIATELY.
Lubricate hitch ball monthly
or as needed.
Chain Loops for safety chains
WARNING:
To prevent serious damage to
truck and/or persons both Lynch
Pins Must be installed through
the holes in the Anchor Handles
for the hitch to be properly
locked.
Install Lynch Pin through
holes in Anchor Handles to lock
30845IN – 31OCT12D PCN18116 ©2005, 2012 CEQUENT PERFORMANCE PRODUCTS, INC. Litho in USA 12
For Kits 30845, 40845 & 50845
Page 13

Signature Series Gooseneck HITCH SYSTEM
IMPORTANT INFORMATION ON TOWING
TOWING EQUIPMENT OWNERS: Make sure all operators of your equipment read and understand this information before towing. Save for
reference. This will help you properly use and maintain your towing equipment. Refer to owner’s manuals for your tow vehicle, trailer and
other parts of your towing system. Learn the capabilities and limitations of each part. GROSS TRAILER WEIGHT and VERTICAL LOAD are
the two most important items to consider. THESE WEIGHTS MUST NEVER EXCEED THE LOWEST RATING OF ANY PART OF YOUR
TOWING SYSTEM. GROSS TRAILER WEIGHT is the weight of the trailer plus cargo. Measure GROSS TRAILER WEIGHT by putting the
fully loaded trailer on a vehicle scale. VERTICAL LOAD is the downward force exerted on the ball by the trailer coupler. Use a vehicle scale
to measure VERTICAL LOAD with the fully loaded trailer on a level surface and the coupler at normal towing height.
TRAILER COUPLERS
The coupler should be smooth, clean and lightly lubricated. Adjust per coupler manufacturer’s instructions.
SAFETY CHAINS
Connect safety chains properly EVERY TIME YOU TOW. Attach securely through the chain loops provided so they can not bounce loose.
Leave only enough slack to permit full turning. Too much slack may prevent chains from maintaining control if other connections separate.
LINCH PINS
All 6 linch pins must be installed in their proper location and locked before towing.
ANCHOR HANDLES
All 4 anchor handles must be in the locked position and have a linch pin installed and locked before towing.
TRAILER LIGHTS, TURN SIGNALS, ELECTRIC AND BREAKAWAY SWITCH CONNECTIONS
Make these safety-critical connections EVERY TIME YOU TOW, no matter how short the trip. Check operation, including electric brake
manual control, before getting on the road.
OTHER USEFUL EQUIPMENT
AIR SPRINGS, AIR SHOCKS, or HELPER SPRINGS are useful for some applications. A TRANSMISSION COOLER may be necessary for
heavy towing. Many states require TOWING MIRRORS on both sides.
TIRE INFLATION
Check often. Follow tow vehicle and trailer manufacturer’s recommendations.
CHECK YOUR EQUIPMENT/REPLACE WORN PARTS
Check ball, coupler, chains, and all other connections EVERY TIME YOU TOW. Re-check at fuel and rest stops.
NO PASSENGERS IN TRAILER!
Never allow people in the trailer while towing, under any circumstances.
TRAILER LOADING
Place heavy objects on the floor ahead of the axle. Balance the load side-to-side. Secure it to prevent shifting. NEVER load the trailer rear
heavy. LOAD THE TRAILER HEAVIER IN THE FRONT, BUT NOT GREATER THAN TONGUE WEIGHT RATING OF THE HITCH.
DRIVING
The additional weight of a trailer affects acceleration, braking and handling. Allow extra time for passing, stopping, and changing lanes. A
gooseneck trailer requires a large turning radius as the trailer tracks to the inside of turns. Severe bumps can damage your towing vehicle,
hitch and trailer. Drive slowly on rough roads. STOP AND MAKE A THOROUGH INSPECTION IF ANY PART OF YOUR TOWING SYSTEM
STRIKES THE ROAD. CORRECT ANY PROBLEMS BEFORE RESUMING TRAVEL.
WARNING
DO NOT MODIFY. Do not tow one trailer behind another, which may cause loss of control. Failure to heed warnings and follow instructions
may result in serious personal injury or death, vehicle crash, and/or property damage.
30845IN – 31OCT12D PCN18116 ©2005, 2012 CEQUENT PERFORMANCE PRODUCTS, INC. Litho in USA 13
For Kits 30845, 40845 & 50845
Page 14

NOTES
SEVEN YEAR LIMITED WARRANTY
Cequent Performance Products warrants its Signature Series Gooseneck Hitches from date of purchase
against defects in material and workmanship under normal use and service, ordinary wear and tear
excepted, for 7 years of ownership to the original consumer purchaser when a Cequent Performance
Products mounting kit is used.
Cequent Performance Products will replace FREE OF CHARGE any part which proves defective in
material or workmanship when presented to any Cequent Performance Products dealer, Cequent
Performance Products Warehouse or returned to factory. TRANSPORTATION CHARGES PREPAID, at
the address below. THIS WARRANTY IS LIMITED TO DEFECTIVE PARTS REPLACEMENT ONLY.
LABOR CHARGES AND/OR DAMAGE INCURRED IN INSTALLATION OR REPLACEMENT AS WELL
AS INCIDENTAL AND CONSEQUENTIAL DAMAGES CONNECTED THEREWITH ARE EXCLUDED.
Some states do not allow the exclusion or limitation of incidental or consequential damages, so the above
limitation or exclusion may not apply to you.
Any damage to the Signature Series Gooseneck Hitch as a result of misuse, abuse, neglect, accident, improper
installation, or any use violative of instructions furnished by us, WILL VOID THE WARRANTY.
This warranty gives you specific legal rights, and you may also have other rights which vary from state to
state. In the event of a problem with warranty service or performance, you may be able to go to a small
claims court, or a federal district court.
Cequent Performance Products, Inc.
47912 Halyard Dr, Suite 100
Plymouth, MI. 48170
30845IN – 31OCT12D PCN18116 ©2005, 2012 CEQUENT PERFORMANCE PRODUCTS, INC. Litho in USA 14
For Kits 30845, 40845 & 50845
 Loading...