

Page 1

Item No. 1378384
t FPV Quadrocopter Cyclone 245 RtF WiFi
Version 12/15
Page 2

Page 3

CYCLONE 245 FPV
INSTRUCTION MANUAL
Page 4
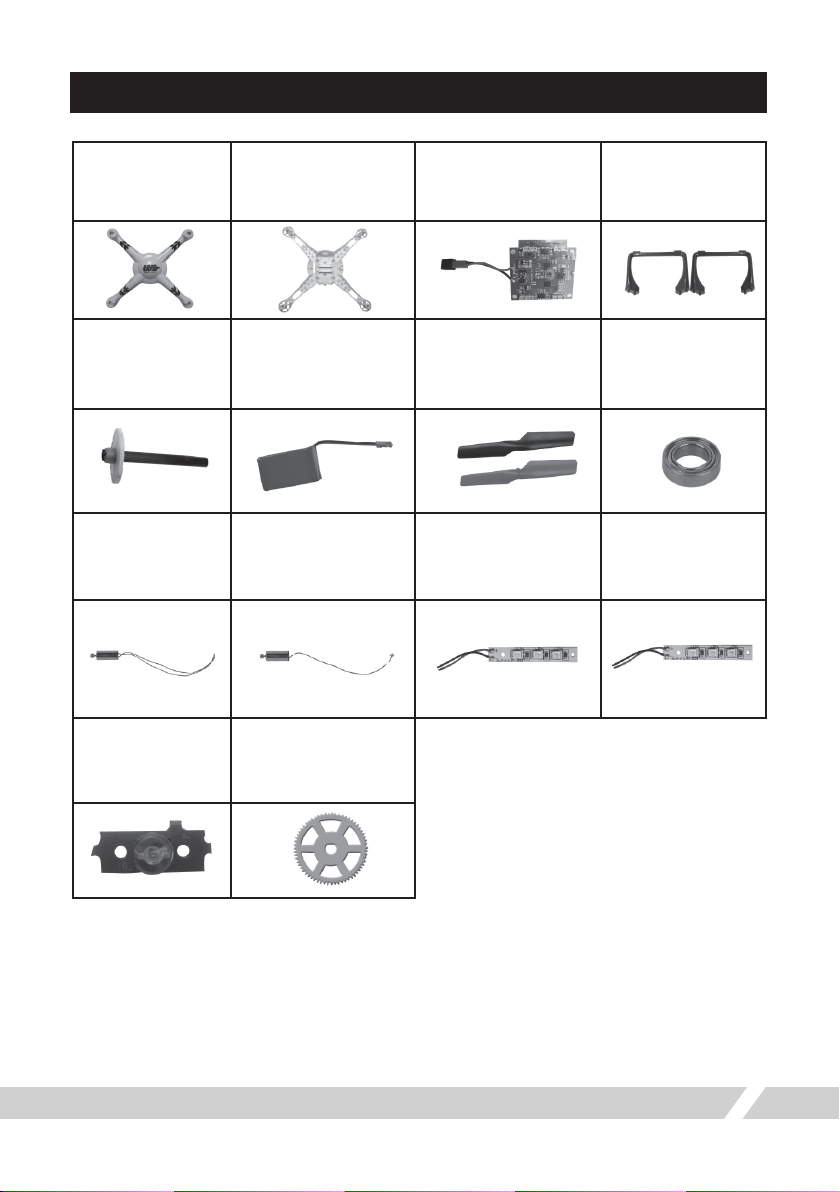
Accessories list (sold separately)
Part name: Upper
housing
Part name: Carbon
bre spindle
Part name: CW
motor (red and
blue wire)
Part name: Tail light
panel
Part name: Lower
housing
Part name: Lithium
Battery
Part name: CCW
motor (black and
white wire)
Part name: Main gear
Part name: Circuit
board
Part name: Rotor
blade
Part name: Green light
Part name: Landing
skid
Part name: Bearing
Part name: Red light
1
Page 5
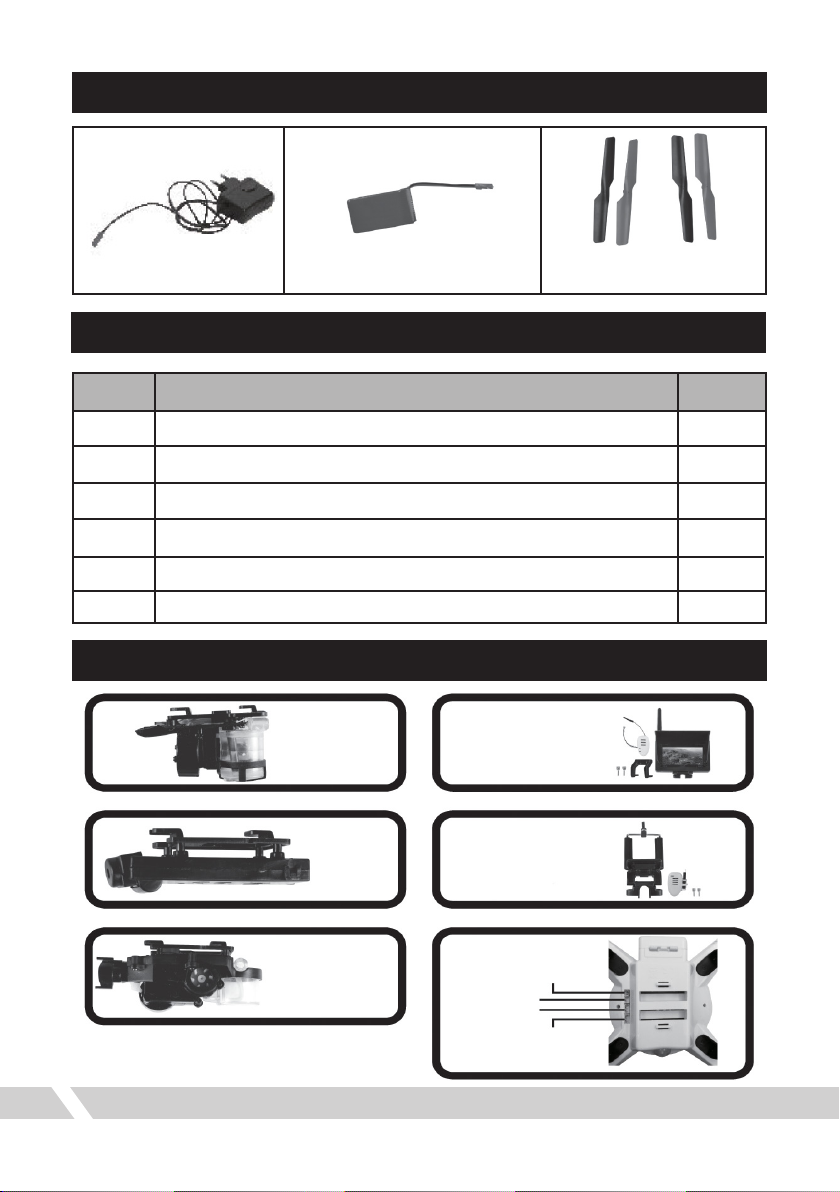
Standard Accessories
Charger x1
NO
1
2
3
4
5
6
3.7 V 730 mAh
Li-Po battery x 1
Blade x4
Delivery content
PART NAME QUANTITY
V686 Instruction Manual
V686 Aircraft
Charger
Li-Po battery
Blade
Remote control
1
1
1
1
4
1
Optional Parts (sold separately)
WATER GUN
MONITOR FPV
CAMERA
BUBBLE GUN
WIFI FPV
WIFI FPV
5.8G FPV
2
Page 6

Warning
■
Read the ENTIRE instruction manual to become familiar with the features of the product
before operating. Failure to operate the product correctly can result in damage to the
product, personal property and cause serious injury. This is a sophisticated hobby product.
It must be operated with caution and common sense and requires some basic mechanical
ability. Failure to operate this Product in a safe and responsible manner could result in injury
or damage to the product or other property. This product is not intended for use by children
without direct adult supervision. This manual contains instructions for safety, operation
and maintenance. It is essential to read and follow all the instructions and warnings in the
manual, prior to assembly, setup or use, in order to operate correctly and avoid damage or
serious injury.
Additional Safety Precautions and Warnings
1. Age recommendation: Not for children under 14 years. This is not a toy.
2. Always operate your model in open spaces away from full-size vehicles, trafc and
people.
3. Always carefully follow the directions and warnings for this and any optional support
equipment ( chargers, rechargeable battery packs, etc.) .
4. Always keep all chemicals, small parts and anything electrical out of the reach of
children.
5. Always avoid water exposure to all equipment not specically designed and protected
for this purpose. Moisture causes damage to electronics.
6. Never place any portion of the model in your mouth as it could cause serious injury or
even death.
7. Never operate your model with low transmitter batteries.
8. Please note that you incur a penalty if you observe strangers with the camera installed
in the product without their knowledge and consent. Observe the provisions and
regulations of the country in which you use this product.
3
Page 7

Introduction
■
Thank you for choosing this REELY product. This four-axis aircraft can fly
outdoors, in order to make it easier and easier to control the aircraft, please
carefully read this manual before operating this aircraft, and please keep this
manual for any future adjustments and maintenance of reference you may
wish to make.
■
Before your first flight, please take the time to carefully read this
manual, which contains important flight information, which will help your
first flight to be a great success.
Table of Contents
Accessories list ..................................................................................
Standard Accessories .........................................................................
Delivery Content ................................................................................
Optional parts ..................................................................................
Warning ..........................................................................................
Additional Safety Precautions and Warnings .................................................
Introduction ......................................................................................
Table of Contents ...............................................................................
Warning and the guide of using battery .......................................................
Battery Charging ................................................................................
First Flight Preparation CAUTION .............................................................
Binding instruction ..............................................................................
Transmitter Controls ............................................................................
First Flight instruction ..........................................................................
3D Rolling .......................................................................................
One key return to home ........................................................................
CF MODE .......................................................................................
CF mode Calibration ..........................................................................
Trouble shooting Guide .......................................................................
Schematic circuit board .......................................................................
Exploded View .................................................................................
Parts list ........................................................................................
Quadrocopter specications ..................................................................
1
2
2
2
3
3
4
4
4
5
6
7
7
8
9
9
10
10
10
10
11
12
13
13
4
Page 8

Warning and the guide of using battery
CAUTION WARNING WARNING
Always use a charger
compatible with
batteries.
Always charge
Batteries away from
ammable materials.
Never leave charging
Batteries unattended.
The Battery Charger included
charges the Li-Po battery.
WARNING
Never charge
damaged Batteries.
WARNING
Never Alter Batteries. Never touch or use
It has been designed with
safety in mind.
WARNING
hot Batteries.
CAUTION: All Instructions and warnings must be followed exactly. Mishandling of Li-Po
batteries can result in a re, personal injury, and/or property damage.
1. By handling, charging or using the included Li-Po battery you assume all risks associated
with lithium batteries.
2. If at any time the battery begins to balloon or swell, discontinue use and disconnect
immediately. Continuing to use, charge or discharge a battery that is ballooning or swelling
can result in re.
3. Always store the battery at room temperature in a dry area for best results.
4. Always transport or temporarily store the battery in a temperature range between 5°C
to 48°C. Do not store the battery in the model or prolonged exposure to direct sunlight. If
stored in a high temperature environment, battery can be damaged or even catch re.
5. Never use a Ni-CD or Ni-MH charger. Failure to charge the battery with a compatible
charger may cause re resulting in personal injury and/or property damage.
6. Never exceed the recommended charge rate.
7. Never cover warning labels with hook and loop strips.
WARNING:
Only use the charger supplied by our company. Do not use a 12V power
supply or property damage and Injury could occur.
Notice: When a LiPo battery is discharged below 3.3V, the battery may be damaged
and may no longer accept a charge. Please land the quadrocopter
immediately and recharge the battery.
5
Page 9

Battery Charging
1-cell 3.7V Variable Rate DC Li-Po Charger
Instruction:
Please only recharge LiPo ight battery with the supplied AC
charger. Connect the battery to charger wire as per below
illustration only.
Charging line
LED
3.7V 730mah
Notice: Only use the charger provided
Notice: Never attempt to power the charger from an AC outlet without the use
of a proper AC to DC adapter/ power supply.
First Flight preparation CAUTION
1. Before taking the quadrocopter into operation, ensure that the ight
battery is charged completely and the batteries in the transmitter still have
enough voltage.
2. Before powering on remote controller, please keep the joystick for the
pitch function in the bottom position.
3. Please ensure quadrocopter is successful binded before operation. First
connect the ight battery to the quadrocopter electronics plug connection
with protection against polarity reversal. The LED on the quadrocopter
ashes quickly, then switch on the remote control transmitter with the
function switch. This starts the binding process, after which transmitter
and receiver use the same digital code. If binding is completed, the LED
remains lit.
4. Do not take any risks when operating the product! Your own safety and
that of your environment is solely down to you being responsible when
dealing with the model. Improper operation may cause serious injury and
property damage! Therefore make sure to keep a sufciently safe distance
to persons, animals or objects during operation.
6
Page 10

BINDING OF RADIO TRANSMITTER AND RECEIVER
Step1
CAUTION
Push the throttle stick
to the lowest position
Li-Po
3.7V 730mAh
Li-Po
3.7V 730mAh
Place the quadrocopter on a level surface.
Step2
Move the joystick for the pitch function to
the lowest setting and switch the transmitter on with the on/off switch. Then push the
joystick all the way forward and then slowly
backward again to switch the transmitter
into operating mode. The transmitter emits
a single signal sound to conrm binding is
complete, and the LED remains lit.
Step3
Remove the ight vehicle battery safely
at the conclusion of the ight. This
should become a post-ight habit to
guard against unforeseeable problems.
Warning: If left connected in the ight
vehicle for a long time, the battery may be
damaged due to over-discharge, or even
become a re hazard.
If transmitter is not to be
used for a long time, please
remove the battery for
storage.
7
Step4
Turn off the transmitter. If transmitter
is not to be used for a long duration,
please remove the battery for storage.
Warning: If the AA batteries are left
in the transmitter, potential leakage
could occur which may damage the
transmitter, and create re hazards.
Page 11

1. Transmitter Control
Power Switch
Power LED
Transmitter Control
Antenna
Video
Throttle Control stick
Throttle trim
Rudder trim
X-axis calibration key / Steering
sensitivity indicator: 40%
Y-axis calibration key / Steering
sensitivity indicator: 60%
Steering sensitivity
indicator: 80%
2. LCD Display
Stick modes indicator
Roll
Elevator Control stick
Elevator trim
Aileron trim
Steering sensitivity indicator: 100%
One key to return home / Light control
Camera (CF mode press &
hold for 2 seconds)
LCD Display
Transimitter battery indicator
Stick modes indicator
Throttle trim indicator
Rudder trim indicator
Elevator trim indicator
Aileron trim indicator
8
Page 12

First Flight instruction
If you are not familiar with the controls of your V636, take a few minutes
to familiarize yourself with them before attempting your rst ight.
Throttle
Throttle up Throttle down
Rudder
Rudder
Left
Elevator
Elevator up Forward
Aileron
Ailerron left Ailerron right
Nose Yaws Left
Left Right
Climb Descend
Rudder
right
Elevator
down
3D Rolling
Nose Yaws Right
Backward
Stable exible, ight routes,
Drift, 3D to roll easily
Once you have mastered all basic controls, then should you proceed and attempt more
difcult maneuvers such as 3D roll. To activate 3D roll function, press top right switch
button, the transmitter will emit a single continuous sound to conrm quadrocopter is in 3D
roll mode. Move the joystick for nick and roll function quickly in the direction in which the
quadrocopter should roll and immediately bring the joystick back to the center position.
Attention: If you do not move the deected joystick back to center position quickly enough,
the quadrcopter may execute 2 rolls in succession and thereby lose considerable altitude.
If quadrocopter is in CF mode, 3D roll cannot be activated.
9
Page 13

One Key return to home
Press and hold light control switch button for 2 seconds. Transmitter will emit a single continuous
sound to conrm, rear light will blink quickly at the same time. Quadrocopter begins to return home.
Note: Please note one key return to home will not work if 1.) during start up, stand behind
quadrocopter and that the quadrocopter is not aligned with the green propellers facing forward. 2.)
If you have changed to CF mode during ight.
CF MODE
Press and hold CF mode switch button for 2 seconds. Transmitter will emit a continuous sound to
conrm.
For you to be able to use CF mode correctly, it is necessary for you to always stand behind the
quadrocopter and look in the direction in which you aligned the quadrocopter before the start. The
quadrocopter must be aligned with the two green propellers facing forward.
CF mode Calibration
The quadrocopter has a compass that allows it to detect its direction and that it needs for ight
in CF mode. The compass comes pre-calibrated from the factory, but for each use in a new ight
area, it needs to be recalibrated.
To do this, proceed as follows:
1. As described above, rst start up the transmitter and then the model. The joystick for the
throttle function must be in the lowest position so that the motors do not start running.
2. Place the quadrocopter on a level surface.
3. Press and hold the 40% switch button until the LEDs on quadrocopter begin to ash and thus
indicate the calibration mode.
4. Now turn the quadrocopter, as seen from above, clockwise until the LEDs remain lit.
5. Press and hold the 60% switch button LEDs begin to ash again.
6. Now hold the quadrocopter with the front side (green propeller) vertically on top and turn it
clockwise again until the LEDs remain lit again.
7. The calibration is thereby successfully completed.
Troubleshooting Guide
Problem Problem cause Solution
Receiver status LED blinks
1
continuously for more than
4 seconds after ight battery
Inserted. No response to control
Input.
No response after battery is
2
connected to quadrocopter.
Motor does not respond to throttle
3
stick, LED receiver ashes.
Main rotor continue to spin after
4
landing.
Unable to bind to transmitter. Repeat the power up initializing
1. Power to the transmitter and
receiver.
2. Check the transmitter and
receiver voltage.
3. Poor contact on battery
terminals.
Flight battery depleted. Fully charge the battery, or
Throttle trim accidentally
Increased during ight.
10
process. (Refer to P.6:Binding of
radio transmitter and receiver.
1. Turn on transmitter and ensure
ight battery Is Inserted properly.
2. Use fully charged batteries.
3. Re-seat the battery and ensure
good contact between battery
contacts.
replace with a fully charged
battery.
Conrm throttle trim is in centre
or slightly below.
Page 14

Main rotor spins but unable
5
to takeoff.
Strong vibration of
6
quadrocopter.
Quadrocopter drifts sideways
7
despite trim adjustment or
Inconsistent speed during
left/right pirouette.
1.
Rotor blades damaged
2. Flight battery depleted
1. Replace main blades
2. Charge or replace with a fully
charged battery.
1.Rotor deformation 1. Replace the rotor
1. Damaged tall rotors
2. Damaged tail drive motor
Replace the rotor
Replace the main motor
Quadrocopter still drifts
8
forward despite trim
adjustment.
Quadrocopter cannot take off
9
after a crash.
Large deviations headless
10
mode.
LED socket (M4)
Motor socket
(M4, M1)
quadrocopter not initialized on a
level surface or correctly aligned
1. Motor fall out
2. Gear loosen
1. quadrocopter not initialized on a
level surface or correctly aligned.
2. CF mode disrupted
Schematic circuit board
Tail LED socket
Disconnect the ight battery, center
all control trims and start up the
quadrocopter again
1. Install the motor again
2. Tighten the gear
1. Start up the quadrocopter again with
correct alignment
2. Re calibrate CF mode (refer section on
CF calibration)
LED socket (M3)
Motor socket
(M2, M3)
LED socket (M1)
LED socket (M2)
11
Page 15

Exploding View
Black A
Green B
forward
Black B
Green A
12
Page 16

Parts Listing
NO PART NAME QUANTITY
1
2
3
4
5
6
7
8
9
10
11
12
13
14
15
16
Propeller guard
Main rotor blade
Upper housing
Receiver board
Bearing
Battery cover
Battery
Electric motor
LED light
LED light cover
Lower housing
Carbon bre spindle
Tail light plate
Bearing
Tail LED
Landing skid
4
4
1
1
8
1
1
4
4
4
1
4
1
4
1
2
Quadrocopter specications
Length
Height
Blade length
Battery Specication
Flight time
13
375 mm
58 mm
136 mm
3.7V 730mAh23C
7-8 min
Page 17

Live Video Streaming and ight
control via WiFi
This quadrocopter comes with a WiFi camera already pre-installed. The device uses advanced image
compression technology to enable you to stream live video on your smartphone at a distance of 50 to 70
meters using WiFi.
To utilize this powerful Live video streaming feature and also ight control via smartphone , simply
download and install the app by scanning the QR code shown on following page matching to your
smartphone operating system.
Operating instruction:
To stream live video with WiFi camera, please ensure to take camera connector wire and plug it into the
appropriate socket with marking “WiFi” etched on quadrocotper housing. Socket is located adjacent to
camera. Please note, if connector wire is not correctly and securely inserted into the socket, live video
streaming feature will not work and may fail.
Power on your transmitter and the quadrocopter, and then the app on your smartphone.
From the Wi-Fi settings control on your smartphone, search for WiFi network name beginning with
“WiFiUFO” and enable connect ion.
Start the app and then press play on screen. The default app setting allows only for video transmission
but is disabled for ight control capability.
Mount the smartphone holder as per illustration on following page.
Place your smartphone on the smartphone holder, and use onscreen controls as shown below to stream
live video or take photos.
To use your smartphone to control ight of quadrocopter, simply press control switch button to
interchange between transmitter control/ phone control.
App Controls
View le from folder
Return
Analog sticks
Rudder trim
Steering sensitivity value
Picture Video
Gravity sensor mode
Control switch (transmitter control /
phone control)
Screen rotation
Elevator trim
Aileron trim
Page 18

Phone Holder assembly
WIFI Webcam Phone Holder
QR code for
IOS
WIFI UFO
(Illustration)
QR code for
(GooglePlay Android)
WIFI UFO
(GooglePlay)
Page 19

Technical specication
Function
Camera
Video encoding format
Video sampling
Image Resolution
Transmitting frequency range
Supports standard
Transmission bit rate
Throughput
Transmission power
Receiver sensitivity
Specications
0.3 megapixel
H.264
rate of 25 to 30 frames per second
VGA (640*840)
2.412-2.484 GHz
support WI-FI 802.11 b / g / n standards
135/54/48/36/24/18/12/9/6 1M ( adaptive )
90Mbps
135M: 15dBM
54M: 15dBM
11M: 19dBM
54/135M:-72dBM@10%PER
11M:-85dBM@8%PER
6M:-88dBM@10%PER
1M:-90dBM@8%PER
Safety standard
Transmission distance
Antenna Selection
PCB size 33mm * 22mm * 0.8mm
Supply voltage
Current consumption
Operating temperature
WEP/WPA-PSK/WPA2-PSK
50 to 150 m (varies depending on surrounding
electromagnetic interference)
IPX 1 generation antenna interface
3-5V
about 800mW
-10°C~+70°C
 Loading...