


03
Contents
Warning
Before beginning this or any exercise programme, consult your
physician. This is especially important for persons who have not
exercised regularly before or persons with pre-existing health
problems. Read all instructions before using. Reebok® assumes
no responsibility for personal injury or property damage
sustained by or through the use of this product.
Precautions 02
Parts List 04
Before you Begin 06
Exploded Diagram of the RB3000 07
Hardware Pack 08
Part Identification Diagram 09
Assembly Instructions 10
Function & Load Buttons 12
Programmes 13
Motor Protection 14
LCD Contrast Calibration 14
Seat Adjustment 15
Heart Rate Sensor Operation 15
Heart Rate Training 16
Hints to Help You Achieve Your Goals 17
Maintenance 18
How to Order Replacement Parts 19
Limited Warranty 19
Questions?
As a manufacturer, we are
committed to providing complete
customer satisfaction. If you have
any questions, or if parts are missing
or damaged, we will guarantee
complete satisfaction through direct
assistance from our factory.
TO AVOID UNNECESSARY DELAYS,
PLEASE CALL OUR CUSTOMER
HOTLINE DIRECT.
The trained technicians on our
customer hotline will provide
immediate assistance free of charge.
UK Customer Hotline:
0870 330 0024
UK E-mail:
info@reebokfitness.co.uk
UK Customer service
address
RFE International, DFDS House,
Maidstone Road, Kingston,
Milton Keynes, MK10 0AJ.
Caution
Read all precautions and instructions
in this manual before using this
equipment. Keep this manual for
future reference.
Model No. RE-10202
Batch No.
Write the batch number in the
space above for future reference.
The batch number can be found on
a sticker underneath the RB3000.
0504
Parts List
NO. DESCRIPTION QTY.
1 BASE FRAME 1 PC.
2 FRONT FOOT 1 PC.
3 SADDLE POST HOLDER 1 PC.
4 SADDLE BRACKET 1 PC.
5 FRONT FOOT COVER 2 PCS.
6 M8 X 75 MM CARRIAGE BOLT 4 PCS.
7 M8 X WASHER OD 16 MM 9 PCS.
8 M8 SPRING WASHER 4 PCS.
9 M8 CAP NUT 4 PCS.
10 REAR FOOT 1 PC.
11 REAR FOOT COVER 1 SET
12 LEFT CHAIN COVER 1 PC.
13 RIGHT CHAIN COVER 1 PC.
14 SADDLE SUPPORT TUBE INSERT 1 PC.
15 PLASTIC COLLAR 1 PC.
16 SADDLE POST 1 PC.
17 END CAP 1 PC.
18 GEL SADDLE 1 PC.
19 SEAT KNOB 1 PC.
20 HANDLEBAR POST 1 PC.
21 ADAPTOR TACK 1 PC.
22 ADAPTOR 1 PC.
23 CRANK COVER 2 PCS.
24 COMPUTER UPPER CABLE 1 PC.
25 COMPUTER LOWER CABLE 1 PC.
26 PULSE WIRE 1 PC.
27 HANDLEBAR BRACKET 1 PC.
28 CHROME M8 X 15 MM ALLEN HEAD BOLT 4 PCS.
29 HANDLEBAR 1 PC.
30 PULSE GRIP UNIT 2 PCS.
31 HANDLEBAR CAP 2 PCS.
32 M8 X 38 MM SCREW 1 PC.
33 M8 WING NUT 1 PC.
34 COMPUTER 1 PC.
35 M5 X 10 MM SCREW 4 PCS.
36 CRANK ASSEMBLY (LEFT & RIGHT) 1 SET.
37 M8 X 20 MM SCREW 2 PCS.
38 PEDAL (LEFT & RIGHT) 1 SET
39 CONNECTOR PLUG 1 PC.
40 PULSE WIRE JACK 1 PC.
41 SERVO MOTOR 1 PC.
42 M6 X 10 MM SCREW 2 PCS.
43 SENSOR WIRE 1 PC.
44 CLIP C17 (ID 15.7 MM) 2 PCS.
45 REAR PULLEY 1 PC.
NO. DESCRIPTION QTY.
46 MAGNET 1 PC.
47 M6 X 12 MM SCREW 1 PC.
48 AXLE FOR PULLEY 1 PC.
49 M6 X 15 MM SCREW 4 PCS.
50 SMALL SPRING 1 PC.
51 BEARING (6203ZZ) 2 PCS.
52 SENSOR BRACKET 1 PC.
53 JOCKEY WHEEL BRACKET 1 PC.
54 BEARING (6001ZZ) 4 PCS.
55 DRIVE BELT WHEEL 1 PC.
56 CLIP C12 (ID 11.1 MM) 3 PCS.
57 M8 X 25.4 MM SCREW 1 PC.
58 M10 NYLON WASHER 2 PCS.
59 M10 WASHER (1.5 MM) 1 PC.
60 M8 NYLOCK NUT 1 PC.
61 CARGE SPRING 1 PC.
62 FLYWHEEL 1 PC.
63 METAL BUSHING 1 PC.
64 BEARING HF-2520B 1 PC.
65 SPACER TUBE 1 PC.
66 FRONT PULLEY 1 PC.
67 FLYWHEEL AXLE 1 PC.
68 BELT 1 PC.
69 M10 WASHER (2.0 MM) 3 PCS.
70 3/8” WH NUT 2 PCS.
71 BRACKET 1 PC.
72 M8 X 16 MM SCREW 2 PCS.
73 MAGNETIC HOLDER 1 PC.
74 M8 X 67.5 MM SCREW 1 PC.
75 WIRE ROD 1 PC.
76 WATER BOTTLE CAGE 1 PC.
77 M5 X 12 MM SCREW 1 PC.
78 WATER BOTTLE 1 PC.
79 M10 WASHER (1.0 MM) 1 PC.
80 WASHER ID12 OD15 (0.3 MM) 1 PC.
81 WASHER ID17 OD22 (0.3 MM) 1 PC.
82 WIRE CONNECTOR 1 PCS.
83 CLIP C5 (ID 4.7 MM) 1 PC.
84 WRENCH 1 PC.
85 ALLEN KEY 1 PC.
86 CROSS HEAD SCREWDRIVER/WRENCH 1 PC.
87 M8 WASHER OD 16 MM (CHROME) 4 PCS.
88 M8 SPRING WASHER (CHROME) 4 PCS.
89 KEEP BACK BRACKET 1 PC.
90 M4 X 10 MM SCREW 2 PCS.
0706
Before You Begin
Congratulations for selecting the RB3000 exercise cycle from
Reebok. Whether you are an accomplished athlete seeking to
maintain peak performance or a beginner realising the benefits
of exercise for the first time, the RB3000 will help you to achieve
your goals. In the “Hints to Help You” section of this manual we
have outlined some tips that we hope will help you maximise the
effectiveness and fun of your workouts.
In the meantime, remember that the benefits of exercise are many
and varied including higher energy levels, reduced stress, improved
self-esteem, clearer and more radiant skin, greater cardiovascular
efficiency, higher metabolic rate, and improved body posture - all
of which can result in a longer and more enjoyable life.
Whilst purchasing the RB3000 will not do all of this alone, it is an
important step towards understanding and achieving the benefits of
exercise. Well done!
All Reebok products are manufactured to the highest
specifications and this instruction manual should enable
you to assemble the RB3000 and commence your workout
programme. If, however, you have any additional
questions, please call our Customer Service Department on
+44 (0) 870 330 0024. To help us assist you, please
quote the product model number and batch number when
calling. The model number is RE-10202. The batch
number can be found on a sticker attached to the
Reebok® RB3000 (see the front cover of this manual).
IMPORTANT: This product requires mains power to
operate and will not function unless the power
adaptor is plugged in.
Seat
Handlebars
Seat Post
Pedal
Front Wheels
FRONT
RIGHT SIDE
BACK
Console
Heart Rate Sensors
Seat Knob
Water
Bottle/
Holder
Mains Power
Adaptor

0908
Hardware Pack
The hardware fittings and tools required for assembly are packed in
a plastic covering within the main carton. These are referenced by
a numerical code as outlined in the parts list (page 4). The pack
configuration is shown below in order to ease identification.
Note: We suggest that you do not open the hardware pack until
you are ready to assemble your RB3000 cycle. When you open
the pack, please do so carefully to ensure that the pieces remain
in their position by their identification numbers.
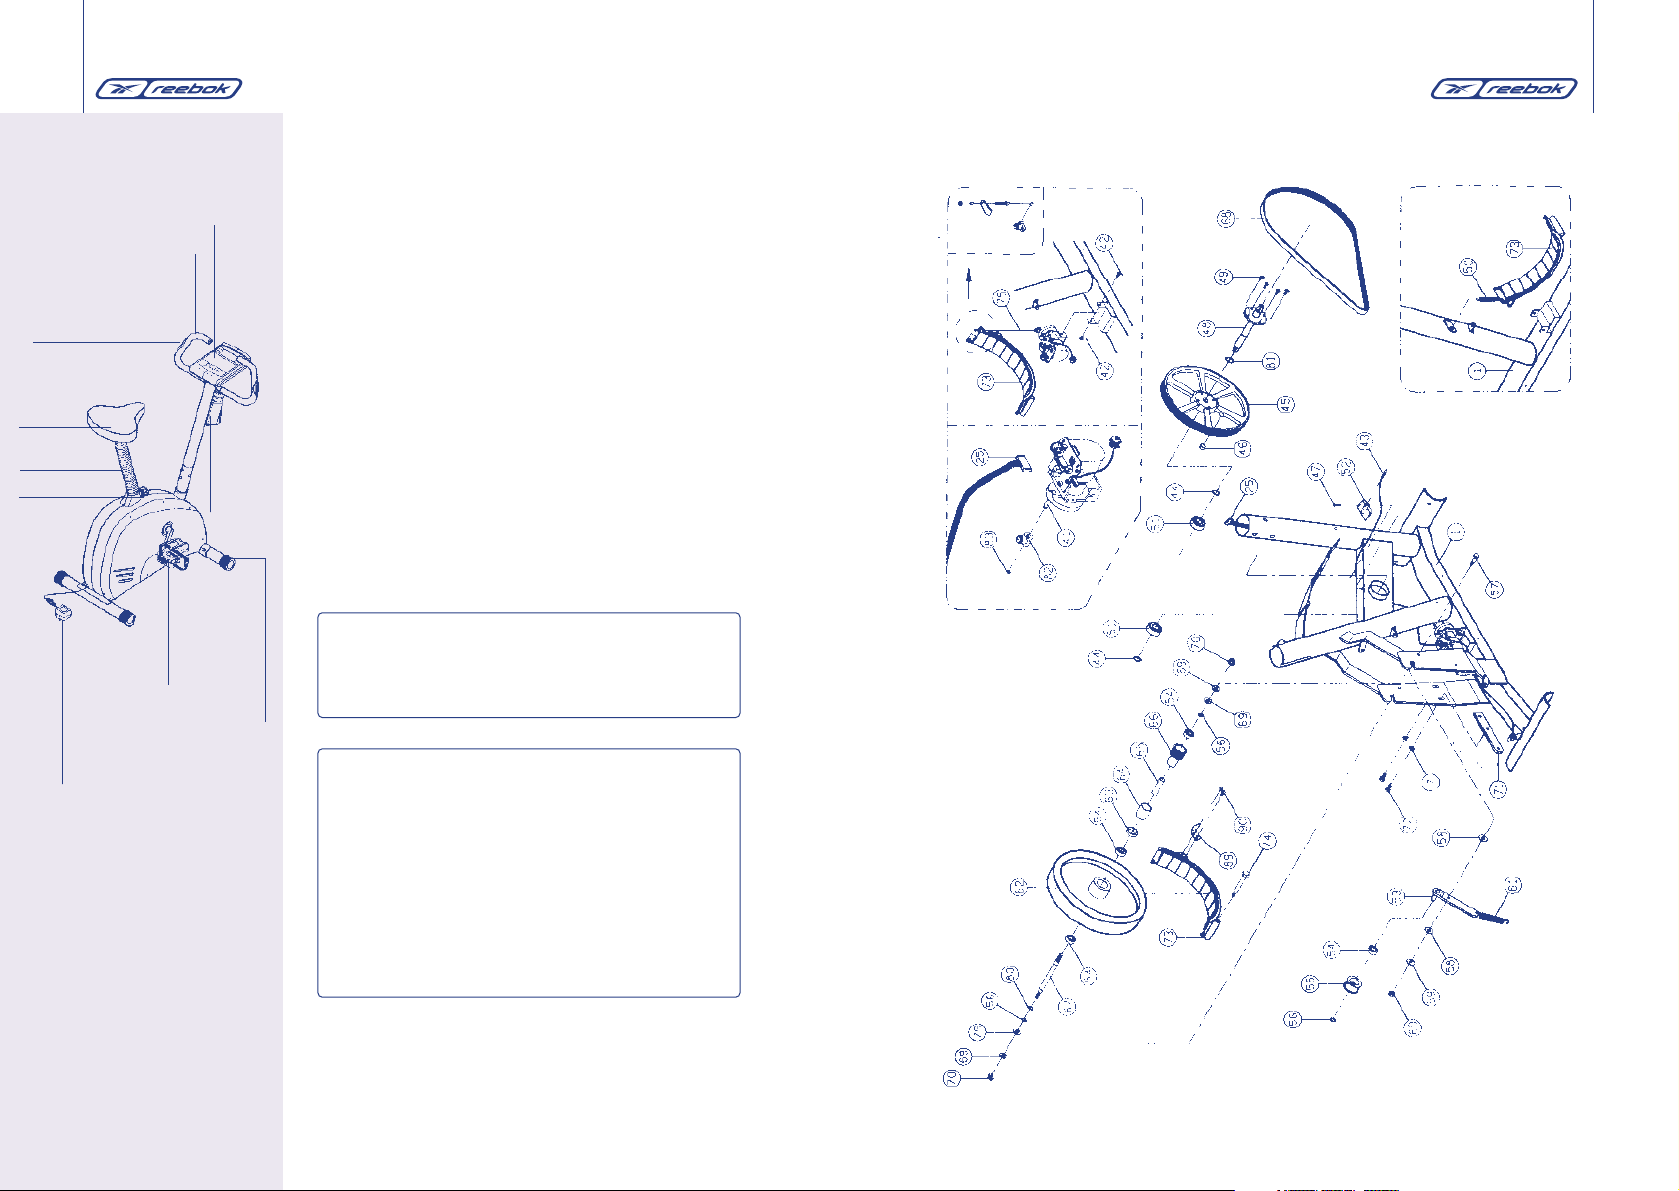
Part Identification Diagram
Use the diagram below to help identify the parts used in assembly. The numbers in the
circles refer to the key number of the part.
Place all parts of the exercise cycle in a cleared area and remove the packaging
materials. Do not dispose of the packaging materials until assembly is completed.
Assembly tools are included.
Note: Some parts may have been pre-attached for shipping purposes.
If a part is not found in the hardware pack, check to see if it has been pre-attached.
85
88
8
87
7
6
9 28
20
86
84

1110
Assembly Instructions
Identify the Front Foot (2), which has a Front Foot Cover (5)
on the end.
Hold the Front Foot against the saddle on the front of the Base
Frame (1). Make sure that the Front Foot is turned so the square
holes are facing away from the saddle. Attach the Front Foot
with 2 x (6), 2 x (7), 2 x (8) and 2 x (9), using the Wrench
(84).
Attach the Rear Foot (10) to the rear of the Frame (1) in the
same manner (see above).
Attach the Computer Upper Cable (24) to the Computer Lower
Cable (25) before inserting the Handlebar Post (20) into the
Handlebar Base. Use 4 x (28), 4 x (87), 4 x (88) to hold the
Handlebar Post in place, tighten with the Allen Key (85).
Attach the Gel Saddle (18) to the Saddle Post (16) by inserting
the Saddle Post Holder (3) into the Saddle Bracket (4).
Place the Plastic Collar (15) over the Saddle Post (16).
Insert the Saddle Post (16) into the Base Frame. Align one of
the holes in the Saddle Post with the hole in the Base Frame.
Insert the Seat Knob (19) into the Frame and Saddle Post, and
tighten the Seat Knob into the Frame. Make sure to insert the
Seat Knob through one of the holes in the Saddle Post; do not
insert the Seat Knob under the Saddle Post.
5
4
3
2
1
Identify the Right Pedal (38); there is an “R” on the Right Pedal
for identification. Tighten the Right Pedal clockwise into the right
arm of the Crank Assembly (36), using the wrench at the end
of the Cross Head Screwdriver (86).
Tighten the Left Pedal (not shown) counterclockwise into the left
arm of the Crank Cover (36).
Attach the Handlebar (29) to the Handlebar Post (20). The
Handlebar Bracket (27) with 2 x (37) and 2 x (7), already
attached. (Note: Please ensure the Wing Nut (33) is pointing
upwards.)
Attach the Computer Upper Cable (24) to the Connector Plug
(39), and the Pulse Wire (26) to the Pulse Wire Jack (40).
Attach the Computer (34) to the Handlebar Post with 4 x (35).
Be careful to avoid pinching the wires inside the Handlebar Post.
Attach the Water Bottle Cage (76) to
the post using 2 x (77). Place the
Water Bottle (78) into the Cage.
Mains Power Supply
The RB3000 requires mains power to
operate. Insert supplied power adaptor
(22) into the base of the bike (at the back)
and plug the adaptor into a mains power
socket. Check to make sure the console is now functioning.
You will
hear the motor self calibrating the resistance system - this is normal.
If
the LCD screen remains blank please re-check the cable connections
(see
and ).
Warning: only use the power adaptor supplied (with 220/240V
mains power supply). If the mains power adaptor is missing or
becomes lost, please call our customer service department on
0870 330 0024.
83
9
8
7
6
22

1312
Function & Load Buttons
MODE By pressing this button you will change from SPEED to
RPM and CALORIES to WATTS press the button again
to change back.
SET Press to preset functions of time, distance, calories and
pulse.* Set button may only work when the computer
is in stop mode.
RESET Press to reset functions individually, or press and hold
to reset all functions.
LOAD UP & These buttons increase and decrease the
LOAD DOWN resistance provided by the machine.
TIME Count up: the computer measures total exercise time from
0:00 up to 99:59. Count down: if you have a preset
target time, the computer will count from that preset time
down to 0:00 as soon as you start exercising.
SPEED Displays the current exercise speed on the LCD.
DISTANCE Count up: measures total distance from 0:00 to
99:99 km. Count down: if you have a preset target
distance, the computer will count from that preset
distance down to zero as soon as you start exercising.
CALORIES Count up: measures total calories burned during
exercise. Count down: if you have a preset target
number of calories, the computer will count from that
preset number down to zero. This data is a rough
guide and should not be used for medical assessment.
PULSE The monitor will display your current heart rate 5 seconds
after you place both hands on the pulse grips. To ensure
accuracy use both hands on the pulse grips. This data
is a rough guide and should not be used for medical
assessment.
The RB3000 offers a choice of 12 different workout programmes that are designed to provide variety
and to help keep you motivated. The programmes include: Manual, Rolling, Valley, Fat Burn, Ramp,
Fitness Test, Random, Plateau, Intervals, Mountain and two Heart Rate Control programmes.
Programmes
1 MANUAL
2 ROLLING
3 VALLEY
4 FAT BURN
5 RAMP
6 FITNESS TEST
7 RANDOM
8 PLATEAU
9 INTERVALS
10 MOUNTAIN
11 60% MAX H.R.
12 85% MAX H.R.
HEART RATE TRAINING ZONE
PROGRAMME
MODE
TIME
SPEED/RPM
DISTANCE
CALORIES/WATT
AGE/TARGET H.R.
PULSE
20 30 40 50 60 70
160
150
140
130
120
110
100
AGE
BPM
START
PAUSE
ENTER
–
+
Programme 1 - Manual
Programme 2 - Rolling
Programme 3 - Valley
Programme 4 - Fat Burn
Programme 5 - Ramp
Programme 6 - Fitness Test
Programme 10 - Mountain
Programme 7 - Random
Programme 8 - Plateau
Programme 9 - Intervals
Programme 11 - Heart Rate Control
Programme 12 - Heart Rate Control
Operating Programmes 1 - 10
1 Press the START/STOP key for at least
2 seconds to enter the initial mode.
2 Press the + or - key to choose the exercise
programme you prefer. The profile will be
displayed on the graphic LCD.
3 After setting the programme press the ENTER
key to enter the Time setting.
4 Press the + or - key to set up your desired
workout time.
5 Press the START key to start exercising.
6 The workout interval will be flashing as you
exercise (0.5 seconds on and 0.5 seconds off).
7 Whilst exercising you can press the + or - key
to increase or decrease the resistance level.
8 Press the STOP key at any time to enter the
PAUSE mode. To restart your workout press
the START key again.
Operating Programmes 11 - 12 (Heart Rate Control)
Programmes 11 and 12 allow the monitor to
adjust the workout resistance automatically
according to your heart rate. When your heart
rate exceeds your target heart rate, the CPU will
automatically decrease the workout resistance,
and when your heart rate drops below your target
heart rate, the CPU will automatically increase the
workout resistance.
1 Press the START/STOP key for at least 2
seconds to enter the initial mode.
2 Press the + or - key to programme 11 or 12
(heart rate control programmes).
3 Press the ENTER key to enter the Time setting.
4 Press the + or - key to set up your desired
exercise time.
5 Repeat steps 3 and 4 to set up your age.
6 Press the START key to start exercising. Once
you start exercising, all functional values will
be shown on the screen automatically.
Enter
Load
Down
Load Up
Start/Pause
Mode

1514
How to Operate the Heart Rate Sensors
To measure your pulse, place both hands on the pulse sensors as
shown. Grip for five to ten seconds, the heart rate symbol will flash
and your heart rate will then be shown. Continue to grip the sensors
to obtain a continual reading. If the displayed pulse appears to be
too high or too low, or if your pulse is not displayed, lift your hands
off the sensors and allow the display to reset. Grip again on the
sensors as described above. Try the sensors several times until you
become familiar with it. The RB3000 Heart Rate facility is
compatible with the Reebok Heart Monitors transmitter belts.
How to Stabilise your RB3000
If your floor is uneven and your bike unstable you need to rotate the
end caps on the rear foot until your bike is no longer unstable.
Motor Protection
1 Whenever you turn the power switch ON, the computer will
check if the small motor is at level 0. If not, the monitor will
send a signal to the driver motor to set it to 0. If there is no
response from the motor, the console will display an “E”.
2 If, during exercise, you press the + or - key to adjust the
workout level and the motor does not respond after 3 attempts,
the monitor will display an “E” and generate a beeping sound.
Press the START/PAUSE key to stop the beeping.
If either of the above occurs, check first that all the connections
between the monitor and the motor are correct and that the motor is
working. Then restart the monitor. If the monitor still displays an “E”
and continues to beep call our customer service department.
LCD Contrast Calibration
1 In STOP mode, press and hold the ENTER and + keys
simultaneously for at least 2 seconds to enter the LCD
CONTRAST CALIBRATION mode.
2 Press the + or - key to adjust the LCD contrast.
3 Press the START/PAUSE key to exit the LCD CONTRAST
CALIBRATION mode.
4 There are 16 different LCD contrast levels. (the automatic
default level is medium contrast).
Note
1 The LCD will shut off automatically after 4 minutes if no signal
is transmitted to the computer.
2 The computer will start beeping as soon as any preset target
values count down to zero.
3 Press and hold the “Mode” button for 4 seconds to reset all
functions except speed.
How to Adjust the Seat
For effective exercise, the saddle (18) should be at the proper
height. As you pedal, there should be a slight bend in your knees
when the pedals are in the lowest position. To adjust the saddle,
first hold the saddle and unscrew the seat knob (19). Align one of
the holes in the saddle post (16) with the hole in the Base Frame
(1). Insert the seat knob into the frame and the saddle post and
tighten the seat knob into the frame.
Heart Rate Sensors
18
16
1
19
How to Transport the RE2000
Lift the RB3000 to 45º so that the transportation wheels point downwards and to the front, and use the
fixed handlebar to move it.
Heart Rate Training
In the normal course of our everyday lives our bodies use oxygen to convert nutrients from our food
intake into energy for muscle movement and body functions. The amount of energy used is measured
in calories. Broadly speaking if we burn more calories than we consume then our body will require
additional fuel and will use calories stored as fat. This will lead to a reduced ratio of fat to lean
muscle tissue in our body composition and a leaner, fitter appearance.
As we exercise, our heart rate has to increase in order to deliver sufficient oxygen to the working
muscles. Regular cardiovascular exercise, such as cycling, results in a stronger heart and lungs that
are more efficient at delivering oxygen to muscles which, in turn, are more efficient at converting
calories into energy.
It is however, imperative that you accurately determine the target heart rate within which to train in
order that you may improve your fitness at a safe, comfortable and sustainable level.
Start by determining your approximate Maximum Heart Rate (MHR). This is the fastest your heart
can beat, measured in beats per minute. Whilst there are sophisticated ways to measure MHR,
an acceptable approximation can be made using the following calculation:
Males Estimated Max MHR = 220 – Age
Females Estimated Max MHR = 226 – Age
Finally, use the Reebok University Training Pyramid on the next page to determine the level at which
you should be exercising based upon your MHR. This level should be maintained using either the
cycle’s heart rate grip sensors or a Reebok Heart Rate Monitor.
Caution: Make sure to insert the
seat knob through one of the holes
in the saddle post; do not insert the
seat knob under the saddle post.

16 17
Hints to Help You Achieve Your Goals
Always use your RB3000 in the correct manner and sitting in the correct bio-mechanical position
incorrect use may lead to injury.
There are a vast number of benefits to exercising. They include improved sleeping patterns, increased
metabolic rate due to the higher ratio of lean muscle tissue to fat (thereby burning calories even when
not working out), improved posture reducing risk of back pain, denser bone mass reducing risk of
osteoporosis, clearer skin and the improved self-esteem that go with all of these. Do not use weight
loss as your only measure of success. Your mirror is a much better indicator than your scales.
Don’t set unrealistic goals at the outset of your exercise programme. This could lead to muscle soreness
and de-motivation. Instead use the cycle for no more than 20 minutes three times a week to allow your
body to recover, and monitor your exertion level using the heart rate grips and the tables above.
Remember, you’re changing your life, take time to do it properly.
Don’t try to immediately change your entire lifestyle to get fitter. Incremental change is far easier and
more sustainable. Don’t try to give up fatty foods, alcohol, late nights and start a gruelling exercise
regime all on the same day. Take it one step at a time, ensure the changes you make genuinely
become part of your lifestyle and don’t chastise yourself for backsliding occasionally.
Understand the other elements of your daily life that can help or hinder you in achieving your goals.
Nutrition is vitally important in affecting your general well-being with regard to the type of food you
eat and when you eat it. Also, there are many opportunities during your normal day when your current
habits could be substituted for healthier practices. Instead of taking the lift, take the stairs and instead
of sitting over a long lunch, take a brisk walk and eat an apple. Even if you only do it one day of the
week it all helps.
Training with Reebok University
Established in 1993, Reebok University brings together some of the
world’s leading fitness professionals and provides you with access
to the latest research in the health and fitness industry. Reebok
University has developed a unique fitness programme with the
Reebok Heart Rate Monitor as its cornerstone - the Reebok University
Training Pyramid. Incorporating all the essential principles of exercise,
the training pyramid utilises four distinct training levels based on
varying exercise intensities as measured by your heart rate.
Using the table below, select the training level that best describes
your specific fitness goals. Then refer to the pyramid to determine
the duration as well as the exercise intensity (% of maximum heart
rate) of your workout programme.
As a guide, Reebok University recommend that beginners work out
in the Active Lifestyle range for the first eight weeks of their training.
After that you will be able to design your own exercise programme
to suit your preferences and objectives.
Active lifestyle
Improve functional capacity • Decrease disease risk
Increase life span • Physical well being
Healthy Heart
Improve cardiovascular health • Lose weight • Increase
energy • Decrease blood pressure • Decrease cholesterol
Increase immune function • Decrease stress
Cardio Challenge
Improve cardiovascular health • Increase aerobic
capacity and endurance
Extreme Training Challenge
Improve lactic acid tolerance • Performance gains
Increase anaerobic capacity
4
3
2
1
Reebok Heart Rate Monitors
Reebok’s new Heart Rate Monitors (HRM) provide the most accurate
and effective way to measure your heart rate. Built to guide you
through any type of workout, every Reebok HRM comes with the
unique Reebok University Training Guide, which provides you with
advice on how to work out effectively and time-efficiently. The ECGaccurate HRMs are packed with features, including a multi-function
chronograph and a ‘Key Press’ function which lets you measure
your heart rate without a chest transmitter.
For more information on Reebok Heart Rate Monitors call our
Customer Hotline on 01908 512244.

18
How to Maintain the RB3000
Inspect and tighten all parts of the exercise cycle regularly. Replace
any worn parts immediately.
For continued smooth operation of the exercise cycle, the Front and
Rear Stabilisers should be kept clean. Using a soft cloth and mild
detergent, clean any dust and residue that may build up where the
Wheels move on the Stabilisers. Other components of the exercise
cycle can also be cleaned in this manner.
IMPORTANT: Never use abrasives or solvents to clean the exercise
cycle. To prevent damage to the computer, keep liquids away and
keep it out of direct sunlight.
Troubleshooting
CHECK WIRE CONNECTIONS
Check the connections if:
• screen goes blank
• no resistance is felt
• no resistance change is felt
• resistance is very high
• error code E1 or E2 is displayed
Error Message ‘E1’
If the connection cables are installed incorrectly, the monitor will
display ‘E1’ on the LCD matrix display and generate a beep sound.
Please examine if all connection cables are connected correctly and
then reset the power to stop the beep sound or, press the
start/pause key for 2 seconds to restart the system.
Error Message ‘E2’
If the load value is incorrect or the EEPROM IC is damaged the
monitor will display ‘E2’. Please contact our Technical Support team
for further assistance.
Contact Number
If you have any other problems please call the following number:
TECHNICAL SUPPORT TEAM 0870 330 0024
 Loading...