

Reebok I SERIES User Manual

D
GB
I
F
NL
CZ
H
RO
SLO
HR
SRB
Computer i-series
COMPUTER MANUAL Reebok i-series-20090220
PL
SK


!
Lesen Sie bitte vor dem Zusammenbau und dem Gebrauch Ihres Fitnessgeräts
ausführlich die Sicherheitshinweise, die der Aufbauanleitung beigefügt sind.
DISPLAY
1
5
2
6
3
4
7
8
9
Geschwindigkeitsanzeige (1)
Anzeige der Geschwindigkeit von 0.0 bis
99.9 km/h; MPH.
Auch Anzeige der Geschwindigkeitsveränderung im Fitness Test Programm.
Pulsanzeige (2)
Anzeige der Herzfrequenz von 40 bis 199
Schläge / min.
Zeitanzeige (7)
Anzeige der Trainingsdauer von 0:00 bis
99:99 min.
Gewichtsanzeige (7)
Anzeige des Körpergewichts von 20 –
200kg ; 40-410lbs
Widerstandsanzeige (3)
Anzeige des Tretwiderstands in Stufen von
1 bis 8.
RPM-Anzeige (8)
Anzeige der Umdrehungen pro Minute
von 0 bis 199 .
Distanzanzeige (4)
Anzeige der zurückgelegten Strecke von 0
bis 99.9 km; Meilen.
Altersanzeige (4)
Anzeige des Alters von 10 bis 99 Jahren.
Kalorienanzeige (9)
Anzeige des Kalorienverbrauchs von 0 bis
999 Kalorien.
Diese Funktion dient nur zur Orientierung
und kann nicht als medizinische
Bewertung herangezogen werden.
Körpergrößenanzeige (9)
Anzeige der Körpergröße von 50 bis
250cm / 25- 100 inches.
D

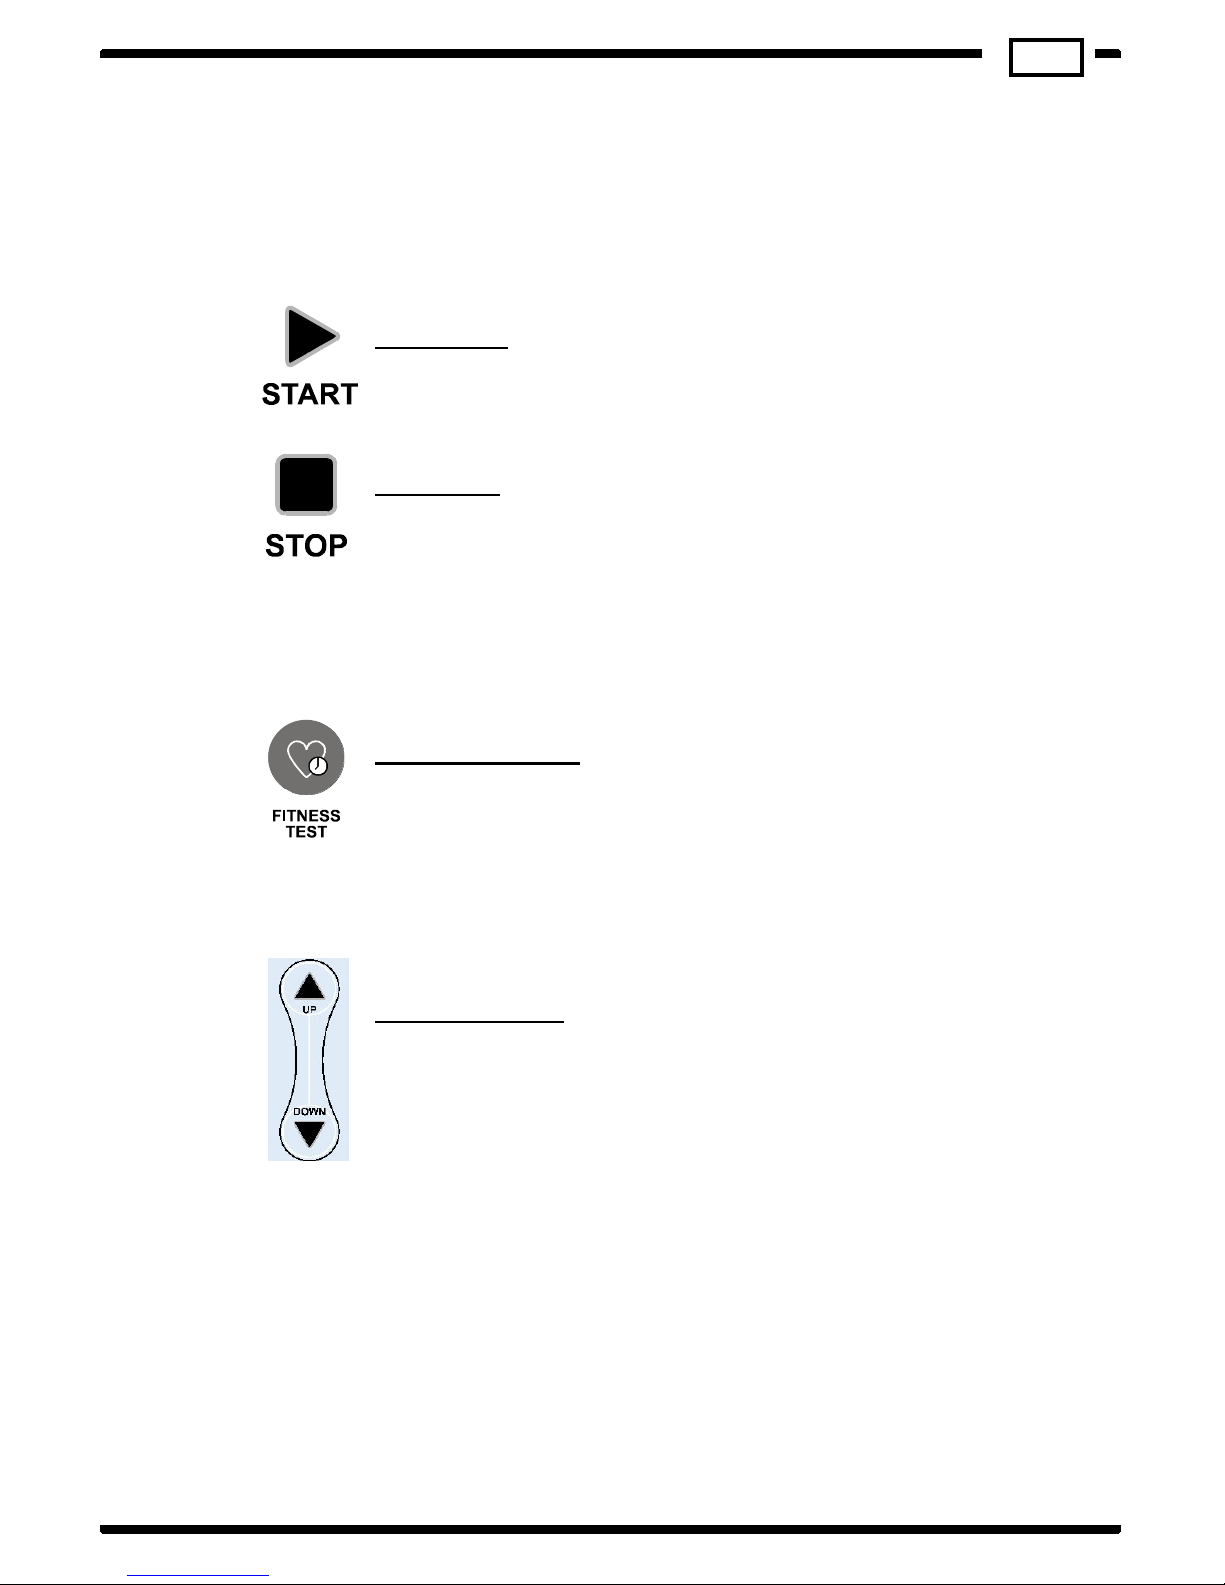
Tasten und Funktionen
START Taste
Drücken Sie START, um Ihr Training zu beginnen.
STOP Taste
Drücken Sie STOP, um das laufende Training zu unterbrechen.
Drücken Sie zweimal STOP, um in den POWER ON Modus zurückzukehren.
Fitness Test Taste
Drücken Sie diese Taste, um die Fitness Test Einstellungen zu starten.
UP-/DOWN-Taste
Drücken Sie diese Taste, um das Programm zu wählen.
D

POWER ON
Die batteriebetriebene Konsole benötigt 2xAA Batterien. Nach dem Einsetzen der Batterien an
der Rückseite der Konsole blinkt das LCD Display auf und ein langer Piepton ertönt.
Schlafmodus
Befindet sich die Konsole im POWER ON Modus und innerhalb von 3 Minuten wird keine Taste
gedrückt, schaltet sich das Display automatisch ab. Drücken Sie eine beliebige Taste oder
bringen Sie das Gerät zum Laufen, so schaltet sich der POWER ON Modus wieder ein.
Aktiv Modus
Um im POWER ON Status das Programm ACTIVE MODE zu erreichen, drücken Sie entweder die
START-Taste für einen Schnellstart oder STOP.
Pause Modus
Befinden Sie sich im Programm Active Mode und treten für länger als 30 Sekunden nicht in die
Pedale, empfängt der Sensor im Gerät kein RPM Signal und die Konsole schaltet in den Pause
Modus. Durch erneutes in die Pedale Treten oder durch Drücken der START Taste schaltet die
Konsole zurück in das Programm Active Mode und fährt das Programm wieder hoch. Steht das
Gerät länger als 150 Sekunden still, schaltet die Konsole den POWER OFF/SLEEP Modus ein und
alle bisherigen Daten des Trainings werden gelöscht.
Während des Trainings können Sie durch einmaliges Drücken der STOP Taste in den PAUSE
Modus gelangen. Durch zweimaliges Drücken der STOP Taste gelangen Sie in den POWER ON
Modus.
Widerstandskontrolle
Der Widerstand kann mit dem Handrad unterhalb der Konsole in 8 Stufen verstellt werden.
Durch Drehen im Uhrzeigersinn erhöht sich der Widerstand, durch Drehen gegen den
Uhrzeigersinn verringert er sich. Die eingestellte Stufe wird in der Konsole angezeigt. Sie können
den Widerstandsgrad während des Trainings verändern.
D

Schnellstart
Wenn sich der Computer im POWER ON Status befindet, drücken Sie START um das
Schnellstartprogramm zu aktivieren. Hierbei werden Zeit, Strecke und Kalorien von
„0“ aufsteigend angezeigt.
Zeit – Zielvorgabe
Wenn Sie sich im POWER ON Modus befinden, drücken Sie die STOP Taste einmal um in die
Programmeinstellungen zu gelangen. Das Zeitdisplay blinkt und zeigt den voreingestellten Wert
30:00 an. Benutzen Sie die Pfeiltaste, um die Trainingszeit festzulegen. Mit jedem Drücken der
UP oder DOWN Taste verlängert bzw. verringert sich die Trainingszeit um je 1 Minute. Halten Sie
die Pfeiltaste gedrückt, um die Zeiteinstellung zu beschleunigen. Die Zeiteinstellung ist im
Bereich von 00:00 bis 99:99 möglich.
Nachdem Sie die Zeiteinstellung beendet haben, drücken Sie START um mit dem Programm zu
beginnen. Der Computer zählt nun die eingestellte Zeit herunter, Kalorien und Distanz werden
von „0“ aus berechnet. Wenn die Zeit auf „0“ herunter gezählt ist, ertönt ein langer Piepton und
für die nächsten 30 Sekunden werden alle Trainingsdaten angezeigt. Nach 30 Sekunden schaltet
die Konsole zurück in den POWER ON Status.
D

Distanz - Zielvorgabe
Wenn Sie sich im POWER ON Modus befinden, drücken Sie die STOP Taste zweimal um in die
Programmeinstellungen zu gelangen. Das Distanzdisplay blinkt und zeigt den voreingestellten
Wert 5.0km/ 3.2 miles an. Benutzen Sie die Pfeiltaste, um die Trainingsdistanz festzulegen. Mit
jedem Drücken der UP oder DOWN Taste verlängert bzw. verringert sich die Trainingsdistanz um
0.1km/ 0.1miles. Halten Sie die Pfeiltaste gedrückt um die Distanzeinstellung zu beschleunigen.
Die Distanzeinstellung ist im Bereich von 0.1km/ 0.1miles bis 99.9km/ 99.9miles möglich.
Nachdem Sie die Distanzeinstellung beendet haben, drücken Sie START um mit dem Programm
zu beginnen. Der Computer rechnet nun die eingestellte Distanz herunter, Kalorien und Zeit
werden von „0“ aus hochgerechnet. Wenn die Distanz auf „0“ herunter gerechnet ist, ertönt ein
langer Piepton und für die nächsten 30 Sekunden werden alle Trainingsdaten angezeigt. Nach 30
Sekunden schaltet die Konsole zurück in den POWER ON Status.
Kalorien – Zielvorgabe
Wenn Sie sich im POWER ON Modus befinden, drücken Sie die STOP Taste dreimal um in die
Programmeinstellungen zu gelangen. Das Kaloriendisplay blinkt und zeigt den voreingestellten
Wert 50 an. Benutzen Sie die Pfeiltaste, um Ihr Kalorienziel festzulegen. Mit jedem Drücken der
UP oder DOWN Taste verändern Sie die Kalorienangabe um 10 Einheiten. Halten Sie die
Pfeiltaste gedrückt, um die Kalorieneinstellung zu beschleunigen. Die Kalorieneinstellung ist im
Bereich von 10 bis 999 möglich. Nachdem Sie die Kalorieneinstellung beendet haben, drücken
Sie START um mit dem Programm zu beginnen. Der Computer rechnet nun den eingestellten
Kalorienwert herunter, Zeit und Distanz werden von „0“ aus hochgerechnet. Wenn die Distanz
auf „0“ herunter gerechnet ist, ertönt ein langer Piepton und für die nächsten 30 Sekunden
werden alle Trainingsdaten angezeigt. Nach 30 Sekunden schaltet die Konsole zurück in den
POWER ON Status.
D

20 Minuten Fitness Test
Für den Gebrauch des Fitness Tests muss der Benutzer zuerst seine persönlichen Daten,
bestehend aus Benutzergewicht, -größe und –alter eingeben. Anhand dieser Daten und der
ermittelten Herzfrequenz (durch Handpuls) errechnet das Programm die geeignete Intensität,
bei der der Benutzer pulsgesteuert ein optimales und effizientes Training absolvieren kann.
Basierend darauf, wie gut der Benutzer den Anforderungen des Programms folgen kann (Halten
des vorgegebenen Puls und der vorgegebenen Geschwindigkeit), wird der Computer im
personalisierten Benutzerbereich eine kurze Statistik über das Training zur Verfügung stellen.
Der Benutzer sollte bei Level 1 starten und nach Erreichen der höchstmöglichen Punktzahl zu
Level 2 wechseln usw.
Um das Fitness Test Programm zu starten, drücken Sie die Fitness Test Taste während sich die
Konsole im POWER ON Modus befindet. Das Konsolendisplay ist hier folgendermaßen
aufgebaut:
Einstellungen der persönlichen Daten:
Benutzergewicht
Nachdem Sie die Fitness Test Taste gedrückt haben, blinkt die Gewichtsanzeige und zeigt den
voreingestellten Wert von 68kg/ 150lbs an. Mit den Pfeiltasten können Sie ihr Gewicht in 1kg/
1lbs Stufen einstellen. Halten Sie die Taste gedrückt um die Einstellung zu beschleunigen. Die
Einstellung ist von 20-200kg/ 44-440lbs möglich. Drücken Sie die STOP Taste um das
Benutzergewicht zu speichern.
Benutzergröße
Nachdem Sie die STOP Taste gedrückt haben, blinkt die Körpergrößenanzeige und zeigt den
voreingestellten Wert 170cm/ 67inches an. Mit den Pfeiltasten können Sie Ihre Größe in 1cm/
1inch Stufen einstellen. Halten Sie die Taste gedrückt um die Einstellung zu beschleunigen. Die
Einstellung ist von 50-250cm/ 20-100inches möglich. Drücken Sie die STOP Taste um die
Benutzergröße zu speichern.
Benutzeralter
Nachdem Sie die STOP Taste gedrückt haben, blinkt die Altersanzeige und zeigt den
voreingestellten Wert von 35 an. Mit den Pfeiltasten können Sie Ihr Alter einstellen. Halten Sie
die Taste gedrückt um die Einstellung zu beschleunigen. Die Einstellung ist von 10 bis 99 möglich.
Drücken Sie die STOP Taste um das Benutzeralter zu speichern.
D

Fitness Programm
Das Fitness Test Programm stellt Ihren Herzfrequenzbereich anhand Ihrer bereits eingegebenen
persönlichen Daten dar. Eine akzeptable Annäherung wird im folgenden Beispiel der
Herzfrequenzberechnung deutlich gemacht:
Zu erwartende normale Herzfrequenz: ( 220-Alter) x 65%
Zu erwartende maximale Herzfrequenz: ( 220- Alter) x 85%
Beispiel: Wenn der Benutzer 35 Jahre alt ist, liegt die zu erwartende normale Herzfrequenz bei
120.
Das Fitness Test Programm schaltet sich ab, wenn der Computer 30 Sekunden lang kein Signal
empfängt. Wenn der Benutzer länger als 3 Minuten inaktiv bleibt, schaltet das Gerät in den
Schlafmodus.
Im Fitness Test Programm startet der Computer das 20 Minuten Programm und zählt von da an
rückwärts von 20:00 bis 0:00. Distanz und Kalorien werden von „0“ an hochgerechnet. Drücken
Sie die STOP Taste um das Programm zu beenden. Drücken Sie zweimal die STOP Taste, schaltet
das Programm zurück in den POWER ON Modus. Um den Test fortzusetzen, drücken Sie START
oder treten Sie in die Pedale. Jetzt drücken Sie die START Taste um den Fitness-Test zu starten.
Legen Sie dafür während dem gesamten Training beide Hände auf die Handpulssensoren. Das
Programm wird Ihnen anhand der per Pulssensoren übertragenen Werte verschiedene
Geschwindigkeiten über das Fenster SPEED zur Auswahl stellen. Wird auf dem SPEED Display ein
Pfeil nach oben angezeigt, müssen Sie Ihre Geschwindigkeit erhöhen. Zeigt das SPEED Display
einen Pfeil nach unten, verringern Sie die Geschwindigkeit. Sollte z.B. ein Benutzer von 35
Jahren einen Durchschnittspuls von 126 bis 135 haben, wird der Computer den Vorschlag für
eine niedrigere Geschwindigkeit machen (Pfeil nach unten). Wird ein Puls von 106 bis 115
registriert, wird der Computer eine höhere Geschwindigkeit vorschlagen.
D

Wenn der Benutzer mehr als zwei Signaltöne im SPEED Bereich mit Pfeilen nach oben oder
unten hört, bedeutet dies, dass die Spanne zur angegebenen Geschwindigkeit zu hoch ist und
mit dem vorgegebenen Puls nicht erreicht werden kann (wenn der Puls im Bereich von 116 bis
125 liegt). Hat der Benutzer einen leistungsfähigen Puls bei normaler Geschwindigkeit, wird auf
dem Display lediglich SPEED ohne Pfeile angezeigt. Behalten Sie diese Geschwindigkeit bei bis
wieder einer der beiden Pfeile erscheint.
Wenn das Display zum Ende des Trainings bei 0:00 ankommt, schaltet das Programm in einen
Erholungsmodus von 1 Minute.
F1 Hervorragend
F2 Sehr gut
F3 Gut
F4 Befriedigend
F5 Ausr
eichend
F6 Ungenügend
Recovery Funktion – Erholungsphase
Während der Erholungsphase sind die Tasten UP, DOWN und START keiner Funktion zugeordnet.
Hat der Benutzer während dieser Zeit die Hände an den Handpulssensoren, wird der Computer
den Puls solange anzeigen bis die Ruhezeit abgelaufen ist.
Im Bereich Strecke wird REC (RECOVERY= Erholungsmodus) angezeigt und der Display zählt den
Countdown von 60 Sekunden herunter. Ist die Zeit abgelaufen, zeigt das Display die
Benutzerpunkte „Fx.x“ (z.B. F6.0, siehe nachfolgende Grafik). Diese Punkte können Sie im
Benutzerbereich unter Training speichern.
Hat der Benutzer seine Hände nicht mehr auf den Handpulssensoren, wird das Display “Fx.x”
nach Beendigung des Programmes anzeigen.
D

Herzfrequenz Anzeige
Das Gerät ist am Lenker mit EKG Handpulssensoren ausgestattet. Um die Herzfrequenz
anzuzeigen, platzieren Sie Ihre Handflächen auf den Sensoren. Es kann ein paar Sekunden
dauern bis Ihr Puls auf der Konsole angezeigt wird. Um den Puls zu beobachten, halten Sie
weiterhin die Sensoren fest. Falls die Anzeige unterbrochen wird, haben Ihre Handflächen
wahrscheinlich keinen direkten Kontakt mehr zu den Sensoren. Stellen Sie den Kontakt wie
beschrieben erneut her.
Herzfrequenz Training
Um optimale Trainingsresultate zu erzielen ist es empfehlenswert, die Intensität Ihres Trainings
über die Herzfrequenz zu steuern.
Es ist unbedingt erforderlich, dass Sie Ihren Zielpuls mit dem Sie trainieren wollen, genau
bestimmen, um Ihre Fitness auf sichere, nachhaltige und angenehme Weise zu verbessern.
Die folgende Tabelle dient Ihnen, basierend auf der Angabe Ihrer maximalen Herzfrequenz, zur
Orientierung um das optimale Level für Ihr Training zu bestimmen.
D

Herzfrequenzdiagramm
Sie können Ihren Zielpuls folgendermaßen bestimmen:
Maximale Herzfrequenz = 220 minus Alter
Für die verschiedenen Trainingsziele sollten Sie mit den folgenden Prozenten Ihrer maximalen
Herzfrequenz trainieren:
Gesundheit/ Fettverbrennung: 50-70% Ihrer max. Herzfrequenz
Fitness/ Body Shaping: 70-80% Ihrer max. Herzfrequenz
Performance: 80-90% Ihrer max. Herzfrequenz
Beispiel:
Sie sind 25 Jahre alt und wollen Ihre Fitness verbessern:
220-25 = 195
70% von 195 = 136,5
80% von 195 = 156
Sie sollten mit einer Herzfrequenz trainieren, die zwischen 136,5 und 156 liegt.
Diese Informationen sind nur Hinweise. Um Ihre individuelle Trainingsintensität zu
ermitteln oder im Falle von gesundheitlichen Einschränkungen, wenden Sie sich bitte
an Ihren Arzt bevor Sie mit dem Training beginnen.
!
D

Kunden Service
Häufig gestellte Fragen (FAQs):
Sollten Sie Fragen zu Ihrem Produkt oder dem Aufbau haben, oder auf Probleme bei der
Bedienung stoßen, finden Sie Hilfe unter:
www.reebokfitness.de Service FAQs
Ersatzteilbestellung:
Auf unserer Homepage können Sie unter Angabe der Seriennummer Ihres Geräts Ersatzteile
bestellen:
www.reebokfitness.de Service Ersatzteilbestellung
Kontakt
Green Fitness GmbH
Am Schlag 5
65549 Limburg a.d.Lahn
e-mail: service@green-fitness.de
web: www.reebokfitness.de
Hinweis
Diese Gebrauchsanweisung dient nur zur Referenz für den Kunden. Reebok übernimmt keine
Haftung für Fehler, die durch Übersetzung oder technische Änderungen des Produkts entstehen.
Individuelle Trainingspläne erstellen und downloaden Sie unter:
www.getfit-concept.de
D

Before assembling or using your fitness equipment, please do carefully read the
precautions included in the assembly instruction.
DISPLAY
1
5
2
6
3
4
7
8
9
SPEED Display (1)
The LCD will display speed range from 0.0
to 99.9MPH/KM/H and will display speed
up or down direction when the user
operates in the “Fitness Test“ program.
PULSE Display (2)
Pulse display range from 40 to 199
TIME Display (7)
Time display range from 0:00 to 99:00
WEIGHT Display (7)
Weight Display range from 20 –200kg / 40410lb
RESISTANCE Display (3)
Resistance display level range from 1 to 8
RPM Display (8)
RPM display range from 0-199
DISTANCE Display (4)
Distance Display range from 0-99.9
ML/KM
AGE Display (4)
Age display range from 10 to 99
Calories Display (9)
Calories display range from 0 to 999
HEIGHT Display (9)
Height Display range from 50-250cm/25100inch
!
GB
BUTTONS FUNCTION
START button
Press the button to start the computer or start the program
STOP button
Press the button to pause the program, press this button twice the LCD
will return to power on status.
FITNESS TEST button
Press the button to start the Fitness Test set up.
UP-/DOWN-Button
Press this button to increase the current assigned value in PROGRAM
MODE.
GB

POWER ON
This console requires 2xAA batteries. After installing the batteries in the back of console, the
LCD graphics and numbers light up with a long beep sound as below:
SLEEP MODE
While the console is in the POWER ON status, if without pressing the START or STOP buttons for
3 minutes, the console will automatically switch off. Press any button or start pedalling to bring
the console back to the POWER ON status.
PROGRAM ACTIVE MODE
While in the POWER ON status, enter the PROGRAM ACTIVE MODE by pressing START button to
enter the Quick Start or press STOP button to enter the program set up.
PAUSE MODE
While in the PROGRAM ACTIVE MODE, if without pedalling the machine for 30 seconds, console
will enter the PAUSE MODE. During the PAUSE MODE, if you start pedalling the machine or
press the START button, the console will return to the PROGRAM ACTIVE MODE and continue
with the original program. If after 150 seconds there is no activity in the PROGRAM ACTIVE
MODE, the console will then enter the POWER OFF/SLEEP MODE and all prior exercise data will
be deleted.
During the exercise, the user can also press the STOP button once to enter the PAUSE MODE. Or
press STOP button twice to enter the POWER ON mode.
TENSION CONTROL
The tension needs to be adjusted manually by the tension adjustment knob located below the
console. There are a total of 8 levels of tension that can be adjusted. Turn the tension control
knob clockwise to increase the tension level and counter clockwise to reduce the tension level.
The level is displayed on the console digitally. The user can adjust the tension level during the
workout.
GB

QUICK START
While in the POWER ON status, press the START button to start the QUICK START program. The
TIME, DISTANCE and CALORIES start from 0 and count up. Without moving the pedals, then only
TIME display will count up and the DISTANCE, CALORIES will stay at 0.
TARGET TIME PROGRAM
While in the POWER ON mode, press STOP button once to start the target workout time set up
procedure. The TIME display shows factory default setting 30:00 flashing. Press the UP and
DOWN button to adjust the target workout time by pressing the UP or DOWN button once you
will set the time in 1 minute increments. Press and hold the UP or DOWN button to speed up
the time adjustment. The time set up range is from 00:00 to 99:00. After setting the target
workout time, press START button to start the program. The time counts down from the set
time, CALORIES, DISTANCE count up from 0. When the TIME counts down to 0.0, the console
will sound a long beep then all workout data freeze and be displayed for 30 seconds. After 30
seconds, the console will return to POWER ON status.
GB

TARGET DISTANCE PROGRAM
While in the POWER ON mode, press the STOP button twice to start the target workout distance
set up procedure. The DISTANCE display shows factory default setting 5.0KM/3.2MILE flashing.
Press the UP and DOWN button to adjust the target workout distance, Press the UP or DOWN
button once to increase each segment by 0.1KM/0.1MILE. Press and hold the UP or DOWN
button to speed up the distance adjustment. The distance set up range is from 0.1KM/0.1MILE
to 99.9KM/99.9MILE. After setting the target workout distance, press the START button to start
the program. The DISTANCE counts down from set distance, the CALORIES, TIME count up from
0. When the DISTANCE counts down to 00:00, the console will sound a long beep then all
workout data freeze and be displayed for 30 seconds. After 30 seconds, console returns to
POWER ON status.
TARGET CALORIES PROGRAM
While in the POWER ON mode, press the STOP button three times to start the target workout
calories set up procedure. The CALORIES display shows the factory default setting 50 flashing.
Press the UP and DOWN button to adjust the target workout calories. Press the UP or DOWN
button once to increase each segment by 10. Press and hold the UP or DOWN button to speed
up the calories adjustment. The calories set up range is from 10 to 999. After setting the target
workout calories, press START button to start the program. CALORIES count down from set
calories, DISTANCE, TIME counts up from 0. When CALORIES counts down to 0, the console will
sound a long beep then all workout data freeze and be displayed for 30 seconds. After 30
seconds, console returns to POWER ON status.
20 MINUTES FITNESS TEST PROGRAM
The FITNESS TEST program requires the user to input their personal data including user weight,
height and age. The program will use this information and detect the user’s heart rate (by hand
pulse) to recommend the user adjusts the pedalling speed in order to maintain the efficient
workout heart rate and to achieve the best workout result. Then based on how good the user
can follow the computer program and reach the proper pedalling speed and maintain the
efficient workout heart rate, the computer program will give the user a score to be recorded on
the training chart inside the owner’s manual. User should start from tension level 1 and upgrade
to tension level 2 after achieving the highest score in the level 1. And continue to upgrade the
tension level.
GB

To start the FITNESS TEST PROGRAM, press FITNESS TEST button while console is in the POWER
ON mode. The console display is shown as below:
User Weight Set Up
After pressing the FITNESS TEST button, the WEIGHT displays the factory default setting
68KG/150LB flashing. Press UP and DOWN button to adjust the user weight. Press the UP once
to increase each segment by 1 KG/1LB. Press and hold the UP or DOWN button to speed up the
weight adjustment. The set up range is from 20-200KG/44-440LB. Press STOP button to save the
user weight.
User Height Set Up
After pressing the STOP button, the HEIGHT displays the factory default setting
170CM/67INCHES flashing. Press UP and DOWN button to adjust the user weight. Press the UP
or DOWN button once to increase each segment by 1CM/1INCH. Press and hold the UP or
DOWN button to speed up the height adjustment. The set up range is from 50-250CM/20100INCHES. Press STOP button to save the user height.
User Age Set Up
After pressing the STOP button, the AGE displays the factory default setting 35 flashing. Press UP
and DOWN button to adjust the age. Press the UP or DOWN button once to increase the age by
1. Press and hold the UP or DOWN button to speed up the age adjustment. The Age Set up
range is from 10-99. Press the STOP button to save the user age.
Fitness Program
The fitness test program will set the Heart Rate range based on your personal data after the set
up procedure. An acceptable approximation will be made by using the following Heart Rate
calculation method:
The estimated Normally Heart Rate = (220 – AGE ) X 65%
The estimated Maximum Heart Rate = (220 – AGE) X 85%
For example:
If user age was 35, the estimated Normally Heart Rate = (220 –35) X 65% = 120.
GB

The fitness test program will stop if the computer does not sense a signal after 30 seconds from
the user pressing the START button. If the user does not press any button or stops pedaling 3
minutes later the console will enter the sleep mode.
In the fitness program, the computer will start the 20 minutes program, the time will count
down from 20:00 to 0:00, the DISTANCE and CALORIES window will display count from 0. Press
the STOP button to stop the program. If you press the STOP button twice the program will
return to the power on mode. The fitness test program will continue to run if you press the
START button or start pedaling. To adjust the resistance up and down, press the up and down
button.
Now, press START button to start the FITNESS TEST program. Make sure you put both hands on
the hand pulse contact sensors all the time. The Program will detect user’s heart rate and shows
the speed on the SPEED display window the console will also beep to alert the user to the actual
Heart Rate. The program will detect the user’s heart rate around the actual heart rate number ±
5. If the speed display shows the SPEED with Up Arrow, the user increases the pedal speed. If
the speed display window shows the SPEED with Down Arrow, user should slow down. For
example, the user age was 35. When the program detects the heart rate number range from
126 to 135, the computer will sound 2 beeps and display the speed with down arrow. When the
program detects the heart rate number range from 106 to 115, the computer will sound 2
beeps and display the speed with up arrow.
If user hears more than 2 beeps at one time when speed display shows Up or Down Arrow, that
means there is still a big gap for them to reach a proper speed to achieve an efficient heart rate
(if the heart rate number range is from 116-125). When the user is at the correct speed and
heart rate, the speed display will only show SPEED without showing the Arrow. Maintain that
speed until you see the Up or Down Arrow.
After the time of the program has counted down to 0:00, the program will enter a 1 minute
recovery mode.
F1 Excellent
F2 Very Good
F3 Good
F4 Satisfactory
F5 Below Average
F6 Poor
GB

Recovery Function
In the recovery mode, the “UP”,”DOWN”,”START” buttons have no function.
When the user holds the handle pulse sensor, the computer will display the heart rate and will
continue to count down the time.
Distance display shows rEC (Recovery) and the time display counts down for 60 seconds. After
time counts down to 0, Speed display will show user’s score “Fx.x “(For example F6.0 as below
graphic shown). Record that score on user’s manual training chart.
If the user doesn´t hold the handle pulse sensor, the LCD will display “Fx.x” after finishing the
program.
GB

Heart Rate Operation
The i series comes with EKG hand pulse sensors which can be found on the handlebars. To
operate pulse rate function, place the palms of your hands over the sensors. It will take a few
seconds for your pulse rate to be displayed on the console. To keep monitoring, keep gripping
the sensors, if the readings are intermittent you may not have full contact with the sensors or
not enough of your palm on the sensor. Remove your hand and place it over the sensor again.
Heart Rate Training
To maximize your results from training it is essential to monitor the intensity of your workout
through your heart rate.
It is imperative that you accurately determine the target pulse rate within which to train in
order that you may improve your fitness at a safe, comfortable and sustainable level.
The following table on the next page is a rough guide to determine the level at which you
should be exercising based upon your maximum heart rate (MHR).
GB

Heart Rate diagram
You can calculate the target-heartrate for your training as follows:
Maximum heartrate = 220 minus age
For the different trainingtargets you should train with the following percentage of your
maximum heartrate:
Health/Fat Burning: 50 – 70% of your max. heartrate
Fitness/Bodyshaping: 70 – 80% of your max. heartrate
Performance: 80 - 90% of your max. heartrate
Example:
You are 25 years old and want to train for the target Fitness:
220 – 25 = 195
70% of 195 = 136,5
80% of 195 = 156
Your target-heartrate should be between 136,5 and 156 beats per minute.
This information is for your reference only. To determine your individual training
intensity or in case you should have health restrictions please consult your
physician before starting exercising.
!
GB

Customer Service
Spare Part Order:
By giving the serial number of your product you can order spare parts via our technical support team
on 0871 474 2614
Contact
RFE INTERNATIONAL LTD
DSV HOUSE
MAIDSTONE RD
KINGSTON
MILTON KEYNES
MK10 0AJ
head office tel: 0044 (0) 1908 512244
head office fax: 0044 (0) 1908 512245
e-mail: info@rfeinternational.com
web: www.reebokfitness.co.uk
Technical support:
tel: 0044 (0) 871 474 2614
e-mail: techsupport@rfeinternational.com
Advice
The owner’s manual is only for the customer reference. Reebok can not be held responsible for
mistakes occurring due to translation or change in technical specification of the product.
Warranty
Limited Warranty – UK Only
RFE International Ltd. (RFE), warrants this product to be free from defects in workmanship and material,
under normal use and service conditions, for a period of (2) two years for parts and labour. This warranty
extends only to the original purchaser. RFE’s obligation under this warranty is limited to replacing or
repairing, at RFE’s option, the product through one of its authorized service centers. All repairs for which
warranty claims are made must be pre-authorized by RFE. This warranty does not extend to any product
or damage to the product caused by or attributed to freight damage, abuse, misuse, improper or abnormal
usage or repairs not provided by a RFE authorized service centre, products used for commercial or rental
purposes, or products used as store display models. No other warranty beyond that specifically set forth
above is authorized by RFE.
RFE is not responsible or liable for indirect, special or consequential damages arising out of or in connection
with the use of performance of the product or damages with respect to any economic loss, loss of property,
loss of revenues or profits, loss of enjoyment or use, costs of removal, installation or other consequential
damages of whatsoever nature.
The warranty extended hereunder is in lieu of any and all other warranties and any implied warranties of
merchantability or fitness for a particular purpose is limited in its scope and duration to the terms set forth
herein.
This warranty gives you specific legal rights.
GB

Prima di iniziare l’assemblaggio ed utilizzare l’attrezzo, per cortesia leggere
attentamente le precauzioni.
DISPLAY
1
5
2
6
3
4
7
8
9
SPEED Display (1) - velocità
L’intervallo è tra 0.0 e 99.9 e il display
mostra la velocità up/down solo quando
utilizzate il programma “Fitness Test “.
PULSE Display (2) - pulsazioni
L’intervallo è tra 40 e 199
TIME Display (7) - tempo
L’intervallo del TIME è da 0:00 a 99:00.
WEIGHT Display (7) - peso
Il WEIGHT è tra 20 e 200 kg. Oppure, il
WEIGHT può essere in lbs, da 44 a 440.
RESISTANCE Display (3) - resistenza
L’intervallo dei RESISTANCE LEVEL è da 1 a
8.
RPM Display (8) – rapporto pedalata
media
L’intervallo è da 0 a 199.
DISTANCE Display (4) - distanza
L’intervallo della DISTANCE è da 0.0 a 99.9
AGE Display (4) - età
L’intervallo della AGE è tra 10 e 99.
Calories Display (9) - calorie
L’intervallo è da 0 a 999.
HEIGHT Display (9) - altezza
La HEIGHT mostra un intervallo tra 50 e
250 cm.
Oppure, la HEIGHT può essere in inch, da
20 a 100 inch.
!
I

TASTI E FUNZIONI
Tasto START
Premere START per iniziare l’esercizio.
Tasto STOP
Premere STOP per fermare momentaneamente le funzioni durante il
programma d’esercizio. Premere STOP due volte e il programma torna al
modo iniziale.
Tasto FITNESS TEST
Premere il tasto per iniziare l’impostazione del Fitness Test.
Tasto UP/DOWN (su)/(giù)
Premere per diminuire il valore corrente assegnato nel PROGRAMMA MODE.
I

POWER ON (accensione)
Dopo aver connesso il cavo alla corrente, premere il tasto power on. Il display LCD si accende ed
emana un beep.
Per spegnere la macchina, premere due volte il tasto stop.
SLEEP MODE (modo stand by) – Quando il computer è acceso entra automaticamente nel
modo SLEEP se lasciato senza alcun input per 3 minuti. Premere un tasto qualsiasi per tornare
allo stato power on quando il computer è nel SLEEP MODE.
PROGRAM ACTIVE MODE – programma modo attivo
Quando il computer è nello stato POWER ON, premere START per entrare nel programma
ACTIVE.
PAUSE MODE (pausa)
Durante il programma, se non pedalate per 30 secondi, il sensore della velocità non riceve
nessun segnale RPM e la console entra nel modo PAUSE. Durante il PAUSE MODE, se iniziate a
pedalare o premete il tasto START, la console torna al PROGRAM MODE e continua il programma
originale. Premere STOP per interrompere (PAUSE) il programma. Premere STOP due volte per
tornare allo stato POWER ON.
TENSION CONTROL – controllo tensione
La tensione deve essere regolata manualmente con il dado posto sotto la console. Ci sono 8
livelli di tensione. Girare il dado in senso orario per aumentare la tensione e antiorario per
ridurla. Il livello della tensione appare sul display della console. Potete regolare la tensione
durante l’esercizio.
I

PARTENZA VELOCE:
Quando il computer è nello stato POWER ON, premere START per attivare il programma QUICK
START. TIME, DISTANCE e CALORIES iniziano il conto quando iniziate l’esercizio.
PROGRAMMA TARGET TIME
Quando nel modo POWER ON, premere STOP una volta per iniziare il programma target time.
Il TIME sul display lampeggia 30:00. Premere UP e DOWN per regolare il tempo: ogni segmento
è 1 minuto. Premere e tenere premuto UP o DOWN per aumentare la velocità della regolazione
del tempo. L’intervallo di tempo impostato consigliato è da 00:00 a 99:00. Dopo aver regolato il
tempo, premere START per iniziare il programma. Il tempo conta alla rovescia partendo dal
valore impostato, CALORIES e DISTANCE contano progressivamente da 0. Quando il TIME arriva
a 0.0, la console emana un lungo beep, tutti o dati sul display lampeggiano per 30 secondi.
Quindi la console torna al modo POWER ON.
I

PROGRAMMA TARGET DISTANCE
Quando nel modo POWER ON, premere STOP due volte per iniziare il programma target
distance. Il display della DISTANCE mostra l’impostazione di 5.0 km/3.0 miglia. Ogni segmento è
0.1KM/0.1MILE. Premere e tenere premuto UP o DOWN per aumentare la velocità della
regolazione della distanza. L’intervallo della distanza impostato consigliato è da 0.1KM/0.1MILE
a 99.9KM/99.9MILE. . Dopo aver regolato il tempo, premere START per iniziare il programma. La
distanza conta alla rovescia partendo dal valore impostato, CALORIES e TIME contano
progressivamente da 0. Quando la distanza arriva a 0.0, la console emana un lungo beep, tutti o
dati sul display lampeggiano per 30 secondi. Quindi la console torna al modo POWER ON.
PROGRAMMA TARGET CALORIES
Quando nel modo POWER ON, premere STOP tre volte per iniziare il programma target calorie.
Il valore delle CALOREIS impostato dalla fabbrica che appare lampeggiando sul display è 50.
Premere UP e DOWN per regolare il target delle calorie di un segmento (10) alla volta. Premere
e tenere premuto UP e DOWN per aumentare la velocità della regolazione delle calorie.
L’intervallo di calorie accettato è da 10 a 999. Dopo aver regolato il tempo, premere START per
iniziare il programma. Le calorie contano alla rovescia partendo dal valore impostato, DISTANCE
e TIME contano progressivamente da 0. Quando le calorie arrivano a 0.0, la console emana un
lungo beep, tutti o dati sul display lampeggiano per 30 secondi. Quindi la console torna al modo
POWER ON.
20 MINUTI PROGRAMMA FITNESS TEST
Il programma FITNESS TEST richiede l’impostazione dei dati personali (peso, altezza, età). Il
programma basandosi su queste informazioni, detiene i battiti cardiaci ( con l’hand pulse) per
aiutarvi a correggere la velocità rispettando il target delle vostre pulsazioni e soprattutto per un
corretto allenamento. Quindi l’utilizzatore può iniziare il proprio programma controllando
velocità e pulsazioni. All’interno del manuale c’è una scheda da compilare con i dati delle
proprie performance. Potete iniziare dal livello di tensione 1 e passare al 2 quando avete
raggiunto il valore massimo del livello 1. E così via.
I

Per iniziare il programma FITNESS TEST PROGRAM, premere il tasto FITNESS TEST mentre la
console è nello stato POWER ON. La console mostra:
User Weight Set Up – impostazione peso
Dopo aver premuto il tasto FITNESS TEST, il display lampeggia il WEIGHT a 68KG/150LB. Premere
UP e DOWN una volta per regolare il peso (ogni segmento 1KG/1LB). Premere e tenere premuto
UP o DOWN per aumentare la velocità della regolazione peso. Impostare l’intervallo da 20200KG/44-440LB. Premere STOP per salvare il peso.
User Height Set Up – impostazione altezza
Dopo aver premuto STOP, l’HEIGHT lampeggia sul display a 170CM/67INCHES. Premere UP e
DOWN una volta per regolare il peso (ogni segmento 1CM/1INCH). Premere e tenere premuto
UP o DOWN per aumentare la velocità della regolazione dell’altezza. Impostare l’intervallo da
50-250CM/20-100INCHES. Premere STOP per salvare l’altezza.
User Age Set Up – impostazione età
Dopo aver premuto STOP, l’AGE lampeggia sul display a 35. Press Premere UP e DOWN una volta
per regolare il peso (ogni segmento 1). Premere e tenere premuto UP o DOWN per aumentare
la velocità della regolazione dell’età. Impostare l’intervallo da 10-99. Premere STOP per salvare
l’età.
Programma Fitness
Dopo avere impostato l’età, il programma automaticamente imposta le pulsazioni normali e
massime.
Stimate normali = (220 – AGE ) X 65%
Stimate massime = (220 – AGE) X 85%
Ad esempio:
Se l’età è 35, le pulsazioni stimate normali sono = (220 –35) X 65% = 120.
I
 Loading...