

Reebok i-bike.se User Manual

reebokfitness.info
RFE International Ltd
The Performance Centre
Maidstone Road, Kingston
Milton Keynes MK10 0BD
+44 (0) 1908 793 020
info@rfeinternational.com
Customer Support
0800 440 2459
techsupport@rfeinternational.com
reebokfitness.info
i-Bike.SE
Usermanual
RFE4489_RE014101_iBikeSE_UMFINAL.indd 1-1 25/06/2010 15:14

Reebok i-Bike.SE
01
reebokfitness.info
Parts . . . . . . . . . . . . . . . . . . . . . . . . . . . . . . . . . . . . . . . . . . . . . . . . . . . . . . . . 02
Assembly. . . . . . . . . . . . . . . . . . . . . . . . . . . . . . . . . . . . . . . . . . . . . . . . . . . . 04
Precautions. . . . . . . . . . . . . . . . . . . . . . . . . . . . . . . . . . . . . . . . . . . . . . . . . . .12
Functions . . . . . . . . . . . . . . . . . . . . . . . . . . . . . . . . . . . . . . . . . . . . . . . . . . . .14
Correct Use . . . . . . . . . . . . . . . . . . . . . . . . . . . . . . . . . . . . . . . . . . . . . . . . . . 15
Warm Up . . . . . . . . . . . . . . . . . . . . . . . . . . . . . . . . . . . . . . . . . . . . . . . . . . . . 16
Computer . . . . . . . . . . . . . . . . . . . . . . . . . . . . . . . . . . . . . . . . . . . . . . . . . . . .17
Maintenance . . . . . . . . . . . . . . . . . . . . . . . . . . . . . . . . . . . . . . . . . . . . . . . . 24
Troubleshooting . . . . . . . . . . . . . . . . . . . . . . . . . . . . . . . . . . . . . . . . . . . . . 26
Parts ID. . . . . . . . . . . . . . . . . . . . . . . . . . . . . . . . . . . . . . . . . . . . . . . . . . . . . . 28
Limited Warranty . . . . . . . . . . . . . . . . . . . . . . . . . . . . . . . . . . . . . . . . . . . . 32
Model name: Reebok i-Bike.SE
Serial number: . . . . . . . . . . . . . . . . . . . . . . . . . . . . . . . . . . . . . . . . . . . . . . . . .
These details can be found on the underside of your product.
Thank you for choosing Reebok. Before you get
started, please read these instructions carefully.
If you experience any difficulties, our support
team will be happy to help – or check out our
website at reebokfitness.info
Welcome from
Reebok Fitness
Contents
Customer Support
0800 440 2459
techsupport@rfeinternational.com
Important note:
Consult your doctor before starting any exercise programme. If you feel any sickness, chest
pain, dizziness or breathlessness during your training, stop exercising and consult your
doctor immediately.
If you have any further queries please contact our customer support team on the details
provided either at the foot of this page or on the back of the manual.
RFE4489_RE014101_iBikeSE_UMFINAL.indd 1-1 25/06/2010 15:14
Reebok i-Bike.SE
02
Customer Support 0800 440 2459 Reebok i-Bike.SE
03
reebokfitness.info
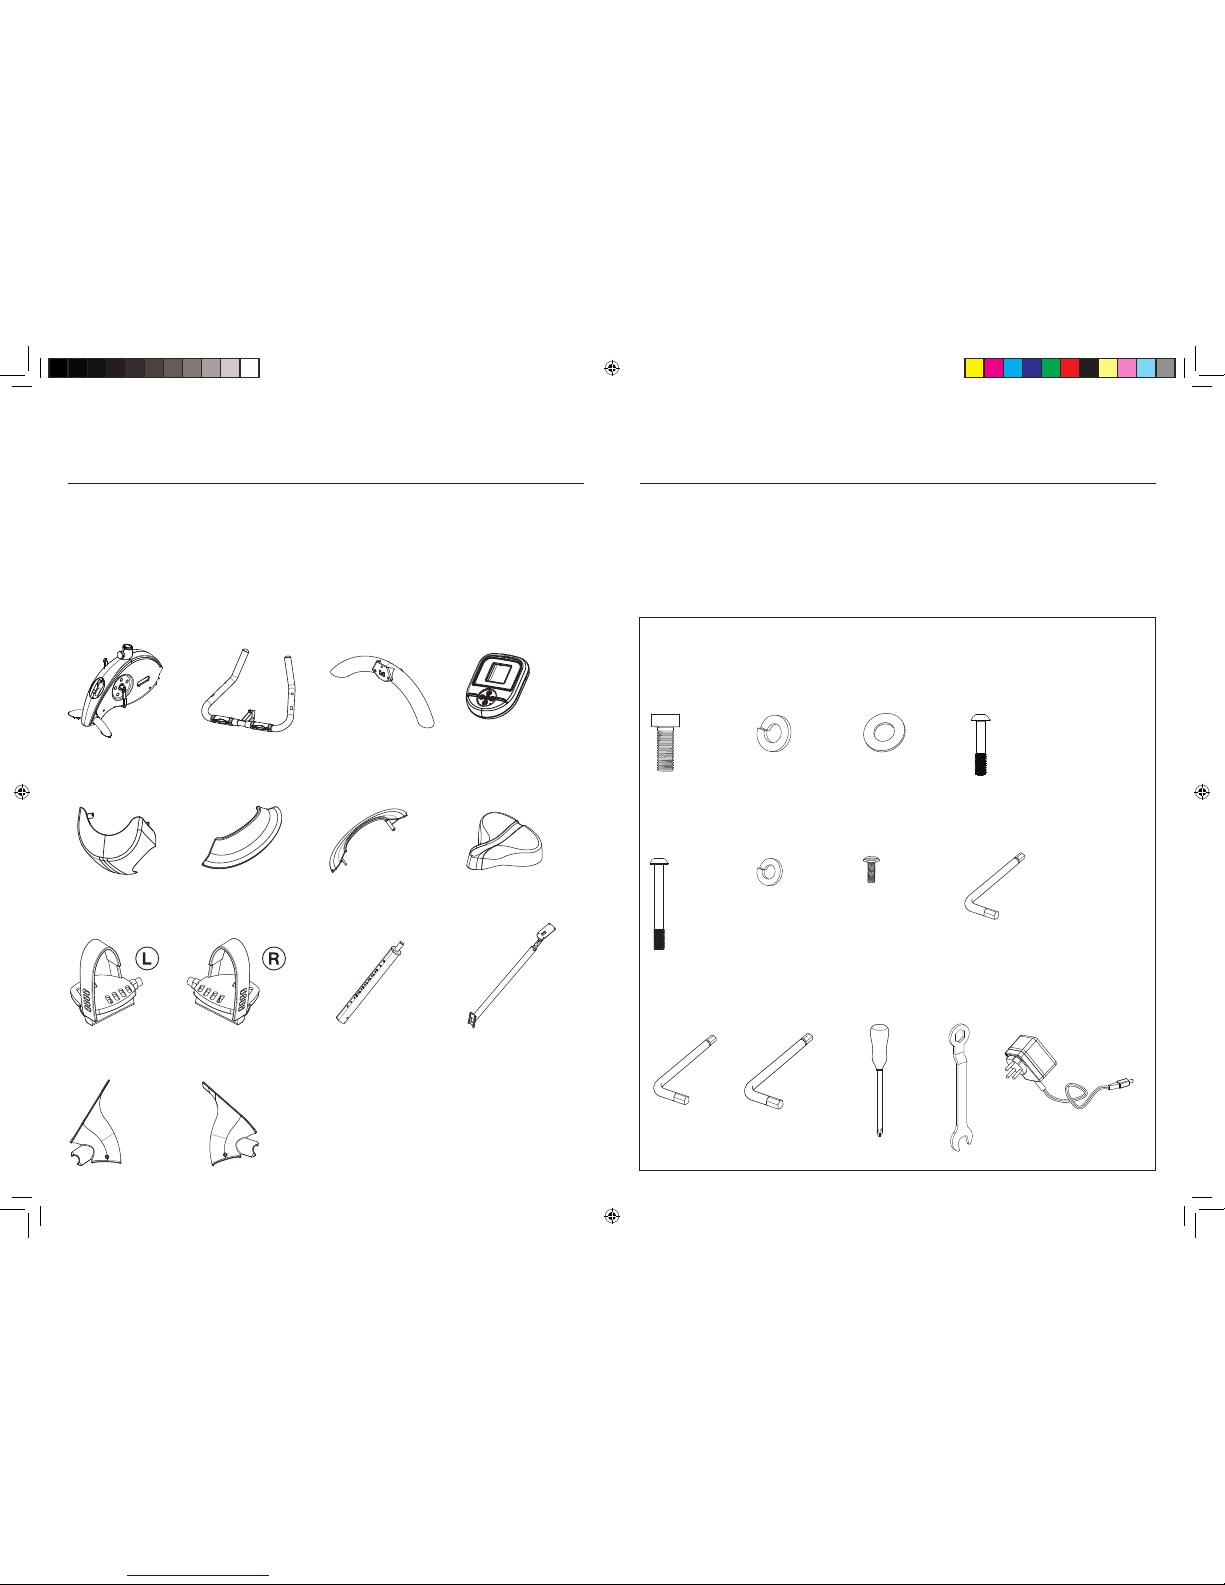
Blister Pack
215 x 5
M8x20mm
219 x 2
M6x50mm
807 x 7
8mm
220 x 2
6mm
C x 1
6mm
373 x 5
8mm
211 x 2
M4x10mm
D x 1
541 x 1
M5x29mm
E x 1 F x 1
A x 1
4mm
B x 1
5mm
Parts
281 x 1 255 x 1 842 x 1347 x 1
419 x 1 437 x 1 418 x 1
438 x 1410 x 1
316 x 1
312 x 1
285 x 1
805 x 1 804 x 1
Checking The Parts
Before you begin, please check all parts are present and undamaged. If you are
missing any parts, please call our Technical Support team on the number at the
top of this page.
RFE4489_RE014101_iBikeSE_UMFINAL.indd 2-3 25/06/2010 15:14
Reebok i-Bike.SE
04
Customer Support 0800 440 2459 Reebok i-Bike.SE
05
reebokfitness.info
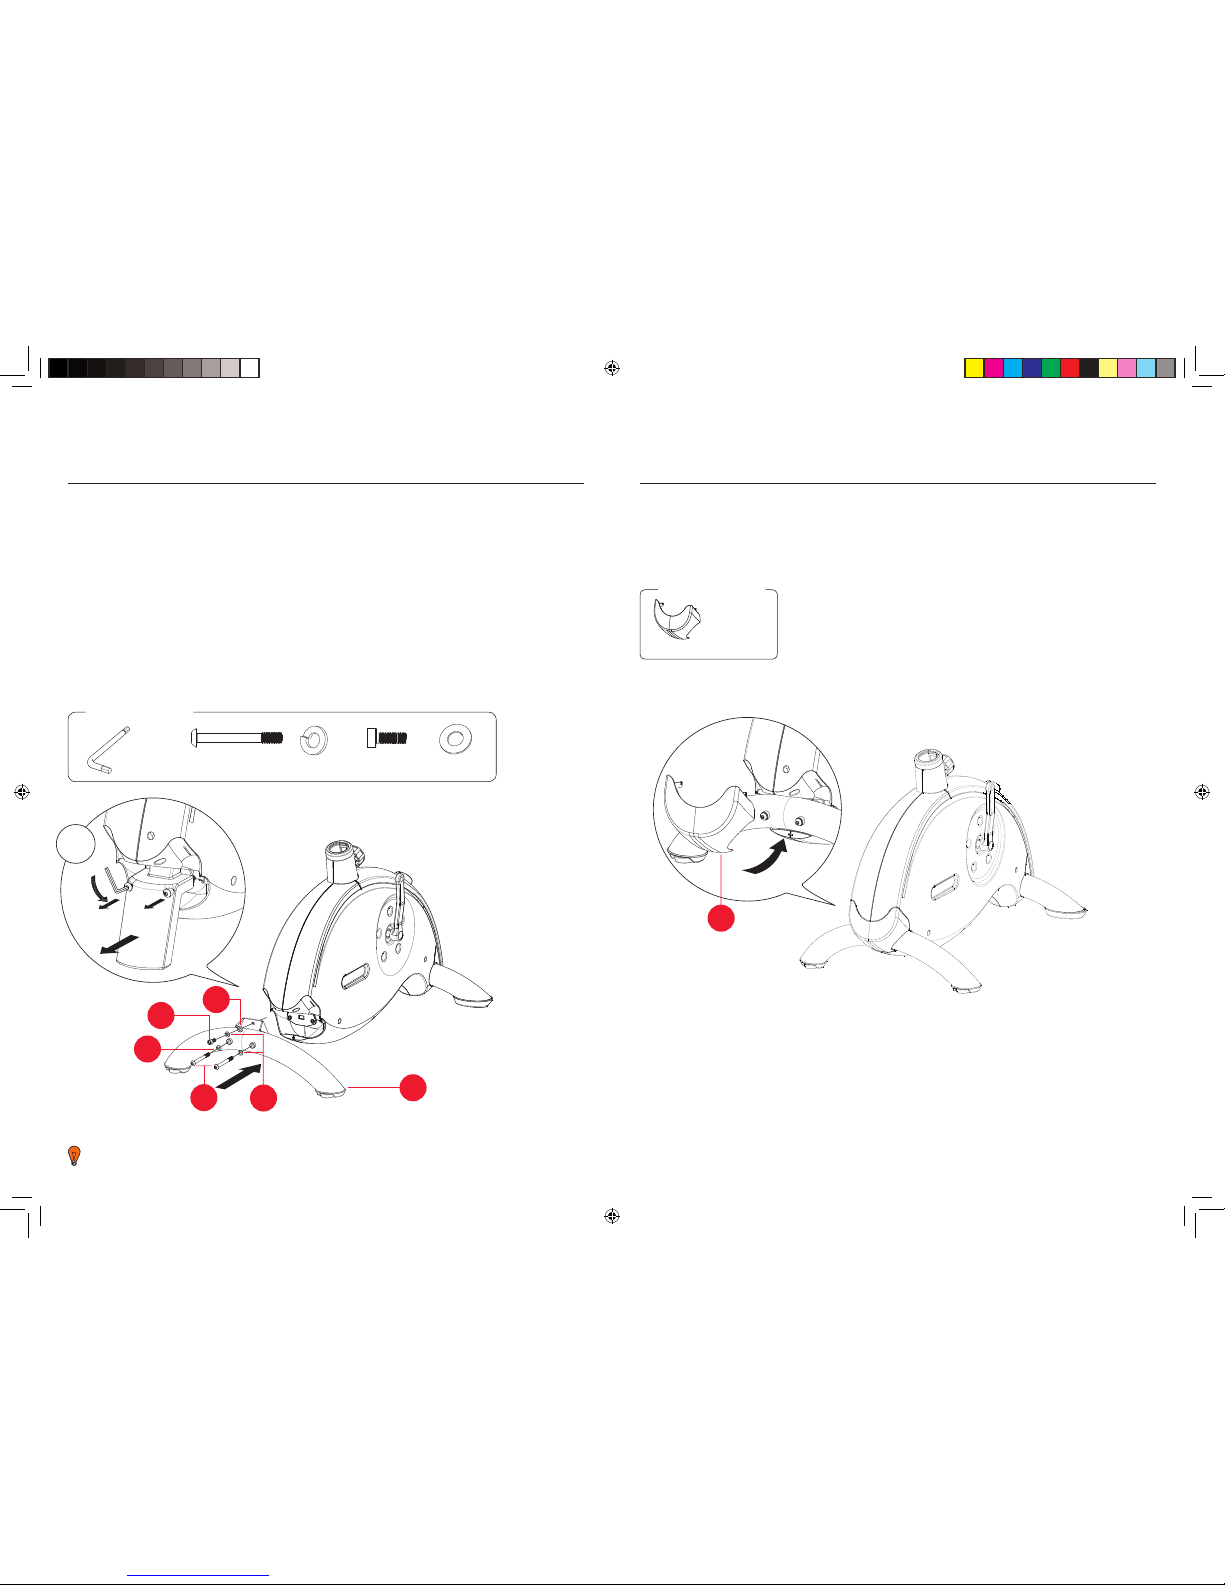
Assembly
Stabiliser
1. Remove the bike from the box.
2. Remove the transport stabiliser, located at the back of the product. These bolts
are 2 x 854 .
3. There are three holes in the rear stabiliser (347). Attach the rear stabiliser to the
main frame, as shown, by fixing 2 x 854 bolts and 2 x 807 spring washers into
the bottom two holes.
4. Now fix the rear stabiliser by inserting 1 x 215 bolt in the top hole, along with 1 x
807 spring washer and 1 x 373 flat washer.
You will require:
You will require:
807 x 3
215 x 1 373 x 1854 x 2
419 x 1
419
5. Once complete, clip the plastic cover (419) over the stabiliser.
To aid access to the bolt holes during assembly, it may help to place the bike
body on a piece of polystyrene packaging.
1
373
215
807
347
807
854
5/6mm
RFE4489_RE014101_iBikeSE_UMFINAL.indd 4-5 25/06/2010 15:14
Reebok i-Bike.SE
06
Customer Support 0800 440 2459 Reebok i-Bike.SE
07
reebokfitness.info
Assembly
R
L
1
2
1
2
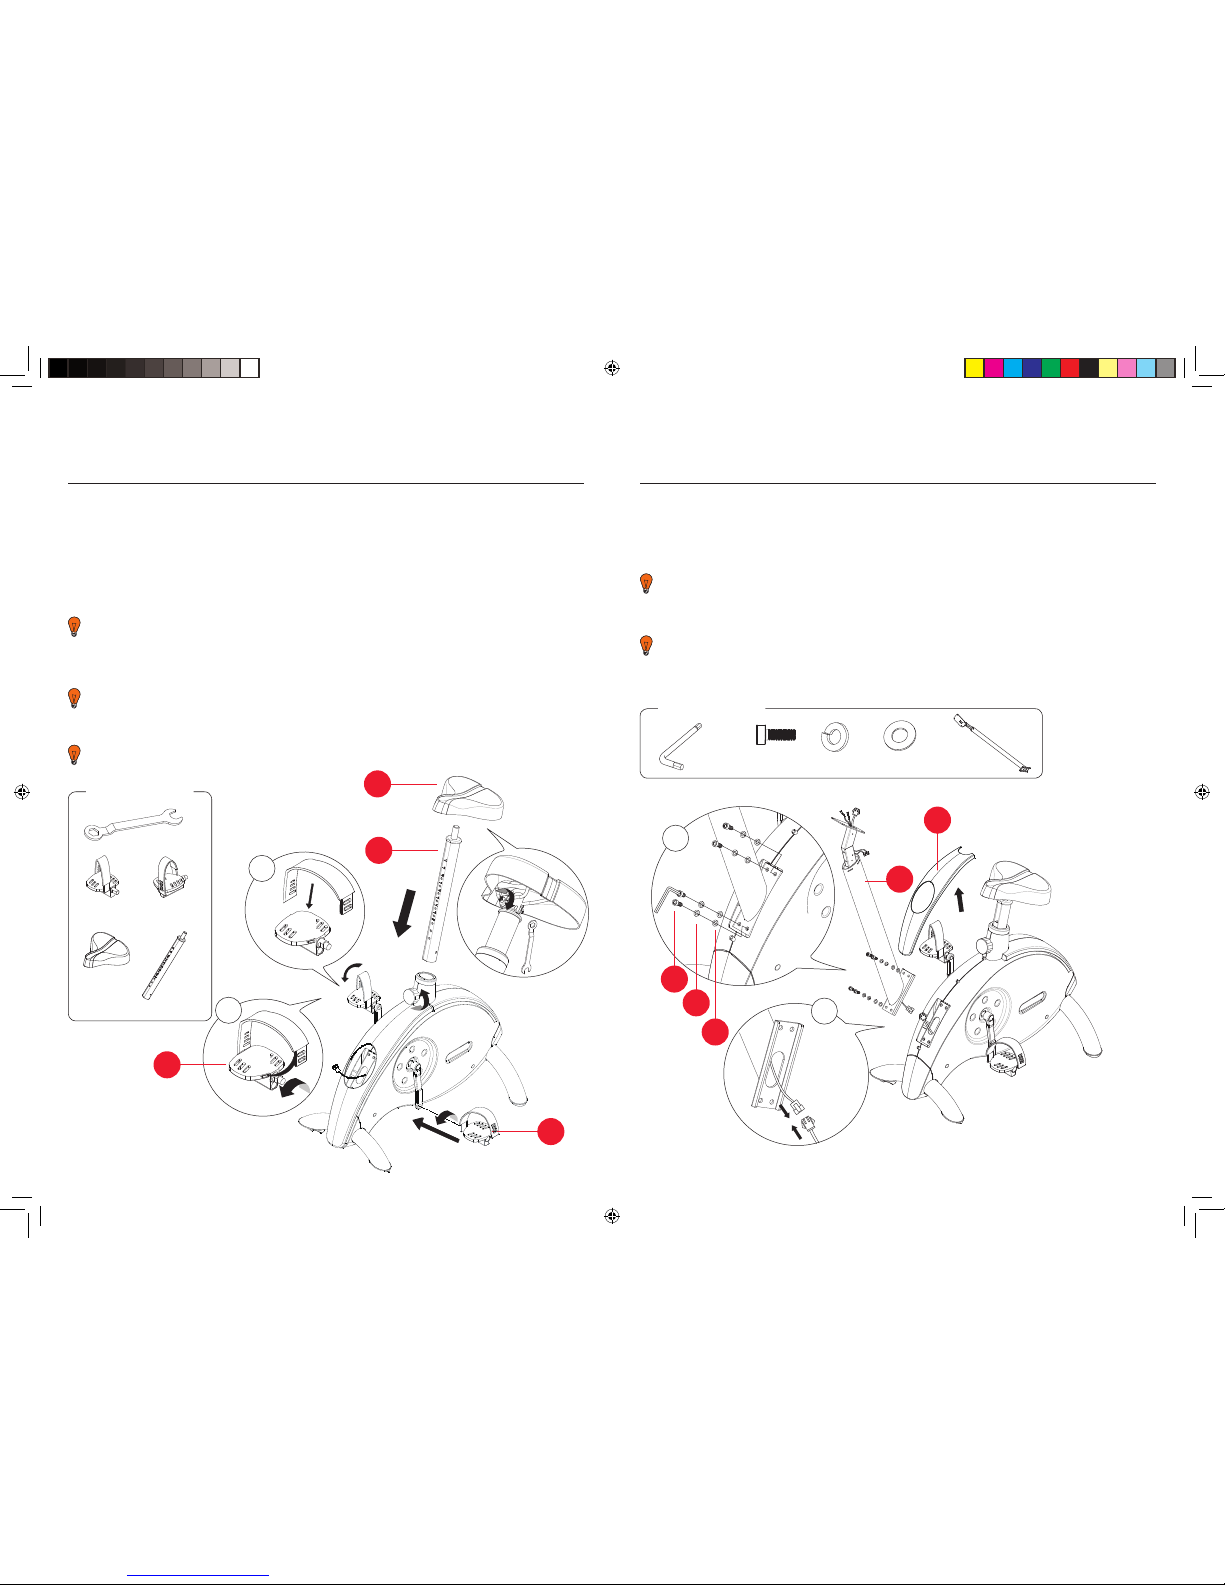
Saddle/Pedals
6. Attach the saddle (316) to the saddle stem (312) using the bolt which is already
in place. Insert the saddle stem into the main body by unscrewing the
adjustment knob a couple of turns and pulling it out.
7. Slot the pedal straps on the pedals as marked L and R for left and right.
The side of the pedal strap with more slots should go on outside of pedal
to allow ease of adjustment at a later date.
8. Attach the right pedal (438) onto the right pedal shaft and tighten with
the spanner.
The right pedal is marked with an R and should be threaded onto the crank
in a CLOCKWISE direction.
9. Attach the left pedal (410) onto the left pedal shaft and tighten with the spanner.
The left pedal is marked with an L and should be threaded onto the crank
in a COUNTERCLOCKWISE direction.
Upright
10. Clip the wires at the bottom of the upright (285), to the pre assembled wires
sticking out at the front of the bike (fig.1).
You will hear a click, which will confirm those wires are connected together.
11. Fix the upright to the main body of the bike using 4 x 215 bolts, 4 x 807 spring
washers and 4 x 373 flat washers (fig.2).
For ease, place the upright (285) over fixing plate. Insert and finger tighten
1 x 215/807/373. You can now tighten each bolt individually.
You will require:
215
807
373
438 x 1 410 x 1
316 x 1 312 x 1
438
316
312
285
807 x 4
You will require:
215 x 4
373 x 4 285 x 16mm
RFE4489_RE014101_iBikeSE_UMFINAL.indd 6-7 25/06/2010 15:14
405
410

Reebok i-Bike.SE
08
Customer Support 0800 440 2459 Reebok i-Bike.SE
09
reebokfitness.info
2
1
Upright Covers
12. Clip the upright covers onto the base of the uprights as shown.
You will require:
418 x 1405 x 1 437 x 1
418 437
405
1
Handlebars
13. Insert the two wires from the back of the handlebars (255) to the pre mounted
wires in the upright (fig.1).
14. Pull wires through to mount the handlebars on the stem.
15. Fix the handlebar to the upright using 2 x 220 spring washers and 2 x 219 bolts.
These insert from the front of the bike back towards the saddle (fig.2).. Ensure
the wires do not get crushed by pushing them back into the upright.
16. Now insert 1 x 541 bolts into the sides of the handlebar bracket, to secure it to
the upright.
255
219
220
541
Assembly
You will require:
220 x 2
219 x 2
255 x 1
541 x 1
4mm
RFE4489_RE014101_iBikeSE_UMFINAL.indd 8-9 25/06/2010 15:14
2
 Loading...