

Page 1
THE
BOILING WATER DISPENSER
INSTALLATION & OPERATING INSTRUCTIONS
IMPORTANT:
This booklet should be left with the user after
installation and demonstration
Page 2

2
Contents
Installation Instructions Page
Important notes . . . . . . . . . . . . . . . . . . . . . . . . . . . . . . . . . . . . . . . . . . . . . . . . . . . . . . . . . 3
What the installer will need . . . . . . . . . . . . . . . . . . . . . . . . . . . . . . . . . . . . . . . . . . . . . . . . 4
Where to locate the SB² . . . . . . . . . . . . . . . . . . . . . . . . . . . . . . . . . . . . . . . . . . . . . . . . . . 4
Installing the water supply and steam vent pipes . . . . . . . . . . . . . . . . . . . . . . . . . . . . . . . 4
Installing the mains supply . . . . . . . . . . . . . . . . . . . . . . . . . . . . . . . . . . . . . . . . . . . . . . . . 5
Removing the front cover . . . . . . . . . . . . . . . . . . . . . . . . . . . . . . . . . . . . . . . . . . . . . . . . . 5
Fixing the unit on the wall . . . . . . . . . . . . . . . . . . . . . . . . . . . . . . . . . . . . . . . . . . . . . . . . . 7
Connecting the water supply and steam vent pipes . . . . . . . . . . . . . . . . . . . . . . . . . . . . . 7
Connecting the mains cable . . . . . . . . . . . . . . . . . . . . . . . . . . . . . . . . . . . . . . . . . . . . . . . 7
Replacing the front cover . . . . . . . . . . . . . . . . . . . . . . . . . . . . . . . . . . . . . . . . . . . . . . . . . 7
Schematic wiring diagram . . . . . . . . . . . . . . . . . . . . . . . . . . . . . . . . . . . . . . . . . . . . . . . . 7
Operating Instructions
After Sales Service . . . . . . . . . . . . . . . . . . . . . . . . . . . . . . . . . . . . . . . . . . . . . . . . . . . . . . 2
General product description . . . . . . . . . . . . . . . . . . . . . . . . . . . . . . . . . . . . . . . . . . . . . . . 8
How to operate the SB² . . . . . . . . . . . . . . . . . . . . . . . . . . . . . . . . . . . . . . . . . . . . . . . . . . 8
How to clean and descale your SB² . . . . . . . . . . . . . . . . . . . . . . . . . . . . . . . . . . . . . . . . . 9
Trouble shooting guidance . . . . . . . . . . . . . . . . . . . . . . . . . . . . . . . . . . . . . . . . . . . . . . . . 10
Guarantee . . . . . . . . . . . . . . . . . . . . . . . . . . . . . . . . . . . . . . . . . . . . . . . . . . . . . . . . . . . . 12
Thank you for choosing a quality Redring product manufactured in Peterborough, England
THIS APPLIANCE CAN BE USED BY CHILDREN AGED FROM 8 YEARS AND
ABOVE AND PERSONS WITH REDUCED PHYSICAL, SENSORY OR MENTAL
CAPABILITIES, OR LACK OF EXPERIENCE AND KNOWLEDGE
IF THEY HAVE BEEN GIVEN SUPERVISION OR INSTRUCTION
CONCERNING USE OF THE APPLIANCE IN A SAFE WAY
AND UNDERSTAND THE HAZARDS INVOLVED.
CHILDREN SHALL NOT PLAY WITH THE APPLIANCE.
CLEANING AND USER MAINTENANCE SHALL NOT BE MADE BY CHILDREN
Redring After Sales Service
We offer a technical advisory service on the telephone to contractors and other customers with
problems in the field.
Many Spare parts can be also be supplied by contacting us as shown above
Remember to quote the exact model of SB² unit, as written on the front of the unit and on this leaflet.
It may also be of use to have a note of the model and serial number as stated on the underside of the
unit.
Make a note of those numbers here, and be sure to quote them if you call for advice.
Model Number: _ _ _ _ _ _ _ _ _ _ _ _ _ _ / Serial Number: _ _ _ _ _ _ _ _ _ _ _ _ _ _ _ _ _
Note: You may be charged for a service call if you do not have the serial number.
Or alternatively email us on: Service.request@redringxpelair.com
Please call our technical team on: 0844 372 7766
Page 3

3
Important Notes
This appliance is intended to be used in household and similar
applications such as:-
- staff kitchen areas in shops, offices and other working environments;
- farm houses;
- by clients in hotels, motels and other residential type environments;
- bed and breakfast type environments.
All installations must be undertaken by a competent installer.
If in any doubt, advice and assistance should be sought from a qualified
plumber and/or electrician.
Installation and wiring must conform to the current BS.7671 (IEE Wiring
Regulations) and the Water Fitting Regulations.
Local regulations may apply in other countries.
The steam vent connection MUST BE MADE, (see page 4)
A means for disconnection in all poles must be incorporated in the fixed
wiring in accordance with the wiring rules.
Check that the mains supply matches the electrical rating on the product.
The rating plate is located on the bottom edge of the unit.
Frost Protection: This appliance should be located where the ambient air
temperature is between 5°C and 50°C.
If the temperature may fall below 5°C when the appliance is not in use, do
not turn off the appliance electrically. This safeguard does NOT offer
protection to the connecting pipe work and fittings.
The unit should not be operated if freezing is suspected.
Allow the unit to thaw completely.
This unit must not be cleaned by, or installed in an area cleaned by
a water jet.
THIS APPLIANCE, AND ALL METAL PIPEWORK CONNECTED TO IT,
MUST BE EARTHED.
If you have any queries about installing this product or after it has been
installed, please contact our Customer Service Helpline on 0844 372 7766
or alternatively email us on Service.request@redringxpelair.com
Customers outside the U.K. should contact their local distributor.
This product may need to be descaled regularly.
The frequency of descaling will depend on the water supply hardness.
Page 4
4
What the installer will need
A means for disconnecting the fixed wiring in all poles in accordance with the wiring rules
(ie. 13A fused double pole isolating switch).
Suitable length of 1.0mm² 3-Core multi-strand PVC insulated mains cable that complies with
BS.6500.
Suitable lengths of Ø15mm copper pipe.
Where to locate the SB²
We recommend that the unit is installed on a suitable wall, at shoulder height and over a sink,
with accessible area to maintain unit if and when required.
Adjacent to the means for disconnecting the fixed wiring in all poles in accordance with the wiring
rules (ie: 13A fused double pole isolating switch).
Available mains cold water supply and drainage facility.
DO NOT install the SB² within reach of a person using a bath or shower.
This unit must not be installed in an area cleaned by a water jet.
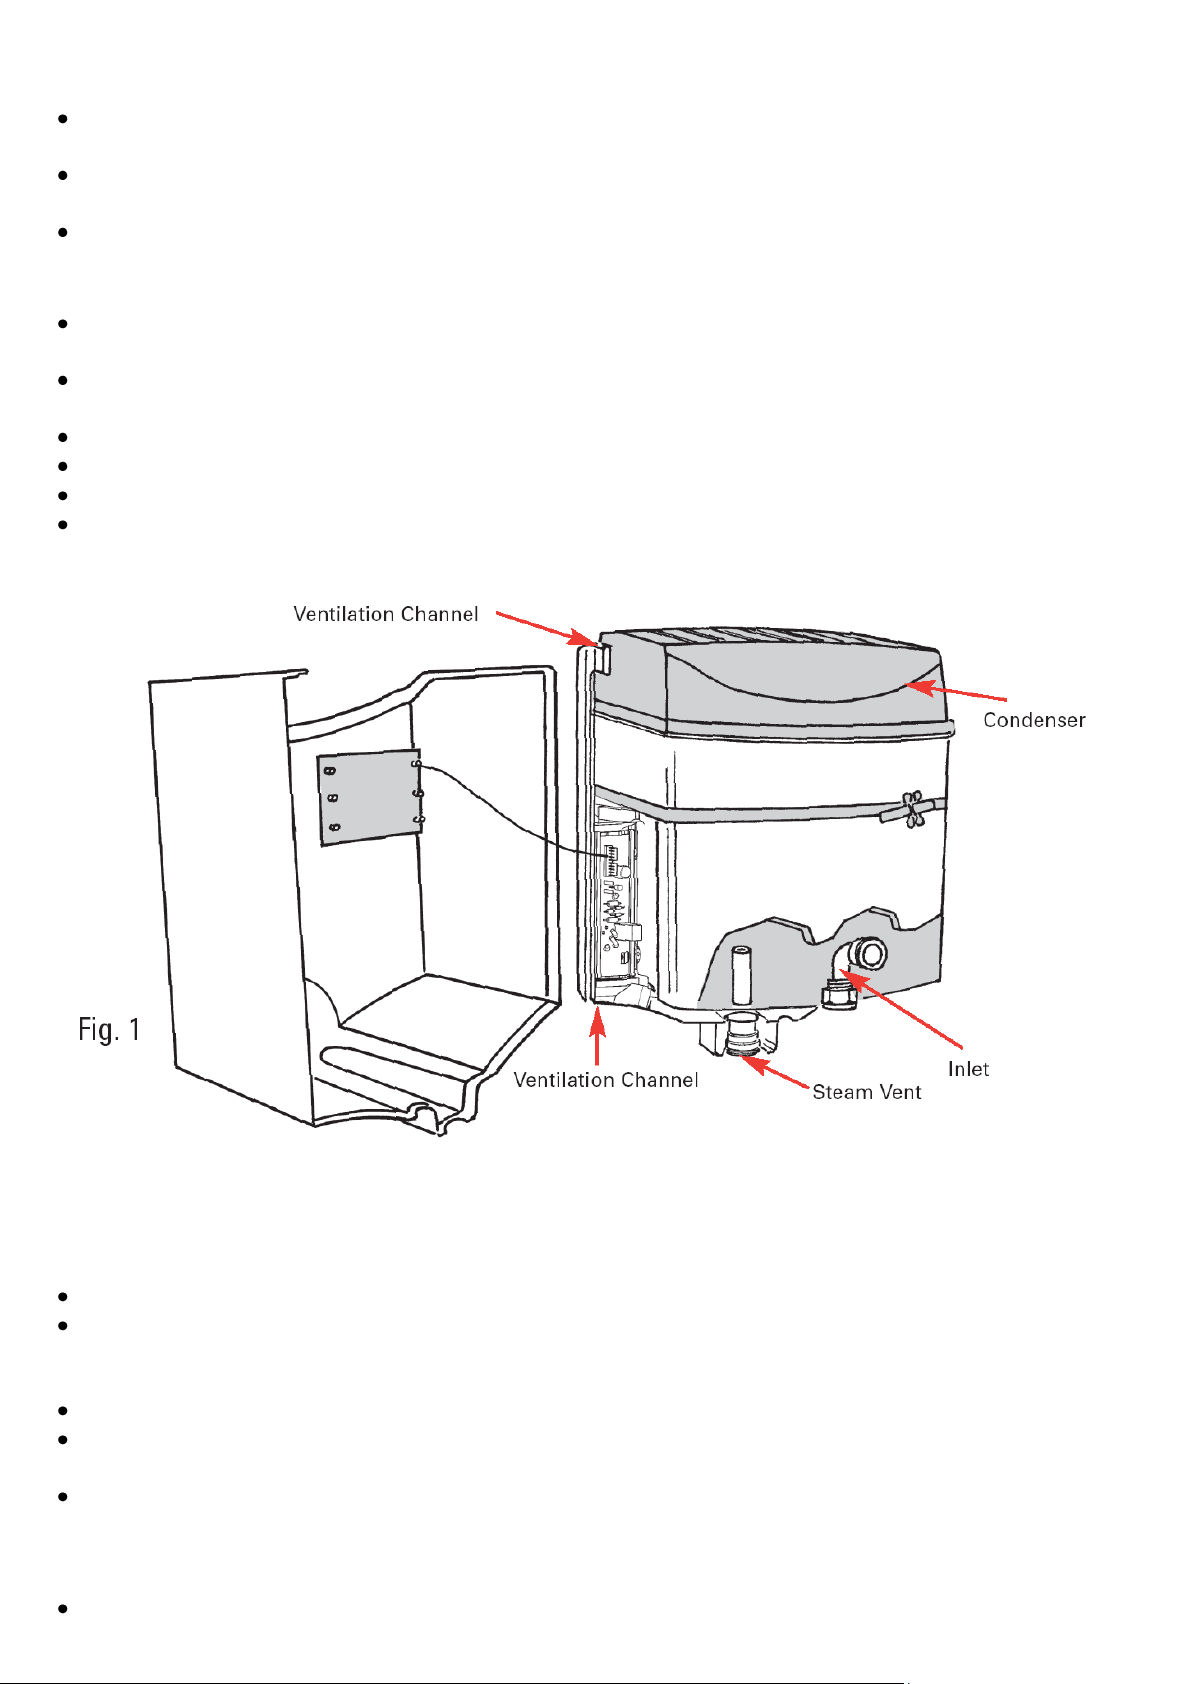
DO NOT obstruct the ventilation channel in the backplate.
Installing the water supply and steam vent pipes
The unit must be connected to cold, mains fed, drinking water only.
Pressure range between 0.069 MPa (0.7 bar / 10 psi) and 1.0 MPa (10.0 bar / 140 psi).
DO NOT connect to a storage tank
Isolate the water supply
Lay in the Ø15mm water supply pipe to the location of the inlet connection (Fig.1).
Check that the water supply position gives enough space under the unit for it to be used properly.
Flush through the water supply before making the final connection so that any debris is removed.
Note: The inlet elbow contains a flow regulator: THIS MUST BE USED IN INSTALLATION
Lay in the Ø15mm drainage pipe to the location of the steam vent connection (Fig.1).
Connection is made using the push-fit adaptor provided.
The steam vent connection must be taken directly to the sink below, if there is one, or via a
tundish to a suitable drain.
If a sink is used it must be able to withstand boiling water and have an overflow
connection.
Note: The steam vent outlet also acts as an overflow.
Page 5

5
Installing the mains supply
If a mains supply is not already available.
Install a means for disconnecting the fixed wiring in all poles
(ie. 13A fused double pole isolating switch) adjacent to where the unit will be fixed.
Removing the front cover
Remove the screw from the bottom and top edge of the unit (Fig.3).
Support the front cover and remove the flow knob (Fig.4).
Pull the front cover away form the unit and carefully remove the flying-lead and plug from the
back-plate connector (Fig 5a and Fig.5b).
Page 6

6
Page 7

7
Fixing the unit to the wall
Use the wall mounting bracket supplied and the two lower fixing holes.
Ensure that the wall mounting bracket is mounted horizontally.
An extra top fixing point is available by temporarily removing the condenser assembly.
Connecting the water supply and vent pipes
When the unit is fixed to the wall, make the final water supply and steam vent connections and
secure the pipework.
Switch the water supply back on.
Connecting the mains cable
Ensure the mains supply is isolated.
Connect the mains cable from the SB² to the means for disconnection (ie. 13A fused double pole
isolating switch).
Ensure the cable clamps are firmly secured and the cable ends are tightened into the terminal
block.
Note:
The supply cable must be a minimum of 1.0mm² 3-Core multi-strand PVC insulated mains
cable. The terminal block will not accept cable diameters above 1.5mm².
Check that the mains supply matches the electrical rating on the product.
The rating plate is located on the bottom edge of the unit.
IMPORTANT:
Connect the supply cable, complying with BS.6500, to this appliance in accordance with the
following code:
GREEN AND YELLOW (EARTH) connect to the terminal marked “ “.
BLUE (NEUTRAL) connect to terminal marked “N”.
BROWN (LIVE) connect to terminal marked “L”.
WARNING: THIS APPLIANCE, AND ALL METAL PIPEWORK CONNECTED TO IT,
Replacing the front cover
MUST BE EARTHED.
Support the cover and re-attach the flying-lead to the unit.
Replace the front cover and secure using the top and bottom screws.
Carefully replace the knob, ensuring correct alignment of the “D-Shaft”.
Reconnect the mains supply.
Schematic
Wiring
Diagram
Page 8

8
Operating Instructions
General Product Description
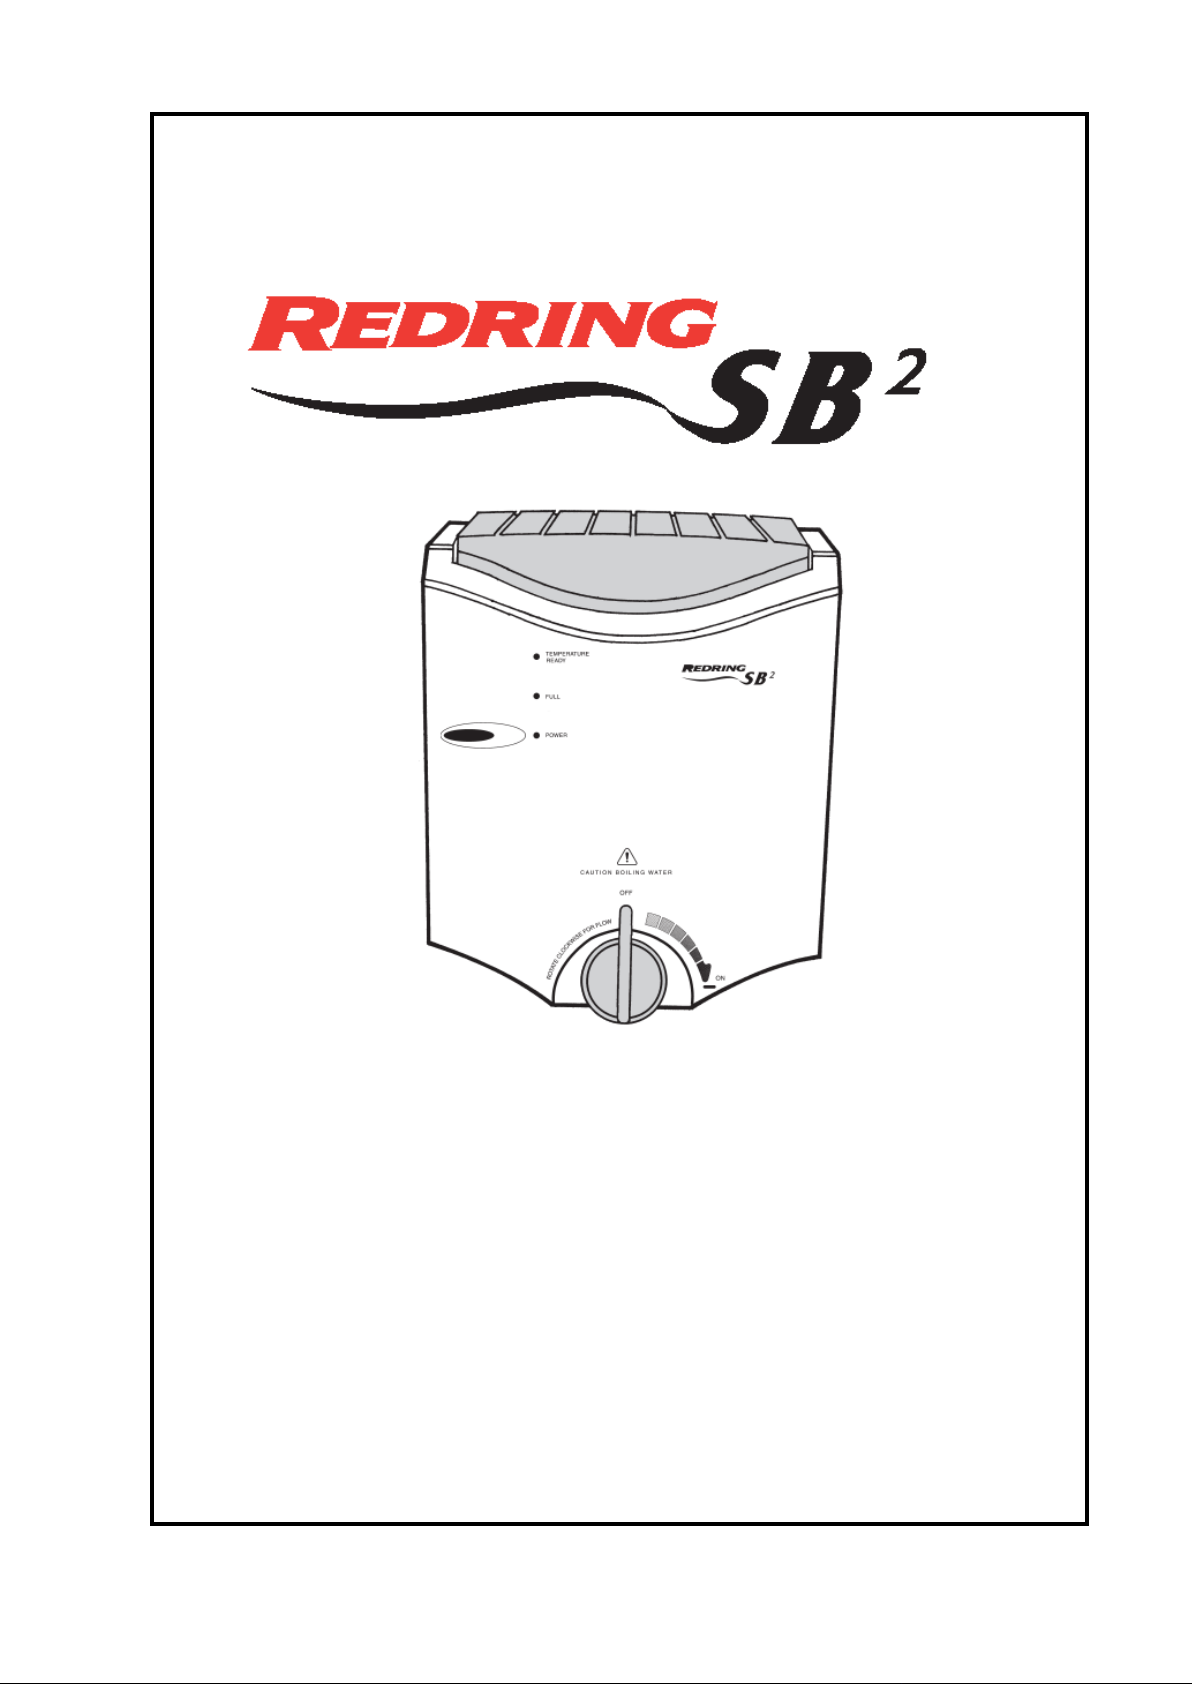
The SB² is a wall mounted, self-calibrating and self-filling boiling water heater.
It can be used for making cups of tea or coffee and even soups and hot snacks.
A special condenser traps steam and returns droplets to the tank, minimising waste and saving
energy.
The water temperature is set and automatically maintained by the SB² and the unit is powered down
with the “Power” button. Water is dispensed by rotating the front cover knob clockwise.
How to operate the SB² (see Fig.6)
Make sure the electricity and water are turned on.
Use the “POWER” button to switch on the SB² on and to power down.
The SB² should be switched off at the mains if the water is not required e.g. at weekends,
holidays etc.
POWER light: when the SB² is on the POWER light will come on.
FULL light: Full light comes on when the tank is full of water.
The SB² fills up automatically and this can take up to 10 minutes if the tank is
completely empty.
TEMPERATURE TEMPERATURE READY light comes on when the water is hot enough to use.
READY light: This can happen even when the tank is not completely full of water.
Page 9

9
Please Note:
The SB² can take several minutes to reach the required temperature, depending on usage and
tank capacity.
To avoid energy wastage, the SB² will automatically reduce the temperature by 10°C if the unit is
not used for more than 60 minutes.
The SB² will automatically go back to boiling when the water is used.
When the SB² is switched on at the local isolator and the POWER button is pressed, it will start
by self-calibrating. This can take up to 20 minutes to complete and includes automatically boiling
the water for 30 seconds.
When first installed, it is recommended that the initial tank of boiling water is fully drawn off and
discarded. Allow the tank to re-fill and the TEMPERATURE READY light to come on, before
using the SB²
Dispensing water from the SB²:
Place your cup under the red spout at the bottom of the unit.
Turn the knob clockwise to fill your cup (Fig.7b).
Turn the knob anti-clockwise to OFF (Fig.7a).
WARNING
SCALDING HOT WATER can be dispensed from the SB².
Never wash your hands directly from the unit.
Some plastic cups can distort if they are filled with boiling water, so causing a danger of
scalding.
Do not use if heater is suspected of being frozen. Allow to thaw completely before use.
How to clean and descale your SB²
Cleaning:
Before cleaning or descaling, switch off the electricity at the isolating switch.
It is recommended that the SB² surfaces are cleaned with a soft cloth.
Do not use abrasive or solvent cleaning fluids.
Descaling:
A suitably qualified person should carry out the descaling.
Ensure the mains electricity supply is isolated.
If scale comes out with the hot water then the SB² may need to be descaled.
This is done by removing the front cover and top condenser assembly and using a suitable kettle
descaler (a packet has been supplied). Ensure unit is thoroughly flushed through after descaling.
Page 10

10
Trouble Shooting
a) TEMPERATURE READY
light is not on
This is normal: The water has not yet reached the set temperature.
(See Table 3 on page 11 for approximate heat up times).
b) TEMPERATURE READY
light is on but the FULL
light is off
This is normal: Some water has been taken out of the tank so it is
no longer full, but the water temperature is still hot enough to use.
(The tank will automatically fill up again).
c) The FULL light is on but
the TEMPERATURE
READY light is off
This is normal: The tank will have automatically filled and the
heater is still getting the water up to the boil.
(See Table 3 on page 11 for approximate heat up times).
d) The POWER light is on
but the
TEMPERATURE
READY and FULL
lights are both off
This is normal: The tank is still filling up with water and the heater is
still getting up to the boil.
(See Table 3 on page 11 for approximate heat up times).
e) TEMPERATURE READY
light is on but the water is
not boiling
To avoid energy wastage, the SB² is designed to automatically
reduce the temperature by 10°C if the unit is not used for more
than 60 minutes.
(The SB² will automatically go back to boiling when the water is
used).
f) All the lights are out and
the POWER button does
not work
Ensure that the electricity supply is switched on at the local isolator,
and then press the POWER button.
g) The water flowing from the
outlet is sometimes only a
trickle
The water in the tank has been drained out due to a high demand.
Wait for the FULL and TEMPERATURE READY lights to come on
again.
h) The SB² takes a long time
to reach the selected
temperature
When the SB² is first switched on it can take up to 18 minutes to
reach the Boil setting.
(See Table 3 on page 11 for approximate heat up times).
i) Steam and very hot water
sometimes dribble out of
the vent at the back of the
SB²
Check that a pipe has been fitted to the steam vent.
Contact your installer if missing.
Use the POWER button to power down the unit and not the mains
electrical local isolator.
(This will reduce the amount of steam produced).
j) The water tastes different
The new SB² needs to be flushed out before being used first used.
We recommend that the initial tank of boiling water is fully drawn off
and discarded.
Wait for the FULL and TEMPERATURE READY lights to come on,
before using the unit.
k) Solid particles are visible
in the water
Scale has built up inside the tank.
As with all water heaters scale may build up inside the water tank.
How quickly this build up occurs will depend on the hardness of the
water and the usage of the SB².
Descale the SB² heater tank (This should be carried out by a
suitably qualified person).
We recommend the use of inline resin filters to protect the heater.
SELF HELP: If the SB² is not working satisfactorily, make the following checks before calling out the
contractor. Any one of these adjustments could restore the performance.
Page 11

11
a) Unit fails to heat the water
Check that the water supply is on and that its pressure is between
0.069 MPa (0.7 bar / 10 psi) and 1.0 MPa (10.0 bar / 140 psi).
Check circuit through solenoid coil.
Check circuit through the heating element.
Check circuit through float switch
If defective then replace.
b) All the light are out and
the POWER button does
not work
Ensure that the electricity supply is switched on at the local isolator.
Ensure that the flying lead to the front cover is connected properly
(see Fig.5a and 5b).
Check the supply to the PCB. If supply OK then change PCB.
c) Water flows continually
from the steam vent pipe
Check that the float switch operates correctly and switches the
water solenoid on and off.
d) The water tank takes
more than 20 minutes to
fill with water
Check that the water supply is on and that its pressure is between
0.069 MPa (0.7 bar / 10 psi) and 1.0 MPa (10.0 bar / 140 psi).
Check operation of the water solenoid and that water flows into the
tank at a rate between 0.3 litres/minute and 1.0 litres/minute.
Check circuit through the solenoid coil
If defective then replace.
CONDITION
APPROXIMATE
HEAT UP TIME
2.5 Litre SB²
APPROXIMATE
HEAT UP TIME
4 Litre SB²
WHAT ELSE HAPPENS
SB² is switched
on at the local
isolator and the
unit is empty of
water.
POWER button is
pressed.
12 minutes
(4 minutes filling
8 minutes heating)
18 minutes
(5 minutes filling
13 minutes heating)
- POWER light comes on
- then FULL light comes on
- then TEMPERATURE READY
light comes on
- then steam comes out of vent
for 30 seconds
SB² is switched
on at the local
isolator and the
unit is already full
of cold water.
POWER button is
pressed.
8 minutes
13 minutes
- POWER and FULL lights both
come on
- then TEMPERATURE READY
light comes on
- then steam comes out of vent
for 30 seconds
PROFESSIONAL SERVICE:
If the SELF HELP checks do not cover the symptom, you should seek professional help.
The following additional checklist is provided for the benefit of the qualified service person.
WARNING: SWITCH OFF THE ELECTRICITY AT THE ISOLATING SWITCH
BEFORE REMOVING THE COVER TO MAKE CHECKS
SB² Heat up times (table 3):
Page 12

12
GUARANTEE
Terms and Conditions for UK (outside UK contact your local distributor)
We guarantee this product for a period of 24 months from the date of purchase.
Within the guarantee period we will resolve, free of charge, any manufacturing defects in the product
resulting from faulty workmanship or material on condition that:-
a) The product has been correctly installed and commissioned in accordance with our instructions and
is being used on the supply circuit or voltage printed on the rating plate.
b) The product has been used in accordance with these instructions and has not been tampered with
or otherwise subject to misuse, neglect or accident.
c) The product has not been taken apart, modified or repaired except by a person authorised by us.
d) Evidence of the date of purchase in the form of an invoice or receipt will be required in order to
qualify under the terms of this guarantee.
e) SCALE PREVENTION: Formation of scale occurs with hot water heaters operating at high
temperatures in hard water areas. We strongly recommend the use of in-line resin filters to protect
the heater. The manufacturer guarantee DOES NOT cover these natural phenomena.
f) For the service work to be undertaken free of charge, the work must only be undertaken by
Redring Xpelair Group Limited, or our approved agents.
g) Service under guarantee has no effect on the expiry date.
The guarantee on any exchanged parts or product ends when the original guarantee period ends.
EXCLUSIONS
This guarantee DOES NOT cover damage or defects arising from poor or incorrect installation,
improper use or lack of maintenance, including the build-up of limescale.
It is the responsibility of the installer to check that the installation parameters meet the requirements
of the products, and any relevant regulations.
If we are called out to a fault, which is subsequently identified as being an installation fault, we will
make a charge, it is important that the routine checks are completed before calling us out, as many
issues can be simply diagnosed and resolved.
A charge will be made where a call under the terms of the guarantee has been booked and a failure
was not product related, or an engineer arrives and is not able to gain access.
We make no guarantees as to response time for repairs.
We will endeavour to achieve the most timely response possible but while we indicate an average
response time, this should not be taken as a guarantee.
The guarantee applies to a repair or replacement (at our discretion) of the product subject to the
conditions above, and DOES NOT cover compensation for the loss of the product or consequential
loss of any kind.
This guarantee does not apply to the repair or replacement of pressure relief devices, descaling of the
unit or damage caused by scale formation, or faults with isolating switches, electrical cable, fuses
and/or circuit breakers.
This guarantee does not affect your statutory rights.
(A4 Leaflet No: 571-2278-01g)
Full details of terms and conditions are available on request from:-
NEWCOMBE HOUSE, NEWCOMBE WAY, ORTON SOUTHGATE, PETERBOROUGH PE2 6SE
TEL: +44 (0) 1733 456789 / FAX: +44 (0) 1733 319610
REDRING XPELAIR GROUP LIMITED
Website: www.redring.co.uk
 Loading...