

Redring 570 User Manual
570
Pumped Electric Shower
Installation instructions & User guide
IMPORTANT: This booklet should be given to the customer after installation and demonstration.
WARNING: Under no circumstances should this unit be connected to the mains cold water supply.
Thank you for choosing a quality 'Redring'
product manufactured in Peterborough, England.
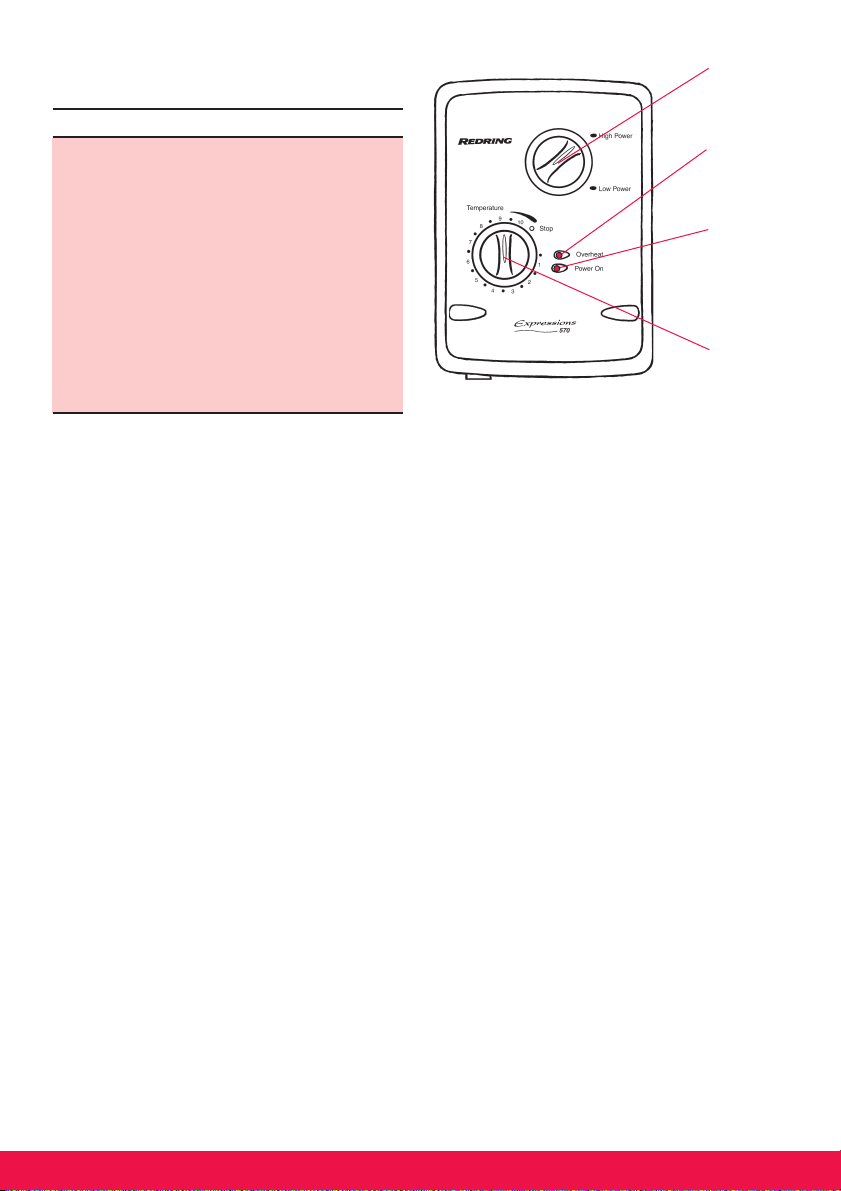
Diagram 1
Knob 'A'
CONTENTS Page
Information for the user
Important Safety Instructions 2
How to use your 'Redring' shower 2
How your 'Redring' shower works 3
How to maintain your 'Redring' shower 4
What to do if things go wrong 4
Additional accessories 9
Information for the installer
Fixing the shower to the wall 6
Plumbing 7
Electrical 8
Guarantee 12
IMPORTANT SAFETY
INSTRUCTIONS
1. The Redring Expressions 570 pumped
electric shower is designed to heat and
boost the flow of stored domestic cold
water, which is gravity fed from a static
cold water cistern.
Under no circumstances should this unit
be connected directly to the mains cold
water supply.
2. The cold water cistern should have a
minimum capacity of 114 Litres (25 gallons).
There must be a minimum head of water of
8.0 cm (3") and a maximum head of 10
Metres (33ft) between the bottom of the cold
water cistern and the top of the shower unit.
Under no circumstances should any of
the pipework supplying the shower unit
rise above the level of the bottom of the
cold water cistern.
3. WARNING! DO NOT SWITCH THE
SHOWER ON IF YOU SUSPECT IT OF
BEING FROZEN. WAIT UNTIL YOU ARE
SURE IT HAS THAWED OUT.
Overheat Light
Power On Light
Knob 'B'
HOW TO USE YOUR 'REDRING'
SHOWER
1. Ensure the electricity and water supplies are
turned on to the unit.
2. Your shower has 2 power settings selected
by turning knob 'A'. The most popular setting
is 'HIGH' indicated by '
There is also a 'LOW' power option indicated
by '
low power'. (See note 7).
•
For this example turn knob 'A' to
'
high power'.
•
3. To start the shower turn knob 'B'
anti-clockwise. Water will start flowing at
around 15º knob rotation (position 10 on the
temperature scale) and the motor will switch
on at around 30º (position 9 on the
temperature scale). The 'power on' light will
illuminate at this stage.
4. Continue turning knob 'B' anti-clockwise
until the required temperature of water is
achieved, allowing time for the temperature of
the water to stabilise.
Note: It is advisable to test the temperature
of the water with your hand before stepping
under the showerhead.
5. If the water is too hot increase the flow of
water by turning knob 'B' anti-clockwise
to a lower number on the temperature scale.
6. If the water is too cold decrease the flow of
water by turning knob 'B' clockwise
to a higher number on the temperature scale.
7. The '
low power' setting of knob 'A'
•
reduces the power giving a cooler shower or
high power'.
•
2
the option of reduced water flow. This option
is mainly for summer usage and if this is used
then knob 'B' must be re-adjusted.
8. When you have finished showering turn knob
'B' fully clockwise to the '
The motor will switch off and water will stop
flowing. The 'POWER ON' light will also
switch off.
9. Switch off the electricity at the ceiling switch
or local isolator.
Diagram 2
10. During normal operation if an overheated
water temperature is sensed by the shower
the thermal cut-out will switch off the power
to the heating elements. The 'overheat' light
will illuminate to provide a visual indication that
this has taken place. Water will continue to
flow and as the water temperature falls the
heating elements will be switched back on. If
the 'overheat' light continues to cycle turn
knob 'B' anti-clockwise to a lower number on
the temperature scale and check that the
handset does not require de-scaling (see
page 4). If the 'overheat' light still continues
to cycle turn knob 'A' to the '
setting (knob 'B' will need adjusting).
If the shower is operated after it has recently
been used the 'overheat' light may illuminate
for a few seconds. This indicates there is still
some hot water left in the shower. Either, wait
a few moments for the light to go out or turn
Stop' position.
•
low power'
•
knob 'B' anti-clockwise to a lower number on
the temperature scale.
WARNING! DO NOT SWITCH THE
SHOWER ON IF YOU SUSPECT IT OF
BEING FROZEN. WAIT UNTIL YOU ARE
SURE IT HAS THAWED OUT.
HOW YOUR 'REDRING' SHOWER
WORKS
Your Redring shower is designed for
convenience, economy and safety of use.
1. Water is heated instantaneously as it flows
over the heating elements in the copper
cylinder assembly.
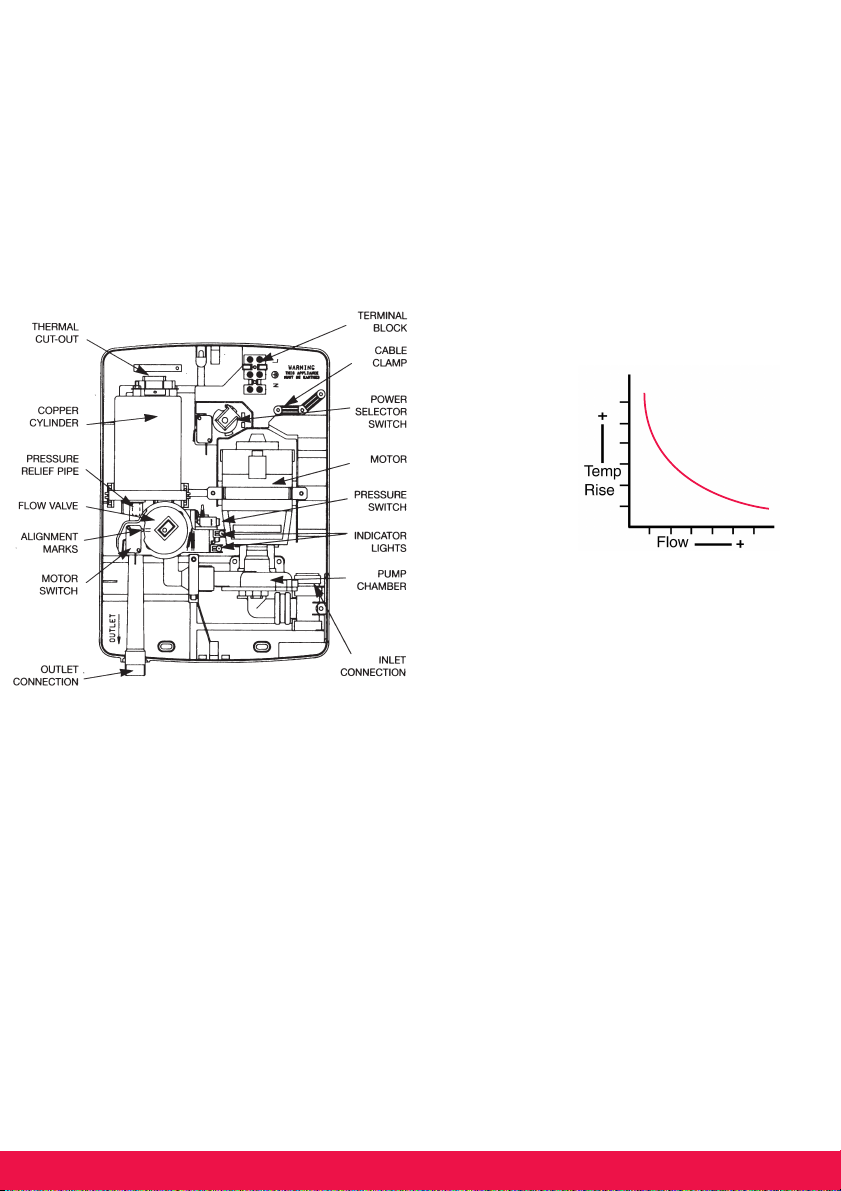
2. The required
water temperature
is achieved
by adjusting the
rate of water
flow. Diagram 3
shows the
principle
involved in
relating
temperature rise to flow rate. The higher the
water flow the lower the temperature rise and
vice versa. The temperature of the water
supplied from the cold water storage cistern
can vary considerably throughout the year
from as low as 5º to as high as 30ºC. This
means that in the winter, the flow rate will be
less than in the summer to achieve the same
outlet temperature. In summer the '
power' setting may give adequate hot water.
3. Your shower incorporates a pump which
boosts the incoming water pressure to a level
more suitable for showering. The motor is
controlled by a switch connected to knob 'B'.
4. The heaters are only switched on when
sufficient water is flowing. This will happen
when the motor is switched on, and is done
automatically with a switch which works on
water pressure.
5. The water is turned on and off by a tap that is
built into the shower.
6. If the water supply falls below a set limit, the
pressure switch will operate and switch off the
power to the elements.
7. As a further safeguard, a thermal cut-out
switches the power off if the water
Diagram 3
low
•
3
temperature climbs above a set limit and the
'overheat' light will come on. This cut-out
which gives an audible click, may also
operate due to residual heat when the shower
is switched off. It will reset itself if cold water
is run through the shower for 10 to 20
seconds and the 'overheat' light will go out.
8. A pressure relief device is fitted to safeguard
against extreme abuse conditions.
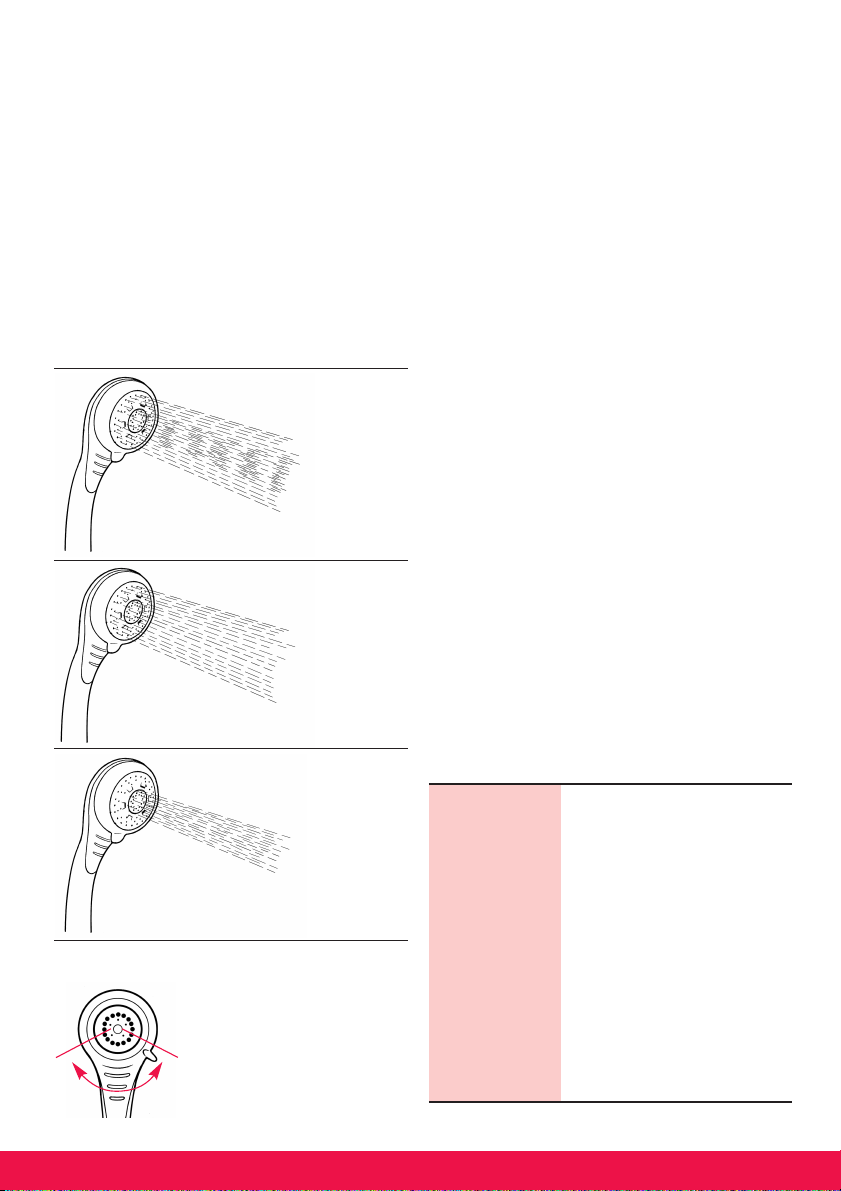
9. There are three defined plate spray settings
adjustable by rotating the spray plate (see
diagram 4). If desired many combinations
between the 3 can be achieved.
Diagram 4
a)
b)
c)
Diagram 5
The spray head rotates
through approximately 140
IN ORDER TO MAINTAIN THE
PERFORMANCE OF YOUR
SHOWER YOU MUST CLEAN
THE SHOWERHEAD.
'CASCADE'
(inner/outer)
'SURF'
(outer spray
only)
'SPORT'
(inner spray
only)
o
HOW TO MAINTAIN YOUR
'REDRING' SHOWER
All water contains particles of lime which build up
in the showerhead and unit reducing the
performance. It is therefore important to clean the
showerhead by regularly dipping it in a suitable
de-scaling solution. The frequency of this will vary
from weekly to quarterly.
Check the srayplate is then free to rotate to give
the three setting. In some winter conditions,
when incoming water from the cold water storage
cistern is particularly cold it may be necessary to
select the inner or outer spray pattern only. This
will ensure correct operation of the shower with a
slightly lower water flow rate.
NOTE:
After use it is normal for some water to drip from
the shower head for a few moments.
Cleaning
It is recommended that the shower unit and
accessories are cleaned using a soft cloth.
DO NOT use powerful abrasive or solvent
cleaning fluids. It is advisable to switch off the
shower at the isolating switch to avoid the
shower accidently switching on.
WHAT TO DO IF THINGS GO
WRONG
Self Help
If the performance of the shower does deteriorate
in service make the following checks before
calling out the contractor. Any one of these
simple adjustments could restore the
performance.
a) Water too
HOT
Increase water flow by
adjusting the temperature
control (knob B) anti-clockwise
to a lower number on the
temperature scale.
Clean the showerhead.
Switch power to '
power' setting .
Select outer or combination
spray pattern.
Increase pressure of water
supply e.g. fully open service
valve.
Check hose is not kinked
restricting the water flow.
low
•
4
 Loading...