

REDRING EXPRESSIONS 550S
SMART TECHNOLOGY
ELECTRIC SHOWER
Installation and User Guide
IMPORTANT:
This booklet should be left with the user after
installation and demonstration

changes caused by water pressure fluctuations.
CONTENTS
Section Page
Introduction _ _ _ _ _ _ _ _ _ _ _ _ _ _ _ _ _ _ _ _ _ _ _ _ _ _ _ _ _ _ _ _ _ _ _ _ _ _ _ _ _ 2
Important Safety Information _ _ _ _ _ _ _ _ _ _ _ _ _ _ _ _ _ _ _ _ _ _ _ _ _ _ _ _ _ _ _ _ 2
How to use your Expressions 550S Shower (Detailed) _ _ _ _ _ _ _ _ _ _ _ _ _ _ _ _ _ _ _ _ 3
How your Expressions 550S Shower Works _ _ _ _ _ _ _ _ _ _ _ _ _ _ _ _ _ _ _ _ _ _ _ _ _ _ 4
How to maintain your Expressions 550S Shower _ _ _ _ _ _ _ _ _ _ _ _ _ _ _ _ _ _ _ _ _ _ _ 5
What to do if things go wrong (1) Self Help _ _ _ _ _ _ _ _ _ _ _ _ _ _ _ _ _ _ _ _ _ _ _ _ _ 5
What to do if things go wrong (2) Professional Service _ _ _ _ _ _ _ _ _ _ _ _ _ _ _ _ _ _ _ _ 6
Redring After Sales Service _ _ _ _ _ _ _ _ _ _ _ _ _ _ _ _ _ _ _ _ _ _ _ _ _ _ _ _ _ _ _ _ _ _ 6
How to install your Expressions 550S Shower _ _ _ _ _ _ _ _ _ _ _ _ _ _ _ _ _ _ _ _ _ _ _ _ 7
Additional Accessories and Spare Parts _ _ _ _ _ _ _ _ _ _ _ _ _ _ _ _ _ _ _ _ _ _ _ _ _ _ _ _ 10
Guarantee and Contact Details _ _ _ _ _ _ _ _ _ _ _ _ _ _ _ _ _ _ _ _ _ _ _ _ _ _ _ _ _ _ _ _ 11
How to use your Expressions 550S Shower (Summary) _ _ _ _ _ _ _ _ _ _ _ _ _ _ _ _ _ _ _ _ 12
INTRODUCTION
Thank you for purchasing a quality Redring Expressions 550S Shower manufactured in England.
To enjoy your new shower at its best, please take time to read this manual thoroughly, and having
done so, keep it handy for future reference.
The Redring Expressions 550S is an electric shower incorporating our “Smart Technology” with
“Set and Forget” and “Smart Flow” functions, a push-button start/stop power selection facility which
starts the shower at a pre-set power and flow rate reducing the amount of adjustment required.
Your shower is designed to stabilise temperature
These can result from toilets being flushed or taps being turned on and off.
When this happens your showering temperature will be held within a controlled band, provided that
the minimum pressure required by the shower is maintained (see “Effect of Other Water Devices”).
If you experience any difficulty with the installation or operation of your new
shower, then please refer to the “What to do if things go wrong” section in this
manual before contacting us.
IMPORTANT SAFETY INFORMATION
1. Your shower has been designed for convenience, economy and safety of use, provided that it is
installed, used and maintained in good working order and in accordance with our instructions and
recommendations.
2. All wiring and installation must be supervised by a suitably qualified person.
3. THIS APPLIANCE MUST BE EARTHED.
4. The installation must be in accordance with the current edition of BS.7671 (the “IEE Wiring
Regulations”) and “Part P” of the “Building Regulations” in force at the time of installation.
Installations outside the United Kingdom must also conform to any local regulations in effect.
This appliance is intended to be permanently connected to the fixed electrical wiring of the mains
supply with its own dedicated supply.
5. This appliance must NOT be fitted where it may be subjected to freezing conditions
6. DO NOT switch the appliance on if you suspect it of being frozen.
Wait until you are sure it has thawed out.
7. DO NOT fit any sort of tap or control on the appliance outlet. The appliance is designed to have
an open outlet and should only be used with “Redring” recommended fittings.
8. Take care to avoid restricting the outlet of the pressure relief device. If water leaks from the
pressure relief device, maintenance will be required before the appliance can be safely used.
9. Isolate the mains electrical and water supply before removing the front cover of the appliance.
2
1. Ensure the electricity and water are turned on to the unit.
HOW TO USE YOUR EXPRESSIONS 550S SHOWER (DETAILED)
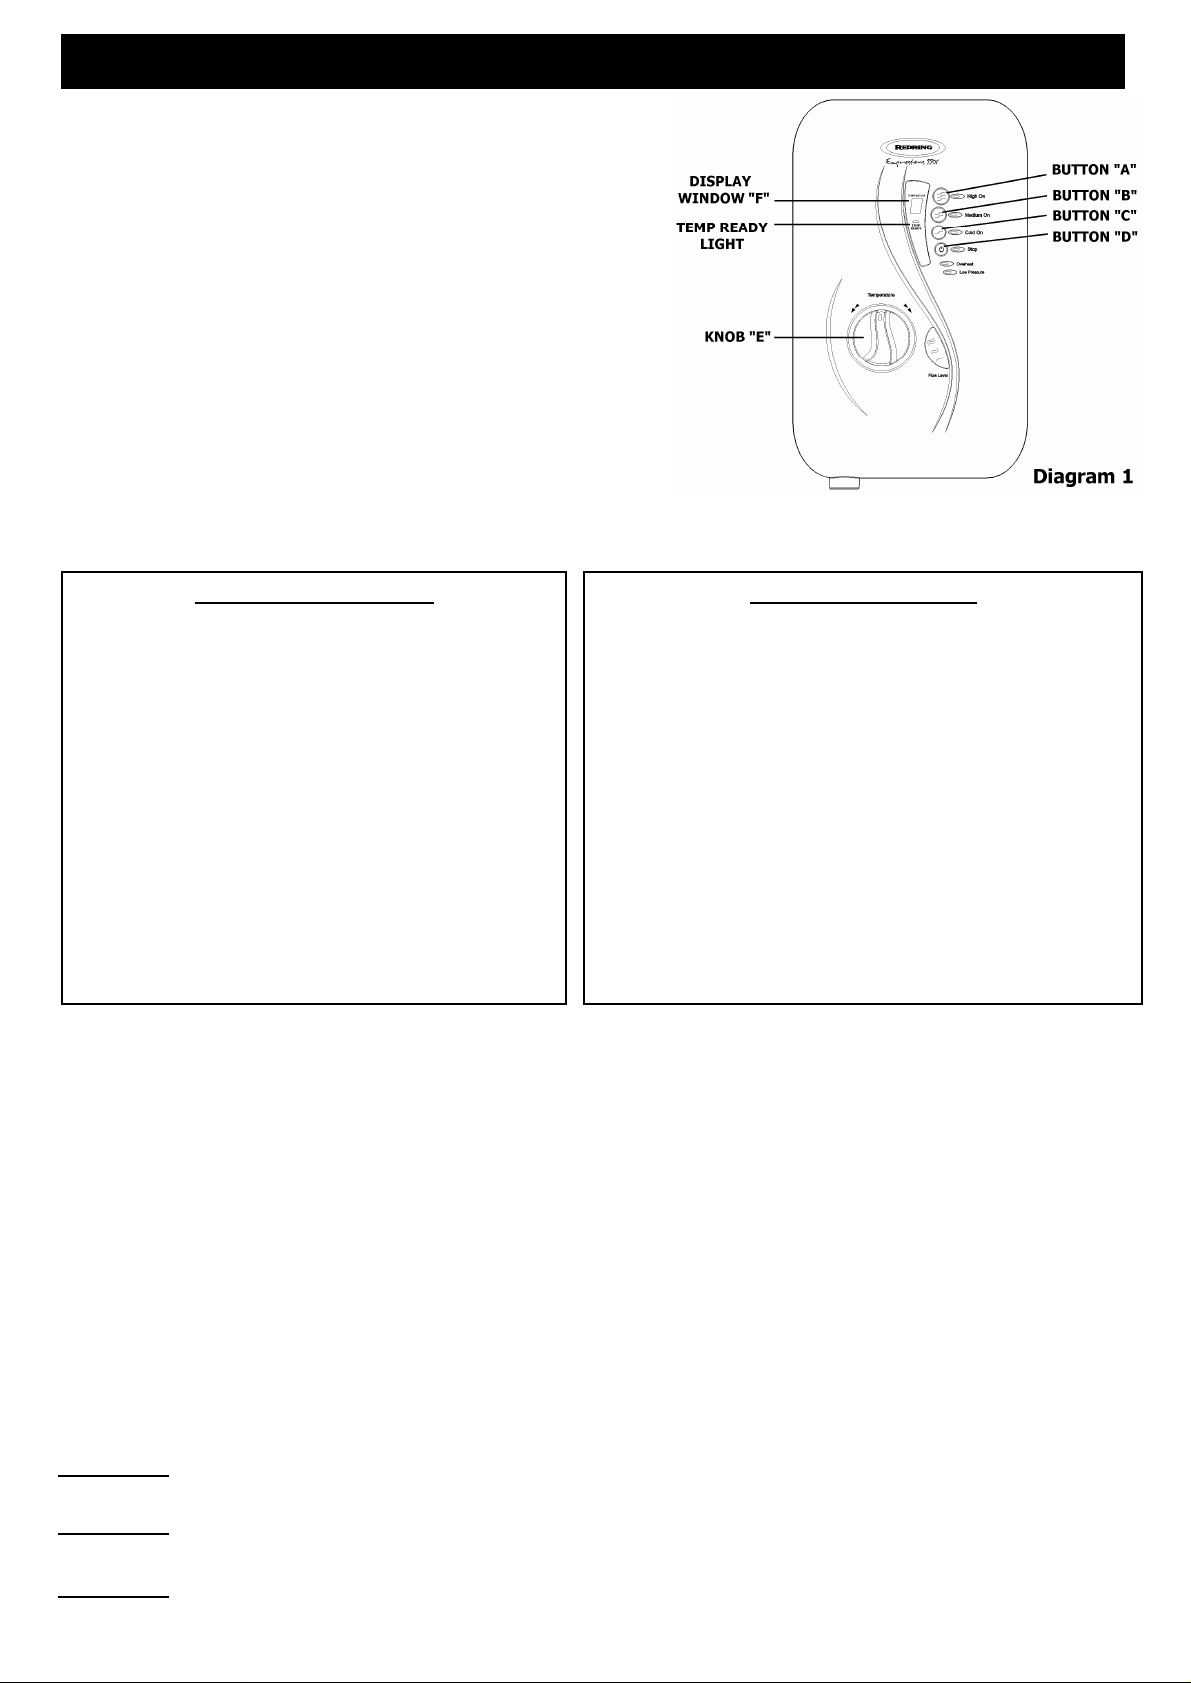
2. Your shower can be turned on by pressing either
Button “A”, Button “B” or Button “C” (see diagram 1).
Button “A” - Starts shower on “High” power.
Button “B” - Starts shower on “Medium” power.
Button “C” - Starts shower on “Cold”.
Once pressed, a light will illuminate next to the button
confirming that power selection has been made.
Knob “E” controls the temperature of the water, and
For this example turn Knob “E” to “12 o’clock”.
3. Press Button “A” and the water will flow. A digit will be
displayed in Window “F” relating to the showering temperature.
“1” is the coolest, whilst “9” is the hottest.
As a guide digit “6” corresponds to a normal showering temperature.
4. Allow about 20 seconds for the temperature of the water to stabilise,
when the water has reached a steady temperature the “Temp Ready” light will illuminate.
IF WATER IS TOO COLD
Turn Knob “E” anti-clockwise in the direction of
the “red arrows” to “11 o’clock”.
The “Temp Ready” light may go out.
Wait 20 seconds after each adjustment for the
water temperature to stabilise, and the
“Temp Ready” light to come back on.
The number in Window “F” should increase by one
digit to reflect the new water temperature if not
re-adjust Knob “E” in smaller increments and
continue turning anti-clockwise until you get the
water temperature of your liking.
If after turning fully anti- clockwise water is still too
cold, set shower pattern on shower handset to outer
or inner pattern only.
Turn Knob “E” clockwise in the direction of the
“blue arrows” to “1 o’clock”.
The “Temp Ready” light may go out.
Wait 20 seconds after each adjustment for the water
temperature to stabilise, and the “Temp Ready” light to
come back on.
The number in Window “F” should decrease by one digit to
reflect the new water temperature if not re-adjust Knob “E”
in smaller increments and continue turning clockwise until
you get the water temperature of your liking.
If after turning fully clockwise, water is still too hot, press
Button “B” (medium) and re-adjust Knob “E” to give
desired temperature.
Water flow will be reduced on this setting.
IF WATER IS TOO HOT
5. Once a temperature setting to your liking has been achieved, Knob “E” will rarely need adjusting.
You must however take into account required adjustments for variations of incoming mains water temperature
between summer and winter (see “Effect of Seasonal Incoming Water Temperature Changes” page 4).
6. When you have finished showering, press button “D” only.
Water will continue to flow for up to 7 seconds before switching off and the “Stop” light will flash.
This reduces the temperature of the water in the tank for the next user.
Switch off the electricity at the ceiling switch or local isolator.
7. Turning the shower on by pressing Button “B” reduces the power used by the shower giving a cooler shower or
the option of reduced water flow.
This option is mainly used for summer usage and if this is used then Knob “E” must be re-adjusted.
8. Turning the shower on by pressing Button “C” will supply water without any heating.
Please note that the “Temp Ready” light will NOT illuminate on this setting.
9. The “Flow Level” indicators provide an indication of the actual flow rate at any given moment.
Three indicators show maximum, half and minimum flow rates.
10. Your shower is designed to stabilise temperature changes caused by water pressure fluctuations
(see “Effect of Other Water Devices on Incoming Water Supply” see page 4).
WARNING: DO NOT SWITCH THE SHOWER ON IF YOU SUSPECT IT OF BEING FROZEN.
WAIT UNTIL YOU ARE SURE IT HAS THAWED OUT.
WARNING: DO NOT OPERATE THE SHOWER IF WATER LEAKS FROM THE PRESSURE RELIEF VALVE.
MAINTENANCE IS REQUIRED BEFORE THE SHOWER CAN BE SAFELY USED.
WARNING: CONSIDERATION SHOULD BE GIVEN TO SUPERVISING THE YOUNG, ELDERLY AND
THE INFIRM WHILST THEY USE THIS SHOWER.
3
Your shower requires a minimum operating pressure of 69kPa (0.7 bar, 10 psi).
ill turn off the power to the heating elements, resulting in a cold shower.
HOW YOUR EXPRESSIONS 550S SHOWER WORKS
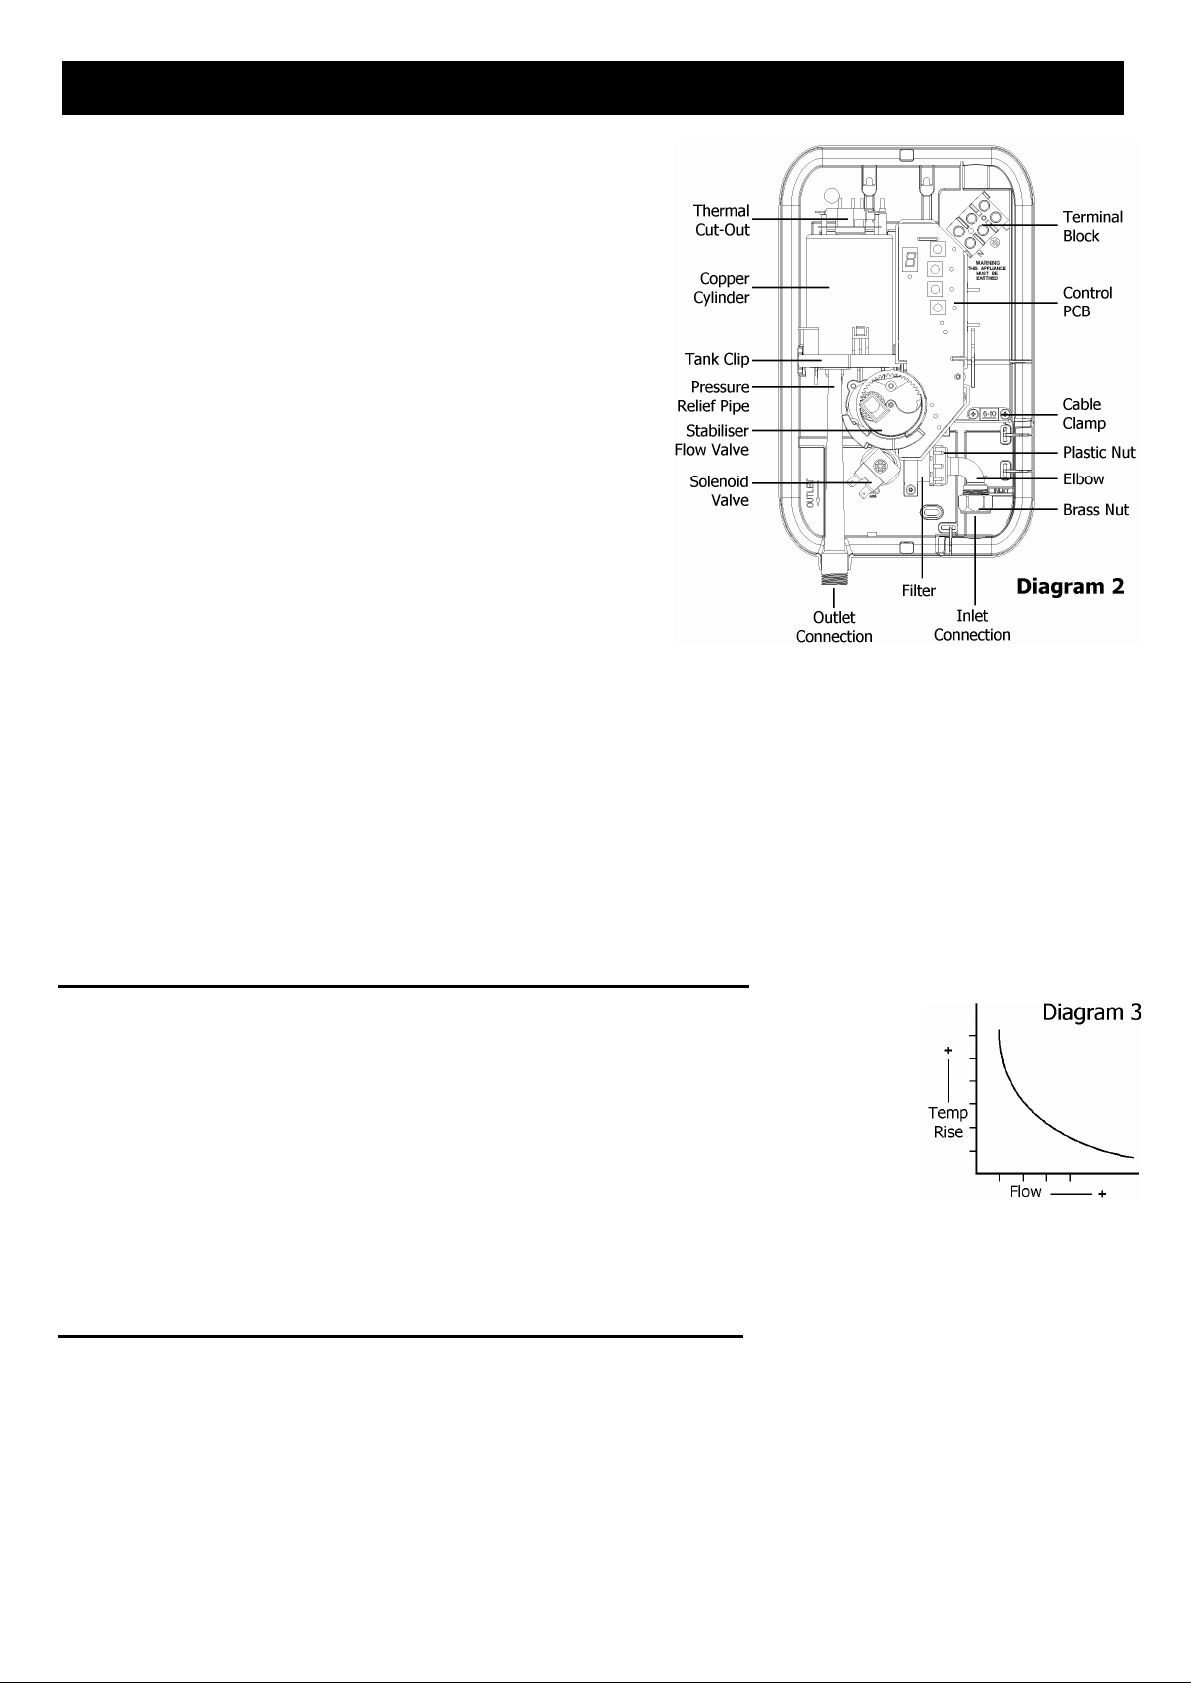
1. Water is heated instantaneously as it flows over the
heating elements in the copper cylinder (diagram 2).
2. The heaters are only switched on when sufficient
water is flowing.
This is done automatically with a switch which works
on water pressure and is indicated by the “High” or
“Medium” light illuminating, depending on whether
Button “A” or “B” has been pressed.
3. The water is turned on and off by the solenoid valve
built into the shower. This is switched on by
pressing Button “A”, “B” or “C”.
4. The flow of water is automatically held at the level
set by the user even though the supply pressure
may vary (see “Effect of Other Water Devices on
Incoming Water Supply”).
5. If the water supply falls below a set limit, the
pressure switch will operate and switch off the
power to the elements. This is indicated by the “Low Pressure” light illuminating (see “Effect of
Other Water Devices on Incoming Water Supply”).
6. As a further safeguard, a thermal cut-out switches the power off if the water temperature
climbs above the set limit and the “Overheat” light will illuminate.
This cut-out, which gives an audible click, may also operate due to residual heat when the shower
is switched off. It will reset itself if water is run through the shower for 10 to 20 seconds, and
the “Overheat” light will go out.
7. The pressure relief device is to safeguard against abnormal pressure conditions.
Effect of Seasonal Incoming Water Temperature Changes
The required water temperature is achieved by adjusting the rate of water flow.
Diagram 3 shows the principle involved in relating temperature rise to flow rate.
The higher the water rate the lower the temperature and vice versa.
The temperature of the water supplied from the mains can vary considerably
throughout the year from 5 to 20°C.
This means that in the winter, flow rate will be less than in the summer to
achieve the same outlet temperature.
In summer the “Medium” power setting may give adequate hot water.
In some winter conditions, it may be necessary to select the inner or outer spray pattern only of
your shower handset. This will ensure correct operation of the shower with a slightly lower flow rate.
Effect of Other Water Devices on Incoming Water Supply
Your shower is designed to stabilise temperature changes caused by water pressure
fluctuations. These can result from toilets being flushed or taps being turned on and off.
When this happens your showering temperature will be held within a controlled band, provided that
the minimum pressure required by the shower is maintained.
At pressures above 69kPa (0.7 bar, 10 psi) it will minimise temperature fluctuations as detailed
above. If the water pressure falls below 69kPa (0.7 bar, 10 psi) it is likely that the pressure switch
w
This will be indicated by the “Low Pressure” light illuminating.
4
 Loading...