

red lion RL-SWJ Series Owner's Manual
www.RedLionProducts.com
ENGLISHEN
SHALLOW WELL JET PUMP
RL-SWJ Series
Owner’s Manual
THIS PUMP IS DUAL VOLTAGE AND FACTORY SET FOR 230 VOLTS.
SEE VOLTAGE SETTING INSTRUCTIONS TO SET FOR 115 VOLTS.
Table of Contents
Before Getting Started .................................................................2
Installation Checklist .................................................................... 3
Introduction ...................................................................................4
Voltage Setting Instructions ........................................................4
Materials and Tools Needed ......................................................... 5
Important Information ................................................................. 5
Quick Installation Guide ............................................................... 6
Detailed Installation Instructions .............................................7-8
Typical Installations ......................................................................9
Pump to Tank Installation ...........................................................10
Wiring Instructions .......................................................................11
Priming the Pump ....................................................................... 12
Maintenance ............................................................................ 13-14
Troubleshooting ...........................................................................14
Replacement Parts ......................................................................15
Limited Warranty ......................................................................... 16
BEFORE GETTING STARTED
Read and follow safety instructions. Refer to product data plate(s) for additional operating instructions and specifications.
This is the safety alert symbol. When you see this symbol on your pump or in this manual, look for one of the following signal words and be
alert to the potential for personal injury or property damage if ignored:
!
s DANGER
warns about hazards that will cause serious personal injury, death or major property damage if ignored.
!
s WARNING
!
s CAUTION
!
s NOTICE
in this manual and on pump.
BEFORE OPERATING OR INSTALLING THIS PUMP, READ THIS MANUAL AND FOLLOW ALL SAFETY RULES AND OPERATING INSTRUCTIONS.
!
s WARNING
!
s WARNING
National Electrical Code (NEC) and with any local codes and ordinances. Employ a licensed electrician.
warns about hazards that can cause serious personal injury, death or major property damage if ignored.
warns about hazards that will or can cause minor personal injury or major property damage if ignored.
indicates special instructions which are important but not related to hazards. Carefully read and follow all safety instructions
WARNING
READ AND FOLLOW ALL SAFETY INSTRUCTIONS.
ELECTRICAL PRECAUTIONS - All wiring, electrical connections, and system grounding must comply with the
DANGER
!
s WARNING
!
s NOTICE
!
s WARNING
• Have an electrician provide electrical power to motor.
• We recommend that a separate circuit be lead from the home electrical distribution panel, properly protected with a fuse
or a circuit breaker.
• A ground fault interrupter (GFI) protected circuit is also recommended for use with any electrical device operating near water.
• For recommended cable size see Table 2.
• Motor must be grounded and terminal cover in place to reduce electrical shock hazard.
• Keep motor operating area as dry as possible.
• Always disconnect power before servicing.
• Not investigated for use in swimming pool areas.
!
s WARNING
This pump is capable of producing high pressure. Installing a 75 psi pressure relief valve is highly recommended.
FOR DUAL VOLTAGE MOTORS (115/230 V) - Voltage change instructions are located in this manual.
The motor voltage is factory set at 230 V.
RISK OF ELECTRIC SHOCK
75 PSI PRESSURE RELIEF VALVE RECOMMENDED
2

INSTALLATION CHECKLIST
This checklist has been provided for your convenience. If a step was missed, ensure power has been shut o at the breaker and completely relieve pressure
from the water system before continuing to work on the system.
!
s WARNING
This pump is capable of producing high pressure. Installing a 75 psi pressure relief valve is highly recommended.
Model #: ________________
Serial #: _________________
Date purchased: ____________
Location purchased: ________________________________________________
KEEP THIS MANUAL ACCESSIBLE FOR FUTURE REFERENCE.
75 PSI PRESSURE RELIEF VALVE RECOMMENDED
✓
Description
Voltage setting on pump verified and set to match voltage on the circuit breaker
Foot valve (for drilled wells) or check valve (for driven well) installed
Wiring and electrical connected by licensed electrician
Pump intake connected to piping in well
Well seal in place
Pump discharge connected to tank and service line
Tank pressure checked and charged to 28 psi
All joints sealed with PVC cement, PTFE tape or heat and clamps
All connections checked for leaks
Pressure relief valve installed
All other accessories installed: drain cock, shut-o valve, pressure gauge (optional)
Breaker turned on
Pump primed
Model number and serial number recorded in this manual
Receipt stapled to manual
3
INTRODUCTION
VOLTAGE SETTING INSTRUCTIONS
The shallow well jet pump is ideal for the supply of fresh water to rural
homes, farms, and cabins. This pump is suitable for installations where the
vertical distance from the pump to the water level does not exceed 25 ft
(7.6 m), including drawdown (less at high altitudes). In oset installation,
friction losses in the suction pipe must be taken into consideration
(refer to Table 1, Friction Loss).
This instruction sheet provides you with the information required to
safely own and operate your product. Retain these instructions for
future reference.
The product you have purchased is of the highest quality workmanship and
material, and has been engineered to give you long and reliable service.
This product has been carefully tested, inspected, and packaged to ensure
safe delivery and operation. Please examine your item(s) carefully to
ensure that no damage occurred during shipment. If damage has occurred,
please contact the place of purchase. They will assist you in replacement or
repair, if required.
READ THESE INSTRUCTIONS CAREFULLY BEFORE ATTEMPTING TO INSTALL,
OPERATE OR SERVICE YOUR PRODUCT. KNOW THE PRODUCT’S APPLICATION,
LIMITATIONS, AND POTENTIAL HAZARDS. PROTECT YOURSELF AND OTHERS
BY OBSERVING ALL SAFETY INFORMATION. FAILURE TO COMPLY WITH
THESE INSTRUCTIONS COULD RESULT IN PERSONAL INJURY AND/OR
PROPERTY DAMAGE!
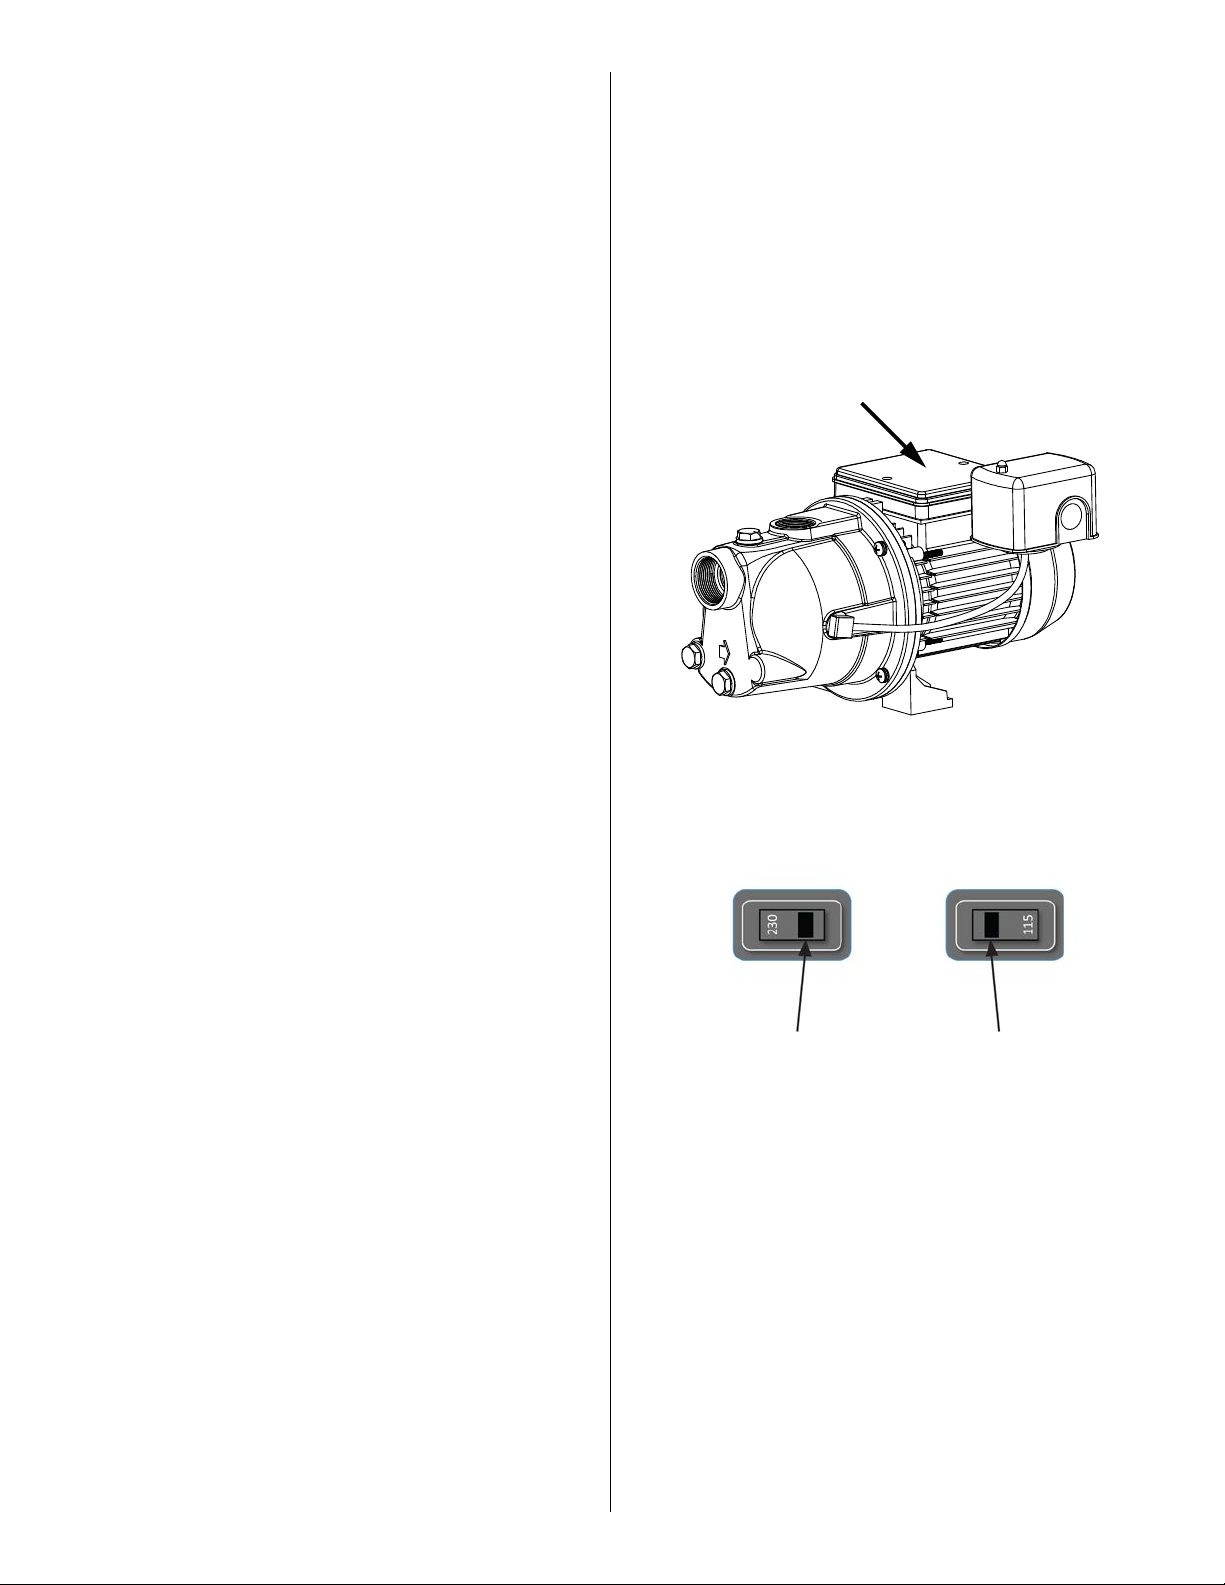
To change the pump voltage from the factory setting of 230 Volts,
a qualified electrician should:
1. Disconnect power supply to pump
2. Remove the cover from the motor terminal box
3. Slide the voltage switch from 230 V to 115 V, as shown in Figure 2
4. Reassemble the terminal box cover
Motor Terminal Box Cover
Figure 1
The motor's switch
is set for 230 V:
Place screwdriver where indicated and slide left or right.
Figure 2 - VOLTAGE SWITCH
The motor's switch
is set for 115 V:
4

MATERIALS AND TOOLS NEEDED
IMPORTANT INFORMATION
MATERIALS NEEDED
Pipe Joints
• One roll of PTFE tape
• One can PVC primer
• One can PVC cement
• Steel clamps (optional)
Drilled Wells (driven well materials are listed separately)
• One 1-1/4" foot valve (not needed for driven wells)
• One 1-1/4" PVC pipe (to attach to foot valve – needed for
shallow well only)
• Rigid 1-1/4" PVC pipe and couplings to reach from bottom of well to pump
• One 1-1/4" male PVC adapter (for discharge opening)
• Well seal with vent tube
• One 1-1/4" PVC 90° elbow (to join piping from well to pump)
• One 1-1/4" male galvanized adapter (for suction opening)
Driven Wells
• Well point (more than one may be needed)
• 1-1/4" galvanized pipe from bottom of well to the top of well plus 1 ft
(30 cm) (if more than one well point is needed, additional piping
and elbows will be needed to join the well points together)
• One 1-1/4" galvanized 90° elbow
• One 1-1/4" galvanized nipple
• One 1-1/4" check valve
• One 1-1/4" male PVC adapter
• One 1-1/4" male galvanized adapter
• 1-1/4" PVC pipe measured from adapter connected to pump to check valve
• Restrictor valve (connected after the elbow on the pump discharge)
• Low pressure cut-o pressure switch (recommended)
Pump to Tank Installation
• One male PVC adapter (attached to tank) – the tank fitting size depends
on the system connect on the tank
• One tank tee – size should be the same as the adapter above
• One 1" PVC elbow
• PVC piping to fit from tank tee to the elbow on the pumps discharge
and to join the service line
• High pressure safety relief valve (attached to the tank tee)
• One 1/2" drain cock (attached to the tank tee)
TOOLS NEEDED
• Round file
• Pipe clamp
• Pipe wrench or crescent wrench
• Slotted screwdriver
• Cross-head screwdriver
• Hacksaw or reciprocating saw
• Heat gun (optional)
JOINING PIPE FITTINGS
Follow the fitting guidelines below for all attachments unless
otherwise specified.
PVC PIPE FITTINGS
When joining two PVC joints together (such as joining an adapter to a PVC
pipe) always use PVC primer to clean both pieces– applying the primer
to the inside of one joint and the outside of the other joint so the primed
areas meet. Select Method 1, 2 or 3 to ax the joints. When tightening PVC,
tighten securely but do not over-tighten or you could break the fitting.
Method 1 – PTFE tape: Wrap PTFE tape tightly around the male
threads. Start wrapping the threads at the end of the pipe, keeping
tension on the tape. Do not let the tape hang over the edge of the
adapter. Wrap in the direction of the threads starting from the end
for the full length of the adapter. Overlap each wrap about 70%.
Method 2 – Using PVC cement: Apply PVC cement to the areas
that were just primed and join the two pieces together. Twist to
the right and back to the left to help imbed the cement between
the pieces.
Method 3 – Using heat and clamps: Add two steel clamps to the
largest fitting before joining the fittings. Heat the largest fitting
with a heat gun (follow all safety instructions in the heat gun
manual). This will shrink the fitting, bonding it to the smaller
joint. Once the joint has cooled down, tighten the clamps with
a screwdriver.
METAL PIPE FITTINGS
Use PTFE tape or thread compound to coat the threadings.
CHECK TO ENSURE THE JOINTS ARE AIRTIGHT.
EVEN A PINHOLE CAN PREVENT PROPER OPERATION OF THE PUMP.
SUCTION AND PRESSURE PIPE
It is recommended that only new, clean 1-1/4" pipe or hose be used. If the
pump is installed any appreciable distance away from the source of water,
the suction pipe should be increased to 1-1/2". Horizontal lengths of pipe
must gradually slope upward from the source of water to the pump to
avoid air pockets in the line. Thread compound should be used on all pipe
joints and connections should be thoroughly tightened. A foot valve or
check valve must be installed and its operation should be checked since
a leak will prevent proper operation of the system. Make sure the foot
valve is located so that it will be submerged at all times. If a sandpoint or
driven well is used, install a check valve next to the pump suction instead
of the foot valve (see Typical Installations Figure 5). All installations must
have a foot valve or a check valve in the suction pipe.
5

QUICK INSTALLATION GUIDE (Replacing an Existing Pump)
This quick installation guide assumes you will be cutting the existing pump free from the plumbing.
More detailed instructions are provided in the Detailed Installation Instructions.
!
s WARNING
DO NOT RUN THE PUMP BEFORE PRIMING IT; THE SEAL AND IMPELLER COULD BE PERMANENTLY DAMAGED
1. Ensure power has been shut o at the breaker
before proceeding.
2. This pump is dual voltage (115/230 V)! Inspect the voltage
wiring on the pump and ensure it matches the voltage on
the breaker before continuing with the installation
(see Voltage Setting Instructions).
3. Completely relieve pressure from the water system before
working on the water system. Open the faucet nearest the
tank and allow the water to drain until the tank is empty.
4. Disconnect wiring from the pressure switch to the
electrical source.
5. Using a hacksaw or reciprocating saw, cut all PVC piping as close
to the old pump as possible at both the suction and discharge
openings. Ensure the pipe from the well and the pipe from the
tank are clean and free of any pipe shavings or pieces as these
could get into the pump and damage the impeller.
6. Set the new pump in place.
7. Seal the threads on the suction opening on the pump with PTFE
tape or thread compound and insert the 1-1/4" male galvanized
adapter into the suction opening. Tighten securely but do not
over-tighten as this could crack the fitting.
9. Seal the threads of the discharge opening on the pump with
PTFE tape or thread compound and insert the 1" male PVC
adapter into the discharge opening. Tighten securely but
do not over-tighten as this could crack the fitting.
10. Attach the 1" PVC pipe from the tank to the 1" male PVC adapter
(additional fitting may need to be added). Check to ensure the
joints are airtight. Even a pinhole can prevent proper operation
of the pump.
11. A pressure gauge is not supplied with the pump. It should be
installed into the 1/8" NPT hole on the front of the casing on the
opposite side of the pressure switch (see Typical Installations
Figures 3, 4, 5, or 6).
12. An electrician should be employed to do the wiring and connect
the electrical service to the pump (see Wiring Instructions).
13. Prime the pump (see Priming Instructions).
14. Verify everything has been completed using the Installation
Checklist provided in this manual.
8. Attach the 1-1/4" PVC pipe from the well to the male adapter
(additional fittings may need to be added). Check to ensure the
joints are airtight. Even a pinhole can prevent proper operation
of the pump.
6

DETAILED INSTALLATION INSTRUCTIONS
!
s WARNING
Before proceeding, ensure power has been shut o at the breaker. If this is replacing an existing pump, completely relieve pressure from the water system
before working on the water system. Open the faucet nearest the tank and allow the water to drain until the tank is empty.
DO NOT RUN THE PUMP BEFORE PRIMING IT; THE SEAL AND IMPELLER COULD BE PERMANENTLY DAMAGED
SHALLOW WELL APPLICATION
(for pumping depths down to 25 ft [7.6 m])
Shallow well installations use only a single pipe connecting the pump to
the water supply. This pump can be used for drilled wells (see Figures 3,
4 or 6) or driven wells (see Figure 5). Drilled wells are holes drilled into
the ground by professional well drillers using a large rig. Driven wells
use well points (also known as sand points), which is a long pointed tube
with a screen that allows water to enter the pipe but keeps out sand and
sediment. The water level in a driven well is fairly high or near ground
level (maximum 30 ft [9.1 m]). Continue with the appropriate shallow
well installation.
DRILLED WELLS (with foot valve)
1. Measure from the bottom of the well to the top of the well and
subtract 5 ft (1.5 m). This is the length of 1-1/4" rigid PVC pipe
and couplings you will need from the bottom of the well to the
first elbow. Cut the pipe and use a round file to smooth the pipe
cutting. Ensure the pipe is clean and free of any pipe shavings or
pieces as these could get into the pump and damage the impeller.
The remainder of the pipe will be used to connect the pump to
the well.
2. Attach the 1-1/4" male PVC adapter to one end of the rigid PVC
pipe and attach the adapter to the foot valve. Check to ensure the
joints are airtight. Even a pinhole can prevent proper operation
of the pump.
5. Attach the end of the pipe securely to a 1-1/4" PVC 90° elbow.
6. Install the pump in a clean, dry, and ventilated location which
provides adequate room for services and protection from
freezing temperatures. It should be bolted to a good foundation,
preferably concrete, and provided with adequate drainage.
Locating the pump as close as possible to the water source
reduces the friction in the suction pipe and will provide
maximum performance.
7. A pressure gauge is not supplied with the pump. It should be
installed into the 1/8" NPT hole on the front of the casing on the
opposite side of the pressure switch (see Typical Installations
Figures 3, 4 or 6).
8. Attach a 1-1/4" male galvanized adapter into the suction inlet.
Do not over-tighten as this could crack the fitting.
9. Use the remainder of the PVC pipe from Step 4. Smooth the pipe
cutting using a round file. Ensure the pipe is clean and free of
any pipe shavings or pieces as these could get into the pump and
damage the impeller; connect one end of the pipe to the adapter
attached to the suction inlet. Check thoroughly for any leaks.
All connections and joints must be airtight. A small pinhole leak
can prevent the pump from operating properly.
10. Follow the Pump to Tank Installation procedures.
11. Verify everything has been completed using the Installation
Checklist provided in this manual.
3. Firmly clamp the unfinished end of the pipe with a pipe clamp 1 ft
(30 cm) from the top of the pipe. This will prevent the pipe from
dropping to the bottom of the well. Lower this section into the
well foot valve first.
4. On the end protruding from the well, which is held in place with
the pipe clamp, insert the well seal and have the pipe protrude
1 ft (30 cm) outside of the well seal. If you have measured
correctly, the foot valve will be suspended 4 ft (1.2 m) from the
bottom of the well. This will ensure sand and sediment doesn’t
get drawn into the system. Install a well vent tube in the well cap.
7

DETAILED INSTALLATION INSTRUCTIONS
DRIVEN WELL (with check valve and well point)
1. Drive the well point into the ground according to the instructions
that come with the well point. It must be deep enough to bore
through the water bearing formation below the water table but
should not exceed 25 ft (7.6 m) in depth. An individual well point
may not supply the amount of water needed. Sometimes it is
necessary to use more than one well point to increase the water
supply. The two separate well points can be jointed together
using additional piping and a cross joint (see Figure 5).
2. Plan to have at least 1 ft (30 cm) of pipe protruding from
the ground. The rise pipe should be galvanized pipe in
approximately 5 ft (1.5 m) sections. This makes it easier to hand
drive. Use as much pipe and as many drive couplings as it takes
to both reach the water and account for the 1 ft (30 cm) of pipe
protruding from the ground.
3. Attach a 1-1/4" galvanized elbow onto the pipe protruding
from the ground.
4. Attach a 1-1/4" galvanized nipple to the 1-1/4" galvanized elbow.
5. Attach a 1-1/4" check valve to the 1-1/4" galvanized nipple.
6. Attach a 1-1/4" male PVC adapter to the 1-1/4" check valve.
7. Install the pump in a clean, dry, and ventilated location
which provides adequate room for services and protection
from freezing temperatures. It should be bolted to a good
foundation, preferably concrete, and provided with adequate
drainage. Locating the pump as close as possible to the water
source reduces the friction in the suction pipe and will provide
maximum performance.
8. A pressure gauge is not supplied with the pump. It should be
installed into the 1/8" NPT hole on the front of the casing on the
opposite side of the pressure switch (see Typical Installations
Figure 5).
9. Attach a 1-1/4" male galvanized adapter into the pump suction
inlet. Do not over-tighten as this could crack the fitting. Measure
from this adapter to the check valve that was installed in Step
6. Cut 1-1/4" PVC pipe to this measurement. Using a round file,
smooth the pipe cutting. Ensure the pipe is clean and free of
any pipe shavings or pieces as these could get into the pump
and may damage the impeller. Attach the 1-1/4" PVC pipe to the
adapter and then to the check valve. Check thoroughly for any
leaks. All connections and joints must be airtight. A pinhole
leak can prevent proper operation of the pump.
10. Driven wells water levels may, at times, be too low to pump up.
To prevent damage to the pump, have an electrician replace the
pressure switch with a low pressure cut-o switch.
11. Follow the Pump to Tank Installation procedures.
12. Verify everything has been completed using the Installation
Checklist provided in this manual.
8
TYPICAL INSTALLATIONS
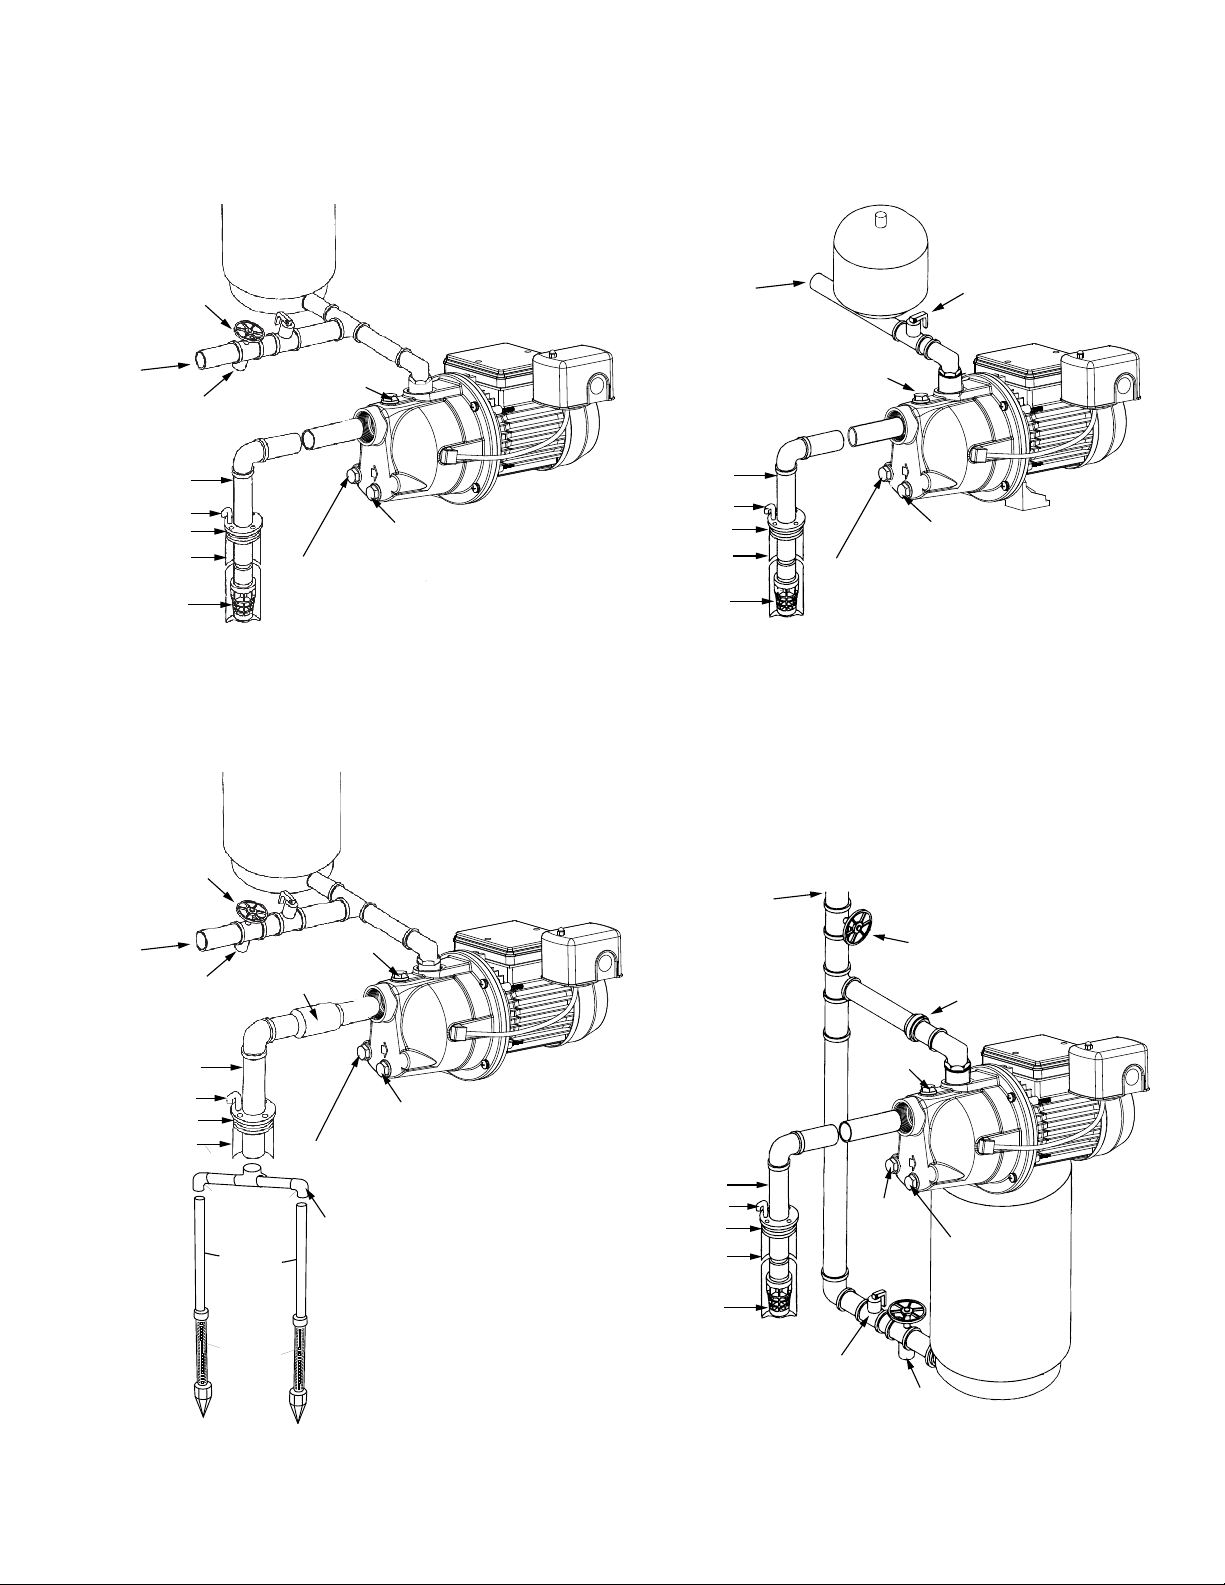
Tank
Relief Valve
Service Line
Drain
Suction Pipe
Vent Pipe
Well Seal
Well
Foot Valve
Figure 3 - SHALLOW WELL
(with foot valve)
Relief valve
Priming Plug
Pressure gauge port (1/8" NPT)
Tank
Drain Plug
Service Line
Suction Pipe
Vent Pipe
Well Seal
Well
Foot Valve
Tank
Priming Plug
Pressure Gauge Port (1/8" NPT)
Figure 4 - SHALLOW WELL, INLINE TANK
(with foot valve)
Service Line
Relief Valve
Drain Plug
Service line
Drain
Suction Pipe
Vent Pipe
Well Seal
Well
Figure 5 - SHALLOW WELL
(with inline check valve)
Inline check valve
1-1/4"
Galvanized Pipe
Well Point
Priming plug
Drain plug
Pressure gauge port (1/8" NPT)
1-1/4" PVC Elbow
Shuto Valve
Priming Plug
Suction Pipe
Vent Pipe
Well Seal
Well
Foot Valve
Pressure
Gauge Port
(1/8" NPT)
Relief Valve
Drain
Figure 6 - SHALLOW WELL, TANK MOUNTED SYSTEM
(with foot valve)
Union Coupling (2 required)
Drain Plug
Tank
9

PUMP TO TANK INSTALLATION
Red Lion® recommends using pre-charged diaphragm tanks. Instructions
for connecting the pump to a diaphragm tank have been provided for
your convenience.
If a non-diaphragm tank is used in the pressure system, an air volume
control must be used to maintain an air cushion in the pressure tank. If
not, air in the tank will gradually be absorbed by water, causing the tank
to water log and the pump to short cycle (turn o and on frequently). This
greatly shortens the life of the motor. An air volume control will provide
the right air/water ratio and prevent water logging. Refer to the pressure
tank owner’s manual for instructions.
NOTE: A check valve should never be installed between the pump
and the tank.
9. Check the tank pre-charge with a tire gauge. It should be equal to
2 psi below the pressure switch cut-in setting (the pressure at which
the pump will start). For this pump that is 30 psi, therefore the
pre-charge pressure should be adjusted to 28 psi. Use a tire pump
or air compressor to charge the tank, if necessary.
10. Replace and tighten the PVC cap on the air valve.
11. See Typical Installations for examples of dierent
pump/tank configurations.
12. Verify everything has been completed using the Installation
Checklist provided in this manual.
Table 1 - FRICTION LOSS FOR PLASTIC PIPE*
Before proceeding, ensure power has been shut o at the breaker. If this
is replacing an existing pump, completely relieve pressure from the water
system before working on the water system. Open the faucet nearest the
tank and allow the water to drain until the tank is empty.
!
s WARNING
75 PSI PRESSURE RELIEF VALVE RECOMMENDED
This pump is capable of producing high pressure. Installing a 75 psi
pressure relief valve is highly recommended.
1. The discharge pipe from the pump to the tank should be as short and
direct as possible and should be the same size as the discharge outlet.
You should have already attached a 1" PVC adapter to the discharge
opening of the pump.
2. Attach a PVC 90° elbow to the adapter.
3. Attach a male PVC adapter to the tank. The tank fitting size depends
on the system connect on the tank.
4. Install a 1" brass tank tee to the tank adapter.
5. Measure the distance from the tank tee to the elbow (or restrictor
valve) on the pump’s discharge and attach 1" PVC piping to fit.
6. Attach accessories to the brass tee such as restrictor valve
(recommended for well point installations), high pressure safety relief
valve (recommended for all installations), and drain cock. Ensure the
high pressure safety relief valve’s location is near the discharge of the
pump, in an area with adequate drainage. Be sure to direct the valve
so that any water flow will not spray toward the pump or any other
electrical devices.
7. Add piping and coupling to join up the service line. The size of the
service line required is governed entirely by the amount of water
needed and the length of the pipe. The pipe selected should be large
enough so that the friction loss (determined from Table 1, Friction
Loss for Plastic Pipe) will never exceed 20 ft (6 m) of head.
8. Remove the PVC cap on the air valve on the tank.
Loss of head in feet due to friction per 100 feet of pipe.
Nominal
Pipe Size
U.S. GPM 3/4" 1" 1-1/4'' 1-1/2'' 2''
4 3.75 1.15 0.30 0.14 –
5 5.66 1.75 0.46 0.22 –
6 7.9 5 2.45 0.65 0.31 –
7 10.60 3.25 0.86 0.41 –
8 13.50 4.1 6 1.10 0.52 –
9 16.80 5.17 1.35 0.65 –
10 20.40 6.31 1.67 0.79 0.23
11 24.40 7.58 1.98 0.95 0.27
12 28.60 8.85 2.33 1.10 0.32
14 38.00 11.80 3.10 1.46 0.43
16 48.60 15.10 3.96 1.87 0.55
18 60.50 18.70 4 .93 2.33 0.69
20 73.50 22.80 6.00 2.83 0.84
Loss of head in meters, due to friction per 100 meters of pipe.
Nominal
Pipe Size
L/Min. 20mm 25mm 32mm 40mm 50mm
15 3.7 1.15 0.30 0 .13 –
20 5.3 1.64 0.4 3 0.1 9 –
25 7.1 2.18 0.56 0.27 –
30 13.5 4.1 3 1.08 0.49 –
35 16.3 5.00 1.31 0.61 –
40 23.5 7. 30 1.90 0.88 0.25
45 28.3 8.74 2.31 1.07 0.29
50 34.2 10.60 2.79 1.32 0.38
55 40.7 12.60 3.32 1.56 0.46
60 48.1 14.90 3 .92 1.85 0.54
65 55.7 17.30 4.45 2.15 0.63
70 63.8 19.70 5.20 2.46 0.73
75 72.2 22.40 5.89 2.78 0.83
*For galvanized pipe, double the figures.
10
WIRING INSTRUCTIONS
!
s WARNING
All wiring, electrical connections, and system grounding must comply with the National Electrical Code (NEC) and with any local codes and ordinances.
Employ a licensed electrician.
!
s WARNING
Before servicing motor-operated equipment, shut o the power at the main electrical panel and disconnect the power supply from motor and accessories.
Use safe working practices during servicing of equipment.
ELECTRICAL PRECAUTIONS
RISK OF ELECTRICAL SHOCK
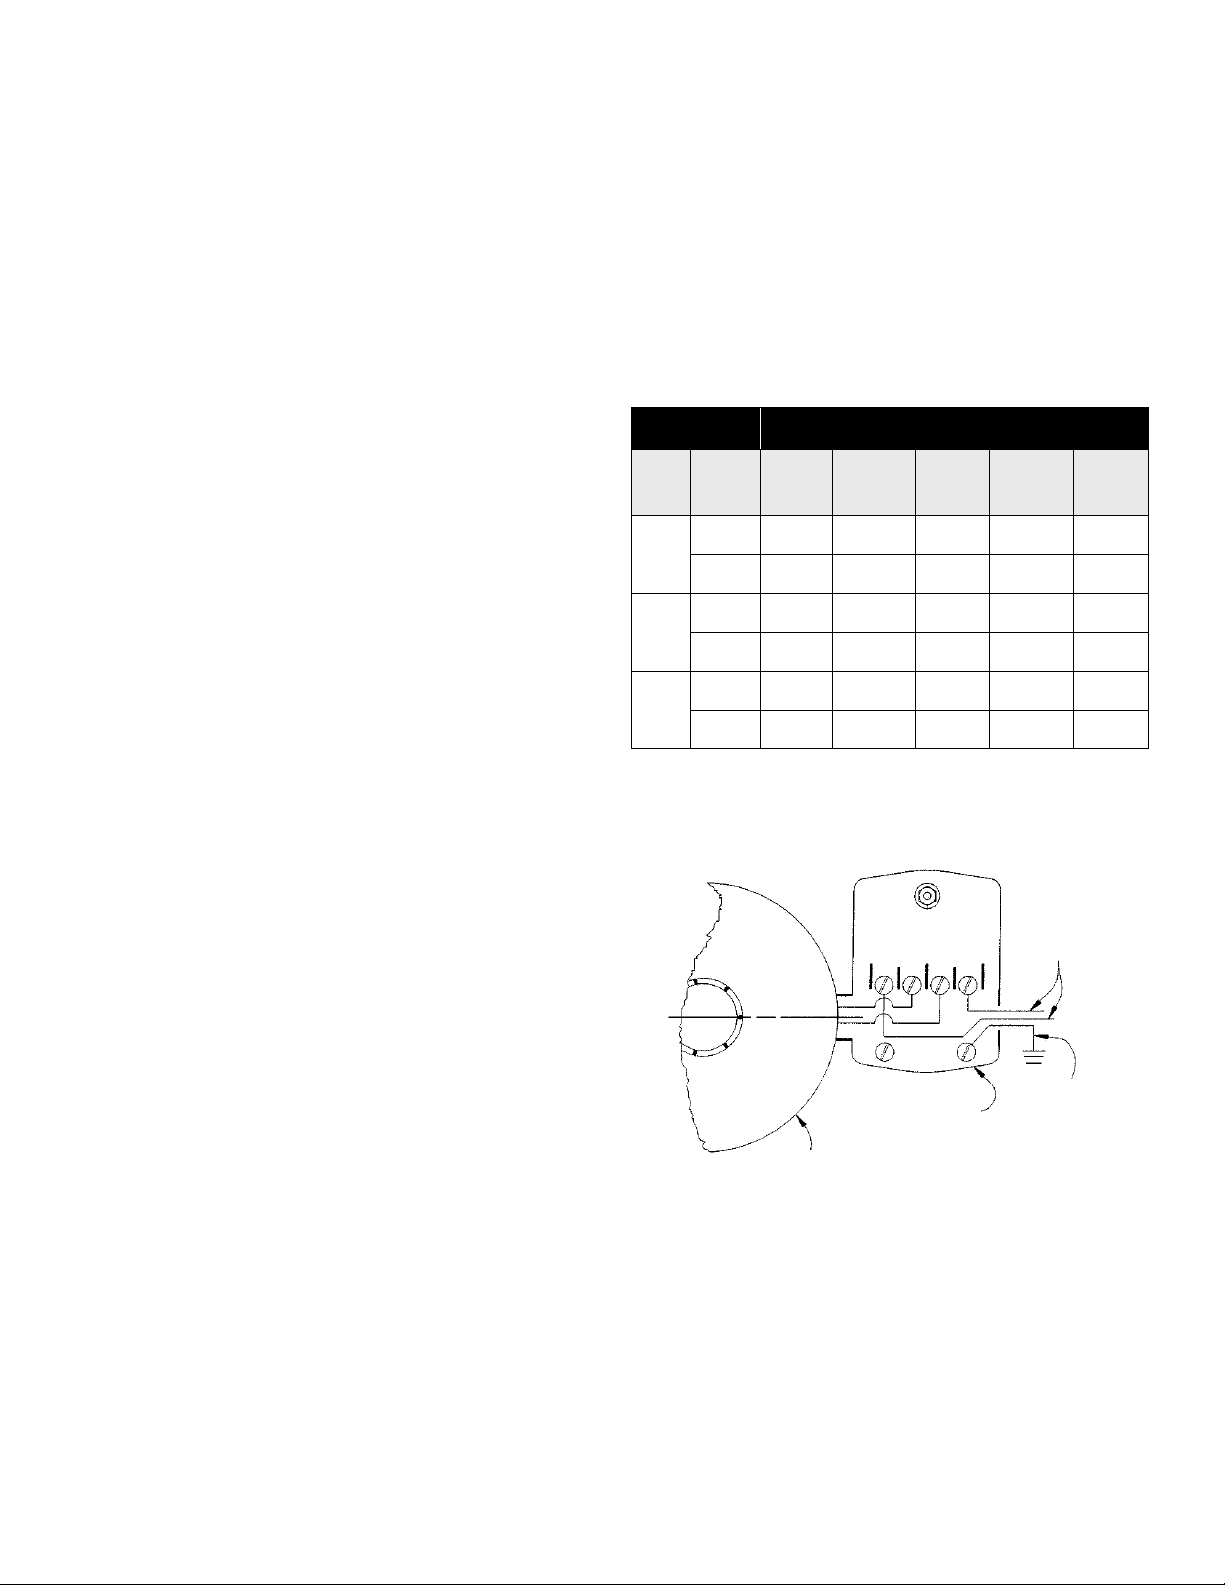
WIRING
An electrician should be employed to do the wiring and connect the
electrical service to the pump. The pressure switch is wired to the motor
at the factory and the voltage for which the motor is wired is indicated by
the voltage change device which is found under the wiring access cover
located on the back of the pump. Make sure the motor is wired for the
same voltage as the power supply. Refer to the inside of the wiring access
cover or this manual for voltage changing instructions. The power lines
should be connected to the pressure switch terminals marked "line"
(Figure 7). It is recommended that a separate circuit be led from the
distribution panel to the pump unit. A ground fault interrupter (GFI)
protected circuit should be used for all electrical devices operating near
water. Install a properly fused disconnect switch in the line and make
certain the wiring is adequately sized and well insulated. Undersized wire
between the motor and the power source will adversely limit the starting
and load carrying abilities of the motor. Minimum wire sizes for motor
branch circuits are recommended (see Table 2). For added safety, the pump
and motor should be grounded to the well casing, if metal, or the ground
in the distribution panel.
Table 2 - MAXIMUM WIRE LENGTH
MOTOR WIRE GAUGE (AWG)
HP Volts
115 14 14 12 10 8
1/2
230 14 14 14 14 14
115 14 14 10 8 8
3/4
230 14 14 14 14 12
115 14 12 10 8 6
1
230 14 14 14 14 12
Based on an approximate 3% voltage drop.
Figure 7 - ELECTRICAL CONNECTIONS
25 ft
(8 m)
50 ft
(15 m)
L 1 L 2
100 ft
(30 m)
150 ft
(46 m)
Power Supply (Line)
200 ft
(61 m)
Ground
Pressure Switch
Motor (Load)
11

PRIMING THE PUMP
!
s WARNING
NOTE: You will need enough water to fill the suction line(s) and casing. Priming time depends on the distance from the water source
to the pump (5-15 minutes).
DO NOT RUN THE PUMP BEFORE PRIMING IT; THE SEAL AND IMPELLER COULD BE PERMANENTLY DAMAGED.
USING AN INLINE CHECK VALVE
1. Open the discharge valve on service line and nearby tap to
monitor water flow.
2. With a wrench, remove the priming plug.
3. Pour clean water through the priming plug opening.
4. Continue filling the pump until water flows out of the
priming hole.
5. Reinstall the priming plug, hand tighten.
6. Start the pump. If a tap is visible, you may see a short discharge
of water that will last 5-10 seconds.
7. Run the pump for 2 minutes and then shut it o.
Remove the priming plug.
8. You have completed the first priming cycle, consisting of Steps
3 to 7. This process will have to be repeated from 2 to 6 times,
depending on the length of your suction line. (Approximately
one priming cycle for every 5 ft [1.5 m] of suction line.) You
will know when to stop because the pump will begin to
pump water continuously.
USING A FOOT VALVE
1. Open the discharge valve on the service line and nearby tap
to monitor water flow.
2. With a wrench, remove the priming plug.
3. Pour clean water through the priming plug opening. You will
need approximately 1 quart (1 liter) of water for every 3 ft
(1 m) of suction line.
NOTE: If you are unable to fill the suction line, please follow
the directions for an inline check valve.
4. Continue filling the pump until water flows out of the
priming hole.
5. Reinstall the priming plug, hand tighten.
6. Start the pump. If the pump is primed correctly it should start
pumping water immediately.
7. If within 2 minutes water is not being pumped continuously, stop
the pump. Remove the priming plug. Repeat Steps 3 through 7.
If this does not work, stop the pump and check the suction line
for leaks.
9. Once the pump begins pumping water continuously,
firmly tighten the priming plug with a wrench.
10. If the pump does not draw water within 8 tries, shut it o
and check the suction line for leaks.
8. Once the pump begins pumping water continuously, firmly
tighten the priming plug with a wrench.
12

MAINTENANCE
!
s WARNING
Before servicing motor-operated equipment, shut o the power at the main electrical panel and disconnect the power supply from motor and accessories.
Use safe working practices during servicing of equipment.
RISK OF ELECTRICAL SHOCK
PERFORM INSPECTIONS MONTHLY
1. Ensure pump is still securely bolted to the foundation.
2. To avoid any fire hazards, ensure that there is adequate clearance
from any combustible materials, shelving or cabinets. Ensure
there are no leaves or debris near the pump.
3. Ensure that the motor is securely wired into a proper GFCIprotected circuit. Test the GFCI periodically by pressing the test
switch when the pump is operating. This should shut o the
pump. If the GFCI does not shut the pump o, have an electrician
replace the GFCI as soon as possible. Remember to reset the GFCI
by pressing the reset switch.
4. Look for any signs of leaks in pipes. Replace or repair, if necessary.
5. Clean the exterior of the pump, if needed, with a solution of
vinegar and water.
DRAINING
Should the unit be subject to freezing, it will be necessary to drain the
pump and tank. To do this, shut o the power to the pump at the main
electrical panel. Open a tap in the water system to release the pressure.
Remove the drain and priming plugs from the pump casing. Remove the
pressure tank drain plug (if so equipped). Allow ample time for the system
to drain before reinstalling the plugs.
LUBRICATION
The pump requires none.
REPLACING MECHANICAL SEAL (See Figure 8)
!
s CAUTION
MAINTENANCE ON ELECTRICAL AND/OR MECHANICAL DEVICES.
Disassembly:
1. Shut o the power to the pump at the main service panel and
disconnect the power supply from motor.
2. Open a tap in the water system to release the pressure.
3. Remove the drain and fill plugs to allow the pump to drain.
4. Remove the bolts (1) and remove casing (2).
5. Remove fan shroud fasteners from the motor and remove the
fan shroud (3).
!
s CAUTION
the motor fan or shroud.
6. Remove the impeller (4) by firmly holding on to the motor fan
(5) and turn the impeller in a clockwise direction.
7. Slip rotating seal (9) o the shaft.
8. Remove motor tie bolts and remove motor (6) from adapter (7)
by slightly tapping end of motor shaft with a mallet.
9. Remove the adapter plate and the O-ring.
Reassembly:
1. Clean all parts thoroughly before assembling.
ONLY DULY QUALIFIED PERSONS SHOULD PERFORM
Care must be taken not to damage
13
2. Lightly lubricate (soapy water) the rubber cap on the ceramic
seal (8) and push it into the adapter (7) using thumbs only. Make
sure the smooth surface of the ceramic seat faces outward.
!
s CAUTION
cleaners or lubricants.
!
s CAUTION
contaminate the ceramic seal face.
NOTE: If the pump will remain out of service for longer
than one week, the seal components must be installed dry
(no lubrication).
3. Reassemble the motor (6) to the adapter. Align the tabs of the
adapter plate with the slot at the bottom of the motor housing.
Do not use petroleum-based
Care must be taken not to
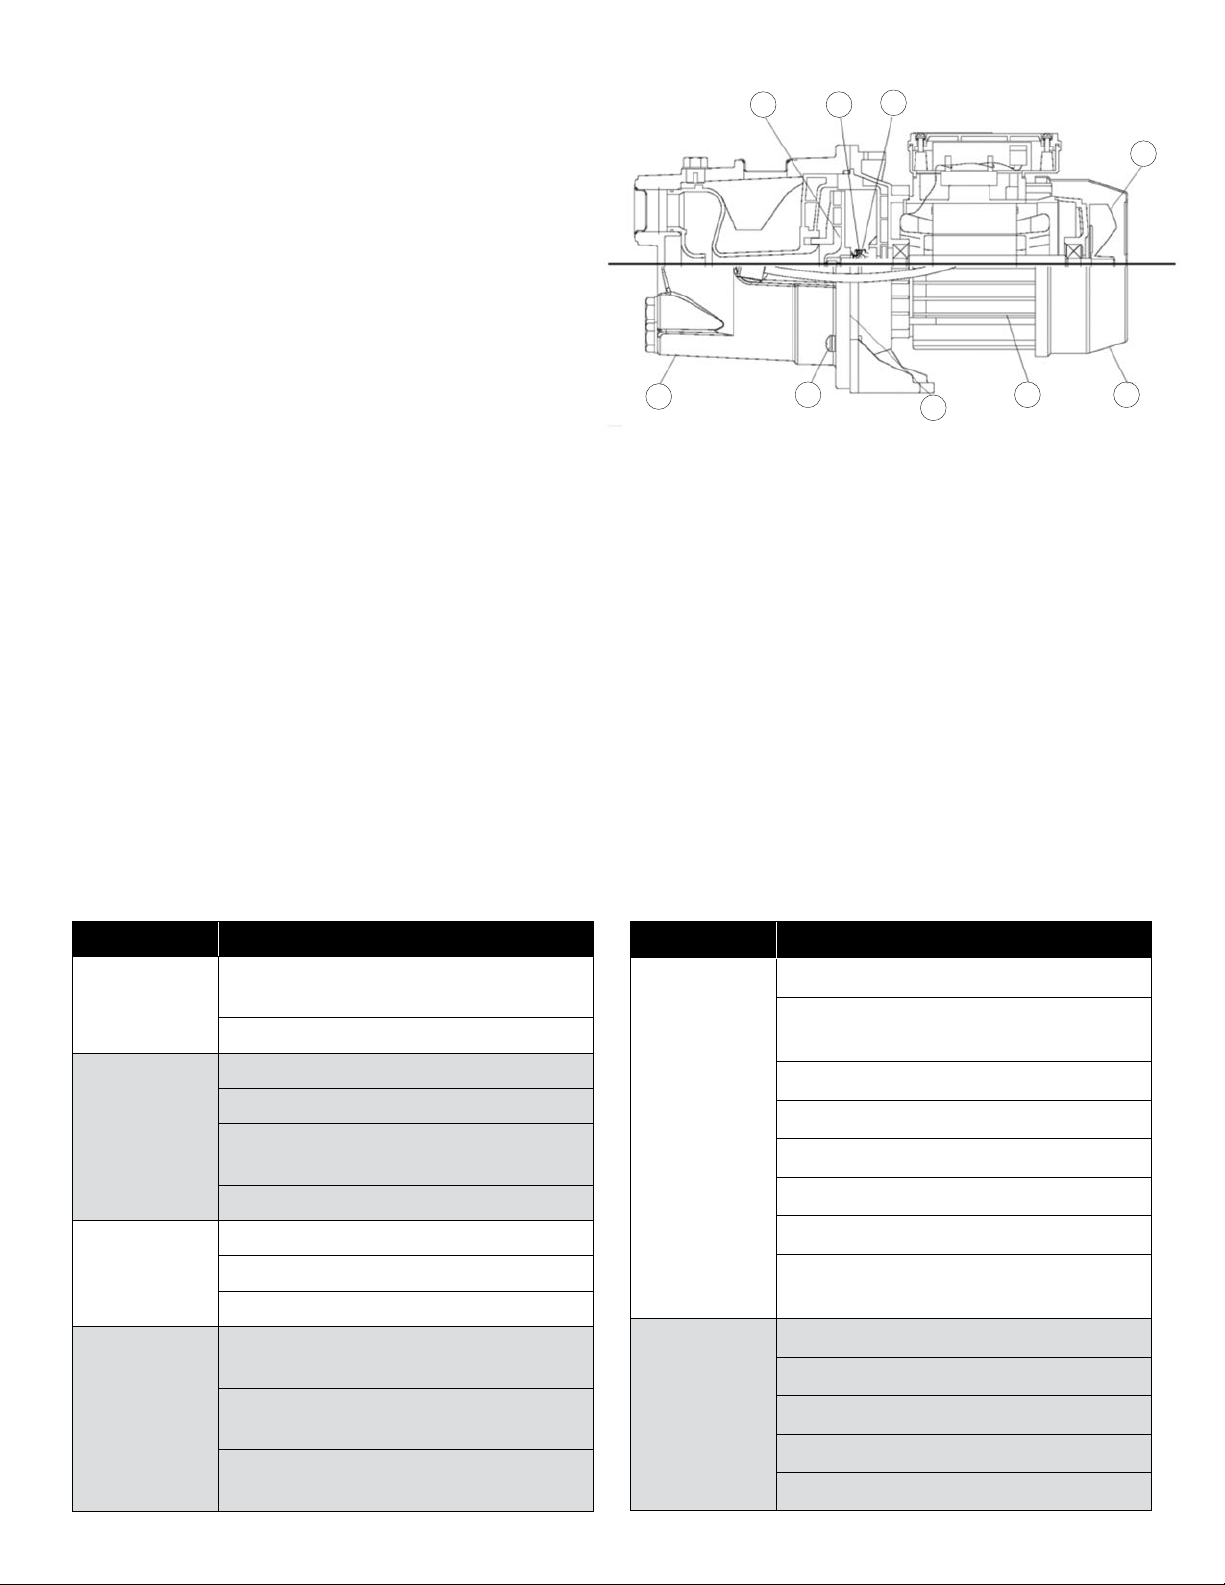
4. Lubricate the rubber components of the rotating seal (9) (soapy
water) and slip it on to the shaft with the ‘carbon’ ring towards
the ceramic seat.Replace the impeller (6) and the diuser (4).
!
s CAUTION
Care must be taken not to
contaminate the ceramic seal face.
5. Replace the impeller (4) and the shroud with fasteners.
Lubricate and replace the O-ring.
6. Replace the casing (2), making sure that O-ring is not damaged
and is in place.
4 8
9
5
7. Replace drain and fill plugs.
8. Reconnect power.
9. Prime the pump.
TROUBLESHOOTING
PROBLEM POSSIBLE CAUSE
No power to pressure switch due to blown fuses,
Motor will not start
Pump fails to
deliver water
open switches or loose connections.
Pump pressure switch not closed.
Pump not completely primed.
Suction lift is too great.
Foot valve is either not submerged, buried in
the mud or plugged.
Restrictor valve is fully closed.
Air leaks in suction line.
4
1
Figure 8
7
PROBLEM POSSIBLE CAUSE
Leaks in suction or discharge line.
Foot valve, suction line, impeller or nozzle are
partially plugged.
Suction lift is greater than recommended.
Pump delivers
water but not at
rated capacity
Improper impeller rotation or low speed.
Venturi or diuser is plugged.
Motor is wired for improper voltage.
Low line voltage at motor.
36
Pump loses prime
For well point
installations where
pump is losing
pressure or unable
to prime
Well draws down too far.
Faulty foot valve.
Have an electrician install a low pressure cut-o switch
to shut down the pump prior to critical failure.
Install or adjust a restrictor valve to oset
available capacity.
Add a larger tank (20 gallon or larger) for
additional capacity.
Pump starts and
stops too often
14
Filtration cartridge (if used) needs changing or is not
installed properly.
Faulty air volume control.
Air leaks in tank above the water level.
Incorrect setting on pressure switch.
Tank is water logged or incorrectly charged.
Foot valve leaks or is stuck open.
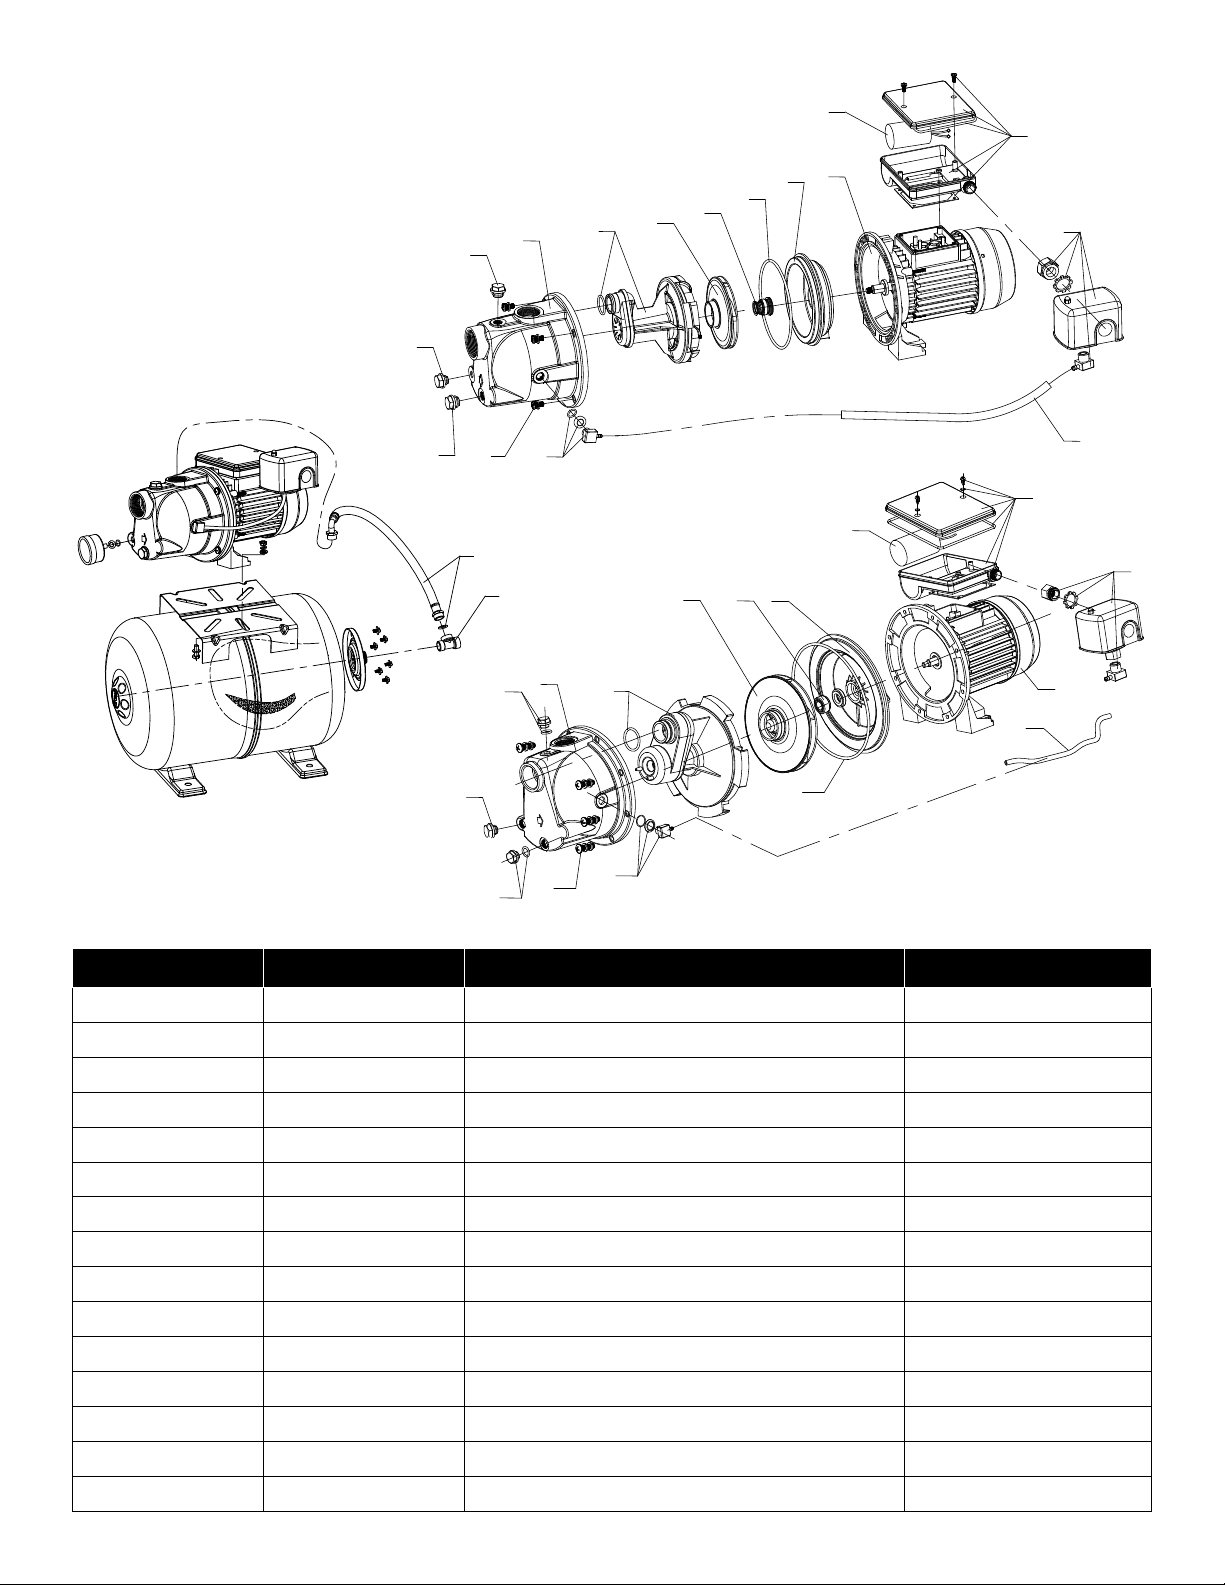
REPLACEMENT PARTS
A12
A13
A11
A10
A9
A8
A7
A5
A3
A6
A14
A4
A3
C3
C4
B1
A1
A2
B10
B7B6
B9
B2
B1
B1
B5
B8
B4
B3
A15
B11
B14
B13
Contents Item Replacement Parts Where Used
A5 & A10 305585001 Case/Seal Plate RL-SWJ50 & RL-SWJ75
B12
A2, A3, A4 & A9 305585002 Hardware Kit RL-SWJ50 & RL-SWJ75
A6, A7 & A8 305585005 Overhaul Kit RL-SWJ50
A6, A7 & A8 305585006 Overhaul Kit RL-SWJ75
A7 305585008 Impeller Kit RL-SWJ50
A7 305585009 Impeller Kit RL-SWJ75
A8 305585011 Shaft Seal Kit RL-SWJ50 & RL-SWJ75
A1, A14 & A15 305585012 Pressure Switch Kit RL-SWJ50 & RL-SWJ75
B2 & B9 305585003 Case/Seal Plate RL-SWJ100
B1, B3 & B8 305585004 Hardware Kit RL-SWJ100
B5, B6 & B7 305585007 Overhaul Kit RL-SWJ100
B6 305585010 Impeller Kit RL-SWJ100
B7 305585011 Shaft Seal Kit RL-SWJ100
B4, B12 & B13 305585012 Pressure Switch Kit RL-SWJ100
C3, C4 305592001 Pump/Tank Hardware Kit RL-SWJ50/RL6H
15
 Loading...